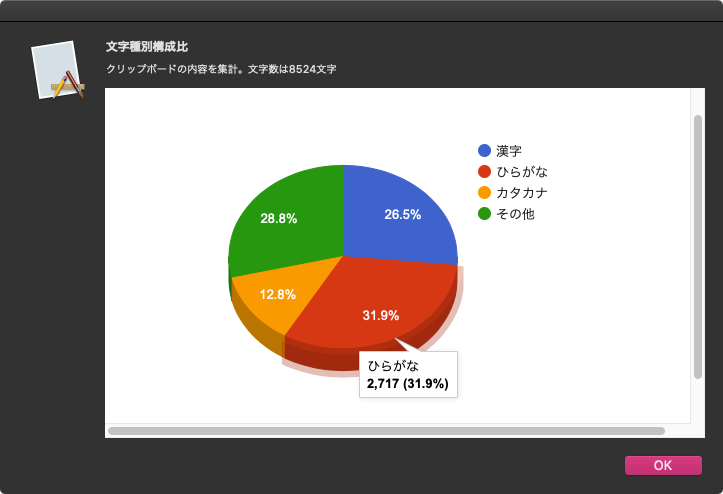
Menu

Skip to content
AppleScriptの穴
  • Home
  • Products
  • Books
  • Docs
  • Events
  • Forum
  • About This Blog
  • License
  • 仕事依頼

AppleScriptの穴

Useful & Practical AppleScript archive. Click '★Click Here to Open This Script' Link to download each AppleScript

AppleScriptでキースキャン

Posted on 2月 26, 2020 by Takaaki Naganoya

Xcode上で作成するAppleScript Cocoa Applicationで、キースキャンを試してみました。

ふだん作っているものだと、各種パラメータをGUI上で設定する程度のもので、キースキャンを行う必要などこれっぽっちもないのですが、いま作っているアプリケーションでキースキャンが必要になってしまったので、昔作ったものを引っ張り出してきました。

AppleScriptのプログラムでキースキャンを行うといえば、AppleScript Appletの起動時に何らかのModifier Keys(ShiftとかOptionとかCommandとかControlとか)が押されていることを検出して動作を変更するといった処理が一般的です。ループ処理中でも、これらのキー入力を定期的に監視することはよく行なっています(処理中に停止したいという要求はあるので)。

–> Watch Demo Movie

–> Download Xcode Project Archive

本プログラムでは、Modifier Keysにかぎらずキーボード入力全般を受け付けています。ただし、キースキャン可能なのは本プログラムが最前面にある場合のみです。

掲載しているコードからではわかりませんが、キー入力の受け付けをNSWindowで行なっています。FirstResponderまわりを一切いじくらずにほぼプログラミングなしでキー受け付けを行おうとした結果NSWindowで行うことになったというわけで、これがベストとも思いません。

とりあえず「こうすればできた」というレベルをおさえておいて、そこから自分の好きな方向に機能を変更していけばよいと思います。

AppleScript名:AppDelegate.applescript
—
— AppDelegate.applescript
— keyEvents
—
— Created by Takaaki Naganoya on 2014/05/09.
— Copyright (c) 2014年 Takaaki Naganoya. All rights reserved.
—

script AppDelegate
  property parent : class "NSObject"
  
  
— IBOutlets
  
property theWindow : missing value
  
property aButton : missing value
  
  
property xMax : 500
  
property yMax : 500
  
  
property aStep : 50
  
  
on applicationWillFinishLaunching:aNotification
    —
  end applicationWillFinishLaunching:
  
  
on applicationShouldTerminate:sender
    return current application’s NSTerminateNow
  end applicationShouldTerminate:


on buttonMove:(aCode as integer)
    set curFrame to aButton’s frame()
    
copy curFrame to {{x, y}, {xWidth, yHeight}}
    
    
if aCode = 123 then
      –Left
      
if x > 0 then
        set x to x – aStep
      end if
    else if aCode = 124 then
      –Right
      
if x < xMax then
        set x to x + aStep
      end if
      
    else if aCode = 126 then
      –Up
      
if y < yMax then
        set y to y + aStep
      end if
      
    else if aCode = 125 then
      –Down
      
if y > 10 then
        set y to y – aStep
      end if
    else if aCode = 125 then
      
    end if
    
    
set newRect to {{x, y}, {xWidth, yHeight}}
    
aButton’s setFrame:newRect
    
aButton’s setNeedsDisplay()
  end buttonMove:
end script

★Click Here to Open This Script 

AppleScript名:keyEventWin.applescript
script keyEvWin
  
  
property parent : class "NSWindow"
  
  
property aButton : missing value


on canBecomeKeyWindow:sender
    return true
  end canBecomeKeyWindow:
  
  
on canBecomeMainWindow:sender
    return true
  end canBecomeMainWindow:


on keyDown:theEvent
    set aCode to (theEvent’s keyCode) as integer
    
    
if aCode = 123 then
      –左
      
current application’s NSApp’s delegate()’s performSelector:"buttonMove:" withObject:(aCode)
      
    else if aCode = 124 then
      –右
      
current application’s NSApp’s delegate()’s performSelector:"buttonMove:" withObject:(aCode)
      
    else if aCode = 126 then
      –上
      
current application’s NSApp’s delegate()’s performSelector:"buttonMove:" withObject:(aCode)
      
    else if aCode = 125 then
      –下
      
current application’s NSApp’s delegate()’s performSelector:"buttonMove:" withObject:(aCode)
      
    end if
    
    
  end keyDown:
  
end script

★Click Here to Open This Script 

Posted in AppleScript Application on Xcode GUI | Tagged 10.13savvy 10.14savvy 10.15savvy NSButton NSEvent NSWindow | Leave a comment

指定Bundle IDのstringsファイル中における指定タイトルの指定言語のローカライズ版を求める

Posted on 2月 24, 2020 by Takaaki Naganoya

/Applicationsフォルダ以下のすべてのアプリケーションのバンドル中のstringsファイル中を走査して、指定の言語における指定キーワード(”Quit”など)の指定言語におけるローカライズした文字列を取得するAppleScriptです。

自分でアプリケーションのローカライズを行う際に、既存のmacOS用のアプリケーションのバンドル内にあるstringsファイルを参考にするためのツールです。

もともとは、Shane StanleyがLate Night Softwareのフォーラムに投稿したプログラムですが、自分もいろいろ試していたように、アプリケーション側のローカライズのされ方(言語別のフォルダ名の名称指定)に「ゆらぎ」があるため、そのあたりは総当たりでテストしているようです。

オリジナルではデータが存在しない場合にはエラーにしていましたが、このようにすべてのアプリケーションに対してループで処理を行うような場合にはエラーで止まっては困るので、そのあたりを書き換えています。

/Applicationsフォルダ以下のSpotlight検索によるアプリケーションの取得についてはMetadata Libを用いています。自分の開発環境で1キーワード(x バンドル内のすべてのstringsファイル x すべてのアプリケーション)の問い合わせに3.6〜5秒程度かかっています。HDDの環境ではこれより大幅に長くかかるはずなので、ちょっと考えたくありません。

また、Stringsファイルで供給されるローカライズ情報については探すことができますが、OS側が強制的に供給するWindowメニューなどの内容については本Scriptで調査することはできません。ねんのため。

AppleScript名:指定Bundle IDのstringsファイル中における指定タイトルの指定言語のローカライズ版を求める.scptd
—
–  Created by: Takaaki Naganoya
–  Created on: 2020/02/24
—
–  Copyright © 2020 Piyomaru Software, All Rights Reserved
—
use AppleScript version "2.5" — El Capitan (10.11) or later
use framework "Foundation"
use framework "AppKit"
use scripting additions
use mdLib : script "Metadata Lib" version "2.0.0" –https://macosxautomation.com/applescript/apps/Script_Libs.html

property NSWorkspace : a reference to current application’s NSWorkspace

set targStr to "Performance"
set origLang to "en" –From
set targLang to "hu" –To

set tList to {}

set origPath to POSIX path of (path to applications folder)
set aResList to mdLib’s searchFolders:{origPath} searchString:("kMDItemContentType == %@") searchArgs:{"com.apple.application-bundle"}
repeat with i in aResList
  set aTitleRes to getAppGUITitleWithCurrentLocale(i, targStr, origLang, targLang) of me
  
if aTitleRes is not equal to missing value and aTitleRes is not in tList then
    set the end of tList to aTitleRes
  end if
end repeat

return tList
–> {"Előadás", "Teljesítmény"}

–指定Bundle IDのstringsファイル中における指定タイトルの現在実行中のロケールのローカライズ版を求める
on getAppGUITitleWithCurrentLocale(aPath, aTargetTitle, origLang, targLang)
  return my localizedStringFor:aTargetTitle inBundle:aPath destLang:targLang sourceLang:origLang
end getAppGUITitleWithCurrentLocale

–Bundle IDからアプリケーションのPathを返す
on retAppAbusolutePathFromBundleID(aBundleID)
  set appPath to NSWorkspace’s sharedWorkspace()’s absolutePathForAppBundleWithIdentifier:aBundleID
  
if appPath = missing value then return false
  
return appPath as string
end retAppAbusolutePathFromBundleID

–Original By Shane Stanley@Late Night Software
–Modified By Takaaki Naganoya
–https://forum.latenightsw.com/t/localizing-gui-scripts/2246
on localizedStringFor:baseString inBundle:aPOSIX destLang:destLangCode sourceLang:sourceLangCode
  set anURL to current application’s |NSURL|’s fileURLWithPath:aPOSIX
  
set theBundle to current application’s NSBundle’s bundleWithURL:anURL
  
if theBundle = missing value then return missing value
  
  
set sourceLangString to current application’s NSString’s stringWithString:sourceLangCode
  
set destLangString to current application’s NSString’s stringWithString:destLangCode
  
  
— get source strings values
  
set theURLs to theBundle’s URLsForResourcesWithExtension:"strings" subdirectory:"" localization:sourceLangString
  
if theURLs = missing value then return missing value
  
if theURLs’s |count|() < 2 and (sourceLangString’s containsString:"_") as boolean then
    — try stripping off country-specific part
    
set sourceLangString to sourceLangString’s substringToIndex:2
    
set theURLs to theBundle’s URLsForResourcesWithExtension:"strings" subdirectory:"" localization:sourceLangString
  end if
  
  
if theURLs’s |count|() < 2 then
    — try long name for localization
    
set sourceLangString to (current application’s NSLocale’s localeWithLocaleIdentifier:"en")’s localizedStringForLocaleIdentifier:sourceLangString
    
set theURLs to theBundle’s URLsForResourcesWithExtension:"strings" subdirectory:"" localization:sourceLangString
  end if
  
  
if theURLs’s |count|() < 2 then return missing value –error "No " & sourceLangCode & " localization found"
  
  
repeat with sourceURL in theURLs
    — skip unlocalized file
    
if not (sourceURL’s URLByDeletingLastPathComponent()’s lastPathComponent()’s isEqualToString:"Resources") as boolean then
      set theData to (current application’s NSData’s alloc()’s initWithContentsOfURL:sourceURL)
      
      
if theData is missing value then return — error "No " & sourceLangCode & " localization found"
      
set sourceDict to (current application’s NSPropertyListSerialization’s propertyListWithData:theData options:0 format:0 |error|:(missing value))
      
if sourceDict = missing value then return missing value
      
      
set theKey to (sourceDict’s allKeysForObject:baseString)’s firstObject()
      
      
if theKey is not missing value then
        set stringsFileName to sourceURL’s lastPathComponent()’s stringByDeletingPathExtension()
        
set localURL to (theBundle’s URLForResource:stringsFileName withExtension:"strings" subdirectory:"" localization:destLangString)
        
        
if localURL is missing value and (destLangString’s containsString:"_") as boolean then
          — try stripping off country-specific part
          
set destLangString to (destLangString’s substringToIndex:2)
          
set localURL to (theBundle’s URLForResource:stringsFileName withExtension:"strings" subdirectory:"" localization:destLangString)
        end if
        
        
if localURL is missing value then
          — try long name for localization
          
set destLangString to ((current application’s NSLocale’s localeWithLocaleIdentifier:"en")’s localizedStringForLocaleIdentifier:destLangString)
          
set localURL to (theBundle’s URLForResource:stringsFileName withExtension:"strings" subdirectory:"" localization:destLangString)
        end if
        
        
if localURL is missing value then return missing value — "No " & destLangCode & " localization found"
        
        
set theData to (current application’s NSData’s alloc()’s initWithContentsOfURL:localURL)
        
if theData is missing value then missing value — "No " & destLangCode & " localization found"
        
set destDict to (current application’s NSPropertyListSerialization’s propertyListWithData:theData options:0 format:0 |error|:(missing value))
        
set destValue to (destDict’s objectForKey:theKey)
        
        
–if destValue is not missing value then return {destValue as text, stringsFileName as text}
        
if destValue is not missing value then return destValue as text
        
return missing value
      end if
    end if
  end repeat
  
return missing value
end localizedStringFor:inBundle:destLang:sourceLang:

★Click Here to Open This Script 

Posted in file File path Language Locale Text | Tagged 10.14savvy 10.15savvy NSBundle NSData NSLocale NSPropertyListSerialization NSString NSURL NSWorkspace | Leave a comment

display dialogで押されたボタンをIDで返す(1はじまり)

Posted on 2月 23, 2020 by Takaaki Naganoya

If you can think of something that a language would normally have applescript does not have it

— mc²than (@parrotgeek1) February 23, 2020

できると思うんだけどなー、と思って30分ぐらいでできました。全部同じtitleのボタンを複数作って、押されたボタンを左側から1はじまりでIDで返すAppleScriptです。

できたところで誰が褒めてくれるわけでもありませんが、できるものをできないというのは、、、、。

そもそも、同じtitleのボタンを複数出すのはGUI的にナンセンスな上に、Xcode上でAppleScriptアプリケーション作れば普通に作れるわけで、、、、

AppleScript名:display dialogで押されたボタンをIDで返す(1はじまり).scptd
—
–  Created by: Takaaki Naganoya
–  Created on: 2020/02/23
—
–  Copyright © 2020 Piyomaru Software, All Rights Reserved
—
use AppleScript version "2.4" — Yosemite (10.10) or later
use framework "Foundation"
use framework "AppKit"
use scripting additions

property NSAlert : a reference to current application’s NSAlert
property NSRunningApplication : a reference to current application’s NSRunningApplication

property theResult : 0
property returnCode : 0
property theDataSource : {}

display dialog "TEST" buttons {"OK", "OK", "OK", "OK", "OK", "OK", "OK"}

on display dialog aString as string buttons buttonList as list
  set paramObj to {myMessage:aString, myButtonList:buttonList}
  
–my dispAlert:paramObj –for debug
  
my performSelectorOnMainThread:"dispAlert:" withObject:(paramObj) waitUntilDone:true
  
return {button returned:my theResult}
end display dialog

on dispAlert:paramObj
  set aMainMes to (myMessage of paramObj) as string
  
set bList to (myButtonList of paramObj) as list
  
set bLen to length of bList
  
  
— set up alert  
  
set theAlert to NSAlert’s alloc()’s init()
  
tell theAlert
    its setMessageText:aMainMes
    
    
repeat with i in bList
      (its addButtonWithTitle:i)
    end repeat
  end tell
  
  
— show alert in modal loop
  
NSRunningApplication’s currentApplication()’s activateWithOptions:0
  
my performSelectorOnMainThread:"doModal:" withObject:(theAlert) waitUntilDone:true
  
  
set aBID to bLen – ((my returnCode) – 1000 + 1) + 1
  
set my theResult to aBID
end dispAlert:

on doModal:aParam
  set (my returnCode) to aParam’s runModal()
end doModal:

★Click Here to Open This Script 

Posted in dialog GUI | Tagged 10.14savvy 10.15savvy NSAlert NSRunningApplication | Leave a comment

ラリー・テスラー亡くなる

Posted on 2月 20, 2020 by Takaaki Naganoya

コンピュータのインタラクション・デザインを研究・実践してきたコンピュータ科学者のラリー・テスラー氏が亡くなりました。Xerox PARCやAppleをはじめ、名だたるIT企業を勤めてきました。

1980年にテスラーはPARCからAppleに移り、1989年、ATG(Apple Technology Group)でMac OSのユーザー向けスクリプティング言語を開発する「Family Farm」プロジェクトを開始。これがのちのAppleScriptになりました。

コピー&ペーストをはじめ、彼の活躍や着想なしに現在のパーソナルコンピュータの姿はありえなかったことでしょう。

彼の冥福をお祈りいたします。

■AppleScript登場前の歴史(書籍「AppleScript 10大最新技術」より引用)

時期 内容
1989年 ATG(Apple Technology Group)で、Mac OSのユーザー向けスクリプティング言語を開発する「Family Farm」プロジェクトが始まる。ラリー・テスラーがリーダー。メンバーはMike Farr、Mitchell Gass、Mike Gough、Jed Harris、Al Hoffman、Ruben Kleiman、Edmund Lai、Frank Ludolph
1990年 HyperCard 2.0が出荷される
1990年中盤 Family Farmプロジェクトの最初のスピンオフプロジェクトとして、スクリプト言語の基盤となるAppleEventの開発が始まる
1991年4月 ウィリアム・クック、Appleで働きはじめる。AppleEvent Managerの最終β段階
1991年夏 発売予定のSystem 7にAppleEvent Managerを一緒に出荷すべく計画される
1991年中旬 LispやSmallTalkなどの既存の言語のランタイム上にAppleScriptシステムを構築することが検討される
1992年 AppleScript対応のHyperCard 2.2がリリース
1992年2月 ウィリアム・クック、Kurt PiersolからAppleScriptに関するアイデアを聞く。AppleScriptのα版がリリースされる。Dave Winer(SOAPとかBlogの仕組みを開発した人)がUserland Frontierの初期バージョンをリリース
1993年4月 AppleScript 1.0Developer's Toolkitをリリース
1993年1月 AppleScript 1.1の次バージョンにさらなる機能追加を行うことをAppleが決定
1993年9月 AppleScript 1.1がリリース。はじめてのエンドユーザー向けのリリース。AppleScriptのオリジナル開発グループが解体される。ウィリアム・クックがAppleを辞める(1993年内の時期不明)
1994年 FaceSpanがリリースされる
1997年 ScriptableなFinderがリリースされる
1997年7月 System 8と一緒にAppleScript 1.1.2がリリースされる
Posted in news | Leave a comment

Bundle IDで指定したアプリケーションを「隠す」

Posted on 2月 16, 2020 by Takaaki Naganoya

Bundle IDで指定したアプリケーションを隠すAppleScriptです。

アプリケーションの指定

macOS上のアプリケーションは一意に判別できるID「Bundle ID」を持っています。このBundle IDは各アプリケーションのバンドル内のInfo.plistに書かれています。

アプリケーションの名称については、ローカライズ名称を指定できるので、英語環境、フランス語環境、日本語環境で異なるアプリケーション名がFinder上で見えるようにできるので、名称ではなくBundle IDで区別するのが一般的です。

言語環境ごとに名称が変わる代表的なアプリケーションには、「リマインダー」(本当の名称はReminders)、「メモ」(本当の名称はNotes)、「写真」(本当の名称はPhotos)などがあります。

アプリケーションプロセスの隠し方

各アプリケーションのアプリケーションメニューに「隠す」というメニュー項目があり、これを実行することで隠すことができます。AppleScriptからこれに該当する操作は、System Eventsに対して指定のアプリケーションプロセスの可視属性をfalseに設定するというものです。

野蛮かつ強引にメニューを操作するという方法(GUI Scripting)も使えますが、速度や信頼性の面でおすすめしません。

AppleScript名:指定アプリケーションプロセスを隠す(System Events)
—
–  Created by: Takaaki Naganoya
–  Created on: 2020/02/16
—
–  Copyright © 2020 Piyomaru Software, All Rights Reserved
—

set pRes to hideAProcessByBUndleID("com.apple.Safari") of me

–指定プロセスを隠す
on hideAProcessByBUndleID(aBundleID)
  tell application "System Events"
    set targProcList to every process whose bundle identifier is aBundleID
    
if targProcList = {} then return false
    
    
set targProc to first item of targProcList
    
tell targProc
      set visible to false
    end tell
  end tell
  
return true
end hideAProcessByBUndleID

★Click Here to Open This Script 

macOS 10.10以降では通常のAppleScriptでCocoaの機能が使えるようになったため、こうしたOS側の機能を用いてもよいでしょう。


▲セキュリティダイアログの表示例

むしろ、macOS 10.14以降では各種アプリケーションへの初回命令時にはセキュリティ・ダイアログが表示されて止まるため、Cocoaの機能を利用できたほうがメリットが大きいといえるぐらいです。

AppleScript名:指定アプリケーションプロセスを隠す(Cocoa)
—
–  Created by: Takaaki Naganoya
–  Created on: 2020/02/16
—
–  Copyright © 2020 Piyomaru Software, All Rights Reserved
—
use AppleScript version "2.4"
use scripting additions
use framework "Foundation"
use framework "AppKit"

set pRes to hideAProcessByBUndleID("com.apple.Safari") of me

–指定プロセスを隠す
on hideAProcessByBUndleID(aBundleID)
  set appArray to current application’s NSRunningApplication’s runningApplicationsWithBundleIdentifier:aBundleID
  
if appArray’s |count|() > 0 then
    set appItem to appArray’s objectAtIndex:0
    
set aRes to (appItem’s hide()) as boolean
    
return aRes
  else
    return false
  end if
end hideAProcessByBUndleID

★Click Here to Open This Script 

Posted in System | Tagged 10.14savvy 10.15savvy NSArray NSRunningApplication System Events | Leave a comment

指定のNSImageにNSBezierPathでclearColor塗りつぶし

Posted on 2月 14, 2020 by Takaaki Naganoya

指定色で塗りつぶしたNSImageを用意し、そこにNSBezierPathでclearColorで塗りつぶし(=切り抜き)を行うAppleScriptです。

2005/8/18にCocoa-dev mailing list に対してStefan Schüßler氏が投稿した内容をもとにしています。いろいろ探して回りましたが、ヒットしたのはこの情報だけでした。彼に感謝を。

Re: [NSColor clearColor] and NSBezierPath: not compatible?

NSBezierPath uses the NSCompositeSourceOver operation, therefore clearColor does not do anything. You could change the graphics state in order to clear the path:

  NSGraphicsContext *context;
  context = [NSGraphicsContext currentContext];
  [context saveGraphicsState];
  [context setCompositingOperation:NSCompositeClear];
  [yourBezierPath fill];
  [context restoreGraphicsState];

Hope this helps.

Stefan
AppleScript名:指定のNSImageにNSBezierPathでclearColor塗りつぶし.scptd
— Created 2020-02-14 by Takaaki Naganoya
— 2020 Piyomaru Software
use AppleScript version "2.4"
use scripting additions
use framework "Foundation"
use framework "AppKit"
use framework "CoreImage"

property NSColor : a reference to current application’s NSColor
property NSImage : a reference to current application’s NSImage
property NSZeroRect : a reference to current application’s NSZeroRect
property NSBezierPath : a reference to current application’s NSBezierPath
property NSCompositeCopy : a reference to current application’s NSCompositeCopy
property NSGraphicsContext : a reference to current application’s NSGraphicsContext
property NSBitmapImageRep : a reference to current application’s NSBitmapImageRep
property NSCalibratedRGBColorSpace : a reference to current application’s NSCalibratedRGBColorSpace

set {rCol, gCol, bCol} to choose color

set aNSImage to makeColoredNSImage({rCol, gCol, bCol}, 400, 400) of me
set aPath to generateCircle(200, 100, 100) of me

set bImage to my fillImage:aNSImage withTransparentPathFilling:aPath

set aFile to POSIX path of (choose file name)
set sRes to my saveNSImageAtPathAsPNG(bImage, aFile)

on fillImage:aSourceImg withTransparentPathFilling:aPath
  set aSize to aSourceImg’s |size|()
  
set aWidth to (aSize’s width)
  
set aHeight to (aSize’s height)
  
  
set aRep to NSBitmapImageRep’s alloc()’s initWithBitmapDataPlanes:(missing value) pixelsWide:aWidth pixelsHigh:aHeight bitsPerSample:8 samplesPerPixel:4 hasAlpha:true isPlanar:false colorSpaceName:(NSCalibratedRGBColorSpace) bytesPerRow:0 bitsPerPixel:0
  
  
NSGraphicsContext’s saveGraphicsState()
  
  
NSGraphicsContext’s setCurrentContext:(NSGraphicsContext’s graphicsContextWithBitmapImageRep:aRep)
  
  
aSourceImg’s drawInRect:(current application’s NSMakeRect(0, 0, aWidth, aHeight)) fromRect:(NSZeroRect) operation:(NSCompositeCopy) fraction:(1.0)
  
  
NSGraphicsContext’s currentContext()’s setCompositingOperation:(current application’s NSCompositeClear)
  
aPath’s fill()
  
  
NSGraphicsContext’s restoreGraphicsState()
  
  
set newImg to NSImage’s alloc()’s initWithSize:(aSize)
  
newImg’s addRepresentation:aRep
  
  
return newImg
end fillImage:withTransparentPathFilling:

on generateCircle(theRadius, x, y)
  set aRect to current application’s NSMakeRect(x, y, theRadius, theRadius)
  
set aCirCle to NSBezierPath’s bezierPath()
  
aCirCle’s appendBezierPathWithOvalInRect:aRect
  
return aCirCle
end generateCircle

on makeColoredNSImage(colList, aWidth, aHeight)
  copy colList to {rCol, gCol, bCol}
  
set aColor to makeNSColorFromRGBA65535val(rCol, gCol, bCol, 1.0) of me
  
set aColoredImage to fillColorWithImage(aColor, aWidth, aHeight) of me
  
return aColoredImage
end makeColoredNSImage

on fillColorWithImage(aColor, aWidth, aHeight)
  set colordImage to makeNSImageWithFilledWithColor(aWidth, aHeight, aColor, aWidth, aHeight) of me
  
colordImage’s lockFocus()
  
colordImage’s drawAtPoint:{0, 0} fromRect:(current application’s NSZeroRect) operation:(current application’s NSCompositeDestinationIn) fraction:1.0
  
colordImage’s unlockFocus()
  
return colordImage
end fillColorWithImage

on makeNSImageWithFilledWithColor(aWidth, aHeight, fillColor)
  set anImage to NSImage’s alloc()’s initWithSize:(current application’s NSMakeSize(aWidth, aHeight))
  
anImage’s lockFocus()
  
—
  
set theRect to {{x:0, y:0}, {height:aHeight, width:aWidth}}
  
set theNSBezierPath to NSBezierPath’s bezierPath
  
theNSBezierPath’s appendBezierPathWithRect:theRect
  
—
  
fillColor’s |set|()
  
theNSBezierPath’s fill()
  
—
  
anImage’s unlockFocus()
  
—
  
return anImage
end makeNSImageWithFilledWithColor

on makeNSColorFromRGBA65535val(redValue as integer, greenValue as integer, blueValue as integer, alphaValue as integer)
  set aRedCocoa to (redValue / 65535) as real
  
set aGreenCocoa to (greenValue / 65535) as real
  
set aBlueCocoa to (blueValue / 65535) as real
  
set aAlphaCocoa to 1.0 as real
  
set aColor to NSColor’s colorWithCalibratedRed:aRedCocoa green:aGreenCocoa blue:aBlueCocoa alpha:aAlphaCocoa
  
return aColor
end makeNSColorFromRGBA65535val

on saveNSImageAtPathAsPNG(anImage, outPath)
  set imageRep to anImage’s TIFFRepresentation()
  
set aRawimg to current application’s NSBitmapImageRep’s imageRepWithData:imageRep
  
set pathString to current application’s NSString’s stringWithString:outPath
  
set newPath to pathString’s stringByExpandingTildeInPath()
  
set myNewImageData to (aRawimg’s representationUsingType:(current application’s NSPNGFileType) |properties|:(missing value))
  
set aRes to (myNewImageData’s writeToFile:newPath atomically:true) as boolean
  
return aRes
end saveNSImageAtPathAsPNG

★Click Here to Open This Script 

Posted in Image | Tagged 10.13savvy 10.14savvy 10.15savvy NSBezierPath NSBitmapImageRep NSCalibratedRGBColorSpace NSColor NSCompositeCopy NSGraphicsContext NSImage NSZeroRect | 1 Comment

AppleScriptでCoreAnimationを利用

Posted on 2月 13, 2020 by Takaaki Naganoya

Xcode上で作成するCocoa AppleScript Applicationにおいて、CoreAnimationを利用するサンプルProjectです。

–> Download Xcode Project Test with Xcode 11.3.1 + macOS 10.14.6

ひととおり(このぐらい)CoreAnimationでGUI部品をアニメーションするテストを行なっていました。あまり使いすぎるのは下品に見えるとの判断から、実際のアプリケーションでは最低限の地味な利用にとどめていました。

–> Watch Demo (1) Double PDF

–> Watch Demo (2) This Project

Mac App Storeで販売している100% AppleScriptで記述したアプリケーション「Double PDF 2.0」においても、コマンド実行後にメニューを更新する際、更新したメニューを点滅表示するぐらいの「節度あるお付き合い」にとどめていました。

それが、ここ最近組んでいるアプリケーションではド派手に利用する必要があるようで、再度こうした試作品を引っ張り出してテストしだしています。

AppleScript名:AppDelegate.applescript
—
— AppDelegate.applescript
— GUI Animation
—
— Created by Takaaki Naganoya on 2017/02/13.
— Copyright 2017 Takaaki Naganoya. All rights reserved.
—
— http://liu044100.blogspot.jp/2013/07/cabasicanimation.html
script AppDelegate
  property parent : class "NSObject"
  
  
— IBOutlets
  
property theWindow : missing value
  
property aPopup : missing value
  
  
property gui1 : missing value
  
property gui2 : missing value
  
property gui3 : missing value
  
property gui4 : missing value
  
property gui5 : missing value
  
property gui6 : missing value
  
property gui7 : missing value
  
property gui8 : missing value
  
property gui9 : missing value
  
property guiA : missing value
  
property guiB : missing value
  
property guiC : missing value


on applicationWillFinishLaunching:aNotification
    — Insert code here to initialize your application before any files are opened
  end applicationWillFinishLaunching:
  
  
on applicationShouldTerminate:sender
    return current application’s NSTerminateNow
  end applicationShouldTerminate:
  
  
on clicked:sender
    set aInd to aPopup’s indexOfSelectedItem()
    
set guiList to {gui1, gui2, gui3, gui4, gui5, gui6, gui7, gui8, gui9, guiA, guiB, guiC}
    
repeat with i in guiList
      if aInd = 0 then
        (my blinkObject:i)
      else if aInd = 1 then
        (my scaleObject:i)
      else if aInd = 2 then
        (my rotateObject:i forAxis:"x")
      else if aInd = 3 then
        (my rotateObject:i forAxis:"y")
      else if aInd = 4 then
        (my rotateObject:i forAxis:"z")
      else if aInd = 5 then
        (my moveObject:i)
      else if aInd = 6 then
        –my mixtureAnimeObject:i
      end if
      
delay 0.1
    end repeat
  end clicked:


on blinkObject:aObject
    set animation to current application’s CABasicAnimation’s animationWithKeyPath:"opacity"
    
animation’s setDuration:0.1
    
animation’s setAutoreverses:true
    
animation’s setRepeatCount:4
    
animation’s setFromValue:(current application’s NSNumber’s numberWithFloat:1.0)
    
animation’s setToValue:(current application’s NSNumber’s numberWithFloat:0.0)
    
aObject’s layer()’s addAnimation:animation forKey:"blink"
  end blinkObject:
  
  
on scaleObject:aObject
    set animation to current application’s CABasicAnimation’s animationWithKeyPath:"transform.scale"
    
animation’s setDuration:0.1
    
animation’s setAutoreverses:true
    
animation’s setRepeatCount:2
    
animation’s setFromValue:(current application’s NSNumber’s numberWithFloat:1.0)
    
animation’s setToValue:(current application’s NSNumber’s numberWithFloat:2.0)
    
aObject’s layer()’s addAnimation:animation forKey:"scale-layer"
  end scaleObject:
  
  
on rotateObject:aObject forAxis:anAxis
    set animation to current application’s CABasicAnimation’s animationWithKeyPath:("transform.rotation." & anAxis)
    
animation’s setDuration:2.0
    
–animation’s setAutoreverses:false
    
animation’s setRepeatCount:1
    
animation’s setFromValue:(current application’s NSNumber’s numberWithFloat:0.0)
    
animation’s setToValue:(current application’s NSNumber’s numberWithFloat:4.0 * 3.1415926)
    
aObject’s layer()’s addAnimation:animation forKey:"rotate-layer"
  end rotateObject:forAxis:


on moveObject:aObject
    set aFrame to aObject’s frame()
    
copy aFrame to {{fx1, fy1}, {fx2, fy2}}
    
set animation to current application’s CABasicAnimation’s animationWithKeyPath:"position"
    
animation’s setDuration:0.4
    
animation’s setAutoreverses:false
    
animation’s setRepeatCount:1
    
animation’s setFromValue:(current application’s NSValue’s valueWithCGRect:(aObject’s frame()))
    
animation’s setToValue:(current application’s NSValue’s valueWithCGRect:(current application’s CGRectMake(100, 100, fx2, fy2)))
    
aObject’s layer()’s addAnimation:animation forKey:"move-layer"
  end moveObject:
  
  
–Not Work Yet…..
  
(*
  on mixtureAnimeObject:aObject
    set animation1 to current application’s CABasicAnimation’s animationWithKeyPath:"transform.translation.x"
    animation1’s setToValue:(current application’s NSNumber’s numberWithFloat:80.0)
    animation1’s setDuration:3.0
    
    set animation2 to current application’s CABasicAnimation’s animationWithKeyPath:"transform.rotation.z"
    animation2’s setFromValue:(current application’s NSNumber’s numberWithFloat:0.0)
    animation2’s setToValue:(current application’s NSNumber’s numberWithFloat:4.0 * 3.1415926)
    animation2’s setDuration:3.0
    
    set aGroup to current application’s CAAnimationGroup’s animation()
    aGroup’s setDuration:3.0
    aGroup’s setRepeatCount:1.0
    aGroup’s setAnimations:(current application’s NSArray’s arrayWithObjects:{animation1, animation2, missing value})
    aObject’s layer()’s addAnimation:aGroup forKey:"move-rotate-layer"
  end mixtureAnimeObject:
*)
end script

★Click Here to Open This Script 

Posted in Animation AppleScript Application on Xcode GUI | Tagged 10.13savvy 10.14savvy 10.15savvy CABasicAnimation NSNumber | Leave a comment

画像に円を塗る

Posted on 2月 11, 2020 by Takaaki Naganoya

作成した画像(NSImage)に円を塗るAppleScriptです。

最近、6角形の図形ばかり塗りつぶしていましたが、「円に変えるとどうなんだろう?」と考えて、本ルーチンを試作してみました。

ためしに、6角形ではなく円で塗りつぶしてみたものの、そんなにイケていない感じがします。

AppleScript名:画像に円を塗る.scptd
—
–  Created by: Takaaki Naganoya
–  Created on: 2020/02/11
—
–  Copyright © 2020 Piyomaru Software, All Rights Reserved
—
use AppleScript version "2.4" — Yosemite (10.10) or later
use framework "Foundation"
use framework "AppKit"
use scripting additions

property aRadius : 40

set aFile to POSIX path of (choose file name)
if aFile does not end with ".png" then
  set aFile to aFile & ".png"
end if

set aColor to current application’s NSColor’s redColor()

set aImage to current application’s NSImage’s alloc()’s initWithSize:{300, 300}

repeat with y from 0 to 300 by aRadius + 4
  repeat with x from 0 to 300 by aRadius + 4
    my drawCircleOnNSIMage(aImage, aRadius, x, y, aColor)
  end repeat
end repeat

set sRes to my saveNSImageAtPathAsPNG(aImage, aFile)

#  MARK: Call By Reference
on drawCircleOnNSIMage(aImage, aRadius, aXpos, aYpos, aColor)
  set aBezier to generateCircle(aRadius, aXpos, aYpos) of me
  (
aImage)’s lockFocus()
  
aColor’s |set|()
  
aBezier’s fill() –ぬりつぶし
  (
aImage)’s unlockFocus()
end drawCircleOnNSIMage

#  MARK: circleのBezier曲線を作成して返す
on generateCircle(theRadius, x, y)
  set aRect to current application’s NSMakeRect(x, y, theRadius, theRadius)
  
set aCirCle to current application’s NSBezierPath’s bezierPath()
  
aCirCle’s appendBezierPathWithOvalInRect:aRect
  
return aCirCle
end generateCircle

# NSImageを指定パスにPNG形式で保存
on saveNSImageAtPathAsPNG(anImage, outPath)
  set imageRep to anImage’s TIFFRepresentation()
  
set aRawimg to current application’s NSBitmapImageRep’s imageRepWithData:imageRep
  
set pathString to current application’s NSString’s stringWithString:outPath
  
set newPath to pathString’s stringByExpandingTildeInPath()
  
set myNewImageData to (aRawimg’s representationUsingType:(current application’s NSPNGFileType) |properties|:(missing value))
  
set aRes to (myNewImageData’s writeToFile:newPath atomically:true) as boolean
  
return aRes –成功ならtrue、失敗ならfalseが返る
end saveNSImageAtPathAsPNG

★Click Here to Open This Script 

Posted in file File path Image | Tagged 10.14savvy 10.15savvy NSBezierPath NSBitmapImageRep NSColor NSImage NSPNGFileType NSString | Leave a comment

画像の指定エリアを透明色塗りつぶし(矩形切り抜き)

Posted on 2月 3, 2020 by Takaaki Naganoya

指定画像の指定エリア(矩形)を透明色で塗りつぶすAppleScriptです。透明色で塗りつぶす=矩形で切り抜いたようなかっこうになります。

画像(NSImage)を指定色で塗りつぶすという処理はよく見かけるものですが、clearColor()(透明色)で塗りつぶすという処理を行うとどうなるかといえば…………何も起こりません。

透明色でNSImageを塗りつぶすという処理は、たいへんに「ありそう」な処理ですが、なかなか見つからない。

さんざん探し回ったのですが、自分には見つけられませんでした。ちょうどEdama2さんに相談してみたところ、こういう処理を探し出してもらえました(ありがとうございますー)。ただ、見つけてきた処理そのままでは思い通りの結果にならなかったので、修正が必要であったとのこと。

透明塗りつぶし(切り抜き)の指定座標はCocoaの座標系をそのまま利用しているので、左下が原点です。

NSBezierPathで切り抜き(透明色で塗りつぶし)できるといいのになーという感じではあります。

AppleScript名:画像の指定エリアを透明色塗りつぶし(矩形切り抜き)
— Created 2017-11-19 by Takaaki Naganoya
— Modified 2018-02-14 by Takaaki Naganoya
— Modified 2020-02-03 by Edama2 & Takaaki Naganoya
use AppleScript version "2.5"
use scripting additions
use framework "Foundation"
use framework "AppKit"

property NSUUID : a reference to current application’s NSUUID
property NSColor : a reference to current application’s NSColor
property NSString : a reference to current application’s NSString
property NSImage : a reference to current application’s NSImage
property NSScreen : a reference to current application’s NSScreen
property NSBezierPath : a reference to current application’s NSBezierPath
property NSPNGFileType : a reference to current application’s NSPNGFileType
property NSCompositeClear : a reference to current application’s NSCompositeClear
property NSBitmapImageRep : a reference to current application’s NSBitmapImageRep

–切り抜きエリア(複数)
set drawList to {{origin:{x:0, y:0}, |size|:{width:200, height:100}}, {origin:{x:100, y:100}, |size|:{width:50, height:50}}}

set imgPath to POSIX path of (choose file of type {"public.image"})
set anImage to NSImage’s alloc()’s initWithContentsOfFile:imgPath

set fillColor to (NSColor’s colorWithCalibratedRed:1.0 green:0.0 blue:0.0 alpha:0.9)

–透明色塗りつぶし処理呼び出し
set resImage to drawImageWithClearColorFill(anImage, drawList) of me

set aUUIDstr to (NSUUID’s UUID()’s UUIDString()) as string
set aPath to ((NSString’s stringWithString:imgPath)’s stringByDeletingLastPathComponent()’s stringByAppendingPathComponent:aUUIDstr)’s stringByAppendingPathExtension:"png"

set fRes to saveImageRepAtPathAsPNG(resImage, aPath) of me

on drawImageWithClearColorFill(anImage, drawList)
  set retinaF to (NSScreen’s mainScreen()’s backingScaleFactor()) as real
  
–>  2.0 (Retina) / 1.0 (Non Retina)
  
  
set aClearCol to NSColor’s clearColor()
  
set op to current application’s NSCompositeClear
  
  
anImage’s lockFocus() –描画開始
  
  
repeat with i in drawList
    set origX to (x of origin of i) / retinaF
    
set origY to (y of origin of i) / retinaF
    
set sizeX to (width of |size| of i) / retinaF
    
set sizeY to (height of |size| of i) / retinaF
    
    
–Draw Clear Color
    
–http://www.drissman.com/blog/archives/2009/10/09/nsrectfill_and_nscolor_clearcolor.html
    
set theRect to {{x:origX, y:origY}, {width:sizeX, height:sizeY}}
    
aClearCol’s |set|()
    
current application’s NSRectFillUsingOperation(theRect, op)
  end repeat
  
  
anImage’s unlockFocus() –描画ここまで
  
  
return anImage –returns NSImage
end drawImageWithClearColorFill

–画像を指定パスにPNG形式で保存
on saveImageRepAtPathAsPNG(anImage, outPath)
  set imageRep to anImage’s TIFFRepresentation()
  
set aRawimg to NSBitmapImageRep’s imageRepWithData:imageRep
  
  
set pathString to NSString’s stringWithString:outPath
  
set newPath to pathString’s stringByExpandingTildeInPath()
  
  
set myNewImageData to (aRawimg’s representationUsingType:(NSPNGFileType) |properties|:(missing value))
  
return (myNewImageData’s writeToFile:newPath atomically:true) as boolean
end saveImageRepAtPathAsPNG

★Click Here to Open This Script 

Posted in file File path Image | Tagged 10.14savvy 10.15savvy NSBitmapImageRep NSColor NSCompositeClear NSImage NSPNGFileType NSScreen NSString NSUUID | 1 Comment

見えてきたSIM入りMacの可能性? CoreTelephony

Posted on 2月 1, 2020 by Takaaki Naganoya

OSのアップデートがあるたびに調査している「CoreTelephony.framework」の調査を行なってみました。

最初(macOS 10.10のころ?)はFrameworkのダミーがあるだけで、use framework “CoreTelephony”などと書いても、エラーになるだけでした。

次いで、use framework “Coretelephony”が通るようになったものの、中身が用意されていない時代が長く続き、とうとうmacOS 10.15で実際にオブジェクトを生成して情報が取れるようになりました。macOS 10.14では本Scriptは動きません。動作するのは10.15以降のみです。

VOIP経由で通話ができるという情報が取れるようになっただけですが、通話に使えるほど待ち受け時間が長いマシン(ARM CPU搭載)の開発が最終段階に到達したのか、あるいはARM CPU搭載のiPadのようなマシンにmacOSを搭載することを検討しているのか、それ以外の何かを用意しているのかは不明です。

ただひとつ言えることは、macOS上でCoreTelephony.frameworkのフルセットが、ようやく動いて、BridgeSupportのファイルまで用意された(=AppleScriptから呼べるようになった)ということです。

struct name='CTError' type64='{_CTError="domain"i"error"i}'
constant name='CTCallStateConnected' type64='@'
constant name='CTCallStateDialing' type64='@'
constant name='CTCallStateDisconnected' type64='@'
constant name='CTCallStateIncoming' type64='@'
constant name='CTRadioAccessTechnologyCDMA1x' type64='@'
constant name='CTRadioAccessTechnologyCDMAEVDORev0' type64='@'
constant name='CTRadioAccessTechnologyCDMAEVDORevA' type64='@'
constant name='CTRadioAccessTechnologyCDMAEVDORevB' type64='@'
constant name='CTRadioAccessTechnologyDidChangeNotification' type64='@'
constant name='CTRadioAccessTechnologyEdge' type64='@'
constant name='CTRadioAccessTechnologyGPRS' type64='@'
constant name='CTRadioAccessTechnologyHSDPA' type64='@'
constant name='CTRadioAccessTechnologyHSUPA' type64='@'
constant name='CTRadioAccessTechnologyLTE' type64='@'
constant name='CTRadioAccessTechnologyWCDMA' type64='@'
constant name='CTRadioAccessTechnologyeHRPD' type64='@'
constant name='CTServiceRadioAccessTechnologyDidChangeNotification' type64='@'
constant name='CTSubscriberTokenRefreshed' type64='@'
enum name='kCTErrorDomainMach' value64='2'
enum name='kCTErrorDomainNoError' value64='0'
enum name='kCTErrorDomainPOSIX' value64='1'
class name='CTCarrier'
method selector='allowsVOIP'
retval type64='B'

下記ScriptはMac mini 2014にBluetooth経由でiPhoneを接続した状態で実行したものです。この記事を書いたあたりで「ARM Macはあり得る」と感じるようになっていました(半信半疑ですが)。

AppleScript名:電話関連情報を取得するじっけん
— Created 2016-09-30 by Takaaki Naganoya
— 2016 Piyomaru Software
use AppleScript version "2.7"
use scripting additions
use framework "Foundation"
use framework "CoreTelephony"

–macOS 10.15ではじめて呼び出せた
set telephony to current application’s CTTelephonyNetworkInfo’s alloc()’s init()
–set telephony to current application’s CTTelephonyNetworkInfo’s new()

set cRes to telephony’s subscriberCellularProvider()
–> missing value

set sRes to telephony’s serviceCurrentRadioAccessTechnology()
–> missing value

set sRes2 to telephony’s serviceSubscriberCellularProviders()
–> missing value

set sRes3 to telephony’s serviceSubscriberCellularProvidersDidUpdateNotifier()
–> missing value

set sRes3 to telephony’s dataServiceIdentifier()
–> missing value

set aCarrier to current application’s CTCarrier’s alloc()’s init()
–>
(*
CTCarrier (0x6000034d5bf0) {
  Carrier name: [<nil>]
  Mobile Country Code: [<nil>]
  Mobile Network Code:[<nil>]
  ISO Country Code:[<nil>]
  Allows VOIP? [YES]
}
*)

set vRes to aCarrier’s allowsVOIP()
–> true

★Click Here to Open This Script 

追記:2020/12/17に同一機体でmacOS 11.1環境で同じScriptを実行した際の結果を反映させてみました。

この時点でARM Mac=M1 Macが登場して、市販もはじまっている状況ですが、SIM入りMacは登場していません。iPad Proのような筐体でMx系CPUを搭載したタブレット的な「Mac Pad」のようなマシンが出てくるものと予測していますが、どうなることやら。

AppleScript名:電話関連情報を取得するじっけん.scptd
— Created 2016-09-30 by Takaaki Naganoya
— 2016 Piyomaru Software
use AppleScript version "2.7"
use scripting additions
use framework "Foundation"
use framework "CoreTelephony"

–macOS 10.15ではじめて呼び出せた
set telephony to current application’s CTTelephonyNetworkInfo’s alloc()’s init()
–set telephony to current application’s CTTelephonyNetworkInfo’s new()

set cRes to telephony’s subscriberCellularProvider()
–> missing value–10.15
–> missing value–11.1

set sRes to telephony’s serviceCurrentRadioAccessTechnology()
–> missing value–10.15
–> (NSDictionary) {}–11.x

set sRes2 to telephony’s serviceSubscriberCellularProviders()
–> missing value–10.15
–> (NSDictionary) {}–11.x

set sRes3 to telephony’s serviceSubscriberCellularProvidersDidUpdateNotifier()
–> missing value–10.15
–> missing value–11.x

set sRes3 to telephony’s dataServiceIdentifier()
–> missing value–10.15
–> missing value–11.x

set aCarrier to current application’s CTCarrier’s alloc()’s init()
–>
(*
–macOS 10.15
CTCarrier (0x6000034d5bf0) {
  Carrier name: [<nil>]
  Mobile Country Code: [<nil>]
  Mobile Network Code:[<nil>]
  ISO Country Code:[<nil>]
  Allows VOIP? [YES]
}

–macOS 11.1
CTCarrier (0x600000a7c300) {
  Carrier name: [<nil>]
  Mobile Country Code: [<nil>]
  Mobile Network Code:[<nil>]
  ISO Country Code:[<nil>]
  Allows VOIP? [YES]
}

*)

set vRes to aCarrier’s allowsVOIP()
–> true–10.15
–> true–11.x

★Click Here to Open This Script 

Posted in Telephony | Tagged 10.15savvy 11.0savvy CTCarrier CTTelephonyNetworkInfo | Leave a comment

2020/2/8のTMUG例会で「Kamenoko」のデモをします

Posted on 1月 31, 2020 by Takaaki Naganoya

2020/2/8(土)に東京都目黒区 目黒区民センター内の中小企業センター 2F第二集会室において行われる東京マッキントッシュユーザーズグループ(TMUG)の2月度例会において、本Blogでもちょくちょく作例が載っているHex-cell Mapの作成アプリケーション「Kamenoko」のデモを行います。

すべてAppleScriptで記述している、グラフというか「図」の作成アプリケーションで、アウトラインプロセッサやマインドマップにはない、プレゼン向きの図の作成や、図を作りながら対話的にアイデアをまとめていけるツールになる(んじゃないかなぁ)と期待しています。英語ネイティブの友人に

ぴ:「これ、一般的にはなんて呼ぶの?」
友:「Graphics」

あれか? 和菓子もシュークリームも、全部『Cake』って呼ぶアレなのか?! というわけで、日本語訳として「図」。独自の用語で「Hex-cell Graphics」と呼んでいる、概念階層レベル色分けマインドマップ的なものをAppleScriptで作ってみた(最中)です。

ご興味のある方は、ぜひこの機会にご参加ください!(事前登録とか別にしなくてもけっこうですので)

日時:2020/2/8(土) 14:00〜17:00(開場14:00、開始14:30)
場所:目黒区民センター内中小企業センター2階第2集会室
東京都目黒区目黒2-4-36/03-3711-1135


▲当時のKamenokoは、フォント変更、書類保存、環境設定などが一切できない「おかわいらしい」ツールでしかありませんでした


▲Xcodeプロジェクトも非常にシンプル。まだ440行ほどのapplescriptファイルが1個しかありません(当時)

Posted in イベント(Event) | Leave a comment

電子ブック年度末フェア実施中!

Posted on 1月 29, 2020 by Takaaki Naganoya

ぴよまるソフトウェアでは、本日より2020/3/31までの間、Piyomaru SoftwareがBOOTH上にて販売している電子ブックをお買い上げの方に、もれなく「Piyomaru Script Assistant v.2.0βお試し版」を配布するキャンペーンを開始いたしました。

Piyomaru Script Assistantは、スクリプトエディタのコンテクストメニューから呼び出すAppleScript記述補助ツール群「Script Assistant」の改良強化版です。


▲左:Apple純正のScript Assistant、右:Piyomaru Script Assistant v2.0

2004年ごろに作成し、以来ずっと個人的にメンテナンスを続けてきた、いわゆる「秘伝のタレ」でしたが、「AppleScript最新リファレンス」「AppleScript 10大最新技術」の刊行時に購入特典としてオマケで配布。これがPiyomaru Script Assistant v.1.0(以下、PSA v1.0と略)です。

その後、時はながれ、macOS 10.13の時代になってこのPSA v1.0のうち動かないScriptが出てきており、さらに2000年代初頭に作成したため「Cocoaの機能を呼び出さないのはおかしい」「いまならもっとスゲーことが普通にできている」と、時代に合わなくなってきました。

# 基礎的なScriptを自動入力できるという意味では、ねらいどおりなのですが、、、

そこで、昨年よりPSAのv.2.0を企画して実装を開始。ちょくちょく画面のスナップショットが掲載されているアレです。

PSA v2.0はv1.0よりもはるかに強力で、さまざまなOSの力を引き出す構成になっており、たとえばメニューバーに常駐するメニューなどもコンテクストメニューから一発入力できるようになっています。AirDropによる編集中のAppleScript書類の共有なども組み込まれています。ほぼ、内容的にはv1.0とは別物です。

このPSA v.2.0のβ版に対するご意見をいただきたいので、macOS 10.14以降の環境をお持ちで、該当期間中にPiyomaru Softwareの電子書籍をご購入いただいた方に、このPSA v2.0の評価キット(実際に使えます)を差し上げます。

同封のアンケートにお答えいただければ、PSA v.2.0の強力な機能をお試しいただけます。

この機会にふるってご応募ください!

応募方法:ご購入後にmaro@piyocast.comまで、「年度末フェア」のタイトルで購入お知らせメールをいただければ、ダウンロード先の情報をご返送いたします。

なお、普通に購入特典の希望メールをいただいた場合でも、「年度末フェア」のご案内を申し上げます。

Posted in PRODUCTS | Leave a comment

eppcで他のMac上のアプリケーション操作

Posted on 1月 26, 2020 by Takaaki Naganoya

MacScripterのフォーラムでeppcについての質問があったので回答していました。eppcを用いて、ネットワーク上の他のMacを操作する件についての話でした。

eppcは、Remote AppleEventのプロトコル表記であり、自分のマシン上のアプリケーションだと、

application "Finder"

と表記しますが、他のMac上のアプリケーションだと、

application "Finder" of machine "eppc://user:password@machineName.local"

という表記になります。パスワードを書いておかないとダイアログで問い合わせが行われるので、書かなくてもいいです(パスワードが丸裸で書いてあるのは不用心なので、テスト時以外はおすすめしません)。

自分の認識では、ネットワーク上の他のマシンの操作については、

のような認識でした。この認識は間違っているわけではなく、リモートのアプリケーション操作はリモート側のアプレットに行わせるようにして、自分からはリモート側のアプレットのハンドラを呼び出すのがリモートアプリケーション操作の基本的な「作法」です。

GUIアプリケーションを直接操作するのは無理だけど、AppleScriptアプレットを常駐させておいて、アプレットのハンドラを呼び出すことで、各リモートマシン上のアプリケーションを操作できる、と。

で、これが他のメンバーのコメントで(リモートアプリケーションのダイレクト呼び出しは)「macOS 10.15でもできるぞ」という話が出てきて、腰を抜かしました。現状の自分のマシン環境(古いのばっかりですが)で検証してみたところ、たしかに(若干の癖はありますが)、GUIアプリケーションを直接操作できて驚きました(セキュリティ上の制約がいろいろあるので、ローカルでできることすべてがリモートアプリケーションに直接司令できるわけではありません)。


▲テストに用いたMac OS X 10.6.8環境


▲テストに用いたMac OS X 10.7.5環境


▲テストに用いたMac OS X 10.13.6環境

Mac OS X 10.6からmacOS 10.12あたり(厳密には確認できていない)の環境では、明確にリモートAppleEventに制約が加わっていました。

ところが、macOS 10.13あたり(10.12かも。このあたり未確認)から、eppcでGUIアプリケーションの操作ができることが確認できました。

macOS Version Direct eppc to GUI Apps
10.0 (No AppleScript Env)
10.1 Works????
10.2 Works
10.3 Works
10.4 Works
10.5 (???)
10.6 Not Work
10.7 Not Work
10.8 Not Work
10.9 Not Work
10.1 Not Work
10.11 Not Work
10.12 (??? Maybe not work)
10.13 Works
10.14 Works
10.15 Works

eppcのポート

eppcがTCP/IPのどこのポート番号を用いているかは、/etc/servicesを見ると書いてあります。

eppc            3031/udp    # Remote AppleEvents/PPC Toolbox
eppc            3031/tcp    # Remote AppleEvents/PPC Toolbox

なので、VPN接続時にこれらのポートが開いていれば、相手側のマシンをAppleScriptで遠隔操作できることになります(実際には、ファイル共有とかいろいろその他の付随するポートを開けておく必要があるわけですが)。

リモート操作の傾向

ただし、ローカルマシン上のアプリケーションを操作するのと比較して、いくつかの挙動の違いも見られます。

(1)アプリケーションの直接的な起動が効かない

各GUIアプリケーションに「activate」とか「launch」コマンドを送っても無視されます。リモートマシン上でいったんアプリケーションが起動した後に「activate」で最前面に持ってくることは可能ですが、起動していない状態でactivateを実行しても、起動は行われません。

AppleScript名:他のマシン上でSafariを起動
set RemoteMachine to "eppc://me@MacMini2014.local"

using terms from application "Finder"
  tell application "Finder" of machine RemoteMachine
    open application file id "com.apple.Safari"
  end tell
end using terms from

★Click Here to Open This Script 

Finder経由でBundle IDを指定して「application fileをオープンする」という指定であれば、たしかにアプリケーションが起動します。

(2)System Eventsの操作に難あり

面白くなっていろいろリモートアプリケーションを操作していてわかってきたのですが、初期状態だとSystem Eventsが起動していない状態です。いえ、ローカルでもSystem Eventsは常時起動してはいないんでしょうけれど、命令を発行すると自動で起動されます。

この自動起動とか明示的に指定して起動といった操作が受け付けられないので、Finder経由で間接的にapplication fileのオープンというかたちでSystem Eventsの起動を行い、処理を依頼します。

このリモートマシン上のSystem Eventsはしばらく処理が行われないと自動で終了するようなので、何かまとまった処理をSystem Eventsに行わせる前には明示的に起動を司令しておくべきなんでしょう。

AppleScript名:他のマシン上のSystem Eventsを起動する
set RemoteMachine to "eppc://me@MacMini2014.local"

using terms from application "Finder"
  tell application "Finder" of machine RemoteMachine
    open application file id "com.apple.SystemEvents"
  end tell
end using terms from

★Click Here to Open This Script 

(3)けっこう動く

GUIアプリケーションの代表としてSafariを実際に操作してみたところ、

Safariのバージョン名の取得、できました。

AppleScript名:他のマシン上で起動しているアプリケーションのバージョンを取得
set RemoteMachine to "eppc://me@MacMini2014.local"

using terms from application "Safari"
  tell application "Safari" of machine RemoteMachine
    version
  end tell
end using terms from

★Click Here to Open This Script 

Safariの新規ウィンドウの作成、できました。

AppleScript名:他のマシン上で起動しているSafariで新規ウィンドウ作成
set RemoteMachine to "eppc://me@MacMini2014.local"

using terms from application "Safari"
  tell application "Safari" of machine RemoteMachine
    make new document
  end tell
end using terms from

★Click Here to Open This Script 

SafariのウィンドウのURLの取得、できました。

AppleScript名:他のマシン上で起動しているSafariの最前面のウィンドウのURLを取得
set RemoteMachine to "eppc://me@MacMini2014.local"

using terms from application "Safari"
  tell application "Safari" of machine RemoteMachine
    set aURL to URL of front document
  end tell
end using terms from

★Click Here to Open This Script 

SafariのウィンドウのURLの書き換え、できました。

AppleScript名:他のマシン上で起動しているSafariのウィンドウのURLを書き換える
set RemoteMachine to "eppc://me@MacMini2014.local"

using terms from application "Safari"
  tell application "Safari" of machine RemoteMachine
    set URL of document 1 to "http://piyocast.com/as/"
  end tell
end using terms from

★Click Here to Open This Script 

Safariの最前面のウィンドウの内容をメールに転送、できました。

AppleScript名:他のマシン上で起動しているSafariの最前面の内容をメール
set RemoteMachine to "eppc://me@MacMini2014.local"

using terms from application "Safari"
  tell application "Safari" of machine RemoteMachine
    make new document
    
set URL of front document to "http://www.apple.com"
    
delay 3 –wait for page loading
    
email contents of front document
  end tell
end using terms from

★Click Here to Open This Script 

Safariのページローディング検出はいろいろ蓄積されているノウハウもありますが、do javascriptコマンドが問題なく動くレベルまで信用できるのかわからなかったので、delayで単純に時間待ちしています。

実際に動かしてみて、自分がビビるぐらいeppcでリモートアプリケーションの操作ができてしまいました。SIPだとかアプリケーション権限だとかでセキュリティ機能でがんじがらめにされている今日このごろですが、eppc経由でリモートマシン上のアプリケーション操作が緩和されている事実にビビりました。

これはおそらくですが、Xcode上のリモートデバッグとか、そういうあたりの機能の実装時に機能がeppcまわりの機能が再実装されたかコメントアウトしていた箇所が復活したかという話に見えます。

Posted in Remote Control | Tagged 10.13savvy 10.14savvy 10.15savvy Safari | Leave a comment

GUI Scriptingでコンテクストメニューのキャプチャを取得

Posted on 1月 24, 2020 by Takaaki Naganoya

GUI Scriptingを用いてスクリプトエディタ上でコンテクストメニューを表示させて、コンテクストメニューのキャプチャを行うAppleScriptです。macOS 10.14.6上で試しただけなので、10.15上では試していません(たぶん動くと思うのですが)。

–> Watch Demo Movie

画面キャプチャをNSImageに取得する機能については、DSCapture.frameworkをビルドして、AppleScript(実行環境はScript Debugger)から呼び出しています。

–> Download DSCapture.framework (To ~/Library/Frameworks/)

AppleScriptの鬼っ子機能である「GUI Scripting」。ある顧客が「キーボードショートカットとキーボード操作をそのままScript化することでこれを作れ」という仕様を出してきて、とても実現できない内容がまだらに含まれていたので「ナイスジョーク!」と却下した記憶があります。

「できること」(キーボードショートカット操作)に「できないこと」(目視で当該データの位置確認)を混ぜて仕様を出されると悪夢でしかありません。

あと、GUI Scriptingで操作を行うと信頼性がないうえに、信頼性を確保するためには「待つ」という処理が必要だったり、本来のAppleScriptの処理速度よりも100倍以上遅くなるので、本当に必要な箇所にだけ使う&可能なかぎり使用しないというのが自分の基本的なスタンスです。

コンテクストメニューの画面キャプチャを自動で

そんな中、新型Piyomaru Script Assistant(macOS 10.14以降対応。10.13は無視)の資料を作るために、コンテクストメニューの内容を画面キャプチャする必要に迫られました。

AppleScriptが500個ぐらい、階層化されたメニューに入っているので、これの画面キャプチャを撮るだけで一仕事です。テストで1階層分の資料を作ってみたのですが、けっこうかかります。

そこで、スクリプトエディタ上で表示させたコンテクストメニューをプログラムで撮れないかを検討することになります。

真っ先に調べたのはCocoaにそういう機能がないかどうか。自前のプログラムのビューの内容をキャプチャすることはできますが、他のアプリケーションのビューをキャプチャする機能は見つかりませんでした。

仕方がないので、画面のキャプチャをまるごと取得して、撮影対象のビューの座標から画像の切り抜きを行うようにしてみました。

GUI Scriptingでコンテクストメニューを表示させるのは無理かと思っていたのですが、できるんですね。これも冗談半分で探してみたらあっけなく方法が見つかって、

tell theTarget to perform action "AXShowMenu" --コンテクストメニューの表示

これで実際にコンテクストメニューの表示を行えました。

実現はいろいろ大変

スクリプトエディタ上の画面撮影を行うので、Scriptの実行そのものはScript Debuggerで実行。

問題になったのは2点。

1つは、画面キャプチャの撮影を行うフレームワークでメインディスプレイから画面イメージをNSImageで取得し、その結果をメイン側(暗黙のrunハンドラといったほうがいいのか)のプロパティに返しているのですが、すぐに反映されないらしくて、クラッシュを頻発。

結局、プロパティに内容が反映されたことをループで時間待ちして受信。

もう1つ困った点は、コンテクストメニューの表示解除(キャンセル)。1つのコンテクストメニュー表示&キャプチャ撮影だけでは意味がありません。選択メニュー項目を変更して、複数のコンテクストメニューのキャプチャを順次行えなくてはなりません。

いろいろな方法を試してみたものの、最前面のアプリケーションを「スクリプトエディタ」でない状態を作ればコンテクストメニュー表示状態は解除されます(このあたり、AppleScriptが純粋なプログラマーに苦手とされる理由。実際に使っているユーザーでないとこういう発想自体が出てこない)。Script Debugger側で実行しているので、Script Debuggerをactivateすることでその状態(コンテクストメニュー表示解除)を作ってみました。

そんなわけでコンテクストメニューの(選択項目を変更して全項目を選択状態にした)画面キャプチャができました。

現在は1階層分のコンテクストメニューの撮影を行なっていますが、メニュー階層をすべてAppleScript側からスキャンして、それぞれのメニューに対して、各メニュー項目を表示した状態で巡回キャプチャできるとよさそうです。

cropNSImageTo:{x1, y1, x2, y2} fromImage:theImage ハンドラは、Y座標の変換をこの用途(全画面キャプチャしたNSImageの切り抜き)の帳尻合わせのために書き換えています。この用途以外では使えないはずです。

AppleScript名:GUI Scriptingで指定したGUI部品のキャプチャを取得.scptd
—
–  Created by: Takaaki Naganoya
–  Created on: 2020/01/24
—
–  Copyright © 2020 Piyomaru Software, All Rights Reserved
—

use AppleScript version "2.4" — Yosemite (10.10) or later
use framework "Foundation"
use framework "DSCapture" –https://github.com/kiding/DSCapture.framework
use framework "AppKit"
use scripting additions

property |NSURL| : a reference to current application’s |NSURL|
property NSUUID : a reference to current application’s NSUUID
property NSString : a reference to current application’s NSString
property NSImage : a reference to current application’s NSImage
property NSPNGFileType : a reference to current application’s NSPNGFileType
property NSBitmapImageRep : a reference to current application’s NSBitmapImageRep

property targPos : {0, 0}
property targSize : {0, 0}
property screenSize : {}
property outPath : ""
property captImg : missing value

set (my captImg) to missing value

tell application "System Events"
  tell process "スクリプトエディタ" –"Script Editor" (Japanese localized name)
    –Editor Area Reference
    
set theTarg to text area 1 of scroll area 1 of splitter group 1 of splitter group 1 of window 1
  end tell
end tell

repeat with i from 1 to 19
  
  
set captImg to missing value
  
set outPath to (POSIX path of (path to desktop)) & ((NSUUID’s UUID()’s UUIDString()) as string) & ".png"
  
  
set {mPos, mSize} to dispMenu(i, theTarg) of me
  
copy mPos to {cx1, cy1}
  
copy mSize to {cWidth, cHeight}
  
  
screenCapture() of me
  
  
repeat 100 times
    if (my captImg) is not equal to missing value then exit repeat
    
delay 0.1
  end repeat


set bImg to (my cropNSImageTo:{cx1, cy1, cWidth, cHeight} fromImage:(my captImg))
  
saveNSImageAtPathAsPNG(bImg, my outPath) of me
  
  
tell current application to activate –Cancel Context Menu
  
delay 0.1
end repeat

on screenCapture()
  current application’s DSCapture’s sharedCapture()’s |full|()’s captureWithTarget:me selector:"displayCaptureData:" useCG:false
end screenCapture

–Delegate Handler
on displayCaptureData:aSender
  set aCount to aSender’s |count|()
  
set anImage to (aSender’s imageAtIndex:0)
  
set my captImg to anImage
  
–saveNSImageAtPathAsPNG(anImage, my outPath) of me
end displayCaptureData:

on cropNSImageTo:{x1, y1, x2, y2} fromImage:theImage
  set newWidth to x2
  
set newHeight to y2
  
set theSize to (theImage’s |size|())
  
set oldHeight to height of theSize
  
  
— transpose y value for Cocoa coordintates
  
set y1 to oldHeight – newHeight – y1
  
set newRect to {{x:x1, y:y1}, {width:x2, height:y2}}
  
  
theImage’s lockFocus()
  
set theRep to NSBitmapImageRep’s alloc()’s initWithFocusedViewRect:newRect
  
theImage’s unlockFocus()
  
  
set outImage to NSImage’s alloc()’s initWithSize:(theRep’s |size|())
  
outImage’s addRepresentation:theRep
  
  
return outImage
end cropNSImageTo:fromImage:

–NSImageを指定パスにPNG形式で保存
on saveNSImageAtPathAsPNG(anImage, outPath)
  set imageRep to anImage’s TIFFRepresentation()
  
set aRawimg to current application’s NSBitmapImageRep’s imageRepWithData:imageRep
  
set pathString to current application’s NSString’s stringWithString:outPath
  
set newPath to pathString’s stringByExpandingTildeInPath()
  
set myNewImageData to (aRawimg’s representationUsingType:(current application’s NSPNGFileType) |properties|:(missing value))
  
set aRes to (myNewImageData’s writeToFile:newPath atomically:true) as boolean
  
return aRes –成功ならtrue、失敗ならfalseが返る
end saveNSImageAtPathAsPNG

on dispMenu(selInd, theTarget)
  activate application "Script Editor"
  
tell application "System Events"
    tell process "スクリプトエディタ" –"Script Editor" (Japanese localized name)
      
      
ignoring application responses
        tell theTarget to perform action "AXShowMenu" –コンテクストメニューの表示
      end ignoring
      
      
tell text area 1 of scroll area 1 of splitter group 1 of splitter group 1 of window 1
        tell menu 1
          set mPos to position
          
set mSize to size
          
          
set mList to every menu item
          
tell menu item (13 + selInd)
            set aRes to properties
            
set selected to true
          end tell
        end tell
      end tell
      
    end tell
  end tell
  
  
return {mPos, mSize}
end dispMenu

★Click Here to Open This Script 

Posted in GUI Scripting | Tagged 10.14savvy NSBitmapImageRep NSImage NSPNGFileType NSString NSURL NSUUID | Leave a comment

Blogへの新規ユーザー登録を停止

Posted on 1月 24, 2020 by Takaaki Naganoya

本Blogには誰でもユーザー登録できるようになっていました。フォーラムの運用を想定していたので、誰でも登録できるようになっていたほうがよいと考えたからです。

ただ、最近はスパマーのボットによるユーザー登録が増えてきて、スパマーのブラックリストを用いての確認とかユーザー削除の作業が増えてきて、一時はスパマー除去のためのプラグインを入れて様子を見ていました。

スパマー除去プラグインのお試し期間が過ぎ、一思案。

スパマー除去サービスを利用するのが最善手でありますが、そこまでするんだったらもう少し、WordPressのユーザー登録時にロボットを弾くための認証プロセスを追加するなどの方法もありそうですし(自分が考えるぐらいだから存在するでしょう)。

とりあえずの暫定措置で、ユーザー登録そのものを一時的に停止します。日本語で書いて意味があるかは不明ですが、、、

Posted in news | Leave a comment

1888年1月1日以前の日付が-1日になる問題の原因

Posted on 1月 23, 2020 by Takaaki Naganoya

Shane Stanleyにチャットで教えてもらっていました(お食事前に申し訳ない!) これは-1日になるほうが暦自体の仕様的に正しいようです。1888/1/1以前には「子午線」とかタイムゾーン(子午線ごとの標準時)という考え方自体が存在せず、1888/1/1に運用を開始した「日本標準時」に合わせてGMT +9になったため、この1888/1/1から前の日付はさかのぼって-1日される、と。

# 子午線のある現在の日付から子午線という概念がまだ存在しない日付をさかのぼった結果、日付が1日ズレた、と

現在施行されている「グレゴリオ暦」は、日本においても1873年(明治3年)に導入されました。この件については、よく知られていることです(自分の記憶があいまいで明治1年かと思っていました)。

ただ、この「グレゴリオ暦@Japan Ver.1」では子午線に関する決まりがなく、アメリカなどの国土が広い国では列車の時刻表などで問題になっていました。

その後、1884/10/11の国際子午線会議における子午線の制定を受け、日本標準時の運用が1888/1/1に開始になりました。この、1888/1/1の日本標準時の運用前にはタイムゾーンという考え方自体がなかったわけです。この、「グレゴリオ暦@Japan Ver.2」ともいえる暦法が1888/1/1に導入されたことにともない、時刻の変更とともに日付が変わったということである、と。

当時は子午線という概念そのものがなく、日本標準時が運用開始になったのが1888/1/1だということでようやく納得できました。

Classic Mac OSやMac OS X 10.6まではカレンダーの計算にこうした歴史的な経緯が加味されておらず、途中でポリシーが変更になったというのが真相のようです。累積誤差で日付が変わったんじゃなかったんですね、、、、

1582/10/15
ローマにてグレゴリオ暦 制定

1873/1/1(明治3年)
日本にてグレゴリオ暦に改暦。ただし、子午線の運用は各国間で規定がなかった。

1884/10/11
国際子午線会議

1888/1/1
日本標準時 運用開始

[おまけ] Cocoa自体のグレゴリオ暦の開始日を実際に取得してみました。

AppleScript名:gregorianStartDate.scptd
—
–  Created by: Takaaki Naganoya
–  Created on: 2020/01/23
—
–  Copyright © 2020 Piyomaru Software, All Rights Reserved
—

use AppleScript version "2.4" — Yosemite (10.10) or later
use framework "Foundation"
use scripting additions

set sDate to current application’s NSDateFormatter’s alloc()’s init()’s gregorianStartDate()
–> (NSDate) "1582-10-15 00:00:00 +0000"

set asDate to sDate as date
–> date "1582年10月15日 金曜日 9:18:59"

★Click Here to Open This Script 

Posted in Calendar History | 2 Comments

元号変換v42

Posted on 1月 23, 2020 by Takaaki Naganoya

西暦→和暦の元号を求めるAppleScriptの改修版です。

前バージョンでは、1868年から1887年までの計算が1日ズレるとか(dateオブジェクトの仕様)、明治の計算が合っていなかったので、その点を修正しました。

前バージョンまでは文字列で与えられた日付をいったんdateオブジェクトに変換していました。これは、”2020/11/31″といった正しくない日付が与えられた場合に、”2020/12/1″と妥当な解釈をし直すための処理でした。つまり、エラー対策のためだけにいったんdateオブジェクトに変換していたわけです。

これさえ行わなければ、とくにdateオブジェクトまわりの問題(before1887)は発生しません。dateオブジェクトとして解釈を行わず、単なる文字列を年、月、日に分解して、大小判定するだけの処理に置き換えました(11/31といったカレンダー的におかしな記述は無視)。

明治の計算についてもごにょごにょして修正してみました。

dateとしての年、月、日の妥当性チェックを行いたい場合には、月が1〜12、日が1〜31といった値の範囲チェックを追加で行うぐらいでしょうか。

AppleScript名:元号変換v42
—
–  Created by: Takaaki Naganoya
–  Created on: 2020/01/23
—
–  Copyright © 2020 Piyomaru Software, All Rights Reserved
—

set outList to {}
repeat with i from 1867 to 2021
  set aStr to (i as string) & "/1/25"
  
set {aGengoStr, aGengoNum} to retJapaneseGengo(aStr) of JGengoKit
  
set the end of outList to {i, aGengoStr, aGengoNum}
end repeat

return outList
–> {{1867, "(改暦前)", false}, {1868, "明治", 1}, {1869, "明治", 2}, {1870, "明治", 3}, {1871, "明治", 4}, {1872, "明治", 5}, {1873, "明治", 6}, {1874, "明治", 7}, {1875, "明治", 8}, {1876, "明治", 9}, {1877, "明治", 10}, {1878, "明治", 11}, {1879, "明治", 12}, {1880, "明治", 13}, {1881, "明治", 14}, {1882, "明治", 15}, {1883, "明治", 16}, {1884, "明治", 17}, {1885, "明治", 18}, {1886, "明治", 19}, {1887, "明治", 20}, {1888, "明治", 21}, {1889, "明治", 22}, {1890, "明治", 23}, {1891, "明治", 24}, {1892, "明治", 25}, {1893, "明治", 26}, {1894, "明治", 27}, {1895, "明治", 28}, {1896, "明治", 29}, {1897, "明治", 30}, {1898, "明治", 31}, {1899, "明治", 32}, {1900, "明治", 33}, {1901, "明治", 34}, {1902, "明治", 35}, {1903, "明治", 36}, {1904, "明治", 37}, {1905, "明治", 38}, {1906, "明治", 39}, {1907, "明治", 40}, {1908, "明治", 41}, {1909, "明治", 42}, {1910, "明治", 43}, {1911, "明治", 44}, {1912, "明治", 45}, {1913, "大正", 2}, {1914, "大正", 3}, {1915, "大正", 4}, {1916, "大正", 5}, {1917, "大正", 6}, {1918, "大正", 7}, {1919, "大正", 8}, {1920, "大正", 9}, {1921, "大正", 10}, {1922, "大正", 11}, {1923, "大正", 12}, {1924, "大正", 13}, {1925, "大正", 14}, {1926, "大正", 15}, {1927, "昭和", 2}, {1928, "昭和", 3}, {1929, "昭和", 4}, {1930, "昭和", 5}, {1931, "昭和", 6}, {1932, "昭和", 7}, {1933, "昭和", 8}, {1934, "昭和", 9}, {1935, "昭和", 10}, {1936, "昭和", 11}, {1937, "昭和", 12}, {1938, "昭和", 13}, {1939, "昭和", 14}, {1940, "昭和", 15}, {1941, "昭和", 16}, {1942, "昭和", 17}, {1943, "昭和", 18}, {1944, "昭和", 19}, {1945, "昭和", 20}, {1946, "昭和", 21}, {1947, "昭和", 22}, {1948, "昭和", 23}, {1949, "昭和", 24}, {1950, "昭和", 25}, {1951, "昭和", 26}, {1952, "昭和", 27}, {1953, "昭和", 28}, {1954, "昭和", 29}, {1955, "昭和", 30}, {1956, "昭和", 31}, {1957, "昭和", 32}, {1958, "昭和", 33}, {1959, "昭和", 34}, {1960, "昭和", 35}, {1961, "昭和", 36}, {1962, "昭和", 37}, {1963, "昭和", 38}, {1964, "昭和", 39}, {1965, "昭和", 40}, {1966, "昭和", 41}, {1967, "昭和", 42}, {1968, "昭和", 43}, {1969, "昭和", 44}, {1970, "昭和", 45}, {1971, "昭和", 46}, {1972, "昭和", 47}, {1973, "昭和", 48}, {1974, "昭和", 49}, {1975, "昭和", 50}, {1976, "昭和", 51}, {1977, "昭和", 52}, {1978, "昭和", 53}, {1979, "昭和", 54}, {1980, "昭和", 55}, {1981, "昭和", 56}, {1982, "昭和", 57}, {1983, "昭和", 58}, {1984, "昭和", 59}, {1985, "昭和", 60}, {1986, "昭和", 61}, {1987, "昭和", 62}, {1988, "昭和", 63}, {1989, "平成", 1}, {1990, "平成", 2}, {1991, "平成", 3}, {1992, "平成", 4}, {1993, "平成", 5}, {1994, "平成", 6}, {1995, "平成", 7}, {1996, "平成", 8}, {1997, "平成", 9}, {1998, "平成", 10}, {1999, "平成", 11}, {2000, "平成", 12}, {2001, "平成", 13}, {2002, "平成", 14}, {2003, "平成", 15}, {2004, "平成", 16}, {2005, "平成", 17}, {2006, "平成", 18}, {2007, "平成", 19}, {2008, "平成", 20}, {2009, "平成", 21}, {2010, "平成", 22}, {2011, "平成", 23}, {2012, "平成", 24}, {2013, "平成", 25}, {2014, "平成", 26}, {2015, "平成", 27}, {2016, "平成", 28}, {2017, "平成", 29}, {2018, "平成", 30}, {2019, "平成", 31}, {2020, "令和", 2}, {2021, "令和", 3}}

script JGengoKit
  on retJapaneseGengo(aDate as string)
    set dList to parseByDelim(aDate, "/") of me
    
if length of dList is not equal to 3 then error "Date Format Error"
    
    
copy dList to {aYear, aMonth, aDay}
    
    
tell current application
      
      
set aStr to retZeroPaddingText(aYear, 4) of me & retZeroPaddingText(aMonth, 2) of me & retZeroPaddingText(aDay, 2) of me
      
      
set aGengo to ""
      
if aStr ≥ "20190501" then
        set aGengo to "令和"
        
set aGengoNum to aYear – 2019 + 1
      else if aStr ≥ "19890108" then
        set aGengo to "平成"
        
set aGengoNum to aYear – 1989 + 1
      else if aStr ≥ "19261225" then
        set aGengo to "昭和"
        
set aGengoNum to aYear – 1926 + 1
      else if aStr ≥ "19120730" then
        set aGengo to "大正"
        
set aGengoNum to aYear – 1912 + 1
      else if aStr ≥ "18680125" then
        set aGengo to "明治"
        
if aYear = 1868 then
          set aGengoNum to 1
        else if (aYear ≥ 1869) or (aYear ≤ 1912) then
          set aGengoNum to aYear – 1867
        end if
      else
        –日本では明治以降に太陽暦を導入したのでそれ以前は意味がない?
        
set aGengo to "(改暦前)"
        
set aGengoNum to false
      end if
      
      
return {aGengo, aGengoNum}
    end tell
  end retJapaneseGengo
  
  
–数値にゼロパディングしたテキストを返す
  
on retZeroPaddingText(aNum, aLen)
    set tText to ("0000000000" & aNum as text)
    
set tCount to length of tText
    
set resText to text (tCount – aLen + 1) thru tCount of tText
    
return resText
  end retZeroPaddingText
  
  
on parseByDelim(aData, aDelim)
    set curDelim to AppleScript’s text item delimiters
    
set AppleScript’s text item delimiters to aDelim
    
set dList to text items of aData
    
set AppleScript’s text item delimiters to curDelim
    
return dList
  end parseByDelim
end script

★Click Here to Open This Script 

Posted in Calendar | Tagged 10.13savvy 10.14savvy 10.15savvy | Leave a comment

1867/1/1〜1887/12/31までの範囲のdateオブジェクトからyear, month, dayを取り出すと-1日される?

Posted on 1月 22, 2020 by Takaaki Naganoya

過去のdateオブジェクトを検証する機会があり(明治の元号計算が合っていない件)、いろいろ検証していたところ、1867/1/1から1887/12/1までのdateオブジェクトからyear,month,dayを個別に取り出すと、dayが-1されるという現象が観測されました。

→ 本現象の発生メカニズムはこちら

西暦から和暦に変換する処理で、明治の年が合わないという(自分のプログラム由来の)問題を検討していました。この問題の洗い出しのため、「日」単位で順次和暦変換していたら、そのちょうど(明治→大正など)改元の境目の日付で(原因不明の)計算ミスが起こっていました。

1868/1/25からは明治時代、という判定は行えても、その1868/1/25というdateオブジェクトからYear, Month, Dayの各要素を取り出すと1868, 1, 24という結果に。

以前から「大昔の日付を扱うと問題がありそう」だとは思っていましたが、このように具体的な現象として観測したのは(個人的には)初めてでした(単に覚えていないだけかも)。

確認したのはmacOS 10.14.6とmacOS 10.15.3beta、macOS 10.13.6上ですが、どれも同じ結果になるようです。

# 追試で、OS X 10.7.5でも試してみたところ、同じ結果になりました
# OS X 10.6.8では確認されませんでした

未来のdateオブジェクトは2050年ぐらいまでチェックしてみたものの、問題はありませんでした。

過去に遡ってうるう日が設定されたとかいう話なんでしょうか? そういう話は聞いたことがないのですが、、、

日本においては太陽暦(グレゴリオ暦)を導入したのが明治元年(1868/1/25〜)なので、それ以前の日付をグレゴリオ歴で求めてもいまひとつ実用性がない(?) ともいえますが、少なくとも1868年から1887年までの間のdateオブジェクトから各種の値の取り出しが期待どおりに行われないのは問題といえるでしょう。

多分、もっと昔の日付も同様にdateオブジェクトからの値取り出しを行うと問題が出ると思われますが、前述のような理由からそこまでの日付を計算させることもないだろうかと。

# ふだん使っているgetMLenInternationalに問題があるのかと考えて、昔使っていたgetMLenを引っ張り出してきましたが、こちらはずいぶんと記法がお可愛らしい感じで、、、、

ただ、この件は気がつかなかっただけで、ずいぶん昔から存在している話なのかも????


▲Classic Mac OS 8.6では確認できませんでした(SheepShaver上で動作)この時代にはmonthをas numberで数値にcastできませんでした

AppleScript名:dateTest.scptd
—
–  Created by: Takaaki Naganoya
–  Created on: 2020/01/22
—
–  Copyright © 2020 Piyomaru Software, All Rights Reserved
—

use AppleScript version "2.4"
use scripting additions
use framework "Foundation"

script spd
  property mList : {}
end script

set (mList of spd) to {}
repeat with y from 1867 to 1888
  repeat with m from 1 to 12
    set aLen to getMlen(y, m) of me
    
repeat with d from 1 to aLen
      set aTmpStr to (y as string) & "/" & (m as string) & "/" & (d as string)
      
set aTmpD to date aTmpStr
      
      
set tmpY to year of aTmpD
      
set tmpM to month of aTmpD as number
      
set tmpD to day of aTmpD
      
      
if (tmpY is not equal to y) or (tmpM is not equal to m) or (tmpD is not equal to d) then
        set the end of (mList of spd) to {aTmpD, tmpY, tmpM, tmpD}
      end if
    end repeat
  end repeat
end repeat

return (mList of spd)
–> {{date "1867年1月1日 火曜日 0:00:00", 1866, 12, 31}, …… {date "1887年12月31日 土曜日 0:00:00", 1887, 12, 30}}

–現在のカレンダーで指定年月の日数を返す
on getMlenInternational(aYear as integer, aMonth as integer)
  set theNSCalendar to current application’s NSCalendar’s currentCalendar() — do *not* use initWithCalendarIdentifier:
  
set theDate to theNSCalendar’s dateWithEra:1 |year|:aYear |month|:aMonth |day|:1 hour:0 minute:0 |second|:0 nanosecond:0
  
set theResult to theNSCalendar’s rangeOfUnit:(current application’s NSDayCalendarUnit) inUnit:(current application’s NSMonthCalendarUnit) forDate:theDate
  
return |length| of theResult
end getMlenInternational

–指定年の指定月の日数を求める
on getMlen(aYear, aMonth)
  set aYear to aYear as number
  
set aMonth to aMonth as number
  
  
set aDat to (aYear as text) & "/" & (aMonth as text) & "/1"
  
if aMonth is 12 then
    set eDat to ((aYear + 1) as text) & "/" & (1 as text) & "/1"
  else
    set eDat to ((aYear as text) & "/" & (aMonth + 1) as text) & "/1"
  end if
  
  
set eDat to date eDat
  
set eDat to eDat – 1
  
  
set mLen to day of eDat
  
return mLen
end getMlen

★Click Here to Open This Script 

Posted in Calendar History | Tagged 10.13savvy 10.14savvy 10.15savvy | 1 Comment

Keynoteで選択中の画像を特定する

Posted on 1月 22, 2020 by Takaaki Naganoya


Keynoteの書類上で選択中のオブジェクト(image)を特定するAppleScriptです。

Keynoteには、選択中のオブジェクトを求めるという重要な機能「selection」が実装されていません。一応、最新版のKeynoteには「selection」の予約語が存在しているものの、slide中の選択オブジェクトではなく「選択中のスライド」が返ってきます。current slideとほぼ同じ動作です。これでは実用性がいまひとつです。

ないと困るselection(get selected object)ですが、実装されていないのは仕方ありません。

そのものズバリの機能が存在していないものの、他のやりかたで選択中の画像を特定してみました。数が少なかったり重複するものが存在していない場合には有効のようです。

本Scriptでは、Keynote書類上で選択中の画像があるという前提の上で、GUI Scripting経由でコピーを行い、選択対象をクリップボードに入れます。このクリップボード内の画像のサイズを取得。次に、現在のKeynote書類の現在のスライド(ページ)上の画像(imageオブジェクト)のサイズを取得し、順次照合。同じサイズのものがあれば、それが選択中のオブジェクトであると類推します。

かなり穴の多いロジックですが、最初の一歩としては悪くないでしょう。とりあえずは、サイズで比較を行い、同一のものがあれば画像同士の類似性を計算するといった方法も検討できそうです。

お手上げになってしまうのは、画像サイズや内容ともに同一のものが複数あった場合です。その場合を除けば割と識別できそうに思えます。

また、ながらく調査を行なってきた「ローカライズ言語に依存しないGUI Scripting」を用いて選択中のオブジェクトのコピーができるとよさそうです。

AppleScript名:Keynoteで選択中の画像を特定する.scptd
—
–  Created by: Takaaki Naganoya
–  Created on: 2020/01/22
—
–  Copyright © 2020 Piyomaru Software, All Rights Reserved
—
use AppleScript version "2.7"
use scripting additions
use framework "Foundation"
use framework "AppKit"

set kRes to getSelectedImage() of me
–> image 3 of slide 24 of document id "534F4E65-4459-4B00-95D4-34C3E020467E"

on getSelectedImage()
  my executeKeynoteItemCopy() –Execute Copy From Menu
  
  
–クリップボードの内容をNSImageに
  
set aNSIMage to my getClipboardASImage()
  
if aNSIMage = false then
    return false
  end if
  
  
–クリップボード中のNSImageのサイズを取得
  
set aSize to aNSIMage’s |size|()
  
set selWidth to (aSize’s width) as real
  
set selHeight to (aSize’s height) as real
  
  
–Keynoteの最前面のドキュメントの現在のスライド上の画像からサイズを取得してクリップボード内の画像サイズと照合する
  
tell application "Keynote"
    tell front document
      tell current slide
        set iList to every image
        
        
repeat with i in iList
          set myHeight to (height of i) as real
          
set myWidth to (width of i) as real
          
if {myWidth, myHeight} = {selWidth, selHeight} then
            return contents of i
          end if
        end repeat
      end tell
    end tell
  end tell
  
return false
end getSelectedImage

— クリップボードの内容をNSImageとして取り出して返す
on getClipboardASImage()
  set theNSPasteboard to current application’s NSPasteboard’s generalPasteboard()
  
set theAttributedStringNSArray to theNSPasteboard’s readObjectsForClasses:({current application’s NSImage}) options:(missing value)
  
if theAttributedStringNSArray = {} then return false
  
set theNSAttributedString to theAttributedStringNSArray’s objectAtIndex:0
  
return theNSAttributedString
end getClipboardASImage

on executeKeynoteItemCopy()
  activate application "Keynote"
  
tell application "System Events"
    tell process "Keynote"
      –click menu item "Copy" of menu 1 of menu bar item "Edit" of menu bar 1
      
click menu item "コピー" of menu 1 of menu bar item "編集" of menu bar 1
    end tell
  end tell
end executeKeynoteItemCopy

★Click Here to Open This Script 

Posted in Clipboard GUI Scripting Image | Tagged 10.14savvy 10.15savvy Keynote NSImage NSPasteboard | Leave a comment

AirSharingLib Script Library

Posted on 1月 22, 2020 by Takaaki Naganoya

AppleScriptからAirDrop経由で他のMacやiPhone、iPadなどのiOSデバイスとファイル共有するAppleScript Library「AirSharingLib」v1.0です。

–> Download airsharinglib(To ~/Library/Script Libraries/)

もともとの内容はhttp://www.macosautomation.comに掲載されている「Sharing Utilities」ですが、現在のmacOS用に一部書き換えたのと、WiFiの強制パワーオンなどの機能を追加しています。

AirDrop経由のファイル共有については、さまざまな場面で必要になりますし、複数ファイルを指定してAirDrop共有するのはGUI側(Finder側)から行うのはなかなか操作が煩わしいので、AppleScriptから操作できると便利です。

そうしたAirDrop共有のためのAppleScriptライブラリが存在していることは重要なのですが、Sharing Utilityだといまひとつ古くなりすぎているので、さまざまなプログラムで参照するのに問題が出てくるように感じていました。

そのため、あらためてSharing Utilityとは別のライブラリをでっち上げた次第です。

AppleScript名:sample1
—
–  Created by: Takaaki Naganoya
–  Created on: 2020/01/20
—
–  Copyright © 2020 Piyomaru Software, All Rights Reserved
–  http://www.piyocast.com
use AppleScript version "2.7" –10.13 or later
use framework "Foundation"
use scripting additions
use airLib : script "AirSharingLib"

set fileList to (choose file with prompt "You can select multiple files with folding [SHIFT] key" with multiple selections allowed)

share with air fileList

★Click Here to Open This Script 

Posted in AirDrop Script Libraries | Tagged 10.14savvy 10.15savvy | 1 Comment

Post navigation

  • Older posts
  • Newer posts

電子書籍(PDF)をオンラインストアで販売中!

Google Search

Popular posts

  • 開発機としてM2 Mac miniが来たのでガチレビュー
  • macOS 15, Sequoia
  • Pages本執筆中に、2つの書類モード切り替えに気がついた
  • Numbersで選択範囲のセルの前後の空白を削除
  • メキシカンハットの描画
  • Pixelmator Pro v3.6.4でAppleScriptからの操作時の挙動に違和感が
  • AppleScriptによる並列処理
  • macOS 15でも変化したText to Speech環境
  • Safariで「プロファイル」機能を使うとAppleScriptの処理に影響
  • デフォルトインストールされたフォント名を取得するAppleScript
  • AppleScript入門③AppleScriptを使った「自動化」とは?
  • 【続報】macOS 15.5で特定ファイル名パターンのfileをaliasにcastすると100%クラッシュするバグ
  • macOS 15 リモートApple Eventsにバグ?
  • Script Debuggerの開発と販売が2025年に終了
  • AppleScript入門① AppleScriptってなんだろう?
  • macOS 14で変更になったOSバージョン取得APIの返り値
  • NSObjectのクラス名を取得 v2.1
  • macOS 15:スクリプトエディタのAppleScript用語辞書を確認できない
  • 有害ではなくなっていたSpaces
  • AVSpeechSynthesizerで読み上げテスト

Tags

10.11savvy (1101) 10.12savvy (1242) 10.13savvy (1391) 10.14savvy (587) 10.15savvy (438) 11.0savvy (283) 12.0savvy (212) 13.0savvy (198) 14.0savvy (151) 15.0savvy (140) CotEditor (66) Finder (51) Keynote (119) NSAlert (61) NSArray (51) NSBitmapImageRep (20) NSBundle (20) NSButton (34) NSColor (53) NSDictionary (28) NSFileManager (23) NSFont (21) NSImage (41) NSJSONSerialization (21) NSMutableArray (63) NSMutableDictionary (22) NSPredicate (36) NSRunningApplication (56) NSScreen (30) NSScrollView (22) NSString (119) NSURL (98) NSURLRequest (23) NSUTF8StringEncoding (30) NSView (33) NSWorkspace (20) Numbers (76) Pages (55) Pixelmator Pro (20) Safari (44) Script Editor (27) WKUserContentController (21) WKUserScript (20) WKWebView (23) WKWebViewConfiguration (22)

カテゴリー

  • 2D Bin Packing
  • 3D
  • AirDrop
  • AirPlay
  • Animation
  • AppleScript Application on Xcode
  • Beginner
  • Benchmark
  • beta
  • Bluetooth
  • Books
  • boolean
  • bounds
  • Bug
  • Calendar
  • call by reference
  • check sum
  • Clipboard
  • Cocoa-AppleScript Applet
  • Code Sign
  • Color
  • Custom Class
  • date
  • dialog
  • diff
  • drive
  • Droplet
  • exif
  • file
  • File path
  • filter
  • folder
  • Font
  • Font
  • GAME
  • geolocation
  • GUI
  • GUI Scripting
  • Hex
  • History
  • How To
  • iCloud
  • Icon
  • Image
  • Input Method
  • Internet
  • iOS App
  • JavaScript
  • JSON
  • JXA
  • Keychain
  • Keychain
  • Language
  • Library
  • list
  • Locale
  • Localize
  • Machine Learning
  • Map
  • Markdown
  • Menu
  • Metadata
  • MIDI
  • MIME
  • Natural Language Processing
  • Network
  • news
  • Noification
  • Notarization
  • Number
  • Object control
  • OCR
  • OSA
  • parallel processing
  • PDF
  • Peripheral
  • process
  • PRODUCTS
  • QR Code
  • Raw AppleEvent Code
  • Record
  • rectangle
  • recursive call
  • regexp
  • Release
  • Remote Control
  • Require Control-Command-R to run
  • REST API
  • Review
  • RTF
  • Sandbox
  • Screen Saver
  • Script Libraries
  • sdef
  • search
  • Security
  • selection
  • shell script
  • Shortcuts Workflow
  • Sort
  • Sound
  • Spellchecker
  • Spotlight
  • SVG
  • System
  • Tag
  • Telephony
  • Text
  • Text to Speech
  • timezone
  • Tools
  • Update
  • URL
  • UTI
  • Web Contents Control
  • WiFi
  • XML
  • XML-RPC
  • イベント(Event)
  • 未分類

アーカイブ

  • 2025年7月
  • 2025年6月
  • 2025年5月
  • 2025年4月
  • 2025年3月
  • 2025年2月
  • 2025年1月
  • 2024年12月
  • 2024年11月
  • 2024年10月
  • 2024年9月
  • 2024年8月
  • 2024年7月
  • 2024年6月
  • 2024年5月
  • 2024年4月
  • 2024年3月
  • 2024年2月
  • 2024年1月
  • 2023年12月
  • 2023年11月
  • 2023年10月
  • 2023年9月
  • 2023年8月
  • 2023年7月
  • 2023年6月
  • 2023年5月
  • 2023年4月
  • 2023年3月
  • 2023年2月
  • 2023年1月
  • 2022年12月
  • 2022年11月
  • 2022年10月
  • 2022年9月
  • 2022年8月
  • 2022年7月
  • 2022年6月
  • 2022年5月
  • 2022年4月
  • 2022年3月
  • 2022年2月
  • 2022年1月
  • 2021年12月
  • 2021年11月
  • 2021年10月
  • 2021年9月
  • 2021年8月
  • 2021年7月
  • 2021年6月
  • 2021年5月
  • 2021年4月
  • 2021年3月
  • 2021年2月
  • 2021年1月
  • 2020年12月
  • 2020年11月
  • 2020年10月
  • 2020年9月
  • 2020年8月
  • 2020年7月
  • 2020年6月
  • 2020年5月
  • 2020年4月
  • 2020年3月
  • 2020年2月
  • 2020年1月
  • 2019年12月
  • 2019年11月
  • 2019年10月
  • 2019年9月
  • 2019年8月
  • 2019年7月
  • 2019年6月
  • 2019年5月
  • 2019年4月
  • 2019年3月
  • 2019年2月
  • 2019年1月
  • 2018年12月
  • 2018年11月
  • 2018年10月
  • 2018年9月
  • 2018年8月
  • 2018年7月
  • 2018年6月
  • 2018年5月
  • 2018年4月
  • 2018年3月
  • 2018年2月

https://piyomarusoft.booth.pm/items/301502

メタ情報

  • ログイン
  • 投稿フィード
  • コメントフィード
  • WordPress.org

Forum Posts

  • 人気のトピック
  • 返信がないトピック

メタ情報

  • ログイン
  • 投稿フィード
  • コメントフィード
  • WordPress.org
Proudly powered by WordPress
Theme: Flint by Star Verte LLC