前回の「買収されました」メッセージを表示するだけのアップデートとは異なり、Apple体制下でのそれらしいアップデート(v3.7)が行われました。
AppleScript用語辞書にも変更が加わっているのですが、

Pixelmatorの各バージョンに設定されていたコードネームを返してくるコマンドが廃止になったようです。そんな機能があったとは知りませんでした。廃止はまぁ、機能的に何も影響がないので妥当なところだろうかと。
前回の「買収されました」メッセージを表示するだけのアップデートとは異なり、Apple体制下でのそれらしいアップデート(v3.7)が行われました。

AppleScript用語辞書にも変更が加わっているのですが、

Pixelmatorの各バージョンに設定されていたコードネームを返してくるコマンドが廃止になったようです。そんな機能があったとは知りませんでした。廃止はまぁ、機能的に何も影響がないので妥当なところだろうかと。
新刊電子書籍「AppleScript基礎テクニック(33)複数のアプリをコントロール」を刊行しました。全74ページ、サンプルAppleScriptアーカイブつき。
→ 販売ページ
macOS上のGUIアプリの書類やウィンドウ中で選択中のオブジェクトを取得し、その情報をもとにAppleScriptで処理を行なって、もとの選択オブジェクトに反映させるといった処理を、日常的に行っています。
このような書き方ができると、まるでAppleScriptによってGUIアプリの機能を拡張しているようにも見えます。実際には外部で処理を行なっていたとしても、使い勝手としては拡張しているように振る舞えます。
ある意味、AppleScriptの備える最強の機能といってもよいでしょう。本書で、この強力なselection機能について、その概要から実例、注意点にいたるまで幅広くご紹介いたします。
PDF 74ページ、Zipアーカイブ添付
■最初に:macOS 13以降では最初にステージマネージャを必ずオフにしてください
macOS 13.x
macOS 14.x
macOS 15.x
その他、オフにすることが望ましい機能
■アプリ上の選択中のオブジェクトにアクセスする予約語「selection」
GUIアプリ上の選択中のオブジェクトを知る
選択中のオブジェクトは、1つだけじゃない
選択中のオブジェクトを加工することも
選択中のオブジェクトの情報分析
■選択中のオブジェクトの情報をもとに他のアプリで処理
selection系の機能をサポートしているアプリ一覧
selectを含む予約語を持つアプリと予約語①
selectを含む予約語を持つアプリと予約語②
selectを含む予約語を持つアプリと予約語③
■selectionの主な実例
selectionの取得方法①(Finder)
selectionの取得方法②(Finder)
selectionの書き換え①(Finder)
selectionの書き換え②(Finder)
selectionの取得方法③(Finder)
selectionの取得方法(住所録)
selectionの書き換え(住所録)
selectionの書き換え(住所録)
selectionの取得方法①(Keynote)
selectionの取得方法②(Keynote)
selectionの書き換え(Keynote)
selectionの取得方法①(ミュージック)
selectionの取得方法②(ミュージック)
selectionの書き換え(ミュージック)
selectionの取得方法①(CotEditor)
selectionの取得方法②(CotEditor)
selectionの書き換え(CotEditor)
selectionの取得方法①(Numbers)
selectionの取得方法②(Numbers)
active sheetの取得方法(Numbers)
selection rangeの取得方法①(Numbers)
selection rangeの取得方法②(Numbers)
selection rangeのセル内容書き換え①(Numbers)
selection rangeのセル内容書き換え②(Numbers)
selection rangeのセル内容書き換え③(Numbers)
selectionの取得方法①(Excel)
selectionの取得方法②(Excel)
選択中のワークシートの取得方法(Excel)
selectionの書き換え(Excel)
selectionの取得方法(Pixelmator Pro)
select-を含む予約語解説①(Pixelmator Pro)
select-を含む予約語解説②(Pixelmator Pro)
select-を含むコマンド実例①(Pixelmator Pro)
select-を含むコマンド実例②(Pixelmator Pro)
select-を含むコマンド実例③(Pixelmator Pro)
select-を含むコマンド実例④(Pixelmator Pro)
select-を含むコマンド実例⑤(Pixelmator Pro)
select-を含むコマンド実例⑥(Pixelmator Pro)
select-を含むコマンド実例⑦(Pixelmator Pro)
select-を含むコマンド実例⑧(Pixelmator Pro)
select-を含むコマンド実例⑨(Pixelmator Pro)
select-を含むコマンド実例⑩(Pixelmator Pro)
select-を含むコマンド実例⑪(Pixelmator Pro)
■selectionを使用うえで注意すべき点
注意点1:大量のオブジェクトの受け渡しに要注意
注意点2:情報の書き戻し時には時間がかかる例も
注意点3:選択オブジェクトの種別判定を①
注意点3:選択オブジェクトの種別判定を②
2024年11月1日付けでPixelmator Teamから発表された発表において、同社がAppleに買収されたとのこと。
Conguratulations!
Pixelmator ProなどのソフトウェアがそのままAppleの製品ラインナップに組み込まれるのか(Apertureの後釜)、あるいは既存のApple製品(Photos.appとか?)との融合が行われるのかはいまのところ不明です。
名前は、変わるかもしれないですね>Pixelmator Pro
Pixelmator Proがv3.6.8でHDR画像のサポートを追加しました。
AppleScript用語辞書の比較で確認された変化は以下のとおりです。
・予約語「JPEG」の類義語として「JPG」を追加定義
・HDR画像の予約語を追加(OpenExr、HDR JPEG、HDR HEIC、HDR AVIF、HDR PNG)
・applicationのプロパティとして「load hdr content」を新設
・documentのプロパティとして「display hdr content」を新設
Appleの公式資料によれば、現行機種はHDRに対応しているとのこと。
ただし、接続しているディスプレイによって、
「このディスプレイはHDRコンテンツをサポートしていません」(Mac mini M1+Apple Cinema Display)
「このディスプレイはHDRコンテンツのサポートが制限されています」(MacBook Air M2)
といったように、非対応/対応(不完全対応を含む)と状態が分かれるようです。
対応環境でPixelmator ProのHDRサポート状態を変更してHDR画像をオープンする実験は行なってみました。
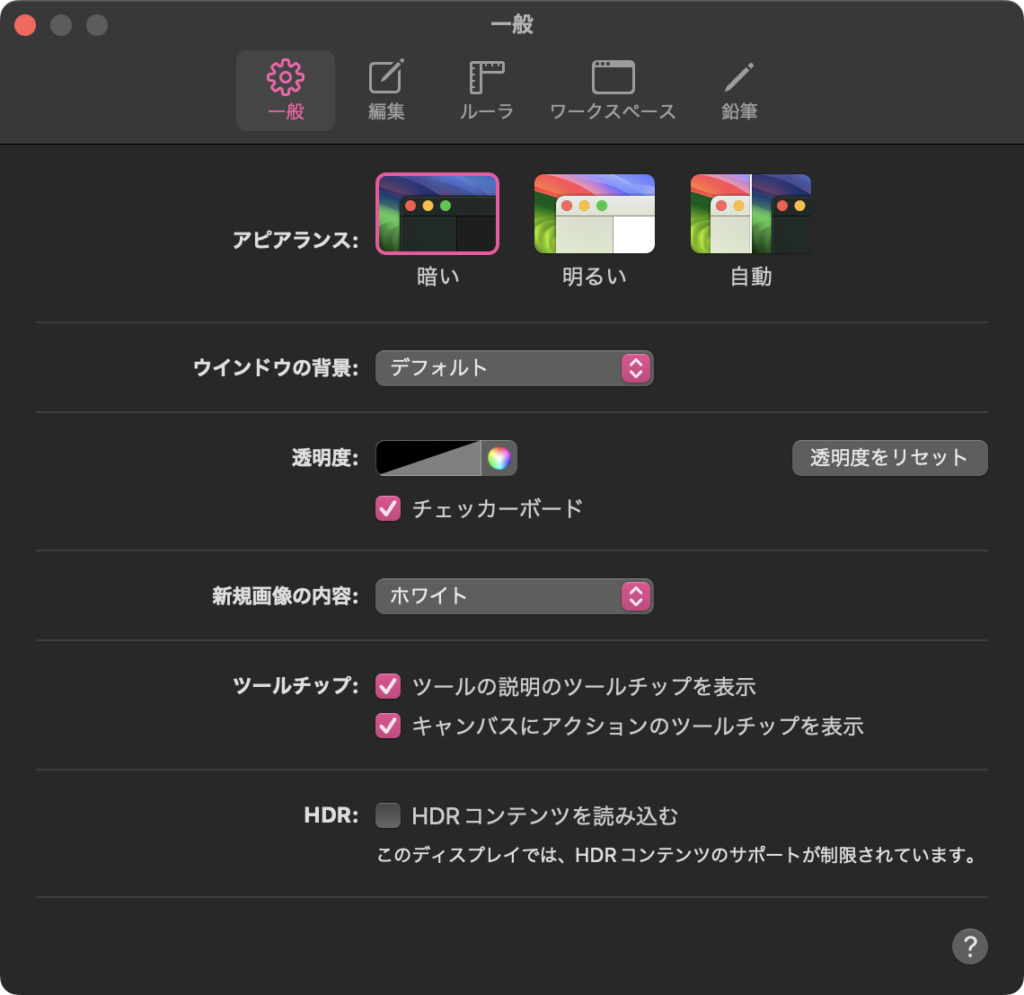
▲Pixelmator Proの設定ウィンドウ HDRコンテンツのサポートが制限されている(MacBook Air M2)と表示
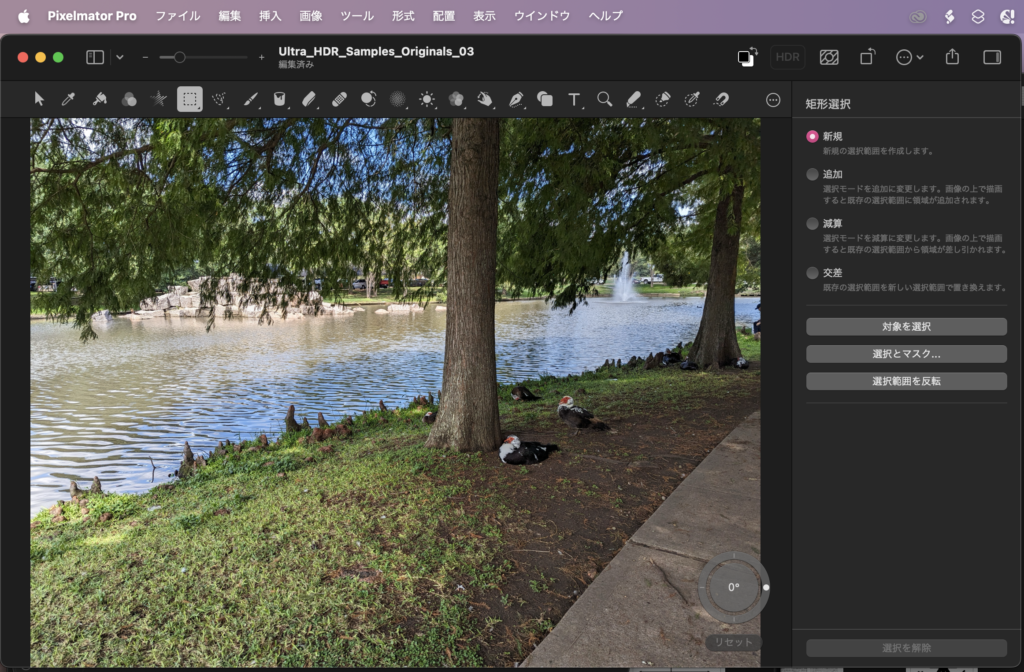
▲Pixelmator ProでサンプルのHDR JPEGをオープンしたところ
| AppleScript名:HDR画像をオープン |
| tell application "Pixelmator Pro" set load hdr content to true set aHDR2 to load hdr content –> true if aHDR2 = false then return set aHDRfile to choose file open aHDRfile end tell |
HDR画像をオープンしても、HDR表示が行われるかどうかは別の管理になっている(documentのプロパティ)ので、そこも設定する必要があるようです。変更すると画面上でわずかに階調表現に変化が見られました(ちょっとだけ)。
| AppleScript名:オープン中のHDR画像をHDR表示する |
| tell application "Pixelmator Pro" –環境チェック set appHDR to load hdr content if appHDR = false then return –HDR画像の表示状態を変更 tell front document set display hdr content to true set docHDR to display hdr content end tell end tell |
電子書籍新刊「AppleScriptでたのしむ レトロ・グラフィック プログラム集」を刊行しました。全154ページ、サンプルAppleScriptアーカイブつき。
→ 販売ページ
1980年代や90年代の8/16ビットPCのBASICで描かせていた、三角関数による各種グラフィックスをAppleScriptで再現。ダイアログで表示するだけでなく、各種GUIアプリ(Keynote、Numbers、Pages、Excel、PowerPoint、Word、Pixelmator Pro)を操作して描画したり、画像書き出ししてAirDropでiOSデバイスに転送するようなサンプルを収録しています。
懐かしのレトロCGの世界を再現
時代を経て感じる郷愁とも異なるテイスト
その昔、十数分かけて描いた三角関数グラフ
1秒以下で終了 vs 6分で終了
最新環境で動くAppleScriptにBASICのプログラムを移植
アップルスクリプトは、構文色分け必須の、色で要素を見分ける環境
最低限の知識でAppleScriptによるグラフィックを
AppleScript書類内に、実行に必要なライブラリを同梱
筆者の関数計算ライブラリ「calcLibAS」内蔵関数
コラム ポケコンエミュレータ“pockemul”
1994年から採用され続けている言語
GUIアプリを操作するために存在。搭載実行環境がとても多い
書き方は、アプリ内に存在する用語辞書を参照
本来の機能を利用するためにはシステム設定で許可する必要が
10.10以降でCocoaを直接呼べるようになったインタプリタ言語
GUI部品を直接操作してアプリを操作する強制操作機能が人気?
Web上のAPIを呼んでクラウド系の機能も利用
AS自体で予約語と機能を記述するライブラリ機能
コラム AppleScriptの世界の全体像 OS機能の最深部からGUIそのものの操作まで
Cocoaの機能を呼び出してメモリ上で画像を作成
NSAlertの上にNSImageViewを作成しグラフィック表示
Cocoaのグラフィックス座標系”
主要なアプリケーションの座標系”
画像ファイルに書き出せば”
他のアプリにコピー&ペースト”
当時は存在していなかった透過画像”
パラメータを変えると動作が変わる”
コラム GUIアプリごとの応答速度の違い
スクリプトエディタでオープンして実行するだけ
必要なライブラリはバンドル内にすべて格納
掲載リストはグラフィックス描画にかかわる箇所のみ
How to use/ダイアログ表示AppleScript
How to use/ファイル出力AppleScript
How to use/ファイル出力+AirDrop AppleScript
How to use/クリップボード転送AppleScript
How to use/各種GUIアプリ操作AppleScript
OS標準搭載の13の実行環境およびサードパーティの数十の実行環境
線画テスト
円画テスト①
円画テスト②
サイクロイド曲線
バラ曲線
パスカルの蝸牛形
リサージュ曲線
ダイヤモンドパターン
アルキメデスの螺旋
メキシカンハット①
メキシカンハット②
メキシカンハット③
メキシカンハット④
コラム マシンごとの実行速度の違い
Pixelmator Proでたまに実行する「1024×1024の画像からアイコン用の各種解像度の画像を作成する」AppleScriptですが、Pixelmator Pro v3.6.4で久しぶりに動かしたら、エラーが出てうまく動かなくなっていました。
このAppleScriptは、1024×1024の画像をオープンした状態で実行するものです。
すぐに、各サイズにリサイズしつつ、ファイル名に解像度を反映させた状態で書き出しを行います。
| AppleScript名:アイコン書き出しv2.scptd |
| — – Created by: Takaaki Naganoya – Created on: 2020/10/19 — – Copyright © 2020 Piyomaru Software, All Rights Reserved — use AppleScript version "2.4" — Yosemite (10.10) or later use framework "Foundation" use scripting additions set resolList to {1024, 512, 256, 128, 64, 32, 16} set aTargFileBase to (choose file name with prompt "Select Export base name") as string tell application "Pixelmator Pro" if (exists of document 1) = false then display dialog "There is no document" buttons {"OK"} default button 1 with icon 1 return end if tell front document set aWidth to width set aHeight to height if {aWidth, aHeight} is not equal to {1024.0, 1024.0} then display dialog "Wrong Image Size (1024×1024 required)" buttons {"OK"} default button 1 with icon 2 with title "Size Error" return end if repeat with i in resolList resize image width i height i resolution 72 algorithm bilinear export to file (aTargFileBase & "_" & (i as string) & "x" & (i as string) & ".png") as PNG undo end repeat end tell end tell |
これが、macOS 13.6.8+Pixelmator Pro v3.6.4の組み合わせで実行したらエラーが出て実行できなくなっていました。
問題点は割と明らかです。documentへのtellブロック内で、documentをパラメータとして要求するexportといったコマンドを実行したときに、tellブロックを認識せず、コマンドの直後にdocumentオブジェクトを表記しないとエラーになります。
解決策は、tellブロックでdocumentを指定するのをやめて、コマンドのパラメータとしてfront documentといったオブジェクトを表記することです。または、「属性値 of it」のようにdocumentへの参照を記述しておくことです(他の言語のユーザーが腰を抜かすので、なるべくitは使わないで記述していますが……)。
これで解決できるものの、macOS側で問題を起こしているのか、Pixelmator Pro側で問題を起こしているのかがわかりにくいところ。
おそらく、Pixelmator Pro側の問題かと思われますが、言い切ることもできないでしょう。
| AppleScript名:アイコン書き出しv3.scptd |
| — – Created by: Takaaki Naganoya – Created on: 2020/10/19 – Modified on: 2024/07/11 — – Copyright © 2020-2024 Piyomaru Software, All Rights Reserved — use AppleScript version "2.4" — Yosemite (10.10) or later use framework "Foundation" use scripting additions set resolList to {1024, 512, 256, 128, 64, 32, 16} set aTargFileBase to (choose file name with prompt "Select Export base name") as string tell application "Pixelmator Pro" if (exists of document 1) = false then display dialog "There is no document" buttons {"OK"} default button 1 with icon 1 return end if tell the front document set aWidth to width set aHeight to height end tell if {aWidth, aHeight} is not equal to {1024.0, 1024.0} then display dialog "Wrong Image Size (1024×1024 required)" buttons {"OK"} default button 1 with icon 2 with title "Size Error" return end if repeat with i in resolList resize image front document width i height i resolution 72 algorithm bilinear export front document to file (aTargFileBase & "_" & (i as string) & "x" & (i as string) & ".png") as PNG undo end repeat end tell |
Pixelmator Pro上でオープン中の2つの書類のレイヤー表示状態をシンクロさせるAppleScriptです。
ちょうど、「ゆっくりAppleScript解説」の続刊を作成中で、レイヤー別に部品が分かれている書類(すべてのレイヤー名は同じ)の表情を「同じ状態」にするのが面倒です。
正直なところ、表情名を入力すると該当するレイヤーを表示状態にしてほしいぐらいです。
そこまで行かないにせよ、1つの書類に対して行ったレイヤー表示操作を、もう一度別の書類に対して行わなくてはならないのは大変です(2つの書類を統合して、キャラクター別の差異をレイヤーで吸収するという手もありますが、、、)。
そこで、2つの書類をオープンしておき、最前面の書類のレイヤー表示状態(=表情の操作)を他方の書類に反映させるAppleScriptを書いてみました。
Pixelmator Proバージョン3.3.6に対してレイヤーの取得を指令してみましたが、なかなか大変です。再帰処理で一番上から末端まで、表示状態になっているレイヤーだけを抽出できるかと考えていたのですが、そうもいきません。
再帰処理がダメなので、もうレイヤー名を決め打ちで指定するようにして(つまり、この用途以外には使えないものと割り切って)、各レイヤーグループ内を走査するように記述しました。
| AppleScript名:同一名、同一構造の2つの書類のレイヤー表示状況をシンクロ.scpt |
| — – Created by: Takaaki Naganoya – Created on: 2023/06/06 — – Copyright © 2023 Piyomaru Software, All Rights Reserved — use AppleScript version "2.4" — Yosemite (10.10) or later use framework "Foundation" use scripting additions tell application "Pixelmator Pro" set allD to {} set dList to name of every document –> {"ゆっくり素材れいむ.pxd", "ゆっくり素材まりさ.pxd"} tell front document set d1Name to name of it if d1Name contains "れいむ" then set d2Name to retAnItemByCond(dList, "れいむ") of me else set d2Name to retAnItemByCond(dList, "まりさ") of me end if tell layer "root" tell layer "顔" set dList to every layer repeat with i in dList set j to contents of i tell j set ddList to (name of every layer whose visible is true) if ddList is not equal to {} then set aCon to contents of first item of ddList set the end of allD to {"root", "顔", name of j, aCon} end if end tell end repeat end tell end tell end tell tell document d2Name repeat with i in allD copy i to {L1, L2, L3, L4} tell layer L3 of layer L2 of layer L1 set tmpL to name of every layer repeat with ii in tmpL set jj to contents of ii tell layer jj if jj = L4 then set visible to true else set visible to false end if end tell end repeat end tell end repeat end tell end tell on retAnItemByCond(aList, aParam) repeat with i in aList set j to contents of i if j does not contain aParam then return j end if end repeat end retAnItemByCond |
スクリプトメニューやService Stationなど、「メニューやウィンドウを持たないGUIなしツール」がたくさんmacOS環境にありますが、macOS 12.4上ではこれらのAppleScript起動ツールから起動したAppleScriptから、UniformtypeIdentifiers.frameworkを用いたUTIの取得をブロックされているようです。
スクリプトメニューで実行を確認した(途中までで実行がブロックされてしまった)AppleScriptを、スクリプトエディタ上で実行したところ、問題なく実行されます。ちなみに、内容は選択した画像ファイルをPixelmator Proで超解像処理してクリップボードに設定する(コピーする)という「おかわいらしい」内容のものです。
Service Stationは、コンテクストメニューからのAppleScript実行を可能にするAppleScript実行ツールですが、これについてもしかるべきハンドラを書いて同じAppleScriptを実行させるようにしてみたものの、UTIの取得をブロックされるようです。
→ 追試で、Terminal.app上からosascript経由で実行してみたところ、UniformtypeIdentifiers.frameworkの呼び出しに失敗することが判明
明示的にMain threadで実行しないとダメ???>UniformtypeIdentifiers.framework
| AppleScript名:🟧選択中の画像を超解像💝処理してコピー.scpt |
| — – Created by: Takaaki Naganoya – Created on: 2021/03/25 — – Copyright © 2021 Piyomaru Software, All Rights Reserved — use AppleScript version "2.8" — Yosemite (10.10) or later use framework "Foundation" use framework "UniformtypeIdentifiers" use scripting additions property |NSURL| : a reference to current application’s |NSURL| property NSArray : a reference to current application’s NSArray property NSPredicate : a reference to current application’s NSPredicate property NSURLTypeIdentifierKey : a reference to current application’s NSURLTypeIdentifierKey set acceptUTI to "public.image" set aFile to choose file (* tell application "Finder" set aFile to first item of (selection as alias list) end tell *) –set aUTI to getUTIFromFile(aFile) of me –選択ファイルからUTIを –display dialog aUTI –if aUTI is equal to missing value then return –set uRes to filterUTIList({aUTI}, acceptUTI) of me –選択ファイルのUTIが、受付可能UTIに含まれるかどうかチェック –if uRes is equal to {} then return –選択したファイルが画像ではなかった –掃除 tell application "Pixelmator Pro" to close every document without saving –取得した画像を超解像処理してコピー tell application "Pixelmator Pro" try open aFile on error close every document without saving return end try tell front document with timeout of 3000 seconds super resolution end timeout end tell end tell tell application "Pixelmator Pro" tell front document select all copy close without saving end tell end tell on getUTIFromFile(aFile) set aPath to POSIX path of aFile set aWS to current application’s NSWorkspace’s sharedWorkspace() set pRes to (aWS’s isFilePackageAtPath:aPath) as boolean if pRes = false then set superType to (current application’s UTTypeData) else set superType to (current application’s UTTypePackage) end if set pathString to current application’s NSString’s stringWithString:aPath set aExt to (pathString’s pathExtension()) as string set aUTType to current application’s UTType’s typeWithFilenameExtension:aExt conformingToType:(superType) set aUTIstr to aUTType’s identifier() as string return aUTIstr end getUTIFromFile –UTIリストが指定UTIに含まれているかどうか演算を行う on filterUTIList(aUTIList, aUTIstr) set anArray to NSArray’s arrayWithArray:aUTIList set aPred to NSPredicate’s predicateWithFormat_("SELF UTI-CONFORMS-TO %@", aUTIstr) set bRes to (anArray’s filteredArrayUsingPredicate:aPred) as list return bRes end filterUTIList |
いまひとつ、「こういう表現を行いたいんだけど、どう操作していいのかわからない」感のあるPixelmator Pro。毎回、メニューを漁っては「これ、どう作るんだろうーなー」という手探り感があります。
Photoshopで育って、どっぷりPhotoshopで画像処理を理解した人がPixelmator Proを理解するのに、敷居の高さを感じます。これ、絶対に「こういう完成物を作りたい」という人向けに「こういう手順で操作すればいい」というマニュアル的なものが必要です。
さて、Pixelmator Proの新バージョンv2.4.1が登場。機械学習を利用した人物写真の自動切り抜き機能が目玉のようです。
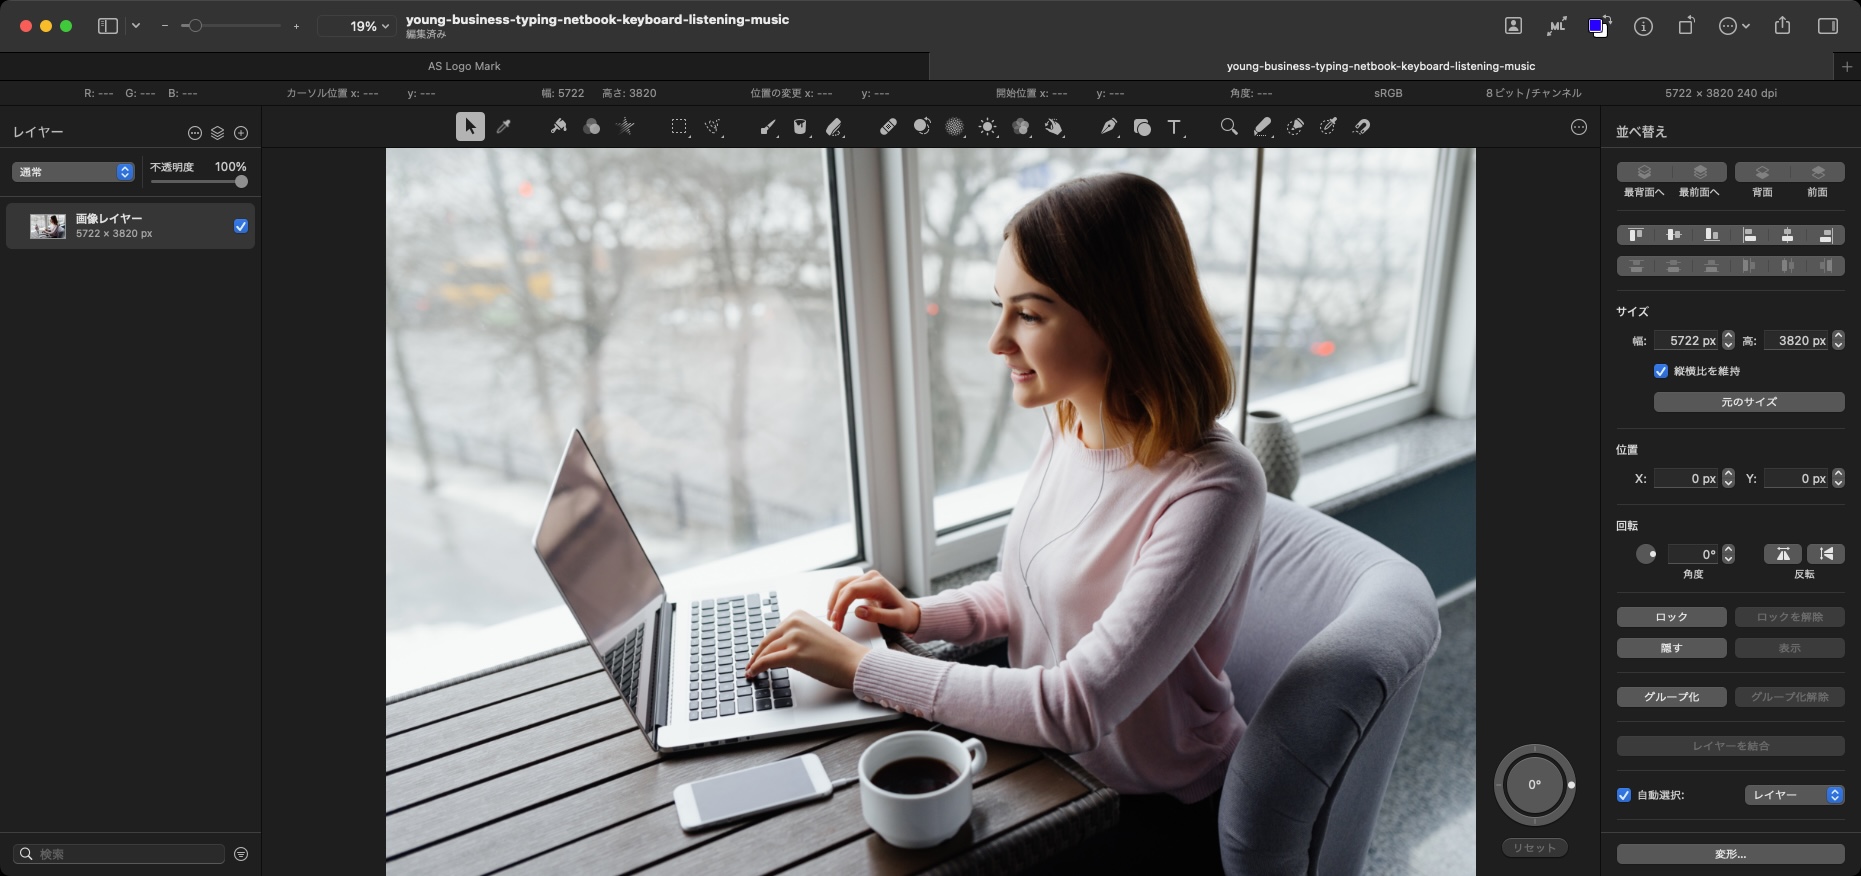

Student with laptop photo created by freepic.diller – www.freepik.com
おお!まつげの箇所だけちょっと切れてしまったけど、これはいい感じ!
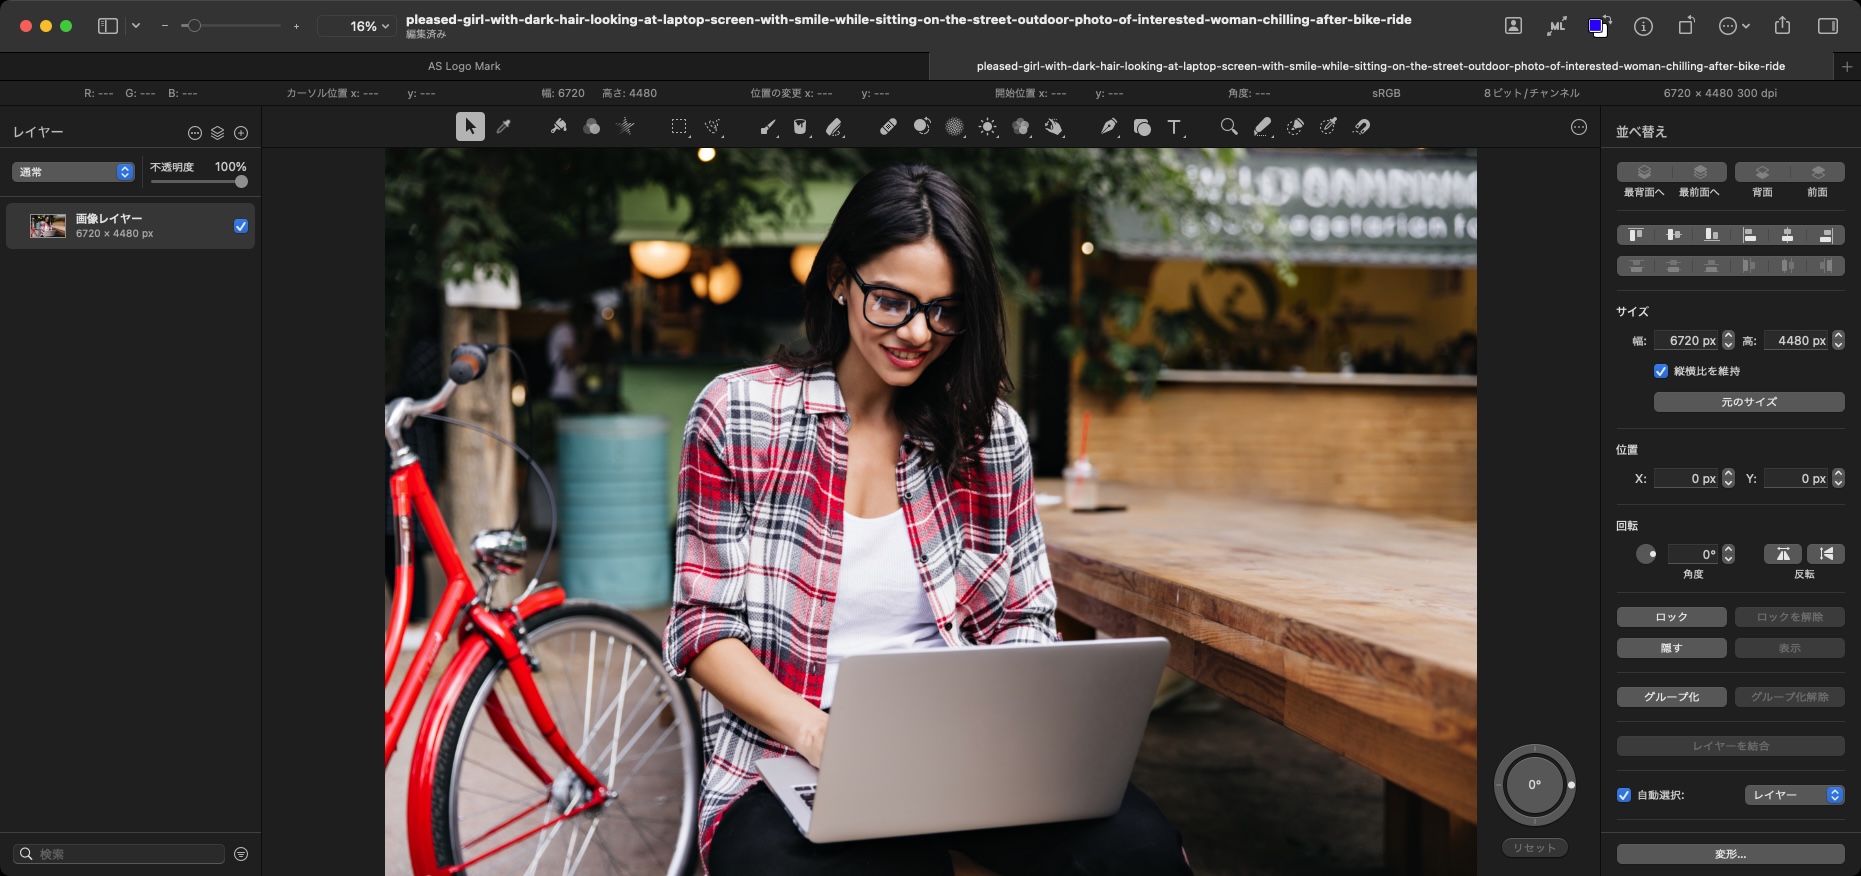

Lookstudio – jp.freepik.com によって作成された people 写真
上半身はほぼ完璧! こーれーはすごい。
いろんなスナップ写真を切り抜かせてみましたが、人物の全身が写っているとヒット率が高いようです。つまり、おかしな箇所を切り抜かれる危険性が低くなるということです。白いTシャツが抜ける危険性が高いようで、、、
export formatに「Motion」(Motion project.)が追加された
コマンド「select subject」追加。
コマンド「smart refine selection」追加。
コマンド「remove background」追加。
エレメント「color adjustments layer」「effects layer」追加。
クラス「image layer」がコマンド「remove background」と「decontaminate colors」に応答するようになった。
クラス「group laye」に要素「color adjustments layer」「effects layer」を追加
クラス「color adjustments layer」「effects layer」を追加
コマンド「draw elliptical selection」の同義語(draw oval selection)を廃止
コマンド「resize image」の同義語(adjust size、image size)を廃止
コマンド「resize canvas」の同義語(adjust canvas、canvas size)を廃止
冒頭の人物自動切り抜きを行うAppleScriptを書いてみると、こんな感じです。Pixelmator ProのAppleScript用語辞書にもサンプルScriptが掲載されています。
| AppleScript名:人物自動切り抜き.scpt |
| tell application "Pixelmator Pro" tell front document remove background –v2.4.1 or later end tell end tell |
Pixelmator Pro v2.0.8で追加された3D LUT(Look Up Table)によるカラー調整機能。これを用いて、複数の3D LUTファイルによるカラー調整を行い、それぞれ3D LUTファイルのファイル名を反映させて書き出すAppleScriptです。
3D LUTファイルは、探してみるとあちこちで配布されており、割とありふれた存在のようです。実際にフリー配布されている3D LUTファイルをダウンロードしてきて、1つのフォルダに入れておき、指定画像に対してカラー調整を行わせてみました。
–> [全てフリー!] シネマティックなルックになる10のLUTsを紹介します!!
フォルダに入っている3D LUTファイルをすべてループで処理するので、3D LUTファイル100個でも1,000個でも処理できますし、ちょっと書き換えれば複数の画像に対してそれぞれすべての3D LUTファイルによる色調整を実行するようにもできます。
| AppleScript名:指定の画像を複数の3D LUTでカラー調整して画像書き出し.scpt |
| — – Created by: Takaaki Naganoya – Created on: 2020/05/02 — – Copyright © 2020 Piyomaru Software, All Rights Reserved — use AppleScript version "2.4" — Yosemite (10.10) or later use framework "Foundation" use scripting additions property |NSURL| : a reference to current application’s |NSURL| property NSArray : a reference to current application’s NSArray property NSPredicate : a reference to current application’s NSPredicate property NSURLTypeIdentifierKey : a reference to current application’s NSURLTypeIdentifierKey –処理対象の画像を選択 set anImage to choose file of type {"public.image"} default location (path to pictures folder) with prompt "Select Proc Image" set imgParent to getParentPathFromAlias(anImage) of me –3D LUTファイルを入れてあるフォルダを選択 set lutFolder to choose folder with prompt "Select 3D LUT folder" –Filter 3D LUT (.cube) files only tell application "Finder" set fList to (every file of folder lutFolder) as alias list end tell set lutList to getFilesWithUTI("com.blackmagicdesign.cube", fList) of me –指定の画像ファイルをオープン tell application "Pixelmator Pro" close every document saving no open anImage end tell –Main Loop repeat with i in lutList set aLut to contents of i –ファイルパスの加工処理 set newImgName to ((current application’s NSString’s stringWithString:(POSIX path of aLut))’s lastPathComponent()’s stringByDeletingPathExtension()’s stringByAppendingString:".jpg") as string set newImgFullPath to (imgParent as string) & "/" & newImgName set newImgFile to POSIX file newImgFullPath tell application "Pixelmator Pro" activate tell front document tell color adjustments of first layer –ここだけ、ネスティングを分割するとエラーになる set its custom lut to aLut end tell export to newImgFullPath as JPEG with properties {compression factor:0.5, bits per channel:8} undo end tell end tell end repeat –後片付け tell application "Pixelmator Pro" tell front document close without saving end tell end tell on getParentPathFromAlias(aliasPath) set aPath to POSIX path of aliasPath set pathString to current application’s NSString’s stringWithString:aPath set newPath to pathString’s stringByDeletingLastPathComponent() return newPath end getParentPathFromAlias on getFilesWithUTI(acceptUTI, aliasList) set aList to {} repeat with i in aliasList set anAlias to i as alias set aUTI to getUTIfromPath(anAlias) of me if aUTI is not equal to missing value then set uRes to filterUTIList({aUTI}, acceptUTI) of me if uRes is not equal to {} then set the end of aList to contents of i end if end if end repeat return aList end getFilesWithUTI –AliasからUTIを求める on getUTIfromPath(anAlias) set aPOSIXpath to POSIX path of anAlias set aURL to current application’s |NSURL|’s fileURLWithPath:aPOSIXpath if aURL = missing value then return missing value set aRes to aURL’s resourceValuesForKeys:{current application’s NSURLTypeIdentifierKey} |error|:(missing value) if aRes = missing value then return missing value return (aRes’s NSURLTypeIdentifierKey) as string end getUTIfromPath –UTIリストが指定UTIに含まれているかどうか演算を行う on filterUTIList(aUTIList, aUTIstr) set anArray to NSArray’s arrayWithArray:aUTIList set aPred to NSPredicate’s predicateWithFormat_("SELF UTI-CONFORMS-TO %@", aUTIstr) set bRes to (anArray’s filteredArrayUsingPredicate:aPred) as list return bRes end filterUTIList |
Pixelmator Proがv2.0.5からv2.0.8にバージョンアップして、3D LUT(Look Up Table)をサポートしました。
自分は知らなかったのですが、映像や画像の処理時に、色の明度カーブをテーブルで置き換えることで、色の調子を整えたり、「●●っぽい色(光)使い」のデータを他の映像/画像データに統一的に適用させたりと、カラーフィルタ的なものをプログラムではなくデータで表現したもの、と理解しました。カラーコレクション系の技術というか手法で、調べてみるとnVidiaとかAdobeとか、そういう会社が関わってきたようで。
3D LUTのファイル(拡張子「.cube」)のUTIを確認したところ、”com.blackmagicdesign.cube”。ビデオ編集関連のハードウェア/ソフトウェアでさまざまな製品を世に送り出しているBlackMagic Designが仕様の策定を行っているのでしょうか。
この3D LUTをPixelmator Proがサポート。42個のLUTをアプリケーション内で持っているほか、外部の3D LUTファイルを指定することも、Pixelmator書類から3D LUTを生成して書き出すこともできるようです。
AppleScript用語辞書的には、「export as lut」コマンドを新設したことと、「color adjustments」コマンドに「custom lut」を指定するオプションを追加しています。
| AppleScript名:現在オープン中の写真に指定のLUTを反映させる.scpt |
| –Pixelmator Pro用語辞書内に掲載されているサンプルを、読みやすいように書き換えた set lutFile to choose file with prompt "Choose the LUT you’d like to apply to the layer:" of type {"com.blackmagicdesign.cube"} tell application "Pixelmator Pro" tell front document tell color adjustments of first layer –ここだけ、ネスティングを分割するとエラーになる set its custom lut to lutFile end tell end tell end tell |
Githubを調べてみたら、Objective-Cで書かれた「CocoaLUT」というプロジェクトを見つけました。ずいぶん前から(7年以上前から)存在していたようで、自分は寡聞にしてこれを知りませんでした。ひととおり機能に目を通してみると、3D LUTのファイルを読み込んでNSImageにカラー変更を適用するといった処理が行えるようです。AppleScriptからダイレクトにCocoaLUTを呼び出して色変更できそうです。
一応、Pixelmator Proの「謝辞」を見てみたところ、「CocoaLUT」に関する記載はなかったので、Pixelmator Proでこのプロジェクトの成果物を利用しているといったことはなさそうです。
YouTubeにアップしたムービーをご覧いただければわかるように、Pixelmator Proで3D LUTによる色置換処理を行ってみると、とても高速です。
Pixelmator Proの機能「ML Super Resolution」をAppleScriptから呼び出して、指定フォルダ内の画像をすべて超解像処理を行って、機械学習モデルをもとに解像度2倍化を行った画像を別フォルダに書き出すAppleScriptです。
超解像処理を行う対象は、別に画面のスナップショット画像でなくてもよいのですが、効果がわかりやすい用途です。
Keynoteに画面スナップショット画像を貼り付けていたときに、拡大倍率が上がると解像度が足りずに荒くなってしまいました。Retina環境で画面のスナップショットを取ると、けっこう綺麗に拡大できるのですが、等倍表示しかできない(&画面表示解像度を落とすことで2x Retina解像度で画面キャプチャ可能)環境なので、ちょっと困りました。
![]()
▲macOS 11.0、見た目の悪さで使う気が失せるはじめてのmacOS。12.0ではもう少しなんとかしてほしい。とくに、このダイアログ。ダイアログと見分けのつかないウィンドウ。ファイル保存ダイアログとかも
そこで、Pixelmator Proで画像のML Super Resolution機能(超解像機能)を用いてソフトウェアの力で画面スナップショット画像を高解像度化してみました。これが予想を超えていい感じだったので、指定フォルダ以下の画像をすべて処理するようにAppleScriptで処理してみました。
–> Download pixelmatorMLSuperResol(Script Bundle with libraries)
ML Super Resolution処理は自分の使っているIntel Mac(MacBook Pro 10,1)には荷の重い処理でささいな画像でも数秒かかりますが、おそらくApple Silicon搭載Macだと瞬殺でしょう。Core MLの処理が段違いに速いので。
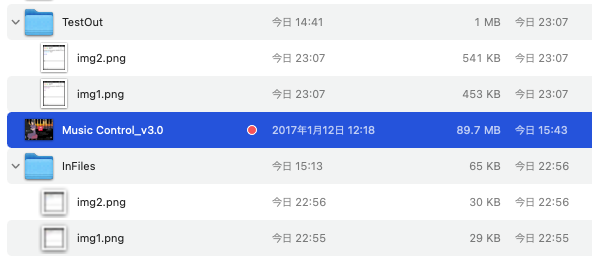
▲オリジナル画像と超解像処理を行なった画像のファイルサイズの違い
本リストは実際にAppleScriptで開発を行う際に記述するコード量そのものを示したものです。本リストには2つのライブラリを利用していますが、ふだんはプログラムリストの再現性(実行できること)を優先して、ライブラリ部分もScript本体に一緒に展開しています。使い回ししている分も同じリストに展開しているので、「たくさん書かないといけない」と思われているようです。
実際には、共通部分はほとんど書いていないので、本処理もこんな(↓)ぐらいの記述量です。リアルな記述量を感じられるような掲載の仕方を考えなくてはいけないのかもしれません。本リストはその試みの第一歩です。
まー、超解像処理を行って72dpiの画面スナップショット画像を144dpiに上げているだけなんで、Retina Display環境で処理すれば不要なんですが、ソフトウェアだけで実現できるのはロマンを感じますし、無駄に2x Retina環境のスクリーンショットを処理して288dpiの高解像度画像に上げてみるとか。
ただ、WWDCのビデオなどを見ていると、画面のスナップショットそのものをベクターグラフィックで取るような仕組みも考えていそうな気配がします。当てずっぽうですが、そういう何かを考えていそうな….
| AppleScript名:画面スナップショット超解像バッチ処理 v1 |
| — – Created by: Takaaki Naganoya – Created on: 2021/03/25 — – Copyright © 2021 Piyomaru Software, All Rights Reserved — use AppleScript version "2.4" — Yosemite (10.10) or later use framework "Foundation" use scripting additions use cPathLib : script "choosePathLib" use imgPicker : script "imgPickerLib" –掃除 tell application "Pixelmator Pro" to close every document without saving –必要なパス情報をユーザーに問い合わせる set {inFol, outFol} to choose multiple path with titles {"Img Folder", "Output Folder"} set outFolStr to outFol as string –画像フォルダから画像のパス一覧を取得 set f1List to getFilepathListByUTI(POSIX path of inFol, "public.image", "alias") of imgPicker –取得した画像を超解像処理して repeat with i in f1List tell application "Pixelmator Pro" open i tell front document with timeout of 3000 seconds super resolution end timeout end tell end tell –新規保存ファイルパスの作成 set pathStr to POSIX path of i set filenameStr to (current application’s NSString’s stringWithString:(pathStr))’s lastPathComponent() as string set savePath to outFolStr & filenameStr tell application "Pixelmator Pro" save front document in file savePath as PNG tell front document close without saving end tell end tell end repeat |
Pixelmator ProでSVGのファイルをPNG形式で書き出すAppleScriptです。
この、ダイアログでファイルを選択して書き出しファイル名を入力させるタイプのAppleScriptをたくさん掲載していますが、もともとAppleScriptの一括処理的なプログラムで、いちいちダイアログを出して1つ1つのファイルを保存させるようなことはやりません。あくまで、サンプルScriptの動作を完結させるための仕様です。
実際には、指定フォルダ以下にあるSVGファイルをSpotlightで抽出して、まとめて書き出し先のフォルダにPNG形式で書き出すといった処理になるでしょう。
SVG方面では1024jpさんのGapplinがあり、こちらもAppleScript対応しており各種操作が行えるようになっているのですが、Sandbox対応度に問題があるためかファイル書き出し操作がAppleScriptから行えていないので、現状では大量のSVG書類の変換にはPhotoshopかPixelmator Proということになりそうです。
SVGを読み込んで他の画像形式に書き出すためのCocoa Frameworkを利用できるとよさそうですが、いまひとつうまく動くものを知りません。
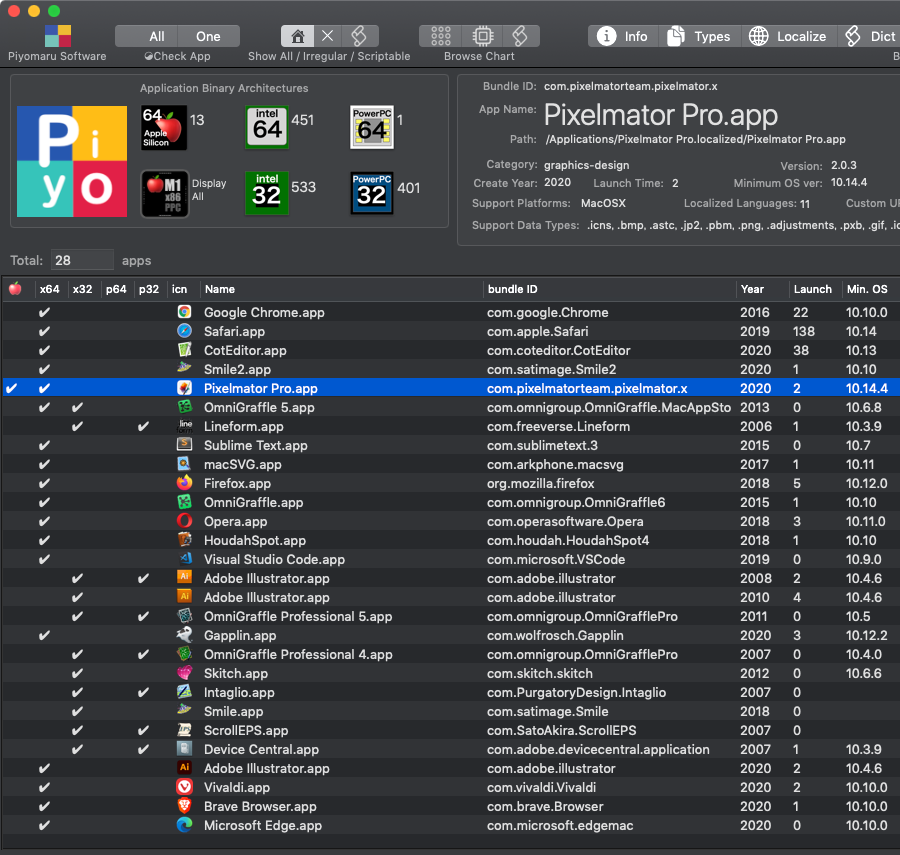
▲SVG対応のアプリケーション。SVGを読めるもの、書けるもの、書き出せるもの、と対応度はさまざま
| AppleScript名:PixelmatorのSVG to PNG変換 |
| — – Created by: Takaaki Naganoya – Created on: 2020/12/01 — – Copyright © 2020 Piyomaru Software, All Rights Reserved — use AppleScript version "2.7" — Yosemite (10.13) or later use framework "Foundation" use scripting additions set aFile to choose file of type {"public.svg-image"} set outPath to choose file name with prompt "select output file name" tell application "Pixelmator Pro" open aFile tell front document export to outPath as PNG close without saving end tell end tell |
| AppleScript名:GaplinのSVG to PNG変換 |
| set aFile to choose file of type {"public.svg-image"} set outPath to choose file name with prompt "select output file name" tell application "Gapplin" open aFile tell front document export to outPath as PNG with options {class:export options, scale:1.0} close without saving end tell end tell |
Pixelmator Pro v2.0.1から2.0.2のバージョンアップ時にAppleScript用語辞書が変更されました。
・select color rangeコマンドにmodeを追加
new selection : Create a new selection.
add selection : Add to the existing selection.
subtract selection : Subtract from the existing selection.
intersect selection : Intersect with the existing selection.
Pixelmator Pro v2.0.2から2.0.3へのバージョンアップ時にはとくに変更はありません。
Pixelmator Proはバージョン1.8でAppleScriptに対応しましたが、その後のアップデートでも用語辞書に変更が加えられています。
v2.0では以前に作ったアイコンの各解像度画像の書き出しScriptがうまく動作していませんでしたが、v2.0.1ではうまく(エラーを出さずに)動作していることを確認しています。バグレポートしてから反映されるまでの時間が短くて、フットワークの軽さに感心しました。こういうところ、Piyomaru Softwareとは比べ物になりません。
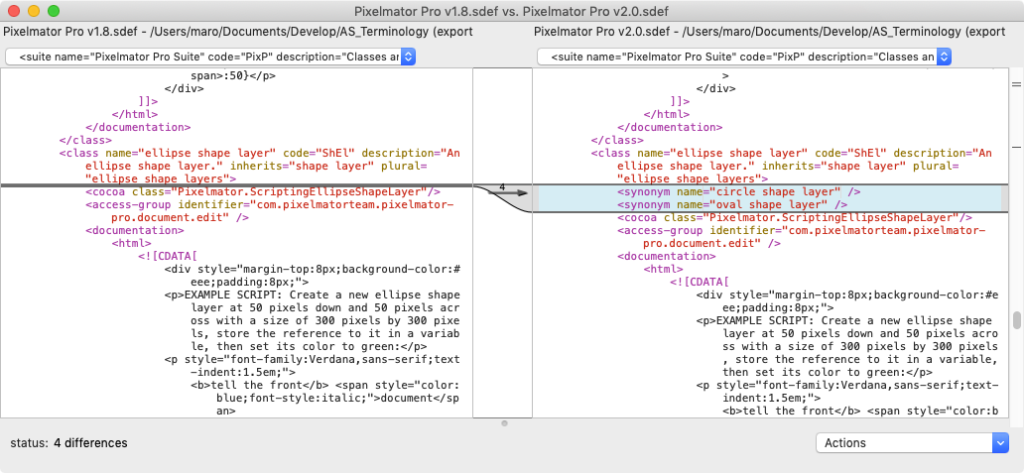
「elipse shape layer」(楕円レイヤー)に同義語(synonym)が追加定義されました。「circle shape layer」「oval shape layer」と入力して構文確認すると「elipse shape layer」として解釈されます。
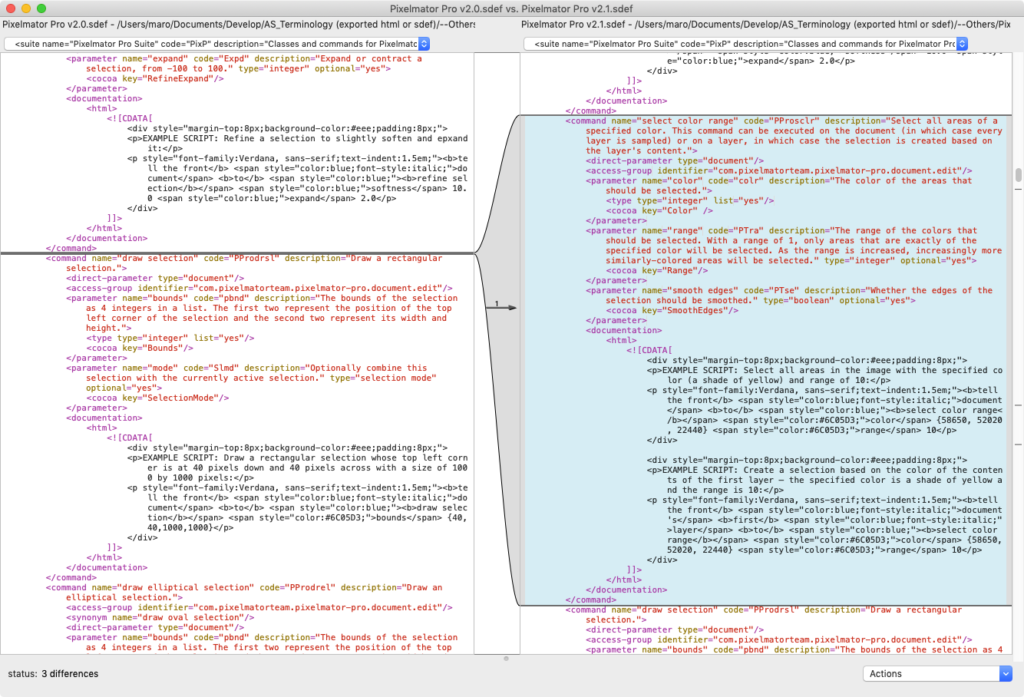
「select color range」コマンドが追加定義されました。写真のようなデータを相手に色域を指定して選択できるようです。このrangeで指定する値が、色差(ΔE)なのか、何か他の指標の数値なのかがいまひとつわかりません。
自分が作った色域指定のAppleScriptでは、文字色の選択のために作ったものなので、もう少し仕様が違います。
select color range v : Select all areas of a specified color. This command can be executed on the document (in which case every layer is sampled) or on a layer, in which case the selection is created based on the layer's content.
select color range document
color list of integer : The color of the areas that should be selected.
[range integer] : The range of the colors that should be selected. With a range of 1, only areas that are exactly of the specified color will be selected. As the range is increased, increasingly more similarly-colored areas will be selected.
[smooth edges boolean] : Whether the edges of the selection should be smoothed.
rangeはrangeとしか書かれていないですね。100を指定するとキャンバス全体が選択されてしまうので、数値範囲は事実上1〜99ということになると思います(AppleScript用語辞書に有効範囲ぐらいは書いておいてほしいなー)。
rangeの値をどう指定するかで、どのぐらいの範囲の「色」を選択できるかが変わってくるので、自分もテストデータの選択色範囲を見ながら値を調整したので、いま指定しているrangeの値が正しいという保証はありません。
もともと、対話的に値を模索するような値なので、画像で使われている色数の分布などの情報をあらかじめ取得して分析しておき、その中でどの程度の色をピックアップするのか知っておく必要があるでしょう。そこまで徹底的に分析してからでないと、このselect color rangeコマンドをバッチ処理的な世界観の中で有効利用することは難しいと思います。
このコマンドを実装するぐらいなら、画像をOCR処理してテキストを取り出して、指定のキーワードが入っているエリアをぼかし処理するといった「OCRフィルタリング」の機能の方がいいかも。画面キャプチャ画像で特定の文字が入っている部分をぼかし処理するパターンがとても多いので、これは自分でも組んでおきたい処理ではあります(OCR次第。OS標準搭載機能だけでなんとかできるとよさそう)。
| AppleScript名:選択中のレイヤーから赤っぽい色を選択.scpt |
| tell application "Pixelmator Pro" tell front document tell current layer select color range color {65535, 0, 0} range 90 end tell end tell end tell |
| AppleScript名:選択中のレイヤーから緑色っぽい色を選択.scpt |
| tell application "Pixelmator Pro" tell front document tell current layer select color range color {0, 65535, 0} range 90 end tell end tell end tell |
| AppleScript名:選択中のレイヤーから青っぽい色を選択.scpt |
| tell application "Pixelmator Pro" tell front document tell current layer select color range color {0, 0, 65535} range 80 end tell end tell end tell |
Pixelmator Proで1024×1024 pixelの画像をmacOSのアプリケーションアイコン素材用に各サイズにリサイズして連続書き出しするAppleScriptです。
Pixelmator ProのAppleScriptプログラミングコンテスト優勝賞品Pixelmator Pro。非破壊画像処理を行い、GPUベースの高速な処理を行うPixelmator Proを実務的な画像処理に使うとどんな感じなのか、いろいろ調べていたらアイコン書き出し用の複数同時解像度書き出し機能などはついていなかったので、さくっと作ってみました。
Photoshopを操作して各種解像度書き出しを行うよりも高速に感じます(厳密にベンチマークを計測したわけではないんですけれども)。
| AppleScript名:Pixelmator Proでアイコン書き出しv2.scptd |
| — – Created by: Takaaki Naganoya – Created on: 2020/10/19 — – Copyright © 2020 Piyomaru Software, All Rights Reserved — use AppleScript version "2.4" — Yosemite (10.10) or later use framework "Foundation" use scripting additions set resolList to {1024, 512, 256, 128, 64, 32, 16} set aTargFileBase to (choose file name with prompt "Select Export base name") as string tell application "Pixelmator Pro" if (exists of document 1) = false then display dialog "There is no document" buttons {"OK"} default button 1 with icon 1 return end if tell the front document set aWidth to width set aHeight to height if {aWidth, aHeight} is not equal to {1024.0, 1024.0} then display dialog "Wrong Image Size (1024×1024 required)" buttons {"OK"} default button 1 with icon 2 with title "Size Error" return end if repeat with i in resolList resize image width i height i resolution 72 algorithm bilinear export to file (aTargFileBase & "_" & (i as string) & "x" & (i as string) & ".png") as PNG undo end repeat end tell end tell |
LateNight Software主催の「Pixelmator Pro AppleScriptコンテスト」で優勝しました。応募作品はPixelmatorもぐらたたきゲームです。
応募するにあたって、まず最初に、「まともにPixelmator Proの機能を活用する」か「Pixelmator Proの機能を無視する」かの2つの方向のどちらを採用するかを考えました。
100行以内というレギュレーションがけっこう厳しかったので、前者のアプローチだとすぐに限界に達するように思われました。それ以前に、使いこなしてもいない、ほぼ初見のアプリケーションを相手に有用なAppleScriptを書くのはほぼ無理といってよいでしょう。実際に対象のアプリケーションを使いこなして、そのアプリケーションが想定しているワークフローをこなしてみて、自分の意図するデータを作って、その作業の中で不満に思ったり効率がよくない点をAppleScriptで補っていくのが「普通のAppleScript」の書かれ方でしょう。
短期間でコンテストに投稿するとなると、ウケ狙いでアプリケーション全体の機能を理解せず一部の機能に着目してまったく関係のない用途のものを作る必要があると判断しました。
もうちょっと使いこなすための期間が長ければ、Pixelmator Proの機能を使い込んで、Pixelmator Proならではのソリューションも出てきたと思います。
なので、Pixelmator Pro AppleScriptコンテストの賞品であるところのPixelmator Pro v1.8を使えれば、「本来こういうものがあるべき」というScriptを書くことも可能だと思われます。
告知ページには、
To celebrate the introduction of AppleScript support in Pixelmator Pro 1.8 I’m giving away three copies of Pixelmator Pro.
と、明記されているので「Pixelmator Pro」(macOS版)が賞品だと思っていたのですが、なぜか送られてきたのが「Pixelmator Photo」(iOS版)のコードで、何か手違いが生じただけだと思いたいのですが、どんなものなんでしょう? → 報告したらちゃんとPixelmator Proのコードが届きました。ねんのため
1999年のMacWorldExpo/Tokyoでデモを行った「FMバトラー」で、すでに「まったくゲーム用ではないアプリケーション(FileMaker Pro)を使ってゲームを作るという経験がありました。
基本的には、Pixelmator Pro書類上に並べたレイヤーの表示状態を制御して、パラパラアニメを表示。その一方でModifier Keyのキースキャンを行なって、ユーザーからの操作を受け取っています。
レギュレーションに「Script Debugger上で動作すること」という項目があり、Modifier Keyのスキャンであれば最前面にいないScript Debuggerでも問題なくスキャンできるため、対応が可能でした。
プログラムは、とにかく短く書くことが課題で、初期段階ではキースキャン部分だけで20行を超えていたものを大幅に短くしています。
もぐら叩きの本体部分もモグラが3段階で迫ってくるという設定を作り、step 1とstep 2の状態でユーザーからの入力があったら「お手つき」的な失敗を行ったという処理をしています。step 3の状態でのみもぐらの撃退が可能で、そのことをデータで表現しています。
set moleList to {{"Mole1", false, 20}, {"Mole2", false, 10}, {"Mole3", true, 20}}
良くも悪くも「Pixelmator Proでゲームを作ろう」という着想自体がすべてであり、プログラム自体はそれほど複雑でも高尚でもありません。
–> Download Piyomaru Whack-3-moles Game(実行に必要なPixelmator Pro書類)
プログラム自体を掲載していてもあまり参考にならないとは思いますが、本来作りたかった「もぐらが同時に3匹出てくるもぐら叩きゲーム」は見てみたいので、より高度なバージョンに書き換えた人がいればぜひ見せてください(^ー^;
最後に、Pixelmator Proもぐらたたきのグラフィックについて。8bit時代のピコピコゲーム(この部分、Google翻訳で非日本語話者に意味が通じるのだろうか?)を彷彿とさせる簡単さで「たいした手数はかけていない」ことが伝わることを重視しています。Pixelmator Proは写真の加工など高い能力を持ったグラフィックソフトなわけですが、あえてグラフィックソフトらしい写実的かつ写真をベースとした生々しいもぐらの絵を使うことは避けました。
また、あからさまにゲームであることがわかるよう背景も単純な色とし、一般的なPixelmator Proの利用シーンとは異なる状況下にあることをユーザーに知らせるように設計しました。絵心のある人ならもっと凝ったグラフィックを描いて表示するはずですが、そういう作り込み要素を排することで「自分にも作れそうだ」という印象を持ってもらうことを重視しています。あと、生き物の殺生を思わせるような生々しい表現(流血とか)は避けています。
| AppleScript名:Mole Game v1.1.1a.scpt |
| – Created by: Takaaki Naganoya – Created on: 2020/09/29 – Copyright © 2020 Piyomaru Software, All Rights Reserved use AppleScript version "2.4" use scripting additions use framework "Foundation" use framework "AppKit" — for NSEvent set aScore to 0 set aMiss to 0 set maxMole to 3 —change mole attack number set delayCount to 300 –delay speed. Faster machine needs larger number. tell application "Pixelmator Pro" activate if (exists of document "Piyomaru Whack-3-moles Game") = false then display dialog "There is no Piyomaru document" buttons {"OK"} default button 1 with icon 1 return end if tell document "Piyomaru Whack-3-moles Game" set visible of layer "Mole1" to false set visible of layer "Mole2" to false set visible of layer "Mole3" to false set visible of layer "Mole3Hit" to false set visible of layer "Mole3Miss" to false repeat 10 times tell layer "Title" set its visible to true set keyRes to keyscanWait(delayCount, true) of me set its visible to false set keyRes to keyscanWait(delayCount, true) of me if keyRes = true then exit repeat end tell end repeat delay 1 set moleList to {{"Mole1", false, 20}, {"Mole2", false, 10}, {"Mole3", true, 20}} repeat maxMole times repeat with i in moleList copy i to {layerName, hitLogic, delayTime} set visible of layer layerName to true set keyRes to keyscanWait((random number from 1 to delayTime) * delayCount, hitLogic) of me set visible of layer layerName to false if keyRes = true then set hitF to true set aScore to aScore + 1 beep set visible of layer "Mole3Hit" to true delay 1 set visible of layer "Mole3Hit" to false exit repeat else if keyRes = false then set aMiss to aMiss + 1 repeat 3 times set visible of layer "Mole3Miss" to true delay 0.5 set visible of layer "Mole3Miss" to false delay 0.5 end repeat set keyRes to true –To Skip See off action exit repeat end if end repeat if keyRes is not equal to true then set aMiss to aMiss + 1 repeat 3 times set visible of layer "Mole3Miss" to true delay 0.5 set visible of layer "Mole3Miss" to false delay 0.5 end repeat end if end repeat display dialog "Score:" & (aScore as string) & return & "Miss:" & (aMiss as string) with title "GAME OVER" buttons {"OK"} default button 1 with icon 1 end tell end tell on keyscanWait(delayLoop, hitLogic) repeat delayLoop times set commandStatus to not ((((current application’s NSEvent’s modifierFlags() as integer) div (current application’s NSShiftKeyMask as integer)) mod 2) = 0) if commandStatus = true then return hitLogic end repeat return missing value end keyscanWait |
LateNight Software主催のPixelmator Pro AppleScriptコンテストに応募してみました。
応募内容は、「もぐら叩きゲーム」です。
Pixelmator Proというグラフィックソフトを使ってもぐら叩きゲーム。不可能ではありません。
Pixelmator ProのAppleScript用語辞書をながめていたら、レイヤーごとの表示/非表示を制御できることがわかったので、レイヤーをセルに見立ててパラパラアニメーション的なものを表示しつつCocoaの機能を使ってキースキャンするとできそうだと思っていました。作ってみたら、問題なくできてしまったと。
このもぐら1匹バージョンのもぐら叩きは1時間ぐらいで出来たのですが、3匹バージョンを試してみたところ、とても100行に収まりきらない感じだったので、3匹バージョン構想は破棄しました(時間かけるような内容でもないですし)。
コンテストのレギュレーションを詳細にチェックすると、1つの外部ファイルの読み込みはOKということになっており、表示用のPixelmator Pro書類がこれに該当するかどうか、という点が気になっていました。
こういうレギュレーションの機敏については、コンテスト開催側の胸先三寸で決められる部分なので、主催者側に判断をおまかせするしかありません。
あとは、環境に応じて時間待ちループ時間を大幅に変えないとダメそうです。AppleScriptObjCのプログラムは、HDDで動いているMac上だと極端に遅くなる傾向があるので、たまたま手元でmacOS 10.15.7を動かしている隔離環境(10.15のテスト環境)だとずいぶん動作が遅い(実際にはAppleScriptの実行が速すぎてウェイト入れまくっているんですが)印象を受けました。
このあたり、実行環境のパフォーマンスを計測して時間待ちの長さを適宜調節すべきなんですが、そういうパフォーマンス計測だけで数十行ぐらいは平気でかかってしまうので、100行以内というレギュレーションだとかなり無理な感じがします。Pixelmator Proに新規書類作成などのコマンドを送ってみて、どのぐらいの時間で処理できるかをその場で計測し、パフォーマンスを計ってウェイト時間を調整するべきなんでしょう。
ただ、コンテスト用のScriptだし、なるべくシンプルなものがいいんでしょう。音がないとさびしいので、iTunesなりMusic.appをコントロールしてBGMを鳴らそうと思っていたんですが、行数が足りなくてダメでした。
Pixelmator Pro向けには、KamenokoのデータをPixelmator Proのネイティブオブジェクトで内容を再現するものを試作して動かしています。ただ、1書類の内容を再構成すると40秒ぐらいかかるのと、Pixelmator Proのオブジェクトで再現するよりPDFベースでコピペしたほうが綺麗だったので、そのプログラムはお蔵入りしています。
この手の「とてもゲームが作れるようには見えない」アプリケーションを使って別のものを仕立てるのは、実は慣れたもので……
Mac World Expo/Tokyoでデモした「FMバトラー」(ファイルメーカーProをAppleScriptでコントロールしてホームページ対戦ゲームに仕立てたデモプログラム)など、これまでにもいろいろ作ってきました。
さらに、Cocoaの機能がAppleScriptから直接呼べるようになったので、複数キーの同時入力受付(正確には、ShiftやControlなどのModifier Keyのキースキャン)といったあからさまにゲームが作りやすそうな機能を利用できるようになったので、過去の無理やりつくったデモ用ゲーム風システムよりも、今回は作りやすかったといえます。
でも、真剣に「Pixelmator Proで込み入ったゲームを作れるんだろうか?」と試してみたところ、そこまでのパワーはありませんでした。オブジェクトの属性値の変更も、様子を見ながら限定されたものを操作するのは向いているものの、大量のオブジェクト操作を行うとアプリケーション側がついてきません。
きしくも、応募作品のもぐら叩きゲームは「奇跡的にちょうどいいバランス」で成立していることがわかりました。
後日、「外部プログラムの威力を利用して画像認識機能をPixelmator Proに足してみては?」と、Web APIとかdarknet(YOLO v3 model)を併用して画像認識した内容をレイヤー名に反映させたりと試していたところ……Pixelmator Proにやられました。
Pixelmator Proにはデフォルトで画像認識機能が入っていて、簡単な動物などの写真はインポートした瞬間に画像認識されて、それっぽいレイヤー名を自動で命名することが判明!
Pixelmator Proのバンドルパッケージを開けてみると、いくつもCore ML Modelのファイルが入っており、深層学習データを併用してさまざまな処理を行なっていることが伺われました。
![]()
▲Finder上からPixelmator Pro書類に画像をドラッグ&ドロップすると、その場で画像認識されて「それっぽい」レイヤー名が自動で割り振られる。「犬」とか「鳥」といった名前はPixelmator Proが自動でつけたもの
![]()
▲「どうせ認識しないだろ」と思って、ガンダムの画像をドロップしたら「おもちゃ」と認識。たった34MBの深層学習データでどうしたらここまで認識できるのやら。学習データだけでなく、別の手段も併用している???(画像取得元のURLの情報を取っているとか?)
もしかして、各種レイヤーの画像を随時(保存時にでも)画像認識して、ユーザーごとの画像⇄レイヤー名の関連性を学習して、再インポート時には過去の画像から類推して近いものを提案するのでは? などと思ってしまうところです。
これはオシャレです! センスよすぎです。さりげなさすぎて気づきませんでした。出しぬこうと悪だくみしてみたら、相手の方がはるかに上手だったということが判明したのでした。アプリケーションの機能で感動したのは久しぶりです。
![]() Late Night Software Blogの告知がTwitterに流れてきていました。Pixelmator Pro v1.8にてAppleScriptに対応したことを祝して、Late Night Software主催でPixelmator ProのAppleScriptプログラミングコンテストが開催されるとのこと。
Late Night Software Blogの告知がTwitterに流れてきていました。Pixelmator Pro v1.8にてAppleScriptに対応したことを祝して、Late Night Software主催でPixelmator ProのAppleScriptプログラミングコンテストが開催されるとのこと。
Pixelmator Proはいわば「IllustratorとPhotoshopを足して2で割った」ようなアプリケーション。Photoshopの代用になる廉価なアプリケーション、という路線です(旧Macromedia FireWorksに近いかも)。基本的にはラスター画像の処理ソフトで、ビットマップイメージを作成するものです。ベクター図形や文字などもキャンバス上に配置できますが、最終的には画像化されます。ラスター画像に対して非破壊で各種フィルタ処理が行えることが売りです。Web画像素材やアプリケーションのアイコン画像作成といった用途、写真のレタッチなどに使われているようです。登場直後にAppleScript対応リクエストを出していたものの、今回10年越しぐらいで実現して腰を抜かしました。
さて、コンテストに話を戻します。Pixelmator Pro v1.8の試用版を使うことで、同アプリケーションのScriptを書いて試せるとのこと(やっています)。辞書内容は事前に確認していましたが、ツッコミどころがあまりないぐらい、さまざまな機能が載っていました。「え、こんな機能まで乗せてるの?」という謎の充実度を見せており(Pixelmator Pro本体に搭載されていないQRコードの検出機能とか)、AS機能の開発に元AppleのSal Soghoianが協力したという話もうなづけます。
以下、コンテストのレギュレーションです。
*締め切り日:2020年10月8日 00:00(PST、日本標準時より1時間早い。別名「Shane Stanley時間」)
*Late Night Softwareのフォーラムで「いいね」が押された数で競う(あ、これ女性と子供が有利なやつだ ^ー^;)
*賞品はPixelmator ProのMac App Storeクーポンコード。優勝者は複数(Winnersと書いてある)だが、どうも人数は決めていない様子。
→ 入賞枠は3とのこと(補足)
*コンテスト応募は、LateNight Softwareのフォーラムに「pixelmatorpro」と「contest」のタグをつけて投稿すること
*AppleScriptの行数は100行まで(えーー)。コメントと空き行は除く。継続記号(┐)で続けた行も区切ってカウントされる。1行が200文字を超えてはいけない
*全Script行数の25%以上、Pixelmator Proの機能を呼び出さなくてはならない
*ScriptはmacOS 10.15, Catalina上で動作しなくてはならない
*ScriptはすべてAppleScriptでなくてはならない(JXAやshell scriptその他はダメ)。ASOCはOK
*外部Script Librariesの使用禁止(BridgePlusが使えない。これは痛い)
*Scriptはサードパーティのソフトウェア使用禁止。macOS Catalinaの標準搭載アプリケーション(ただし、Keynote、Pages、Numbersは使用OK)および(当然)Pixelmator Proのコントロールはしてよいものとする
*Scriptは製作者提供の外部データを1つに限り読み込んでよいものとする
*インターネット上のデータの読み込みはOK
*ScriptのInfo欄にスクリーンショットを入れてもいいよ
*楽しんでくれ。嫌がらせや破壊行為はNG
*ルールの明示化のためにルール自体の補足・説明を(主催者が)随時行えるものとする
*Script Debugger上で動作すること
![]()
……巨大Scriptで一部のScripterがコンテストを蹂躙することを避けつつ、「このあたり、穴場だよね?」という箇所を埋めてあります。あっと驚く参加者(たぶん、最年少参加者)が優勝をもぎ取って、真の実力者(Edama2さんみたいな)が投稿したScriptが全力でスルーされつつPixelmator Pro Scriptingの肥やしになりそうな、よく考えられたレギュレーションです(コンテストってそういうもんなんで)。
そして、一部のScripterが巨大な外部ライブラリを使ってコンテストを荒らすことを防ぐ、いいレギュレーションだと思います(Piyomaru Software対策)。
macOS標準装備のScript Editorと、LateNight Softwareが提供しているScript Debuggerの間で、(主にCocoa Scriptingで)若干の挙動の違いがありますが、レギュレーションではScript Debugger上で動作することを明記しています。まー、こんな100行程度のScriptでCocoa Scripting使ってもたいした処理が書けないんで、Cocoaの使いこなしで発生する実力差を相殺したいんだと思います。
自分が参加するとしたら、優勝狙いではなく「AppleScriptでこんなことできないでしょ」という連中を一発で黙らせるような破壊力のあるものを投稿して、それでも優勝しないという内容でしょう。ただ、100行以内だと「秘密兵器」を仕込むほどの分量がありませんね。
「1つの外部ファイルを読み込んでよい」というあたりが狙い所でしょうか。ここで勝負が決まると思います。ベトナムとかマレーシアの女子中学生あたりが優勝しそうだと予想。
Pixelmator ProのAppleScript用語辞書にはサンプルコードが多数掲載されており、それらを試してみるだけでもかなりのことがわかってきます。ただ、サンプルは行数を減らして見せるよう書かれているため、表記ゆらぎが大きく、オブジェクト階層を素直にtell文で順序立てて書くようなScriptに書き直さないと「部品」としては使いにくい印象も受けました。
実際に、Pixelmator ProのScriptingを行って、Kamenokoのネイティブデータにアクセスしてデータ書き出しを行ってみましたが、これだけでも数百行のコード規模になっているので、100行だけだと実に過酷だと感じましたわー。
Pixelmator Proがv1.8でAppleScriptに対応するとPixelmator Blogで発表しました。
Pixelmatorの登場当初からAppleScript対応の意見を出していましたが、そこから……何年たったのでしょうか。
サンプルScriptをながめたかぎりでは、オブジェクトを作って属性情報を書き換える操作はできるようです。
selectionが扱えるかどうか(選択中のオブジェクトを取れるかどうか)が1つの判断基準になりそうです。
いくらCocoaの機能が使える、NSBezierPathが使えるといっても、こういうローレベルなAPIを相手に高度なグラフィックを描かせるのはつらいので、GUIアプリケーション側の機能が使えるとたすかります。
→ Beta Programに登録して、Betaを落としてきたものの、これMac App Store版のPixelmator Proが入っていないとBetaが起動しないんですね(うまい! このやり方は知っておきたい)。とりあえず、AppleScript用語辞書だけ見られればよかったので、sdef取り出して眺めてみたところ、けっこう気合いが入っていてビビりました。
近年、こんなに気合いの入ったAppleScript用語辞書を装備したアプリケーションは見ていません。「あー、この機能たしかに入れたいよねー、実用性はさておきとして」「なるほどーこういう単位でselectionできるのかー」などなど、詳細は書けませんが、これが全部まともに動くのならすごいです。
ただ、サンプルのScriptが掲載されているのに、スクリプトリンクが埋め込まれていないので、サンプルをすぐに使えるというレベルには達していません。また、画面のスナップショットやムービーなどが入っているわけでもありません。