Menu

Skip to content
AppleScriptの穴
  • Home
  • Products
  • Books
  • Docs
  • Events
  • Forum
  • About This Blog
  • License
  • 仕事依頼

AppleScriptの穴

Useful & Practical AppleScript archive. Click '★Click Here to Open This Script' Link to download each AppleScript

月: 2019年6月

sd checker

Posted on 6月 30, 2019 by Takaaki Naganoya

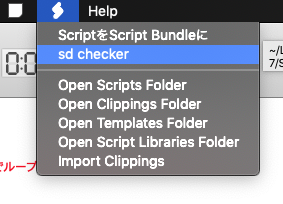
Script Debuggerを操作して、オープン中のScriptのうちのいずれかから、選択してScriptからリンクしているFrameworkやライブラリが指定のScriptバンドル内に存在しているかどうかチェックするAppleScriptです。

AppleScript appletの納品時にライブラリやFrameworkをすべてバンドル内に入れておいたはずなのに、納品先の環境でFrameworkやライブラリが入っていないエラーに直面したことは、実はけっこうあります。とくにFrameworkです。

つまり、バンドルに収めたFrameworkやライブラリがリンクされていれば問題ないものの、~/Library/Frameworksや~/Library/Script Librariesフォルダ内のファイルが指し示されている場合には、他の環境に持って行ったときに実行できません。

その割に、どのFrameworkがバンドル外ファイルにリンクされているのかといったチェックを(Apple純正のスクリプトエディタでは)明示的に行う手段がなく、一時的に開発環境内の当該Frameworkを削除してアプリケーション書き出しして様子を見るといったチェック作業を行っていました。

AppleScriptのバンドル内にFrameworkを突っ込む機能がScript Debugger上に用意されていないため手作業で行っており、たまーに突っ込むフォルダの階層を間違えてしまうんですね(涙)。

自分のことながら、この作業自体がひたすら間抜けだったので、プログラムでチェックだけでも行えるようにしてみたものがこのAppleScriptです。

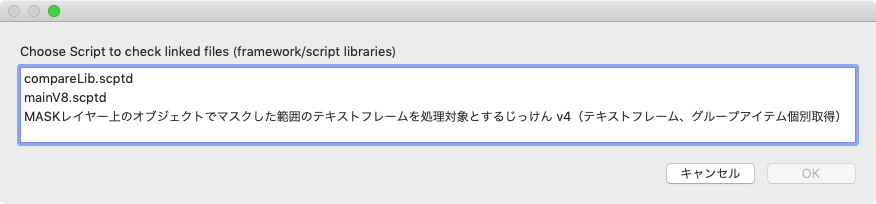
本Scriptは1つのScriptをそのままチェックするだけのものです。本来は、当該Scriptに含まれるScript Libraryを再帰でオープンしてチェックすべきなんでしょう。

Script Debuggerにこの機能が用意されているということは、メーカーのLate Night Softwareでもいろいろハマったんだと思いますが、メニューなどのGUI要素がついていない理由がよくわかりません。Shaneにはアプリ書き出し時にFrameworkのバンドル内組み込みを行う方向で要望は出しています。現場的には必須の機能です。

AppleScript名:sd checker.scptd
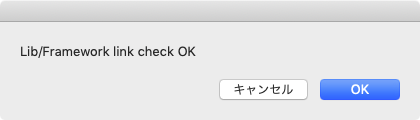
—
–  Created by: Takaaki Naganoya
–  Created on: 2019/06/30
—
–  Copyright © 2019 Piyomaru Software, All Rights Reserved
—

use AppleScript version "2.4" — Yosemite (10.10) or later
use framework "Foundation"
use scripting additions

tell application "Script Debugger"
  set dList to name of every document
  
set dRes to choose from list dList with prompt "Choose Script to check linked files (framework/script libraries)"
  
if dRes = false then return
  
set dName to contents of item 1 of dRes
  
  
tell document dName
    set myFile to path
    
    
–Framework Check
    
set uList to used framework files
    
set fList to {}
    
repeat with i in uList
      set j to POSIX path of i
      
if (j does not start with myFile) and (j does not start with "/System/Library/Frameworks/") then
        set the end of fList to j
      end if
    end repeat
    
    
–Script Library Check
    
set libList to used script library files
    
set sList to {}
    
repeat with i in sList
      set j to POSIX path of i
      
if j does not start with myFile then
        set the end of sList to POSIX path of i
      end if
    end repeat
    
    
(*
    –Scripting Additions Check (Omitted)
    set sdList to used scripting addition files
    set dList to {}
    repeat with i in dList
      set j to POSIX path of i
      if j does not start with myFile then
        set the end of dList to POSIX path of i
      end if
    end repeat
    *)

  end tell
end tell

set resList to {fList, sList}
set res2List to FlattenList(resList) of me
set res3List to cleanUp1DList(res2List, {""}) of me
if res3List = {} then
  display dialog "Lib/Framework link check OK"
else
  set aLen to length of res3List
  
set tmpStr to retDelimedText(res3List, return) of me
  
display dialog (aLen as string) & " Lib/Framework exists out of the bundle." & return & tmpStr
end if

–次元数上限なしの多次元配列を1次元配列にフラット化 By Paul Berkowitz
on FlattenList(aList)
  set oldDelims to AppleScript’s text item delimiters
  
set AppleScript’s text item delimiters to {"????"}
  
set aString to aList as text
  
set aList to text items of aString
  
set AppleScript’s text item delimiters to oldDelims
  
return aList
end FlattenList

on cleanUp1DList(aList as list, cleanUpItems as list)
  set bList to {}
  
repeat with i in aList
    set j to contents of i
    
if j is not in cleanUpItems then
      set the end of bList to j
    end if
  end repeat
  
return bList
end cleanUp1DList

on retDelimedText(aList, aDelim)
  set aText to ""
  
set curDelim to AppleScript’s text item delimiters
  
set AppleScript’s text item delimiters to aDelim
  
set aText to aList as text
  
set AppleScript’s text item delimiters to curDelim
  
return aText
end retDelimedText

★Click Here to Open This Script 

Posted in File path list | Tagged 10.12savvy 10.13savvy 10.14savvy Script Debugger | 3 Comments

テキストから数値を抽出して度数分布集計 v3

Posted on 6月 29, 2019 by Takaaki Naganoya

CotEditorで編集中の最前面の書類の本文中から指定桁の数値を抽出して登場回数で度数分布の集計を行うAppleScriptです。

初版では、集計対象の数値を桁数で指定するという(使うのに)無茶な仕様になっていたので、この頭の悪い仕様に作った本人もめまいがしていました。

わざわざAppleScriptを使うのは、他のどの環境でも追いつけない高度な処理を行うことに意義があると思っています。

そこで、

 (1)数字部分をあらかじめ抽出して事前に集計(分布および最小値、最大値を計算)
 (2)事前集計結果をグラフ表示
 (3)集計対象の数字の範囲を最小値〜最大値までの間で指定できるように
 (4)パラメータの入力、および事前集計結果の表示を自前で作成したアラートダイアログで表示

といった変更を加えてみました。初版では「数字の桁数」というご無体な指定で数字を抽出していましたが、最初に最大値を計算しておいたことで、最大値の桁数ですべて数値を抽出し、最小値・最大値の間に収まる数値のみを抽出して度数分布を再計算しています(言うほど計算結果が変わってきたりはしないんですけど ^ー^;;)。

このぐらい行えば、安心して見られる感じでしょうか。

追記:
4.11といった文字が「4」と「11」に分離して認識されるようだったので数値として認識するCharacter setに「.」(小数点)および「,」(桁数区切り)を追加してみました。想定していた部分はうまくクリアしたものの、「REV.」の部分の「.」も認識して「0.411」のような数値として認識したようです。

このあたりに課題を残しつつも、全体として見ると当初からノイズとして除去する対象として考えていた箇所でもあったため、そんなもんだろうかと。

アラートダイアログに表示するテスト集計結果の文字が小さかったので、少し大きくしてみました。フォントについては「ヒラギノ角ゴシック W1」(PostScript名は「HiraginoSans-W1」)を指定しています。このあたりは好みに応じて変更してみるとよいでしょう。

巨大なテキスト(青空文庫の小説1作文まるごととか)を対象に処理していないので(画面キャプチャ掲載している程度のサイズ)そういう配慮は行っていません。仕事だと考慮しないでもないですが、必要と思われた処理をとりあえず組んでみた程度なので、そういうものだとお考えください。

–> Download Applet With Libraries (mainly for macOS 10.14 or later)

AppleScript名:テキストから数値を抽出して度数分布集計 v3.1
— Created 2019-06-29 by Takaaki Naganoya
— 2019 Piyomaru Software
use AppleScript version "2.5"
use scripting additions
use framework "Foundation"
use framework "AppKit"
use bPlus : script "BridgePlus" –https://www.macosxautomation.com/applescript/apps/BridgePlus.html

property NSView : a reference to current application’s NSView
property NSAlert : a reference to current application’s NSAlert
property NSColor : a reference to current application’s NSColor
property NSTextField : a reference to current application’s NSTextField
property NSTextView : a reference to current application’s NSTextView
property NSScrollView : a reference to current application’s NSScrollView
property NSRunningApplication : a reference to current application’s NSRunningApplication

–property theResult : 0
property returnCode : 0
property segRes : missing value

set segRes to missing value

tell application "CotEditor"
  if (count every document) = 0 then return –No Document
  
  
tell front document
    set aText to contents of it
    
set lineTerm to (line ending)
  end tell
  
  
–改行コードの選択(ドキュメントの状態から取得)
  
if lineTerm = LF then
    set aRet to ASCII character 10 –To avoid keyword conflict (string)
  else if lineTerm = CR then
    set aRet to ASCII character 13
  else if lineTerm = CRLF then
    set aRet to (ASCII character 13) & (ASCII character 10)
  else
    set aRet to ASCII character 10
  end if
end tell

–事前にテキストから自動で数値部分を抽出して分析
set cArray to extractNumberFromText(aText) of me
set aRes to (cArray’s valueForKeyPath:"@max.self")’s intValue()
set bRes to (cArray’s valueForKeyPath:"@min.self")’s intValue()
set cRes to (cArray’s valueForKeyPath:"@count")’s intValue()

–事前に数字の分布シミュレーションを計算
set tmpLen to count every character of (aRes as string)
set theList to my findPattern:("[0-9]{" & tmpLen & "}") inString:aText
set sampleStr to calculateNumFreq(cArray, "■", aRet, bRes, aRes, true) of me

set sampleStr to return & return & "テスト集計結果:" & return & return & sampleStr

–テキストからの数値抽出時のパラメータ取得
set paramObj to {myMessage:"テキスト内の数値の度数分布集計", mySubMessage:"集計対象の数値の範囲と、集計時のグラフ生成時の構成文字を指定してください", mes1:"最小値(min.)", mes1Default:(bRes as string), mes2:"最大値(max.)", mes2Default:(aRes as string), mes3:"出力文字", mes3Default:"絆", aSample:sampleStr}

–set segRes to my inputParametersFromAlertDialog:paramObj–for debugging
my performSelectorOnMainThread:"inputParametersFromAlertDialog:" withObject:(paramObj) waitUntilDone:true
if segRes = missing value then return –Cancel

–度数分布計算
set tmpLen to count every character of ((a2Res of segRes) as string)
set theList to my findPattern:("[0-9]{" & tmpLen & "}") inString:aText
set outStr to calculateNumFreq(cArray, a3Res of segRes, aRet, a1Res of segRes, a2Res of segRes, false) of me

–テキストエディタへの集計結果出力
tell application "CotEditor"
  tell front document
    set contents of it to (aText & aRet & aRet & "集計結果:" & aRet & aRet & outStr & aRet)
  end tell
end tell

on inputParametersFromAlertDialog:paramObj
  –Receive Parameters
  
set aMainMes to (myMessage of paramObj) as string –Main Message
  
set aSubMes to (mySubMessage of paramObj) as string –Sub Message
  
set mes1Label to (mes1 of paramObj) as string –Text Input field 1 Label
  
set mes2Label to (mes2 of paramObj) as string –Text Input field 2 Label
  
set mes3Label to (mes3 of paramObj) as string –Text Input field 3 Label
  
set aTextInputString to (mes1Default of paramObj) as string –Text Input field 1 Default value
  
set bTextInputString to (mes2Default of paramObj) as string –Text Input field 2 Default value
  
set cTextInputString to (mes3Default of paramObj) as string –Text Input field 2 Default value
  
set sampleString to (aSample of paramObj) as string
  
  
— Create a view
  
set theView to NSView’s alloc()’s initWithFrame:(current application’s NSMakeRect(0, 0, 500, 400))
  
  
— create two input field and their labels pairs
  
–NSTextFields for Input
  
set aTextInput to makeNSTextField(100, 70, 140, 20, true, (aTextInputString), true, true) of me
  
set bTextInput to makeNSTextField(100, 35, 140, 20, true, (bTextInputString), true, true) of me
  
set cTextInput to makeNSTextField(100, 0, 140, 20, true, (cTextInputString), true, true) of me
  
  
–Labels
  
set a1TF to makeNSTextField(0, 70, 100, 20, false, (mes1Label), false, false) of me
  
set a2TF to makeNSTextField(0, 35, 100, 20, false, (mes2Label), false, false) of me
  
set a3TF to makeNSTextField(0, 0, 100, 20, false, (mes3Label), false, false) of me
  
  
–Sample Text View
  
set aColor to NSColor’s colorWithDeviceRed:0.0 green:0.0 blue:0.0 alpha:0.9
  
set tvScroll to NSScrollView’s alloc()’s initWithFrame:(current application’s NSMakeRect(0, 120, 500, 300))
  
set tvView to NSTextView’s alloc()’s initWithFrame:(current application’s NSMakeRect(0, 120, 500, 380))
  
tvView’s setRichText:true
  
tvView’s useAllLigatures:true
  
tvView’s setTextColor:(NSColor’s cyanColor()) —
  
tvView’s setFont:(current application’s NSFont’s fontWithName:"HiraginoSans-W1" |size|:16.0)
  
tvView’s setBackgroundColor:aColor
  
tvView’s setEditable:false
  
  
tvScroll’s setDocumentView:tvView
  
tvView’s enclosingScrollView()’s setHasVerticalScroller:true
  
tvView’s setString:(sampleString)


theView’s setSubviews:{a1TF, aTextInput, a2TF, bTextInput, a3TF, cTextInput, tvScroll}
  
  
— set up alert
  
set theAlert to NSAlert’s alloc()’s init()
  
tell theAlert
    its setMessageText:aMainMes
    
its setInformativeText:aSubMes
    
its addButtonWithTitle:"OK"
    
its addButtonWithTitle:"Cancel"
    
its setAccessoryView:theView
  end tell
  
  
— show alert in modal loop
  
NSRunningApplication’s currentApplication()’s activateWithOptions:0
  
my performSelectorOnMainThread:"doModal:" withObject:(theAlert) waitUntilDone:true
  
if (my returnCode as number) = 1001 then
    set my segRes to missing value
  else
    set s1Val to (aTextInput’s integerValue()) as integer
    
set s2Val to (bTextInput’s integerValue()) as integer
    
set s3Val to (cTextInput’s stringValue()) as string
    
    
–return {a1Res:s1Val, a2Res:s2Val, a3Res:s3Val}–old version’s way to return values
    
set my segRes to {a1Res:s1Val, a2Res:s2Val, a3Res:s3Val}
  end if
end inputParametersFromAlertDialog:

on doModal:aParam
  set (my returnCode) to aParam’s runModal()
end doModal:

on makeNSTextField(xPos as integer, yPos as integer, myWidth as integer, myHeight as integer, editableF as boolean, setVal as string, backgroundF as boolean, borderedF as boolean)
  set aNSString to NSTextField’s alloc()’s initWithFrame:(current application’s NSMakeRect(xPos, yPos, myWidth, myHeight))
  
aNSString’s setEditable:(editableF)
  
aNSString’s setStringValue:(setVal)
  
aNSString’s setDrawsBackground:(backgroundF)
  
aNSString’s setBordered:(borderedF)
  
return aNSString
end makeNSTextField

–与えられたテキストから数値部分を抽出して1D Arrayで返す
on extractNumberFromText(aText)
  set aStr to current application’s NSString’s stringWithString:aText
  
–set nonDigitCharacterSet to (current application’s NSCharacterSet’s decimalDigitCharacterSet())’s invertedSet()
  
set nonDigitCharacterSet to (current application’s NSCharacterSet’s characterSetWithCharactersInString:"0123456789.,")’s invertedSet()
  
set bArray to (aStr’s componentsSeparatedByCharactersInSet:nonDigitCharacterSet)
  
  
–Sweep Blank Items
  
load framework –BridgePlus
  
set cArray to (current application’s SMSForder’s arrayByDeletingBlanksIn:(bArray))’s valueForKey:"intValue"
  
return cArray –return as NSArray
end extractNumberFromText

–正規表現でテキスト中から指定パターンに該当する箇所を抽出してリストで返す
on findPattern:thePattern inString:theString
  set theOptions to ((current application’s NSRegularExpressionDotMatchesLineSeparators) as integer) + ((current application’s NSRegularExpressionAnchorsMatchLines) as integer)
  
set theRegEx to current application’s NSRegularExpression’s regularExpressionWithPattern:thePattern options:theOptions |error|:(missing value)
  
set theFinds to theRegEx’s matchesInString:theString options:0 range:{location:0, |length|:length of theString}
  
set theFinds to theFinds as list — so we can loop through
  
set theResult to {} — we will add to this
  
set theNSString to current application’s NSString’s stringWithString:theString
  
repeat with i from 1 to count of items of theFinds
    set theRange to (item i of theFinds)’s range()
    
set end of theResult to (theNSString’s substringWithRange:theRange) as integer
  end repeat
  
return theResult
end findPattern:inString:

–1D Listをユニーク化してソート
on uniquifyAndSort1DList(theList as list, aBool as boolean)
  set aArray to current application’s NSArray’s arrayWithArray:theList
  
set bArray to aArray’s valueForKeyPath:"@distinctUnionOfObjects.self"
  
set aDdesc to current application’s NSSortDescriptor’s sortDescriptorWithKey:"self" ascending:aBool selector:"compare:"
  
set cArray to bArray’s sortedArrayUsingDescriptors:{aDdesc}
  
  
set bList to cArray as list
  
return bList
end uniquifyAndSort1DList

–度数分布集計して文字グラフ出力
on calculateNumFreq(theList, outChar, aLineTerminator, aMin, aMax, zeroPaddingF)
  set theCountedSet to current application’s NSCountedSet’s alloc()’s initWithArray:theList
  
set newArray to current application’s NSMutableArray’s new()
  
  
set kList to uniquifyAndSort1DList(theList, false) of me –降順ソート
  
set maxDigit to (count every character of (aMax as string))
  
  
repeat with i in kList
    if (i ≥ aMin) and (i ≤ aMax) then
      (newArray’s addObject:{theKey:i, theCount:(theCountedSet’s countForObject:i)})
    end if
  end repeat
  
  
set outStr to ""
  
  
repeat with i in newArray as list
    set j to (current application’s NSDictionary’s dictionaryWithDictionary:i)
    
set tmpStr to (j’s valueForKey:"theKey")
    
    
if zeroPaddingF = true then
      –Zero Pagging
      
set keyNumStr to numToZeroPaddingStr(tmpStr, maxDigit, "0") of me
    else
      –No Padding
      
copy (tmpStr as string) to keyNumStr
    end if
    
    
set outStr to outStr & keyNumStr & ":"
    
    
set aNum to (j’s valueForKey:"theCount")
    
repeat aNum times
      set outStr to outStr & outChar
    end repeat
    
    
set outStr to outStr & aLineTerminator
  end repeat
end calculateNumFreq

–整数の値に指定桁数ゼロパディングして文字列で返す
on numToZeroPaddingStr(aNum as integer, aDigit as integer, paddingChar as text)
  set aNumForm to current application’s NSNumberFormatter’s alloc()’s init()
  
aNumForm’s setPaddingPosition:(current application’s NSNumberFormatterPadBeforePrefix)
  
aNumForm’s setPaddingCharacter:paddingChar
  
aNumForm’s setMinimumIntegerDigits:aDigit
  
  
set bNum to current application’s NSNumber’s numberWithInt:aNum
  
set aStr to aNumForm’s stringFromNumber:bNum
  
  
return aStr as text
end numToZeroPaddingStr

★Click Here to Open This Script 

Posted in list regexp Sort Text | Tagged 10.12savvy 10.13savvy 10.14savvy CotEditor NSAlert NSColor NSRunningApplication NSScrollView NSTextField NSTextView NSView | 1 Comment

テキストから指定桁数の数値を抽出して度数分布集計

Posted on 6月 28, 2019 by Takaaki Naganoya

CotEditorで編集中の最前面の書類の本文中から指定桁の数値を抽出して登場回数で度数分布の集計を行うAppleScriptです。

CotEditorのアプリケーション内のスクリプトメニューに入れて実行できることを確認してあります(@macOS 10.14.5)。

たまたま、テキストで集計していた情報のうち、数値部分の度数分布を計算したいと考え、ありもののルーチンを組み合わせて作ったものです。

実行すると、集計対象の数値の桁数を聞いてくるため、適当なものを選択してださい。

CotEditorのScriptingの要注意点で、オブジェクト階層を素直に書いて、当該階層のオブジェクトの属性値を取りたいような場合に、そのまま属性を書いても取得できないケースが見られます。そのため、明示的にオブジェクト階層を指定するために「of it」を書いています。Xcodeが同じような挙動を行うため、注意が必要です。

本Scriptについていえば、正規表現でテキストから情報を抽出したりと、一応最低限のレベルはクリアしているものの、いまひとつ満足できません。

数字が連続して登場している箇所を抽出し、どれを集計対象にするのかといった分析を冒頭で行ってユーザーに問い合わせしたいところです。現段階では、「桁数を聞く」という頭の悪い実装になっていますが、そのうちどうにかしたいと考えるところです。

AppleScript名:テキストから指定桁数の数値を抽出して度数分布集計.scptd
— Created 2019-06-28 by Takaaki Naganoya
— 2019 Piyomaru Software
use AppleScript version "2.4"
use scripting additions
use framework "Foundation"

property graphStr : "絆" –グラフに出力する文字

tell application "CotEditor"
  –最前面の書類からテキスト本文を取得
  
tell front document
    set aText to contents of it –本文
    
set lineTerm to (line ending) –改行コード
  end tell
  
  
–改行コードの選択(ドキュメントの状態から取得)
  
if lineTerm = LF then
    set aRet to ASCII character 10 –To avoid keyword conflict (string)
  else if lineTerm = CR then
    set aRet to ASCII character 13
  else if lineTerm = CRLF then
    set aRet to (ASCII character 13) & (ASCII character 10)
  else
    set aRet to ASCII character 10
  end if
end tell

–桁数選択
set digiList to {"2", "3", "4", "5"}
set digitRes to first item of (choose from list digiList with prompt "Choose the digit to extract as numbers")

–正規表現で数字部分のみ抽出
set theList to my findPattern:("[0-9]{" & digitRes & "}") inString:aText

–検出した数字部分の度数分布を計算
set theCountedSet to current application’s NSCountedSet’s alloc()’s initWithArray:theList
set newArray to current application’s NSMutableArray’s new()
set kList to uniquifyAndSort1DList(theList, false) of me –降順ソート

repeat with i in kList
  (newArray’s addObject:{theKey:i, theCount:(theCountedSet’s countForObject:i)})
end repeat

–出力用のテキストを作成
set outStr to ""
repeat with i in newArray as list
  set outStr to (outStr & (theKey of i) as string) & ":"
  
set aNum to (theCount of i) as integer
  
  
repeat aNum times
    set outStr to outStr & graphStr
  end repeat
  
  
set outStr to outStr & aRet
end repeat

–最前面のテキスト末尾に集計結果を出力
tell application "CotEditor"
  tell front document
    set contents of it to (aText & aRet & aRet & "集計結果:" & aRet & aRet & outStr & aRet)
  end tell
end tell

–正規表現でテキスト中から指定パターンに該当する箇所を抽出してリストで返す
on findPattern:thePattern inString:theString
  set theOptions to ((current application’s NSRegularExpressionDotMatchesLineSeparators) as integer) + ((current application’s NSRegularExpressionAnchorsMatchLines) as integer)
  
set theRegEx to current application’s NSRegularExpression’s regularExpressionWithPattern:thePattern options:theOptions |error|:(missing value)
  
set theFinds to theRegEx’s matchesInString:theString options:0 range:{location:0, |length|:length of theString}
  
set theFinds to theFinds as list — so we can loop through
  
set theResult to {} — we will add to this
  
set theNSString to current application’s NSString’s stringWithString:theString
  
repeat with i from 1 to count of items of theFinds
    set theRange to (item i of theFinds)’s range()
    
set end of theResult to (theNSString’s substringWithRange:theRange) as integer
  end repeat
  
return theResult
end findPattern:inString:

–1D Listをユニーク化してソート
on uniquifyAndSort1DList(theList as list, aBool as boolean)
  set aArray to current application’s NSArray’s arrayWithArray:theList
  
set bArray to aArray’s valueForKeyPath:"@distinctUnionOfObjects.self"
  
set aDdesc to current application’s NSSortDescriptor’s sortDescriptorWithKey:"self" ascending:aBool selector:"compare:"
  
set cArray to bArray’s sortedArrayUsingDescriptors:{aDdesc}
  
  
set bList to cArray as list
  
return bList
end uniquifyAndSort1DList

★Click Here to Open This Script 

Posted in list Record regexp Sort Text | Tagged 10.12savvy 10.13savvy 10.14savvy CotEditor NSArray NSCountedSet NSMutableArray NSRegularExpression NSRegularExpressionDotMatchesLineSeparators NSSortDescriptor NSString | Leave a comment

QuickTime Playerでオープン中の全ムービーを頭出しして同時再生

Posted on 6月 27, 2019 by Takaaki Naganoya

QuickTime Playerでオープン中のすべてのムービーを頭出し(再生位置を冒頭に移動)して、同時に再生を開始するAppleScriptです。

とくに工夫も何もない、「必要だから作った」というScript。複数の条件で行った操作を画面を録画してならべ、同時に再生を行わせるという用途で使いました。

頭出しとかいうのは、カセットテープ/ビデオテープ時代の名残りの表現ですが、、、、電子データで頭出しというのは、言うんだか言わないんだか、、、

AppleScript名:QuickTime Playerでオープン中の全ムービーを頭出しして同時再生
tell application "QuickTime Player"
  activate
  
set dList to every document
  
  
repeat with i in dList
    tell i
      set current time to 0
    end tell
  end repeat


tell every document to play
  
end tell

★Click Here to Open This Script 

Posted in How To | Tagged 10.12savvy 10.13savvy 10.14savvy QuickTime Player | Leave a comment

Keynote, Pages, Numbersがアップデート

Posted on 6月 26, 2019 by Takaaki Naganoya

macOS 10.13以上で動作するiWorkアプリケーションの最新版がアップデートしました。

Keynote v9.1、Pages v8.1、Numbers v6.1です。

AppleScript用語辞書を書き出して比較してみましたが、用語辞書に変更は一切ありません。

ただし、アプリケーション自体には大幅に機能追加が行われており、ちょっと前までの停滞しまくっていたiWorkアプリケーションとは思えないほどの強化ぶりです。

Photos.app以外でははじめて顔認識の機能が(Apple純正アプリでは)利用され、写真を配置する際に顔認識して配置するとか、ページ間リンクを張るさいにブックマークを挿入(他のアプリケーションで言うところの「アンカー」ですね)したりと、アプリケーションとしてまっとうな機能アップが行われたように感じられました。

Posted in Release | Tagged 10.13savvy 10.14savvy Keynote Numbers Pages | Leave a comment

指定フォルダ以下のWordのファイルをすべてPDFに書き出す

Posted on 6月 22, 2019 by Takaaki Naganoya

指定フォルダ以下のWordファイルをSpotlight機能でリストアップし、かたっぱしからPDF書き出しするAppleScriptです。

Wordの制御以外はありもののルーチンを組み合わせただけなので、とくにたいした手間がかかっているわけではありません。

逆に、Wordでファイルをオープンするという動作が割とたいへんだということがわかりました。Wordの書類によっては変換の必要があるようで、オープン時に形式を聞かれました。Word書類を作成したWordのバージョン次第のようですが、注意したいところです。Script中ではオートで変換してくれるように指定しておいたものの、それほど現場でさまざまな書類を処理したわけではありません。

処理する書類の古さや、作成したWordがどのOS上で作られたかによっては、さらに何かを追加指定する必要があるかもしれません(確認は作成時最新のWord v16.24+macOS 10.12.6にて行いました)。

Spotlightでサーチして、指定フォルダ以下のWord書類をすべてリストアップしたあと、オープンしてPDFに書き出してクローズ、という動作を繰り返します。実にAppleScript「らしい」処理です。

これを、GUI Scripting(メニューやボタンの強制的な操作)だけで行うサンプルもあるようですが、GUI Scriptingは各アプリケーションの持っているAppleScriptのコマンド(AppleScript用語辞書に書かれています)に記載のない命令を「仕方なく」「例外的に」実行するだけのものであって、こういう「命令が最初から用意されているコマンド」を実行させてもメリットが何もありません。

GUI Scriptingを使ったScriptを評して「遅い」とか「確実性がない」と言われることが多いようですが、それはGUI Scriptingを使っているからです。GUI Scriptingを使うと、AppleScript本来の処理速度よりも10〜100倍ぐらい遅くなる(Cocoaの機能を活用している現代のAppleScriptだとそこから50倍ぐらい高速)ものなので、GUI Scriptingが(System Eventsを用いてメニューやボタンのクリックが行われている)多用されているAppleScriptは、本来の性能を活かせない可能性が高い(もっと高速に処理できる余地がある)ことを知っていただきたいところです。

本Scriptはそのような意味をこめて作成・公開したものです。

–> Download WordFileToPDFExporter Run-Only (Applet)

AppleScript名:WordFileToPDFExporter.scptd
— Created 2019-06-20 by Takaaki Naganoya
— 2019 Piyomaru Software
use AppleScript version "2.4"
use scripting additions
use framework "Foundation"
use mdLib : script "Metadata Lib" version "2.0.0" –https://www.macosxautomation.com/applescript/apps/Script_Libs.html#Metadata_Lib

property NSString : a reference to current application’s NSString
property NSFileManager : a reference to current application’s NSFileManager
property NSOrderedSame : a reference to current application’s NSOrderedSame

set basePath to (path to desktop) as string –Target Folder to write PDFs
set origPath to POSIX path of (choose folder with prompt "Select Word File Orig Folder") –(path to documents folder)

–Find Word (.doc & .docx ) files by Spotlight
set resList to mdLib’s searchFolders:{origPath} searchString:("kMDItemContentTypeTree == %@ || kMDItemContentTypeTree == %@") searchArgs:{"org.openxmlformats.wordprocessingml.document", "com.microsoft.word.doc"}

if resList = {} then
  –No Word Files or Spotlight index is broken
  
display dialog "There is no Word File within your folder.." buttons {"OK"} default button 1 with icon 1
  
return
end if

set resNumLen to length of ((length of resList) as string)

–Close Word Documents without saving
closeEveryWordDocs() of me

set sCount to 1 –saving file counter
set erCount to 0

–Loop by Word files
repeat with i in resList
  set j to contents of i
  
set anAlias to (POSIX file j) as alias
  
set dRes to openWordFile(anAlias) of me
  
  
if dRes is not equal to false then
    set numStr to retZeroPaddingText(sCount, resNumLen + 1) of me
    
set newFile to basePath & numStr & "_" & (repFileNameExtension(dRes, ".pdf") of me)
    
saveWordDocAsPDF(newFile) of me
  else
    set erCount to erCount + 1
  end if
  
  
set sCount to sCount + 1 –Increment
end repeat

–Report Finish
if erCount = 0 then
  activate
  
display dialog (sCount as string) & " Word files are converted to PDF.." buttons {"OK"} default button 1 with icon 1
else
  if erCount = 1 then
    set pluralStr to ""
  else
    set pluralStr to "s"
  end if
  
  
activate
  
display dialog (sCount as string) & " Word files are converted to PDF.." & return & "But " & (erCount as string) & "file" & pluralStr & " caused error to open" buttons {"OK"} default button 1 with icon 1
end if

–最前面のWord Documentを指定パスにPDFとして書き出す
on saveWordDocAsPDF(saveHFSpathStr)
  tell application "Microsoft Word"
    save as active document file name saveHFSpathStr file format format PDF
    
close front document saving no
  end tell
end saveWordDocAsPDF

–指定パスのWord書類をオープンする
on openWordFile(aFileAlias)
  tell application "Microsoft Word"
    try
      –このあたり、予想外にいろいろオープン処理を止めるダイアログ表示などがあるようなので試行錯誤が必要
      
open aFileAlias file converter open format auto
      
tell front document
        set dName to name
      end tell
    on error
      return false
    end try
  end tell
  
return dName
end openWordFile

–Word書類をすべてクローズ。未保存のものも破棄してクローズ
on closeEveryWordDocs()
  try
    tell application "Microsoft Word"
      close every document without saving
    end tell
  end try
end closeEveryWordDocs

–ファイル名から拡張子を置換する
on repFileNameExtension(origName, newExt)
  set aName to current application’s NSString’s stringWithString:origName
  
set theExtension to aName’s pathExtension()
  
if (theExtension as string) is not equal to "" then
    set thePathNoExt to aName’s stringByDeletingPathExtension()
    
set newName to (thePathNoExt’s stringByAppendingString:newExt)
  else
    set newName to (aName’s stringByAppendingString:newExt)
  end if
  
  
return newName as string
end repFileNameExtension

–数値にゼロパディングしたテキストを返す
on retZeroPaddingText(aNum, aLen)
  set tText to ("0000000000" & aNum as text)
  
set tCount to length of tText
  
set resText to text (tCount – aLen + 1) thru tCount of tText
  
return resText
end retZeroPaddingText

★Click Here to Open This Script 

Posted in file PDF | Tagged 10.12savvy 10.13savvy 10.14savvy NSFileManager NSOrderedSame NSString Word | Leave a comment

与えられた文字列の1D Listのすべての順列組み合わせパターン文字列を返す v3

Posted on 6月 20, 2019 by Takaaki Naganoya

与えられた1次元配列のデータのすべての順列組み合わせパターンを計算し、そのとおりに配列を並べて連結した文字列を、すべての順列組み合わせパターンについて生成して返す(Permutations)AppleScriptです。

初版ではありもののサブルーチンを組み合わせて、検証を行うには十分なものでした(v2)。ただし、本来その用途に作成したものではないルーチンを寄せ集めて作ったので、組み合わせ数が増えると処理時間がかかりすぎるきらいがありました。

そこで、こうした処理(Permutations)を英語でどう呼ぶのかを調べ、AppleScriptの実装例を調べたら、灯台下暗し。MacScripter.netにありました。

ただし、そのままではいまひとつ使いにくかったので、きちんと組み合わせた文字列を1次元配列で返すように組んでみたところ、オリジナル版よりは処理時間はかかっていますが、初版からくらべると大幅に処理速度とメモリ使用効率が改善されました。

MacScripter.net掲載サンプル処理結果:{{“A”, “T”, “G”, “C”}….}
本Scriptの処理結果:{“ATGC”, “ATCG”…..}

4要素の順列組み合わせ計算:5倍速
5要素の順列組み合わせ計算:10倍速
6要素の順列組み合わせ計算:30倍速
7要素の順列組み合わせ計算:67倍速
8要素の順列組み合わせ計算:(計測不能)

というように、大規模データになればなるほど高速化の度合いが高くなります。AppleScriptにしては大規模データを扱う演算なので、Cocoaの機能を積極的に利用することで高速化を行なっています。

開発機として用いているMacBook Pro 2012 Retina(Core i7 2.6GHz)と、MacBook Pro 13 2017 (Dual Thunderbolt)で処理時間を計測してみたところ、2012のMBPのほうがわずかに高速でした。

AppleScript名:与えられた文字列の1D Listのすべての順列組み合わせパターン文字列を返す v3.scptd
— 2014-10-06 Original By Nigel Garvey@macscripter.net
— 2019-06-19 Modified By Takaaki Naganoya
use AppleScript version "2.4"
use scripting additions
use framework "Foundation"

script spdPerm
  property permutations : missing value
end script

on run
  –Test by MacBook Pro 2012 Retina Core i7 2.6GHz
  
–set theList to {"A", "T", "G", "C", "1"} –0.05 secs (5 digits) 120 items.
  
–set theList to {"A", "T", "G", "C", "1", "2"} –0.21secs (6 digits) 720 items.
  
set theList to {"A", "T", "G", "C", "1", "2", "3"} –1.44 secs (7 digits) 5,040 items.
  
–set theList to {"A", "T", "G", "C", "1", "2", "3", "4"} –11.54 secs (8 digits) 40,320 items.
  
–set theList to {"A", "T", "G", "C", "1", "2", "3", "4", "5"} –107.27 secs (9 digits) 362,880 items.
  
  
set aRes to permute(theList) of me
  
return length of aRes
end run

on permute(theList as list)
  set theArray to current application’s NSMutableArray’s arrayWithArray:theList
  
set (permutations of spdPerm) to current application’s NSMutableArray’s array()
  
prmt(theArray, 0, (count theList) – 1)
  
  
–Return AppleScript string list
  
set aFinishArray to current application’s NSMutableArray’s new()
  
set anEnum to (permutations of spdPerm)’s objectEnumerator()
  
repeat
    set aValue to anEnum’s nextObject()
    
if aValue = missing value then exit repeat
    
set aStr to aValue’s componentsJoinedByString:""
    (
aFinishArray’s addObject:aStr)
  end repeat
  
  
return aFinishArray as list
end permute

on prmt(theArray, theStart as number, theEnd as number)
  if (theStart = theEnd) then
    (permutations of spdPerm)’s addObject:theArray
  else
    repeat with x from theStart to theEnd
      set theCopy to theArray’s mutableCopy()
      
–swap
      
if (x > theStart) then (theCopy’s exchangeObjectAtIndex:theStart withObjectAtIndex:x)
      
prmt(theCopy, theStart + 1, theEnd)
    end repeat
  end if
end prmt

★Click Here to Open This Script 

Posted in list recursive call | Tagged 10.11savvy 10.12savvy 10.13savvy 10.14savvy NSMutableArray | 2 Comments

Keynoteで選択中のスライドだけをデスクトップに画像で書き出す

Posted on 6月 20, 2019 by Takaaki Naganoya

Keynoteでオープン中の最前面の書類で、選択中のスライドだけをデスクトップにPNG画像で書き出すAppleScriptです。Keynote 9.xを必要とします(macOS 10.13以降)。

ちょっとした説明のためにKeynoteの資料の一部だけを画面上でキャプチャして、メールなどに添付して送ることはよくあります(全部送ると量がおおすぎたり、焦点がぼやけたり)。

そこで、複数枚のスライド(ページ)を選択しておくと、それらのみを画像書き出しするAppleScriptを作ってみました。Keynoteにそんな機能はないのですが、「選択中のページ番号」は取れるので、書類全体をPDF書き出ししておいて、書き出したPDFから指定ページを画像として再書き出しを行い、PDFを削除しています。

手品のように見える処理でも、実際に行える機能を組み合わせて地道に作っているだけです。問題は、「手品」が実は地道な調査と機能確認、こまごまとしたライブラリの整備の末に実現されていることが、一般の方にはわかりにくいということでしょうか(いきなり手品を求められて絶句すること多し)。

仕事の合間に作ったので、割と雑な作りです。書き出し画像のファイル名衝突チェックなどは入れていません。

それでも、スクリプトメニューに入れて利用するとなかなか便利です。

AppleScript名:Keynoteで選択中のスライドだけをデスクトップに画像で書き出す.scptd
—
–  Created by: Takaaki Naganoya
–  Created on: 2019/06/20
—
–  Copyright © 2019 Piyomaru Software, All Rights Reserved
—
use AppleScript version "2.7" — 10.13 or later
use framework "Foundation"
use framework "Quartz"
use framework "AppKit"
use scripting additions

set dtPath to (path to desktop) as string

tell application "Keynote"
  set aVer to version
  
  
considering numeric strings
    if aVer < "9.0" then
      display dialog "Too old version for this Script." buttons {"OK"} default button 1 with icon 1
      
return
    end if
  end considering
  
  
tell front document
    set aSel to selection –選択中のスライドオブジェクトへの参照がリストで入る
    
set pList to {}
    
repeat with i in aSel
      set tmpPage to slide number of i
      
set the end of pList to tmpPage
    end repeat
    
  end tell
end tell

–Keynote書類を指定フォルダにPDF書き出し(全ページ書き出し)
set savedPDFPath to exportKeynoteDocToPDF(dtPath) of me
if savedPDFPath = false then return –Error

set aPOSIXpath to POSIX path of savedPDFPath

–書き出したPDFから、部分的にPNG画像に書き出す
repeat with p in pList
  –PDFの指定ページをNSImageとして取り出す
  
set tmpNSImage to getNSImageFromPDFPage(aPOSIXpath, p) of me
  
  
–PDFの書き出しファイル名に子番号にスライド番号をつける
  
set bPath to addStringbeforeExtension(aPOSIXpath, "_" & (p as string)) of me
  
  
–PDF書き出しファイル名に
  
set newPath to repFilePathExtension(bPath, ".png") of me
  
  
–指定のNSImageを指定のパスにPNG形式で保存
  
set sRes to saveNSImageAtPathAsPNG(tmpNSImage, newPath) of me
end repeat

–書き出したPDFを削除
tell application "Finder"
  delete savedPDFPath
end tell

–Keynote書類からPDF書き出し
on exportKeynoteDocToPDF(targFolderPath as string)
  tell application "Keynote"
    set dCount to count every document
    
if dCount = 0 then
      return false
    end if
    
set aPath to file of document 1
  end tell
  
  
set curPath to (current application’s NSString’s stringWithString:(POSIX path of aPath))’s lastPathComponent()’s stringByDeletingPathExtension()’s stringByAppendingString:".pdf"
  
set outPath to (targFolderPath & curPath)
  
  
tell application "Keynote"
    set anOpt to {class:export options, export style:IndividualSlides, all stages:false, skipped slides:true, PDF image quality:Best}
    
export document 1 to file outPath as PDF with properties anOpt
  end tell
  
  
return (outPath as alias)
  
end exportKeynoteDocToPDF

–指定のPDFから、指定のページをNSImageで返す
on getNSImageFromPDFPage(aPOSIX, aPage as number)
  set aURL to (current application’s |NSURL|’s fileURLWithPath:aPOSIX)
  
  
set aPDFdoc to current application’s PDFDocument’s alloc()’s initWithURL:aURL
  
set pCount to aPDFdoc’s pageCount()
  
  
set compFactor to 1.0 –1.0 — 0.0 = max jpeg compression, 1.0 = none
  
  
–Detect Retina Environment
  
set retinaF to current application’s NSScreen’s mainScreen()’s backingScaleFactor()
  
if retinaF = 1.0 then
    set aScale to 2.0 –Non Retina Env
  else
    set aScale to 1.0 –Retina Env
  end if
  
  
set thisPage to (aPDFdoc’s pageAtIndex:(aPage – 1))
  
set anNSImage to (current application’s NSImage’s alloc()’s initWithData:(thisPage’s dataRepresentation()))
  
  
if anNSImage = missing value then error "Error in getting imagerep from PDF"
  
  
return anNSImage
end getNSImageFromPDFPage

–ファイル名の拡張子の直前に子番号的な文字列を入れる
on addStringbeforeExtension(aPath, extraString)
  set pathString to current application’s NSString’s stringWithString:aPath
  
set theExtension to pathString’s pathExtension()
  
set thePathNoExt to pathString’s stringByDeletingPathExtension()
  
set newPath to (thePathNoExt’s stringByAppendingString:extraString)’s stringByAppendingPathExtension:theExtension
  
return newPath as string
end addStringbeforeExtension

–与えられたパスの拡張子を付け替える
on repFilePathExtension(origPath, newExt)
  set aName to current application’s NSString’s stringWithString:origPath
  
set theExtension to aName’s pathExtension()
  
if (theExtension as string) is not equal to "" then
    set thePathNoExt to aName’s stringByDeletingPathExtension()
    
set newName to (thePathNoExt’s stringByAppendingString:newExt)
  else
    set newName to (aName’s stringByAppendingString:newExt)
  end if
  
return newName as string
end repFilePathExtension

–NSImageを指定パスにPNG形式で保存
on saveNSImageAtPathAsPNG(anImage, outPath)
  set imageRep to anImage’s TIFFRepresentation()
  
set aRawimg to current application’s NSBitmapImageRep’s imageRepWithData:imageRep
  
set pathString to current application’s NSString’s stringWithString:outPath
  
set newPath to pathString’s stringByExpandingTildeInPath()
  
set myNewImageData to (aRawimg’s representationUsingType:(current application’s NSPNGFileType) |properties|:(missing value))
  
set aRes to (myNewImageData’s writeToFile:newPath atomically:true) as boolean
  
return aRes –true/false
end saveNSImageAtPathAsPNG

★Click Here to Open This Script 

Posted in file File path Image PDF | Tagged 10.13savvy 10.14savvy Finder Keynote NSBitmapImageRep NSImage NSScreen NSString NSURL PDFDocument | Leave a comment

与えられた1D Listのすべての順列組み合わせパターン文字列を返す

Posted on 6月 18, 2019 by Takaaki Naganoya

与えられた1次元配列のデータのすべての順列組み合わせパターンを計算し、そのとおりに配列を並べて連結した文字列を、すべての順列組み合わせパターンについて生成して返すAppleScriptです。

InDesignやIllustratorなどの書類上に元データをレイアウトした際に、複数のテキストフィールドに分解してレイアウトされていることがあります(見た目重視で)。

その分割されたテキストフィールドを元データと比較する際に、位置情報などをもとに「このあたりが一緒になってそうだ」とあたりをつけるわけですが、左→右、上→下という順序に基づいて配置されているという保証はありません。見た目やインパクト重視で、あえて順番を変えているケースも考えられます。

そこで、並び順について「考えられるかぎりの全ての順列組み合わせでつないでチェック」するという脳筋な(マッチョな)方法を考えてみたりもするわけです。実際、この手の計算にはコンピュータは実に向いている道具なので(やらない方がおかしい?)。

そんな計算を行うために作成したAppleScriptですが、意外や意外、すべての順列組み合わせパターンを計算するルーチンは作ってありませんでした。性格的に、このあたり作ってないと気がすまないと(自分でも)思うものの、これだけ数千本も数万本もAppleScriptを書いておいて、手付かずの処理があったというのは逆に掘り出し物というべきなんでしょう。

そのため、過去に作った一番近いルーチンを流用して、すべての組み合わせパターンを計算し、そのうえで「すべての要素が異なる組み合わせ」だけを抽出しています(すべての組み合わせを計算するのに、「AAAA」とか「AAGG」とかの要素が重複する項目は削除)。

元になっているルーチンは、製品コードなどの複数桁から構成され、それぞれの桁で数値の範囲が異なるという規則性を持つコードを、すべてのパターンについて生成するというものでした。割と、製品カタログ掲載データなどで「ありがち」な仕様です。最新のルーチンでは、各桁についてプロパティ「aRuleList」に、

{下限値, 上限値}

とコードの生成ルールを定義しておいて、そのルールにもとづいてすべてのパターンのコードを展開していました。

出来上がったプログラムにそれほど時間はかけていませんが、それなりの行数に(圧縮記述をせず、見やすく、高度な処理を書けば、行数が増えるのは当然のことなんですけれども)。

  「もう少しシンプルに書けそうなもんだけどー?」

という気持ちでいっぱいですが、まずは機能を実現することが重要です。

→ この処理自体を「Permutations」と呼ぶことを見つけ、MacScripter.netにそのものズバリの処理がずらずらと並んでいるのを見て脱力しました。そうかぁ、再帰で処理するのかぁ。あ、全然高速ですね。ただ、項目数を増やすとやっぱりメモリが足りなくなって、処理がきつくなるのは同様の模様で。

→ 結局、MacScripterに投稿された各種Scriptも、最終的にテキスト要素の1次元配列にデータ変換すると、本ルーチンと同じぐらいの処理時間がかかって驚きです 本ルーチン、そんなに遅くない模様(無駄に長いだけで)

AppleScript名:与えられた文字列の1D Listのすべての順列組み合わせパターン文字列を返す v2
— Created 2019-06-18 by Takaaki Naganoya
— 2019 Piyomaru Software
use AppleScript version "2.4"
use scripting additions
use framework "Foundation"

script spd
  property aList : {}
  
property tmpList : {}
  
property aRuleList : {{1, 4}, {1, 4}, {1, 4}, {1, 4}} –上書きしてしまうので、この通りとはかぎらない
  
property aRuleLen : length of aRuleList
end script

set targList to {"A", "T", "G", "C"}
set aRes to retStrListInAllCombinations(targList) of me
–> {"ATGC", "ATCG", "AGTC", "AGCT", "ACTG", "ACGT", "TAGC", "TACG", "TGAC", "TGCA", "TCAG", "TCGA", "GATC", "GACT", "GTAC", "GTCA", "GCAT", "GCTA", "CATG", "CAGT", "CTAG", "CTGA", "CGAT", "CGTA"}

–与えた文字列リストを、順列組み合わせの全パターンで組み替え直して返す
on retStrListInAllCombinations(targList as list)
  
  
set aRes to retAllPatterns(targList) of me
  
–> {1234, 1243, 1324, 1342, 1423, 1432, 2134, 2143, 2314, 2341, 2413, 2431, 3124, 3142, 3214, 3241, 3412, 3421, 4123, 4132, 4213, 4231, 4312, 4321}
  
  
–順列組み合わせデータをもとに元データをその順番に組み合わせる
  
set (tmpList of spd) to {}
  
repeat with i in aRes
    set jList to characters of (i as string)
    
    
set tmpStr to ""
    
repeat with ii in jList
      set tmpStr to tmpStr & (contents of item (ii as integer) of targList)
    end repeat
    
    
set the end of (tmpList of spd) to tmpStr
  end repeat
  
  
return (tmpList of spd)
end retStrListInAllCombinations

–与えられた要素数のリストをもとに、すべての順列組み合わせパターンを返す
on retAllPatterns(targList)
  –ルールテーブルの初期化
  
set targStrLen to length of targList
  
set (aRuleList of spd) to {}
  
repeat with i from 1 to targStrLen
    set the end of (aRuleList of spd) to {1, targStrLen}
  end repeat
  
set (aRuleLen of spd) to targStrLen –初版ではここを更新していなかったので、データの桁数を増やしても出力結果の桁数が変わらないというバグがあった
  
  
—
  
set (aList of spd) to {} –initilaize
  
set initNum to getMinNum() of me –本ルール下における最小値
  
  
copy initNum to aNum
  
  
repeat
    set aRes to incDigit(aNum, 1) of me
    
    
if aRes = false then
      exit repeat
    end if
    
    
if (chkEachDigitIsNotSameChar(aRes) of me) = true then
      if aRes is not in (aList of spd) then
        set the end of (aList of spd) to aRes
      end if
    end if
    
    
copy aRes to aNum
    
  end repeat
  
  
return (aList of spd)
end retAllPatterns

–与えられたルール下における最小値をルールリストから求める
on getMinNum()
  –桁数が合っているだけのダミー数字を、適切な桁数作成する(例:11111)
  
set tmpNumStr to ""
  
repeat (aRuleLen of spd) times
    set tmpNumStr to tmpNumStr & "1"
  end repeat
  
  
set tmpNum to tmpNumStr as integer
  
  
–ルールから各桁の最小値を取り出して、各桁に設定する
  
repeat with i from 1 to (aRuleLen of spd)
    set aDigNum to item 1 of item i of (aRuleList of spd)
    
set tmpNum to setDigit(tmpNum, i, aDigNum) of me
  end repeat
  
  
return tmpNum
end getMinNum

–繰り上がり処理(再帰呼び出しで使用)
on incDigit(aNum, aDigit)
  set {thisMin, thisMax} to item ((aRuleLen of spd) – aDigit + 1) of (aRuleList of spd)
  
  
set aTarget to getDigit(aNum, aDigit) of me
  
  
if aTarget = thisMax then
    if aDigit = (aRuleLen of spd) then
      –オーバーフロー(桁あふれ)エラーを返す
      
return false
    end if
    
    
set bNum to incDigit(aNum, aDigit + 1) of me
    
    
if bNum = false then return false
    
    
set bNum to setDigit(bNum, aDigit, thisMin) of me
  else
    set aTarget to aTarget + 1
    
set bNum to setDigit(aNum, aDigit, aTarget) of me
  end if
  
  
return bNum
end incDigit

–指定数値のうち指定桁の数字を返す
on getDigit(aNum, aDigit)
  
  
set aStr to aNum as string
  
set aLen to length of aStr
  
if aLen < aDigit then
    return false –エラー
  end if
  
  
set tStr to character (aLen – aDigit + 1) of aStr
  
return tStr as integer
  
end getDigit

–指定数値のうち指定桁の数字を返す
on setDigit(aNum, aDigit, newNum)
  
  
set aStr to aNum as string
  
set aLen to length of aStr
  
if aLen < aDigit then
    return false –エラー
  end if
  
  
set aList to characters of aStr
  
  
set item (aLen – aDigit + 1) of aList to (newNum as string)
  
set aaStr to aList as string
  
  
return aaStr as integer
  
end setDigit

–与えた文字列の各キャラクタがすべて「別のもの」であるかをチェック
on chkEachDigitIsNotSameChar(aStr as string)
  set aLen to length of aStr
  
set aList to characters of aStr
  
  
set bList to {}
  
repeat with i in aList
    set j to contents of i
    
if j is not in bList then
      set the end of bList to j
    else
      return false –Some duplicated character(s) exists
    end if
  end repeat
  
return true –All Characters are different
end chkEachDigitIsNotSameChar

★Click Here to Open This Script 

Posted in list | Tagged 10.11savvy 10.12savvy 10.13savvy 10.14savvy 10.15savvy | 1 Comment

CotEditorで編集中のMarkdown書類をPDFプレビュー

Posted on 6月 15, 2019 by Takaaki Naganoya

CotEditorで編集中のMarkdown書類を、MacDownでPDF書き出しして、Skimでオープンして表示するAppleScriptです。

CotEditorにMarkdownのプレビュー機能がついたらいいと思っている人は多いようですが、MarkdownはMarkdownで、方言は多いし標準がないし、1枚もののMarkdown書類だけ編集できればいいのか、本などのプロジェクト単位で編集とか、目次が作成できないとダメとか、リンクした画像の扱いをどうするのかとか、対応しようとすると「ほぼ別のソフトを作るのと同じ」ぐらい手間がかかりそうです(メンテナー様ご本人談)。

そこで、AppleScript経由で他のソフトを連携させてPDFプレビューさせてみました。これなら、誰にも迷惑をかけずに、今日この時点からすぐにMarkdownのプレビューが行えます(当然、HTML書き出ししてSafariでプレビューするバージョンははるかかなた昔に作ってあります)。

ただし、OS側の機能制限の問題で、CotEditor上のスクリプトメニューから実行はできません(GUI Scriptingの実行が許可されない)。OS側のスクリプトメニューに登録して実行する必要があります。

GUI Scriptingを利用してメニュー操作を行なっているため、システム環境設定で許可しておく必要があります。

本来であれば、PDFの書き出し先フォルダ(この場合は書き出しダイアログで、GUI Scirptingを用いてCommand-Dで指定して一律に場所指定が行えるデスクトップフォルダ)に同名のPDFが存在しないかどうかチェックし、存在すれば削除するといった処理が必要ですが、面倒だったのであらかじめMarkdown書類をUUIDにリネームしておくことで、書き出されたPDFも同じくUUIDのファイル名になるため、論理上はファイル名の衝突を回避できるため、削除処理を省略しています。

AppleScript名:🌏レンダリングしてPDFプレビュー
— Created 2019-06-15 by Takaaki Naganoya
— 2019 Piyomaru Software
use AppleScript version "2.5"
use scripting additions
use framework "Foundation"
use framework "AppKit"

property NSUUID : a reference to current application’s NSUUID
property NSWorkspace : a reference to current application’s NSWorkspace

–オープン中のMarkdown書類を取得する
tell application "CotEditor"
  tell front document
    set cStyle to coloring style
    
if cStyle is not equal to "Markdown" then
      display dialog "編集中のファイルはMarkdown書類ではないようです。" buttons {"OK"} default button 1
      
return
    end if
    
    
set aPath to path
  end tell
end tell

–一時フォルダにMarkdown書類をコピー
set sPath to (path to temporary items)
tell application "Finder"
  set sRes to (duplicate ((POSIX file aPath) as alias) to folder sPath with replacing)
end tell

–コピーしたMarkdown書類をリネーム
set s1Res to sRes as alias
set aUUID to NSUUID’s UUID()’s UUIDString() as text –UUIDを作成する
tell application "Finder"
  set name of s1Res to (aUUID & ".md")
end tell

–Markdown書類をデスクトップにPDF書き出し
set pdfRes to exportFromMacDown(POSIX path of s1Res) of me

–PDF Viewerでオープン
tell application "Skim" –Preview.appでもOK
  activate
  
open pdfRes
end tell

–一時フォルダに書き出したMarkdown書類を削除
tell application "Finder"
  delete s1Res
end tell

–指定のMacDownファイル(alias)をデスクトップ上にPDFで書き出し
on exportFromMacDown(anAlias)
  set s1Text to paragraphs of (do shell script "ls ~/Desktop/*.pdf") –pdf書き出し前のファイル一覧
  
  
tell application "MacDown"
    open {anAlias}
  end tell
  
  
macDownForceSave() of me
  
  
tell application "MacDown"
    close every document without saving
  end tell
  
  
do shell script "sync" –ねんのため
  
  
set s2Text to paragraphs of (do shell script "ls ~/Desktop/*.pdf") –pdf書き出し後のファイル一覧
  
  
set dRes to getDiffBetweenLists(s1Text, s2Text) of me –デスクトップ上のPDFファイル名一覧の差分を取得
  
set d2Res to (addItems of dRes)
  
  
if length of d2Res ≥ 1 then
    return contents of first item of d2Res
  else
    error "Error in exporting PDF to desktop folder…."
  end if
end exportFromMacDown

on getDiffBetweenLists(aArray as list, bArray as list)
  set allSet to current application’s NSMutableSet’s setWithArray:aArray
  
allSet’s addObjectsFromArray:bArray
  
  
–重複する要素のみ抜き出す
  
set duplicateSet to current application’s NSMutableSet’s setWithArray:aArray
  
duplicateSet’s intersectSet:(current application’s NSSet’s setWithArray:bArray)
  
  
–重複部分を削除する
  
allSet’s minusSet:duplicateSet
  
set resArray to (allSet’s allObjects()) as list
  
  
set aSet to current application’s NSMutableSet’s setWithArray:aArray
  
set bSet to current application’s NSMutableSet’s setWithArray:resArray
  
aSet’s intersectSet:bSet –積集合
  
set addRes to aSet’s allObjects() as list
  
  
set cSet to current application’s NSMutableSet’s setWithArray:bArray
  
cSet’s intersectSet:bSet –積集合
  
set minusRes to cSet’s allObjects() as list
  
  
return {addItems:minusRes, minusItems:addRes}
end getDiffBetweenLists

–注意!! ここでGUI Scriptingを使用。バージョンが変わったときにメニュー階層などの変更があったら書き換え
on macDownForceSave()
  activate application "MacDown"
  
tell application "System Events"
    tell process "MacDown"
      — File > Export > PDF
      
click menu item 2 of menu 1 of menu item 14 of menu 1 of menu bar item 3 of menu bar 1
      
      
–Go to Desktop Folder
      
keystroke "d" using {command down}
      
      
–Save Button on Sheet
      
click button 1 of sheet 1 of window 1
    end tell
  end tell
end macDownForceSave

–Bundle IDからアプリケーションのPathを返す
on retAppAbusolutePathFromBundleID(aBundleID)
  set appPath to NSWorkspace’s sharedWorkspace()’s absolutePathForAppBundleWithIdentifier:aBundleID
  
if appPath = missing value then return false
  
return appPath as string
end retAppAbusolutePathFromBundleID

★Click Here to Open This Script 

Posted in file File path GUI Scripting Markdown PDF shell script | Tagged 10.11savvy 10.12savvy 10.13savvy CotEditor Finder MacDown NSUUID NSWorkspace Skim | Leave a comment

Markdown書類をメモ.appに新規エントリで登録する

Posted on 6月 11, 2019 by Takaaki Naganoya

指定のMarkdown書類をメモ.app(Notes.app)に新規エントリとして登録するAppleScriptです。


▲テストに使ったMarkdown書類

Markdown書類をUTF-8のテキストとして読み込み、それをHTMLに変換し、そのままメモ.app(Notes.app)に新規エントリとして登録します。Markdown書類のHTMLへの解釈はオープンソースのMMMarkdownを利用しています。

自分はMarkdownエディタにMacDownを用いているため、使用しているMarkdown書類もMacDownが解釈する、割と自由度の高い(HTMLコードをそのまま書いておいても許容するような)Markdownのコードを与えて処理してみましたが、これらはMMMarkdownでHTML変換する際にスルーされたせいか、装飾がかなり再現されているように感じます。

Markdownタグの互換性はエディタごとに大きく異なるため、確認はお手元のエディタ用のMarkdown書類で行なってください。

–> Download MMMarkdown.framework (To ~/Library/Frameworks/)


▲MMMarkdownを用いてMarkdown書類をHTMLに変換し、メモ.app(Notes.app)に登録した内容。表以外はけっこう反映できている

タイトルやメモ.app(Notes.app)上の登録先などは適宜変更してみてください。

何も考えずに、手元にあったMarkdown書類を処理してみたところ、http://のリンクや、applescript://のリンクなどもそのまま反映。色情報もそのまま反映されているようです。


▲macOS 10.14.5上で、Applet形式で実行。表も反映されている

macOS 10.14上では、①Script Debuggerを用いて実行 ②Frameworkを含めてApplet形式に書き出して実行 ③SIPを解除してスクリプトエディタ上で実行 のどちらか好きなものを選んでください。

Framework入りでAppletに書き出したものをダウンロードできるようにしておきました。macOS 10.14以降ではこちらもお試しください。

2019/6/15 フレームワークのリンク先が間違っていたようで、バイナリを書き出しし直しました。また、macOS 10.14環境で一部Scripterが言っているような「アプリケーション操作の認証を再度求められる」ような現象には遭遇していません。

–> MarkdownToNotes.zip

AppleScript名:Markdown書類をメモ.appに新規エントリで登録する.scptd
— Created 2019-06-11 by Takaaki Naganoya
— 2019 Piyomaru Software
use AppleScript version "2.4"
use scripting additions
use framework "Foundation"
use framework "MMMarkdown" –https://github.com/mdiep/MMMarkdown

property NSUUID : a reference to current application’s NSUUID

–Markdown書類の読み込み
set aFile to choose file of type {"net.daringfireball.markdown"}
tell current application
  set aStr to (read aFile as «class utf8»)
end tell

–Markdown to HTML
set htmlString to current application’s MMMarkdown’s HTMLStringWithMarkdown:aStr |error|:(missing value)

–メモ.app(Notes.app)に新規エントリを作成する
set aUUID to NSUUID’s UUID()’s UUIDString() as text –UUIDを作成する
tell application "Notes"
  make new note at folder "Notes" of account "iCloud" with properties {name:"TEST Notes_" & aUUID, body:(htmlString as string)}
end tell

★Click Here to Open This Script 

Posted in file Markdown | Tagged 10.11savvy 10.12savvy 10.13savvy 10.14savvy Notes | Leave a comment

Keynote書類のテキスト色を置換

Posted on 6月 9, 2019 by Takaaki Naganoya

最前面のKeynote書類の文字色を置換するAppleScriptです。

# 初出時にはmacOS 10.13であったため、スクリプトエディタ上からも野良Framework呼び出しができましたが、macOS 10.14以降ではSIPを解除するかScript Debugger上で実行する必要があります

Keynoteは文字色の置換をする機能が実装されていないので、個別に手で色を変更するか、あるいはスタイルを編集して一括で修正するやり方になります。

そこで、AppleScriptで色置換を行う処理を書いてみました。表の背景色を置換する処理を書いたときの部品を大幅に使いまわしています。

文字色の取得や判定は、テキストアイテムの1文字目の情報で判断しています。途中で色を変更しているような場合にはうまく検出できません(処理スピードを重視したことと、自分の利用方法の範囲ではそういう文字ごとに異なる色を指定するところまではサポートしなくてよいと考えたためです。仕事ならもうちょっと真面目に作り込むかもしれませんが、、、、)。

ポップアップメニュー中の色名の動的な推定に、オープンソースの「DBColorNames」をフレームワーク化した
「dbColNamesKit.framework」を利用しています。

–> dbColNamesKit.framework (To ~/Library/Frameworks)


▲左上の時刻部分の色を置換したい


▲本Scriptを実行した直後。最前面のKeynote書類のすべてのテキストを走査して文字色を取得する


▲取得した文字色リスト。この中から置換対象を選択する。色データから色名を動的に生成し、色IDとともに名称で個別に指定したり識別したりできる


▲変更後の色をカラーピッカーで選択


▲Keynote書類上の文字色を変更してみた

AppleScript名:Keynote書類の現在のテキスト色を置換.scptd
—
–  Created by: Takaaki Naganoya
–  Created on: 2019/06/08
—
–  Copyright © 2019 Piyomaru Software, All Rights Reserved
—
use AppleScript version "2.5" — Yosemite (10.11) or later
use framework "Foundation"
use framework "AppKit"
use framework "dbColNamesKit" –https://github.com/daniel-beard/DBColorNames/
use scripting additions

property NSView : a reference to current application’s NSView
property NSAlert : a reference to current application’s NSAlert
property NSColor : a reference to current application’s NSColor
property NSMenu : a reference to current application’s NSMenu
property NSImage : a reference to current application’s NSImage
property NSIndexSet : a reference to current application’s NSIndexSet
property NSTextField : a reference to current application’s NSTextField
property NSColorWell : a reference to current application’s NSColorWell
property NSMenuItem : a reference to current application’s NSMenuItem
property NSBezierPath : a reference to current application’s NSBezierPath
property NSPopUpButton : a reference to current application’s NSPopUpButton
property NSMutableArray : a reference to current application’s NSMutableArray
property NSRunningApplication : a reference to current application’s NSRunningApplication

property returnCode : 0
property pop1ind : 0

–スライド枚数をカウント
tell application "Keynote"
  tell front document
    set sCount to count every slide
  end tell
end tell

–すべてのテキストアイテム、タイトルから色情報を取得する
set cList to {}
repeat with sNum from 1 to sCount
  set cList to cList & getEveryTextColorOfSlide(sNum) of me
end repeat

–文字色のユニーク化
set dList to makeUniqueListOf(cList) of me

set paramObj to {mainDat:dList, myTitle:"テキスト色置換", mySubTitle:"Keynoteのテキストアイテム、デフォルトアイテム(タイトル)の文字色置換", myColorRangeMax:65535}
my getPopupValues:paramObj

if pop1ind = false then return –timed out
set fromCol to (contents of item pop1ind of dList)

–カラーピッカーで置換色選択
set tCol to choose color default color fromCol

–Keynote書類中のテキストの文字色を置換
repeat with sNum from 1 to sCount
  set cList to cList & repEveryTextColorOfSlide(sNum, fromCol, tCol) of me
end repeat

–カラーポップアップメニューをウィンドウ表示
on getPopupValues:paramObj
  set ap1List to (mainDat of (paramObj as record)) as list
  
set winTitle to (myTitle of (paramObj as record)) as string
  
set subTitle to (mySubTitle of (paramObj as record)) as string
  
set aColMax to (myColorRangeMax of (paramObj as record)) as list
  
  
–Viewをつくる
  
set aView to NSView’s alloc()’s initWithFrame:(current application’s NSMakeRect(0, 0, 360, 80))
  
  
–Labelをつくる
  
set a1TF to NSTextField’s alloc()’s initWithFrame:(current application’s NSMakeRect(0, 40, 80, 20))
  
a1TF’s setEditable:false
  
a1TF’s setStringValue:"From Color:"
  
a1TF’s setDrawsBackground:false
  
a1TF’s setBordered:false
  
  
–Ppopup Buttonをつくる
  
set a1Button to NSPopUpButton’s alloc()’s initWithFrame:(current application’s NSMakeRect(80, 40, 200, 20)) pullsDown:false
  
a1Button’s removeAllItems()
  
  
set a1Menu to NSMenu’s alloc()’s init()
  
set aCDB to current application’s DBColorNames’s alloc()’s init()
  
  
–Popup Menuをつくる
  
set iCount to 1
  
repeat with i in ap1List
    copy i to {r1, g1, b1}
    
    
set nsCol to makeNSColorFromRGBAval(r1, g1, b1, aColMax, aColMax) of me
    
set anImage to makeRoundedNSImageWithFilledWithColor(64, 64, nsCol, 4) of me
    
    
–色名をRGB値から動的に生成(あらかじめdbNamesが持っているカラーパレットの近似色の色名を返す)
    
set aTitle to "#" & (iCount as string) & " " & (aCDB’s nameForColor:nsCol) as string
    
    
–Menu Itemを作成する
    
set aMenuItem to (NSMenuItem’s alloc()’s initWithTitle:aTitle action:"actionHandler:" keyEquivalent:"")
    (
aMenuItem’s setImage:anImage)
    (
aMenuItem’s setEnabled:true)
    (
aMenuItem’s setTarget:me)
    (
a1Menu’s addItem:aMenuItem)
    
    
set iCount to iCount + 1
  end repeat
  
  
–Popup ButtonにPopup Menuを設定する
  
a1Button’s setMenu:a1Menu
  
  
–ViewにPopup Buttonとテキストラベルを入れる
  
aView’s addSubview:a1TF
  
aView’s addSubview:a1Button
  
aView’s setNeedsDisplay:true


— set up alert  
  
set theAlert to NSAlert’s alloc()’s init()
  
tell theAlert
    its setMessageText:winTitle
    
its setInformativeText:subTitle
    
its addButtonWithTitle:"OK"
    
its addButtonWithTitle:"Cancel"
    
its setAccessoryView:aView
  end tell
  
  
— show alert in modal loop
  
NSRunningApplication’s currentApplication()’s activateWithOptions:0
  
my performSelectorOnMainThread:"doModal:" withObject:(theAlert) waitUntilDone:true
  
if (my returnCode as number) = 1001 then error number -128
  
  
set s1Val to ((a1Button’s indexOfSelectedItem() as number) + 1)
  
copy s1Val to my pop1ind
end getPopupValues:

on doModal:aParam
  set (my returnCode) to aParam’s runModal()
end doModal:

–Popup Action Handler
on actionHandler:sender
  set aTag to tag of sender as integer
  
set aTitle to title of sender as string
end actionHandler:

–aMaxValを最大値とする数値でNSColorを作成して返す
on makeNSColorFromRGBAval(redValue as integer, greenValue as integer, blueValue as integer, alphaValue as integer, aMaxVal as integer)
  set aRedCocoa to (redValue / aMaxVal) as real
  
set aGreenCocoa to (greenValue / aMaxVal) as real
  
set aBlueCocoa to (blueValue / aMaxVal) as real
  
set aAlphaCocoa to (alphaValue / aMaxVal) as real
  
set aColor to NSColor’s colorWithCalibratedRed:aRedCocoa green:aGreenCocoa blue:aBlueCocoa alpha:aAlphaCocoa
  
return aColor
end makeNSColorFromRGBAval

–指定サイズのNSImageを作成し、指定色で塗ってNSImageで返す
on makeNSImageWithFilledWithColor(aWidth as integer, aHeight as integer, fillColor)
  set anImage to NSImage’s alloc()’s initWithSize:(current application’s NSMakeSize(aWidth, aHeight))
  
anImage’s lockFocus()
  
—
  
set theRect to {{x:0, y:0}, {height:aHeight, width:aWidth}}
  
set theNSBezierPath to NSBezierPath’s bezierPath
  
theNSBezierPath’s appendBezierPathWithRect:theRect
  
—
  
fillColor’s |set|() –色設定
  
theNSBezierPath’s fill() –ぬりつぶし
  
—
  
anImage’s unlockFocus()
  
—
  
return anImage
end makeNSImageWithFilledWithColor

–指定サイズのNSImageを作成し、指定色で塗ってNSImageで返す、anRadiusの半径の角丸で
on makeRoundedNSImageWithFilledWithColor(aWidth as integer, aHeight as integer, fillColor, anRadius as real)
  set anImage to NSImage’s alloc()’s initWithSize:(current application’s NSMakeSize(aWidth, aHeight))
  
anImage’s lockFocus()
  
—
  
set theRect to {{x:0, y:0}, {height:aHeight, width:aWidth}}
  
set theNSBezierPath to NSBezierPath’s bezierPathWithRoundedRect:theRect xRadius:anRadius yRadius:anRadius
  
—
  
fillColor’s |set|() –色設定
  
theNSBezierPath’s fill() –ぬりつぶし
  
—
  
anImage’s unlockFocus()
  
  
return anImage
end makeRoundedNSImageWithFilledWithColor

–最前面のKeynote書類のすべてのスライドから、テキストアイテムとタイトルアイテムの文字色を取得
on getEveryTextColorOfSlide(sNum)
  set cList to {}
  
  
tell application "Keynote"
    tell front document
      set sMax to count every slide
      
if sMax < sNum then return false
      
      
tell slide sNum
        –すべての文字アイテムの先頭の文字の色情報を取得
        
try
          set tCount to count every text item
          
repeat with i from 1 to tCount
            set s1List to color of character 1 of object text of text item i
            
set the end of cList to s1List
          end repeat
        on error
          –set s1List to {}
        end try
        
        
–タイトルの先頭の文字の色情報を取得
        
try
          set s2List to color of character 1 of object text of default title item
          
set the end of cList to s2List
        on error
          set s2List to {}
        end try
      end tell
      
    end tell
  end tell
  
  
return cList
end getEveryTextColorOfSlide

–最前面のKeynote書類の指定番号のスライドで、テキストアイテムとタイトルアイテムの文字色を置換
on repEveryTextColorOfSlide(sNum, fromCol, toCol)
  tell application "Keynote"
    tell front document
      set sMax to count every slide
      
if sMax < sNum then return false
      
      
tell slide sNum
        –すべての文字アイテムの先頭の文字の色情報を置換
        
try
          set tCount to count every text item
          
repeat with i from 1 to tCount
            set s1List to color of character 1 of object text of text item i
            
if s1List = fromCol then
              ignoring application responses
                set color of every character of object text of text item i to toCol
              end ignoring
            end if
          end repeat
        on error
          —
        end try
        
        
–タイトルの先頭の文字の色情報を置換
        
try
          set s2List to color of character 1 of object text of default title item
          
if s2List = fromCol then
            ignoring application responses
              set color of every character of object text of default title item to toCol
            end ignoring
          end if
        on error
          set s2List to {}
        end try
      end tell
      
    end tell
  end tell
end repEveryTextColorOfSlide

–Listのユニーク化
on makeUniqueListOf(theList)
  set theSet to current application’s NSOrderedSet’s orderedSetWithArray:theList
  
return (theSet’s array()) as list
end makeUniqueListOf

★Click Here to Open This Script 

Posted in Color dialog GUI list | Tagged 10.11savvy 10.12savvy 10.13savvy Keynote NSAlert NSBezierPath NSColor NSColorWell NSImage NSIndexSet NSMenu NSMenuItem NSMutableArray NSPopUpButton NSRunningApplication NSTextField NSView | Leave a comment

Catalyst AppでAppleScript対応

Posted on 6月 7, 2019 by Takaaki Naganoya

Can you use AppleScript in your UIKit app on macOS Catalina, by utilizing an AppKit bundle? ABSOLUTELY! No hacks required; just set up your scripting definition and handle AppleScript in your AppKit code as normal, or use AEInstallEventHandler. Catalyst apps are Mac apps pic.twitter.com/V3c2FAHfBc

— Steve Troughton-Smith (@stroughtonsmith) June 6, 2019

macOS 10.15, Catalinaで導入された、「Project Catalyst」。かつての名前は「Marzipan」。iOSアプリをmacOSなどAppleの他のOSプラットフォームに移植しやすくするためのフレームワークで、本来のMacアプリケーションとは機能差が(低い方に)生じるのではないかと懸念されていました。

実際のところ、Appleによる(iOSとの共通コードで作られたようにしか見えない)MusicやApple TVアプリケーションなどがAppleScriptに対応していることを見ても、CatalystアプリケーションでAppleScriptへの対応が容易であることが例示されたことの意義は大きいと思います(じゃあなんでPodcastアプリは対応してないんだよ、というツッコミはあるわけですが)。

Posted in sdef | Tagged 10.15savvy | Leave a comment

Numbersで選択中の表のセルの範囲を背景色で頻度集計

Posted on 6月 6, 2019 by Takaaki Naganoya

Numbersでオープン中の書類の現在のシート上にある表の選択範囲のセルに対して、背景色(Background color)で登場頻度の集計を行って、どの色が何回登場しているかを色プレビューしつつ表示するAppleScriptです。

集計をRGB値で数値的に行うことは容易ですが、結局のところ色なんてRGB値で見せられてもわからず、実際に目で見える色で表示しないと判断できません。そのため、アラートダイアログを作成してその上にColorWellで表示しています。


▲Numbersの表でセルを選択


▲Numbersの表のセルに指定されている背景色の登場頻度で集計し、色プレビューと登場回数を表示(スクリプトエディタ@macOS 10.14.5上の表示、Dark Mode)


▲Numbersの表のセルに指定されている背景色の登場頻度で集計し、色プレビューと登場回数を表示(Script Debugger@macOS 10.14.5上の表示、Dark Mode)

上記サンプル表は本Blog上での説明用のために簡略化した表ですが、実際には数十行の入り組んだNumbersの表を相手にしており、かつ、手作業で色付きセルだけを数えるなんて考えたくもないレベルで頻繁に確認しなくてはならなかったために、本Scriptを作ってみました。

Numbersにかぎらず、iWorkアプリケーション(Keynote、Pages、Numbers)で共通の仕様ですが、背景色を塗らないセルから背景色を取得するとmissing valueが返ります。

本ScriptはScript Menuに入れて実行するとアラートダイアログが最前面に出てこないなど、Script書類(.scpt、.scptd)のままで実行すると問題が発生。Script Menuに入れる場合にはアプレット(.app)書き出しする必要があります。


▲スクリプトメニューにアプレット書き出しした実行ファイルを入れて呼び出し(macOS 10.14.5)。スクリプトメニューは最前面にあるGUIアプリケーションに応じて、それぞれのアプリケーション用のメニューを表示できるようになっている

AppleScript名:選択中の表のセルの範囲を背景色で頻度集計.scptd
—
–  Created by: Takaaki Naganoya
–  Created on: 2019/06/06
—
–  Copyright © 2019 Piyomaru Software, All Rights Reserved
—
use AppleScript version "2.4" — Yosemite (10.10) or later
use framework "Foundation"
use framework "AppKit"
use scripting additions

property NSView : a reference to current application’s NSView
property NSAlert : a reference to current application’s NSAlert
property NSColor : a reference to current application’s NSColor
property NSIndexSet : a reference to current application’s NSIndexSet
property NSTextField : a reference to current application’s NSTextField
property NSColorWell : a reference to current application’s NSColorWell
property NSScrollView : a reference to current application’s NSScrollView
property NSMutableArray : a reference to current application’s NSMutableArray
property NSRunningApplication : a reference to current application’s NSRunningApplication

property theResult : 0
property returnCode : 0
property theDataSource : {}

tell application "Numbers"
  tell front document
    tell active sheet
      try
        set theTable to first table whose class of selection range is range
      on error
        return "No Selection" –何も選択されてなかった場合
      end try
      
      
tell theTable
        set bgColList to background color of every cell of selection range
        
–> {{18572, 45937, 65452}, {18572, 45937, 65452}, {3001, 24801, 44056}, {18572, 45937, 65452}, {18572, 45937, 65452}, {64899, 33134, 31509}, {64899, 33134, 31509}, {18572, 45937, 65452}, {18572, 45937, 65452}, {3001, 24801, 44056}, {18572, 45937, 65452}, {18572, 45937, 65452}, {26149, 65534, 58650}, {26149, 65534, 58650}, {26149, 65534, 58650}, {26149, 65534, 58650}, {18572, 45937, 65452}, {18572, 45937, 65452}}
      end tell
    end tell
  end tell
end tell

set bgColList to countItemsByItsAppearance(bgColList) of me
–> {{theName:{65535, 65533, 65534}, numberOfTimes:73}, {theName:{65535, 65535, 21706}, numberOfTimes:73}, {theName:missing value, numberOfTimes:27}}

set paramObj to {mainDat:bgColList, myTitle:"色別集計", mySubTitle:"Numbers上で選択したセルの背景色の頻度集計"}
–my browseColors:paramObj–for debug

my performSelectorOnMainThread:"browseColors:" withObject:(paramObj) waitUntilDone:true

on browseColors:paramObj
  set aParamList to (mainDat of (paramObj as record)) as list
  
set winTitle to (myTitle of (paramObj as record)) as string
  
set subTitle to (mySubTitle of (paramObj as record)) as string
  
  
set aLen to length of aParamList
  
  
set aHeight to 100
  
set aWidth to 300
  
  
–NSViewをつくる
  
set aNSV to NSView’s alloc()’s initWithFrame:(current application’s NSMakeRect(0, 0, aWidth, aHeight * 1.5))
  
aNSV’s setNeedsDisplay:true
  
  
— NSScroll Viewをつくる
  
set aScroll to NSScrollView’s alloc()’s initWithFrame:(current application’s NSMakeRect(0, 0, aWidth, aHeight))
  
aScroll’s setDocumentView:aNSV
  
  
aNSV’s enclosingScrollView()’s setHasHorizontalScroller:true
  
aNSV’s enclosingScrollView()’s setHasVerticalScroller:true
  
  
–NSColorWell+ NSTextFieldをつくる
  
set aStep to 1
  
repeat with i in aParamList
    set aColorWell to (NSColorWell’s alloc()’s initWithFrame:(current application’s NSMakeRect(10, ((aLen – aStep + 1) * 30), 60, 20)))
    
    
set myName to (theName of i)
    
set myTimes to (numberOfTimes of i)
    
    
if myName is not equal to missing value then
      copy (myName as list) to {rNum, gNum, bNum}
      
set myTimes to numberOfTimes of i
      
      
set myColor to makeNSColorFromRGBAval(rNum, gNum, bNum, 65535, 65535) of me
      (
aColorWell’s setColor:myColor)
      (
aColorWell’s setBordered:false)
      (
aNSV’s addSubview:aColorWell)
      
      
set aTF to makeNSTextField(80, ((aLen – aStep + 1) * 30), 100, 20, false, myTimes as string, true, true) of me
      (
aNSV’s addSubview:aTF)
      
      
set aStep to aStep + 1
    end if
  end repeat
  
  
–NSScrollViewを強制的にトップにスクロール
  
set aPT to current application’s NSMakePoint(0.0, aHeight)
  
aScroll’s documentView()’s scrollPoint:aPT
  
  
— set up alert  
  
set theAlert to NSAlert’s alloc()’s init()
  
tell theAlert
    its setMessageText:winTitle
    
its setInformativeText:subTitle
    
its addButtonWithTitle:"OK"
    
its addButtonWithTitle:"Cancel"
    
its setAccessoryView:aScroll
  end tell
  
  
— show alert in modal loop
  
NSRunningApplication’s currentApplication()’s activateWithOptions:0
  
my performSelectorOnMainThread:"doModal:" withObject:(theAlert) waitUntilDone:true
  
if (my returnCode as number) = 1001 then error number -128
  
end browseColors:

on doModal:aParam
  set (my returnCode) to aParam’s runModal()
end doModal:

on makeNSColorFromRGBAval(redValue as integer, greenValue as integer, blueValue as integer, alphaValue as integer, aMaxVal as integer)
  set aRedCocoa to (redValue / aMaxVal) as real
  
set aGreenCocoa to (greenValue / aMaxVal) as real
  
set aBlueCocoa to (blueValue / aMaxVal) as real
  
set aAlphaCocoa to (alphaValue / aMaxVal) as real
  
set aColor to NSColor’s colorWithCalibratedRed:aRedCocoa green:aGreenCocoa blue:aBlueCocoa alpha:aAlphaCocoa
  
return aColor
end makeNSColorFromRGBAval

–1D Listを要素別に出現回数で集計
on countItemsByItsAppearance(aList as list)
  set aSet to current application’s NSCountedSet’s alloc()’s initWithArray:aList
  
set bArray to current application’s NSMutableArray’s array()
  
set theEnumerator to aSet’s objectEnumerator()
  
  
repeat
    set aValue to theEnumerator’s nextObject()
    
if aValue is missing value then exit repeat
    
bArray’s addObject:(current application’s NSDictionary’s dictionaryWithObjects:{aValue, (aSet’s countForObject:aValue)} forKeys:{"theName", "numberOfTimes"})
  end repeat
  
  
–出現回数(numberOfTimes)で降順ソート
  
set theDesc to current application’s NSSortDescriptor’s sortDescriptorWithKey:"numberOfTimes" ascending:false
  
bArray’s sortUsingDescriptors:{theDesc}
  
  
return bArray as list
end countItemsByItsAppearance

on makeNSTextField(xPos as integer, yPos as integer, myWidth as integer, myHeight as integer, editableF as boolean, setVal as string, backgroundF as boolean, borderedF as boolean)
  set aNSString to NSTextField’s alloc()’s initWithFrame:(current application’s NSMakeRect(xPos, yPos, myWidth, myHeight))
  
aNSString’s setEditable:(editableF)
  
aNSString’s setStringValue:(setVal)
  
aNSString’s setDrawsBackground:(backgroundF)
  
aNSString’s setBordered:(borderedF)
  
return aNSString
end makeNSTextField

★Click Here to Open This Script 

Posted in Color dialog list Record | Tagged 10.12savvy 10.13savvy 10.14savvy NSAlert NSColor NSColorWell NSCountedSet NSDictionary NSIndexSet NSMutableArray NSRunningApplication NSScrollView NSSortDescriptor NSTextField NSView Numbers | Leave a comment

Finder上で選択中のファイルをDMGに変換して圧縮 v2

Posted on 6月 6, 2019 by Takaaki Naganoya

Finder上で選択中のファイルをあらたに作ったDiskImageに入れてZip圧縮するAppleScriptです。

Script Menuに入れて実行することを前提にして作ってあります。

Google DriveなどのクラウドストレージにAppleScriptアプレットなどの実行ファイルをアップロードすると、バンドルが壊れたり、実行できなくなったりします。

そのため、仕方なくZip圧縮してアップロードしたりするわけですが、どうもZipの中身までGoogle Drive側が内容を展開して確認するらしく、ウィルスと疑われてZip圧縮した実行ファイルをダウンロードできないケースが見られます。

また、.dmgファイルに入れただけでもGoogle Driveが中身をスキャンして実行ファイルに警告を出すとのこと。一般的にはウィルスの拡散を防止する機能として好意的に受け止められるべきものですが、本当にプログラムを受け渡す必要がある場合には、こまった仕様です。

そこで、Diskimageに入れて、本来であればパスワードをつけてZip圧縮したいところですが、取り回しが悪くなるので、パスワードはつけないでアーカイブ化するようにしてみました。


▲Finder上で選択中のファイル(複数可)


▲本Scriptでdmg化してZip圧縮したもの


▲Zipアーカイブを展開してdiskimageファイルをマウントしたところ

本Scriptは、おおよそ自分で組んだ記憶がないのと、プログラムの構造が自分らしくないので、おそらくMacScripter.netあたりで拾ってきたScriptをそのまま使っていたものでしょう。それを一部修正してみました。オリジナルのScriptではFinder上で選択中のフォルダのみ処理するようになっていましたが、実際にはファイルをやりとりしたい(AppleScriptアプレットのケース多し)ので、ファイルをそのままdmg化できるように変更しました(単にフォルダを作成してコピーするだけですが)。

本ScriptはmacOS 10.15Beta1上では、macOS 10.15側にバグがあるため動作しません(POSIX pathへの変換程度でバグを作ってほしくないなー)。

AppleScript名:Finder上で選択中のファイルをDMGに変換して圧縮 v2
—
–  Created by: Takaaki Naganoya
–  Created on: 2019/06/06
—
–  Copyright © 2019 Piyomaru Software, All Rights Reserved
—
use AppleScript version "2.5"
use scripting additions
use framework "Foundation"

property NSUUID : a reference to current application’s NSUUID

property deleteV : true –DMG変換後に対象フォルダを削除しない(trueで削除)
property zipDmg : true –DMG作成後にZip圧縮する(trueで圧縮+DMG削除)

–Finder上の選択項目を取得、選択されていない場合には処理終了
tell application "Finder"
  set selList to selection as alias list
  
if selList = {} or selList = "" or selList = missing value then
    activate
    
display dialog "何も選択されていません。" buttons {"OK"} default button 1 with icon 1
    
return
  end if
end tell

–一時フォルダを作って選択中のアイテムをコピー
set aUUID to NSUUID’s UUID()’s UUIDString() as text

set aTmp to POSIX path of (path to desktop) –macOS 10.15 beta1ではおかしな結果が返ってくる
set tmpDir to aTmp & aUUID
do shell script "mkdir -p " & quoted form of tmpDir

set targFol to (POSIX file tmpDir) as alias

try
  tell application "Finder"
    duplicate selList to folder targFol
  end tell
on error
  display dialog "エラー:ファイルのコピー中にエラーが発生" buttons {"OK"} default button 1 with icon 1
  
return
end try

set aList to {targFol}

tell application "Finder"
  
  
set dmgList to {}
  
  
–選択中のアイテムを順次処理するループ
  
repeat with i in aList
    set the end of dmgList to makeDMGfromFolderAlias(i, "") of me –パスワードは付けない
    
    
–処理後のフォルダを削除する処理
    
if (deleteV as boolean) = true then
      deleteFolderItself(i) of me
    else
      –元フォルダを削除しない場合、元フォルダの名前を変更する
      
tell application "Finder"
        set aName to name of i
      end tell
      
      
set aName to aName & "_origFol"
      
      
tell application "Finder"
        set name of i to aName
      end tell
    end if
  end repeat
  
  
if zipDmg = true then
    repeat with i in dmgList
      set j to contents of i
      
      
set f1Path to quoted form of j –DMGファイルのPOSIX Path
      
set f2Path to quoted form of (j & ".zip") –ZipファイルのPOSIX Path
      
      
–タイムアウト時間は2時間
      
with timeout of 7200 seconds
        do shell script "/usr/bin/zip -r -j " & f2Path & " " & f1Path
        
do shell script "/bin/rm -f " & f1Path
      end timeout
      
    end repeat
  end if
end tell

–指定のフォルダ(alias)をDiskImageに変換する
on makeDMGfromFolderAlias(aaSel, aPassword)
  
  
set aPassword to aPassword as string
  
  
tell application "Finder"
    set fn to name of aaSel
  end tell
  
  
set aDir to (POSIX path of aaSel)
  
set aDir to quoted form of aDir
  
  
set fp2 to do shell script "dirname " & aDir
  
set fp2 to fp2 & "/"
  
  
set outPath to (fp2 & fn & ".dmg")
  
  
if aPassword is not equal to "" then
    –パスワードつきの場合
    
set aCMD to "printf ’" & aPassword & "’ | hdiutil create -encryption -srcfolder " & aDir & " " & (quoted form of outPath)
  else
    –パスワードなしの場合
    
set aCMD to "hdiutil create -srcfolder " & aDir & " " & (quoted form of outPath)
  end if
  
  
set fp3 to do shell script aCMD
  
  
return outPath
  
end makeDMGfromFolderAlias

–指定フォルダ内をすべて削除し、そのフォルダ自体も削除
on deleteFolderItself(aFol)
  set aU to (quoted form of POSIX path of aFol)
  
do shell script "rm -rf " & aU
end deleteFolderItself

★Click Here to Open This Script 

Posted in file list | Tagged 10.12savvy 10.13savvy 10.14savvy Finder NSUUID | Leave a comment

macOS 10.15 Beta Release Notesに将来のmacOSでPython、Ruby、Perlなどのランタイムが含まれなくなることを告知

Posted on 6月 6, 2019 by Takaaki Naganoya

https://developer.apple.com/documentation/macos_release_notes/macos_10_15_beta_release_notes

Scripting language runtimes such as Python, Ruby, and Perl are included in macOS for compatibility with legacy software. Future versions of macOS won’t include scripting language runtimes by default.

なので、これらのツールを使って処理をしているプログラムは、インストーラーを走らせるとか、パッケージ内にこれらのツールのバイナリを同梱するといった対処が必要になるようです。

普通にhomebrewなどのパッケージマネージャで各種シェル系のプログラムをインストールすることが多いので、「わかっている人には影響はない」ものの、そういう事情がわかっていない人には影響が出そうなポリシー変更ではあります。

また、今後のmacOS環境にはこれらのツールがデフォルトではインストールされていないことを前提にAppleScriptを組む必要があるため、これらのツールを使う場合にはAppleScriptのバンドル内に入れて配布、基本的にdo shell scriptの使用を避けるといった対処が必要です(これら以外のCLIのコマンドも追加インストールにならないとは限りません)。

AppleのポリシーがGPLのポリシーと相入れないためにこうなった、と見る人も多いですが、セキュリティのレベルを上げるための言い訳ではないでしょうか。実際のところは分かりませんけれども。

ちなみに、osascript(つまりAppleScriptやJXA)、shell scriptなどのインタプリタ・コマンドは添付され続けるとのことです。

肝心のAppleScriptの処理系についてですが、Version 2.7で変更はありませんでした。ただ、バージョンが変わらないものの新たなバグが出ているので、macOS 10.13で失われまくった信頼を取り戻すためにも、バグを修正していただきたいものです(PDFkitまわりとか)。

「将来リリースされるmacOS」が指している具体的な内容が、正式リリース版のmacOS 10.15なのか、次のmacOS 10.16もしくはそれ以降のバージョンを指しているのかは不明です。

Posted in How To | Tagged 10.15savvy | Leave a comment

Apple TVアプリベータ版にAppleScript用語辞書

Posted on 6月 5, 2019 by Takaaki Naganoya

You'll be happy to know that but both Music and Apple TV apps on Catalina have Applescript dictionaries. Music even has stuff for controlling Air Play.

I'm pleasantly surprised.

— Kevin van Haaren (@kvanh) June 4, 2019


macOS 10.15, Catalina Beta 1を試用したユーザーからの報告によると、同バージョンに同梱されているApple TVアプリに旧iTunes.appのAppleScript用語辞書を元にしたと思われるAppleScript用語辞書が含まれており、AppleScriptからコントロールできるようです。

旧iTunes.appを親に持つ新アプリは「Music」「Apple TV」、そして「Podcast」の3本があるわけですが、前者2つにAppleScript用語辞書があることが確認されました。

残念ながら現時点ではPodcastアプリにAppleScript用語辞書はないようですが、今後のアップデートで状況は変わるかもしれません。

Posted in sdef | Tagged 10.15savvy Apple TV iTunes Music | Leave a comment

Musicアプリベータ版にAppleScript用語辞書

Posted on 6月 4, 2019 by Takaaki Naganoya

https://twitter.com/boyvanamstel/status/1135651562540478466

このところ、仕事で大きめのAppleScriptのシステムを組んでいるのでWWDC方面はぜんぜんキャチアップできていないのですが、iTunesがMusic、Podcast、Movieの3つのアプリに解体されるという噂が、だいたいそのとおりになったようで。

さらに、Musicアプリのベータ版にはiTunesと同じ(未確認)AppleScript用語辞書が搭載されているとか。ただし、iTunesの辞書そのままではない(比較してみると完全に同じではないらしい)点に注意が必要です。別アプリに分離されたデータとかは扱えないように(珍しくきちんと)配慮されているようです。

地味に、macOS 10.15, CatalinaでMacBook Pro 2012が切られなかったことが驚きであります。画面のコーティングが剥離してきても、ディスプレイまわりのパッキンがつぶれても、筐体裏面のゴム足が消え失せても、まだサポートが続くMacBook Pro 2012。

Posted in sdef | Tagged 10.15savvy iTunes Music | Leave a comment

電子書籍(PDF)をオンラインストアで販売中!

Google Search

Popular posts

  • macOS 13, Ventura(継続更新)
  • アラートダイアログ上にWebViewで3Dコンテンツを表示(WebGL+three.js)v3
  • UI Browserがgithub上でソース公開され、オープンソースに
  • macOS 13 TTS Voice環境に変更
  • Xcode 14.2でAppleScript App Templateを復活させる
  • 2022年に書いた価値あるAppleScript
  • ChatGPTで文章のベクトル化(Embedding)
  • 新発売:AppleScriptからSiriを呼び出そう!
  • iWork 12.2がリリースされた
  • 従来と異なるmacOS 13の性格?
  • 新発売:CotEditor Scripting Book with AppleScript
  • macOS 13対応アップデート:AppleScript実践的テクニック集(1)GUI Scripting
  • AS関連データの取り扱いを容易にする(はずの)privateDataTypeLib
  • macOS 13でNSNotFoundバグふたたび
  • macOS 12.5.1、11.6.8でFinderのselectionでスクリーンショット画像をopenできない問題
  • ChatGPTでchatに対する応答文を取得
  • 新発売:iWork Scripting Book with AppleScript
  • Finderの隠し命令openVirtualLocationが発見される
  • macOS 13.1アップデートでスクリプトエディタの挙動がようやくまともに
  • あのコン過去ログビューワー(暫定版)

Tags

10.11savvy (1101) 10.12savvy (1242) 10.13savvy (1390) 10.14savvy (586) 10.15savvy (434) 11.0savvy (277) 12.0savvy (185) 13.0savvy (55) CotEditor (60) Finder (47) iTunes (19) Keynote (98) NSAlert (60) NSArray (51) NSBezierPath (18) NSBitmapImageRep (20) NSBundle (20) NSButton (34) NSColor (51) NSDictionary (27) NSFileManager (23) NSFont (18) NSImage (41) NSJSONSerialization (21) NSMutableArray (62) NSMutableDictionary (21) NSPredicate (36) NSRunningApplication (56) NSScreen (30) NSScrollView (22) NSString (117) NSURL (97) NSURLRequest (23) NSUTF8StringEncoding (30) NSView (33) NSWorkspace (20) Numbers (56) Pages (37) Safari (41) Script Editor (20) WKUserContentController (21) WKUserScript (20) WKUserScriptInjectionTimeAtDocumentEnd (18) WKWebView (23) WKWebViewConfiguration (22)

カテゴリー

  • 2D Bin Packing
  • 3D
  • AirDrop
  • AirPlay
  • Animation
  • AppleScript Application on Xcode
  • beta
  • Bluetooth
  • Books
  • boolean
  • bounds
  • Bug
  • Calendar
  • call by reference
  • Clipboard
  • Code Sign
  • Color
  • Custom Class
  • dialog
  • drive
  • exif
  • file
  • File path
  • filter
  • folder
  • Font
  • Font
  • GAME
  • geolocation
  • GUI
  • GUI Scripting
  • Hex
  • History
  • How To
  • iCloud
  • Icon
  • Image
  • Input Method
  • Internet
  • iOS App
  • JavaScript
  • JSON
  • JXA
  • Keychain
  • Keychain
  • Language
  • Library
  • list
  • Locale
  • Machine Learning
  • Map
  • Markdown
  • Menu
  • Metadata
  • MIDI
  • MIME
  • Natural Language Processing
  • Network
  • news
  • Noification
  • Notarization
  • Number
  • Object control
  • OCR
  • OSA
  • PDF
  • Peripheral
  • PRODUCTS
  • QR Code
  • Raw AppleEvent Code
  • Record
  • rectangle
  • recursive call
  • regexp
  • Release
  • Remote Control
  • Require Control-Command-R to run
  • REST API
  • Review
  • RTF
  • Sandbox
  • Screen Saver
  • Script Libraries
  • sdef
  • search
  • Security
  • selection
  • shell script
  • Shortcuts Workflow
  • Sort
  • Sound
  • Spellchecker
  • Spotlight
  • SVG
  • System
  • Tag
  • Telephony
  • Text
  • Text to Speech
  • timezone
  • Tools
  • Update
  • URL
  • UTI
  • Web Contents Control
  • WiFi
  • XML
  • XML-RPC
  • イベント(Event)
  • 未分類

アーカイブ

  • 2023年9月
  • 2023年8月
  • 2023年7月
  • 2023年6月
  • 2023年5月
  • 2023年4月
  • 2023年3月
  • 2023年2月
  • 2023年1月
  • 2022年12月
  • 2022年11月
  • 2022年10月
  • 2022年9月
  • 2022年8月
  • 2022年7月
  • 2022年6月
  • 2022年5月
  • 2022年4月
  • 2022年3月
  • 2022年2月
  • 2022年1月
  • 2021年12月
  • 2021年11月
  • 2021年10月
  • 2021年9月
  • 2021年8月
  • 2021年7月
  • 2021年6月
  • 2021年5月
  • 2021年4月
  • 2021年3月
  • 2021年2月
  • 2021年1月
  • 2020年12月
  • 2020年11月
  • 2020年10月
  • 2020年9月
  • 2020年8月
  • 2020年7月
  • 2020年6月
  • 2020年5月
  • 2020年4月
  • 2020年3月
  • 2020年2月
  • 2020年1月
  • 2019年12月
  • 2019年11月
  • 2019年10月
  • 2019年9月
  • 2019年8月
  • 2019年7月
  • 2019年6月
  • 2019年5月
  • 2019年4月
  • 2019年3月
  • 2019年2月
  • 2019年1月
  • 2018年12月
  • 2018年11月
  • 2018年10月
  • 2018年9月
  • 2018年8月
  • 2018年7月
  • 2018年6月
  • 2018年5月
  • 2018年4月
  • 2018年3月
  • 2018年2月

https://piyomarusoft.booth.pm/items/301502

メタ情報

  • ログイン
  • 投稿フィード
  • コメントフィード
  • WordPress.org

Forum Posts

  • 人気のトピック
  • 返信がないトピック

メタ情報

  • ログイン
  • 投稿フィード
  • コメントフィード
  • WordPress.org
Proudly powered by WordPress
Theme: Flint by Star Verte LLC