Appleの子会社であるClarisから、Claris FileMaker Pro 2025(v22)がリリースされました。
| AppleScript名:Claris FileMaker Pro 2025のバージョン番号取得.scpt |
| tell application "FileMaker Pro" version –> "22.0.1" end tell |
AppleScript用語辞書は前バージョンから変更されていません。
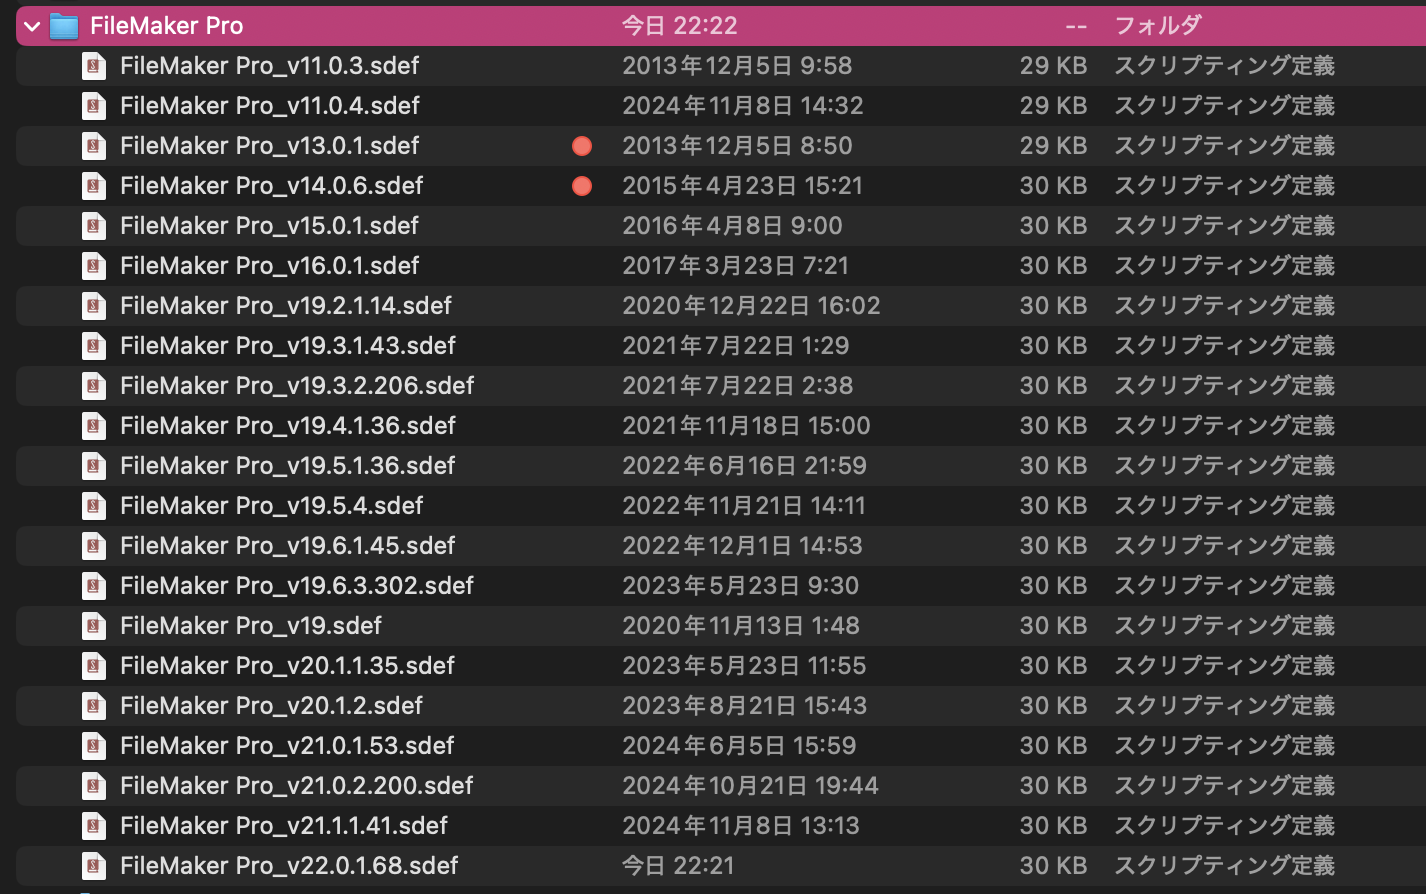
Appleの子会社であるClarisから、Claris FileMaker Pro 2025(v22)がリリースされました。
| AppleScript名:Claris FileMaker Pro 2025のバージョン番号取得.scpt |
| tell application "FileMaker Pro" version –> "22.0.1" end tell |
AppleScript用語辞書は前バージョンから変更されていません。

ASCII ARTで指定の2点間に線を引くAppleScriptです。(デモ用の)文字で表現するゲームを作る場合に、基礎ルーチンを整備しておく必要性を感じて、書いておきました。
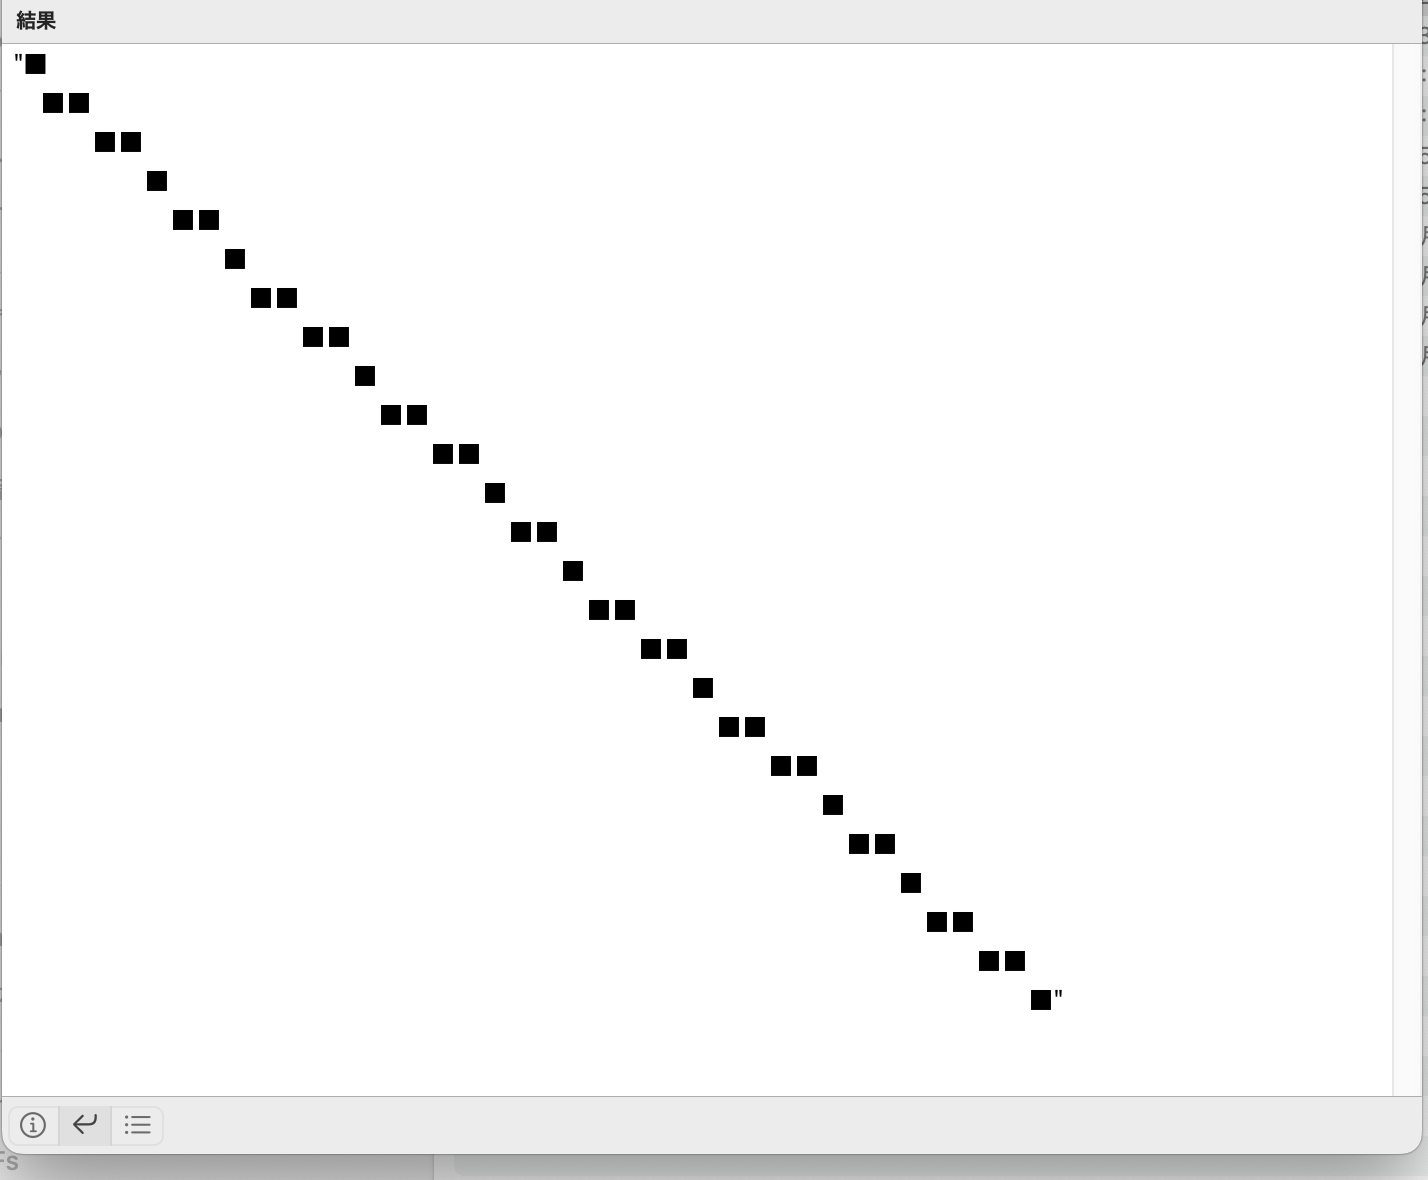
| AppleScript名:ASCII ARTで直線を引く v3.1.scpt |
| — – Created by: Takaaki Naganoya – Created on: 2025/07/07 — – Copyright © 2025 Piyomaru Software, All Rights Reserved — property widthCount : 40 property heightCount : 25 property spaceChar : " " property drawChar : "■" — 使用例 set canvas to makeBlankCanvas() of me set canvas to drawLine(canvas, 0, 0, 39, 24, 1) of me — 太さ1の線 set curDelim to AppleScript’s text item delimiters set AppleScript’s text item delimiters to return set resultText to canvas as text set AppleScript’s text item delimiters to curDelim return resultText on makeBlankCanvas() set blankLine to "" repeat widthCount times set blankLine to blankLine & spaceChar end repeat set canvas to {} repeat heightCount times set end of canvas to blankLine end repeat return canvas end makeBlankCanvas on drawLine(canvas, x0, y0, x1, y1, thickness) script spd property drawnPositions : {} property drawXCoords : {} property canvas : {} property lineChars : {} end script copy canvas to (canvas of spd) set dx to x1 – x0 set dy to y1 – y0 set lineLength to (dx * dx + dy * dy) ^ 0.5 if lineLength = 0 then if x0 ≥ 0 and x0 < widthCount and y0 ≥ 0 and y0 < heightCount then set theLine to item (y0 + 1) of (canvas of spd) set newLine to replaceCharAt(theLine, x0 + 1, drawChar) set item (y0 + 1) of (canvas of spd) to newLine end if return (canvas of spd) end if set nx to –dy / lineLength set ny to dx / lineLength set halfThickness to (thickness – 1) / 2 if halfThickness < 0 then set halfThickness to 0 set x to x0 set y to y0 set dxAbs to absNum(dx) of me set dyAbs to absNum(dy) of me set sx to signNum(dx) of me set sy to signNum(dy) of me set err to dxAbs – dyAbs set (drawnPositions of spd) to {} repeat set (drawXCoords of spd) to {} repeat with t from –halfThickness to halfThickness set pxF to x + nx * t set pxInt to pxF as integer if pxInt ≥ 0 and pxInt < widthCount then if (drawXCoords of spd) does not contain pxInt then set end of (drawXCoords of spd) to pxInt end if end if end repeat set pyInt to y as integer if pyInt ≥ 0 and pyInt < heightCount then set theLine to item (pyInt + 1) of (canvas of spd) set (lineChars of spd) to characters of theLine repeat with pxInt in (drawXCoords of spd) set posKey to (pxInt as string) & "," & (pyInt as string) if (drawnPositions of spd) does not contain posKey then set item (pxInt + 1) of (lineChars of spd) to drawChar set end of (drawnPositions of spd) to posKey end if end repeat set newLine to (lineChars of spd) as string set item (pyInt + 1) of (canvas of spd) to newLine end if if x = x1 and y = y1 then exit repeat set e2 to 2 * err if e2 > –dyAbs then set err to err – dyAbs set x to x + sx end if if e2 < dxAbs then set err to err + dxAbs set y to y + sy end if end repeat return (canvas of spd) end drawLine on replaceCharAt(str, pos, char) if pos < 1 or pos > (length of str) then return str set prefix to text 1 thru (pos – 1) of str set suffix to text (pos + 1) thru -1 of str return prefix & char & suffix end replaceCharAt on absNum(n) if n < 0 then return –n return n end absNum on signNum(n) if n > 0 then return 1 if n < 0 then return -1 return 0 end signNum |
ASCII ARTで円を塗りつぶすAppleScriptです。(デモ用の)文字で表現するゲームを作る場合に、基礎ルーチンを整備しておく必要性を感じて、書いておきました。
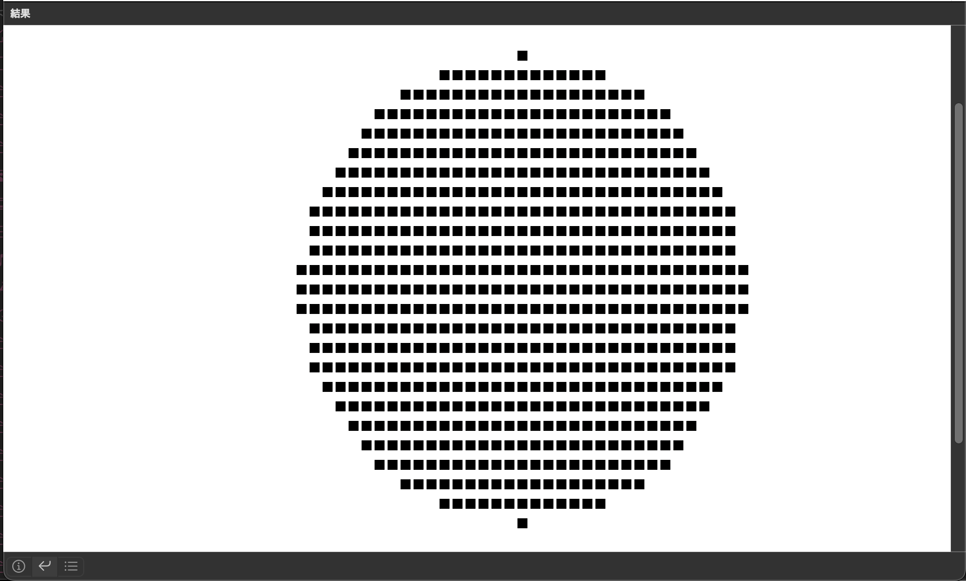
| AppleScript名:ASCII ARTで円を塗る.scpt |
| — – Created by: Takaaki Naganoya – Created on: 2025/07/04 — – Copyright © 2025 Piyomaru Software, All Rights Reserved — use AppleScript version "2.4" — Yosemite (10.10) or later use framework "Foundation" use scripting additions — 円の半径 (この数値を変更すると円の大きさが変わります) set radiusNum to 12 — キャンバスのサイズ set canvasWidth to 80 set canvasHeight to 40 — 円の中心座標 set centerX to canvasWidth / 2 set centerY to canvasHeight / 2 — 全角文字のアスペクト比補正係数 set aspectRatio to 0.7 set aaRes to aaFillCircle(radiusNum, canvasWidth, canvasHeight, centerX, centerY, aspectRatio) of me on aaFillCircle(radiusNum, canvasWidth, canvasHeight, centerX, centerY, aspectRatio) script spd property outputText : "" end script — 描画結果を格納する変数 set (outputText of spd) to "" — 描画処理 (1行ずつ文字を生成) repeat with y from 1 to canvasHeight set currentLine to "" repeat with x from 1 to canvasWidth — 円の方程式を使い、中心からの距離を計算 set distSquared to ((x – centerX) * aspectRatio) ^ 2 + (y – centerY) ^ 2 — 現在の座標が円の内側または円周上にあるか判定 if distSquared ≤ radiusNum ^ 2 then set currentLine to currentLine & "■" else set currentLine to currentLine & " " end if end repeat — 1行分の文字列と改行を出力に追加 set (outputText of spd) to (outputText of spd) & currentLine & " " end repeat return contents of (outputText of spd) end aaFillCircle |
ASCII ARTで円を線で描くAppleScriptです。(デモ用の)文字で表現するゲームを作る場合に、基礎ルーチンを整備しておく必要性を感じて、書いておきました。
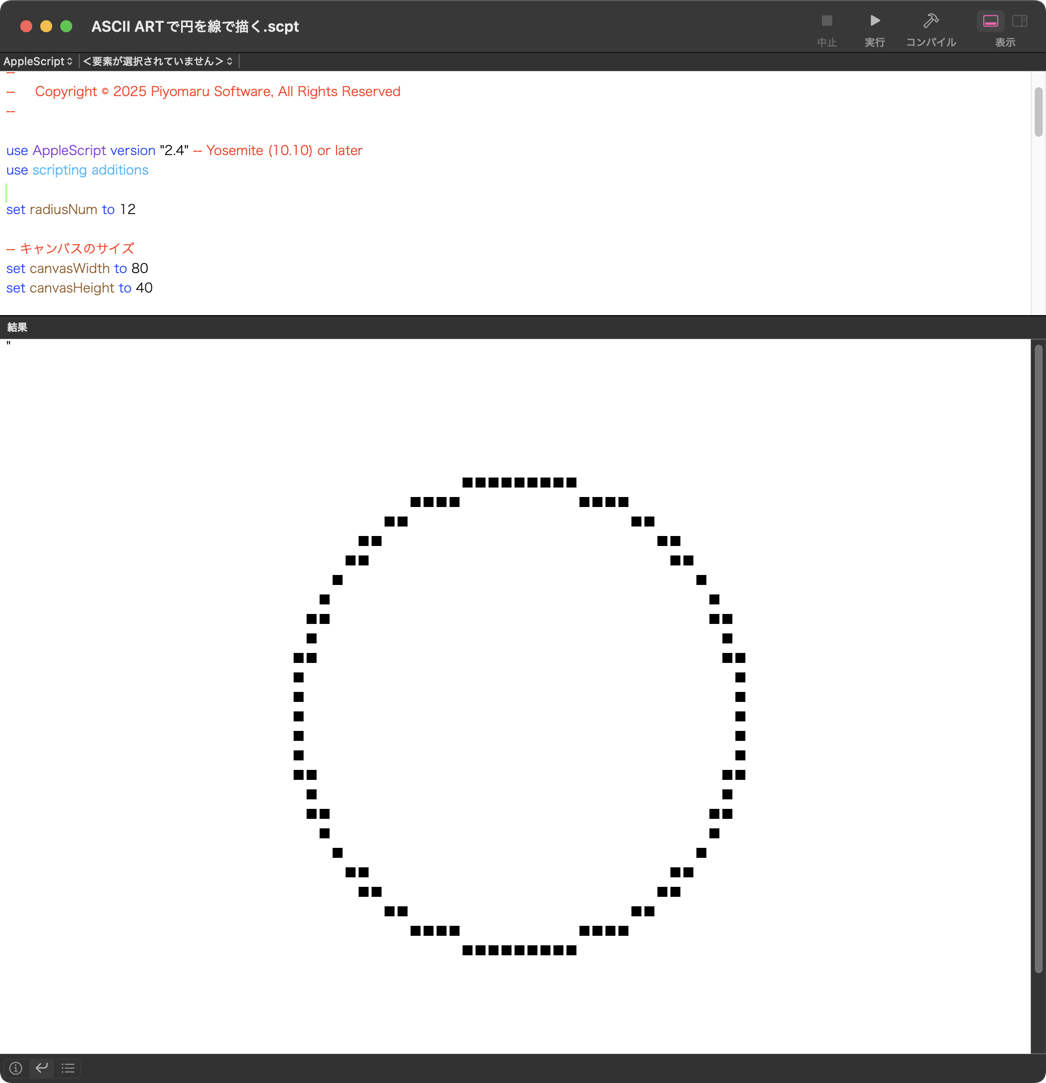
| AppleScript名:ASCII ARTで円を線で描く.scpt |
| — – Created by: Takaaki Naganoya – Created on: 2025/07/04 — – Copyright © 2025 Piyomaru Software, All Rights Reserved — use AppleScript version "2.4" — Yosemite (10.10) or later use scripting additions set radiusNum to 12 — キャンバスのサイズ set canvasWidth to 80 set canvasHeight to 40 — 円の中心座標 set centerX to canvasWidth / 2 set centerY to canvasHeight / 2 — 全角文字のアスペクト比補正係数 set aspectRatio to 0.7 — 描画する線の太さ set lineWidth to 0.5 set ssRes to aaDrawCircleLine(radiusNum, canvasWidth, canvasHeight, centerX, centerY, aspectRatio, lineWidth) of me on aaDrawCircleLine(radiusNum, canvasWidth, canvasHeight, centerX, centerY, aspectRatio, lineWidth) script spd property outputText : "" end script — 描画結果を格納する変数 set (outputText of spd) to "" — 描画処理 (1行ずつ文字を生成) repeat with y from 1 to canvasHeight set currentLine to "" repeat with x from 1 to canvasWidth — 円の方程式を使い、中心からの距離を計算 set distSquared to ((x – centerX) * aspectRatio) ^ 2 + (y – centerY) ^ 2 — 現在の座標が円周上にあるか判定 if (distSquared > (radiusNum – lineWidth) ^ 2) and (distSquared < (radiusNum + lineWidth) ^ 2) then set currentLine to currentLine & "■" else set currentLine to currentLine & " " end if end repeat — 1行分の文字列と改行を出力に追加 set (outputText of spd) to (outputText of spd) & currentLine & " " end repeat return contents of (outputText of spd) end aaDrawCircleLine |
前回の「買収されました」メッセージを表示するだけのアップデートとは異なり、Apple体制下でのそれらしいアップデート(v3.7)が行われました。
AppleScript用語辞書にも変更が加わっているのですが、

Pixelmatorの各バージョンに設定されていたコードネームを返してくるコマンドが廃止になったようです。そんな機能があったとは知りませんでした。廃止はまぁ、機能的に何も影響がないので妥当なところだろうかと。
ChatGPTに日本語形態素解析のAppleScriptを書かせてみました。そのままでは使い物にならず、ずいぶん書き直しましたが、ゼロから書くよりは時間の節約になっています。
ただし、実際に書いて動かしてみるとNLTaggerでは日本語の品詞情報が取得できないので、ほぼ役に立ちません。MeCab経由で取得したほうが実用的です。
この状態で「なんちゃらIntelligence」とか言われても、「はぁ?」としか、、、基礎ができていないのに応用はできませんよ。
| AppleScript名:NLTaggerで品詞つきの日本語形態素解析(ただし、品詞はほとんど役に立たない).scptd |
| — – Created by: Takaaki Naganoya – Created on: 2025/06/30 — – Copyright © 2025 Piyomaru Software, All Rights Reserved — use AppleScript version "2.8" — macOS 12 or later use framework "Foundation" use framework "NaturalLanguage" use scripting additions set inputText to current application’s NSString’s stringWithString:"私は昨日東京に行きました。" — NLTaggerの作成(品詞情報を取得したいのでLexicalClassを指定) set tagger to current application’s NLTagger’s alloc()’s initWithTagSchemes:{current application’s NLTagSchemeLexicalClass} tagger’s setString:inputText tagger’s setLanguage:(current application’s NLLanguageJapanese) range:{location:0, |length|:(inputText’s |length|())} — 結果を格納するリスト set tokenList to {} — 解析処理 set inputLength to (inputText’s |length|()) as integer set currentIndex to 0 repeat while currentIndex < inputLength set tokenRangeRef to reference set {tagRes, theRange} to tagger’s tagAtIndex:(currentIndex) unit:(current application’s NLTokenUnitWord) |scheme|:(current application’s NLTagSchemeLexicalClass) tokenRange:(tokenRangeRef) –return theRange set theRange to theRange as record set startLoc to theRange’s location set rangeLen to theRange’s |length|() if (rangeLen > 0) then set tokenText to inputText’s substringWithRange:(current application’s NSMakeRange(startLoc, rangeLen)) if tagRes is not missing value then set posStr to tagRes as string else set posStr to "Unknown" end if set endIndex to startLoc + rangeLen set end of tokenList to {(tokenText as string), posStr} set currentIndex to endIndex else exit repeat end if end repeat return tokenList –> {{"私", "OtherWord"}, {"は", "OtherWord"}, {"昨日", "OtherWord"}, {"東京", "OtherWord"}, {"に", "OtherWord"}, {"行き", "OtherWord"}, {"まし", "OtherWord"}, {"た", "OtherWord"}, {"。", "SentenceTerminator"}} |
2025年1月1日に製品開発の終了を宣言した、AppleScriptの統合開発環境「Script Debugger」について、Late Night Software, ltd.のWebサイトからダウンロードできるようになりました。
過去の各バージョンのScript Debugger(v4、v4.5、v5、v6、v7、v8)をダウンロードでき、Registration Numberが記載されています。
ただし、As Isで提供されるものであり、サポートや新たに発見されたバグについては免責とされています。
CotEditorでオープン中の最前面の書類の内容を書き換えて、ブロック崩し(Breakout)ゲームを行うAppleScriptです。
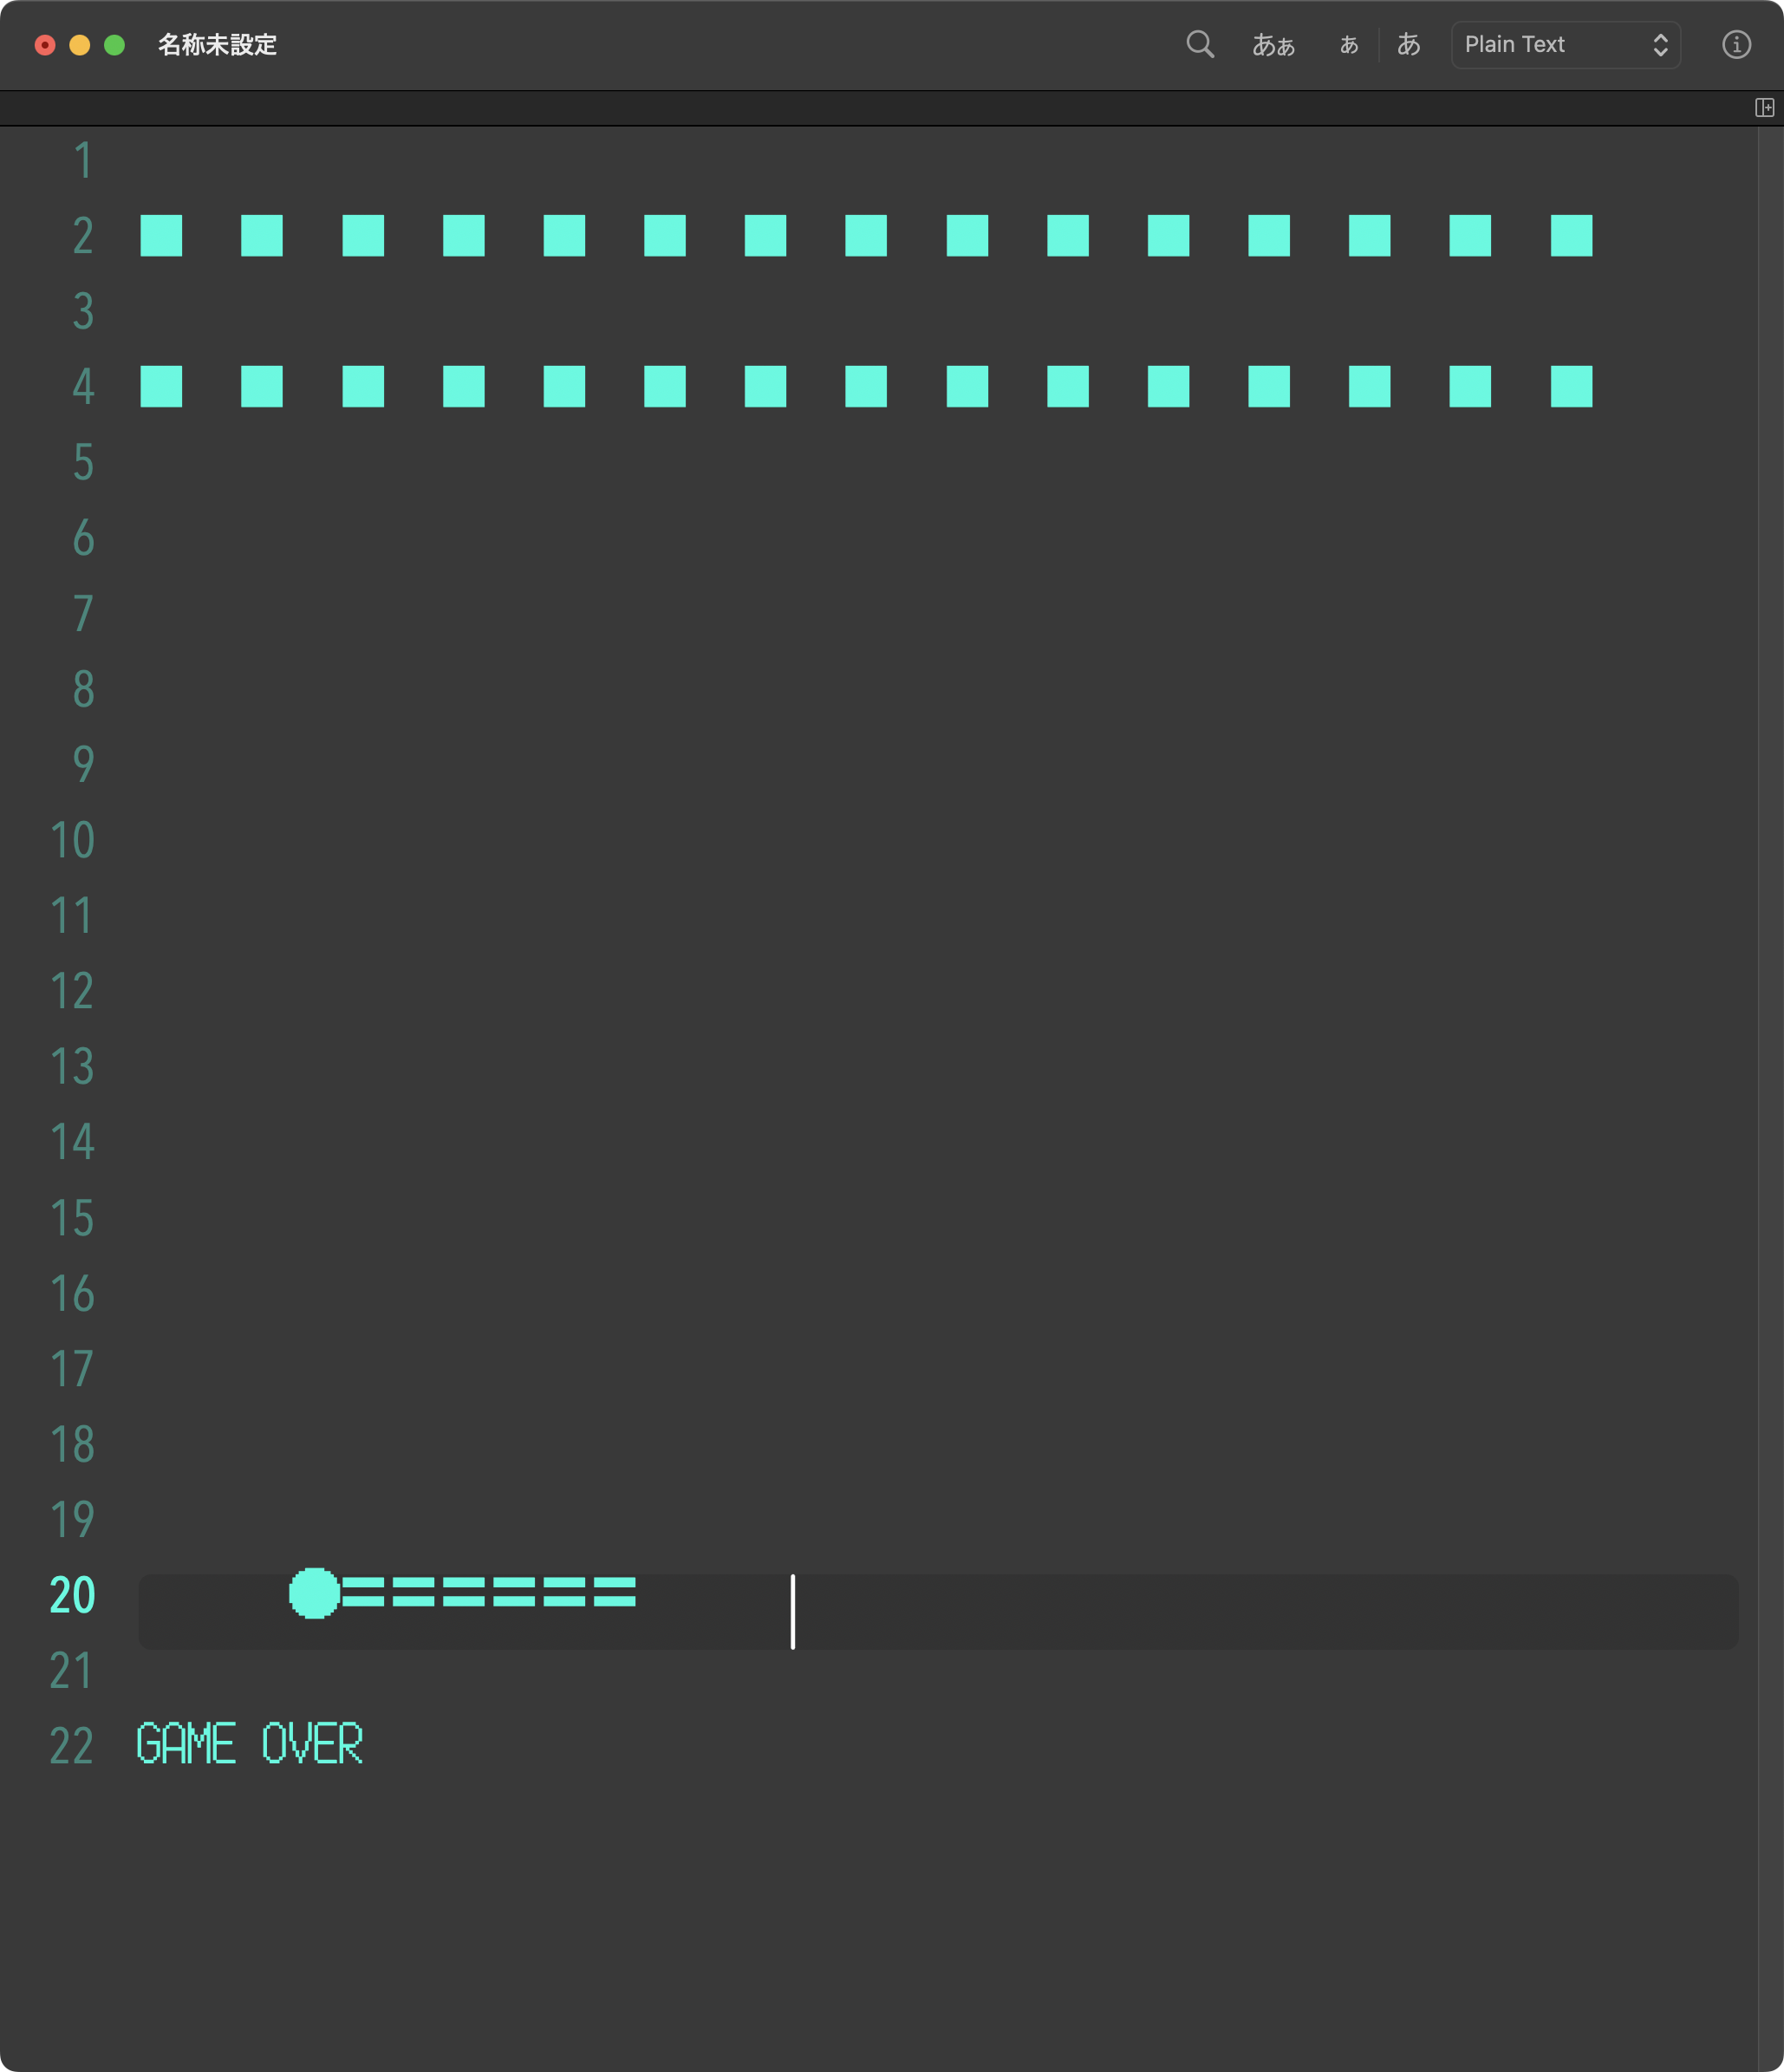
最前面の書類ウィンドウ内の表示フォントに等幅フォントを指定し、行間をなるべく少なく(0.6行ぐらい)指定した状態で実行してください。
実行はスクリプトエディタなどの実行環境のほか、CotEditorの内蔵スクリプトメニューを利用することも可能です。
CotEditor依存部分はほんの2箇所なので、JeditΩ、mi、BBEdit、Pagesなど幅広いアプリに容易に対応できます。
操作は、パドルの左移動を[option]キー、右移動を[shift]キーで行います。スコアの管理は行なっていません。ミスるとその場でゲームオーバーです。
動作速度は相当に速いので、速すぎてウェイト(delayコマンド)を入れているぐらいです。テキストエディタ上で実行できるブロック崩しとしては、文句のない出来になっていますが、ブロック崩しとしては不満の残る仕上がりです。
開発とテストはMacBook Air M2で行なっているため、delayコマンドの値は同機のパフォーマンスに合わせて調整していますが、Intel Macでは半分以下ぐらいの速度しか出ないので、delayコマンドの値を減らす必要があることでしょう。
Apple Silicon Macの上位機種でコアを貼り合わせてSoCを構成しているものは、シンプルなSoCの構成のものよりもパフォーマンスが下がる可能性もあります。
ボールを打ち返す角度が一定であるため、ブロック崩しといいつつ永遠に消せないブロックが大量に存在しています。実際には、パドルの移動速度を勘案して反射角度を変えるといった処理が必要になることでしょう。
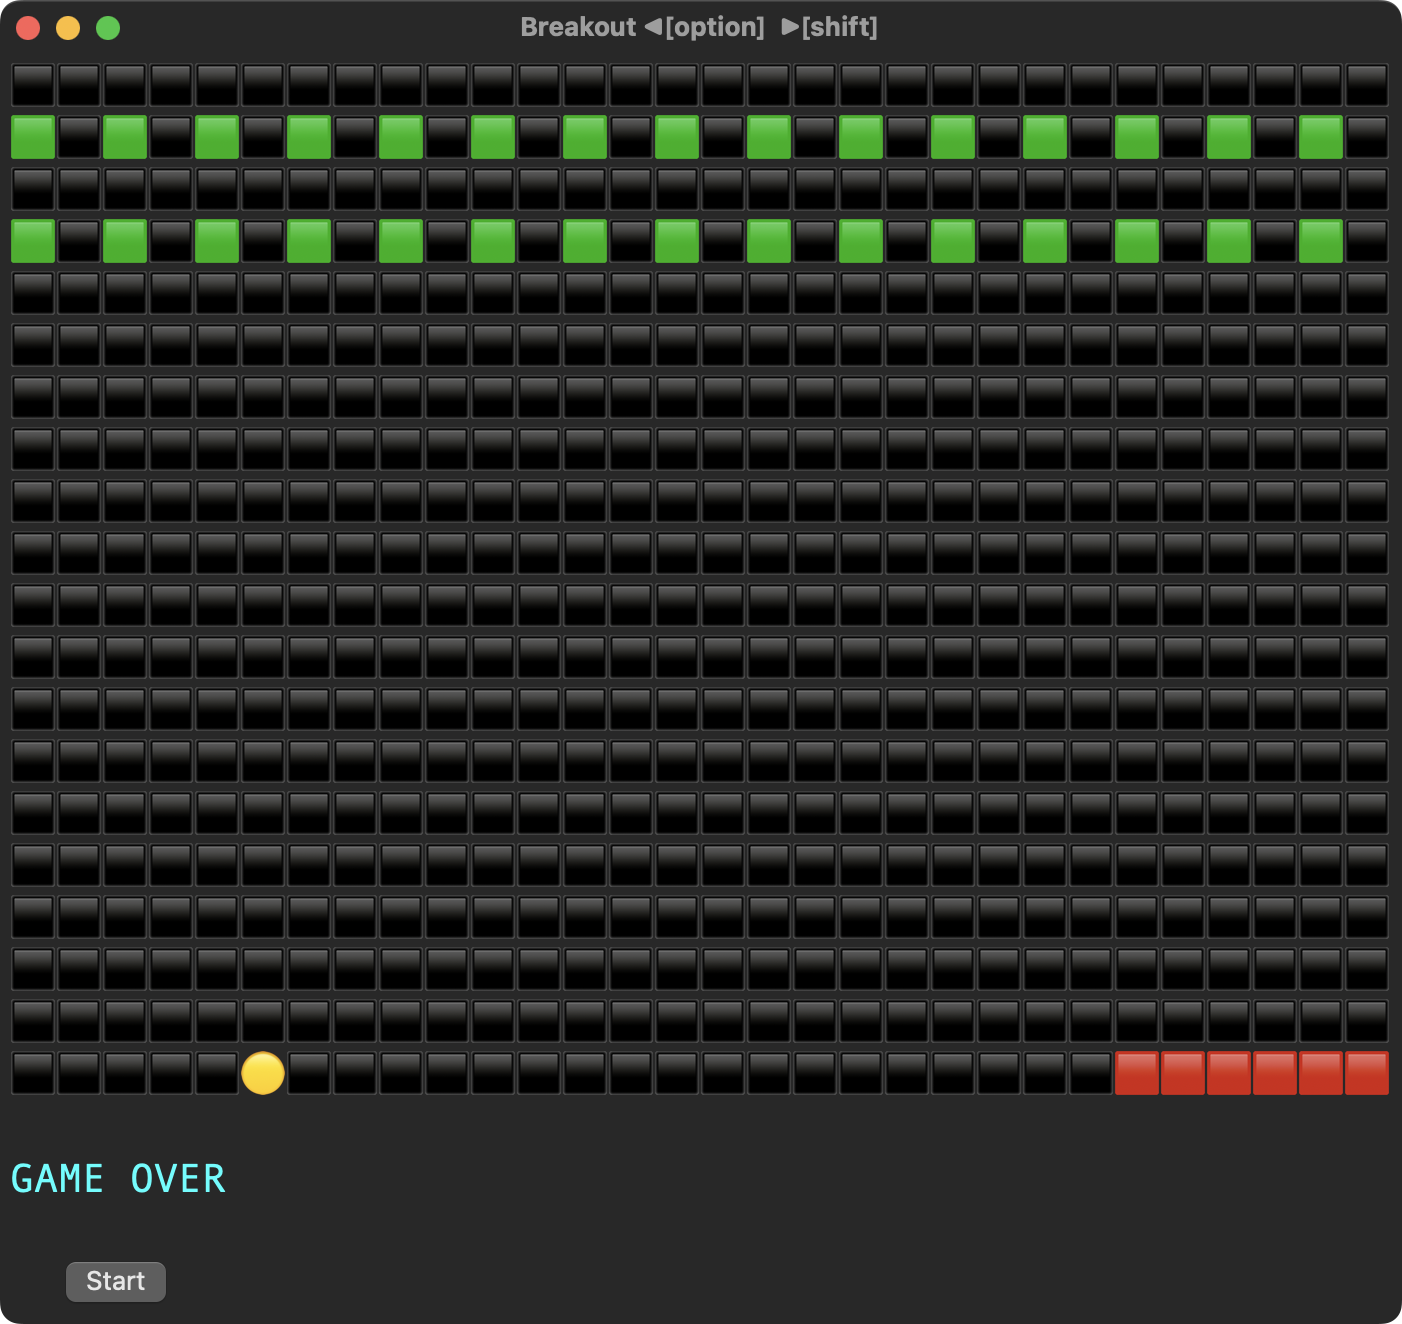
そのままXcode上にもっていって実行していますが、やはりこの反射角度が固定されていることは相当にストレスフルなので、いい感じに書き換えられるとよさそうです。
| AppleScript名:Block崩し v3.1.1.scpt |
| — – Created by: Takaaki Naganoya – Created on: 2025/06/14 — – Copyright © 2025 Piyomaru Software, All Rights Reserved — use AppleScript version "2.4" use scripting additions use framework "Foundation" use framework "AppKit" — for NSEvent property screenWidth : 30 property screenHeight : 20 property paddleSize : 6 property ballX : 0 property ballY : 0 property paddleX : 0 script spd property blockList : {} property screenLines : {} property lineText : "" end script set paddleX to (screenWidth div 2) – (paddleSize div 2) set ballX to screenWidth div 2 set ballY to screenHeight – 3 set ballDX to 1 set ballDY to -1 set (blockList of spd) to {} — ブロックは「x,y」の文字列形式で格納し、検索高速化 set blockSet to {} repeat with y from 1 to 3 repeat with x from 0 to screenWidth – 1 if (x mod 2 = 0) then set end of blockSet to (x as text) & "," & (y as text) end if end repeat end repeat set text item delimiters to return –CotEditorに依存している部分(1) 差し替え可能 — CotEditorのドキュメント取得 tell application "CotEditor" set dCount to count every document if dCount = 0 then make new document activate set doc to front document display dialog "◀︎[Option] [Shift]▶︎" with title "How to control" end tell delay 2 — ゲームループ repeat — キー入力処理 if my modKeyScan:"Option" then if paddleX > 0 then set paddleX to paddleX – 1 else if my modKeyScan:"Shift" then if paddleX < screenWidth – paddleSize then set paddleX to paddleX + 1 end if — ボール移動 set ballX to ballX + ballDX set ballY to ballY + ballDY — 壁に当たったら反射 if ballX ≤ 0 or ballX ≥ screenWidth – 1 then set ballDX to ballDX * -1 if ballY ≤ 0 then set ballDY to ballDY * -1 — キー入力処理 if my modKeyScan:"Option" then if paddleX > 0 then set paddleX to paddleX – 1 else if my modKeyScan:"Shift" then if paddleX < screenWidth – paddleSize then set paddleX to paddleX + 1 end if — パドル反射 if ballY = screenHeight – 2 and ballX ≥ paddleX and ballX < (paddleX + paddleSize) then set ballDY to ballDY * -1 end if — ブロック衝突 set coordKey to (ballX as text) & "," & (ballY as text) if coordKey is in blockSet then set blockSet to my removeFromList(coordKey, blockSet) set ballDY to ballDY * -1 end if — ゲームオーバー if ballY ≥ screenHeight – 1 then my renderScreen(doc, blockSet, paddleX, ballX, ballY, "GAME OVER") exit repeat end if — 描画 my renderScreen(doc, blockSet, paddleX, ballX, ballY, "") delay 0.06 end repeat — 描画ルーチン(配列構築をまとめて実行) on renderScreen(theDoc, blockSet, paddleX, ballX, ballY, messageText) set screenBuffer to {} repeat with y from 0 to screenHeight – 1 set rowText to "" repeat with x from 0 to screenWidth – 1 if y = ballY and x = ballX then set rowText to rowText & "●" else if y = (screenHeight – 1) and x ≥ paddleX and x < (paddleX + paddleSize) then set rowText to rowText & "〓" else if ((x as text) & "," & (y as text)) is in blockSet then set rowText to rowText & "■" else set rowText to rowText & " " end if end repeat set end of screenBuffer to rowText end repeat if messageText is not "" then set end of screenBuffer to "" set end of screenBuffer to messageText end if –CotEditorに依存している部分(2) 差し替え可能 ignoring application responses tell application "CotEditor" set contents of theDoc to screenBuffer as rich text end tell end ignoring end renderScreen — 指定要素をリストから削除 on removeFromList(target, sourceList) set newList to {} repeat with i in sourceList set j to contents of i if j is not target then set end of newList to j end repeat return newList end removeFromList on modKeyScan:(targKeyName as string) set chkList to {"fn", "", "", "Command", "Option", "Control", "Shift", "Caps"} set theKey to current application’s NSEvent’s modifierFlags() as integer set aBin to binaryEncode(theKey) of me set detectStr to text 9 thru 16 of aBin set detectList to characters of detectStr set aList to {} set aCount to 1 repeat with i in detectList set j to contents of i if j = "1" then set jj to contents of item aCount of chkList set the end of aList to jj end if set aCount to aCount + 1 end repeat return (targKeyName is in aList) as boolean end modKeyScan: –0~2^32範囲の10進数を2進数の文字列に変換して返す on binaryEncode(aNum) if aNum < 0 or 67108864 < aNum then return false set bitStr to "" repeat with i from 31 to 0 by -1 try set aRes to aNum div (2 ^ i) set aNum to aNum mod (aRes * (2 ^ i)) on error set aRes to 0 end try set aRes to aRes as integer set bitStr to bitStr & (aRes as string) end repeat return bitStr end binaryEncode |
macOS 15.xで続いていた、Shortcuts.appの「AppleScriptを実行」アクションにおいて、デフォルト入力されるべきハンドラなどのScriptが新規追加時に入力されないバグが、修正されたようです。
これは、macOS 26BetaのShortcuts.app上で本バグが修正されていたことから、macOS 15.5上のShortcuts.appの再確認を行ったところ、実際に修正されていることが明らかになりました。
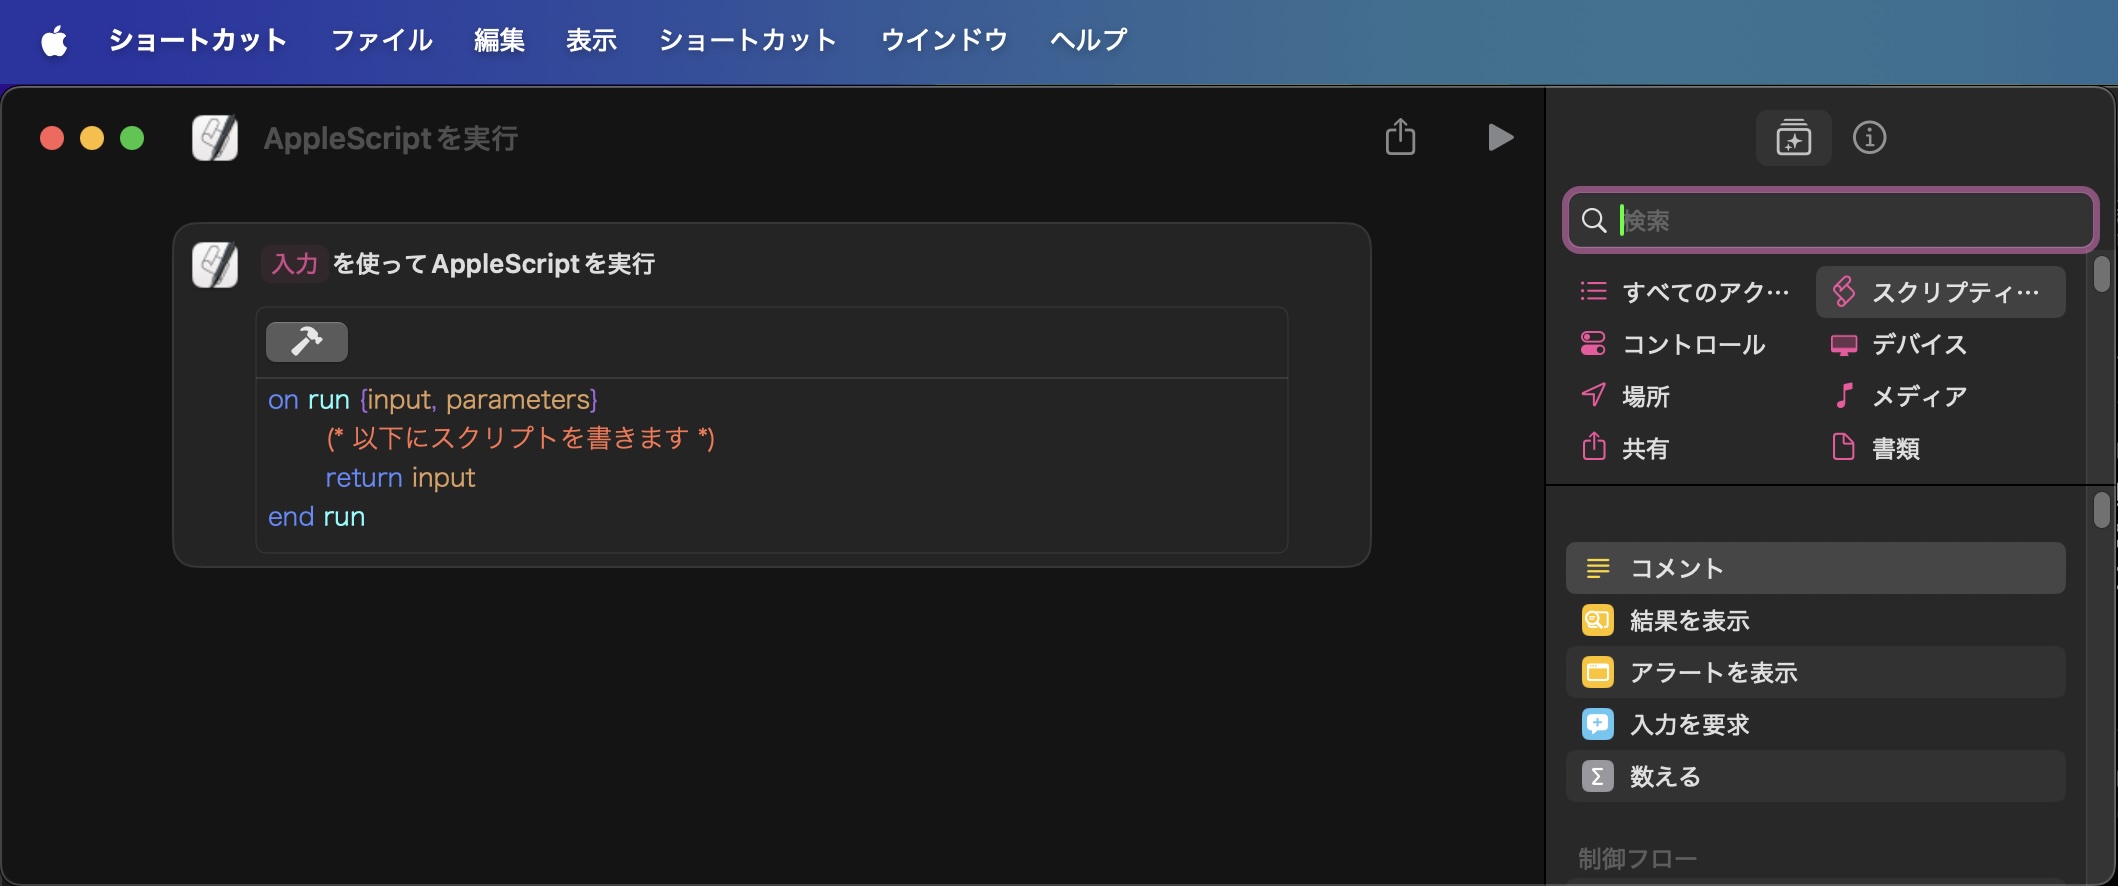
macOS 15.5上のShortcuts.app ようやく「AppleScriptを実行」アクションのバグが修正されたもよう
バージョン番号のリナンバーが行われ、macOS 15の次はmacOS 26ということになりました。AppleScriptで「system info」を実行すると、 system version:”26.0″が返ってきます。
スクリプトエディタのバージョンは上がっていませんが、Dark Modeへの対応が行われており、エディタ背景がDark Modeで暗くなるようです。ウィンドウの角丸の半径が大きくなって、全体的にオモチャみたいな印象を受けます。個人的に嫌いではないですが、画面を広く使えない(余白が多い)ので現場によっては困ることも。
AppleScriptのバージョンは2.8で変更なし。まだそんなに真剣に使っていないので、AppleScriptから見て挙動が変わったかといった点はわかりません。
β版のmacOSでありがちな、バージョン取得機能ミスや、aliasからPOSIX pathへの変換ミスなどは見られませんでした。
ただ、WWDC Keynoteで見られたガラス調のUIの見た目については、現時点では見られず、これがまだ実装が間に合っていないためなのか、M1 Mac miniだと環境的に再現しないのかは不明です。
テキスト読み上げ音声系のVoice Characterが増えたりはしていないのですが、「プレミアム」と「拡張」が同時に存在しているなど、ポリシーにゆらぎが見えます。どちらかにするのではないんですね。
バグ:
スクリプトエディタ内からスクリプトメニューをオンに設定しても、ステータスメニュー上にスクリプトメニューが表示されません。すぐにオフになります。この点はバグでしょう(調査が始まったとの話)。
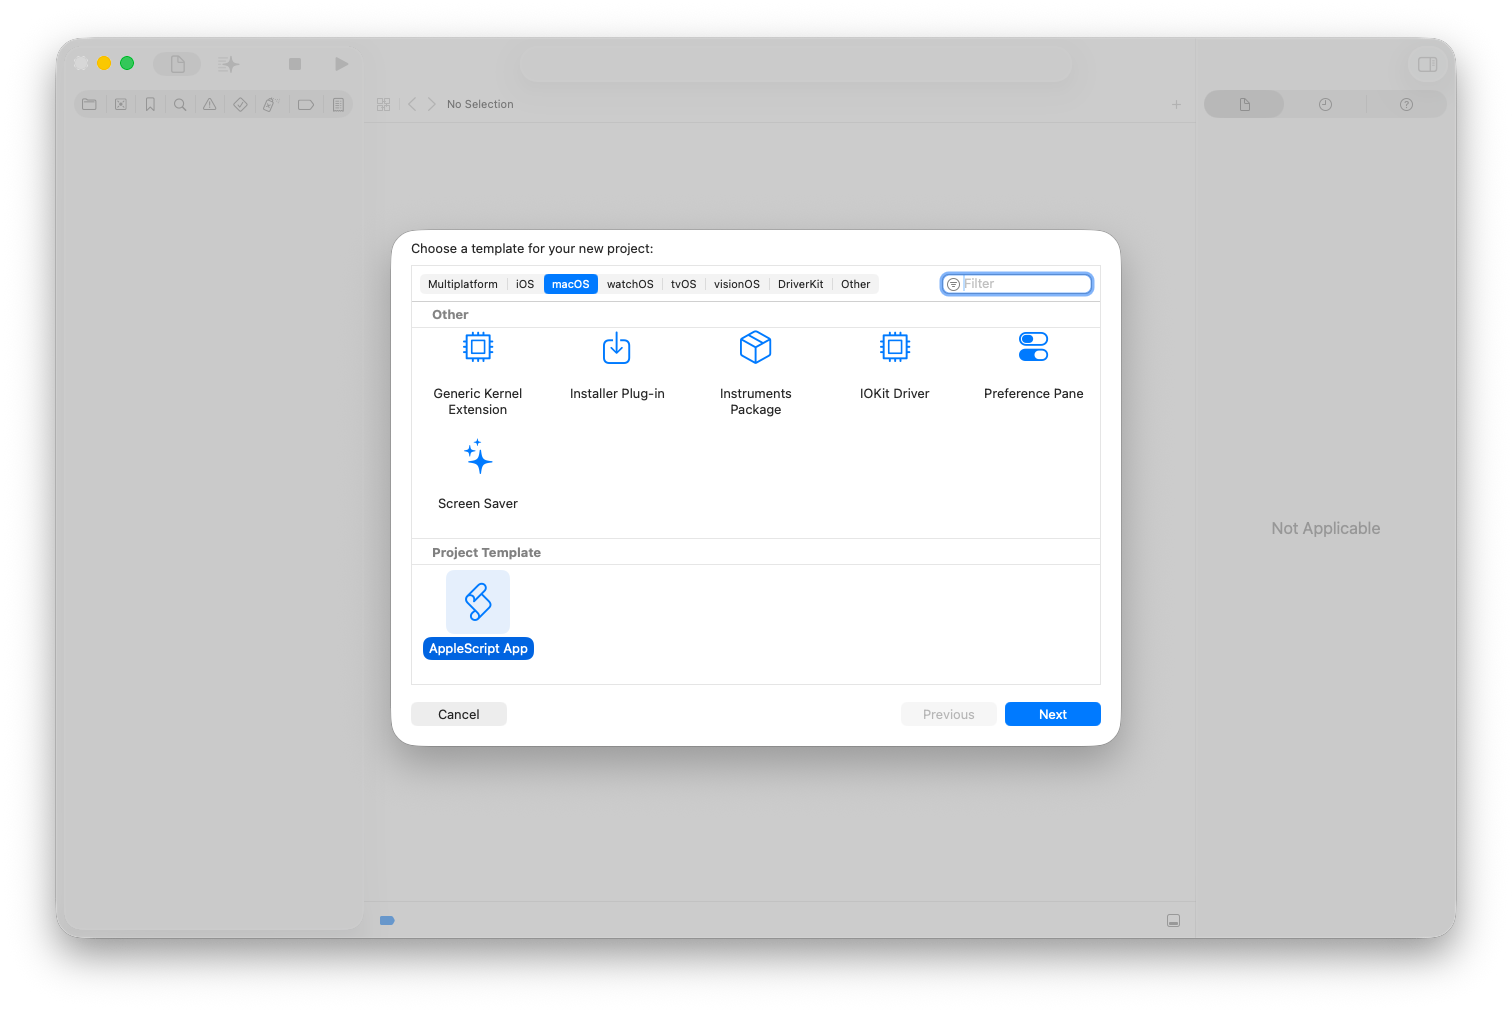
Xcode 26でAppleScript App templateが認識されませんでした。関係者に報告していますが、回答はもらっていません。一応、既存のXcode ProjectをmacOS 26に持って行って、ビルド+実行できることは確認しています。テンプレートの場所や記法が変わったのかも?
→ Xcodeのテンプレートのフォルダが変更になったようです。従来は、~/Library/Xcode/Templatesでしたが、Xcode 26では~/Library/Developer/Xcode/Templates に変わっていました(ドキュメントとかヘルプに記載なし)。
→ 関係者との協議のすえ、これは自分の勘違いで最初から ~/Library/Developer/Xcode/Templates であったことが判明しました。
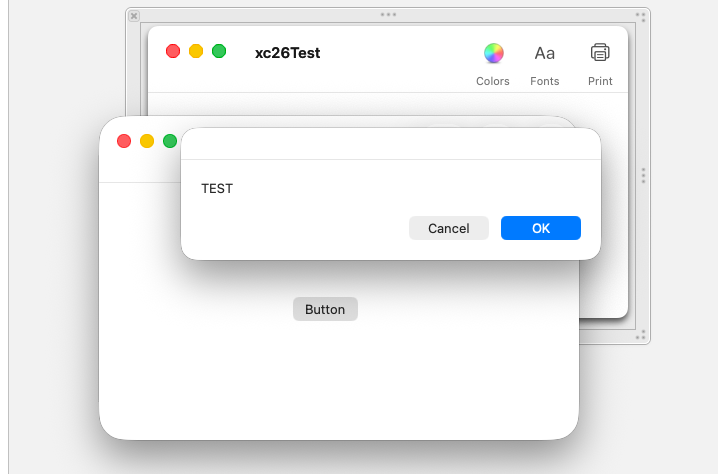
Applicationのactivate(最前面への移動)のイベントを検知して、記録するAppleScriptです。30秒間待って、その間に最前面に移動されたアプリケーションのローカライズ名称をリストに蓄積して返します。Script終了時には、activateされたアプリの名称をリストで返します。
macOS 15.5上で動作を確認しています。スクリプトエディタ、Script Debugger、Xcode(Cocoa Application)での実行を確認していますが、observerの追加宣言の箇所、
notifCenter’s addObserver:me selector:”appWasActivated:” |name|:(current application’s NSWorkspaceDidActivateApplicationNotification) object:(missing value)
で、objectなど記述にエスケープを記述しないと動かないこともありました(Xcode)。「|object|:」と記述する必要が。
イベント記録用の実験用Scriptなので、ほぼ実用性はありません。実際に使い物にするのであれば、リアルタイムでGUIに反映させるとか、アプリごとのactivate期間を集計するとかいったレベルに昇華させる必要があることでしょう。
| AppleScript名:activateを記録する v2.scptd |
| — Created 2015-05-30 18:11:12 +0900 by Piyomaru — Modified 2025-06-08 12:56:30 +0900 by Piyomaru — 2015–2025 Piyomaru Software use AppleScript version "2.8" use scripting additions use framework "Foundation" use framework "AppKit" property appList : {} property prevApp : missing value –アプリケーションのActivateをNotification Centerに登録 set theWorkspace to current application’s NSWorkspace’s sharedWorkspace() set notifCenter to theWorkspace’s notificationCenter() notifCenter’s addObserver:me selector:"appWasActivated:" |name|:(current application’s NSWorkspaceDidActivateApplicationNotification) object:(missing value) delay 30 my stopObserving:(me) return appList –> {"Safari", "Finder", "Keynote", "QuickTime Player", "Keynote", "Finder", "スクリプトエディタ"} on stopObserving:sender set theWorkspace to current application’s NSWorkspace’s sharedWorkspace() set notifCenter to theWorkspace’s notificationCenter() notifCenter’s removeObserver:me |name|:(current application’s NSWorkspaceDidActivateApplicationNotification) object:(missing value) end stopObserving: on appWasActivated:aNotification — query the notification for the active app set theApp to aNotification’s userInfo()’s valueForKey:(current application’s NSWorkspaceApplicationKey) set theAppName to (theApp’s localizedName()) as string if prevApp is not equal to theAppName then set prevApp to theAppName set the end of appList to theAppName end if using terms from scripting additions display notification theAppName & " is activated" end using terms from end appWasActivated: |
Keynote書類で選択中のスライド(ページ)において、default title itemからテキストを取り出し、正規表現で数字を抽出し、章番号(数字+章)を振り直すAppleScriptです。
本ScriptはmacOS 15.5+Keynote 14.4で動作確認を行なっていますが、バージョン依存する部分はほとんどないので、もっと前のバージョンでも動作することでしょう。本Scriptの動作には、BridgePlus AppleScript Libraryを必要とします。
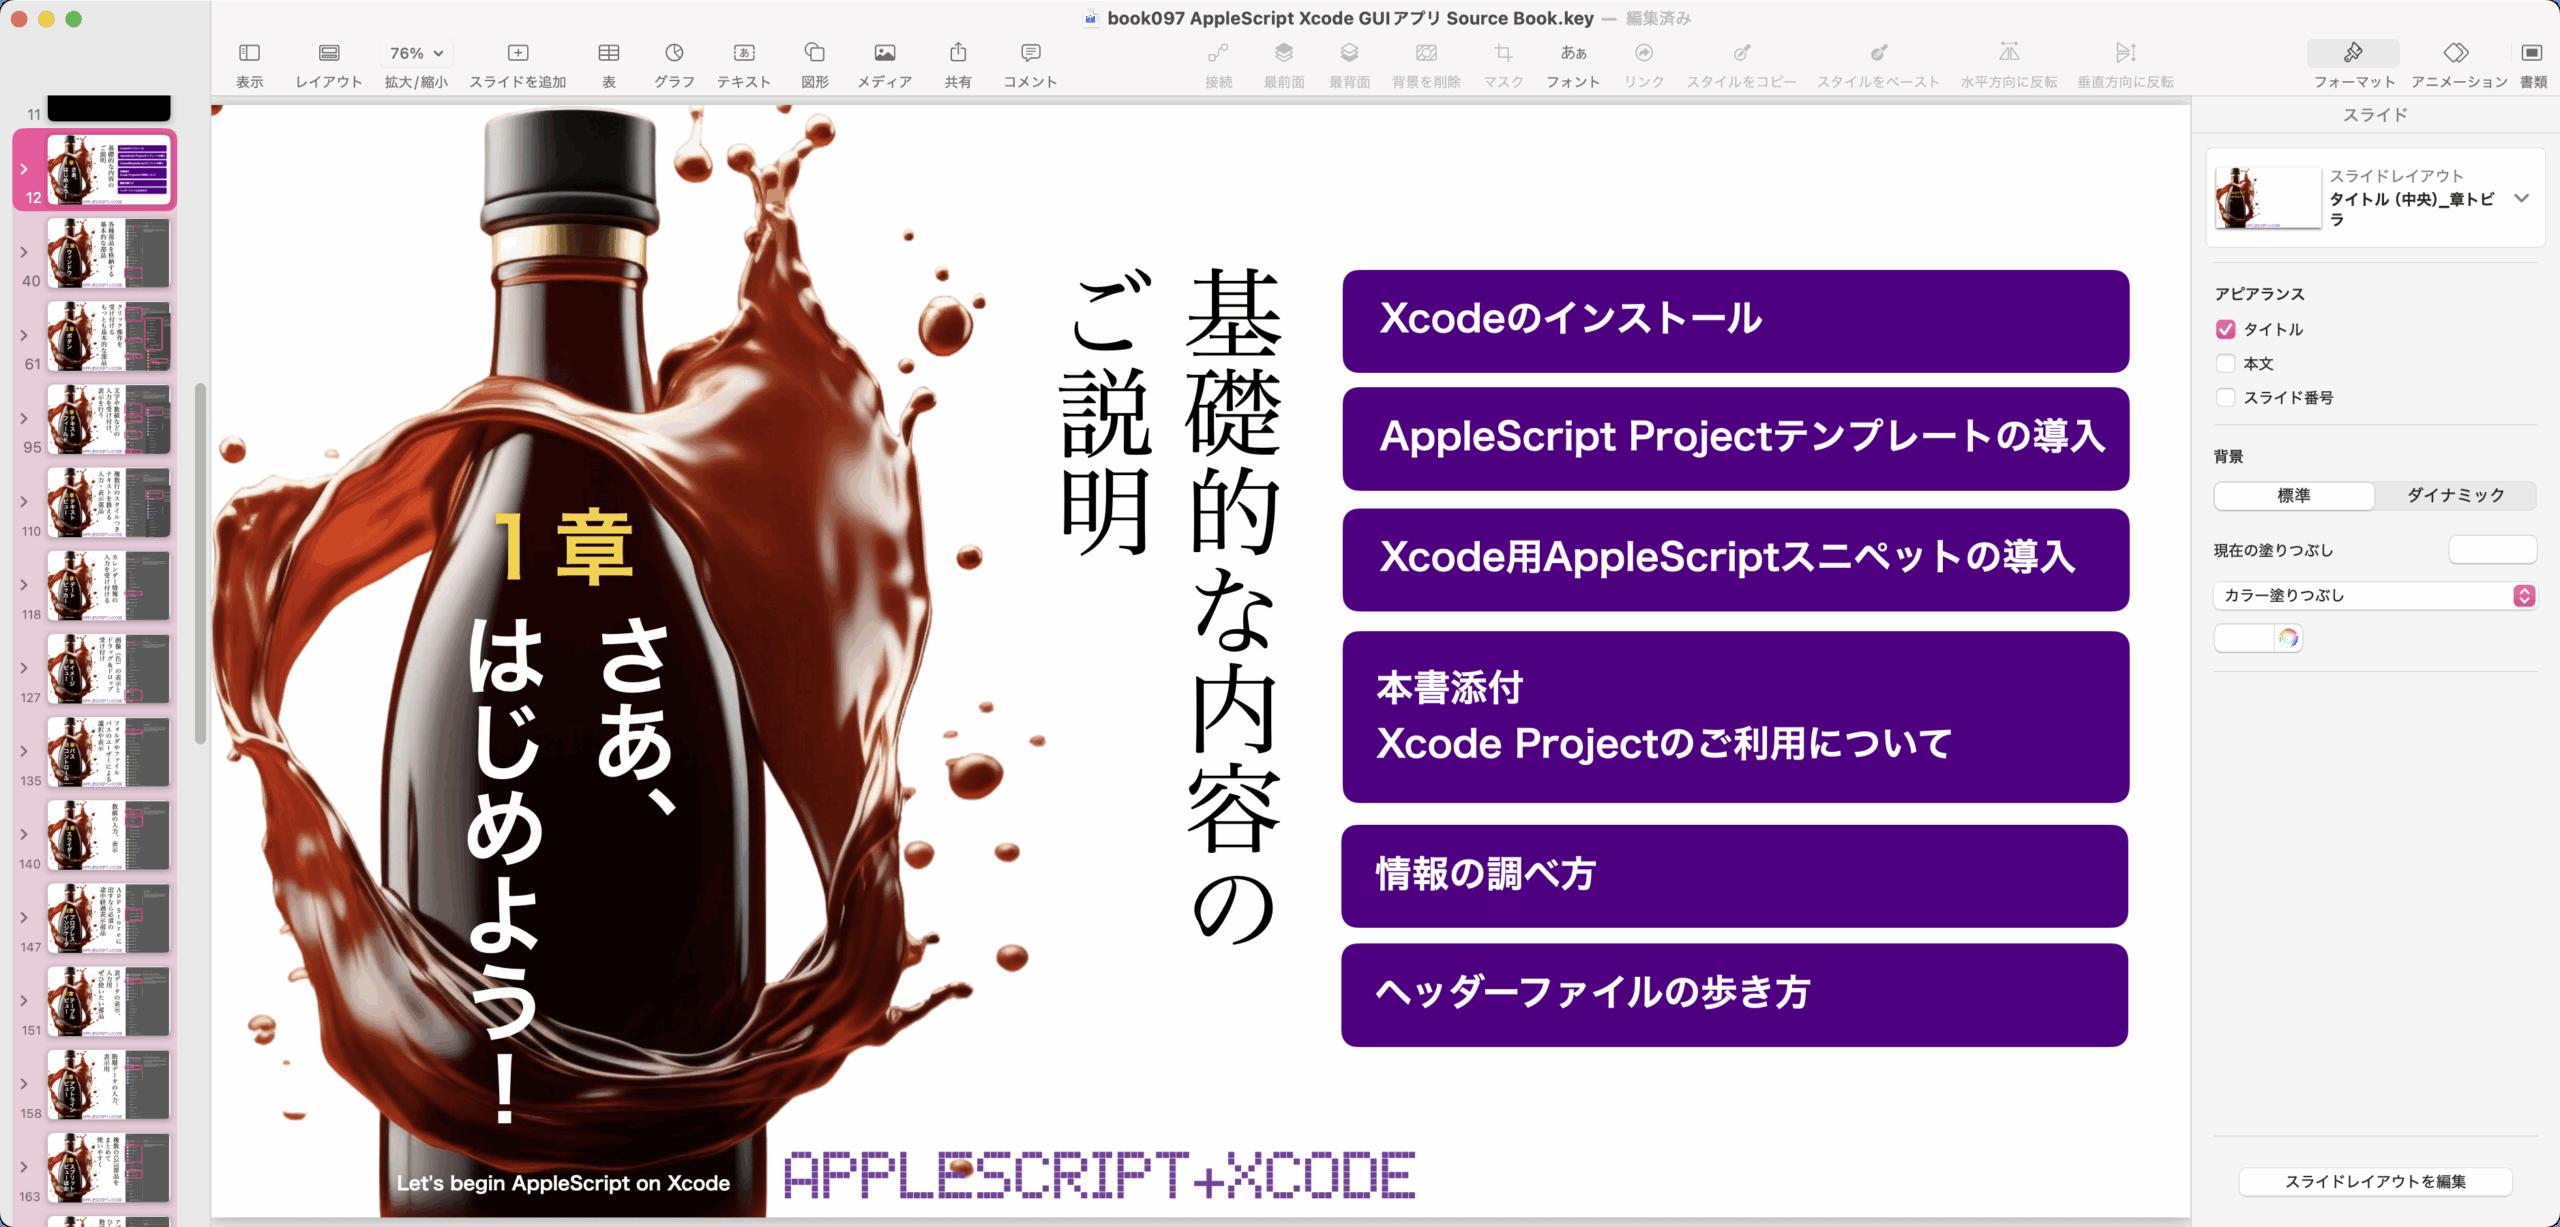
このサンプルのKeynote書類では、ウィンドウ左端に表示させた「ナビゲータ」の階層表示の機能を利用して、一番上の階層(章トビラなど)だけを選択できるようになっています(そのように編集)。

▲スライドごとに階層構造になっているKeynote書類。章トビラ、記事トビラ、記事といった構造になっている
そのため、このナビゲータ上の階層を最上位のものだけ表示させると、最上位の章トビラだけを選択できます。
この状態で、章トビラのスライドだけを選択した状態で、本AppleScriptを実行すると、スライドのdefault tile item(タイトルが入るテキストボックス)に書かれた「1章」「2章」といった文字を読み取って、範囲内の最小の数値と最大の数値を検出し、冒頭から「1章」「2章」と章番号を割り振り直します。
Keynote書類の編集中に章構成に変更が発生し、章番号の割り振りをやり直す必要がある場合のために作成したものです。
| AppleScript名:Keynoteの各slideのtitleで、章番号を振り直す v2.scpt |
| — – Created by: Takaaki Naganoya – Created on: 2025/06/04 — – Copyright © 2021 Piyomaru Software, All Rights Reserved – 本バージョンから、Keynoteのスライドのdefault title itemへの描き戻しをサポート use AppleScript version "2.8" use framework "Foundation" use scripting additions use bPlus : script "BridgePlus" –https://www.macosxautomation.com/applescript/apps/BridgePlus.html property NSStringTransformFullwidthToHalfwidth : a reference to current application’s NSStringTransformFullwidthToHalfwidth load framework –選択中のスライドのタイトルとスライドオブジェクトを取得 set {aList, aSel} to getTitleAndObjFromSelectedSlides() of me if {aList, aSel} = {false, false} then error "Keynote書類内のスライド選択状態に異常あり" –抽出したタイトルから章番号のみ取得し、最小値/最大値/枚数などの情報を取得 set nList to {} repeat with i in aList set j to contents of i set n to filterNumStr(j) of me set the end of nList to n end repeat set minRes to calcMin(nList) of me set maxRes to calcMax(nList) of me set countRes to maxRes – minRes + 1 set gapRes to calcGaps(nList) of me log {minRes, maxRes, countRes, gapRes} –最小値、最大値、枚数、連番からの数値抜け(リスト) –> {1, 30, 30, {13}} –章番号を振り直すデータを作成。選択範囲内の最小の章番号から1ずつインクリメントして章番号を付与 set n2List to {} set aCount to minRes repeat with i in aList if aCount < 10 then –1桁の数の場合には、全角数字を使用する set aNumStr to hanToZen(aCount as string) of me else copy aCount to aNumStr end if set the end of n2List to ((aNumStr as string) & "章") set aCount to aCount + 1 end repeat –return n2List –選択中のスライドの各タイトルに章番号を振り直し setEachTitlesToListedSlides(n2List, aSel) of me –Keynoteの各slideのタイトルを取得する on getTitleAndObjFromSelectedSlides() set aList to {} set selectedTitles to {} tell application "Keynote" tell front document set aSel to selection –エラーチェック if length of aSel ≤ 1 then display dialog "連番を振り直す対象のスライドが複数枚数選択されていないので処理終了します" buttons {"OK"} default button 1 with icon 1 return {false, false} end if set aFirstClass to class of contents of first item of aSel if aFirstClass is not equal to slide then display dialog "スライド単位で選択されていないので処理終了します" buttons {"OK"} default button 1 with icon 1 return {false, false} end if –スライドの逆順選択が発生していた場合には、listを逆順に入れ替えて正順(開始ページ→終了ページ)に修正 set fItem to slide number of first item of aSel set lItem to slide number of last item of aSel if fItem > lItem then set aSel to reverse of aSel –選択中のスライドのタイトル(default title item) repeat with i in aSel tell i try set tmpStr to object text of default title item on error set tmpStr to "" end try end tell set the end of aList to tmpStr end repeat return {aList, aSel} end tell end tell end getTitleAndObjFromSelectedSlides on setEachTitlesToListedSlides(newList, aSel) –連番を振り直したリストを元に、Keynoteの各slideのtitleを変更する set aCount to 1 tell application "Keynote" tell document 1 repeat with i in aSel tell i set object text of default title item to (contents of item aCount of newList) end tell set aCount to aCount + 1 end repeat end tell end tell end setEachTitlesToListedSlides on filterRealNumStr(aStr as string) set regStr to "\\d+\\.\\d+" set aRes to findStrByPattern(aStr, regStr) of me return aRes as real end filterRealNumStr on filterNumStr(aStr as string) set aLen to length of aStr set regStr to "\\d{1," & (aLen as string) & "}" set aRes to findStrByPattern(aStr, regStr) of me return aRes as {boolean, number} end filterNumStr on findStrByPattern(aText as string, regStr as string) set anNSString to current application’s NSString’s stringWithString:aText set aRange to anNSString’s rangeOfString:regStr options:(current application’s NSRegularExpressionSearch) if aRange = {location:0, length:0} then return "" set bStr to anNSString’s substringWithRange:aRange return bStr as string end findStrByPattern on calcMax(aList as list) set tmpFItem to first item of aList set aClass to class of tmpFItem set nArray to current application’s NSMutableArray’s arrayWithArray:aList if aClass = real then set maxRes to (nArray’s valueForKeyPath:"@max.self")’s doubeValue() else set maxRes to (nArray’s valueForKeyPath:"@max.self")’s intValue() end if return maxRes end calcMax on calcMin(aList as list) set tmpFItem to first item of aList set aClass to class of tmpFItem set nArray to current application’s NSMutableArray’s arrayWithArray:aList if aClass = real then set maxRes to (nArray’s valueForKeyPath:"@min.self")’s doubeValue() else set maxRes to (nArray’s valueForKeyPath:"@min.self")’s intValue() end if return maxRes end calcMin on calcGaps(aList as list) set nArray to (current application’s NSMutableArray’s arrayWithArray:aList) set maxRes to (nArray’s valueForKeyPath:"@max.self")’s intValue() set minRes to (nArray’s valueForKeyPath:"@min.self")’s intValue() –最小値から最大値までの連番リスト作成 set theIndexSet to current application’s NSIndexSet’s indexSetWithIndexesInRange:{minRes, maxRes} set theList to (current application’s SMSForder’s arrayWithIndexSet:theIndexSet) as list –補集合 set aSet to current application’s NSMutableSet’s setWithArray:theList set bSet to current application’s NSMutableSet’s setWithArray:nArray aSet’s minusSet:bSet return aSet’s allObjects() as list end calcGaps –半角→全角変換 on hanToZen(aStr as string) set aString to current application’s NSMutableString’s stringWithString:aStr return (aString’s stringByApplyingTransform:(current application’s NSStringTransformFullwidthToHalfwidth) |reverse|:true) as string end hanToZen –全角→半角変換 on zenToHan(aStr as string) set aString to current application’s NSMutableString’s stringWithString:aStr return (aString’s stringByApplyingTransform:(current application’s NSStringTransformFullwidthToHalfwidth) |reverse|:false) as string end zenToHan |
Keynote書類上でタイトルと(ボックスの領域が)重なるテキスト、および文字サイズが指定サイズと同じテキストを抽出してまとめるAppleScriptを書いてみました。Keynoteで作成した電子書籍の目次データ確認のためのものです。
実行はmacOS 15.5+Keynote v14.4上で行いましたが、とくにバージョン依存している箇所はないので、異なるバージョンであっても使えるはずです。分析対象の書類をKeynoteでオープンした状態で、解析対象のスライド(複数)を選択した状態でスクリプトエディタ上で実行することを前提にしています。
Keynoteのスライド(ページ)からのテキスト抽出は、Cocoaの機能が利用できるようになってからずいぶんと楽になりました。boundsが重なっているものを演算で判別するのも楽勝です。
以下は、執筆中の最新刊「AppleScript+Xcode GUIアプリソース集」の内容にもとづいています(未完成)。
# 同書の作業中、その暫定タイトル名からmacOS 15.5BetaのAppleScript処理系のクラッシュを誘発したといういわくつきのタイトルでもあります(同バグはリリース時に修正されました)
99ソースの部分はまだ添付Xcodeプロジェクトを確認していないので、「だいたいそのぐらいだろう」という暫定値でもあります。

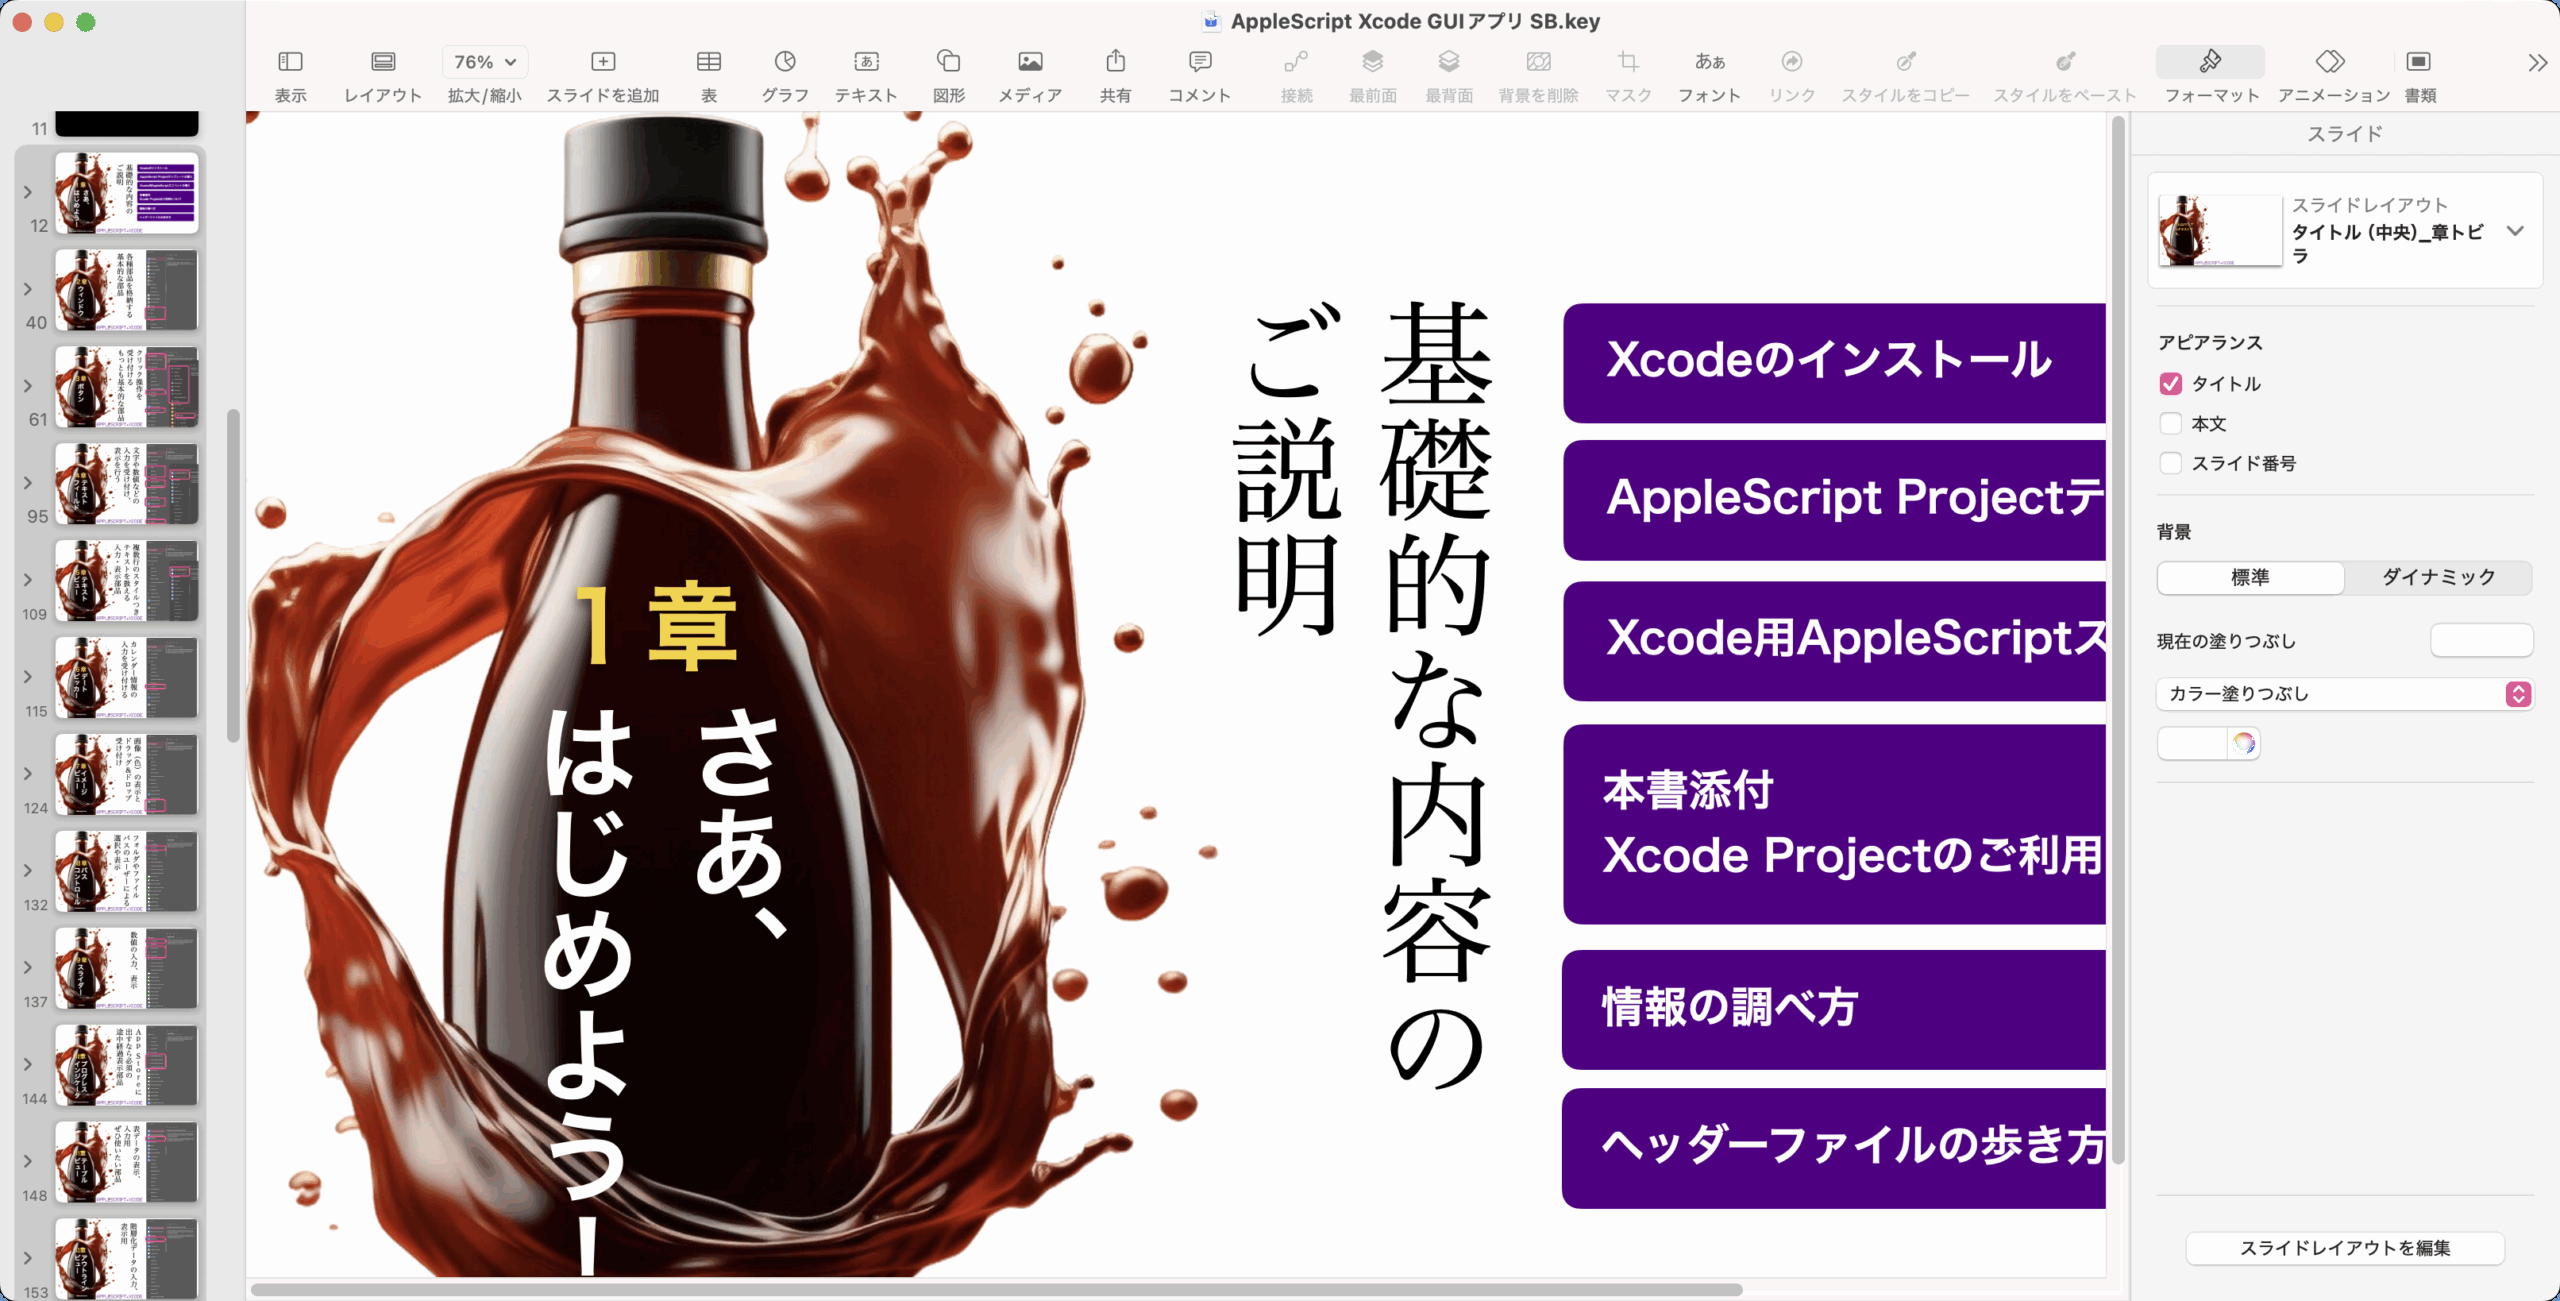
この状態でウィンドウ左側のカバーページ部分だけを選択すると、selectionでカバーページだけを抽出できます。
カバーページに対して、デフォルトタイトルアイテム(ここでは章番号が入る)と、そのエリアに重なっているテキストアイテムを抽出。
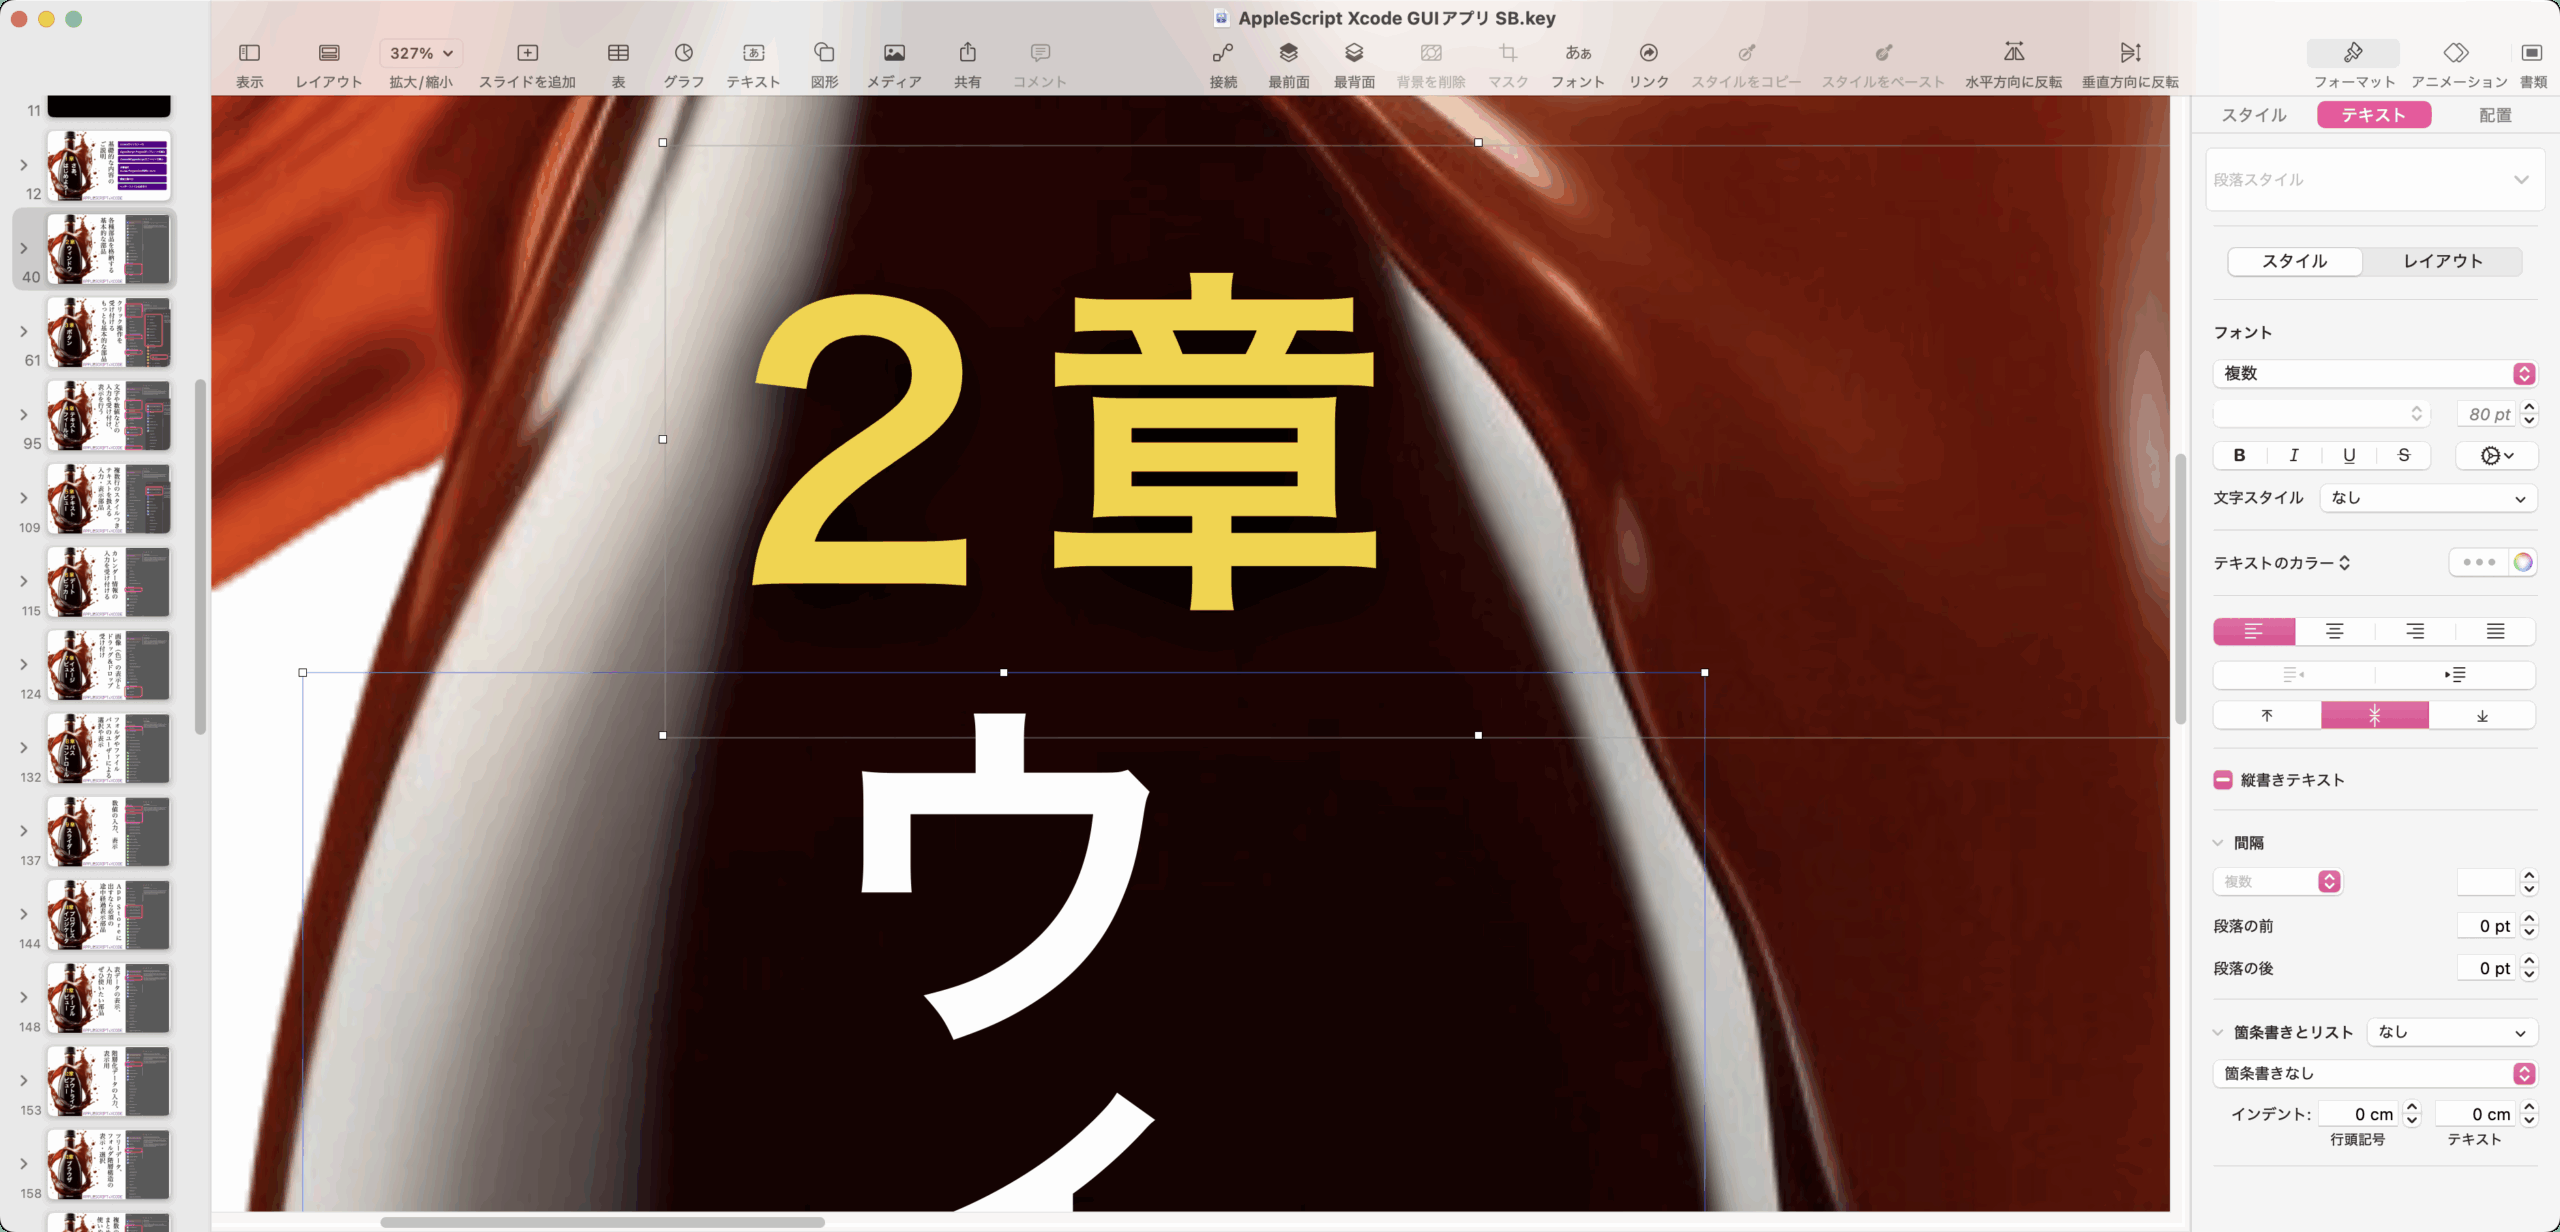
さらに、中央に配置している96ポイントのテキストアイテムを抽出。
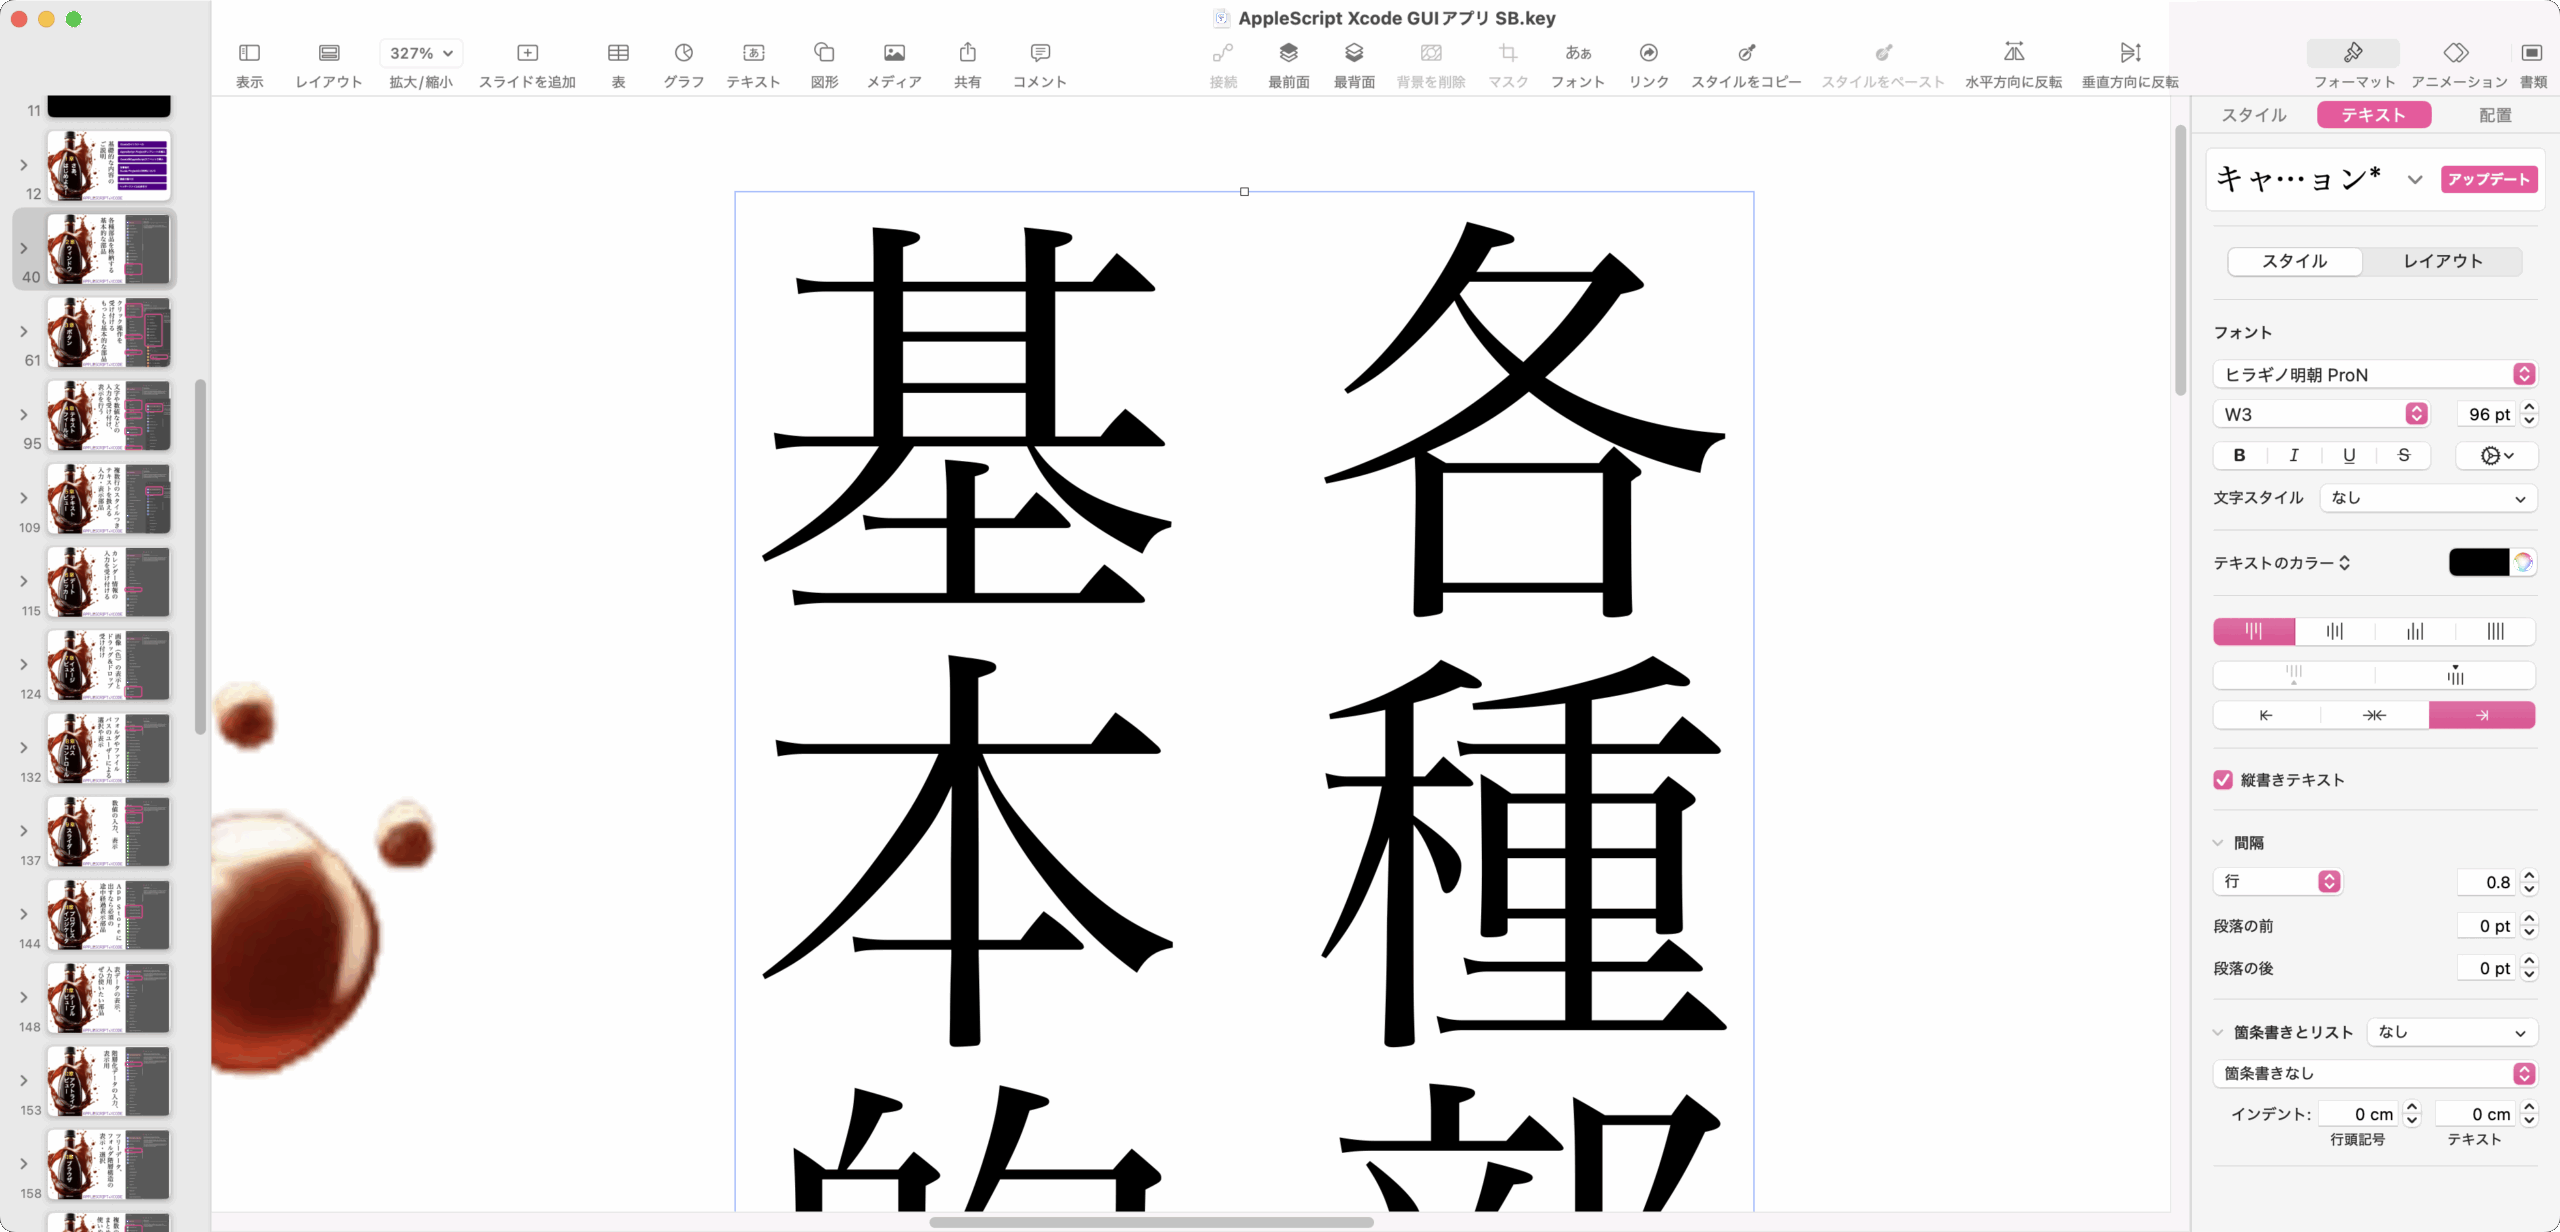
あとは、Keynote(iWorks Apps)でよくあるテキストアイテムから抽出したテキストに謎コード(iWork共通のオブジェクト内強制改行)が入っていて改行を解除できないという問題にも対処しています。
また、KeynoteなどのiWork Apps共通の問題点である「オブジェクト同士のIDによる識別ができない」点については、propertiesでまとめて属性値を取得し、この属性値でまとめて判定を行っています。少々遅くなりそうな感じでしたが、実際に試してみたら(マシンが速いので?)問題ありませんでした。
1章 さあ、はじめよう!
基礎的な内容のご説明
2章 ウィンドウ
各種部品を格納する基本的な部品
3章 ボタン
クリック操作を受け付けるもっとも基本的な部品
4章 テキストフィールド
文字や数値などの入力を受け付け、表示を行う
5章 テキストビュー
複数行のスタイルつきテキストを扱える入力・表示部品
6章 デートピッカー
カレンダー情報の入力を受け付ける
7章 イメージビュー
画像(色)の表示とドラッグ&ドロップ受け付け
8章 パスコントロール
フォルダやファイルパスのユーザーによる選択や表示
9章 スライダー
数値の入力、表示
10章 プログレスインジケータ
App Storeに出すなら必須の途中経過表示部品
11章 テーブルビュー
表データの表示、入力用ぜひ使いたい部品
12章 アウトラインビュー
階層化データの入力、表示用
13章 ブラウザ
ツリーデータ、フォルダ階層構造の表示・選択
14章 スプリットビューほか
複数のGUI部品をまとめて使いやすく
15章 メニュー
アプリの機能をひととおり呼び出す階層メニュー
16章 ポップオーバー
ボタンなどからオーバーレイ表示する簡易子ウィンドウ
17章 アドレスブックピープルピッカー
住所録データを表示・選択する
18章 AVキットプレイヤービュー
各種ムービーを再生表示
19章 マップキットビュー
場所と倍率と形式を指定して世界地図を表示
20章 OSAキットビュー
スクリプトエディタ部品でAS編集・実行
21章 PDFキットビュー
PDFとサムネイル表示
22章 ウェブキットビュー
Webコンテンツの表示と操作
23章 サービス
各アプリに対して共通で機能を提供する
24章 ドキュメントベースアプリ
「書類」を扱うアプリ形式
25章 外部アプリコントロール
AppleScriptで他のGUIアプリを操作
26章 スクリプタブル化
アプリ自体を外部からAppleScriptで操作可能に
27章 アプリアイコン
Dock上に表示するアプリアイコンを操作する
28章 ダイアログ
文字入力ダイアログを表示して文字入力
29章 アニメーション
GUI部品をアニメーションさせてユーザーの操作を促す
30章 その他
その他のこまごまとした実用的なノウハウ
あとがき、奥付 Author’s notes
ご愛読、ご協力感謝申し上げます。
すべて自分で作ったデータなので、非常に「ゆらぎ」が小さくなっており、そのデータ品質を前提に作っています。
実際にはもっとデータ品質が低いものと思われるため、そうした低品質データに対処するためには、もっといろいろな処理が必要になってくることでしょう。
処理対象データ(ここではKeynote書類)が事前に予想したとおりの構造(default title item使用)や品質(データのばらつきの存在)になっているかは、AppleScriptを何回か走らせてデータの内容を確認するものでもあるため、最初から一発で想定どおりの処理ができるわけではありません。
| AppleScript名:デフォルトタイトルと重なっているものと指定サイズのものを抽出.scpt |
| — – Created by: Takaaki Naganoya – Created on: 2025/05/26 — – Copyright © 2025 Piyomaru Software, All Rights Reserved — use AppleScript version "2.4" use scripting additions use framework "Foundation" set targSize to 96.0 –取り出し対象の文字サイズ set outList to "" tell application "Keynote" tell front document set aSel to selection repeat with i in aSel set j to contents of i tell j set tList to every text item set dItem to default title item set dProp to properties of dItem set dText to object text of dItem –テキスト set dPos to position of default title item set dHeight to height of default title item set dWidth to width of default title item set dList to dPos & {dWidth, dHeight} –座標領域が重なっているオブジェクトを抽出 set colList to {} repeat with ii in tList set jj to contents of ii set tPos to position of jj set tHeight to height of jj set tWidth to width of jj set ttList to tPos & {tHeight, tHeight} set tProp to properties of jj if dProp is not equal to tProp then set gCol to getCollision(dList, ttList) of me if gCol = true then set the end of colList to jj end if end if end repeat –指定フォントサイズのテキストアイテムを抽出 set sizeList to {} repeat with ii in tList set jj to contents of ii set tSize to size of object text of jj if tSize = targSize then set the end of sizeList to jj end if end repeat –出力用テキストの整形 set t1 to cleanUpKeynoteTextObj(dText) of me set t2 to cleanUpKeynoteTextObj(object text of item 1 of sizeList) of me set t3 to cleanUpKeynoteTextObj(object text of item 1 of colList) of me set outStr to t1 & tab & t3 & return & t2 set outList to outList & return & outStr end tell end repeat end tell end tell return outList –iWorkのtext itemのオブジェクト内改行を削除 on cleanUpKeynoteTextObj(tObj) set tObj to repChar(tObj, string id 10, "") of me –LF set tObj to repChar(tObj, string id 13, "") of me –CR set tObj to repChar(tObj, string id 8232, "") of me –強制改行? return tObj end cleanUpKeynoteTextObj on getCollision(aList, bList) copy aList to {aXn, aYn, aWn, aHn} copy bList to {bXn, bYn, bWn, bHn} set a4Rect to current application’s NSMakeRect(aXn, aYn, aWn, aHn) set b4Rect to current application’s NSMakeRect(bXn, bYn, bWn, bHn) set a4Res to detectRectanglesCollision(a4Rect, b4Rect) of me return a4Res end getCollision –NSRect同士の衝突判定 on detectRectanglesCollision(aRect, bRect) set a1Res to (current application’s NSIntersectionRect(aRect, bRect)) as {record, list} set tmpClass to class of a1Res if tmpClass = record then –macOS 10.10, 10.11, 10.12 return not (a1Res = {origin:{x:0.0, y:0.0}, |size|:{width:0.0, height:0.0}}) else if tmpClass = list then –macOS 10.13 or later return not (a1Res = {{0.0, 0.0}, {0.0, 0.0}}) end if end detectRectanglesCollision on repChar(origText as string, targStr as string, repStr as string) set {txdl, AppleScript’s text item delimiters} to {AppleScript’s text item delimiters, targStr} set temp to text items of origText set AppleScript’s text item delimiters to repStr set res to temp as text set AppleScript’s text item delimiters to txdl return res end repChar |
Xcode上でAppleScriptによるアプリ開発を行なったときに、logコマンドによるXcodeのログ出力欄への出力が、最近になって行えなくなってしまいました。
そこで、テキストエディタにログ出力したり、NSLogでsyslogに出力したりと、いろいろな方法を試してみるわけですが……他のアプリに出力するのはできなくはないものの、手軽さに欠けますし、syslogに出力されたメッセージをコンソール.app上で検索するのも大変です。
ところが、他の言語処理系(Objective-Cなど)ではNSLogを用いてログ出力するとXcodeのログ表示欄にメッセージが表示されるとかで、教えていただいて腰を抜かしました。
そこで、以前に作ったデータの型と内容表示用のプログラムと合わせて、手軽にXcodeのログ表示欄にデータ内容を出力するプログラムを書いてみました。
set theResult to (current date) as string

Logger's logMessage_(theResult)

Logger's printObjectInfo_(sender)

Logger's printObjectInfo_({1,2,3})

Logger's printObjectInfo_({aLabel:1})

Logger's printObjectInfo_(1.2)

Logger's printObjectInfo_("Piyomaru")
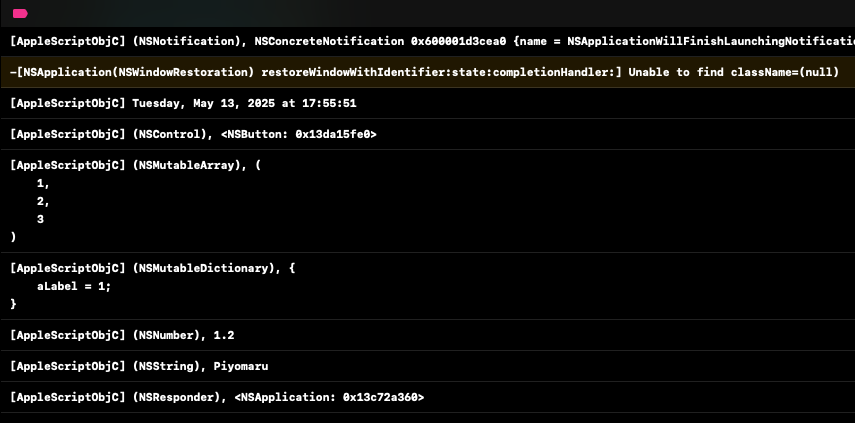
さまざまなデータをXcodeのログ表示欄に出力できていることが見てとれます。
macOS 15.5+Xcode 16.3上で動作確認を行なっています。現在執筆中のこちら(↓)の本では、 Xcode+AppleScriptの多彩なサンプル・プロジェクトを紹介しており、本プロジェクトもその1つです。

AppleがmacOS 16でクリップボードへのアクセスをiOSアプリ同様に制限する(認証を求める?)らしい、という話が出てきました。
Apple、Macアプリによるクリップボードの無断アクセスを制限へ
それだけなら、「なるほど」という話になるのですが、例によって検証をまともに行わないことが予想されるために、アプリ/アプレットのアイコンへのドラッグ&ドロップや、「サービス」を提供するプログラムにGUIがない場合に影響が出てくることでしょう(認証はGUIを持つプログラムに対してのみ行えるため)。
# 「サービス」機能は各アプリでメンテナンスしていないはずなので、対応せずに全滅するかも?
これは、相当に広い範囲にわたって影響が出るはずなので、問題動作がいたるところで発生することが予想されます。
各AppleScript実行プログラムに対してセキュリティ設定を行わないと、ファイルのドラッグ&ドロップやクリップボードの操作コマンドに問題が出るはずです。
macOS 15.5beta5(24F74)が配信されたので、報告済みのバグが修正されているかを確認しました。
日本語環境で特定パターンのファイル名のファイルパスをas aliasでキャストすると処理系まるごとクラッシュするバグ
→ 修正されたように見えます。報告したファイル名パターンで追試したものの、クラッシュは確認されません。
ただ、Appleの傾向として「一度直った箇所が、複数チーム間の連携不足(絶無?)ですぐに再発」するので、経過観察といったところでしょうか。これまでに発生した(つまらない)バグ同様、何回も繰り返して発生することが予想されます。
アクセシビリティ系の音声コマンドの一覧が呼び出せないバグは、本バージョンでは修正されていません。
GoogleのオンラインサービスNotebook LMを用いて、自分の書いた電子書籍を入力して、そのまとめ音声番組を生成させてみました。
すごっ!!(^ーー^;;;;;
Notebook LM自体に「アップロードするファイルは200MBまで」「アップロードできるのは全部で50本まで」という(無料使用時の)制限があるため、その範囲内での試用ということになります。
音声番組を手軽にアウトプットしてくれることに驚かされます。また、細かいところではちょっと間違いがあるものの、テーマを与えるとおおまかに「それっぽく」まとめてくれるのは驚きです。しかも、機械音声読み上げ(Text To Speech)なのにおっそろしくこなれています。
全体の印象としては、NHKの朝のニュースの5分ぐらいのコーナーのイメージでしょうか。
macOS 15.5beta4が配信されましたが、とくに報告ずみのバグは何も直っていません。15.5台では直らないというよりも、バグとして認識していないんじゃないでしょうか?
正式リリースされたようですが、アクセシビリティの音声コマンドが動作していないバグについては、修正されていません。
macOS 15の初期バージョンでは動作することを確認していたのですが、目下macOS 15.5beta3でアクセシビリティ系の音声コマンドの機能が呼び出せないことを確認しています。
同機能は、日本語のファイル名をつけたAppleScriptアプレットを音声で呼び出せるため、音声操作が必要な用途では役立つものとして機能をチェックしてきました。ただ、Appleのワイヤレスヘッドセットのうち、AirPodsは音声認識に使えるもののAirPods Proが音声認識に使えなかったりと、ちょっと微妙な立ち位置になっていました。
AirPods/AirPods Proが使えるSiri系の操作機能と、この音声コマンドの2系統の音声操作機能が存在しており、統合するのかそのままなのか、さっぱり方向性が見えていない中のできごと。
アクセシビリティの機能が「システム設定」に存在しているのですが、画面上から内容を確認しようとするとエラーになります。
この問題は、日本語環境でも英語環境でも発生しています。
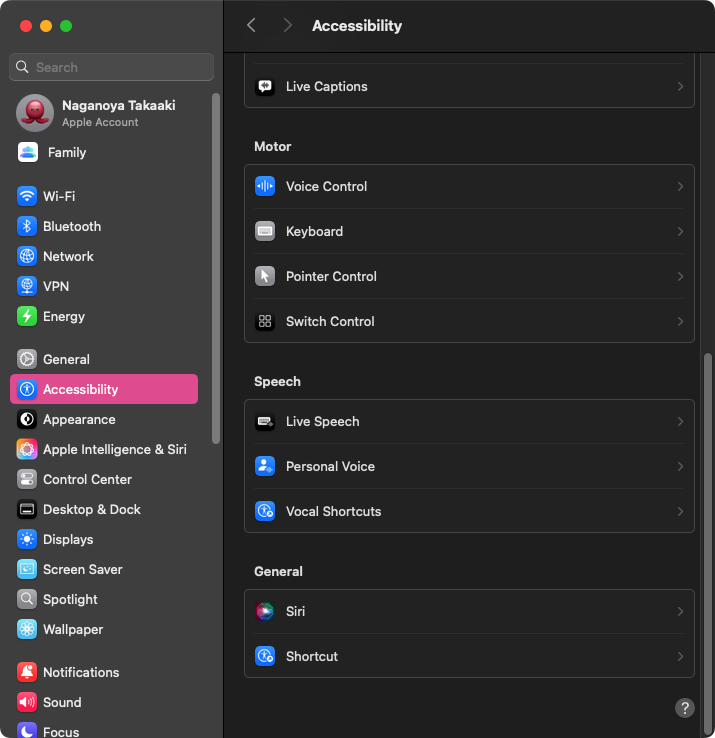
▲システム設定の「アクセシビリティ」>「音声コントロール」を選択
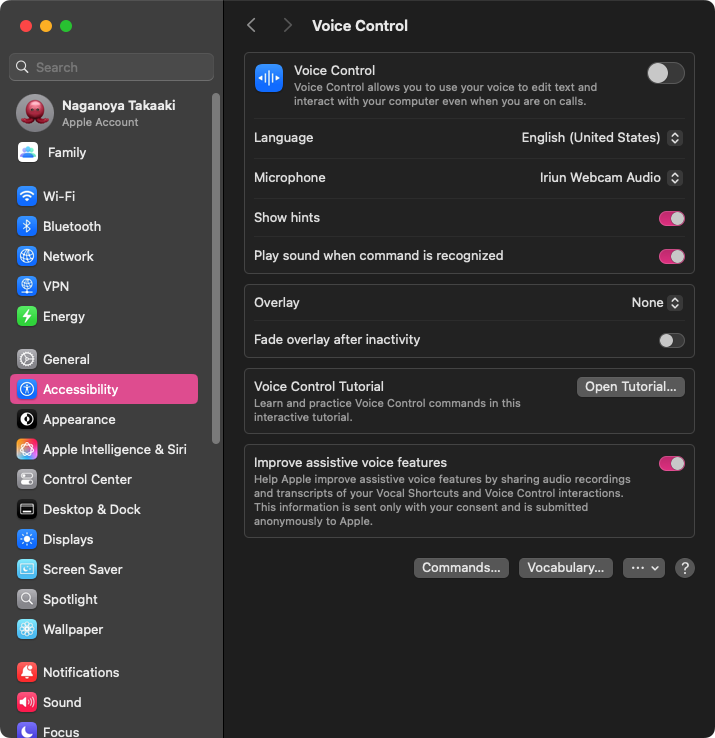
▲画面下の方の「Commands…」で音声コマンドの一覧を確認しようとして、クリックすると
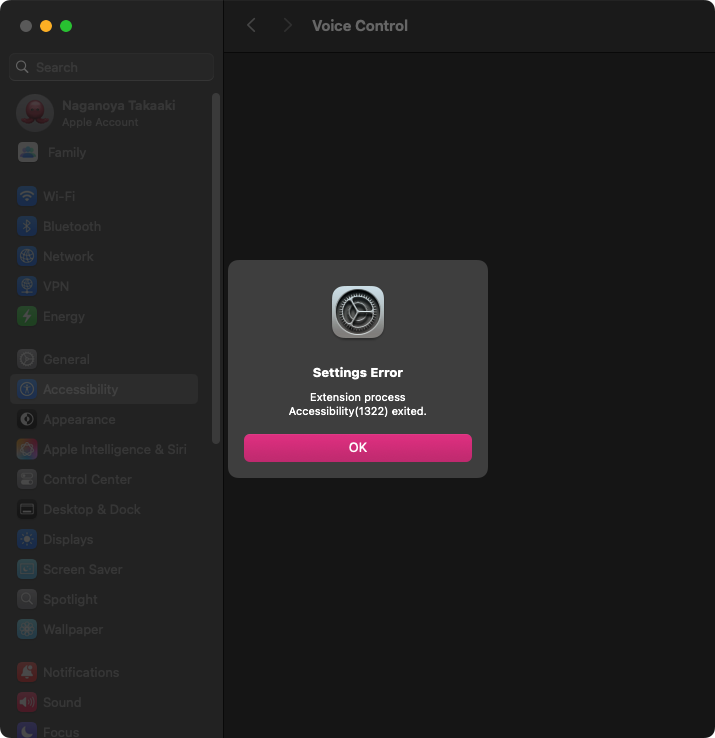
▲エラーが出て表示されない
特定のパターンのファイル名のパスをaliasにcastする処理で処理系まるごとクラッシュするというmacOS 15.5β版(15.5 Beta(24F5053f))のバグ。
もっと以前から存在していたのかもしれませんが、特定のファイル名だとクラッシュを引き起こす前代未聞のバグがすごすぎて、いろいろ調べてみました。
文字依存する箇所はごくわずかで、いろいろ規則性があることがわかってきました。
・15.5 Beta(24F5053f)の日本語ユーザー環境(Primary LanguageをJapaneseにした状態)で発生。英語環境に変更すると発生しない
・ファイルパスをaliasにcastすると即・クラッシュ
・アルファベットとひらがな/カタカナが混在している必要がある???
・拡張子の種別は関係なく発生
・一定の文字数以上の長さが必要
・決定的な問題を引き起こすのは、濁点/半濁点つきのひらがな/カタカナが入っていること
・当初、記号文字やスペースが入っていることが条件かと思っていたが、これらを除去しても発生
・濁点/半濁点つき文字はファイル名の特定文字数以降に登場する必要がある。冒頭に移動させてもクラッシュは発生しない
・同じ処理内容のJXAでもクラッシュが発生する
・これらのクラッシュを誘発するファイル名がフォルダ名についていてもクラッシュは発生しない
現時点でクラッシュを発生させる最低限のファイル名は、
AAXAAXXあああああああああパ1.txt
であることを確認しています。
追記:
macOS 15.5β3(24F5053j)でも継続して発生中です。
追記:
macOS 15.5正式リリース時には解消されました。