Piymaru Softwareによる電子書籍の84冊目、「ゆっくりAppleScript解説(3)」を発売しました。PDF42ページで構成されています。
第7章:デフォルト色のまま使うのはヤバいんだぜ!
第8章:tellを閉じるのに「end tell」と書くのは無駄無駄無駄無駄無駄ァ! なんだぜ!
第9章:「遅い」という文句は、残念なヤツの自己紹介なんだぜ
Piymaru Softwareによる電子書籍の84冊目、「ゆっくりAppleScript解説(3)」を発売しました。PDF42ページで構成されています。
第7章:デフォルト色のまま使うのはヤバいんだぜ!
第8章:tellを閉じるのに「end tell」と書くのは無駄無駄無駄無駄無駄ァ! なんだぜ!
第9章:「遅い」という文句は、残念なヤツの自己紹介なんだぜ
AVSpeechSynthesizerを呼び出して、指定文字列を読み上げる(Text to Speech)AppleScriptです。
AppleScript標準装備のsayコマンドと比べて、声の高さや読み上げ速度の設定範囲が広いようで、未知の読み上げ音声が聞こえます。
Siriの音声キャラクタはまだ指定できないようですが、次のOSぐらいでできたりするものでしょうか?
音声レンダリングした内容をファイルに書き込む方法が分かれば、さらにいろいろできそうです。
| AppleScript名:Voice Character IDと音程、速度、音量を指定して読み上げ.scptd |
| — – Created by: Takaaki Naganoya – Created on: 2023/08/28 — – Copyright © 2023 Piyomaru Software, All Rights Reserved — use AppleScript version "2.4" — Yosemite (10.10) or later use framework "Foundation" use framework "AVFoundation" use scripting additions set aSynth to current application’s AVSpeechSynthesizer’s alloc()’s init() set aUtte to current application’s AVSpeechUtterance’s alloc()’s initWithString:"こんにちは。私の名前はおとやです。" aUtte’s setVoice:(current application’s AVSpeechSynthesisVoice’s voiceWithIdentifier:"com.apple.voice.enhanced.ja-JP.Otoya") –aUtte’s setVoice:(current application’s AVSpeechSynthesisVoice’s voiceWithIdentifier:"com.apple.voice.compact.ja-JP.Otoya") ( aUtte’s setRate:(0.6 as real)) –0.0から1.0。デフォルト 0.5 【速度】(aUtte’s setPitchMultiplier:(1.8 as real)) –0.5から2.0。デフォルト1.0 【音程】 (aUtte’s setVolume:(1.0 as real)) –0.0から1.0。デフォルト1.0 【音量】 ( aSynth’s speakUtterance:(aUtte)) |
Piymaru Softwareによる電子書籍の83冊目、「Cocoa Scripting Course #6, PDFKit」を発売しました。PDF560ページ+サンプルScript Zipアーカイブで構成されています。
PDF処理は、Cocoa Scriptingの1つの価値ある到達点です。この処理が行いたいからCocoaの呼び出しについて苦労を重ねてきたと言えます。機械学習やREST API呼び出し、配列からの高速なデータ抽出など、Cocoa Scriptingの「おいしい用途」は星の数ほどありますが、PDF処理は間違いなくその中でもトップランクの攻略目標のうちの1つです。
日常的にPDFを扱っているScripterなら、Cocoa Scriptingによって得られるメリットが膨大なものであることをもれなく間違いなくいかんなく実感できることでしょう。
1章 入門編
2章 実践編
3章 PDFKit編
PDFKitの位置付けと役割
用途別のフレームワークを知ろう
PDFKit内の主要クラス
PDFKit+AppleScriptのつかいどころ
PDFKit+AppleScriptの注意点
PDFKit.frameworkの利用宣言文
(参考資料)PDFの座標系
PDFDocument Basic Samples
PDFPage Basic Samples
PDFOutline Basic Samples
PDFAnnotation Basic Samples
4章 PDF処理 基礎編
PDFの処理の流れ
AppleScript+PDFKitでよく使う基礎的な処理
AppleScript+PDFKitの基礎的な処理手順
AppleScript+PDFKitでよく使う基礎的な処理の手順
PDFからの情報取得
PDFのサイズをPointで取得
PDFから各種情報をNSDictionaryで取得
PDFから各種情報を文字列で取得
PDFページカウント
PDFのページカウント(PDFDocument)
PDFのページカウント(Metadata Lib経由)
PDF本文テキスト抽出
PDFの全ページのテキストを抽出
PDFのテキストをページ単位で抽出
PDFを回転
PDFを回転させて新規保存
PDFを印刷
PDFを印刷
RTFをPDFに変換
RTFをPDFに変換
PDFからのテキスト検索
PDFテキストからの指定キーワード検索
ページ単位でPDF分割
ページ単位でPDF分割
複数PDF結合
choose fileコマンドで選択した複数のPDFを結合
PDF→他形式画像変換
ページ単位でJPEG画像に変換
画像連結してPDF作成
フォルダ内のJPEG画像を新規PDFに連結
指定フォルダ下のすべての画像を新規PDFに連結
フォルダ内のJPEG画像を既存のPDFに連結
Multi Page TIFFからPDFへの変換
Multi Page TIFFからPDFへの変換
アラートダイアログでPDFを表示
アラートダイアログ+WkWebViewでPDFを表示
アラートダイアログ+PDFViewでPDFを表示
5章 PDF処理 上級編
PDFのパスワード、暗号化設定
PDFのアクセス権とパスワード
パスワード設定をチェック
設定されているパーミッションを取得
PDFにパスワードを設定(1/2)
PDFにパスワードを設定(2/2)
PDFのパスワードを解除
PDFの空白ページ検出
PDFから空白ページを削除(1/3)
PDFから空白ページを削除(2/3)
PDFから空白ページを削除(3/3)
PDFフォーム入力
PDFフォームにテキスト入力して別名保存(1/2)
PDFフォームにテキスト入力して別名保存(2/2)
PDFフォームにチェックボックス入力(1/2)
PDFフォームにチェックボックス入力(2/2)
Quartzフィルタ
Quartzフィルタとは?
QuartzFilter出力例一覧
Quartzフィルタの一覧を出力
白黒のQuartzフィルタをかけて出力
ブルートーンのQuartzフィルタをかけて出力
PDFX-3のQuartzフィルタをかけて出力
グレートーンのQuartzフィルタをかけて出力
明度低下のQuartzフィルタをかけて出力
明度上昇のQuartzフィルタをかけて出力
ファイルサイズ縮小のQuartzフィルタをかけて出力
セピアトーンのQuartzフィルタをかけて出力
PDFアノテーションを取得、追加、書き換え、削除
アノテーションについて
アノテーションを取得
サークル・アノテーションを追加
スクウェア・アノテーションを追加
ライン・アノテーションを追加
テキスト・アノテーションを追加
URLリンク・アノテーションを追加(1/2)
URLリンク・アノテーションを追加(2/2)
指定語群にハイライトを追加(1/2)
指定語群にハイライトを追加(2/2)
指定語群にアンダーラインを追加(1/2)
指定語群にアンダーラインを追加(2/2)
指定語群に打ち消し線を追加(1/2)
指定語群に打ち消し線を追加(2/2)
PDFからすべてのアノテーションを削除
PDFのリンク抽出、リンク置換
PDFのリンク先は?
リンクの各種情報を取得(1/2)
リンクの各種情報を取得(2/2)
リンク・アノテーションからURLを抽出
URLリンク・アノテーションを追加(1/2)
URLリンク・アノテーションを追加(2/2)
書類内リンク・アノテーションを追加(1/2)
書類内リンク・アノテーションを追加(2/2)
リンクアノテーションのURLを置換
PDFのOCR処理(OCRテキスト埋め込み)
PDFのOCR処理(1/3)
PDFのOCR処理(2/3)
PDFのOCR処理(3/3)
PDFのしおり(TOC)を取得、追加、削除
TOCの題名と階層が悩ましい(1/2)
TOCの題名と階層が悩ましい(2/2)
指定PDFのTOCを取得してレコード化(1/2)
指定PDFのTOCを取得してレコード化(2/2)
ノンブルだけのフラットなTOCを付加(1/2)
ノンブルだけのフラットなTOCを付加(2/2)
Recordデータから階層TOCを付加(1/3)
Recordデータから階層TOCを付加(2/3)
Recordデータから階層TOCを付加(3/3)
Numbersの表データから階層TOCを付加(1/4)
Numbersの表データから階層TOCを付加(2/4)
Numbersの表データから階層TOCを付加(3/4)
Numbersの表データから階層TOCを付加(4/4)
指定PDFのTOCを削除
添付サンプルScript紹介
サンプルScript集
資料編
目下、「Cocoa Scripting Course #6 PDFKit」の仕上げ作業中ですが、懸案事項がありました。
PDFに対してコメント、注釈的なもの(PDFAnnotation)をつけられるようになっていますが、各アプリケーションで管理方法が微妙に異なっており、互換性がありません。
Adobe Acrobatが付けたアノテーション → Skimで表示できない、プレビュー.appで表示できる
Skimが付けたアノテーション → Adobe Acrobat、プレビュー.appで表示できない
プレビュー.appが付けたアノテーション → Adobe Acrobat、Skimで表示できる
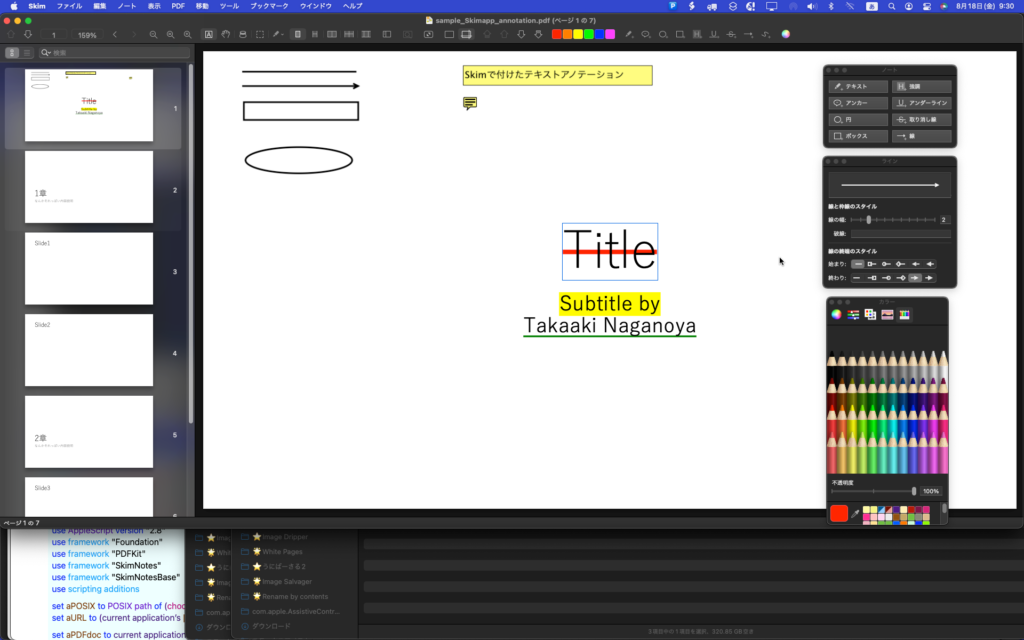
▲Skim上でPDFに対して各種アノテーションを付加した状態
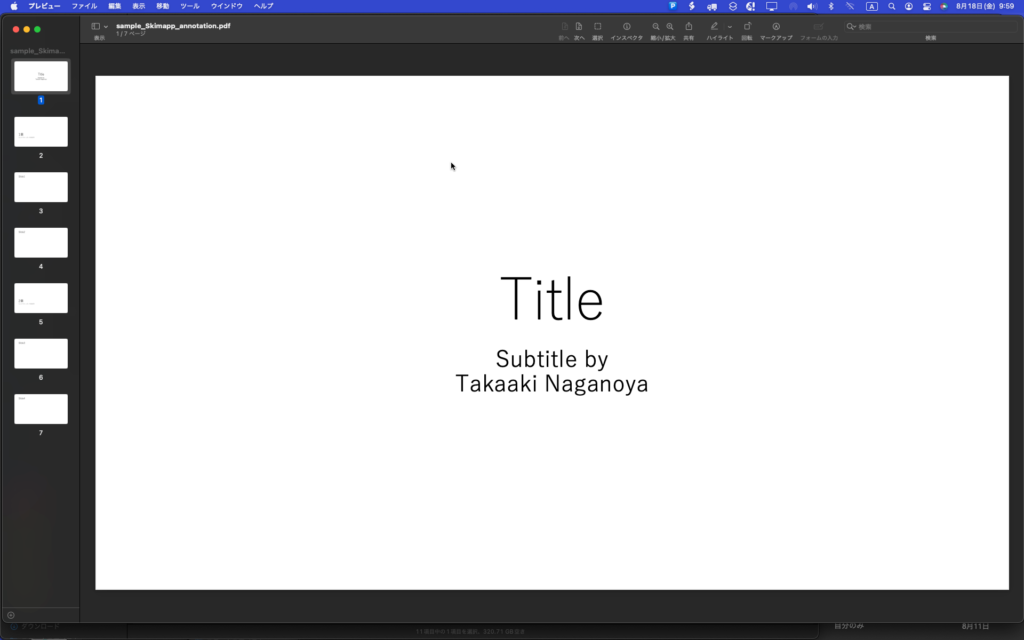
▲Skim上でPDFに各種アノテーションを付加したものをPreview.appで表示。何も表示されない
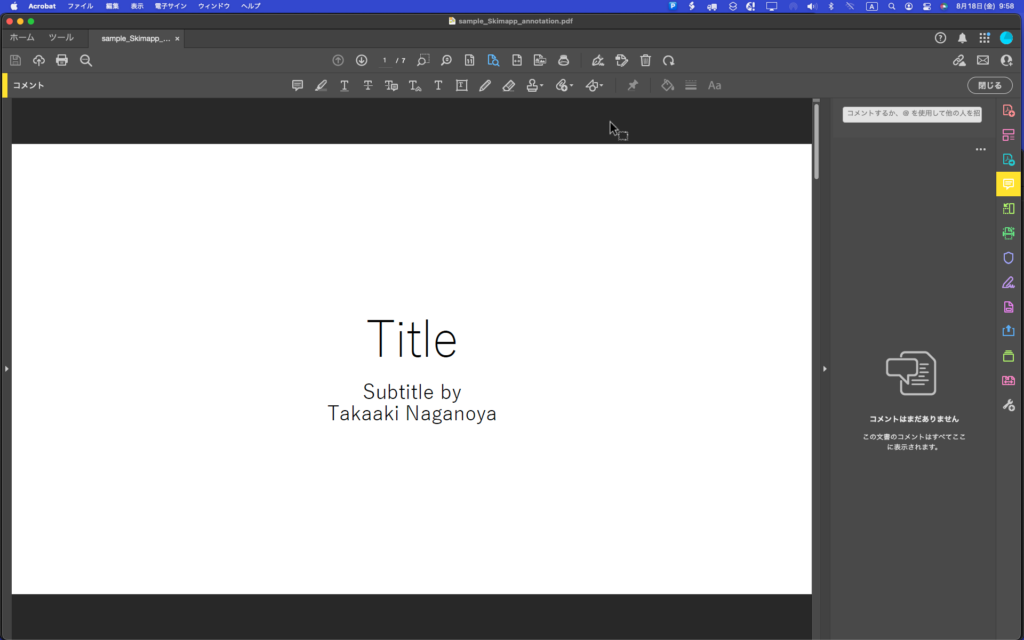
▲Skim上でPDFに各種アノテーションを付加したものをAdobe Acrobatで表示。こちらも何も表示されない
SkimとAcrobatのアノテーションの互換性がナニでアレでありますが、一応プレビュー.appとSkimがあればなんとかなる感じです。
さて、Skimでアノテーションを付けるとSkim同士でしかアノテーションを表示できない状態になってしまい、かつ、AppleScriptからPDFKitを操作しても読めないので困っていました(SkimのGUIアプリケーション経由で取得できないこともなさそう)。
Skimのアノテーションを読むために、Skim本体とは別にSkimNotes.frameworkとSkimNotesBase.frameworkが提供されています。Skim.appとは別にインストールする必要があります。インストール先は~/Library/Frameworksです。
コード署名されていないので、Script Debugger上でこれらのFrameworkの機能を呼び出そうとすると、署名されていない旨の警告が表示されますが、システム設定.app>セキュリティとプライバシーで認証できます。これら2つのFramrworkの両方とも認証しておく必要があります。
テストデータとして、Skim.app上でノートアノテーションをPDFに追記して保存。これに対して、AppleScriptからアクセスできるか試してみました。
結論からいえば、AppleScriptからアクセスできるわけですが、互換性を持たせるような何かがあってもいいような気がするところです。Adobe Acrobatでアノテーションを記載したPDFを、Skimで見られるように修正するとか。Skimで記入したアノテーションを他のアプリケーションでも見られるように変換するとか。
| AppleScript名:Skim Notesのじっけん.scptd |
| — – Created by: Takaaki Naganoya – Created on: 2023/08/17 — – Copyright © 2023 Piyomaru Software, All Rights Reserved — use AppleScript version "2.8" use framework "Foundation" use framework "PDFKit" use framework "SkimNotes" use framework "SkimNotesBase" use scripting additions set aPOSIX to POSIX path of (choose file of type {"com.adobe.pdf"}) set aURL to (current application’s |NSURL|’s fileURLWithPath:aPOSIX) set aPDFdoc to current application’s PDFDocument’s alloc()’s initWithURL:aURL readSkimNotes:true set pCount to aPDFdoc’s pageCount() repeat with ii from 0 to (pCount – 1) log ii –Page Count set firstPage to (aPDFdoc’s pageAtIndex:ii) –> (PDFPage) PDFPage, label 1 set anoList to (firstPage’s annotations()) as list if anoList is not equal to {} then repeat with i in anoList set j to contents of i log j (*(SKNPDFAnnotationNote) Type: ’/Text’, Bounds: (320, 737) [16, 16]\n*) set aType to (j’s type()) as string log aType (*Note*) if aType = "Note" then set cVal to j’s |contents|() as string log cVal (*Skim Noteのタイトルだよ Skim Noteの本文だよ\n\n*) set cVal to j’s iconType() log cVal (*0*) set dVal to j’s isSkimNote() as boolean log dVal (*true*) if dVal = true then set eVal to j’s |string|() log eVal (*(NSString) "Skim Noteのタイトルだよ"*) set fVal to j’s SkimNoteProperties() (*(NSDictionary) {bounds:"{{308, 732}, {16, 16}}", color:(NSColorSpaceColor) sRGB IEC61966-2.1 colorspace 1 1 0.5 1, userName:"Takaaki Naganoya2", modificationDate:(NSDate) "2023-08-17 14:38:39 +0000", image:<NSImage 0x6000067d32a0 Size={1920, 1200} RepProvider=<NSImageArrayRepProvider: 0x6000015034a0, reps:(\n "NSBitmapImageRep 0x600003eb85b0 Size={1920, 1200} ColorSpace=(not yet loaded) BPS=8 BPP=(not yet loaded) Pixels=1920×1200 Alpha=YES Planar=NO Format=(not yet loaded) CurrentBacking=nil (faulting) CGImageSource=0x600001089360"\n)>>, contents:"Skim Noteのタイトルだよ", text:(NSConcreteAttributedString) Skim Note{\n NSFont = ""Helvetica 12.00 pt. P [] (0x11f597610) fobj=0x139642430, spc=3.33"";\n NSParagraphStyle = "Alignment 0, LineSpacing 0, ParagraphSpacing 0, ParagraphSpacingBefore 0, HeadIndent 0, TailIndent 0, FirstLineHeadIndent 0, LineHeight 0/0, LineHeightMultiple 0, LineBreakMode 0, Tabs (\n 28L,\n 56L,\n 84L,\n 112L,\n 140L,\n 168L,\n 196L,\n 224L,\n 252L,\n 280L,\n 308L,\n 336L\n), DefaultTabInterval 0, Blocks (null), Lists (\n), BaseWritingDirection -1, HyphenationFactor 0, TighteningForTruncation NO, HeaderLevel 0 LineBreakStrategy 0 PresentationIntents (\n) ListIntentOrdinal 0 CodeBlockIntentLanguageHint ’(null)’";\n}の本文だよ\n\n{\n NSFont = ""HiraginoSans-W3 12.00 pt. P [] (0x11f597610) fobj=0x11f5277a0, spc=4.00"";\n NSParagraphStyle = "Alignment 0, LineSpacing 0, ParagraphSpacing 0, ParagraphSpacingBefore 0, HeadIndent 0, TailIndent 0, FirstLineHeadIndent 0, LineHeight 0/0, LineHeightMultiple 0, LineBreakMode 0, Tabs (\n 28L,\n 56L,\n 84L,\n 112L,\n 140L,\n 168L,\n 196L,\n 224L,\n 252L,\n 280L,\n 308L,\n 336L\n), DefaultTabInterval 0, Blocks (null), Lists (\n), BaseWritingDirection -1, HyphenationFactor 0, TighteningForTruncation NO, HeaderLevel 0 LineBreakStrategy 0 PresentationIntents (\n) ListIntentOrdinal 0 CodeBlockIntentLanguageHint ’(null)’";\n}, type:"Note", pageIndex:0, iconType:0}*) set anImage to fVal’s image log anImage (*<NSImage 0x6000067cf700 Size={1920, 1200} RepProvider=<NSImageArrayRepProvider: 0x6000015182c0, reps:(\n "NSBitmapImageRep 0x600003effb10 Size={1920, 1200} ColorSpace=(not yet loaded) BPS=8 BPP=(not yet loaded) Pixels=1920×1200 Alpha=YES Planar=NO Format=(not yet loaded) CurrentBacking=nil (faulting) CGImageSource=0x60000105fa20"\n)>>*) set colRes to fVal’s |color| log colRes (*(NSColorSpaceColor) sRGB IEC61966-2.1 colorspace 1 1 0.5 1*) set tRes to fVal’s |text| log tRes (*(NSConcreteAttributedString) Skim Note{\n NSFont = ""Helvetica 12.00 pt. P [] (0x1296dd6e0) fobj=0x139642430, spc=3.33"";\n NSParagraphStyle = "Alignment 0, LineSpacing 0, ParagraphSpacing 0, ParagraphSpacingBefore 0, HeadIndent 0, TailIndent 0, FirstLineHeadIndent 0, LineHeight 0/0, LineHeightMultiple 0, LineBreakMode 0, Tabs (\n 28L,\n 56L,\n 84L,\n 112L,\n 140L,\n 168L,\n 196L,\n 224L,\n 252L,\n 280L,\n 308L,\n 336L\n), DefaultTabInterval 0, Blocks (null), Lists (\n), BaseWritingDirection -1, HyphenationFactor 0, TighteningForTruncation NO, HeaderLevel 0 LineBreakStrategy 0 PresentationIntents (\n) ListIntentOrdinal 0 CodeBlockIntentLanguageHint ’(null)’";\n}の本文だよ\n\n{\n NSFont = ""HiraginoSans-W3 12.00 pt. P [] (0x1296dd6e0) fobj=0x11f5277a0, spc=4.00"";\n NSParagraphStyle = "Alignment 0, LineSpacing 0, ParagraphSpacing 0, ParagraphSpacingBefore 0, HeadIndent 0, TailIndent 0, FirstLineHeadIndent 0, LineHeight 0/0, LineHeightMultiple 0, LineBreakMode 0, Tabs (\n 28L,\n 56L,\n 84L,\n 112L,\n 140L,\n 168L,\n 196L,\n 224L,\n 252L,\n 280L,\n 308L,\n 336L\n), DefaultTabInterval 0, Blocks (null), Lists (\n), BaseWritingDirection -1, HyphenationFactor 0, TighteningForTruncation NO, HeaderLevel 0 LineBreakStrategy 0 PresentationIntents (\n) ListIntentOrdinal 0 CodeBlockIntentLanguageHint ’(null)’";\n}*) set sBounds to fVal’s |bounds| log sBounds (*(NSString) "{{308, 732}, {16, 16}}"*) set uName to fVal’s userName log uName (*(NSString) "Takaaki Naganoya2"*) set modRes to fVal’s modificationDate log modRes (*(NSDate) "2023-08-17 14:38:39 +0000"*) end if end if end repeat end if end repeat |
Excelのワークシート上にドラッグ&ドロップして配置された画像のセルのアドレスを推定するAppleScriptの強化版です。
このぐらい作り込んでおけば実用性のある部品になることでしょう。Microsoft Excel 16.76を対象に検証を行なっています。テストは1つのExcel書類上に1つだけ画像を配置(Finderからドラッグ&ドロップで配置)した状態、1つのセルの上に乗っているように見える状態に大きさを調整して実行しました。
まず、大前提でpictureのID(1から始まる通し番号)、pictureの始点座標が存在するExcel上のセルのrow(行)とcolumn(列)。これはあらかじめ各Pictureの始点座標をもとにあらかじめ計算しておいたものを使います。
本Scriptは、この「始点座標から存在するセルを計算」する処理の後処理として、実際に画像が重なっているセルを重なっている部分の面積をもとに最大の面積のものを「配置されているセル」として計算で推定します。
この処理には前提条件があって、複数のセルにまたがりすぎているような(数十のセルにまたがってpictureが配置されている)場合には計算そのものが無意味です。「1セルに1画像ぐらい」の調子で配置されていないと、こうした処理を行なっても無駄になってしまいます。
本Scriptでは、Excelワークシートの対象のpictureのID、pictureの始点座標から求めたセルのrow(行)とcolumn(列)を与えて呼び出します。すると、始点セルを基準に3×3のセルの矩形エリア(NSRect)を求め、pictureの矩形(NSRect)との重なっている面積を計算。もっとも面積が大きいものを対象セルとしてrow, columnを返します。
こうしたScriptを作ってほうがよいと考えた理由は、このExcelシート上に貼り付けた画像に対してさまざまな文字データが隣のセルに入力され、セル上のデータと画像を関連づけてデータ取得するような処理を考えたときに必要と考えたためです。
| AppleScript名:pictureが置かれているセルのアドレスを推定する v2.scpt |
| — – Created by: Takaaki Naganoya – Created on: 2023/08/07 — – Copyright © 2023 Piyomaru Software, All Rights Reserved — use AppleScript use scripting additions use framework "Foundation" set targRow to 22 set targCol to 2 set targPictureID to 1 set tCell to getPictureLocatedCellRowColByItsPosition(targRow, targCol, targPictureID) of me –> {rowNum:23, columnNum:2} –ループで指定セルを左上とした3×3の範囲のセルから、指定のPictureと重なっている面積が最も大きいものを返す on getPictureLocatedCellRowColByItsPosition(targRow as integer, targCol as integer, targPictureID as integer) –Picture 1のNSRectを求める set pRect to getAPictureRectByID(targPictureID) of me set tmpList to {} –始点座標から3×3の範囲のセルとPictureの重なる面積を計算 repeat with x from 0 to 2 repeat with y from 0 to 2 set tmpRow to (targRow + y) set tmpCol to (targCol + x) set tmpRect to retExcelCellRect(tmpRow, tmpCol) of me –指定Pictureと指定Cellの共通部分の矩形座標を計算 set a1Res to (current application’s NSIntersectionRect(tmpRect, pRect)) as {record, list} –指定Pictureと指定Cellの共通部分の面積を計算 set a1Area to calcAnArea(a1Res) of me if a1Area > 0 then set the end of tmpList to {columnNum:tmpCol, rowNum:tmpRow, interAreaWithPict:a1Area} end if end repeat end repeat –面積で降順ソート set zList to (sortRecListByLabel(tmpList, {"interAreaWithPict"}, {false}) of me) as list –> {{columnNum:2, rowNum:23, interAreaWithPict:4973.377807617188}, {columnNum:2, rowNum:24, interAreaWithPict:747.665495456778}, {columnNum:2, rowNum:22, interAreaWithPict:333.296168677043}} set resCell to first item of zList set resCol to columnNum of resCell set resRow to rowNum of resCell return {rowNum:resRow, columnNum:resCol} end getPictureLocatedCellRowColByItsPosition –IDで指定したPictureのNSRectを返す on getAPictureRectByID(anID as integer) tell application "Microsoft Excel" tell active workbook tell active sheet set anImage to picture anID set tmpX to left position of anImage set tmpY to top of anImage set tmpW to width of anImage set tmpH to height of anImage end tell end tell end tell set aZRect to current application’s NSMakeRect(tmpX, tmpY, tmpW, tmpH) return aZRect end getAPictureRectByID –NSRectの面積を計算する on calcAnArea(aRect) if class of aRect = list then set xWidth to (item 1 of item 2 of aRect) set yHeight to (item 2 of item 2 of aRect) else set xWidth to (aRect’s |size|’s width) set yHeight to (aRect’s |size|’s height) end if set anArea to xWidth * yHeight return anArea end calcAnArea –指定Row, ColumnのCellのNSRectを返す on retExcelCellRect(y as integer, x as integer) tell application "Microsoft Excel" tell active workbook tell active sheet tell row y tell cell x set xMin0 to left position set yMin0 to top set xWidth0 to width set yHeight0 to height end tell end tell end tell end tell end tell set a1Rect to current application’s NSMakeRect(xMin0, yMin0, xWidth0, yHeight0) return a1Rect end retExcelCellRect –リストに入れたレコードを、指定の属性ラベルの値でソート on sortRecListByLabel(aRecList as list, aLabelStr as list, ascendF as list) set aArray to current application’s NSArray’s arrayWithArray:aRecList set aCount to length of aLabelStr set sortDescArray to current application’s NSMutableArray’s new() repeat with i from 1 to aCount set aLabel to (item i of aLabelStr) set aKey to (item i of ascendF) set sortDesc to (current application’s NSSortDescriptor’s alloc()’s initWithKey:aLabel ascending:aKey) (sortDescArray’s addObject:sortDesc) end repeat return (aArray’s sortedArrayUsingDescriptors:sortDescArray) end sortRecListByLabel |
Excelのワークシート上にドラッグ&ドロップして配置された画像のセルのアドレスを推定するAppleScriptの試作品です。
ただし、pictureオブジェクトは単にExcel書類上に重ね合わせて配置されている「異物」であり、どこかのセルに置かれているわけではありません。オブジェクトからpropertiesを取得しても、セルのアドレスを取得できたりはしません。ワークシート左上を原点とする座標値が取得できるだけです。
ただ、pictureの配置座標を取得して、その座標からセルを求める処理を行ったとしても(やりました)、配置座標と実際に置かれているセルは異なります。
実際に、Excelワークシート上に配置されている画像を個別に書き出す処理(リサイズして高解像度化する処理つき)を書いて動かしてみましたが、書き出したファイル名にセルのアドレスを反映させたら使いやすいのではないかと考え、解決策を試してみました。
上の画面キャプチャでいえば、R22C2のセルにpicture 1が存在している(始点座標が存在している)わけなのですが、実際に目で見た感じではR23C2に存在している(ユーザーがそのように作業を行った)ものと推定されます。この画像をファイル書き出しする際に、R22C2というファイル名をつけてしまっては、後で整理する際に「ナニコレ?」という話になってしまいます。
そこで、複数のセルにまたがってpictureオブジェクトの矩形領域と、それぞれ重なっているセルの矩形領域の共通部分を求め、面積を計算。共通面積が最も大きいものを採用するための試作品を作ってみた次第です。
| AppleScript名:pictureが置かれているセルのアドレスを推定する.scpt |
| — – Created by: Takaaki Naganoya – Created on: 2023/08/07 — – Copyright © 2023 Piyomaru Software, All Rights Reserved — use AppleScript use scripting additions use framework "Foundation" set aRect to retExcelCellRect(22, 2) of me set bRect to retExcelCellRect(23, 2) of me tell application "Microsoft Excel" tell active workbook tell active sheet set anImage to picture 1 set tmpX to left position of anImage set tmpY to top of anImage set tmpW to width of anImage set tmpH to height of anImage end tell end tell end tell set aZRect to current application’s NSMakeRect(tmpX, tmpY, tmpW, tmpH) –共通部分の矩形座標を計算 set a1Res to (current application’s NSIntersectionRect(aRect, aZRect)) as {record, list} set b1Res to (current application’s NSIntersectionRect(bRect, aZRect)) as {record, list} –共通部分の面積を計算 set a1Area to calcAnArea(a1Res) of me set b1Area to calcAnArea(b1Res) of me –大小判定 if a1Area > b1Area then return "a is larger" else return "b is larger" end if –NSRectの面積を計算する on calcAnArea(aRect) if class of aRect = list then set xWidth to (item 1 of item 2 of aRect) set yHeight to (item 2 of item 2 of aRect) else set xWidth to (aRect’s |size|’s width) set yHeight to (aRect’s |size|’s height) end if set anArea to xWidth * yHeight return anArea end calcAnArea on retExcelCellRect(y, x) tell application "Microsoft Excel" tell active workbook tell active sheet tell row y tell cell x set xMin0 to left position set yMin0 to top set xWidth0 to width set yHeight0 to height end tell end tell end tell end tell end tell set a1Rect to current application’s NSMakeRect(xMin0, yMin0, xWidth0, yHeight0) return a1Rect end retExcelCellRect |
マンデルブロ集合を文字で組み立てて、デスクトップフォルダにRTF形式で保存して、テキストエディットでオープンして表示するAppleScriptです。
Courier Newはどの環境にも入っているフォントだと思っていますが、ない場合には別の等幅フォントのPostScript名に変更してください。また、フォントサイズや描画色を変更してみるといいかもしれません。
ちなみに、実用性はまっっっっったくありません。昔は計算に数分かかったのに、いまだとインタプリタ型の言語で動かしても1秒以下なんだ、へーという納得ができる程度です。
| AppleScript名:マンデルブロ集合を描画してRTFとして組み立ててテキストエディットでオープン.scpt |
| — – Created by: Takaaki Naganoya – Created on: 2023/08/06 — – Copyright © 2023 Piyomaru Software, All Rights Reserved — use AppleScript use framework "Foundation" use framework "AppKit" use scripting additions property NSFont : a reference to current application’s NSFont property NSUUID : a reference to current application’s NSUUID property NSColor : a reference to current application’s NSColor property NSString : a reference to current application’s NSString property NSDictionary : a reference to current application’s NSDictionary property NSLiteralSearch : a reference to current application’s NSLiteralSearch property NSMutableArray : a reference to current application’s NSMutableArray property NSMutableDictionary : a reference to current application’s NSMutableDictionary property NSFontAttributeName : a reference to current application’s NSFontAttributeName property NSMutableAttributedString : a reference to current application’s NSMutableAttributedString property NSForegroundColorAttributeName : a reference to current application’s NSForegroundColorAttributeName property NSDocumentTypeDocumentAttribute : a reference to current application’s NSDocumentTypeDocumentAttribute set outStr to generateMandel() of me set anAssrStr to makeRTFfromParameters(outStr, "CourierNewPSMT", 12) of me –結果のRTFをデスクトップ上に書き出す。ファイル名はUUID.rtf set thePath to (POSIX path of (path to desktop)) & (do shell script "uuidgen") & ".rtf" set aRes to my saveStyledTextAsRTF(thePath, anAssrStr) set targAlias to (POSIX file (thePath as string)) as alias tell application "TextEdit" activate open targAlias end tell –スタイル付きテキストを指定パス(POSIX path)にRTFで書き出し on saveStyledTextAsRTF(targPath, aStyledString) set targPathNSString to NSString’s stringWithString:targPath set bstyledLength to aStyledString’s |string|()’s |length|() set bDict to NSDictionary’s dictionaryWithObject:"NSRTFTextDocumentType" forKey:(NSDocumentTypeDocumentAttribute) set bRTF to aStyledString’s RTFFromRange:(current application’s NSMakeRange(0, bstyledLength)) documentAttributes:bDict return (bRTF’s writeToFile:targPath atomically:true) as boolean end saveStyledTextAsRTF –書式つきテキストを組み立てる on makeRTFfromParameters(aStr as string, aFontName as string, aFontSize as real) set aVal1 to NSFont’s fontWithName:aFontName |size|:aFontSize set aKey1 to (current application’s NSFontAttributeName) set aVal2 to NSColor’s cyanColor() set aKey2 to (current application’s NSForegroundColorAttributeName) set aVal3 to 0.0 set akey3 to (current application’s NSKernAttributeName) set keyList to {aKey1, aKey2, akey3} set valList to {aVal1, aVal2, aVal3} set attrsDictionary to NSMutableDictionary’s dictionaryWithObjects:valList forKeys:keyList set attrStr to NSMutableAttributedString’s alloc()’s initWithString:aStr attributes:attrsDictionary return attrStr end makeRTFfromParameters –マンデルブロ集合を文字で描画して返す on generateMandel() set outStr to "" repeat with y from -12 to 12 by 1 repeat with x from -39 to 39 by 1 set ca to x * 0.0458 set cb to y * 0.08333 set a to ca set b to cb repeat with i from 0 to 15 by 1 set t to (a * a) – (b * b) + ca set b to (2 * a * b) + cb set a to t if ((a * a) + (b * b)) > 4 then exit repeat end repeat if ((a * a) + (b * b)) ≤ 4 then set outStr to outStr & " " else if i > 9 then set i to i + 7 set outStr to outStr & string id (48 + i) end if end repeat set outStr to outStr & return end repeat return outStr end generateMandel |
日常的に利用するAppleScriptは、macOS標準搭載のScript Menuに入れて使用しています。エンドユーザーに「Script Editor上で実行しろ」とかいうのは無茶ですし、「全部Appletに書き出してアプリケーションとして実行」とかいうのも、セキュリティ的な縛りが増えた環境においては、無茶な話です。だいたい、日常的に利用している数百本のAppleScriptを全部Appletに書き出すというのも(自動処理でできるけど)無茶な話です。
そのため、日常的に利用するAppleScriptは、個人的にScript Menuから実行していますし、Script Menuを「最終防衛線」として定義し、AppleがOSアップデートのたびに作成するバグに対して文句を言っています。Script Menu上で動かなかったら問題視しています。
さて、そこに新たな頭痛の種が舞い込んできました。ここ数日いじくりまわしているPowerPointです。
いつものように、Script Menuに操作系のScriptを入れて実行すれば、それでおしまい! というわけには行きませんでした。PowerPointの書類からTOCつきのPDFを書き出すAppleScriptを書いて、Script Menuに入れたら実行できなくなりました(途中までは実行できるのに……)。Script Editor/Script Debugger上では問題なく実行できるのに、です。
この場合、Script Menuがランタイム環境(実行環境)になるわけで、各種セキュリティ設定もScript Menuに対して行っています。AppleScript Appletを数百個自動生成できたとしても、数百個のAppletに対してすべてセキュリティ設定を行うのは現実的な話ではありません。Script Menuに対して権限設定をまとめておけたほうが便利です。
そのため、Script Menuには「オートメーション」「フルディスクアクセス」「アクセシビリティ」など考えられる一通りのセキュリティ設定が行われているわけですが、先のPowerPointを操作するAppleScriptが、Script Menu上からは実行が完了しませんでした。
どうもファイルアクセス権限に関する問題(Script Editor上から実行しても、初回はダイアログが出る)のようなのですが、この権限がScript Menuから実行すると取得できないようで…
この問題をAppleに報告すべきなのか、Microsoftに報告すべきなのか、現状だと判断がつかないところです(たらいまわしにされる予感)。
PowerPointなんか使う方が悪い、という話までありそうな、、、、
PowerPoint書類(presentation)の各スライドのタイトルを取得するAppleScriptです。
正確にいえば、タイトルを取得するかもしれないAppleScriptです。本Scriptの実行時にはPowerPointで何らかのPPTX書類をオープンしていることを期待しています。
PowerPointをこづき回してみると、各スライドのタイトルを保持しているプロパティとかいったものが「ない」ことに気づきます。
ではどうやって取り出すかといえば、
(1)slideのplace holderを取得する
(2)place holder内にtext frameが存在しているかを確認
(3)text frameが存在している場合には、内部にアクセスして文字を取り出す
という手順になるようです。
ただし、place holderにアクセスする都合上、
スライドのレイアウトの種類によってはplace holderが存在していないものもあるため、place holderの存在確認から行うべきかもしれません。
また、slide内に複数のplace holderが存在する場合に、どれがtitleに該当するのかを調べる必要があるとか(座標とか、文字サイズとかを頼りに推測)、いろいろと処理が破綻しそうな「例外条件」が多数存在していそうです。
| AppleScript名:各slideのタイトル文字列を取得 v2.scpt |
| — – Created by: Takaaki Naganoya – Created on: 2023/08/03 — – Copyright © 2023 Piyomaru Software, All Rights Reserved — set tList to getEveryPPTSlideTItles() of me –> {"Title", "1章", "Slide1", "Slide2", "2章", "Slide3", "Slide4"} on getEveryPPTSlideTItles() set tList to {} tell application "Microsoft PowerPoint" tell active presentation set sList to every slide repeat with i in sList set j to contents of i tell j set plaList to every place holder set aPla to contents of first item of plaList set hText to (has text of text frame of aPla) as boolean if hText = true then set hTextR to (content of text range of text frame of aPla) as string else set hTextR to "" end if end tell set the end of tList to hTextR end repeat return tList end tell end tell end getEveryPPTSlideTItles |
いろいろ調べてみたら、PowerPointが扱うファイルパス形式に整合性がまったくないことがわかりました。なんなんでしょう、これは。
これは、とくに問題はありません。最低限のラインはクリアしているといってよいでしょう。
fileオブジェクトではなくHFS pathの文字列です。ここでかなり「おかしなプログラムだな」という感想を抱きます。こんなおかしなデータを要求するのはPowerPointぐらいだと思いますよ?
PDF書き出しもPPTX書類の保存も、同じく「save」コマンドで行うので、仕様が同じなのも納得ですが、通常書類のsaveにこれでは相当変わった仕様にしか見えません。
これは、致命的におかしな挙動であり、呆れるほどおかしな仕様です。担当者が正気なのか疑わしいレベルです。Office 2011のPowerPointでpresentation(書類)のfull name(フルパス情報)を取得してみたところ、HFS path文字列が返ってきたという調査結果が残っていました。
いま、バージョン16.75のPowerPointのpresentation(書類)のfull name(フルパス情報)を取得すると、POSIX pathが返ってきます。
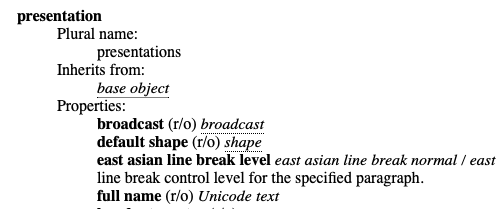
▲Office 2011のPowerPointのパス情報の記述
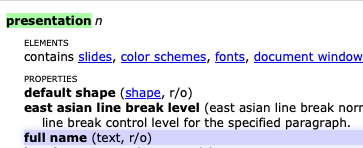
▲バージョン16.75のPowerPointのパス情報の記述
AppleScript用語辞書上の記載内容にはたいして変化はないのですが、こんな頭のおかしな状態になっているとは思いませんでした。正直、PowerPointで何かまとまった処理を行おうとは思ったことが(それほど)なかったのですが、Keynoteで山のようにいろいろ強烈なScriptを書いているので、PowerPointでもいろいろできるのでは? と、冗談半分で試してこの通りです。
まさか、ExcelとWordもこの調子なのでは?(^ー^;
| AppleScript名:オープン中の最前面のPowerPoint書類のフルパスの文字列を取得.scpt |
| set a to getPPTpath() of me –> "Cherry:Users:me:Documents:2013-MacUDingCFUD.ppt"–Office 2011 –> "/Users/me/Documents/AppleScript 13/PowerPoint/TESTプレゼンテーション1 .pptx"–Office 2019 –オープン中の最前面のPowerPoint書類のフルパスの文字列を取得 on getPPTpath() tell application "Microsoft PowerPoint" set pCount to count every presentation if pCount = 0 then return false tell active presentation –Documentのフルパスを取得する set aPath to full name return aPath end tell end tell end getPPTpath |
PowerPointの書類からTOCつきのPDFを書き出すAppleScriptを書いた際には、頭のおかしなPowerPoint 16.75が返してくるパス形式をサブルーチン側で吸収して処理するようにしました。ただ、将来的にこの頭のおかしな形式からまともな形式に戻してきたときに問題が発生するので、再変更に備えてもう少し準備しておいたほうがよいのかもしれません。
このPowerPointの担当者は、頭がおかしいです。
| AppleScript名:オープン中のPowerPoint書類のパスをalias形式で取得.scpt |
| set pptPath to getPPTpath() of me –> alias "Macintosh HD:Users:me:Documents:AppleScript 13:PowerPoint:TESTプレゼンテーション1 (Sectionなし).pptx" –オープン中の最前面のPowerPoint書類のフルパスの文字列を取得 on getPPTpath() tell application "Microsoft PowerPoint" set pCount to count every presentation if pCount = 0 then return false tell active presentation –Documentのフルパスを取得する set aPath to full name end tell end tell set aFile to POSIX file aPath set anAlias to aFile as alias return anAlias end getPPTpath |
KeynoteからPDF書き出しを行う際に、デフォルトの機能ではTOCも何もついていないのですが、AppleScriptからあらゆる手段を講じてTOCつきで書き出せるようにしています(新刊「Keynote Scripting Book with AppleScript」に掲載)。
一方、PowerPointではどうかといえば、sectionを作成し章構成を分けて、スライドを章ごとに折りたためるようになっています。PDF書き出し時にこのsectionが反映されるということはまったくなく、sectionを追加しようが書き出されたPDFはそのままです。
このsection内のインデント情報が取得できれば、それを元にTOCを作ってもよいのですが、残念ながらインデント情報は取り出せないようです。
ただ、処理に必要な最低限の情報が取れるので、Keynoteと同レベルのTOCつきPDFをAppleScriptで合成することは可能と思われます。
| AppleScript名:各スライドから情報を取得.scpt |
| tell application "Microsoft PowerPoint" tell active presentation set sList to every slide repeat with i in sList set j to contents of i tell j set sInd to section index set sNum to section number set myLayout to layout as string log {sInd, sNum, myLayout} end tell end repeat end tell end tell |
各スライドのタイトルを取得しようとしたら、素直に取得できず……かといって取れなさそうでもないので、いろいろ調べてみたら、どうやら取得できたようです。
| AppleScript名:各slideのタイトル文字列を取得.scpt |
| tell application "Microsoft PowerPoint" tell active presentation set sList to every slide repeat with i in sList set j to contents of i tell j set sInd to section index set sNum to section number set myLayout to layout as string log {sInd, sNum, myLayout} set plaList to every place holder set aPla to contents of first item of plaList set hText to (has text of text frame of aPla) as boolean log hText if hText = true then set hTextR to (content of text range of text frame of aPla) as string log hTextR end if end tell end repeat end tell end tell |