— Created 2018-02-15 by Takaaki Naganoya
— 2018 Piyomaru Software
use AppleScript version "2.8"
use scripting additions
use framework "Foundation"
use framework "AVFoundation"
set aList to (current application’s AVSpeechSynthesisVoice’s speechVoices()’s valueForKey:"identifier") as list
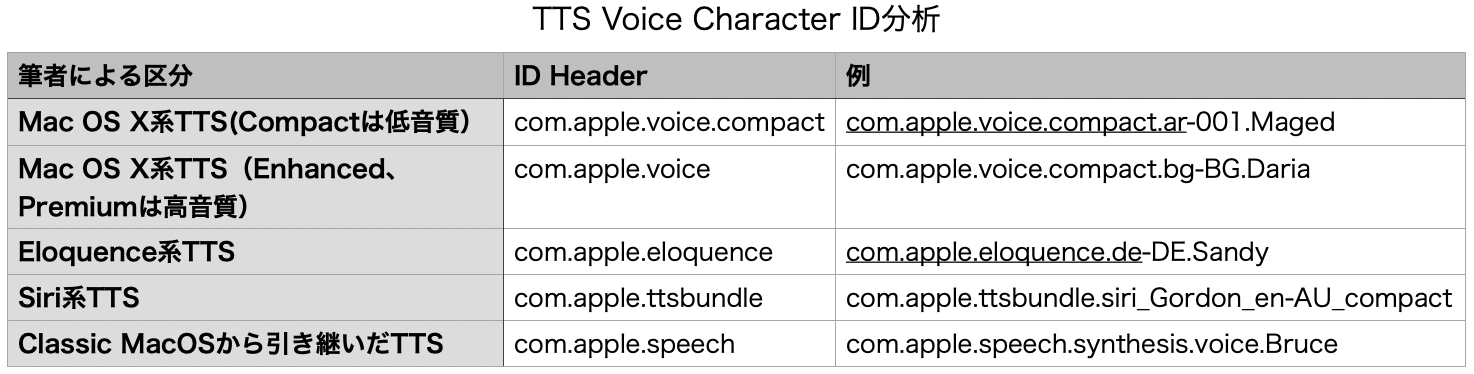
–macOS 13 (190)
–> {"com.apple.voice.compact.ar-001.Maged", "com.apple.voice.compact.bg-BG.Daria", "com.apple.voice.compact.ca-ES.Montserrat", "com.apple.voice.compact.cs-CZ.Zuzana", "com.apple.voice.compact.da-DK.Sara", "com.apple.eloquence.de-DE.Sandy", "com.apple.eloquence.de-DE.Shelley", "com.apple.ttsbundle.siri_Helena_de-DE_compact", "com.apple.eloquence.de-DE.Grandma", "com.apple.eloquence.de-DE.Grandpa", "com.apple.eloquence.de-DE.Eddy", "com.apple.eloquence.de-DE.Reed", "com.apple.voice.compact.de-DE.Anna", "com.apple.ttsbundle.siri_Martin_de-DE_compact", "com.apple.eloquence.de-DE.Rocko", "com.apple.eloquence.de-DE.Flo", "com.apple.voice.compact.el-GR.Melina", "com.apple.ttsbundle.siri_Gordon_en-AU_compact", "com.apple.voice.compact.en-AU.Karen", "com.apple.ttsbundle.siri_Catherine_en-AU_compact", "com.apple.voice.premium.en-GB.Malcolm", "com.apple.voice.enhanced.en-GB.Daniel", "com.apple.ttsbundle.Oliver-premium", "com.apple.voice.enhanced.en-GB.Kate", "com.apple.eloquence.en-GB.Rocko", "com.apple.eloquence.en-GB.Shelley", "com.apple.ttsbundle.Oliver-compact", "com.apple.voice.compact.en-GB.Daniel", "com.apple.ttsbundle.siri_Martha_en-GB_compact", "com.apple.eloquence.en-GB.Grandma", "com.apple.eloquence.en-GB.Grandpa", "com.apple.eloquence.en-GB.Flo", "com.apple.eloquence.en-GB.Eddy", "com.apple.eloquence.en-GB.Reed", "com.apple.eloquence.en-GB.Sandy", "com.apple.ttsbundle.siri_Arthur_en-GB_compact", "com.apple.voice.enhanced.en-IE.Moira", "com.apple.voice.compact.en-IE.Moira", "com.apple.voice.compact.en-IN.Rishi", "com.apple.voice.premium.en-US.Zoe", "com.apple.voice.premium.en-US.Ava", "com.apple.voice.enhanced.en-US.Samantha", "com.apple.voice.enhanced.en-US.Evan", "com.apple.voice.enhanced.en-US.Zoe", "com.apple.voice.enhanced.en-US.Joelle", "com.apple.voice.enhanced.en-US.Susan", "com.apple.voice.enhanced.en-US.Nathan", "com.apple.voice.enhanced.en-US.Tom", "com.apple.voice.enhanced.en-US.Noelle", "com.apple.eloquence.en-US.Flo", "com.apple.speech.synthesis.voice.Albert", "com.apple.speech.synthesis.voice.Bahh", "com.apple.speech.synthesis.voice.Fred", "com.apple.speech.synthesis.voice.Hysterical", "com.apple.voice.compact.en-US.Allison", "com.apple.speech.synthesis.voice.Organ", "com.apple.speech.synthesis.voice.Cellos", "com.apple.voice.compact.en-US.Evan", "com.apple.speech.synthesis.voice.Zarvox", "com.apple.eloquence.en-US.Rocko", "com.apple.eloquence.en-US.Shelley", "com.apple.speech.synthesis.voice.Princess", "com.apple.eloquence.en-US.Grandma", "com.apple.eloquence.en-US.Eddy", "com.apple.speech.synthesis.voice.Bells", "com.apple.eloquence.en-US.Grandpa", "com.apple.speech.synthesis.voice.Trinoids", "com.apple.speech.synthesis.voice.Kathy", "com.apple.eloquence.en-US.Reed", "com.apple.speech.synthesis.voice.Boing", "com.apple.speech.synthesis.voice.GoodNews", "com.apple.speech.synthesis.voice.Whisper", "com.apple.speech.synthesis.voice.Bruce", "com.apple.speech.synthesis.voice.Deranged", "com.apple.ttsbundle.siri_Nicky_en-US_compact", "com.apple.speech.synthesis.voice.BadNews", "com.apple.ttsbundle.siri_Aaron_en-US_compact", "com.apple.speech.synthesis.voice.Bubbles", "com.apple.voice.compact.en-US.Susan", "com.apple.voice.compact.en-US.Tom", "com.apple.speech.synthesis.voice.Agnes", "com.apple.voice.compact.en-US.Samantha", "com.apple.eloquence.en-US.Sandy", "com.apple.speech.synthesis.voice.Junior", "com.apple.voice.compact.en-US.Ava", "com.apple.speech.synthesis.voice.Ralph", "com.apple.voice.compact.en-ZA.Tessa", "com.apple.eloquence.es-ES.Shelley", "com.apple.eloquence.es-ES.Grandma", "com.apple.eloquence.es-ES.Rocko", "com.apple.eloquence.es-ES.Grandpa", "com.apple.eloquence.es-ES.Flo", "com.apple.eloquence.es-ES.Sandy", "com.apple.voice.compact.es-ES.Monica", "com.apple.eloquence.es-ES.Eddy", "com.apple.eloquence.es-ES.Reed", "com.apple.eloquence.es-MX.Rocko", "com.apple.voice.compact.es-MX.Paulina", "com.apple.eloquence.es-MX.Flo", "com.apple.eloquence.es-MX.Sandy", "com.apple.eloquence.es-MX.Eddy", "com.apple.eloquence.es-MX.Shelley", "com.apple.eloquence.es-MX.Reed", "com.apple.eloquence.es-MX.Grandma", "com.apple.eloquence.es-MX.Grandpa", "com.apple.eloquence.fi-FI.Shelley", "com.apple.eloquence.fi-FI.Grandma", "com.apple.eloquence.fi-FI.Grandpa", "com.apple.eloquence.fi-FI.Sandy", "com.apple.voice.compact.fi-FI.Satu", "com.apple.eloquence.fi-FI.Eddy", "com.apple.eloquence.fi-FI.Rocko", "com.apple.eloquence.fi-FI.Reed", "com.apple.eloquence.fi-FI.Flo", "com.apple.voice.premium.fr-CA.Amelie", "com.apple.voice.enhanced.fr-CA.Chantal", "com.apple.eloquence.fr-CA.Shelley", "com.apple.eloquence.fr-CA.Grandma", "com.apple.eloquence.fr-CA.Grandpa", "com.apple.eloquence.fr-CA.Rocko", "com.apple.eloquence.fr-CA.Eddy", "com.apple.eloquence.fr-CA.Reed", "com.apple.voice.compact.fr-CA.Amelie", "com.apple.eloquence.fr-CA.Flo", "com.apple.eloquence.fr-CA.Sandy", "com.apple.eloquence.fr-FR.Grandma", "com.apple.eloquence.fr-FR.Flo", "com.apple.eloquence.fr-FR.Rocko", "com.apple.eloquence.fr-FR.Grandpa", "com.apple.eloquence.fr-FR.Sandy", "com.apple.eloquence.fr-FR.Eddy", "com.apple.voice.compact.fr-FR.Thomas", "com.apple.ttsbundle.siri_Dan_fr-FR_compact", "com.apple.eloquence.fr-FR.Jacques", "com.apple.ttsbundle.siri_Marie_fr-FR_compact", "com.apple.eloquence.fr-FR.Shelley", "com.apple.voice.compact.he-IL.Carmit", "com.apple.voice.compact.hi-IN.Lekha", "com.apple.voice.compact.hr-HR.Lana", "com.apple.voice.compact.hu-HU.Mariska", "com.apple.voice.compact.id-ID.Damayanti", "com.apple.eloquence.it-IT.Eddy", "com.apple.eloquence.it-IT.Sandy", "com.apple.eloquence.it-IT.Reed", "com.apple.eloquence.it-IT.Shelley", "com.apple.eloquence.it-IT.Grandma", "com.apple.eloquence.it-IT.Grandpa", "com.apple.eloquence.it-IT.Flo", "com.apple.eloquence.it-IT.Rocko", "com.apple.voice.compact.it-IT.Alice", "com.apple.ttsbundle.siri_Hattori_ja-JP_premium", "com.apple.ttsbundle.siri_O-Ren_ja-JP_premium", "com.apple.voice.enhanced.ja-JP.Kyoko", "com.apple.voice.enhanced.ja-JP.Otoya", "com.apple.voice.compact.ja-JP.Kyoko", "com.apple.ttsbundle.siri_Hattori_ja-JP_compact", "com.apple.voice.compact.ja-JP.Otoya", "com.apple.ttsbundle.siri_O-Ren_ja-JP_compact", "com.apple.voice.compact.ko-KR.Yuna", "com.apple.voice.compact.ms-MY.Amira", "com.apple.voice.compact.nb-NO.Nora", "com.apple.voice.compact.nl-BE.Ellen", "com.apple.voice.compact.nl-NL.Xander", "com.apple.voice.compact.pl-PL.Zosia", "com.apple.eloquence.pt-BR.Reed", "com.apple.voice.compact.pt-BR.Luciana", "com.apple.eloquence.pt-BR.Shelley", "com.apple.eloquence.pt-BR.Grandma", "com.apple.eloquence.pt-BR.Grandpa", "com.apple.eloquence.pt-BR.Rocko", "com.apple.eloquence.pt-BR.Flo", "com.apple.eloquence.pt-BR.Sandy", "com.apple.eloquence.pt-BR.Eddy", "com.apple.voice.compact.pt-PT.Joana", "com.apple.voice.compact.ro-RO.Ioana", "com.apple.voice.compact.ru-RU.Milena", "com.apple.voice.compact.sk-SK.Laura", "com.apple.voice.compact.sv-SE.Alva", "com.apple.voice.compact.th-TH.Kanya", "com.apple.voice.compact.tr-TR.Yelda", "com.apple.voice.compact.uk-UA.Lesya", "com.apple.voice.compact.vi-VN.Linh", "com.apple.ttsbundle.siri_Yu-Shu_zh-CN_compact", "com.apple.ttsbundle.siri_Li-Mu_zh-CN_compact", "com.apple.voice.compact.zh-CN.Tingting", "com.apple.ttsbundle.Sin-ji-premium", "com.apple.voice.compact.zh-HK.Sinji", "com.apple.ttsbundle.Mei-Jia-premium", "com.apple.voice.compact.zh-TW.Meijia", "com.apple.speech.synthesis.voice.Alex"}
–macOS 15 (222)
–> {"com.apple.voice.compact.ar-001.Maged", "com.apple.voice.compact.bg-BG.Daria", "com.apple.voice.compact.ca-ES.Montserrat", "com.apple.voice.compact.cs-CZ.Zuzana", "com.apple.voice.compact.da-DK.Sara", "com.apple.eloquence.de-DE.Sandy", "com.apple.eloquence.de-DE.Shelley", "com.apple.ttsbundle.siri_Helena_de-DE_compact", "com.apple.eloquence.de-DE.Grandma", "com.apple.eloquence.de-DE.Grandpa", "com.apple.eloquence.de-DE.Eddy", "com.apple.eloquence.de-DE.Reed", "com.apple.voice.compact.de-DE.Anna", "com.apple.ttsbundle.siri_Martin_de-DE_compact", "com.apple.eloquence.de-DE.Rocko", "com.apple.eloquence.de-DE.Flo", "com.apple.voice.compact.el-GR.Melina", "com.apple.ttsbundle.siri_Gordon_en-AU_compact", "com.apple.voice.compact.en-AU.Karen", "com.apple.ttsbundle.siri_Catherine_en-AU_compact", "com.apple.voice.premium.en-GB.Malcolm", "com.apple.voice.enhanced.en-GB.Daniel", "com.apple.voice.enhanced.en-GB.Kate", "com.apple.eloquence.en-GB.Rocko", "com.apple.eloquence.en-GB.Shelley", "com.apple.voice.compact.en-GB.Daniel", "com.apple.ttsbundle.siri_Martha_en-GB_compact", "com.apple.eloquence.en-GB.Grandma", "com.apple.eloquence.en-GB.Grandpa", "com.apple.eloquence.en-GB.Flo", "com.apple.eloquence.en-GB.Eddy", "com.apple.eloquence.en-GB.Reed", "com.apple.eloquence.en-GB.Sandy", "com.apple.ttsbundle.siri_Arthur_en-GB_compact", "com.apple.voice.enhanced.en-IE.Moira", "com.apple.voice.compact.en-IE.Moira", "com.apple.voice.compact.en-IN.Rishi", "com.apple.voice.premium.en-US.Zoe", "com.apple.voice.premium.en-US.Ava", "com.apple.voice.enhanced.en-US.Samantha", "com.apple.voice.enhanced.en-US.Evan", "com.apple.ttsbundle.siri_Nicky_en-US_premium", "com.apple.voice.enhanced.en-US.Ava", "com.apple.voice.enhanced.en-US.Zoe", "com.apple.voice.enhanced.en-US.Joelle", "com.apple.voice.enhanced.en-US.Susan", "com.apple.voice.enhanced.en-US.Allison", "com.apple.speech.synthesis.voice.Bruce", "com.apple.voice.enhanced.en-US.Nathan", "com.apple.voice.enhanced.en-US.Tom", "com.apple.speech.synthesis.voice.Agnes", "com.apple.voice.enhanced.en-US.Noelle", "com.apple.eloquence.en-US.Flo", "com.apple.speech.synthesis.voice.Bahh", "com.apple.speech.synthesis.voice.Fred", "com.apple.speech.synthesis.voice.Albert", "com.apple.speech.synthesis.voice.Hysterical", "com.apple.voice.compact.en-US.Allison", "com.apple.speech.synthesis.voice.Organ", "com.apple.speech.synthesis.voice.Cellos", "com.apple.voice.compact.en-US.Evan", "com.apple.speech.synthesis.voice.Zarvox", "com.apple.eloquence.en-US.Rocko", "com.apple.eloquence.en-US.Shelley", "com.apple.speech.synthesis.voice.Princess", "com.apple.eloquence.en-US.Grandma", "com.apple.eloquence.en-US.Eddy", "com.apple.speech.synthesis.voice.Bells", "com.apple.eloquence.en-US.Grandpa", "com.apple.speech.synthesis.voice.Kathy", "com.apple.speech.synthesis.voice.Trinoids", "com.apple.eloquence.en-US.Reed", "com.apple.speech.synthesis.voice.Boing", "com.apple.speech.synthesis.voice.Whisper", "com.apple.speech.synthesis.voice.GoodNews", "com.apple.speech.synthesis.voice.Deranged", "com.apple.ttsbundle.siri_Nicky_en-US_compact", "com.apple.speech.synthesis.voice.BadNews", "com.apple.ttsbundle.siri_Aaron_en-US_compact", "com.apple.speech.synthesis.voice.Bubbles", "com.apple.voice.compact.en-US.Susan", "com.apple.voice.compact.en-US.Tom", "com.apple.voice.compact.en-US.Samantha", "com.apple.eloquence.en-US.Sandy", "com.apple.speech.synthesis.voice.Junior", "com.apple.voice.compact.en-US.Ava", "com.apple.speech.synthesis.voice.Ralph", "com.apple.voice.compact.en-ZA.Tessa", "com.apple.eloquence.es-ES.Shelley", "com.apple.eloquence.es-ES.Grandma", "com.apple.eloquence.es-ES.Rocko", "com.apple.eloquence.es-ES.Grandpa", "com.apple.eloquence.es-ES.Flo", "com.apple.eloquence.es-ES.Sandy", "com.apple.voice.compact.es-ES.Monica", "com.apple.eloquence.es-ES.Eddy", "com.apple.eloquence.es-ES.Reed", "com.apple.eloquence.es-MX.Rocko", "com.apple.voice.compact.es-MX.Paulina", "com.apple.eloquence.es-MX.Flo", "com.apple.eloquence.es-MX.Sandy", "com.apple.eloquence.es-MX.Eddy", "com.apple.eloquence.es-MX.Shelley", "com.apple.eloquence.es-MX.Grandma", "com.apple.eloquence.es-MX.Reed", "com.apple.eloquence.es-MX.Grandpa", "com.apple.eloquence.fi-FI.Shelley", "com.apple.eloquence.fi-FI.Grandma", "com.apple.eloquence.fi-FI.Grandpa", "com.apple.eloquence.fi-FI.Sandy", "com.apple.voice.compact.fi-FI.Satu", "com.apple.eloquence.fi-FI.Eddy", "com.apple.eloquence.fi-FI.Rocko", "com.apple.eloquence.fi-FI.Reed", "com.apple.eloquence.fi-FI.Flo", "com.apple.voice.premium.fr-CA.Amelie", "com.apple.voice.enhanced.fr-CA.Chantal", "com.apple.eloquence.fr-CA.Shelley", "com.apple.eloquence.fr-CA.Grandma", "com.apple.eloquence.fr-CA.Grandpa", "com.apple.eloquence.fr-CA.Rocko", "com.apple.eloquence.fr-CA.Eddy", "com.apple.eloquence.fr-CA.Reed", "com.apple.voice.compact.fr-CA.Amelie", "com.apple.eloquence.fr-CA.Flo", "com.apple.eloquence.fr-CA.Sandy", "com.apple.eloquence.fr-FR.Grandma", "com.apple.eloquence.fr-FR.Flo", "com.apple.eloquence.fr-FR.Rocko", "com.apple.eloquence.fr-FR.Grandpa", "com.apple.eloquence.fr-FR.Sandy", "com.apple.eloquence.fr-FR.Eddy", "com.apple.voice.compact.fr-FR.Thomas", "com.apple.ttsbundle.siri_Dan_fr-FR_compact", "com.apple.eloquence.fr-FR.Jacques", "com.apple.ttsbundle.siri_Marie_fr-FR_compact", "com.apple.eloquence.fr-FR.Shelley", "com.apple.voice.compact.he-IL.Carmit", "com.apple.voice.compact.hi-IN.Lekha", "com.apple.voice.compact.hr-HR.Lana", "com.apple.voice.compact.hu-HU.Mariska", "com.apple.voice.compact.id-ID.Damayanti", "com.apple.eloquence.it-IT.Eddy", "com.apple.eloquence.it-IT.Sandy", "com.apple.eloquence.it-IT.Reed", "com.apple.eloquence.it-IT.Shelley", "com.apple.eloquence.it-IT.Grandma", "com.apple.eloquence.it-IT.Grandpa", "com.apple.eloquence.it-IT.Flo", "com.apple.eloquence.it-IT.Rocko", "com.apple.voice.compact.it-IT.Alice", "com.apple.ttsbundle.siri_Hattori_ja-JP_premium", "com.apple.ttsbundle.siri_O-Ren_ja-JP_premium", "com.apple.voice.enhanced.ja-JP.Kyoko", "com.apple.voice.enhanced.ja-JP.Otoya", "com.apple.eloquence.ja-JP.Eddy", "com.apple.eloquence.ja-JP.Reed", "com.apple.eloquence.ja-JP.Shelley", "com.apple.voice.compact.ja-JP.Kyoko", "com.apple.eloquence.ja-JP.Grandma", "com.apple.eloquence.ja-JP.Rocko", "com.apple.eloquence.ja-JP.Grandpa", "com.apple.ttsbundle.siri_Hattori_ja-JP_compact", "com.apple.voice.compact.ja-JP.Otoya", "com.apple.eloquence.ja-JP.Sandy", "com.apple.ttsbundle.siri_O-Ren_ja-JP_compact", "com.apple.eloquence.ja-JP.Flo", "com.apple.eloquence.ko-KR.Rocko", "com.apple.eloquence.ko-KR.Grandma", "com.apple.eloquence.ko-KR.Grandpa", "com.apple.eloquence.ko-KR.Eddy", "com.apple.eloquence.ko-KR.Sandy", "com.apple.voice.compact.ko-KR.Yuna", "com.apple.eloquence.ko-KR.Reed", "com.apple.eloquence.ko-KR.Flo", "com.apple.eloquence.ko-KR.Shelley", "com.apple.voice.compact.ms-MY.Amira", "com.apple.voice.compact.nb-NO.Nora", "com.apple.voice.compact.nl-BE.Ellen", "com.apple.voice.compact.nl-NL.Xander", "com.apple.voice.compact.pl-PL.Zosia", "com.apple.eloquence.pt-BR.Reed", "com.apple.voice.compact.pt-BR.Luciana", "com.apple.eloquence.pt-BR.Shelley", "com.apple.eloquence.pt-BR.Grandma", "com.apple.eloquence.pt-BR.Grandpa", "com.apple.eloquence.pt-BR.Rocko", "com.apple.eloquence.pt-BR.Flo", "com.apple.eloquence.pt-BR.Sandy", "com.apple.eloquence.pt-BR.Eddy", "com.apple.voice.compact.pt-PT.Joana", "com.apple.voice.compact.ro-RO.Ioana", "com.apple.voice.compact.ru-RU.Milena", "com.apple.voice.compact.sk-SK.Laura", "com.apple.voice.compact.sl-SI.Tina", "com.apple.voice.compact.sv-SE.Alva", "com.apple.voice.compact.th-TH.Kanya", "com.apple.voice.compact.tr-TR.Yelda", "com.apple.voice.compact.uk-UA.Lesya", "com.apple.voice.compact.vi-VN.Linh", "com.apple.eloquence.zh-CN.Eddy", "com.apple.eloquence.zh-CN.Shelley", "com.apple.ttsbundle.siri_Yu-Shu_zh-CN_compact", "com.apple.eloquence.zh-CN.Grandma", "com.apple.eloquence.zh-CN.Reed", "com.apple.eloquence.zh-CN.Grandpa", "com.apple.eloquence.zh-CN.Rocko", "com.apple.ttsbundle.siri_Li-Mu_zh-CN_compact", "com.apple.eloquence.zh-CN.Flo", "com.apple.voice.compact.zh-CN.Tingting", "com.apple.eloquence.zh-CN.Sandy", "com.apple.voice.compact.zh-HK.Sinji", "com.apple.eloquence.zh-TW.Shelley", "com.apple.eloquence.zh-TW.Grandma", "com.apple.eloquence.zh-TW.Grandpa", "com.apple.eloquence.zh-TW.Sandy", "com.apple.eloquence.zh-TW.Flo", "com.apple.eloquence.zh-TW.Eddy", "com.apple.eloquence.zh-TW.Reed", "com.apple.voice.compact.zh-TW.Meijia", "com.apple.eloquence.zh-TW.Rocko", "com.apple.speech.synthesis.voice.Alex"} |