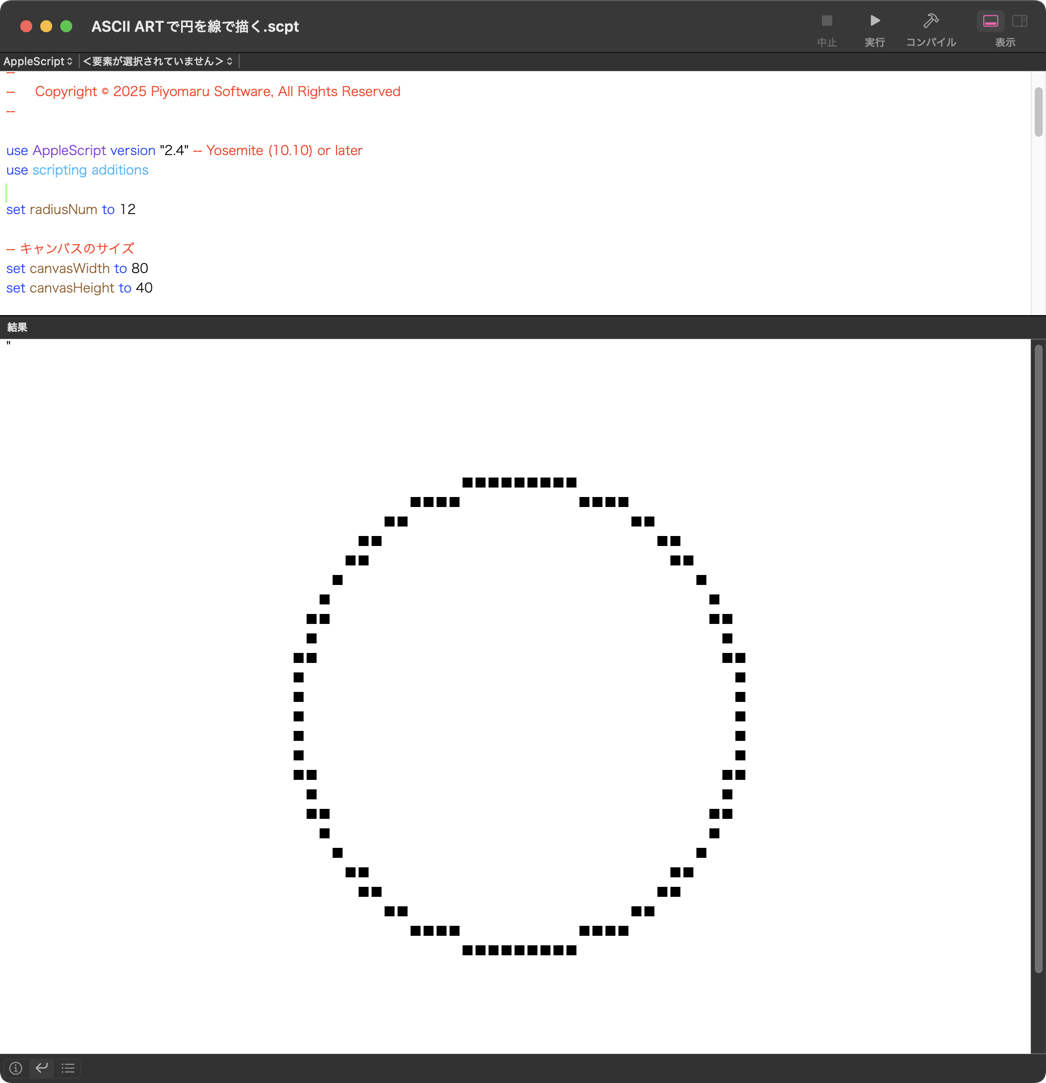
テキストで作成した棒グラフの生成AppleScriptです。
比較的どうでもいいデータの傾向を知りたい場合に棒グラフ表示させて全体の傾向を把握することが、よくあります。そんなときに、文字だけで作成した棒グラフを生成します。何回か書いたことがあるような気もするのですが、簡単なものを作っておきます。
本Scriptで生成するグラフのタイプは2種類。
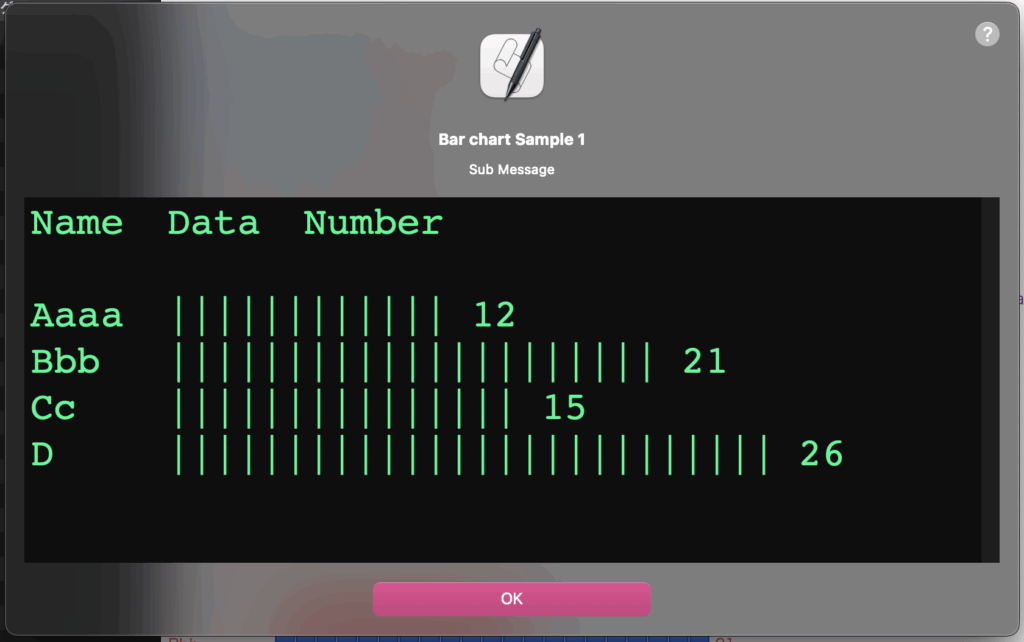
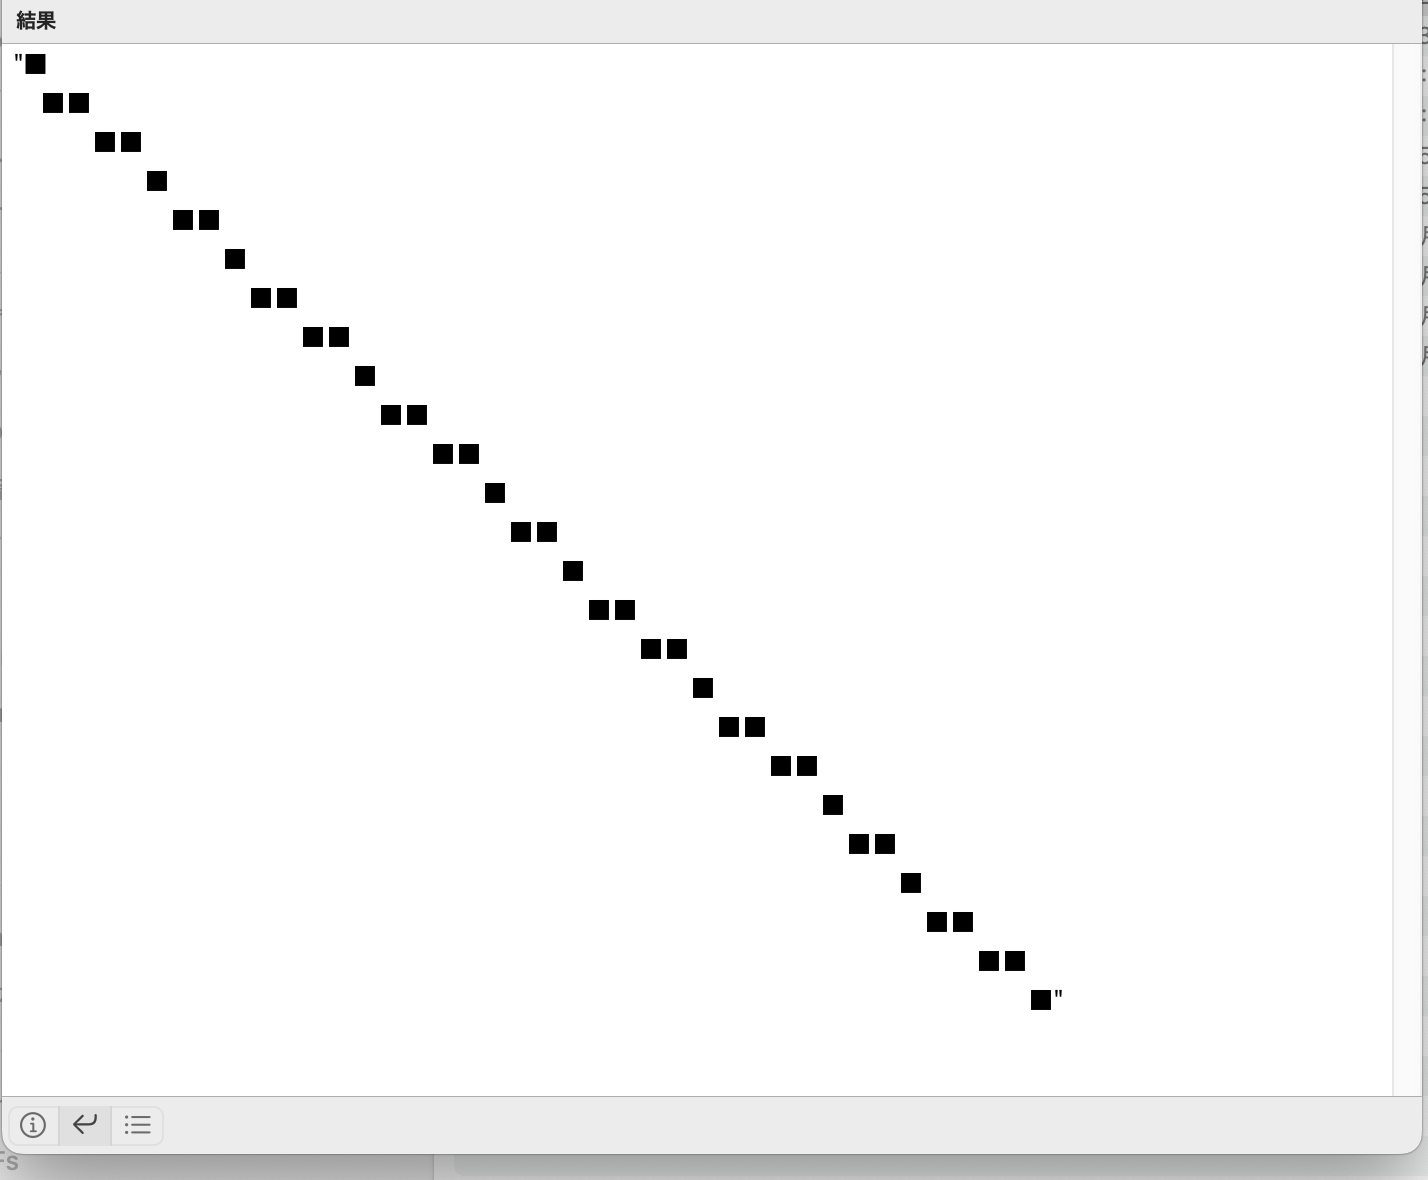
▲モノクロ表示用の、同じ文字を重ねて棒グラフを表示するタイプ
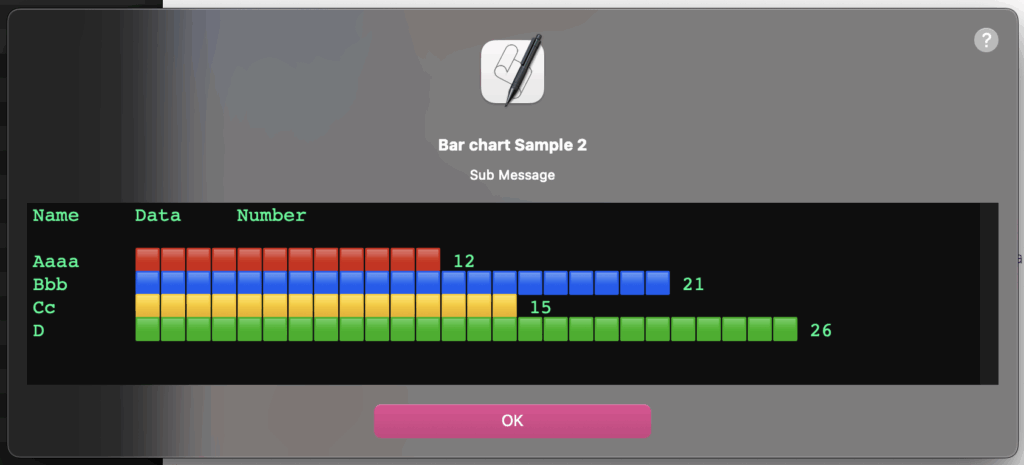
▲カラー(色分け)表示用の、絵文字を用いて色分けして棒グラフを表示するタイプ
項目名の最大文字数を求めて、他の項目で文字数が足りない箇所には不足分のスペースを足して、グラフの位置揃えを行なっていますが、このあたりタブで処理するべきなのか。
実際には、Pages書類上で選択しておいたオブジェクトから画像(image)のみピックアップして、それらの幅を集計してグラフ表示するような用途に使っています。
| AppleScript名:テキストベースの棒グラフ取得.scptd |
| — – Created by: Takaaki Naganoya – Created on: 2025/09/27 — – Copyright © 2025 Piyomaru Software, All Rights Reserved — use AppleScript version "2.4" — Yosemite (10.10) or later use framework "Foundation" use scripting additions use radioLib : script "displayTextView" set bList to {12, 21, 15, 26} set labelList to {"Aaaa", "Bbb", "Cc", "D"} set aStr to retCharBarChart(labelList, bList, "|") of me set aStr to "Name" & tab & tab & "Data" & tab & tab & "Number" & return & return & aStr display text view aStr main message "Bar chart Sample 1" sub message "Sub Message" with properties {font name:"Courier", size:32, width:800, height:300, color:{0, 255, 128}} (* "Name Data Number Aaaa |||||||||||| 12 (* "Aaaa 🟥🟥🟥🟥🟥🟥🟥🟥🟥🟥🟥🟥 12 Bbb 🟦🟦🟦🟦🟦🟦🟦🟦🟦🟦🟦🟦🟦🟦🟦🟦🟦🟦🟦🟦🟦 21 Cc 🟨🟨🟨🟨🟨🟨🟨🟨🟨🟨🟨🟨🟨🟨🟨 15 D 🟩🟩🟩🟩🟩🟩🟩🟩🟩🟩🟩🟩🟩🟩🟩🟩🟩🟩🟩🟩🟩🟩🟩🟩🟩🟩 26 " *) set bStr to "Name" & tab & tab & "Data" & tab & tab & "Number" & return & return & bStr display text view bStr main message "Bar chart Sample 2" sub message "Sub Message" with properties {font name:"Courier", size:16, width:800, height:150, color:{0, 255, 128}} –文字ベースで棒グラフを作成するための文字グラフルーチン on retCharBarChart(labelList, bList, charFlag) –ラベル文字の長さをそろえる(文字種類については不問、単に文字数をそろえるだけ) set tMax to maximumItemLengthFromList(labelList) of me set resText to "" –set aChar to "■" set aCharList to {"🟥", "🟦", "🟨", "🟩", "🟧", "🟪", "🟫", "⬛️", "❤️", "💙", "💛", "💚", "🧡", "💜", "🤎", "🩶", "🖤", "🔴", "🔵", "🟡", "🟢", "🟠", "🟣", "🟤", "⚫️"} set aCharLLen to length of aCharList set iCounter to 1 set aCharPointer to 1 if charFlag = false then –ローテーション方式の色文字グラフ repeat with i in bList set j to contents of i set aLabel to (contents of item iCounter of labelList) as string set aLabel to paddingSpacesAfter(aLabel, tMax, " ") of me set tmpChar to contents of item aCharPointer of aCharList set resText to (resText & aLabel & tab & tab & makeCharRep(j, tmpChar) of me & " " & j as string) & return set iCounter to iCounter + 1 set aCharPointer to aCharPointer + 1 if aCharPointer > aCharLLen then set aCharPointer to 1 end if end repeat else –指定文字で作成する文字グラフ repeat with i in bList set j to contents of i set aLabel to (contents of item iCounter of labelList) as string set aLabel to paddingSpacesAfter(aLabel, tMax, " ") of me set resText to (resText & aLabel & tab & tab & makeCharRep(j, charFlag) of me & " " & j as string) & return set iCounter to iCounter + 1 set aCharPointer to aCharPointer + 1 if aCharPointer > aCharLLen then set aCharPointer to 1 end if end repeat end if return resText end retCharBarChart –指定文字を指定回数連結したテキストを返す on makeCharRep(aNum, aChar) set aText to "" repeat aNum times set aText to aText & aChar end repeat return aText end makeCharRep –指定文字列に、指定の長さまで空白文字列を追加 on paddingSpacesAfter(aDat as string, targLen as integer, padStr as {boolean, string}) set dLen to length of aDat if dLen > targLen then error "Logical error: Target length is shorter than data length" copy aDat to aStr set padStr to makeCharRep(targLen – dLen, padStr) of me return aStr & padStr end paddingSpacesAfter –1D Listで最長の文字列の文字数を返す on maximumItemLengthFromList(nList as list) script o property nl : nList property itemNo : 1 end script set max to length of (item 1 of o’s nl) repeat with i from 2 to (count nList) set n to length of (item i of o’s nl) if n > max then set max to n set o’s itemNo to i end if end repeat return length of (contents of (item (o’s itemNo) of nList)) end maximumItemLengthFromList |