Menu

Skip to content
AppleScriptの穴
  • Home
  • Products
  • Books
  • Docs
  • Events
  • Forum
  • About This Blog
  • License
  • 仕事依頼

AppleScriptの穴

Useful & Practical AppleScript archive. Click '★Click Here to Open This Script' Link to download each AppleScript

タグ: NSColor

クリップボードの画像を指定色でモノクロ化してクリップボードへ v3

Posted on 3月 13, 2022 by Takaaki Naganoya

クリップボードに入れた画像を、グレースケール化したあとに指定の色のベタ塗り画像とフィルタで合成し、単色の色付き画像に変換するAppleScriptです。

資料に掲載する画像の情報量を減らすために、単色画像に変換したいと考えました。Photoshopだと2つのレイヤーの重ね合わせで指定して処理するような内容です。ただ、もうPhotoshopにできるぐらいのことの大部分は、AppleScriptだけで単独でできてしまうのが2022年的な状況です。

アプリケーションを使わずに処理するためには、CIFilterを用いて画像処理して、単色画像にすることになります。

CIFilterにもいろいろな画像フィルタ機能が用意されているわけで、ここから「どのフィルタを使うか」選ぶことになります。

# フィルタが200種類ぐらいあるんですけど!!

このような場合のために、FileMaker Proで作った「FileMaker Pro PowerPack」だとひととおりのCIFilterをサンプルデータで処理できるようにしておきました。

FileMaker Proのデータベース上にサンプルデータをコピー&ペーストしておけば、DB上でフィルタ処理してどのような処理をしてくれるかがわかります。

いやーー、作っておいてよかったー。「なんでこんなにフィルタ処理ばっかりあるんだよ!」的な話がありましたが、こうして実際に役立つわけで。フィルタの名称、編集できるテストデータ、処理結果が表示されるところまで……「動かせる資料」的なものに仕上がっています>FileMaker Pro PowerPack

ひととおりAppleScriptを作ってみて、いろいろ調整してみたところ……調整し切れなかったので、edama2さんに相談して(送りつけて)こんな感じに仕上がりました。

これでなんとか動くはずなのに、なぜこうなるのか。。。CIFilterを実際に日常的に使うツールで使ったのは実はこれが最初だったので、意外な挙動に割と困りました。


▲画面上の指定範囲のスクリーンショットを撮ってクリップボードへ


▲ScriptをmacOS標準搭載のスクリプトメニューから呼び出すことを前提に作った。


▲クリップボードの内容をペーストすると、単色化された画像が出力される

AppleScript名:クリップボードの画像を指定色でモノクロ化してクリップボードへ v3.scpt
—
–  Created by: Takaaki Naganoya
–  Created on: 2022/03/11
—
–  Copyright © 2022 Piyomaru Software, All Rights Reserved
–  v2 Takaaki Naganoya : マスクが1/4の大きさになったり2倍になったりしていた
–  v3 edama2:上記の問題に対処。クリーンナップ
—
use AppleScript version "2.7"
use framework "AppKit"
use framework "CoreImage"
use framework "Foundation"
use scripting additions

on run
  my main()
end run

on main()
  –クリップボード内のデータをNSImageとして取得
  
set sourceImg to my getClipboardASImage()
  
  
# 色指定
  
set aColor to my makeNSColorFromRGBA255val(252, 2, 128, 255)


# 同じ大きさの塗りつぶし画像を作成
  
tell current application’s NSImage’s alloc()
    tell initWithSize_(sourceImg’s |size|())
      lockFocus()
      
aColor’s |set|()
      
set aRect to current application’s NSMakeRect(0, 0, its |size|()’s width, its |size|()’s height)
      
current application’s NSBezierPath’s fillRect:aRect
      
unlockFocus()
      
set fillImg to it
    end tell
  end tell
  
  
# NSImage –> CIimage
  
set sourceImage to my convNSImageToCIimage(sourceImg)
  
set fillImage to my convNSImageToCIimage(fillImg)
  
  
set newImage to my filterImage2(fillImage, sourceImage)
  
  
my restoreClipboard({newImage})
end main

on filterImage2(fillImage, sourceImage)
  
  
set redValue to 0.295719844358
  
set greenValue to 0.295719844358
  
set blueValue to 0.295719844358
  
set alphaVlaue to 1.0
  
set aCIColor to current application’s CIColor’s alloc()’s initWithRed:redValue green:greenValue blue:blueValue alpha:alphaVlaue
  
  
tell current application’s CIFilter
    — CIFilter(モノクロ化)
    
tell filterWithName_("CIColorMonochrome")
      setDefaults()
      
setValue_forKey_(sourceImage, "inputImage")
      
setValue_forKey_(aCIColor, "inputColor")
      
set filteredImage to valueForKey_("outputImage")
    end tell
    
    
— CIFilter(モノクロ化)
    
tell filterWithName_("CIAdditionCompositing")
      setDefaults()
      
setValue_forKey_(fillImage, "inputImage")
      
setValue_forKey_(filteredImage, "inputBackgroundImage")
      
set theCIImage to valueForKey_(current application’s kCIOutputImageKey)
    end tell
  end tell
  
  
# CIImage –> NSImage
  
set imageRep to current application’s NSCIImageRep’s alloc()’s initWithCIImage:theCIImage
  
set rNSImage to current application’s NSImage’s alloc()’s initWithSize:(imageRep’s |size|())
  
rNSImage’s addRepresentation:imageRep
  
  
return rNSImage
end filterImage2

# NSImage –> CIimage
on convNSImageToCIimage(aNSImage)
  set tiffDat to aNSImage’s TIFFRepresentation()
  
set aRep to current application’s NSBitmapImageRep’s imageRepWithData:tiffDat
  
set newImg to current application’s CIImage’s alloc()’s initWithBitmapImageRep:aRep
  
return newImg
end convNSImageToCIimage

— クリップボードの内容をNSImageとして取り出して返す
on getClipboardASImage()
  set thePasteboard to current application’s NSPasteboard’s generalPasteboard()
  
set theAttributedStringNSArray to thePasteboard’s readObjectsForClasses:({current application’s NSImage}) options:(missing value)
  
set theNSImage to theAttributedStringNSArray’s objectAtIndex:0
  
return theNSImage
end getClipboardASImage

on restoreClipboard(theArray as list)
  set thePasteboard to current application’s NSPasteboard’s generalPasteboard()
  
thePasteboard’s clearContents()
  
thePasteboard’s writeObjects:theArray
end restoreClipboard

on makeNSColorFromRGBA255val(redValue as integer, greenValue as integer, blueValue as integer, alphaValue as integer)
  set aRedCocoa to (redValue / 255) as real
  
set aGreenCocoa to (greenValue / 255) as real
  
set aBlueCocoa to (blueValue / 255) as real
  
set aAlphaCocoa to (alphaValue / 255) as real
  
set aColor to current application’s NSColor’s colorWithCalibratedRed:aRedCocoa green:aGreenCocoa blue:aBlueCocoa alpha:aAlphaCocoa
  
return aColor
end makeNSColorFromRGBA255val

★Click Here to Open This Script 

(Visited 45 times, 1 visits today)
Posted in filter Image | Tagged 12.0savvy CIColor CIImage NSBezierPath NSCIImageRep NSColor NSImage NSPasteboard | Leave a comment

16bitカラー値から明度を取得 v1.1

Posted on 1月 20, 2022 by Takaaki Naganoya

choose colorコマンドやiWorkアプリケーションが返してくる16ビットのカラー値({R,G,B})から明度情報を取得するAppleScriptです。0から1までの値を返し、0に近づくほど暗く、1に近づくほど明るい色であることを表現しています。

色情報同士を比較して、明るい箇所に指定している色データと暗い箇所に指定している色データを、RGB値から自動認識するような処理に使っています。

また、ファイル名から「章」(Chapter)の番号を検出して、実際のツメ(Index)の選択部分を暗い色で塗り直す処理も行なっています。

–> Watch Demo Movie

Pages書類の上に作成したツメ(辞書などの端に印刷されているAからZのインデックス)に対して、ツメのオブジェクトを(座標や形状から)自動認識したあとに、色の塗り分け情報を本ルーチンを用いて自動認識。濃い色を現在の選択箇所の色、明るい(淡い)色を通常の箇所の色情報として扱い、あらかじめツメに指定していた色情報を用いて実際の章構成を反映させてツメのオブジェクト(表)を再構成する処理に必須のものです。

明度情報の取得には、グレースケールに変換してグレー度(whiteComponent)を明度とみなして計算しています。直感的にこちらのほうが、まっとうな処理(HSB色空間の色に変換してからBrightnessを取得)よりもしっくり来る計算結果だったので採用しています。

おまけで、2つの色情報のうちどちらが暗いか、結果をインデックス値で返す処理ルーチンをつけています。これも、選択色と非選択色の自動識別のために必要なものです。

AppleScript名:16bitカラー値から明度を取得 v1.1.scptd
—
–  Created by: Takaaki Naganoya
–  Created on: 2022/01/20
—
–  Copyright © 2022 Piyomaru Software, All Rights Reserved
—

set a1Col to {26148, 65535, 58650}
set a1Col to choose color default color a1Col
set w1Col to calcBrightnessFrom16bitColorList(a1Col) of colorBrightnessKit
–> 0.900838315487

set a2Col to {2966, 23133, 21203}
set a2Col to choose color default color a2Col
set w2Col to calcBrightnessFrom16bitColorList(a2Col) of colorBrightnessKit
–> 0.37399661541–0に近いのでこちらのほうが暗い

set cIndRes to calcColorPairsDarkerCol(a1Col, a2Col) of colorBrightnessKit
–> {2, 1}–暗い順にインデックス値を返す

–色情報から明度を計算するKit。0に近い値が暗い。CMYKやグレースケール値は対象外。RGBのみ
script colorBrightnessKit
  
  
use AppleScript
  
use framework "Foundation"
  
use framework "AppKit"
  
use scripting additions
  
property parent : AppleScript
  
  
property NSColor : a reference to current application’s NSColor
  
property NSString : a reference to current application’s NSString
  
property NSAttributedString : a reference to current application’s NSAttributedString
  
property NSUTF16StringEncoding : a reference to current application’s NSUTF16StringEncoding
  
property NSDeviceWhiteColorSpace : a reference to current application’s NSDeviceWhiteColorSpace


–2つの16ビットカラー値でそれぞれ明度を計算し、暗いものから順にインデックス値を返す
  
on calcColorPairsDarkerCol(aCol as list, bCol as list)
    set b1 to calcBrightnessFrom16bitColorList(aCol) of me
    
set b2 to calcBrightnessFrom16bitColorList(bCol) of me
    
if b1 ≥ b2 then
      return {2, 1} –bColのほうが暗い
    else
      return {1, 2} –aColのほうが暗い
    end if
  end calcColorPairsDarkerCol


–16ビットカラー値から明度を計算
  
on calcBrightnessFrom16bitColorList(colList as list)
    copy colList to {rVal, gVal, bVal}
    
–NSColorを作成
    
set aCol to makeNSColorFromRGBAval(rVal, gVal, bVal, 65535, 65535) of me
    
— グレースケール化
    
set gCol to aCol’s colorUsingColorSpaceName:(NSDeviceWhiteColorSpace)
    
set wComp to gCol’s whiteComponent() –whiteComponentを取得することで擬似的に明度情報を取得  
    
return wComp
  end calcBrightnessFrom16bitColorList


–HTMLカラー値あから明度を計算
  
on calcBrightnessFromHTMLColorCodeStr(aStr as string)
    set {rVal, gVal, bVal} to rgbHex2nunList(aStr) of me
    
–NSColorを作成
    
set aCol to makeNSColorFromRGBAval(rVal, gVal, bVal, 255, 255) of me
    
— グレースケール化
    
set gCol to aCol’s colorUsingColorSpaceName:(NSDeviceWhiteColorSpace)
    
set wComp to gCol’s whiteComponent() –whiteComponentを取得することで擬似的に明度情報を取得  
    
return wComp
  end calcBrightnessFromHTMLColorCodeStr


on makeNSColorFromRGBAval(redValue as integer, greenValue as integer, blueValue as integer, alphaValue as integer, aMaxVal as integer)
    set aRedCocoa to (redValue / aMaxVal) as real
    
set aGreenCocoa to (greenValue / aMaxVal) as real
    
set aBlueCocoa to (blueValue / aMaxVal) as real
    
set aAlphaCocoa to (alphaValue / aMaxVal) as real
    
set aColor to NSColor’s colorWithCalibratedRed:aRedCocoa green:aGreenCocoa blue:aBlueCocoa alpha:aAlphaCocoa
    
return aColor
  end makeNSColorFromRGBAval


on decodeCharacterReference(aStr)
    set anNSString to NSString’s stringWithString:aStr
    
set theData to anNSString’s dataUsingEncoding:(NSUTF16StringEncoding)
    
set styledString to NSAttributedString’s alloc()’s initWithHTML:theData documentAttributes:(missing value)
    
set plainText to (styledString’s |string|()) as string
    
return plainText
  end decodeCharacterReference


–HTMLコードのRGB 16進数コードを数値リストに変換
  
on rgbHex2nunList(aHexStr)
    –エラーチェック
    
if aHexStr does not start with "#" then return false
    
if length of aHexStr is not equal to 7 then return false
    
set bHex to text 2 thru -1 of aHexStr
    
    
set {rStr, gStr, bStr} to {text 1 thru 2 of bHex, text 3 thru 4 of bHex, text 5 thru 6 of bHex}
    
    
set bList to {}
    
repeat with i in {rStr, gStr, bStr}
      set j to contents of i
      
set the end of bList to aHexStrToNum(j) of me
    end repeat
    
    
return bList
  end rgbHex2nunList


–16進数文字列を10進数数値に変換する
  
on aHexStrToNum(hexStr)
    set hStr to "0123456789ABCDEF"
    
    
set aNum to 0
    
set aLen to length of hexStr
    
    
repeat with i from aLen to 1 by -1
      
      
set aCon to contents of character i of hexStr
      
using terms from scripting additions
        set aVal to (offset of aCon in hStr) – 1
      end using terms from
      
set aNum to aNum + aVal * (16 ^ (aLen – i))
      
    end repeat
    
    
return aNum as integer
  end aHexStrToNum
end script

★Click Here to Open This Script 

(Visited 36 times, 1 visits today)
Posted in Color list | Tagged 10.15savvy 11.0savvy 12.0savvy NSColor | Leave a comment

Intel MacとApple Silicon Macの速度差〜画像処理

Posted on 1月 2, 2022 by Takaaki Naganoya

macOS 11から12に移行して、なぜかリリースが近づくにつれて細かいバグや巨大なバグが顕在化し、まだ手放しでおすすめできる状況にないのが心苦しいところですが、AppleScriptからのCocoa呼び出しについてはIntel Mac/Apple Silicon Macでも速度が向上。とくに、Apple Silicon Macでの速度向上が顕著です。

で、特定の処理(巨大なlistやrecord in list同士の検索)でM1 Mac miniがiMac Proの2.5倍ぐらい速いといったベンチマークは出しているわけですが、いかにもApple Silicon Macで処理が速そうな画像処理のベンチマークを実施してみました。

Intel Mac mini 2014が手元からなくなってしまったので、以前のメインマシンであったMacBook Pro Retina 2012(MacBookPro10,1)と比較してみました。

ベンチマーク内容は、指定の画像が空白かどうかをチェックするというものです。フルHD画像でも4K画像でも8K画像でも、1ピクセルでも白くない点があれば検出できるという処理内容。外部のGPUImage FrameworkやPhotoshopのヒストグラム処理を呼び出すよりもAppleScriptだけで処理した方が速いというものです(8K画像だとPhotoshopの方が速いかも)。


▲画像解像度の変化と処理時間の相関。グラフは数値が小さいほど高速。巨大な画像になると処理速度差が大きくなる傾向にある?

だいたい、MacBook Pro Retina 2012と比べて3〜4倍ぐらいM1 Mac miniの方が高速です。MacBook Pro Retina 2012は2017年のMacBook Pro 13インチといい勝負ぐらいの速度が出ており、古い割にはごく最近まで使えていました。

そこから3〜4倍高速ということで、M1 Mac miniはコストの割にはパワフルです。ファンレスのMacBook Air M1でも同程度の速度が出るはずです。

一方で、M1 Pro/M1 Max搭載のMacBook ProでM1機よりも大幅に高速なのかと言われると……このぐらいの静止画の処理程度だとごくわずかな差しかつかないはずです。下手をすると、速度差がないかもしれません。

→ Download blank_image_detection_benchmark.zip (including script libraries)

–> Download test Data


▲バーが短いほど高速。M1がM1 Maxの2倍高速という結果が出てしまった。M1 Max MBPは2014年のIntel Mac miniより少し速いだけのマシンという結果に。2018年のIntel Mac miniとの比較だとM1 Max MBPよりもIntel Mac miniのほうが速そう

M1、M1 Max、M1 Ultra(最上位機種)で処理時間を比較した結果。予想どおりM1がM1 MaxやM1 Ultraよりも2倍以上高速。もはや8K画像ぐらいは、大きなデータにならないというべきなのか。

AppleScript名:画像の空白判定 v4_bench_時間計測.scptd
—
–  Created by: Takaaki Naganoya
–  Created on: 2022/01/01
—
–  Copyright © 2022 Piyomaru Software, All Rights Reserved
—
use AppleScript version "2.7"
use framework "Foundation"
use framework "AppKit"
use scripting additions
use mdLib : script "Metadata Lib" version "2.0.0"
use easyTable : script "display table by list"

set aFol to choose folder

set aResList to perform search in folders {aFol} predicate string "kMDItemContentTypeTree CONTAINS %@" search arguments {"public.image"}

set aList to {}
repeat with i in aResList
  set a1Dat to current application’s NSDate’s timeIntervalSinceReferenceDate()
  
  
set iRes to checkImageIsWhite(i) of blankImageKit of me
  
  
set b1Dat to current application’s NSDate’s timeIntervalSinceReferenceDate()
  
set c1Dat to b1Dat – a1Dat
  
  
set aName to (current application’s NSString’s stringWithString:i)’s lastPathComponent() as string
  
  
if iRes = true then
    set jRes to "White"
  else
    set jRes to "Black"
  end if
  
  
–log {aName, jRes}
  
  
set the end of aList to {aName, jRes, c1Dat}
end repeat

set fLabels to {"File name", "Result", "Estimate(Seconds)"}
set aRes to (display table by list aList main message "Blank Image check" size {800, 600} labels fLabels)
return aList

script blankImageKit
  use AppleScript version "2.7" — High Sierra (10.13) or later
  
use framework "Foundation"
  
use framework "AppKit"
  
use scripting additions
  
property parent : AppleScript
  
  
property NSData : a reference to current application’s NSData
  
property |NSURL| : a reference to current application’s |NSURL|
  
property NSColor : a reference to current application’s NSColor
  
property NSImage : a reference to current application’s NSImage
  
property NSBezierPath : a reference to current application’s NSBezierPath
  
property NSBitmapImageRep : a reference to current application’s NSBitmapImageRep


–Compare Original Data and
  
on checkImageIsWhite(aFile)
    set aPOSIXpath to POSIX path of aFile
    
set aURL to |NSURL|’s fileURLWithPath:(aPOSIXpath)
    
    
set aNSImage to NSImage’s alloc()’s initWithContentsOfURL:(aURL)
    
set bNSImage to NSImage’s alloc()’s initWithContentsOfURL:(aURL)
    
    
set fillColor1 to NSColor’s clearColor()
    
set blankNSImage1 to drawImageWithFilledColor(aNSImage, fillColor1) of me
    
    
set fillColor2 to makeNSColorFromRGBAval(65535, 65535, 65535, 65535, 65535) of me –white
    
set blankNSImage2 to drawImageWithFilledColor(bNSImage, fillColor2) of me
    
    
set aTiff to blankNSImage1’s TIFFRepresentation()
    
set bTiff to blankNSImage2’s TIFFRepresentation()
    
    
set chkWhite to (aTiff’s isEqualToData:bTiff) as boolean
    
    
return chkWhite
  end checkImageIsWhite


on getSizeOfImage(anNSImage)
    set aSize to anNSImage’s |size|()
    
set aClass to class of aSize
    
if aClass = record then
      copy aSize to theSize –To macOS 10.12.x
    else –macOS 10.13 or later
      set sizeX to (item 1 of item 2 of aSize)
      
set sizeY to (item 2 of item 2 of aSize)
      
set theSize to {width:sizeX, height:sizeY}
    end if
    
return theSize
  end getSizeOfImage


–指定サイズの画像を作成し、背景を指定色で塗る
  
on drawImageWithFilledColor(anImage, fillColor)
    set aSize to getSizeOfImage(anImage) of me
    
    
anImage’s lockFocus()
    
    
set theRect to {{x:0, y:0}, {width:(width of aSize), height:(height of aSize)}}
    
set theNSBezierPath to NSBezierPath’s bezierPath
    
theNSBezierPath’s appendBezierPathWithRect:theRect
    
fillColor’s |set|()
    
theNSBezierPath’s fill()
    
    
anImage’s unlockFocus()
    
    
return anImage
  end drawImageWithFilledColor


–aMaxValを最大値とする数値でNSColorを作成して返す
  
on makeNSColorFromRGBAval(redValue as integer, greenValue as integer, blueValue as integer, alphaValue as integer, aMaxVal as integer)
    set aRedCocoa to (redValue / aMaxVal) as real
    
set aGreenCocoa to (greenValue / aMaxVal) as real
    
set aBlueCocoa to (blueValue / aMaxVal) as real
    
set aAlphaCocoa to (alphaValue / aMaxVal) as real
    
set aColor to NSColor’s colorWithCalibratedRed:aRedCocoa green:aGreenCocoa blue:aBlueCocoa alpha:aAlphaCocoa
    
return aColor
  end makeNSColorFromRGBAval
  
end script

★Click Here to Open This Script 

(Visited 262 times, 1 visits today)
Posted in Image | Tagged 10.14savvy 10.15savvy 11.0savvy 12.0savvy NSBezierPath NSBitmapImageRep NSColor NSData NSDate NSImage NSURL | Leave a comment

HTMLカラー値から明度を取得

Posted on 12月 8, 2020 by Takaaki Naganoya

HTMLカラー値からNSColorを作成し、Gray Scaleに変換したのちに明度情報を取得するAppleScriptです。

RGB値をHSV(HSB)に変換して明度情報を取得するバージョンも試してみたのですが、個人的にはこちらの処理の方がしっくりくる感じでした。

# コメント部分のWhiteとBlackの記述が逆だったので修正しておきました

AppleScript名:HTMLカラー値から明度を取得 v1.1.scptd
—
–  Created by: Takaaki Naganoya
–  Created on: 2020/12/07
—
–  Copyright © 2020 Piyomaru Software, All Rights Reserved
—
use AppleScript version "2.4" — Yosemite (10.10) or later
use framework "Foundation"
use framework "AppKit"
use scripting additions

property NSColor : a reference to current application’s NSColor
property NSString : a reference to current application’s NSString
property NSAttributedString : a reference to current application’s NSAttributedString
property NSUTF16StringEncoding : a reference to current application’s NSUTF16StringEncoding
property NSDeviceWhiteColorSpace : a reference to current application’s NSDeviceWhiteColorSpace

set aCol to "#412a23"
set wCol to calcBrightnessFromHTMLColorCodeStr(aCol) of me
–> 0.245871186256

set aCol to "#000000" –Black
set wCol to calcBrightnessFromHTMLColorCodeStr(aCol) of me
–> 0.0

set aCol to "#FFFFFF" –White
set wCol to calcBrightnessFromHTMLColorCodeStr(aCol) of me
–> 1.0

set aCol to "#EEA096"
set wCol to calcBrightnessFromHTMLColorCodeStr(aCol) of me
–> 0.759391903877

on calcBrightnessFromHTMLColorCodeStr(aStr as string)
  set {rVal, gVal, bVal} to rgbHex2nunList(aStr) of me
  
–NSColorを作成
  
set aCol to makeNSColorFromRGBAval(rVal, gVal, bVal, 255, 255) of me
  
— グレースケール化
  
set gCol to aCol’s colorUsingColorSpaceName:(NSDeviceWhiteColorSpace)
  
set wComp to gCol’s whiteComponent() –whiteComponentを取得することで擬似的に明度情報を取得  
  
return wComp
end calcBrightnessFromHTMLColorCodeStr

on makeNSColorFromRGBAval(redValue as integer, greenValue as integer, blueValue as integer, alphaValue as integer, aMaxVal as integer)
  set aRedCocoa to (redValue / aMaxVal) as real
  
set aGreenCocoa to (greenValue / aMaxVal) as real
  
set aBlueCocoa to (blueValue / aMaxVal) as real
  
set aAlphaCocoa to (alphaValue / aMaxVal) as real
  
set aColor to NSColor’s colorWithCalibratedRed:aRedCocoa green:aGreenCocoa blue:aBlueCocoa alpha:aAlphaCocoa
  
return aColor
end makeNSColorFromRGBAval

on decodeCharacterReference(aStr)
  set anNSString to NSString’s stringWithString:aStr
  
set theData to anNSString’s dataUsingEncoding:(NSUTF16StringEncoding)
  
set styledString to NSAttributedString’s alloc()’s initWithHTML:theData documentAttributes:(missing value)
  
set plainText to (styledString’s |string|()) as string
  
return plainText
end decodeCharacterReference

–HTMLコードのRGB 16進数コードを数値リストに変換
on rgbHex2nunList(aHexStr)
  –エラーチェック
  
if aHexStr does not start with "#" then return false
  
if length of aHexStr is not equal to 7 then return false
  
set bHex to text 2 thru -1 of aHexStr
  
  
set {rStr, gStr, bStr} to {text 1 thru 2 of bHex, text 3 thru 4 of bHex, text 5 thru 6 of bHex}
  
  
set bList to {}
  
repeat with i in {rStr, gStr, bStr}
    set j to contents of i
    
set the end of bList to aHexStrToNum(j) of me
  end repeat
  
  
return bList
end rgbHex2nunList

–16進数文字列を10進数数値に変換する
on aHexStrToNum(hexStr)
  set hStr to "0123456789ABCDEF"
  
  
set aNum to 0
  
set aLen to length of hexStr
  
  
repeat with i from aLen to 1 by -1
    
    
set aCon to contents of character i of hexStr
    
using terms from scripting additions
      set aVal to (offset of aCon in hStr) – 1
    end using terms from
    
set aNum to aNum + aVal * (16 ^ (aLen – i))
    
  end repeat
  
  
return aNum as integer
end aHexStrToNum

★Click Here to Open This Script 

(Visited 43 times, 1 visits today)
Posted in Color | Tagged 10.13savvy 10.14savvy 10.15savvy 11.0savvy NSAttributedString NSColor NSDeviceWhiteColorSpace NSString NSUTF16StringEncoding | Leave a comment

アラートダイアログ上にCollection Viewを表示

Posted on 8月 24, 2020 by Takaaki Naganoya

emada2さんからの投稿です。Collection Viewの利用については、Kamenokoの開発時に導入検討したことがありますが、Objective-CのサンプルコードをAppleScriptに翻訳しきれなくて中途半端に放置していました。

まとまった形でCollection Viewのサンプルコードが出てきたのは、おそらくこれが初めてだと思います。ありがとうございます。

Collection Viewを箱庭ダイアログに乗せることができました。
でも残念なのは、itemPrototypeは10.14でDeprecatedになっているので将来的に長く使えないでしょう
その他のやり方を探してappleのサンプルコードをみたら、swift 3で書かれていているので10.14でビルドできませんでした。
なのでまだまだCollection Viewを使いこなすのは難しそうです😢

–> Download Script Bundle

@property (nullable, strong) NSCollectionViewItem *itemPrototype API_DEPRECATED("Use -registerNib:forItemWithIdentifier: or -registerClass:forItemWithIdentifier: instead.", macos(10.5,10.14));
AppleScript名:アラートダイアログ上にCollection Viewを表示
use AppleScript version "2.4" — Yosemite (10.10) or later
use framework "AppKit"
use framework "AppleScriptObjC"
use framework "CoreFoundation"
use framework "Foundation"
use scripting additions

on run
  my testRun()
end run

on testRun()
  set aMainMes to "アプリケーションの選択"
  
set aSubMes to "適切なものを以下からえらんでください"
  
  
#ダイアログ内のビューサイズを指定
  
set aHeight to 384
  
set aWidth to 512 + 12 –> スクロールバーの分
  
  
#アプリケーションフォルダ内のアプリケーションを取得
  
set aFolder to path to applications folder
  
set aPath to aFolder’s POSIX path
  
set aURL to current application’s NSURL’s fileURLWithPath:aPath
  
  
# 指定フォルダの直下のファイルを取得
  
set filePaths to current application’s NSFileManager’s defaultManager’s ¬
    contentsOfDirectoryAtURL:aURL ¬
      includingPropertiesForKeys:{current application’s NSURLNameKey} ¬
      
options:(current application’s NSDirectoryEnumerationSkipsHiddenFiles) ¬
      
|error|:(missing value)
  
  
set filePaths to filePaths as list
  
set thisFileType to "com.apple.application-bundle"
  
  
set dataSourceList to {}
  
repeat with anItem in filePaths
    
    
set aPath to anItem’s contents’s POSIX path
    
set aURL to (current application’s NSURL’s fileURLWithPath:aPath)
    
    
set {aResult, aUTI, aError} to (aURL’s getResourceValue:(reference) ¬
      forKey:(current application’s NSURLTypeIdentifierKey) ¬
      
|error|:(reference))
    
    
if (aUTI as text) is thisFileType then
      set iconImage to (current application’s NSWorkspace’s sharedWorkspace’s iconForFile:aPath)
      
set dict to {fileURL:aURL, icon:iconImage}
      
set dataSourceList’s end to dict
    end if
  end repeat
  
  
set execButtonTitle to "OK😄"
  
  
set dateObj to my chooseItemByCollectionView:aMainMes subMes:aSubMes myWidth:aWidth myHeight:aHeight myDataSource:dataSourceList okTitle:execButtonTitle
end testRun

on chooseItemByCollectionView:(aMainMes as text) subMes:(aSubMes as text) myWidth:(aWidth as integer) myHeight:(aHeight as integer) myDataSource:(dataSourceList as list) okTitle:(execButtonTitle as text)
  
  
# Script Bundle内のResourcesフォルダを求める
  
set resourcePath to POSIX path of (path to me) & "Contents/Resources/"
  
set theBundle to current application’s NSBundle’s bundleWithPath:resourcePath
  
theBundle’s loadAppleScriptObjectiveCScripts()
  
  
# subClasses.scptを呼び出す
  
set DialogCore to current application’s AppDelegate’s new()
  
set fRes to DialogCore’s chooseItemByCollectionView:aMainMes subMes:aSubMes myWidth:aWidth myHeight:aHeight myDataSource:dataSourceList okTitle:execButtonTitle
  
  
if fRes is missing value then error number -128
  
return fRes as list
end chooseItemByCollectionView:subMes:myWidth:myHeight:myDataSource:okTitle:

★Click Here to Open This Script 

AppleScript名:subClasses
script AppDelegate
  property parent : class "NSObject"
  
  
— IBOutlets
  
property theWindow : missing value
  
  
on applicationShouldTerminate:sender
    return current application’s NSTerminateNow
  end applicationShouldTerminate:
  
  
on applicationShouldTerminateAfterLastWindowClosed:sender
    return true
  end applicationShouldTerminateAfterLastWindowClosed:
  
  
——————
  
  
on applicationWillFinishLaunching:aNotification
    log my testRun()
  end applicationWillFinishLaunching:
  
  
on testRun()
    set aMainMes to "アプリケーションの選択"
    
set aSubMes to "適切なものを以下からえらんでください"
    
    
#ダイアログ内のビューサイズを指定
    
set aHeight to 384
    
set aWidth to 512 + 12 –> スクロールバーの分
    
    
#アプリケーションフォルダ内のアプリケーションを取得
    
set aFolder to path to applications folder
    
set aPath to aFolder’s POSIX path
    
set aURL to current application’s NSURL’s fileURLWithPath:aPath
    
    
# 指定フォルダの直下のファイルを取得
    
set filePaths to current application’s NSFileManager’s defaultManager’s ¬
      contentsOfDirectoryAtURL:aURL ¬
        includingPropertiesForKeys:{current application’s NSURLNameKey} ¬
        
options:(current application’s NSDirectoryEnumerationSkipsHiddenFiles) ¬
        
|error|:(missing value)
    
    
set filePaths to filePaths as list
    
set thisFileType to "com.apple.application-bundle"
    
    
set dataSourceList to {}
    
repeat with anItem in filePaths
      
      
set aPath to anItem’s contents’s POSIX path
      
set aURL to (current application’s NSURL’s fileURLWithPath:aPath)
      
      
set {aResult, aUTI, aError} to (aURL’s getResourceValue:(reference) ¬
        forKey:(current application’s NSURLTypeIdentifierKey) ¬
        
|error|:(reference))
      
      
if (aUTI as text) is thisFileType then
        set iconImage to (current application’s NSWorkspace’s sharedWorkspace’s iconForFile:aPath)
        
set dict to {fileURL:aURL, icon:iconImage}
        
set dataSourceList’s end to dict
      end if
    end repeat
    
    
set execButtonTitle to "OK😄"
    
    
set dateObj to my chooseItemByCollectionView:aMainMes subMes:aSubMes myWidth:aWidth myHeight:aHeight myDataSource:dataSourceList okTitle:execButtonTitle
  end testRun
  
  
# アラートダイアログでCollectionViewを表示
  
property _retrieve_data : missing value
  
on chooseItemByCollectionView:(aMainMes as text) subMes:(aSubMes as text) myWidth:(aWidth as integer) myHeight:(aHeight as integer) myDataSource:(dataSourceList as list) okTitle:(execButtonTitle as text)
    
    
set paramObj to {myMessage:aMainMes}
    
set paramObj to paramObj & {mySubMessage:aSubMes}
    
set paramObj to paramObj & {myDataSource:dataSourceList}
    
set paramObj to paramObj & {myWidth:aWidth}
    
set paramObj to paramObj & {myHeight:aHeight}
    
set paramObj to paramObj & {myOKTitile:execButtonTitle}
    
    
my performSelectorOnMainThread:"raizeAlert:" withObject:paramObj waitUntilDone:true
    
    
if (my _retrieve_data) is missing value then error number -128
    
return (my _retrieve_data)
  end chooseItemByCollectionView:subMes:myWidth:myHeight:myDataSource:okTitle:
  
  
## retrieve date
  
on raizeAlert:paramObj
    
    
set mesText to paramObj’s myMessage as text
    
set infoText to paramObj’s mySubMessage as text
    
set dataSourceList to paramObj’s myDataSource as list
    
set viewWidth to paramObj’s myWidth as integer
    
set viewHeight to paramObj’s myHeight as integer
    
set okButton to paramObj’s myOKTitile as text
    
    
# set up view
    
set {thisView, collectionView} to my makeContentView(dataSourceList, viewWidth, viewHeight)
    
    
### set up alert
    
tell current application’s NSAlert’s new()
      addButtonWithTitle_(okButton)
      
addButtonWithTitle_("Cancel")
      
setAccessoryView_(thisView)
      
–setIcon_(aImage)
      
setInformativeText_(infoText)
      
setMessageText_(mesText)
      
tell |window|()
        setInitialFirstResponder_(thisView)
      end tell
      
#### show alert in modal loop
      
if runModal() is (current application’s NSAlertSecondButtonReturn) then return
    end tell
    
    
### retrieve data
    
set aIndexSet to collectionView’s selectionIndexes()
    
set theArray to current application’s NSArrayController’s alloc()’s initWithContent:(collectionView’s content())
    
set chooseItems to ((theArray)’s arrangedObjects()’s objectsAtIndexes:aIndexSet) as list
    
    
# reset
    
set _retrieve_data to {}
    
    
repeat with anItem in chooseItems
      set (my _retrieve_data)’s end to anItem’s contents
    end repeat
    
    
return my _retrieve_data
  end raizeAlert:
  
  
# set up view
  
on makeContentView(dataSourceList, viewWidth, viewHeight)
    
    
set thisRect to current application’s NSMakeRect(0, 0, viewWidth, viewHeight)
    
    
tell current application’s NSCollectionView’s alloc
      tell initWithFrame_(thisRect)
        setItemPrototype_(current application’s YKZCollectionViewItem’s new())
        
        
setAllowsEmptySelection_(true)
        
setAllowsMultipleSelection_(true)
        
setContent_(dataSourceList)
        
setSelectable_(true)
        
        
set collectionView to it
      end tell
    end tell
    
    
# Viewを作成
    
tell current application’s NSScrollView’s alloc()
      tell initWithFrame_(thisRect)
        setBorderType_(current application’s NSBezelBorder)
        
setDocumentView_(collectionView)
        
setHasHorizontalScroller_(true)
        
setHasVerticalScroller_(true)
        
set baseView to it
      end tell
    end tell
    
    
return {baseView, collectionView}
  end makeContentView
end script

#MARK: –
script YKZView
  property parent : class "NSView"
  
  
property imageView : missing value
  
  
property selected : false
  
property viewItemHeight : 128
  
property viewItemWidth : 128
  
  
on initWithFrame:rect
    
    
set myRect to current application’s NSMakeRect(0, 0, viewItemWidth, viewItemHeight)
    
continue initWithFrame:myRect
    
    
set aHeight to viewItemHeight – 10
    
set aWidth to viewItemWidth – 10
    
set newRect to current application’s NSMakeRect(5, 5, aWidth, aHeight)
    
    
tell current application’s NSImageView’s alloc()
      tell initWithFrame_(newRect)
        setImageScaling_(current application’s NSImageScaleProportionallyUpOrDown)
        
setImageAlignment_(current application’s NSImageAlignCenter)
        
set my imageView to it
      end tell
    end tell
    
    
my addSubview:(my imageView)
    
return me
  end initWithFrame:
  
  
on drawRect:rect
    if my selected then
      current application’s NSColor’s redColor()’s |set|()
    else
      current application’s NSColor’s controlBackgroundColor()’s |set|()
    end if
    
current application’s NSRectFill(rect)
    
continue drawRect:rect
  end drawRect:
end script

#MARK: –
script YKZCollectionViewItem
  property parent : class "NSCollectionViewItem"
  
  
on loadView()
    my setView:(current application’s YKZView’s alloc()’s initWithFrame:(current application’s NSZeroRect))
  end loadView
  
  
on setRepresentedObject:representedObject
    –continue setRepresentedObject:representedObject
    
if representedObject is missing value then return
    (
my view())’s imageView’s setImage:(representedObject’s icon)
  end setRepresentedObject:
  
  
on setSelected:isSelected
    set (my view())’s selected to isSelected
    (
my view())’s setNeedsDisplay:true
    
continue setSelected:isSelected
  end setSelected:
end script

★Click Here to Open This Script 

(Visited 72 times, 1 visits today)
Posted in dialog file File path | Tagged 10.13savvy 10.14savvy 10.15savvy 11.0savvy NSAlert NSArrayController NSBundle NSCollectionView NSCollectionViewItem NSColor NSFileManager NSImageView NSURL NSWorkspace | Leave a comment

カラーリストの処理

Posted on 7月 27, 2020 by Takaaki Naganoya

カラーリストまわりの情報を取得するAppleScriptです。

カラーピッカーで取得できる各種色セットの内容を取得できたりと、割と使いでがあります。

AppleScript名:使用可能なカラーリスト名称一覧を取得.scptd
—
–  Created by: Takaaki Naganoya
–  Created on: 2020/07/26
—
–  Copyright © 2020 Piyomaru Software, All Rights Reserved
—

use AppleScript version "2.4"
use scripting additions
use framework "Foundation"
use framework "AppKit"

set cList to ((current application’s NSColorList’s availableColorLists())’s valueForKeyPath:"name") as list
–> {"Apple", "System", "World", "Europe", "Japanese", "Scrivener", "AquaPro", "Crayons", "Web セーフカラー"}

★Click Here to Open This Script 

AppleScript名:指定名称のカラーリストに登録されているNSColorを配列で取得.scptd
—
–  Created by: Takaaki Naganoya
–  Created on: 2020/07/26
—
–  Copyright © 2020 Piyomaru Software, All Rights Reserved
—

use AppleScript version "2.4"
use scripting additions
use framework "Foundation"
use framework "AppKit"

set aColList to (current application’s NSColorList’s colorListNamed:"Crayons")

set kList to (aColList’s allKeys()) as list
set colList to {}
repeat with i in kList
  set j to contents of i
  
set cVal to (aColList’s colorWithKey:j)
  
set the end of colList to cVal
end repeat

return colList

★Click Here to Open This Script 

(Visited 60 times, 1 visits today)
Posted in Color System | Tagged 10.13savvy 10.14savvy 10.15savvy 11.0savvy NSColor NSColorList | Leave a comment

アラートダイアログ上に印刷対象ページ一覧を表示して対象ページを指定

Posted on 7月 17, 2020 by Takaaki Naganoya

アラートダイアログ上にボタンタイプのチェックボックスを並べて、選択したボタンのタイトルを選択するAppleScriptです。

書類の印刷対象を、こまかくページ指定するために作成した部品です。

ヘルプボタンにより、全ボタンの選択/非選択状態を作り出せます。


▲Beta2でAlert Dialogのタイトルまわりが変更されたようですが、、、、うーーん。あと、選択状態をボタンの見かけから知ることができないですわー

AppleScript名:アラートダイアログ上に印刷対象ページ一覧を表示して対象ページを指定
— Created 2020-07-17 by Takaaki Naganoya
— 2020 Piyomaru Software

set aRes to selectByCheckbox("Select each printout page", "Selected pages are the target", 64, "Helvetica") of chooseSeqNum

script chooseSeqNum
  
  
use AppleScript version "2.5"
  
use scripting additions
  
use framework "Foundation"
  
use framework "AppKit"
  
  
property NSFont : a reference to current application’s NSFont
  
property NSView : a reference to current application’s NSView
  
property NSAlert : a reference to current application’s NSAlert
  
property NSColor : a reference to current application’s NSColor
  
property NSButton : a reference to current application’s NSButton
  
property NSOnState : a reference to current application’s NSOnState
  
property NSOffState : a reference to current application’s NSOffState
  
property NSTextField : a reference to current application’s NSTextField
  
property NSMutableArray : a reference to current application’s NSMutableArray
  
property NSButtonTypeOnOff : a reference to current application’s NSButtonTypeOnOff
  
property NSMutableDictionary : a reference to current application’s NSMutableDictionary
  
property NSRunningApplication : a reference to current application’s NSRunningApplication
  
property NSFontAttributeName : a reference to current application’s NSFontAttributeName
  
property NSKernAttributeName : a reference to current application’s NSKernAttributeName
  
property NSMutableParagraphStyle : a reference to current application’s NSMutableParagraphStyle
  
property NSLigatureAttributeName : a reference to current application’s NSLigatureAttributeName
  
property NSMutableAttributedString : a reference to current application’s NSMutableAttributedString
  
property NSUnderlineStyleAttributeName : a reference to current application’s NSUnderlineStyleAttributeName
  
property NSParagraphStyleAttributeName : a reference to current application’s NSParagraphStyleAttributeName
  
property NSForegroundColorAttributeName : a reference to current application’s NSForegroundColorAttributeName
  
  
property theResult : 0
  
property returnCode : 0
  
property cList : {} –Checkbox button object array
  
property bArray : {}


on selectByCheckbox(aMainMessage, aSubMessage, aMaxPage, myFont)
    set paramObj to {myMessage:aMainMessage, mySubMessage:aSubMessage, maxPage:aMaxPage, fontName:myFont}
    
–my chooseItemByCheckBox:paramObj –for Debugging
    
my performSelectorOnMainThread:"chooseItemByCheckBox:" withObject:(paramObj) waitUntilDone:true
    
–> {1, 3, 5, 7, 9, 11}
    
return cList
  end selectByCheckbox
  
  
on chooseItemByCheckBox:(paramObj)
    set aMainMes to (myMessage of paramObj) as string
    
set aSubMes to (mySubMessage of paramObj) as string
    
set aMaxPage to (maxPage of paramObj) as integer
    
set aFontName to (fontName of paramObj) as string
    
    
set cList to {}
    
    
set colNum to 10
    
set rowNum to (aMaxPage div 10) + 1
    
set aLen to (colNum * rowNum)
    
    
set aButtonCellWidth to 56
    
set aButtonCellHeight to 40
    
    
set viewWidth to aButtonCellWidth * colNum
    
set viewHeight to aButtonCellHeight * (rowNum + 1)
    
    
–define the matrix size where you’ll put the radio buttons
    
set matrixRect to current application’s NSMakeRect(0.0, 0.0, viewWidth, viewHeight)
    
set aView to NSView’s alloc()’s initWithFrame:(matrixRect)
    
    
set aCount to 1
    
set aFontSize to 24
    
set bArray to current application’s NSMutableArray’s new()
    
    
–Make Header (Month, Year)
    
set aCalList to makeSeqNumList(1, aMaxPage) of me
    
set aCount to 1


–Make Calendar (Calendar Body)
    
repeat with y from 1 to rowNum
      repeat with x from 1 to colNum
        –try
        
set j to (contents of item aCount of aCalList)
        
set tmpB to (NSButton’s alloc()’s initWithFrame:(current application’s NSMakeRect(((x – 1) * aButtonCellWidth), ((aLen – aCount) div colNum) * aButtonCellHeight, aButtonCellWidth, aButtonCellHeight)))
        
        (
tmpB’s setTitle:(j as string))
        (
tmpB’s setFont:(NSFont’s fontWithName:aFontName |size|:aFontSize))
        
–set attrTitle to makeRTFfromParameters((aCount as string), aFontName, aFontSize, 0, (aFontSize * 1.2)) of me
        
–(tmpB’s setAttributedTitle:(attrTitle))
        (
tmpB’s setShowsBorderOnlyWhileMouseInside:true)
        (
tmpB’s setAlignment:(current application’s NSCenterTextAlignment))
        (
tmpB’s setEnabled:(j ≠ ""))
        (
tmpB’s setTarget:me)
        (
tmpB’s setAction:("clicked:"))
        (
tmpB’s setButtonType:(NSButtonTypeOnOff))
        (
tmpB’s setHidden:(j = ""))
        
        (
tmpB’s setTag:(j))
        (
bArray’s addObject:tmpB)
        
        
set aCount to aCount + 1
        
if aCount > aMaxPage then exit repeat
        
–end try
      end repeat
      
if aCount > aMaxPage then exit repeat
    end repeat
    
    
–Select the first radio button item
    
–(tmpArray’s objectAtIndex:0)’s setState:(current application’s NSOnState)
    
set my theResult to {}
    
    (
aView’s setSubviews:bArray)
    
    
— set up alert  
    
set theAlert to NSAlert’s alloc()’s init()
    
tell theAlert
      its setMessageText:aMainMes
      
its setInformativeText:aSubMes
      
its addButtonWithTitle:"OK"
      
its addButtonWithTitle:"Cancel"
      
its setAccessoryView:aView
      
      
–for Help Button
      
its setShowsHelp:(true)
      
its setDelegate:(me)
      
    end tell
    
    
— show alert in modal loop
    
NSRunningApplication’s currentApplication()’s activateWithOptions:0
    
my performSelectorOnMainThread:"doModal:" withObject:(theAlert) waitUntilDone:true
    
if (my returnCode as number) = 1001 then error number -128
    
    
set bNumList to (bArray’s valueForKeyPath:"state") as list
    
–set cList to {}
    
repeat with i from 1 to aMaxPage
      set aFlag to (contents of item i of bNumList) as boolean
      
if aFlag = true then
        set the end of cList to contents of i
      end if
    end repeat
    
    
copy cList to bArray
  end chooseItemByCheckBox:


on doModal:aParam
    set (my returnCode) to aParam’s runModal()
  end doModal:


on clicked:aParam
    set aTag to (tag of aParam) as integer
    
–clicked
    
if aTag is not in (my theResult) then
      set the end of (my theResult) to aTag
    else
      set theResult to my deleteItem:aTag fromList:theResult
    end if
  end clicked:


on deleteItem:anItem fromList:theList
    set theArray to NSMutableArray’s arrayWithArray:theList
    
theArray’s removeObject:anItem
    
return theArray as list
  end deleteItem:fromList:


–1D List(数値)をsort / ascOrderがtrueだと昇順ソート、falseだと降順ソート
  
on sort1DNumList:theList ascOrder:aBool
    tell current application’s NSSet to set theSet to setWithArray_(theList)
    
tell current application’s NSSortDescriptor to set theDescriptor to sortDescriptorWithKey_ascending_(missing value, true)
    
set sortedList to theSet’s sortedArrayUsingDescriptors:{theDescriptor}
    
return (sortedList) as list
  end sort1DNumList:ascOrder:


–Help Button Clicked Event Handler
  
on alertShowHelp:aNotification
    set aRes to display dialog "Do you change all checkbox state?" buttons {"All Off", "All On", "Cancel"} default button 3 with icon 1
    
set bRes to (button returned of aRes) as string
    
    
if bRes = "All Off" then
      set bLen to bArray’s |count|()
      
set theResult to {}
      
repeat with i from 0 to bLen
        ((bArray’s objectAtIndex:i)’s setState:(current application’s NSOffState))
      end repeat
      
    else if bRes = "All On" then
      set bLen to bArray’s |count|()
      
set theResult to {}
      
repeat with i from 0 to bLen
        ((bArray’s objectAtIndex:i)’s setState:(current application’s NSOnState))
        
set the end of theResult to i + 1
      end repeat
    end if
    
    
return false –trueを返すと親ウィンドウ(アラートダイアログ)がクローズする
  end alertShowHelp:


–書式つきテキストを組み立てる
  
on makeRTFfromParameters(aStr as string, fontName as string, aFontSize as real, aKerning as real, aLineSpacing as real)
    set aVal1 to NSFont’s fontWithName:fontName |size|:aFontSize
    
set aKey1 to (NSFontAttributeName)
    
    
set aVal2 to NSColor’s blackColor()
    
set aKey2 to (NSForegroundColorAttributeName)
    
    
set aVal3 to aKerning
    
set akey3 to (NSKernAttributeName)
    
    
set aVal4 to 0
    
set akey4 to (NSUnderlineStyleAttributeName)
    
    
set aVal5 to 2 –all ligature ON
    
set akey5 to (NSLigatureAttributeName)
    
    
set aParagraphStyle to NSMutableParagraphStyle’s alloc()’s init()
    
aParagraphStyle’s setMinimumLineHeight:(aLineSpacing)
    
aParagraphStyle’s setMaximumLineHeight:(aLineSpacing)
    
set akey7 to (NSParagraphStyleAttributeName)
    
    
set keyList to {aKey1, aKey2, akey3, akey4, akey5, akey7}
    
set valList to {aVal1, aVal2, aVal3, aVal4, aVal5, aParagraphStyle}
    
set attrsDictionary to NSMutableDictionary’s dictionaryWithObjects:valList forKeys:keyList
    
    
set attrStr to NSMutableAttributedString’s alloc()’s initWithString:aStr attributes:attrsDictionary
    
return attrStr
  end makeRTFfromParameters


on makeNSTextField(xPos as integer, yPos as integer, myWidth as integer, myHeight as integer, editableF as boolean, setVal as string, backgroundF as boolean, borderedF as boolean)
    set aNSString to NSTextField’s alloc()’s initWithFrame:(current application’s NSMakeRect(xPos, yPos, myWidth, myHeight))
    
aNSString’s setEditable:(editableF)
    
aNSString’s setStringValue:(setVal)
    
aNSString’s setDrawsBackground:(backgroundF)
    
aNSString’s setBordered:(borderedF)
    
return aNSString
  end makeNSTextField


on makeSeqNumList(fromNum as integer, toNum as integer)
    script spd
      property aList : {}
    end script
    
    
set aList of spd to {}
    
    
repeat with i from fromNum to toNum
      set the end of (aList of spd) to i
    end repeat
    
    
return (aList of spd)
  end makeSeqNumList
  
  
end script

★Click Here to Open This Script 

(Visited 54 times, 1 visits today)
Posted in dialog | Tagged 10.13savvy 10.14savvy 10.15savvy 11.0savvy NSAlert NSButton NSButtonTypeOnOff NSColor NSFont NSFontAttributeName NSForegroundColorAttributeName NSKernAttributeName NSLigatureAttributeName NSMutableArray NSMutableAttributedString NSMutableDictionary NSMutableParagraphStyle NSOffState NSOnState NSParagraphStyleAttributeName NSRunningApplication NSTextField NSUnderlineStyleAttributeName NSView | Leave a comment

プログラムで作ったアラートダイアログ上のTextViewをフォーカスする

Posted on 4月 14, 2020 by Takaaki Naganoya

AppleScriptでダイナミックに(動的に)生成したアラートダイアログ上にテキストビューを生成し、そのテキストビュー上にテキスト入力用のキャレットを移動させる(フォーカスする)AppleScriptです。

Xcode上でAppleScriptでGUIアプリケーションを作っていて、文字サイズの大きなテキスト入力フィールドを動的に生成。さらに、テキスト入力フィールドにテキスト入力用のキャレットを移動させようとして、割と手こずっていました。

テキスト入力を受け付けるGUI部品に対して、入力フォーカスを与え、テキスト入力のキャレットが置かれた状態を再現するには、GUIの画面上からはマウスカーソルでクリック操作するとできます。同じ状態をプログラム側から作る場合にはFirstResponderにセットするという処理になります。

この、FirstResponderに指定することは理解でき、Xcode(Interface Builder)上で配置した部品に対して実行する処理は昔からやっています。NSTextFieldに強制的に入力フォーカスを置いた上でバーコードリーダーからのテキスト入力を受け付けるといった処理です。

一方、プログラムから動的に生成したGUI部品に対して、Cocoaが用意しているAPIのどれを用いて、どのように指定すべきなのかで困りました。

親WindowのFirstResponderにしてみたり、アラートウィンドウのFirstResponderにしてみたり、いろいろ試した末に、

parentWin's setInitialFirstResponder:aView

で、Alert DialogのWindowをparentWinに、alert dialog上のテキストビューをaViewに代入した状態で実行して、入力キャレットをテキストビュー上に移動できました。本Xcode Projectは上記の1行の記述の検証を行うためのテストプロジェクトです。

–> Download Xcode Project

AppleScript名:AppDelegate.applescript
—
— AppDelegate.applescript
— dialogCarret
—
— Created by Takaaki Naganoya on 2020/04/14.
— Copyright © 2020 Takaaki Naganoya. All rights reserved.
—

script AppDelegate
  property parent : class "NSObject"
  
  
property |NSURL| : a reference to current application’s |NSURL|
  
property NSFont : a reference to current application’s NSFont
  
property NSView : a reference to current application’s NSView
  
property NSAlert : a reference to current application’s NSAlert
  
property NSColor : a reference to current application’s NSColor
  
property NSTextView : a reference to current application’s NSTextView
  
property NSScrollView : a reference to current application’s NSScrollView
  
property NSRunningApplication : a reference to current application’s NSRunningApplication
  
  
— IBOutlets
  
property theWindow : missing value
  
  
property returnCode : 0
  
property resStr : ""


on applicationWillFinishLaunching:aNotification
    —
  end applicationWillFinishLaunching:
  
  
on applicationShouldTerminate:sender
    return current application’s NSTerminateNow
  end applicationShouldTerminate:
  
  
on clicked:sender
    set tmpStr to "TEST"
    
set paramObj to {myMessage:"Input Text", mySubMessage:"", mes1:(tmpStr), mesWidth:400, mesHeight:200}
    
my performSelectorOnMainThread:"dispTextViewWithAlertdialog:" withObject:paramObj waitUntilDone:true
    
set aResText to (my resStr) as string
    
    
display dialog aResText
  end clicked:
  
  
on dispTextViewWithAlertdialog:paramObj
    –Receive Parameters
    
set aMainMes to (myMessage of paramObj) as string –Main Message
    
set aSubMes to (mySubMessage of paramObj) as string –Sub Message
    
set mesStr to (mes1 of paramObj) as string –Text Input field 1 Label
    
set aWidth to (mesWidth of paramObj) as integer –TextView width
    
set aHeight to (mesHeight of paramObj) as integer –TextView height
    
    
set vNum to system attribute "sys2"
    
if vNum > 13 then
      set apRes to retLightOrDark() of me
      
if apRes = true then
        set textColor to (current application’s NSColor’s cyanColor())
      else
        set textColor to (current application’s NSColor’s blackColor())
      end if
    else
      set textColor to (current application’s NSColor’s blackColor())
    end if


— Create a TextView with Scroll View
    
set aScroll to NSScrollView’s alloc()’s initWithFrame:(current application’s NSMakeRect(0, 0, aWidth, aHeight))
    
set aView to NSTextView’s alloc()’s initWithFrame:(current application’s NSMakeRect(0, 0, aWidth, aHeight))
    
aView’s setDelegate:me
    
aView’s setRichText:true
    
aView’s useAllLigatures:true
    
aView’s setTextColor:textColor
    
aView’s setFont:(current application’s NSFont’s systemFontOfSize:90.0)
    
set aColor to current application’s NSColor’s colorWithDeviceRed:0.0 green:0.0 blue:0.0 alpha:0.1
    
    
aView’s setBackgroundColor:aColor
    
aView’s setString:mesStr
    
aScroll’s setDocumentView:aView
    
aView’s enclosingScrollView()’s setHasVerticalScroller:true
    
    
— set up alert
    
set theAlert to NSAlert’s alloc()’s init()
    
tell theAlert
      its setMessageText:aMainMes
      
its setInformativeText:aSubMes
      
its addButtonWithTitle:"OK"
      
–its addButtonWithTitle:"Cancel"
      
its setAccessoryView:aScroll
      
set parentWin to its |window|()
    end tell
    
    
parentWin’s setAlphaValue:0.8
    
–parentWin’s setOpaque:(false)
    
parentWin’s setLevel:(current application’s NSScreenSaverWindowLevel)
    
    
parentWin’s setInitialFirstResponder:aView —Place Input Carret to Alert Dialog
    
    
— show alert in modal loop
    
NSRunningApplication’s currentApplication()’s activateWithOptions:0
    
my performSelectorOnMainThread:"doModal:" withObject:(theAlert) waitUntilDone:true
    
    
if (my returnCode as number) = 1001 then
      —
    else
      set my resStr to aView’s |string|()
    end if
  end dispTextViewWithAlertdialog:


on doModal:aParam
    set (my returnCode) to aParam’s runModal()
  end doModal:


on retLightOrDark()
    return true
  end retLightOrDark
  
end script

★Click Here to Open This Script 

(Visited 145 times, 1 visits today)
Posted in AppleScript Application on Xcode dialog How To | Tagged 10.13savvy 10.14savvy 10.15savvy NSAlert NSColor NSFont NSMakeRect NSRunningApplication NSScrollView NSTextView | Leave a comment

指定のNSImageにNSBezierPathでclearColor塗りつぶし

Posted on 2月 14, 2020 by Takaaki Naganoya

指定色で塗りつぶしたNSImageを用意し、そこにNSBezierPathでclearColorで塗りつぶし(=切り抜き)を行うAppleScriptです。

2005/8/18にCocoa-dev mailing list に対してStefan Schüßler氏が投稿した内容をもとにしています。いろいろ探して回りましたが、ヒットしたのはこの情報だけでした。彼に感謝を。

Re: [NSColor clearColor] and NSBezierPath: not compatible?

NSBezierPath uses the NSCompositeSourceOver operation, therefore clearColor does not do anything. You could change the graphics state in order to clear the path:

  NSGraphicsContext *context;
  context = [NSGraphicsContext currentContext];
  [context saveGraphicsState];
  [context setCompositingOperation:NSCompositeClear];
  [yourBezierPath fill];
  [context restoreGraphicsState];

Hope this helps.

Stefan
AppleScript名:指定のNSImageにNSBezierPathでclearColor塗りつぶし.scptd
— Created 2020-02-14 by Takaaki Naganoya
— 2020 Piyomaru Software
use AppleScript version "2.4"
use scripting additions
use framework "Foundation"
use framework "AppKit"
use framework "CoreImage"

property NSColor : a reference to current application’s NSColor
property NSImage : a reference to current application’s NSImage
property NSZeroRect : a reference to current application’s NSZeroRect
property NSBezierPath : a reference to current application’s NSBezierPath
property NSCompositeCopy : a reference to current application’s NSCompositeCopy
property NSGraphicsContext : a reference to current application’s NSGraphicsContext
property NSBitmapImageRep : a reference to current application’s NSBitmapImageRep
property NSCalibratedRGBColorSpace : a reference to current application’s NSCalibratedRGBColorSpace

set {rCol, gCol, bCol} to choose color

set aNSImage to makeColoredNSImage({rCol, gCol, bCol}, 400, 400) of me
set aPath to generateCircle(200, 100, 100) of me

set bImage to my fillImage:aNSImage withTransparentPathFilling:aPath

set aFile to POSIX path of (choose file name)
set sRes to my saveNSImageAtPathAsPNG(bImage, aFile)

on fillImage:aSourceImg withTransparentPathFilling:aPath
  set aSize to aSourceImg’s |size|()
  
set aWidth to (aSize’s width)
  
set aHeight to (aSize’s height)
  
  
set aRep to NSBitmapImageRep’s alloc()’s initWithBitmapDataPlanes:(missing value) pixelsWide:aWidth pixelsHigh:aHeight bitsPerSample:8 samplesPerPixel:4 hasAlpha:true isPlanar:false colorSpaceName:(NSCalibratedRGBColorSpace) bytesPerRow:0 bitsPerPixel:0
  
  
NSGraphicsContext’s saveGraphicsState()
  
  
NSGraphicsContext’s setCurrentContext:(NSGraphicsContext’s graphicsContextWithBitmapImageRep:aRep)
  
  
aSourceImg’s drawInRect:(current application’s NSMakeRect(0, 0, aWidth, aHeight)) fromRect:(NSZeroRect) operation:(NSCompositeCopy) fraction:(1.0)
  
  
NSGraphicsContext’s currentContext()’s setCompositingOperation:(current application’s NSCompositeClear)
  
aPath’s fill()
  
  
NSGraphicsContext’s restoreGraphicsState()
  
  
set newImg to NSImage’s alloc()’s initWithSize:(aSize)
  
newImg’s addRepresentation:aRep
  
  
return newImg
end fillImage:withTransparentPathFilling:

on generateCircle(theRadius, x, y)
  set aRect to current application’s NSMakeRect(x, y, theRadius, theRadius)
  
set aCirCle to NSBezierPath’s bezierPath()
  
aCirCle’s appendBezierPathWithOvalInRect:aRect
  
return aCirCle
end generateCircle

on makeColoredNSImage(colList, aWidth, aHeight)
  copy colList to {rCol, gCol, bCol}
  
set aColor to makeNSColorFromRGBA65535val(rCol, gCol, bCol, 1.0) of me
  
set aColoredImage to fillColorWithImage(aColor, aWidth, aHeight) of me
  
return aColoredImage
end makeColoredNSImage

on fillColorWithImage(aColor, aWidth, aHeight)
  set colordImage to makeNSImageWithFilledWithColor(aWidth, aHeight, aColor, aWidth, aHeight) of me
  
colordImage’s lockFocus()
  
colordImage’s drawAtPoint:{0, 0} fromRect:(current application’s NSZeroRect) operation:(current application’s NSCompositeDestinationIn) fraction:1.0
  
colordImage’s unlockFocus()
  
return colordImage
end fillColorWithImage

on makeNSImageWithFilledWithColor(aWidth, aHeight, fillColor)
  set anImage to NSImage’s alloc()’s initWithSize:(current application’s NSMakeSize(aWidth, aHeight))
  
anImage’s lockFocus()
  
—
  
set theRect to {{x:0, y:0}, {height:aHeight, width:aWidth}}
  
set theNSBezierPath to NSBezierPath’s bezierPath
  
theNSBezierPath’s appendBezierPathWithRect:theRect
  
—
  
fillColor’s |set|()
  
theNSBezierPath’s fill()
  
—
  
anImage’s unlockFocus()
  
—
  
return anImage
end makeNSImageWithFilledWithColor

on makeNSColorFromRGBA65535val(redValue as integer, greenValue as integer, blueValue as integer, alphaValue as integer)
  set aRedCocoa to (redValue / 65535) as real
  
set aGreenCocoa to (greenValue / 65535) as real
  
set aBlueCocoa to (blueValue / 65535) as real
  
set aAlphaCocoa to 1.0 as real
  
set aColor to NSColor’s colorWithCalibratedRed:aRedCocoa green:aGreenCocoa blue:aBlueCocoa alpha:aAlphaCocoa
  
return aColor
end makeNSColorFromRGBA65535val

on saveNSImageAtPathAsPNG(anImage, outPath)
  set imageRep to anImage’s TIFFRepresentation()
  
set aRawimg to current application’s NSBitmapImageRep’s imageRepWithData:imageRep
  
set pathString to current application’s NSString’s stringWithString:outPath
  
set newPath to pathString’s stringByExpandingTildeInPath()
  
set myNewImageData to (aRawimg’s representationUsingType:(current application’s NSPNGFileType) |properties|:(missing value))
  
set aRes to (myNewImageData’s writeToFile:newPath atomically:true) as boolean
  
return aRes
end saveNSImageAtPathAsPNG

★Click Here to Open This Script 

(Visited 146 times, 1 visits today)
Posted in Image | Tagged 10.13savvy 10.14savvy 10.15savvy NSBezierPath NSBitmapImageRep NSCalibratedRGBColorSpace NSColor NSCompositeCopy NSGraphicsContext NSImage NSZeroRect | 1 Comment

画像に円を塗る

Posted on 2月 11, 2020 by Takaaki Naganoya

作成した画像(NSImage)に円を塗るAppleScriptです。

最近、6角形の図形ばかり塗りつぶしていましたが、「円に変えるとどうなんだろう?」と考えて、本ルーチンを試作してみました。

ためしに、6角形ではなく円で塗りつぶしてみたものの、そんなにイケていない感じがします。

AppleScript名:画像に円を塗る.scptd
—
–  Created by: Takaaki Naganoya
–  Created on: 2020/02/11
—
–  Copyright © 2020 Piyomaru Software, All Rights Reserved
—
use AppleScript version "2.4" — Yosemite (10.10) or later
use framework "Foundation"
use framework "AppKit"
use scripting additions

property aRadius : 40

set aFile to POSIX path of (choose file name)
if aFile does not end with ".png" then
  set aFile to aFile & ".png"
end if

set aColor to current application’s NSColor’s redColor()

set aImage to current application’s NSImage’s alloc()’s initWithSize:{300, 300}

repeat with y from 0 to 300 by aRadius + 4
  repeat with x from 0 to 300 by aRadius + 4
    my drawCircleOnNSIMage(aImage, aRadius, x, y, aColor)
  end repeat
end repeat

set sRes to my saveNSImageAtPathAsPNG(aImage, aFile)

#  MARK: Call By Reference
on drawCircleOnNSIMage(aImage, aRadius, aXpos, aYpos, aColor)
  set aBezier to generateCircle(aRadius, aXpos, aYpos) of me
  (
aImage)’s lockFocus()
  
aColor’s |set|()
  
aBezier’s fill() –ぬりつぶし
  (
aImage)’s unlockFocus()
end drawCircleOnNSIMage

#  MARK: circleのBezier曲線を作成して返す
on generateCircle(theRadius, x, y)
  set aRect to current application’s NSMakeRect(x, y, theRadius, theRadius)
  
set aCirCle to current application’s NSBezierPath’s bezierPath()
  
aCirCle’s appendBezierPathWithOvalInRect:aRect
  
return aCirCle
end generateCircle

# NSImageを指定パスにPNG形式で保存
on saveNSImageAtPathAsPNG(anImage, outPath)
  set imageRep to anImage’s TIFFRepresentation()
  
set aRawimg to current application’s NSBitmapImageRep’s imageRepWithData:imageRep
  
set pathString to current application’s NSString’s stringWithString:outPath
  
set newPath to pathString’s stringByExpandingTildeInPath()
  
set myNewImageData to (aRawimg’s representationUsingType:(current application’s NSPNGFileType) |properties|:(missing value))
  
set aRes to (myNewImageData’s writeToFile:newPath atomically:true) as boolean
  
return aRes –成功ならtrue、失敗ならfalseが返る
end saveNSImageAtPathAsPNG

★Click Here to Open This Script 

(Visited 56 times, 1 visits today)
Posted in file File path Image | Tagged 10.14savvy 10.15savvy NSBezierPath NSBitmapImageRep NSColor NSImage NSPNGFileType NSString | Leave a comment

画像の指定エリアを透明色塗りつぶし(矩形切り抜き)

Posted on 2月 3, 2020 by Takaaki Naganoya

指定画像の指定エリア(矩形)を透明色で塗りつぶすAppleScriptです。透明色で塗りつぶす=矩形で切り抜いたようなかっこうになります。

画像(NSImage)を指定色で塗りつぶすという処理はよく見かけるものですが、clearColor()(透明色)で塗りつぶすという処理を行うとどうなるかといえば…………何も起こりません。

透明色でNSImageを塗りつぶすという処理は、たいへんに「ありそう」な処理ですが、なかなか見つからない。

さんざん探し回ったのですが、自分には見つけられませんでした。ちょうどEdama2さんに相談してみたところ、こういう処理を探し出してもらえました(ありがとうございますー)。ただ、見つけてきた処理そのままでは思い通りの結果にならなかったので、修正が必要であったとのこと。

透明塗りつぶし(切り抜き)の指定座標はCocoaの座標系をそのまま利用しているので、左下が原点です。

NSBezierPathで切り抜き(透明色で塗りつぶし)できるといいのになーという感じではあります。

AppleScript名:画像の指定エリアを透明色塗りつぶし(矩形切り抜き)
— Created 2017-11-19 by Takaaki Naganoya
— Modified 2018-02-14 by Takaaki Naganoya
— Modified 2020-02-03 by Edama2 & Takaaki Naganoya
use AppleScript version "2.5"
use scripting additions
use framework "Foundation"
use framework "AppKit"

property NSUUID : a reference to current application’s NSUUID
property NSColor : a reference to current application’s NSColor
property NSString : a reference to current application’s NSString
property NSImage : a reference to current application’s NSImage
property NSScreen : a reference to current application’s NSScreen
property NSBezierPath : a reference to current application’s NSBezierPath
property NSPNGFileType : a reference to current application’s NSPNGFileType
property NSCompositeClear : a reference to current application’s NSCompositeClear
property NSBitmapImageRep : a reference to current application’s NSBitmapImageRep

–切り抜きエリア(複数)
set drawList to {{origin:{x:0, y:0}, |size|:{width:200, height:100}}, {origin:{x:100, y:100}, |size|:{width:50, height:50}}}

set imgPath to POSIX path of (choose file of type {"public.image"})
set anImage to NSImage’s alloc()’s initWithContentsOfFile:imgPath

set fillColor to (NSColor’s colorWithCalibratedRed:1.0 green:0.0 blue:0.0 alpha:0.9)

–透明色塗りつぶし処理呼び出し
set resImage to drawImageWithClearColorFill(anImage, drawList) of me

set aUUIDstr to (NSUUID’s UUID()’s UUIDString()) as string
set aPath to ((NSString’s stringWithString:imgPath)’s stringByDeletingLastPathComponent()’s stringByAppendingPathComponent:aUUIDstr)’s stringByAppendingPathExtension:"png"

set fRes to saveImageRepAtPathAsPNG(resImage, aPath) of me

on drawImageWithClearColorFill(anImage, drawList)
  set retinaF to (NSScreen’s mainScreen()’s backingScaleFactor()) as real
  
–>  2.0 (Retina) / 1.0 (Non Retina)
  
  
set aClearCol to NSColor’s clearColor()
  
set op to current application’s NSCompositeClear
  
  
anImage’s lockFocus() –描画開始
  
  
repeat with i in drawList
    set origX to (x of origin of i) / retinaF
    
set origY to (y of origin of i) / retinaF
    
set sizeX to (width of |size| of i) / retinaF
    
set sizeY to (height of |size| of i) / retinaF
    
    
–Draw Clear Color
    
–http://www.drissman.com/blog/archives/2009/10/09/nsrectfill_and_nscolor_clearcolor.html
    
set theRect to {{x:origX, y:origY}, {width:sizeX, height:sizeY}}
    
aClearCol’s |set|()
    
current application’s NSRectFillUsingOperation(theRect, op)
  end repeat
  
  
anImage’s unlockFocus() –描画ここまで
  
  
return anImage –returns NSImage
end drawImageWithClearColorFill

–画像を指定パスにPNG形式で保存
on saveImageRepAtPathAsPNG(anImage, outPath)
  set imageRep to anImage’s TIFFRepresentation()
  
set aRawimg to NSBitmapImageRep’s imageRepWithData:imageRep
  
  
set pathString to NSString’s stringWithString:outPath
  
set newPath to pathString’s stringByExpandingTildeInPath()
  
  
set myNewImageData to (aRawimg’s representationUsingType:(NSPNGFileType) |properties|:(missing value))
  
return (myNewImageData’s writeToFile:newPath atomically:true) as boolean
end saveImageRepAtPathAsPNG

★Click Here to Open This Script 

(Visited 98 times, 1 visits today)
Posted in file File path Image | Tagged 10.14savvy 10.15savvy NSBitmapImageRep NSColor NSCompositeClear NSImage NSPNGFileType NSScreen NSString NSUUID | 1 Comment

RoundWindow v2

Posted on 1月 12, 2020 by Takaaki Naganoya

Edama2さんと「無理だよねー」「そうそう、絶対無理〜」などとメールで言っていたら、Shane Stanleyから届いた「できるよ」という衝撃のメール。

スクリプトエディタ上で記述する通常のAppleScriptで、CocoaのCustom Class宣言と呼び出しができるとのこと。

自分で動作確認してみるまで、半信半疑でしたが、、、、できますねこれは、、、

–> Download Editable and Executable Script Bundle

冗談半分で思いついたことを試してみたらできてしまったり、冗談半分でできるわけないよねと念のために書いておいたことが世界の誰かの目に止まったりと、「冗談半分」ってけっこう重要なことだと思えてきました。

以下、Shane Stanleyの説明による、その書き換え手順です。

(1)Subclassファイル(複数可)をXcode上のプロジェクトで書くようなスタイルで書く

こういう(↑)スタイルですね。かならずscript宣言しつつ、parent属性を宣言しておくところがXcode上のAppleScriptアプリケーションのスタイルです。あとで動作確認して、アプリケーションの起動や終了に関するイベントハンドラを書いておいたのは無駄(実行されない)ではないかとも思われました。

(2)実行するメインのScriptのResourcesフォルダ内にSubclassファイルを入れる

普通、AppleScriptのファイルが入る/Contents/Resources/Scripts/でも、ライブラリを入れておく/Contents/Resources/Script Libraries/でもなく、/Contents/Resources/の直下に入れます。ファイル名はオリジナルのEdama2さんのものをそのまま採用していますが、割となんでもいいようです。Custom Classファイルは分割してもいいし、このサンプルのようにまとめてもいいんでしょう。

# 追加実験してみたところ、Resourcesフォルダ以下の/Scriptsや/Script Libraries/フォルダと重複しない名称の別フォルダ(例:/Classes/)に入れておいても大丈夫でした

(3)use framework “AppleScriptObjC”の宣言文を追加

見たことのない光景ですが、書くことについてはとくに障害はありません。AppKit.Frameworkもuse宣言しておいたほうがよかったかもしれません。

(4)メインスクリプトの実行時に以下の処理を実行

set theBundle to current application’s NSBundle’s bundleWithPath:pathToFolderWithScripts
theBundle’s loadAppleScriptObjectiveCScripts()

★Click Here to Open This Script 

試行錯誤して、上記の「pathToFolderWithScripts」にバンドル内の/Contents/Resources/を入れて実行すればよいことが理解できました。

以上の変更を加えて、ためしにスクリプトエディタ&Script Debugger上で実行してみたところ、改変前と変わりなく実行できてしまいました(冒頭のスクリーンショット)。

いや、これはめちゃくちゃすごいですよ!! 何がすごいって、CocoaのCustom Classをスクリプトライブラリ中に入れて呼び出せるということで、けっこう無茶な箱庭インタフェースが作れてしまう予感が、、、、。

そして、AppleScriptObjC(AppleScriptObjC.frameworkより)でスクリプトエディタの「.scpt」形式のファイルを読み込んで実行できてしまったということは、Xcode上のAppleScriptアプリケーション内のScriptもテキスト形式だけでなく、スクリプトエディタで編集できる.scpt形式のファイルを突っ込んで編集できる可能性が見えてきました。

ただ、テキスト形式になっていないと、Interface Builderとの連携のあたりで問題になりそうな気もします。

AppleScript名:customClassTest.scptd
—
–  Created by: Edama2 2020/01/10
–  Adviced by: Shane Stanley 2020/01/11
–  Modified by: Takaaki Naganoya 2020/01/12
—
use AppleScript version "2.4" — Yosemite (10.10) or later
use framework "Foundation"
use framework "AppleScriptObjC"
use scripting additions

property _clock_text_view : missing value –> 時計用の文字列
property _clock_timer : missing value –> 時計用のNSTimer

–Script Bundle内のResourcesフォルダを求める
set resourcePath to POSIX path of (path to me) & "Contents/Resources/"
set theBundle to current application’s NSBundle’s bundleWithPath:resourcePath
theBundle’s loadAppleScriptObjectiveCScripts()

my performSelectorOnMainThread:"raizeWindow:" withObject:(missing value) waitUntilDone:true

# ウィンドウを作成
on raizeWindow:aParam
  
  
# 時計用の文字を作成
  
tell current application’s NSTextView’s alloc()
    tell initWithFrame_(current application’s NSMakeRect(35, 120, 300, 40))
      setRichText_(true)
      
useAllLigatures_(true)
      
setTextColor_(current application’s NSColor’s whiteColor())
      
setFont_(current application’s NSFont’s fontWithName:"Arial-Black" |size|:48)
      
setBackgroundColor_(current application’s NSColor’s colorWithDeviceRed:0.0 green:0.0 blue:0.0 alpha:0.0)
      
setAlphaValue_(1.0)
      
setEditable_(false)
      
–setString_("00:00:00")
      
      
set my _clock_text_view to it
    end tell
  end tell
  
  
# 時計を更新するNSTimerを作成
  
set my _clock_timer to current application’s NSTimer’s scheduledTimerWithTimeInterval:1 target:me selector:"idleHandler:" userInfo:(missing value) repeats:true
  
  
# 丸いViewを作成
  
set aFrame to current application’s NSMakeRect(0, 0, 300, 300)
  
tell current application’s RoundView’s alloc()
    tell initWithFrame_(aFrame)
      setNeedsDisplay_(true)
      
setSubviews_({my _clock_text_view})
      
set customView to it
    end tell
  end tell
  
  
#スクリーンのサイズを調べる
  
set aScreen to current application’s NSScreen’s mainScreen()
  
  
# Window
  
set aBacking to current application’s NSWindowStyleMaskBorderless
  
–set aBacking to current application’s NSBorderlessWindowMask
  
set aDefer to current application’s NSBackingStoreBuffered
  
  
tell current application’s CustomWindow’s alloc()
    tell initWithContentRect_styleMask_backing_defer_screen_(aFrame, aBacking, aDefer, false, aScreen)
      –setTitle_(uniqueName) –>タイトル
      
setBackgroundColor_(current application’s NSColor’s clearColor()) — Grammar Police –>背景色
      
setContentView_(customView) –>内容ビューのセット
      
setDelegate_(me) –>デリゲート
      
setDisplaysWhenScreenProfileChanges_(true) –>スクリーンプロファイルが変更されたときウインドウの内容をアップデートするか
      
setHasShadow_(true) –>ウインドウに影があるか
      
setIgnoresMouseEvents_(false) –>マウスイベントを無視するか
      
–setLevel_((current application’s NSScreenSaverWindowLevel) + 1) –>ウインドウの前後関係の位置
      
setOpaque_(false) –>ウインドウを不透明にするか
      
setReleasedWhenClosed_(true) –>閉じたときにメモリを解放するか
      
      
#
      
|center|()
      
makeKeyAndOrderFront_(me) –>キーウインドウにして前面に持ってくる
      
–setFrame_display_(aFrame, true) –>表示
    end tell
  end tell
end raizeWindow:

#タイマー割り込み
on idleHandler:aSender
  set mesStr to time string of (current date)
  (
my _clock_text_view)’s setString:mesStr
end idleHandler:

★Click Here to Open This Script 

AppleScript名:CocoaAppletAppDelegate.scpt
script CocoaAppletAppDelegate
  property parent : class "NSObject"
  
  
on applicationWillFinishLaunching:aNotification
    —
  end applicationWillFinishLaunching:


on applicationShouldTerminate:sender
    return current application’s NSTerminateNow
  end applicationShouldTerminate:
  
end script

script CustomWindow
  property parent : class "NSWindow"
  
property canBecomeKeyWindow : true
  
  
property _initial_location : missing value
  
  
on mouseDown:theEvent
    set my _initial_location to theEvent’s locationInWindow()
  end mouseDown:
  
  
on mouseDragged:theEvent
    –set res to display dialog "mouseDragged" buttons {"OK"} default button "OK"
    
try
      set screenVisibleFrame to current application’s NSScreen’s mainScreen()’s visibleFrame()
      
set screenVisibleFrame to my myHandler(screenVisibleFrame)
      
set windowFrame to my frame()
      
set windowFrame to my myHandler(windowFrame)
      
set newOrigin to windowFrame’s origin
      
      
set currentLocation to theEvent’s locationInWindow()
      
set newOrigin’s x to (newOrigin’s x) + ((currentLocation’s x) – (_initial_location’s x))
      
set newOrigin’s y to (newOrigin’s y) + ((currentLocation’s y) – (_initial_location’s y))
      
      
set tmpY to ((newOrigin’s y) + (windowFrame’s |size|’s height))
      
set screenY to (screenVisibleFrame’s origin’s y) + (screenVisibleFrame’s |size|’s height)
      
if tmpY > screenY then
        set newOrigin’s y to (screenVisibleFrame’s origin’s y) + ((screenVisibleFrame’s |size|’s height) – (windowFrame’s |size|’s height))
      end if
      
      
my setFrameOrigin:newOrigin
    on error error_message number error_number
      set error_text to "Error: " & error_number & ". " & error_message
      
display dialog error_text buttons {"OK"} default button 1
      
return error_text
    end try
    
  end mouseDragged:
  
  
on myHandler(aFrame)
    if class of aFrame is list then
      set {{theX, theY}, {theWidth, theHeight}} to aFrame
      
set aFrame to {origin:{x:theX, y:theY}, |size|:{width:theWidth, height:theHeight}}
      
–set aFrame to current application’s NSMakeRect(theX, theY, theWidth, theHeight)
    end if
    
return aFrame
  end myHandler
end script

script RoundView
  property parent : class "NSView"
  
  
on drawRect:rect
    set aFrame to my frame()
    
set myColor to current application’s NSColor’s redColor()
    
    
tell current application’s NSBezierPath
      tell bezierPathWithOvalInRect_(aFrame)
        myColor’s |set|()
        
fill()
      end tell
    end tell
  end drawRect:
end script

★Click Here to Open This Script 

(Visited 47 times, 1 visits today)
Posted in Custom Class GUI How To | Tagged 10.14savvy 10.15savvy NSBezierPath NSBundle NSColor NSFont NSScreen NSTextView NSTimer NSView NSWindow | Leave a comment

RoundWindow

Posted on 1月 10, 2020 by Takaaki Naganoya

本Scriptは、Edama2さんから投稿していただいたものです。Cocoa AppleScript AppletでCustom Classを宣言して作られた、丸いウィンドウ(透明ウィンドウの上に丸いグラフィックを描画)を表示して、タイマー割り込みで時計を表示するAppleScriptです。

–> Download Editable and Executable Applet

AppleScriptのランタイム環境はいくつかあり、それぞれに「できること」と「できないこと」、「手軽さ」などが異なります。

(1)スクリプトエディタ上で記述、実行する環境
一番セキュリティ上の制約が緩く、できることの多い環境です。

(2)Script Debugger上で記述、実行する環境
Cocoaのイベントやオブジェクトのログ表示などができる環境です。

(3)Applet環境
AppleScriptの実行ファイルです。

(4)Script Menu環境
macOS標準装備の、メニューからAppleScriptを実行できる環境です。

さらに、Cocoa Scriptingの機能に着目してみると、見え方が変わります。

本Scriptを記述している「Cocoa AppleScript Applet」環境(上の図の赤い部分)は、スクリプトエディタ上で記述する通常のAppleScriptと、Xcode上で記述するCocoaアプリケーションの中間的な性格を持つものです。スクリプトエディタ上で直接は動かせず、アプレット形式で動作させることになりますが、スクリプトエディタ上で動かすよりも、よりCocoaの機能が利用できます。

Cocoa AppleScript Appletでは、アプリケーション(Applet)起動や終了の最中で発生するイベントを利用できますし、本ScriptのようにCocoaのCustom Classを宣言できます。これは、普通のスクリプトエディタ上で記述する(本Blogの大部分のScriptのような)Scriptではできない真似です。
→ Shane Stanleyからツッコミが入って、手の込んだ作業を行うとできるとかで(テンプレートそのままでは無理)、後で実際に試してみます

タイトルは「丸いウィンドウと時計の表示」
NSWindowのカスタムクラスを使ったタイトルバーなしのドラッグで移動できる丸いウィンドウとオマケに時計を表示したものです。
初心者受けしそうなやつです。
問題はそこではなく、
XcodeやCocoa applescript appletから実行するASOCだとカスタムクラスが作れるけど、
ノーマルのapplescriptから実行するASOCではカスタムクラスが作れないということです。
表現がややこしいですが...。
ノーマルのapplescriptからカスタムクラスを作ると、ただのスクリプトオブジェクトにしかなりません。
誰かうまい解決方法を知っている人がいたら教えてください。

ちょうど、こういう資料をまとめていたので補足説明に役立ってしまいました。スクリプトエディタ上で記述する通常のAppleScriptでもCustom Cocoa Classが宣言できると便利そうですが、どんなもんでしょうか? 

Custom Classは便利なので使いたくなる一方、AppleScriptのインタプリタ上で実行するため、Objective-Cなどで書くのと同じような感覚で使うと「遅くて使えない」という話になると思いますが、このEdama2さんのサンプルぐらいの使いかたであれば、ちょうどいいんじゃないかというところです。

歴史的にみると、Cocoa-AppleScript Appletは、Xcode上で記述するCocoa-Applicationを簡略化してスクリプトエディタ上でCocoa Scriptingを手軽に使えるように手直しした「途中」の環境といえます。

Cocoa-AppleScript Appletは、GUIが手軽に作れるわけでもなく、スクリプトエディタ上で直接実行やログ表示ができるわけでもなありません。マスターしたところで最終到達点がCocoaアプリケーションほど高くなく、編集や習熟もしづらいことから「中途半端」「使えない」という評価になっていました(自分も使っていませんでした)。

その後、Cocoa-AppleScript Appletの機能要素をさらにダウンサイジングして、スクリプトエディタ上で手軽に記述・実行ができるように進化したのが現在・広くつかわれているCocoa Scripting環境です。

ただ、使いやすくなって広く使われるようになったはいいものの、「Xcodeを使うまでもないが、もうちょっとCocoaの機能が利用できないか?」という意見も出るようになり、Cocoa-AppleScript Appletを再評価してもいいんじゃないかと考えるようになってきてはいます。

ちなみに、本Cocoa-AppleScript AppletでCustom Classを宣言しているのと同じような書き方で、通常のCocoa Scriptingの環境で動かすような変更を加えたScriptもEdama2さんが試していますが、それは「動かない」ということで結論が出ています。

AppleScript名:CocoaAppletAppDelegate.scpt
script CocoaAppletAppDelegate
  property parent : class "NSObject"
  
  
property _clock_text_view : missing value –> 時計用の文字列
  
property _clock_timer : missing value –> 時計用のNSTimer
  
  
on applicationWillFinishLaunching:aNotification
    my raizeWindow()
  end applicationWillFinishLaunching:
  
  
on applicationShouldTerminate:sender
    my _clock_timer’s invalidate()
    
return current application’s NSTerminateNow
  end applicationShouldTerminate:
  
  
# ウィンドウを作成
  
on raizeWindow()
    
    
# 時計用の文字を作成
    
tell current application’s NSTextView’s alloc()
      tell initWithFrame_(current application’s NSMakeRect(35, 120, 300, 40))
        setRichText_(true)
        
useAllLigatures_(true)
        
setTextColor_(current application’s NSColor’s whiteColor())
        
setFont_(current application’s NSFont’s fontWithName:"Arial-Black" |size|:48)
        
setBackgroundColor_(current application’s NSColor’s colorWithDeviceRed:0.0 green:0.0 blue:0.0 alpha:0.0)
        
setAlphaValue_(1.0)
        
setEditable_(false)
        
–setString_("00:00:00")
        
        
set my _clock_text_view to it
      end tell
    end tell
    
    
# 時計を更新するNSTimerを作成
    
set my _clock_timer to current application’s NSTimer’s scheduledTimerWithTimeInterval:1 target:me selector:"idleHandler:" userInfo:(missing value) repeats:true


# 丸いViewを作成
    
set aFrame to current application’s NSMakeRect(0, 0, 300, 300)
    
tell current application’s RoundView’s alloc()
      tell initWithFrame_(aFrame)
        setNeedsDisplay_(true)
        
setSubviews_({my _clock_text_view})
        
set customView to it
      end tell
    end tell
    
    
#スクリーンのサイズを調べる
    
set aScreen to current application’s NSScreen’s mainScreen()
    
    
# Window
    
set aBacking to current application’s NSWindowStyleMaskBorderless
    
–set aBacking to current application’s NSBorderlessWindowMask
    
set aDefer to current application’s NSBackingStoreBuffered
    
tell current application’s CustomWindow’s alloc()
      tell initWithContentRect_styleMask_backing_defer_screen_(aFrame, aBacking, aDefer, false, aScreen)
        –setTitle_(uniqueName) –>タイトル
        
setBackgroundColor_(current application’s NSColor’s clearColor()) –>背景色
        
setContentView_(customView) –>内容ビューのセット
        
setDelegate_(me) –>デリゲート
        
setDisplaysWhenScreenProfileChanges_(true) –>スクリーンプロファイルが変更されたときウインドウの内容をアップデートするか
        
setHasShadow_(true) –>ウインドウに影があるか
        
setIgnoresMouseEvents_(false) –>マウスイベントを無視するか
        
–setLevel_((current application’s NSScreenSaverWindowLevel) + 1) –>ウインドウの前後関係の位置
        
setOpaque_(false) –>ウインドウを不透明にするか
        
setReleasedWhenClosed_(true) –>閉じたときにメモリを解放するか
        
        
#
        
|center|()
        
makeKeyAndOrderFront_(me) –>キーウインドウにして前面に持ってくる
        
–setFrame_display_(aFrame, true) –>表示
      end tell
    end tell
  end raizeWindow
  
  
#タイマー割り込み
  
on idleHandler:aSender
    set mesStr to time string of (current date)
    (
my _clock_text_view)’s setString:mesStr
  end idleHandler:
end script

script CustomWindow
  property parent : class "NSWindow"
  
property canBecomeKeyWindow : true
  
  
property _initial_location : missing value
  
  
on mouseDown:theEvent
    set my _initial_location to theEvent’s locationInWindow()
  end mouseDown:
  
  
on mouseDragged:theEvent
    –set res to display dialog "mouseDragged" buttons {"OK"} default button "OK"
    
try
      set screenVisibleFrame to current application’s NSScreen’s mainScreen()’s visibleFrame()
      
set screenVisibleFrame to my myHandler(screenVisibleFrame)
      
set windowFrame to my frame()
      
set windowFrame to my myHandler(windowFrame)
      
set newOrigin to windowFrame’s origin
      
      
set currentLocation to theEvent’s locationInWindow()
      
set newOrigin’s x to (newOrigin’s x) + ((currentLocation’s x) – (_initial_location’s x))
      
set newOrigin’s y to (newOrigin’s y) + ((currentLocation’s y) – (_initial_location’s y))
      
      
set tmpY to ((newOrigin’s y) + (windowFrame’s |size|’s height))
      
set screenY to (screenVisibleFrame’s origin’s y) + (screenVisibleFrame’s |size|’s height)
      
if tmpY > screenY then
        set newOrigin’s y to (screenVisibleFrame’s origin’s y) + ((screenVisibleFrame’s |size|’s height) – (windowFrame’s |size|’s height))
      end if
      
      
my setFrameOrigin:newOrigin
    on error error_message number error_number
      set error_text to "Error: " & error_number & ". " & error_message
      
display dialog error_text buttons {"OK"} default button 1
      
return error_text
    end try
    
  end mouseDragged:
  
  
on myHandler(aFrame)
    if class of aFrame is list then
      set {{theX, theY}, {theWidth, theHeight}} to aFrame
      
set aFrame to {origin:{x:theX, y:theY}, |size|:{width:theWidth, height:theHeight}}
      
–set aFrame to current application’s NSMakeRect(theX, theY, theWidth, theHeight)
    end if
    
return aFrame
  end myHandler
end script

script RoundView
  property parent : class "NSView"
  
  
on drawRect:rect
    set aFrame to my frame()
    
set myColor to current application’s NSColor’s redColor()
    
    
tell current application’s NSBezierPath
      tell bezierPathWithOvalInRect_(aFrame)
        myColor’s |set|()
        
fill()
      end tell
    end tell
  end drawRect:
end script

★Click Here to Open This Script 

(Visited 75 times, 1 visits today)
Posted in GUI | Tagged 10.14savvy 10.15savvy NSBezierPath NSColor NSScreen NSTextView NSTimer NSView NSWindow | Leave a comment

アラートダイアログ上にTable Viewを表示 v5_複数キー抽出つき

Posted on 12月 23, 2019 by Takaaki Naganoya

アラートダイアログ上にTableViewを表示し、複数キーの組み合わせによって項目抽出。選択項目のデータを返すAppleScriptです。

あくまで試作品なので、あちらこちらに「お可愛らしい」実装が転がっています。NSBoxがまだまともに使いこなせていないあたりとか(Xcode上で部品として配置するのは楽勝ですが、プログラムから動的に生成して使用するのは別なので)。

抽出キー数は可変で外部から指定できるとよいのですが、本Scriptでは固定です。また、各抽出条件も外部から供給するのが本来あるべき姿ですが、ハードコーディングしています。

あと、TableViewの下側に謎の余白があるのは、めんどくさくなってそのまま放置しています。これで外部から各種パラメータを指定できるようにして、sdefつけて1命令で呼び出せるようにしておけば、レコード数の多い選択項目から条件抽出しつつ項目選択できてよいでしょう。

プログラム内容自体は、高度でもなければ高尚でもありません。実にダラダラとGUI部品のパラメータを設定しているだけです。

AppleScript名:アラートダイアログ上にTable Viewを表示 v5_複数キー抽出つき
— Created 2019-12-22 by Takaaki Naganoya
— 2019 Piyomaru Software
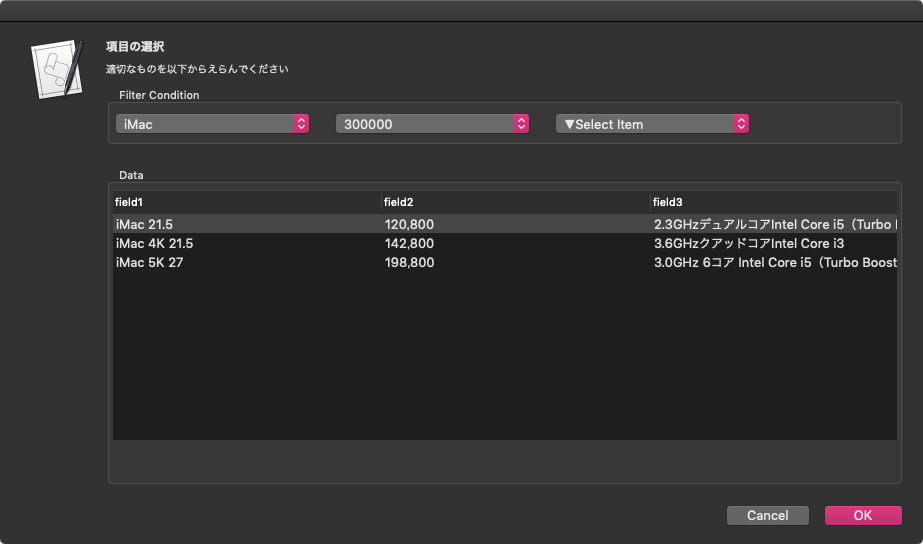
set aRes to displayCondTable() of filterTableDialogView
–> {field3:"3.0GHz 6コア Intel Core i5(Turbo Boost使用時最大4.1GHz)", field2:198800, field1:"iMac 5K 27"}

script filterTableDialogView
  use scripting additions
  
use framework "Foundation"
  
use framework "AppKit"
  
property parent : AppleScript
  
  
property NSBox : a reference to current application’s NSBox
  
property NSView : a reference to current application’s NSView
  
property NSAlert : a reference to current application’s NSAlert
  
property NSColor : a reference to current application’s NSColor
  
property NSIndexSet : a reference to current application’s NSIndexSet
  
property NSPredicate : a reference to current application’s NSPredicate
  
property NSScrollView : a reference to current application’s NSScrollView
  
property NSTableView : a reference to current application’s NSTableView
  
property NSTableColumn : a reference to current application’s NSTableColumn
  
property NSPopUpButton : a reference to current application’s NSPopUpButton
  
property NSMutableArray : a reference to current application’s NSMutableArray
  
property NSRunningApplication : a reference to current application’s NSRunningApplication
  
property NSCompoundPredicate : a reference to current application’s NSCompoundPredicate
  
property NSModalPanelWindowLevel : a reference to current application’s NSModalPanelWindowLevel
  
property NSAlertSecondButtonReturn : a reference to current application’s NSAlertSecondButtonReturn


property theResult : 0
  
property returnCode : 0
  
property theDataSource : {}
  
property tView : missing value
  
property aDataList : {}
  
property aSel : 0
  
property bSel : 0
  
property cSel : 0
  
property predList : {}
  
property a1Button : missing value
  
property a2Button : missing value
  
property a3Button : missing value
  
  
on displayCondTable()
    set (my theResult) to 0 –initialize
    
    
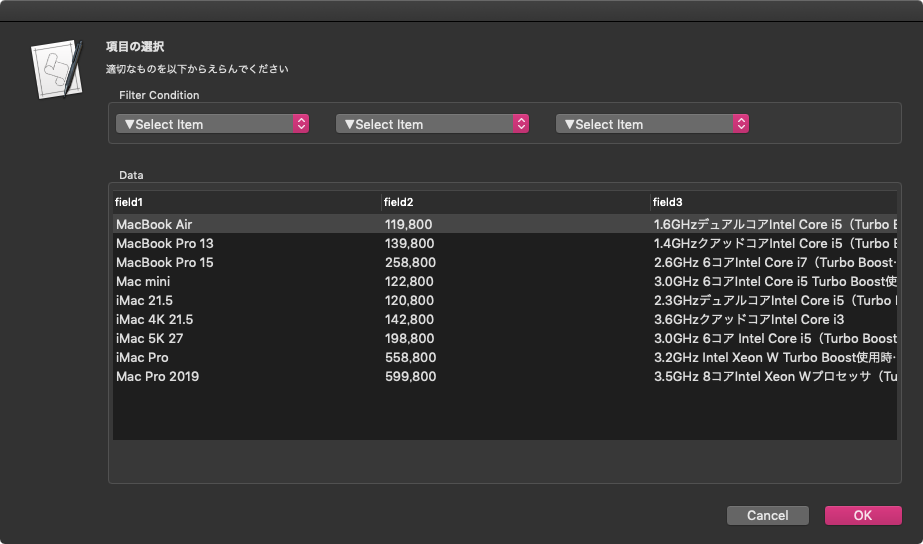
set aDataList to {{field1:"MacBook Air", field2:119800, field3:"1.6GHzデュアルコアIntel Core i5(Turbo Boost使用時最大3.6GHz)、4MB L3キャッシュ"}, {field1:"MacBook Pro 13", field2:139800, field3:"1.4GHzクアッドコアIntel Core i5(Turbo Boost使用時最大3.9GHz)、128MB eDRAM"}, {field1:"MacBook Pro 15", field2:258800, field3:"2.6GHz 6コアIntel Core i7(Turbo Boost使用時最大4.5GHz)、12MB共有L3キャッシュ"}, {field1:"Mac mini", field2:122800, field3:"3.0GHz 6コアIntel Core i5 Turbo Boost使用時最大4.1GHz 9MB共有L3キャッシュ"}, {field1:"iMac 21.5", field2:120800, field3:"2.3GHzデュアルコアIntel Core i5(Turbo Boost使用時最大3.6GHz)"}, {field1:"iMac 4K 21.5", field2:142800, field3:"3.6GHzクアッドコアIntel Core i3"}, {field1:"iMac 5K 27", field2:198800, field3:"3.0GHz 6コア Intel Core i5(Turbo Boost使用時最大4.1GHz)"}, {field1:"iMac Pro", field2:558800, field3:"3.2GHz Intel Xeon W Turbo Boost使用時最大4.2GHz 19MBキャッシュ"}, {field1:"Mac Pro 2019", field2:599800, field3:"3.5GHz 8コアIntel Xeon Wプロセッサ(Turbo Boost使用時最大4.0GHz)"}}
    
    
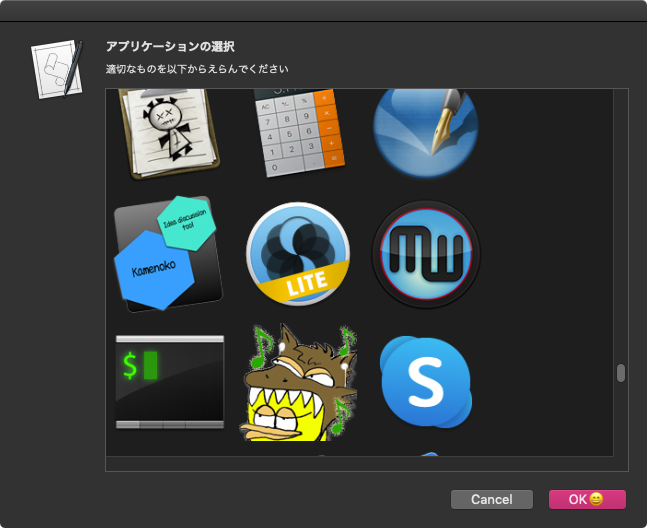
set paramObj to {myMessage:"項目の選択", mySubMessage:"適切なものを以下からえらんでください", aTableList:aDataList, aSortOrder:{"field1", "field2", "field3"}}
    
    
–my chooseItemByTableView:paramObj –for debug
    
my performSelectorOnMainThread:"chooseItemByTableView:" withObject:paramObj waitUntilDone:true
    
    
return (my theResult)
  end displayCondTable
  
  
on chooseItemByTableView:paramObj
    set aMainMes to myMessage of paramObj
    
set aSubMes to mySubMessage of paramObj
    
set aTList to (aTableList of paramObj) as list
    
set labelSortList to (aSortOrder of paramObj) as list
    
    
set aWidth to 800
    
set aHeight to 400
    
set my aSel to 0
    
set my bSel to 0
    
    
–Viewをつくる
    
set parentView to NSView’s alloc()’s initWithFrame:(current application’s NSMakeRect(0, 0, aWidth, aHeight))


–BOX Aをつくる
    
set aBox to (NSBox’s alloc()’s initWithFrame:(current application’s NSMakeRect(0, aHeight – 60, aWidth, 60)))
    (
aBox’s setTitle:("Filter Condition"))
    
    
–このあたり、項目数に合わせてUIを可変で生成するように(本Scriptは試作品なので、決め打ちでUI生成)
    
set a1Button to (NSPopUpButton’s alloc()’s initWithFrame:(current application’s NSMakeRect(0, 0, 200, 30)) pullsDown:false)
    
a1Button’s removeAllItems()
    (
a1Button’s addItemsWithTitles:{"▼Select Item", "MacBook", "iMac", "mini", "Air", "Pro"})
    
a1Button’s setTarget:(me)
    
a1Button’s setAction:("mySelector:")
    
a1Button’s setEnabled:(true)
    
    
set a2Button to (NSPopUpButton’s alloc()’s initWithFrame:(current application’s NSMakeRect(220, 0, 200, 30)) pullsDown:false)
    
a2Button’s removeAllItems()
    (
a2Button’s addItemsWithTitles:{"▼Select Item", "150000", "200000", "300000", "400000", "600000"})
    
a2Button’s setTarget:(me)
    
a2Button’s setAction:("mySelector:")
    
a2Button’s setEnabled:(true)
    
    
set a3Button to (NSPopUpButton’s alloc()’s initWithFrame:(current application’s NSMakeRect(440, 0, 200, 30)) pullsDown:false)
    
a3Button’s removeAllItems()
    (
a3Button’s addItemsWithTitles:{"▼Select Item", "デュアルコア", "クアッドコア", "6コア", "8コア"})
    
a3Button’s setTarget:(me)
    
a3Button’s setAction:("mySelector:")
    
a3Button’s setEnabled:(true)
    
    
    (
aBox’s addSubview:a1Button)
    (
aBox’s addSubview:a2Button)
    (
aBox’s addSubview:a3Button)


–BOX Bをつくる
    
set bBox to (NSBox’s alloc()’s initWithFrame:(current application’s NSMakeRect(0, 0, aWidth, aHeight – 80)))
    (
bBox’s setTitle:("Data"))
    
    
set aScroll to makeTableView(aTList, aWidth, aHeight – 150, labelSortList) of me
    
    (
bBox’s addSubview:aScroll)
    
    
parentView’s setSubviews:{aBox, bBox}
    
    
— set up alert  
    
set theAlert to NSAlert’s alloc()’s init()
    
tell theAlert
      its setMessageText:aMainMes
      
its setInformativeText:aSubMes
      
its addButtonWithTitle:"OK"
      
its addButtonWithTitle:"Cancel"
      
its setAccessoryView:(parentView)
      
      
set myWindow to its |window|
    end tell
    
    
myWindow’s setLevel:(NSModalPanelWindowLevel)
    
    
— show alert in modal loop
    
NSRunningApplication’s currentApplication()’s activateWithOptions:0
    
my performSelectorOnMainThread:"doModal:" withObject:(theAlert) waitUntilDone:true
    
if (my returnCode) = 1001 then error number -128
    
    
set tmpResult to (aScroll’s documentView’s selectedRow()) + 1
    
set (my theResult) to contents of item tmpResult of ((my theDataSource) as list)
  end chooseItemByTableView:


on doModal:aParam
    set (my returnCode) to (aParam’s runModal()) as number
  end doModal:


–TableView Event Handlers
  
on numberOfRowsInTableView:aView
    return (my theDataSource)’s |count|()
  end numberOfRowsInTableView:
  
  
on tableView:aView objectValueForTableColumn:aColumn row:aRow
    set aRec to (my theDataSource)’s objectAtIndex:(aRow as number)
    
set aTitle to (aColumn’s headerCell()’s title()) as string
    
set aRes to (aRec’s valueForKey:aTitle)
    
return aRes
  end tableView:objectValueForTableColumn:row:


on makeTableView(aDicList, aWidth, aHeight, labelSortList)
    set aOffset to 40
    
set theDataSource to NSMutableArray’s alloc()’s init()
    
theDataSource’s addObjectsFromArray:aDicList
    
    
set aScroll to NSScrollView’s alloc()’s initWithFrame:(current application’s NSMakeRect(0, aOffset, aWidth, aHeight))
    
set tView to NSTableView’s alloc()’s initWithFrame:(current application’s NSMakeRect(0, aOffset, aWidth, aHeight))
    
    
set aLen to length of labelSortList
    
    
repeat with i in labelSortList
      set j to contents of i
      
set aColumn to (NSTableColumn’s alloc()’s initWithIdentifier:j)
      (
aColumn’s setWidth:(aWidth div aLen))
      (
aColumn’s headerCell()’s setStringValue:j)
      (
tView’s addTableColumn:aColumn)
    end repeat
    
    
tView’s setDelegate:me
    
tView’s setDataSource:me
    
tView’s reloadData()
    
    
aScroll’s setDocumentView:tView
    
tView’s enclosingScrollView()’s setHasVerticalScroller:true
    
aScroll’s setVerticalLineScroll:(30.0 as real)
    
    
–1行目を選択
    
set aIndexSet to NSIndexSet’s indexSetWithIndex:0
    
tView’s selectRowIndexes:aIndexSet byExtendingSelection:false
    
    
–強制的にトップにスクロール
    
set aDBounds to aScroll’s documentView()’s |bounds|()
    
if class of aDBounds = list then
      –macOS 10.13 or later
      
set maxHeight to item 2 of item 1 of aDBounds
    else
      –macOS 10.10….10.12
      
set maxHeight to height of |size| of aDBounds
    end if
    
    
set aPT to current application’s NSMakePoint(0.0, -1 * (maxHeight as real))
    
aScroll’s documentView()’s scrollPoint:aPT
    
    
return aScroll
  end makeTableView


on alertShowHelp:aNotification
    display dialog "Help Me!" buttons {"OK"} default button 1 with icon 1
    
return false –trueを返すと親ウィンドウ(アラートダイアログ)がクローズする
  end alertShowHelp:


on mySelector:aObject
    set aIndex to (aObject’s indexOfSelectedItem()) as number
    
filterByMultipleCondition() of me
  end mySelector:


on filterByMultipleCondition()
    set prediCatesArray to {}
    
    
set aInd to (my a1Button’s indexOfSelectedItem()) as number
    
set bInd to (my a2Button’s indexOfSelectedItem()) as number
    
set cInd to (my a3Button’s indexOfSelectedItem()) as number
    
    
if {aInd, bInd, cInd} = {0, 0, 0} then
      set (my theDataSource) to NSMutableArray’s arrayWithArray:(my aDataList)
      
tView’s reloadData()
      
return
    end if
    
    
–このあたり、複数条件をハードコーディングしているのは超絶頭悪い。項目数の増減に対応できるべき
    
if aInd > 0 then
      set aTitle to (my a1Button’s title()) as string
      
set the end of prediCatesArray to "field1 contains ’" & aTitle & "’"
    end if
    
    
if bInd > 0 then
      set bTitle to (my a2Button’s title()) as string
      
set the end of prediCatesArray to "field2.integerValue < " & bTitle
    end if
    
    
if cInd > 0 then
      set cTitle to (my a3Button’s title()) as string
      
set the end of prediCatesArray to "field3 contains ’" & cTitle & "’"
    end if
    
    
–データ 抽出
    
set tmpList to filterDictArrayByLabel3((my aDataList), prediCatesArray) of me
    
    
–データ 再表示
    
set (my theDataSource) to NSMutableArray’s arrayWithArray:(tmpList)
    
tView’s reloadData()
  end filterByMultipleCondition


–リストに入れたレコードを、指定の属性ラベルの値で抽出(複数PredicatesをANDで合成)
  
on filterDictArrayByLabel3(origArray as list, aPredicateList as list)
    set aArray to NSMutableArray’s arrayWithArray:origArray
    
set predArray to NSMutableArray’s new()
    
    
repeat with i in aPredicateList
      (predArray’s addObject:(NSPredicate’s predicateWithFormat:(contents of i)))
    end repeat
    
    
set pred to current application’s NSCompoundPredicate’s andPredicateWithSubpredicates:predArray
    
set filteredArray to aArray’s filteredArrayUsingPredicate:pred
    
    
return filteredArray
  end filterDictArrayByLabel3
end script

★Click Here to Open This Script 

(Visited 90 times, 1 visits today)
Posted in dialog GUI list Record search | Tagged 10.13savvy 10.14savvy 10.15savvy NSAlert NSAlertSecondButtonReturn NSBox NSColor NSCompoundPredicate NSIndexSet NSModalPanelWindowLevel NSMutableArray NSPopUpButton NSPredicate NSRunningApplication NSScrollView NSTableColumn NSTableView NSView | 1 Comment

画像の空白判定 v4

Posted on 12月 19, 2019 by Takaaki Naganoya

画像のすべてのピクセルが白であることをチェックするAppleScriptです。

以前にmacOS 10.12上で作成した「空白画像検出v3」は一般的に処理時間のかかる空白画像の検出(ヒストグラム計算してチェックする?)が高速に処理できます(GPUImageでヒストグラム計算を行うより2倍ぐらい高速)。空白検出のためだけにAdobe Photoshopが必要になるといった事態は避けられます。

–> test Data(動作検証用各種テストデータ)

macOS 10.14.6上でこのルーチンを再度試してみたところ、思ったとおりに空白検出(数百万ピクセルの画像でも1つだけ黒であればfalseを返す)してくれません。ちょっと書き方を変えていますが、単体で通常のAppleScript(Cocoa不使用)にコンテクストメニューから突っ込むモジュールとして運用するためです。

copyコマンドがdeep copyしてくれない?

参照ではなくすべてのデータをコピーするコマンドとして、copyコマンドはとても重宝しています。単に「パラメータの代入の方向が違う偏屈なコマンド」ではなく、明示的にデータ内容をコピーするためのコマンドと認識しています。

AppleScriptのオブジェクト同様、Cocoaのオブジェクトについてもcopyコマンドでdeep copyしてくれるものと理解していましたが、macOS 10.14.6上で本ルーチンを試してみたところ、どうも参照をコピーしている気配がします。

AppleScriptのオブジェクト(配列とか)をcopyコマンドでコピーすると、参照ではなくデータが複製されていることを確認しました。Cocoaオブジェクトのcopyも同様かどうかは、ちょっとそうじゃないんじゃないかというところです。

set bNSImage to aNSImage's |copy|()

Cocoaの世界のオブジェクトのコピーはこんな感じ(↑)でできたので、今後はこちらを採用することにします。

1×1のNSImageに色を塗るとデータサイズが増える

ビットマップ画像の状態であるNSBitmapImageRepになっていれば、1×1画像のサイズは同じことが期待されます。実際、macOS 10.12上ではそのように扱えていました。

ところが、macOS 10.14上で1×1ドットのNSImageに対して色を塗って、NSBitmapImageRepを取得すると、塗らない状態のNSImageよりもデータ(NSData)サイズが大きくなることがわかりました。


▲1×1のPNG画像をビットマップ化したデータ。赤が処理前、青が塗りつぶし処理後のデータ(macOS 10.14.6)。ピクセル数が増えてるのでは? と疑ってサイズを何回も計算して確認しましたが、間違っていません

しかも、データ量がmacOS 10.14と10.15では大幅に異なります(macOS 10.15では大幅にデータ量が減る)。

 1×1 PNG画像 ビットマップ化したデータサイズ:3,354 Bytes(macOS 10.14.6)
 1×1 PNG画像 塗りつぶし ビットマップ化したデータサイズ:3,574 Bytes(macOS 10.14.6)
 1×1 PNG画像 塗りつぶし ビットマップ化したデータサイズ:750 Bytes(macOS 10.15.2)

さすがに匙を投げかけましたが、比較元のデータに透明の色(clearColor())を塗る=画像的に意味はないが、同じ処理を通すことでデータサイズを同程度にするという処理を行うことで、いい感じに空白検出できるようになりました。

なにをどういじくったら、1×1ビットマップ画像のサイズがOSアップデートごとに大幅に変わるのかさっぱり理解できないのですが、そこに何か意味があるのでしょうか?

Mac App Storeに出したアプリケーションで、PDFの空白ページ検出に本ルーチンを利用していますが、Appleのレビュー段階で「単にPDFから文字を抽出して空白検出しているのだろう」と思われてリジェクトされました。実際には、全ページを画像レンダリングして1ドットの画像でも存在していたら空白としては認識しない仕様になっているのですが、Appleのレビューワーには処理内容を説明して、各種ベンチマーク結果などを出さないと信じてもらえませんでした。

Appleのエンジニアが考えるところの空白検出が「文字チェックだけ」の使い物にならない処理だということはよくわかりました。また、頭からそのように思い込んで攻撃してきた間抜けにも遭遇してウンザリしました。

AppleScript名:画像の空白判定 v4
set aFile to (choose file of type {"public.image"})
set iRes to checkImageIsWhite(aFile) of whiteImageKit
–> true –white (blank) image

script whiteImageKit
  use AppleScript version "2.7" — High Sierra (10.13) or later
  
use framework "Foundation"
  
use framework "AppKit"
  
use scripting additions
  
property parent : AppleScript
  
  
property NSData : a reference to current application’s NSData
  
property NSDate : a reference to current application’s NSDate
  
property |NSURL| : a reference to current application’s |NSURL|
  
property NSColor : a reference to current application’s NSColor
  
property NSImage : a reference to current application’s NSImage
  
property NSBezierPath : a reference to current application’s NSBezierPath
  
property NSBitmapImageRep : a reference to current application’s NSBitmapImageRep
  
  
–Compare Original Data and
  
on checkImageIsWhite(aFile)
    set aPOSIXpath to POSIX path of aFile
    
set aURL to |NSURL|’s fileURLWithPath:(aPOSIXpath)
    
    
set aNSImage to NSImage’s alloc()’s initWithContentsOfURL:(aURL)
    
set bNSImage to NSImage’s alloc()’s initWithContentsOfURL:(aURL)
    
    
–copy aNSImage to bNSImage–Not deep copy ????
    
    
set fillColor1 to NSColor’s clearColor()
    
set blankNSImage1 to drawImageWithFilledColor(aNSImage, fillColor1) of me
    
    
set fillColor2 to makeNSColorFromRGBAval(65535, 65535, 65535, 65535, 65535) of me
    
set blankNSImage2 to drawImageWithFilledColor(bNSImage, fillColor2) of me
    
    
set aTiff to blankNSImage1’s TIFFRepresentation()
    
set bTiff to blankNSImage2’s TIFFRepresentation()
    
    
set chkWhite to (aTiff’s isEqualToData:bTiff) as boolean
    
    
return chkWhite
  end checkImageIsWhite


on getSizeOfImage(anNSImage)
    set aSize to anNSImage’s |size|()
    
set aClass to class of aSize
    
if aClass = record then
      copy aSize to theSize –To macOS 10.12.x
    else –macOS 10.13 or later
      set sizeX to (item 1 of item 2 of aSize)
      
set sizeY to (item 2 of item 2 of aSize)
      
set theSize to {width:sizeX, height:sizeY}
    end if
    
return theSize
  end getSizeOfImage


–指定サイズの画像を作成し、背景を指定色で塗る
  
on drawImageWithFilledColor(anImage, fillColor)
    set aSize to getSizeOfImage(anImage) of me
    
    
anImage’s lockFocus()
    
    
set theRect to {{x:0, y:0}, {width:(width of aSize), height:(height of aSize)}}
    
set theNSBezierPath to NSBezierPath’s bezierPath
    
theNSBezierPath’s appendBezierPathWithRect:theRect
    
fillColor’s |set|()
    
theNSBezierPath’s fill()
    
    
anImage’s unlockFocus()
    
    
return anImage
  end drawImageWithFilledColor


–aMaxValを最大値とする数値でNSColorを作成して返す
  
on makeNSColorFromRGBAval(redValue as integer, greenValue as integer, blueValue as integer, alphaValue as integer, aMaxVal as integer)
    set aRedCocoa to (redValue / aMaxVal) as real
    
set aGreenCocoa to (greenValue / aMaxVal) as real
    
set aBlueCocoa to (blueValue / aMaxVal) as real
    
set aAlphaCocoa to (alphaValue / aMaxVal) as real
    
set aColor to NSColor’s colorWithCalibratedRed:aRedCocoa green:aGreenCocoa blue:aBlueCocoa alpha:aAlphaCocoa
    
return aColor
  end makeNSColorFromRGBAval
  
end script

★Click Here to Open This Script 

(Visited 151 times, 1 visits today)
Posted in Image | Tagged 10.13savvy 10.14savvy 10.15savvy NSBezierPath NSBitmapImageRep NSColor NSData NSImage NSURL | 2 Comments

指定のフォントとサイズに該当するテキストを抽出する v3

Posted on 12月 1, 2019 by Takaaki Naganoya

指定のRTFファイルから書式情報を取得し、フォント名とフォントサイズのペアをスタイルを反映させたポップアップメニューで選択。RTFの内容を解析したのち、ダイアログが表示されます(ここの所要時間は読ませるRTFのサイズ次第)。ポップアップメニューで書式を選ぶと、すぐさま抽出した箇所をすべてまとめて表示します。

–> Watch Demo Movie

–> Download Script Bundle with Sample data

ダイアログ表示前に書式ごとの抽出を完了し、個別のTabViewに抽出後の文字データを展開しておくので、ポップアップメニューから選択すると、展開ずみのデータを入れてあるTabViewに表示を切り替えるだけ。切り替え時に計算は行わないため、すぐに抽出ずみの文字データが表示されるという寸法です。

今回は短いサンプルデータを処理してみましたが、サンプル抽出時にあらかじめ範囲指定するなどして、データ処理規模を限定することで処理時間を稼ぐこともできることでしょう。

テキストエディットでオープン中のRTF書類のパスを取得して、それを処理対象にしてもいいでしょう。

ただし、やっつけで作ったのでスクリプトエディタ上でCommand-Control-Rで実行しないと動きません(メインスレッド実行をプログラムで強制しても、途中でクラッシュしてしまいます)。それほど時間もかけずに作ったやっつけプログラムなので、あまり原因追求も行えずそのままです。

AppleScript名:アラートダイアログ+Tab View v3.scptd
—
–  Created by: Takaaki Naganoya
–  Created on: 2019/09/16
—
–  Copyright © 2019 Piyomaru Software, All Rights Reserved
—
use AppleScript version "2.4"
use scripting additions
use framework "Foundation"
use framework "AppKit"
use rtfLib : script "readStyledTextLib"
use parseLib : script "parseAttrLib"

property NSFont : a reference to current application’s NSFont
property NSView : a reference to current application’s NSView
property NSAlert : a reference to current application’s NSAlert
property NSColor : a reference to current application’s NSColor
property NSMenu : a reference to current application’s NSMenu
property NSArray : a reference to current application’s NSArray
property NSTabView : a reference to current application’s NSTabView
property NSPredicate : a reference to current application’s NSPredicate
property NSTextView : a reference to current application’s NSTextView
property NSMenuItem : a reference to current application’s NSMenuItem
property NSTabViewItem : a reference to current application’s NSTabViewItem
property NSPopUpButton : a reference to current application’s NSPopUpButton
property NSMutableDictionary : a reference to current application’s NSMutableDictionary
property NSRunningApplication : a reference to current application’s NSRunningApplication
property NSFontAttributeName : a reference to current application’s NSFontAttributeName
property NSKernAttributeName : a reference to current application’s NSKernAttributeName
property NSLigatureAttributeName : a reference to current application’s NSLigatureAttributeName
property NSMutableAttributedString : a reference to current application’s NSMutableAttributedString
property NSStrokeWidthAttributeName : a reference to current application’s NSStrokeWidthAttributeName
property NSUnderlineStyleAttributeName : a reference to current application’s NSUnderlineStyleAttributeName
property NSForegroundColorAttributeName : a reference to current application’s NSForegroundColorAttributeName

property TabPosition : 4 —0=Top, 1=Left, 2=Bottom, 3=Right, 4=None

property returnCode : 0

property aTabV : missing value
property selectedNum : {}

set aFile to choose file of type {"public.rtf"}

set aStyledStr to readRTFfile(aFile) of rtfLib
set paramObj to {myMessage:"Select Style", mySubMessage:"Select style you want to filter", viewWidth:800, viewHeight:400, myStyledStr:aStyledStr}

my dispTabViewWithAlertdialog:paramObj –for debug
–my performSelectorOnMainThread:"dispTabViewWithAlertdialog:" withObject:paramObj waitUntilDone:true
return selectedNum

on dispTabViewWithAlertdialog:paramObj
  –Receive Parameters
  
set aMainMes to (myMessage of paramObj) as string –Main Message
  
set aSubMes to (mySubMessage of paramObj) as string –Sub Message
  
set aWidth to (viewWidth of paramObj) as integer –TextView width
  
set aHeight to (viewHeight of paramObj) as integer –TextView height
  
set aStyledStr to (myStyledStr of paramObj)
  
  
set attrResTmp to getAttributeRunsFromAttrString(aStyledStr) of parseLib
  
set attrList to attributes of attrResTmp
  
set menuStyle to menuList of attrResTmp
  
  
set selectedNum to {}
  
  
set aView to NSView’s alloc()’s initWithFrame:(current application’s NSMakeRect(0, 0, aWidth, aHeight))
  
  
–Ppopup Buttonをつくる
  
set a1Button to NSPopUpButton’s alloc()’s initWithFrame:(current application’s NSMakeRect(0, aHeight – 20, 400, 20)) pullsDown:false
  
a1Button’s removeAllItems()
  
  
–WYSIWHG popup menuをつくる
  
set a1Menu to NSMenu’s alloc()’s init()
  
repeat with i from 1 to (length of menuStyle)
    set {tmpFont, tmpSize} to contents of item i of menuStyle
    
set aTitle to (tmpFont & " " & tmpSize as string) & " point"
    
set aMenuItem to (NSMenuItem’s alloc()’s initWithTitle:aTitle action:"actionHandler:" keyEquivalent:"")
    
    
set attributedTitle to makeRTFfromParameters(aTitle, tmpFont, tmpSize, NSColor’s blackColor()) of me
    
    (
aMenuItem’s setEnabled:true)
    (
aMenuItem’s setTarget:me)
    (
aMenuItem’s setTag:(i as string))
    (
aMenuItem’s setAttributedTitle:(attributedTitle))
    (
a1Menu’s addItem:aMenuItem)
  end repeat
  
  
–Ppopup Buttonにmenuをつける
  
a1Button’s setMenu:a1Menu
  
  
–Make Tab View
  
set aTabV to NSTabView’s alloc()’s initWithFrame:(current application’s NSMakeRect(0, 0, aWidth, aHeight – 30))
  
aTabV’s setTabViewType:(TabPosition)


–TabViewに中身を入れる
  
repeat with i from 1 to (length of menuStyle)
    set {tmpFont, tmpSize} to contents of item i of menuStyle
    
set tmpKey to (tmpFont as string) & "/" & (tmpSize as string)
    
set tmpArry to filterRecListByLabel1(attrList, "styleKey2 == ’" & tmpKey & "’") of me
    
set tmpStr to (tmpArry’s valueForKeyPath:"stringVal") as list
    
    
set aTVItem to (NSTabViewItem’s alloc()’s initWithIdentifier:(i as string))
    (
aTVItem’s setLabel:(i as string))


set aTextView to (NSTextView’s alloc()’s initWithFrame:(current application’s NSMakeRect(0, 0, aWidth – 10, aHeight – 10)))
    (
aTextView’s setRichText:true)
    
set tmpAttr to makeRTFfromParameters(tmpStr as string, tmpFont, tmpSize, NSColor’s blackColor()) of me
    (
aTextView’s textStorage()’s appendAttributedString:tmpAttr)
    
    (
aTVItem’s setView:aTextView)
    
    (
aTabV’s addTabViewItem:aTVItem)
  end repeat


aView’s setSubviews:{a1Button, aTabV}
  
aView’s setNeedsDisplay:true


— set up alert
  
set theAlert to NSAlert’s alloc()’s init()
  
tell theAlert
    –for Messages
    
its setMessageText:(aMainMes)
    
its setInformativeText:(aSubMes)
    
    
–for Buttons
    
its addButtonWithTitle:"OK"
    
its addButtonWithTitle:"Cancel"
    
    
–Add Accessory View
    
its setAccessoryView:(aView)
    
    
–for Help Button
    
its setShowsHelp:(true)
    
its setDelegate:(me)
  end tell


— show alert in modal loop
  
NSRunningApplication’s currentApplication()’s activateWithOptions:0
  
my performSelectorOnMainThread:"doModal:" withObject:(theAlert) waitUntilDone:true
  
if (my returnCode as number) = 1001 then error number -128
  
  
set selectedNum to contents of item ((a1Button’s indexOfSelectedItem()) + 1) of menuStyle
end dispTabViewWithAlertdialog:

on doModal:aParam
  set (my returnCode) to aParam’s runModal()
end doModal:

on alertShowHelp:aNotification
  display dialog "Help Me!" buttons {"OK"} default button 1 with icon 1
  
return false –trueを返すと親ウィンドウ(アラートダイアログ)がクローズする
end alertShowHelp:

–Popup Action Handler
on actionHandler:sender
  set aTag to tag of sender as integer
  
aTabV’s selectTabViewItemAtIndex:(aTag – 1)
end actionHandler:

–書式つきテキストを組み立てる
on makeRTFfromParameters(aStr as string, aFontName as string, aFontSize as real, aColor)
  –フォント
  
set aVal1 to NSFont’s fontWithName:(aFontName) |size|:aFontSize
  
set aKey1 to (NSFontAttributeName)
  
  
–色
  
set aVal2 to aColor
  
set aKey2 to (NSForegroundColorAttributeName)
  
  
–カーニング
  
set aVal3 to 0.0
  
set akey3 to (NSKernAttributeName)
  
  
–アンダーライン
  
set aVal4 to 0
  
set akey4 to (NSUnderlineStyleAttributeName)
  
  
–リガチャ
  
–set aVal5 to 2 –全てのリガチャを有効にする
  
–set akey5 to ( NSLigatureAttributeName)
  
  
–枠線(アウトライン)
  
–set aVal6 to outlineNum
  
–set akey6 to ( NSStrokeWidthAttributeName)


set keyList to {aKey1, aKey2, akey3, akey4}
  
set valList to {aVal1, aVal2, aVal3, aVal4}
  
set attrsDictionary to NSMutableDictionary’s dictionaryWithObjects:valList forKeys:keyList
  
  
set attrStr to NSMutableAttributedString’s alloc()’s initWithString:aStr attributes:attrsDictionary
  
return attrStr
end makeRTFfromParameters

–リストに入れたレコードを、指定の属性ラベルの値で抽出
on filterRecListByLabel1(aRecList as list, aPredicate as string)
  set aArray to NSArray’s arrayWithArray:aRecList
  
set aPredicate to NSPredicate’s predicateWithFormat:aPredicate
  
set filteredArray to aArray’s filteredArrayUsingPredicate:aPredicate
  
set bList to filteredArray
  
return bList
end filterRecListByLabel1

★Click Here to Open This Script 

(Visited 52 times, 1 visits today)
Posted in Color dialog Font GUI Require Control-Command-R to run RTF | Tagged 10.14savvy 10.15savvy NSAlert NSArray NSColor NSFont NSFontAttributeName NSForegroundColorAttributeName NSKernAttributeName NSLigatureAttributeName NSMenu NSMenuItem NSMutableAttributedString NSMutableDictionary NSPopUpButton NSPredicate NSRunningApplication NSStrokeWidthAttributeName NSTabView NSTabViewItem NSTextView NSUnderlineStyleAttributeName NSView | 1 Comment

アラートダイアログ上のWebViewに世界地図を表示 v2b

Posted on 11月 20, 2019 by Takaaki Naganoya

世界地図のSVGをHTMLReader.frameworkでparseして、目的のノードに塗り色の指定を行い、WkWebView上で表示するAppleScriptです。

–> Download selectCountry2(Code-signed AppleScript executable applet)

昨日のものがあくまでSVGのParseと表示が目的の試作品であったのに対し、本Scriptは連続してポップアップメニューから対象を選んで表示するというものです。

同様にmacOS 10.15.1上で作成しましたが、このバージョンのOS環境ではAppleScriptアプレットにFrameworkを入れてAppleScript内から呼び出すことが標準のランタイム(Script Editorから書き出した場合)では行えないようになっており、Script Debuggerから「Application(Enhanced)」で書き出さないと呼び出せないようです(これはちょっとひどいかも、、、、)。

世界地図はWikipediaから拾ってきたもので、ISO国コードではなく名称でIDが振ってあり、日本もJapanではなくHokkaido、Honshu、Shikoku、Kyushuuに分けて登録されています。


▲Script Editor上でサードパーティFramework呼び出しの動作ができているのは、この実行環境でSIPを解除してあるからです

AppleScript名:アラートダイアログ上のWebViewに世界地図を表示 v2b.scptd
—
–  Created by: Takaaki Naganoya
–  Created on: 2019/11/18
—
–  Copyright © 2019 Piyomaru Software, All Rights Reserved
—
use AppleScript version "2.4" — Yosemite (10.10) or later
use framework "Foundation"
use framework "AppKit"
use framework "HTMLReader" –https://github.com/nolanw/HTMLReader
use framework "WebKit"
use scripting additions

property |NSURL| : a reference to current application’s |NSURL|
property NSAlert : a reference to current application’s NSAlert
property NSColor : a reference to current application’s NSColor
property NSString : a reference to current application’s NSString
property NSImage : a reference to current application’s NSImage
property NSScreen : a reference to current application’s NSScreen
property NSButton : a reference to current application’s NSButton
property WKWebView : a reference to current application’s WKWebView
property WKUserScript : a reference to current application’s WKUserScript
property NSURLRequest : a reference to current application’s NSURLRequest
property HTMLDocument : a reference to current application’s HTMLDocument
property NSRunningApplication : a reference to current application’s NSRunningApplication
property NSUTF8StringEncoding : a reference to current application’s NSUTF8StringEncoding
property WKUserContentController : a reference to current application’s WKUserContentController
property WKWebViewConfiguration : a reference to current application’s WKWebViewConfiguration
property WKUserScriptInjectionTimeAtDocumentEnd : a reference to current application’s WKUserScriptInjectionTimeAtDocumentEnd

property theResult : 0
property returnCode : 0
property aWebView : missing value
property aLog : missing value
property tmpURL : ""

tell current application
  set mePath to ((path to me) as string) & "Contents:Resources:World_map_-_low_resolution.svg"
  
set svgCon to read (mePath as alias)
  
  
set aWidth to 950
  
set aHeight to 650


set paramObj to {myMessage:"Browse World map", mySubMessage:"This is a sample SVG World map", targContents:svgCon, myWidth:(aWidth), myHeight:(aHeight)}
  
–my browseLocalWebContents:paramObj
  
my performSelectorOnMainThread:"browseLocalWebContents:" withObject:(paramObj) waitUntilDone:true
  
return aLog
end tell

on browseLocalWebContents:paramObj
  set aMainMes to (myMessage of paramObj) as string
  
set aSubMes to (mySubMessage of paramObj) as string
  
set tmpURL to (targContents of paramObj) as string –local contents
  
set aWidth to (myWidth of paramObj) as integer
  
set aHeight to (myHeight of paramObj) as integer


set aView to current application’s NSView’s alloc()’s initWithFrame:(current application’s NSMakeRect(0, 0, aWidth, aHeight))
  
  
–Ppopup Buttonをつくる
  
set a1Button to current application’s NSPopUpButton’s alloc()’s initWithFrame:(current application’s NSMakeRect(0, aHeight – 26, 200, 24)) pullsDown:(false)
  
a1Button’s removeAllItems()
  
  
–Menuの中身を作る  
  
set aHTML to current application’s HTMLDocument’s documentWithString:(tmpURL)
  
set fList to (aHTML’s nodesMatchingSelector:"path")’s valueForKeyPath:"attributes.id"
  
set fList to fList’s sortedArrayUsingSelector:"compare:"
  
  
a1Button’s addItemWithTitle:"▼Select"
  
  
repeat with i in fList
    (a1Button’s addItemWithTitle:(i as string))
  end repeat
  
  
a1Button’s setTarget:(me)
  
a1Button’s setAction:("mySelector:")
  
a1Button’s setEnabled:(true)
  
  
set aWebView to makeWebViewAndLoadContents(tmpURL, aWidth, aHeight – 40) of me
  
  
aView’s addSubview:a1Button
  
aView’s addSubview:aWebView
  
  
— set up alert  
  
set theAlert to NSAlert’s alloc()’s init()
  
tell theAlert
    its setMessageText:aMainMes
    
its setInformativeText:aSubMes
    
its addButtonWithTitle:"OK"
    
its addButtonWithTitle:"Cancel"
    
its setAccessoryView:aView
  end tell
  
  
— show alert in modal loop
  
NSRunningApplication’s currentApplication()’s activateWithOptions:0
  
my performSelectorOnMainThread:"doModal:" withObject:(theAlert) waitUntilDone:true
  
  
–Stop Web View Action
  
set bURL to |NSURL|’s URLWithString:"about:blank"
  
set bReq to NSURLRequest’s requestWithURL:bURL
  
aWebView’s loadRequest:bReq
  
  
if (my returnCode as number) = 1001 then error number -128
end browseLocalWebContents:

on doModal:aParam
  set (my returnCode) to (aParam’s runModal()) as number
end doModal:

on viewDidLoad:aNotification
  return true
end viewDidLoad:

–Popup Action Handler
on actionHandler:sender
  set aTitle to title of sender as string
end actionHandler:

on fetchJSSourceString(aURL)
  set jsURL to |NSURL|’s URLWithString:aURL
  
set jsSourceString to NSString’s stringWithContentsOfURL:jsURL encoding:(NSUTF8StringEncoding) |error|:(missing value)
  
return jsSourceString
end fetchJSSourceString

on mySelector:aSender
  set targetCountry to (aSender’s title()) as string
  
  
set aHTML to current application’s HTMLDocument’s documentWithString:(tmpURL as string)
  
  
set eList to (aHTML’s nodesMatchingSelector:"path") as list
  
set fList to (aHTML’s nodesMatchingSelector:"path")’s valueForKeyPath:"attributes.id"
  
  
–Search Target Country
  
set aRes to (fList)’s indexOfObject:(targetCountry)
  
if (aRes = current application’s NSNotFound) or (aRes > 9.99999999E+8) then
    error "Target country not found"
  end if
  
  
set aRes to aRes + 1
  
  
–Rewrite target country’s fill color on SVG
  
set tmpNode to contents of item aRes of (eList)
  (
tmpNode’s setObject:"Red" forKeyedSubscript:"fill") –Change Target Country’s fill color
  
  
set svgCon to (tmpNode’s |document|()’s serializedFragment()) as string –HTMLReaderはこういう処理ができるところが好き
  
  
aWebView’s loadHTMLString:svgCon baseURL:(missing value)
end mySelector:

on makeWebViewAndLoadContents(aContents as string, aWidth as integer, aHeight as integer)
  set aConf to WKWebViewConfiguration’s alloc()’s init()
  
  
–指定URLのJavaScriptをFetch
  
set jsSource to my fetchJSSourceString(aContents)
  
set userScript to WKUserScript’s alloc()’s initWithSource:jsSource injectionTime:(WKUserScriptInjectionTimeAtDocumentEnd) forMainFrameOnly:true
  
set userContentController to WKUserContentController’s alloc()’s init()
  
userContentController’s addUserScript:(userScript)
  
aConf’s setUserContentController:userContentController
  
  
set aWebView to WKWebView’s alloc()’s initWithFrame:(current application’s NSMakeRect(0, 0, aWidth, aHeight)) configuration:aConf
  
aWebView’s setNavigationDelegate:me
  
aWebView’s setUIDelegate:me
  
aWebView’s setTranslatesAutoresizingMaskIntoConstraints:true
  
aWebView’s setOpaque:false
  
aWebView’s setBackgroundColor:(NSColor’s clearColor())
  
–aWebView’s scrollView()’s setBackgroundColor:(NSColor’s clearColor())
  
  
aWebView’s loadHTMLString:aContents baseURL:(missing value)
  
return aWebView
end makeWebViewAndLoadContents

★Click Here to Open This Script 

(Visited 72 times, 1 visits today)
Posted in dialog geolocation GUI Image SVG | Tagged 10.13savvy 10.14savvy 10.15savvy HTMLDocument NSAlert NSButton NSColor NSImage NSRunningApplication NSScreen NSString NSURL NSURLRequest NSUTF8StringEncoding WKUserContentController WKUserScript WKUserScriptInjectionTimeAtDocumentEnd WKWebView WKWebViewConfiguration | Leave a comment

アラートダイアログ上のWebViewに円グラフを表示

Posted on 11月 18, 2019 by Takaaki Naganoya

アラートダイアログ上のWebViewにSVGで作った円グラフを表示するAppleScriptです。

Objective-Cで作られたチャート表示フレームワークなどを呼び出して試していますが、スクリプトエディタ上で作成したAppleScriptから呼び出すと、アニメーションしなかったり表示が行えなかったりといろいろ環境にフィットしていません。

# 逆をいえば、Xcode上でCocoa AppleScriptアプリケーションを作成した場合には割とチャート表示部品をそのまま使えます

そこで、単純なグラフ表示を行うようにレベルを下げ、SVGをWkWebView上に表示する形式にしてみました。

本Scriptでは最低限のサンプルを表示させていますが、SVGの組み立てをもう少し強化してグラフの背景を透明にできればいい感じになるのではないでしょうか。


▲世界地図あたりだといい感じに見えるかもしれません。当該の国だけ色を変えるような処理を仕込めば何かに使えそうです。

AppleScript名:アラートダイアログ上のWebViewに円グラフを表示.scptd
—
–  Created by: Takaaki Naganoya
–  Created on: 2019/11/18
—
–  Copyright © 2019 Piyomaru Software, All Rights Reserved
—
use AppleScript version "2.4" — Yosemite (10.10) or later
use framework "Foundation"
use framework "AppKit"
use framework "WebKit"
use scripting additions

property |NSURL| : a reference to current application’s |NSURL|
property NSAlert : a reference to current application’s NSAlert
property NSColor : a reference to current application’s NSColor
property NSString : a reference to current application’s NSString
property NSImage : a reference to current application’s NSImage
property NSScreen : a reference to current application’s NSScreen
property NSButton : a reference to current application’s NSButton
property WKWebView : a reference to current application’s WKWebView
property WKUserScript : a reference to current application’s WKUserScript
property NSURLRequest : a reference to current application’s NSURLRequest
property NSRunningApplication : a reference to current application’s NSRunningApplication
property NSUTF8StringEncoding : a reference to current application’s NSUTF8StringEncoding
property WKUserContentController : a reference to current application’s WKUserContentController
property WKWebViewConfiguration : a reference to current application’s WKWebViewConfiguration
property WKUserScriptInjectionTimeAtDocumentEnd : a reference to current application’s WKUserScriptInjectionTimeAtDocumentEnd

property theResult : 0
property returnCode : 0

–set svgCon to read (choose file)
set svgCon to retSampleSVG() of me

set paramObj to {myMessage:"Browse Pie Chart", mySubMessage:"This is a sample pie chart made by SVG", targContents:svgCon}
–my browseLocalWebContents:paramObj
my performSelectorOnMainThread:"browseLocalWebContents:" withObject:(paramObj) waitUntilDone:true

on browseLocalWebContents:paramObj
  set aMainMes to (myMessage of paramObj) as string
  
set aSubMes to (mySubMessage of paramObj) as string
  
set tmpURL to (targContents of paramObj) as string –local contents
  
  
set aWidth to 330
  
set aHeight to 430
  
  
–WebViewをつくる
  
set aConf to WKWebViewConfiguration’s alloc()’s init()
  
  
–指定URLのJavaScriptをFetch
  
set jsSource to my fetchJSSourceString(tmpURL)
  
set userScript to WKUserScript’s alloc()’s initWithSource:jsSource injectionTime:(WKUserScriptInjectionTimeAtDocumentEnd) forMainFrameOnly:true
  
set userContentController to WKUserContentController’s alloc()’s init()
  
userContentController’s addUserScript:(userScript)
  
aConf’s setUserContentController:userContentController
  
  
set aWebView to WKWebView’s alloc()’s initWithFrame:(current application’s NSMakeRect(0, 0, aWidth, aHeight – 100)) configuration:aConf
  
aWebView’s setNavigationDelegate:me
  
aWebView’s setUIDelegate:me
  
aWebView’s setTranslatesAutoresizingMaskIntoConstraints:true
  
aWebView’s setOpaque:false
  
aWebView’s setBackgroundColor:(NSColor’s clearColor())
  
–aWebView’s scrollView()’s setBackgroundColor:(NSColor’s clearColor())
  
  
aWebView’s loadHTMLString:tmpURL baseURL:(missing value)


— set up alert  
  
set theAlert to NSAlert’s alloc()’s init()
  
tell theAlert
    its setMessageText:aMainMes
    
its setInformativeText:aSubMes
    
its addButtonWithTitle:"OK"
    
its addButtonWithTitle:"Cancel"
    
its setAccessoryView:aWebView
  end tell
  
  
— show alert in modal loop
  
NSRunningApplication’s currentApplication()’s activateWithOptions:0
  
my performSelectorOnMainThread:"doModal:" withObject:(theAlert) waitUntilDone:true
  
  
–Stop Web View Action
  
set bURL to |NSURL|’s URLWithString:"about:blank"
  
set bReq to NSURLRequest’s requestWithURL:bURL
  
aWebView’s loadRequest:bReq
  
  
if (my returnCode as number) = 1001 then error number -128
end browseLocalWebContents:

on doModal:aParam
  set (my returnCode) to (aParam’s runModal()) as number
end doModal:

on viewDidLoad:aNotification
  return true
end viewDidLoad:

on fetchJSSourceString(aURL)
  set jsURL to |NSURL|’s URLWithString:aURL
  
set jsSourceString to NSString’s stringWithContentsOfURL:jsURL encoding:(NSUTF8StringEncoding) |error|:(missing value)
  
return jsSourceString
end fetchJSSourceString

on retSampleSVG()
  return "<svg xmlns=\"http://www.w3.org/2000/svg\" version=\"1.1\" width=\"300\" height=\"300\" fill-opacity=\"0.9\">
<path d=\"M 150,0 A 150,150 0 1,1 141.8986347236027,299.7810664959306 L 150,150 Z\" fill=\"#0153d8\" stroke=\"#fff\"></path>
<text x=\"170\" y=\"150\" fill=\"#fff\" font-size=\"20\">Piyomaru</text>
<text x=\"170\" y=\"190\" fill=\"#fff\" font-size=\"40\">50.86%</text>
</svg>"
end retSampleSVG

★Click Here to Open This Script 

(Visited 100 times, 1 visits today)
Posted in dialog GUI | Tagged 10.13savvy 10.14savvy 10.15savvy NSAlert NSButton NSColor NSImage NSRunningApplication NSScreen NSString NSURL NSURLRequest NSUTF8StringEncoding WKUserContentController WKUserScript WKUserScriptInjectionTimeAtDocumentEnd WKWebView WKWebViewConfiguration | 1 Comment

アラートダイアログ上にカレンダー1か月分を表示して選択 有効日指定あり v3a

Posted on 11月 13, 2019 by Takaaki Naganoya

アラートダイアログ上に指定月のカレンダー1か月分を表示してユーザーの日付選択(複数可)をもとめるAppleScriptです。

NSDatePickerを用いて日付選択のダイアログを作っていたら、日付がとても小さくて現代のMacの画面解像度にとても合っておらず、もっと大きめのカレンダーで選択したいと考えて作ったものです。

(1)カレンダーの表示サイズを大型化

現代のMacの画面にNSDatePickerをそのまま表示すると、とても小さくて見ていられないので、表示サイズを自由に変えられるカレンダー選択部品を作ってみました。どれか1つの日付を選択するものではなく、複数の日付を選択して、リストで結果を返してきます。

▲画面上で見やすいようにカレンダー部品を大型化

(2)選択無効日指定

あらかじめ、日付選択の対象外とする日付を指定できるようにしました。

(3)過去日付の選択無効

過去の日付を表示・選択できないようにする指定です。

▲過去日付を無効に指定すると、現在日時よりも過去の日付は選択できない

(4)曜日を現在のLocale情報から変更

曜日に用いる文字列を現在のLocale情報から取得するようにしてみました。本来であれば、日曜日はじまり「ではない」カレンダーを用いている場所もあるので(香港とかフランスとか?)、どの曜日から表示開始するかを自由選択にしたいところですが、そこまでは作り込んでいません。

▲Localeに合わせた曜日が表示される(ただし、年/月は固定フォーマット)

実用性を考えれば、Calendar.appのように日付選択とスケジュール確認が行えるものが望ましいのですが、そこまで作り込む手間をかけるほどのものでもないですし、表示対象月の移動を行おうとしてclickイベントを拾いつつカレンダー再描画に失敗した「残骸」です。見た目はいいのに完成度がいまひとつというあたりが残念です。

AppleScript名:アラートダイアログ上にカレンダー1か月分を表示して選択 有効日指定あり v3a
— Created 2019-10-15 by Takaaki Naganoya
— 2019 Piyomaru Software
use AppleScript version "2.5"
use scripting additions
use framework "Foundation"
use framework "AppKit"

property NSFont : a reference to current application’s NSFont
property NSView : a reference to current application’s NSView
property NSAlert : a reference to current application’s NSAlert
property NSColor : a reference to current application’s NSColor
property NSButton : a reference to current application’s NSButton
property NSOnState : a reference to current application’s NSOnState
property NSOffState : a reference to current application’s NSOffState
property NSTextField : a reference to current application’s NSTextField
property NSMutableArray : a reference to current application’s NSMutableArray
property NSButtonTypeOnOff : a reference to current application’s NSButtonTypeOnOff
property NSMutableDictionary : a reference to current application’s NSMutableDictionary
property NSRunningApplication : a reference to current application’s NSRunningApplication
property NSFontAttributeName : a reference to current application’s NSFontAttributeName
property NSKernAttributeName : a reference to current application’s NSKernAttributeName
property NSMutableParagraphStyle : a reference to current application’s NSMutableParagraphStyle
property NSLigatureAttributeName : a reference to current application’s NSLigatureAttributeName
property NSMutableAttributedString : a reference to current application’s NSMutableAttributedString
property NSUnderlineStyleAttributeName : a reference to current application’s NSUnderlineStyleAttributeName
property NSParagraphStyleAttributeName : a reference to current application’s NSParagraphStyleAttributeName
property NSForegroundColorAttributeName : a reference to current application’s NSForegroundColorAttributeName

property theResult : 0
property returnCode : 0
property bArray : {} –Checkbox button object array

property tYear : 0
property tMonth : 0
property theAlert : missing value
property theView : missing value

on run
  set tYear to 2019
  
set tMonth to 11
  
set ignoreP to true
  
set ndList to {2, 3, 4, 9, 10, 13, 16, 17, 23, 24, 25, 30} –選択表示させない日付
  
set paramObj to {myMessage:"", mySubMessage:"適切な日付を以下からえらんでください", targetYear:tYear, targetMonth:tMonth, nodisp:ndList, ignorePast:ignoreP}
  
  
–Detect Past Date Error
  
set curDate to current date
  
set dLimit to getMlen(tYear, tMonth) of me
  
set tmpDate to getDateInternational(tYear, tMonth, dLimit) of me
  
if (tmpDate < curDate) and (ignoreP = true) then error (("Target month is past (" & tYear as string) & "/" & tMonth as string) & "/1 is past. Today is " & date string of curDate & ")"
  
  
–my chooseItemByCheckBox:paramObj –for Debugging
  
my performSelectorOnMainThread:"chooseItemByCheckBox:" withObject:(paramObj) waitUntilDone:true
  
return my sort1DNumList:(my theResult) ascOrder:true
  
–> {1, 3, 5, 7, 9, 11}
end run

on chooseItemByCheckBox:(paramObj)
  set aMainMes to (myMessage of paramObj) as string
  
set aSubMes to (mySubMessage of paramObj) as string
  
set aMatList to (matrixTitleList of paramObj) as list
  
set tYear to (targetYear of paramObj) as integer
  
set tMonth to (targetMonth of paramObj) as integer
  
set noDispList to (nodisp of paramObj) as list
  
set ignoreP to (ignorePast of paramObj) as boolean
  
  
if aMainMes = "" then
    set aMainMes to "日付を選択してください"
  end if
  
  
set theView to makeCalendarView(tYear, tMonth, noDispList, ignoreP) of me
  
  
–Select the first radio button item
  
set my theResult to {}
  
  
— set up alert  
  
set theAlert to NSAlert’s alloc()’s init()
  
tell theAlert
    its setMessageText:aMainMes
    
its setInformativeText:aSubMes
    
its addButtonWithTitle:"OK"
    
its addButtonWithTitle:"Cancel"
    
its setAccessoryView:theView
    
    
–for Help Button
    
–its setShowsHelp:(true)
    
its setDelegate:(me)
    
set aWin to its |window|()
  end tell
  
  
aWin’s setLevel:(current application’s NSFloatingWindowLevel)
  
  
— show alert in modal loop
  
NSRunningApplication’s currentApplication()’s activateWithOptions:0
  
my performSelectorOnMainThread:"doModal:" withObject:(theAlert) waitUntilDone:true
  
if (my returnCode as number) = 1001 then error number -128
  
end chooseItemByCheckBox:

on doModal:aParam
  set (my returnCode) to aParam’s runModal()
end doModal:

on clicked:aParam
  set aTag to (tag of aParam) as integer
  
  
–clicked
  
if aTag is not in (my theResult) then
    set the end of (my theResult) to aTag
  else
    set theResult to my deleteItem:aTag fromList:theResult
  end if
end clicked:

on deleteItem:anItem fromList:theList
  set theArray to NSMutableArray’s arrayWithArray:theList
  
theArray’s removeObject:anItem
  
return theArray as list
end deleteItem:fromList:

–1D List(数値)をsort / ascOrderがtrueだと昇順ソート、falseだと降順ソート
on sort1DNumList:theList ascOrder:aBool
  tell current application’s NSSet to set theSet to setWithArray_(theList)
  
tell current application’s NSSortDescriptor to set theDescriptor to sortDescriptorWithKey_ascending_(missing value, true)
  
set sortedList to theSet’s sortedArrayUsingDescriptors:{theDescriptor}
  
return (sortedList) as list
end sort1DNumList:ascOrder:

–Help Button Clicked Event Handler
on alertShowHelp:aNotification
  set aRes to display dialog "Do you change all checkbox state?" buttons {"All Off", "All On", "Cancel"} default button 3 with icon 1
  
set bRes to (button returned of aRes) as string
  
  
if bRes = "All Off" then
    set bLen to bArray’s |count|()
    
set theResult to {}
    
repeat with i from 0 to bLen
      ((bArray’s objectAtIndex:i)’s setState:(current application’s NSOffState))
    end repeat
    
  else if bRes = "All On" then
    set bLen to bArray’s |count|()
    
set theResult to {}
    
repeat with i from 0 to bLen
      ((bArray’s objectAtIndex:i)’s setState:(current application’s NSOnState))
      
set the end of theResult to i + 1
    end repeat
  end if
  
  
return false –trueを返すと親ウィンドウ(アラートダイアログ)がクローズする
end alertShowHelp:

–書式つきテキストを組み立てる
on makeRTFfromParameters(aStr as string, fontName as string, aFontSize as real, aKerning as real, aLineSpacing as real)
  set aVal1 to NSFont’s fontWithName:fontName |size|:aFontSize
  
set aKey1 to (NSFontAttributeName)
  
  
set aVal2 to NSColor’s blackColor()
  
set aKey2 to (NSForegroundColorAttributeName)
  
  
set aVal3 to aKerning
  
set akey3 to (NSKernAttributeName)
  
  
set aVal4 to 0
  
set akey4 to (NSUnderlineStyleAttributeName)
  
  
set aVal5 to 2 –all ligature ON
  
set akey5 to (NSLigatureAttributeName)
  
  
set aParagraphStyle to NSMutableParagraphStyle’s alloc()’s init()
  
aParagraphStyle’s setMinimumLineHeight:(aLineSpacing)
  
aParagraphStyle’s setMaximumLineHeight:(aLineSpacing)
  
set akey7 to (NSParagraphStyleAttributeName)
  
  
set keyList to {aKey1, aKey2, akey3, akey4, akey5, akey7}
  
set valList to {aVal1, aVal2, aVal3, aVal4, aVal5, aParagraphStyle}
  
set attrsDictionary to NSMutableDictionary’s dictionaryWithObjects:valList forKeys:keyList
  
  
set attrStr to NSMutableAttributedString’s alloc()’s initWithString:aStr attributes:attrsDictionary
  
return attrStr
end makeRTFfromParameters

on makeNSTextField(xPos as integer, yPos as integer, myWidth as integer, myHeight as integer, editableF as boolean, setVal as string, backgroundF as boolean, borderedF as boolean)
  set aNSString to NSTextField’s alloc()’s initWithFrame:(current application’s NSMakeRect(xPos, yPos, myWidth, myHeight))
  
aNSString’s setEditable:(editableF)
  
aNSString’s setStringValue:(setVal)
  
aNSString’s setDrawsBackground:(backgroundF)
  
aNSString’s setBordered:(borderedF)
  
return aNSString
end makeNSTextField

–指定月のカレンダーを1D List(7 days x 6 weeks) で返す
on retListCalendar(tYear, tMonth)
  set mLen to getMlen(tYear, tMonth) of me
  
set aList to {}
  
  
set fDat to getDateInternational(tYear, tMonth, 1) of me
  
tell current application
    set aOffset to (weekday of fDat) as number
  end tell
  
  
–header gap
  
repeat (aOffset – 1) times
    set the end of aList to ""
  end repeat
  
  
–calendar body
  
repeat with i from 1 to mLen
    set the end of aList to (i as string)
  end repeat
  
  
–footer gap
  
repeat (42 – aOffset – mLen + 1) times
    set the end of aList to ""
  end repeat
  
  
return aList
end retListCalendar

–現在のカレンダーで指定年月の日数を返す(国際化対応版)
on getMlen(aYear as integer, aMonth as integer)
  set theNSCalendar to current application’s NSCalendar’s currentCalendar()
  
set theDate to theNSCalendar’s dateWithEra:1 |year|:aYear |month|:aMonth |day|:1 hour:0 minute:0 |second|:0 nanosecond:0
  
set theResult to theNSCalendar’s rangeOfUnit:(current application’s NSDayCalendarUnit) inUnit:(current application’s NSMonthCalendarUnit) forDate:theDate
  
return |length| of theResult
end getMlen

–現在のカレンダーで指定年月のdate objectを返す
on getDateInternational(aYear, aMonth, aDay)
  set theNSCalendar to current application’s NSCalendar’s currentCalendar()
  
set theDate to theNSCalendar’s dateWithEra:1 |year|:aYear |month|:aMonth |day|:aDay hour:0 minute:0 |second|:0 nanosecond:0
  
return theDate as date
end getDateInternational

–ローカライズされた曜日名称を返す
on getLocalizedDaynames(aLoc)
  set df to current application’s NSDateFormatter’s alloc()’s init()
  
df’s setLocale:(current application’s NSLocale’s localeWithLocaleIdentifier:aLoc)
  
set dayNames to df’s standaloneWeekdaySymbols() as list
  
return dayNames
end getLocalizedDaynames

–ローカライズされた月名称を返す
on getLocalizedMonthnames(aLoc)
  set df to current application’s NSDateFormatter’s alloc()’s init()
  
df’s setLocale:(current application’s NSLocale’s localeWithLocaleIdentifier:aLoc)
  
set monthNames to df’s standaloneMonthSymbols() as list
  
return monthNames
end getLocalizedMonthnames

–ローカライズされた曜日の名称を返す
on getLocalizedWeekdaySymbol(aLoc)
  set df to current application’s NSDateFormatter’s alloc()’s init()
  
df’s setLocale:(current application’s NSLocale’s localeWithLocaleIdentifier:aLoc)
  
set dayNames to df’s weekdaySymbols()
  
return dayNames as list
end getLocalizedWeekdaySymbol

–ローカライズされた曜日の名称(短縮版)を返す
on getLocalizedShortWeekdaySymbol(aLoc)
  set df to current application’s NSDateFormatter’s alloc()’s init()
  
df’s setLocale:(current application’s NSLocale’s localeWithLocaleIdentifier:aLoc)
  
set dayNames to df’s shortWeekdaySymbols()
  
return dayNames as list
end getLocalizedShortWeekdaySymbol

–ローカライズされた曜日の名称(短縮記号)を返す
on getLocalizedVeryShortWeekdaySymbol(aLoc)
  set df to current application’s NSDateFormatter’s alloc()’s init()
  
df’s setLocale:(current application’s NSLocale’s localeWithLocaleIdentifier:aLoc)
  
set dayNames to df’s veryShortWeekdaySymbols()
  
return dayNames as list
end getLocalizedVeryShortWeekdaySymbol

–ローカライズされた曜日の名称を返す
on getLocalizedVeryStandaloneWeekdaySymbols(aLoc)
  set df to current application’s NSDateFormatter’s alloc()’s init()
  
df’s setLocale:(current application’s NSLocale’s localeWithLocaleIdentifier:aLoc)
  
set dayNames to df’s standaloneWeekdaySymbols()
  
return dayNames as list
end getLocalizedVeryStandaloneWeekdaySymbols

–ローカライズされた曜日の名称を返す
on getLocalizedShortStandaloneWeekdaySymbols(aLoc)
  set df to current application’s NSDateFormatter’s alloc()’s init()
  
df’s setLocale:(current application’s NSLocale’s localeWithLocaleIdentifier:aLoc)
  
set dayNames to df’s shortStandaloneWeekdaySymbols()
  
return dayNames as list
end getLocalizedShortStandaloneWeekdaySymbols

–ローカライズされた曜日の名称を返す
on getLocalizedVeryShortStandaloneWeekdaySymbols(aLoc)
  set df to current application’s NSDateFormatter’s alloc()’s init()
  
df’s setLocale:(current application’s NSLocale’s localeWithLocaleIdentifier:aLoc)
  
set dayNames to df’s veryShortStandaloneWeekdaySymbols()
  
return dayNames as list
end getLocalizedVeryShortStandaloneWeekdaySymbols

–カレンダー表示ビューを作成
on makeCalendarView(tYear as integer, tMonth as integer, noDispList as list, ignoreP as boolean)
  set colNum to 7
  
set rowNum to 8
  
set aLen to (colNum * rowNum)
  
  
set aButtonCellWidth to 70 –56
  
set aButtonCellHeight to 40
  
  
set viewWidth to aButtonCellWidth * colNum
  
set viewHeight to aButtonCellHeight * rowNum
  
  
–define the matrix size where you’ll put the radio buttons
  
set matrixRect to current application’s NSMakeRect(0.0, 0.0, viewWidth, viewHeight)
  
set aView to NSView’s alloc()’s initWithFrame:(matrixRect)
  
  
set aCount to 1
  
set aFontSize to 30
  
set bArray to current application’s NSMutableArray’s new()
  
  
–Make Header (Month, Year)
  
set x to 1
  
set tmpB to (NSTextField’s alloc()’s initWithFrame:(current application’s NSMakeRect(((x – 1) * aButtonCellWidth), ((aLen – aCount) div colNum) * (aButtonCellHeight), aButtonCellWidth * 4, aButtonCellHeight)))
  (
tmpB’s setEditable:false)
  (
tmpB’s setBordered:false)
  (
tmpB’s setDrawsBackground:false)
  (
tmpB’s setAlignment:(current application’s NSLeftTextAlignment))
  (
tmpB’s setStringValue:((tYear as string) & " / " & tMonth as string))
  (
tmpB’s setFont:(NSFont’s fontWithName:"Times-Roman" |size|:40))
  (
bArray’s addObject:tmpB)
  
  
set aCount to aCount + 1


–Make Header (Weekday)
  
set curLocale to current application’s NSLocale’s currentLocale()
  
set aDS10 to (curLocale’s objectForKey:(current application’s NSLocaleIdentifier)) as string
  
set wdList to getLocalizedShortStandaloneWeekdaySymbols(aDS10) of me
  
set y to 2
  
  
repeat with x from 1 to 7
    set j to contents of item x of wdList
    
set tmpB to (NSTextField’s alloc()’s initWithFrame:(current application’s NSMakeRect(((x – 1) * aButtonCellWidth), ((aLen – aCount) div colNum – 1) * (aButtonCellHeight), aButtonCellWidth, aButtonCellHeight / 2)))
    (
tmpB’s setEditable:false)
    (
tmpB’s setAlignment:(current application’s NSCenterTextAlignment))
    (
tmpB’s setStringValue:(j))
    (
bArray’s addObject:tmpB)
  end repeat
  
  
set aCalList to retListCalendar(tYear, tMonth) of me
  
set aCount to 1


–Make Calendar (Calendar Body)
  
set curDat to current date
  
  
repeat with y from 3 to rowNum
    repeat with x from 1 to colNum
      set j to contents of item aCount of aCalList
      
set tmpB to (NSButton’s alloc()’s initWithFrame:(current application’s NSMakeRect(((x – 1) * aButtonCellWidth), ((aLen – aCount) div colNum – 2) * aButtonCellHeight, aButtonCellWidth, aButtonCellHeight)))
      
      
set tmpDate to getDateInternational(tYear, tMonth, j as integer) of me
      
set tmpF to (tmpDate < curDat) as boolean
      
      
if ignoreP = false then
        set dispF to true
      else if ignoreP = true and tmpF = false then
        set dispF to true
      else
        set dispF to false
      end if
      
      
if (j as integer) is not in noDispList then
        if (dispF = true) then
          (tmpB’s setTitle:(j as string))
          (
tmpB’s setFont:(NSFont’s fontWithName:"ArialMT" |size|:aFontSize))
          
–set attrTitle to makeRTFfromParameters((aCount as string), "ArialMT", aFontSize, 0, (aFontSize * 1.2)) of me
          
–(tmpB’s setAttributedTitle:(attrTitle))
          (
tmpB’s setShowsBorderOnlyWhileMouseInside:true)
          (
tmpB’s setAlignment:(current application’s NSCenterTextAlignment))
          (
tmpB’s setEnabled:(j ≠ ""))
          (
tmpB’s setTarget:me)
          (
tmpB’s setAction:("clicked:"))
          (
tmpB’s setButtonType:(NSButtonTypeOnOff))
          (
tmpB’s setHidden:(j = ""))
          
if j is not equal to "" then
            (tmpB’s setTag:(j))
            (
bArray’s addObject:tmpB)
          end if
        end if
      end if
      
set aCount to aCount + 1
    end repeat
  end repeat
  
  (
aView’s setSubviews:bArray)
  
return aView
end makeCalendarView