Edama2さんと「無理だよねー」「そうそう、絶対無理〜」などとメールで言っていたら、Shane Stanleyから届いた「できるよ」という衝撃のメール。
スクリプトエディタ上で記述する通常のAppleScriptで、CocoaのCustom Class宣言と呼び出しができるとのこと。
自分で動作確認してみるまで、半信半疑でしたが、、、、できますねこれは、、、
–> Download Editable and Executable Script Bundle
冗談半分で思いついたことを試してみたらできてしまったり、冗談半分でできるわけないよねと念のために書いておいたことが世界の誰かの目に止まったりと、「冗談半分」ってけっこう重要なことだと思えてきました。
以下、Shane Stanleyの説明による、その書き換え手順です。
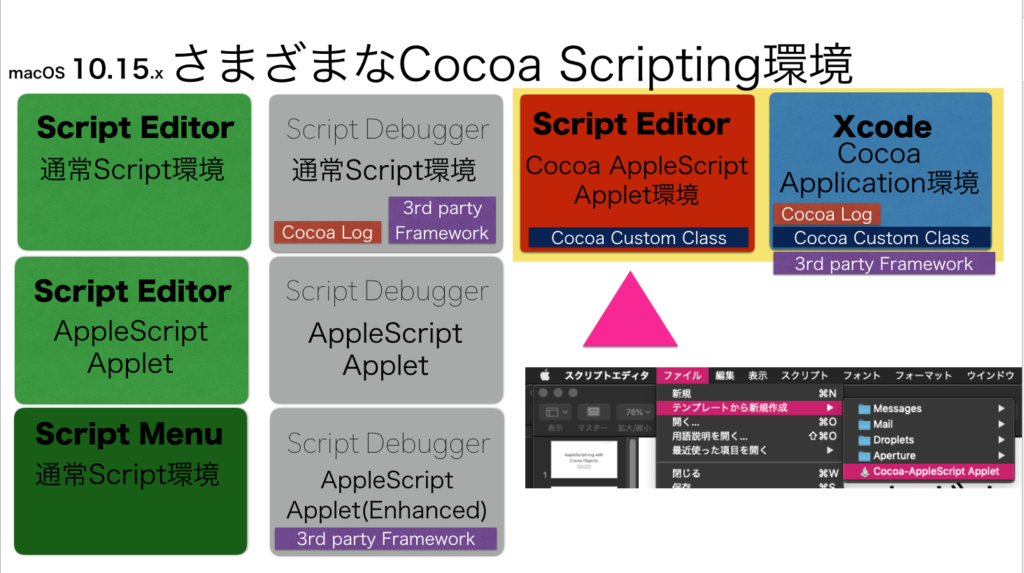
(1)Subclassファイル(複数可)をXcode上のプロジェクトで書くようなスタイルで書く
こういう(↑)スタイルですね。かならずscript宣言しつつ、parent属性を宣言しておくところがXcode上のAppleScriptアプリケーションのスタイルです。あとで動作確認して、アプリケーションの起動や終了に関するイベントハンドラを書いておいたのは無駄(実行されない)ではないかとも思われました。
(2)実行するメインのScriptのResourcesフォルダ内にSubclassファイルを入れる
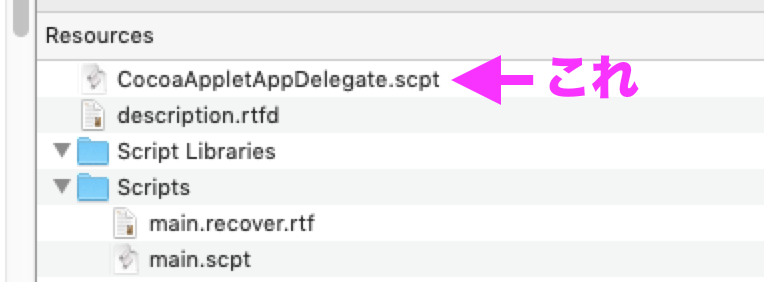
普通、AppleScriptのファイルが入る/Contents/Resources/Scripts/でも、ライブラリを入れておく/Contents/Resources/Script Libraries/でもなく、/Contents/Resources/の直下に入れます。ファイル名はオリジナルのEdama2さんのものをそのまま採用していますが、割となんでもいいようです。Custom Classファイルは分割してもいいし、このサンプルのようにまとめてもいいんでしょう。
# 追加実験してみたところ、Resourcesフォルダ以下の/Scriptsや/Script Libraries/フォルダと重複しない名称の別フォルダ(例:/Classes/)に入れておいても大丈夫でした
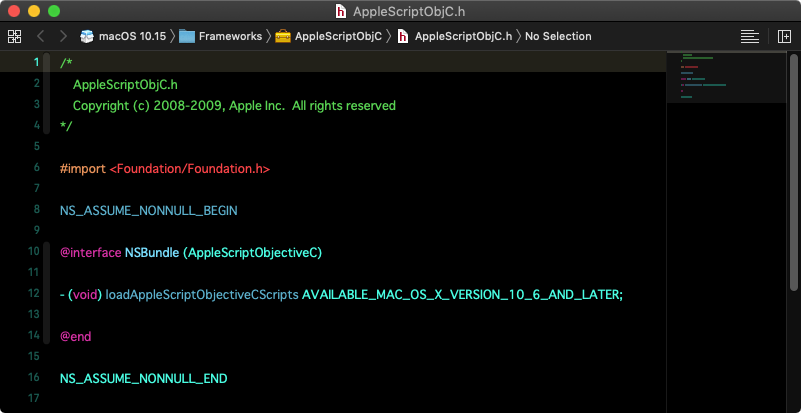
(3)use framework “AppleScriptObjC”の宣言文を追加

見たことのない光景ですが、書くことについてはとくに障害はありません。AppKit.Frameworkもuse宣言しておいたほうがよかったかもしれません。
(4)メインスクリプトの実行時に以下の処理を実行
set theBundle to current application’s NSBundle’s bundleWithPath:pathToFolderWithScripts
theBundle’s loadAppleScriptObjectiveCScripts()
★Click Here to Open This Script
試行錯誤して、上記の「pathToFolderWithScripts」にバンドル内の/Contents/Resources/を入れて実行すればよいことが理解できました。
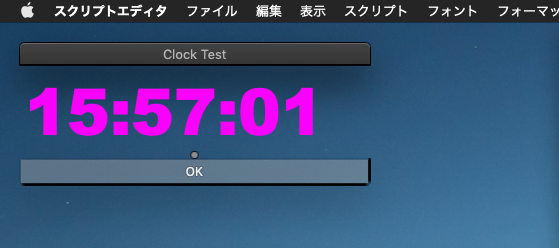
以上の変更を加えて、ためしにスクリプトエディタ&Script Debugger上で実行してみたところ、改変前と変わりなく実行できてしまいました(冒頭のスクリーンショット)。
いや、これはめちゃくちゃすごいですよ!! 何がすごいって、CocoaのCustom Classをスクリプトライブラリ中に入れて呼び出せるということで、けっこう無茶な箱庭インタフェースが作れてしまう予感が、、、、。
そして、AppleScriptObjC(AppleScriptObjC.frameworkより)でスクリプトエディタの「.scpt」形式のファイルを読み込んで実行できてしまったということは、Xcode上のAppleScriptアプリケーション内のScriptもテキスト形式だけでなく、スクリプトエディタで編集できる.scpt形式のファイルを突っ込んで編集できる可能性が見えてきました。
ただ、テキスト形式になっていないと、Interface Builderとの連携のあたりで問題になりそうな気もします。
| AppleScript名:customClassTest.scptd |
| — – Created by: Edama2 2020/01/10 – Adviced by: Shane Stanley 2020/01/11 – Modified by: Takaaki Naganoya 2020/01/12 — use AppleScript version "2.4" — Yosemite (10.10) or later use framework "Foundation" use framework "AppleScriptObjC" use scripting additions property _clock_text_view : missing value –> 時計用の文字列 property _clock_timer : missing value –> 時計用のNSTimer –Script Bundle内のResourcesフォルダを求める set resourcePath to POSIX path of (path to me) & "Contents/Resources/" set theBundle to current application’s NSBundle’s bundleWithPath:resourcePath theBundle’s loadAppleScriptObjectiveCScripts() my performSelectorOnMainThread:"raizeWindow:" withObject:(missing value) waitUntilDone:true # ウィンドウを作成 on raizeWindow:aParam # 時計用の文字を作成 tell current application’s NSTextView’s alloc() tell initWithFrame_(current application’s NSMakeRect(35, 120, 300, 40)) setRichText_(true) useAllLigatures_(true) setTextColor_(current application’s NSColor’s whiteColor()) setFont_(current application’s NSFont’s fontWithName:"Arial-Black" |size|:48) setBackgroundColor_(current application’s NSColor’s colorWithDeviceRed:0.0 green:0.0 blue:0.0 alpha:0.0) setAlphaValue_(1.0) setEditable_(false) –setString_("00:00:00") set my _clock_text_view to it end tell end tell # 時計を更新するNSTimerを作成 set my _clock_timer to current application’s NSTimer’s scheduledTimerWithTimeInterval:1 target:me selector:"idleHandler:" userInfo:(missing value) repeats:true # 丸いViewを作成 set aFrame to current application’s NSMakeRect(0, 0, 300, 300) tell current application’s RoundView’s alloc() tell initWithFrame_(aFrame) setNeedsDisplay_(true) setSubviews_({my _clock_text_view}) set customView to it end tell end tell #スクリーンのサイズを調べる set aScreen to current application’s NSScreen’s mainScreen() # Window set aBacking to current application’s NSWindowStyleMaskBorderless –set aBacking to current application’s NSBorderlessWindowMask set aDefer to current application’s NSBackingStoreBuffered tell current application’s CustomWindow’s alloc() tell initWithContentRect_styleMask_backing_defer_screen_(aFrame, aBacking, aDefer, false, aScreen) –setTitle_(uniqueName) –>タイトル setBackgroundColor_(current application’s NSColor’s clearColor()) — Grammar Police –>背景色 setContentView_(customView) –>内容ビューのセット setDelegate_(me) –>デリゲート setDisplaysWhenScreenProfileChanges_(true) –>スクリーンプロファイルが変更されたときウインドウの内容をアップデートするか setHasShadow_(true) –>ウインドウに影があるか setIgnoresMouseEvents_(false) –>マウスイベントを無視するか –setLevel_((current application’s NSScreenSaverWindowLevel) + 1) –>ウインドウの前後関係の位置 setOpaque_(false) –>ウインドウを不透明にするか setReleasedWhenClosed_(true) –>閉じたときにメモリを解放するか # |center|() makeKeyAndOrderFront_(me) –>キーウインドウにして前面に持ってくる –setFrame_display_(aFrame, true) –>表示 end tell end tell end raizeWindow: #タイマー割り込み on idleHandler:aSender set mesStr to time string of (current date) (my _clock_text_view)’s setString:mesStr end idleHandler: |
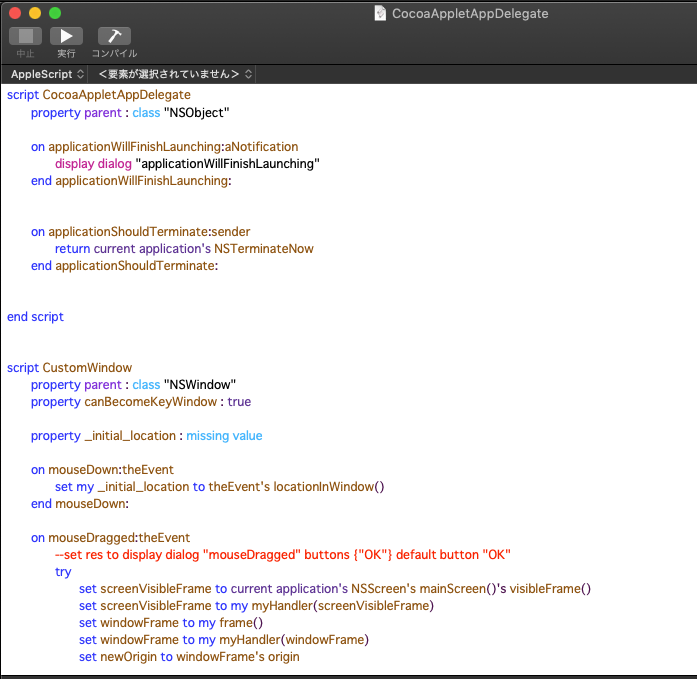
| AppleScript名:CocoaAppletAppDelegate.scpt |
| script CocoaAppletAppDelegate property parent : class "NSObject" on applicationWillFinishLaunching:aNotification — end applicationWillFinishLaunching: on applicationShouldTerminate:sender return current application’s NSTerminateNow end applicationShouldTerminate: end script script CustomWindow property parent : class "NSWindow" property canBecomeKeyWindow : true property _initial_location : missing value on mouseDown:theEvent set my _initial_location to theEvent’s locationInWindow() end mouseDown: on mouseDragged:theEvent –set res to display dialog "mouseDragged" buttons {"OK"} default button "OK" try set screenVisibleFrame to current application’s NSScreen’s mainScreen()’s visibleFrame() set screenVisibleFrame to my myHandler(screenVisibleFrame) set windowFrame to my frame() set windowFrame to my myHandler(windowFrame) set newOrigin to windowFrame’s origin set currentLocation to theEvent’s locationInWindow() set newOrigin’s x to (newOrigin’s x) + ((currentLocation’s x) – (_initial_location’s x)) set newOrigin’s y to (newOrigin’s y) + ((currentLocation’s y) – (_initial_location’s y)) set tmpY to ((newOrigin’s y) + (windowFrame’s |size|’s height)) set screenY to (screenVisibleFrame’s origin’s y) + (screenVisibleFrame’s |size|’s height) if tmpY > screenY then set newOrigin’s y to (screenVisibleFrame’s origin’s y) + ((screenVisibleFrame’s |size|’s height) – (windowFrame’s |size|’s height)) end if my setFrameOrigin:newOrigin on error error_message number error_number set error_text to "Error: " & error_number & ". " & error_message display dialog error_text buttons {"OK"} default button 1 return error_text end try end mouseDragged: on myHandler(aFrame) if class of aFrame is list then set {{theX, theY}, {theWidth, theHeight}} to aFrame set aFrame to {origin:{x:theX, y:theY}, |size|:{width:theWidth, height:theHeight}} –set aFrame to current application’s NSMakeRect(theX, theY, theWidth, theHeight) end if return aFrame end myHandler end script script RoundView property parent : class "NSView" on drawRect:rect set aFrame to my frame() set myColor to current application’s NSColor’s redColor() tell current application’s NSBezierPath tell bezierPathWithOvalInRect_(aFrame) myColor’s |set|() fill() end tell end tell end drawRect: end script |