Menu

Skip to content
AppleScriptの穴
  • Home
  • Products
  • Books
  • Docs
  • Events
  • Forum
  • About This Blog
  • License
  • 仕事依頼

AppleScriptの穴

Useful & Practical AppleScript archive. Click '★Click Here to Open This Script' Link to download each AppleScript

タグ: Keynote

macOS 15.5で特定ファイル名パターンのfileをaliasにcastすると100%クラッシュするバグ

Posted on 4月 19 by Takaaki Naganoya

きわめて珍しいパターンのバグに遭遇しました。自分の手元のmacOS 15.5Beta2環境(Apple Silicon Mac x 2)では再現率100%です(FB17285323)。再起動しても再現し、日本語環境で発生する一方で英語環境では発生しません。日本語環境であればJXAでも同様の現象の発生を確認しています。

「AppleScript+Xcode GUIアプリ ソースブック.key」

というファイル名のKeynote書類を、macOS 15.5β(日本語ユーザー環境)+Keynote v14.4で編集。このKeynote書類のボツスライドの移動用の「没.key」という書類をもとの書類の同階層に同じスタイルで作成するAppleScriptをスクリプトメニューから実行したところ、これがクラッシュ。

ねんのために、PagesとNumbersでも同様のテストを行なったところ、予想どおり100%クラッシュ。

これまでのmacOSでは遭遇したことのない現象だったので、原因を深掘り。

最終的に、Keynote/Pages/Numbers v14.4の書類からファイルパス(file)を取得し、そのfileをaliasにcastするとクラッシュするということが分かりました。

追記:Pixelmator Pro、CotEditorでも同様のファイル名に対して処理を行うとクラッシュすることが確認されました。

さらに追記:クラッシュを起こすパターンのファイルをchoose fileして、フルパスをstringにcastし、さらにaliasにcastするとアプリ操作に関係なくクラッシュすることが判明

さらに、ファイル名を短くしたり一部を取り出したりすることで、同様のクラッシュが発生するかどうかを調べてみたところ、

AppleScript+Xcode GUIアプリ ソースブ.key
AppleScript+Xcode GUIアプリ ソースブッ.key
AppleScript+Xcode GUIアプリ ソースブック.key
AAAAAAAA+XXXX GUIアプリ ソースブック.key
XXXXXXXX+XXXX XXXアプリ ソースブック.key
XXXXXXXX_XXXX XXXアプリ ソースブック.key
XXXXXXXX-XXXX XXXアプリ ソースブック.key
XXXXXXXX&XXXX XXXアプリ ソースブック.key
XXXXXXXX+XXXX GUIアプリ ソースブック.key
XXXXXXXX=XXXX XXXアプリ ソースブック.key

のパターンで、以下のAppleScriptを実行すると100%クラッシュが発生。スクリプトエディタでもScript Debuggerでもスクリプトメニューでも100%クラッシュ(実行プログラムのクラッシュ)します。

逆に、

AppleScript+Xcode GUIア.key
AppleScript+Xcode GUIアプ.key
AppleScript+Xcode GUIアプリ.key
AppleScript+Xcode GUIアプリ ソース.key
AppleScript+XCODE GUアプリ ソースブック.key
GUIアプリ ソースブックのコピー.key

ではクラッシュが発生しません(なんでや?)。

なんでこの組み合わせでクラッシュが発生するのか、macOS 10.12の時代に発生していた「日本語IMからのファイル名の入力時に余計なUnicode文字が入ることで、ファイル処理できなくなるバグ」の再現かと考え、このファイル名をテキストエディタにコピー&ペーストで表示させたものの、

とくに謎のゴミ文字が入力されているということはないようです。

ちなみに、「AppleScript+Xcode GUIアプリ ソースブック」は企画検討中の電子書籍です。

AppleScript名:Crash Test Script_Keynote.scpt
—
–  Created by: Takaaki Naganoya
–  Created on: 2025/04/19
—
–  Copyright © 2025 Piyomaru Software, All Rights Reserved
—

tell application "Keynote"
  tell front document
    set curFile to (file of it)
  end tell
end tell

set curFile to curFile as alias

★Click Here to Open This Script 

AppleScript名:Crash Test Script_PAGES.scpt
—
–  Created by: Takaaki Naganoya
–  Created on: 2025/04/19
—
–  Copyright © 2025 Piyomaru Software, All Rights Reserved
—

tell application "Pages"
  tell front document
    set curFile to (file of it)
  end tell
end tell

set curFile to curFile as alias

★Click Here to Open This Script 

AppleScript名:Crash Test Script_Numbers.scpt
—
–  Created by: Takaaki Naganoya
–  Created on: 2025/04/19
—
–  Copyright © 2025 Piyomaru Software, All Rights Reserved
—

tell application "Numbers"
  tell front document
    set curFile to (file of it)
  end tell
end tell

set curFile to curFile as alias

★Click Here to Open This Script 

AppleScript名:Crash Test Script_Pixelmator Pro.scpt
—
–  Created by: Takaaki Naganoya
–  Created on: 2025/04/19
—
–  Copyright © 2025 Piyomaru Software, All Rights Reserved
—

tell application "Pixelmator Pro"
  tell front document
    set curFile to (file of it)
  end tell
end tell

set curFile to curFile as alias

★Click Here to Open This Script 

AppleScript名:Crash Test Script_CotEditor.scpt
—
–  Created by: Takaaki Naganoya
–  Created on: 2025/04/19
—
–  Copyright © 2025 Piyomaru Software, All Rights Reserved
—

tell application "CotEditor"
  tell front document
    set curFile to (file of it)
  end tell
end tell

set curFile to curFile as alias

★Click Here to Open This Script 

AppleScript名:only choose file.scpt
set aFol to (choose file) as string
set anAlias to aFol as alias

★Click Here to Open This Script 

Posted in Bug | Tagged 15.0savvy Keynote | Leave a comment

Keynoteの現在のスライド上で選択中のテキストをもとに、後続の記事トビラページのタイトルに内容を設定 v2a

Posted on 3月 23 by Takaaki Naganoya

Keynote書類の現在表示中のスライド上で選択中のテキストアイテム(ボックス)の内容をもとに、後続の記事トビラページのタイトルを設定するAppleScriptです。Keynote 14.3+macOS 15.4betaで動作確認していますが、とくにバージョン依存した書き方などは行なっていません。

また、本来はiWork汎用オブジェクトの座標によるソート機能をライブラリとして独立させ、バンドル形式のScript書類に入れてあったのですが、Blog掲載のためにフラットなScriptに書き換えています。

本来、Keynoteのようにスライドのインデント(レベル変更)を行って階層構造を形成できるアプリでは、それぞれのスライド(ページ)のレベルを取得したり変更できることが望ましいのですが、Keynoteの機能セットの範囲内ではAppleScriptからそのような操作は行えません。そこで、各スライドのベースレイアウトに何を用いているかによって擬似的にレベルを判定しています。

KeynoteのAppleScript対応機能はiWork Apps中では屈指の対応度を誇っていますが、レイアウトした画像の内容データにアクセスできないのと、各スライドのレベルの取得/変更が行えない点がものすごく残念です。

電子書籍「Cocoa Scripting Course」の作成用に、以前にも作ったことがあるかもしれませんが、ふたたび作ってしまいました。ちょっと大きめの書き捨てScriptです。


▲Keynote書類の章トビラ上で章の記事内容を示すテキストボックスを選択した状態で本AppleScriptを実行。複数のボックスを選択してあっても、座標値でソートして順番を決定


▲各記事のトビラページに、章トビラから取得したテキストを設定。以下、繰り返し


▲章トビラ上のテキストをすべて記事トビラのタイトルに設定

AppleScript名:現在のスライド上で選択中のテキストをもとに、後続の記事トビラページのタイトルに内容を設定 v2a.scptd
—
–  Created by: Takaaki Naganoya
–  Created on: 2025/03/23
—
–  Copyright © 2025 Piyomaru Software, All Rights Reserved
—

use AppleScript version "2.4" — Yosemite (10.10) or later
use framework "Foundation"
use scripting additions
–use iwoSortLib : script "iWorkObjSortLib"

tell application "Keynote"
  tell front document
    –章扉の上にあるテキストアイテム(各記事タイトルが入っているものと想定、複数可能)を取得
    
set aSelList to selection
    
set bSelList to {}
    
set sCount to count every slide


–画面上で選択しておいたオブジェクトのうち、text itemのみを抽出(念のため)
    
repeat with i in aSelList
      set j to contents of i
      
set aClass to class of j
      
if aClass is text item then
        set the end of bSelList to j
      end if
    end repeat
    
    
set cSelList to sortIWorkObjectsByPositionAndRetObjRef(bSelList, {"positionX", "positionY"}, {true, true}) of iWorkObjSort


–章トビラ上のテキストアイテム(複数可)をループしつつ、中のテキストを行ごとに分解してリスト化
    
–(連結前にあらかじめX座標をもとにソートしておいたほうがいい??)
    
set textList to {}
    
repeat with i in cSelList
      set tmpCon to object text of i
      
set tmpList to paragraphs of tmpCon
      
set textList to textList & tmpList
    end repeat
    
–return textList
    
    
–章トビラのページの情報を取得
    
tell current slide
      set curSlideNum to slide number
      
set curSlideLayout to name of base layout
    end tell
    
    
–章トビラの次のページの情報を取得(ここが必ず記事トビラであるという前提のもとに処理)
    
tell slide (curSlideNum + 1)
      set nextSlideLayout to name of base layout
    end tell
    
    
set targSlideList to {}
    
repeat with i from (curSlideNum + 1) to sCount
      tell slide i
        set tSTheme to name of base layout
        
if tSTheme = curSlideLayout then
          –章トビラを検出したら処理終了
          
exit repeat
        else if tSTheme = nextSlideLayout then
          –扉+1ページのスライド(記事カバー)を検出したら記録
          
set the end of targSlideList to i
        end if
      end tell
    end repeat
    
–return targSlideList
    
    
set iCount to 1
    
repeat with i in targSlideList
      try
        set tmpT to contents of item iCount of textList
        
tell slide i
          set object text of default title item of it to tmpT
        end tell
        
set iCount to iCount + 1
      on error
        return
      end try
    end repeat
  end tell
end tell

–ライブラリとしてバンドル形式のAppleScript書類に組み込んでいたものをBlog掲載用に展開した
script iWorkObjSort
  property parent : AppleScript
  
use AppleScript
  
use framework "Foundation"
  
use framework "AppKit"
  
use scripting additions
  
  
script spd
    property aaSel : {}
  end script
  
  
–Keynote上のiWork ObjをXY座標でソートして結果を返す(App Obj情報はitem noだけ)
  
on sortIWorkObjectsByPosition(aaSel, sortLabelLIst, sortDirectionList)
    tell application "Keynote"
      set aVer to version
      
if aVer < "12.0" then return
      
      
tell front document
        set posList to {}
        
set aCount to 1
        
        
repeat with ii in aaSel
          set jj to contents of ii
          
set bClass to class of jj
          
          
tell jj
            set {posX, posY} to position
            
            
try
              set tmpStr to object text as string
            on error
              set tmpStr to ""
            end try
          end tell
          
          
set the end of posList to {positionX:posX, positionY:posY, objID:aCount, myStr:tmpStr}
          
          
set aCount to aCount + 1
        end repeat
        
        
–座標データをもとにソート
        
set sortedList to sortRecListByLabel(posList, sortLabelLIst, sortDirectionList) of me
        
      end tell
    end tell
    
    
return sortedList
  end sortIWorkObjectsByPosition


–Keynote上のiWork ObjをXY座標でソートして結果を返す(App Objだけ返す)
  
on sortIWorkObjectsByPositionIncludingObjRef(aaSel, sortLabelLIst, sortDirectionList)
    tell application "Keynote"
      set aVer to version
      
if aVer < "12.0" then return
      
      
tell front document
        set posList to {}
        
set aCount to 1
        
        
repeat with ii in aaSel
          set jj to contents of ii
          
set bClass to class of jj
          
          
tell jj
            set {posX, posY} to position
            
            
try
              set tmpStr to object text as string
            on error
              set tmpStr to ""
            end try
          end tell
          
          
set the end of posList to {positionX:posX, positionY:posY, objID:aCount, myStr:tmpStr}
          
          
set aCount to aCount + 1
        end repeat
        
        
–座標データをもとにソート
        
set sortedList to sortRecListByLabel(posList, sortLabelLIst, sortDirectionList) of me
        
        
–データを返す配列にiWork Object への参照を含める
        
set sCount to 1
        
repeat with i from 1 to (length of aaSel)
          set tmpID to objID of contents of item i of sortedList
          
set tmpObj to contents of item tmpID of aaSel
          
set (item tmpID of sortedList) to (item tmpID of sortedList) & {objRef:tmpObj}
        end repeat
      end tell
    end tell
    
    
return sortedList
  end sortIWorkObjectsByPositionIncludingObjRef


–Keynote上のiWork ObjをXY座標でソートして結果を返す(App Obj入りのリストを返す)
  
on sortIWorkObjectsByPositionAndRetObjRef(aaSel, sortLabelLIst, sortDirectionList)
    tell application "Keynote"
      set aVer to version
      
if aVer < "12.0" then return
      
      
tell front document
        set posList to {}
        
set aCount to 1
        
        
repeat with ii in aaSel
          set jj to contents of ii
          
set bClass to class of jj
          
          
tell jj
            set {posX, posY} to position
            
            
try
              set tmpStr to object text as string
            on error
              set tmpStr to ""
            end try
          end tell
          
          
set the end of posList to {positionX:posX, positionY:posY, objID:aCount, myStr:tmpStr}
          
          
set aCount to aCount + 1
        end repeat
        
        
–座標データをもとにソート
        
set sortedList to sortRecListByLabel(posList, sortLabelLIst, sortDirectionList) of me
        
        
–データを返す配列にiWork Object への参照を含める
        
set sCount to 1
        
set retList to {}
        
repeat with i from 1 to (length of aaSel)
          set tmpID to objID of contents of item i of sortedList
          
set tmpObj to contents of item tmpID of aaSel
          
set the end of retList to tmpObj
        end repeat
      end tell
    end tell
    
    
return retList
  end sortIWorkObjectsByPositionAndRetObjRef


–リストに入れたレコードを、指定の属性ラベルの値でソート
  
on sortRecListByLabel(aRecList as list, aLabelStr as list, ascendF as list)
    set aArray to current application’s NSArray’s arrayWithArray:aRecList
    
    
set aCount to length of aLabelStr
    
set sortDescArray to current application’s NSMutableArray’s new()
    
repeat with i from 1 to aCount
      set aLabel to (item i of aLabelStr)
      
set aKey to (item i of ascendF)
      
set sortDesc to (current application’s NSSortDescriptor’s alloc()’s initWithKey:aLabel ascending:aKey)
      (
sortDescArray’s addObject:sortDesc)
    end repeat
    
    
return (aArray’s sortedArrayUsingDescriptors:sortDescArray) as list
  end sortRecListByLabel
  
end script

★Click Here to Open This Script 

Posted in list Sort | Tagged 13.0savvy 14.0savvy 15.0savvy Keynote | Leave a comment

Cocoa Scripting Course用、タイトルの丸つき数字から表を編集 v2(複数スライド選択用)

Posted on 12月 23, 2024 by Takaaki Naganoya

Keynote書類で、タイトルに入っている丸つき数字を取得して、同スライド内にある「表」の行数を追加し、追加したヘッダーカラムに丸つき数字を追加するAppleScriptです。Cocoa Scripting Courseで手間のかかるページの作業を効率化するために作成しました。

本ScriptはKeynote 14.3で作成していますが、とくにあたらしめの機能は使っていないため、かなり古いバージョンに対しても使えるはずです。


▲処理前


▲処理後 表の行数が変更されている

Keynoteの現在表示中のスライドからテキストを抽出し、そこから丸つき数字の文字だけを取り出します。

それぞれの丸つき数字文字を数値に変換し、最大値を求めます。この最大値と表の行数を比較。表で足りない行数を計算して、表に行を新規追加。カラムヘッダーに丸つき数字を補います。

こうした処理を選択中の複数のスライド(ページ)に対して実行します。

表の「中身」についても、実際にスライド上に配置しているので自動で抽出できてもよさそうですが、そこに時間をかけても仕方がないのでいまはこのままです。あとで、そういう処理ができるようになるかもしれません。

AppleScript名:Cocoa Scripting Course用、タイトルの丸つき数字から表を編集 v2(複数スライド選択用).scptd
—
–  Created by: Takaaki Naganoya
–  Created on: 2024/12/23
—
–  Copyright © 2024 Piyomaru Software, All Rights Reserved
—

use AppleScript version "2.4" — Yosemite (10.10) or later
use framework "Foundation"
use scripting additions

tell application "Keynote"
  tell front document
    set sSel to selection
    
if class of first item of sSel is not equal to slide then return
    
    
repeat with curSlide in sSel
      set current slide to curSlide
      
      
tell current slide
        –タイトルから丸つき数字文字のみ抽出
        
set myTitle to object text of default title item
        
set numStr to holdNumberWithSignOnly(myTitle) of me
        
set numList to characters of numStr
        
        
–丸つき数字のうち最大のものを取得
        
set cList to {}
        
repeat with i in numList
          set j to decodeNumFromNumWithSign(i) of me
          
set the end of cList to j
        end repeat
        
        
set sList to shellSortDescending(cList) of me
        
set theLargestNum to first item of sList –最大値


–表の情報を取得
        
tell table 1
          set rCount to count every row
          
set tHeight to height of it
        end tell
        
        
–追加が必要な行数を算出
        
set addRows to theLargestNum + 2 – rCount
        
if addRows > 0 then
          tell table 1
            set row count to (rCount + addRows)
            
            
repeat with i from (rCount – 1) to (rCount + addRows – 2)
              tell row (i + 1)
                tell cell 1
                  set value to convNumToNumWithSign(i) of me
                end tell
              end tell
            end repeat
            
            
tell row -1
              tell cell 1
                set value to "返り値"
              end tell
            end tell
            
            
–Resize Heiight
            
set curRows to row count
            
set height to (tHeight / rCount) * curRows
          end tell
        end if
      end tell
    end repeat
  end tell
end tell

–文字列から丸つき数字のみ抽出
on holdNumberWithSignOnly(aStr as text)
  set aNSString to current application’s NSString’s stringWithString:aStr
  
  
return (aNSString’s stringByReplacingOccurrencesOfString:"[^\\U000024EA-\\U000024EA\\U00002460-\\U00002473\\U00003251-\\U000032BF\\U000024FF-\\U000024FF\\U00002776-\\U0000277F\\U000024EB-\\U000024F4\\U00002780-\\U00002789\\U0000278A-\\U00002793\\U000024F5-\\U000024FE]" withString:"" options:(current application’s NSRegularExpressionSearch) range:{0, aNSString’s |length|()}) as text
end holdNumberWithSignOnly

–丸つき数字を数字に変換
on decodeNumFromNumWithSign(aStr as string)
  set numStr to "①②③④⑤⑥⑦⑧⑨⑩⑪⑫⑬⑭⑮⑯⑰⑱⑲⑳㉑㉒㉓㉔㉕㉖㉗㉘㉙㉚㉛㉜㉝㉞㉟㊱㊲㊳㊴㊵㊶㊷㊸㊹㊺㊻㊼㊽㊾㊿"
  
if numStr does not contain aStr then return false
  
using terms from scripting additions
    set bNum to offset of aStr in numStr
  end using terms from
  
return bNum
end decodeNumFromNumWithSign

–数字を丸つき数字に変換
on convNumToNumWithSign(aNum as number)
  if (aNum ≤ 0) or (aNum > 50) then return ""
  
set aStr to "①②③④⑤⑥⑦⑧⑨⑩⑪⑫⑬⑭⑮⑯⑰⑱⑲⑳㉑㉒㉓㉔㉕㉖㉗㉘㉙㉚㉛㉜㉝㉞㉟㊱㊲㊳㊴㊵㊶㊷㊸㊹㊺㊻㊼㊽㊾㊿"
  
set bChar to character aNum of aStr
  
return bChar
end convNumToNumWithSign

–入れ子ではないリスト(1D List)の昇順ソート
on shellSortAscending(aSortList)
  script oBj
    property list : aSortList
  end script
  
set len to count oBj’s list’s items
  
set gap to 1
  
repeat while (gap ≤ len)
    set gap to ((gap * 3) + 1)
  end repeat
  
repeat while (gap > 0)
    set gap to (gap div 3)
    
if (gap < len) then
      repeat with i from gap to (len – 1)
        set temp to oBj’s list’s item (i + 1)
        
set j to i
        
repeat while ((j ≥ gap) and (oBj’s list’s item (j – gap + 1) > temp))
          set oBj’s list’s item (j + 1) to oBj’s list’s item (j – gap + 1)
          
set j to j – gap
        end repeat
        
set oBj’s list’s item (j + 1) to temp
      end repeat
    end if
  end repeat
  
return oBj’s list
end shellSortAscending

–入れ子ではないリスト(1D List)の降順ソート
on shellSortDescending(aSortList)
  script oBj
    property list : aSortList
  end script
  
set len to count oBj’s list’s items
  
set gap to 1
  
repeat while (gap ≤ len)
    set gap to ((gap * 3) + 1)
  end repeat
  
repeat while (gap > 0)
    set gap to (gap div 3)
    
if (gap < len) then
      repeat with i from gap to (len – 1)
        set temp to oBj’s list’s item (i + 1)
        
set j to i
        
repeat while ((j ≥ gap) and (oBj’s list’s item (j – gap + 1) < temp))
          set oBj’s list’s item (j + 1) to oBj’s list’s item (j – gap + 1)
          
set j to j – gap
        end repeat
        
set oBj’s list’s item (j + 1) to temp
      end repeat
    end if
  end repeat
  
return oBj’s list
end shellSortDescending

★Click Here to Open This Script 

Posted in Text | Tagged 13.0savvy 14.0savvy 15.0 Keynote | Leave a comment

iWork apps 14.3にアップデート

Posted on 12月 22, 2024 by Takaaki Naganoya

Keynote、Pages、NumbersのiWork appsがバージョン14.3にアップデートしていました(気づかなかった)。

アップデート内容もたいしてありませんし、Apple Inteligenceを利用した機能なので、日本語環境では利用できません。

AppleScript用語辞書についても、とくに前バージョンから変更はありません。

Posted in news | Tagged 14.0savvy 15.0savvy Keynote Numbers Pages | Leave a comment

Keynoteで選択中のオブジェクトをリサイズ

Posted on 12月 20, 2024 by Takaaki Naganoya

Keynote書類上で選択中のオブジェクトのリサイズを行うAppleScriptです。

本Scriptの作成とテストはKeynote 14.214.3上で行いました。

Keynote書類は、4:3の書類と16:9の書類が存在しており、4:3の書類を16:9にリサイズしても内容についてはとくに変更は加えられず、逆に16:9の書類を4:3に変換すると、中身がぐしゃぐしゃになります。

「じゃあ、オブジェクトをグループ化してリサイズすれば?」

という話になりますが、やってみるとこれはうまく動きません。

iWork Apps間でのオブジェクトのコピー&ペーストにも問題があります。

たとえば、KeynoteからPagesにペーストした瞬間に「文字の回り込み」がデフォルトでオンになってしまい(この挙動が邪魔)、隣接するオブジェクトを避けて文字が回り込み、おかしな状態になります。

Keynote書類のリサイズ、他のiWork Appへのデータ使い回しを便利に行うために、オブジェクトのリサイズ処理というのは重要なテーマであり続けています。ただ、重要ではあるものの、iWork App上のオブジェクトのコントロール機能がAppleScript側に公開されていないため、手作業なしに複数オブジェクトをまとめてリサイズすることは(現状では)不可能です。


▲処理前 Keynote書類上のオブジェクトを選択した状態


▲処理後 本Scriptを実行したことにより、Keynote書類上の各種オブジェクトが1/2のサイズになっている。ただし、lineの太さがそのままだったり、text alignの都合でバランスが悪くなってしまった箇所がある

なので、ここに示したScriptは「あくまでも試作品」レベルのものであり、この困難な作業に対する「銀の弾丸」ではありません。

lineオブジェクトの線の太さを制御できないですし、テキストオブジェクトの左寄せ/右寄せといった制御がAppleScriptからできないため、テストデータを処理してみてもこれらの手作業が必要だと感じます。

それでも、100%すべて手作業で調整するよりは「いくぶんマシ」なものでしょう。

AppleScript名:選択中のオブジェクトのリサイズ.scptd
—
–  Created by: Takaaki Naganoya
–  Created on: 2024/12/20
—
–  Copyright © 2024 Piyomaru Software, All Rights Reserved
—

use AppleScript version "2.4" — Yosemite (10.10) or later
use framework "Foundation"
use scripting additions

set aScale to 2

tell application "Keynote"
  tell front document
    set aSel to selection
    
    
repeat with i in aSel
      set j to contents of i
      
set aClass to class of j


if aClass is not in {document, slide} then
        set aPos to position of j
        
copy aPos to {xPos, yPos}
        
        
set aWidth to width of j
        
set aHeight to height of j


if (aClass = text item) or (aClass = shape) then
          tell j
            try
              set firstSize to size of first character of object text
              
set targSize to firstSize / aScale
              
ignoring application responses
                set size of every character of object text to targSize
              end ignoring
            end try
          end tell
        else if aClass = table then
          tell j
            set cList to every cell
            
repeat with ii in cList
              set jj to contents of ii
              
set aSize to font size of jj
              
ignoring application responses
                set font size of jj to (aSize / aScale)
              end ignoring
            end repeat
          end tell
        else if aClass = line then
          set lineW to width of j
          
–set width of j to (lineW / aScale)
        end if
        
        
ignoring application responses
          set j’s width to (aWidth / aScale)
          
set j’s height to (aHeight / aScale)
          
set j’s position to {xPos / aScale, yPos / aScale}
        end ignoring
      end if
    end repeat
  end tell
end tell

★Click Here to Open This Script 

Posted in Object control | Tagged 14.0savvy 15.0savvy Keynote | Leave a comment

新刊電子書籍「AppleScript基礎テクニック(33)選択中のオブジェクト取得」を刊行

Posted on 11月 21, 2024 by Takaaki Naganoya

新刊電子書籍「AppleScript基礎テクニック(33)複数のアプリをコントロール」を刊行しました。全74ページ、サンプルAppleScriptアーカイブつき。
→ 販売ページ

macOS上のGUIアプリの書類やウィンドウ中で選択中のオブジェクトを取得し、その情報をもとにAppleScriptで処理を行なって、もとの選択オブジェクトに反映させるといった処理を、日常的に行っています。

このような書き方ができると、まるでAppleScriptによってGUIアプリの機能を拡張しているようにも見えます。実際には外部で処理を行なっていたとしても、使い勝手としては拡張しているように振る舞えます。

ある意味、AppleScriptの備える最強の機能といってもよいでしょう。本書で、この強力なselection機能について、その概要から実例、注意点にいたるまで幅広くご紹介いたします。

PDF 74ページ、Zipアーカイブ添付

目次

■最初に:macOS 13以降では最初にステージマネージャを必ずオフにしてください

macOS 13.x
macOS 14.x
macOS 15.x
その他、オフにすることが望ましい機能

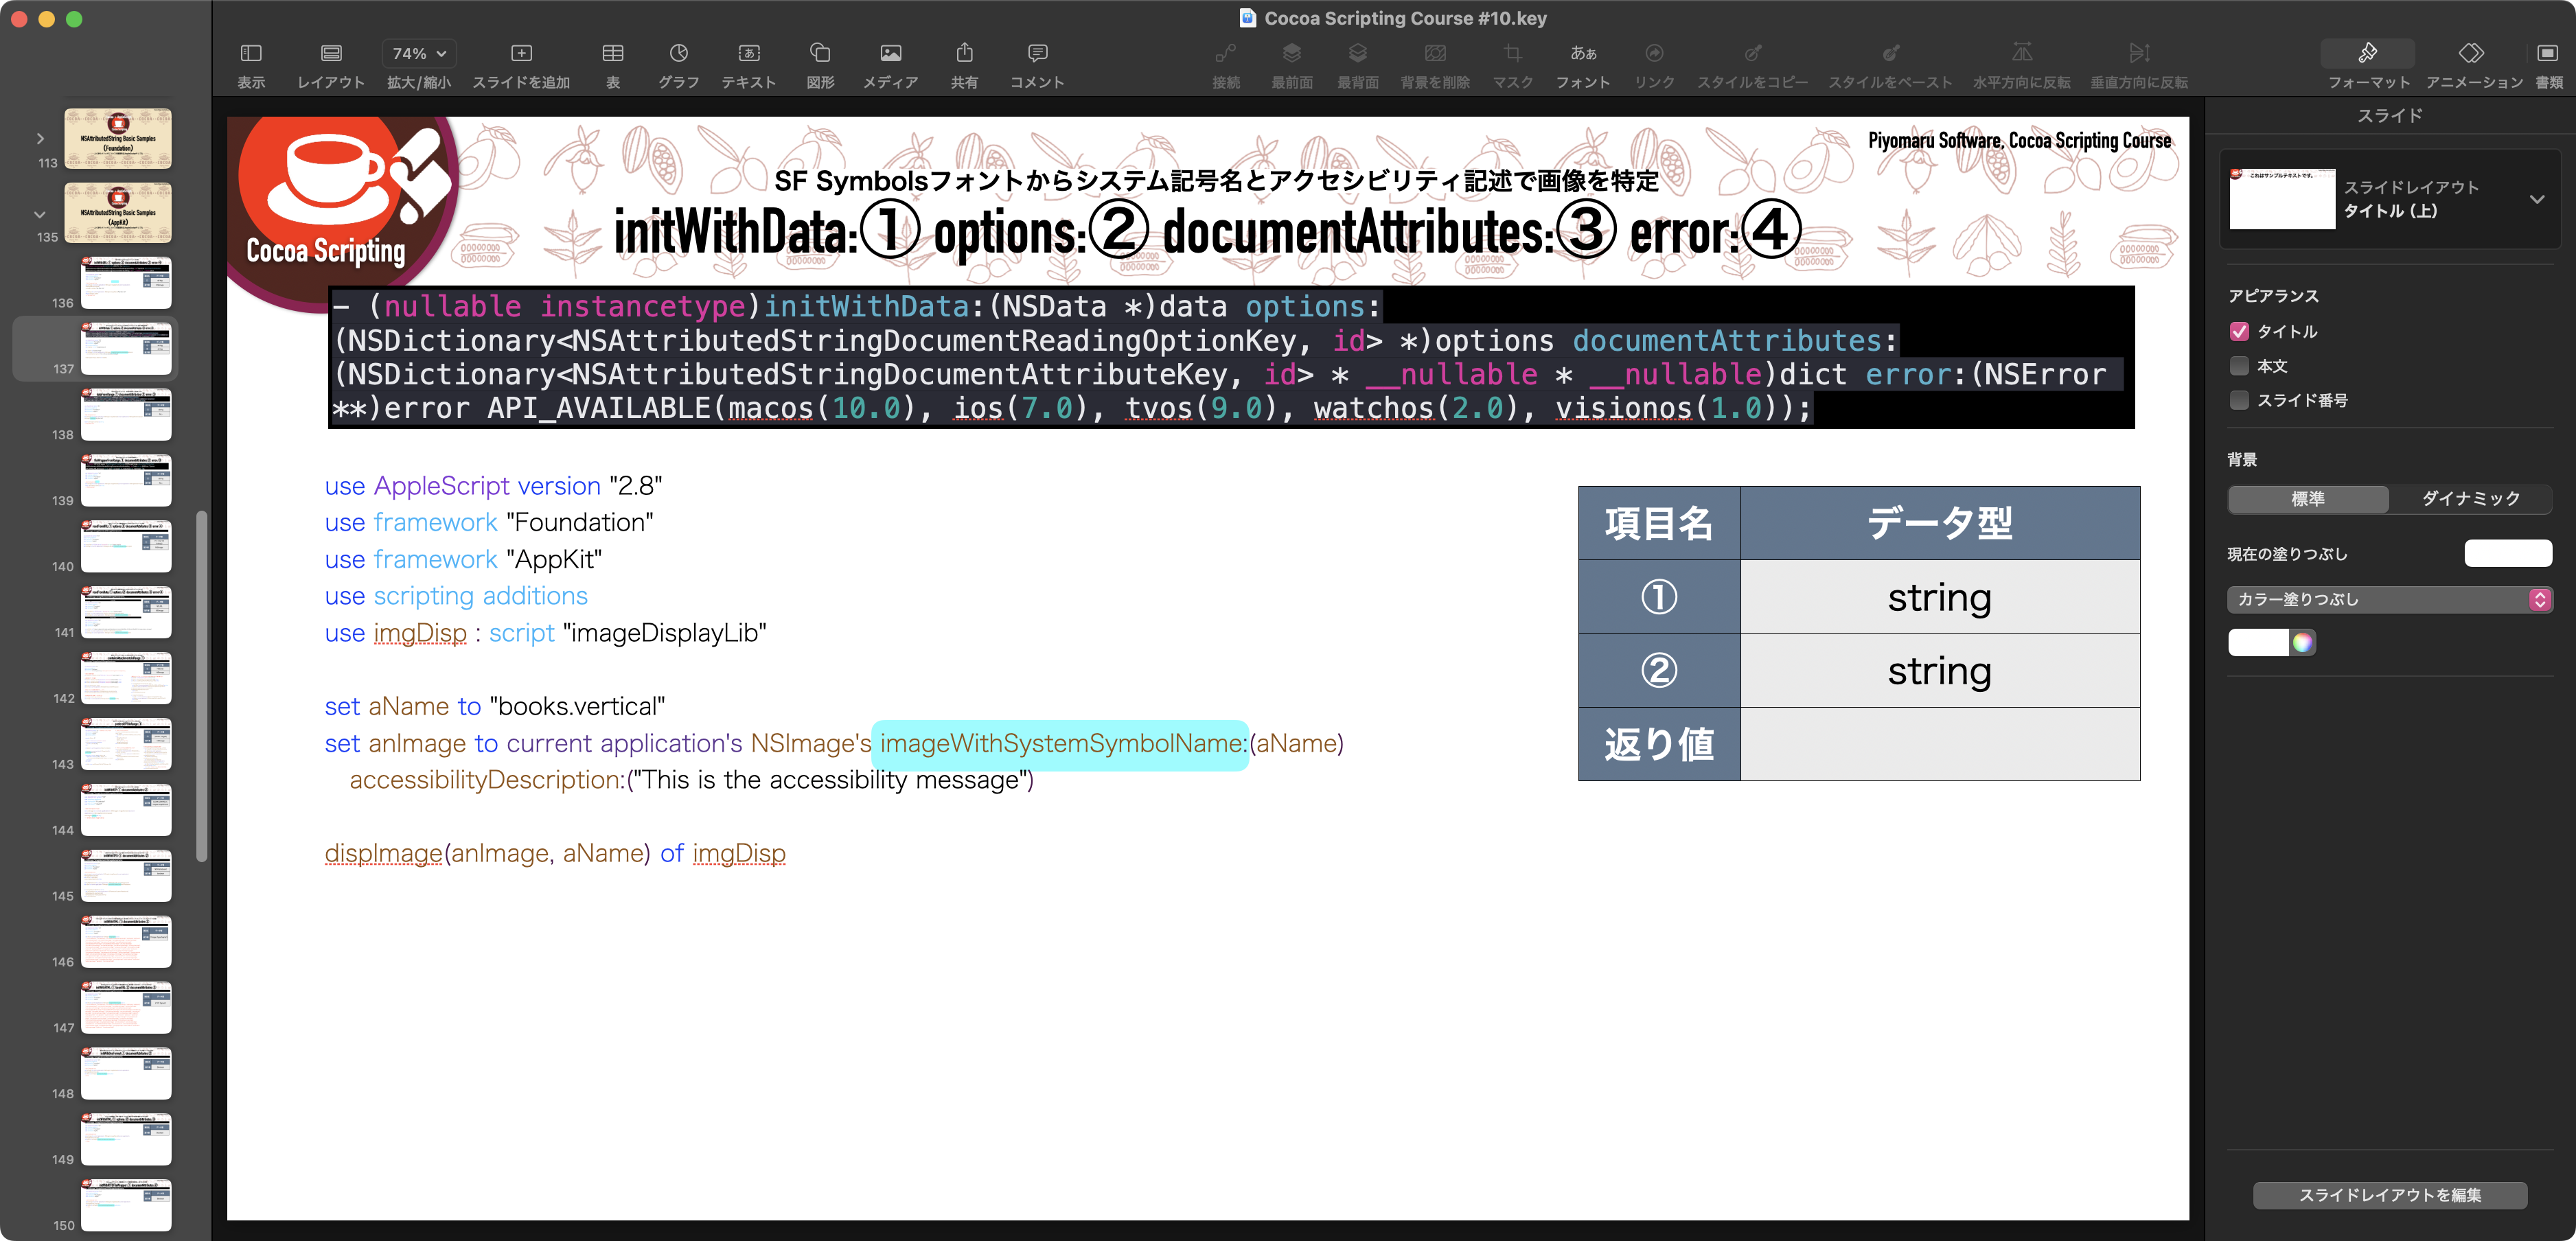
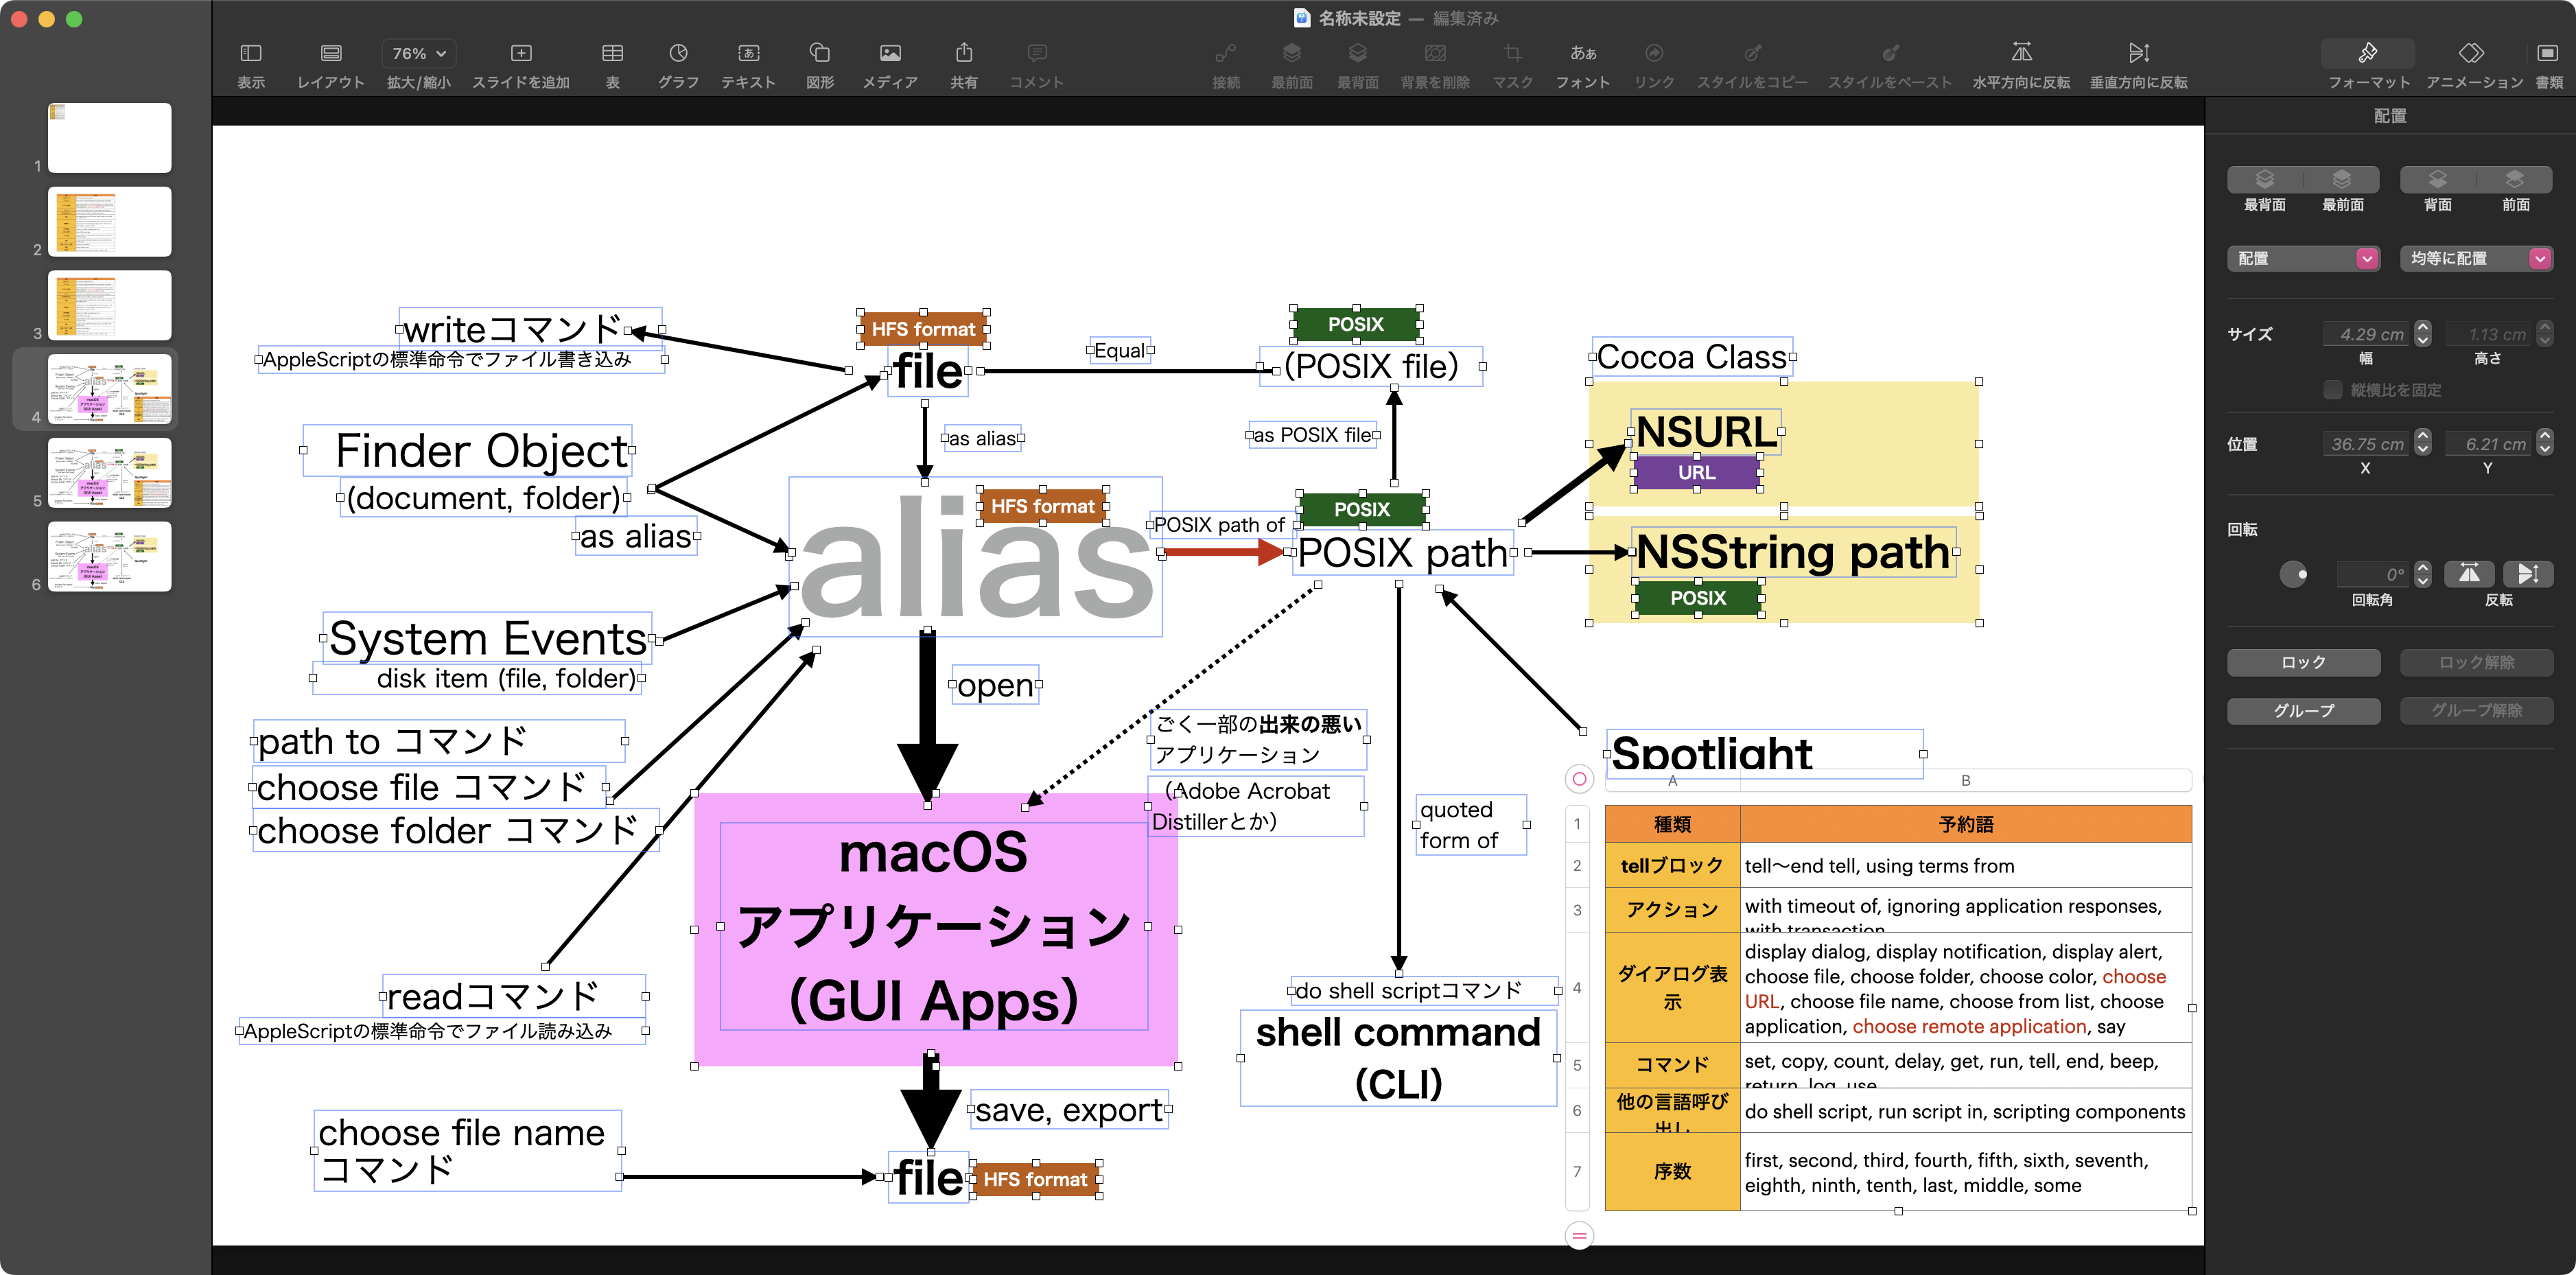
■アプリ上の選択中のオブジェクトにアクセスする予約語「selection」

GUIアプリ上の選択中のオブジェクトを知る
選択中のオブジェクトは、1つだけじゃない
選択中のオブジェクトを加工することも
選択中のオブジェクトの情報分析

■選択中のオブジェクトの情報をもとに他のアプリで処理

selection系の機能をサポートしているアプリ一覧
selectを含む予約語を持つアプリと予約語①
selectを含む予約語を持つアプリと予約語②
selectを含む予約語を持つアプリと予約語③

■selectionの主な実例

selectionの取得方法①(Finder)
selectionの取得方法②(Finder)
selectionの書き換え①(Finder)
selectionの書き換え②(Finder)
selectionの取得方法③(Finder)

selectionの取得方法(住所録)
selectionの書き換え(住所録)
selectionの書き換え(住所録)

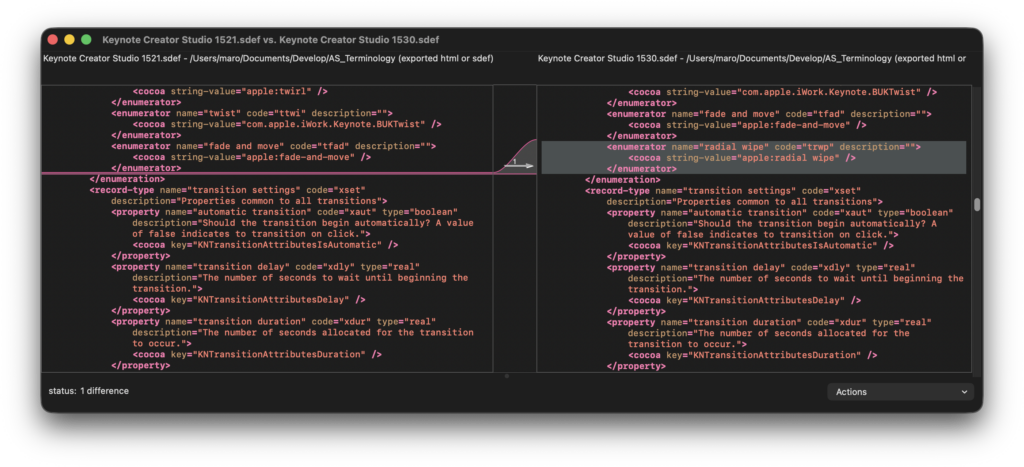
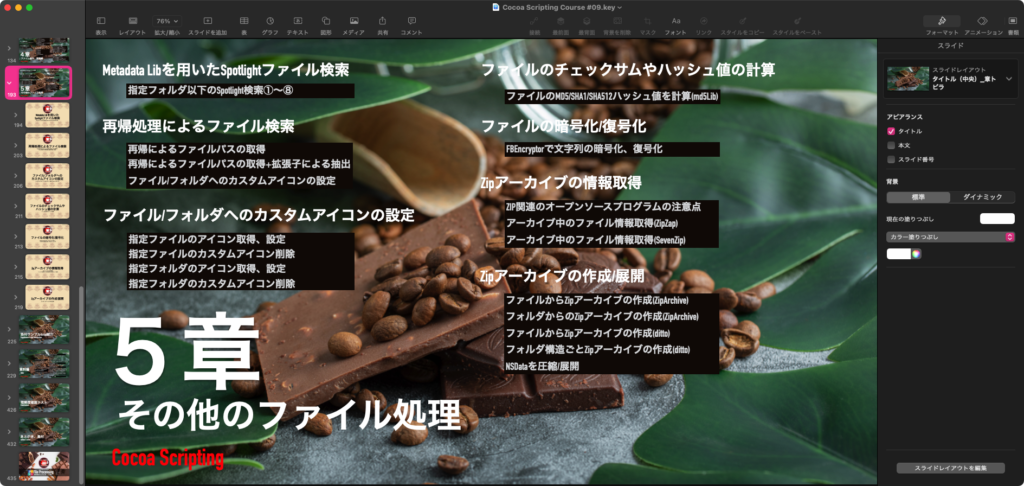
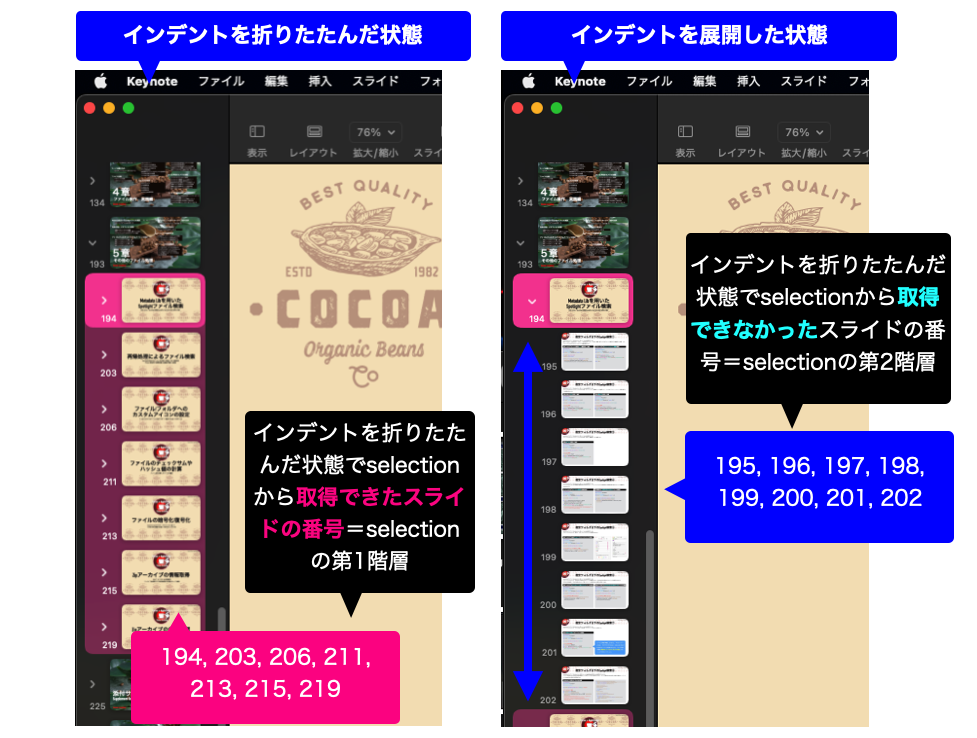
selectionの取得方法①(Keynote)
selectionの取得方法②(Keynote)
selectionの書き換え(Keynote)

selectionの取得方法①(ミュージック)
selectionの取得方法②(ミュージック)
selectionの書き換え(ミュージック)

selectionの取得方法①(CotEditor)
selectionの取得方法②(CotEditor)
selectionの書き換え(CotEditor)

selectionの取得方法①(Numbers)
selectionの取得方法②(Numbers)
active sheetの取得方法(Numbers)
selection rangeの取得方法①(Numbers)
selection rangeの取得方法②(Numbers)
selection rangeのセル内容書き換え①(Numbers)
selection rangeのセル内容書き換え②(Numbers)
selection rangeのセル内容書き換え③(Numbers)

selectionの取得方法①(Excel)
selectionの取得方法②(Excel)
選択中のワークシートの取得方法(Excel)
selectionの書き換え(Excel)

selectionの取得方法(Pixelmator Pro)
select-を含む予約語解説①(Pixelmator Pro)
select-を含む予約語解説②(Pixelmator Pro)
select-を含むコマンド実例①(Pixelmator Pro)
select-を含むコマンド実例②(Pixelmator Pro)
select-を含むコマンド実例③(Pixelmator Pro)
select-を含むコマンド実例④(Pixelmator Pro)
select-を含むコマンド実例⑤(Pixelmator Pro)
select-を含むコマンド実例⑥(Pixelmator Pro)
select-を含むコマンド実例⑦(Pixelmator Pro)
select-を含むコマンド実例⑧(Pixelmator Pro)
select-を含むコマンド実例⑨(Pixelmator Pro)
select-を含むコマンド実例⑩(Pixelmator Pro)
select-を含むコマンド実例⑪(Pixelmator Pro)

■selectionを使用うえで注意すべき点

注意点1:大量のオブジェクトの受け渡しに要注意
注意点2:情報の書き戻し時には時間がかかる例も
注意点3:選択オブジェクトの種別判定を①
注意点3:選択オブジェクトの種別判定を②

Posted in Books news | Tagged 13.0savvy 14.0savvy 15.0savvy Contacts CotEditor Excel Finder Keynote Music Numbers Pixelmator Pro | Leave a comment

最前面のKeynote書類で選択中のshapeを一番上のガイドオブジェクトの幅をもとに、残りを等分割

Posted on 11月 15, 2024 by Takaaki Naganoya

Keynote書類上で複数Shapeないしtext itemが選択された状態で、一番上にあるitemの幅に、下にあるitemを等分割+位置合わせを行うAppleScriptです。

言葉で言い表すと難しいのですが、画面キャプチャで表現すると一目瞭然です。


▲処理前、4つのshapeオブジェクトを選択状態に


▲処理後、上側のshapeの幅で下のshapeを等分割+ギャップ指定

電子書籍作成時によく行う作業をワンアクションで行えるようにしてみました。

2D ListのソートはVanilla AppleScriptで書かれたものを使っていますが、これはソートする対象のデータが極小なのと、本ScriptをmacOS標準搭載のScript Menuから呼び出すために作ったためです。

2D Listのソートを行うためだけに、BridgePlusを使用=Script DebuggerでEnhanced Appletに書き出す必要があるというのは面倒なので。

AppleScript名:最前面のKeynote書類で選択中のshapeを一番上のガイドオブジェクトの幅をもとに、残りを等分割
—
–  Created by: Takaaki Naganoya
–  Created on: 2024/11/15
—
–  Copyright © 2024 Piyomaru Software, All Rights Reserved
—

use AppleScript version "2.4" — Yosemite (10.10) or later
use framework "Foundation"
use scripting additions

property xGap : 8 –X軸方向のオブジェクトの隙間座標値

tell application "Keynote"
  tell front document
    set aSel to selection
    
if aSel = {} then return
    
set fClass to class of first item of aSel
    
if fClass = slide then return –スライド上のオブジェクトではなく、スライドが選択されていた場合には処理しない
    
    
set objList to {}
    
set posList to {}
    
set aCount to 1
    
    
repeat with i in aSel
      set j to contents of i
      
set tmpClass to class of j
      
      
–条件に合うオブジェクトのみ処理対象に
      
if tmpClass is in {text item, shape} then
        set the end of objList to j
        
set the end of posList to ((position of j) & (width of j) & aCount)
        
        
set aCount to aCount + 1
      end if
    end repeat


set newPosList to shellSortListAscending(posList, 2) of sortLib –Y軸値をもとにソート
    
set guideObj to first item of newPosList –Y軸座標が一番少ない(上)のものをガイドオブジェクトとしてみなす
    
    
set newPosList to shellSortListAscending(rest of newPosList, 1) of sortLib –ガイドオブジェクト以外のオブジェクト座標値をX軸値でソート
    
set guideWidth to contents of item 3 of guideObj
    
    
set xStartPos to item 1 of item 1 of newPosList
    
set yPos to item 2 of item 1 of newPosList
    
set itemsCount to length of newPosList
    
    
set itemWidth to (guideWidth – (xGap * (itemsCount – 1))) / itemsCount
    
    
–下側オブジェクトの位置と幅修正処理
    
copy xStartPos to x
    
repeat with i from 1 to itemsCount
      
      
set y to item 2 of (item i of newPosList)
      
      
set targObj to item (item 4 of (item i of newPosList)) of objList
      
      
tell targObj
        set position of it to {x, y}
        
set width of it to itemWidth
      end tell
      
      
set x to x + itemWidth + (xGap)
      
    end repeat
  end tell
end tell

–Vanilla AppleScriptで書いた2D ListのSorting Lib
script sortLib
  –シェルソートで入れ子のリストを昇順ソート
  
on shellSortListAscending(aSortList, aKeyItem)
    script oBj
      property list : aSortList
    end script
    
set len to count oBj’s list’s items
    
set gap to 1
    
repeat while (gap ≤ len)
      set gap to ((gap * 3) + 1)
    end repeat
    
repeat while (gap > 0)
      set gap to (gap div 3)
      
if (gap < len) then
        repeat with i from gap to (len – 1)
          set temp to oBj’s list’s item (i + 1)
          
set j to i
          
repeat while ((j ≥ gap) and (contents of item aKeyItem of (oBj’s list’s item (j – gap + 1)) > item aKeyItem of temp))
            set oBj’s list’s item (j + 1) to oBj’s list’s item (j – gap + 1)
            
set j to j – gap
          end repeat
          
set oBj’s list’s item (j + 1) to temp
        end repeat
      end if
    end repeat
    
return oBj’s list
  end shellSortListAscending


–シェルソートで入れ子のリストを降順ソート
  
on shellSortListDescending(aSortList, aKeyItem)
    script oBj
      property list : aSortList
    end script
    
set len to count oBj’s list’s items
    
set gap to 1
    
repeat while (gap ≤ len)
      set gap to ((gap * 3) + 1)
    end repeat
    
repeat while (gap > 0)
      set gap to (gap div 3)
      
if (gap < len) then
        repeat with i from gap to (len – 1)
          set temp to oBj’s list’s item (i + 1)
          
set j to i
          
repeat while ((j ≥ gap) and (contents of item aKeyItem of (oBj’s list’s item (j – gap + 1)) < item aKeyItem of temp))
            set oBj’s list’s item (j + 1) to oBj’s list’s item (j – gap + 1)
            
set j to j – gap
          end repeat
          
set oBj’s list’s item (j + 1) to temp
        end repeat
      end if
    end repeat
    
return oBj’s list
  end shellSortListDescending
end script

★Click Here to Open This Script 

Posted in Object control | Tagged 13.0savvy 14.0savvy 15.0savvy Keynote | Leave a comment

Keynoteで選択中のtext itemの冒頭のフォントを太くする v2

Posted on 11月 1, 2024 by Takaaki Naganoya

Keynote書類で選択中のテキストアイテムのうち、各行の冒頭からマークの文字までの間を太文字にするAppleScriptです。

v1を改良し、さまざまな区切り記号に対応させるべく、改修を行なってみたものです。

当初は、各テキストアイテムの内部テキストを解析して、共通記号文字を計算して自動で認識処理を行なってみようかと考えていました。統計処理を行なって共通で登場する文字をピックアップさせることを検討していました。

ただ、これだと複数の選択アイテムで別々の区切り文字を採用している場合に対応できません。

統計処理を行わず、技術的にもっとレベルを下げ、「ゆらぎ」検出のためのオーソドックスな、ゆらぎ表記列挙リストを作って、ひたすらループで処理するように改変。


▲処理前 Keynoteの書類上でテキストアイテムを選択


▲処理後 各テキストアイテムで、指定の記号より前の部分の文字を太くした

なお、本Scriptは書式変更ターゲット文字のピックアップ性能を向上させたものであり、欧文フォントの処理を考慮したものにはなっていません。フォントファミリー内のウェイトを上げたフォントを求めるという処理を行なっています。

fFamilyCount = 2

の場合には、「ヒラギノ角ゴProN W3」を「ヒラギノ角ゴProN W6」に変更する処理を行います。

fFamilyCount > 4

の場合には、「ヒラギノ角ゴシック Wn」のウェイトを上げています。

もしも、利用中のMacにウェイトが多数含まれているフォントをインストールして、Keynote書類上でそのフォントを指定している場合には、ウェイトを上げたフォントを求める処理で、文字を太くするよう処理されることでしょう。

AppleScript名:選択中のtext itemの冒頭のフォントを太くする(フォントのWeightを変更)v2.scptd
—
–  Created by: Takaaki Naganoya
–  Created on: 2024/11/01
—
–  Copyright © 2024 Piyomaru Software, All Rights Reserved
—

use AppleScript version "2.4" — Yosemite (10.10) or later
use framework "Foundation"
use framework "AppKit"
use scripting additions

property NSFont : a reference to current application’s NSFont
property NSFontManager : a reference to current application’s NSFontManager

–セパレータリスト、表記ゆらぎ対応(ゆらぎ表記個数は可変)
property separatorList : {{":", ":"}, {"mm", "㎜"}, {"cm", "cm"}}

tell application "Keynote"
  tell front document
    set aSel to selection


–Keynote上の選択中のオブジェクトでループ
    
repeat with i in aSel
      set j to contents of i
      
set tmpClass to class of j


–選択中のオブジェクトがテキストアイテムの場合に…….
      
if tmpClass = text item then
        set objText to object text of j
        
set fontName to font of object text of j
        
set fontSize to size of object text of j


–フォントを太らせる(ウェイトを上げる)
        
set fFamilyCount to countFontsInItsFamily(fontName) of me
        
if fFamilyCount = 2 then
          set newFont to incrementFontWeight(fontName, 1) of me
        else if fFamilyCount > 4 then
          set newFont to incrementFontWeight(fontName, 4) of me
        end if
        
        
set aCount to 1
        
set tList to splitByLInes(objText) of me


–行ごとにParseした行ごとのテキストでループ
        
repeat with ii in tList
          set jj to contents of ii
          
          
set anOffset to 0
          
          
–セパレータでループ
          
repeat with iii in separatorList
            –セパレータの「ゆらぎ」表記を考慮してループ
            
repeat with iiii in iii
              set jjjj to contents of iiii
              
set anOffset to offset of jjjj in jj
              
              
if anOffset is not equal to 0 then
                exit repeat
              end if
            end repeat
            
            
if anOffset is not equal to 0 then exit repeat
            
          end repeat
          
          
if anOffset is not equal to 0 then
            try
              set font of characters 1 thru (anOffset – 1) of paragraph aCount of object text of j to newFont
            end try
          end if
          
          
set aCount to aCount + 1
          
        end repeat
      end if
    end repeat
  end tell
end tell

–テキストを行ごとにParse
on splitByLInes(someText) — free to a good home
  set theString to current application’s NSString’s stringWithString:someText
  
set theList to theString’s componentsSeparatedByCharactersInSet:(current application’s NSCharacterSet’s newlineCharacterSet())
  
return theList as list
end splitByLInes

–フォントを太らせる。欧文フォントは考慮していない(別の方法で行う)
on incrementFontWeight(psFontName, incNum)
  set aFont to current application’s NSFont’s fontWithName:psFontName |size|:9.0
  
–> (NSCTFont) "HiraginoSans-W0 9.00 pt. P [] (0x12870af00) fobj=0x11b1e90d0, spc=1.98"
  
  
set fontM to current application’s NSFontManager’s sharedFontManager()
  
  
repeat incNum times
    set aFont to fontM’s convertWeight:true ofFont:aFont
  end repeat
  
  
return (aFont’s fontName()) as string
end incrementFontWeight

–指定フォントのファミリーに属するフォント数を取得
on countFontsInItsFamily(aPSName)
  set aFont to current application’s NSFont’s fontWithName:(aPSName) |size|:9.0
  
set aFamily to aFont’s familyName()
  
set fMan to current application’s NSFontManager’s sharedFontManager()
  
set fList to fMan’s availableMembersOfFontFamily:aFamily
  
return length of (fList as list)
end countFontsInItsFamily

★Click Here to Open This Script 

Posted in Font Text | Tagged 10.15savvy 11.0savvy 12.0savvy 13.0savvy 14.0savvy 15.0savvy Keynote | Leave a comment

Keynoteで選択中のtext itemの冒頭のフォントを太くする

Posted on 10月 19, 2024 by Takaaki Naganoya

Keynote書類で選択中のテキストアイテムのうち、各行の冒頭から「:」の文字までの間を太文字にするAppleScriptです。


▲処理範囲に入っている文字列


▲処理前


▲処理後

本Scriptは、処理内容が地味な割に、処理内容(の説明)が大変です。かなり複雑な処理をやっているためです。(フォント名を文字列で組み立てるなどの)もっと乱暴な処理もできるのですが、ここはあえて丁寧な処理を行なってみました。

Keynote書類上の選択中のText item(複数の場合もある)内のObject textにアクセス。ここで、文字情報、フォント情報、フォントサイズ情報、文字色情報などが取得できます。

フォントサイズ情報を取得して(テキストアイテム内はすべて同じフォントが指定されているものと想定)、フォント名がPostScript名で返ってくるので、NSFontManagerの機能を用いて、当該フォントが所属するフォントファミリーを求めます。さらに、そのファミリーにいくつのフォントが所属しているのかを求めます。

ここで想定しているのは、ヒラギノ角ゴ W3/W6かヒラギノ角ゴシックW0〜W9です。欧文フォントでは、ボールド書体がファミリー中に存在するかをチェックし、存在すればボールド書体を指定するといったまったく別の処理が必要です。本Scriptはとりあえずやりたいことを詰め込んで動くレベルにまとめただけで、汎用性はあまりありません。

また、Keynoteのtext item中の「行」(paragraph)へのアクセスが安定していません。改行をリターンキーだけで行うか、Shift-Returnで行うか、Control-Returnで行うかといった些細な操作の違いによって行カウントできる行数に差が発生します。

安全のためには、AppleScript上でRTF(NSMutableAttributedString)を作って、そこでフォントの変更を行なってtext itemのobject textに書き戻すのが理想的です。

AppleScript名:選択中のtext itemの冒頭のフォントを太くする.scptd
—
–  Created by: Takaaki Naganoya
–  Created on: 2024/10/19
—
–  Copyright © 2024 Piyomaru Software, All Rights Reserved
—

use AppleScript version "2.4" — Yosemite (10.10) or later
use framework "Foundation"
use framework "AppKit"
use scripting additions

property NSFont : a reference to current application’s NSFont
property NSFontManager : a reference to current application’s NSFontManager

tell application "Keynote"
  tell front document
    set aSel to selection
    
    
repeat with i in aSel
      set j to contents of i
      
set tmpClass to class of j
      
      
if tmpClass = text item then
        set objText to object text of j
        
set fontName to font of object text of j
        
set fontSize to size of object text of j
        
        
–フォントを太らせる(ウェイトを上げる)
        
set fFamilyCount to countFontsInItsFamily(fontName) of me
        
if fFamilyCount = 2 then
          set newFont to incrementFontWeight(fontName, 1) of me
        else if fFamilyCount > 4 then
          set newFont to incrementFontWeight(fontName, 4) of me
        end if
        
        
set aCount to 1
        
set tList to splitByLInes(objText) of me


repeat with ii in tList
          set jj to contents of ii
          
set anOffset1 to offset of ":" in jj
          
set anOffset2 to offset of ":" in jj
          
          
if {anOffset1, anOffset2} is not equal to {0, 0} then
            if anOffset1 = 0 then
              set offRes to anOffset2
            else if anOffset2 = 0 then
              set offRes to anOffset1
            else
              set offRes to anOffset1
            end if
            
            
try
              set font of characters 1 thru offRes of paragraph aCount of object text of j to newFont
            end try
            
            
set aCount to aCount + 1
          end if
        end repeat
      end if
    end repeat
  end tell
end tell

–テキストを行ごとにParse
on splitByLInes(someText) — free to a good home
  set theString to current application’s NSString’s stringWithString:someText
  
set theList to theString’s componentsSeparatedByCharactersInSet:(current application’s NSCharacterSet’s newlineCharacterSet())
  
return theList as list
end splitByLInes

–フォントを太らせる。欧文フォントは考慮していない(別の方法で行う)
on incrementFontWeight(psFontName, incNum)
  set aFont to current application’s NSFont’s fontWithName:psFontName |size|:9.0
  
–> (NSCTFont) "HiraginoSans-W0 9.00 pt. P [] (0x12870af00) fobj=0x11b1e90d0, spc=1.98"
  
  
set fontM to current application’s NSFontManager’s sharedFontManager()
  
  
repeat incNum times
    set aFont to fontM’s convertWeight:true ofFont:aFont
  end repeat
  
  
return (aFont’s fontName()) as string
end incrementFontWeight

–指定フォントのファミリーに属するフォント数を取得
on countFontsInItsFamily(aPSName)
  set aFont to current application’s NSFont’s fontWithName:(aPSName) |size|:9.0
  
set aFamily to aFont’s familyName()
  
set fMan to current application’s NSFontManager’s sharedFontManager()
  
set fList to fMan’s availableMembersOfFontFamily:aFamily
  
return length of (fList as list)
end countFontsInItsFamily

★Click Here to Open This Script 

Posted in Font | Tagged 13.0savvy 14.0savvy 15.0savvy Keynote | Leave a comment

iWork Appsがv14.2にアップデート

Posted on 9月 20, 2024 by Takaaki Naganoya

iWork Apps(Keynote、Pages、Numbers)がバージョン14.2にアップデートしました。

すべてのアプリでAppleScript用語辞書への変更はありません。

Keynote 14.2では、macOS 15, Sequoia上でHDRコンテンツの表示をサポートしています。

バグの修正がうたわれていますが、Pagesのページ上のオブジェクトの情報を取得できる範囲が現在表示中の見開き+6ページに制限されるというアホな仕様は変わっていないことを確認しています。

Posted in news | Tagged Keynote Numbers Pages | Leave a comment

iWork Appsでオブジェクトの削除を安全に

Posted on 9月 14, 2024 by Takaaki Naganoya

iWork Apps(Keynote、Pages、Numbers)にはAppleScript系の機能でいろいろ勘弁してほしい仕様がありますが、その中でも最大のものが、書類内の各オブジェクトがIndexで管理されていることです。

Indexというのは、1からはじまる連番の数値です。

iWork Apps(Keynote、Pages、Numbers)のドキュメント上でオブジェクトの削除を行おうとすると、「地獄」を見ることになります。

iWork Appsの書類上でオブジェクトの削除を行うと、このIndex値が振り直されてしまうために、正しく「対象」を指し示すことが(途中から)できなくなってしまうのです。あるいは、まったく関係のない別のオブジェクトが削除されるとか。

これが、idで管理されていれば、何かのオブジェクトを削除されても影響はありません。何かUUID的な重複しないidが割り振られて、最初から最後まで(アプリケーションが起動してから終了するまで、あるいは書類がオープンされてからクローズされるまで)個別に識別されます。

対策

各オブジェクトを識別する場合に、それ専用の属性値を持たせることがあります。

Adobe InDesign:script label AppleScriptから設定・確認が可能なラベル(文字列)を設定できる

もともとある仕組みを本来の目的以外の用途に使うことができるケースもあります。

OmniGraffle:URL urlとかいいつつ、文字列だったらだいたいなんでも入った記憶が

そして、iWork Apps(Keynote、Pages、Numbers)。普段ほとんど使わなくて、AppleScriptから操作できて害のない属性値なんて便利なものがあるわけが……ありました。

Keynoteで使っている例は見かけましたが、他で使ったことのない「reflectin value」。つまり、「反射」属性。

PagesでもNumbersでも使ったことがありません。個人的には、Keynoteでも使ったことがないと思います。

選択状態にあるオブジェクトをもとに何らかの処理を行なって、選択していたオブジェクトを削除する場合に、普通に処理すると(オブジェクトがIndexで管理されているので)、地獄を見ます。

なので、削除対象のオブジェクトのreflection valueに100とか(1〜100のうち、0でないお好きな値を)を設定しておいて、ひととおり処理し終わったら、reflection valueが指定値になっているオブジェクトだけをフィルタ参照で削除する、といった対策が有効です。

実際のAppleScript

前処理Scriptで、最初にreflection valueが何か設定されているオブジェクトが存在しないことを確認したうえで、選択中のオブジェクトのreflection valueに100を設定し……

AppleScript名:削除_前処理.scptd
tell application "Pages"
  tell front document
    set reList to every iWork item whose reflection value is 100
    
if length of reList is not equal to 0 then return
    
    
set aSel to selection
    
repeat with i in aSel
      set j to contents of i
      
set reflection value of j to 100
    end repeat
  end tell
end tell

★Click Here to Open This Script 

処理を行なったあとで、reflection valueに100と設定されているオブジェクトを削除します。

AppleScript名:削除_後処理.scptd
tell application "Pages"
  tell front document
    tell current page
      set aSel to delete (every iWork item whose reflection value = 100)
    end tell
  end tell
end tell

★Click Here to Open This Script 

Posted in Object control | Tagged 13.0savvy 14.0savvy 15.0savvy Keynote Numbers Pages | Leave a comment

新刊電子書籍「AppleScriptでたのしむ レトロ・グラフィック プログラム集」を刊行

Posted on 8月 31, 2024 by Takaaki Naganoya

電子書籍新刊「AppleScriptでたのしむ レトロ・グラフィック プログラム集」を刊行しました。全154ページ、サンプルAppleScriptアーカイブつき。
→ 販売ページ

1980年代や90年代の8/16ビットPCのBASICで描かせていた、三角関数による各種グラフィックスをAppleScriptで再現。ダイアログで表示するだけでなく、各種GUIアプリ(Keynote、Numbers、Pages、Excel、PowerPoint、Word、Pixelmator Pro)を操作して描画したり、画像書き出ししてAirDropでiOSデバイスに転送するようなサンプルを収録しています。

目次

1章 レトロ・グラフィックスの世界

懐かしのレトロCGの世界を再現
時代を経て感じる郷愁とも異なるテイスト
その昔、十数分かけて描いた三角関数グラフ
1秒以下で終了 vs 6分で終了
最新環境で動くAppleScriptにBASICのプログラムを移植
アップルスクリプトは、構文色分け必須の、色で要素を見分ける環境
最低限の知識でAppleScriptによるグラフィックを
AppleScript書類内に、実行に必要なライブラリを同梱
筆者の関数計算ライブラリ「calcLibAS」内蔵関数
コラム ポケコンエミュレータ“pockemul”

2章 早足で紹介するAppleScriptの世界

1994年から採用され続けている言語
GUIアプリを操作するために存在。搭載実行環境がとても多い
書き方は、アプリ内に存在する用語辞書を参照
本来の機能を利用するためにはシステム設定で許可する必要が
10.10以降でCocoaを直接呼べるようになったインタプリタ言語
GUI部品を直接操作してアプリを操作する強制操作機能が人気?
Web上のAPIを呼んでクラウド系の機能も利用
AS自体で予約語と機能を記述するライブラリ機能
コラム AppleScriptの世界の全体像 OS機能の最深部からGUIそのものの操作まで

3章 AppleScriptでグラフィックスを扱う

Cocoaの機能を呼び出してメモリ上で画像を作成
NSAlertの上にNSImageViewを作成しグラフィック表示
Cocoaのグラフィックス座標系”
主要なアプリケーションの座標系”
画像ファイルに書き出せば”
他のアプリにコピー&ペースト”
当時は存在していなかった透過画像”
パラメータを変えると動作が変わる”
コラム GUIアプリごとの応答速度の違い

4章 レトロ・グラフィックスプログラム集

スクリプトエディタでオープンして実行するだけ
必要なライブラリはバンドル内にすべて格納
掲載リストはグラフィックス描画にかかわる箇所のみ
How to use/ダイアログ表示AppleScript
How to use/ファイル出力AppleScript
How to use/ファイル出力+AirDrop AppleScript
How to use/クリップボード転送AppleScript
How to use/各種GUIアプリ操作AppleScript
OS標準搭載の13の実行環境およびサードパーティの数十の実行環境

線画テスト
円画テスト①
円画テスト②
サイクロイド曲線
バラ曲線
パスカルの蝸牛形
リサージュ曲線
ダイヤモンドパターン
アルキメデスの螺旋
メキシカンハット①
メキシカンハット②
メキシカンハット③
メキシカンハット④
コラム マシンごとの実行速度の違い

Posted in Books news | Tagged 13.0savvy 14.0savvy 15.0savvy Excel Keynote Numbers Pages Pixelmator Pro PowerPoint Word | Leave a comment

Keynote上で選択中のテキストアイテムを、位置情報をもとにテキスト連結してクリップボードへ

Posted on 5月 13, 2024 by Takaaki Naganoya

Keynoteで作業がめんどくさくなったら、その場でAppleScriptを書いて使うシリーズ。Keynote v14で動かしていますが、別にバージョン依存している箇所はありません。もっと古いKeynoteでも動くと思います(KeynoteのAppleScript対応機能的には、slideのselectionができるようになったv12が実用下限だと思っています)。

Keynote書類の、章トビラに内容を個別のテキストアイテムで箇条書きしていたような場合に、

これを、全部結合して1つのテキストアイテムに入れたくなる時があります。

そこで、本ScriptのようなものをmacOS標準搭載のスクリプトメニューに入れて、

呼び出すために作ったものです。

実行すると、それぞれのテキストアイテムをY座標に着目してソートを行い、上→下の順番にならべかえて、テキストを取り出し、改行をはさみつつ連結します。

この後で、もとのテキストアイテムにこの連結したテキストを入れることになります。

一番上(positionのY座標が一番小さい)のテキストアイテムだけ残してあとは削除するわけですが、このあたりのオブジェクト操作もAppleScriptから操作してしまったほうがよさそうです。

ただし、Keynoteはテキストアイテム内の文字の上寄せ/下寄せの制御をAppleScriptからできないので(キーボードショートかメニューでも操作する?)そのあたりに「残念感」が残ってしまうかもしれません。

macOS標準搭載のスクリプトメニューに入れるAppleScriptで、絵文字を大量に入れるのは、大量のAppleScriptをメニューに入れるため文字だけだと視認性が低く、色付き文字を入れてそれぞれを識別しやすくするためです。

AppleScript名:🧭位置情報🧭をもとに🈴テキスト連結🈴して📎📎クリップボードへ📎📎.scpt
use AppleScript
use scripting additions
use framework "Foundation"

set outList to {}
set outStr to ""

tell application "Keynote"
  tell front document
    set aSel to selection
    
    
if length of aSel = 0 then
      display dialog "Keynote書類上で何も選択されていません。" with title "オブジェクト選択エラー" buttons {"OK"} default button 1 with icon 2
      
return
    else if length of aSel = 1 then
      display dialog "Keynote書類上で複数のオブジェクトが選択されていません。" with title "オブジェクト選択エラー" buttons {"OK"} default button 1 with icon 2
      
return
    else if (class of first item of aSel = slide) then
      display dialog "Keynote書類上でスライドが選択されてしまっています。" with title "オブジェクト選択エラー" buttons {"OK"} default button 1 with icon 2
      
return
    end if
    
    
repeat with i in aSel
      set j to contents of i
      
set aClass to class of j
      
if aClass = text item then
        set {aPosX, aPosY} to position of j
        
set aCon to object text of j
        
set the end of outList to {xPos:aPosX, yPos:aPosY, textCon:aCon}
      end if
    end repeat
    
  end tell
end tell

set bList to sortListAscending(outList, "yPos") of me

repeat with i in bList
  set j to contents of i
  
set aText to textCon of j
  
set outStr to outStr & aText & return
end repeat

set the clipboard to outStr
beep 1

–入れ子のリストを昇順ソート(AppleScriptObjC)
on sortListAscending(theList as list, keyLabel)
  set anArray to current application’s NSMutableArray’s arrayWithArray:(theList)
  
set theDescriptor to current application’s NSSortDescriptor’s sortDescriptorWithKey:(keyLabel) ascending:(true)
  
set sortedList to anArray’s sortedArrayUsingDescriptors:{theDescriptor}
  
return sortedList as list
end sortListAscending

★Click Here to Open This Script 

Posted in list Object control Record Sort | Tagged 12.0savvy 13.0savvy 14.0savvy Keynote | Leave a comment

Keynoteで2階層のスライドのタイトルをまとめてテキスト化

Posted on 5月 10, 2024 by Takaaki Naganoya

Keynoteでページ数の多い書類、この場合は電子書籍「Cocoa Scripting Course」の9巻「File Processing」で章ごとの目次を作ろうとしたときに、各ページのタイトルを記事のレベルを反映しつつ文字列化するのが大変なので、AppleScriptで半自動化しました。

実際には、機械的に全スライドのタイトルを取得してテキスト化するAppleScriptを作って使っていたのですが、機械的にタイトルを取り出したあとで、レベルを反映させるといった「手作業」が発生していたので、半自動処理に変更したほうがまだ作業量が少なくなるという見立てになりました。

Keynote書類をオープンして、最終階層のスライドを畳んだ状態で処理範囲(同一レベルのスライド)を選択しておいた状態で本Scriptを実行します。もともと、章トビラに掲載する内容をテキストで取り出すためのものなので、1つの章を構成する中トビラのみを選択した状態にしてから実行する必要があります。

Keynoteでは、ウィンドウ左端にナビゲータを表示させ、各スライドのレベルを変更し、アウトラインプロセッサのように下位スライドの表示を隠したり、表示させたりできます。つまり、ページ数の多いスライドの整理を行いやすくなっています。

本来、このスライドのインデントレベルを数値で取得できる必要があります。それでも、KeynoteのAppleScript用語辞書にその機能は実装されていません。ただ、ないものにないと文句を言っているだけでは前に進めません。

Keynoteのウィンドウ上で下位スライドを非表示状態にして選択すると、selection中の第1階層のスライドのみ選択された状態になるため、スライド番号を取得すると、selection中の第2階層のスライド番号が「抜けた」状態になります。この違いによってスライドの階層を識別できます。

スライド番号を取得できたselection中の第1階層のスライドと、スライド番号を取得できなかったselection中の第2階層のスライドで別々に処理(インデント文字=tab)することで、文字列で階層の違いも表現できます。

出力例:

◽️再帰処理によるファイル検索  –第1階層
  再帰によるファイルパスの取得  –第2階層
  再帰によるファイルパスの取得+拡張子による抽出  –第2階層
  ファイル名衝突回避つきリネーム  –第2階層

処理結果はクリップボードに転送されます。つまり、他のテキストエディタに内容をそのままペーストできます。

スライドのインデントレベルを取得できないことへの対処は、スライドのbase layoutにインデント情報を書いておくとか、種別で判定するやりかたもあります。出現確率をそれぞれのbase layoutについて計算し、登場頻度の低いものをより上位の章トビラとして認識するといったAppleScriptもありますが、完全自動よりも決定前にユーザーに確認を取るぐらいの作りになっているほうが実用性が高い感じです。

AppleScript名:選択中のスライドから、2段階の階層のタイトルを取得してクリップボードへ.scptd
—
–  Created by: Takaaki Naganoya
–  Created on: 2024/05/04
—
–  Copyright © 2024 Piyomaru Software, All Rights Reserved
—

use AppleScript
use framework "Foundation"
use scripting additions

property headerChar : "◽️" –1階層目のタイトルの行頭に入れる
property indentChar : tab –2階層目のタイトルの行頭に入れる

tell application "Keynote"
  tell front document
    set aSel to selection
    
set aFirst to class of first item of aSel
    
if aFirst is not equal to slide then
      display dialog "スライド単位で選択されていません(スライド内のオブジェクトが選ばれている)" buttons {"OK"} default button 1
      
return
    end if
    
    
–スライドの逆順選択が発生していた場合には、listを逆順に入れ替えて正順(開始ページ→終了ページ)に修正  
    
set fItem to slide number of first item of aSel
    
set lItem to slide number of last item of aSel
    
if fItem > lItem then set aSel to reverse of aSel
    
    
–スライド番号を選択部分から取り出す
    
set pNumList to {}
    
repeat with i in aSel
      set the end of pNumList to (slide number of i)
    end repeat
    
    
–選択中の最終スライドの次のスライドは説明部分とみなし、説明部分が続く(同じベースレイアウト)ブロックを検出
    
set totalCount to count every slide
    
set aMasterSlide to base layout of slide ((last item of pNumList) + 1)
    
set hitF to false
    
    
repeat with i from (last item of pNumList) + 2 to totalCount
      set tmpBase to base layout of slide i
      
if aMasterSlide is not equal to tmpBase then
        set hitF to true
        
exit repeat
      end if
    end repeat
    
    
if hitF = false then error "Page selection Error"
    
    
—末尾の情報を補う。そのため、本Scriptではスライド末尾までの選択が行えないが、実用上問題がないので無視している
    
copy i to lastThreadShould
    
copy pNumList to pNumList2
    
set the end of pNumList to i


–メインループ
    
set outList to {}
    
set aCount to 1
    
    
–1階層目のタイトル収集ループ
    
repeat with i in (pNumList2)
      
      
tell slide i
        try
          set tmpTitle1 to object text of default title item
        on error
          set tmpTitle1 to "" –タイトルが存在しないスライドなどの場合
        end try
      end tell
      
      
–オブジェクト内の強制改行文字を削除
      
set tmpTitle13 to repChar(tmpTitle1, string id 8232, "") of me
      
      
–出力用のリストに追加
      
set the end of outList to (return & headerChar & tmpTitle13)
      
      
–2階層目のタイトル収集ループ
      
repeat with ii from (i + 1) to ((item (aCount + 1) of pNumList) – 1)
        if ii ≥ (lastThreadShould) then exit repeat
        
        
tell slide ii
          try
            set tmpTitle2 to object text of default title item
          on error
            set tmpTitle2 to "" –タイトルが存在しないスライドなどの場合
          end try
        end tell
        
        
–オブジェクト内の強制改行文字を削除
        
set tmpTitle22 to repChar(tmpTitle2, string id 8232, "") of me
        
        
–出力用のリストに追加
        
set the end of outList to (indentChar & tmpTitle22)
      end repeat
      
      
set aCount to aCount + 1
      
    end repeat
    
    
–クリップボードに結果文字列を設定
    
set outStr to retListedText(outList, return) of me
    
set the clipboard to outStr
  end tell
end tell

–1D Listにデリミタ文字を入れつつテキスト化
on retListedText(aList, aSeparator)
  set aText to ""
  
set curDelim to AppleScript’s text item delimiters
  
set AppleScript’s text item delimiters to aSeparator
  
set aText to aList as text
  
set AppleScript’s text item delimiters to curDelim
  
return aText
end retListedText

–文字置換ルーチン
on repChar(origText as string, targStr as string, repStr as string)
  set {txdl, AppleScript’s text item delimiters} to {AppleScript’s text item delimiters, targStr}
  
set temp to text items of origText
  
set AppleScript’s text item delimiters to repStr
  
set res to temp as text
  
set AppleScript’s text item delimiters to txdl
  
return res
end repChar

★Click Here to Open This Script 

Posted in Object control | Tagged 13.0savvy 14.0savvy Keynote | Leave a comment

Keynoteでslideの逆順選択状態を解消する

Posted on 5月 9, 2024 by Takaaki Naganoya

Keynoteで日々さまざまな書類を作っており、Keynoteを使わない日はないと言って過言ではないほどです。

当然、Keynote関連の作業の効率化のためのAppleScriptを書くことが多くなります。そして、Keynote書類の連続したスライド(ページ)を選択し、それらのタイトルを加工するようなAppleScriptをよく使います。

たとえば、マル付き数字(例:①②③)の付け直し(リナンバー)AppleScriptはよく使いますが、

Keynote上で末尾ページから先頭ページに向かってページ選択できる、いわば「逆順選択状態」を画面上からの操作によって作り出せてしまうことに気づきました。

この状態でAppleScriptからselectionを取得すると、P-197、196、195、194、193、192、191と、意図しない順番でスライドオブジェクトを取得できてしまうことがわかりました。この逆順選択状態で、マル付き数字のリナンバーScriptを実行すると、末尾から番号が振られてしまいます。

この状態は、たとえば197ページを選択しておいて、SHIFTキーを押しながら、上向き矢印キーを押すことで選択範囲を拡張した場合に発生することがわかりました。この現象は、Keynote v14.0+macOS 13.6.7で発生を確認しています。

これは、バグではありません。ただ、意図しない状態を作り出せてしまうことについては、知っておく必要がある内容です。

selectionでアクセスできるSlideオブジェクトが、かならずしもページの先頭方向から順に末尾方向へと並んでいるわけではない、ということで対策が必要になりました。この手の、複数Slideを選択して実行するAppleScriptは割と多いので。

そこで、selctionから取得したSlideオブジェクトの先頭と末尾のSlide numberを取得し、先頭のSlide Numberが大きければ、selectionから取得したデータをその場で逆順に並べ替えるという対処を行いました。

AppleScript名:スライドの逆順選択状態を解消する.scpt
tell application "Keynote"
  tell front document
    set aaSel to selection
    
set fItem to class of first item of aaSel
    
if fItem is not equal to slide then
      display dialog "Slide内のオブジェクトが選択されています。Slide単位で選択してください。" buttons {"OK"} default button 1
      
return
    end if
    
    
set fItem to slide number of first item of aaSel
    
set lItem to slide number of last item of aaSel
    
    
–逆順選択が発生していた場合には、listを逆順に入れ替える
    
if fItem > lItem then
      set aaSel to reverse of aaSel
    end if
    
    
set fItem2 to slide number of first item of aaSel
    
set lItem2 to slide number of last item of aaSel
    
return {fItem2, lItem2}
  end tell
end tell

★Click Here to Open This Script 

Posted in Object control | Tagged 13.0savvy 14.0savvy Keynote | Leave a comment

Keynote/Pagesで選択中の表カラムの幅を均等割

Posted on 5月 5, 2024 by Takaaki Naganoya

Keynote/Pagesの書類上の「表」のうち、選択中のカラムについて「幅」を均等割する(等しい幅に設定する)AppleScriptです。Keynote/Pages v14.0で動作確認していますが、とくにバージョン固有の機能などに依存する部分はありません。


▲Keynote書類上の表のカラムを選択しておいてAppleScript実行


▲Keynote書類上で選択しておいた表カラムが均等幅に設定される


▲Pages書類上の表のカラムを選択しておいてAppleScript実行


▲Pages書類上で選択しておいた表カラムが均等幅に設定される

AppleScript名:選択中の表カラムの幅を均等割.scpt
—
–  Created by: Takaaki Naganoya
–  Created on: 2024/05/05
—
–  Copyright © 2024 Piyomaru Software, All Rights Reserved
—

tell application "Keynote"
  tell front document
    set aSel to selection
    
set fObj to class of first item of aSel
    
if fObj is not equal to table then
      display notification "tableが選択されていません"
      
return
    end if
    
    
tell current slide
      try
        set theTable to first table whose class of selection range is range
      on error
        display notification "table中のセル(カラム)が選択されていません"
        
return –何も選択されてなかった場合
      end try
      
      
tell theTable
        
        
set vList to address of column of every cell of selection range
        
set vUList to uniquify1DList(vList) of uniquifyKit of me
        
        
–均等割したカラム幅を計算
        
set totalW to 0
        
repeat with i in vUList
          tell column i
            set tmpW to width
            
set totalW to totalW + tmpW
          end tell
        end repeat
        
        
–選択カラム幅に均等割した幅を設定
        
set aColW to totalW / (length of vUList)
        
repeat with i in vUList
          tell column i
            set width to aColW
          end tell
        end repeat
        
      end tell
    end tell
    
  end tell
end tell

script uniquifyKit
  use scripting additions
  
use framework "Foundation"
  
property parent : AppleScript
  
  
on uniquify1DList(theList as list)
    set theSet to current application’s NSOrderedSet’s orderedSetWithArray:theList
    
return (theSet’s array()) as list
  end uniquify1DList
end script

★Click Here to Open This Script 

AppleScript名:選択中のカラムの幅を均等割.scpt
—
–  Created by: Takaaki Naganoya
–  Created on: 2024/05/05
—
–  Copyright © 2024 Piyomaru Software, All Rights Reserved
—

tell application "Pages"
  tell front document
    set aSel to selection
    
set fObj to class of first item of aSel
    
if fObj is not equal to table then
      display notification "tableが選択されていません"
      
return
    end if
    
    
try
      set theTable to first table whose class of selection range is range
    on error
      display notification "table中のセル(カラム)が選択されていません"
      
return –何も選択されてなかった場合
    end try
    
    
tell theTable
      
      
set vList to address of column of every cell of selection range
      
set vUList to uniquify1DList(vList) of uniquifyKit of me
      
      
–均等割したカラム幅を計算
      
set totalW to 0
      
repeat with i in vUList
        tell column i
          set tmpW to width
          
set totalW to totalW + tmpW
        end tell
      end repeat
      
      
–選択カラム幅に均等割した幅を設定
      
set aColW to totalW / (length of vUList)
      
repeat with i in vUList
        tell column i
          set width to aColW
        end tell
      end repeat
      
    end tell
    
  end tell
end tell

script uniquifyKit
  use scripting additions
  
use framework "Foundation"
  
property parent : AppleScript
  
  
on uniquify1DList(theList as list)
    set theSet to current application’s NSOrderedSet’s orderedSetWithArray:theList
    
return (theSet’s array()) as list
  end uniquify1DList
end script

★Click Here to Open This Script 

Posted in Object control | Tagged 12.0savvy 13.0savvy 14.0savvy Keynote Pages | Leave a comment

Keynote、Pages、Numbers Ver.14.0が登場

Posted on 4月 3, 2024 by Takaaki Naganoya

Keynote、Pages、NumbersのiWorkアプリがバージョン14にアップデートされました。

本バージョンはmacOS 13以降に対応しています。

各アプリのAppleScript用語辞書に変更はありません。Pagesで見られている、ウィンドウで表示されていないページ上のオブジェクトからの情報取得ができない(正確にいえば、表示中の見開き+2見開き分まで取得可能)という挙動は変わっていません。どうも処理速度向上のための仕様のようなので、この部分はこのままだと思います。

Posted in news | Tagged 13.0savvy 14.0savvy Keynote Numbers Pages | Leave a comment

アプリケーション操作の次の段階へ

Posted on 1月 28, 2024 by Takaaki Naganoya

GUIアプリケーションの操作において、若干の不満を覚えつつもmacOS上のGUIアプリケーションの操作を行えてきました。

ただ、「次」の段階が見えているのに、GUIアプリケーション側の機能がそれに追いついていなかったり、未実装の部分があったりで、GUIアプリケーション側が足を引っ張っているように見える今日このごろです。

たとえばKeynoteにおいて、特定のグラフィックだけを削除したい(会社ロゴなど)という場合に、メニューに「この部品に近似する部品を削除」といった機能が実装されていてもよさそうな昨今ですが、それはありません。「類似画像を削除」「類似部品を削除」といった処理はやりたくなる部分だと(勝手に)考えるものです。だいたい、OS内の機能を見ても容易に実装できそうに見えます。

Keynote書類にはimageオブジェクトが用意されており、さまざまなプロパティを取得できるようになっていますが、file nameは取得できても、

file属性を取得できない状態です。

AppleScript名:画像からfile属性を取得(できない).scpt
tell application "Keynote"
  tell front document
    set aSel to selection
    
set aaSel to first item of aSel
    
    
set aFile to file of aaSel
    
–> error "Keynoteでエラーが起きました: AppleEventのハンドラで誤りが起きました。" number -10000
  end tell
end tell

★Click Here to Open This Script 

iCloud上に存在するKeynote書類の内部ファイルに対してのパスを表現しづらい、といった理由は理解できるかもしれませんが、用語辞書にfile属性が取れると明記してある以上、file属性は(ローカルに書類が存在するなどの条件下では)取得できるべきだと考えます。

そして、file属性(おそらく、file pathをalias形式で取得できる)を取れれば、画像の「内容」にもアクセスして、「指定の画像に近似するものを削除」といった処理はできるはずです(画像のハッシュ値を計算する処理は別途する必要はあるわけですが)。

このあたりの処理が、そろそろできてもいいんですが、いろいろ邪魔が入ってできないのが残念な感じがします。

Posted in Image | Tagged 13.0savvy 14.0savvy Keynote | Leave a comment

Keynote/Pages/Numbers v13.2がリリースされる

Posted on 9月 22, 2023 by Takaaki Naganoya

iWork……という言葉は最近はあまり使われないようなので、Keynote、Pages、Numbersと呼びますが……これらのアップデート版v13.2が公開されました。AppleScript用語辞書の修正、追加はありません(作成できるグラフ形式が増えているのですが、ASから作成できるようにはなっていません)。

メジャーアップデートのv14.0などではないので、本バージョンは堅実で小刻みな機能アップデート版といえるでしょう。

3Dオブジェクトを格納するUSDZファイルをデータとして挿入できたりアニメーション表示(Keynote)できたり、新しいテーマが追加されたり、その他SVG画像を素材として利用できるようになったもようです。

USDZ形式のファイルを扱えるのは、いまのところ手元のアプリケーションではXcodeとPreview.appのみ。

SVGについては、いろいろ増えてきています。

こうした各種書類形式をキーにして、さまざまなアプリケーションを連携させられるという情報を提供する件をAppleのWWDRに提案したことがありましたが、どこのチームも興味を持たなかったとのこと。

USDZ形式データについては、数年前からこの形式データの利用を広めたいという「意図」が見えたので、いろいろ情報収集はすすめてきました。iWork Appsでサポートするということで、1段階利用が広がったというところですが、たとえばKeynoteで3Dを前提としたアニメーションやトランジッションが実装される、という機能が整備されるまでは単なる素材が1つ増えたぐらいでしょう。

Keynoteに3Dトランジッションや3Dアニメーションを追加するぐらいのことは、とっくの昔から検討されていたと思われますが、おそらく実装してみると「思ったよりも効果的ではない」という結論になったのでしょう。Vision ProのようなxRデバイスで閲覧するという「ブラウズ環境」を整備できたことにより、USDZ形式のデータを広くサポートする「価値」が生まれると踏んだのでしょう。

Vision Proが成功を収めるか、誰もが記憶から追い出したくなるような失敗として記録されるかは不明ですが、USDZ形式の利用が広くサポートされれば、それは多くの人々に役立つものとなることでしょう。

Posted in news | Tagged 12.0savvy 13.0savvy 14.0savvy Keynote Numbers Pages | Leave a comment

Keynote,Pages,Numbers v13.0がリリースされる

Posted on 4月 2, 2023 by Takaaki Naganoya

Keynote, Pages, Numbersのバージョン13.0がリリースされました。AppleScript用語辞書的な変更点はありません。

Keynote v11からずっと、新規書類を保存するとエラーになる。Full Disk Accessの権限をKeynoteに与えていてもエラーになる、という重大な問題が解消されないままである、という認識でおりました。状況はKeynote v13.0でも変わりません。

これは、Apple側が問題として認識していないのではないか? という仮説を立て、いろいろ試してみました。

まずは、v12から継続している状況についての説明。Keynoteで新規書類を保存する際に「as Keynote」という、明らかに「指定してくださいね」というオプションがAppleScript用語辞書の中にあるので、指定したくなるところですが

AppleScript名:Keynoteで書類を新規保存(A).scpt
set newFile to ((path to desktop) as string) & "newDoc1111.key"

tell application "Keynote"
  set newDoc to make new document
  
save document 1 in file newFile as Keynote
end tell

★Click Here to Open This Script 

これを指定するとエラーになります。これが、Keynote v12.0から続いており、1年以上継続している状況です。以前のバージョンで通っていた記述がエラーを出すようになった、というものです。

ふとここで、「as Keynote」というオプション指定をはずしてみると…….

AppleScript名:Keynoteで書類を新規保存(A).scpt
set newFile to ((path to desktop) as string) & "newDoc1111.key"

tell application "Keynote"
  set newDoc to make new document
  
save document 1 in file newFile
end tell

★Click Here to Open This Script 

エラーが出なくなりました!!!(^ー^;;;; ファイル保存もできました。

なんなんでしょう、これは、、、、

Posted in Bug news | Tagged 12.0savvy 13.0savvy Keynote Numbers Pages | 1 Comment

Post navigation

  • Older posts

電子書籍(PDF)をオンラインストアで販売中!

Google Search

Popular posts

  • 開発機としてM2 Mac miniが来たのでガチレビュー
  • macOS 15, Sequoia
  • 指定のWordファイルをPDFに書き出す
  • Pages本執筆中に、2つの書類モード切り替えに気がついた
  • Numbersで選択範囲のセルの前後の空白を削除
  • メキシカンハットの描画
  • Pixelmator Pro v3.6.4でAppleScriptからの操作時の挙動に違和感が
  • AdobeがInDesign v19.4からPOSIX pathを採用
  • Safariで「プロファイル」機能を使うとAppleScriptの処理に影響
  • AppleScriptによる並列処理
  • Cocoa Scripting Course 続刊計画
  • macOS 14.xでScript Menuの実行速度が大幅に下がるバグ
  • AppleScript入門③AppleScriptを使った「自動化」とは?
  • Keynote/Pagesで選択中の表カラムの幅を均等割
  • Keynote、Pages、Numbers Ver.14.0が登場
  • macOS 15 リモートApple Eventsにバグ?
  • デフォルトインストールされたフォント名を取得するAppleScript
  • AppleScript入門① AppleScriptってなんだろう?
  • macOS 15でも変化したText to Speech環境
  • Numbersで最前面の書類のすべてのシート上の表の行数を合計

Tags

10.11savvy (1101) 10.12savvy (1242) 10.13savvy (1391) 10.14savvy (587) 10.15savvy (438) 11.0savvy (283) 12.0savvy (212) 13.0savvy (194) 14.0savvy (147) 15.0savvy (130) CotEditor (66) Finder (51) iTunes (19) Keynote (117) NSAlert (61) NSArray (51) NSBitmapImageRep (20) NSBundle (20) NSButton (34) NSColor (53) NSDictionary (28) NSFileManager (23) NSFont (21) NSImage (41) NSJSONSerialization (21) NSMutableArray (63) NSMutableDictionary (22) NSPredicate (36) NSRunningApplication (56) NSScreen (30) NSScrollView (22) NSString (119) NSURL (98) NSURLRequest (23) NSUTF8StringEncoding (30) NSView (33) NSWorkspace (20) Numbers (76) Pages (55) Safari (44) Script Editor (27) WKUserContentController (21) WKUserScript (20) WKWebView (23) WKWebViewConfiguration (22)

カテゴリー

  • 2D Bin Packing
  • 3D
  • AirDrop
  • AirPlay
  • Animation
  • AppleScript Application on Xcode
  • Beginner
  • Benchmark
  • beta
  • Bluetooth
  • Books
  • boolean
  • bounds
  • Bug
  • Calendar
  • call by reference
  • check sum
  • Clipboard
  • Cocoa-AppleScript Applet
  • Code Sign
  • Color
  • Custom Class
  • date
  • dialog
  • diff
  • drive
  • Droplet
  • exif
  • file
  • File path
  • filter
  • folder
  • Font
  • Font
  • GAME
  • geolocation
  • GUI
  • GUI Scripting
  • Hex
  • History
  • How To
  • iCloud
  • Icon
  • Image
  • Input Method
  • Internet
  • iOS App
  • JavaScript
  • JSON
  • JXA
  • Keychain
  • Keychain
  • Language
  • Library
  • list
  • Locale
  • Localize
  • Machine Learning
  • Map
  • Markdown
  • Menu
  • Metadata
  • MIDI
  • MIME
  • Natural Language Processing
  • Network
  • news
  • Noification
  • Notarization
  • Number
  • Object control
  • OCR
  • OSA
  • parallel processing
  • PDF
  • Peripheral
  • PRODUCTS
  • QR Code
  • Raw AppleEvent Code
  • Record
  • rectangle
  • recursive call
  • regexp
  • Release
  • Remote Control
  • Require Control-Command-R to run
  • REST API
  • Review
  • RTF
  • Sandbox
  • Screen Saver
  • Script Libraries
  • sdef
  • search
  • Security
  • selection
  • shell script
  • Shortcuts Workflow
  • Sort
  • Sound
  • Spellchecker
  • Spotlight
  • SVG
  • System
  • Tag
  • Telephony
  • Text
  • Text to Speech
  • timezone
  • Tools
  • Update
  • URL
  • UTI
  • Web Contents Control
  • WiFi
  • XML
  • XML-RPC
  • イベント(Event)
  • 未分類

アーカイブ

  • 2025年4月
  • 2025年3月
  • 2025年2月
  • 2025年1月
  • 2024年12月
  • 2024年11月
  • 2024年10月
  • 2024年9月
  • 2024年8月
  • 2024年7月
  • 2024年6月
  • 2024年5月
  • 2024年4月
  • 2024年3月
  • 2024年2月
  • 2024年1月
  • 2023年12月
  • 2023年11月
  • 2023年10月
  • 2023年9月
  • 2023年8月
  • 2023年7月
  • 2023年6月
  • 2023年5月
  • 2023年4月
  • 2023年3月
  • 2023年2月
  • 2023年1月
  • 2022年12月
  • 2022年11月
  • 2022年10月
  • 2022年9月
  • 2022年8月
  • 2022年7月
  • 2022年6月
  • 2022年5月
  • 2022年4月
  • 2022年3月
  • 2022年2月
  • 2022年1月
  • 2021年12月
  • 2021年11月
  • 2021年10月
  • 2021年9月
  • 2021年8月
  • 2021年7月
  • 2021年6月
  • 2021年5月
  • 2021年4月
  • 2021年3月
  • 2021年2月
  • 2021年1月
  • 2020年12月
  • 2020年11月
  • 2020年10月
  • 2020年9月
  • 2020年8月
  • 2020年7月
  • 2020年6月
  • 2020年5月
  • 2020年4月
  • 2020年3月
  • 2020年2月
  • 2020年1月
  • 2019年12月
  • 2019年11月
  • 2019年10月
  • 2019年9月
  • 2019年8月
  • 2019年7月
  • 2019年6月
  • 2019年5月
  • 2019年4月
  • 2019年3月
  • 2019年2月
  • 2019年1月
  • 2018年12月
  • 2018年11月
  • 2018年10月
  • 2018年9月
  • 2018年8月
  • 2018年7月
  • 2018年6月
  • 2018年5月
  • 2018年4月
  • 2018年3月
  • 2018年2月

https://piyomarusoft.booth.pm/items/301502

メタ情報

  • ログイン
  • 投稿フィード
  • コメントフィード
  • WordPress.org

Forum Posts

  • 人気のトピック
  • 返信がないトピック

メタ情報

  • ログイン
  • 投稿フィード
  • コメントフィード
  • WordPress.org
Proudly powered by WordPress
Theme: Flint by Star Verte LLC