Menu

Skip to content
AppleScriptの穴
  • Home
  • Products
  • Books
  • Docs
  • Events
  • Forum
  • About This Blog
  • License
  • 仕事依頼

AppleScriptの穴

Useful & Practical AppleScript archive. Click '★Click Here to Open This Script' Link to download each AppleScript

月: 2019年2月

SFPSDWriterでレイヤー分けしたPhotoshopデータを作成

Posted on 2月 27, 2019 by Takaaki Naganoya

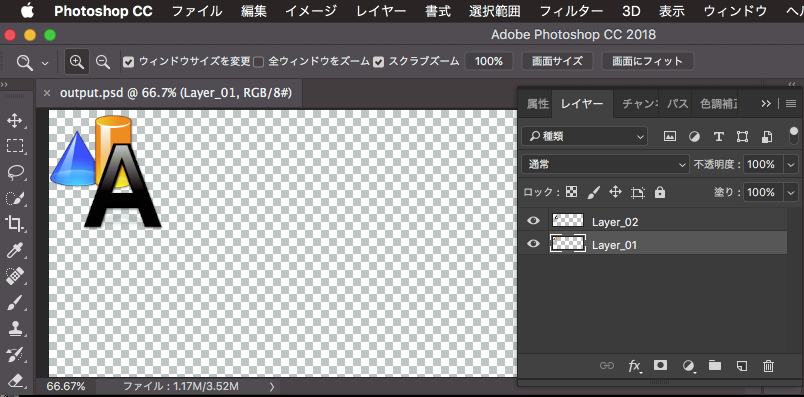
オープンソースのSFPSDWriterを呼び出して、レイヤー分けしたPhotoshopデータを作成するAppleScriptです。

SFPSDWriterは基本的にCGImageを与えてPSDを作成するプログラムですが、AppleScriptからはCGImageを作れません。

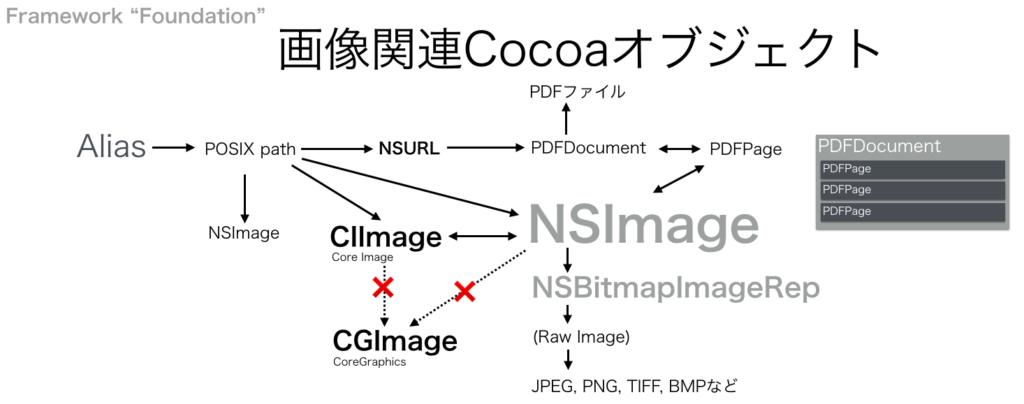
SFPSDWriterのソースコードを読んでみたら、コメントにNSImageからCGImageへの変換方法が書かれていたので、NSImageを受け付けるメソッドを新規追加してAppleScriptから呼べるようにしてみました。

–> Download SFPSDWriter.framework(To ~/Library/Frameworks)

PSDを読み書きするObjective-Cのプログラムは割とすぐに見つかるのですが、AppleScriptから呼べない(CGImageをパラメータにするため)ものが多く、どれか1つぐらいは使えてほしいと思っていました。

SFPSDWriterの機能はすべて試せていませんが、名前どおり本ソフトはPSDファイルを書き込む専用であって、読むためのものではありません。これ以外にPSDファイルを読み込んでオブジェクトを取り出せる(ように改造できる)ものを探しておきたいところです。Photoshopを用いないでPSDデータにアクセスできることには価値があります。Mac App Storeに出すソフトウェアだととくにそうです。

Photoshopを操作してほぼ同様の処理を行うものを書いてみましたが、SFPSDWriterを用いて処理したほうがシンプルなことに驚きます。

AppleScript名:SFPSDWriterのじっけん
— Created 2016-03-12 by Takaaki Naganoya
— Modified 2019-02-27 by Takaaki Naganoya
— 2019 Piyomaru Software
use AppleScript version "2.4"
use scripting additions
use framework "Foundation"
use framework "AppKit"
use framework "SFPSDWriter" –https://github.com/shinyfrog/SFPSDWriter

property |NSURL| : a reference to current application’s |NSURL|
property NSString : a reference to current application’s NSString
property NSImage : a reference to current application’s NSImage
property SFPSDWriter : a reference to current application’s SFPSDWriter
property NSWorkspace : a reference to current application’s NSWorkspace

property SFPSDResolutionUnitPPI : 1
property SFPSDResolutionUnitPPC : 2

set layer1 to NSImage’s alloc()’s initWithContentsOfURL:(|NSURL|’s fileURLWithPath:(POSIX path of (choose file of type {"public.png"})))
set layer2 to NSImage’s alloc()’s initWithContentsOfURL:(|NSURL|’s fileURLWithPath:(POSIX path of (choose file of type {"public.png"})))

set anWriter to SFPSDWriter’s alloc()’s initWithDocumentSize:(current application’s CGSizeMake(1024, 400)) andResolution:72.0 andResolutionUnit:(SFPSDResolutionUnitPPI)

anWriter’s addLayerWithNSImage:layer1 andName:"Layer_01" andOpacity:1.0 andOffset:{x:0.0, y:0.0}
anWriter’s addLayerWithNSImage:layer2 andName:"Layer_02" andOpacity:1.0 andOffset:{x:50.0, y:50.0}

set aPSD to anWriter’s createPSDData()

set pathString to NSString’s stringWithString:"~/Desktop/output.psd"
set newPath to pathString’s stringByExpandingTildeInPath()

aPSD’s writeToFile:newPath atomically:true

–Open with Adobe Photoshop
NSWorkspace’s sharedWorkspace()’s openFile:newPath

★Click Here to Open This Script 

AppleScript名:PhotoshopでSFPSDWriterと同じような処理を行う
— Created 2019-02-27 by Takaaki Naganoya
— 2019 Piyomaru Software
set layer1 to (choose file of type {"public.png"}) as string
set layer2 to (choose file of type {"public.png"}) as string

tell application id "com.adobe.photoshop"
  activate
  
close every document saving no
  
  
set aDoc to make new document with properties {height:900, width:900, resolution:72.0, mode:RGB, bits per channel:eight, initial fill:transparent, color profile kind:none, pixel aspect ratio:1.0}
  
tell aDoc
    set origLayer to (first item of (name of every art layer)) as string
  end tell
  
  
open file layer1
  
set bDoc to a reference to current document
  
tell bDoc
    select all
    
copy
    
close without saving
  end tell
  
  
tell aDoc
    set artLayerRef to make new art layer with properties {name:"Layer_01"}
    
set current layer to artLayerRef
    
tell artLayerRef
      paste
    end tell
  end tell
  
  
open file layer2
  
set cDoc to a reference to current document
  
tell cDoc
    select all
    
copy
    
close without saving
  end tell
  
  
tell aDoc
    set artLayerRef to make new art layer with properties {name:"Layer_02"}
    
set current layer to artLayerRef
    
tell artLayerRef
      paste
    end tell
    
    
delete art layer origLayer
  end tell
end tell

★Click Here to Open This Script 

Posted in file Image | Tagged 10.11savvy 10.12savvy 10.13savvy Photoshop | 1 Comment

クリップボード内のRTFをStyled Stringとして解釈して行ごとに分割して画面描画サイズ幅で昇順ソートして再結合

Posted on 2月 27, 2019 by Takaaki Naganoya

クリップボードにコピーしておいた書式つきテキストを、行ごとに画面上の描画サイズで昇順ソートし、再結合してクリップボードに転送するAppleScriptです。

ほぼ毎日使っているAppleScriptの改良版です。

Cocoaの機能を呼び出すと、AppleScript冒頭にproperty宣言文を書くことになりますが(書かなくてもいいんですが)、この宣言文を「プロポーショナルフォントを考慮しつつ実際の画面上の描画サイズを考慮」して短いものから長いものにソートして掲載しています。

ただし、従来のバージョンでは実際のフォントではなく一律に指定フォントで描画したさいの描画幅でソートしていたため、ごくまれに掲載時のリストが短い順になっていませんでした(世界中で誰も気にしてねえよ! ^ー^;)。

これを、実際の指定フォントやサイズを考慮した行単位のスタイル付きテキストに分解し、描画幅でソートしたあとにスタイル付きテキストを再合成するようにしました。

従来のOld Style AppleScriptではスタイル付きテキストの操作は一切できませんでしたが、Cocoaの機能を活用することでこのように自由度の高い処理ができるようになった、という好例です。

なお、本ルーチンによって厳密に描画幅でソートしても、Web掲載時にはWebブラウザのレンダリングのルール(&ユーザー側で指定しているWebブラウザのフォント)が適用されるため、macOS上のアプリケーション上での見た目と若干違いが出るという残念な結果も出ています。

macOS標準装備のスクリプトメニューに入れて呼び出しています。

AppleScript名:クリップボード内のRTFをStyled Stringとして解釈して行ごとに分割して画面描画サイズ幅で昇順ソートして再結合
— Created 2017-04-24 by Shane Stanley
— Modified 2019-02-27 by Takaaki Naganoya
use AppleScript version "2.5"
use scripting additions
use framework "Foundation"
use framework "AppKit"
use bPlus : script "BridgePlus" –https://www.macosxautomation.com/applescript/apps/BridgePlus.html

property NSFont : a reference to current application’s NSFont
property NSColor : a reference to current application’s NSColor
property NSPasteboard : a reference to current application’s NSPasteboard
property NSAttributedString : a reference to current application’s NSAttributedString
property NSFontAttributeName : a reference to current application’s NSFontAttributeName
property NSMutableAttributedString : a reference to current application’s NSMutableAttributedString
property NSForegroundColorAttributeName : a reference to current application’s NSForegroundColorAttributeName

–クリップボードの内容をNSAttributedStringに
set anAttr to my getClipboardASStyledText()
if anAttr = missing value then return

–Split Attributed Strings into lines
set attrList to splitAttributedStringByLines(anAttr) of me

–Sort by Width in ascending
set sortedList to shellSortListAscending(attrList, 1) of me

–Append Attributed Strings
set mutableReturn to NSMutableAttributedString’s alloc()’s initWithString:(return)
set outStr to NSMutableAttributedString’s alloc()’s initWithString:""

repeat with i in sortedList
  copy i to {tmpWidth, tmpAttr}
  (
outStr’s appendAttributedString:tmpAttr)
  
  
set tmpStr to tmpAttr’s |string|() as string
  
if (tmpStr does not end with string id 10) and (tmpStr does not end with string id 13) then
    (outStr’s appendAttributedString:mutableReturn)
  end if
end repeat

— Set Styled String to Clipboard
set theArray to {outStr}
restoreClipboard(theArray) of me

–Clipboardにデータを設定する
on restoreClipboard(theArray as list)
  set thePasteboard to NSPasteboard’s generalPasteboard()
  
thePasteboard’s clearContents()
  
thePasteboard’s writeObjects:theArray
end restoreClipboard

— クリップボードの内容をNSAttributedStringとして取り出して返す
on getClipboardASStyledText()
  try
    set theNSPasteboard to NSPasteboard’s generalPasteboard()
    
set theAttributedStringNSArray to theNSPasteboard’s readObjectsForClasses:({NSAttributedString}) options:(missing value)
    
set theNSAttributedString to theAttributedStringNSArray’s objectAtIndex:0
    
return theNSAttributedString
  on error
    return missing value
  end try
end getClipboardASStyledText

on splitAttributedStringByLines(theStyledText)
  set outList to {}
  
set outAttr to NSMutableAttributedString’s alloc()’s initWithString:""
  
  
set thePureString to theStyledText’s |string|() –pure string from theStyledText
  
set theLength to theStyledText’s |length|()
  
set startIndex to 0
  
  
repeat until (startIndex = theLength)
    set {theAtts, theRange} to theStyledText’s attributesAtIndex:startIndex longestEffectiveRange:(reference) inRange:{startIndex, theLength – startIndex}
    
set aText to (thePureString’s substringWithRange:theRange) as string –String
    
    
set aColor to (theAtts’s valueForKeyPath:"NSColor") –Color
    
set aFont to (theAtts’s valueForKeyPath:"NSFont") –Font
    
if aFont is equal to missing value then error "Not font name and size are specified" –Font Name error
    
set aDFontName to aFont’s displayName() –Font Name
    
set aDFontSize to aFont’s pointSize() –Font Size
    
    
set tmpAttrStr to generateAttributedString(aText, aDFontName, aDFontSize, aColor) of me
    
outAttr’s appendAttributedString:tmpAttrStr
    
    
if (aText contains return) or (aText contains string id 10) then –CR or LF
      set tmpSize to outAttr’s |size|()
      
set tmpWidth to retWidthFromSize(tmpSize) of me
      
      
set the end of outList to {tmpWidth, outAttr}
      
set outAttr to NSMutableAttributedString’s alloc()’s initWithString:""
    end if
    
    
set startIndex to current application’s NSMaxRange(theRange)
  end repeat
  
  
set tmpSize to outAttr’s |size|()
  
set tmpWidth to retWidthFromSize(tmpSize) of me
  
set the end of outList to {tmpWidth, outAttr}
  
  
return outList
end splitAttributedStringByLines

on retWidthFromSize(tmpSize)
  if class of tmpSize = record then
    –macOS 10.10, 10.11, 10.12
    
set tmpWidth to width of tmpSize
  else
    –macOS 10.13, 10.14
    
set tmpWidth to first item of tmpSize
  end if
  
return tmpWidth
end retWidthFromSize

on generateAttributedString(aStr, aFontPSName, aFontSize, aColor)
  set tmpAttr to NSMutableAttributedString’s alloc()’s initWithString:aStr
  
set aRange to current application’s NSMakeRange(0, tmpAttr’s |length|())
  
set aVal1 to NSFont’s fontWithName:aFontPSName |size|:aFontSize
  
tmpAttr’s beginEditing()
  
tmpAttr’s addAttribute:(NSFontAttributeName) value:aVal1 range:aRange
  
tmpAttr’s addAttribute:(NSForegroundColorAttributeName) value:aColor range:aRange
  
tmpAttr’s endEditing()
  
return tmpAttr
end generateAttributedString

–入れ子のリストを昇順ソート
on shellSortListAscending(a, keyItem)
  return sort2DList(a, keyItem, {true}) of me
end shellSortListAscending

–入れ子のリストを降順ソート
on shellSortListDecending(a, keyItem)
  return sort2DList(a, keyItem, {false}) of me
end shellSortListDecending

–2D Listをソート
on sort2DList(aList as list, sortIndexes as list, sortOrders as list)
  load framework
  
–index値をAS流(アイテムが1はじまり)からCocoa流(アイテムが0はじまり)に変換
  
set newIndex to {}
  
repeat with i in sortIndexes
    set j to contents of i
    
set j to j – 1
    
set the end of newIndex to j
  end repeat
  
  
–Sort TypeのListを作成(あえて外部から指定する内容でもない)
  
set sortTypes to {}
  
repeat (length of sortIndexes) times
    set the end of sortTypes to "compare:"
  end repeat
  
  
–Sort
  
set resList to (current application’s SMSForder’s subarraysIn:(aList) sortedByIndexes:newIndex ascending:sortOrders sortTypes:sortTypes |error|:(missing value)) as list
  
return resList
end sort2DList

★Click Here to Open This Script 

Posted in Clipboard Color list RTF Sort Text | Tagged 10.11savvy 10.12savvy 10.13savvy 10.14savvy NSAttributedString NSColor NSFont NSFontAttributeName NSForegroundColorAttributeName NSMutableAttributedString NSPasteboard | Leave a comment

アラートダイアログの背景色を指定してTable Viewを表示

Posted on 2月 25, 2019 by Takaaki Naganoya

指定色のアラートダイアログを作成し、その上にScroll View+Table Viewを表示して選択肢の選択を行うAppleScriptです。

アラートダイアログの背景色変更のテストを行なったものです。また、メソッド名をテキストで(Table Viewから)取得し、そのメソッド名で色を作成するテスト(NSSelectorFromString)も行いました。

Table Viewで選択した色は、次回実行時に反映されます(スクリプトエディタ/Script Debugger上で)。

本当はTable View上で行を選択したときに、アラートダイアログの背景色を変更させたかったのですが、試してみたもののうまく動かなかったので、その機能は削りました。最初から指定色のダイアログウィンドウを表示するだけなら問題はないので、現状のようなコードに落ち着きました。

AppleScript名:アラートダイアログの背景色を指定してTable Viewを表示
— Created 2019-02-25 by Takaaki Naganoya
— 2019 Piyomaru Software
use AppleScript version "2.5"
use scripting additions
use framework "Foundation"
use framework "AppKit"

property NSAlert : a reference to current application’s NSAlert
property NSColor : a reference to current application’s NSColor
property NSIndexSet : a reference to current application’s NSIndexSet
property NSScrollView : a reference to current application’s NSScrollView
property NSTableView : a reference to current application’s NSTableView
property NSTableColumn : a reference to current application’s NSTableColumn
property NSMutableArray : a reference to current application’s NSMutableArray
property NSRunningApplication : a reference to current application’s NSRunningApplication
property NSAlertSecondButtonReturn : a reference to current application’s NSAlertSecondButtonReturn
property NSFullSizeContentViewWindowMask : a reference to current application’s NSFullSizeContentViewWindowMask

property theResult : 0
property returnCode : 0
property theDataSource : {}
property theColList : {}
property theWindow : missing value
property selectedColor : missing value

set paramObj to {myMessage:"Choose a color", mySubMessage:"Choose an appropriate color from color name list", aTableList:{"redColor", "blueColor", "yellowColor", "greenColor", "grayColor", "blackColor"}}
set aRes to my chooseItemByTableView:paramObj

on chooseItemByTableView:paramObj
  set aMainMes to myMessage of paramObj
  
set aSubMes to mySubMessage of paramObj
  
set aTList to (aTableList of paramObj) as list
  
  
— make table view with scroll view
  
set aScrollWithTable to makeTableView(aTList, 300, 120) of me
  
  
— set up alert  
  
set theAlert to NSAlert’s alloc()’s init()
  
tell theAlert
    its setMessageText:aMainMes
    
its setInformativeText:aSubMes
    
its addButtonWithTitle:"OK"
    
its addButtonWithTitle:"Cancel"
    
its setAccessoryView:aScrollWithTable
  end tell
  
  
— customize alert’s window style and color
  
if selectedColor = missing value then
    set tmpColor to NSColor’s grayColor()
  else
    set tmpSel to current application’s NSSelectorFromString(selectedColor)
    
set tmpColor to NSColor’s performSelector:tmpSel
  end if
  
  
set theWindow to theAlert’s |window|()
  
theWindow’s setTitleVisibility:false
  
–theWindow’s setStyleMask:( NSFullSizeContentViewWindowMask)
  
theWindow’s setTitlebarAppearsTransparent:true
  
theWindow’s setBackgroundColor:tmpColor
  
  
— show alert in modal loop
  
NSRunningApplication’s currentApplication()’s activateWithOptions:0
  
my performSelectorOnMainThread:"doModal:" withObject:(theAlert) waitUntilDone:true
  
if (my returnCode as number) = 1001 then error number -128
  
  
return (aScrollWithTable’s documentView’s selectedRow()) + 1
end chooseItemByTableView:

on doModal:aParam
  set (my returnCode) to aParam’s runModal()
end doModal:

on makeTableView(aList as list, aWidth as number, aHeight as number)
  set aOffset to 40
  
  
set sourceList to {}
  
repeat with i in aList
    set the end of sourceList to {dataItem:(contents of i)}
  end repeat
  
  
set theDataSource to NSMutableArray’s alloc()’s init()
  
theDataSource’s addObjectsFromArray:sourceList
  
  
set aScroll to NSScrollView’s alloc()’s initWithFrame:(current application’s NSMakeRect(0, aOffset, aWidth, aHeight))
  
set aView to NSTableView’s alloc()’s initWithFrame:(current application’s NSMakeRect(0, aOffset, aWidth, aHeight))


set aColumn to (NSTableColumn’s alloc()’s initWithIdentifier:"dataItem")
  (
aColumn’s setWidth:aWidth)
  (
aColumn’s headerCell()’s setStringValue:"dataItem")
  (
aView’s addTableColumn:aColumn)
  
  
aView’s setDelegate:me
  
aView’s setDataSource:me
  
aView’s reloadData()
  
  
aScroll’s setDocumentView:aView
  
aView’s enclosingScrollView()’s setHasVerticalScroller:true
  
  
–1行目を選択
  
set aIndexSet to NSIndexSet’s indexSetWithIndex:0
  
aView’s selectRowIndexes:aIndexSet byExtendingSelection:false
  
  
–強制的にトップにスクロール
  
set aDBounds to aScroll’s documentView()’s |bounds|()
  
if class of aDBounds = list then
    –macOS 10.13 or later
    
set maxHeight to item 2 of item 1 of aDBounds
  else
    –macOS 10.10….10.12
    
set maxHeight to height of |size| of aDBounds
  end if
  
  
set aPT to current application’s NSMakePoint(0.0, -40.0) —— (aScroll’s documentView()’s |bounds|()’s |size|()’s height))
  
aScroll’s documentView()’s scrollPoint:aPT
  
  
return aScroll
end makeTableView

–TableView Event Handlers
on numberOfRowsInTableView:aView
  return my theDataSource’s |count|()
end numberOfRowsInTableView:

on tableView:aView objectValueForTableColumn:aColumn row:aRow
  set selRow to (aRow as number)
  
set aRec to (my theDataSource)’s objectAtIndex:selRow
  
set aTitle to (aColumn’s headerCell()’s title()) as string
  
set aRes to (aRec’s valueForKey:aTitle) as string
  
set my selectedColor to aRes
  
  
return aRes
end tableView:objectValueForTableColumn:row:

on tableView:aView shouldEditTableColumn:aTableColumn row:rowIndex
  return false –Not Editable
end tableView:shouldEditTableColumn:row:

★Click Here to Open This Script 

Posted in Color GUI list | Tagged 10.11savvy 10.12savvy 10.13savvy 10.14savvy NSAlert NSAlertSecondButtonReturn NSColor NSFullSizeContentViewWindowMask NSIndexSet NSMutableArray NSRunningApplication NSScrollView NSTableColumn NSTableView | Leave a comment

アラートダイアログ上にTable View+Map View+Segmented Controlを表示

Posted on 2月 23, 2019 by Takaaki Naganoya

アラートダイアログを作成し、その上にScroll View+Table ViewおよびMap Viewを表示して選択肢の選択を行うAppleScriptです。Segmented Controlで地図の種別切り替えを行い、項目選択用のTable Viewを編集不可にしました。

Map Viewを使用するために、インターネット接続が必要です。地図表示パフォーマンスはインターネット接続速度次第です。


▲Map Type = Standard (Map)


▲Map Type = Satellite


▲Map Type = Hybrid (Satellite + Map)

本Scriptに与える緯度・経度情報についてはあらかじめ住所ジオコーダーによって「住所情報→緯度・経度情報」の変換を行なったものを書いておく必要がありますが、Yahoo!の住所ジオコーダーサービスなどを呼び出せば、住所情報をパラメーターとすることも可能です。

サンプルデータの緯度・経度情報は、例によって「戦場の絆」の入っている近所のゲーセンの情報を適当にみつくろって入れてみたものです。

本ダイアログは、それほど件数の多くない(20件ぐらい?)選択肢からの選択を意図して作ったものですが、数百件とか数千件のデータから選ぶような場合には、Outline Viewを利用して小エリアごとに分割するとか、Search Fieldを連動させてキーワードによる絞り込みを有効にするなど、それなりの対処が必要です。

AppleScript名:アラートダイアログ上にTable View+Map View+Segmented Controlを表示
— Created 2019-02-23 by Takaaki Naganoya
— 2019 Piyomaru Software
use AppleScript version "2.5"
use scripting additions
use framework "Foundation"
use framework "AppKit"
use framework "MapKit"

property NSAlert : a reference to current application’s NSAlert
property NSIndexSet : a reference to current application’s NSIndexSet
property MKMapView : a reference to current application’s MKMapView
property NSScrollView : a reference to current application’s NSScrollView
property NSTableView : a reference to current application’s NSTableView
property NSTableColumn : a reference to current application’s NSTableColumn
property NSMutableArray : a reference to current application’s NSMutableArray
property MKPointAnnotation : a reference to current application’s MKPointAnnotation
property NSSegmentedControl : a reference to current application’s NSSegmentedControl
property NSRunningApplication : a reference to current application’s NSRunningApplication
property NSAlertSecondButtonReturn : a reference to current application’s NSAlertSecondButtonReturn
property NSSegmentStyleTexturedRounded : a reference to current application’s NSSegmentStyleTexturedRounded

property MKMapTypeHybrid : a reference to current application’s MKMapTypeHybrid
property MKMapTypeSatellite : a reference to current application’s MKMapTypeSatellite
property MKMapTypeStandard : a reference to current application’s MKMapTypeStandard

property zLevel : 21 –Map Zoom Level (0:World View, 21:House/Building Zoom View)
property aMaxViewWidth : 800
property theResult : 0
property returnCode : 0
property theDataSource : {}
property curRow : 0
property aMapView : missing value
property nameL : {}
property placeL : {}

set aPlaceList to {{placeName:"Hey", aLat:"35.69906613", aLong:"139.77084064"}, {placeName:"namco中野", aLat:"35.70859274", aLong:"139.66584339"}, {placeName:"ゲームシティ板橋", aLat:"35.74572771", aLong:"139.67553260"}, {placeName:"ラウンドワンスタジアム板橋", aLat:"35.77661583", aLong:"139.67864491"}, {placeName:"キャロム練馬", aLat:"35.76386421", aLong:"139.66591600"}, {placeName:"アミュージアムOSC", aLat:"35.75308308", aLong:"139.59476696"}}

set paramObj to {myMessage:"場所の選択", mySubMessage:"適切な場所を以下のリストからえらんでください", placeList:aPlaceList}
my performSelectorOnMainThread:"chooseItemByTableViewWithMapAndSegment:" withObject:(paramObj) waitUntilDone:true
if (my theResult) = 0 then error number -128
return (my theResult)

on chooseItemByTableViewWithMapAndSegment:paramObj
  set aMainMes to myMessage of paramObj
  
set aSubMes to mySubMessage of paramObj
  
set aTList to (placeList of paramObj) as list
  
  
set nameL to {}
  
set placeL to {}
  
repeat with i in aTList
    set the end of nameL to (placeName of i)
    
set the end of placeL to {contents of (aLat of i), contents of (aLong of i)}
  end repeat
  
  
— create a view
  
set theView to current application’s NSView’s alloc()’s initWithFrame:(current application’s NSMakeRect(0, 0, aMaxViewWidth, 400))
  
  
— make table view with scroll view
  
set aScrollWithTable to makeTableView(nameL, 200, 400) of me
  
  
set aMapView to MKMapView’s alloc()’s initWithFrame:(current application’s NSMakeRect(210, 30, aMaxViewWidth – 210, 370))
  
tell aMapView
    its setMapType:MKMapTypeStandard
    
its setZoomEnabled:true
    
its setScrollEnabled:true
    
its setPitchEnabled:true
    
its setRotateEnabled:true
    
its setShowsCompass:true
    
its setShowsZoomControls:true
    
its setShowsScale:true
    
its setShowsUserLocation:true
    
    
set aLocation to current application’s CLLocationCoordinate2DMake((first item of first item of placeL) as real, (second item of first item of placeL) as real)
    
its setCenterCoordinate:aLocation zoomLevel:(zLevel) animated:false
    
its setDelegate:me
  end tell
  
  
–MapにPinを追加
  
repeat with i from 1 to (length of nameL)
    set tmpAdr to contents of item i of nameL
    
copy item i of placeL to {tmpLat, tmpLong}
    
    
set aLocation to current application’s CLLocationCoordinate2DMake(tmpLat as real, tmpLong as real)
    
set anAnnotation to MKPointAnnotation’s alloc()’s init()
    (
anAnnotation’s setCoordinate:aLocation)
    (
anAnnotation’s setTitle:tmpAdr)
    (
aMapView’s addAnnotation:anAnnotation)
  end repeat
  
  
–Segmented Controlをつくる
  
set segTitleList to {"Map", "Satellite", "Satellite + Map"}
  
set aSeg to makeSegmentedControl(segTitleList, 210, 0, 150, 20) of me
  
  
theView’s setSubviews:{aScrollWithTable, aMapView, aSeg}
  
  
— set up alert  
  
set theAlert to NSAlert’s alloc()’s init()
  
tell theAlert
    its setMessageText:aMainMes
    
its setInformativeText:aSubMes
    
its addButtonWithTitle:"OK"
    
its addButtonWithTitle:"Cancel"
    
its setAccessoryView:theView
  end tell
  
  
–To enable the first annotation visible
  
copy item 1 of placeL to {tmpLat, tmpLong}
  
set aLocation to current application’s CLLocationCoordinate2DMake(tmpLat as real, tmpLong as real)
  
aMapView’s setCenterCoordinate:aLocation zoomLevel:(zLevel) animated:false
  
  
— show alert in modal loop
  
NSRunningApplication’s currentApplication()’s activateWithOptions:0
  
my performSelectorOnMainThread:"doModal:" withObject:(theAlert) waitUntilDone:true
  
  
set (my theResult) to (aScrollWithTable’s documentView’s selectedRow()) + 1
end chooseItemByTableViewWithMapAndSegment:

on doModal:aParam
  set (my returnCode) to aParam’s runModal()
end doModal:

on makeTableView(aList as list, aWidth as number, aHeight as number)
  set aOffset to 0
  
  
set sourceList to {}
  
repeat with i in aList
    set the end of sourceList to {dataItem:(contents of i)}
  end repeat
  
  
set theDataSource to NSMutableArray’s alloc()’s init()
  
theDataSource’s addObjectsFromArray:sourceList
  
  
set aScroll to NSScrollView’s alloc()’s initWithFrame:(current application’s NSMakeRect(0, 30, aWidth, aHeight – 30))
  
set aView to NSTableView’s alloc()’s initWithFrame:(current application’s NSMakeRect(0, 30, aWidth, aHeight – 30))


set aColumn to (NSTableColumn’s alloc()’s initWithIdentifier:"dataItem")
  (
aColumn’s setWidth:aWidth)
  (
aColumn’s headerCell()’s setStringValue:"dataItem")
  (
aView’s addTableColumn:aColumn)
  
  
aView’s setDelegate:me
  
aView’s setDataSource:me
  
aView’s reloadData()
  
  
aScroll’s setDocumentView:aView
  
aView’s enclosingScrollView()’s setHasVerticalScroller:true
  
  
–1行目を選択
  
set aIndexSet to NSIndexSet’s indexSetWithIndex:0
  
aView’s selectRowIndexes:aIndexSet byExtendingSelection:false
  
  
–強制的にトップにスクロール
  
set aDBounds to aScroll’s documentView()’s |bounds|()
  
if class of aDBounds = list then
    –macOS 10.13 or later
    
set maxHeight to item 2 of item 1 of aDBounds
  else
    –macOS 10.10, 10.11, 10.12
    
set maxHeight to height of |size| of aDBounds
  end if
  
  
set aPT to current application’s NSMakePoint(0.0, -40.0) —— (aScroll’s documentView()’s |bounds|()’s |size|()’s height))
  
aScroll’s documentView()’s scrollPoint:aPT
  
  
return aScroll
end makeTableView

–TableView Event Handlers
on numberOfRowsInTableView:aView
  return my theDataSource’s |count|()
end numberOfRowsInTableView:

on tableView:aView objectValueForTableColumn:aColumn row:aRow
  set (tmpRow) to aView’s selectedRow() as number
  
  
–Table View上で現在選択行「以外の」行が選択されたら、Mapを選択項目で更新
  
if (my curRow) is not equal to tmpRow then
    set tmpLat to (first item of item (tmpRow + 1) of placeL) as real
    
set tmpLong to (second item of item (tmpRow + 1) of placeL) as real
    
    
tell aMapView
      set aLocation to current application’s CLLocationCoordinate2DMake(tmpLat, tmpLong)
      
its setCenterCoordinate:aLocation zoomLevel:(zLevel) animated:false
    end tell
    
    
set (my curRow) to tmpRow
  end if
  
  
set aRec to (my theDataSource)’s objectAtIndex:(aRow as number)
  
set aTitle to (aColumn’s headerCell()’s title()) as string
  
set aRes to (aRec’s valueForKey:aTitle)
  
return aRes
end tableView:objectValueForTableColumn:row:

on tableView:aView shouldEditTableColumn:aTableColumn row:rowIndex
  return false –Not Editable
end tableView:shouldEditTableColumn:row:

–Segmented Controlをつくる
on makeSegmentedControl(titleList, startX, startY, aWidth, aHeight)
  set aLen to length of titleList
  
  
set aSeg to NSSegmentedControl’s alloc()’s init()
  
aSeg’s setSegmentCount:aLen
  
  
set aCount to 0
  
repeat with i in titleList
    set j to contents of i
    (
aSeg’s setLabel:j forSegment:aCount)
    
set aCount to aCount + 1
  end repeat
  
  
aSeg’s setTranslatesAutoresizingMaskIntoConstraints:false
  
aSeg’s setSegmentStyle:(NSSegmentStyleTexturedRounded)
  
aSeg’s setFrame:(current application’s NSMakeRect(startX, startY, aWidth, aHeight))
  
aSeg’s setTrackingMode:0
  
aSeg’s setTarget:me
  
aSeg’s setAction:"clickedSeg:"
  
aSeg’s setSelectedSegment:0
  
  
return aSeg
end makeSegmentedControl

–Segmented Controlのクリック時のイベントハンドラ
on clickedSeg:aSender
  set aSel to aSender’s selectedSegment()
  
set tList to {MKMapTypeStandard, MKMapTypeSatellite, MKMapTypeHybrid}
  
set tmpType to contents of item (aSel + 1) of tList
  
  
aMapView’s setMapType:(tmpType)
  
  
set selSeg to aSel
end clickedSeg:

★Click Here to Open This Script 

Posted in geolocation GUI | Tagged 10.11savvy 10.12savvy 10.13savvy 10.14savvy MKMapView MKPointAnnotation NSAlert NSAlertSecondButtonReturn NSIndexSet NSMutableArray NSRunningApplication NSScrollView NSSegmentedControl NSSegmentStyleTexturedRounded NSTableColumn NSTableView | Leave a comment

アラートダイアログ上にTable View+Map Viewを表示

Posted on 2月 22, 2019 by Takaaki Naganoya

アラートダイアログを作成し、その上にScroll View+Table ViewおよびMap Viewを表示して選択肢の選択を行うAppleScriptです。

Map Viewを使用するために、インターネット接続が必要です。地図表示パフォーマンスはインターネット接続速度次第です。

{{placeName:"Hey", aLat:"35.69906613", aLong:"139.77084064"}....}

のように位置データを、

名称, 緯度, 経度

とまとめたリストで選択肢を指定します。実行すると選択肢のアイテム番号(1からはじまる)を返してきます。


▲左から、macOS 10.12.6、10.13.6、10.14.4betaで同じAppleScriptを動かしたところ。同じ場所、同じZoom LevelでもOSバージョンごとに微妙に表示内容が違う

現状の実装では、表UI(Table View)内のデータがダブルクリックで編集できてしまうので、編集できないようにするあたりが改良対象でしょうか。あと、地図・衛星写真の切り替えもつけておくとよいでしょう。

本Scriptに与える緯度・経度情報についてはあらかじめ住所ジオコーダーによって「住所情報→緯度・経度情報」の変換を行なったものを書いておく必要がありますが、Yahoo!の住所ジオコーダーサービスなどを呼び出せば、住所情報をパラメーターとすることも可能です。

サンプルデータの緯度・経度情報は、例によって「戦場の絆」の入っている近所のゲーセンの情報を適当にみつくろって入れてみたものです。

AppleScript名:アラートダイアログ上にTable View+Map Viewを表示 v2
— Created 2019-02-22 by Takaaki Naganoya
— 2019 Piyomaru Software
use AppleScript version "2.5"
use scripting additions
use framework "Foundation"
use framework "AppKit"
use framework "MapKit"

property NSAlert : a reference to current application’s NSAlert
property NSIndexSet : a reference to current application’s NSIndexSet
property MKMapView : a reference to current application’s MKMapView
property NSScrollView : a reference to current application’s NSScrollView
property NSTableView : a reference to current application’s NSTableView
property NSTableColumn : a reference to current application’s NSTableColumn
property NSMutableArray : a reference to current application’s NSMutableArray
property NSRunningApplication : a reference to current application’s NSRunningApplication
property NSAlertSecondButtonReturn : a reference to current application’s NSAlertSecondButtonReturn

property zLevel : 18
property aMaxViewWidth : 800
property theResult : 0
property returnCode : 0
property theDataSource : {}
property curRow : 0
property aMapView : missing value
property nameL : {}
property placeL : {}

set aPlaceList to {{placeName:"Hey", aLat:"35.69906613", aLong:"139.77084064"}, {placeName:"namco中野", aLat:"35.70859274", aLong:"139.66584339"}, {placeName:"ゲームシティ板橋", aLat:"35.74572771", aLong:"139.67553260"}, {placeName:"ラウンドワンスタジアム板橋", aLat:"35.77661583", aLong:"139.67864491"}, {placeName:"キャロム練馬", aLat:"35.76386421", aLong:"139.66591600"}, {placeName:"アミュージアムOSC", aLat:"35.75308308", aLong:"139.59476696"}}

set paramObj to {myMessage:"場所の選択", mySubMessage:"適切な場所を以下のリストからえらんでください", placeList:aPlaceList}
my performSelectorOnMainThread:"chooseItemByTableViewWithMap:" withObject:(paramObj) waitUntilDone:true
return (my theResult)

on chooseItemByTableViewWithMap:paramObj
  set aMainMes to myMessage of paramObj
  
set aSubMes to mySubMessage of paramObj
  
set aTList to (placeList of paramObj) as list
  
  
set nameL to {}
  
set placeL to {}
  
repeat with i in aTList
    set the end of nameL to (placeName of i)
    
set the end of placeL to {contents of (aLat of i), contents of (aLong of i)}
  end repeat
  
  
— create a view
  
set theView to current application’s NSView’s alloc()’s initWithFrame:(current application’s NSMakeRect(0, 0, aMaxViewWidth, 400))
  
  
— make table view with scroll view
  
set aScrollWithTable to makeTableView(nameL, 200, 400) of me
  
  
set aMapView to MKMapView’s alloc()’s initWithFrame:(current application’s NSMakeRect(210, 0, aMaxViewWidth – 210, 400))
  
tell aMapView
    its setMapType:(current application’s MKMapTypeStandard)
    
its setZoomEnabled:true
    
its setScrollEnabled:true
    
its setPitchEnabled:true
    
its setRotateEnabled:true
    
its setShowsCompass:true
    
its setShowsZoomControls:true
    
its setShowsScale:true
    
its setShowsUserLocation:true
    
    
set aLocation to current application’s CLLocationCoordinate2DMake((first item of first item of placeL) as real, (second item of first item of placeL) as real)
    
    
its setCenterCoordinate:aLocation zoomLevel:(zLevel) animated:false
    
its setDelegate:me
  end tell
  
  
theView’s setSubviews:{aScrollWithTable, aMapView}
  
  
— set up alert  
  
set theAlert to NSAlert’s alloc()’s init()
  
tell theAlert
    its setMessageText:aMainMes
    
its setInformativeText:aSubMes
    
its addButtonWithTitle:"OK"
    
its addButtonWithTitle:"Cancel"
    
its setAccessoryView:theView
  end tell
  
  
— show alert in modal loop
  
NSRunningApplication’s currentApplication()’s activateWithOptions:0
  
my performSelectorOnMainThread:"doModal:" withObject:(theAlert) waitUntilDone:true
  
if (my returnCode as number) = 1001 then error number -128
  
  
set (my theResult) to (aScrollWithTable’s documentView’s selectedRow()) + 1
end chooseItemByTableViewWithMap:

on doModal:aParam
  set (my returnCode) to aParam’s runModal()
end doModal:

on makeTableView(aList as list, aWidth as number, aHeight as number)
  set aOffset to 0
  
  
set sourceList to {}
  
repeat with i in aList
    set the end of sourceList to {dataItem:(contents of i)}
  end repeat
  
  
set theDataSource to NSMutableArray’s alloc()’s init()
  
theDataSource’s addObjectsFromArray:sourceList
  
  
set aScroll to NSScrollView’s alloc()’s initWithFrame:(current application’s NSMakeRect(0, aOffset, aWidth, aHeight))
  
set aView to NSTableView’s alloc()’s initWithFrame:(current application’s NSMakeRect(0, aOffset, aWidth, aHeight))


set aColumn to (NSTableColumn’s alloc()’s initWithIdentifier:"dataItem")
  (
aColumn’s setWidth:aWidth)
  (
aColumn’s headerCell()’s setStringValue:"dataItem")
  (
aView’s addTableColumn:aColumn)
  
  
aView’s setDelegate:me
  
aView’s setDataSource:me
  
aView’s reloadData()
  
  
aScroll’s setDocumentView:aView
  
aView’s enclosingScrollView()’s setHasVerticalScroller:true
  
  
–1行目を選択
  
set aIndexSet to NSIndexSet’s indexSetWithIndex:0
  
aView’s selectRowIndexes:aIndexSet byExtendingSelection:false
  
  
–強制的にトップにスクロール
  
–強制的にトップにスクロール
  
–set maxHeight to aScroll’s documentView()’s |bounds|()’s |size|()’s height
  
set aDBounds to aScroll’s documentView()’s |bounds|()
  
if class of aDBounds = list then
    –macOS 10.13 or later
    
set maxHeight to item 2 of item 1 of aDBounds
  else
    –macOS 10.10….10.12
    
set maxHeight to height of |size| of aDBounds
  end if
  
  
set aPT to current application’s NSMakePoint(0.0, -40.0) —— (aScroll’s documentView()’s |bounds|()’s |size|()’s height))
  
aScroll’s documentView()’s scrollPoint:aPT
  
  
return aScroll
end makeTableView

–TableView Event Handlers
on numberOfRowsInTableView:aView
  return my theDataSource’s |count|()
end numberOfRowsInTableView:

on tableView:aView objectValueForTableColumn:aColumn row:aRow
  set (tmpRow) to aView’s selectedRow() as number
  
  
–Table View上で現在選択行「以外の」行が選択されたら、Mapを選択項目で更新
  
if (my curRow) is not equal to tmpRow then
    set tmpLat to (first item of item (tmpRow + 1) of placeL) as real
    
set tmpLong to (second item of item (tmpRow + 1) of placeL) as real
    
    
tell aMapView
      set aLocation to current application’s CLLocationCoordinate2DMake(tmpLat, tmpLong)
      
its setCenterCoordinate:aLocation zoomLevel:(zLevel) animated:false
    end tell
    
    
set (my curRow) to tmpRow
  end if
  
  
set aRec to (my theDataSource)’s objectAtIndex:(aRow as number)
  
set aTitle to (aColumn’s headerCell()’s title()) as string
  
set aRes to (aRec’s valueForKey:aTitle)
  
return aRes
end tableView:objectValueForTableColumn:row:

★Click Here to Open This Script 

Posted in geolocation GUI list | Tagged 10.11savvy 10.12savvy 10.13savvy 10.14savvy MKMapView NSAlert NSAlertSecondButtonReturn NSIndexSet NSMutableArray NSRunningApplication NSScrollView NSTableColumn NSTableView | Leave a comment

アラートダイアログ上にTable Viewを表示

Posted on 2月 22, 2019 by Takaaki Naganoya

アラートダイアログを作成し、その上にScroll View+Table Viewを表示して選択肢の選択を行うAppleScriptです。

1D List(1次元配列)を与え、選択を行うUIです。実行すると選択肢のアイテム番号(1からはじまる)を返してきます。

とくにこれが作りたかったのではなく、位置情報(Geo Location)の選択をTable Viewで行い、該当する場所をMap Viewに表示させると擬似的に複数の固定位置情報から任意のものを選択させるダイアログが作れるだろうかと思って作成した試作品です。

東京への引っ越しの荷物が到着して、ようやく検証用のサブマシンが届いたものの、ネットワークを新規敷設しなくてはならないのでぼちぼちです。

AppleScript名:アラートダイアログ上にTable Viewを表示 v3
— Created 2019-02-21 by Takaaki Naganoya
— 2019 Piyomaru Software
use AppleScript version "2.5"
use scripting additions
use framework "Foundation"
use framework "AppKit"

property NSAlert : a reference to current application’s NSAlert
property NSIndexSet : a reference to current application’s NSIndexSet
property NSScrollView : a reference to current application’s NSScrollView
property NSTableView : a reference to current application’s NSTableView
property NSTableColumn : a reference to current application’s NSTableColumn
property NSMutableArray : a reference to current application’s NSMutableArray
property NSRunningApplication : a reference to current application’s NSRunningApplication
property NSAlertSecondButtonReturn : a reference to current application’s NSAlertSecondButtonReturn

property theResult : 0
property returnCode : 0
property theDataSource : {}

set paramObj to {myMessage:"項目の選択", mySubMessage:"適切なものを以下からえらんでください", aTableList:{"なし", "りんご", "ひよこ", "ぎょうざ", "すなぎも", "ぼんじり", "もも"}}
set aRes to my chooseItemByTableView:paramObj

on chooseItemByTableView:paramObj
  set aMainMes to myMessage of paramObj
  
set aSubMes to mySubMessage of paramObj
  
set aTList to (aTableList of paramObj) as list
  
  
–define the matrix size where you’ll put the radio buttons
  
set aScrollWithTable to makeTableView(aTList, 300, 150) of me
  
  
— set up alert  
  
set theAlert to NSAlert’s alloc()’s init()
  
tell theAlert
    its setMessageText:aMainMes
    
its setInformativeText:aSubMes
    
its addButtonWithTitle:"OK"
    
its addButtonWithTitle:"Cancel"
    
its setAccessoryView:aScrollWithTable
  end tell
  
  
— show alert in modal loop
  
NSRunningApplication’s currentApplication()’s activateWithOptions:0
  
my performSelectorOnMainThread:"doModal:" withObject:(theAlert) waitUntilDone:true
  
if (my returnCode as number) = 1001 then error number -128
  
  
return (aScrollWithTable’s documentView’s selectedRow()) + 1
end chooseItemByTableView:

on doModal:aParam
  set (my returnCode) to aParam’s runModal()
end doModal:

on makeTableView(aList as list, aWidth as number, aHeight as number)
  set aOffset to 40
  
  
set sourceList to {}
  
repeat with i in aList
    set the end of sourceList to {dataItem:(contents of i)}
  end repeat
  
  
set theDataSource to NSMutableArray’s alloc()’s init()
  
theDataSource’s addObjectsFromArray:sourceList
  
  
set aScroll to NSScrollView’s alloc()’s initWithFrame:(current application’s NSMakeRect(0, aOffset, aWidth, aHeight))
  
set aView to NSTableView’s alloc()’s initWithFrame:(current application’s NSMakeRect(0, aOffset, aWidth, aHeight))


set aColumn to (NSTableColumn’s alloc()’s initWithIdentifier:"dataItem")
  (
aColumn’s setWidth:aWidth)
  (
aColumn’s headerCell()’s setStringValue:"dataItem")
  (
aView’s addTableColumn:aColumn)
  
  
aView’s setDelegate:me
  
aView’s setDataSource:me
  
aView’s reloadData()
  
  
aScroll’s setDocumentView:aView
  
aView’s enclosingScrollView()’s setHasVerticalScroller:true
  
  
–1行目を選択
  
set aIndexSet to NSIndexSet’s indexSetWithIndex:0
  
aView’s selectRowIndexes:aIndexSet byExtendingSelection:false
  
  
–強制的にトップにスクロール
  
–set maxHeight to aScroll’s documentView()’s |bounds|()’s |size|()’s height
  
set aDBounds to aScroll’s documentView()’s |bounds|()
  
if class of aDBounds = list then
    –macOS 10.13 or later
    
set maxHeight to item 2 of item 1 of aDBounds
  else
    –macOS 10.10….10.12
    
set maxHeight to height of |size| of aDBounds
  end if
  
  
set aPT to current application’s NSMakePoint(0.0, -40.0) —— (aScroll’s documentView()’s |bounds|()’s |size|()’s height))
  
aScroll’s documentView()’s scrollPoint:aPT
  
  
return aScroll
end makeTableView

–TableView Event Handlers
on numberOfRowsInTableView:aView
  return my theDataSource’s |count|()
end numberOfRowsInTableView:

on tableView:aView objectValueForTableColumn:aColumn row:aRow
  set aRec to (my theDataSource)’s objectAtIndex:(aRow as number)
  
set aTitle to (aColumn’s headerCell()’s title()) as string
  
set aRes to (aRec’s valueForKey:aTitle)
  
return aRes
end tableView:objectValueForTableColumn:row:

★Click Here to Open This Script 

Posted in GUI list | Tagged 10.11savvy 10.12savvy 10.13savvy 10.14savvy NSAlert NSAlertSecondButtonReturn NSIndexSet NSMutableArray NSRunningApplication NSScrollView NSTableColumn NSTableView | 1 Comment

アラートダイアログ上にsegmented controlを表示

Posted on 2月 19, 2019 by Takaaki Naganoya

アラートダイアログを作成し、その上にsegmented control(タブみたいな複数項目1択UI部品)を表示して選択肢の選択を行うAppleScriptです。

選択肢のインデックス番号が(1からはじまる)返ってきます。

AppleScript名:アラートダイアログ上にsegmented controlを表示
— Created 2019-02-14 by Takaaki Naganoya
— 2019 Piyomaru Software
use AppleScript version "2.5"
use scripting additions
use framework "Foundation"
use framework "AppKit"

property NSAlert : a reference to current application’s NSAlert
property NSView : a reference to current application’s NSView
property NSSegmentedControl : a reference to current application’s NSSegmentedControl
property NSRunningApplication : a reference to current application’s NSRunningApplication
property NSSegmentStyleTexturedRounded : a reference to current application’s NSSegmentStyleTexturedRounded

property theSegSel : 0
property returnCode : 0

set paramObj to {myMessage:"項目選択", mySubMessage:"どれか選択してください。", segmentMes:{"Red", "Blue", "Yellow", "Brown", "White", "Cyan", "Grey"}}
set segRes to my chooseSegment:paramObj

on chooseSegment:paramObj
  set aMainMes to myMessage of paramObj
  
set aSubMes to mySubMessage of paramObj
  
set segMesList to segmentMes of paramObj
  
  
— create a view
  
set theView to NSView’s alloc()’s initWithFrame:(current application’s NSMakeRect(0, 0, 400, 200))
  
  
–Segmented Controlをつくる
  
set aSeg to makeSegmentedControl(segMesList, 400, 80) of me
  
  
theView’s setSubviews:{aSeg}
  
  
set theAlert to NSAlert’s alloc()’s init()
  
  
— set up alert
  
tell theAlert
    its setMessageText:aMainMes
    
its setInformativeText:aSubMes
    
its addButtonWithTitle:"OK"
    
its addButtonWithTitle:"Cancel"
    
its setAccessoryView:aSeg
  end tell
  
  
— show alert in modal loop
  
NSRunningApplication’s currentApplication()’s activateWithOptions:0
  
my performSelectorOnMainThread:"doModal:" withObject:(theAlert) waitUntilDone:true
  
if (my returnCode as number) = 1001 then error number -128
  
  
set (my theSegSel) to (aSeg’s selectedSegment()) as number
  
return (my theSegSel) + 1
end chooseSegment:

on doModal:aParam
  set (my returnCode) to aParam’s runModal()
end doModal:

on makeSegmentedControl(titleList, aWidth, aHeight)
  set aLen to length of titleList
  
  
set aSeg to NSSegmentedControl’s alloc()’s init()
  
aSeg’s setSegmentCount:aLen
  
  
set aCount to 0
  
repeat with i in titleList
    set j to contents of i
    (
aSeg’s setLabel:j forSegment:aCount)
    
set aCount to aCount + 1
  end repeat
  
  
aSeg’s setTranslatesAutoresizingMaskIntoConstraints:false
  
aSeg’s setSegmentStyle:(NSSegmentStyleTexturedRounded)
  
aSeg’s setFrame:(current application’s NSMakeRect(20, aHeight – 60, aWidth, aHeight – 40))
  
aSeg’s setTrackingMode:0
  
aSeg’s setTarget:me
  
aSeg’s setAction:"clickedSeg:"
  
aSeg’s setSelectedSegment:0
  
  
return aSeg
end makeSegmentedControl

on clickedSeg:aSender
  set aSel to aSender’s selectedSegment()
  
set selSeg to aSel
end clickedSeg:

★Click Here to Open This Script 

Posted in dialog GUI list | Tagged 10.11savvy 10.12savvy 10.13savvy NSAlert NSRunningApplication NSSegmentedControl NSSegmentStyleTexturedRounded NSView | Leave a comment

アラートダイアログ上にRadio Buttonを表示

Posted on 2月 19, 2019 by Takaaki Naganoya

アラートダイアログを作成し、その上にRadio Buttonを表示して位置座標の選択を行うAppleScriptです。

任意の選択肢をlist(配列)で指定すると、その通りのRadio Buttonを表示します。ユーザーが選択した項目のtitle文字列を返します。項目番号ではありません。

AppleScript名:アラートダイアログ上にRadio Buttonを表示 v2
— Created 2019-02-14 by Takaaki Naganoya
— 2019 Piyomaru Software
use AppleScript version "2.5"
use scripting additions
use framework "Foundation"
use framework "AppKit"

property NSAlert : a reference to current application’s NSAlert
property NSMatrix : a reference to current application’s NSMatrix
property NSButtonCell : a reference to current application’s NSButtonCell
property NSRadioButton : a reference to current application’s NSRadioButton
property NSRadioModeMatrix : a reference to current application’s NSRadioModeMatrix
property NSAlertSecondButtonReturn : a reference to current application’s NSAlertSecondButtonReturn

property theResult : 0
property returnCode : 0

set paramObj to {myMessage:"項目の選択", mySubMessage:"適切なものを以下からえらんでください", matrixTitleList:{"なし", "りんご", "ひよこ", "ぎょうざ", "すなぎも", "ぼんじり", "もも"}}
set aRes to my chooseItemByRadioButton:paramObj

on chooseItemByRadioButton:paramObj
  set aMainMes to myMessage of paramObj
  
set aSubMes to mySubMessage of paramObj
  
set aMatList to (matrixTitleList of paramObj) as list
  
set aLen to length of aMatList
  
  
–create the radio button prototype
  
set aProto to NSButtonCell’s alloc()’s init()
  
aProto’s setTitle:"Options"
  
aProto’s setButtonType:(NSRadioButton)
  
  
–define the matrix size where you’ll put the radio buttons
  
set matrixRect to current application’s NSMakeRect(20.0, 20.0, 200.0, (20.0 * aLen))
  
set aMatrix to NSMatrix’s alloc()’s initWithFrame:matrixRect mode:(NSRadioModeMatrix) prototype:aProto numberOfRows:(aLen) numberOfColumns:1
  
  
set cellList to aMatrix’s cells()
  
set aCount to 0
  
repeat with i in aMatList
    set j to contents of i
    ((
cellList’s objectAtIndex:aCount)’s setTitle:j)
    
set aCount to aCount + 1
  end repeat
  
  
— set up alert  
  
set theAlert to NSAlert’s alloc()’s init()
  
tell theAlert
    its setMessageText:aMainMes
    
its setInformativeText:aSubMes
    
its addButtonWithTitle:"OK"
    
its addButtonWithTitle:"Cancel"
    
its setAccessoryView:aMatrix
  end tell
  
  
— show alert in modal loop
  
current application’s NSRunningApplication’s currentApplication()’s activateWithOptions:0
  
my performSelectorOnMainThread:"doModal:" withObject:(theAlert) waitUntilDone:true
  
if (my returnCode as number) = 1001 then error number -128
  
  
return (aMatrix’s selectedCell()’s title()) as string
end chooseItemByRadioButton:

on doModal:aParam
  set (my returnCode) to aParam’s runModal()
end doModal:

★Click Here to Open This Script 

Posted in dialog GUI list | Tagged 10.11savvy 10.12savvy 10.13savvy NSAlert NSAlertSecondButtonReturn NSButtonCell NSMatrix NSRadioButton NSRadioModeMatrix | Leave a comment

アラートダイアログ上にMap Viewを表示

Posted on 2月 19, 2019 by Takaaki Naganoya

アラートダイアログを作成し、その上にMap Viewを表示して位置座標の選択を行うAppleScriptです。

Map Viewを使用するためには、インターネット接続が必要です。

もしこれをAppleScriptのコマンドのように表現するなら「choose geo location」とかいうコマンドになるでしょうか。本当は地図.appのように地図中でクリックした場所にピンを打って選択箇所を明示するようなものを考えていたのですが、実際にASだけで作ろうとすると難しいものがありそうで。

こうした「ざっくり場所を選ぶ」ダイアログのほか、複数の地点をピンで表示し、そのうちのどれかを地図上で選択するといったコマンドがあると使いでがありそうです。

AppleScript名:アラートダイアログ上のMap Viewを表示
— Created 2019-02-14 by Takaaki Naganoya
— 2019 Piyomaru Software
use AppleScript version "2.5"
use scripting additions
use framework "Foundation"
use framework "MapKit"
use framework "AppKit"

property |NSURL| : a reference to current application’s |NSURL|
property NSData : a reference to current application’s NSData
property MKMapView : a reference to current application’s MKMapView
property NSURLRequest : a reference to current application’s NSURLRequest
property NSURLConnection : a reference to current application’s NSURLConnection

property theResult : 0
property returnCode : 0

set nRes to hasInternetConnection("http://www.google.com") of me
if nRes = false then error "No Internet Connection…."

–地図表示初期座標。一般的にはWiFi経由でAssistive-GPSから現在位置を拾って指定
set aLong to 130.55723797
set aLat to 31.57868838

set paramObj to {myMessage:"場所の選択", mySubMessage:"目標の場所を地図中央に入れてください", aLongitude:aLong, aLatitude:aLat}
my performSelectorOnMainThread:"chooseCoordinate:" withObject:(paramObj) waitUntilDone:true
return theResult
–> {latitude:31.57868838, longitude:130.55723797}

on chooseCoordinate:paramObj
  set aMainMes to myMessage of paramObj
  
set aSubMes to mySubMessage of paramObj
  
set aLong to aLongitude of paramObj
  
set aLat to aLatitude of paramObj
  
  
–MKMapViewをつくる
  
set aMapView to MKMapView’s alloc()’s initWithFrame:(current application’s NSMakeRect(0, 0, 500, 300))
  
tell aMapView
    its setMapType:(current application’s MKMapTypeStandard)
    
its setZoomEnabled:true
    
its setScrollEnabled:true
    
its setPitchEnabled:true
    
its setRotateEnabled:true
    
its setShowsCompass:true
    
its setShowsZoomControls:true
    
its setShowsScale:true
    
its setShowsUserLocation:true
    
    
set aLocation to current application’s CLLocationCoordinate2DMake(aLat, aLong)
    
its setCenterCoordinate:aLocation zoomLevel:17 animated:false
    
its setDelegate:me
  end tell
  
  
— set up alert  
  
set theAlert to current application’s NSAlert’s alloc()’s init()
  
tell theAlert
    its setMessageText:aMainMes
    
its setInformativeText:aSubMes
    
its addButtonWithTitle:"OK"
    
its addButtonWithTitle:"Cancel"
    
its setAccessoryView:aMapView
  end tell
  
  
— show alert in modal loop
  
current application’s NSRunningApplication’s currentApplication()’s activateWithOptions:(current application’s NSApplicationActivateIgnoringOtherApps)
  
set returnCode to theAlert’s runModal()
  
if returnCode = (current application’s NSAlertSecondButtonReturn) then error number -128
  
  
set (my theResult) to (aMapView’s centerCoordinate()) as record
end chooseCoordinate:

–Internet Connection Check
on hasInternetConnection(aURLString)
  set aURL to |NSURL|’s alloc()’s initWithString:aURLString
  
set aReq to NSURLRequest’s alloc()’s initWithURL:aURL cachePolicy:(current application’s NSURLRequestReloadIgnoringLocalCacheData) timeoutInterval:5.0
  
set urlRes to (NSURLConnection’s sendSynchronousRequest:aReq returningResponse:(missing value) |error|:(missing value))
  
if urlRes = missing value then
    return false
  else
    return true
  end if
end hasInternetConnection

★Click Here to Open This Script 

Posted in geolocation GUI Internet | Tagged 10.11savvy 10.12savvy 10.13savvy NSData NSURL NSView | Leave a comment

アラートダイアログ上にpath control x2を表示

Posted on 2月 18, 2019 by Takaaki Naganoya

アラートダイアログを作成し、その上にpath controlを2つ表示してパスの選択を行うAppleScriptです。

path controlには、対象のフォルダ/ファイルをドラッグ&ドロップしてファイルのパスを指定できます。使いやすい一方で、choose folderコマンドのようにフォルダの新規作成までサポートしているわけではありません。

スクリプトエディタ、Script Debugger、Appletなどでは正常に動作しますが、スクリプトメニュー上から呼び出すとアラートダイアログが最前面に表示されず、前に出す操作が必要になります。

AppleScript名:アラートダイアログ上のpath control x2を表示
— Created 2019-02-14 by Takaaki Naganoya
— 2019 Piyomaru Software
use AppleScript version "2.5"
use scripting additions
use framework "Foundation"
use framework "AppKit"

property theResult : 0
property returnCode : 0

set paramObj to {myMessage:"項目選択", mySubMessage:"どれか選択してください。", fromPathMes:"移動元:", toPathMes:"移動先:"}
set segRes to my chooseTwoPath:paramObj
–> {fromPathRes:"/Users/me/Documents/AppleScript/パスコントロール", toPathRes:"/Users/me/Documents/AppleScript/タッチバー"}

on chooseTwoPath:paramObj
  set aMainMes to myMessage of paramObj
  
set aSubMes to mySubMessage of paramObj
  
set fromLabel to fromPathMes of paramObj
  
set toLabel to toPathMes of paramObj
  
  
— create a view
  
set theView to current application’s NSView’s alloc()’s initWithFrame:(current application’s NSMakeRect(0, 0, 800, 60))
  
  
— create two path control & text field
  
set aPathControl to current application’s NSPathControl’s alloc()’s initWithFrame:(current application’s NSMakeRect(100, 35, 700, 20))
  
set bPathControl to current application’s NSPathControl’s alloc()’s initWithFrame:(current application’s NSMakeRect(100, 0, 700, 20))
  
aPathControl’s setBackgroundColor:(current application’s NSColor’s cyanColor())
  
bPathControl’s setBackgroundColor:(current application’s NSColor’s yellowColor())
  
  
set aHome to current application’s |NSURL|’s fileURLWithPath:(current application’s NSHomeDirectory()) –initial dir
  
aPathControl’s setURL:aHome
  
bPathControl’s setURL:aHome
  
  
set a1TF to current application’s NSTextField’s alloc()’s initWithFrame:(current application’s NSMakeRect(0, 35, 100, 20))
  
set a2TF to current application’s NSTextField’s alloc()’s initWithFrame:(current application’s NSMakeRect(0, 0, 100, 20))
  
a1TF’s setEditable:false
  
a2TF’s setEditable:false
  
a1TF’s setStringValue:fromLabel
  
a2TF’s setStringValue:toLabel
  
a1TF’s setDrawsBackground:false
  
a2TF’s setDrawsBackground:false
  
a1TF’s setBordered:false
  
a2TF’s setBordered:false
  
  
theView’s setSubviews:{a1TF, aPathControl, a2TF, bPathControl}
  
  
— set up alert
  
set theAlert to current application’s NSAlert’s alloc()’s init()
  
tell theAlert
    its setMessageText:aMainMes
    
its setInformativeText:aSubMes
    
its addButtonWithTitle:"OK"
    
its addButtonWithTitle:"Cancel"
    
its setAccessoryView:theView
  end tell
  
  
— show alert in modal loop
  
current application’s NSRunningApplication’s currentApplication()’s activateWithOptions:0
  
my performSelectorOnMainThread:"doModal:" withObject:(theAlert) waitUntilDone:true
  
if (my returnCode as number) = 1001 then error number -128
  
  
set s1Val to (aPathControl’s |URL|’s |path|()) as string
  
set s2Val to (bPathControl’s |URL|’s |path|()) as string
  
  
return {fromPathRes:s1Val, toPathRes:s2Val}
end chooseTwoPath:

on doModal:aParam
  set (my returnCode) to aParam’s runModal()
end doModal:

★Click Here to Open This Script 

Posted in File path GUI | Tagged 10.11savvy 10.12savvy 10.13savvy | Leave a comment

アラートダイアログ上のDate Pickerで日付選択

Posted on 2月 18, 2019 by Takaaki Naganoya

アラートダイアログを作成し、その上にDate Pickerを表示して日付の選択を行うAppleScriptです。

スクリプトエディタ、Script Debugger、Appletなどでは正常に動作しますが、スクリプトメニュー上から呼び出すとアラートダイアログが最前面に表示されず、前に出す操作が必要になります。

もともとはShane Stanleyが作成したカレンダー選択ダイアログでしたが、メインスレッドでの実行を強制しなくてはならなかったのと、汎用的に使える構造になっていなかったので、機能を整理しました。

このDate Pickerダイアログをもとに、さまざまなGUI部品を配置してちょっとしたユーザーの操作を受け付ける汎用ダイアログとして整備してみました。最終的には、SDEF(AppleScript用語辞書)をつけたAppleScript Librariesに仕上げるといい感じでしょうか。

アラートダイアログという、サイズ固定のダイアログウィンドウ上に各種GUI部品を表示するのは、使いにくいんじゃないかと疑問を持っていたのですが、表示後のリサイズはできないものの、中に入れるViewのサイズ次第でダイアログの大きさも可変なので、予想よりも使えそうです。

AppleScript名:アラートダイアログ上のDate Pickerで日付選択
— Created 2019-02-14 by Takaaki Naganoya
— 2019 Piyomaru Software
use AppleScript version "2.5"
use scripting additions
use framework "Foundation"
use framework "AppKit"

property NSAlert : a reference to current application’s NSAlert
property NSDate : a reference to current application’s NSDate
property NSView : a reference to current application’s NSView
property NSDatePicker : a reference to current application’s NSDatePicker
property NSRunningApplication : a reference to current application’s NSRunningApplication
property NSClockAndCalendarDatePickerStyle : a reference to current application’s NSClockAndCalendarDatePickerStyle
property NSYearMonthDayDatePickerElementFlag : a reference to current application’s NSYearMonthDayDatePickerElementFlag
property NSHourMinuteSecondDatePickerElementFlag : a reference to current application’s NSHourMinuteSecondDatePickerElementFlag

property theResult : missing value
property returnCode : 0

set paramObj to {myMessage:"月選択", mySubMessage:"作成対象の月を選択してください。日付はどれでもけっこうです。"}
set {targYear, targMonth, targDate} to my chooseDate:((paramObj) of me)
–> {2018, 10, 8}

on chooseDate:paramObj
  set aMainMes to myMessage of paramObj
  
set aSubMes to mySubMessage of paramObj
  
  
— create a view
  
set theView to NSView’s alloc()’s initWithFrame:(current application’s NSMakeRect(0, 0, 200, 300))
  
set datePicker to NSDatePicker’s alloc()’s initWithFrame:(current application’s NSMakeRect(0, 0, 300, 200))
  
datePicker’s setDatePickerStyle:(NSClockAndCalendarDatePickerStyle)
  
datePicker’s setDatePickerElements:((NSYearMonthDayDatePickerElementFlag) + (NSHourMinuteSecondDatePickerElementFlag as integer))
  
  
datePicker’s setDateValue:(NSDate’s |date|())
  
  
set theSize to datePicker’s fittingSize()
  
  
theView’s setFrameSize:theSize
  
datePicker’s setFrameSize:theSize
  
  
theView’s setSubviews:{datePicker}
  
  
set theAlert to NSAlert’s alloc()’s init()
  
  
— set up alert
  
tell theAlert
    its setMessageText:aMainMes
    
its setInformativeText:aSubMes
    
its addButtonWithTitle:"OK"
    
its addButtonWithTitle:"Cancel"
    
its setAccessoryView:theView
  end tell
  
  
— show alert in modal loop
  
NSRunningApplication’s currentApplication()’s activateWithOptions:0
  
my performSelectorOnMainThread:"doModal:" withObject:(theAlert) waitUntilDone:true
  
if (my returnCode as number) = 1001 then error number -128
  
  
set (my theResult) to (datePicker’s dateValue()) as date
  
  
set aYear to year of theResult
  
set aMonth to month of theResult as number
  
set aDate to day of theResult
  
return {aYear, aMonth, aDate}
end chooseDate:

on doModal:aParam
  set (my returnCode) to aParam’s runModal()
end doModal:

★Click Here to Open This Script 

Posted in GUI | Tagged 10.11savvy 10.12savvy NSAlert NSDate NSDatePicker NSRunningApplication NSView | 1 Comment

指定Localeおよび現在のユーザー環境のLocaleから短縮曜日名を取得

Posted on 2月 16, 2019 by Takaaki Naganoya

指定の任意のLocaleもしくはScript実行中のユーザー環境のLocaleを取得して、曜日の短縮名称を取得するAppleScriptです。

AppleScript名:指定Localeおよび現在のユーザー環境のLocaleから短縮曜日名を取得
— Created 2019-02-14 by Takaaki Naganoya
— 2019 Piyomaru Software
use AppleScript version "2.4"
use scripting additions
use framework "Foundation"

set aList to getLocalizedShortDaynames("en_US")
–>  {"Sun", "Mon", "Tue", "Wed", "Thu", "Fri", "Sat"}
set aList to getLocalizedShortDaynames("fr_FR")
–>  {"dim.", "lun.", "mar.", "mer.", "jeu.", "ven.", "sam."}
set aList to getLocalizedShortDaynames("ja_JP")
–>  {"日", "月", "火", "水", "木", "金", "土"}
set aList to getLocalizedShortDaynames("zh-Hans")
–>  {"周日", "周一", "周二", "周三", "周四", "周五", "周六"}

–現在のユーザーのLocale情報を取得して短縮曜日名を取得
set curLoc to (current application’s NSLocale’s currentLocale’s objectForKey:(current application’s NSLocaleIdentifier)) as string
–> "ja_JP"
set bList to getLocalizedShortDaynames(curLoc) of me
–> {"日", "月", "火", "水", "木", "金", "土"}

–ローカライズされた曜日名称を返す(短縮名称)
on getLocalizedShortDaynames(aLoc)
  set df to current application’s NSDateFormatter’s alloc()’s init()
  
df’s setLocale:(current application’s NSLocale’s localeWithLocaleIdentifier:aLoc)
  
set dayNames to df’s shortStandaloneWeekdaySymbols() as list
  
return dayNames
end getLocalizedShortDaynames

★Click Here to Open This Script 

Posted in Calendar Locale System | Tagged 10.11savvy 10.12savvy 10.13savvy 10.14savvy | Leave a comment

YouTubeムービーの状態を取得、操作

Posted on 2月 16, 2019 by Takaaki Naganoya

Safari上で表示中のYouTubeのムービーの再生状態を取得、再生/停止のトグル動作を行うなどのAppleScriptです。

追記(2021/7/31):pausedの属性を取得できていないですね。YouTube側に変更があったのか…?
追記(2022/1/21):YouTube側の仕様がかわって、ムービープレイヤーに対する操作が通りません。x倍速再生が便利だったのですが…

macOS標準搭載のスクリプトメニューに入れて呼び出しています。

AppleScript名:Safariの最前面のウィンドウで再生中のYouTubeムービーの状態を取得する
–Get YouTube Movie status
tell application "Safari"
  tell front document
    set aRes to (do JavaScript "document.querySelector(’#movie_player video’).paused;")
  end tell
end tell

★Click Here to Open This Script 

AppleScript名:Safariの最前面のウィンドウで再生中のYouTubeムービーを再生_停止をトグル切り替え
–Toggle Youtube play/pause
tell application "Safari"
  tell front document
    set aRes to (do JavaScript "document.querySelector(’#movie_player .ytp-play-button’).click();")
  end tell
end tell

★Click Here to Open This Script 

AppleScript名:Safariの最前面のウィンドウでオープン中のYouTubeムービーを再生
tell application "Safari"
  tell front document
    set aURL to URL
    
–最前面のウィンドウがYouTubeの場合のみ処理
    
if aURL begins with "https://www.youtube.com/" then
      set aRes to (do JavaScript "document.querySelector(’#movie_player video’).paused;")
      
if aRes = true then
        –停止中(一時停止中)の場合のみ再生操作
        (
do JavaScript "document.querySelector(’#movie_player .ytp-play-button’).click();")
      end if
    end if
  end tell
end tell

★Click Here to Open This Script 

AppleScript名:Safariの最前面のウィンドウでオープン中のYouTubeムービーの再生フレームの冒頭からの時間を取得
tell application "Safari"
  tell front document
    set aURL to URL
    
–最前面のウィンドウがYouTubeの場合のみ処理
    
if aURL begins with "https://www.youtube.com/" then
      set tRes to (do JavaScript "document.querySelector(’#movie_player video’).getCurrentTime();")
    end if
  end tell
end tell

★Click Here to Open This Script 

AppleScript名:Safariの最前面のウィンドウでオープン中のYouTubeムービーの再生ポジションを変更
tell application "Safari"
  tell front document
    set aURL to URL
    
–最前面のウィンドウがYouTubeの場合のみ処理
    
if aURL begins with "https://www.youtube.com/" then
      set tRes to (do JavaScript "document.querySelector(’#movie_player video’).currentTime =300;")
    end if
  end tell
end tell

★Click Here to Open This Script 

AppleScript名:Safariの最前面のウィンドウでオープン中のYouTubeムービーのdurationを取得
tell application "Safari"
  tell front document
    set aURL to URL
    
–最前面のウィンドウがYouTubeの場合のみ処理
    
if aURL begins with "https://www.youtube.com/" then
      set tRes to (do JavaScript "document.querySelector(’#movie_player video’).duration;")
    end if
  end tell
end tell

★Click Here to Open This Script 

Posted in JavaScript URL Web Contents Control | Tagged 10.11savvy 10.12savvy 10.13savvy 10.14savvy Safari | 3 Comments

Keynoteの最前面のドキュメントの現在のスライドに指定月の日曜日はじまりカレンダーを表で作成

Posted on 2月 14, 2019 by Takaaki Naganoya

Keynoteの最前面の書類の現在選択中のスライド(ページ)に、指定月の日曜日はじまりカレンダーを、表オブジェクトで作成するAppleScriptです。

Keynoteで資料を作成していると、資料にカレンダーを入れたいケースが多々あります。Terminal.appを起動してcalコマンドでカレンダーを作ってみたり、Dashboardのカレンダーをコピーして入れることも多いですが、Dashboardはもうあるんだかないんだ分からない状態。かわりのものを用意してみました。

あとは、サイズやスタイル、土日のデータを削除するなど用途に応じて編集して表カレンダーを利用するとよいでしょう。

macOS標準装備のスクリプトメニューに入れて呼び出す場合には、アプリケーション形式で書き出したものを使う必要があります。

世の中のカレンダーは日曜日はじまりだけではないので、月曜日はじまりなど、その国、その現場ごとのルールに合わせて変更することが重要です。曜日名についても、実行中のユーザーの言語環境から取得して入れることも可能なので、そのようにしてもよいでしょう。

同じぐらいのスペックのマシンで本Scriptを動かすと、macOS 10.14, Mojave上では10.12.6上の(Keynote v8.1の)倍ぐらい速くて驚かされます。10.13.6上でも同様なのでOS側の対応というよりは、Keynote側のバージョンアップ(v8.1 –> v8.3)によるものかもしれません。

AppleScript名:指定月の日曜日はじまりカレンダーを表で作成 v2.scptd
— Created 2019-02-14 by Takaaki Naganoya
use AppleScript version "2.5"
use scripting additions
use framework "Foundation"
use framework "AppKit"

property theDate : missing value

property daysList : {"日", "月", "火", "水", "木", "金", "土"} –Japanese
–property daysList : {"Sun", "Mon", "Tue", "Wed", "Thu", "Fri", "Sat"}–English

set paramObj to {myMessage:"月選択", mySubMessage:"作成対象の月を選択してください。日付はどれでもけっこうです。"}
set {targYear, targMonth} to chooseMonth(paramObj) of me

–指定月のカレンダーを1D List(7 days x 6 weeks) で作成
set aCalList to retListCalendar(targYear, targMonth) of me

set fullCalList to daysList & aCalList

set aTitle to (targYear as string) & (targMonth as string)
set dCount to 1

tell application "Keynote"
  tell front document
    tell current slide
      set aTable to make new table with properties {header column count:0, header row count:1, row count:7, column count:7, name:aTitle}
      
tell aTable
        repeat with i from 1 to 49
          tell cell i
            ignoring application responses
              set value to contents of item dCount of fullCalList
            end ignoring
          end tell
          
set dCount to dCount + 1
        end repeat
      end tell
    end tell
  end tell
end tell

–カレンダー作成対象の年、月を選択(ただし、日付をクリックして選択しないと値を取得できないので注意)
on chooseMonth(paramObj)
  my performSelectorOnMainThread:"chooseDate:" withObject:(paramObj) waitUntilDone:true
  
set aYear to year of theDate
  
set aMonth to month of theDate as number
  
return {aYear, aMonth}
end chooseMonth

on chooseDate:paramObj
  set aMainMes to myMessage of paramObj
  
set aSubMes to mySubMessage of paramObj
  
  
— create a view
  
set theView to current application’s NSView’s alloc()’s initWithFrame:(current application’s NSMakeRect(0, 0, 100, 200))
  
set datePicker to current application’s NSDatePicker’s alloc()’s initWithFrame:(current application’s NSMakeRect(0, 0, 100, 100))
  
datePicker’s setDatePickerStyle:(current application’s NSClockAndCalendarDatePickerStyle)
  
datePicker’s setDatePickerElements:((current application’s NSYearMonthDayDatePickerElementFlag) + (current application’s NSHourMinuteSecondDatePickerElementFlag as integer))
  
  
datePicker’s setDateValue:(current application’s NSDate’s |date|())
  
  
set theSize to datePicker’s fittingSize()
  
  
theView’s setFrameSize:theSize
  
datePicker’s setFrameSize:theSize
  
  
theView’s setSubviews:{datePicker}
  
  
set theAlert to current application’s NSAlert’s alloc()’s init()
  
  
— set up alert
  
tell theAlert
    its setMessageText:aMainMes
    
its setInformativeText:aSubMes
    
its addButtonWithTitle:"OK"
    
its addButtonWithTitle:"Cancel"
    
its setAccessoryView:theView
  end tell
  
  
— show alert in modal loop
  
set returnCode to theAlert’s runModal()
  
if returnCode = (current application’s NSAlertSecondButtonReturn) then error number -128
  
  
— retrieve date
  
set (my theDate) to (datePicker’s dateValue()) as date
  
end chooseDate:

–指定月のカレンダーを1D List(7 days x 6 weeks) で返す
on retListCalendar(tYear, tMonth)
  set mLen to getMlen(tYear, tMonth) of me
  
set aList to {}
  
  
set fDat to getDateInternational(tYear, tMonth, 1) of me
  
tell current application
    set aOffset to (weekday of fDat) as number
  end tell
  
  
–header gap
  
repeat (aOffset – 1) times
    set the end of aList to ""
  end repeat
  
  
–calendar body
  
repeat with i from 1 to mLen
    set the end of aList to (i as string)
  end repeat
  
  
–footer gap
  
repeat (42 – aOffset – mLen + 1) times
    set the end of aList to ""
  end repeat
  
  
return aList
end retListCalendar

–現在のカレンダーで指定年月の日数を返す(国際化対応版)
on getMlen(aYear as integer, aMonth as integer)
  set theNSCalendar to current application’s NSCalendar’s currentCalendar()
  
set theDate to theNSCalendar’s dateWithEra:1 |year|:aYear |month|:aMonth |day|:1 hour:0 minute:0 |second|:0 nanosecond:0
  
set theResult to theNSCalendar’s rangeOfUnit:(current application’s NSDayCalendarUnit) inUnit:(current application’s NSMonthCalendarUnit) forDate:theDate
  
return |length| of theResult
end getMlen

–現在のカレンダーで指定年月のdate objectを返す
on getDateInternational(aYear, aMonth, aDay)
  set theNSCalendar to current application’s NSCalendar’s currentCalendar()
  
set theDate to theNSCalendar’s dateWithEra:1 |year|:aYear |month|:aMonth |day|:aDay hour:0 minute:0 |second|:0 nanosecond:0
  
return theDate as date
end getDateInternational

★Click Here to Open This Script 

Posted in Calendar GUI list | Tagged 10.11savvy 10.12savvy 10.13savvy 10.14savvy Keynote NSAlert NSAlertSecondButtonReturn NSCalendar NSClockAndCalendarDatePickerStyle NSDate NSDatePicker NSDayCalendarUnit NSHourMinuteSecondDatePickerElementFlag NSMonthCalendarUnit NSView NSYearMonthDayDatePickerElementFlag | Leave a comment

US Apple主催のMailing Listの死活判定

Posted on 2月 14, 2019 by Takaaki Naganoya

自分は100個以上のApple MLを購読。さすがに政府公共機関向けと学校教育機関向けMLは追い出されましたが、入れるかぎりのMLに入っておいて、手元(Mail.app上)でAppleScriptのボットを走らせメールタイトルをもとに綿密なフォルダ分けを行なって、各ML上の頻出語句でフォルダ分けして情報を整理・活用しておりました。

そんな最中、2017年1月末に発生したML Serverのダウン。その後1か月もの間、US Appleにあらゆる方法でコンタクトして無視されるという経験を経て、US在住のMLメンバーが知り合いのApple社員に電話し、それでようやく復旧したことは記憶に新しいところです。

ここに、数日前に掲載した、list.apple.com上の「Lists hosted on this site」のML一覧の画像があります。25個のMailing Listが掲載されていることが確認できます(記事作成時点のカウント)。

しかし、自分の手元には、このリストに載っていないMLあてのメールが続々と到着。

「あれ? list server上で加入フォームへのリンクが設置されていない、活動中のMailing Listがけっこうある??」

と、気がついて、、、Numbers上に記載したメールアドレスを読み取ってテストメールを送信するAppleScriptを作成して、ジャンルごとにMailing Listにテストメールを送信してみました。

手で数えたところ、「Lists hosted on this site」のページからリンクされていないが、物理的に生きているMLが35もありました。内容によっては極端に流量が少なかったり、すでに廃止されて久しい技術のために論理的に生きていないMLなどもありますが、それでも30前後は普通に運用されているMLと言ってよいでしょう。

以下、自分の個人的なカテゴリ分けのもと、「紹介されていないが生きている」MLは名称を赤く塗っておきました。

個別のMLを正式に終了させる場合には、きちんとアナウンスしてほしいところです。

追記:SALT MLとSmartCard Users MLがテスト対象のリストからもれていましたが、いずれも健在のようです。

Posted in How To | Leave a comment

spacesKitで現在のSpacesのIDを取得する

Posted on 2月 12, 2019 by Takaaki Naganoya

オープンソースのTaskRail-MacをもとにしたspacesKitフレームワークを利用して、現在のSpacesのIDを取得する実験的なAppleScriptです。

–> Download spacesKit.framework (To ~/Library/Frameworks/)

Spaces変更通知を正確に受信したい

Spacesの変更操作についてはNotificationを受信できます。でも、Spacesの切り替え表示から「元と同じSpace」を選んで、Spacesの切り替えが発生しなかったとしても同様にNotificationが発生します。「現在選択中のSpaces」の情報を取得できないのでNotificationを利用しただけでは実用性がいまひとつでした。

Spacesごとに別々のDesktop Pictureを指定していればDesktop Pictureのパスをもとに特定できなくはありませんが、すべてのSpacesで同じDesktop Pictureが設定されていると区別できません。

そこで、TaskRail-Macの機能を利用して現在有効なSpacesのIDを取得し、本当に別のSpacesに切り替えたことを検出できました。

ただ、そこまでやってもいろいろ試してみると意外な伏兵に遭遇。

アプリケーションのフルスクリーン動作画面というのはOS的には動的に生成する別のテンポラリSpacesを利用しているようです。アプリケーションをフルスクリーン表示にしたり、YouTubeのムービーを全画面表示させるとSpaces切り替えNotificationを受信したりで、この「フルスクリーン表示」状態を検出・除外する方法を知りたいところです。

TaskRail-Macの返してくるSpacesのID

Spaces関連では、Terminal上から、

defaults read com.apple.spaces

と操作することで詳細な情報を取得できますが、spacesKitフレームワーク(TaskRail-Mac)で得られるIDはこのdefaltsコマンドの結果とは異なっています。

TaskRail-MacのObjective-Cのコードを読んでみると単にカウントを行なっているだけでIDに(OS内の設定値にもとづいた)根拠はないように見えます。

TaskRail-Macが返すIDは、defaults readで設定値を読み取った中に該当するものが見つかりませんでした。


▲spacesKitが返してくるID。左側のものが17207、右側デフォルトのものが311@macOS 10.14

また、複数ディスプレイを接続した環境でも、返ってくるIDは1つのみであり、メインディスプレイ以外でSpacesが変更されてもID値に変更はないため、メインディスプレイのSpacesのIDを返してくるものと考えてください。

ここで言う「メインディスプレイ」とは、MacBook系のノート型マシンの本体内蔵ディスプレイではなく、デスクトップが表示されるソフトウェア的なメインディスプレイを指します。

元になっているTaskRail-Mac自体がかなり実験的なプログラムであり、広範なハードウェアコンフィグレーション環境下でテストされたものでなく、「ディスプレイごとに個別のスペース」設定を行なっていない環境のみを考慮したものとうかがわれます。

これは、別にTaskRail-Macが悪いのではなく、AppleがSpaces関連のAPIを整備・公開していないためです。

macOS 10.14上で動かす場合には、アプレット書き出しを行なってアプレットのバンドル内にFrameworkを格納するか、~/Library/FrameworksにFrameworkをインストールしてScript Debugger上で実行、あるいはSIPを解除してスクリプトエディタ上で実行することが可能です。

AppleScript名:spacesKitで現在のSpacesのIDを取得する.scptd
—
–  Created by: Takaaki Naganoya
–  Created on: 2019/02/09
—
–  Copyright © 2019 Piyomaru Software, All Rights Reserved
—
use AppleScript version "2.4" — Yosemite (10.10) or later
use framework "Foundation"
use framework "spacesKit" –https://github.com/DamianSullivan/TaskRail-Mac
use scripting additions

set aSwitcher to current application’s TRDesktopSwitcher’s alloc()’s init()
set aRes to aSwitcher’s getCurrentSpaceId()

★Click Here to Open This Script 

AppleScript名:space notifier
—
–  Created by: Takaaki Naganoya
–  Created on: 2019/01/25
—
–  Copyright © 2019 Piyomaru Software, All Rights Reserved
—
use AppleScript version "2.4" — Yosemite (10.10) or later
use framework "Foundation"
use framework "AppKit"
use framework "spacesKit" –https://github.com/DamianSullivan/TaskRail-Mac
use scripting additions

property aSwitcher : missing value
property currentSpace : 0

set aCenter to current application’s NSWorkspace’s sharedWorkspace()’s notificationCenter()

aCenter’s addObserver:me selector:"spacesChanged:" |name|:"NSWorkspaceActiveSpaceDidChangeNotification" object:(missing value)

set aSwitcher to current application’s TRDesktopSwitcher’s alloc()’s init()
set currentSpace to aSwitcher’s getCurrentSpaceId() as integer

on spacesChanged:aNotif
  set aRes to aSwitcher’s getCurrentSpaceId() as integer
  
if aRes is not equal to currentSpace then
    log aRes
    
display notification "Active Spaces changed to " & (aRes as string)
    
say "Active Spaces changed to " & (aRes as string) using "Tom"
    
set currentSpace to aRes
  end if
end spacesChanged:

★Click Here to Open This Script 

Posted in System | Tagged 10.11savvy 10.12savvy 10.13savvy 10.14savvy | Leave a comment

指定ファイルサイズのJPEGに変換(圧縮率可変)_1K=1024で計算

Posted on 2月 11, 2019 by Takaaki Naganoya

Finder上で選択中の画像ファイルを指定ファイルサイズを下回るよう圧縮率を調整してJPEGに変換するAppleScriptです。

指定画像を指定のファイルサイズ(1K=1024で計算)以内になるよう、非圧縮の状態から段階的に圧縮率を高くして仕上がりファイルサイズを下回るかどうか演算を行います。ファイルに書き込まずに仕上がりサイズの計算を行うところが新機軸です。

macOS標準搭載のスクリプトメニューから呼び出して使うことを想定しています。実行すると、ダイアログ表示して指定ファイルサイズをKB単位で数値入力する必要があります。

巨大な画像ファイルを処理してしまった場合への対処として、最初に最高圧縮率で圧縮してみて、指定ファイルサイズ以内になるかどうかを計算します。

最初は圧縮率100%から25%まで1%きざみで仕上がり画像ファイルサイズを計算してみたのですが、数十Mバイトの巨大な画像を処理させたら、途中でマウスカーソルが反応しないほどOSが無反応になったので(暴走状態?)、それを避けるために、このような処理を行なってみました。

JPEGにファイル変換した画像はデスクトップに

UUID_JPEG画質.jpg

の形式で出力されます。JPEG画質は1.0から0.01までの数値です。

AppleScript名:指定ファイルサイズのJPEGに変換(圧縮率可変)_1K=1024で計算
— Created 2014-02-21 Shane Stanley
— Modified 2019-02-11 Takaaki Naganoya
use AppleScript version "2.5"
use scripting additions
use framework "Foundation"
use framework "AppKit"

property |NSURL| : a reference to current application’s |NSURL|
property NSUUID : a reference to current application’s NSUUID
property NSArray : a reference to current application’s NSArray
property NSString : a reference to current application’s NSString
property NSImage : a reference to current application’s NSImage
property NSPredicate : a reference to current application’s NSPredicate
property NSJPEGFileType : a reference to current application’s NSJPEGFileType
property NSBitmapImageRep : a reference to current application’s NSBitmapImageRep
property NSURLTypeIdentifierKey : a reference to current application’s NSURLTypeIdentifierKey

property compressList : {100, 99, 98, 97, 96, 95, 90, 85, 80, 75, 70, 65, 60, 55, 50, 40, 30, 20, 25} –大→小 へと並んでいる必要がある
property kbBase : 1024

tell application "Finder"
  set inFiles to selection as alias list
end tell

–指定のAlias listのうち画像ファイルのみ抽出
set filRes1 to filterAliasListByUTI(inFiles, "public.image") of me
if filRes1 = {} then return

–ターゲットサイズを指定
set aMessage to "Input Target size in KB ( " & (kbBase as string) & " based )"
set aRes to text returned of (display dialog aMessage default answer "300" buttons {"OK"} default button 1)
if aRes = false or aRes = "" then return
set targLimit to (aRes as number) * kbBase

–選択中のファイルのうちの1つから親フォルダを求め、出力先ファイルパスを組み立てる
set outPathTarg to (contents of first item of filRes1)
set pathString to NSString’s stringWithString:outPathTarg
set newPath to (pathString’s stringByDeletingLastPathComponent()) as string

–Main Loop
repeat with i in filRes1
  set aNSImage to (NSImage’s alloc()’s initWithContentsOfFile:(i))
  
  
–巨大すぎる画像のリサイズ時への保険で、最小サイズで投機的に圧縮して結果を確認する
  
set minSize to calcSavedJPEGSizeFromNSIMage(aNSImage, (last item of compressList) / 100) of me
  
  
if minSize < targLimit then
    –Simulate Suitable JPEG Compression Ratio to target file size
    
repeat with ii in compressList
      set jj to ii / 100
      
set fileSize to calcSavedJPEGSizeFromNSIMage(aNSImage, jj) of me
      
      
if fileSize < targLimit then
        exit repeat
      end if
    end repeat
  else
    set jj to 0.01 –エラー時にはやけくそで1%まで圧縮指定
  end if
  
  
set outPOSIXpath to (newPath & "/" & (NSUUID’s UUID()’s UUIDString()) as string) & "_" & (jj as string)
  
set savePath to outPOSIXpath & ".jpg"
  
  
saveNSImageAtPathAsJPG(aNSImage, savePath, jj) of me
end repeat

–Alias listから指定UTIに含まれるものをPOSIX pathのリストで返す
on filterAliasListByUTI(aList, targUTI)
  set newList to {}
  
repeat with i in aList
    set j to POSIX path of i
    
set tmpUTI to my retUTIfromPath(j)
    
set utiRes to my filterUTIList({tmpUTI}, targUTI)
    
if utiRes is not equal to {} then
      set the end of newList to j
    end if
  end repeat
  
return newList
end filterAliasListByUTI

–指定のPOSIX pathのファイルのUTIを求める
on retUTIfromPath(aPOSIXPath)
  set aURL to |NSURL|’s fileURLWithPath:aPOSIXPath
  
set {theResult, theValue} to aURL’s getResourceValue:(reference) forKey:NSURLTypeIdentifierKey |error|:(missing value)
  
  
if theResult = true then
    return theValue as string
  else
    return theResult
  end if
end retUTIfromPath

–UTIリストが指定UTIに含まれているかどうか演算を行う
on filterUTIList(aUTIList, aUTIstr)
  set anArray to NSArray’s arrayWithArray:aUTIList
  
set aPred to NSPredicate’s predicateWithFormat_("SELF UTI-CONFORMS-TO %@", aUTIstr)
  
set bRes to (anArray’s filteredArrayUsingPredicate:aPred) as list
  
return bRes
end filterUTIList

–NSImageを指定パスにJPEG形式で保存、qulityNumは0.0〜1.0。1.0は無圧縮
on saveNSImageAtPathAsJPG(anImage, outPath, qulityNum as real)
  set imageRep to anImage’s TIFFRepresentation()
  
set aRawimg to NSBitmapImageRep’s imageRepWithData:imageRep
  
set pathString to NSString’s stringWithString:outPath
  
set newPath to pathString’s stringByExpandingTildeInPath()
  
set myNewImageData to (aRawimg’s representationUsingType:(NSJPEGFileType) |properties|:{NSImageCompressionFactor:qulityNum})
  
  
set aLength to (myNewImageData’s |length|()) as number
  
  
set aRes to (myNewImageData’s writeToFile:newPath atomically:true) as boolean
  
return aRes –true/false
end saveNSImageAtPathAsJPG

–NSImageをJPEG形式で保存したときのファイルサイズを計算
on calcSavedJPEGSizeFromNSIMage(anImage, qulityNum as real)
  set imageRep to anImage’s TIFFRepresentation()
  
set aRawimg to NSBitmapImageRep’s imageRepWithData:imageRep
  
set myNewImageData to (aRawimg’s representationUsingType:(NSJPEGFileType) |properties|:{NSImageCompressionFactor:qulityNum})
  
set aLength to (myNewImageData’s |length|()) as number
  
return aLength
end calcSavedJPEGSizeFromNSIMage

★Click Here to Open This Script 

Posted in file Image list UTI | Tagged 10.11savvy 10.12savvy 10.13savvy 10.14savvy Finder NSArray NSBitmapImageRep NSImage NSPredicate NSString NSURL NSURLTypeIdentifierKey NSUUID | Leave a comment

macOS 10.14のバグ? アクセシビリティ認証

Posted on 2月 10, 2019 by Takaaki Naganoya

macOS 10.14.4Betaを使っていて遭遇したトラブルというかバグのような挙動なのですが、「システム環境設定」の「セキュリティーとプライバシー」>「プライバシー」>「アクセシビリティ」の項目。これは、Scripterにはおなじみの「GUI Scriptingの許可」を行う設定項目です。

# 本件については、最新のmacOS 10.14.6+同OSで利用可能な最新のXcode 11.3.1の組み合わせで、後述のように回避できるようになったことを確認しています

ここに、同一名称で異なるバージョン(バージョン番号の大きいもの=新バージョン)のアプリケーションが登録されない、という不具合です。

たとえば、v1.0のappletを登録しておいて、v2.0のappletを登録しようとしても、すでにv1.0が登録されているので追加登録できないし、いったん登録したものを削除できなかったという状況でした。

この問題のどこが困るかといえば、Xcode上でAppleScriptによるアプリケーションを開発していて、その中でGUI Scriptingを利用しているような場合です。Xcode上でAppleScriptアプリケーションをビルドすると、まず最初に動作確認用にdebugビルドを行うことになりますが、これで1つのバイナリができます。テスト実行時にアクセシビリティ認証を取得して、実行。

次いで、実際に単体で実行する(Xcodeのログ表示にlogコマンドによる表示が出ない)Relaseビルドのバイナリをビルドして実行。debugビルドとは別のバイナリができて、実行してみるとOS側からアクセシビリティ認証が許可されず、実行できないという状況でした。いったんこうなると、debugビルドのバイナリのアクセシビリティ認証を解除してもReleaseビルドを登録して認証することもできず、お手上げの状態でした。

以前、macOS 10.10あたりでこの項目で不可解な挙動が見られたことがありましたが、それが復活したような不安定さを感じます。ただ、テスト機はHDDで運用しているため、設定項目の変更がなかなか反映されないといった独特の挙動が発生することもあり、継続調査は必要だと感じていました。まだ、他のユーザーの環境でも同様の問題が発生するか「裏取り」ができていない状況でもありました。

この問題がmacOS 10.14 Beta Relaseの最中に突然発症したので、当時仕事で作成途中のプログラムがGUI Scriptingを一部で利用しており、現状のままでは10.14対応ができないと顧客に報告する必要が出てきました。

本BlogにアクセスしているクライアントのOSバージョンについてWebサーバーのアクセスlogから調査してみたところ、(自分の当時のメイン環境が10.12ということもありますが)10.12が最多。10.9から10.12にほぼ同じぐらいのクライアントが存在しているもようです。鬼っ子10.13や鬼っ子改の10.14については、アクセスlogに形跡が残っていない(Unknown Version?)としか言いようがありません。10.14は多い可能性もあります。

AppleにはmacOS 10.13でバギーなまま使い物にならない状態のOSをリリースしたという「前科」があり、10.14もその延長線上にあるということから、つねに疑問を持って接しています。

# かくして、macOS 10.14が正式リリースされ、開発には利用していましたが、メイン環境は長らく移行しませんでした。macOS 10.14.6が出た段階で再評価を行い、この問題が解決されていたので移行。当時macOS 10.15が出ていたものの、メールが消えるといった致命的な障害報告があったために、移行できない危険なOSだと判断しました。

[追記]2020/3時点での状況

macOS 10.14.x+Xcodeのプロジェクト内でGUI Scriptingを使ったプログラムの認証や開発が行えたなかった件については、Xcode側の対応が改善されたためか、OS側の対処が改善されたためか、現在では解決されています。

OSバージョン:macOS 10.14.6
Xcodeバージョン:11.3.1

この環境で、「File」>「New」>「Project」>「AppleScript App」のプロジェクトを作成し、中で他のアプリケーションをGUI Scripting経由でコントロールする処理を含むプログラムを書いて、アプリケーションとしてビルドし、OS側のセキュリティ機能と折り合いをつけて動作するようにできています。

Xcode Project側で設定すべき点は2つ。

(1)Info.plistに「Privacy – AppleEvents Sending Usage Description」のエントリを作成する(このエントリの内容の文字列が、アプリケーション初回起動時のセキュリティダイアログで表示されます)

(2)Xcode Projectの「TARGETS」でビルドターゲットを選択し、「Signning & Capabilities」>「All」で「Runtime Exceptions」の「Apple Events」にチェックを入れる

これらの設定を行って、Code Signしてあればビルドして実行すると、初回時にOSのセキュリティダイアログが表示され、そののちにGUI Scriptingの認証ダイアログが表示され、認証後、ビルドしたアプリケーションをいったん終了。

再度ビルド&実行するとOS側の「セキュリティ」認証とGUI Scriptingの(アクセシビリティの)認証が通ってアプリケーションの実行ができました。

Posted in AppleScript Application on Xcode Bug GUI Scripting | Leave a comment

AppleScriptの情報源

Posted on 2月 9, 2019 by Takaaki Naganoya

AppleScript関連の情報源については、US Appleの主催しているAppleScript Users MLが圧倒的に活発だったのですが、2017年1月31日「血の火曜日事件」とのちに呼ばれる(嘘)MLサーバーのクラッシュが発生。

このサーバーダウンに際してAppleに対しさまざまなチャネル経由で「MLサーバーが落ちてるぞ!」と知らせたものの、縦割り管理が行きすぎてトラブルへの対応がめちゃめちゃ後手後手なApple。まったくMLサーバーの障害について対応しませんでした(Developper Support経由でアクセスしても対応がないのはどうかと思います)。

CEOに直接メールしてもダメ、Developper Supportにメールや電話してもダメ。MLの管理者にメールしろとか言われましたが、落ちているサーバー上にアカウントがある管理者にメールして、何の意味があるというのでしょう。

結局、この1か月間の空白によりMailing Listから多くのユーザーが離れ、MLが復旧したことを1年間知らなかったユーザーがいたほどです。

「人の煩悩の数ほど存在している」と言われていたApple MLですが、開発者サポートについてはWebフォーラムに移行しつつありました。これは、従業員が仕事中にMLに質問を投げたり回答することをTopが嫌ったとも、Apple Developper Program外のメンバーに対してApple従業員がコメントすることのコストをTopが嫌ったとも噂されていますが、正確なところはよくわかりません。

Mailing Listでないと自動処理ロボットで情報収集をしにくいし、Webフォーラムはサーバーの応答性によって閲覧に時間がかかるのでとてもとても勘弁してほしいのですが、最近はフォーラムが多いようです。

(1)AppleScript Users ML

Shaneが(4)と(5)にコメントをするようになって、それにしたがって(1)から人が減ったように思います。現状、あんまり活性度は高くありません。

(2)GroupsIO ML

(1)がコケたときに危機感を抱いた有志が立ち上げたML群です。AppleScript系ではあんまり活性度は高くありません。

(3)Apple Developper Forum

正直、使い勝手がいまひとつで、質問しても答えてもらえそうな気配がまったくしません。ここにはScripterはまったくいません。Appleの従業員が質問に答えてくれるようですが、そんなもんに一切期待していないので用はありません。

(4)Mac Scripter Forum

Xcode関連のScript(Xcode上でGUIアプリを記述するAppleScript)だとここで調べ物をしています。2018/9に管理者が交代になってLate Light Softwareが(Mark AlldrittとShane Stanleyが)運営、コメントするようになりました。

(5)Late Night Software Forum

2016年ごろに刷新されたWeb Forumです。割と活発に稼働していますが、基本的に「メーカーへの質問」とか「ユーザーサポート」の性質が強いので、書き込みしにくい印象があります(個人の印象です)。

これらのほかに、Twitterで「AppleScript」をキーワードに検索巡回を行い、間違った内容を吹聴しているユーザーに対して「これはこうだよー」とBotのようにコメントをつけています。ただ、TwitterのMac版クライアントがなくなって使い勝手が著しく悪くなったので、先行き不透明です。

ちなみに、本Blogにもフォーラムを作っておきましたが、なぜか私の独演会状態になっています。

(6)Piyomaru Software Books

Piyomaru Softwareによる電子ブック(PDF)を多数刊行しています。

Posted in How To | 2 Comments

クリップボード中の書式つきテキストのフォントサイズを取得する

Posted on 2月 8, 2019 by Takaaki Naganoya

クリップボードに入っているデータを書式付きテキストとして評価して取得し、そのうち最大のフォントサイズを取得するAppleScriptです。

クリップボードに入っているデータをプレーンテキストとして取得して処理することはよくやっていたのですが、書式付きテキストとして処理することはあまりやっていなかったので、試してみたものです。

AppleScript名:クリップボード中の書式つきテキストのフォントサイズを取得する.scptd
–Created 2015-08-03 by Shane Stanley
–Modified 2019-02-06 by Takaaki Naganoya
use AppleScript version "2.4"
use scripting additions
use framework "Foundation"
use framework "AppKit" — for NSPasteboard

property NSFont : a reference to current application’s NSFont
property NSColor : a reference to current application’s NSColor
property NSString : a reference to current application’s NSString
property NSFontAttributeName : a reference to current application’s NSFontAttributeName
property NSMutableAttributedString : a reference to current application’s NSMutableAttributedString
property NSForegroundColorAttributeName : a reference to current application’s NSForegroundColorAttributeName

–クリップボードの内容をNSAttributedStringに
set anAttr to my getClipboardASStyledText()
if anAttr = missing value then return 0

set maxSize to getAttributeStringFontSize(anAttr) of me
–> 13.0

— クリップボードの内容をNSAttributedStringとして取り出して返す
on getClipboardASStyledText()
  try
    set theNSPasteboard to current application’s NSPasteboard’s generalPasteboard()
    
set theAttributedStringNSArray to theNSPasteboard’s readObjectsForClasses:({current application’s NSAttributedString}) options:(missing value)
    
set theNSAttributedString to theAttributedStringNSArray’s objectAtIndex:0
    
return theNSAttributedString
  on error
    return missing value
  end try
end getClipboardASStyledText

on getAttributeStringFontSize(theStyledText)
  set maxSize to 0
  
set thePureString to theStyledText’s |string|() –pure string from theStyledText
  
set theLength to theStyledText’s |length|()
  
  
set startIndex to 0
  
  
repeat until (startIndex = theLength)
    set {theAtts, theRange} to theStyledText’s attributesAtIndex:startIndex longestEffectiveRange:(reference) inRange:{startIndex, theLength – startIndex}
    
    
–Font
    
set aFont to (theAtts’s valueForKeyPath:"NSFont")
    
if aFont is not equal to missing value then
      set aDFontName to aFont’s displayName()
      
set aDFontSize to (aFont’s pointSize()) as real
    end if
    
    
if maxSize < aDFontSize then
      set maxSize to aDFontSize
    end if
    
set startIndex to current application’s NSMaxRange(theRange)
  end repeat
  
  
return maxSize
end getAttributeStringFontSize

★Click Here to Open This Script 

Posted in RTF | Tagged 10.11savvy 10.12savvy 10.13savvy 10.14savvy NSColor NSFont NSFontAttributeName NSString | Leave a comment

Post navigation

  • Older posts

電子書籍(PDF)をオンラインストアで販売中!

Google Search

Popular posts

  • macOS 13, Ventura(継続更新)
  • アラートダイアログ上にWebViewで3Dコンテンツを表示(WebGL+three.js)v3
  • UI Browserがgithub上でソース公開され、オープンソースに
  • macOS 13 TTS Voice環境に変更
  • Xcode 14.2でAppleScript App Templateを復活させる
  • 2022年に書いた価値あるAppleScript
  • ChatGPTで文章のベクトル化(Embedding)
  • 新発売:AppleScriptからSiriを呼び出そう!
  • iWork 12.2がリリースされた
  • 従来と異なるmacOS 13の性格?
  • 新発売:CotEditor Scripting Book with AppleScript
  • macOS 13対応アップデート:AppleScript実践的テクニック集(1)GUI Scripting
  • AS関連データの取り扱いを容易にする(はずの)privateDataTypeLib
  • macOS 13でNSNotFoundバグふたたび
  • macOS 12.5.1、11.6.8でFinderのselectionでスクリーンショット画像をopenできない問題
  • ChatGPTでchatに対する応答文を取得
  • 新発売:iWork Scripting Book with AppleScript
  • Finderの隠し命令openVirtualLocationが発見される
  • macOS 13.1アップデートでスクリプトエディタの挙動がようやくまともに
  • あのコン過去ログビューワー(暫定版)

Tags

10.11savvy (1101) 10.12savvy (1242) 10.13savvy (1390) 10.14savvy (586) 10.15savvy (434) 11.0savvy (277) 12.0savvy (185) 13.0savvy (55) CotEditor (60) Finder (47) iTunes (19) Keynote (98) NSAlert (60) NSArray (51) NSBezierPath (18) NSBitmapImageRep (20) NSBundle (20) NSButton (34) NSColor (51) NSDictionary (27) NSFileManager (23) NSFont (18) NSImage (41) NSJSONSerialization (21) NSMutableArray (62) NSMutableDictionary (21) NSPredicate (36) NSRunningApplication (56) NSScreen (30) NSScrollView (22) NSString (117) NSURL (97) NSURLRequest (23) NSUTF8StringEncoding (30) NSView (33) NSWorkspace (20) Numbers (56) Pages (37) Safari (41) Script Editor (20) WKUserContentController (21) WKUserScript (20) WKUserScriptInjectionTimeAtDocumentEnd (18) WKWebView (23) WKWebViewConfiguration (22)

カテゴリー

  • 2D Bin Packing
  • 3D
  • AirDrop
  • AirPlay
  • Animation
  • AppleScript Application on Xcode
  • beta
  • Bluetooth
  • Books
  • boolean
  • bounds
  • Bug
  • Calendar
  • call by reference
  • Clipboard
  • Code Sign
  • Color
  • Custom Class
  • dialog
  • drive
  • exif
  • file
  • File path
  • filter
  • folder
  • Font
  • Font
  • GAME
  • geolocation
  • GUI
  • GUI Scripting
  • Hex
  • History
  • How To
  • iCloud
  • Icon
  • Image
  • Input Method
  • Internet
  • iOS App
  • JavaScript
  • JSON
  • JXA
  • Keychain
  • Keychain
  • Language
  • Library
  • list
  • Locale
  • Machine Learning
  • Map
  • Markdown
  • Menu
  • Metadata
  • MIDI
  • MIME
  • Natural Language Processing
  • Network
  • news
  • Noification
  • Notarization
  • Number
  • Object control
  • OCR
  • OSA
  • PDF
  • Peripheral
  • PRODUCTS
  • QR Code
  • Raw AppleEvent Code
  • Record
  • rectangle
  • recursive call
  • regexp
  • Release
  • Remote Control
  • Require Control-Command-R to run
  • REST API
  • Review
  • RTF
  • Sandbox
  • Screen Saver
  • Script Libraries
  • sdef
  • search
  • Security
  • selection
  • shell script
  • Shortcuts Workflow
  • Sort
  • Sound
  • Spellchecker
  • Spotlight
  • SVG
  • System
  • Tag
  • Telephony
  • Text
  • Text to Speech
  • timezone
  • Tools
  • Update
  • URL
  • UTI
  • Web Contents Control
  • WiFi
  • XML
  • XML-RPC
  • イベント(Event)
  • 未分類

アーカイブ

  • 2023年9月
  • 2023年8月
  • 2023年7月
  • 2023年6月
  • 2023年5月
  • 2023年4月
  • 2023年3月
  • 2023年2月
  • 2023年1月
  • 2022年12月
  • 2022年11月
  • 2022年10月
  • 2022年9月
  • 2022年8月
  • 2022年7月
  • 2022年6月
  • 2022年5月
  • 2022年4月
  • 2022年3月
  • 2022年2月
  • 2022年1月
  • 2021年12月
  • 2021年11月
  • 2021年10月
  • 2021年9月
  • 2021年8月
  • 2021年7月
  • 2021年6月
  • 2021年5月
  • 2021年4月
  • 2021年3月
  • 2021年2月
  • 2021年1月
  • 2020年12月
  • 2020年11月
  • 2020年10月
  • 2020年9月
  • 2020年8月
  • 2020年7月
  • 2020年6月
  • 2020年5月
  • 2020年4月
  • 2020年3月
  • 2020年2月
  • 2020年1月
  • 2019年12月
  • 2019年11月
  • 2019年10月
  • 2019年9月
  • 2019年8月
  • 2019年7月
  • 2019年6月
  • 2019年5月
  • 2019年4月
  • 2019年3月
  • 2019年2月
  • 2019年1月
  • 2018年12月
  • 2018年11月
  • 2018年10月
  • 2018年9月
  • 2018年8月
  • 2018年7月
  • 2018年6月
  • 2018年5月
  • 2018年4月
  • 2018年3月
  • 2018年2月

https://piyomarusoft.booth.pm/items/301502

メタ情報

  • ログイン
  • 投稿フィード
  • コメントフィード
  • WordPress.org

Forum Posts

  • 人気のトピック
  • 返信がないトピック

メタ情報

  • ログイン
  • 投稿フィード
  • コメントフィード
  • WordPress.org
Proudly powered by WordPress
Theme: Flint by Star Verte LLC