Menu

Skip to content
AppleScriptの穴
  • Home
  • Products
  • Books
  • Docs
  • Events
  • Forum
  • About This Blog
  • License
  • 仕事依頼

AppleScriptの穴

Useful & Practical AppleScript archive. Click '★Click Here to Open This Script' Link to download each AppleScript

タグ: NSData

Intel MacとApple Silicon Macの速度差〜画像処理

Posted on 1月 2, 2022 by Takaaki Naganoya

macOS 11から12に移行して、なぜかリリースが近づくにつれて細かいバグや巨大なバグが顕在化し、まだ手放しでおすすめできる状況にないのが心苦しいところですが、AppleScriptからのCocoa呼び出しについてはIntel Mac/Apple Silicon Macでも速度が向上。とくに、Apple Silicon Macでの速度向上が顕著です。

で、特定の処理(巨大なlistやrecord in list同士の検索)でM1 Mac miniがiMac Proの2.5倍ぐらい速いといったベンチマークは出しているわけですが、いかにもApple Silicon Macで処理が速そうな画像処理のベンチマークを実施してみました。

Intel Mac mini 2014が手元からなくなってしまったので、以前のメインマシンであったMacBook Pro Retina 2012(MacBookPro10,1)と比較してみました。

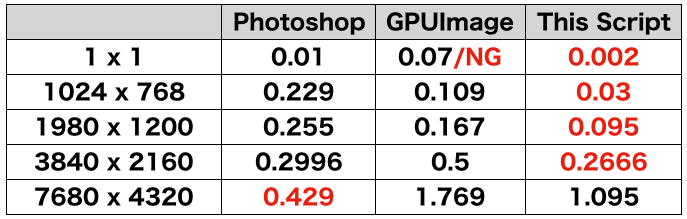
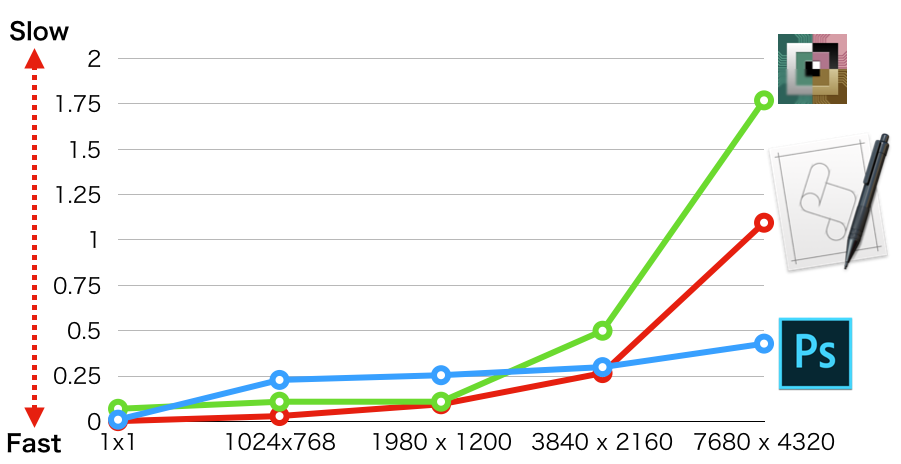
ベンチマーク内容は、指定の画像が空白かどうかをチェックするというものです。フルHD画像でも4K画像でも8K画像でも、1ピクセルでも白くない点があれば検出できるという処理内容。外部のGPUImage FrameworkやPhotoshopのヒストグラム処理を呼び出すよりもAppleScriptだけで処理した方が速いというものです(8K画像だとPhotoshopの方が速いかも)。


▲画像解像度の変化と処理時間の相関。グラフは数値が小さいほど高速。巨大な画像になると処理速度差が大きくなる傾向にある?

だいたい、MacBook Pro Retina 2012と比べて3〜4倍ぐらいM1 Mac miniの方が高速です。MacBook Pro Retina 2012は2017年のMacBook Pro 13インチといい勝負ぐらいの速度が出ており、古い割にはごく最近まで使えていました。

そこから3〜4倍高速ということで、M1 Mac miniはコストの割にはパワフルです。ファンレスのMacBook Air M1でも同程度の速度が出るはずです。

一方で、M1 Pro/M1 Max搭載のMacBook ProでM1機よりも大幅に高速なのかと言われると……このぐらいの静止画の処理程度だとごくわずかな差しかつかないはずです。下手をすると、速度差がないかもしれません。

→ Download blank_image_detection_benchmark.zip (including script libraries)

–> Download test Data


▲バーが短いほど高速。M1がM1 Maxの2倍高速という結果が出てしまった。M1 Max MBPは2014年のIntel Mac miniより少し速いだけのマシンという結果に。2018年のIntel Mac miniとの比較だとM1 Max MBPよりもIntel Mac miniのほうが速そう

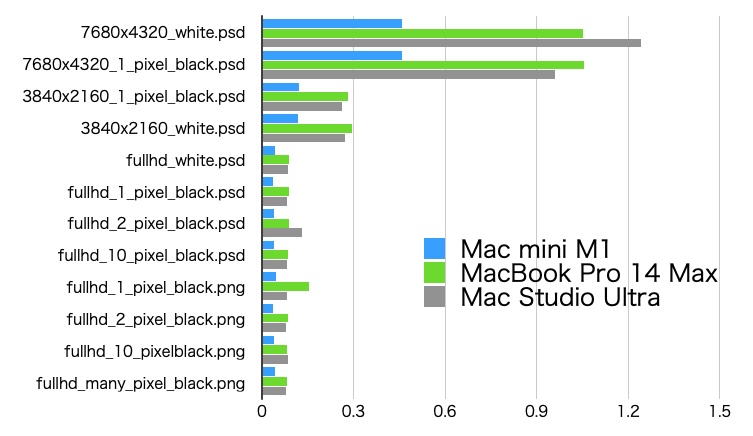
M1、M1 Max、M1 Ultra(最上位機種)で処理時間を比較した結果。予想どおりM1がM1 MaxやM1 Ultraよりも2倍以上高速。もはや8K画像ぐらいは、大きなデータにならないというべきなのか。

AppleScript名:画像の空白判定 v4_bench_時間計測.scptd
—
–  Created by: Takaaki Naganoya
–  Created on: 2022/01/01
—
–  Copyright © 2022 Piyomaru Software, All Rights Reserved
—
use AppleScript version "2.7"
use framework "Foundation"
use framework "AppKit"
use scripting additions
use mdLib : script "Metadata Lib" version "2.0.0"
use easyTable : script "display table by list"

set aFol to choose folder

set aResList to perform search in folders {aFol} predicate string "kMDItemContentTypeTree CONTAINS %@" search arguments {"public.image"}

set aList to {}
repeat with i in aResList
  set a1Dat to current application’s NSDate’s timeIntervalSinceReferenceDate()
  
  
set iRes to checkImageIsWhite(i) of blankImageKit of me
  
  
set b1Dat to current application’s NSDate’s timeIntervalSinceReferenceDate()
  
set c1Dat to b1Dat – a1Dat
  
  
set aName to (current application’s NSString’s stringWithString:i)’s lastPathComponent() as string
  
  
if iRes = true then
    set jRes to "White"
  else
    set jRes to "Black"
  end if
  
  
–log {aName, jRes}
  
  
set the end of aList to {aName, jRes, c1Dat}
end repeat

set fLabels to {"File name", "Result", "Estimate(Seconds)"}
set aRes to (display table by list aList main message "Blank Image check" size {800, 600} labels fLabels)
return aList

script blankImageKit
  use AppleScript version "2.7" — High Sierra (10.13) or later
  
use framework "Foundation"
  
use framework "AppKit"
  
use scripting additions
  
property parent : AppleScript
  
  
property NSData : a reference to current application’s NSData
  
property |NSURL| : a reference to current application’s |NSURL|
  
property NSColor : a reference to current application’s NSColor
  
property NSImage : a reference to current application’s NSImage
  
property NSBezierPath : a reference to current application’s NSBezierPath
  
property NSBitmapImageRep : a reference to current application’s NSBitmapImageRep


–Compare Original Data and
  
on checkImageIsWhite(aFile)
    set aPOSIXpath to POSIX path of aFile
    
set aURL to |NSURL|’s fileURLWithPath:(aPOSIXpath)
    
    
set aNSImage to NSImage’s alloc()’s initWithContentsOfURL:(aURL)
    
set bNSImage to NSImage’s alloc()’s initWithContentsOfURL:(aURL)
    
    
set fillColor1 to NSColor’s clearColor()
    
set blankNSImage1 to drawImageWithFilledColor(aNSImage, fillColor1) of me
    
    
set fillColor2 to makeNSColorFromRGBAval(65535, 65535, 65535, 65535, 65535) of me –white
    
set blankNSImage2 to drawImageWithFilledColor(bNSImage, fillColor2) of me
    
    
set aTiff to blankNSImage1’s TIFFRepresentation()
    
set bTiff to blankNSImage2’s TIFFRepresentation()
    
    
set chkWhite to (aTiff’s isEqualToData:bTiff) as boolean
    
    
return chkWhite
  end checkImageIsWhite


on getSizeOfImage(anNSImage)
    set aSize to anNSImage’s |size|()
    
set aClass to class of aSize
    
if aClass = record then
      copy aSize to theSize –To macOS 10.12.x
    else –macOS 10.13 or later
      set sizeX to (item 1 of item 2 of aSize)
      
set sizeY to (item 2 of item 2 of aSize)
      
set theSize to {width:sizeX, height:sizeY}
    end if
    
return theSize
  end getSizeOfImage


–指定サイズの画像を作成し、背景を指定色で塗る
  
on drawImageWithFilledColor(anImage, fillColor)
    set aSize to getSizeOfImage(anImage) of me
    
    
anImage’s lockFocus()
    
    
set theRect to {{x:0, y:0}, {width:(width of aSize), height:(height of aSize)}}
    
set theNSBezierPath to NSBezierPath’s bezierPath
    
theNSBezierPath’s appendBezierPathWithRect:theRect
    
fillColor’s |set|()
    
theNSBezierPath’s fill()
    
    
anImage’s unlockFocus()
    
    
return anImage
  end drawImageWithFilledColor


–aMaxValを最大値とする数値でNSColorを作成して返す
  
on makeNSColorFromRGBAval(redValue as integer, greenValue as integer, blueValue as integer, alphaValue as integer, aMaxVal as integer)
    set aRedCocoa to (redValue / aMaxVal) as real
    
set aGreenCocoa to (greenValue / aMaxVal) as real
    
set aBlueCocoa to (blueValue / aMaxVal) as real
    
set aAlphaCocoa to (alphaValue / aMaxVal) as real
    
set aColor to NSColor’s colorWithCalibratedRed:aRedCocoa green:aGreenCocoa blue:aBlueCocoa alpha:aAlphaCocoa
    
return aColor
  end makeNSColorFromRGBAval
  
end script

★Click Here to Open This Script 

Posted in Image | Tagged 10.14savvy 10.15savvy 11.0savvy 12.0savvy NSBezierPath NSBitmapImageRep NSColor NSData NSDate NSImage NSURL | Leave a comment

NSDataのdescriptionの形式がmacOS 10.15で変更された

Posted on 5月 20, 2021 by Takaaki Naganoya

文字列データのhexdumpを表示させようとして、予期しない結果が返ってきたので原因を追求してみました。

問題の発生源はNSDataのdescriptionを取得した箇所。

--> "<e38182e3 8184e381 86e38188 e3818a>"--macOS 10.14.6
--> "{length = 15, bytes = 0xe38182e38184e38186e38188e3818a}"--macOS 10.15.7
--> "{length = 15, bytes = 0xe38182e38184e38186e38188e3818a}"--macOS 11.4

macOS 10.15で、この結果を返すさいの記述が変更になったようです。descriptionからhex値を取得するのは、たしかに「裏技」っぽい解決策。

データが長くなると、

{length = 60, bytes = 0xe38182e3 8184e381 86e38188 e3818ae3 ... 81a4e381 a6e381a8 }

のように途中が省略されるので、データを小分けにして処理する必要があります。

AppleScript名:dataのdescription.scptd
—
–  Created by: Takaaki Naganoya
–  Created on: 2021/05/20
—
–  Copyright © 2021 Piyomaru Software, All Rights Reserved
—   
–  Don’t remove this header!!!

use AppleScript version "2.4" — Yosemite (10.10) or later
use framework "Foundation"
use scripting additions

set aStr to current application’s NSString’s stringWithString:"あいうえお"
set aDat to aStr’s dataUsingEncoding:(current application’s NSUTF8StringEncoding)
set bStr to aDat’s |description|() as string
–> "<e38182e3 8184e381 86e38188 e3818a>"–macOS 10.14.6
–> "{length = 15, bytes = 0xe38182e38184e38186e38188e3818a}"–macOS 10.15.7
–> "{length = 15, bytes = 0xe38182e38184e38186e38188e3818a}"–macOS 11.x

★Click Here to Open This Script 

Shane Stanleyからメールで「debugDescriptionだと従来のdescriptionと同じ結果が得られるよ」と教えてもらいました(Thanks Shane!)。

AppleScript名:hexdumpTest.scptd
–By Shane Stanley 2021/05/21
use AppleScript version "2.7"
use framework "Foundation"
use scripting additions

set a to "あいうえおかきくけこさしすせそたちつてと"
set aStr to current application’s NSString’s stringWithString:a
set aDat to aStr’s dataUsingEncoding:(current application’s NSUTF8StringEncoding)
set bStr to aDat’s |debugDescription|() as string
–> <e38182e3 8184e381 86e38188 e3818ae3 818be381 8de3818f e38191e3 8193e381 95e38197 e38199e3 819be381 9de3819f e381a1e3 81a4e381 a6e381a8>

★Click Here to Open This Script 

Posted in Text | Tagged 10.14savvy 10.15savvy 11.0savvy NSData | 1 Comment

指定Bundle IDのstringsファイル中における指定タイトルの指定言語のローカライズ版を求める

Posted on 2月 24, 2020 by Takaaki Naganoya

/Applicationsフォルダ以下のすべてのアプリケーションのバンドル中のstringsファイル中を走査して、指定の言語における指定キーワード(”Quit”など)の指定言語におけるローカライズした文字列を取得するAppleScriptです。

自分でアプリケーションのローカライズを行う際に、既存のmacOS用のアプリケーションのバンドル内にあるstringsファイルを参考にするためのツールです。

もともとは、Shane StanleyがLate Night Softwareのフォーラムに投稿したプログラムですが、自分もいろいろ試していたように、アプリケーション側のローカライズのされ方(言語別のフォルダ名の名称指定)に「ゆらぎ」があるため、そのあたりは総当たりでテストしているようです。

オリジナルではデータが存在しない場合にはエラーにしていましたが、このようにすべてのアプリケーションに対してループで処理を行うような場合にはエラーで止まっては困るので、そのあたりを書き換えています。

/Applicationsフォルダ以下のSpotlight検索によるアプリケーションの取得についてはMetadata Libを用いています。自分の開発環境で1キーワード(x バンドル内のすべてのstringsファイル x すべてのアプリケーション)の問い合わせに3.6〜5秒程度かかっています。HDDの環境ではこれより大幅に長くかかるはずなので、ちょっと考えたくありません。

また、Stringsファイルで供給されるローカライズ情報については探すことができますが、OS側が強制的に供給するWindowメニューなどの内容については本Scriptで調査することはできません。ねんのため。

AppleScript名:指定Bundle IDのstringsファイル中における指定タイトルの指定言語のローカライズ版を求める.scptd
—
–  Created by: Takaaki Naganoya
–  Created on: 2020/02/24
—
–  Copyright © 2020 Piyomaru Software, All Rights Reserved
—
use AppleScript version "2.5" — El Capitan (10.11) or later
use framework "Foundation"
use framework "AppKit"
use scripting additions
use mdLib : script "Metadata Lib" version "2.0.0" –https://macosxautomation.com/applescript/apps/Script_Libs.html

property NSWorkspace : a reference to current application’s NSWorkspace

set targStr to "Performance"
set origLang to "en" –From
set targLang to "hu" –To

set tList to {}

set origPath to POSIX path of (path to applications folder)
set aResList to mdLib’s searchFolders:{origPath} searchString:("kMDItemContentType == %@") searchArgs:{"com.apple.application-bundle"}
repeat with i in aResList
  set aTitleRes to getAppGUITitleWithCurrentLocale(i, targStr, origLang, targLang) of me
  
if aTitleRes is not equal to missing value and aTitleRes is not in tList then
    set the end of tList to aTitleRes
  end if
end repeat

return tList
–> {"Előadás", "Teljesítmény"}

–指定Bundle IDのstringsファイル中における指定タイトルの現在実行中のロケールのローカライズ版を求める
on getAppGUITitleWithCurrentLocale(aPath, aTargetTitle, origLang, targLang)
  return my localizedStringFor:aTargetTitle inBundle:aPath destLang:targLang sourceLang:origLang
end getAppGUITitleWithCurrentLocale

–Bundle IDからアプリケーションのPathを返す
on retAppAbusolutePathFromBundleID(aBundleID)
  set appPath to NSWorkspace’s sharedWorkspace()’s absolutePathForAppBundleWithIdentifier:aBundleID
  
if appPath = missing value then return false
  
return appPath as string
end retAppAbusolutePathFromBundleID

–Original By Shane Stanley@Late Night Software
–Modified By Takaaki Naganoya
–https://forum.latenightsw.com/t/localizing-gui-scripts/2246
on localizedStringFor:baseString inBundle:aPOSIX destLang:destLangCode sourceLang:sourceLangCode
  set anURL to current application’s |NSURL|’s fileURLWithPath:aPOSIX
  
set theBundle to current application’s NSBundle’s bundleWithURL:anURL
  
if theBundle = missing value then return missing value
  
  
set sourceLangString to current application’s NSString’s stringWithString:sourceLangCode
  
set destLangString to current application’s NSString’s stringWithString:destLangCode
  
  
— get source strings values
  
set theURLs to theBundle’s URLsForResourcesWithExtension:"strings" subdirectory:"" localization:sourceLangString
  
if theURLs = missing value then return missing value
  
if theURLs’s |count|() < 2 and (sourceLangString’s containsString:"_") as boolean then
    — try stripping off country-specific part
    
set sourceLangString to sourceLangString’s substringToIndex:2
    
set theURLs to theBundle’s URLsForResourcesWithExtension:"strings" subdirectory:"" localization:sourceLangString
  end if
  
  
if theURLs’s |count|() < 2 then
    — try long name for localization
    
set sourceLangString to (current application’s NSLocale’s localeWithLocaleIdentifier:"en")’s localizedStringForLocaleIdentifier:sourceLangString
    
set theURLs to theBundle’s URLsForResourcesWithExtension:"strings" subdirectory:"" localization:sourceLangString
  end if
  
  
if theURLs’s |count|() < 2 then return missing value –error "No " & sourceLangCode & " localization found"
  
  
repeat with sourceURL in theURLs
    — skip unlocalized file
    
if not (sourceURL’s URLByDeletingLastPathComponent()’s lastPathComponent()’s isEqualToString:"Resources") as boolean then
      set theData to (current application’s NSData’s alloc()’s initWithContentsOfURL:sourceURL)
      
      
if theData is missing value then return — error "No " & sourceLangCode & " localization found"
      
set sourceDict to (current application’s NSPropertyListSerialization’s propertyListWithData:theData options:0 format:0 |error|:(missing value))
      
if sourceDict = missing value then return missing value
      
      
set theKey to (sourceDict’s allKeysForObject:baseString)’s firstObject()
      
      
if theKey is not missing value then
        set stringsFileName to sourceURL’s lastPathComponent()’s stringByDeletingPathExtension()
        
set localURL to (theBundle’s URLForResource:stringsFileName withExtension:"strings" subdirectory:"" localization:destLangString)
        
        
if localURL is missing value and (destLangString’s containsString:"_") as boolean then
          — try stripping off country-specific part
          
set destLangString to (destLangString’s substringToIndex:2)
          
set localURL to (theBundle’s URLForResource:stringsFileName withExtension:"strings" subdirectory:"" localization:destLangString)
        end if
        
        
if localURL is missing value then
          — try long name for localization
          
set destLangString to ((current application’s NSLocale’s localeWithLocaleIdentifier:"en")’s localizedStringForLocaleIdentifier:destLangString)
          
set localURL to (theBundle’s URLForResource:stringsFileName withExtension:"strings" subdirectory:"" localization:destLangString)
        end if
        
        
if localURL is missing value then return missing value — "No " & destLangCode & " localization found"
        
        
set theData to (current application’s NSData’s alloc()’s initWithContentsOfURL:localURL)
        
if theData is missing value then missing value — "No " & destLangCode & " localization found"
        
set destDict to (current application’s NSPropertyListSerialization’s propertyListWithData:theData options:0 format:0 |error|:(missing value))
        
set destValue to (destDict’s objectForKey:theKey)
        
        
–if destValue is not missing value then return {destValue as text, stringsFileName as text}
        
if destValue is not missing value then return destValue as text
        
return missing value
      end if
    end if
  end repeat
  
return missing value
end localizedStringFor:inBundle:destLang:sourceLang:

★Click Here to Open This Script 

Posted in file File path Language Locale Text | Tagged 10.14savvy 10.15savvy NSBundle NSData NSLocale NSPropertyListSerialization NSString NSURL NSWorkspace | Leave a comment

画像の空白判定 v4

Posted on 12月 19, 2019 by Takaaki Naganoya

画像のすべてのピクセルが白であることをチェックするAppleScriptです。

以前にmacOS 10.12上で作成した「空白画像検出v3」は一般的に処理時間のかかる空白画像の検出(ヒストグラム計算してチェックする?)が高速に処理できます(GPUImageでヒストグラム計算を行うより2倍ぐらい高速)。空白検出のためだけにAdobe Photoshopが必要になるといった事態は避けられます。

–> test Data(動作検証用各種テストデータ)

macOS 10.14.6上でこのルーチンを再度試してみたところ、思ったとおりに空白検出(数百万ピクセルの画像でも1つだけ黒であればfalseを返す)してくれません。ちょっと書き方を変えていますが、単体で通常のAppleScript(Cocoa不使用)にコンテクストメニューから突っ込むモジュールとして運用するためです。

copyコマンドがdeep copyしてくれない?

参照ではなくすべてのデータをコピーするコマンドとして、copyコマンドはとても重宝しています。単に「パラメータの代入の方向が違う偏屈なコマンド」ではなく、明示的にデータ内容をコピーするためのコマンドと認識しています。

AppleScriptのオブジェクト同様、Cocoaのオブジェクトについてもcopyコマンドでdeep copyしてくれるものと理解していましたが、macOS 10.14.6上で本ルーチンを試してみたところ、どうも参照をコピーしている気配がします。

AppleScriptのオブジェクト(配列とか)をcopyコマンドでコピーすると、参照ではなくデータが複製されていることを確認しました。Cocoaオブジェクトのcopyも同様かどうかは、ちょっとそうじゃないんじゃないかというところです。

set bNSImage to aNSImage's |copy|()

Cocoaの世界のオブジェクトのコピーはこんな感じ(↑)でできたので、今後はこちらを採用することにします。

1×1のNSImageに色を塗るとデータサイズが増える

ビットマップ画像の状態であるNSBitmapImageRepになっていれば、1×1画像のサイズは同じことが期待されます。実際、macOS 10.12上ではそのように扱えていました。

ところが、macOS 10.14上で1×1ドットのNSImageに対して色を塗って、NSBitmapImageRepを取得すると、塗らない状態のNSImageよりもデータ(NSData)サイズが大きくなることがわかりました。


▲1×1のPNG画像をビットマップ化したデータ。赤が処理前、青が塗りつぶし処理後のデータ(macOS 10.14.6)。ピクセル数が増えてるのでは? と疑ってサイズを何回も計算して確認しましたが、間違っていません

しかも、データ量がmacOS 10.14と10.15では大幅に異なります(macOS 10.15では大幅にデータ量が減る)。

 1×1 PNG画像 ビットマップ化したデータサイズ:3,354 Bytes(macOS 10.14.6)
 1×1 PNG画像 塗りつぶし ビットマップ化したデータサイズ:3,574 Bytes(macOS 10.14.6)
 1×1 PNG画像 塗りつぶし ビットマップ化したデータサイズ:750 Bytes(macOS 10.15.2)

さすがに匙を投げかけましたが、比較元のデータに透明の色(clearColor())を塗る=画像的に意味はないが、同じ処理を通すことでデータサイズを同程度にするという処理を行うことで、いい感じに空白検出できるようになりました。

なにをどういじくったら、1×1ビットマップ画像のサイズがOSアップデートごとに大幅に変わるのかさっぱり理解できないのですが、そこに何か意味があるのでしょうか?

Mac App Storeに出したアプリケーションで、PDFの空白ページ検出に本ルーチンを利用していますが、Appleのレビュー段階で「単にPDFから文字を抽出して空白検出しているのだろう」と思われてリジェクトされました。実際には、全ページを画像レンダリングして1ドットの画像でも存在していたら空白としては認識しない仕様になっているのですが、Appleのレビューワーには処理内容を説明して、各種ベンチマーク結果などを出さないと信じてもらえませんでした。

Appleのエンジニアが考えるところの空白検出が「文字チェックだけ」の使い物にならない処理だということはよくわかりました。また、頭からそのように思い込んで攻撃してきた間抜けにも遭遇してウンザリしました。

AppleScript名:画像の空白判定 v4
set aFile to (choose file of type {"public.image"})
set iRes to checkImageIsWhite(aFile) of whiteImageKit
–> true –white (blank) image

script whiteImageKit
  use AppleScript version "2.7" — High Sierra (10.13) or later
  
use framework "Foundation"
  
use framework "AppKit"
  
use scripting additions
  
property parent : AppleScript
  
  
property NSData : a reference to current application’s NSData
  
property NSDate : a reference to current application’s NSDate
  
property |NSURL| : a reference to current application’s |NSURL|
  
property NSColor : a reference to current application’s NSColor
  
property NSImage : a reference to current application’s NSImage
  
property NSBezierPath : a reference to current application’s NSBezierPath
  
property NSBitmapImageRep : a reference to current application’s NSBitmapImageRep
  
  
–Compare Original Data and
  
on checkImageIsWhite(aFile)
    set aPOSIXpath to POSIX path of aFile
    
set aURL to |NSURL|’s fileURLWithPath:(aPOSIXpath)
    
    
set aNSImage to NSImage’s alloc()’s initWithContentsOfURL:(aURL)
    
set bNSImage to NSImage’s alloc()’s initWithContentsOfURL:(aURL)
    
    
–copy aNSImage to bNSImage–Not deep copy ????
    
    
set fillColor1 to NSColor’s clearColor()
    
set blankNSImage1 to drawImageWithFilledColor(aNSImage, fillColor1) of me
    
    
set fillColor2 to makeNSColorFromRGBAval(65535, 65535, 65535, 65535, 65535) of me
    
set blankNSImage2 to drawImageWithFilledColor(bNSImage, fillColor2) of me
    
    
set aTiff to blankNSImage1’s TIFFRepresentation()
    
set bTiff to blankNSImage2’s TIFFRepresentation()
    
    
set chkWhite to (aTiff’s isEqualToData:bTiff) as boolean
    
    
return chkWhite
  end checkImageIsWhite


on getSizeOfImage(anNSImage)
    set aSize to anNSImage’s |size|()
    
set aClass to class of aSize
    
if aClass = record then
      copy aSize to theSize –To macOS 10.12.x
    else –macOS 10.13 or later
      set sizeX to (item 1 of item 2 of aSize)
      
set sizeY to (item 2 of item 2 of aSize)
      
set theSize to {width:sizeX, height:sizeY}
    end if
    
return theSize
  end getSizeOfImage


–指定サイズの画像を作成し、背景を指定色で塗る
  
on drawImageWithFilledColor(anImage, fillColor)
    set aSize to getSizeOfImage(anImage) of me
    
    
anImage’s lockFocus()
    
    
set theRect to {{x:0, y:0}, {width:(width of aSize), height:(height of aSize)}}
    
set theNSBezierPath to NSBezierPath’s bezierPath
    
theNSBezierPath’s appendBezierPathWithRect:theRect
    
fillColor’s |set|()
    
theNSBezierPath’s fill()
    
    
anImage’s unlockFocus()
    
    
return anImage
  end drawImageWithFilledColor


–aMaxValを最大値とする数値でNSColorを作成して返す
  
on makeNSColorFromRGBAval(redValue as integer, greenValue as integer, blueValue as integer, alphaValue as integer, aMaxVal as integer)
    set aRedCocoa to (redValue / aMaxVal) as real
    
set aGreenCocoa to (greenValue / aMaxVal) as real
    
set aBlueCocoa to (blueValue / aMaxVal) as real
    
set aAlphaCocoa to (alphaValue / aMaxVal) as real
    
set aColor to NSColor’s colorWithCalibratedRed:aRedCocoa green:aGreenCocoa blue:aBlueCocoa alpha:aAlphaCocoa
    
return aColor
  end makeNSColorFromRGBAval
  
end script

★Click Here to Open This Script 

Posted in Image | Tagged 10.13savvy 10.14savvy 10.15savvy NSBezierPath NSBitmapImageRep NSColor NSData NSImage NSURL | 3 Comments

htmlの並列ダウンロード処理

Posted on 9月 13, 2019 by Takaaki Naganoya

Webコンテンツ(HTML)の並列ダウンロードを行うAppleScriptです。

Webコンテンツからデータを抽出する際に、あらかじめ一括でHTMLを並列ダウンロードしておいて、ダウンロードずみのデータを一括処理すると処理時間を大幅に短縮できます。「戦場の絆」Wikiから機体データの表をすべて取得するのに、順次HTMLを取得して抽出していた場合には3〜4分程度かかっていたものを、並列ダウンロードしたのちにデータ処理するように変更すれば、これが十数秒程度にまで高速化できます。

既存のプログラムを修正してHTMLのダウンロード用に仕立ててみました。並列キュー(未処理タスク数)へのアクセスはAppleScriptからはできなかった(実行すると結果が返ってこなかった)のですが、そこに手をつけずに並列処理の完了状態を検出しています。

ダウンロードが完了したデータはlist(配列)に入るので、リクエスト数と完了リクエスト数をループ内でチェックし、完了アイテム数がリクエスト数と同じになれば終了、条件を満たさない場合でも指定のタイムアウト時間を超えたらエラー終了という処理を行なっています。

問題点は、スクリプトエディタ上では実行できるもののScript Debugger上では実行できないことです(結果が返ってきません)。AppleScriptアプレットに書き出して実行してみたところ、結果が返ってきません。ただし、Script Menuからの実行は行えます(macOS 10.12.6、10.13.6、10.14.6で同様)。XcodeのAppleScript Appのプロジェクト内で実行することはできました。

このように、ランタイム環境に実行状況が左右される点にご注意ください。ただし、そうしたマイナス面を補ってあまりあるほどダウンロードは高速です。90ファイル強のダウンロードを数秒で完了(マシン、ネットワーク速度、ダウンロード先サーバーの負荷状況、キャッシュ状態などに左右される、参考値です)するため、ダウンロード後に各HTMLからのデータ抽出も高速に行えます。

AppleScript名:htmlの並列ダウンロード処理
— Created 2019-09-13 by Takaaki Naganoya
— 2019 Piyomaru Software
—
– オリジナル: HTTP からファイルをダウンロードして、ローカルに保存する方法(shintarou_horiのブログ)
— http://shintarou-hori.hatenablog.com/entry/2014/03/15/193604

use AppleScript version "2.4"
use scripting additions
use framework "Foundation"

property |NSURL| : a reference to current application’s |NSURL|
property NSData : a reference to current application’s NSData
property NSString : a reference to current application’s NSString
property NSOperationQueue : a reference to current application’s NSOperationQueue
property NSInvocationOperation : a reference to current application’s NSInvocationOperation
property NSUTF8StringEncoding : a reference to current application’s NSUTF8StringEncoding

property aTimer : missing value

script spd
  property mList : {}
  
property resList : {}
end script

set (mList of spd) to {}
set (resList of spd) to {}
set baseURL to "https://w.atwiki.jp/senjounokizuna/pages/"

set numList to {25, 1594, 890, 70, 1669, 82, 1717, 997, 1080, 1614, 1712, 159, 1311, 1694, 1752, 1263}

set urlList to {}
repeat with i in numList
  set the end of urlList to (baseURL & i as string) & ".html"
end repeat

set aLen to length of urlList
set paramObj to {urls:urlList, timeOutSec:60}

–set (resList of spd) to downloadHTMLConcurrently(urlList, 60) of me
my performSelectorOnMainThread:"downloadHTMLConcurrently:" withObject:(paramObj) waitUntilDone:true
return length of (mList of spd)

on downloadHTMLConcurrently:paramObj
  set urlList to (urls of paramObj) as list
  
set timeOutS to (timeOutSec of paramObj) as real
  
set aLen to length of urlList
  
  
repeat with i in urlList
    set j to contents of i
    
set aURL to (|NSURL|’s URLWithString:j)
    
set aQueue to NSOperationQueue’s new()
    
set aOperation to (NSInvocationOperation’s alloc()’s initWithTarget:me selector:"execDL:" object:aURL)
    (
aQueue’s addOperation:aOperation)
  end repeat
  
  
–Check Completion
  
set compF to false
  
set loopTimes to (timeOutS * 10)
  
repeat loopTimes times
    if length of (mList of spd) = aLen then
      set compF to true
      
exit repeat
    end if
    
delay 0.1
  end repeat
  
  
if compF = false then error "Concurrent download timed out"
end downloadHTMLConcurrently:

on execDL:theURL
  set receiveData to NSData’s alloc()’s initWithContentsOfURL:theURL
  
if receiveData = missing value then
    return
  end if
  
  
set aFileName to theURL’s |lastPathComponent|()
  
my performSelectorOnMainThread:"saveData:" withObject:{receiveData, aFileName} waitUntilDone:false
end execDL:

on saveData:theDataArray
  copy theDataArray to {theData, saveFileName}
  
set aCon to NSString’s alloc()’s initWithData:theData encoding:NSUTF8StringEncoding
  
set the end of (mList of spd) to {fileName:saveFileName as string, contentsData:aCon as string}
end saveData:

★Click Here to Open This Script 

Posted in list Network URL | Tagged 10.12savvy 10.13savvy 10.14savvy NSData NSInvocationOperation NSOperationQueue NSString NSURL NSUTF8StringEncoding | Leave a comment

画像の空白判定 v3

Posted on 3月 7, 2019 by Takaaki Naganoya

指定の画像のドットがすべて白色かをチェックする(=画像の空白判定)AppleScriptです。

画像の空白判定処理は自分的にはひじょうに重要な処理であり、画像をグレースケール化しておいて、

(方法1)Photoshopを用いて明度ヒストグラムを取得し、明度=255のデータだけが存在することを確認
(方法2)GPUImage.frameworkを用いて明度ヒストグラムを取得し、明度=255のデータだけが存在することを確認

といった方法で確認を行なっていました。

PDFの余白ページ判定処理や、画像同士の差分確認など、Photoshopを使わずに済めば利用範囲も広がるため(Mac App Storeに出せるため)、AppleScript+Frameworkぐらいで高速処理できることにはものすごく価値があります。

そんな中、GPUImageは急速に2度の方向転換を行い、AppleScriptからは付き合いにくいフレームワークに変化しました。

全面的にSwiftで書き換えたGPUImage2、さらにmacOS 10.14で行われた「OpenGL/OpenCLの非推奨化」という方針転換(わかっていたことですが)を受け、Metalを活用するように書き換えられたGPUImage3へと姿を変えました。オリジナルから見るとほぼ別物です。

GPUImage 3はまだまだ機能不足なうえにAppleScriptから呼べない状態。ヒストグラムの計算フィルタも搭載されていません。Objective-Cで書かれ、中国のスマホ開発者が写真加工するのに活用しまくった、人民に愛されまくったGPUImageの姿はもう見られないのでしょうか。

GPUImageを用いた他のフィルタ処理はCIFilterで代替できるのであまり問題にはなりませんが、この空白画像検出処理だけはなんとしても代替手段を見つける必要に迫られました。応用例が多すぎるからです。

そこで思いついたのが、「チェック対象の画像と同サイズの白い画像を作って、データ内容が同じかどうか調べる」というシンプルな方法(最初から思いついてほしい>自分)。

これならCPUパワーもそれほど必要とせず、GPUの力を絞り出す必要もありません(あたりまえ)。

さっそく書いてみたものの、今度はどうも「白い色」の値が合わず、頭をひねりまくりました。


▲1×1ドット画像を新規作成して白く塗りつぶして比較。Photoshopで作成してファイルから読み込んだ画像とDataが同じにならない

カラープロファイルが合わないために「白い色」を指定してもイコールにならないようだったので、オリジナル画像をコピーしてそれ自体を白く塗りつぶして空白検出の比較対象としてみました。これで空白検出が無事できるようになりました。しかも、GPUImage.frameworkを使っていたバージョンよりもあからさまに高速、、、、

処理速度をPhotoshop版、GPUImage版のAppleScriptと比較してみたところ、1980×1200ピクセルぐらいの画像だとGPUImage版の倍ぐらい高速、8K(7680×4320)ぐらいになるとPhotoshopに負けるといったところです。


▲同一環境にて、Photoshop CC 2018、GPUImage、本Scriptで各種サイズの画像の空白検出を実行(単位:秒)

処理内容がシンプルなだけに小さい画像の処理は得意で、大きな画像は不向きといえるかもしれません。テスト機は例によってCore i7 2.66GHzメモリ8GBのマシンであり、より搭載メモリ量の多いマシンで実行すると挙動が変わってくるかもしれません。

補足までに、GPUImageの明度ヒストグラム検出は、結果を数値の配列ではなく、1×256ドットの「画像」として返してくる変態仕様なので、結果を判定するために1×256ピクセルの画像をループでチェックする必要があります。この仕様が余計なオーバーヘッドを生んでいる(つまり、GPUで処理しているから爆速、という世間の期待値を大幅に下回る処理内容になっている)可能性は否定できません。

ただ、PhosothopなしでPhotoshopと同様のヒストグラム処理が行えるという「手軽さ」がいいと思ってGPUImageを使い出したので、速度をベンチマークしてみると「こんなもんだろ」という印象です。

AppleScript名:画像の空白判定 v3.scpt
—
–  Created by: Takaaki Naganoya
–  Created on: 2019/03/07
—
–  Copyright © 2019 Piyomaru Software, All Rights Reserved
—
use AppleScript version "2.4" — Yosemite (10.10) or later
use framework "Foundation"
use framework "AppKit"
use scripting additions

property NSData : a reference to current application’s NSData
property NSDate : a reference to current application’s NSDate
property |NSURL| : a reference to current application’s |NSURL|
property NSColor : a reference to current application’s NSColor
property NSImage : a reference to current application’s NSImage
property NSBezierPath : a reference to current application’s NSBezierPath
property NSBitmapImageRep : a reference to current application’s NSBitmapImageRep

set aPOSIXpath to POSIX path of (choose file of type {"public.image"})

set a1Dat to NSDate’s timeIntervalSinceReferenceDate()

set iRes to checkImageIsWhite(aPOSIXpath) of me

set b1Dat to NSDate’s timeIntervalSinceReferenceDate()
set c1Dat to b1Dat – a1Dat

return {iRes, c1Dat}

–Compare Original Data and
on checkImageIsWhite(aPOSIXpath)
  set aURL to |NSURL|’s fileURLWithPath:(aPOSIXpath)
  
set anNSImage to NSImage’s alloc()’s initWithContentsOfURL:(aURL)
  
  
copy anNSImage to bNSImage
  
  
set fillColor to makeNSColorFromRGBAval(65535, 65535, 65535, 65535, 65535) of me
  
–set fillColor to NSColor’s whiteColor()
  
set blankImage to drawImageWithFilledColor(bNSImage, fillColor) of me
  
  
set imgA to anNSImage’s TIFFRepresentation()
  
set imgB to blankImage’s TIFFRepresentation()
  
  
set chkWhite to (imgA’s isEqualToData:imgB) as boolean
  
return chkWhite
end checkImageIsWhite

on getSizeOfImage(anNSImage)
  set aSize to anNSImage’s |size|()
  
set aClass to class of aSize
  
if aClass = record then
    copy aSize to theSize –To macOS 10.12.x
  else –macOS 10.13 or later
    set sizeX to (item 1 of item 2 of aSize)
    
set sizeY to (item 2 of item 2 of aSize)
    
set theSize to {width:sizeX, height:sizeY}
  end if
  
return theSize
end getSizeOfImage

–指定サイズの画像を作成し、背景を指定色で塗る
on drawImageWithFilledColor(anImage, fillColor)
  set aSize to getSizeOfImage(anImage) of me
  
  
anImage’s lockFocus()
  
  
set theRect to {{x:0, y:0}, {width:(width of aSize), height:(height of aSize)}}
  
set theNSBezierPath to NSBezierPath’s bezierPath
  
theNSBezierPath’s appendBezierPathWithRect:theRect
  
fillColor’s |set|()
  
theNSBezierPath’s fill()
  
  
anImage’s unlockFocus()
  
  
return anImage
end drawImageWithFilledColor

–aMaxValを最大値とする数値でNSColorを作成して返す
on makeNSColorFromRGBAval(redValue as integer, greenValue as integer, blueValue as integer, alphaValue as integer, aMaxVal as integer)
  set aRedCocoa to (redValue / aMaxVal) as real
  
set aGreenCocoa to (greenValue / aMaxVal) as real
  
set aBlueCocoa to (blueValue / aMaxVal) as real
  
set aAlphaCocoa to (alphaValue / aMaxVal) as real
  
set aColor to NSColor’s colorWithCalibratedRed:aRedCocoa green:aGreenCocoa blue:aBlueCocoa alpha:aAlphaCocoa
  
return aColor
end makeNSColorFromRGBAval

★Click Here to Open This Script 

Posted in Image | Tagged 10.11savvy 10.12savvy 10.13savvy 10.14savvy NSBezierPath NSColor NSData NSDate NSImage NSURL | 3 Comments

アラートダイアログ上にMap Viewを表示

Posted on 2月 19, 2019 by Takaaki Naganoya

アラートダイアログを作成し、その上にMap Viewを表示して位置座標の選択を行うAppleScriptです。

Map Viewを使用するためには、インターネット接続が必要です。

もしこれをAppleScriptのコマンドのように表現するなら「choose geo location」とかいうコマンドになるでしょうか。本当は地図.appのように地図中でクリックした場所にピンを打って選択箇所を明示するようなものを考えていたのですが、実際にASだけで作ろうとすると難しいものがありそうで。

こうした「ざっくり場所を選ぶ」ダイアログのほか、複数の地点をピンで表示し、そのうちのどれかを地図上で選択するといったコマンドがあると使いでがありそうです。

AppleScript名:アラートダイアログ上のMap Viewを表示
— Created 2019-02-14 by Takaaki Naganoya
— 2019 Piyomaru Software
use AppleScript version "2.5"
use scripting additions
use framework "Foundation"
use framework "MapKit"
use framework "AppKit"

property |NSURL| : a reference to current application’s |NSURL|
property NSData : a reference to current application’s NSData
property MKMapView : a reference to current application’s MKMapView
property NSURLRequest : a reference to current application’s NSURLRequest
property NSURLConnection : a reference to current application’s NSURLConnection

property theResult : 0
property returnCode : 0

set nRes to hasInternetConnection("http://www.google.com") of me
if nRes = false then error "No Internet Connection…."

–地図表示初期座標。一般的にはWiFi経由でAssistive-GPSから現在位置を拾って指定
set aLong to 130.55723797
set aLat to 31.57868838

set paramObj to {myMessage:"場所の選択", mySubMessage:"目標の場所を地図中央に入れてください", aLongitude:aLong, aLatitude:aLat}
my performSelectorOnMainThread:"chooseCoordinate:" withObject:(paramObj) waitUntilDone:true
return theResult
–> {latitude:31.57868838, longitude:130.55723797}

on chooseCoordinate:paramObj
  set aMainMes to myMessage of paramObj
  
set aSubMes to mySubMessage of paramObj
  
set aLong to aLongitude of paramObj
  
set aLat to aLatitude of paramObj
  
  
–MKMapViewをつくる
  
set aMapView to MKMapView’s alloc()’s initWithFrame:(current application’s NSMakeRect(0, 0, 500, 300))
  
tell aMapView
    its setMapType:(current application’s MKMapTypeStandard)
    
its setZoomEnabled:true
    
its setScrollEnabled:true
    
its setPitchEnabled:true
    
its setRotateEnabled:true
    
its setShowsCompass:true
    
its setShowsZoomControls:true
    
its setShowsScale:true
    
its setShowsUserLocation:true
    
    
set aLocation to current application’s CLLocationCoordinate2DMake(aLat, aLong)
    
its setCenterCoordinate:aLocation zoomLevel:17 animated:false
    
its setDelegate:me
  end tell
  
  
— set up alert  
  
set theAlert to current application’s NSAlert’s alloc()’s init()
  
tell theAlert
    its setMessageText:aMainMes
    
its setInformativeText:aSubMes
    
its addButtonWithTitle:"OK"
    
its addButtonWithTitle:"Cancel"
    
its setAccessoryView:aMapView
  end tell
  
  
— show alert in modal loop
  
current application’s NSRunningApplication’s currentApplication()’s activateWithOptions:(current application’s NSApplicationActivateIgnoringOtherApps)
  
set returnCode to theAlert’s runModal()
  
if returnCode = (current application’s NSAlertSecondButtonReturn) then error number -128
  
  
set (my theResult) to (aMapView’s centerCoordinate()) as record
end chooseCoordinate:

–Internet Connection Check
on hasInternetConnection(aURLString)
  set aURL to |NSURL|’s alloc()’s initWithString:aURLString
  
set aReq to NSURLRequest’s alloc()’s initWithURL:aURL cachePolicy:(current application’s NSURLRequestReloadIgnoringLocalCacheData) timeoutInterval:5.0
  
set urlRes to (NSURLConnection’s sendSynchronousRequest:aReq returningResponse:(missing value) |error|:(missing value))
  
if urlRes = missing value then
    return false
  else
    return true
  end if
end hasInternetConnection

★Click Here to Open This Script 

Posted in geolocation GUI Internet | Tagged 10.11savvy 10.12savvy 10.13savvy NSData NSURL NSView | Leave a comment

電子書籍(PDF)をオンラインストアで販売中!

Google Search

Popular posts

  • 開発機としてM2 Mac miniが来たのでガチレビュー
  • macOS 13.6.5 AS系のバグ、一切直らず
  • CotEditorで2つの書類の行単位での差分検出
  • Apple純正マウス、キーボードのバッテリー残量取得
  • macOS 15, Sequoia
  • ディスプレイをスリープ状態にして処理続行
  • 初心者がつまづきやすい「log」コマンド
  • Adobe AcrobatをAppleScriptから操作してPDF圧縮
  • 与えられた文字列の1D Listのすべての順列組み合わせパターン文字列を返す v3(ベンチマーク用)
  • 指定のWordファイルをPDFに書き出す
  • メキシカンハットの描画
  • macOS 13 TTS環境の変化について
  • 2023年に書いた価値あるAppleScript
  • Pixelmator Pro v3.6.4でAppleScriptからの操作時の挙動に違和感が
  • AdobeがInDesign v19.4からPOSIX pathを採用
  • Pages本執筆中に、2つの書類モード切り替えに気がついた
  • 可変次元のベクトルに対応したコサイン類似度計算
  • Safariで「プロファイル」機能を使うとAppleScriptの処理に影響
  • Cocoa Scripting Course 続刊計画
  • macOS 13.6.2アップデート Cocoa-AppleScript Applet修正はなし

Tags

10.11savvy (1101) 10.12savvy (1242) 10.13savvy (1391) 10.14savvy (586) 10.15savvy (437) 11.0savvy (281) 12.0savvy (201) 13.0savvy (138) 14.0savvy (86) 15.0savvy (62) CotEditor (63) Finder (51) iTunes (19) Keynote (112) NSAlert (60) NSArray (51) NSBitmapImageRep (20) NSBundle (20) NSButton (34) NSColor (51) NSDictionary (27) NSFileManager (23) NSFont (19) NSImage (41) NSJSONSerialization (21) NSMutableArray (62) NSMutableDictionary (21) NSPredicate (36) NSRunningApplication (56) NSScreen (30) NSScrollView (22) NSString (117) NSURL (97) NSURLRequest (23) NSUTF8StringEncoding (30) NSView (33) NSWorkspace (20) Numbers (67) Pages (51) Safari (44) Script Editor (26) WKUserContentController (21) WKUserScript (20) WKWebView (23) WKWebViewConfiguration (22)

カテゴリー

  • 2D Bin Packing
  • 3D
  • AirDrop
  • AirPlay
  • Animation
  • AppleScript Application on Xcode
  • Beginner
  • Benchmark
  • beta
  • Bluetooth
  • Books
  • boolean
  • bounds
  • Bug
  • Calendar
  • call by reference
  • Clipboard
  • Code Sign
  • Color
  • Custom Class
  • dialog
  • diff
  • drive
  • Droplet
  • exif
  • file
  • File path
  • filter
  • folder
  • Font
  • Font
  • GAME
  • geolocation
  • GUI
  • GUI Scripting
  • Hex
  • History
  • How To
  • iCloud
  • Icon
  • Image
  • Input Method
  • Internet
  • iOS App
  • JavaScript
  • JSON
  • JXA
  • Keychain
  • Keychain
  • Language
  • Library
  • list
  • Locale
  • Localize
  • Machine Learning
  • Map
  • Markdown
  • Menu
  • Metadata
  • MIDI
  • MIME
  • Natural Language Processing
  • Network
  • news
  • Noification
  • Notarization
  • Number
  • Object control
  • OCR
  • OSA
  • parallel processing
  • PDF
  • Peripheral
  • PRODUCTS
  • QR Code
  • Raw AppleEvent Code
  • Record
  • rectangle
  • recursive call
  • regexp
  • Release
  • Remote Control
  • Require Control-Command-R to run
  • REST API
  • Review
  • RTF
  • Sandbox
  • Screen Saver
  • Script Libraries
  • sdef
  • search
  • Security
  • selection
  • shell script
  • Shortcuts Workflow
  • Sort
  • Sound
  • Spellchecker
  • Spotlight
  • SVG
  • System
  • Tag
  • Telephony
  • Text
  • Text to Speech
  • timezone
  • Tools
  • Update
  • URL
  • UTI
  • Web Contents Control
  • WiFi
  • XML
  • XML-RPC
  • イベント(Event)
  • 未分類

アーカイブ

  • 2024年11月
  • 2024年10月
  • 2024年9月
  • 2024年8月
  • 2024年7月
  • 2024年6月
  • 2024年5月
  • 2024年4月
  • 2024年3月
  • 2024年2月
  • 2024年1月
  • 2023年12月
  • 2023年11月
  • 2023年10月
  • 2023年9月
  • 2023年8月
  • 2023年7月
  • 2023年6月
  • 2023年5月
  • 2023年4月
  • 2023年3月
  • 2023年2月
  • 2023年1月
  • 2022年12月
  • 2022年11月
  • 2022年10月
  • 2022年9月
  • 2022年8月
  • 2022年7月
  • 2022年6月
  • 2022年5月
  • 2022年4月
  • 2022年3月
  • 2022年2月
  • 2022年1月
  • 2021年12月
  • 2021年11月
  • 2021年10月
  • 2021年9月
  • 2021年8月
  • 2021年7月
  • 2021年6月
  • 2021年5月
  • 2021年4月
  • 2021年3月
  • 2021年2月
  • 2021年1月
  • 2020年12月
  • 2020年11月
  • 2020年10月
  • 2020年9月
  • 2020年8月
  • 2020年7月
  • 2020年6月
  • 2020年5月
  • 2020年4月
  • 2020年3月
  • 2020年2月
  • 2020年1月
  • 2019年12月
  • 2019年11月
  • 2019年10月
  • 2019年9月
  • 2019年8月
  • 2019年7月
  • 2019年6月
  • 2019年5月
  • 2019年4月
  • 2019年3月
  • 2019年2月
  • 2019年1月
  • 2018年12月
  • 2018年11月
  • 2018年10月
  • 2018年9月
  • 2018年8月
  • 2018年7月
  • 2018年6月
  • 2018年5月
  • 2018年4月
  • 2018年3月
  • 2018年2月

https://piyomarusoft.booth.pm/items/301502

メタ情報

  • ログイン
  • 投稿フィード
  • コメントフィード
  • WordPress.org

Forum Posts

  • 人気のトピック
  • 返信がないトピック

メタ情報

  • ログイン
  • 投稿フィード
  • コメントフィード
  • WordPress.org
Proudly powered by WordPress
Theme: Flint by Star Verte LLC