macOS 11から12に移行して、なぜかリリースが近づくにつれて細かいバグや巨大なバグが顕在化し、まだ手放しでおすすめできる状況にないのが心苦しいところですが、AppleScriptからのCocoa呼び出しについてはIntel Mac/Apple Silicon Macでも速度が向上。とくに、Apple Silicon Macでの速度向上が顕著です。
で、特定の処理(巨大なlistやrecord in list同士の検索)でM1 Mac miniがiMac Proの2.5倍ぐらい速いといったベンチマークは出しているわけですが、いかにもApple Silicon Macで処理が速そうな画像処理のベンチマークを実施してみました。
Intel Mac mini 2014が手元からなくなってしまったので、以前のメインマシンであったMacBook Pro Retina 2012(MacBookPro10,1)と比較してみました。
ベンチマーク内容は、指定の画像が空白かどうかをチェックするというものです。フルHD画像でも4K画像でも8K画像でも、1ピクセルでも白くない点があれば検出できるという処理内容。外部のGPUImage FrameworkやPhotoshopのヒストグラム処理を呼び出すよりもAppleScriptだけで処理した方が速いというものです(8K画像だとPhotoshopの方が速いかも)。

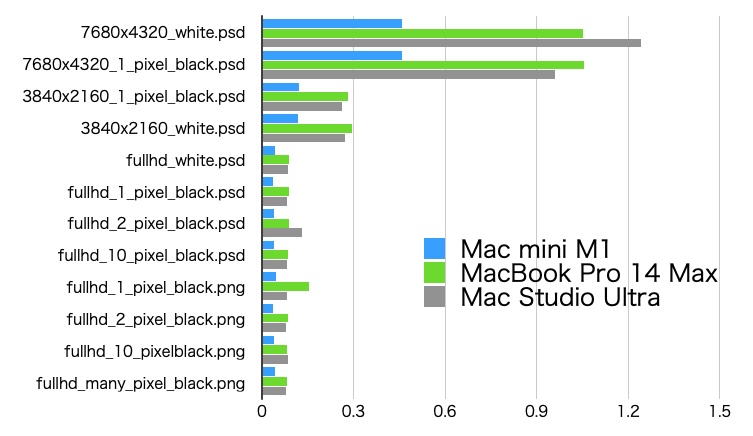
▲画像解像度の変化と処理時間の相関。グラフは数値が小さいほど高速。巨大な画像になると処理速度差が大きくなる傾向にある?
だいたい、MacBook Pro Retina 2012と比べて3〜4倍ぐらいM1 Mac miniの方が高速です。MacBook Pro Retina 2012は2017年のMacBook Pro 13インチといい勝負ぐらいの速度が出ており、古い割にはごく最近まで使えていました。
そこから3〜4倍高速ということで、M1 Mac miniはコストの割にはパワフルです。ファンレスのMacBook Air M1でも同程度の速度が出るはずです。
一方で、M1 Pro/M1 Max搭載のMacBook ProでM1機よりも大幅に高速なのかと言われると……このぐらいの静止画の処理程度だとごくわずかな差しかつかないはずです。下手をすると、速度差がないかもしれません。
→ Download blank_image_detection_benchmark.zip (including script libraries)

▲バーが短いほど高速。M1がM1 Maxの2倍高速という結果が出てしまった。M1 Max MBPは2014年のIntel Mac miniより少し速いだけのマシンという結果に。2018年のIntel Mac miniとの比較だとM1 Max MBPよりもIntel Mac miniのほうが速そう
M1、M1 Max、M1 Ultra(最上位機種)で処理時間を比較した結果。予想どおりM1がM1 MaxやM1 Ultraよりも2倍以上高速。もはや8K画像ぐらいは、大きなデータにならないというべきなのか。
| AppleScript名:画像の空白判定 v4_bench_時間計測.scptd |
| — – Created by: Takaaki Naganoya – Created on: 2022/01/01 — – Copyright © 2022 Piyomaru Software, All Rights Reserved — use AppleScript version "2.7" use framework "Foundation" use framework "AppKit" use scripting additions use mdLib : script "Metadata Lib" version "2.0.0" use easyTable : script "display table by list" set aFol to choose folder set aResList to perform search in folders {aFol} predicate string "kMDItemContentTypeTree CONTAINS %@" search arguments {"public.image"} set aList to {} repeat with i in aResList set a1Dat to current application’s NSDate’s timeIntervalSinceReferenceDate() set iRes to checkImageIsWhite(i) of blankImageKit of me set b1Dat to current application’s NSDate’s timeIntervalSinceReferenceDate() set c1Dat to b1Dat – a1Dat set aName to (current application’s NSString’s stringWithString:i)’s lastPathComponent() as string if iRes = true then set jRes to "White" else set jRes to "Black" end if –log {aName, jRes} set the end of aList to {aName, jRes, c1Dat} end repeat set fLabels to {"File name", "Result", "Estimate(Seconds)"} set aRes to (display table by list aList main message "Blank Image check" size {800, 600} labels fLabels) return aList script blankImageKit use AppleScript version "2.7" — High Sierra (10.13) or later use framework "Foundation" use framework "AppKit" use scripting additions property parent : AppleScript property NSData : a reference to current application’s NSData property |NSURL| : a reference to current application’s |NSURL| property NSColor : a reference to current application’s NSColor property NSImage : a reference to current application’s NSImage property NSBezierPath : a reference to current application’s NSBezierPath property NSBitmapImageRep : a reference to current application’s NSBitmapImageRep –Compare Original Data and on checkImageIsWhite(aFile) set aPOSIXpath to POSIX path of aFile set aURL to |NSURL|’s fileURLWithPath:(aPOSIXpath) set aNSImage to NSImage’s alloc()’s initWithContentsOfURL:(aURL) set bNSImage to NSImage’s alloc()’s initWithContentsOfURL:(aURL) set fillColor1 to NSColor’s clearColor() set blankNSImage1 to drawImageWithFilledColor(aNSImage, fillColor1) of me set fillColor2 to makeNSColorFromRGBAval(65535, 65535, 65535, 65535, 65535) of me –white set blankNSImage2 to drawImageWithFilledColor(bNSImage, fillColor2) of me set aTiff to blankNSImage1’s TIFFRepresentation() set bTiff to blankNSImage2’s TIFFRepresentation() set chkWhite to (aTiff’s isEqualToData:bTiff) as boolean return chkWhite end checkImageIsWhite on getSizeOfImage(anNSImage) set aSize to anNSImage’s |size|() set aClass to class of aSize if aClass = record then copy aSize to theSize –To macOS 10.12.x else –macOS 10.13 or later set sizeX to (item 1 of item 2 of aSize) set sizeY to (item 2 of item 2 of aSize) set theSize to {width:sizeX, height:sizeY} end if return theSize end getSizeOfImage –指定サイズの画像を作成し、背景を指定色で塗る on drawImageWithFilledColor(anImage, fillColor) set aSize to getSizeOfImage(anImage) of me anImage’s lockFocus() set theRect to {{x:0, y:0}, {width:(width of aSize), height:(height of aSize)}} set theNSBezierPath to NSBezierPath’s bezierPath theNSBezierPath’s appendBezierPathWithRect:theRect fillColor’s |set|() theNSBezierPath’s fill() anImage’s unlockFocus() return anImage end drawImageWithFilledColor –aMaxValを最大値とする数値でNSColorを作成して返す on makeNSColorFromRGBAval(redValue as integer, greenValue as integer, blueValue as integer, alphaValue as integer, aMaxVal as integer) set aRedCocoa to (redValue / aMaxVal) as real set aGreenCocoa to (greenValue / aMaxVal) as real set aBlueCocoa to (blueValue / aMaxVal) as real set aAlphaCocoa to (alphaValue / aMaxVal) as real set aColor to NSColor’s colorWithCalibratedRed:aRedCocoa green:aGreenCocoa blue:aBlueCocoa alpha:aAlphaCocoa return aColor end makeNSColorFromRGBAval end script |


