Menu

Skip to content
AppleScriptの穴
  • Home
  • Products
  • Books
  • Docs
  • Events
  • Forum
  • About This Blog
  • License
  • 仕事依頼

AppleScriptの穴

Useful & Practical AppleScript archive. Click '★Click Here to Open This Script' Link to download each AppleScript

タグ: NSBezierPath

クリップボードの画像を指定色でモノクロ化してクリップボードへ v3

Posted on 3月 13, 2022 by Takaaki Naganoya

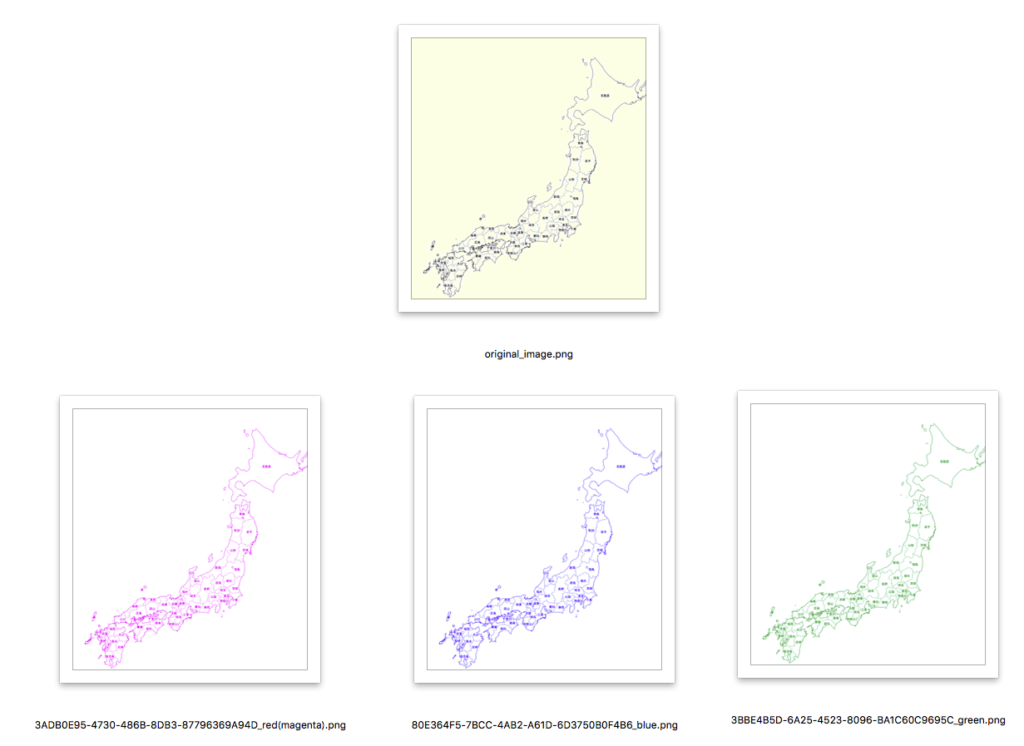
クリップボードに入れた画像を、グレースケール化したあとに指定の色のベタ塗り画像とフィルタで合成し、単色の色付き画像に変換するAppleScriptです。

資料に掲載する画像の情報量を減らすために、単色画像に変換したいと考えました。Photoshopだと2つのレイヤーの重ね合わせで指定して処理するような内容です。ただ、もうPhotoshopにできるぐらいのことの大部分は、AppleScriptだけで単独でできてしまうのが2022年的な状況です。

アプリケーションを使わずに処理するためには、CIFilterを用いて画像処理して、単色画像にすることになります。

CIFilterにもいろいろな画像フィルタ機能が用意されているわけで、ここから「どのフィルタを使うか」選ぶことになります。

# フィルタが200種類ぐらいあるんですけど!!

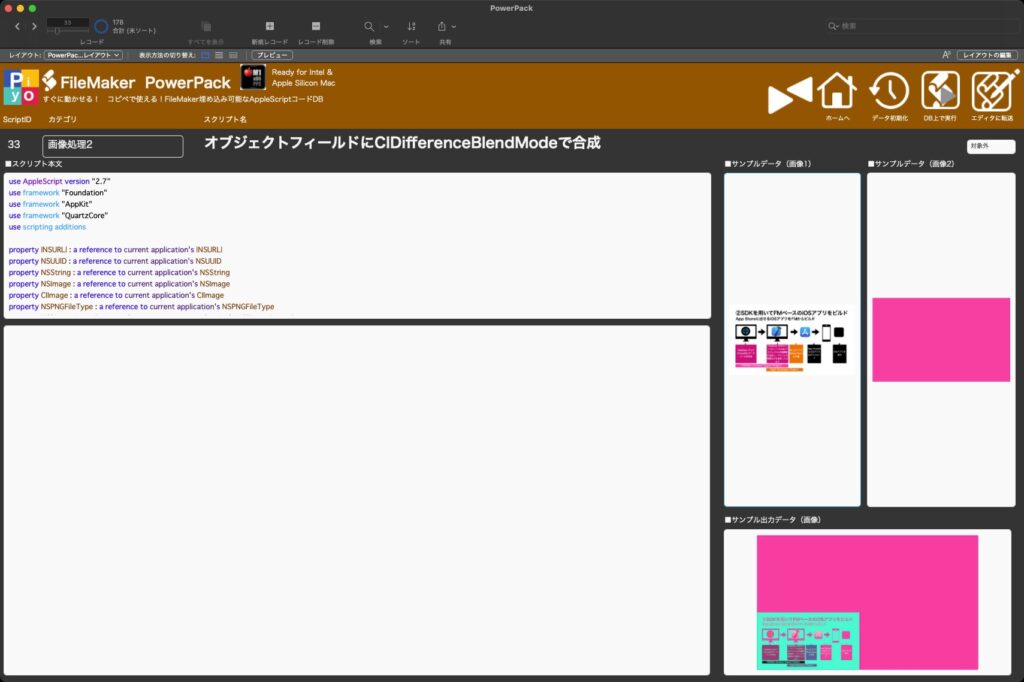
このような場合のために、FileMaker Proで作った「FileMaker Pro PowerPack」だとひととおりのCIFilterをサンプルデータで処理できるようにしておきました。

FileMaker Proのデータベース上にサンプルデータをコピー&ペーストしておけば、DB上でフィルタ処理してどのような処理をしてくれるかがわかります。

いやーー、作っておいてよかったー。「なんでこんなにフィルタ処理ばっかりあるんだよ!」的な話がありましたが、こうして実際に役立つわけで。フィルタの名称、編集できるテストデータ、処理結果が表示されるところまで……「動かせる資料」的なものに仕上がっています>FileMaker Pro PowerPack

ひととおりAppleScriptを作ってみて、いろいろ調整してみたところ……調整し切れなかったので、edama2さんに相談して(送りつけて)こんな感じに仕上がりました。

これでなんとか動くはずなのに、なぜこうなるのか。。。CIFilterを実際に日常的に使うツールで使ったのは実はこれが最初だったので、意外な挙動に割と困りました。


▲画面上の指定範囲のスクリーンショットを撮ってクリップボードへ


▲ScriptをmacOS標準搭載のスクリプトメニューから呼び出すことを前提に作った。


▲クリップボードの内容をペーストすると、単色化された画像が出力される

AppleScript名:クリップボードの画像を指定色でモノクロ化してクリップボードへ v3.scpt
—
–  Created by: Takaaki Naganoya
–  Created on: 2022/03/11
—
–  Copyright © 2022 Piyomaru Software, All Rights Reserved
–  v2 Takaaki Naganoya : マスクが1/4の大きさになったり2倍になったりしていた
–  v3 edama2:上記の問題に対処。クリーンナップ
—
use AppleScript version "2.7"
use framework "AppKit"
use framework "CoreImage"
use framework "Foundation"
use scripting additions

on run
  my main()
end run

on main()
  –クリップボード内のデータをNSImageとして取得
  
set sourceImg to my getClipboardASImage()
  
  
# 色指定
  
set aColor to my makeNSColorFromRGBA255val(252, 2, 128, 255)


# 同じ大きさの塗りつぶし画像を作成
  
tell current application’s NSImage’s alloc()
    tell initWithSize_(sourceImg’s |size|())
      lockFocus()
      
aColor’s |set|()
      
set aRect to current application’s NSMakeRect(0, 0, its |size|()’s width, its |size|()’s height)
      
current application’s NSBezierPath’s fillRect:aRect
      
unlockFocus()
      
set fillImg to it
    end tell
  end tell
  
  
# NSImage –> CIimage
  
set sourceImage to my convNSImageToCIimage(sourceImg)
  
set fillImage to my convNSImageToCIimage(fillImg)
  
  
set newImage to my filterImage2(fillImage, sourceImage)
  
  
my restoreClipboard({newImage})
end main

on filterImage2(fillImage, sourceImage)
  
  
set redValue to 0.295719844358
  
set greenValue to 0.295719844358
  
set blueValue to 0.295719844358
  
set alphaVlaue to 1.0
  
set aCIColor to current application’s CIColor’s alloc()’s initWithRed:redValue green:greenValue blue:blueValue alpha:alphaVlaue
  
  
tell current application’s CIFilter
    — CIFilter(モノクロ化)
    
tell filterWithName_("CIColorMonochrome")
      setDefaults()
      
setValue_forKey_(sourceImage, "inputImage")
      
setValue_forKey_(aCIColor, "inputColor")
      
set filteredImage to valueForKey_("outputImage")
    end tell
    
    
— CIFilter(モノクロ化)
    
tell filterWithName_("CIAdditionCompositing")
      setDefaults()
      
setValue_forKey_(fillImage, "inputImage")
      
setValue_forKey_(filteredImage, "inputBackgroundImage")
      
set theCIImage to valueForKey_(current application’s kCIOutputImageKey)
    end tell
  end tell
  
  
# CIImage –> NSImage
  
set imageRep to current application’s NSCIImageRep’s alloc()’s initWithCIImage:theCIImage
  
set rNSImage to current application’s NSImage’s alloc()’s initWithSize:(imageRep’s |size|())
  
rNSImage’s addRepresentation:imageRep
  
  
return rNSImage
end filterImage2

# NSImage –> CIimage
on convNSImageToCIimage(aNSImage)
  set tiffDat to aNSImage’s TIFFRepresentation()
  
set aRep to current application’s NSBitmapImageRep’s imageRepWithData:tiffDat
  
set newImg to current application’s CIImage’s alloc()’s initWithBitmapImageRep:aRep
  
return newImg
end convNSImageToCIimage

— クリップボードの内容をNSImageとして取り出して返す
on getClipboardASImage()
  set thePasteboard to current application’s NSPasteboard’s generalPasteboard()
  
set theAttributedStringNSArray to thePasteboard’s readObjectsForClasses:({current application’s NSImage}) options:(missing value)
  
set theNSImage to theAttributedStringNSArray’s objectAtIndex:0
  
return theNSImage
end getClipboardASImage

on restoreClipboard(theArray as list)
  set thePasteboard to current application’s NSPasteboard’s generalPasteboard()
  
thePasteboard’s clearContents()
  
thePasteboard’s writeObjects:theArray
end restoreClipboard

on makeNSColorFromRGBA255val(redValue as integer, greenValue as integer, blueValue as integer, alphaValue as integer)
  set aRedCocoa to (redValue / 255) as real
  
set aGreenCocoa to (greenValue / 255) as real
  
set aBlueCocoa to (blueValue / 255) as real
  
set aAlphaCocoa to (alphaValue / 255) as real
  
set aColor to current application’s NSColor’s colorWithCalibratedRed:aRedCocoa green:aGreenCocoa blue:aBlueCocoa alpha:aAlphaCocoa
  
return aColor
end makeNSColorFromRGBA255val

★Click Here to Open This Script 

Posted in filter Image | Tagged 12.0savvy CIColor CIImage NSBezierPath NSCIImageRep NSColor NSImage NSPasteboard | Leave a comment

Intel MacとApple Silicon Macの速度差〜画像処理

Posted on 1月 2, 2022 by Takaaki Naganoya

macOS 11から12に移行して、なぜかリリースが近づくにつれて細かいバグや巨大なバグが顕在化し、まだ手放しでおすすめできる状況にないのが心苦しいところですが、AppleScriptからのCocoa呼び出しについてはIntel Mac/Apple Silicon Macでも速度が向上。とくに、Apple Silicon Macでの速度向上が顕著です。

で、特定の処理(巨大なlistやrecord in list同士の検索)でM1 Mac miniがiMac Proの2.5倍ぐらい速いといったベンチマークは出しているわけですが、いかにもApple Silicon Macで処理が速そうな画像処理のベンチマークを実施してみました。

Intel Mac mini 2014が手元からなくなってしまったので、以前のメインマシンであったMacBook Pro Retina 2012(MacBookPro10,1)と比較してみました。

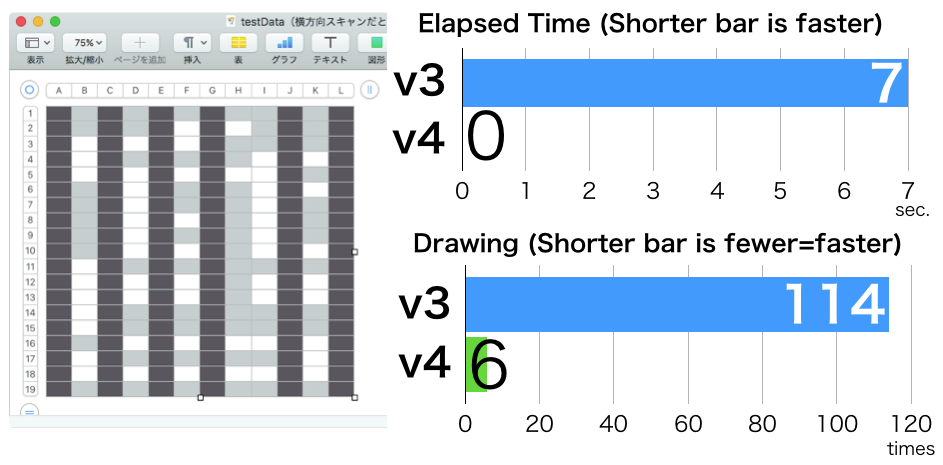
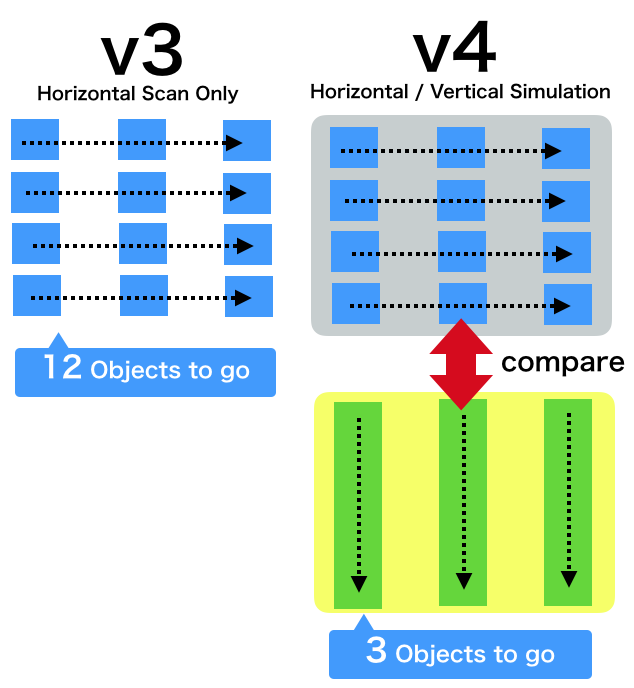
ベンチマーク内容は、指定の画像が空白かどうかをチェックするというものです。フルHD画像でも4K画像でも8K画像でも、1ピクセルでも白くない点があれば検出できるという処理内容。外部のGPUImage FrameworkやPhotoshopのヒストグラム処理を呼び出すよりもAppleScriptだけで処理した方が速いというものです(8K画像だとPhotoshopの方が速いかも)。


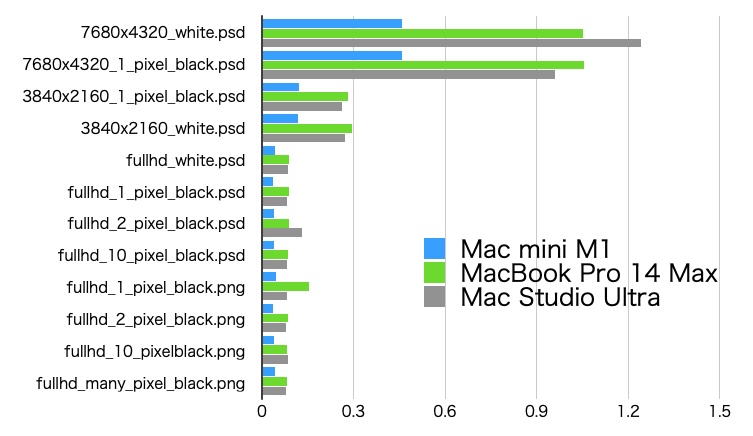
▲画像解像度の変化と処理時間の相関。グラフは数値が小さいほど高速。巨大な画像になると処理速度差が大きくなる傾向にある?

だいたい、MacBook Pro Retina 2012と比べて3〜4倍ぐらいM1 Mac miniの方が高速です。MacBook Pro Retina 2012は2017年のMacBook Pro 13インチといい勝負ぐらいの速度が出ており、古い割にはごく最近まで使えていました。

そこから3〜4倍高速ということで、M1 Mac miniはコストの割にはパワフルです。ファンレスのMacBook Air M1でも同程度の速度が出るはずです。

一方で、M1 Pro/M1 Max搭載のMacBook ProでM1機よりも大幅に高速なのかと言われると……このぐらいの静止画の処理程度だとごくわずかな差しかつかないはずです。下手をすると、速度差がないかもしれません。

→ Download blank_image_detection_benchmark.zip (including script libraries)

–> Download test Data


▲バーが短いほど高速。M1がM1 Maxの2倍高速という結果が出てしまった。M1 Max MBPは2014年のIntel Mac miniより少し速いだけのマシンという結果に。2018年のIntel Mac miniとの比較だとM1 Max MBPよりもIntel Mac miniのほうが速そう

M1、M1 Max、M1 Ultra(最上位機種)で処理時間を比較した結果。予想どおりM1がM1 MaxやM1 Ultraよりも2倍以上高速。もはや8K画像ぐらいは、大きなデータにならないというべきなのか。

AppleScript名:画像の空白判定 v4_bench_時間計測.scptd
—
–  Created by: Takaaki Naganoya
–  Created on: 2022/01/01
—
–  Copyright © 2022 Piyomaru Software, All Rights Reserved
—
use AppleScript version "2.7"
use framework "Foundation"
use framework "AppKit"
use scripting additions
use mdLib : script "Metadata Lib" version "2.0.0"
use easyTable : script "display table by list"

set aFol to choose folder

set aResList to perform search in folders {aFol} predicate string "kMDItemContentTypeTree CONTAINS %@" search arguments {"public.image"}

set aList to {}
repeat with i in aResList
  set a1Dat to current application’s NSDate’s timeIntervalSinceReferenceDate()
  
  
set iRes to checkImageIsWhite(i) of blankImageKit of me
  
  
set b1Dat to current application’s NSDate’s timeIntervalSinceReferenceDate()
  
set c1Dat to b1Dat – a1Dat
  
  
set aName to (current application’s NSString’s stringWithString:i)’s lastPathComponent() as string
  
  
if iRes = true then
    set jRes to "White"
  else
    set jRes to "Black"
  end if
  
  
–log {aName, jRes}
  
  
set the end of aList to {aName, jRes, c1Dat}
end repeat

set fLabels to {"File name", "Result", "Estimate(Seconds)"}
set aRes to (display table by list aList main message "Blank Image check" size {800, 600} labels fLabels)
return aList

script blankImageKit
  use AppleScript version "2.7" — High Sierra (10.13) or later
  
use framework "Foundation"
  
use framework "AppKit"
  
use scripting additions
  
property parent : AppleScript
  
  
property NSData : a reference to current application’s NSData
  
property |NSURL| : a reference to current application’s |NSURL|
  
property NSColor : a reference to current application’s NSColor
  
property NSImage : a reference to current application’s NSImage
  
property NSBezierPath : a reference to current application’s NSBezierPath
  
property NSBitmapImageRep : a reference to current application’s NSBitmapImageRep


–Compare Original Data and
  
on checkImageIsWhite(aFile)
    set aPOSIXpath to POSIX path of aFile
    
set aURL to |NSURL|’s fileURLWithPath:(aPOSIXpath)
    
    
set aNSImage to NSImage’s alloc()’s initWithContentsOfURL:(aURL)
    
set bNSImage to NSImage’s alloc()’s initWithContentsOfURL:(aURL)
    
    
set fillColor1 to NSColor’s clearColor()
    
set blankNSImage1 to drawImageWithFilledColor(aNSImage, fillColor1) of me
    
    
set fillColor2 to makeNSColorFromRGBAval(65535, 65535, 65535, 65535, 65535) of me –white
    
set blankNSImage2 to drawImageWithFilledColor(bNSImage, fillColor2) of me
    
    
set aTiff to blankNSImage1’s TIFFRepresentation()
    
set bTiff to blankNSImage2’s TIFFRepresentation()
    
    
set chkWhite to (aTiff’s isEqualToData:bTiff) as boolean
    
    
return chkWhite
  end checkImageIsWhite


on getSizeOfImage(anNSImage)
    set aSize to anNSImage’s |size|()
    
set aClass to class of aSize
    
if aClass = record then
      copy aSize to theSize –To macOS 10.12.x
    else –macOS 10.13 or later
      set sizeX to (item 1 of item 2 of aSize)
      
set sizeY to (item 2 of item 2 of aSize)
      
set theSize to {width:sizeX, height:sizeY}
    end if
    
return theSize
  end getSizeOfImage


–指定サイズの画像を作成し、背景を指定色で塗る
  
on drawImageWithFilledColor(anImage, fillColor)
    set aSize to getSizeOfImage(anImage) of me
    
    
anImage’s lockFocus()
    
    
set theRect to {{x:0, y:0}, {width:(width of aSize), height:(height of aSize)}}
    
set theNSBezierPath to NSBezierPath’s bezierPath
    
theNSBezierPath’s appendBezierPathWithRect:theRect
    
fillColor’s |set|()
    
theNSBezierPath’s fill()
    
    
anImage’s unlockFocus()
    
    
return anImage
  end drawImageWithFilledColor


–aMaxValを最大値とする数値でNSColorを作成して返す
  
on makeNSColorFromRGBAval(redValue as integer, greenValue as integer, blueValue as integer, alphaValue as integer, aMaxVal as integer)
    set aRedCocoa to (redValue / aMaxVal) as real
    
set aGreenCocoa to (greenValue / aMaxVal) as real
    
set aBlueCocoa to (blueValue / aMaxVal) as real
    
set aAlphaCocoa to (alphaValue / aMaxVal) as real
    
set aColor to NSColor’s colorWithCalibratedRed:aRedCocoa green:aGreenCocoa blue:aBlueCocoa alpha:aAlphaCocoa
    
return aColor
  end makeNSColorFromRGBAval
  
end script

★Click Here to Open This Script 

Posted in Image | Tagged 10.14savvy 10.15savvy 11.0savvy 12.0savvy NSBezierPath NSBitmapImageRep NSColor NSData NSDate NSImage NSURL | Leave a comment

指定のNSImageにNSBezierPathでclearColor塗りつぶし

Posted on 2月 14, 2020 by Takaaki Naganoya

指定色で塗りつぶしたNSImageを用意し、そこにNSBezierPathでclearColorで塗りつぶし(=切り抜き)を行うAppleScriptです。

2005/8/18にCocoa-dev mailing list に対してStefan Schüßler氏が投稿した内容をもとにしています。いろいろ探して回りましたが、ヒットしたのはこの情報だけでした。彼に感謝を。

Re: [NSColor clearColor] and NSBezierPath: not compatible?

NSBezierPath uses the NSCompositeSourceOver operation, therefore clearColor does not do anything. You could change the graphics state in order to clear the path:

  NSGraphicsContext *context;
  context = [NSGraphicsContext currentContext];
  [context saveGraphicsState];
  [context setCompositingOperation:NSCompositeClear];
  [yourBezierPath fill];
  [context restoreGraphicsState];

Hope this helps.

Stefan
AppleScript名:指定のNSImageにNSBezierPathでclearColor塗りつぶし.scptd
— Created 2020-02-14 by Takaaki Naganoya
— 2020 Piyomaru Software
use AppleScript version "2.4"
use scripting additions
use framework "Foundation"
use framework "AppKit"
use framework "CoreImage"

property NSColor : a reference to current application’s NSColor
property NSImage : a reference to current application’s NSImage
property NSZeroRect : a reference to current application’s NSZeroRect
property NSBezierPath : a reference to current application’s NSBezierPath
property NSCompositeCopy : a reference to current application’s NSCompositeCopy
property NSGraphicsContext : a reference to current application’s NSGraphicsContext
property NSBitmapImageRep : a reference to current application’s NSBitmapImageRep
property NSCalibratedRGBColorSpace : a reference to current application’s NSCalibratedRGBColorSpace

set {rCol, gCol, bCol} to choose color

set aNSImage to makeColoredNSImage({rCol, gCol, bCol}, 400, 400) of me
set aPath to generateCircle(200, 100, 100) of me

set bImage to my fillImage:aNSImage withTransparentPathFilling:aPath

set aFile to POSIX path of (choose file name)
set sRes to my saveNSImageAtPathAsPNG(bImage, aFile)

on fillImage:aSourceImg withTransparentPathFilling:aPath
  set aSize to aSourceImg’s |size|()
  
set aWidth to (aSize’s width)
  
set aHeight to (aSize’s height)
  
  
set aRep to NSBitmapImageRep’s alloc()’s initWithBitmapDataPlanes:(missing value) pixelsWide:aWidth pixelsHigh:aHeight bitsPerSample:8 samplesPerPixel:4 hasAlpha:true isPlanar:false colorSpaceName:(NSCalibratedRGBColorSpace) bytesPerRow:0 bitsPerPixel:0
  
  
NSGraphicsContext’s saveGraphicsState()
  
  
NSGraphicsContext’s setCurrentContext:(NSGraphicsContext’s graphicsContextWithBitmapImageRep:aRep)
  
  
aSourceImg’s drawInRect:(current application’s NSMakeRect(0, 0, aWidth, aHeight)) fromRect:(NSZeroRect) operation:(NSCompositeCopy) fraction:(1.0)
  
  
NSGraphicsContext’s currentContext()’s setCompositingOperation:(current application’s NSCompositeClear)
  
aPath’s fill()
  
  
NSGraphicsContext’s restoreGraphicsState()
  
  
set newImg to NSImage’s alloc()’s initWithSize:(aSize)
  
newImg’s addRepresentation:aRep
  
  
return newImg
end fillImage:withTransparentPathFilling:

on generateCircle(theRadius, x, y)
  set aRect to current application’s NSMakeRect(x, y, theRadius, theRadius)
  
set aCirCle to NSBezierPath’s bezierPath()
  
aCirCle’s appendBezierPathWithOvalInRect:aRect
  
return aCirCle
end generateCircle

on makeColoredNSImage(colList, aWidth, aHeight)
  copy colList to {rCol, gCol, bCol}
  
set aColor to makeNSColorFromRGBA65535val(rCol, gCol, bCol, 1.0) of me
  
set aColoredImage to fillColorWithImage(aColor, aWidth, aHeight) of me
  
return aColoredImage
end makeColoredNSImage

on fillColorWithImage(aColor, aWidth, aHeight)
  set colordImage to makeNSImageWithFilledWithColor(aWidth, aHeight, aColor, aWidth, aHeight) of me
  
colordImage’s lockFocus()
  
colordImage’s drawAtPoint:{0, 0} fromRect:(current application’s NSZeroRect) operation:(current application’s NSCompositeDestinationIn) fraction:1.0
  
colordImage’s unlockFocus()
  
return colordImage
end fillColorWithImage

on makeNSImageWithFilledWithColor(aWidth, aHeight, fillColor)
  set anImage to NSImage’s alloc()’s initWithSize:(current application’s NSMakeSize(aWidth, aHeight))
  
anImage’s lockFocus()
  
—
  
set theRect to {{x:0, y:0}, {height:aHeight, width:aWidth}}
  
set theNSBezierPath to NSBezierPath’s bezierPath
  
theNSBezierPath’s appendBezierPathWithRect:theRect
  
—
  
fillColor’s |set|()
  
theNSBezierPath’s fill()
  
—
  
anImage’s unlockFocus()
  
—
  
return anImage
end makeNSImageWithFilledWithColor

on makeNSColorFromRGBA65535val(redValue as integer, greenValue as integer, blueValue as integer, alphaValue as integer)
  set aRedCocoa to (redValue / 65535) as real
  
set aGreenCocoa to (greenValue / 65535) as real
  
set aBlueCocoa to (blueValue / 65535) as real
  
set aAlphaCocoa to 1.0 as real
  
set aColor to NSColor’s colorWithCalibratedRed:aRedCocoa green:aGreenCocoa blue:aBlueCocoa alpha:aAlphaCocoa
  
return aColor
end makeNSColorFromRGBA65535val

on saveNSImageAtPathAsPNG(anImage, outPath)
  set imageRep to anImage’s TIFFRepresentation()
  
set aRawimg to current application’s NSBitmapImageRep’s imageRepWithData:imageRep
  
set pathString to current application’s NSString’s stringWithString:outPath
  
set newPath to pathString’s stringByExpandingTildeInPath()
  
set myNewImageData to (aRawimg’s representationUsingType:(current application’s NSPNGFileType) |properties|:(missing value))
  
set aRes to (myNewImageData’s writeToFile:newPath atomically:true) as boolean
  
return aRes
end saveNSImageAtPathAsPNG

★Click Here to Open This Script 

Posted in Image | Tagged 10.13savvy 10.14savvy 10.15savvy NSBezierPath NSBitmapImageRep NSCalibratedRGBColorSpace NSColor NSCompositeCopy NSGraphicsContext NSImage NSZeroRect | 1 Comment

画像に円を塗る

Posted on 2月 11, 2020 by Takaaki Naganoya

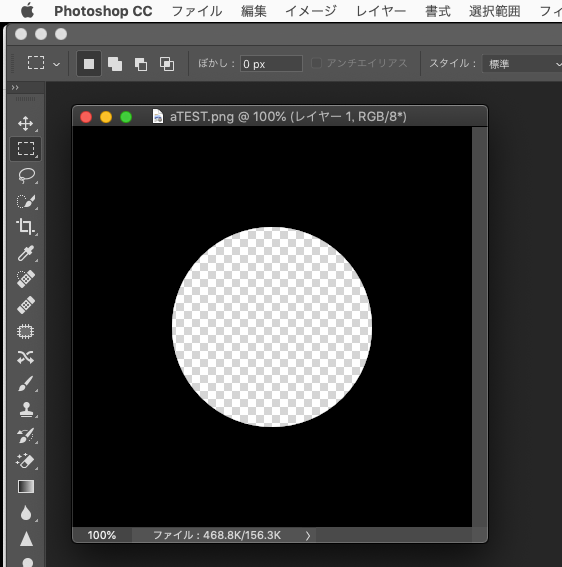
作成した画像(NSImage)に円を塗るAppleScriptです。

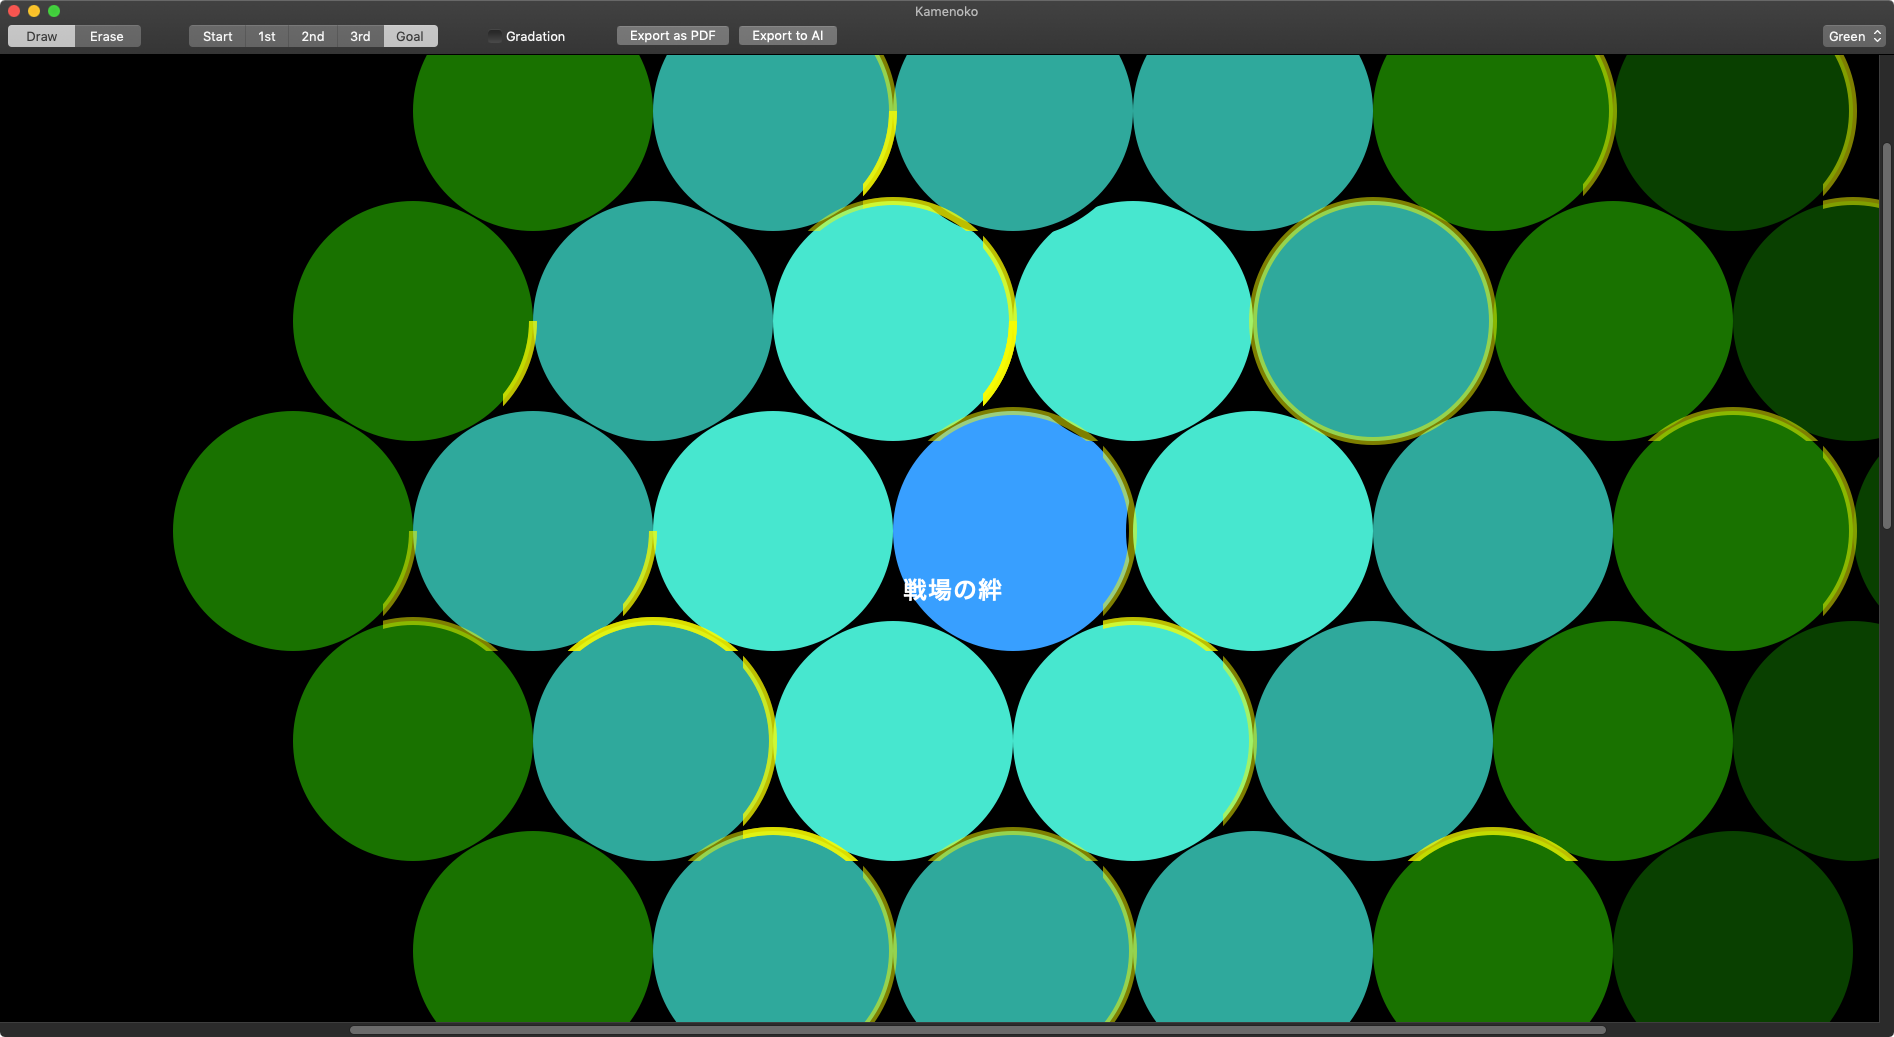
最近、6角形の図形ばかり塗りつぶしていましたが、「円に変えるとどうなんだろう?」と考えて、本ルーチンを試作してみました。

ためしに、6角形ではなく円で塗りつぶしてみたものの、そんなにイケていない感じがします。

AppleScript名:画像に円を塗る.scptd
—
–  Created by: Takaaki Naganoya
–  Created on: 2020/02/11
—
–  Copyright © 2020 Piyomaru Software, All Rights Reserved
—
use AppleScript version "2.4" — Yosemite (10.10) or later
use framework "Foundation"
use framework "AppKit"
use scripting additions

property aRadius : 40

set aFile to POSIX path of (choose file name)
if aFile does not end with ".png" then
  set aFile to aFile & ".png"
end if

set aColor to current application’s NSColor’s redColor()

set aImage to current application’s NSImage’s alloc()’s initWithSize:{300, 300}

repeat with y from 0 to 300 by aRadius + 4
  repeat with x from 0 to 300 by aRadius + 4
    my drawCircleOnNSIMage(aImage, aRadius, x, y, aColor)
  end repeat
end repeat

set sRes to my saveNSImageAtPathAsPNG(aImage, aFile)

#  MARK: Call By Reference
on drawCircleOnNSIMage(aImage, aRadius, aXpos, aYpos, aColor)
  set aBezier to generateCircle(aRadius, aXpos, aYpos) of me
  (
aImage)’s lockFocus()
  
aColor’s |set|()
  
aBezier’s fill() –ぬりつぶし
  (
aImage)’s unlockFocus()
end drawCircleOnNSIMage

#  MARK: circleのBezier曲線を作成して返す
on generateCircle(theRadius, x, y)
  set aRect to current application’s NSMakeRect(x, y, theRadius, theRadius)
  
set aCirCle to current application’s NSBezierPath’s bezierPath()
  
aCirCle’s appendBezierPathWithOvalInRect:aRect
  
return aCirCle
end generateCircle

# NSImageを指定パスにPNG形式で保存
on saveNSImageAtPathAsPNG(anImage, outPath)
  set imageRep to anImage’s TIFFRepresentation()
  
set aRawimg to current application’s NSBitmapImageRep’s imageRepWithData:imageRep
  
set pathString to current application’s NSString’s stringWithString:outPath
  
set newPath to pathString’s stringByExpandingTildeInPath()
  
set myNewImageData to (aRawimg’s representationUsingType:(current application’s NSPNGFileType) |properties|:(missing value))
  
set aRes to (myNewImageData’s writeToFile:newPath atomically:true) as boolean
  
return aRes –成功ならtrue、失敗ならfalseが返る
end saveNSImageAtPathAsPNG

★Click Here to Open This Script 

Posted in file File path Image | Tagged 10.14savvy 10.15savvy NSBezierPath NSBitmapImageRep NSColor NSImage NSPNGFileType NSString | Leave a comment

RoundWindow v2

Posted on 1月 12, 2020 by Takaaki Naganoya

Edama2さんと「無理だよねー」「そうそう、絶対無理〜」などとメールで言っていたら、Shane Stanleyから届いた「できるよ」という衝撃のメール。

スクリプトエディタ上で記述する通常のAppleScriptで、CocoaのCustom Class宣言と呼び出しができるとのこと。

自分で動作確認してみるまで、半信半疑でしたが、、、、できますねこれは、、、

–> Download Editable and Executable Script Bundle

冗談半分で思いついたことを試してみたらできてしまったり、冗談半分でできるわけないよねと念のために書いておいたことが世界の誰かの目に止まったりと、「冗談半分」ってけっこう重要なことだと思えてきました。

以下、Shane Stanleyの説明による、その書き換え手順です。

(1)Subclassファイル(複数可)をXcode上のプロジェクトで書くようなスタイルで書く

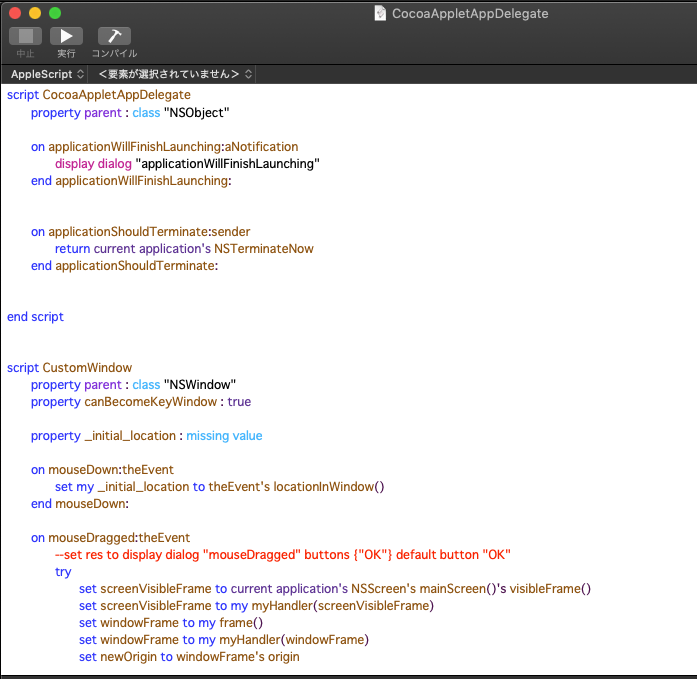
こういう(↑)スタイルですね。かならずscript宣言しつつ、parent属性を宣言しておくところがXcode上のAppleScriptアプリケーションのスタイルです。あとで動作確認して、アプリケーションの起動や終了に関するイベントハンドラを書いておいたのは無駄(実行されない)ではないかとも思われました。

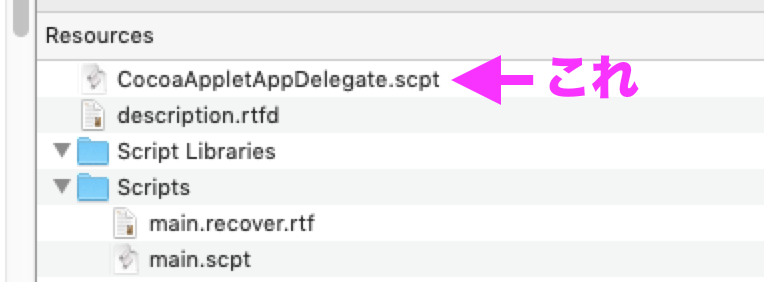
(2)実行するメインのScriptのResourcesフォルダ内にSubclassファイルを入れる

普通、AppleScriptのファイルが入る/Contents/Resources/Scripts/でも、ライブラリを入れておく/Contents/Resources/Script Libraries/でもなく、/Contents/Resources/の直下に入れます。ファイル名はオリジナルのEdama2さんのものをそのまま採用していますが、割となんでもいいようです。Custom Classファイルは分割してもいいし、このサンプルのようにまとめてもいいんでしょう。

# 追加実験してみたところ、Resourcesフォルダ以下の/Scriptsや/Script Libraries/フォルダと重複しない名称の別フォルダ(例:/Classes/)に入れておいても大丈夫でした

(3)use framework “AppleScriptObjC”の宣言文を追加

見たことのない光景ですが、書くことについてはとくに障害はありません。AppKit.Frameworkもuse宣言しておいたほうがよかったかもしれません。

(4)メインスクリプトの実行時に以下の処理を実行

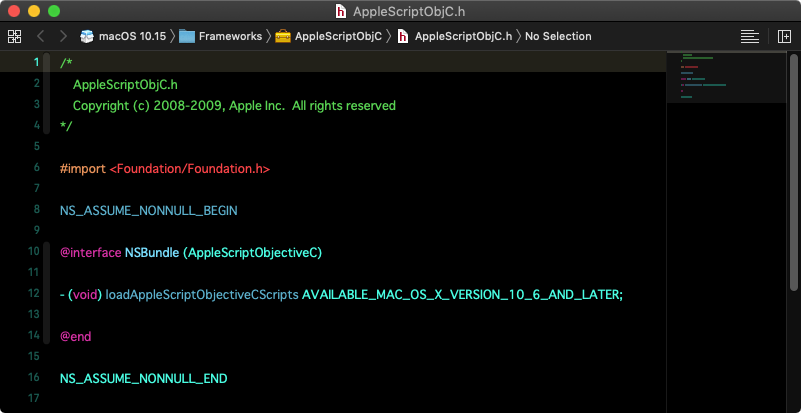
set theBundle to current application’s NSBundle’s bundleWithPath:pathToFolderWithScripts
theBundle’s loadAppleScriptObjectiveCScripts()

★Click Here to Open This Script 

試行錯誤して、上記の「pathToFolderWithScripts」にバンドル内の/Contents/Resources/を入れて実行すればよいことが理解できました。

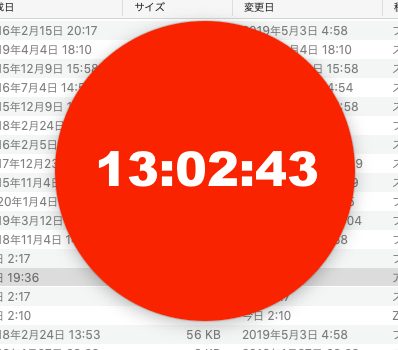
以上の変更を加えて、ためしにスクリプトエディタ&Script Debugger上で実行してみたところ、改変前と変わりなく実行できてしまいました(冒頭のスクリーンショット)。

いや、これはめちゃくちゃすごいですよ!! 何がすごいって、CocoaのCustom Classをスクリプトライブラリ中に入れて呼び出せるということで、けっこう無茶な箱庭インタフェースが作れてしまう予感が、、、、。

そして、AppleScriptObjC(AppleScriptObjC.frameworkより)でスクリプトエディタの「.scpt」形式のファイルを読み込んで実行できてしまったということは、Xcode上のAppleScriptアプリケーション内のScriptもテキスト形式だけでなく、スクリプトエディタで編集できる.scpt形式のファイルを突っ込んで編集できる可能性が見えてきました。

ただ、テキスト形式になっていないと、Interface Builderとの連携のあたりで問題になりそうな気もします。

AppleScript名:customClassTest.scptd
—
–  Created by: Edama2 2020/01/10
–  Adviced by: Shane Stanley 2020/01/11
–  Modified by: Takaaki Naganoya 2020/01/12
—
use AppleScript version "2.4" — Yosemite (10.10) or later
use framework "Foundation"
use framework "AppleScriptObjC"
use scripting additions

property _clock_text_view : missing value –> 時計用の文字列
property _clock_timer : missing value –> 時計用のNSTimer

–Script Bundle内のResourcesフォルダを求める
set resourcePath to POSIX path of (path to me) & "Contents/Resources/"
set theBundle to current application’s NSBundle’s bundleWithPath:resourcePath
theBundle’s loadAppleScriptObjectiveCScripts()

my performSelectorOnMainThread:"raizeWindow:" withObject:(missing value) waitUntilDone:true

# ウィンドウを作成
on raizeWindow:aParam
  
  
# 時計用の文字を作成
  
tell current application’s NSTextView’s alloc()
    tell initWithFrame_(current application’s NSMakeRect(35, 120, 300, 40))
      setRichText_(true)
      
useAllLigatures_(true)
      
setTextColor_(current application’s NSColor’s whiteColor())
      
setFont_(current application’s NSFont’s fontWithName:"Arial-Black" |size|:48)
      
setBackgroundColor_(current application’s NSColor’s colorWithDeviceRed:0.0 green:0.0 blue:0.0 alpha:0.0)
      
setAlphaValue_(1.0)
      
setEditable_(false)
      
–setString_("00:00:00")
      
      
set my _clock_text_view to it
    end tell
  end tell
  
  
# 時計を更新するNSTimerを作成
  
set my _clock_timer to current application’s NSTimer’s scheduledTimerWithTimeInterval:1 target:me selector:"idleHandler:" userInfo:(missing value) repeats:true
  
  
# 丸いViewを作成
  
set aFrame to current application’s NSMakeRect(0, 0, 300, 300)
  
tell current application’s RoundView’s alloc()
    tell initWithFrame_(aFrame)
      setNeedsDisplay_(true)
      
setSubviews_({my _clock_text_view})
      
set customView to it
    end tell
  end tell
  
  
#スクリーンのサイズを調べる
  
set aScreen to current application’s NSScreen’s mainScreen()
  
  
# Window
  
set aBacking to current application’s NSWindowStyleMaskBorderless
  
–set aBacking to current application’s NSBorderlessWindowMask
  
set aDefer to current application’s NSBackingStoreBuffered
  
  
tell current application’s CustomWindow’s alloc()
    tell initWithContentRect_styleMask_backing_defer_screen_(aFrame, aBacking, aDefer, false, aScreen)
      –setTitle_(uniqueName) –>タイトル
      
setBackgroundColor_(current application’s NSColor’s clearColor()) — Grammar Police –>背景色
      
setContentView_(customView) –>内容ビューのセット
      
setDelegate_(me) –>デリゲート
      
setDisplaysWhenScreenProfileChanges_(true) –>スクリーンプロファイルが変更されたときウインドウの内容をアップデートするか
      
setHasShadow_(true) –>ウインドウに影があるか
      
setIgnoresMouseEvents_(false) –>マウスイベントを無視するか
      
–setLevel_((current application’s NSScreenSaverWindowLevel) + 1) –>ウインドウの前後関係の位置
      
setOpaque_(false) –>ウインドウを不透明にするか
      
setReleasedWhenClosed_(true) –>閉じたときにメモリを解放するか
      
      
#
      
|center|()
      
makeKeyAndOrderFront_(me) –>キーウインドウにして前面に持ってくる
      
–setFrame_display_(aFrame, true) –>表示
    end tell
  end tell
end raizeWindow:

#タイマー割り込み
on idleHandler:aSender
  set mesStr to time string of (current date)
  (
my _clock_text_view)’s setString:mesStr
end idleHandler:

★Click Here to Open This Script 

AppleScript名:CocoaAppletAppDelegate.scpt
script CocoaAppletAppDelegate
  property parent : class "NSObject"
  
  
on applicationWillFinishLaunching:aNotification
    —
  end applicationWillFinishLaunching:


on applicationShouldTerminate:sender
    return current application’s NSTerminateNow
  end applicationShouldTerminate:
  
end script

script CustomWindow
  property parent : class "NSWindow"
  
property canBecomeKeyWindow : true
  
  
property _initial_location : missing value
  
  
on mouseDown:theEvent
    set my _initial_location to theEvent’s locationInWindow()
  end mouseDown:
  
  
on mouseDragged:theEvent
    –set res to display dialog "mouseDragged" buttons {"OK"} default button "OK"
    
try
      set screenVisibleFrame to current application’s NSScreen’s mainScreen()’s visibleFrame()
      
set screenVisibleFrame to my myHandler(screenVisibleFrame)
      
set windowFrame to my frame()
      
set windowFrame to my myHandler(windowFrame)
      
set newOrigin to windowFrame’s origin
      
      
set currentLocation to theEvent’s locationInWindow()
      
set newOrigin’s x to (newOrigin’s x) + ((currentLocation’s x) – (_initial_location’s x))
      
set newOrigin’s y to (newOrigin’s y) + ((currentLocation’s y) – (_initial_location’s y))
      
      
set tmpY to ((newOrigin’s y) + (windowFrame’s |size|’s height))
      
set screenY to (screenVisibleFrame’s origin’s y) + (screenVisibleFrame’s |size|’s height)
      
if tmpY > screenY then
        set newOrigin’s y to (screenVisibleFrame’s origin’s y) + ((screenVisibleFrame’s |size|’s height) – (windowFrame’s |size|’s height))
      end if
      
      
my setFrameOrigin:newOrigin
    on error error_message number error_number
      set error_text to "Error: " & error_number & ". " & error_message
      
display dialog error_text buttons {"OK"} default button 1
      
return error_text
    end try
    
  end mouseDragged:
  
  
on myHandler(aFrame)
    if class of aFrame is list then
      set {{theX, theY}, {theWidth, theHeight}} to aFrame
      
set aFrame to {origin:{x:theX, y:theY}, |size|:{width:theWidth, height:theHeight}}
      
–set aFrame to current application’s NSMakeRect(theX, theY, theWidth, theHeight)
    end if
    
return aFrame
  end myHandler
end script

script RoundView
  property parent : class "NSView"
  
  
on drawRect:rect
    set aFrame to my frame()
    
set myColor to current application’s NSColor’s redColor()
    
    
tell current application’s NSBezierPath
      tell bezierPathWithOvalInRect_(aFrame)
        myColor’s |set|()
        
fill()
      end tell
    end tell
  end drawRect:
end script

★Click Here to Open This Script 

Posted in Custom Class GUI How To | Tagged 10.14savvy 10.15savvy NSBezierPath NSBundle NSColor NSFont NSScreen NSTextView NSTimer NSView NSWindow | Leave a comment

RoundWindow

Posted on 1月 10, 2020 by Takaaki Naganoya

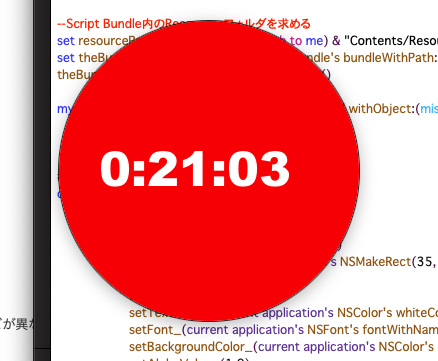
本Scriptは、Edama2さんから投稿していただいたものです。Cocoa AppleScript AppletでCustom Classを宣言して作られた、丸いウィンドウ(透明ウィンドウの上に丸いグラフィックを描画)を表示して、タイマー割り込みで時計を表示するAppleScriptです。

–> Download Editable and Executable Applet

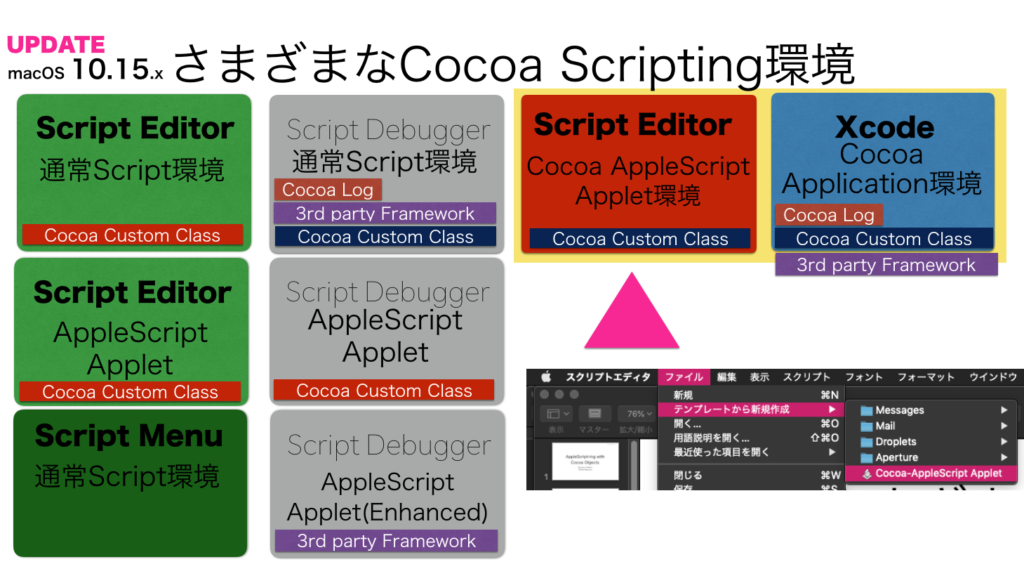
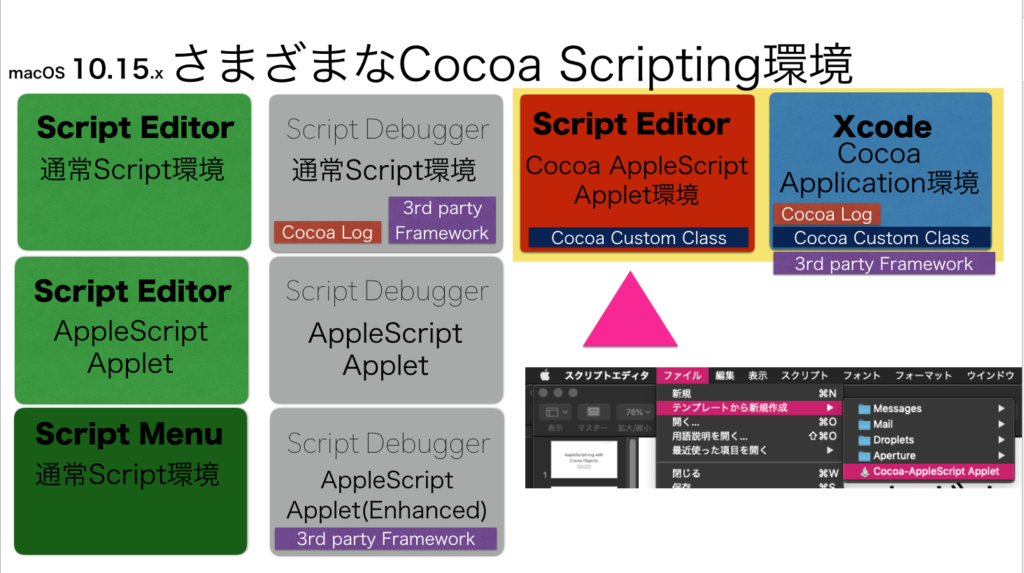
AppleScriptのランタイム環境はいくつかあり、それぞれに「できること」と「できないこと」、「手軽さ」などが異なります。

(1)スクリプトエディタ上で記述、実行する環境
一番セキュリティ上の制約が緩く、できることの多い環境です。

(2)Script Debugger上で記述、実行する環境
Cocoaのイベントやオブジェクトのログ表示などができる環境です。

(3)Applet環境
AppleScriptの実行ファイルです。

(4)Script Menu環境
macOS標準装備の、メニューからAppleScriptを実行できる環境です。

さらに、Cocoa Scriptingの機能に着目してみると、見え方が変わります。

本Scriptを記述している「Cocoa AppleScript Applet」環境(上の図の赤い部分)は、スクリプトエディタ上で記述する通常のAppleScriptと、Xcode上で記述するCocoaアプリケーションの中間的な性格を持つものです。スクリプトエディタ上で直接は動かせず、アプレット形式で動作させることになりますが、スクリプトエディタ上で動かすよりも、よりCocoaの機能が利用できます。

Cocoa AppleScript Appletでは、アプリケーション(Applet)起動や終了の最中で発生するイベントを利用できますし、本ScriptのようにCocoaのCustom Classを宣言できます。これは、普通のスクリプトエディタ上で記述する(本Blogの大部分のScriptのような)Scriptではできない真似です。
→ Shane Stanleyからツッコミが入って、手の込んだ作業を行うとできるとかで(テンプレートそのままでは無理)、後で実際に試してみます

タイトルは「丸いウィンドウと時計の表示」
NSWindowのカスタムクラスを使ったタイトルバーなしのドラッグで移動できる丸いウィンドウとオマケに時計を表示したものです。
初心者受けしそうなやつです。
問題はそこではなく、
XcodeやCocoa applescript appletから実行するASOCだとカスタムクラスが作れるけど、
ノーマルのapplescriptから実行するASOCではカスタムクラスが作れないということです。
表現がややこしいですが...。
ノーマルのapplescriptからカスタムクラスを作ると、ただのスクリプトオブジェクトにしかなりません。
誰かうまい解決方法を知っている人がいたら教えてください。

ちょうど、こういう資料をまとめていたので補足説明に役立ってしまいました。スクリプトエディタ上で記述する通常のAppleScriptでもCustom Cocoa Classが宣言できると便利そうですが、どんなもんでしょうか? 

Custom Classは便利なので使いたくなる一方、AppleScriptのインタプリタ上で実行するため、Objective-Cなどで書くのと同じような感覚で使うと「遅くて使えない」という話になると思いますが、このEdama2さんのサンプルぐらいの使いかたであれば、ちょうどいいんじゃないかというところです。

歴史的にみると、Cocoa-AppleScript Appletは、Xcode上で記述するCocoa-Applicationを簡略化してスクリプトエディタ上でCocoa Scriptingを手軽に使えるように手直しした「途中」の環境といえます。

Cocoa-AppleScript Appletは、GUIが手軽に作れるわけでもなく、スクリプトエディタ上で直接実行やログ表示ができるわけでもなありません。マスターしたところで最終到達点がCocoaアプリケーションほど高くなく、編集や習熟もしづらいことから「中途半端」「使えない」という評価になっていました(自分も使っていませんでした)。

その後、Cocoa-AppleScript Appletの機能要素をさらにダウンサイジングして、スクリプトエディタ上で手軽に記述・実行ができるように進化したのが現在・広くつかわれているCocoa Scripting環境です。

ただ、使いやすくなって広く使われるようになったはいいものの、「Xcodeを使うまでもないが、もうちょっとCocoaの機能が利用できないか?」という意見も出るようになり、Cocoa-AppleScript Appletを再評価してもいいんじゃないかと考えるようになってきてはいます。

ちなみに、本Cocoa-AppleScript AppletでCustom Classを宣言しているのと同じような書き方で、通常のCocoa Scriptingの環境で動かすような変更を加えたScriptもEdama2さんが試していますが、それは「動かない」ということで結論が出ています。

AppleScript名:CocoaAppletAppDelegate.scpt
script CocoaAppletAppDelegate
  property parent : class "NSObject"
  
  
property _clock_text_view : missing value –> 時計用の文字列
  
property _clock_timer : missing value –> 時計用のNSTimer
  
  
on applicationWillFinishLaunching:aNotification
    my raizeWindow()
  end applicationWillFinishLaunching:
  
  
on applicationShouldTerminate:sender
    my _clock_timer’s invalidate()
    
return current application’s NSTerminateNow
  end applicationShouldTerminate:
  
  
# ウィンドウを作成
  
on raizeWindow()
    
    
# 時計用の文字を作成
    
tell current application’s NSTextView’s alloc()
      tell initWithFrame_(current application’s NSMakeRect(35, 120, 300, 40))
        setRichText_(true)
        
useAllLigatures_(true)
        
setTextColor_(current application’s NSColor’s whiteColor())
        
setFont_(current application’s NSFont’s fontWithName:"Arial-Black" |size|:48)
        
setBackgroundColor_(current application’s NSColor’s colorWithDeviceRed:0.0 green:0.0 blue:0.0 alpha:0.0)
        
setAlphaValue_(1.0)
        
setEditable_(false)
        
–setString_("00:00:00")
        
        
set my _clock_text_view to it
      end tell
    end tell
    
    
# 時計を更新するNSTimerを作成
    
set my _clock_timer to current application’s NSTimer’s scheduledTimerWithTimeInterval:1 target:me selector:"idleHandler:" userInfo:(missing value) repeats:true


# 丸いViewを作成
    
set aFrame to current application’s NSMakeRect(0, 0, 300, 300)
    
tell current application’s RoundView’s alloc()
      tell initWithFrame_(aFrame)
        setNeedsDisplay_(true)
        
setSubviews_({my _clock_text_view})
        
set customView to it
      end tell
    end tell
    
    
#スクリーンのサイズを調べる
    
set aScreen to current application’s NSScreen’s mainScreen()
    
    
# Window
    
set aBacking to current application’s NSWindowStyleMaskBorderless
    
–set aBacking to current application’s NSBorderlessWindowMask
    
set aDefer to current application’s NSBackingStoreBuffered
    
tell current application’s CustomWindow’s alloc()
      tell initWithContentRect_styleMask_backing_defer_screen_(aFrame, aBacking, aDefer, false, aScreen)
        –setTitle_(uniqueName) –>タイトル
        
setBackgroundColor_(current application’s NSColor’s clearColor()) –>背景色
        
setContentView_(customView) –>内容ビューのセット
        
setDelegate_(me) –>デリゲート
        
setDisplaysWhenScreenProfileChanges_(true) –>スクリーンプロファイルが変更されたときウインドウの内容をアップデートするか
        
setHasShadow_(true) –>ウインドウに影があるか
        
setIgnoresMouseEvents_(false) –>マウスイベントを無視するか
        
–setLevel_((current application’s NSScreenSaverWindowLevel) + 1) –>ウインドウの前後関係の位置
        
setOpaque_(false) –>ウインドウを不透明にするか
        
setReleasedWhenClosed_(true) –>閉じたときにメモリを解放するか
        
        
#
        
|center|()
        
makeKeyAndOrderFront_(me) –>キーウインドウにして前面に持ってくる
        
–setFrame_display_(aFrame, true) –>表示
      end tell
    end tell
  end raizeWindow
  
  
#タイマー割り込み
  
on idleHandler:aSender
    set mesStr to time string of (current date)
    (
my _clock_text_view)’s setString:mesStr
  end idleHandler:
end script

script CustomWindow
  property parent : class "NSWindow"
  
property canBecomeKeyWindow : true
  
  
property _initial_location : missing value
  
  
on mouseDown:theEvent
    set my _initial_location to theEvent’s locationInWindow()
  end mouseDown:
  
  
on mouseDragged:theEvent
    –set res to display dialog "mouseDragged" buttons {"OK"} default button "OK"
    
try
      set screenVisibleFrame to current application’s NSScreen’s mainScreen()’s visibleFrame()
      
set screenVisibleFrame to my myHandler(screenVisibleFrame)
      
set windowFrame to my frame()
      
set windowFrame to my myHandler(windowFrame)
      
set newOrigin to windowFrame’s origin
      
      
set currentLocation to theEvent’s locationInWindow()
      
set newOrigin’s x to (newOrigin’s x) + ((currentLocation’s x) – (_initial_location’s x))
      
set newOrigin’s y to (newOrigin’s y) + ((currentLocation’s y) – (_initial_location’s y))
      
      
set tmpY to ((newOrigin’s y) + (windowFrame’s |size|’s height))
      
set screenY to (screenVisibleFrame’s origin’s y) + (screenVisibleFrame’s |size|’s height)
      
if tmpY > screenY then
        set newOrigin’s y to (screenVisibleFrame’s origin’s y) + ((screenVisibleFrame’s |size|’s height) – (windowFrame’s |size|’s height))
      end if
      
      
my setFrameOrigin:newOrigin
    on error error_message number error_number
      set error_text to "Error: " & error_number & ". " & error_message
      
display dialog error_text buttons {"OK"} default button 1
      
return error_text
    end try
    
  end mouseDragged:
  
  
on myHandler(aFrame)
    if class of aFrame is list then
      set {{theX, theY}, {theWidth, theHeight}} to aFrame
      
set aFrame to {origin:{x:theX, y:theY}, |size|:{width:theWidth, height:theHeight}}
      
–set aFrame to current application’s NSMakeRect(theX, theY, theWidth, theHeight)
    end if
    
return aFrame
  end myHandler
end script

script RoundView
  property parent : class "NSView"
  
  
on drawRect:rect
    set aFrame to my frame()
    
set myColor to current application’s NSColor’s redColor()
    
    
tell current application’s NSBezierPath
      tell bezierPathWithOvalInRect_(aFrame)
        myColor’s |set|()
        
fill()
      end tell
    end tell
  end drawRect:
end script

★Click Here to Open This Script 

Posted in GUI | Tagged 10.14savvy 10.15savvy NSBezierPath NSColor NSScreen NSTextView NSTimer NSView NSWindow | Leave a comment

画像の空白判定 v4

Posted on 12月 19, 2019 by Takaaki Naganoya

画像のすべてのピクセルが白であることをチェックするAppleScriptです。

以前にmacOS 10.12上で作成した「空白画像検出v3」は一般的に処理時間のかかる空白画像の検出(ヒストグラム計算してチェックする?)が高速に処理できます(GPUImageでヒストグラム計算を行うより2倍ぐらい高速)。空白検出のためだけにAdobe Photoshopが必要になるといった事態は避けられます。

–> test Data(動作検証用各種テストデータ)

macOS 10.14.6上でこのルーチンを再度試してみたところ、思ったとおりに空白検出(数百万ピクセルの画像でも1つだけ黒であればfalseを返す)してくれません。ちょっと書き方を変えていますが、単体で通常のAppleScript(Cocoa不使用)にコンテクストメニューから突っ込むモジュールとして運用するためです。

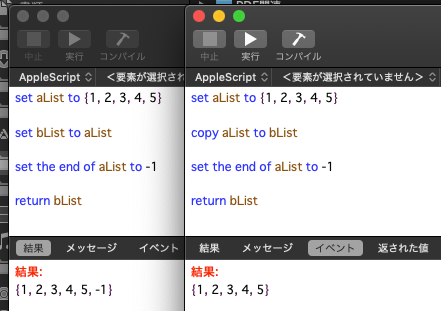
copyコマンドがdeep copyしてくれない?

参照ではなくすべてのデータをコピーするコマンドとして、copyコマンドはとても重宝しています。単に「パラメータの代入の方向が違う偏屈なコマンド」ではなく、明示的にデータ内容をコピーするためのコマンドと認識しています。

AppleScriptのオブジェクト同様、Cocoaのオブジェクトについてもcopyコマンドでdeep copyしてくれるものと理解していましたが、macOS 10.14.6上で本ルーチンを試してみたところ、どうも参照をコピーしている気配がします。

AppleScriptのオブジェクト(配列とか)をcopyコマンドでコピーすると、参照ではなくデータが複製されていることを確認しました。Cocoaオブジェクトのcopyも同様かどうかは、ちょっとそうじゃないんじゃないかというところです。

set bNSImage to aNSImage's |copy|()

Cocoaの世界のオブジェクトのコピーはこんな感じ(↑)でできたので、今後はこちらを採用することにします。

1×1のNSImageに色を塗るとデータサイズが増える

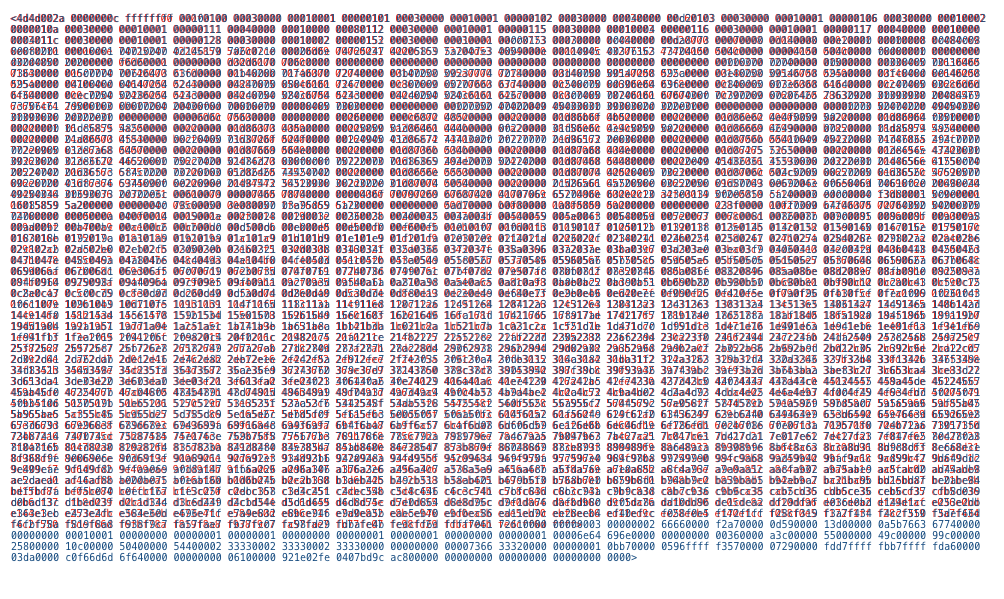
ビットマップ画像の状態であるNSBitmapImageRepになっていれば、1×1画像のサイズは同じことが期待されます。実際、macOS 10.12上ではそのように扱えていました。

ところが、macOS 10.14上で1×1ドットのNSImageに対して色を塗って、NSBitmapImageRepを取得すると、塗らない状態のNSImageよりもデータ(NSData)サイズが大きくなることがわかりました。


▲1×1のPNG画像をビットマップ化したデータ。赤が処理前、青が塗りつぶし処理後のデータ(macOS 10.14.6)。ピクセル数が増えてるのでは? と疑ってサイズを何回も計算して確認しましたが、間違っていません

しかも、データ量がmacOS 10.14と10.15では大幅に異なります(macOS 10.15では大幅にデータ量が減る)。

 1×1 PNG画像 ビットマップ化したデータサイズ:3,354 Bytes(macOS 10.14.6)
 1×1 PNG画像 塗りつぶし ビットマップ化したデータサイズ:3,574 Bytes(macOS 10.14.6)
 1×1 PNG画像 塗りつぶし ビットマップ化したデータサイズ:750 Bytes(macOS 10.15.2)

さすがに匙を投げかけましたが、比較元のデータに透明の色(clearColor())を塗る=画像的に意味はないが、同じ処理を通すことでデータサイズを同程度にするという処理を行うことで、いい感じに空白検出できるようになりました。

なにをどういじくったら、1×1ビットマップ画像のサイズがOSアップデートごとに大幅に変わるのかさっぱり理解できないのですが、そこに何か意味があるのでしょうか?

Mac App Storeに出したアプリケーションで、PDFの空白ページ検出に本ルーチンを利用していますが、Appleのレビュー段階で「単にPDFから文字を抽出して空白検出しているのだろう」と思われてリジェクトされました。実際には、全ページを画像レンダリングして1ドットの画像でも存在していたら空白としては認識しない仕様になっているのですが、Appleのレビューワーには処理内容を説明して、各種ベンチマーク結果などを出さないと信じてもらえませんでした。

Appleのエンジニアが考えるところの空白検出が「文字チェックだけ」の使い物にならない処理だということはよくわかりました。また、頭からそのように思い込んで攻撃してきた間抜けにも遭遇してウンザリしました。

AppleScript名:画像の空白判定 v4
set aFile to (choose file of type {"public.image"})
set iRes to checkImageIsWhite(aFile) of whiteImageKit
–> true –white (blank) image

script whiteImageKit
  use AppleScript version "2.7" — High Sierra (10.13) or later
  
use framework "Foundation"
  
use framework "AppKit"
  
use scripting additions
  
property parent : AppleScript
  
  
property NSData : a reference to current application’s NSData
  
property NSDate : a reference to current application’s NSDate
  
property |NSURL| : a reference to current application’s |NSURL|
  
property NSColor : a reference to current application’s NSColor
  
property NSImage : a reference to current application’s NSImage
  
property NSBezierPath : a reference to current application’s NSBezierPath
  
property NSBitmapImageRep : a reference to current application’s NSBitmapImageRep
  
  
–Compare Original Data and
  
on checkImageIsWhite(aFile)
    set aPOSIXpath to POSIX path of aFile
    
set aURL to |NSURL|’s fileURLWithPath:(aPOSIXpath)
    
    
set aNSImage to NSImage’s alloc()’s initWithContentsOfURL:(aURL)
    
set bNSImage to NSImage’s alloc()’s initWithContentsOfURL:(aURL)
    
    
–copy aNSImage to bNSImage–Not deep copy ????
    
    
set fillColor1 to NSColor’s clearColor()
    
set blankNSImage1 to drawImageWithFilledColor(aNSImage, fillColor1) of me
    
    
set fillColor2 to makeNSColorFromRGBAval(65535, 65535, 65535, 65535, 65535) of me
    
set blankNSImage2 to drawImageWithFilledColor(bNSImage, fillColor2) of me
    
    
set aTiff to blankNSImage1’s TIFFRepresentation()
    
set bTiff to blankNSImage2’s TIFFRepresentation()
    
    
set chkWhite to (aTiff’s isEqualToData:bTiff) as boolean
    
    
return chkWhite
  end checkImageIsWhite


on getSizeOfImage(anNSImage)
    set aSize to anNSImage’s |size|()
    
set aClass to class of aSize
    
if aClass = record then
      copy aSize to theSize –To macOS 10.12.x
    else –macOS 10.13 or later
      set sizeX to (item 1 of item 2 of aSize)
      
set sizeY to (item 2 of item 2 of aSize)
      
set theSize to {width:sizeX, height:sizeY}
    end if
    
return theSize
  end getSizeOfImage


–指定サイズの画像を作成し、背景を指定色で塗る
  
on drawImageWithFilledColor(anImage, fillColor)
    set aSize to getSizeOfImage(anImage) of me
    
    
anImage’s lockFocus()
    
    
set theRect to {{x:0, y:0}, {width:(width of aSize), height:(height of aSize)}}
    
set theNSBezierPath to NSBezierPath’s bezierPath
    
theNSBezierPath’s appendBezierPathWithRect:theRect
    
fillColor’s |set|()
    
theNSBezierPath’s fill()
    
    
anImage’s unlockFocus()
    
    
return anImage
  end drawImageWithFilledColor


–aMaxValを最大値とする数値でNSColorを作成して返す
  
on makeNSColorFromRGBAval(redValue as integer, greenValue as integer, blueValue as integer, alphaValue as integer, aMaxVal as integer)
    set aRedCocoa to (redValue / aMaxVal) as real
    
set aGreenCocoa to (greenValue / aMaxVal) as real
    
set aBlueCocoa to (blueValue / aMaxVal) as real
    
set aAlphaCocoa to (alphaValue / aMaxVal) as real
    
set aColor to NSColor’s colorWithCalibratedRed:aRedCocoa green:aGreenCocoa blue:aBlueCocoa alpha:aAlphaCocoa
    
return aColor
  end makeNSColorFromRGBAval
  
end script

★Click Here to Open This Script 

Posted in Image | Tagged 10.13savvy 10.14savvy 10.15savvy NSBezierPath NSBitmapImageRep NSColor NSData NSImage NSURL | 3 Comments

Keynote書類のテキスト色を置換

Posted on 6月 9, 2019 by Takaaki Naganoya

最前面のKeynote書類の文字色を置換するAppleScriptです。

# 初出時にはmacOS 10.13であったため、スクリプトエディタ上からも野良Framework呼び出しができましたが、macOS 10.14以降ではSIPを解除するかScript Debugger上で実行する必要があります

Keynoteは文字色の置換をする機能が実装されていないので、個別に手で色を変更するか、あるいはスタイルを編集して一括で修正するやり方になります。

そこで、AppleScriptで色置換を行う処理を書いてみました。表の背景色を置換する処理を書いたときの部品を大幅に使いまわしています。

文字色の取得や判定は、テキストアイテムの1文字目の情報で判断しています。途中で色を変更しているような場合にはうまく検出できません(処理スピードを重視したことと、自分の利用方法の範囲ではそういう文字ごとに異なる色を指定するところまではサポートしなくてよいと考えたためです。仕事ならもうちょっと真面目に作り込むかもしれませんが、、、、)。

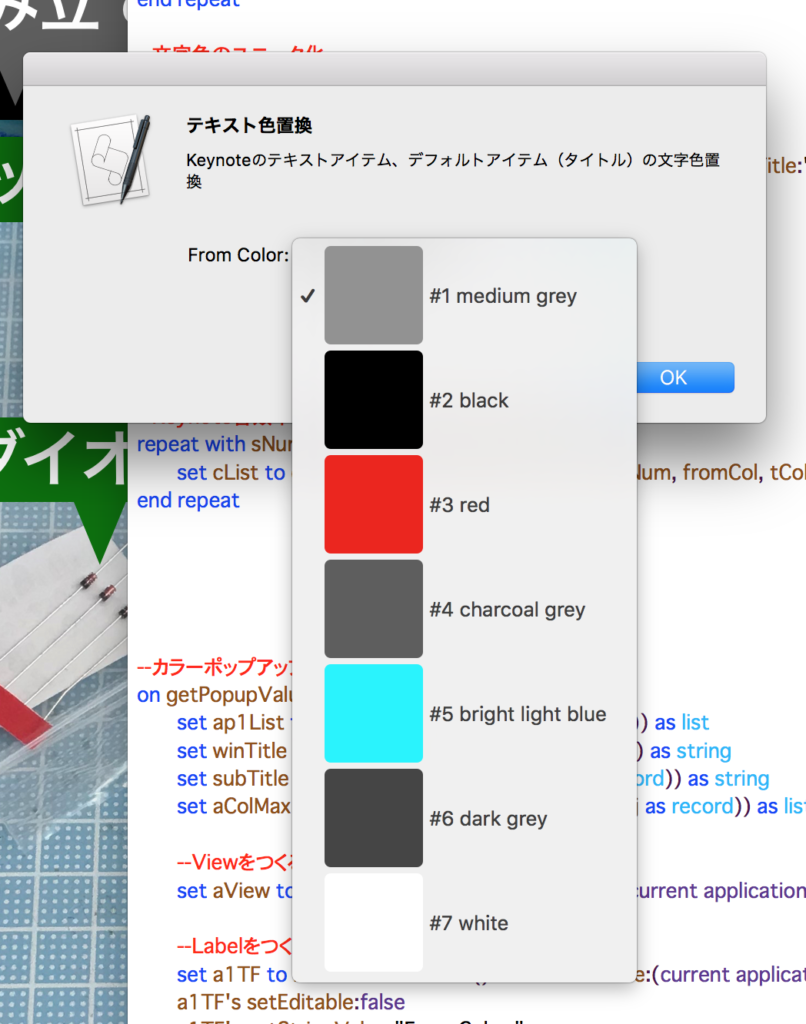
ポップアップメニュー中の色名の動的な推定に、オープンソースの「DBColorNames」をフレームワーク化した
「dbColNamesKit.framework」を利用しています。

–> dbColNamesKit.framework (To ~/Library/Frameworks)


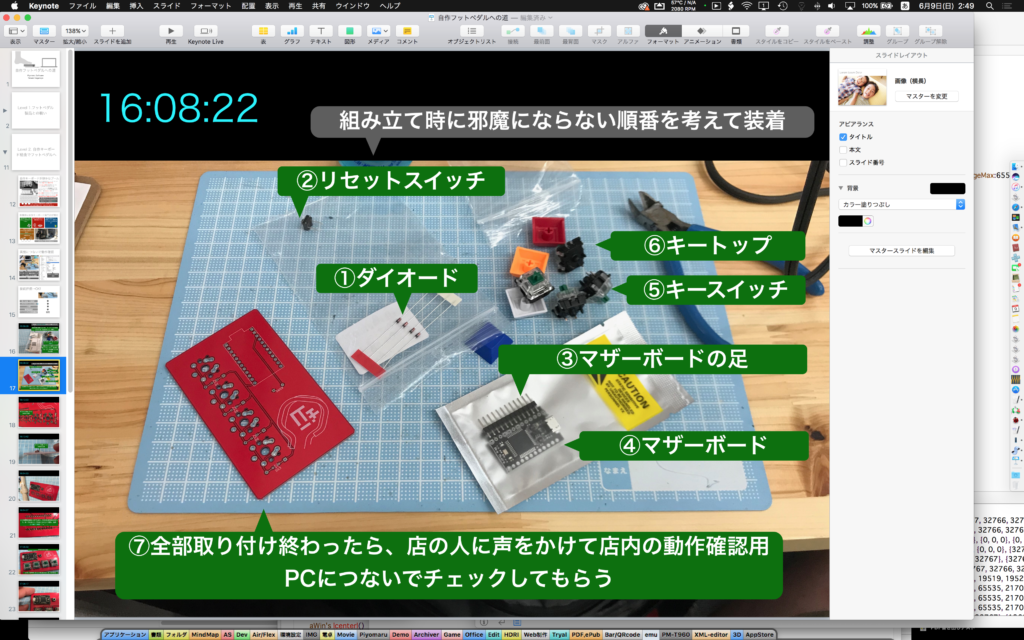
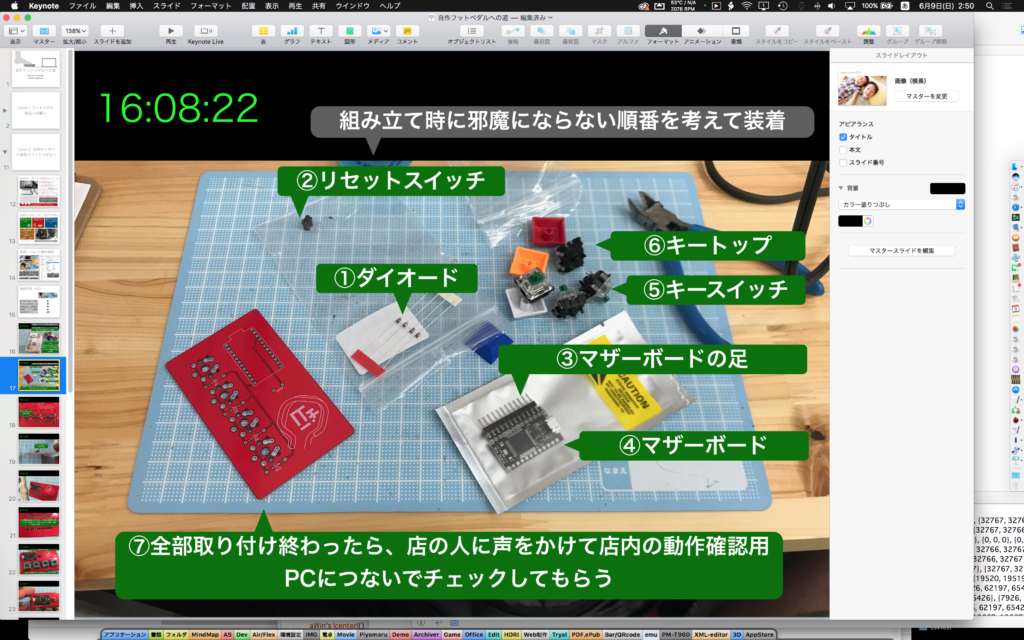
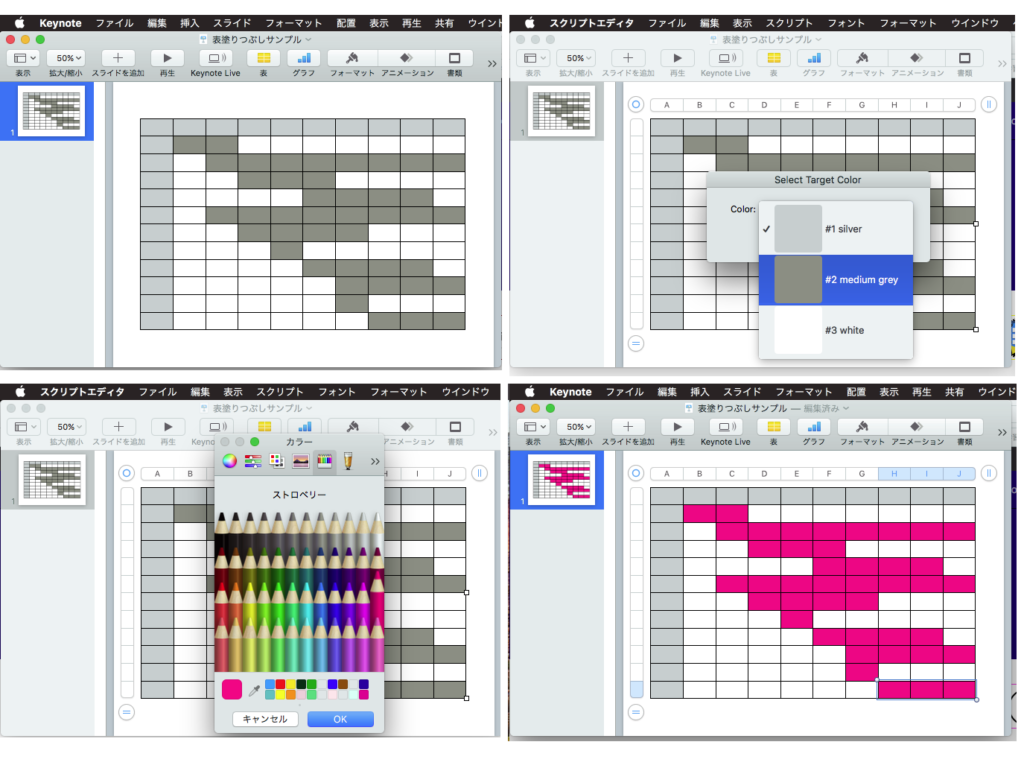
▲左上の時刻部分の色を置換したい


▲本Scriptを実行した直後。最前面のKeynote書類のすべてのテキストを走査して文字色を取得する


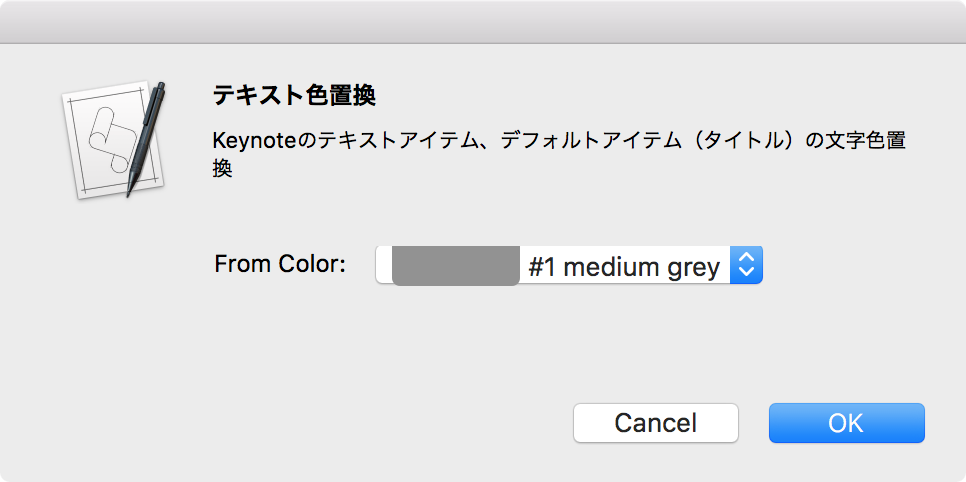
▲取得した文字色リスト。この中から置換対象を選択する。色データから色名を動的に生成し、色IDとともに名称で個別に指定したり識別したりできる


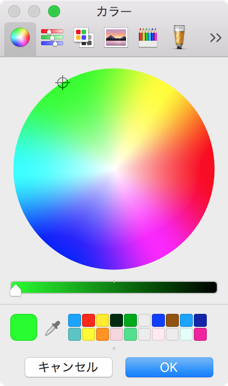
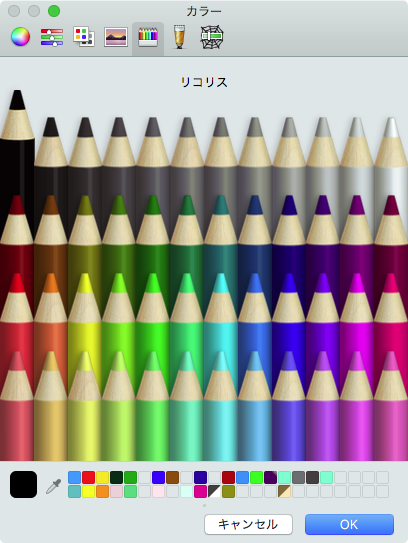
▲変更後の色をカラーピッカーで選択


▲Keynote書類上の文字色を変更してみた

AppleScript名:Keynote書類の現在のテキスト色を置換.scptd
—
–  Created by: Takaaki Naganoya
–  Created on: 2019/06/08
—
–  Copyright © 2019 Piyomaru Software, All Rights Reserved
—
use AppleScript version "2.5" — Yosemite (10.11) or later
use framework "Foundation"
use framework "AppKit"
use framework "dbColNamesKit" –https://github.com/daniel-beard/DBColorNames/
use scripting additions

property NSView : a reference to current application’s NSView
property NSAlert : a reference to current application’s NSAlert
property NSColor : a reference to current application’s NSColor
property NSMenu : a reference to current application’s NSMenu
property NSImage : a reference to current application’s NSImage
property NSIndexSet : a reference to current application’s NSIndexSet
property NSTextField : a reference to current application’s NSTextField
property NSColorWell : a reference to current application’s NSColorWell
property NSMenuItem : a reference to current application’s NSMenuItem
property NSBezierPath : a reference to current application’s NSBezierPath
property NSPopUpButton : a reference to current application’s NSPopUpButton
property NSMutableArray : a reference to current application’s NSMutableArray
property NSRunningApplication : a reference to current application’s NSRunningApplication

property returnCode : 0
property pop1ind : 0

–スライド枚数をカウント
tell application "Keynote"
  tell front document
    set sCount to count every slide
  end tell
end tell

–すべてのテキストアイテム、タイトルから色情報を取得する
set cList to {}
repeat with sNum from 1 to sCount
  set cList to cList & getEveryTextColorOfSlide(sNum) of me
end repeat

–文字色のユニーク化
set dList to makeUniqueListOf(cList) of me

set paramObj to {mainDat:dList, myTitle:"テキスト色置換", mySubTitle:"Keynoteのテキストアイテム、デフォルトアイテム(タイトル)の文字色置換", myColorRangeMax:65535}
my getPopupValues:paramObj

if pop1ind = false then return –timed out
set fromCol to (contents of item pop1ind of dList)

–カラーピッカーで置換色選択
set tCol to choose color default color fromCol

–Keynote書類中のテキストの文字色を置換
repeat with sNum from 1 to sCount
  set cList to cList & repEveryTextColorOfSlide(sNum, fromCol, tCol) of me
end repeat

–カラーポップアップメニューをウィンドウ表示
on getPopupValues:paramObj
  set ap1List to (mainDat of (paramObj as record)) as list
  
set winTitle to (myTitle of (paramObj as record)) as string
  
set subTitle to (mySubTitle of (paramObj as record)) as string
  
set aColMax to (myColorRangeMax of (paramObj as record)) as list
  
  
–Viewをつくる
  
set aView to NSView’s alloc()’s initWithFrame:(current application’s NSMakeRect(0, 0, 360, 80))
  
  
–Labelをつくる
  
set a1TF to NSTextField’s alloc()’s initWithFrame:(current application’s NSMakeRect(0, 40, 80, 20))
  
a1TF’s setEditable:false
  
a1TF’s setStringValue:"From Color:"
  
a1TF’s setDrawsBackground:false
  
a1TF’s setBordered:false
  
  
–Ppopup Buttonをつくる
  
set a1Button to NSPopUpButton’s alloc()’s initWithFrame:(current application’s NSMakeRect(80, 40, 200, 20)) pullsDown:false
  
a1Button’s removeAllItems()
  
  
set a1Menu to NSMenu’s alloc()’s init()
  
set aCDB to current application’s DBColorNames’s alloc()’s init()
  
  
–Popup Menuをつくる
  
set iCount to 1
  
repeat with i in ap1List
    copy i to {r1, g1, b1}
    
    
set nsCol to makeNSColorFromRGBAval(r1, g1, b1, aColMax, aColMax) of me
    
set anImage to makeRoundedNSImageWithFilledWithColor(64, 64, nsCol, 4) of me
    
    
–色名をRGB値から動的に生成(あらかじめdbNamesが持っているカラーパレットの近似色の色名を返す)
    
set aTitle to "#" & (iCount as string) & " " & (aCDB’s nameForColor:nsCol) as string
    
    
–Menu Itemを作成する
    
set aMenuItem to (NSMenuItem’s alloc()’s initWithTitle:aTitle action:"actionHandler:" keyEquivalent:"")
    (
aMenuItem’s setImage:anImage)
    (
aMenuItem’s setEnabled:true)
    (
aMenuItem’s setTarget:me)
    (
a1Menu’s addItem:aMenuItem)
    
    
set iCount to iCount + 1
  end repeat
  
  
–Popup ButtonにPopup Menuを設定する
  
a1Button’s setMenu:a1Menu
  
  
–ViewにPopup Buttonとテキストラベルを入れる
  
aView’s addSubview:a1TF
  
aView’s addSubview:a1Button
  
aView’s setNeedsDisplay:true


— set up alert  
  
set theAlert to NSAlert’s alloc()’s init()
  
tell theAlert
    its setMessageText:winTitle
    
its setInformativeText:subTitle
    
its addButtonWithTitle:"OK"
    
its addButtonWithTitle:"Cancel"
    
its setAccessoryView:aView
  end tell
  
  
— show alert in modal loop
  
NSRunningApplication’s currentApplication()’s activateWithOptions:0
  
my performSelectorOnMainThread:"doModal:" withObject:(theAlert) waitUntilDone:true
  
if (my returnCode as number) = 1001 then error number -128
  
  
set s1Val to ((a1Button’s indexOfSelectedItem() as number) + 1)
  
copy s1Val to my pop1ind
end getPopupValues:

on doModal:aParam
  set (my returnCode) to aParam’s runModal()
end doModal:

–Popup Action Handler
on actionHandler:sender
  set aTag to tag of sender as integer
  
set aTitle to title of sender as string
end actionHandler:

–aMaxValを最大値とする数値でNSColorを作成して返す
on makeNSColorFromRGBAval(redValue as integer, greenValue as integer, blueValue as integer, alphaValue as integer, aMaxVal as integer)
  set aRedCocoa to (redValue / aMaxVal) as real
  
set aGreenCocoa to (greenValue / aMaxVal) as real
  
set aBlueCocoa to (blueValue / aMaxVal) as real
  
set aAlphaCocoa to (alphaValue / aMaxVal) as real
  
set aColor to NSColor’s colorWithCalibratedRed:aRedCocoa green:aGreenCocoa blue:aBlueCocoa alpha:aAlphaCocoa
  
return aColor
end makeNSColorFromRGBAval

–指定サイズのNSImageを作成し、指定色で塗ってNSImageで返す
on makeNSImageWithFilledWithColor(aWidth as integer, aHeight as integer, fillColor)
  set anImage to NSImage’s alloc()’s initWithSize:(current application’s NSMakeSize(aWidth, aHeight))
  
anImage’s lockFocus()
  
—
  
set theRect to {{x:0, y:0}, {height:aHeight, width:aWidth}}
  
set theNSBezierPath to NSBezierPath’s bezierPath
  
theNSBezierPath’s appendBezierPathWithRect:theRect
  
—
  
fillColor’s |set|() –色設定
  
theNSBezierPath’s fill() –ぬりつぶし
  
—
  
anImage’s unlockFocus()
  
—
  
return anImage
end makeNSImageWithFilledWithColor

–指定サイズのNSImageを作成し、指定色で塗ってNSImageで返す、anRadiusの半径の角丸で
on makeRoundedNSImageWithFilledWithColor(aWidth as integer, aHeight as integer, fillColor, anRadius as real)
  set anImage to NSImage’s alloc()’s initWithSize:(current application’s NSMakeSize(aWidth, aHeight))
  
anImage’s lockFocus()
  
—
  
set theRect to {{x:0, y:0}, {height:aHeight, width:aWidth}}
  
set theNSBezierPath to NSBezierPath’s bezierPathWithRoundedRect:theRect xRadius:anRadius yRadius:anRadius
  
—
  
fillColor’s |set|() –色設定
  
theNSBezierPath’s fill() –ぬりつぶし
  
—
  
anImage’s unlockFocus()
  
  
return anImage
end makeRoundedNSImageWithFilledWithColor

–最前面のKeynote書類のすべてのスライドから、テキストアイテムとタイトルアイテムの文字色を取得
on getEveryTextColorOfSlide(sNum)
  set cList to {}
  
  
tell application "Keynote"
    tell front document
      set sMax to count every slide
      
if sMax < sNum then return false
      
      
tell slide sNum
        –すべての文字アイテムの先頭の文字の色情報を取得
        
try
          set tCount to count every text item
          
repeat with i from 1 to tCount
            set s1List to color of character 1 of object text of text item i
            
set the end of cList to s1List
          end repeat
        on error
          –set s1List to {}
        end try
        
        
–タイトルの先頭の文字の色情報を取得
        
try
          set s2List to color of character 1 of object text of default title item
          
set the end of cList to s2List
        on error
          set s2List to {}
        end try
      end tell
      
    end tell
  end tell
  
  
return cList
end getEveryTextColorOfSlide

–最前面のKeynote書類の指定番号のスライドで、テキストアイテムとタイトルアイテムの文字色を置換
on repEveryTextColorOfSlide(sNum, fromCol, toCol)
  tell application "Keynote"
    tell front document
      set sMax to count every slide
      
if sMax < sNum then return false
      
      
tell slide sNum
        –すべての文字アイテムの先頭の文字の色情報を置換
        
try
          set tCount to count every text item
          
repeat with i from 1 to tCount
            set s1List to color of character 1 of object text of text item i
            
if s1List = fromCol then
              ignoring application responses
                set color of every character of object text of text item i to toCol
              end ignoring
            end if
          end repeat
        on error
          —
        end try
        
        
–タイトルの先頭の文字の色情報を置換
        
try
          set s2List to color of character 1 of object text of default title item
          
if s2List = fromCol then
            ignoring application responses
              set color of every character of object text of default title item to toCol
            end ignoring
          end if
        on error
          set s2List to {}
        end try
      end tell
      
    end tell
  end tell
end repEveryTextColorOfSlide

–Listのユニーク化
on makeUniqueListOf(theList)
  set theSet to current application’s NSOrderedSet’s orderedSetWithArray:theList
  
return (theSet’s array()) as list
end makeUniqueListOf

★Click Here to Open This Script 

Posted in Color dialog GUI list | Tagged 10.11savvy 10.12savvy 10.13savvy Keynote NSAlert NSBezierPath NSColor NSColorWell NSImage NSIndexSet NSMenu NSMenuItem NSMutableArray NSPopUpButton NSRunningApplication NSTextField NSView | Leave a comment

指定単語の花文字テキストを取得する(Retina対応)英文字用 v2

Posted on 3月 29, 2019 by Takaaki Naganoya

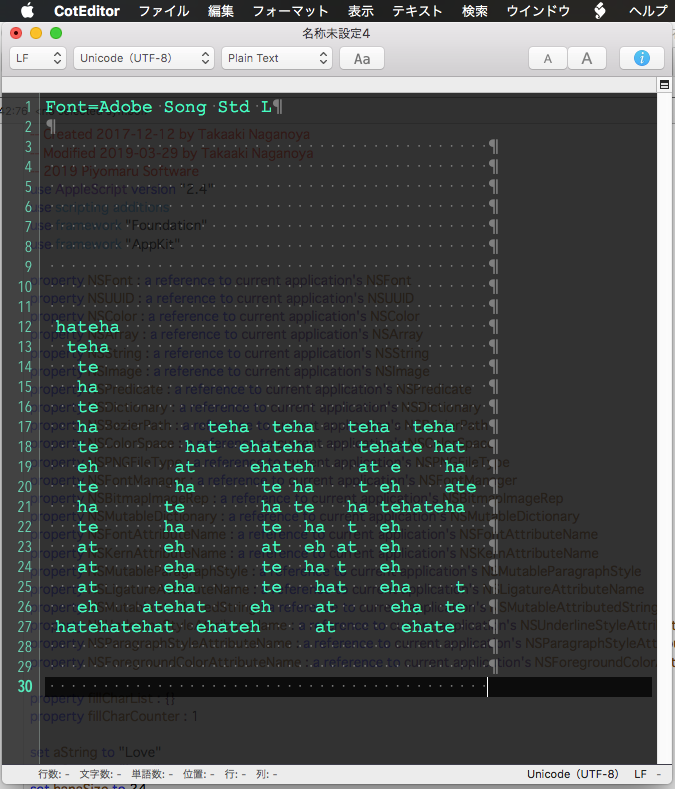
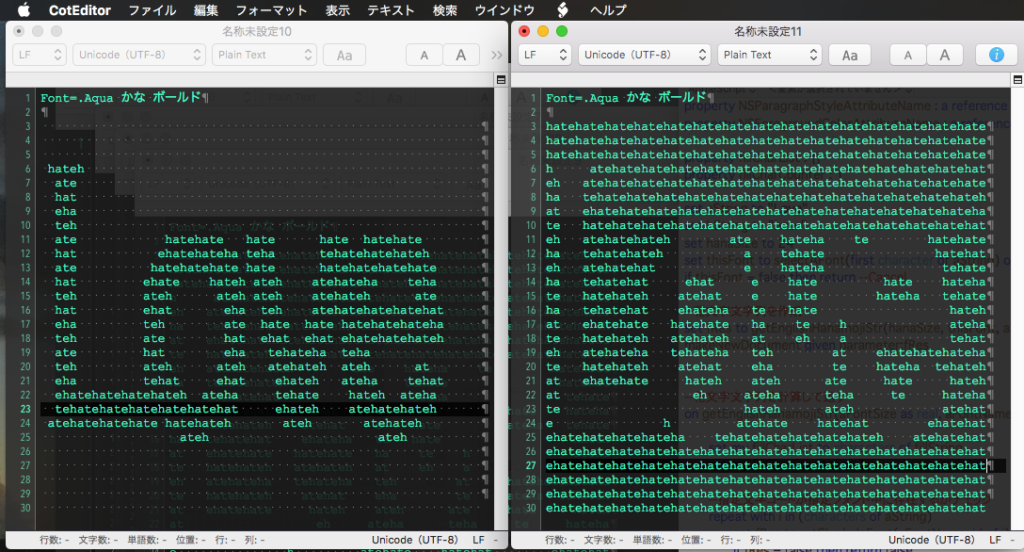
英語版の花文字テキストを作成してテキストエディタ(CotEditor)に出力するAppleScriptです。

描画用の英単語と、塗りつぶし用の英単語を別々に指定できます。invertFをtrueに設定すると、白黒反転出力を行います。

おおもとの元ネタは、大型計算機を大勢のユーザーで共有していた時代(ぱそこん登場前)、計算結果を高速プリンタの帳票に出力するようになっていたころにさかのぼります。どのユーザーの計算結果かを大量のプリンタの出力結果の中から仕分けるため、印刷出力の1ページ目をユーザー名などの情報を印字した「バナー」として使用。

そのさい、ドットインパクトプリンターだったので、決められた固定ドット数の文字しか印字できないため、英数字を組み合わせて擬似的に大きな文字でバナーを印刷していたことに端を発します。

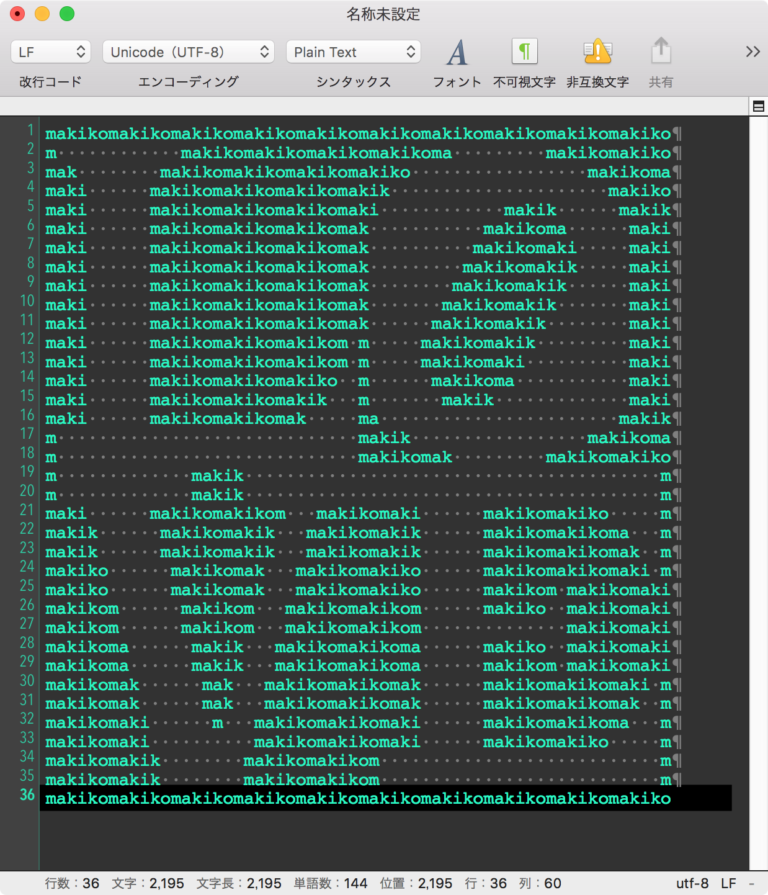
その時代の「残り香」ともいえるバナーがパソコンの電子メールやBBSの時代にお遊びの「花文字」として引き継がれ、原始的なアスキーアートの一種として楽しまれてきました。

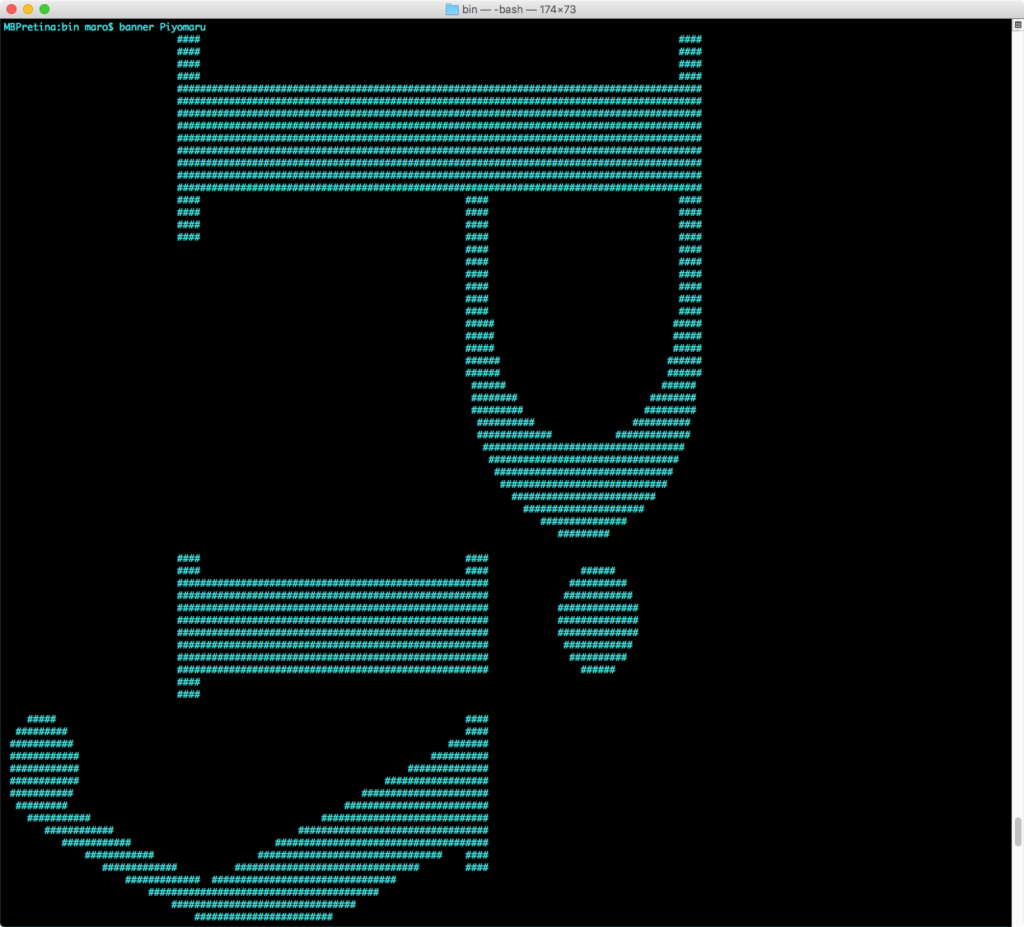
いまでも、shell commandの「banner」コマンドにその末裔を見ることができます。

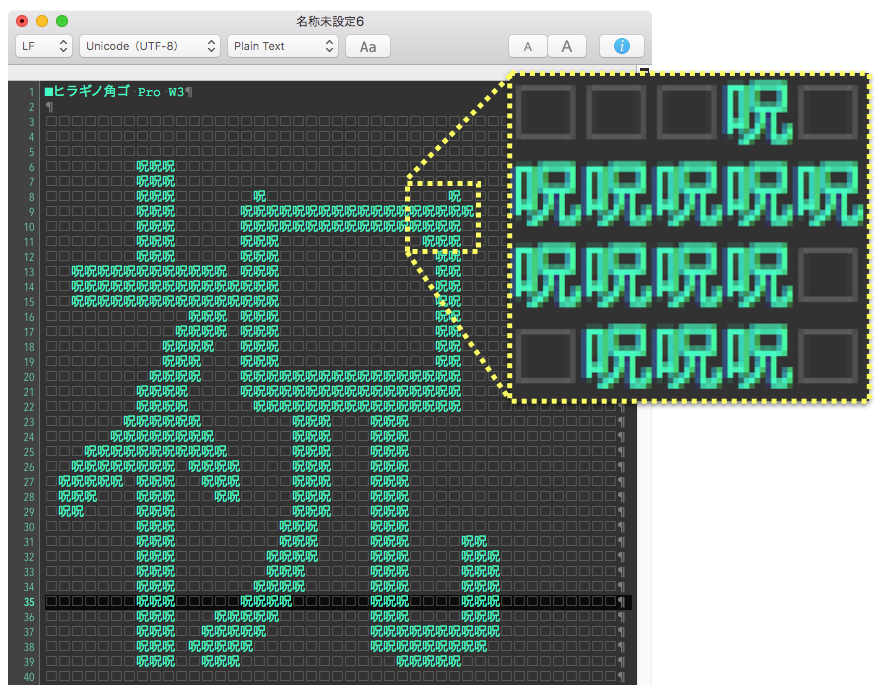
先週のmacOS nativeのデモ時に「祝」という花文字を「呪」の文字で出力するという、定番の持ちネタを披露したところ、たいへんウケておりました。

ただ、これを海外のScripter向けにそのままデモしても受けません。

この、花文字テキストを出力するプログラムの英語版としては、love.scptといういにしえのデータをそのまま使いまわしたものがありますが、描画パターンを数値データで保持しているため、異なるパターンを表示させることはできません。

そこで、日本語版の花文字テキスト出力プログラムに若干手をくわえ、英単語の出力が行えるようにしてみました。

テキストの出力はCotEditorに対して行なっていますが、新規書類を指定文字で作成する程度なので、AppleScriptに対応しているテキストエディタならどれでも作り変えられます。また、表示を等幅フォントにしておく必要があります(あとから指定してもOK)。

AppleScript名:指定単語の花文字テキストを取得する(Retina対応)英文字用 v2
— Created 2017-12-12 by Takaaki Naganoya
— Modified 2019-03-29 by Takaaki Naganoya
— 2019 Piyomaru Software
use AppleScript version "2.4"
use scripting additions
use framework "Foundation"
use framework "AppKit"

property NSFont : a reference to current application’s NSFont
property NSUUID : a reference to current application’s NSUUID
property NSColor : a reference to current application’s NSColor
property NSArray : a reference to current application’s NSArray
property NSString : a reference to current application’s NSString
property NSImage : a reference to current application’s NSImage
property NSPredicate : a reference to current application’s NSPredicate
property NSDictionary : a reference to current application’s NSDictionary
property NSBezierPath : a reference to current application’s NSBezierPath
property NSColorSpace : a reference to current application’s NSColorSpace
property NSPNGFileType : a reference to current application’s NSPNGFileType
property NSFontManager : a reference to current application’s NSFontManager
property NSBitmapImageRep : a reference to current application’s NSBitmapImageRep
property NSMutableDictionary : a reference to current application’s NSMutableDictionary
property NSFontAttributeName : a reference to current application’s NSFontAttributeName
property NSKernAttributeName : a reference to current application’s NSKernAttributeName
property NSMutableParagraphStyle : a reference to current application’s NSMutableParagraphStyle
property NSLigatureAttributeName : a reference to current application’s NSLigatureAttributeName
property NSMutableAttributedString : a reference to current application’s NSMutableAttributedString
property NSUnderlineStyleAttributeName : a reference to current application’s NSUnderlineStyleAttributeName
property NSParagraphStyleAttributeName : a reference to current application’s NSParagraphStyleAttributeName
property NSForegroundColorAttributeName : a reference to current application’s NSForegroundColorAttributeName

property fillCharList : {}
property fillCharCounter : 1

set aString to "Love"
set bString to "hate"
set hanaSize to 24
set thisFont to selectAFont(first character of aString) of me
if thisFont = false then return –Cancel

–花文字文字列を作成
set fRes to getEnglishHanamojiStr(hanaSize, thisFont, aString, bString, 0.7, true, true) of me
makeNewDocument given parameter:fRes

–花文字文字列を計算して返す
on getEnglishHanamojiStr(aFontSize as real, aFontName as string, aString as string, fillString as string, aThread as real, incFontName as boolean, invertF as boolean)
  
  
set my fillCharList to characters of fillString
  
set my fillCharCounter to 1
  
  
–指定文字コードが指定フォント中に存在するかチェック
  
repeat with i in (characters of aString)
    set fRes to retGlyphsInFont(aFontName, id of i) of me
    
if fRes = false then return false
  end repeat
  
  
set aThreadShould to 768 * aThread
  
if (chkMultiByteChar(first character of aString) of me) = false then
    set spaceChar to string id 12288 –全角スペース(UTF-16)
  else
    set spaceChar to string id 32 –半角スペース
  end if
  
  
set fillColor to NSColor’s whiteColor –塗り色
  
set bString to aString & " " –処理内容の帳尻合わせ(そのままだと右端が欠けるのでスペースを入れた)
  
set anAssrStr to makeRTFfromParameters(bString, aFontName, aFontSize, -2, (aFontSize * 1.2)) of me
  
set aSize to anAssrStr’s |size|()
  
  
if class of aSize = record then
    set attrStrWidth to width of aSize
    
set attrStrHeight to height of aSize
  else if class of aSize = list then –macOS 10.13.xのバグ回避
    copy aSize to {attrStrWidth, attrStrHeight}
  end if
  
  
set {xPos, yPos} to {0, 0}
  
  
set tmpImg1 to makeImageWithFilledColor(attrStrWidth, attrStrHeight, fillColor) of me
  
set tmpImg2 to drawAttributedStringsOnImage(tmpImg1, anAssrStr, xPos, yPos) of me
  
set aRawimg to NSBitmapImageRep’s imageRepWithData:(tmpImg2’s TIFFRepresentation())
  
  
–画像から順次指定座標の色データを拾って花文字listに反映
  
set strList to {}
  
repeat with y from 1 to attrStrHeight – 1
    
    
set strListX to {}
    
repeat with x from 0 to attrStrWidth – 1
      set tmpCol to getColorFromRawImage(aRawimg, x, y) of me
      
      
if invertF = false then
        
        
–通常描画(invert = false)時
        
if tmpCol is not equal to false then
          if tmpCol is not equal to {255, 255, 255} then
            copy tmpCol to {tmpR, tmpG, tmpB}
            
if (tmpR + tmpG + tmpB) < aThreadShould then
              set the end of strListX to getChar() of me
            else
              set the end of strListX to spaceChar
            end if
          else
            set the end of strListX to spaceChar
          end if
        end if
        
      else
        –白黒反転(invert = true)時
        
if tmpCol is not equal to false then
          if tmpCol is not equal to {255, 255, 255} then
            copy tmpCol to {tmpR, tmpG, tmpB}
            
if (tmpR + tmpG + tmpB) < aThreadShould then
              set the end of strListX to spaceChar
            else
              set the end of strListX to getChar() of me
            end if
          else
            set the end of strListX to getChar() of me
          end if
        end if
        
      end if
    end repeat
    
set the end of strList to strListX
  end repeat
  
  
–2D List→Text
  
set aRes to list2dToStringByUsingDelimiters(strList, "", return) of me
  
  
if incFontName = true then
    set fName to getDisplayedNameOfFont(aFontName) of me
    
set aRes to "Font=" & fName & return & return & aRes
  end if
  
  
return aRes
end getEnglishHanamojiStr

on getChar()
  set retChar to item (my fillCharCounter) of (my fillCharList)
  
if (my fillCharCounter) = length of (my fillCharList) then
    set (my fillCharCounter) to 1
  else
    set (my fillCharCounter) to (my fillCharCounter) + 1
  end if
  
return retChar
end getChar

–指定Raw画像中の指定座標のピクセルの色をRGBで取り出す
on getColorFromRawImage(aRawimg, x as real, y as real)
  set aRatio to getImageRatio() of me –Retina Display対応
  
set origColor to (aRawimg’s colorAtX:(x * aRatio) y:(y * aRatio))
  
  
set srgbColSpace to NSColorSpace’s deviceRGBColorSpace
  
if srgbColSpace = missing value then return false
  
  
set aColor to (origColor’s colorUsingColorSpace:srgbColSpace)
  
  
set aRed to (aColor’s redComponent()) * 255
  
set aGreen to (aColor’s greenComponent()) * 255
  
set aBlue to (aColor’s blueComponent()) * 255
  
  
return {aRed as integer, aGreen as integer, aBlue as integer}
end getColorFromRawImage

–画像のうえに指定のスタイル付きテキストを描画して画像を返す
on drawAttributedStringsOnImage(anImage, anAssrStr, xPos as real, yPos as real)
  anImage’s lockFocus()
  
anAssrStr’s drawAtPoint:(current application’s NSMakePoint(xPos, yPos))
  
anImage’s unlockFocus()
  
return anImage
end drawAttributedStringsOnImage

–書式つきテキストを組み立てる
on makeRTFfromParameters(aStr as string, fontName as string, aFontSize as real, aKerning as real, aLineSpacing as real)
  set aVal1 to NSFont’s fontWithName:fontName |size|:aFontSize
  
set aKey1 to (NSFontAttributeName)
  
  
set aVal2 to NSColor’s blackColor()
  
set aKey2 to (NSForegroundColorAttributeName)
  
  
set aVal3 to aKerning
  
set akey3 to (NSKernAttributeName)
  
  
set aVal4 to 0
  
set akey4 to (NSUnderlineStyleAttributeName)
  
  
set aVal5 to 2 –all ligature ON
  
set akey5 to (NSLigatureAttributeName)
  
  
set aParagraphStyle to NSMutableParagraphStyle’s alloc()’s init()
  
aParagraphStyle’s setMinimumLineHeight:(aLineSpacing)
  
aParagraphStyle’s setMaximumLineHeight:(aLineSpacing)
  
set akey7 to (NSParagraphStyleAttributeName)
  
  
set keyList to {aKey1, aKey2, akey3, akey4, akey5, akey7}
  
set valList to {aVal1, aVal2, aVal3, aVal4, aVal5, aParagraphStyle}
  
set attrsDictionary to NSMutableDictionary’s dictionaryWithObjects:valList forKeys:keyList
  
  
set attrStr to NSMutableAttributedString’s alloc()’s initWithString:aStr attributes:attrsDictionary
  
return attrStr
end makeRTFfromParameters

–指定サイズの画像を作成し、背景を指定色で塗る
on makeImageWithFilledColor(aWidth as real, aHeight as real, fillColor)
  set anImage to NSImage’s alloc()’s initWithSize:(current application’s NSMakeSize(aWidth, aHeight))
  
set aRatio to getImageRatio() of me –Retina Display対応
  
  
anImage’s lockFocus()
  
set theRect to {{x:0, y:0}, {width:aWidth * aRatio, height:aHeight * aRatio}}
  
set theNSBezierPath to NSBezierPath’s bezierPath
  
theNSBezierPath’s appendBezierPathWithRect:theRect
  
fillColor’s |set|()
  
theNSBezierPath’s fill()
  
anImage’s unlockFocus()
  
  
return anImage
end makeImageWithFilledColor

–2D Listをアイテム間および行間のデリミタを個別に指定してテキスト変換
on list2dToStringByUsingDelimiters(aList as list, itemDelimiter, lineDelimiter)
  set outList to {}
  
repeat with i in aList
    set aStr to listToStringUsingTextItemDelimiter(i, itemDelimiter) of me
    
set the end of outList to aStr
  end repeat
  
  
set bStr to listToStringUsingTextItemDelimiter(outList, lineDelimiter) of me
  
return bStr
end list2dToStringByUsingDelimiters

on listToStringUsingTextItemDelimiter(sourceList as list, textItemDelimiter)
  set CocoaArray to NSArray’s arrayWithArray:sourceList
  
set CocoaString to CocoaArray’s componentsJoinedByString:textItemDelimiter
  
return (CocoaString as string)
end listToStringUsingTextItemDelimiter

–ユーザー環境にインストールされているすべてのフォントのPostScript名とグリフ数を返す
on getEveryFontPSNameANdGlyphsNum(aStr)
  set aFontList to NSFontManager’s sharedFontManager()’s availableFonts()
  
set thePred to NSPredicate’s predicateWithFormat:"NOT SELF BEGINSWITH ’.’"
  
set aFontList to (aFontList’s filteredArrayUsingPredicate:thePred) as list
  
  
set aList to {}
  
repeat with i in aFontList
    set aName to contents of i
    
set aNum to countNumberOfGlyphsInFont(aName) of me
    
set dName to getDisplayedNameOfFont(aName) of me
    
    
set fRes to retGlyphsInFont(aName, id of aStr) of me
    
if fRes = true then
      set the end of aList to {fontName:aName, fontNum:aNum, dispName:dName}
    end if
  end repeat
  
  
return aList
end getEveryFontPSNameANdGlyphsNum

–指定Postscript名称のフォントに定義されている文字数を数えて返す
on countNumberOfGlyphsInFont(fontName as string)
  set aFont to NSFont’s fontWithName:fontName |size|:9.0
  
if aFont = missing value then return false
  
set aProp to aFont’s numberOfGlyphs()
  
return aProp as number
end countNumberOfGlyphsInFont

–フォントのPostScript NameからDisplayed Nameを取得
on getDisplayedNameOfFont(aName as string)
  set aFont to NSFont’s fontWithName:aName |size|:9.0
  
set aDispName to (aFont’s displayName()) as string
  
return aDispName
end getDisplayedNameOfFont

–全角文字が存在するか
on chkMultiByteChar(checkString as string)
  set aStr to NSString’s stringWithString:checkString
  
set aRes to aStr’s canBeConvertedToEncoding:(current application’s NSASCIIStringEncoding)
  
return (aRes as boolean)
end chkMultiByteChar

–指定名称のフォントに指定の文字コードが含まれているかチェック
on retGlyphsInFont(fontName as string, strCode as integer)
  set aFont to NSFont’s fontWithName:fontName |size|:24.0
  
if aFont = missing value then return false
  
set aSet to aFont’s coveredCharacterSet()
  
set aRes to (aSet’s characterIsMember:strCode) as boolean
  
return aRes as list of string or string –as anything
end retGlyphsInFont

on selectAFont(aString)
  set fRes to getEveryFontPSNameANdGlyphsNum(aString) of me
  
set theArray to NSArray’s arrayWithArray:fRes
  
set thePred to NSPredicate’s predicateWithFormat:"fontNum > 10000"
  
set bArray to ((theArray’s filteredArrayUsingPredicate:thePred)’s valueForKeyPath:"dispName") as list
  
set thisFont to choose from list bArray
  
return thisFont
end selectAFont

–Retina Display対応ルーチン
on getImageRatio()
  set retinaF to detectRetinaDisplay() of me
  
if retinaF = true then
    return 2.0 as real
  else
    return 1.0 as real
  end if
end getImageRatio

on detectRetinaDisplay()
  set dispList to current application’s NSScreen’s screens()
  
set retinaF to false
  
  
repeat with i in dispList
    set j to contents of i
    
set aDepth to j’s backingScaleFactor()
    
if aDepth > 1.0 then
      set retinaF to true
    end if
  end repeat
  
  
return retinaF
end detectRetinaDisplay

on makeNewDocument given parameter:aStr
  tell application id "com.coteditor.CotEditor"
    activate
    
set newDoc to make new document
    
tell newDoc
      set contents to aStr
    end tell
  end tell
end makeNewDocument

★Click Here to Open This Script 

Posted in Color Image RTF Text | Tagged 10.12savvy 10.13savvy 10.14savvy CotEditor NSArray NSBezierPath NSBitmapImageRep NSColor NSColorSpace NSDictionary NSFont NSFontManager NSImage NSMutableAttributedString NSMutableDictionary NSPredicate NSString | 1 Comment

画像の空白判定 v3

Posted on 3月 7, 2019 by Takaaki Naganoya

指定の画像のドットがすべて白色かをチェックする(=画像の空白判定)AppleScriptです。

画像の空白判定処理は自分的にはひじょうに重要な処理であり、画像をグレースケール化しておいて、

(方法1)Photoshopを用いて明度ヒストグラムを取得し、明度=255のデータだけが存在することを確認
(方法2)GPUImage.frameworkを用いて明度ヒストグラムを取得し、明度=255のデータだけが存在することを確認

といった方法で確認を行なっていました。

PDFの余白ページ判定処理や、画像同士の差分確認など、Photoshopを使わずに済めば利用範囲も広がるため(Mac App Storeに出せるため)、AppleScript+Frameworkぐらいで高速処理できることにはものすごく価値があります。

そんな中、GPUImageは急速に2度の方向転換を行い、AppleScriptからは付き合いにくいフレームワークに変化しました。

全面的にSwiftで書き換えたGPUImage2、さらにmacOS 10.14で行われた「OpenGL/OpenCLの非推奨化」という方針転換(わかっていたことですが)を受け、Metalを活用するように書き換えられたGPUImage3へと姿を変えました。オリジナルから見るとほぼ別物です。

GPUImage 3はまだまだ機能不足なうえにAppleScriptから呼べない状態。ヒストグラムの計算フィルタも搭載されていません。Objective-Cで書かれ、中国のスマホ開発者が写真加工するのに活用しまくった、人民に愛されまくったGPUImageの姿はもう見られないのでしょうか。

GPUImageを用いた他のフィルタ処理はCIFilterで代替できるのであまり問題にはなりませんが、この空白画像検出処理だけはなんとしても代替手段を見つける必要に迫られました。応用例が多すぎるからです。

そこで思いついたのが、「チェック対象の画像と同サイズの白い画像を作って、データ内容が同じかどうか調べる」というシンプルな方法(最初から思いついてほしい>自分)。

これならCPUパワーもそれほど必要とせず、GPUの力を絞り出す必要もありません(あたりまえ)。

さっそく書いてみたものの、今度はどうも「白い色」の値が合わず、頭をひねりまくりました。


▲1×1ドット画像を新規作成して白く塗りつぶして比較。Photoshopで作成してファイルから読み込んだ画像とDataが同じにならない

カラープロファイルが合わないために「白い色」を指定してもイコールにならないようだったので、オリジナル画像をコピーしてそれ自体を白く塗りつぶして空白検出の比較対象としてみました。これで空白検出が無事できるようになりました。しかも、GPUImage.frameworkを使っていたバージョンよりもあからさまに高速、、、、

処理速度をPhotoshop版、GPUImage版のAppleScriptと比較してみたところ、1980×1200ピクセルぐらいの画像だとGPUImage版の倍ぐらい高速、8K(7680×4320)ぐらいになるとPhotoshopに負けるといったところです。


▲同一環境にて、Photoshop CC 2018、GPUImage、本Scriptで各種サイズの画像の空白検出を実行(単位:秒)

処理内容がシンプルなだけに小さい画像の処理は得意で、大きな画像は不向きといえるかもしれません。テスト機は例によってCore i7 2.66GHzメモリ8GBのマシンであり、より搭載メモリ量の多いマシンで実行すると挙動が変わってくるかもしれません。

補足までに、GPUImageの明度ヒストグラム検出は、結果を数値の配列ではなく、1×256ドットの「画像」として返してくる変態仕様なので、結果を判定するために1×256ピクセルの画像をループでチェックする必要があります。この仕様が余計なオーバーヘッドを生んでいる(つまり、GPUで処理しているから爆速、という世間の期待値を大幅に下回る処理内容になっている)可能性は否定できません。

ただ、PhosothopなしでPhotoshopと同様のヒストグラム処理が行えるという「手軽さ」がいいと思ってGPUImageを使い出したので、速度をベンチマークしてみると「こんなもんだろ」という印象です。

AppleScript名:画像の空白判定 v3.scpt
—
–  Created by: Takaaki Naganoya
–  Created on: 2019/03/07
—
–  Copyright © 2019 Piyomaru Software, All Rights Reserved
—
use AppleScript version "2.4" — Yosemite (10.10) or later
use framework "Foundation"
use framework "AppKit"
use scripting additions

property NSData : a reference to current application’s NSData
property NSDate : a reference to current application’s NSDate
property |NSURL| : a reference to current application’s |NSURL|
property NSColor : a reference to current application’s NSColor
property NSImage : a reference to current application’s NSImage
property NSBezierPath : a reference to current application’s NSBezierPath
property NSBitmapImageRep : a reference to current application’s NSBitmapImageRep

set aPOSIXpath to POSIX path of (choose file of type {"public.image"})

set a1Dat to NSDate’s timeIntervalSinceReferenceDate()

set iRes to checkImageIsWhite(aPOSIXpath) of me

set b1Dat to NSDate’s timeIntervalSinceReferenceDate()
set c1Dat to b1Dat – a1Dat

return {iRes, c1Dat}

–Compare Original Data and
on checkImageIsWhite(aPOSIXpath)
  set aURL to |NSURL|’s fileURLWithPath:(aPOSIXpath)
  
set anNSImage to NSImage’s alloc()’s initWithContentsOfURL:(aURL)
  
  
copy anNSImage to bNSImage
  
  
set fillColor to makeNSColorFromRGBAval(65535, 65535, 65535, 65535, 65535) of me
  
–set fillColor to NSColor’s whiteColor()
  
set blankImage to drawImageWithFilledColor(bNSImage, fillColor) of me
  
  
set imgA to anNSImage’s TIFFRepresentation()
  
set imgB to blankImage’s TIFFRepresentation()
  
  
set chkWhite to (imgA’s isEqualToData:imgB) as boolean
  
return chkWhite
end checkImageIsWhite

on getSizeOfImage(anNSImage)
  set aSize to anNSImage’s |size|()
  
set aClass to class of aSize
  
if aClass = record then
    copy aSize to theSize –To macOS 10.12.x
  else –macOS 10.13 or later
    set sizeX to (item 1 of item 2 of aSize)
    
set sizeY to (item 2 of item 2 of aSize)
    
set theSize to {width:sizeX, height:sizeY}
  end if
  
return theSize
end getSizeOfImage

–指定サイズの画像を作成し、背景を指定色で塗る
on drawImageWithFilledColor(anImage, fillColor)
  set aSize to getSizeOfImage(anImage) of me
  
  
anImage’s lockFocus()
  
  
set theRect to {{x:0, y:0}, {width:(width of aSize), height:(height of aSize)}}
  
set theNSBezierPath to NSBezierPath’s bezierPath
  
theNSBezierPath’s appendBezierPathWithRect:theRect
  
fillColor’s |set|()
  
theNSBezierPath’s fill()
  
  
anImage’s unlockFocus()
  
  
return anImage
end drawImageWithFilledColor

–aMaxValを最大値とする数値でNSColorを作成して返す
on makeNSColorFromRGBAval(redValue as integer, greenValue as integer, blueValue as integer, alphaValue as integer, aMaxVal as integer)
  set aRedCocoa to (redValue / aMaxVal) as real
  
set aGreenCocoa to (greenValue / aMaxVal) as real
  
set aBlueCocoa to (blueValue / aMaxVal) as real
  
set aAlphaCocoa to (alphaValue / aMaxVal) as real
  
set aColor to NSColor’s colorWithCalibratedRed:aRedCocoa green:aGreenCocoa blue:aBlueCocoa alpha:aAlphaCocoa
  
return aColor
end makeNSColorFromRGBAval

★Click Here to Open This Script 

Posted in Image | Tagged 10.11savvy 10.12savvy 10.13savvy 10.14savvy NSBezierPath NSColor NSData NSDate NSImage NSURL | 3 Comments

アラートダイアログ上に縦棒グラフを表示

Posted on 3月 4, 2019 by Takaaki Naganoya

アラートダイアログ上に縦棒グラフを表示するAppleScriptです。

グラフを作成するのであれば、NumbersやKeynoteなどを使ったほうがいいですが、簡単にデータの傾向だけダイアログ上で見せたいような場合のために作成した部品です。

NSImageViewの表示実験がしたかっただけなので、別に他の言語処理系で作成したグラフ画像を読み込んでNSImageに読み込んでからNSIMageViewで表示するぐらいの使い方でもぜんぜんOKでしょう。

WebViewを表示してインタラクティブなグラフ(マウスカーソルに反応してアニメーション表示を行うとか)を表示するといった使い方もよさそうです(アプリケーション化しないとダメかも)。

macOS 10.14上のDark Modeについては、実行環境によって対応度が異なります。


▲macOS 10.14上のDark Modeで実行したところ。左側からスクリプトエディタ、AppleScriptアプレット、スクリプトメニュー


▲macOS 10.14上のDark Modeで実行したところ。左側からScript Debugger、Script DebuggerからSD拡張アプレットで書き出したもの

グラフの描画については、色指定をblackColor()とかgrayColor()などと指定せずに、Dark Mode時に制御されるUI色で指定しておく必要があることでしょう。

AppleScript名:アラートダイアログ上に縦棒グラフを表示.scptd
—
–  Created by: Takaaki Naganoya
–  Created on: 2019/03/04
—
–  Copyright © 2019 Piyomaru Software, All Rights Reserved
—
use AppleScript version "2.4" — Yosemite (10.10) or later
use framework "Foundation"
use framework "AppKit"
use scripting additions

property NSFont : a reference to current application’s NSFont
property NSAlert : a reference to current application’s NSAlert
property NSColor : a reference to current application’s NSColor
property NSArray : a reference to current application’s NSArray
property NSString : a reference to current application’s NSString
property NSImage : a reference to current application’s NSImage
property NSScreen : a reference to current application’s NSScreen
property NSDictionary : a reference to current application’s NSDictionary
property NSBezierPath : a reference to current application’s NSBezierPath
property NSImageView : a reference to current application’s NSImageView
property NSMutableArray : a reference to current application’s NSMutableArray
property NSBitmapImageRep : a reference to current application’s NSBitmapImageRep
property NSRunningApplication : a reference to current application’s NSRunningApplication
property NSFontAttributeName : a reference to current application’s NSFontAttributeName
property NSAlertSecondButtonReturn : a reference to current application’s NSAlertSecondButtonReturn
property NSForegroundColorAttributeName : a reference to current application’s NSForegroundColorAttributeName
property NSImageScaleProportionallyUpOrDown : a reference to current application’s NSImageScaleProportionallyUpOrDown

property returnCode : 0

set plotData to {20, 30, 100, 80, 150, 90}
set paramObj to {myMessage:"This is a graph", mySubMessage:"Browse bar graph", aPlotData:plotData}
my performSelectorOnMainThread:"displayBarGraph:" withObject:(paramObj) waitUntilDone:true

on displayBarGraph:paramObj
  set aMainMes to myMessage of paramObj
  
set aSubMes to mySubMessage of paramObj
  
set aTList to (aPlotData of paramObj) as list
  
  
— make NSIMageView with graph image
  
set anImage to makeGraphImage(aTList, 300, 200) of me
  
set anImageView to NSImageView’s alloc()’s initWithFrame:{origin:{x:0.0, y:0.0}, |size|:{width:300.0, height:200.0}}
  
anImageView’s setImageScaling:(NSImageScaleProportionallyUpOrDown)
  
anImageView’s setEditable:false
  
anImageView’s setImage:anImage
  
anImageView’s display()
  
  
— set up alert  
  
set theAlert to NSAlert’s alloc()’s init()
  
tell theAlert
    its setMessageText:aMainMes
    
its setInformativeText:aSubMes
    
its addButtonWithTitle:"OK"
    
its addButtonWithTitle:"Cancel"
    
its setAccessoryView:anImageView
  end tell
  
  
— show alert in modal loop
  
NSRunningApplication’s currentApplication()’s activateWithOptions:0
  
my performSelectorOnMainThread:"doModal:" withObject:(theAlert) waitUntilDone:true
  
if (my returnCode as number) = 1001 then error number -128
end displayBarGraph:

on doModal:aParam
  set (my returnCode) to aParam’s runModal()
end doModal:

on makeGraphImage(plotData, aWidth, aHeight)
  set innerGapL to 30
  
set innerGapU to 10
  
set innerGapR to 20
  
set innerGapD to 20
  
set barGap to 10
  
  
–パラメータから下地になる画像を作成する
  
set aSize to current application’s NSMakeSize(aWidth, aHeight)
  
set anImage to NSImage’s alloc()’s initWithSize:aSize
  
  
–各種パラメータの計算
  
–copy plotArea to {plotWidth, plotHeight}
  
set itemNum to count every item of plotData
  
set barThickness to (aWidth – (itemNum * barGap * 2)) div itemNum
  
  
–プロットデータの最大値
  
set anArray to NSArray’s arrayWithArray:plotData
  
set aYmax to (anArray’s valueForKeyPath:"@max.self")’s intValue()
  
set aMaxYVal to aHeight – innerGapU – innerGapD
  
set aYPlotArea to aHeight – innerGapU – innerGapD – 20
  
set aYUnit to aYPlotArea / aYmax
  
  
–数値データをもとに描画データを組み立てる
  
set drawList to {}
  
  
set startX to innerGapL
  
copy startX to origX
  
  
repeat with i in plotData
    set the end of drawList to current application’s NSMakeRect(startX, innerGapD, barThickness, innerGapD + (i * aYUnit))
    
set startX to startX + barThickness + barGap
  end repeat
  
  
–グラフ塗りつぶし処理呼び出し
  
set fillColor to (NSColor’s colorWithCalibratedRed:0.1 green:0.1 blue:0.1 alpha:0.3)
  
set resImage to drawImageWithColorFill(anImage, drawList, fillColor) of me
  
  
–数値データ(文字)をグラフィックに記入
  
set fillColor2 to NSColor’s blackColor()
  
set resImage to drawImageWithString(resImage, drawList, fillColor2, plotData, "Eurostile Bold", 20.0) of me
  
  
–補助線を引く
  
set fillColor3 to (NSColor’s colorWithCalibratedRed:0.0 green:0.0 blue:0.0 alpha:0.8)
  
set aVertical to current application’s NSMakeRect(origX, innerGapD, aWidth – innerGapL – innerGapR, 1)
  
set aHorizontal to current application’s NSMakeRect(origX, innerGapD, 1, aHeight – innerGapU – innerGapD)
  
set draw2List to {aVertical, aHorizontal}
  
set resImage to drawImageWithColorFill(resImage, draw2List, fillColor3) of me
  
  
return resImage
end makeGraphImage

–NSImageに対して文字を描画する
on drawImageWithString(anImage, drawList, fillColor, dataList, aPSFontName, aFontSize)
  set retinaF to (NSScreen’s mainScreen()’s backingScaleFactor()) as real
  
–>  2.0 (Retina) / 1.0 (Non Retina)
  
  
set aDict to (NSDictionary’s dictionaryWithObjects:{NSFont’s fontWithName:aPSFontName |size|:aFontSize, fillColor} forKeys:{NSFontAttributeName, NSForegroundColorAttributeName})
  
  
anImage’s lockFocus() –描画開始
  
  
set aLen to length of drawList
  
repeat with i from 1 to aLen
    set i1 to contents of item i of drawList
    
    
set v2 to system attribute "sys2"
    
if v2 ≤ 12 then
      –To macOS 10.12.x
      
set origX to (x of origin of i1) / retinaF
      
set origY to (y of origin of i1) / retinaF
      
set sizeX to (width of |size| of i1) / retinaF
      
set sizeY to (height of |size| of i1) / retinaF
      
set theRect to {{x:origX, y:origY}, {width:sizeX, height:sizeY}}
    else
      –macOS 10.13 or later
      
set origX to (item 1 of item 1 of i1) / retinaF
      
set origY to (item 2 of item 1 of i1) / retinaF
      
set sizeX to (item 1 of item 2 of i1) / retinaF
      
set sizeY to (item 2 of item 2 of i1) / retinaF
      
set theRect to {{origX, origY}, {sizeX, sizeY}}
    end if
    
    
set aString to (current application’s NSString’s stringWithString:((contents of item i of dataList) as string))
    (
aString’s drawAtPoint:(current application’s NSMakePoint(origX + (sizeX / 2), sizeY)) withAttributes:aDict)
  end repeat
  
  
anImage’s unlockFocus() –描画ここまで
  
  
return anImage –returns NSImage
end drawImageWithString

–NSImageに対して矩形を塗りつぶす
on drawImageWithColorFill(anImage, drawList, fillColor)
  set retinaF to (NSScreen’s mainScreen()’s backingScaleFactor()) as real
  
–>  2.0 (Retina) / 1.0 (Non Retina)
  
  
anImage’s lockFocus() –描画開始
  
  
repeat with i in drawList
    set v2 to system attribute "sys2"
    
if v2 ≤ 12 then
      –To macOS 10.12.x
      
set origX to (x of origin of i) / retinaF
      
set origY to (y of origin of i) / retinaF
      
set sizeX to (width of |size| of i) / retinaF
      
set sizeY to (height of |size| of i) / retinaF
      
set theRect to {{x:origX, y:origY}, {width:sizeX, height:sizeY}}
    else
      –macOS 10.13 or later
      
set origX to (item 1 of item 1 of i) / retinaF
      
set origY to (item 2 of item 1 of i) / retinaF
      
set sizeX to (item 1 of item 2 of i) / retinaF
      
set sizeY to (item 2 of item 2 of i) / retinaF
      
set theRect to {{origX, origY}, {sizeX, sizeY}}
    end if
    
    
set theNSBezierPath to NSBezierPath’s bezierPath
    (
theNSBezierPath’s appendBezierPathWithRect:theRect)
    
    
fillColor’s |set|() –色設定
    
theNSBezierPath’s fill() –ぬりつぶし
  end repeat
  
  
anImage’s unlockFocus() –描画ここまで
  
  
return anImage –returns NSImage
end drawImageWithColorFill

★Click Here to Open This Script 

Posted in GUI Image list | Tagged 10.11savvy 10.12savvy 10.13savvy 10.14savvy NSAlert NSAlertSecondButtonReturn NSArray NSBezierPath NSBitmapImageRep NSColor NSDictionary NSFont NSFontAttributeName NSForegroundColorAttributeName NSImage NSImageScaleProportionallyUpOrDown NSImageView NSMutableArray NSRunningApplication NSScreen NSString | Leave a comment

指定色で塗りつぶし角丸画像を作成

Posted on 2月 5, 2019 by Takaaki Naganoya

指定の矩形に対して、指定色で、指定半径の角丸で、指定ファイルパスに角丸ぬりつぶしPNG画像を作成するAppleScriptです。

色選択のポップアップメニュー中に入れるNSImage作成用に作ったものですが、ねんのために(動作確認のために)ファイル出力させてみました。

AppleScript名:指定色で塗りつぶし角丸画像を作成.scptd
—
–  Created by: Piyomaru Software
–  Created on: 2019/01/29
—
–  Copyright © 2019 Piyomaru Software, All Rights Reserved
—
use AppleScript version "2.4" — Yosemite (10.10) or later
use framework "Foundation"
use scripting additions
use framework "AppKit"

property |NSURL| : a reference to current application’s |NSURL|
property NSColor : a reference to current application’s NSColor
property NSString : a reference to current application’s NSString
property NSImage : a reference to current application’s NSImage
property NSScreen : a reference to current application’s NSScreen
property NSBezierPath : a reference to current application’s NSBezierPath
property NSPNGFileType : a reference to current application’s NSPNGFileType
property NSBitmapImageRep : a reference to current application’s NSBitmapImageRep

set tCol to choose color
copy tCol to {rVal, gVal, bVal}

set aRadius to 12
set aNSColor to makeNSColorFromRGBAval(rVal, gVal, bVal, 65535, 65535) of me
set aNSImage to makeRoundedNSImageWithFilledWithColor(100, 100, aNSColor, aRadius) of me

set aPath to NSString’s stringWithString:(POSIX path of (choose file name))
set bPath to aPath’s stringByAppendingPathExtension:"png"
set aRes to saveNSImageAtPathAsPNG(aNSImage, bPath) of me

–指定サイズのNSImageを作成し、指定色で塗ってNSImageで返す、anRadiusの半径の角丸で
on makeRoundedNSImageWithFilledWithColor(aWidth, aHeight, fillColor, anRadius as real)
  set anImage to NSImage’s alloc()’s initWithSize:(current application’s NSMakeSize(aWidth, aHeight))
  
anImage’s lockFocus()
  
—
  
set theRect to {{x:0, y:0}, {height:aHeight, width:aWidth}}
  
set theNSBezierPath to NSBezierPath’s bezierPathWithRoundedRect:theRect xRadius:anRadius yRadius:anRadius
  
—
  
fillColor’s |set|() –色設定
  
theNSBezierPath’s fill() –ぬりつぶし
  
—
  
anImage’s unlockFocus()
  
  
return anImage
end makeRoundedNSImageWithFilledWithColor

–aMaxValを最大値とする数値でNSColorを作成して返す
on makeNSColorFromRGBAval(redValue as integer, greenValue as integer, blueValue as integer, alphaValue as integer, aMaxVal as integer)
  set aRedCocoa to (redValue / aMaxVal) as real
  
set aGreenCocoa to (greenValue / aMaxVal) as real
  
set aBlueCocoa to (blueValue / aMaxVal) as real
  
set aAlphaCocoa to (alphaValue / aMaxVal) as real
  
set aColor to NSColor’s colorWithCalibratedRed:aRedCocoa green:aGreenCocoa blue:aBlueCocoa alpha:aAlphaCocoa
  
return aColor
end makeNSColorFromRGBAval

–NSImageを指定パスにPNG形式で保存
on saveNSImageAtPathAsPNG(anImage, outPath)
  set imageRep to anImage’s TIFFRepresentation()
  
set aRawimg to NSBitmapImageRep’s imageRepWithData:imageRep
  
  
set pathString to NSString’s stringWithString:outPath
  
set newPath to pathString’s stringByExpandingTildeInPath()
  
  
set myNewImageData to (aRawimg’s representationUsingType:(NSPNGFileType) |properties|:(missing value))
  
set aRes to (myNewImageData’s writeToFile:newPath atomically:true) as boolean
  
  
return aRes –成功ならtrue、失敗ならfalseが返る
end saveNSImageAtPathAsPNG

★Click Here to Open This Script 

Posted in file Image | Tagged 10.11savvy 10.12savvy 10.13savvy 10.14savvy NSBezierPath NSColor NSImage NSScreen NSString NSURL | Leave a comment

Keynote書類の現在のスライド上の表1の背景色を置換 v1

Posted on 1月 31, 2019 by Takaaki Naganoya

Keynoteでオープン中の最前面の書類の現在表示中のスライドに存在する表1の背景色を置換するAppleScriptです。

Pages用のScriptをごく一部修正してkeynoteの表に対して処理できるようにしてみました。macOS 10.11, 10.12, 10.13ではスクリプトエディタ上で動作します。macOS 10.14ではSIPを解除してスクリプトエディタで動かすか、アプレット形式で書き出して、アプレットのバンドル中にdbColNamesKit.frameworkを入れると動きます。

Script DebuggerとScript Menu上では動作しません。

ポップアップメニュー中に色の名称の動的な推定に、オープンソースの「DBColorNames」をフレームワーク化した
「dbColNamesKit.framework」を利用しています。

–> dbColNamesKit.framework (To ~/Library/Frameworks)

AppleScript名:Keynote書類の現在のスライド上の表の背景色を置換 v1
— Created 2019-01-29 by Takaaki Naganoya
— 2019 Piyomaru Software
use AppleScript version "2.4"
use scripting additions
use framework "Foundation"
use framework "AppKit"
use framework "dbColNamesKit" –https://github.com/daniel-beard/DBColorNames/
use Bplus : script "BridgePlus" –https://www.macosxautomation.com/applescript/apps/BridgePlus.html

–v1:Convert Pages version to Keynote

property NSView : a reference to current application’s NSView
property NSColor : a reference to current application’s NSColor
property NSArray : a reference to current application’s NSArray
property NSMenu : a reference to current application’s NSMenu
property NSImage : a reference to current application’s NSImage
property NSScreen : a reference to current application’s NSScreen
property NSButton : a reference to current application’s NSButton
property NSWindow : a reference to current application’s NSWindow
property NSTextField : a reference to current application’s NSTextField
property NSMenuItem : a reference to current application’s NSMenuItem
property NSBezierPath : a reference to current application’s NSBezierPath
property NSPopUpButton : a reference to current application’s NSPopUpButton
property NSWindowController : a reference to current application’s NSWindowController
property NSTitledWindowMask : a reference to current application’s NSTitledWindowMask
property NSRoundedBezelStyle : a reference to current application’s NSRoundedBezelStyle
property NSFloatingWindowLevel : a reference to current application’s NSFloatingWindowLevel
property NSBackingStoreBuffered : a reference to current application’s NSBackingStoreBuffered
property NSMomentaryLightButton : a reference to current application’s NSMomentaryLightButton

property windisp : true
property wController : missing value
property pop1ind : 1

–初期化
set (my windisp) to true
set (my pop1ind) to 1
load framework

–Pagesの1ページ目にある表の塗り色を取得
tell application "Keynote"
  tell front document
    tell current slide
      tell table 1
        set c1List to background color of every cell
        
set aProp to properties
        
set xCount to column count of aProp
      end tell
    end tell
  end tell
end tell

–Convert 1D List to 2D List
set c3List to (current application’s SMSForder’s subarraysFrom:c1List groupedBy:xCount |error|:(missing value)) as list

–色データをユニーク化(重複削除)
set bList to uniquifyList(c1List) of me

–missing value(背景色なし)を除外する
set c2List to (current application’s SMSForder’s arrayByDeletingBlanksIn:(bList)) as list

–Popup Menuで置換色選択
set paramObj to {c2List, 65535, "OK", "Select Target Color", 180} –Timeout = 180 sec, Color val range = 16bit
my performSelectorOnMainThread:"getPopupValues:" withObject:(paramObj) waitUntilDone:true
if pop1ind = false then return –timed out
set fromCol to (contents of item pop1ind of c2List)

–カラーピッカーで置換色選択
set tCol to choose color default color fromCol

set d1 to current date

–実際に表の背景色を置換する
set hitList to findDataFrom2DList(fromCol, c3List) of me –データ上で当該色のセル情報を計算する

–Rangeを横スキャンと縦スキャンの2通りで試算(Two way Simulation)
set rList1 to retRangeFromPosListHorizontal(hitList) of me –横方向へのrange評価
set rList2 to retRangeFromPosListVertival(hitList) of me –縦方向へのrange評価

–Simulationの結果、要素数の少ない方(=処理時間の短い方=高速な方)を採用する
log {"Simulation", (length of rList1), (length of rList2)}
if (length of rList1) < (length of rList2) then
  copy rList1 to rangeList
else
  copy rList2 to rangeList
end if

tell application "Keynote"
  activate
  
tell front document
    tell current slide
      tell table 1
        repeat with i in rangeList
          set j to contents of i
          
          
ignoring application responses –非同期実行モードで高速実行
            set background color of range j to tCol
          end ignoring
          
        end repeat
      end tell
    end tell
  end tell
end tell

set d2 to current date
return d2 – d1

–カラーポップアップメニューをウィンドウ表示
on getPopupValues:paramObj
  copy (paramObj as list) to {ap1List, aColMax, aButtonMSG, aSliderValMSG, timeOutSecs}
  
  
set (my windisp) to true
  
  
set aView to NSView’s alloc()’s initWithFrame:(current application’s NSMakeRect(0, 0, 360, 100))
  
  
–Labelをつくる
  
set a1TF to NSTextField’s alloc()’s initWithFrame:(current application’s NSMakeRect(30, 60, 80, 20))
  
a1TF’s setEditable:false
  
a1TF’s setStringValue:"Color:"
  
a1TF’s setDrawsBackground:false
  
a1TF’s setBordered:false
  
  
–Ppopup Buttonをつくる
  
set a1Button to NSPopUpButton’s alloc()’s initWithFrame:(current application’s NSMakeRect(80, 60, 200, 20)) pullsDown:false
  
a1Button’s removeAllItems()
  
  
set a1Menu to NSMenu’s alloc()’s init()
  
set aCDB to current application’s DBColorNames’s alloc()’s init()
  
  
set iCount to 1
  
repeat with i in ap1List
    copy i to {r1, g1, b1}
    
    
set nsCol to makeNSColorFromRGBAval(r1, g1, b1, aColMax, aColMax) of me
    
set anImage to makeRoundedNSImageWithFilledWithColor(64, 64, nsCol, 4) of me
    
    
set aTitle to "#" & (iCount as string) & " " & (aCDB’s nameForColor:nsCol) as string
    
set aMenuItem to (NSMenuItem’s alloc()’s initWithTitle:aTitle action:"actionHandler:" keyEquivalent:"")
    (
aMenuItem’s setImage:anImage)
    (
aMenuItem’s setEnabled:true)
    (
a1Menu’s addItem:aMenuItem)
    
    
set iCount to iCount + 1
  end repeat
  
  
a1Button’s setMenu:a1Menu


–Buttonをつくる
  
set bButton to (NSButton’s alloc()’s initWithFrame:(current application’s NSMakeRect(80, 10, 140, 40)))
  
bButton’s setButtonType:(NSMomentaryLightButton)
  
bButton’s setBezelStyle:(NSRoundedBezelStyle)
  
bButton’s setTitle:aButtonMSG
  
bButton’s setTarget:me
  
bButton’s setAction:("clicked:")
  
bButton’s setKeyEquivalent:(return)
  
  
aView’s addSubview:a1TF
  
  
aView’s addSubview:a1Button
  
aView’s addSubview:bButton
  
aView’s setNeedsDisplay:true
  
  
–NSWindowControllerを作ってみた(いらない?)
  
set aWin to (my makeWinWithView(aView, 300, 100, aSliderValMSG))
  
  
set wController to NSWindowController’s alloc()
  
wController’s initWithWindow:aWin
  
  
wController’s showWindow:me
  
  
set aCount to timeOutSecs * 100
  
  
set hitF to false
  
repeat aCount times
    if (my windisp) = false then
      set hitF to true
      
exit repeat
    end if
    
delay 0.01
    
set aCount to aCount – 1
  end repeat
  
  
my closeWin:aWin
  
  
if hitF = true then
    set s1Val to ((a1Button’s indexOfSelectedItem() as number) + 1)
  else
    set s1Val to false
  end if
  
  
copy s1Val to my pop1ind
  
end getPopupValues:

on clicked:aSender
  set (my windisp) to false
end clicked:

–make Window for Display
on makeWinWithView(aView, aWinWidth as integer, aWinHeight as integer, aTitle as string)
  set aScreen to NSScreen’s mainScreen()
  
set aFrame to {{0, 0}, {aWinWidth, aWinHeight}}
  
  
set aBacking to NSTitledWindowMask
  
  
set aDefer to NSBackingStoreBuffered
  
  
— Window
  
set aWin to NSWindow’s alloc()
  (
aWin’s initWithContentRect:aFrame styleMask:aBacking backing:aDefer defer:false screen:aScreen)
  
  
aWin’s setTitle:aTitle
  
aWin’s setDelegate:me
  
aWin’s setDisplaysWhenScreenProfileChanges:true
  
aWin’s setHasShadow:true
  
aWin’s setIgnoresMouseEvents:false
  
aWin’s setLevel:(NSFloatingWindowLevel)
  
aWin’s setOpaque:false
  
aWin’s setReleasedWhenClosed:true
  
aWin’s |center|()
  
  
aWin’s setContentView:aView
  
  
return aWin
end makeWinWithView

–close win
on closeWin:aWindow
  repeat with n from 10 to 1 by -1
    (aWindow’s setAlphaValue:n / 10)
    
delay 0.02
  end repeat
  
aWindow’s |close|()
end closeWin:

–Popup Action Handler
on actionHandler:sender
  set aTag to tag of sender as integer
  
set aTitle to title of sender as string
end actionHandler:

–aMaxValを最大値とする数値でNSColorを作成して返す
on makeNSColorFromRGBAval(redValue as integer, greenValue as integer, blueValue as integer, alphaValue as integer, aMaxVal as integer)
  set aRedCocoa to (redValue / aMaxVal) as real
  
set aGreenCocoa to (greenValue / aMaxVal) as real
  
set aBlueCocoa to (blueValue / aMaxVal) as real
  
set aAlphaCocoa to (alphaValue / aMaxVal) as real
  
set aColor to NSColor’s colorWithCalibratedRed:aRedCocoa green:aGreenCocoa blue:aBlueCocoa alpha:aAlphaCocoa
  
return aColor
end makeNSColorFromRGBAval

–指定サイズのNSImageを作成し、指定色で塗ってNSImageで返す
on makeNSImageWithFilledWithColor(aWidth as integer, aHeight as integer, fillColor)
  set anImage to NSImage’s alloc()’s initWithSize:(current application’s NSMakeSize(aWidth, aHeight))
  
anImage’s lockFocus()
  
—
  
set theRect to {{x:0, y:0}, {height:aHeight, width:aWidth}}
  
set theNSBezierPath to NSBezierPath’s bezierPath
  
theNSBezierPath’s appendBezierPathWithRect:theRect
  
—
  
fillColor’s |set|() –色設定
  
theNSBezierPath’s fill() –ぬりつぶし
  
—
  
anImage’s unlockFocus()
  
—
  
return anImage
end makeNSImageWithFilledWithColor

–指定サイズのNSImageを作成し、指定色で塗ってNSImageで返す、anRadiusの半径の角丸で
on makeRoundedNSImageWithFilledWithColor(aWidth as integer, aHeight as integer, fillColor, anRadius as real)
  set anImage to NSImage’s alloc()’s initWithSize:(current application’s NSMakeSize(aWidth, aHeight))
  
anImage’s lockFocus()
  
—
  
set theRect to {{x:0, y:0}, {height:aHeight, width:aWidth}}
  
set theNSBezierPath to NSBezierPath’s bezierPathWithRoundedRect:theRect xRadius:anRadius yRadius:anRadius
  
—
  
fillColor’s |set|() –色設定
  
theNSBezierPath’s fill() –ぬりつぶし
  
—
  
anImage’s unlockFocus()
  
  
return anImage
end makeRoundedNSImageWithFilledWithColor

on uniquifyList(aList as list)
  set aArray to NSArray’s arrayWithArray:aList
  
set bArray to aArray’s valueForKeyPath:"@distinctUnionOfObjects.self"
  
return bArray as list
end uniquifyList

on findDataFrom2DList(anItem, aList as list)
  script spd
    property aList : {}
    
property resList : {}
  end script
  
  
set (aList of spd) to aList
  
set (resList of spd) to {}
  
  
set yCount to 1
  
  
repeat with i in (aList of spd)
    
    
set aResList to (Bplus’s indexesOfItem:anItem inList:i inverting:false) as list
    
    
set tmpList to {}
    
if aResList is not equal to {} then
      repeat with ii in aResList
        set jj to contents of ii
        
set the end of tmpList to {jj, yCount}
      end repeat
      
set (resList of spd) to (resList of spd) & tmpList
    end if
    
    
set yCount to yCount + 1
  end repeat
  
  
return (resList of spd) –return {{x, y}…..} item list (1-based)
end findDataFrom2DList

on retRangeFromPosListVertival(posList as list)
  script rangeSPD
    property posList2 : {}
  end script
  
  
–縦方向へのrange評価に都合がいいようにソート
  
set (posList2 of rangeSPD) to shellSortListAscending(posList, {1, 2}) of me
  
  
–先頭データをピックアップ
  
set firstData to first item of (posList2 of rangeSPD)
  
set (posList2 of rangeSPD) to rest of (posList2 of rangeSPD)
  
  
copy firstData to {curX1, curY1}
  
set tmpRangeStr to aNumToExcelColumn(curX1) of me & (curY1 as string) & ":"
  
  
set tmpRange to {}
  
set hitF to false
  
  
set outList to {}
  
  
repeat with i in (posList2 of rangeSPD)
    copy i to {tmpX, tmpY}
    
    
–log {"{curX1, curY1}", {curX1, curY1}}
    
–log {"{tmpX, tmpY}", {tmpX, tmpY}}


if (curX1 = tmpX) and (curY1 + 1 = tmpY) then
      –Y方向への連続値を拾っている最中
      
if hitF = false then
        –log "case 1a"
        
–log {"hitF", hitF}
        
set hitF to true
      else
        –log "case 1b"
        
–log {"hitF", hitF}
        
–横に連続しているブロックの途中
      end if
    else
      –直前の値と連続していない
      
if hitF = false then
        –log "case 2a"
        
–log {"hitF", hitF}
        
set tmpRangeStr to tmpRangeStr & aNumToExcelColumn(curX1) of me & (curY1 as string)
        
set the end of outList to tmpRangeStr
        
set tmpRangeStr to aNumToExcelColumn(tmpX) of me & (tmpY as string) & ":"
        
set hitF to false
      else
        –log "case 2b"
        
–log {"hitF", hitF}
        
–連続ブロックの末尾を拾った
        
set tmpRangeStr to tmpRangeStr & aNumToExcelColumn(curX1) of me & (curY1 as string)
        
set the end of outList to tmpRangeStr
        
set tmpRangeStr to aNumToExcelColumn(tmpX) of me & (tmpY as string) & ":"
        
set hitF to false
        
–log {"tmpRangeStr", tmpRangeStr}
      end if
    end if
    
    
copy {tmpX, tmpY} to {curX1, curY1}
  end repeat
  
  
–log {tmpRangeStr, hitF}
  
  
if (hitF = true) or (tmpRangeStr is not equal to "") then
    set tmpRangeStr to tmpRangeStr & aNumToExcelColumn(curX1) of me & (curY1 as string)
    
set the end of outList to tmpRangeStr
  end if
  
  
return outList
end retRangeFromPosListVertival

on retRangeFromPosListHorizontal(posList as list)
  script rangeSPD
    property posList2 : {}
  end script
  
  
copy posList to (posList2 of rangeSPD)
  
  
–先頭データをピックアップ
  
set firstData to first item of (posList2 of rangeSPD)
  
set (posList2 of rangeSPD) to rest of (posList2 of rangeSPD)
  
  
copy firstData to {curX1, curY1}
  
set tmpRangeStr to aNumToExcelColumn(curX1) of me & (curY1 as string) & ":"
  
  
set tmpRange to {}
  
set hitF to false
  
  
set outList to {}
  
  
repeat with i in (posList2 of rangeSPD)
    copy i to {tmpX, tmpY}
    
    
–log {"{curX1, curY1}", {curX1, curY1}}
    
–log {"{tmpX, tmpY}", {tmpX, tmpY}}


if (curX1 + 1 = tmpX) and (curY1 = tmpY) then
      –X方向への連続値を拾っている最中
      
if hitF = false then
        –log "case 1a"
        
–log {"hitF", hitF}
        
set hitF to true
      else
        –log "case 1b"
        
–log {"hitF", hitF}
        
–横に連続しているブロックの途中
      end if
    else
      –直前の値と連続していない
      
if hitF = false then
        –log "case 2a"
        
–log {"hitF", hitF}
        
set tmpRangeStr to tmpRangeStr & aNumToExcelColumn(curX1) of me & (curY1 as string)
        
set the end of outList to tmpRangeStr
        
set tmpRangeStr to aNumToExcelColumn(tmpX) of me & (tmpY as string) & ":"
        
set hitF to false
      else
        –log "case 2b"
        
–log {"hitF", hitF}
        
–連続ブロックの末尾を拾った
        
set tmpRangeStr to tmpRangeStr & aNumToExcelColumn(curX1) of me & (curY1 as string)
        
set the end of outList to tmpRangeStr
        
set tmpRangeStr to aNumToExcelColumn(tmpX) of me & (tmpY as string) & ":"
        
set hitF to false
        
–log {"tmpRangeStr", tmpRangeStr}
      end if
    end if
    
    
copy {tmpX, tmpY} to {curX1, curY1}
  end repeat
  
  
–log {tmpRangeStr, hitF}
  
  
if (hitF = true) or (tmpRangeStr is not equal to "") then
    set tmpRangeStr to tmpRangeStr & aNumToExcelColumn(curX1) of me & (curY1 as string)
    
set the end of outList to tmpRangeStr
  end if
  
  
return outList
end retRangeFromPosListHorizontal

–2008/05/01 By Takaaki Naganoya
–10進数数値をExcel 2004/2008的カラム表現にエンコードするサブルーチン を使いまわし
–1〜1351までの間であれば正しいエンコーディング結果を返す
on aNumToExcelColumn(origNum as integer)
  if origNum > 1351 then
    error "エラー:Excel 2004/2008的カラム表現(A1形式)への変換ルーチンにおいて、想定範囲外(1351以上)のパラメータが指定されました"
  end if
  
  
set upperDigitEncTable to {"A", "B", "C", "D", "E", "F", "G", "H", "I", "J", "K", "L", "M", "N", "O", "P", "Q", "R", "S", "T", "U", "V", "W", "X", "Y", "Z", "A"}
  
set lowerDigitEncTable to {"A", "B", "C", "D", "E", "F", "G", "H", "I", "J", "K", "L", "M", "N", "O", "P", "Q", "R", "S", "T", "U", "V", "W", "X", "Y", "Z", "A"}
  
  
set oNum to origNum
  
set nTh to 26
  
set stringLength to 4
  
  
–数字が1桁の場合の対応
  
if origNum < 27 then
    set aRes to (item origNum of upperDigitEncTable) as string
    
return aRes
  end if


if origNum > 702 then
    –3桁になる場合
    
set upupNum to oNum div 676 –整数除算–上の上の桁
    
set oNum to oNum – (upupNum * 676)
    
set upNum to oNum div 26 –整数除算–上の桁
    
set lowNum to oNum mod 26 – 1 –余剰計算–下の桁
    
    
–超つじつま合わせ処理
    
if lowNum = -1 then
      set upNum to upNum – 1
      
set lowNum to 25
    end if
    
    
set upupChar to (item upupNum of upperDigitEncTable) as string
    
set upChar to (item upNum of upperDigitEncTable) as string
    
set lowChar to (item (lowNum + 1) of lowerDigitEncTable) as string
    
set resText to upupChar & upChar & lowChar
    
  else
    –2桁の場合
    
set upNum to oNum div 26 –整数除算–上の桁
    
set lowNum to oNum mod 26 – 1 –余剰計算–下の桁
    
    
–超つじつま合わせ処理
    
if lowNum = -1 then
      set upNum to upNum – 1
      
set lowNum to 25
    end if
    
    
set upChar to (item upNum of upperDigitEncTable) as string
    
set lowChar to (item (lowNum + 1) of lowerDigitEncTable) as string
    
set resText to upChar & lowChar
    
  end if
  
  
return resText
end aNumToExcelColumn

–入れ子のリストを昇順ソート
on shellSortListAscending(a, keyItem)
  return sort2DList(a, keyItem, {true}) of me
end shellSortListAscending

–入れ子のリストを降順ソート
on shellSortListDecending(a, keyItem)
  return sort2DList(a, keyItem, {false}) of me
end shellSortListDecending

–2D Listをソート
on sort2DList(aList as list, sortIndexes as list, sortOrders as list)
  
  
–index値をAS流(アイテムが1はじまり)からCocoa流(アイテムが0はじまり)に変換
  
set newIndex to {}
  
repeat with i in sortIndexes
    set j to contents of i
    
set j to j – 1
    
set the end of newIndex to j
  end repeat
  
  
–Sort TypeのListを作成(あえて外部から指定する内容でもない)
  
set sortTypes to {}
  
repeat (length of sortIndexes) times
    set the end of sortTypes to "compare:"
  end repeat
  
  
–Sort
  
set resList to (current application’s SMSForder’s subarraysIn:(aList) sortedByIndexes:newIndex ascending:sortOrders sortTypes:sortTypes |error|:(missing value)) as list
  
  
return resList
end sort2DList

★Click Here to Open This Script 

Posted in Color GUI | Tagged 10.11savvy 10.12savvy 10.13savvy 10.14savvy Keynote NSArray NSBezierPath NSButton NSColor NSImage NSMenu NSMenuItem NSPopUpButton NSScreen NSTextField NSView NSWindow NSWindowController | 1 Comment

Numbers書類の現在のシート上の表1の背景色を置換 v1

Posted on 1月 31, 2019 by Takaaki Naganoya

Numbersでオープン中の最前面の書類の現在表示中のシートに存在する表1の背景色を置換するAppleScriptです。

Pages用のScriptをごく一部修正してNumbersの表に対して処理できるようにしてみました。macOS 10.11, 10.12, 10.13ではスクリプトエディタ上で動作します。macOS 10.14ではSIPを解除してスクリプトエディタで動かすか、アプレット形式で書き出して、アプレットのバンドル中にdbColNamesKit.frameworkを入れると動きます。

Script DebuggerとScript Menu上では動作しません。

ポップアップメニュー中に色の名称の動的な推定に、オープンソースの「DBColorNames」をフレームワーク化した
「dbColNamesKit.framework」を利用しています。

–> dbColNamesKit.framework (To ~/Library/Frameworks)

AppleScript名:Numbers書類の現在のシート上の表1の背景色を置換 v1
— Created 2019-01-29 by Takaaki Naganoya
— 2019 Piyomaru Software
use AppleScript version "2.4"
use scripting additions
use framework "Foundation"
use framework "AppKit"
use framework "dbColNamesKit" –https://github.com/daniel-beard/DBColorNames/
use Bplus : script "BridgePlus" –https://www.macosxautomation.com/applescript/apps/BridgePlus.html

–v1:Change Pages part to Numbers

property NSView : a reference to current application’s NSView
property NSColor : a reference to current application’s NSColor
property NSArray : a reference to current application’s NSArray
property NSMenu : a reference to current application’s NSMenu
property NSImage : a reference to current application’s NSImage
property NSScreen : a reference to current application’s NSScreen
property NSButton : a reference to current application’s NSButton
property NSWindow : a reference to current application’s NSWindow
property NSTextField : a reference to current application’s NSTextField
property NSMenuItem : a reference to current application’s NSMenuItem
property NSBezierPath : a reference to current application’s NSBezierPath
property NSPopUpButton : a reference to current application’s NSPopUpButton
property NSWindowController : a reference to current application’s NSWindowController
property NSTitledWindowMask : a reference to current application’s NSTitledWindowMask
property NSRoundedBezelStyle : a reference to current application’s NSRoundedBezelStyle
property NSFloatingWindowLevel : a reference to current application’s NSFloatingWindowLevel
property NSBackingStoreBuffered : a reference to current application’s NSBackingStoreBuffered
property NSMomentaryLightButton : a reference to current application’s NSMomentaryLightButton

property windisp : true
property wController : missing value
property pop1ind : 1

–初期化
set (my windisp) to true
set (my pop1ind) to 1
load framework

–Pagesの1ページ目にある表の塗り色を取得
tell application "Numbers"
  tell front document
    tell active sheet
      tell table 1
        set c1List to background color of every cell
        
set aProp to properties
        
set xCount to column count of aProp
      end tell
    end tell
  end tell
end tell

–Convert 1D List to 2D List
set c3List to (current application’s SMSForder’s subarraysFrom:c1List groupedBy:xCount |error|:(missing value)) as list

–色データをユニーク化(重複削除)
set bList to uniquifyList(c1List) of me

–missing value(背景色なし)を除外する
set c2List to (current application’s SMSForder’s arrayByDeletingBlanksIn:(bList)) as list

–Popup Menuで置換色選択
set paramObj to {c2List, 65535, "OK", "Select Target Color", 180} –Timeout = 180 sec, Color val range = 16bit
my performSelectorOnMainThread:"getPopupValues:" withObject:(paramObj) waitUntilDone:true
if pop1ind = false then return –timed out
set fromCol to (contents of item pop1ind of c2List)

–カラーピッカーで置換色選択
set tCol to choose color default color fromCol

set d1 to current date

–実際に表の背景色を置換する
set hitList to findDataFrom2DList(fromCol, c3List) of me –データ上で当該色のセル情報を計算する

–Rangeを横スキャンと縦スキャンの2通りで試算(Two way Simulation)
set rList1 to retRangeFromPosListHorizontal(hitList) of me –横方向へのrange評価
set rList2 to retRangeFromPosListVertival(hitList) of me –縦方向へのrange評価

–Simulationの結果、要素数の少ない方(=処理時間の短い方=高速な方)を採用する
if (length of rList1) < (length of rList2) then
  copy rList1 to rangeList
else
  copy rList2 to rangeList
end if

tell application "Numbers"
  activate
  
tell front document
    tell active sheet
      tell table 1
        repeat with i in rangeList
          set j to contents of i
          
          
ignoring application responses –非同期実行モードで高速実行
            set background color of range j to tCol
          end ignoring
          
        end repeat
      end tell
    end tell
  end tell
end tell

set d2 to current date
return d2 – d1

–カラーポップアップメニューをウィンドウ表示
on getPopupValues:paramObj
  copy (paramObj as list) to {ap1List, aColMax, aButtonMSG, aSliderValMSG, timeOutSecs}
  
  
set (my windisp) to true
  
  
set aView to NSView’s alloc()’s initWithFrame:(current application’s NSMakeRect(0, 0, 360, 100))
  
  
–Labelをつくる
  
set a1TF to NSTextField’s alloc()’s initWithFrame:(current application’s NSMakeRect(30, 60, 80, 20))
  
a1TF’s setEditable:false
  
a1TF’s setStringValue:"Color:"
  
a1TF’s setDrawsBackground:false
  
a1TF’s setBordered:false
  
  
–Ppopup Buttonをつくる
  
set a1Button to NSPopUpButton’s alloc()’s initWithFrame:(current application’s NSMakeRect(80, 60, 200, 20)) pullsDown:false
  
a1Button’s removeAllItems()
  
  
set a1Menu to NSMenu’s alloc()’s init()
  
set aCDB to current application’s DBColorNames’s alloc()’s init()
  
  
set iCount to 1
  
repeat with i in ap1List
    copy i to {r1, g1, b1}
    
    
set nsCol to makeNSColorFromRGBAval(r1, g1, b1, aColMax, aColMax) of me
    
set anImage to makeRoundedNSImageWithFilledWithColor(64, 64, nsCol, 4) of me
    
    
set aTitle to "#" & (iCount as string) & " " & (aCDB’s nameForColor:nsCol) as string
    
set aMenuItem to (NSMenuItem’s alloc()’s initWithTitle:aTitle action:"actionHandler:" keyEquivalent:"")
    (
aMenuItem’s setImage:anImage)
    (
aMenuItem’s setEnabled:true)
    (
a1Menu’s addItem:aMenuItem)
    
    
set iCount to iCount + 1
  end repeat
  
  
a1Button’s setMenu:a1Menu


–Buttonをつくる
  
set bButton to (NSButton’s alloc()’s initWithFrame:(current application’s NSMakeRect(80, 10, 140, 40)))
  
bButton’s setButtonType:(NSMomentaryLightButton)
  
bButton’s setBezelStyle:(NSRoundedBezelStyle)
  
bButton’s setTitle:aButtonMSG
  
bButton’s setTarget:me
  
bButton’s setAction:("clicked:")
  
bButton’s setKeyEquivalent:(return)
  
  
aView’s addSubview:a1TF
  
  
aView’s addSubview:a1Button
  
aView’s addSubview:bButton
  
aView’s setNeedsDisplay:true
  
  
–NSWindowControllerを作ってみた(いらない?)
  
set aWin to (my makeWinWithView(aView, 300, 100, aSliderValMSG))
  
  
set wController to NSWindowController’s alloc()
  
wController’s initWithWindow:aWin
  
  
wController’s showWindow:me
  
  
set aCount to timeOutSecs * 100
  
  
set hitF to false
  
repeat aCount times
    if (my windisp) = false then
      set hitF to true
      
exit repeat
    end if
    
delay 0.01
    
set aCount to aCount – 1
  end repeat
  
  
my closeWin:aWin
  
  
if hitF = true then
    set s1Val to ((a1Button’s indexOfSelectedItem() as number) + 1)
  else
    set s1Val to false
  end if
  
  
copy s1Val to my pop1ind
  
end getPopupValues:

on clicked:aSender
  set (my windisp) to false
end clicked:

–make Window for Display
on makeWinWithView(aView, aWinWidth as integer, aWinHeight as integer, aTitle as string)
  set aScreen to NSScreen’s mainScreen()
  
set aFrame to {{0, 0}, {aWinWidth, aWinHeight}}
  
  
set aBacking to NSTitledWindowMask
  
  
set aDefer to NSBackingStoreBuffered
  
  
— Window
  
set aWin to NSWindow’s alloc()
  (
aWin’s initWithContentRect:aFrame styleMask:aBacking backing:aDefer defer:false screen:aScreen)
  
  
aWin’s setTitle:aTitle
  
aWin’s setDelegate:me
  
aWin’s setDisplaysWhenScreenProfileChanges:true
  
aWin’s setHasShadow:true
  
aWin’s setIgnoresMouseEvents:false
  
aWin’s setLevel:(NSFloatingWindowLevel)
  
aWin’s setOpaque:false
  
aWin’s setReleasedWhenClosed:true
  
aWin’s |center|()
  
  
aWin’s setContentView:aView
  
  
return aWin
end makeWinWithView

–close win
on closeWin:aWindow
  repeat with n from 10 to 1 by -1
    (aWindow’s setAlphaValue:n / 10)
    
delay 0.02
  end repeat
  
aWindow’s |close|()
end closeWin:

–Popup Action Handler
on actionHandler:sender
  set aTag to tag of sender as integer
  
set aTitle to title of sender as string
end actionHandler:

–aMaxValを最大値とする数値でNSColorを作成して返す
on makeNSColorFromRGBAval(redValue as integer, greenValue as integer, blueValue as integer, alphaValue as integer, aMaxVal as integer)
  set aRedCocoa to (redValue / aMaxVal) as real
  
set aGreenCocoa to (greenValue / aMaxVal) as real
  
set aBlueCocoa to (blueValue / aMaxVal) as real
  
set aAlphaCocoa to (alphaValue / aMaxVal) as real
  
set aColor to NSColor’s colorWithCalibratedRed:aRedCocoa green:aGreenCocoa blue:aBlueCocoa alpha:aAlphaCocoa
  
return aColor
end makeNSColorFromRGBAval

–指定サイズのNSImageを作成し、指定色で塗ってNSImageで返す
on makeNSImageWithFilledWithColor(aWidth as integer, aHeight as integer, fillColor)
  set anImage to NSImage’s alloc()’s initWithSize:(current application’s NSMakeSize(aWidth, aHeight))
  
anImage’s lockFocus()
  
—
  
set theRect to {{x:0, y:0}, {height:aHeight, width:aWidth}}
  
set theNSBezierPath to NSBezierPath’s bezierPath
  
theNSBezierPath’s appendBezierPathWithRect:theRect
  
—
  
fillColor’s |set|() –色設定
  
theNSBezierPath’s fill() –ぬりつぶし
  
—
  
anImage’s unlockFocus()
  
—
  
return anImage
end makeNSImageWithFilledWithColor

–指定サイズのNSImageを作成し、指定色で塗ってNSImageで返す、anRadiusの半径の角丸で
on makeRoundedNSImageWithFilledWithColor(aWidth as integer, aHeight as integer, fillColor, anRadius as real)
  set anImage to NSImage’s alloc()’s initWithSize:(current application’s NSMakeSize(aWidth, aHeight))
  
anImage’s lockFocus()
  
—
  
set theRect to {{x:0, y:0}, {height:aHeight, width:aWidth}}
  
set theNSBezierPath to NSBezierPath’s bezierPathWithRoundedRect:theRect xRadius:anRadius yRadius:anRadius
  
—
  
fillColor’s |set|() –色設定
  
theNSBezierPath’s fill() –ぬりつぶし
  
—
  
anImage’s unlockFocus()
  
  
return anImage
end makeRoundedNSImageWithFilledWithColor

on uniquifyList(aList as list)
  set aArray to NSArray’s arrayWithArray:aList
  
set bArray to aArray’s valueForKeyPath:"@distinctUnionOfObjects.self"
  
return bArray as list
end uniquifyList

on findDataFrom2DList(anItem, aList as list)
  script spd
    property aList : {}
    
property resList : {}
  end script
  
  
set (aList of spd) to aList
  
set (resList of spd) to {}
  
  
set yCount to 1
  
  
repeat with i in (aList of spd)
    
    
set aResList to (Bplus’s indexesOfItem:anItem inList:i inverting:false) as list
    
    
set tmpList to {}
    
if aResList is not equal to {} then
      repeat with ii in aResList
        set jj to contents of ii
        
set the end of tmpList to {jj, yCount}
      end repeat
      
set (resList of spd) to (resList of spd) & tmpList
    end if
    
    
set yCount to yCount + 1
  end repeat
  
  
return (resList of spd) –return {{x, y}…..} item list (1-based)
end findDataFrom2DList

on retRangeFromPosListVertival(posList as list)
  script rangeSPD
    property posList2 : {}
  end script
  
  
–縦方向へのrange評価に都合がいいようにソート
  
set (posList2 of rangeSPD) to shellSortListAscending(posList, {1, 2}) of me
  
  
–先頭データをピックアップ
  
set firstData to first item of (posList2 of rangeSPD)
  
set (posList2 of rangeSPD) to rest of (posList2 of rangeSPD)
  
  
copy firstData to {curX1, curY1}
  
set tmpRangeStr to aNumToExcelColumn(curX1) of me & (curY1 as string) & ":"
  
  
set tmpRange to {}
  
set hitF to false
  
  
set outList to {}
  
  
repeat with i in (posList2 of rangeSPD)
    copy i to {tmpX, tmpY}
    
    
–log {"{curX1, curY1}", {curX1, curY1}}
    
–log {"{tmpX, tmpY}", {tmpX, tmpY}}


if (curX1 = tmpX) and (curY1 + 1 = tmpY) then
      –Y方向への連続値を拾っている最中
      
if hitF = false then
        –log "case 1a"
        
–log {"hitF", hitF}
        
set hitF to true
      else
        –log "case 1b"
        
–log {"hitF", hitF}
        
–横に連続しているブロックの途中
      end if
    else
      –直前の値と連続していない
      
if hitF = false then
        –log "case 2a"
        
–log {"hitF", hitF}
        
set tmpRangeStr to tmpRangeStr & aNumToExcelColumn(curX1) of me & (curY1 as string)
        
set the end of outList to tmpRangeStr
        
set tmpRangeStr to aNumToExcelColumn(tmpX) of me & (tmpY as string) & ":"
        
set hitF to false
      else
        –log "case 2b"
        
–log {"hitF", hitF}
        
–連続ブロックの末尾を拾った
        
set tmpRangeStr to tmpRangeStr & aNumToExcelColumn(curX1) of me & (curY1 as string)
        
set the end of outList to tmpRangeStr
        
set tmpRangeStr to aNumToExcelColumn(tmpX) of me & (tmpY as string) & ":"
        
set hitF to false
        
–log {"tmpRangeStr", tmpRangeStr}
      end if
    end if
    
    
copy {tmpX, tmpY} to {curX1, curY1}
  end repeat
  
  
–log {tmpRangeStr, hitF}
  
  
if (hitF = true) or (tmpRangeStr is not equal to "") then
    set tmpRangeStr to tmpRangeStr & aNumToExcelColumn(curX1) of me & (curY1 as string)
    
set the end of outList to tmpRangeStr
  end if
  
  
return outList
end retRangeFromPosListVertival

on retRangeFromPosListHorizontal(posList as list)
  script rangeSPD
    property posList2 : {}
  end script
  
  
copy posList to (posList2 of rangeSPD)
  
  
–先頭データをピックアップ
  
set firstData to first item of (posList2 of rangeSPD)
  
set (posList2 of rangeSPD) to rest of (posList2 of rangeSPD)
  
  
copy firstData to {curX1, curY1}
  
set tmpRangeStr to aNumToExcelColumn(curX1) of me & (curY1 as string) & ":"
  
  
set tmpRange to {}
  
set hitF to false
  
  
set outList to {}
  
  
repeat with i in (posList2 of rangeSPD)
    copy i to {tmpX, tmpY}
    
    
–log {"{curX1, curY1}", {curX1, curY1}}
    
–log {"{tmpX, tmpY}", {tmpX, tmpY}}


if (curX1 + 1 = tmpX) and (curY1 = tmpY) then
      –X方向への連続値を拾っている最中
      
if hitF = false then
        –log "case 1a"
        
–log {"hitF", hitF}
        
set hitF to true
      else
        –log "case 1b"
        
–log {"hitF", hitF}
        
–横に連続しているブロックの途中
      end if
    else
      –直前の値と連続していない
      
if hitF = false then
        –log "case 2a"
        
–log {"hitF", hitF}
        
set tmpRangeStr to tmpRangeStr & aNumToExcelColumn(curX1) of me & (curY1 as string)
        
set the end of outList to tmpRangeStr
        
set tmpRangeStr to aNumToExcelColumn(tmpX) of me & (tmpY as string) & ":"
        
set hitF to false
      else
        –log "case 2b"
        
–log {"hitF", hitF}
        
–連続ブロックの末尾を拾った
        
set tmpRangeStr to tmpRangeStr & aNumToExcelColumn(curX1) of me & (curY1 as string)
        
set the end of outList to tmpRangeStr
        
set tmpRangeStr to aNumToExcelColumn(tmpX) of me & (tmpY as string) & ":"
        
set hitF to false
        
–log {"tmpRangeStr", tmpRangeStr}
      end if
    end if
    
    
copy {tmpX, tmpY} to {curX1, curY1}
  end repeat
  
  
–log {tmpRangeStr, hitF}
  
  
if (hitF = true) or (tmpRangeStr is not equal to "") then
    set tmpRangeStr to tmpRangeStr & aNumToExcelColumn(curX1) of me & (curY1 as string)
    
set the end of outList to tmpRangeStr
  end if
  
  
return outList
end retRangeFromPosListHorizontal

–2008/05/01 By Takaaki Naganoya
–10進数数値をExcel 2004/2008的カラム表現にエンコードするサブルーチン を使いまわし
–1〜1351までの間であれば正しいエンコーディング結果を返す
on aNumToExcelColumn(origNum as integer)
  if origNum > 1351 then
    error "エラー:Excel 2004/2008的カラム表現(A1形式)への変換ルーチンにおいて、想定範囲外(1351以上)のパラメータが指定されました"
  end if
  
  
set upperDigitEncTable to {"A", "B", "C", "D", "E", "F", "G", "H", "I", "J", "K", "L", "M", "N", "O", "P", "Q", "R", "S", "T", "U", "V", "W", "X", "Y", "Z", "A"}
  
set lowerDigitEncTable to {"A", "B", "C", "D", "E", "F", "G", "H", "I", "J", "K", "L", "M", "N", "O", "P", "Q", "R", "S", "T", "U", "V", "W", "X", "Y", "Z", "A"}
  
  
set oNum to origNum
  
set nTh to 26
  
set stringLength to 4
  
  
–数字が1桁の場合の対応
  
if origNum < 27 then
    set aRes to (item origNum of upperDigitEncTable) as string
    
return aRes
  end if


if origNum > 702 then
    –3桁になる場合
    
set upupNum to oNum div 676 –整数除算–上の上の桁
    
set oNum to oNum – (upupNum * 676)
    
set upNum to oNum div 26 –整数除算–上の桁
    
set lowNum to oNum mod 26 – 1 –余剰計算–下の桁
    
    
–超つじつま合わせ処理
    
if lowNum = -1 then
      set upNum to upNum – 1
      
set lowNum to 25
    end if
    
    
set upupChar to (item upupNum of upperDigitEncTable) as string
    
set upChar to (item upNum of upperDigitEncTable) as string
    
set lowChar to (item (lowNum + 1) of lowerDigitEncTable) as string
    
set resText to upupChar & upChar & lowChar
    
  else
    –2桁の場合
    
set upNum to oNum div 26 –整数除算–上の桁
    
set lowNum to oNum mod 26 – 1 –余剰計算–下の桁
    
    
–超つじつま合わせ処理
    
if lowNum = -1 then
      set upNum to upNum – 1
      
set lowNum to 25
    end if
    
    
set upChar to (item upNum of upperDigitEncTable) as string
    
set lowChar to (item (lowNum + 1) of lowerDigitEncTable) as string
    
set resText to upChar & lowChar
    
  end if
  
  
return resText
end aNumToExcelColumn

–入れ子のリストを昇順ソート
on shellSortListAscending(a, keyItem)
  return sort2DList(a, keyItem, {true}) of me
end shellSortListAscending

–入れ子のリストを降順ソート
on shellSortListDecending(a, keyItem)
  return sort2DList(a, keyItem, {false}) of me
end shellSortListDecending

–2D Listをソート
on sort2DList(aList as list, sortIndexes as list, sortOrders as list)
  
  
–index値をAS流(アイテムが1はじまり)からCocoa流(アイテムが0はじまり)に変換
  
set newIndex to {}
  
repeat with i in sortIndexes
    set j to contents of i
    
set j to j – 1
    
set the end of newIndex to j
  end repeat
  
  
–Sort TypeのListを作成(あえて外部から指定する内容でもない)
  
set sortTypes to {}
  
repeat (length of sortIndexes) times
    set the end of sortTypes to "compare:"
  end repeat
  
  
–Sort
  
set resList to (current application’s SMSForder’s subarraysIn:(aList) sortedByIndexes:newIndex ascending:sortOrders sortTypes:sortTypes |error|:(missing value)) as list
  
  
return resList
end sort2DList

★Click Here to Open This Script 

Posted in Color GUI | Tagged 10.11savvy 10.12savvy 10.13savvy 10.14savvy NSArray NSBezierPath NSButton NSColor NSImage NSMenu NSMenuItem NSPopUpButton NSRoundedBezelStyle NSScreen NSTextField NSTitledWindowMask NSView NSWindow NSWindowController Numbers | Leave a comment

Pages書類の1ページ目の表の背景色を置換 v4

Posted on 1月 30, 2019 by Takaaki Naganoya

Pagesでオープン中の最前面の書類の1ページ目に存在する表オブジェクト中の背景色を置換するAppleScriptです。

例によって、Pages書類上の表オブジェクトは「配置」を「移動しない」に設定しないとAppleScriptからアクセスできないので、あらかじめ「移動しない」設定にしておく必要があります。

本バージョンでは、データの連続部分をrangeとしてまとめて処理する方法を、1行ずつ横方向に(左→右)スキャンした場合と、1列ずつ(上→下)縦方向にスキャンした場合の2パターンで処理し、より少ないデータ単位(より多くのセルを一括で指定)で処理できる方の方式を採用するようにしました。

このため、処理データによって塗りつぶし動作が変わってきます。横方向のみのスキャンでは大幅に遅くなるタイプのデータ(縦に処理対象セルが並んでいて、横方向にはつながっていない)でも「遅くならない」ことがテーマです。

ほかには、オープンソースの「DBColorNames」を利用して色から色名称を動的に取得したり、ポップアップメニューに表示する色イメージ画像を角丸にしたりしています。

–> dbColNamesKit.framework (To ~/Library/Frameworks)

これ以上の高速化は、「縦横混在のrangeシミュレーション」でも行わないとできないと思いますが、方法についてはいろいろ思いつくので論理的には可能だと思います。ただ、単に塗りつぶしを高速化するためだけに何日も試行錯誤するのはちょっと………なので、このぐらいにしておこうかと。

macOS 10.14上では、「csrutil disable」でSIPをオフにすると、ホームディレクトリ下の~/Library/Frameworksフォルダ内のFrameworkにアクセスでき、本Scriptをそのままスクリプトエディタで実行できました。アプレット形式で書き出して、アプレット内にFrameworkを入れればSIPをオフにしなくても実行できるはずです。Script Debugger/Script Menu上では実行できないというあたりが困りどころです。

AppleScript名:Pages書類の1ページ目の表の背景色を置換 v4.1
— Created 2017-07-15 by Takaaki Naganoya
— Modified 2019-01-29 by Takaaki Naganoya
— 2019 Piyomaru Software
use AppleScript version "2.4"
use scripting additions
use framework "Foundation"
use framework "AppKit"
use framework "dbColNamesKit" –https://github.com/daniel-beard/DBColorNames/
use Bplus : script "BridgePlus" –https://www.macosxautomation.com/applescript/apps/BridgePlus.html

–v1:First Version
–v2:Pick Up target cells by calculate every background color (35% speed up)
–v3:Draw cells by range (x20 speed up)
–v3.1:Bug Fix (retRangeFromPosList)
–v3.1.1:Bug Fix (retRangeFromPosList)
–v4:Two-way Simulation (Horizontal / Vertical scan), Corner-Rounded NSImage, Dynamic Color Naming
–v4.1:Correct Vertical Scan simulation (Sort list for vertical range evaluation, at first)

property NSView : a reference to current application’s NSView
property NSColor : a reference to current application’s NSColor
property NSArray : a reference to current application’s NSArray
property NSMenu : a reference to current application’s NSMenu
property NSImage : a reference to current application’s NSImage
property NSScreen : a reference to current application’s NSScreen
property NSButton : a reference to current application’s NSButton
property NSWindow : a reference to current application’s NSWindow
property NSTextField : a reference to current application’s NSTextField
property NSMenuItem : a reference to current application’s NSMenuItem
property NSBezierPath : a reference to current application’s NSBezierPath
property NSPopUpButton : a reference to current application’s NSPopUpButton
property NSWindowController : a reference to current application’s NSWindowController
property NSTitledWindowMask : a reference to current application’s NSTitledWindowMask
property NSRoundedBezelStyle : a reference to current application’s NSRoundedBezelStyle
property NSFloatingWindowLevel : a reference to current application’s NSFloatingWindowLevel
property NSBackingStoreBuffered : a reference to current application’s NSBackingStoreBuffered
property NSMomentaryLightButton : a reference to current application’s NSMomentaryLightButton

property windisp : true
property wController : missing value
property pop1ind : 1

–初期化
set (my windisp) to true
set (my pop1ind) to 1
load framework

–Pagesの1ページ目にある表の塗り色を取得
tell application "Pages"
  tell front document
    tell table 1
      set c1List to background color of every cell
      
set aProp to properties
      
set xCount to column count of aProp
    end tell
  end tell
end tell

–色データをユニーク化(重複削除)
set bList to uniquifyList(c1List) of me

–Convert 1D List to 2D List
set c3List to (current application’s SMSForder’s subarraysFrom:c1List groupedBy:xCount |error|:(missing value)) as list

–missing value(背景色なし)を除外する
set c2List to (current application’s SMSForder’s arrayByDeletingBlanksIn:(bList)) as list

–Popup Menuで置換色選択
set paramObj to {c2List, 65535, "OK", "Select Target Color", 180} –Timeout = 180 sec, Color val range = 16bit
my performSelectorOnMainThread:"getPopupValues:" withObject:(paramObj) waitUntilDone:true
if pop1ind = false then return –timed out
set fromCol to (contents of item pop1ind of c2List)

–カラーピッカーで置換色選択
set tCol to choose color default color fromCol

set d1 to current date

–実際に表の背景色を置換する
set hitList to findDataFrom2DList(fromCol, c3List) of me –データ上で当該色のセル情報を計算する

–Rangeを横スキャンと縦スキャンの2通りで試算(Two way Simulation)
set rList1 to retRangeFromPosListHorizontal(hitList) of me –横方向へのrange評価
set rList2 to retRangeFromPosListVertival(hitList) of me –縦方向へのrange評価

–Simulationの結果、要素数の少ない方(=処理時間の短い方=高速な方)を採用する
log {"Simulation", (length of rList1), (length of rList2)}
if (length of rList1) < (length of rList2) then
  copy rList1 to rangeList
else
  copy rList2 to rangeList
end if

tell application "Pages"
  activate
  
tell front document
    tell table 1
      repeat with i in rangeList
        set j to contents of i
        
        
ignoring application responses –非同期実行モードで高速実行
          set background color of range j to tCol
        end ignoring
        
      end repeat
    end tell
  end tell
end tell

set d2 to current date
return d2 – d1

–カラーポップアップメニューをウィンドウ表示
on getPopupValues:paramObj
  copy (paramObj as list) to {ap1List, aColMax, aButtonMSG, aSliderValMSG, timeOutSecs}
  
  
set (my windisp) to true
  
  
set aView to NSView’s alloc()’s initWithFrame:(current application’s NSMakeRect(0, 0, 360, 100))
  
  
–Labelをつくる
  
set a1TF to NSTextField’s alloc()’s initWithFrame:(current application’s NSMakeRect(30, 60, 80, 20))
  
a1TF’s setEditable:false
  
a1TF’s setStringValue:"Color:"
  
a1TF’s setDrawsBackground:false
  
a1TF’s setBordered:false
  
  
–Ppopup Buttonをつくる
  
set a1Button to NSPopUpButton’s alloc()’s initWithFrame:(current application’s NSMakeRect(80, 60, 200, 20)) pullsDown:false
  
a1Button’s removeAllItems()
  
  
set a1Menu to NSMenu’s alloc()’s init()
  
set aCDB to current application’s DBColorNames’s alloc()’s init()
  
  
set iCount to 1
  
repeat with i in ap1List
    copy i to {r1, g1, b1}
    
    
set nsCol to makeNSColorFromRGBAval(r1, g1, b1, aColMax, aColMax) of me
    
set anImage to makeRoundedNSImageWithFilledWithColor(64, 64, nsCol, 4) of me
    
    
set aTitle to "#" & (iCount as string) & " " & (aCDB’s nameForColor:nsCol) as string
    
set aMenuItem to (NSMenuItem’s alloc()’s initWithTitle:aTitle action:"actionHandler:" keyEquivalent:"")
    (
aMenuItem’s setImage:anImage)
    (
aMenuItem’s setEnabled:true)
    (
a1Menu’s addItem:aMenuItem)
    
    
set iCount to iCount + 1
  end repeat
  
  
a1Button’s setMenu:a1Menu


–Buttonをつくる
  
set bButton to (NSButton’s alloc()’s initWithFrame:(current application’s NSMakeRect(80, 10, 140, 40)))
  
bButton’s setButtonType:(NSMomentaryLightButton)
  
bButton’s setBezelStyle:(NSRoundedBezelStyle)
  
bButton’s setTitle:aButtonMSG
  
bButton’s setTarget:me
  
bButton’s setAction:("clicked:")
  
bButton’s setKeyEquivalent:(return)
  
  
aView’s addSubview:a1TF
  
  
aView’s addSubview:a1Button
  
aView’s addSubview:bButton
  
aView’s setNeedsDisplay:true
  
  
–NSWindowControllerを作ってみた(いらない?)
  
set aWin to (my makeWinWithView(aView, 300, 100, aSliderValMSG))
  
  
set wController to NSWindowController’s alloc()
  
wController’s initWithWindow:aWin
  
  
wController’s showWindow:me
  
  
set aCount to timeOutSecs * 100
  
  
set hitF to false
  
repeat aCount times
    if (my windisp) = false then
      set hitF to true
      
exit repeat
    end if
    
delay 0.01
    
set aCount to aCount – 1
  end repeat
  
  
my closeWin:aWin
  
  
if hitF = true then
    set s1Val to ((a1Button’s indexOfSelectedItem() as number) + 1)
  else
    set s1Val to false
  end if
  
  
copy s1Val to my pop1ind
  
end getPopupValues:

on clicked:aSender
  set (my windisp) to false
end clicked:

–make Window for Display
on makeWinWithView(aView, aWinWidth as integer, aWinHeight as integer, aTitle as string)
  set aScreen to NSScreen’s mainScreen()
  
set aFrame to {{0, 0}, {aWinWidth, aWinHeight}}
  
  
set aBacking to NSTitledWindowMask
  
  
set aDefer to NSBackingStoreBuffered
  
  
— Window
  
set aWin to NSWindow’s alloc()
  (
aWin’s initWithContentRect:aFrame styleMask:aBacking backing:aDefer defer:false screen:aScreen)
  
  
aWin’s setTitle:aTitle
  
aWin’s setDelegate:me
  
aWin’s setDisplaysWhenScreenProfileChanges:true
  
aWin’s setHasShadow:true
  
aWin’s setIgnoresMouseEvents:false
  
aWin’s setLevel:(NSFloatingWindowLevel)
  
aWin’s setOpaque:false
  
aWin’s setReleasedWhenClosed:true
  
aWin’s |center|()
  
  
aWin’s setContentView:aView
  
  
return aWin
end makeWinWithView

–close win
on closeWin:aWindow
  repeat with n from 10 to 1 by -1
    (aWindow’s setAlphaValue:n / 10)
    
delay 0.02
  end repeat
  
aWindow’s |close|()
end closeWin:

–Popup Action Handler
on actionHandler:sender
  set aTag to tag of sender as integer
  
set aTitle to title of sender as string
end actionHandler:

–aMaxValを最大値とする数値でNSColorを作成して返す
on makeNSColorFromRGBAval(redValue as integer, greenValue as integer, blueValue as integer, alphaValue as integer, aMaxVal as integer)
  set aRedCocoa to (redValue / aMaxVal) as real
  
set aGreenCocoa to (greenValue / aMaxVal) as real
  
set aBlueCocoa to (blueValue / aMaxVal) as real
  
set aAlphaCocoa to (alphaValue / aMaxVal) as real
  
set aColor to NSColor’s colorWithCalibratedRed:aRedCocoa green:aGreenCocoa blue:aBlueCocoa alpha:aAlphaCocoa
  
return aColor
end makeNSColorFromRGBAval

–指定サイズのNSImageを作成し、指定色で塗ってNSImageで返す
on makeNSImageWithFilledWithColor(aWidth as integer, aHeight as integer, fillColor)
  set anImage to NSImage’s alloc()’s initWithSize:(current application’s NSMakeSize(aWidth, aHeight))
  
anImage’s lockFocus()
  
—
  
set theRect to {{x:0, y:0}, {height:aHeight, width:aWidth}}
  
set theNSBezierPath to NSBezierPath’s bezierPath
  
theNSBezierPath’s appendBezierPathWithRect:theRect
  
—
  
fillColor’s |set|() –色設定
  
theNSBezierPath’s fill() –ぬりつぶし
  
—
  
anImage’s unlockFocus()
  
—
  
return anImage
end makeNSImageWithFilledWithColor

–指定サイズのNSImageを作成し、指定色で塗ってNSImageで返す、anRadiusの半径の角丸で
on makeRoundedNSImageWithFilledWithColor(aWidth as integer, aHeight as integer, fillColor, anRadius as real)
  set anImage to NSImage’s alloc()’s initWithSize:(current application’s NSMakeSize(aWidth, aHeight))
  
anImage’s lockFocus()
  
—
  
set theRect to {{x:0, y:0}, {height:aHeight, width:aWidth}}
  
set theNSBezierPath to NSBezierPath’s bezierPathWithRoundedRect:theRect xRadius:anRadius yRadius:anRadius
  
—
  
fillColor’s |set|() –色設定
  
theNSBezierPath’s fill() –ぬりつぶし
  
—
  
anImage’s unlockFocus()
  
  
return anImage
end makeRoundedNSImageWithFilledWithColor

on uniquifyList(aList as list)
  set aArray to NSArray’s arrayWithArray:aList
  
set bArray to aArray’s valueForKeyPath:"@distinctUnionOfObjects.self"
  
return bArray as list
end uniquifyList

on findDataFrom2DList(anItem, aList as list)
  script spd
    property aList : {}
    
property resList : {}
  end script
  
  
set (aList of spd) to aList
  
set (resList of spd) to {}
  
  
set yCount to 1
  
  
repeat with i in (aList of spd)
    
    
set aResList to (Bplus’s indexesOfItem:anItem inList:i inverting:false) as list
    
    
set tmpList to {}
    
if aResList is not equal to {} then
      repeat with ii in aResList
        set jj to contents of ii
        
set the end of tmpList to {jj, yCount}
      end repeat
      
set (resList of spd) to (resList of spd) & tmpList
    end if
    
    
set yCount to yCount + 1
  end repeat
  
  
return (resList of spd) –return {{x, y}…..} item list (1-based)
end findDataFrom2DList

on retRangeFromPosListVertival(posList as list)
  script rangeSPD
    property posList2 : {}
  end script
  
  
–縦方向へのrange評価に都合がいいようにソート
  
set (posList2 of rangeSPD) to shellSortListAscending(posList, {1, 2}) of me
  
  
–先頭データをピックアップ
  
set firstData to first item of (posList2 of rangeSPD)
  
set (posList2 of rangeSPD) to rest of (posList2 of rangeSPD)
  
  
copy firstData to {curX1, curY1}
  
set tmpRangeStr to aNumToExcelColumn(curX1) of me & (curY1 as string) & ":"
  
  
set tmpRange to {}
  
set hitF to false
  
  
set outList to {}
  
  
repeat with i in (posList2 of rangeSPD)
    copy i to {tmpX, tmpY}
    
    
–log {"{curX1, curY1}", {curX1, curY1}}
    
–log {"{tmpX, tmpY}", {tmpX, tmpY}}


if (curX1 = tmpX) and (curY1 + 1 = tmpY) then
      –Y方向への連続値を拾っている最中
      
if hitF = false then
        –log "case 1a"
        
–log {"hitF", hitF}
        
set hitF to true
      else
        –log "case 1b"
        
–log {"hitF", hitF}
        
–横に連続しているブロックの途中
      end if
    else
      –直前の値と連続していない
      
if hitF = false then
        –log "case 2a"
        
–log {"hitF", hitF}
        
set tmpRangeStr to tmpRangeStr & aNumToExcelColumn(curX1) of me & (curY1 as string)
        
set the end of outList to tmpRangeStr
        
set tmpRangeStr to aNumToExcelColumn(tmpX) of me & (tmpY as string) & ":"
        
set hitF to false
      else
        –log "case 2b"
        
–log {"hitF", hitF}
        
–連続ブロックの末尾を拾った
        
set tmpRangeStr to tmpRangeStr & aNumToExcelColumn(curX1) of me & (curY1 as string)
        
set the end of outList to tmpRangeStr
        
set tmpRangeStr to aNumToExcelColumn(tmpX) of me & (tmpY as string) & ":"
        
set hitF to false
        
–log {"tmpRangeStr", tmpRangeStr}
      end if
    end if
    
    
copy {tmpX, tmpY} to {curX1, curY1}
  end repeat
  
  
–log {tmpRangeStr, hitF}
  
  
if (hitF = true) or (tmpRangeStr is not equal to "") then
    set tmpRangeStr to tmpRangeStr & aNumToExcelColumn(curX1) of me & (curY1 as string)
    
set the end of outList to tmpRangeStr
  end if
  
  
return outList
end retRangeFromPosListVertival

on retRangeFromPosListHorizontal(posList as list)
  script rangeSPD
    property posList2 : {}
  end script
  
  
copy posList to (posList2 of rangeSPD)
  
  
–先頭データをピックアップ
  
set firstData to first item of (posList2 of rangeSPD)
  
set (posList2 of rangeSPD) to rest of (posList2 of rangeSPD)
  
  
copy firstData to {curX1, curY1}
  
set tmpRangeStr to aNumToExcelColumn(curX1) of me & (curY1 as string) & ":"
  
  
set tmpRange to {}
  
set hitF to false
  
  
set outList to {}
  
  
repeat with i in (posList2 of rangeSPD)
    copy i to {tmpX, tmpY}
    
    
–log {"{curX1, curY1}", {curX1, curY1}}
    
–log {"{tmpX, tmpY}", {tmpX, tmpY}}


if (curX1 + 1 = tmpX) and (curY1 = tmpY) then
      –X方向への連続値を拾っている最中
      
if hitF = false then
        –log "case 1a"
        
–log {"hitF", hitF}
        
set hitF to true
      else
        –log "case 1b"
        
–log {"hitF", hitF}
        
–横に連続しているブロックの途中
      end if
    else
      –直前の値と連続していない
      
if hitF = false then
        –log "case 2a"
        
–log {"hitF", hitF}
        
set tmpRangeStr to tmpRangeStr & aNumToExcelColumn(curX1) of me & (curY1 as string)
        
set the end of outList to tmpRangeStr
        
set tmpRangeStr to aNumToExcelColumn(tmpX) of me & (tmpY as string) & ":"
        
set hitF to false
      else
        –log "case 2b"
        
–log {"hitF", hitF}
        
–連続ブロックの末尾を拾った
        
set tmpRangeStr to tmpRangeStr & aNumToExcelColumn(curX1) of me & (curY1 as string)
        
set the end of outList to tmpRangeStr
        
set tmpRangeStr to aNumToExcelColumn(tmpX) of me & (tmpY as string) & ":"
        
set hitF to false
        
–log {"tmpRangeStr", tmpRangeStr}
      end if
    end if
    
    
copy {tmpX, tmpY} to {curX1, curY1}
  end repeat
  
  
–log {tmpRangeStr, hitF}
  
  
if (hitF = true) or (tmpRangeStr is not equal to "") then
    set tmpRangeStr to tmpRangeStr & aNumToExcelColumn(curX1) of me & (curY1 as string)
    
set the end of outList to tmpRangeStr
  end if
  
  
return outList
end retRangeFromPosListHorizontal

–2008/05/01 By Takaaki Naganoya
–10進数数値をExcel 2004/2008的カラム表現にエンコードするサブルーチン を使いまわし
–1〜1351までの間であれば正しいエンコーディング結果を返す
on aNumToExcelColumn(origNum as integer)
  if origNum > 1351 then
    error "エラー:Excel 2004/2008的カラム表現(A1形式)への変換ルーチンにおいて、想定範囲外(1351以上)のパラメータが指定されました"
  end if
  
  
set upperDigitEncTable to {"A", "B", "C", "D", "E", "F", "G", "H", "I", "J", "K", "L", "M", "N", "O", "P", "Q", "R", "S", "T", "U", "V", "W", "X", "Y", "Z", "A"}
  
set lowerDigitEncTable to {"A", "B", "C", "D", "E", "F", "G", "H", "I", "J", "K", "L", "M", "N", "O", "P", "Q", "R", "S", "T", "U", "V", "W", "X", "Y", "Z", "A"}
  
  
set oNum to origNum
  
set nTh to 26
  
set stringLength to 4
  
  
–数字が1桁の場合の対応
  
if origNum < 27 then
    set aRes to (item origNum of upperDigitEncTable) as string
    
return aRes
  end if


if origNum > 702 then
    –3桁になる場合
    
set upupNum to oNum div 676 –整数除算–上の上の桁
    
set oNum to oNum – (upupNum * 676)
    
set upNum to oNum div 26 –整数除算–上の桁
    
set lowNum to oNum mod 26 – 1 –余剰計算–下の桁
    
    
–超つじつま合わせ処理
    
if lowNum = -1 then
      set upNum to upNum – 1
      
set lowNum to 25
    end if
    
    
set upupChar to (item upupNum of upperDigitEncTable) as string
    
set upChar to (item upNum of upperDigitEncTable) as string
    
set lowChar to (item (lowNum + 1) of lowerDigitEncTable) as string
    
set resText to upupChar & upChar & lowChar
    
  else
    –2桁の場合
    
set upNum to oNum div 26 –整数除算–上の桁
    
set lowNum to oNum mod 26 – 1 –余剰計算–下の桁
    
    
–超つじつま合わせ処理
    
if lowNum = -1 then
      set upNum to upNum – 1
      
set lowNum to 25
    end if
    
    
set upChar to (item upNum of upperDigitEncTable) as string
    
set lowChar to (item (lowNum + 1) of lowerDigitEncTable) as string
    
set resText to upChar & lowChar
    
  end if
  
  
return resText
end aNumToExcelColumn

–入れ子のリストを昇順ソート
on shellSortListAscending(a, keyItem)
  return sort2DList(a, keyItem, {true}) of me
end shellSortListAscending

–入れ子のリストを降順ソート
on shellSortListDecending(a, keyItem)
  return sort2DList(a, keyItem, {false}) of me
end shellSortListDecending

–2D Listをソート
on sort2DList(aList as list, sortIndexes as list, sortOrders as list)
  
  
–index値をAS流(アイテムが1はじまり)からCocoa流(アイテムが0はじまり)に変換
  
set newIndex to {}
  
repeat with i in sortIndexes
    set j to contents of i
    
set j to j – 1
    
set the end of newIndex to j
  end repeat
  
  
–Sort TypeのListを作成(あえて外部から指定する内容でもない)
  
set sortTypes to {}
  
repeat (length of sortIndexes) times
    set the end of sortTypes to "compare:"
  end repeat
  
  
–Sort
  
set resList to (current application’s SMSForder’s subarraysIn:(aList) sortedByIndexes:newIndex ascending:sortOrders sortTypes:sortTypes |error|:(missing value)) as list
  
  
return resList
end sort2DList

★Click Here to Open This Script 

Posted in Color GUI list | Tagged 10.11savvy 10.12savvy 10.13savvy 10.14savvy NSArray NSBezierPath NSButton NSColor NSImage NSMenu NSMenuItem NSPopUpButton NSScreen NSTextField NSView NSWindow NSWindowController Pages | 2 Comments
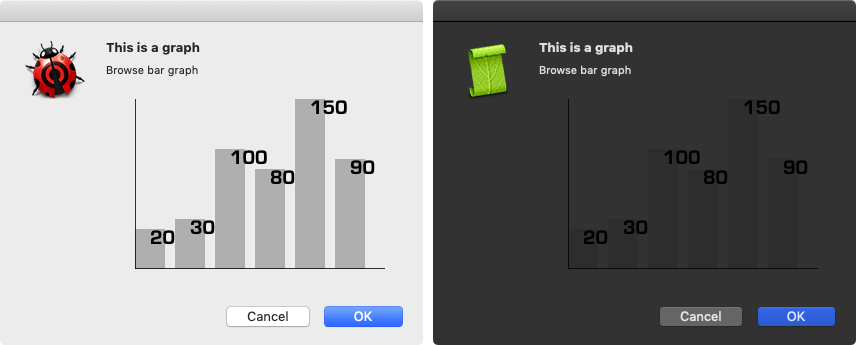
Pages書類の1ページ目の表の背景色を置換 v3.1(約20倍速)

Posted on 1月 29, 2019 by Takaaki Naganoya

Pagesでオープン中の最前面の書類の1ページ目に存在する表オブジェクト中の背景色を置換するAppleScriptの高速化版です。

初版では表中のセルをすべて取得し、すべてのセルについて順次背景色を求め、置換対象色であれば塗り直していました。セル1個ずつ塗っていたので、それなりの時間(テストデータでは20秒)がかかっていました。GUIアプリケーションを操作するために存在しているAppleScriptですが、アプリケーションとの通信はコストが高いので、この通信部分を減らすことが高速化の基本です。

ちなみに、「ignoring application responses」〜「end ignoring」で囲った範囲は非同期実行モードで実行され、2.5倍ぐらい高速になります。AppleScriptでは、GUIアプリケーションに対してコマンドを実行した場合、「コマンド実行」「コマンド処理」「コマンド結果受信」の3ステップを行なっています。非同期実行モードでは「コマンド実行」だけを行うので高速ですが、設定値や状態を知りたいような場合には(結果が返ってこないので)使う意味がありません。本Blogを「ignoring application responses」で検索しても、あまり出てこないはずです。

v2では、高速化のために全セルの背景色を抽出したあとに、2次元配列データ上で当該セルの座標を計算し、塗り替え対象セルのみ処理することで約35%のスピードアップを行いました。GUIアプリケーションにコマンドを送る(そして、処理を待って結果を受信する)よりも配列変数上で検索を行ったほうがはるかに高速です。

本v3では、さらなる高速化のために、2次元配列データ上で当該セルの座標を計算したあと、それらを横方向にスキャンして、点ではなく範囲(range)として評価し、極力複数のセルを連続する範囲(range)としてまとめて、rangeを一括塗りすることで初版から約20倍の高速化を行なったものです。v1やv2ではセルを1つずつ塗りつぶしていましたが、v3からは横方向に複数まとめてぬりつぶします。

実際のPages書類上の表の塗りつぶし領域が、ヘッダーや年表のような横方向に連続した塗りエリアを持つことが多いことに着目して、複数セルを一度に塗りつぶすことで高速化しました(1セル塗るのと複数セルを塗るのとで時間かわらず)。本Scriptでも1マスごとに塗りつぶしが存在するようなハッチング模様の表の塗りつぶし色を変更する場合にはパフォーマンスが最悪の状態に落ち込みますが、v2のレベル以下に落ちることはないでしょう。

この世のどこかには、さらにデータを1D Arrayではなく2D Arrayとして評価して、最大限まとめた面積のrangeとみなすことで本ルーチンの2倍ぐらいの速度で処理できるプログラムも存在しそうですが、人類の叡智のレベルを超えそうなので、自分はこのぐらいの速度が出れば満足です(総当たり的なアプローチで全パターンをシミュレーションして、一番いい結果が出るものを採用というのも考えないではないですが、シミュレーションをていねいに行うと処理時間が余計にかかるので、、、)。

1D Listに入っている座標値をX軸方向に評価して、連続値であればrangeに変換するルーチン「retRangeFromPosList」については、それほど真剣にテストしていないので処理が間違っている可能性もあります。
→ 処理に誤りがあったので修正しました(v3.1)

また、数値からExcelのA1形式のアドレスに変換するために作ってホコリをかぶっていた「aNumToExcelColumn」ルーチンも、一応テストはしてありますが変換できるアドレスの上限値が存在しているため注意が必要です。

AppleScript名:Pages書類の1ページ目の表の背景色を置換 v3.11
— Created 2017-07-15 by Takaaki Naganoya
— Modified 2019-01-29 by Takaaki Naganoya
— 2019 Piyomaru Software
use AppleScript version "2.4"
use scripting additions
use framework "Foundation"
use framework "AppKit"
use Bplus : script "BridgePlus" –https://www.macosxautomation.com/applescript/apps/BridgePlus.html

–v1:First Version
–v2:Pick Up target cells by calculate every background color (35% speed up)
–v3:Draw cells by range (x20 speed up)
–v3.1:Bug Fix (retRangeFromPosList)
–v3.1.1:Bug Fix (retRangeFromPosList)

property NSView : a reference to current application’s NSView
property NSColor : a reference to current application’s NSColor
property NSArray : a reference to current application’s NSArray
property NSMenu : a reference to current application’s NSMenu
property NSImage : a reference to current application’s NSImage
property NSScreen : a reference to current application’s NSScreen
property NSButton : a reference to current application’s NSButton
property NSWindow : a reference to current application’s NSWindow
property NSTextField : a reference to current application’s NSTextField
property NSMenuItem : a reference to current application’s NSMenuItem
property NSBezierPath : a reference to current application’s NSBezierPath
property NSPopUpButton : a reference to current application’s NSPopUpButton
property NSWindowController : a reference to current application’s NSWindowController
property NSTitledWindowMask : a reference to current application’s NSTitledWindowMask
property NSRoundedBezelStyle : a reference to current application’s NSRoundedBezelStyle
property NSNormalWindowLevel : a reference to current application’s NSNormalWindowLevel
property NSBackingStoreBuffered : a reference to current application’s NSBackingStoreBuffered
property NSMomentaryLightButton : a reference to current application’s NSMomentaryLightButton

property windisp : true
property wController : missing value
property pop1ind : 1

–初期化
set (my windisp) to true
set (my pop1ind) to 1
load framework

–Pagesの1ページ目にある表の塗り色を取得
tell application "Pages"
  tell front document
    tell table 1
      set c1List to background color of every cell
      
set aProp to properties
      
set xCount to column count of aProp
    end tell
  end tell
end tell

–色データをユニーク化(重複削除)
set bList to uniquifyList(c1List) of me

–Convert 1D List to 2D List
set c3List to (current application’s SMSForder’s subarraysFrom:c1List groupedBy:xCount |error|:(missing value)) as list

–missing value(背景色なし)を除外する
load framework
set c2List to (current application’s SMSForder’s arrayByDeletingBlanksIn:(bList)) as list

–Popup Menuで置換色選択
set aButtonMSG to "OK"
set aSliderValMSG to "Select Target Color"
set paramObj to {c2List, 65535, aButtonMSG, aSliderValMSG, 20}
my performSelectorOnMainThread:"getPopupValues:" withObject:(paramObj) waitUntilDone:true
set fromCol to (contents of item pop1ind of c2List)

–カラーピッカーで置換色選択
set tCol to choose color default color fromCol

set d1 to current date

–実際に表の背景色を置換する
set hitList to findDataFrom2DList(fromCol, c3List) of me –データ上で当該色のセル情報を計算する

set rangeList to retRangeFromPosList(hitList) of me

tell application "Pages"
  tell front document
    tell table 1
      repeat with i in rangeList
        set j to contents of i
        
        
ignoring application responses –非同期実行モードで高速実行
          set background color of range j to tCol
        end ignoring
      end repeat
    end tell
  end tell
end tell

set d2 to current date
return d2 – d1

–カラーポップアップメニューをウィンドウ表示
on getPopupValues:paramObj
  copy (paramObj as list) to {ap1List, aColMax, aButtonMSG, aSliderValMSG, timeOutSecs}
  
  
set (my windisp) to true
  
  
set aView to NSView’s alloc()’s initWithFrame:(current application’s NSMakeRect(0, 0, 360, 100))
  
  
–Labelをつくる
  
set a1TF to NSTextField’s alloc()’s initWithFrame:(current application’s NSMakeRect(30, 60, 80, 20))
  
a1TF’s setEditable:false
  
a1TF’s setStringValue:"Color:"
  
a1TF’s setDrawsBackground:false
  
a1TF’s setBordered:false
  
  
–Ppopup Buttonをつくる
  
set a1Button to NSPopUpButton’s alloc()’s initWithFrame:(current application’s NSMakeRect(80, 60, 200, 20)) pullsDown:false
  
a1Button’s removeAllItems()
  
  
set a1Menu to NSMenu’s alloc()’s init()
  
  
set iCount to 1
  
repeat with i in ap1List
    copy i to {r1, g1, b1}
    
    
set nsCol to makeNSColorFromRGBAval(r1, g1, b1, aColMax, aColMax) of me
    
set anImage to makeNSImageWithFilledWithColor(64, 64, nsCol) of me
    
    
set aTitle to "color_" & (iCount as string)
    
set aMenuItem to (NSMenuItem’s alloc()’s initWithTitle:aTitle action:"actionHandler:" keyEquivalent:"")
    (
aMenuItem’s setImage:anImage)
    (
aMenuItem’s setEnabled:true)
    (
a1Menu’s addItem:aMenuItem)
    
    
set iCount to iCount + 1
  end repeat
  
  
a1Button’s setMenu:a1Menu


–Buttonをつくる
  
set bButton to (NSButton’s alloc()’s initWithFrame:(current application’s NSMakeRect(80, 10, 140, 40)))
  
bButton’s setButtonType:(NSMomentaryLightButton)
  
bButton’s setBezelStyle:(NSRoundedBezelStyle)
  
bButton’s setTitle:aButtonMSG
  
bButton’s setTarget:me
  
bButton’s setAction:("clicked:")
  
bButton’s setKeyEquivalent:(return)
  
  
aView’s addSubview:a1TF
  
  
aView’s addSubview:a1Button
  
aView’s addSubview:bButton
  
aView’s setNeedsDisplay:true
  
  
–NSWindowControllerを作ってみた(いらない?)
  
set aWin to (my makeWinWithView(aView, 300, 100, aSliderValMSG))
  
  
set wController to NSWindowController’s alloc()
  
wController’s initWithWindow:aWin
  
  
wController’s showWindow:me
  
  
set aCount to timeOutSecs * 100
  
  
set hitF to false
  
repeat aCount times
    if (my windisp) = false then
      set hitF to true
      
exit repeat
    end if
    
delay 0.01
    
set aCount to aCount – 1
  end repeat
  
  
my closeWin:aWin
  
  
if hitF = true then
    set s1Val to ((a1Button’s indexOfSelectedItem() as number) + 1)
  else
    set s1Val to false
  end if
  
  
copy s1Val to my pop1ind
  
end getPopupValues:

on clicked:aSender
  set (my windisp) to false
end clicked:

–make Window for Display
on makeWinWithView(aView, aWinWidth, aWinHeight, aTitle)
  set aScreen to NSScreen’s mainScreen()
  
set aFrame to {{0, 0}, {aWinWidth, aWinHeight}}
  
  
set aBacking to NSTitledWindowMask
  
  
set aDefer to NSBackingStoreBuffered
  
  
— Window
  
set aWin to NSWindow’s alloc()
  (
aWin’s initWithContentRect:aFrame styleMask:aBacking backing:aDefer defer:false screen:aScreen)
  
  
aWin’s setTitle:aTitle
  
aWin’s setDelegate:me
  
aWin’s setDisplaysWhenScreenProfileChanges:true
  
aWin’s setHasShadow:true
  
aWin’s setIgnoresMouseEvents:false
  
aWin’s setLevel:(NSNormalWindowLevel)
  
aWin’s setOpaque:false
  
aWin’s setReleasedWhenClosed:true
  
aWin’s |center|()
  
  
aWin’s setContentView:aView
  
  
return aWin
end makeWinWithView

–close win
on closeWin:aWindow
  repeat with n from 10 to 1 by -1
    (aWindow’s setAlphaValue:n / 10)
    
delay 0.02
  end repeat
  
aWindow’s |close|()
end closeWin:

–Popup Action Handler
on actionHandler:sender
  set aTag to tag of sender as integer
  
set aTitle to title of sender as string
end actionHandler:

–aMaxValを最大値とする数値でNSColorを作成して返す
on makeNSColorFromRGBAval(redValue as integer, greenValue as integer, blueValue as integer, alphaValue as integer, aMaxVal as integer)
  set aRedCocoa to (redValue / aMaxVal) as real
  
set aGreenCocoa to (greenValue / aMaxVal) as real
  
set aBlueCocoa to (blueValue / aMaxVal) as real
  
set aAlphaCocoa to (alphaValue / aMaxVal) as real
  
set aColor to NSColor’s colorWithCalibratedRed:aRedCocoa green:aGreenCocoa blue:aBlueCocoa alpha:aAlphaCocoa
  
return aColor
end makeNSColorFromRGBAval

–指定サイズのNSImageを作成し、指定色で塗ってNSImageで返す
on makeNSImageWithFilledWithColor(aWidth, aHeight, fillColor)
  set anImage to NSImage’s alloc()’s initWithSize:(current application’s NSMakeSize(aWidth, aHeight))
  
anImage’s lockFocus()
  
—
  
set theRect to {{x:0, y:0}, {height:aHeight, width:aWidth}}
  
set theNSBezierPath to NSBezierPath’s bezierPath
  
theNSBezierPath’s appendBezierPathWithRect:theRect
  
—
  
fillColor’s |set|() –色設定
  
theNSBezierPath’s fill() –ぬりつぶし
  
—
  
anImage’s unlockFocus()
  
—
  
return anImage
end makeNSImageWithFilledWithColor

on uniquifyList(aList as list)
  set aArray to NSArray’s arrayWithArray:aList
  
set bArray to aArray’s valueForKeyPath:"@distinctUnionOfObjects.self"
  
return bArray as list
end uniquifyList

on findDataFrom2DList(anItem, aList)
  script spd
    property aList : {}
    
property resList : {}
  end script
  
  
set (aList of spd) to aList
  
set (resList of spd) to {}
  
  
set yCount to 1
  
  
repeat with i in (aList of spd)
    
    
set aResList to (Bplus’s indexesOfItem:anItem inList:i inverting:false) as list
    
    
set tmpList to {}
    
if aResList is not equal to {} then
      repeat with ii in aResList
        set jj to contents of ii
        
set the end of tmpList to {jj, yCount}
      end repeat
      
set (resList of spd) to (resList of spd) & tmpList
    end if
    
    
set yCount to yCount + 1
  end repeat
  
  
return (resList of spd) –return {{x, y}…..} item list (1-based)
end findDataFrom2DList

on retRangeFromPosList(posList as list)
  script rangeSPD
    property posList2 : {}
  end script
  
  
copy posList to (posList2 of rangeSPD)
  
  
–先頭データをピックアップ
  
set firstData to first item of (posList2 of rangeSPD)
  
set (posList2 of rangeSPD) to rest of (posList2 of rangeSPD)
  
  
copy firstData to {curX1, curY1}
  
set tmpRangeStr to aNumToExcelColumn(curX1) of me & (curY1 as string) & ":"
  
  
set tmpRange to {}
  
set hitF to false
  
  
set outList to {}
  
  
repeat with i in (posList2 of rangeSPD)
    copy i to {tmpX, tmpY}
    
    
–log {"{curX1, curY1}", {curX1, curY1}}
    
–log {"{tmpX, tmpY}", {tmpX, tmpY}}


if (curX1 + 1 = tmpX) and (curY1 = tmpY) then
      –X方向への連続値を拾っている最中
      
if hitF = false then
        –log "case 1a"
        
–log {"hitF", hitF}
        
set hitF to true
      else
        –log "case 1b"
        
–log {"hitF", hitF}
        
–横に連続しているブロックの途中
      end if
    else
      –直前の値と連続していない
      
if hitF = false then
        –log "case 2a"
        
–log {"hitF", hitF}
        
set tmpRangeStr to tmpRangeStr & aNumToExcelColumn(curX1) of me & (curY1 as string)
        
set the end of outList to tmpRangeStr
        
set tmpRangeStr to aNumToExcelColumn(tmpX) of me & (tmpY as string) & ":"
        
set hitF to false
      else
        –log "case 2b"
        
–log {"hitF", hitF}
        
–連続ブロックの末尾を拾った
        
set tmpRangeStr to tmpRangeStr & aNumToExcelColumn(curX1) of me & (curY1 as string)
        
set the end of outList to tmpRangeStr
        
set tmpRangeStr to aNumToExcelColumn(tmpX) of me & (tmpY as string) & ":"
        
set hitF to false
        
–log {"tmpRangeStr", tmpRangeStr}
      end if
    end if
    
    
copy {tmpX, tmpY} to {curX1, curY1}
  end repeat
  
  
–log {tmpRangeStr, hitF}
  
  
if (hitF = true) or (tmpRangeStr is not equal to "") then
    set tmpRangeStr to tmpRangeStr & aNumToExcelColumn(curX1) of me & (curY1 as string)
    
set the end of outList to tmpRangeStr
  end if
  
  
return outList
end retRangeFromPosList

–2008/05/01 By Takaaki Naganoya
–10進数数値をExcel 2004/2008的カラム表現にエンコードするサブルーチン を使いまわし
–1〜1351までの間であれば正しいエンコーディング結果を返す
on aNumToExcelColumn(origNum as integer)
  if origNum > 1351 then
    display dialog "エラー:Excel 2004/2008的カラム表現(A1形式)への変換ルーチンにおいて、想定範囲外(1351以上)のパラメータが指定されました" buttons {"OK"} default button 1
    
return ""
  end if
  
  
set upperDigitEncTable to {"A", "B", "C", "D", "E", "F", "G", "H", "I", "J", "K", "L", "M", "N", "O", "P", "Q", "R", "S", "T", "U", "V", "W", "X", "Y", "Z", "A"}
  
set lowerDigitEncTable to {"A", "B", "C", "D", "E", "F", "G", "H", "I", "J", "K", "L", "M", "N", "O", "P", "Q", "R", "S", "T", "U", "V", "W", "X", "Y", "Z", "A"}
  
  
set oNum to origNum
  
set nTh to 26
  
set stringLength to 4
  
  
–数字が1桁の場合の対応
  
if origNum < 27 then
    set aRes to (item origNum of upperDigitEncTable) as string
    
return aRes
  end if


if origNum > 702 then
    –3桁になる場合
    
set upupNum to oNum div 676 –整数除算–上の上の桁
    
set oNum to oNum – (upupNum * 676)
    
set upNum to oNum div 26 –整数除算–上の桁
    
set lowNum to oNum mod 26 – 1 –余剰計算–下の桁
    
    
–超つじつま合わせ処理
    
if lowNum = -1 then
      set upNum to upNum – 1
      
set lowNum to 25
    end if
    
    
set upupChar to (item upupNum of upperDigitEncTable) as string
    
set upChar to (item upNum of upperDigitEncTable) as string
    
set lowChar to (item (lowNum + 1) of lowerDigitEncTable) as string
    
set resText to upupChar & upChar & lowChar
    
  else
    –2桁の場合
    
set upNum to oNum div 26 –整数除算–上の桁
    
set lowNum to oNum mod 26 – 1 –余剰計算–下の桁
    
    
–超つじつま合わせ処理
    
if lowNum = -1 then
      set upNum to upNum – 1
      
set lowNum to 25
    end if
    
    
set upChar to (item upNum of upperDigitEncTable) as string
    
set lowChar to (item (lowNum + 1) of lowerDigitEncTable) as string
    
set resText to upChar & lowChar
    
  end if
  
  
return resText
end aNumToExcelColumn

★Click Here to Open This Script 

Posted in Color GUI list | Tagged 10.11savvy 10.12savvy 10.13savvy 10.14savvy NSArray NSBackingStoreBuffered NSBezierPath NSButton NSColor NSImage NSMenu NSMenuItem NSMomentaryLightButton NSNormalWindowLevel NSPopUpButton NSRoundedBezelStyle NSScreen NSTextField NSTitledWindowMask NSView NSWindow NSWindowController Pages | Leave a comment

Pages書類の1ページ目の表の背景色を置換

Posted on 1月 28, 2019 by Takaaki Naganoya

Pagesでオープン中の最前面の書類の1ページ目に存在する表オブジェクト中の背景色を置換するAppleScriptです。

Pages書類の「表オブジェクト」にAppleScriptからアクセスするためには、Pages上で表オブジェクトを選択した状態で、

「オブジェクトの配置」を「移動しない」に事前に設定しておく必要があります。

本AppleScriptを実行可能なランタイム環境は、スクリプトエディタ、アプレットの2つです。スクリプトメニューおよびScript Debuggerでは各GUI部品のクリックイベントを拾えないために、実行しても選択などが行えません。

のように、1ページのみのPages書類に表オブジェクトを入れて、「移動しない」設定にしてある状態で本AppleScriptを実行。

表のセル中の色をすべて取得して、ユニーク化してポップアップメニューから「変更元」の色を選択できます。

選択して、「OK」ボタンをクリック。ここで選択した色が置換されます。

選択した色をどの色に変更(置換)するのかを指定します。

黒い色を選択。

ちょっと置換に時間がかかりますが(テストデータ+開発環境で20秒前後)、セルの背景色をします。このあたり、Pagesの表オブジェクト中のセルに対して、background colorでフィルタ参照できればよかったのですが、自分が試した範囲ではフィルタ参照で抽出できませんでした。全セルを取得してループで背景色のチェックと置換を行なっています。

こういう機能が最初からPagesに実装されているわけでもないので、手作業よりははるかに高速なのでしばらく放っておけば終わるのでいいんじゃないでしょうか。

本来であれば、指定色に該当するセルをフィルタ参照で抽出して、ヒットしたセルだけでループして背景色を変更できるとベストですが、実際にフィルタ参照で抽出できるかどうかはアプリケーション側の対応度次第なので、実際にやってみないとわかりません。

AppleScript名:Pages書類の1ページ目の表の背景色を置換
— Created 2017-07-15 by Takaaki Naganoya
— Created 2019-01-28 by Takaaki Naganoya
— 2019 Piyomaru Software
use AppleScript version "2.4"
use scripting additions
use framework "Foundation"
use framework "AppKit"
use Bplus : script "BridgePlus" –https://www.macosxautomation.com/applescript/apps/BridgePlus.html

property NSView : a reference to current application’s NSView
property NSColor : a reference to current application’s NSColor
property NSArray : a reference to current application’s NSArray
property NSMenu : a reference to current application’s NSMenu
property NSImage : a reference to current application’s NSImage
property NSScreen : a reference to current application’s NSScreen
property NSButton : a reference to current application’s NSButton
property NSWindow : a reference to current application’s NSWindow
property NSTextField : a reference to current application’s NSTextField
property NSMenuItem : a reference to current application’s NSMenuItem
property NSBezierPath : a reference to current application’s NSBezierPath
property NSPopUpButton : a reference to current application’s NSPopUpButton
property NSWindowController : a reference to current application’s NSWindowController
property NSTitledWindowMask : a reference to current application’s NSTitledWindowMask
property NSRoundedBezelStyle : a reference to current application’s NSRoundedBezelStyle
property NSNormalWindowLevel : a reference to current application’s NSNormalWindowLevel
property NSBackingStoreBuffered : a reference to current application’s NSBackingStoreBuffered
property NSMomentaryLightButton : a reference to current application’s NSMomentaryLightButton

property windisp : false
property wController : false
property pop1ind : missing value

–Pagesの1ページ目にある表の塗り色を取得
tell application "Pages"
  tell front document
    tell table 1
      set cList to background color of every cell
    end tell
  end tell
end tell

–色データをユニーク化(重複削除)
set bList to uniquifyList(cList) of me

–missing value(背景色なし)を除外する
load framework
set cList to (current application’s SMSForder’s arrayByDeletingBlanksIn:(bList)) as list

–Popup Menuで置換色選択
set aButtonMSG to "OK"
set aSliderValMSG to "Select Target Color"
set paramObj to {cList, 65535, aButtonMSG, aSliderValMSG, 20}
my performSelectorOnMainThread:"getPopupValues:" withObject:(paramObj) waitUntilDone:true

–カラーピッカーで色選択
set fromCol to (contents of item pop1ind of cList)
set tCol to choose color default color fromCol

–実際に表の背景色を置換する
tell application "Pages"
  tell front document
    tell table 1
      set cellList to every cell
      
      
repeat with i in cellList
        set aBG to background color of i
        
        
if aBG = fromCol then
          ignoring application responses
            set background color of i to tCol
          end ignoring
        end if
      end repeat
    end tell
  end tell
end tell

–カラーポップアップメニューをウィンドウ表示
on getPopupValues:paramObj
  copy (paramObj as list) to {ap1List, aColMax, aButtonMSG, aSliderValMSG, timeOutSecs}
  
  
set (my windisp) to true
  
  
set aView to NSView’s alloc()’s initWithFrame:(current application’s NSMakeRect(0, 0, 360, 100))
  
  
–Labelをつくる
  
set a1TF to NSTextField’s alloc()’s initWithFrame:(current application’s NSMakeRect(30, 60, 80, 20))
  
a1TF’s setEditable:false
  
a1TF’s setStringValue:"Color:"
  
a1TF’s setDrawsBackground:false
  
a1TF’s setBordered:false
  
  
–Ppopup Buttonをつくる
  
set a1Button to NSPopUpButton’s alloc()’s initWithFrame:(current application’s NSMakeRect(80, 60, 200, 20)) pullsDown:false
  
a1Button’s removeAllItems()
  
  
set a1Menu to NSMenu’s alloc()’s init()
  
  
set iCount to 0
  
repeat with i in ap1List
    copy i to {r1, g1, b1}
    
    
set nsCol to makeNSColorFromRGBAval(r1, g1, b1, aColMax, aColMax) of me
    
set anImage to makeNSImageWithFilledWithColor(64, 64, nsCol) of me
    
    
set aTitle to "color_" & (iCount as string)
    
set aMenuItem to (NSMenuItem’s alloc()’s initWithTitle:aTitle action:"actionHandler:" keyEquivalent:"")
    (
aMenuItem’s setImage:anImage)
    (
aMenuItem’s setEnabled:true)
    (
a1Menu’s addItem:aMenuItem)
    
    
set iCount to iCount + 1
  end repeat
  
  
a1Button’s setMenu:a1Menu


–Buttonをつくる
  
set bButton to (NSButton’s alloc()’s initWithFrame:(current application’s NSMakeRect(80, 10, 140, 40)))
  
bButton’s setButtonType:(NSMomentaryLightButton)
  
bButton’s setBezelStyle:(NSRoundedBezelStyle)
  
bButton’s setTitle:aButtonMSG
  
bButton’s setTarget:me
  
bButton’s setAction:("clicked:")
  
bButton’s setKeyEquivalent:(return)
  
  
aView’s addSubview:a1TF
  
  
aView’s addSubview:a1Button
  
aView’s addSubview:bButton
  
aView’s setNeedsDisplay:true
  
  
–NSWindowControllerを作ってみた(いらない?)
  
set aWin to (my makeWinWithView(aView, 300, 100, aSliderValMSG))
  
  
set wController to NSWindowController’s alloc()
  
wController’s initWithWindow:aWin
  
  
wController’s showWindow:me
  
  
set aCount to timeOutSecs * 100
  
  
set hitF to false
  
repeat aCount times
    if (my windisp) = false then
      set hitF to true
      
exit repeat
    end if
    
delay 0.01
    
set aCount to aCount – 1
  end repeat
  
  
my closeWin:aWin
  
  
if hitF = true then
    set s1Val to ((a1Button’s indexOfSelectedItem() as number) + 1)
  else
    set s1Val to false
  end if
  
  
copy s1Val to my pop1ind
  
end getPopupValues:

on clicked:aSender
  set (my windisp) to false
end clicked:

–make Window for Display
on makeWinWithView(aView, aWinWidth, aWinHeight, aTitle)
  set aScreen to NSScreen’s mainScreen()
  
set aFrame to {{0, 0}, {aWinWidth, aWinHeight}}
  
  
set aBacking to NSTitledWindowMask
  
  
set aDefer to NSBackingStoreBuffered
  
  
— Window
  
set aWin to NSWindow’s alloc()
  (
aWin’s initWithContentRect:aFrame styleMask:aBacking backing:aDefer defer:false screen:aScreen)
  
  
aWin’s setTitle:aTitle
  
aWin’s setDelegate:me
  
aWin’s setDisplaysWhenScreenProfileChanges:true
  
aWin’s setHasShadow:true
  
aWin’s setIgnoresMouseEvents:false
  
aWin’s setLevel:(NSNormalWindowLevel)
  
aWin’s setOpaque:false
  
aWin’s setReleasedWhenClosed:true
  
aWin’s |center|()
  
  
aWin’s setContentView:aView
  
  
return aWin
end makeWinWithView

–close win
on closeWin:aWindow
  repeat with n from 10 to 1 by -1
    (aWindow’s setAlphaValue:n / 10)
    
delay 0.02
  end repeat
  
aWindow’s |close|()
end closeWin:

–Popup Action Handler
on actionHandler:sender
  set aTag to tag of sender as integer
  
set aTitle to title of sender as string
end actionHandler:

–aMaxValを最大値とする数値でNSColorを作成して返す
on makeNSColorFromRGBAval(redValue as integer, greenValue as integer, blueValue as integer, alphaValue as integer, aMaxVal as integer)
  set aRedCocoa to (redValue / aMaxVal) as real
  
set aGreenCocoa to (greenValue / aMaxVal) as real
  
set aBlueCocoa to (blueValue / aMaxVal) as real
  
set aAlphaCocoa to (alphaValue / aMaxVal) as real
  
set aColor to NSColor’s colorWithCalibratedRed:aRedCocoa green:aGreenCocoa blue:aBlueCocoa alpha:aAlphaCocoa
  
return aColor
end makeNSColorFromRGBAval

–指定サイズのNSImageを作成し、指定色で塗ってNSImageで返す
on makeNSImageWithFilledWithColor(aWidth, aHeight, fillColor)
  set anImage to NSImage’s alloc()’s initWithSize:(current application’s NSMakeSize(aWidth, aHeight))
  
anImage’s lockFocus()
  
—
  
set theRect to {{x:0, y:0}, {height:aHeight, width:aWidth}}
  
set theNSBezierPath to NSBezierPath’s bezierPath
  
theNSBezierPath’s appendBezierPathWithRect:theRect
  
—
  
fillColor’s |set|() –色設定
  
theNSBezierPath’s fill() –ぬりつぶし
  
—
  
anImage’s unlockFocus()
  
—
  
return anImage
end makeNSImageWithFilledWithColor

on uniquifyList(aList as list)
  set aArray to NSArray’s arrayWithArray:aList
  
set bArray to aArray’s valueForKeyPath:"@distinctUnionOfObjects.self"
  
return bArray as list
end uniquifyList

★Click Here to Open This Script 

Posted in Color GUI | Tagged 10.11savvy 10.12savvy 10.13savvy 10.14savvy NSArray NSBackingStoreBuffered NSBezierPath NSButton NSColor NSImage NSMenu NSMenuItem NSMomentaryLightButton NSNormalWindowLevel NSPopUpButton NSRoundedBezelStyle NSScreen NSTextField NSTitledWindowMask NSView NSWindow NSWindowController Pages | 1 Comment

色付き単色画像を作成する(自由色指定&色名推定)

Posted on 7月 17, 2018 by Takaaki Naganoya

指定画像を任意の色で単色化し、指定色名をファイル名に反映させてファイル出力するAppleScriptです。

もとは、「色付き単色画像を作成する」AppleScriptに、

 ・choose colorによるユーザー選択色を反映
 ・choose colorで指定した色のざっくりとした色名検出

などの機能をつなぎ合わせたものです。

日本地図の白地図からカラーバリエーション画像を出力する際に作成しました。線が黒で書かれている白地図(白地図というのはそういうものですが)から、さまざまな色のバリエーションを作成。その際に、どのような色を指定したかをファイル名に反映させておいたほうが便利だったので、そのようにしてみました。

GPUImage.frameworkを利用しています。

–> GPUImage.framework (To ~/Library/Frameworks/)

色名推定のロジックもけっこうしっくりきていますが、明度も反映して、明るいものは「light-」、暗いものは「dark-」と出力させてもいいような気がします。ただし、「dark-orange」はBrownのことですし、ほかにも色名を別途振り直したほうがいいパターンもあるように思われます。

AppleScript名:色付き単色画像を作成する(自由色指定&色名推定)
— Created 2017-02-11 by Takaaki Naganoya
— Modified 2018-07-15 by Takaaki Naganoya
— 2017-2018 Piyomaru Software
use AppleScript version "2.4"
use scripting additions
use framework "Foundation"
use framework "AppKit"
use framework "GPUImage" –https://github.com/BradLarson/GPUImage

property NSUUID : a reference to current application’s NSUUID
property NSColor : a reference to current application’s NSColor
property NSString : a reference to current application’s NSString
property NSImage : a reference to current application’s NSImage
property NSBezierPath : a reference to current application’s NSBezierPath
property NSPNGFileType : a reference to current application’s NSPNGFileType
property GPUImagePicture : a reference to current application’s GPUImagePicture
property NSBitmapImageRep : a reference to current application’s NSBitmapImageRep

–Select Image File
set aFile to POSIX path of (choose file of type {"public.image"} with prompt "Select image")

–Select Color
set {rCol, gCol, bCol} to choose color

set fillColorR to makeNSColorFromRGBAval(rCol, gCol, bCol, 65535, 65535) of me
set fillColorRName to retColorDomainNameFromNSColor(fillColorR) of me –だいたいの色名称を計算

set imgRes to makeMonoColoredImage(aFile, fillColorR) of me
set fRes to retUUIDandKeyfilePath(aFile, fillColorRName, "png") of me
set bRes to saveNSImageAtPathAsPNG(imgRes, fRes) of me

— return "UUID_aKey.aEXT" full path
on retUUIDandKeyfilePath(aPath, aKey, aEXT)
  set aUUIDstr to ((NSUUID’s UUID()’s UUIDString()) as string) & "_" & aKey
  
set aPath to ((NSString’s stringWithString:aPath)’s stringByDeletingLastPathComponent()’s stringByAppendingPathComponent:aUUIDstr)’s stringByAppendingPathExtension:aEXT
  
return aPath
end retUUIDandKeyfilePath

on makeMonoColoredImage(aFile, NScolorObj)
  set aImage to NSImage’s alloc()’s initWithContentsOfFile:aFile
  
return makeColoredNSImageWithColor(aImage, NScolorObj) of me –色付き単色画像を作成する
end makeMonoColoredImage

on makeColoredNSImageWithColor(aImage, fillColor)
  set aSize to aImage’s |size|()
  
set aWidth to width of aSize
  
set aHeight to height of aSize
  
set newNSImage to makeNSImageWithFilledWithColor(aWidth, aHeight, fillColor)
  
set grayImage to filterWithNSImage(aImage, "GPUImageGrayscaleFilter") of me
  
set compImage to composeImageWithBlendFilter(grayImage, newNSImage, "GPUImageScreenBlendFilter") of me
  
return compImage
end makeColoredNSImageWithColor

on filterWithNSImage(aNSImage, filterName as string)
  set aClass to current application’s NSClassFromString(filterName)
  
set aImageFilter to aClass’s alloc()’s init()
  
set aProcImg to (aImageFilter’s imageByFilteringImage:aNSImage)
  
return aProcImg
end filterWithNSImage

on composeImageWithBlendFilter(aImage, bImage, filterName)
  set aClass to current application’s NSClassFromString(filterName)
  
set blendFilter to aClass’s alloc()’s init()
  
set pictureA to GPUImagePicture’s alloc()’s initWithImage:aImage
  
pictureA’s addTarget:blendFilter
  
pictureA’s processImage()
  
set imgRes to blendFilter’s imageByFilteringImage:bImage
  
return imgRes
end composeImageWithBlendFilter

–指定サイズの画像を作成し、指定色で塗ってNSImageで返す
on makeNSImageWithFilledWithColor(aWidth, aHeight, fillColor)
  –Imageの作成  
  
set curSize to current application’s NSMakeSize(aWidth, aHeight)
  
set anImage to NSImage’s alloc()’s initWithSize:curSize
  
  
anImage’s lockFocus() –描画開始
  
  
set theRect to {{x:0, y:0}, {height:aHeight, width:aWidth}}
  
set theNSBezierPath to NSBezierPath’s bezierPath
  
theNSBezierPath’s appendBezierPathWithRect:theRect
  
  
fillColor’s |set|() –色設定
  
theNSBezierPath’s fill() –ぬりつぶし
  
  
anImage’s unlockFocus() –描画ここまで
  
  
–生成した画像のRaw画像を作成
  
set imageRep to anImage’s TIFFRepresentation()
  
set aRawimg to NSBitmapImageRep’s imageRepWithData:imageRep
  
  
set newImg to NSImage’s alloc()’s initWithSize:curSize
  
newImg’s addRepresentation:aRawimg
  
return newImg
end makeNSImageWithFilledWithColor

–NSImageを指定パスにPNG形式で保存
on saveNSImageAtPathAsPNG(anImage, outPath)
  set imageRep to anImage’s TIFFRepresentation()
  
set aRawimg to NSBitmapImageRep’s imageRepWithData:imageRep
  
set pathString to NSString’s stringWithString:outPath
  
set newPath to pathString’s stringByExpandingTildeInPath()
  
set myNewImageData to (aRawimg’s representationUsingType:(NSPNGFileType) |properties|:(missing value))
  
set aRes to (myNewImageData’s writeToFile:newPath atomically:true) as boolean
  
return aRes –true/false
end saveNSImageAtPathAsPNG

–NSColor(内容はRGBAカラー)からだいたいの色名を推測
on retColorDomainNameFromNSColor(aCol)
  set hueVal to aCol’s hueComponent()
  
set satVal to aCol’s saturationComponent()
  
set brightVal to aCol’s brightnessComponent()
  
  
if satVal ≤ 0.01 then set satVal to 0.0
  
  
set colName to ""
  
  
if satVal = 0.0 then
    if brightVal ≤ 0.2 then
      set colName to "black"
    else if (brightVal > 0.95) then
      set colName to "white"
    else
      set colName to "gray"
    end if
  else
    if hueVal ≤ (15.0 / 360) or hueVal ≥ (330 / 360) then
      set colName to "red"
    else if hueVal ≤ (45.0 / 360) then
      set colName to "orange"
    else if hueVal < (70.0 / 360) then
      set colName to "yellow"
    else if hueVal < (150.0 / 360) then
      set colName to "green"
    else if hueVal < (190.0 / 360) then
      set colName to "green(cyan)"
    else if (hueVal < 250.0 / 360.0) then
      set colName to "blue"
    else if (hueVal < 290.0 / 360.0) then
      set colName to "purple"
    else
      set colName to "red(magenta)"
    end if
  end if
  
  
return colName
end retColorDomainNameFromNSColor

on makeNSColorFromRGBAval(redValue as integer, greenValue as integer, blueValue as integer, alphaValue as integer, aMaxVal as integer)
  set aRedCocoa to (redValue / aMaxVal) as real
  
set aGreenCocoa to (greenValue / aMaxVal) as real
  
set aBlueCocoa to (blueValue / aMaxVal) as real
  
set aAlphaCocoa to (alphaValue / aMaxVal) as real
  
set aColor to NSColor’s colorWithCalibratedRed:aRedCocoa green:aGreenCocoa blue:aBlueCocoa alpha:aAlphaCocoa
  
return aColor
end makeNSColorFromRGBAval

★Click Here to Open This Script 

Posted in Color file Image | Tagged 10.11savvy 10.12savvy 10.13savvy NSBezierPath NSBitmapImageRep NSColor NSImage NSString NSUUID | Leave a comment

電子書籍(PDF)をオンラインストアで販売中!

Google Search

Popular posts

  • 開発機としてM2 Mac miniが来たのでガチレビュー
  • macOS 13.6.5 AS系のバグ、一切直らず
  • CotEditorで2つの書類の行単位での差分検出
  • Apple純正マウス、キーボードのバッテリー残量取得
  • macOS 15, Sequoia
  • ディスプレイをスリープ状態にして処理続行
  • 初心者がつまづきやすい「log」コマンド
  • Adobe AcrobatをAppleScriptから操作してPDF圧縮
  • 与えられた文字列の1D Listのすべての順列組み合わせパターン文字列を返す v3(ベンチマーク用)
  • 指定のWordファイルをPDFに書き出す
  • メキシカンハットの描画
  • macOS 13 TTS環境の変化について
  • 2023年に書いた価値あるAppleScript
  • Pixelmator Pro v3.6.4でAppleScriptからの操作時の挙動に違和感が
  • AdobeがInDesign v19.4からPOSIX pathを採用
  • Pages本執筆中に、2つの書類モード切り替えに気がついた
  • 可変次元のベクトルに対応したコサイン類似度計算
  • Safariで「プロファイル」機能を使うとAppleScriptの処理に影響
  • Cocoa Scripting Course 続刊計画
  • macOS 13.6.2アップデート Cocoa-AppleScript Applet修正はなし

Tags

10.11savvy (1101) 10.12savvy (1242) 10.13savvy (1391) 10.14savvy (586) 10.15savvy (437) 11.0savvy (281) 12.0savvy (201) 13.0savvy (139) 14.0savvy (87) 15.0savvy (63) CotEditor (63) Finder (51) iTunes (19) Keynote (112) NSAlert (60) NSArray (51) NSBitmapImageRep (20) NSBundle (20) NSButton (34) NSColor (51) NSDictionary (27) NSFileManager (23) NSFont (19) NSImage (41) NSJSONSerialization (21) NSMutableArray (62) NSMutableDictionary (21) NSPredicate (36) NSRunningApplication (56) NSScreen (30) NSScrollView (22) NSString (117) NSURL (97) NSURLRequest (23) NSUTF8StringEncoding (30) NSView (33) NSWorkspace (20) Numbers (67) Pages (51) Safari (44) Script Editor (26) WKUserContentController (21) WKUserScript (20) WKWebView (23) WKWebViewConfiguration (22)

カテゴリー

  • 2D Bin Packing
  • 3D
  • AirDrop
  • AirPlay
  • Animation
  • AppleScript Application on Xcode
  • Beginner
  • Benchmark
  • beta
  • Bluetooth
  • Books
  • boolean
  • bounds
  • Bug
  • Calendar
  • call by reference
  • Clipboard
  • Code Sign
  • Color
  • Custom Class
  • dialog
  • diff
  • drive
  • Droplet
  • exif
  • file
  • File path
  • filter
  • folder
  • Font
  • Font
  • GAME
  • geolocation
  • GUI
  • GUI Scripting
  • Hex
  • History
  • How To
  • iCloud
  • Icon
  • Image
  • Input Method
  • Internet
  • iOS App
  • JavaScript
  • JSON
  • JXA
  • Keychain
  • Keychain
  • Language
  • Library
  • list
  • Locale
  • Localize
  • Machine Learning
  • Map
  • Markdown
  • Menu
  • Metadata
  • MIDI
  • MIME
  • Natural Language Processing
  • Network
  • news
  • Noification
  • Notarization
  • Number
  • Object control
  • OCR
  • OSA
  • parallel processing
  • PDF
  • Peripheral
  • PRODUCTS
  • QR Code
  • Raw AppleEvent Code
  • Record
  • rectangle
  • recursive call
  • regexp
  • Release
  • Remote Control
  • Require Control-Command-R to run
  • REST API
  • Review
  • RTF
  • Sandbox
  • Screen Saver
  • Script Libraries
  • sdef
  • search
  • Security
  • selection
  • shell script
  • Shortcuts Workflow
  • Sort
  • Sound
  • Spellchecker
  • Spotlight
  • SVG
  • System
  • Tag
  • Telephony
  • Text
  • Text to Speech
  • timezone
  • Tools
  • Update
  • URL
  • UTI
  • Web Contents Control
  • WiFi
  • XML
  • XML-RPC
  • イベント(Event)
  • 未分類

アーカイブ

  • 2024年11月
  • 2024年10月
  • 2024年9月
  • 2024年8月
  • 2024年7月
  • 2024年6月
  • 2024年5月
  • 2024年4月
  • 2024年3月
  • 2024年2月
  • 2024年1月
  • 2023年12月
  • 2023年11月
  • 2023年10月
  • 2023年9月
  • 2023年8月
  • 2023年7月
  • 2023年6月
  • 2023年5月
  • 2023年4月
  • 2023年3月
  • 2023年2月
  • 2023年1月
  • 2022年12月
  • 2022年11月
  • 2022年10月
  • 2022年9月
  • 2022年8月
  • 2022年7月
  • 2022年6月
  • 2022年5月
  • 2022年4月
  • 2022年3月
  • 2022年2月
  • 2022年1月
  • 2021年12月
  • 2021年11月
  • 2021年10月
  • 2021年9月
  • 2021年8月
  • 2021年7月
  • 2021年6月
  • 2021年5月
  • 2021年4月
  • 2021年3月
  • 2021年2月
  • 2021年1月
  • 2020年12月
  • 2020年11月
  • 2020年10月
  • 2020年9月
  • 2020年8月
  • 2020年7月
  • 2020年6月
  • 2020年5月
  • 2020年4月
  • 2020年3月
  • 2020年2月
  • 2020年1月
  • 2019年12月
  • 2019年11月
  • 2019年10月
  • 2019年9月
  • 2019年8月
  • 2019年7月
  • 2019年6月
  • 2019年5月
  • 2019年4月
  • 2019年3月
  • 2019年2月
  • 2019年1月
  • 2018年12月
  • 2018年11月
  • 2018年10月
  • 2018年9月
  • 2018年8月
  • 2018年7月
  • 2018年6月
  • 2018年5月
  • 2018年4月
  • 2018年3月
  • 2018年2月

https://piyomarusoft.booth.pm/items/301502

メタ情報

  • ログイン
  • 投稿フィード
  • コメントフィード
  • WordPress.org

Forum Posts

  • 人気のトピック
  • 返信がないトピック

メタ情報

  • ログイン
  • 投稿フィード
  • コメントフィード
  • WordPress.org
Proudly powered by WordPress
Theme: Flint by Star Verte LLC