Menu

Skip to content
AppleScriptの穴
  • Home
  • Products
  • Books
  • Docs
  • Events
  • Forum
  • About This Blog
  • License
  • 仕事依頼

AppleScriptの穴

Useful & Practical AppleScript archive. Click '★Click Here to Open This Script' Link to download each AppleScript

タグ: NSWindow

自分のウィンドウのフルスクリーン化 v3

Posted on 5月 22, 2020 by Takaaki Naganoya

Xcode上で作成したAppleScriptアプリケーションのウィンドウをフルスクリーン化するAppleScriptです。

–> download fullScreenTestv3 (Xcode project archive)

前バージョンを実際にアプリケーションに組み込んで実行してみたところ、メニューバーを表示しないうえにツールバー(NSToolbar)も非表示状態でフルスクリーン化したうえに、通常表示状態に戻ってこれませんでした。戻ってくるにはアプリケーションを終了(Command-Q)するしかありませんでした。

ゲームならこれでいいと思うのですが、通常のアプリケーションでフルスクリーンモードから戻ってこられないのは困りますし、メニューやツールバーが使えないのは困ります。

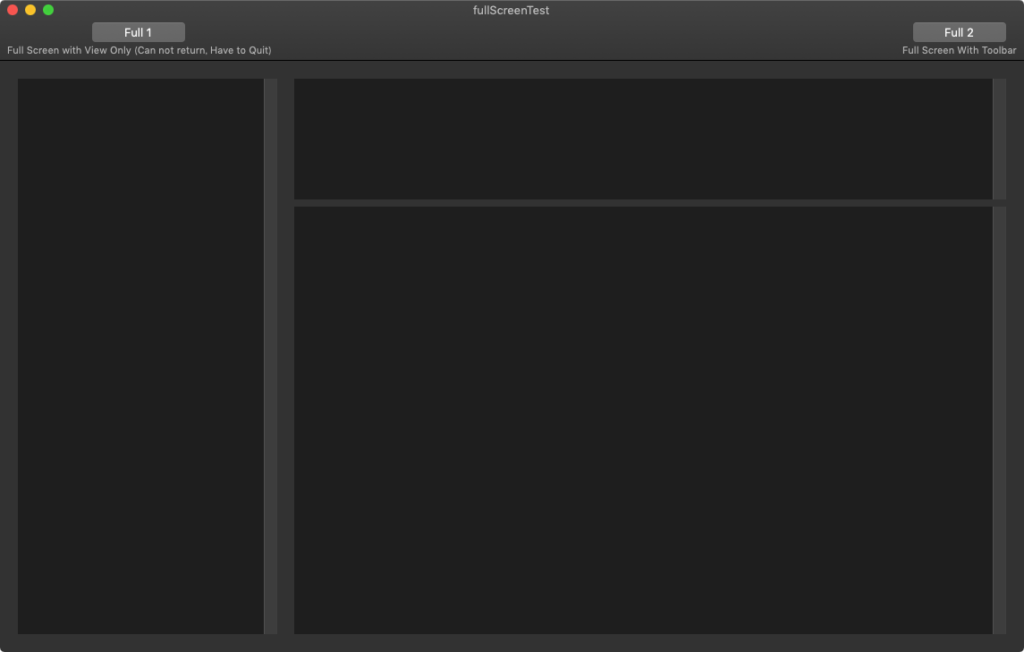
そこで、複数あるうちの別のやりかたを試してみました。本テストアプリケーションのツールバー上の左側のボタンが前バージョンと同じ働きをするもの、右側が新規に試したものです。

ツールバーの右側のボタンをクリックすると、ウィンドウの緑色のボタンをクリックして全画面表示させたのと同じ動きを行います。


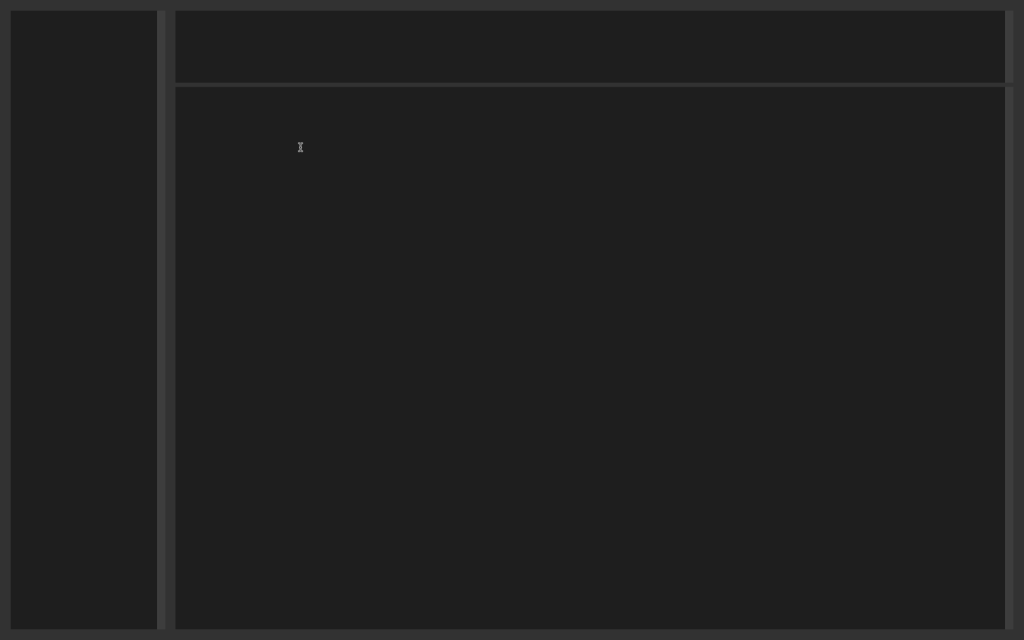
▲ビルドして起動したところ


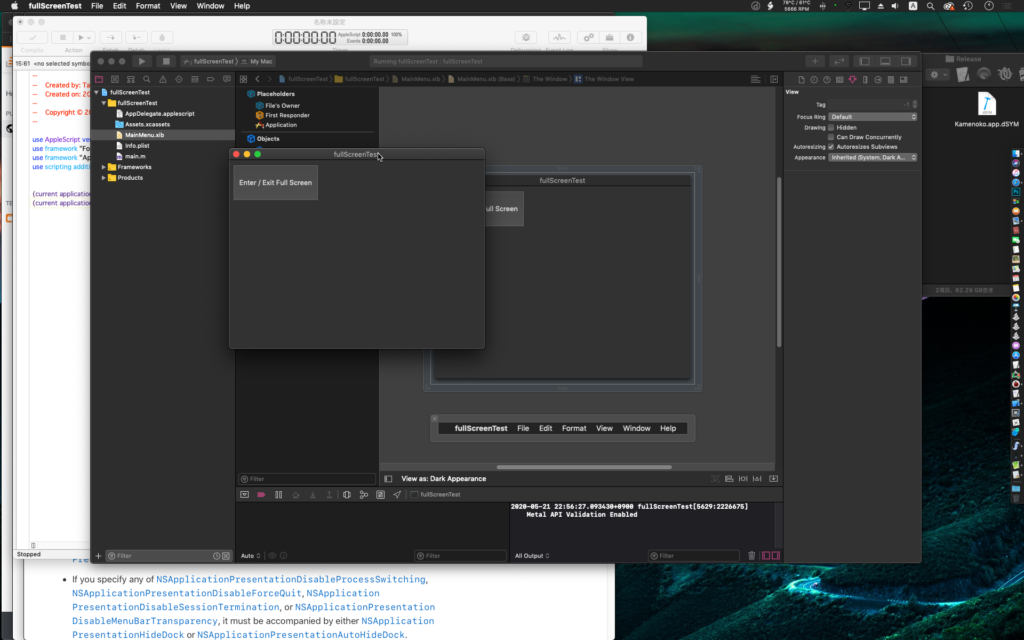
▲ツールバー左側のボタンをクリックして全画面表示させたところ。全画面表示されるが、ツールバーもメニューも表示されない。Command-Qで終了しないと解除されない


▲ツールバー右側のボタンをクリックして全画面表示させたところ。もう一度クリックすると通常表示モードに戻る


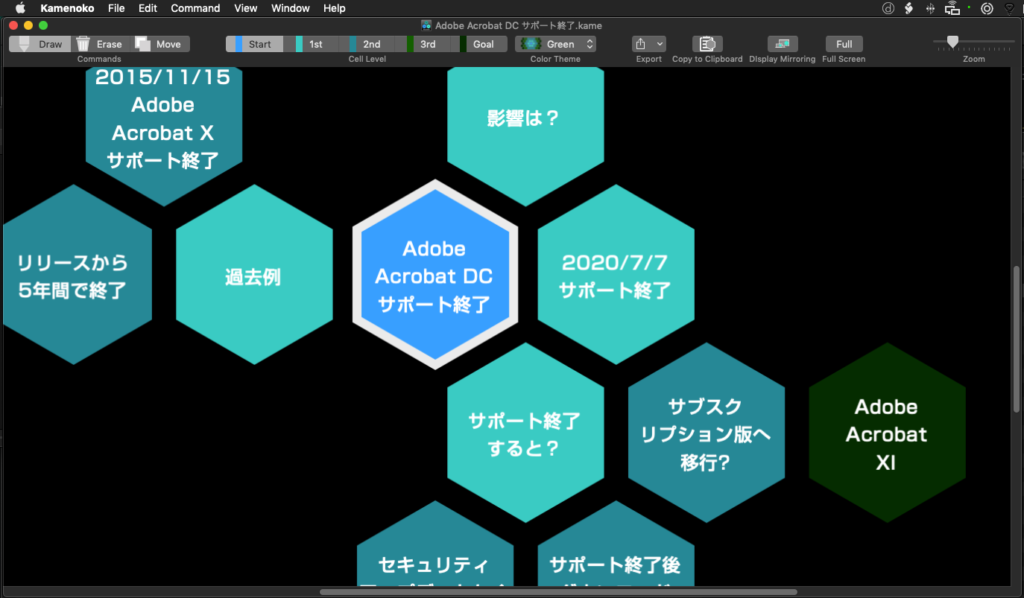
▲自分のアプリケーション(Kamenoko)のツールバーに組み込んで実験したところ(制作中のv1.1)

AppleScript名:AppDelegate.applescript
—
— AppDelegate.applescript
— fullScreenTest
—
— Created by Takaaki Naganoya on 2020/05/21.
— Copyright © 2020 Takaaki Naganoya. All rights reserved.
—

script AppDelegate
  property parent : class "NSObject"
  
  
— IBOutlets
  
property theWindow : missing value
  
property theWindowView : missing value
  
  
on applicationWillFinishLaunching:aNotification
  
end applicationWillFinishLaunching:
  
  
on applicationShouldTerminate:sender
    return current application’s NSTerminateNow
  end applicationShouldTerminate:
  
  
on clicked:aSender
    set aTag to (tag of aSender) as integer
    
    
if aTag = 10 then
      set curScreen to theWindow’s screen()
      
set fMode to (theWindowView’s inFullScreenMode) as boolean
      
      
if fMode = true then
        –Can not return from Full Screen Mode. Quit this test app to return from full screen mode
        
theWindowView’s exitFullScreenModeWithOptions:(missing value)
      else
        –Enter Full Screen Mode
        
theWindowView’s enterFullScreenMode:(curScreen) withOptions:(missing value)
      end if
      
    else if aTag = 20 then
      set fMode to (theWindowView’s inFullScreenMode) as boolean
      
      
if fMode = true then
        –Exit Full Screen Mode
        
theWindow’s toggleFullScreen:(missing value)
      else
        –Enter Full Screen Mode with Toolbar
        
theWindow’s toggleFullScreen:theWindow
      end if
    end if
    
  end clicked:
end script

★Click Here to Open This Script 

Posted in AppleScript Application on Xcode | Tagged 10.13savvy 10.14savvy 10.15savvy NSView NSWindow | Leave a comment

自分のウィンドウのフルスクリーン化 v2

Posted on 5月 21, 2020 by Takaaki Naganoya

Xcodeで作成したAppleScriptアプリケーションの、メインウィンドウ上のビューをフルスクリーン表示させるAppleScriptです。

→ Download Xcode Project

AppleScriptのProjectだとoptionにmissing value以外が使えないみたいなのですが、、、、

AppleScript名:AppDelegate.applescript
—
— AppDelegate.applescript
— fullScreenTest
—
— Created by Takaaki Naganoya on 2020/05/21.
— Copyright © 2020 Takaaki Naganoya. All rights reserved.
—

script AppDelegate
  property parent : class "NSObject"
  
  
— IBOutlets
  
property theWindow : missing value
  
property theWindowView : missing value
  
  
on applicationWillFinishLaunching:aNotification
    — Insert code here to initialize your application before any files are opened
  end applicationWillFinishLaunching:
  
  
on applicationShouldTerminate:sender
    — Insert code here to do any housekeeping before your application quits
    
return current application’s NSTerminateNow
  end applicationShouldTerminate:
  
  
on clicked:aSender
    set fMode to (theWindowView’s inFullScreenMode) as boolean
    
if fMode = true then
      theWindowView’s exitFullScreenModeWithOptions:(missing value)
    else
      theWindowView’s enterFullScreenMode:(current application’s NSScreen’s mainScreen()) withOptions:(missing value)
    end if
  end clicked:
end script

★Click Here to Open This Script 

Posted in AppleScript Application on Xcode | Tagged 10.14savvy 10.15savvy NSScreen NSWindow | 1 Comment

WebKit Utilities v2

Posted on 3月 16, 2020 by Takaaki Naganoya

AppleScriptで指定URLのページを表示する「WebKit Utilities」がmacOS 10.13以降の環境で動かなくなっていたので、書き換えて動くようにしておきました。

–> Download WebKit Utilities_archive v2

これ自体が役に立ったということはなく、単にAppleScript Librariesの書き方のサンプルと理解しています。Webサイトの表示を行うよりも1枚ものの画像やPDFにレンダリングする処理のほうがバッチ処理の中では相性がいいと思います。

また、このScriptはWkWebViewではなく古いWebViewを使っているので、じきに動かなくなります。

AppleScript名:WebKit Utilitiesで指定URLをウィンドウ表示
— Created 2017-03-24 by Takaaki Naganoya
— 2017 Piyomaru Software
use AppleScript version "2.4"
use scripting additions
use webLib : script "WebKit Utilities"

set targetURL to "http://www.piyocast.com/"
display URL targetURL window size {1024, 1024}

★Click Here to Open This Script 

AppleScript名:WebKit Utilities
— An example AppleScript/Objective-C library that uses the WebKit framework.

use AppleScript
use framework "AppKit"
use framework "WebKit"

property NSURL : a reference to current application’s NSURL
property WebView : a reference to current application’s WebView
property NSScreen : a reference to current application’s NSScreen
property NSThread : a reference to current application’s NSThread
property NSWindow : a reference to current application’s NSWindow
property NSURLRequest : a reference to current application’s NSURLRequest
property NSMutableDictionary : a reference to current application’s NSMutableDictionary

on _DisplayWebWindowWithURL:theURLString windowSize:theWindowSize
  — Create and display a horizontally centered window with a WebView
  
  
set {thisWindowWidth, thisWindowHeight} to theWindowSize
  
set screenBounds to the NSScreen’s mainScreen’s visibleFrame as any
  
  
if class of screenBounds = record then
    set screenWidth to screenBounds’s |size|’s width
    
set screenHeight to screenBounds’s |size|’s height
    
set windowLeft to ((screenWidth – thisWindowWidth) / 2) + (screenBounds’s origin’s x)
    
set windowBottom to screenHeight – thisWindowHeight + (screenBounds’s origin’s y) – 40
  else
    copy screenBounds to {{originX, originY}, {screenWidth, screenHeight}}
    
set windowLeft to ((screenWidth – thisWindowWidth) / 2) + originX
    
set windowBottom to screenHeight – thisWindowHeight + originY – 40
  end if
  
  
set theStyleMask to (get current application’s NSTitledWindowMask) + (get current application’s NSClosableWindowMask) + (get current application’s NSMiniaturizableWindowMask) + (get current application’s NSResizableWindowMask)
  
set webWindow to NSWindow’s alloc()’s initWithContentRect:(current application’s NSMakeRect(windowLeft, windowBottom, thisWindowWidth, thisWindowHeight)) ¬
    styleMask:theStyleMask backing:(current application’s NSBackingStoreBuffered) defer:false
  — set webWindow’s title to "WebView Created with AppleScript – " & theURLString
  
  
set theWebView to WebView’s alloc()’s initWithFrame:(current application’s NSMakeRect(0, 0, thisWindowWidth, thisWindowHeight)) ¬
    frameName:"WebKit Frame" groupName:"WebKit Group"
  set webWindow’s contentView to theWebView
  
  
tell webWindow to makeKeyAndOrderFront:(missing value)
  
  
— Start loading the URL
  
  
set theURL to NSURL’s URLWithString:theURLString
  
set theURLRequest to NSURLRequest’s requestWithURL:theURL
  
tell theWebView’s mainFrame to loadRequest:theURLRequest
  
  
webWindow
end _DisplayWebWindowWithURL:windowSize:

— The following two handlers exist to deal with running on a background thread.
— If we’re on a background thread, we have to run the UI code on the main thread.

on _DisplayWebWindowMainThread:parameterDictionary
  try
    set theURLString to parameterDictionary’s objectForKey:"url string"
    
set theWindowSize to parameterDictionary’s objectForKey:"window size"
    
    
set webWindow to my _DisplayWebWindowWithURL:theURLString windowSize:theWindowSize
    
    
tell parameterDictionary to setObject:webWindow forKey:"result"
  on error errMsg number errNum
    using terms from scripting additions
      display alert "Error!" message errMsg & " (" & errNum & ")"
    end using terms from
    
tell parameterDictionary to setObject:{errMsg, errNum} forKey:"error"
  end try
end _DisplayWebWindowMainThread:

on display URL theURLString window size theWindowSize
  — All UI methods must be invoked on the main thread.
  
if (NSThread’s isMainThread) then
    my _DisplayWebWindowWithURL:theURLString windowSize:theWindowSize
  else
    — Parameters, results and error information are communicated between threads via a dictionary.
    
set parameterDictionary to NSMutableDictionary’s dictionary()
    
tell parameterDictionary to setObject:theURLString forKey:"url string"
    
tell parameterDictionary to setObject:theWindowSize forKey:"window size"
    
    
its performSelectorOnMainThread:"_DisplayWebWindowMainThread:" withObject:parameterDictionary waitUntilDone:true
    
    
— Propagate errors from the other thread
    
    
set errInfo to parameterDictionary’s objectForKey:"error"
    
if errInfo is not missing value then error errInfo’s first item number errInfo’s second item
    
    
parameterDictionary’s objectForKey:"result"
  end if
end display URL

★Click Here to Open This Script 

Posted in GUI Internet URL | Tagged 10.13savvy 10.14savvy 10.15savvy NSMutableDictionary NSScreen NSThread NSURL NSURLRequest NSWindow WebView | Leave a comment

AppleScriptでキースキャン

Posted on 2月 26, 2020 by Takaaki Naganoya

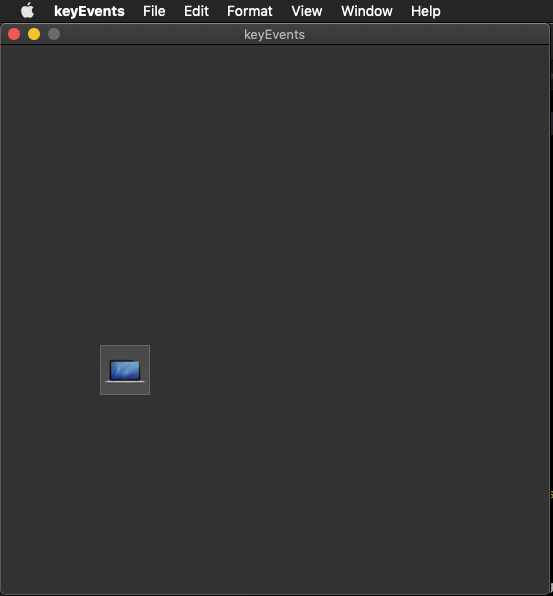
Xcode上で作成するAppleScript Cocoa Applicationで、キースキャンを試してみました。

ふだん作っているものだと、各種パラメータをGUI上で設定する程度のもので、キースキャンを行う必要などこれっぽっちもないのですが、いま作っているアプリケーションでキースキャンが必要になってしまったので、昔作ったものを引っ張り出してきました。

AppleScriptのプログラムでキースキャンを行うといえば、AppleScript Appletの起動時に何らかのModifier Keys(ShiftとかOptionとかCommandとかControlとか)が押されていることを検出して動作を変更するといった処理が一般的です。ループ処理中でも、これらのキー入力を定期的に監視することはよく行なっています(処理中に停止したいという要求はあるので)。

–> Watch Demo Movie

–> Download Xcode Project Archive

本プログラムでは、Modifier Keysにかぎらずキーボード入力全般を受け付けています。ただし、キースキャン可能なのは本プログラムが最前面にある場合のみです。

掲載しているコードからではわかりませんが、キー入力の受け付けをNSWindowで行なっています。FirstResponderまわりを一切いじくらずにほぼプログラミングなしでキー受け付けを行おうとした結果NSWindowで行うことになったというわけで、これがベストとも思いません。

とりあえず「こうすればできた」というレベルをおさえておいて、そこから自分の好きな方向に機能を変更していけばよいと思います。

AppleScript名:AppDelegate.applescript
—
— AppDelegate.applescript
— keyEvents
—
— Created by Takaaki Naganoya on 2014/05/09.
— Copyright (c) 2014年 Takaaki Naganoya. All rights reserved.
—

script AppDelegate
  property parent : class "NSObject"
  
  
— IBOutlets
  
property theWindow : missing value
  
property aButton : missing value
  
  
property xMax : 500
  
property yMax : 500
  
  
property aStep : 50
  
  
on applicationWillFinishLaunching:aNotification
    —
  end applicationWillFinishLaunching:
  
  
on applicationShouldTerminate:sender
    return current application’s NSTerminateNow
  end applicationShouldTerminate:


on buttonMove:(aCode as integer)
    set curFrame to aButton’s frame()
    
copy curFrame to {{x, y}, {xWidth, yHeight}}
    
    
if aCode = 123 then
      –Left
      
if x > 0 then
        set x to x – aStep
      end if
    else if aCode = 124 then
      –Right
      
if x < xMax then
        set x to x + aStep
      end if
      
    else if aCode = 126 then
      –Up
      
if y < yMax then
        set y to y + aStep
      end if
      
    else if aCode = 125 then
      –Down
      
if y > 10 then
        set y to y – aStep
      end if
    else if aCode = 125 then
      
    end if
    
    
set newRect to {{x, y}, {xWidth, yHeight}}
    
aButton’s setFrame:newRect
    
aButton’s setNeedsDisplay()
  end buttonMove:
end script

★Click Here to Open This Script 

AppleScript名:keyEventWin.applescript
script keyEvWin
  
  
property parent : class "NSWindow"
  
  
property aButton : missing value


on canBecomeKeyWindow:sender
    return true
  end canBecomeKeyWindow:
  
  
on canBecomeMainWindow:sender
    return true
  end canBecomeMainWindow:


on keyDown:theEvent
    set aCode to (theEvent’s keyCode) as integer
    
    
if aCode = 123 then
      –左
      
current application’s NSApp’s delegate()’s performSelector:"buttonMove:" withObject:(aCode)
      
    else if aCode = 124 then
      –右
      
current application’s NSApp’s delegate()’s performSelector:"buttonMove:" withObject:(aCode)
      
    else if aCode = 126 then
      –上
      
current application’s NSApp’s delegate()’s performSelector:"buttonMove:" withObject:(aCode)
      
    else if aCode = 125 then
      –下
      
current application’s NSApp’s delegate()’s performSelector:"buttonMove:" withObject:(aCode)
      
    end if
    
    
  end keyDown:
  
end script

★Click Here to Open This Script 

Posted in AppleScript Application on Xcode GUI | Tagged 10.13savvy 10.14savvy 10.15savvy NSButton NSEvent NSWindow | Leave a comment

RoundWindow v2

Posted on 1月 12, 2020 by Takaaki Naganoya

Edama2さんと「無理だよねー」「そうそう、絶対無理〜」などとメールで言っていたら、Shane Stanleyから届いた「できるよ」という衝撃のメール。

スクリプトエディタ上で記述する通常のAppleScriptで、CocoaのCustom Class宣言と呼び出しができるとのこと。

自分で動作確認してみるまで、半信半疑でしたが、、、、できますねこれは、、、

–> Download Editable and Executable Script Bundle

冗談半分で思いついたことを試してみたらできてしまったり、冗談半分でできるわけないよねと念のために書いておいたことが世界の誰かの目に止まったりと、「冗談半分」ってけっこう重要なことだと思えてきました。

以下、Shane Stanleyの説明による、その書き換え手順です。

(1)Subclassファイル(複数可)をXcode上のプロジェクトで書くようなスタイルで書く

こういう(↑)スタイルですね。かならずscript宣言しつつ、parent属性を宣言しておくところがXcode上のAppleScriptアプリケーションのスタイルです。あとで動作確認して、アプリケーションの起動や終了に関するイベントハンドラを書いておいたのは無駄(実行されない)ではないかとも思われました。

(2)実行するメインのScriptのResourcesフォルダ内にSubclassファイルを入れる

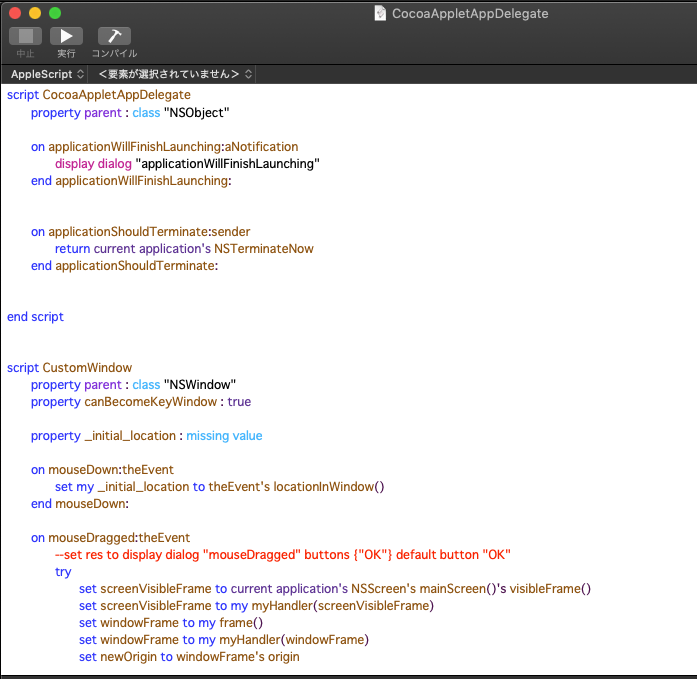
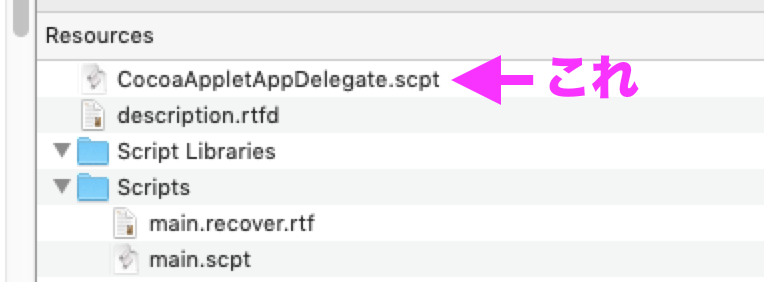
普通、AppleScriptのファイルが入る/Contents/Resources/Scripts/でも、ライブラリを入れておく/Contents/Resources/Script Libraries/でもなく、/Contents/Resources/の直下に入れます。ファイル名はオリジナルのEdama2さんのものをそのまま採用していますが、割となんでもいいようです。Custom Classファイルは分割してもいいし、このサンプルのようにまとめてもいいんでしょう。

# 追加実験してみたところ、Resourcesフォルダ以下の/Scriptsや/Script Libraries/フォルダと重複しない名称の別フォルダ(例:/Classes/)に入れておいても大丈夫でした

(3)use framework “AppleScriptObjC”の宣言文を追加

見たことのない光景ですが、書くことについてはとくに障害はありません。AppKit.Frameworkもuse宣言しておいたほうがよかったかもしれません。

(4)メインスクリプトの実行時に以下の処理を実行

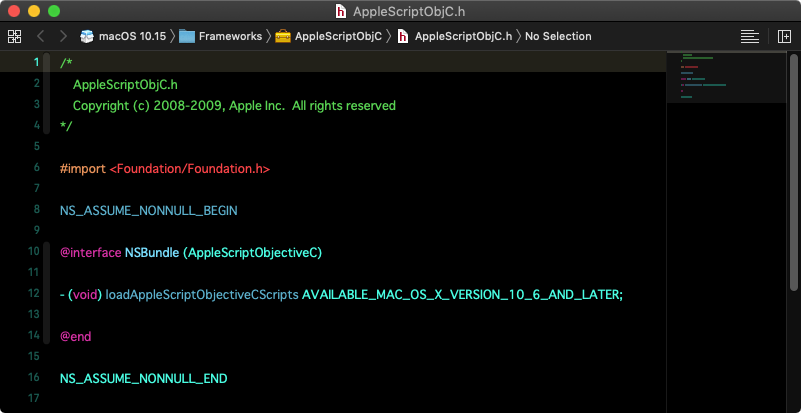
set theBundle to current application’s NSBundle’s bundleWithPath:pathToFolderWithScripts
theBundle’s loadAppleScriptObjectiveCScripts()

★Click Here to Open This Script 

試行錯誤して、上記の「pathToFolderWithScripts」にバンドル内の/Contents/Resources/を入れて実行すればよいことが理解できました。

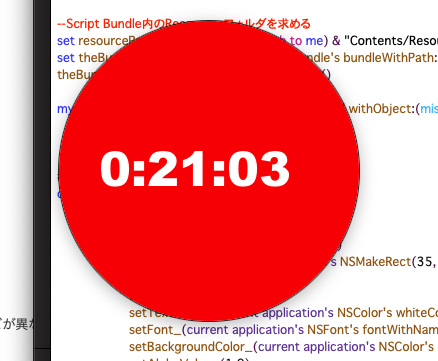
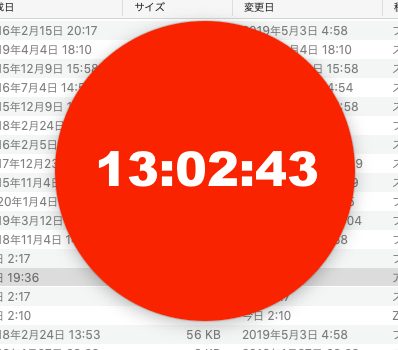
以上の変更を加えて、ためしにスクリプトエディタ&Script Debugger上で実行してみたところ、改変前と変わりなく実行できてしまいました(冒頭のスクリーンショット)。

いや、これはめちゃくちゃすごいですよ!! 何がすごいって、CocoaのCustom Classをスクリプトライブラリ中に入れて呼び出せるということで、けっこう無茶な箱庭インタフェースが作れてしまう予感が、、、、。

そして、AppleScriptObjC(AppleScriptObjC.frameworkより)でスクリプトエディタの「.scpt」形式のファイルを読み込んで実行できてしまったということは、Xcode上のAppleScriptアプリケーション内のScriptもテキスト形式だけでなく、スクリプトエディタで編集できる.scpt形式のファイルを突っ込んで編集できる可能性が見えてきました。

ただ、テキスト形式になっていないと、Interface Builderとの連携のあたりで問題になりそうな気もします。

AppleScript名:customClassTest.scptd
—
–  Created by: Edama2 2020/01/10
–  Adviced by: Shane Stanley 2020/01/11
–  Modified by: Takaaki Naganoya 2020/01/12
—
use AppleScript version "2.4" — Yosemite (10.10) or later
use framework "Foundation"
use framework "AppleScriptObjC"
use scripting additions

property _clock_text_view : missing value –> 時計用の文字列
property _clock_timer : missing value –> 時計用のNSTimer

–Script Bundle内のResourcesフォルダを求める
set resourcePath to POSIX path of (path to me) & "Contents/Resources/"
set theBundle to current application’s NSBundle’s bundleWithPath:resourcePath
theBundle’s loadAppleScriptObjectiveCScripts()

my performSelectorOnMainThread:"raizeWindow:" withObject:(missing value) waitUntilDone:true

# ウィンドウを作成
on raizeWindow:aParam
  
  
# 時計用の文字を作成
  
tell current application’s NSTextView’s alloc()
    tell initWithFrame_(current application’s NSMakeRect(35, 120, 300, 40))
      setRichText_(true)
      
useAllLigatures_(true)
      
setTextColor_(current application’s NSColor’s whiteColor())
      
setFont_(current application’s NSFont’s fontWithName:"Arial-Black" |size|:48)
      
setBackgroundColor_(current application’s NSColor’s colorWithDeviceRed:0.0 green:0.0 blue:0.0 alpha:0.0)
      
setAlphaValue_(1.0)
      
setEditable_(false)
      
–setString_("00:00:00")
      
      
set my _clock_text_view to it
    end tell
  end tell
  
  
# 時計を更新するNSTimerを作成
  
set my _clock_timer to current application’s NSTimer’s scheduledTimerWithTimeInterval:1 target:me selector:"idleHandler:" userInfo:(missing value) repeats:true
  
  
# 丸いViewを作成
  
set aFrame to current application’s NSMakeRect(0, 0, 300, 300)
  
tell current application’s RoundView’s alloc()
    tell initWithFrame_(aFrame)
      setNeedsDisplay_(true)
      
setSubviews_({my _clock_text_view})
      
set customView to it
    end tell
  end tell
  
  
#スクリーンのサイズを調べる
  
set aScreen to current application’s NSScreen’s mainScreen()
  
  
# Window
  
set aBacking to current application’s NSWindowStyleMaskBorderless
  
–set aBacking to current application’s NSBorderlessWindowMask
  
set aDefer to current application’s NSBackingStoreBuffered
  
  
tell current application’s CustomWindow’s alloc()
    tell initWithContentRect_styleMask_backing_defer_screen_(aFrame, aBacking, aDefer, false, aScreen)
      –setTitle_(uniqueName) –>タイトル
      
setBackgroundColor_(current application’s NSColor’s clearColor()) — Grammar Police –>背景色
      
setContentView_(customView) –>内容ビューのセット
      
setDelegate_(me) –>デリゲート
      
setDisplaysWhenScreenProfileChanges_(true) –>スクリーンプロファイルが変更されたときウインドウの内容をアップデートするか
      
setHasShadow_(true) –>ウインドウに影があるか
      
setIgnoresMouseEvents_(false) –>マウスイベントを無視するか
      
–setLevel_((current application’s NSScreenSaverWindowLevel) + 1) –>ウインドウの前後関係の位置
      
setOpaque_(false) –>ウインドウを不透明にするか
      
setReleasedWhenClosed_(true) –>閉じたときにメモリを解放するか
      
      
#
      
|center|()
      
makeKeyAndOrderFront_(me) –>キーウインドウにして前面に持ってくる
      
–setFrame_display_(aFrame, true) –>表示
    end tell
  end tell
end raizeWindow:

#タイマー割り込み
on idleHandler:aSender
  set mesStr to time string of (current date)
  (
my _clock_text_view)’s setString:mesStr
end idleHandler:

★Click Here to Open This Script 

AppleScript名:CocoaAppletAppDelegate.scpt
script CocoaAppletAppDelegate
  property parent : class "NSObject"
  
  
on applicationWillFinishLaunching:aNotification
    —
  end applicationWillFinishLaunching:


on applicationShouldTerminate:sender
    return current application’s NSTerminateNow
  end applicationShouldTerminate:
  
end script

script CustomWindow
  property parent : class "NSWindow"
  
property canBecomeKeyWindow : true
  
  
property _initial_location : missing value
  
  
on mouseDown:theEvent
    set my _initial_location to theEvent’s locationInWindow()
  end mouseDown:
  
  
on mouseDragged:theEvent
    –set res to display dialog "mouseDragged" buttons {"OK"} default button "OK"
    
try
      set screenVisibleFrame to current application’s NSScreen’s mainScreen()’s visibleFrame()
      
set screenVisibleFrame to my myHandler(screenVisibleFrame)
      
set windowFrame to my frame()
      
set windowFrame to my myHandler(windowFrame)
      
set newOrigin to windowFrame’s origin
      
      
set currentLocation to theEvent’s locationInWindow()
      
set newOrigin’s x to (newOrigin’s x) + ((currentLocation’s x) – (_initial_location’s x))
      
set newOrigin’s y to (newOrigin’s y) + ((currentLocation’s y) – (_initial_location’s y))
      
      
set tmpY to ((newOrigin’s y) + (windowFrame’s |size|’s height))
      
set screenY to (screenVisibleFrame’s origin’s y) + (screenVisibleFrame’s |size|’s height)
      
if tmpY > screenY then
        set newOrigin’s y to (screenVisibleFrame’s origin’s y) + ((screenVisibleFrame’s |size|’s height) – (windowFrame’s |size|’s height))
      end if
      
      
my setFrameOrigin:newOrigin
    on error error_message number error_number
      set error_text to "Error: " & error_number & ". " & error_message
      
display dialog error_text buttons {"OK"} default button 1
      
return error_text
    end try
    
  end mouseDragged:
  
  
on myHandler(aFrame)
    if class of aFrame is list then
      set {{theX, theY}, {theWidth, theHeight}} to aFrame
      
set aFrame to {origin:{x:theX, y:theY}, |size|:{width:theWidth, height:theHeight}}
      
–set aFrame to current application’s NSMakeRect(theX, theY, theWidth, theHeight)
    end if
    
return aFrame
  end myHandler
end script

script RoundView
  property parent : class "NSView"
  
  
on drawRect:rect
    set aFrame to my frame()
    
set myColor to current application’s NSColor’s redColor()
    
    
tell current application’s NSBezierPath
      tell bezierPathWithOvalInRect_(aFrame)
        myColor’s |set|()
        
fill()
      end tell
    end tell
  end drawRect:
end script

★Click Here to Open This Script 

Posted in Custom Class GUI How To | Tagged 10.14savvy 10.15savvy NSBezierPath NSBundle NSColor NSFont NSScreen NSTextView NSTimer NSView NSWindow | Leave a comment

RoundWindow

Posted on 1月 10, 2020 by Takaaki Naganoya

本Scriptは、Edama2さんから投稿していただいたものです。Cocoa AppleScript AppletでCustom Classを宣言して作られた、丸いウィンドウ(透明ウィンドウの上に丸いグラフィックを描画)を表示して、タイマー割り込みで時計を表示するAppleScriptです。

–> Download Editable and Executable Applet

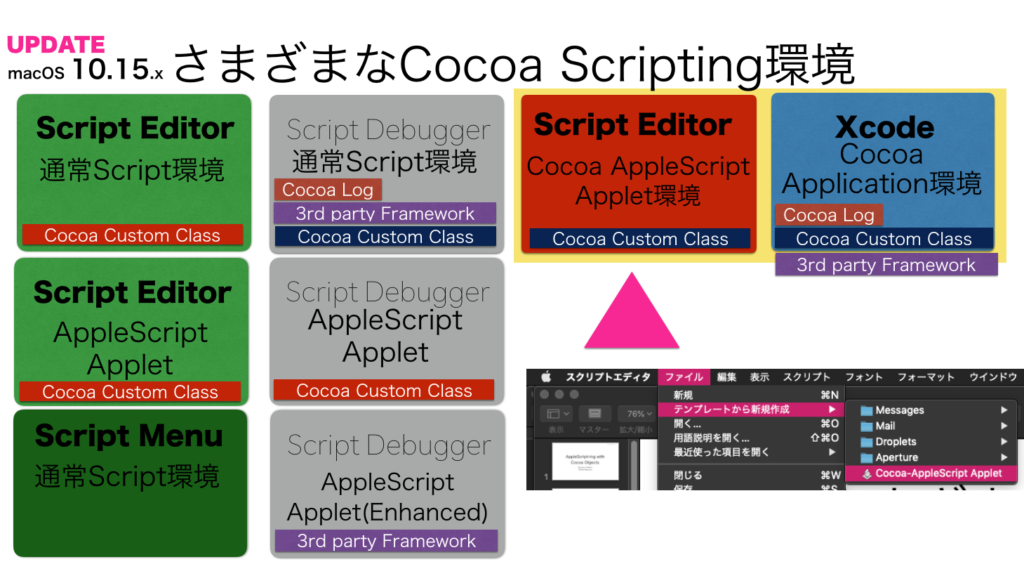
AppleScriptのランタイム環境はいくつかあり、それぞれに「できること」と「できないこと」、「手軽さ」などが異なります。

(1)スクリプトエディタ上で記述、実行する環境
一番セキュリティ上の制約が緩く、できることの多い環境です。

(2)Script Debugger上で記述、実行する環境
Cocoaのイベントやオブジェクトのログ表示などができる環境です。

(3)Applet環境
AppleScriptの実行ファイルです。

(4)Script Menu環境
macOS標準装備の、メニューからAppleScriptを実行できる環境です。

さらに、Cocoa Scriptingの機能に着目してみると、見え方が変わります。

本Scriptを記述している「Cocoa AppleScript Applet」環境(上の図の赤い部分)は、スクリプトエディタ上で記述する通常のAppleScriptと、Xcode上で記述するCocoaアプリケーションの中間的な性格を持つものです。スクリプトエディタ上で直接は動かせず、アプレット形式で動作させることになりますが、スクリプトエディタ上で動かすよりも、よりCocoaの機能が利用できます。

Cocoa AppleScript Appletでは、アプリケーション(Applet)起動や終了の最中で発生するイベントを利用できますし、本ScriptのようにCocoaのCustom Classを宣言できます。これは、普通のスクリプトエディタ上で記述する(本Blogの大部分のScriptのような)Scriptではできない真似です。
→ Shane Stanleyからツッコミが入って、手の込んだ作業を行うとできるとかで(テンプレートそのままでは無理)、後で実際に試してみます

タイトルは「丸いウィンドウと時計の表示」
NSWindowのカスタムクラスを使ったタイトルバーなしのドラッグで移動できる丸いウィンドウとオマケに時計を表示したものです。
初心者受けしそうなやつです。
問題はそこではなく、
XcodeやCocoa applescript appletから実行するASOCだとカスタムクラスが作れるけど、
ノーマルのapplescriptから実行するASOCではカスタムクラスが作れないということです。
表現がややこしいですが...。
ノーマルのapplescriptからカスタムクラスを作ると、ただのスクリプトオブジェクトにしかなりません。
誰かうまい解決方法を知っている人がいたら教えてください。

ちょうど、こういう資料をまとめていたので補足説明に役立ってしまいました。スクリプトエディタ上で記述する通常のAppleScriptでもCustom Cocoa Classが宣言できると便利そうですが、どんなもんでしょうか? 

Custom Classは便利なので使いたくなる一方、AppleScriptのインタプリタ上で実行するため、Objective-Cなどで書くのと同じような感覚で使うと「遅くて使えない」という話になると思いますが、このEdama2さんのサンプルぐらいの使いかたであれば、ちょうどいいんじゃないかというところです。

歴史的にみると、Cocoa-AppleScript Appletは、Xcode上で記述するCocoa-Applicationを簡略化してスクリプトエディタ上でCocoa Scriptingを手軽に使えるように手直しした「途中」の環境といえます。

Cocoa-AppleScript Appletは、GUIが手軽に作れるわけでもなく、スクリプトエディタ上で直接実行やログ表示ができるわけでもなありません。マスターしたところで最終到達点がCocoaアプリケーションほど高くなく、編集や習熟もしづらいことから「中途半端」「使えない」という評価になっていました(自分も使っていませんでした)。

その後、Cocoa-AppleScript Appletの機能要素をさらにダウンサイジングして、スクリプトエディタ上で手軽に記述・実行ができるように進化したのが現在・広くつかわれているCocoa Scripting環境です。

ただ、使いやすくなって広く使われるようになったはいいものの、「Xcodeを使うまでもないが、もうちょっとCocoaの機能が利用できないか?」という意見も出るようになり、Cocoa-AppleScript Appletを再評価してもいいんじゃないかと考えるようになってきてはいます。

ちなみに、本Cocoa-AppleScript AppletでCustom Classを宣言しているのと同じような書き方で、通常のCocoa Scriptingの環境で動かすような変更を加えたScriptもEdama2さんが試していますが、それは「動かない」ということで結論が出ています。

AppleScript名:CocoaAppletAppDelegate.scpt
script CocoaAppletAppDelegate
  property parent : class "NSObject"
  
  
property _clock_text_view : missing value –> 時計用の文字列
  
property _clock_timer : missing value –> 時計用のNSTimer
  
  
on applicationWillFinishLaunching:aNotification
    my raizeWindow()
  end applicationWillFinishLaunching:
  
  
on applicationShouldTerminate:sender
    my _clock_timer’s invalidate()
    
return current application’s NSTerminateNow
  end applicationShouldTerminate:
  
  
# ウィンドウを作成
  
on raizeWindow()
    
    
# 時計用の文字を作成
    
tell current application’s NSTextView’s alloc()
      tell initWithFrame_(current application’s NSMakeRect(35, 120, 300, 40))
        setRichText_(true)
        
useAllLigatures_(true)
        
setTextColor_(current application’s NSColor’s whiteColor())
        
setFont_(current application’s NSFont’s fontWithName:"Arial-Black" |size|:48)
        
setBackgroundColor_(current application’s NSColor’s colorWithDeviceRed:0.0 green:0.0 blue:0.0 alpha:0.0)
        
setAlphaValue_(1.0)
        
setEditable_(false)
        
–setString_("00:00:00")
        
        
set my _clock_text_view to it
      end tell
    end tell
    
    
# 時計を更新するNSTimerを作成
    
set my _clock_timer to current application’s NSTimer’s scheduledTimerWithTimeInterval:1 target:me selector:"idleHandler:" userInfo:(missing value) repeats:true


# 丸いViewを作成
    
set aFrame to current application’s NSMakeRect(0, 0, 300, 300)
    
tell current application’s RoundView’s alloc()
      tell initWithFrame_(aFrame)
        setNeedsDisplay_(true)
        
setSubviews_({my _clock_text_view})
        
set customView to it
      end tell
    end tell
    
    
#スクリーンのサイズを調べる
    
set aScreen to current application’s NSScreen’s mainScreen()
    
    
# Window
    
set aBacking to current application’s NSWindowStyleMaskBorderless
    
–set aBacking to current application’s NSBorderlessWindowMask
    
set aDefer to current application’s NSBackingStoreBuffered
    
tell current application’s CustomWindow’s alloc()
      tell initWithContentRect_styleMask_backing_defer_screen_(aFrame, aBacking, aDefer, false, aScreen)
        –setTitle_(uniqueName) –>タイトル
        
setBackgroundColor_(current application’s NSColor’s clearColor()) –>背景色
        
setContentView_(customView) –>内容ビューのセット
        
setDelegate_(me) –>デリゲート
        
setDisplaysWhenScreenProfileChanges_(true) –>スクリーンプロファイルが変更されたときウインドウの内容をアップデートするか
        
setHasShadow_(true) –>ウインドウに影があるか
        
setIgnoresMouseEvents_(false) –>マウスイベントを無視するか
        
–setLevel_((current application’s NSScreenSaverWindowLevel) + 1) –>ウインドウの前後関係の位置
        
setOpaque_(false) –>ウインドウを不透明にするか
        
setReleasedWhenClosed_(true) –>閉じたときにメモリを解放するか
        
        
#
        
|center|()
        
makeKeyAndOrderFront_(me) –>キーウインドウにして前面に持ってくる
        
–setFrame_display_(aFrame, true) –>表示
      end tell
    end tell
  end raizeWindow
  
  
#タイマー割り込み
  
on idleHandler:aSender
    set mesStr to time string of (current date)
    (
my _clock_text_view)’s setString:mesStr
  end idleHandler:
end script

script CustomWindow
  property parent : class "NSWindow"
  
property canBecomeKeyWindow : true
  
  
property _initial_location : missing value
  
  
on mouseDown:theEvent
    set my _initial_location to theEvent’s locationInWindow()
  end mouseDown:
  
  
on mouseDragged:theEvent
    –set res to display dialog "mouseDragged" buttons {"OK"} default button "OK"
    
try
      set screenVisibleFrame to current application’s NSScreen’s mainScreen()’s visibleFrame()
      
set screenVisibleFrame to my myHandler(screenVisibleFrame)
      
set windowFrame to my frame()
      
set windowFrame to my myHandler(windowFrame)
      
set newOrigin to windowFrame’s origin
      
      
set currentLocation to theEvent’s locationInWindow()
      
set newOrigin’s x to (newOrigin’s x) + ((currentLocation’s x) – (_initial_location’s x))
      
set newOrigin’s y to (newOrigin’s y) + ((currentLocation’s y) – (_initial_location’s y))
      
      
set tmpY to ((newOrigin’s y) + (windowFrame’s |size|’s height))
      
set screenY to (screenVisibleFrame’s origin’s y) + (screenVisibleFrame’s |size|’s height)
      
if tmpY > screenY then
        set newOrigin’s y to (screenVisibleFrame’s origin’s y) + ((screenVisibleFrame’s |size|’s height) – (windowFrame’s |size|’s height))
      end if
      
      
my setFrameOrigin:newOrigin
    on error error_message number error_number
      set error_text to "Error: " & error_number & ". " & error_message
      
display dialog error_text buttons {"OK"} default button 1
      
return error_text
    end try
    
  end mouseDragged:
  
  
on myHandler(aFrame)
    if class of aFrame is list then
      set {{theX, theY}, {theWidth, theHeight}} to aFrame
      
set aFrame to {origin:{x:theX, y:theY}, |size|:{width:theWidth, height:theHeight}}
      
–set aFrame to current application’s NSMakeRect(theX, theY, theWidth, theHeight)
    end if
    
return aFrame
  end myHandler
end script

script RoundView
  property parent : class "NSView"
  
  
on drawRect:rect
    set aFrame to my frame()
    
set myColor to current application’s NSColor’s redColor()
    
    
tell current application’s NSBezierPath
      tell bezierPathWithOvalInRect_(aFrame)
        myColor’s |set|()
        
fill()
      end tell
    end tell
  end drawRect:
end script

★Click Here to Open This Script 

Posted in GUI | Tagged 10.14savvy 10.15savvy NSBezierPath NSColor NSScreen NSTextView NSTimer NSView NSWindow | Leave a comment

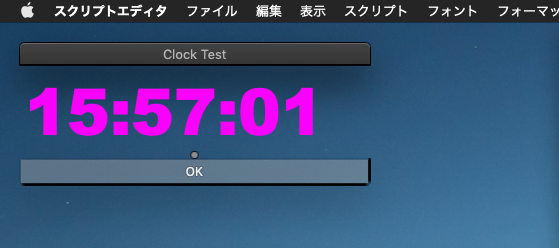
透明ウィンドウで時計表示

Posted on 10月 2, 2019 by Takaaki Naganoya

透明のNSTextView+NSWindowで時計を表示するAppleScriptです。ありものを組み合わせて作ってみました。

テキストビュー+ボタンをつくる ScriptにTimerを組み合わせたぐらいです。macOS標準装備のスクリプトエディタ上でそのまま動きますし、Script Debugger上でも動作確認ずみです。

この手のプログラムは初心者が割と作りたくなるものの、作ってもそれほど役に立たない上に、「まあ、こんなもんか」という程度にしかなりません。初心者向けといえば初心者向けですが、記述量がそれほど少なくないのが困りものです(Xcode上でAppleScriptでCocoa-Appを書いたほうがずっと短く書けることでしょう)。

それもこれも、実際に動かしてみないとわからないことでしょう。Safariで表示中の表だけCSVに書き出すScriptなどと比べると、ものすごく面白くありません。

AppleScript名:テキストビュー+ボタンを作成(フォント指定)_+Timer
— Created 2019-10-02 by Takaaki Naganoya
— 2019 Piyomaru Software
use AppleScript version "2.4"
use scripting additions
use framework "Foundation"
use framework "AppKit"

property NSFont : a reference to current application’s NSFont
property NSColor : a reference to current application’s NSColor
property NSTimer : a reference to current application’s NSTimer
property NSScreen : a reference to current application’s NSScreen
property NSButton : a reference to current application’s NSButton
property NSWindow : a reference to current application’s NSWindow
property NSSplitView : a reference to current application’s NSSplitView
property NSTextView : a reference to current application’s NSTextView
property NSWindowController : a reference to current application’s NSWindowController
property NSTitledWindowMask : a reference to current application’s NSTitledWindowMask
property NSFloatingWindowLevel : a reference to current application’s NSFloatingWindowLevel
property NSBackingStoreBuffered : a reference to current application’s NSBackingStoreBuffered

property windisp : false
property aView : missing value

set aFontName to "Arial-Black"
set aWidth to 350
set aHeight to 120
set aTitle to "Clock Test" –Window Title
set aButtonMSG to "OK" –Button Title

set aRes to checkExistenceOfFont(aFontName) of me
if aRes = false then
  display dialog "There is no <" & aFontName & "> font. Select another one." –No font
  
return
end if
set dispStr to ""

set paramObj to {myWidth:aWidth, myHeight:aHeight, myTitle:aTitle, myBMes:aButtonMSG, myTimeOut:180, myFontID:aFontName, myFontSize:48}
–my dispTextView:aRecObj
my performSelectorOnMainThread:"dispTextView:" withObject:paramObj waitUntilDone:true

on dispTextView:aRecObj
  set aWidth to myWidth of aRecObj as integer
  
set aHeight to myHeight of aRecObj as integer
  
set aTitle to myTitle of aRecObj as string
  
set aButtonMSG to myBMes of aRecObj as string
  
set timeOutSecs to myTimeOut of aRecObj as integer
  
set fontID to myFontID of aRecObj as string
  
set fontSize to myFontSize of aRecObj as integer
  
  
set dispStr to ""
  
  
–Make Timer
  
set aTimer to NSTimer’s scheduledTimerWithTimeInterval:1 target:me selector:"idleHandler:" userInfo:(missing value) repeats:true
  
  
— Text View Background color
  
set aColor to NSColor’s colorWithDeviceRed:0.0 green:0.0 blue:0.0 alpha:0.0
  
set (my windisp) to true
  
  
–Text View+Scroll Viewをつくる
  
set aView to NSTextView’s alloc()’s initWithFrame:(current application’s NSMakeRect(0, 0, aWidth, aHeight))
  
aView’s setRichText:true
  
aView’s useAllLigatures:true
  
aView’s setTextColor:(NSColor’s magentaColor())
  
aView’s setFont:(NSFont’s fontWithName:fontID |size|:fontSize)
  
aView’s setBackgroundColor:aColor
  
aView’s setAlphaValue:1.0
  
aView’s setEditable:false
  
–aView’s enclosingScrollView()’s setHasVerticalScroller:true
  
  
–Buttonをつくる
  
set bButton to (NSButton’s alloc()’s initWithFrame:(current application’s NSMakeRect(0, 0, aWidth, 40)))
  
bButton’s setTitle:aButtonMSG
  
bButton’s setTarget:me
  
bButton’s setAction:("clicked:")
  
  
–SplitViewをつくる
  
set aSplitV to NSSplitView’s alloc()’s initWithFrame:(current application’s NSMakeRect(0, 0, aHeight, aWidth))
  
aSplitV’s setVertical:false
  
  
aSplitV’s addSubview:aView
  
aSplitV’s addSubview:bButton
  
aSplitV’s setNeedsDisplay:true
  
  
–WindowとWindow Controllerをつくる
  
set aWin to makeWinWithView(aSplitV, aWidth, aHeight, aTitle, 1.0)
  
aWin’s makeKeyAndOrderFront:(missing value)
  
set wController to NSWindowController’s alloc()
  
wController’s initWithWindow:aWin
  
aWin’s makeFirstResponder:aView
  
aView’s setString:dispStr
  
wController’s showWindow:me
  
  
set aCount to timeOutSecs * 10 –timeout seconds * 10
  
repeat aCount times
    if (my windisp) = false then
      exit repeat
    end if
    
delay 0.1
    
set aCount to aCount – 1
  end repeat
  
  
aTimer’s invalidate() –Stop Timer
  
my closeWin:aWin
  
end dispTextView:

–Button Clicked Event Handler
on clicked:aSender
  set (my windisp) to false
end clicked:

–make Window for Input
on makeWinWithView(aView, aWinWidth, aWinHeight, aTitle, alphaV)
  set aScreen to NSScreen’s mainScreen()
  
set aFrame to {{0, 0}, {aWinWidth, aWinHeight}}
  
set aBacking to NSTitledWindowMask –NSBorderlessWindowMask
  
set aDefer to NSBackingStoreBuffered
  
  
— Window
  
set aWin to NSWindow’s alloc()
  (
aWin’s initWithContentRect:aFrame styleMask:aBacking backing:aDefer defer:false screen:aScreen)
  
aWin’s setBackgroundColor:(NSColor’s clearColor())
  
  
aWin’s setTitle:aTitle
  
aWin’s setDelegate:me
  
aWin’s setDisplaysWhenScreenProfileChanges:true
  
aWin’s setHasShadow:true
  
aWin’s setIgnoresMouseEvents:false
  
aWin’s setLevel:(NSFloatingWindowLevel)
  
aWin’s setOpaque:false
  
aWin’s setAlphaValue:alphaV –append
  
aWin’s setReleasedWhenClosed:true
  
aWin’s |center|()
  
–aWin’s makeKeyAndOrderFront:(me)
  
  
— Set Custom View
  
aWin’s setContentView:aView
  
  
return aWin
end makeWinWithView

–close win
on closeWin:aWindow
  aWindow’s |close|()
end closeWin:

–指定PostScript名称のフォントがコンピューター上に存在するかどうかチェック
on checkExistenceOfFont(fontName as string)
  if fontName = "" then return false
  
set aFont to NSFont’s fontWithName:fontName |size|:9.0
  
if aFont = missing value then
    return false
  else
    return true
  end if
end checkExistenceOfFont

–タイマー割り込み
on idleHandler:aSender
  set mesStr to time string of (current date)
  
aView’s setString:mesStr
end idleHandler:

★Click Here to Open This Script 

Posted in Color dialog | Tagged 10.12savvy 10.13savvy 10.14savvy NSBackingStoreBuffered NSButton NSColor NSFloatingWindowLevel NSFont NSScreen NSSplitView NSTextView NSTimer NSTitledWindowMask NSWindow NSWindowController | 6 Comments

People Picker

Posted on 7月 11, 2019 by Takaaki Naganoya

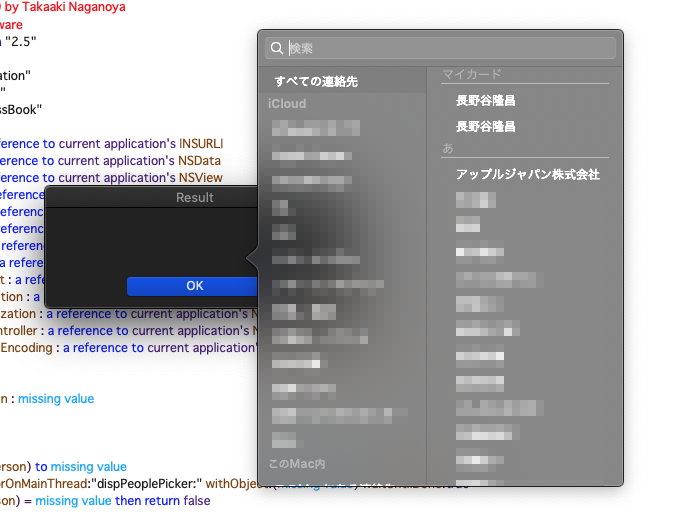
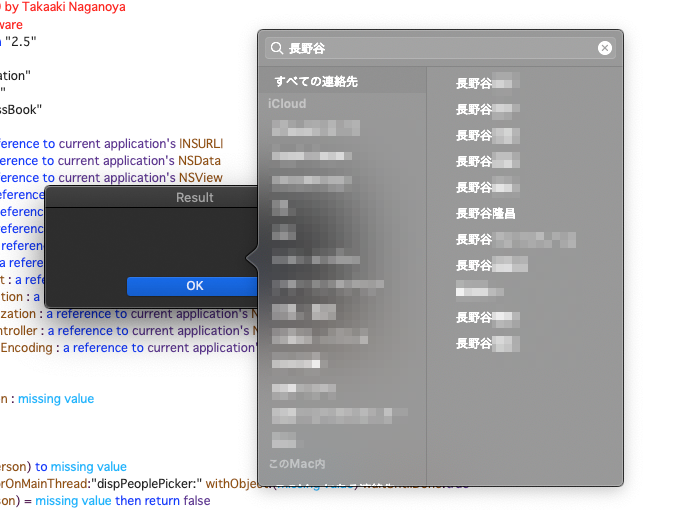
ABPersonPickerでアドレスブックに登録のあるPerson(人)をダイアログ選択するAppleScriptです。

ずいぶんと前に作ってあったものの、活用できる機会がまったくなくて埃をかぶっていました。Alertダイアログ上に表示できないかと修正してみたものの、ABPersonPickerがWindowを要求するようで、書き換えてもうまく動かなかったために「誰か改良してくれるかもしれないし、掲載しとくかー」と、引っ張り出してきたものです。

本Scriptは人物(Person)1人を選択するものであるため、正確にいえば、Person Pickerですね。

人物の選択を行うための機能はAppleScriptには提供されていないため、一般的にはアドレスブックに登録されている全員の氏名を一括で取得してchoose from listで選択するといった話になることでしょう。

それよりは幾分マシではあるものの、使い勝手という面ではさっぱりです。アドレスブック(連絡先)でAppleScriptプラグインが(macOS 10.14で)使えなくなりましたが、このような代替案だったり、使い物にならない連作先.appの代わりにAddressBookフレームワークにアクセスしてPerson情報をしぼりこんでScriptを実行するようなプログラムを作ることになるでしょう。

連絡先(旧称アドレスブック)、カレンダー(旧称iCal)は「ただ動けばいい」ぐらいのぞんざいな作りなのが本当に残念です。


▲macOS 10.14.5(Dark Mode)上で実行したところ


▲ ABPersonPicker上でキーワードによる絞り込みもリアルタイムに行える

AppleScript名:People Picker
— Created 2017-12-20 by Takaaki Naganoya
— 2017 Piyomaru Software
use AppleScript version "2.5"
use scripting additions
use framework "Foundation"
use framework "AppKit"
use framework "AddressBook"

property NSView : a reference to current application’s NSView
property NSScreen : a reference to current application’s NSScreen
property NSButton : a reference to current application’s NSButton
property NSWindow : a reference to current application’s NSWindow
property ABPersonPicker : a reference to current application’s ABPersonPicker
property NSRectEdgeMaxX : a reference to current application’s NSRectEdgeMaxX
property NSWindowController : a reference to current application’s NSWindowController
property NSTitledWindowMask : a reference to current application’s NSTitledWindowMask
property NSRoundedBezelStyle : a reference to current application’s NSRoundedBezelStyle
property NSNormalWindowLevel : a reference to current application’s NSNormalWindowLevel
property NSBackingStoreBuffered : a reference to current application’s NSBackingStoreBuffered
property NSMomentaryLightButton : a reference to current application’s NSMomentaryLightButton

property windisp : false
property selectedPerson : missing value

on run
  set (my selectedPerson) to missing value
  
  
my performSelectorOnMainThread:"dispPeoplePicker:" withObject:(missing value) waitUntilDone:true
  
if (my selectedPerson) = missing value then return false
  
  
set firstName to (my selectedPerson’s |First|) as string
  
set lastName to (my selectedPerson’s |Last|) as string
  
  
return {lastName, firstName}
end run

on dispPeoplePicker:aParam
  set aWidth to 300
  
set aHeight to 100
  
choosePeople(aWidth, aHeight, "Result", "OK", 180) of me
end dispPeoplePicker:

on choosePeople(aWidth as integer, aHeight as integer, aTitle as text, aButtonMSG as text, timeOutSecs as number)
  set (my windisp) to true
  
  
–Buttonをつくる
  
set bButton to (NSButton’s alloc()’s initWithFrame:(current application’s NSMakeRect(aWidth / 4, 0, aWidth / 2, 40)))
  
bButton’s setTitle:aButtonMSG
  
bButton’s setButtonType:(NSMomentaryLightButton)
  
bButton’s setBezelStyle:(NSRoundedBezelStyle)
  
bButton’s setKeyEquivalent:(return)
  
bButton’s setTarget:me
  
bButton’s setAction:("clicked:")
  
  
–NSViewをつくる
  
set aNSV to NSView’s alloc()’s initWithFrame:(current application’s NSMakeRect(0, 0, aHeight, aWidth))
  
aNSV’s addSubview:bButton
  
aNSV’s setNeedsDisplay:true
  
  
–NSWindowをつくる  
  
set aWin to makeWinWithView(aNSV, aWidth, aHeight, aTitle, 1.0)
  
  
–NSWindowControllerをつくる
  
set wController to NSWindowController’s alloc()
  
wController’s initWithWindow:aWin
  
wController’s showWindow:me
  
  
–People Pickerをつくる
  
set anAB to ABPersonPicker’s alloc()’s init()
  
anAB’s showRelativeToRect:(current application’s NSMakeRect(0, 0, 200, 200)) ofView:aNSV preferredEdge:(NSRectEdgeMaxX)
  
anAB’s setDelegate:(me)
  
  
–NSWindowの最前面表示  
  
aWin’s makeKeyAndOrderFront:me
  
  
set aCount to timeOutSecs * 10 –timeout seconds * 10
  
repeat aCount times
    if (my windisp) = false then
      exit repeat
    end if
    
delay 0.1
  end repeat
  
  
my closeWin:aWin
end choosePeople

–Button Clicked Event Handler
on clicked:aSender
  set (my windisp) to false
end clicked:

–make Window for Input
on makeWinWithView(aView, aWinWidth, aWinHeight, aTitle, alphaV)
  set aScreen to NSScreen’s mainScreen()
  
set aFrame to {{0, 0}, {aWinWidth, aWinHeight}}
  
set aBacking to NSTitledWindowMask
  
set aDefer to NSBackingStoreBuffered
  
  
— Window
  
set aWin to NSWindow’s alloc()
  (
aWin’s initWithContentRect:aFrame styleMask:aBacking backing:aDefer defer:false screen:aScreen)
  
  
aWin’s setTitle:aTitle
  
aWin’s setDelegate:me
  
aWin’s setDisplaysWhenScreenProfileChanges:true
  
aWin’s setHasShadow:true
  
aWin’s setIgnoresMouseEvents:false
  
aWin’s setLevel:(NSNormalWindowLevel)
  
aWin’s setOpaque:false
  
aWin’s setAlphaValue:alphaV –append
  
aWin’s setReleasedWhenClosed:true
  
aWin’s |center|()
  
aWin’s makeKeyAndOrderFront:(me)
  
  
— Set Custom View
  
aWin’s setContentView:aView
  
  
return aWin
end makeWinWithView

–close win
on closeWin:aWindow
  repeat with n from 10 to 1 by -1
    (aWindow’s setAlphaValue:n / 10)
    
delay 0.02
  end repeat
  
aWindow’s |close|()
end closeWin:

on personPicker:(aPicker) didChoosePerson:(aPerson) |property|:(aProperty) identifier:(anID)
  log {"personPicker:didChoosePerson:"}
  
log aPicker
  
log aPerson
  
log aProperty
  
log anID
  
copy aPerson to my selectedPerson
end personPicker:didChoosePerson:|property|:identifier:

on personPickerDidClose:(aPicker)
  log {"personPickerDidClose"}
  
set (my windisp) to false
end personPickerDidClose:

★Click Here to Open This Script 

Posted in dialog GUI System | Tagged 10.12savvy 10.13savvy 10.14savvy ABPersonPicker NSBackingStoreBuffered NSButton NSMomentaryLightButton NSNormalWindowLevel NSRectEdgeMaxX NSRoundedBezelStyle NSScreen NSTitledWindowMask NSView NSWindow NSWindowController | Leave a comment

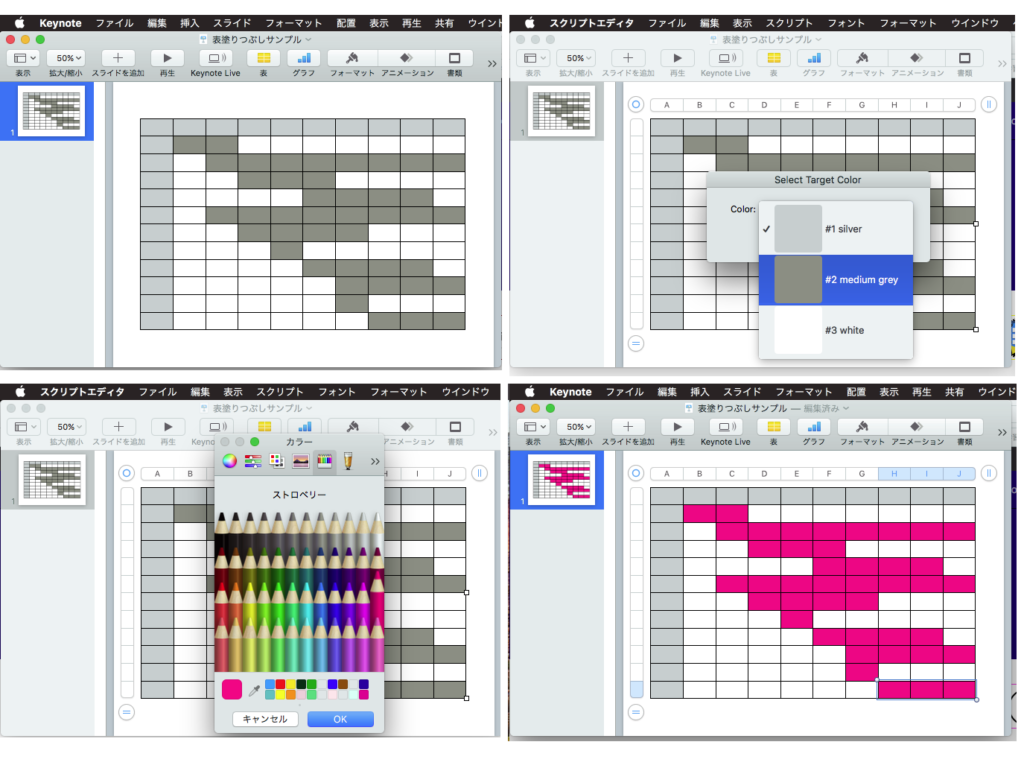
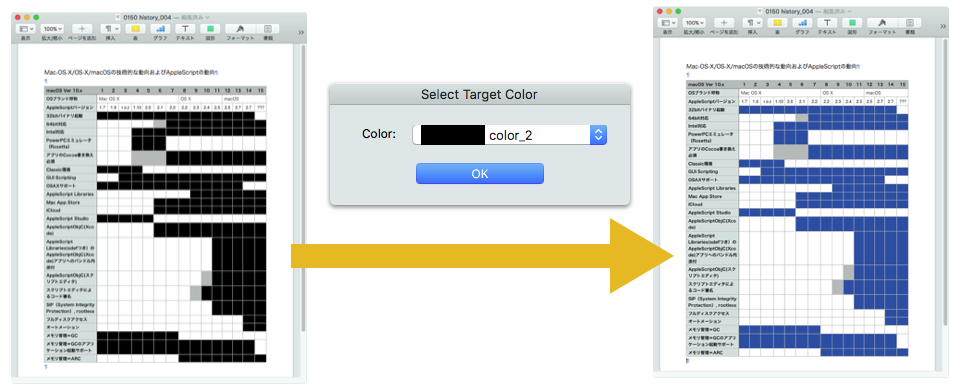
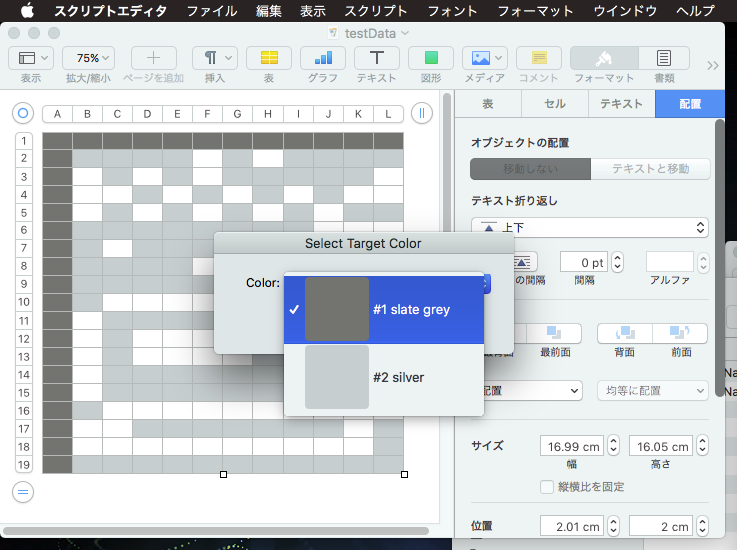
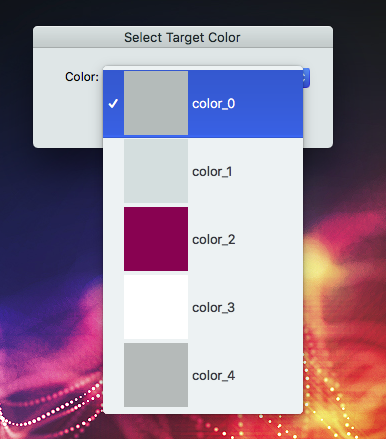
Keynote書類の現在のスライド上の表1の背景色を置換 v1

Posted on 1月 31, 2019 by Takaaki Naganoya

Keynoteでオープン中の最前面の書類の現在表示中のスライドに存在する表1の背景色を置換するAppleScriptです。

Pages用のScriptをごく一部修正してkeynoteの表に対して処理できるようにしてみました。macOS 10.11, 10.12, 10.13ではスクリプトエディタ上で動作します。macOS 10.14ではSIPを解除してスクリプトエディタで動かすか、アプレット形式で書き出して、アプレットのバンドル中にdbColNamesKit.frameworkを入れると動きます。

Script DebuggerとScript Menu上では動作しません。

ポップアップメニュー中に色の名称の動的な推定に、オープンソースの「DBColorNames」をフレームワーク化した
「dbColNamesKit.framework」を利用しています。

–> dbColNamesKit.framework (To ~/Library/Frameworks)

AppleScript名:Keynote書類の現在のスライド上の表の背景色を置換 v1
— Created 2019-01-29 by Takaaki Naganoya
— 2019 Piyomaru Software
use AppleScript version "2.4"
use scripting additions
use framework "Foundation"
use framework "AppKit"
use framework "dbColNamesKit" –https://github.com/daniel-beard/DBColorNames/
use Bplus : script "BridgePlus" –https://www.macosxautomation.com/applescript/apps/BridgePlus.html

–v1:Convert Pages version to Keynote

property NSView : a reference to current application’s NSView
property NSColor : a reference to current application’s NSColor
property NSArray : a reference to current application’s NSArray
property NSMenu : a reference to current application’s NSMenu
property NSImage : a reference to current application’s NSImage
property NSScreen : a reference to current application’s NSScreen
property NSButton : a reference to current application’s NSButton
property NSWindow : a reference to current application’s NSWindow
property NSTextField : a reference to current application’s NSTextField
property NSMenuItem : a reference to current application’s NSMenuItem
property NSBezierPath : a reference to current application’s NSBezierPath
property NSPopUpButton : a reference to current application’s NSPopUpButton
property NSWindowController : a reference to current application’s NSWindowController
property NSTitledWindowMask : a reference to current application’s NSTitledWindowMask
property NSRoundedBezelStyle : a reference to current application’s NSRoundedBezelStyle
property NSFloatingWindowLevel : a reference to current application’s NSFloatingWindowLevel
property NSBackingStoreBuffered : a reference to current application’s NSBackingStoreBuffered
property NSMomentaryLightButton : a reference to current application’s NSMomentaryLightButton

property windisp : true
property wController : missing value
property pop1ind : 1

–初期化
set (my windisp) to true
set (my pop1ind) to 1
load framework

–Pagesの1ページ目にある表の塗り色を取得
tell application "Keynote"
  tell front document
    tell current slide
      tell table 1
        set c1List to background color of every cell
        
set aProp to properties
        
set xCount to column count of aProp
      end tell
    end tell
  end tell
end tell

–Convert 1D List to 2D List
set c3List to (current application’s SMSForder’s subarraysFrom:c1List groupedBy:xCount |error|:(missing value)) as list

–色データをユニーク化(重複削除)
set bList to uniquifyList(c1List) of me

–missing value(背景色なし)を除外する
set c2List to (current application’s SMSForder’s arrayByDeletingBlanksIn:(bList)) as list

–Popup Menuで置換色選択
set paramObj to {c2List, 65535, "OK", "Select Target Color", 180} –Timeout = 180 sec, Color val range = 16bit
my performSelectorOnMainThread:"getPopupValues:" withObject:(paramObj) waitUntilDone:true
if pop1ind = false then return –timed out
set fromCol to (contents of item pop1ind of c2List)

–カラーピッカーで置換色選択
set tCol to choose color default color fromCol

set d1 to current date

–実際に表の背景色を置換する
set hitList to findDataFrom2DList(fromCol, c3List) of me –データ上で当該色のセル情報を計算する

–Rangeを横スキャンと縦スキャンの2通りで試算(Two way Simulation)
set rList1 to retRangeFromPosListHorizontal(hitList) of me –横方向へのrange評価
set rList2 to retRangeFromPosListVertival(hitList) of me –縦方向へのrange評価

–Simulationの結果、要素数の少ない方(=処理時間の短い方=高速な方)を採用する
log {"Simulation", (length of rList1), (length of rList2)}
if (length of rList1) < (length of rList2) then
  copy rList1 to rangeList
else
  copy rList2 to rangeList
end if

tell application "Keynote"
  activate
  
tell front document
    tell current slide
      tell table 1
        repeat with i in rangeList
          set j to contents of i
          
          
ignoring application responses –非同期実行モードで高速実行
            set background color of range j to tCol
          end ignoring
          
        end repeat
      end tell
    end tell
  end tell
end tell

set d2 to current date
return d2 – d1

–カラーポップアップメニューをウィンドウ表示
on getPopupValues:paramObj
  copy (paramObj as list) to {ap1List, aColMax, aButtonMSG, aSliderValMSG, timeOutSecs}
  
  
set (my windisp) to true
  
  
set aView to NSView’s alloc()’s initWithFrame:(current application’s NSMakeRect(0, 0, 360, 100))
  
  
–Labelをつくる
  
set a1TF to NSTextField’s alloc()’s initWithFrame:(current application’s NSMakeRect(30, 60, 80, 20))
  
a1TF’s setEditable:false
  
a1TF’s setStringValue:"Color:"
  
a1TF’s setDrawsBackground:false
  
a1TF’s setBordered:false
  
  
–Ppopup Buttonをつくる
  
set a1Button to NSPopUpButton’s alloc()’s initWithFrame:(current application’s NSMakeRect(80, 60, 200, 20)) pullsDown:false
  
a1Button’s removeAllItems()
  
  
set a1Menu to NSMenu’s alloc()’s init()
  
set aCDB to current application’s DBColorNames’s alloc()’s init()
  
  
set iCount to 1
  
repeat with i in ap1List
    copy i to {r1, g1, b1}
    
    
set nsCol to makeNSColorFromRGBAval(r1, g1, b1, aColMax, aColMax) of me
    
set anImage to makeRoundedNSImageWithFilledWithColor(64, 64, nsCol, 4) of me
    
    
set aTitle to "#" & (iCount as string) & " " & (aCDB’s nameForColor:nsCol) as string
    
set aMenuItem to (NSMenuItem’s alloc()’s initWithTitle:aTitle action:"actionHandler:" keyEquivalent:"")
    (
aMenuItem’s setImage:anImage)
    (
aMenuItem’s setEnabled:true)
    (
a1Menu’s addItem:aMenuItem)
    
    
set iCount to iCount + 1
  end repeat
  
  
a1Button’s setMenu:a1Menu


–Buttonをつくる
  
set bButton to (NSButton’s alloc()’s initWithFrame:(current application’s NSMakeRect(80, 10, 140, 40)))
  
bButton’s setButtonType:(NSMomentaryLightButton)
  
bButton’s setBezelStyle:(NSRoundedBezelStyle)
  
bButton’s setTitle:aButtonMSG
  
bButton’s setTarget:me
  
bButton’s setAction:("clicked:")
  
bButton’s setKeyEquivalent:(return)
  
  
aView’s addSubview:a1TF
  
  
aView’s addSubview:a1Button
  
aView’s addSubview:bButton
  
aView’s setNeedsDisplay:true
  
  
–NSWindowControllerを作ってみた(いらない?)
  
set aWin to (my makeWinWithView(aView, 300, 100, aSliderValMSG))
  
  
set wController to NSWindowController’s alloc()
  
wController’s initWithWindow:aWin
  
  
wController’s showWindow:me
  
  
set aCount to timeOutSecs * 100
  
  
set hitF to false
  
repeat aCount times
    if (my windisp) = false then
      set hitF to true
      
exit repeat
    end if
    
delay 0.01
    
set aCount to aCount – 1
  end repeat
  
  
my closeWin:aWin
  
  
if hitF = true then
    set s1Val to ((a1Button’s indexOfSelectedItem() as number) + 1)
  else
    set s1Val to false
  end if
  
  
copy s1Val to my pop1ind
  
end getPopupValues:

on clicked:aSender
  set (my windisp) to false
end clicked:

–make Window for Display
on makeWinWithView(aView, aWinWidth as integer, aWinHeight as integer, aTitle as string)
  set aScreen to NSScreen’s mainScreen()
  
set aFrame to {{0, 0}, {aWinWidth, aWinHeight}}
  
  
set aBacking to NSTitledWindowMask
  
  
set aDefer to NSBackingStoreBuffered
  
  
— Window
  
set aWin to NSWindow’s alloc()
  (
aWin’s initWithContentRect:aFrame styleMask:aBacking backing:aDefer defer:false screen:aScreen)
  
  
aWin’s setTitle:aTitle
  
aWin’s setDelegate:me
  
aWin’s setDisplaysWhenScreenProfileChanges:true
  
aWin’s setHasShadow:true
  
aWin’s setIgnoresMouseEvents:false
  
aWin’s setLevel:(NSFloatingWindowLevel)
  
aWin’s setOpaque:false
  
aWin’s setReleasedWhenClosed:true
  
aWin’s |center|()
  
  
aWin’s setContentView:aView
  
  
return aWin
end makeWinWithView

–close win
on closeWin:aWindow
  repeat with n from 10 to 1 by -1
    (aWindow’s setAlphaValue:n / 10)
    
delay 0.02
  end repeat
  
aWindow’s |close|()
end closeWin:

–Popup Action Handler
on actionHandler:sender
  set aTag to tag of sender as integer
  
set aTitle to title of sender as string
end actionHandler:

–aMaxValを最大値とする数値でNSColorを作成して返す
on makeNSColorFromRGBAval(redValue as integer, greenValue as integer, blueValue as integer, alphaValue as integer, aMaxVal as integer)
  set aRedCocoa to (redValue / aMaxVal) as real
  
set aGreenCocoa to (greenValue / aMaxVal) as real
  
set aBlueCocoa to (blueValue / aMaxVal) as real
  
set aAlphaCocoa to (alphaValue / aMaxVal) as real
  
set aColor to NSColor’s colorWithCalibratedRed:aRedCocoa green:aGreenCocoa blue:aBlueCocoa alpha:aAlphaCocoa
  
return aColor
end makeNSColorFromRGBAval

–指定サイズのNSImageを作成し、指定色で塗ってNSImageで返す
on makeNSImageWithFilledWithColor(aWidth as integer, aHeight as integer, fillColor)
  set anImage to NSImage’s alloc()’s initWithSize:(current application’s NSMakeSize(aWidth, aHeight))
  
anImage’s lockFocus()
  
—
  
set theRect to {{x:0, y:0}, {height:aHeight, width:aWidth}}
  
set theNSBezierPath to NSBezierPath’s bezierPath
  
theNSBezierPath’s appendBezierPathWithRect:theRect
  
—
  
fillColor’s |set|() –色設定
  
theNSBezierPath’s fill() –ぬりつぶし
  
—
  
anImage’s unlockFocus()
  
—
  
return anImage
end makeNSImageWithFilledWithColor

–指定サイズのNSImageを作成し、指定色で塗ってNSImageで返す、anRadiusの半径の角丸で
on makeRoundedNSImageWithFilledWithColor(aWidth as integer, aHeight as integer, fillColor, anRadius as real)
  set anImage to NSImage’s alloc()’s initWithSize:(current application’s NSMakeSize(aWidth, aHeight))
  
anImage’s lockFocus()
  
—
  
set theRect to {{x:0, y:0}, {height:aHeight, width:aWidth}}
  
set theNSBezierPath to NSBezierPath’s bezierPathWithRoundedRect:theRect xRadius:anRadius yRadius:anRadius
  
—
  
fillColor’s |set|() –色設定
  
theNSBezierPath’s fill() –ぬりつぶし
  
—
  
anImage’s unlockFocus()
  
  
return anImage
end makeRoundedNSImageWithFilledWithColor

on uniquifyList(aList as list)
  set aArray to NSArray’s arrayWithArray:aList
  
set bArray to aArray’s valueForKeyPath:"@distinctUnionOfObjects.self"
  
return bArray as list
end uniquifyList

on findDataFrom2DList(anItem, aList as list)
  script spd
    property aList : {}
    
property resList : {}
  end script
  
  
set (aList of spd) to aList
  
set (resList of spd) to {}
  
  
set yCount to 1
  
  
repeat with i in (aList of spd)
    
    
set aResList to (Bplus’s indexesOfItem:anItem inList:i inverting:false) as list
    
    
set tmpList to {}
    
if aResList is not equal to {} then
      repeat with ii in aResList
        set jj to contents of ii
        
set the end of tmpList to {jj, yCount}
      end repeat
      
set (resList of spd) to (resList of spd) & tmpList
    end if
    
    
set yCount to yCount + 1
  end repeat
  
  
return (resList of spd) –return {{x, y}…..} item list (1-based)
end findDataFrom2DList

on retRangeFromPosListVertival(posList as list)
  script rangeSPD
    property posList2 : {}
  end script
  
  
–縦方向へのrange評価に都合がいいようにソート
  
set (posList2 of rangeSPD) to shellSortListAscending(posList, {1, 2}) of me
  
  
–先頭データをピックアップ
  
set firstData to first item of (posList2 of rangeSPD)
  
set (posList2 of rangeSPD) to rest of (posList2 of rangeSPD)
  
  
copy firstData to {curX1, curY1}
  
set tmpRangeStr to aNumToExcelColumn(curX1) of me & (curY1 as string) & ":"
  
  
set tmpRange to {}
  
set hitF to false
  
  
set outList to {}
  
  
repeat with i in (posList2 of rangeSPD)
    copy i to {tmpX, tmpY}
    
    
–log {"{curX1, curY1}", {curX1, curY1}}
    
–log {"{tmpX, tmpY}", {tmpX, tmpY}}


if (curX1 = tmpX) and (curY1 + 1 = tmpY) then
      –Y方向への連続値を拾っている最中
      
if hitF = false then
        –log "case 1a"
        
–log {"hitF", hitF}
        
set hitF to true
      else
        –log "case 1b"
        
–log {"hitF", hitF}
        
–横に連続しているブロックの途中
      end if
    else
      –直前の値と連続していない
      
if hitF = false then
        –log "case 2a"
        
–log {"hitF", hitF}
        
set tmpRangeStr to tmpRangeStr & aNumToExcelColumn(curX1) of me & (curY1 as string)
        
set the end of outList to tmpRangeStr
        
set tmpRangeStr to aNumToExcelColumn(tmpX) of me & (tmpY as string) & ":"
        
set hitF to false
      else
        –log "case 2b"
        
–log {"hitF", hitF}
        
–連続ブロックの末尾を拾った
        
set tmpRangeStr to tmpRangeStr & aNumToExcelColumn(curX1) of me & (curY1 as string)
        
set the end of outList to tmpRangeStr
        
set tmpRangeStr to aNumToExcelColumn(tmpX) of me & (tmpY as string) & ":"
        
set hitF to false
        
–log {"tmpRangeStr", tmpRangeStr}
      end if
    end if
    
    
copy {tmpX, tmpY} to {curX1, curY1}
  end repeat
  
  
–log {tmpRangeStr, hitF}
  
  
if (hitF = true) or (tmpRangeStr is not equal to "") then
    set tmpRangeStr to tmpRangeStr & aNumToExcelColumn(curX1) of me & (curY1 as string)
    
set the end of outList to tmpRangeStr
  end if
  
  
return outList
end retRangeFromPosListVertival

on retRangeFromPosListHorizontal(posList as list)
  script rangeSPD
    property posList2 : {}
  end script
  
  
copy posList to (posList2 of rangeSPD)
  
  
–先頭データをピックアップ
  
set firstData to first item of (posList2 of rangeSPD)
  
set (posList2 of rangeSPD) to rest of (posList2 of rangeSPD)
  
  
copy firstData to {curX1, curY1}
  
set tmpRangeStr to aNumToExcelColumn(curX1) of me & (curY1 as string) & ":"
  
  
set tmpRange to {}
  
set hitF to false
  
  
set outList to {}
  
  
repeat with i in (posList2 of rangeSPD)
    copy i to {tmpX, tmpY}
    
    
–log {"{curX1, curY1}", {curX1, curY1}}
    
–log {"{tmpX, tmpY}", {tmpX, tmpY}}


if (curX1 + 1 = tmpX) and (curY1 = tmpY) then
      –X方向への連続値を拾っている最中
      
if hitF = false then
        –log "case 1a"
        
–log {"hitF", hitF}
        
set hitF to true
      else
        –log "case 1b"
        
–log {"hitF", hitF}
        
–横に連続しているブロックの途中
      end if
    else
      –直前の値と連続していない
      
if hitF = false then
        –log "case 2a"
        
–log {"hitF", hitF}
        
set tmpRangeStr to tmpRangeStr & aNumToExcelColumn(curX1) of me & (curY1 as string)
        
set the end of outList to tmpRangeStr
        
set tmpRangeStr to aNumToExcelColumn(tmpX) of me & (tmpY as string) & ":"
        
set hitF to false
      else
        –log "case 2b"
        
–log {"hitF", hitF}
        
–連続ブロックの末尾を拾った
        
set tmpRangeStr to tmpRangeStr & aNumToExcelColumn(curX1) of me & (curY1 as string)
        
set the end of outList to tmpRangeStr
        
set tmpRangeStr to aNumToExcelColumn(tmpX) of me & (tmpY as string) & ":"
        
set hitF to false
        
–log {"tmpRangeStr", tmpRangeStr}
      end if
    end if
    
    
copy {tmpX, tmpY} to {curX1, curY1}
  end repeat
  
  
–log {tmpRangeStr, hitF}
  
  
if (hitF = true) or (tmpRangeStr is not equal to "") then
    set tmpRangeStr to tmpRangeStr & aNumToExcelColumn(curX1) of me & (curY1 as string)
    
set the end of outList to tmpRangeStr
  end if
  
  
return outList
end retRangeFromPosListHorizontal

–2008/05/01 By Takaaki Naganoya
–10進数数値をExcel 2004/2008的カラム表現にエンコードするサブルーチン を使いまわし
–1〜1351までの間であれば正しいエンコーディング結果を返す
on aNumToExcelColumn(origNum as integer)
  if origNum > 1351 then
    error "エラー:Excel 2004/2008的カラム表現(A1形式)への変換ルーチンにおいて、想定範囲外(1351以上)のパラメータが指定されました"
  end if
  
  
set upperDigitEncTable to {"A", "B", "C", "D", "E", "F", "G", "H", "I", "J", "K", "L", "M", "N", "O", "P", "Q", "R", "S", "T", "U", "V", "W", "X", "Y", "Z", "A"}
  
set lowerDigitEncTable to {"A", "B", "C", "D", "E", "F", "G", "H", "I", "J", "K", "L", "M", "N", "O", "P", "Q", "R", "S", "T", "U", "V", "W", "X", "Y", "Z", "A"}
  
  
set oNum to origNum
  
set nTh to 26
  
set stringLength to 4
  
  
–数字が1桁の場合の対応
  
if origNum < 27 then
    set aRes to (item origNum of upperDigitEncTable) as string
    
return aRes
  end if


if origNum > 702 then
    –3桁になる場合
    
set upupNum to oNum div 676 –整数除算–上の上の桁
    
set oNum to oNum – (upupNum * 676)
    
set upNum to oNum div 26 –整数除算–上の桁
    
set lowNum to oNum mod 26 – 1 –余剰計算–下の桁
    
    
–超つじつま合わせ処理
    
if lowNum = -1 then
      set upNum to upNum – 1
      
set lowNum to 25
    end if
    
    
set upupChar to (item upupNum of upperDigitEncTable) as string
    
set upChar to (item upNum of upperDigitEncTable) as string
    
set lowChar to (item (lowNum + 1) of lowerDigitEncTable) as string
    
set resText to upupChar & upChar & lowChar
    
  else
    –2桁の場合
    
set upNum to oNum div 26 –整数除算–上の桁
    
set lowNum to oNum mod 26 – 1 –余剰計算–下の桁
    
    
–超つじつま合わせ処理
    
if lowNum = -1 then
      set upNum to upNum – 1
      
set lowNum to 25
    end if
    
    
set upChar to (item upNum of upperDigitEncTable) as string
    
set lowChar to (item (lowNum + 1) of lowerDigitEncTable) as string
    
set resText to upChar & lowChar
    
  end if
  
  
return resText
end aNumToExcelColumn

–入れ子のリストを昇順ソート
on shellSortListAscending(a, keyItem)
  return sort2DList(a, keyItem, {true}) of me
end shellSortListAscending

–入れ子のリストを降順ソート
on shellSortListDecending(a, keyItem)
  return sort2DList(a, keyItem, {false}) of me
end shellSortListDecending

–2D Listをソート
on sort2DList(aList as list, sortIndexes as list, sortOrders as list)
  
  
–index値をAS流(アイテムが1はじまり)からCocoa流(アイテムが0はじまり)に変換
  
set newIndex to {}
  
repeat with i in sortIndexes
    set j to contents of i
    
set j to j – 1
    
set the end of newIndex to j
  end repeat
  
  
–Sort TypeのListを作成(あえて外部から指定する内容でもない)
  
set sortTypes to {}
  
repeat (length of sortIndexes) times
    set the end of sortTypes to "compare:"
  end repeat
  
  
–Sort
  
set resList to (current application’s SMSForder’s subarraysIn:(aList) sortedByIndexes:newIndex ascending:sortOrders sortTypes:sortTypes |error|:(missing value)) as list
  
  
return resList
end sort2DList

★Click Here to Open This Script 

Posted in Color GUI | Tagged 10.11savvy 10.12savvy 10.13savvy 10.14savvy Keynote NSArray NSBezierPath NSButton NSColor NSImage NSMenu NSMenuItem NSPopUpButton NSScreen NSTextField NSView NSWindow NSWindowController | 1 Comment

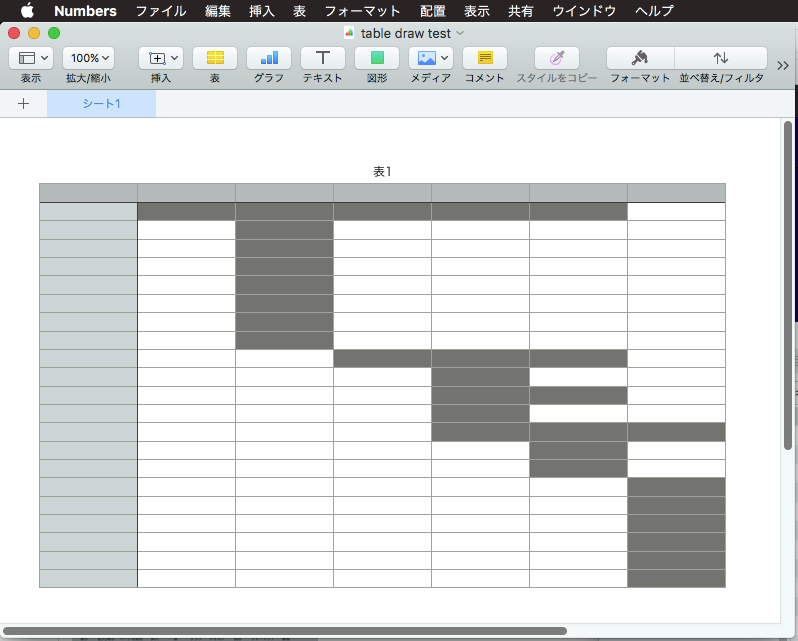
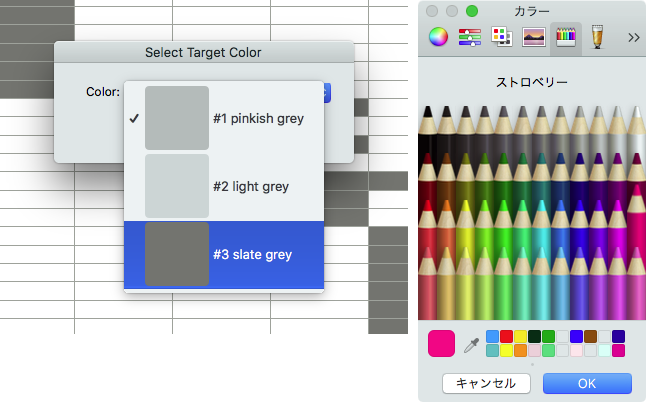
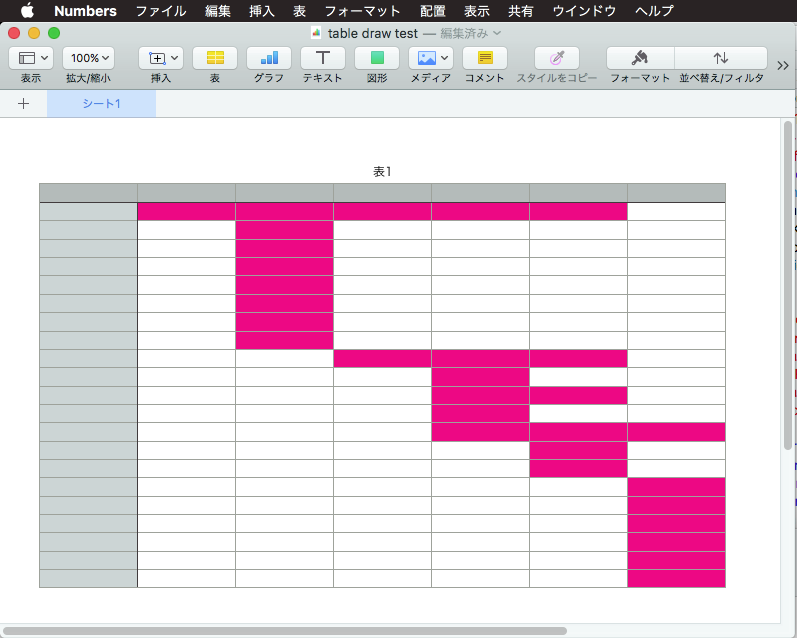
Numbers書類の現在のシート上の表1の背景色を置換 v1

Posted on 1月 31, 2019 by Takaaki Naganoya

Numbersでオープン中の最前面の書類の現在表示中のシートに存在する表1の背景色を置換するAppleScriptです。

Pages用のScriptをごく一部修正してNumbersの表に対して処理できるようにしてみました。macOS 10.11, 10.12, 10.13ではスクリプトエディタ上で動作します。macOS 10.14ではSIPを解除してスクリプトエディタで動かすか、アプレット形式で書き出して、アプレットのバンドル中にdbColNamesKit.frameworkを入れると動きます。

Script DebuggerとScript Menu上では動作しません。

ポップアップメニュー中に色の名称の動的な推定に、オープンソースの「DBColorNames」をフレームワーク化した
「dbColNamesKit.framework」を利用しています。

–> dbColNamesKit.framework (To ~/Library/Frameworks)

AppleScript名:Numbers書類の現在のシート上の表1の背景色を置換 v1
— Created 2019-01-29 by Takaaki Naganoya
— 2019 Piyomaru Software
use AppleScript version "2.4"
use scripting additions
use framework "Foundation"
use framework "AppKit"
use framework "dbColNamesKit" –https://github.com/daniel-beard/DBColorNames/
use Bplus : script "BridgePlus" –https://www.macosxautomation.com/applescript/apps/BridgePlus.html

–v1:Change Pages part to Numbers

property NSView : a reference to current application’s NSView
property NSColor : a reference to current application’s NSColor
property NSArray : a reference to current application’s NSArray
property NSMenu : a reference to current application’s NSMenu
property NSImage : a reference to current application’s NSImage
property NSScreen : a reference to current application’s NSScreen
property NSButton : a reference to current application’s NSButton
property NSWindow : a reference to current application’s NSWindow
property NSTextField : a reference to current application’s NSTextField
property NSMenuItem : a reference to current application’s NSMenuItem
property NSBezierPath : a reference to current application’s NSBezierPath
property NSPopUpButton : a reference to current application’s NSPopUpButton
property NSWindowController : a reference to current application’s NSWindowController
property NSTitledWindowMask : a reference to current application’s NSTitledWindowMask
property NSRoundedBezelStyle : a reference to current application’s NSRoundedBezelStyle
property NSFloatingWindowLevel : a reference to current application’s NSFloatingWindowLevel
property NSBackingStoreBuffered : a reference to current application’s NSBackingStoreBuffered
property NSMomentaryLightButton : a reference to current application’s NSMomentaryLightButton

property windisp : true
property wController : missing value
property pop1ind : 1

–初期化
set (my windisp) to true
set (my pop1ind) to 1
load framework

–Pagesの1ページ目にある表の塗り色を取得
tell application "Numbers"
  tell front document
    tell active sheet
      tell table 1
        set c1List to background color of every cell
        
set aProp to properties
        
set xCount to column count of aProp
      end tell
    end tell
  end tell
end tell

–Convert 1D List to 2D List
set c3List to (current application’s SMSForder’s subarraysFrom:c1List groupedBy:xCount |error|:(missing value)) as list

–色データをユニーク化(重複削除)
set bList to uniquifyList(c1List) of me

–missing value(背景色なし)を除外する
set c2List to (current application’s SMSForder’s arrayByDeletingBlanksIn:(bList)) as list

–Popup Menuで置換色選択
set paramObj to {c2List, 65535, "OK", "Select Target Color", 180} –Timeout = 180 sec, Color val range = 16bit
my performSelectorOnMainThread:"getPopupValues:" withObject:(paramObj) waitUntilDone:true
if pop1ind = false then return –timed out
set fromCol to (contents of item pop1ind of c2List)

–カラーピッカーで置換色選択
set tCol to choose color default color fromCol

set d1 to current date

–実際に表の背景色を置換する
set hitList to findDataFrom2DList(fromCol, c3List) of me –データ上で当該色のセル情報を計算する

–Rangeを横スキャンと縦スキャンの2通りで試算(Two way Simulation)
set rList1 to retRangeFromPosListHorizontal(hitList) of me –横方向へのrange評価
set rList2 to retRangeFromPosListVertival(hitList) of me –縦方向へのrange評価

–Simulationの結果、要素数の少ない方(=処理時間の短い方=高速な方)を採用する
if (length of rList1) < (length of rList2) then
  copy rList1 to rangeList
else
  copy rList2 to rangeList
end if

tell application "Numbers"
  activate
  
tell front document
    tell active sheet
      tell table 1
        repeat with i in rangeList
          set j to contents of i
          
          
ignoring application responses –非同期実行モードで高速実行
            set background color of range j to tCol
          end ignoring
          
        end repeat
      end tell
    end tell
  end tell
end tell

set d2 to current date
return d2 – d1

–カラーポップアップメニューをウィンドウ表示
on getPopupValues:paramObj
  copy (paramObj as list) to {ap1List, aColMax, aButtonMSG, aSliderValMSG, timeOutSecs}
  
  
set (my windisp) to true
  
  
set aView to NSView’s alloc()’s initWithFrame:(current application’s NSMakeRect(0, 0, 360, 100))
  
  
–Labelをつくる
  
set a1TF to NSTextField’s alloc()’s initWithFrame:(current application’s NSMakeRect(30, 60, 80, 20))
  
a1TF’s setEditable:false
  
a1TF’s setStringValue:"Color:"
  
a1TF’s setDrawsBackground:false
  
a1TF’s setBordered:false
  
  
–Ppopup Buttonをつくる
  
set a1Button to NSPopUpButton’s alloc()’s initWithFrame:(current application’s NSMakeRect(80, 60, 200, 20)) pullsDown:false
  
a1Button’s removeAllItems()
  
  
set a1Menu to NSMenu’s alloc()’s init()
  
set aCDB to current application’s DBColorNames’s alloc()’s init()
  
  
set iCount to 1
  
repeat with i in ap1List
    copy i to {r1, g1, b1}
    
    
set nsCol to makeNSColorFromRGBAval(r1, g1, b1, aColMax, aColMax) of me
    
set anImage to makeRoundedNSImageWithFilledWithColor(64, 64, nsCol, 4) of me
    
    
set aTitle to "#" & (iCount as string) & " " & (aCDB’s nameForColor:nsCol) as string
    
set aMenuItem to (NSMenuItem’s alloc()’s initWithTitle:aTitle action:"actionHandler:" keyEquivalent:"")
    (
aMenuItem’s setImage:anImage)
    (
aMenuItem’s setEnabled:true)
    (
a1Menu’s addItem:aMenuItem)
    
    
set iCount to iCount + 1
  end repeat
  
  
a1Button’s setMenu:a1Menu


–Buttonをつくる
  
set bButton to (NSButton’s alloc()’s initWithFrame:(current application’s NSMakeRect(80, 10, 140, 40)))
  
bButton’s setButtonType:(NSMomentaryLightButton)
  
bButton’s setBezelStyle:(NSRoundedBezelStyle)
  
bButton’s setTitle:aButtonMSG
  
bButton’s setTarget:me
  
bButton’s setAction:("clicked:")
  
bButton’s setKeyEquivalent:(return)
  
  
aView’s addSubview:a1TF
  
  
aView’s addSubview:a1Button
  
aView’s addSubview:bButton
  
aView’s setNeedsDisplay:true
  
  
–NSWindowControllerを作ってみた(いらない?)
  
set aWin to (my makeWinWithView(aView, 300, 100, aSliderValMSG))
  
  
set wController to NSWindowController’s alloc()
  
wController’s initWithWindow:aWin
  
  
wController’s showWindow:me
  
  
set aCount to timeOutSecs * 100
  
  
set hitF to false
  
repeat aCount times
    if (my windisp) = false then
      set hitF to true
      
exit repeat
    end if
    
delay 0.01
    
set aCount to aCount – 1
  end repeat
  
  
my closeWin:aWin
  
  
if hitF = true then
    set s1Val to ((a1Button’s indexOfSelectedItem() as number) + 1)
  else
    set s1Val to false
  end if
  
  
copy s1Val to my pop1ind
  
end getPopupValues:

on clicked:aSender
  set (my windisp) to false
end clicked:

–make Window for Display
on makeWinWithView(aView, aWinWidth as integer, aWinHeight as integer, aTitle as string)
  set aScreen to NSScreen’s mainScreen()
  
set aFrame to {{0, 0}, {aWinWidth, aWinHeight}}
  
  
set aBacking to NSTitledWindowMask
  
  
set aDefer to NSBackingStoreBuffered
  
  
— Window
  
set aWin to NSWindow’s alloc()
  (
aWin’s initWithContentRect:aFrame styleMask:aBacking backing:aDefer defer:false screen:aScreen)
  
  
aWin’s setTitle:aTitle
  
aWin’s setDelegate:me
  
aWin’s setDisplaysWhenScreenProfileChanges:true
  
aWin’s setHasShadow:true
  
aWin’s setIgnoresMouseEvents:false
  
aWin’s setLevel:(NSFloatingWindowLevel)
  
aWin’s setOpaque:false
  
aWin’s setReleasedWhenClosed:true
  
aWin’s |center|()
  
  
aWin’s setContentView:aView
  
  
return aWin
end makeWinWithView

–close win
on closeWin:aWindow
  repeat with n from 10 to 1 by -1
    (aWindow’s setAlphaValue:n / 10)
    
delay 0.02
  end repeat
  
aWindow’s |close|()
end closeWin:

–Popup Action Handler
on actionHandler:sender
  set aTag to tag of sender as integer
  
set aTitle to title of sender as string
end actionHandler:

–aMaxValを最大値とする数値でNSColorを作成して返す
on makeNSColorFromRGBAval(redValue as integer, greenValue as integer, blueValue as integer, alphaValue as integer, aMaxVal as integer)
  set aRedCocoa to (redValue / aMaxVal) as real
  
set aGreenCocoa to (greenValue / aMaxVal) as real
  
set aBlueCocoa to (blueValue / aMaxVal) as real
  
set aAlphaCocoa to (alphaValue / aMaxVal) as real
  
set aColor to NSColor’s colorWithCalibratedRed:aRedCocoa green:aGreenCocoa blue:aBlueCocoa alpha:aAlphaCocoa
  
return aColor
end makeNSColorFromRGBAval

–指定サイズのNSImageを作成し、指定色で塗ってNSImageで返す
on makeNSImageWithFilledWithColor(aWidth as integer, aHeight as integer, fillColor)
  set anImage to NSImage’s alloc()’s initWithSize:(current application’s NSMakeSize(aWidth, aHeight))
  
anImage’s lockFocus()
  
—
  
set theRect to {{x:0, y:0}, {height:aHeight, width:aWidth}}
  
set theNSBezierPath to NSBezierPath’s bezierPath
  
theNSBezierPath’s appendBezierPathWithRect:theRect
  
—
  
fillColor’s |set|() –色設定
  
theNSBezierPath’s fill() –ぬりつぶし
  
—
  
anImage’s unlockFocus()
  
—
  
return anImage
end makeNSImageWithFilledWithColor

–指定サイズのNSImageを作成し、指定色で塗ってNSImageで返す、anRadiusの半径の角丸で
on makeRoundedNSImageWithFilledWithColor(aWidth as integer, aHeight as integer, fillColor, anRadius as real)
  set anImage to NSImage’s alloc()’s initWithSize:(current application’s NSMakeSize(aWidth, aHeight))
  
anImage’s lockFocus()
  
—
  
set theRect to {{x:0, y:0}, {height:aHeight, width:aWidth}}
  
set theNSBezierPath to NSBezierPath’s bezierPathWithRoundedRect:theRect xRadius:anRadius yRadius:anRadius
  
—
  
fillColor’s |set|() –色設定
  
theNSBezierPath’s fill() –ぬりつぶし
  
—
  
anImage’s unlockFocus()
  
  
return anImage
end makeRoundedNSImageWithFilledWithColor

on uniquifyList(aList as list)
  set aArray to NSArray’s arrayWithArray:aList
  
set bArray to aArray’s valueForKeyPath:"@distinctUnionOfObjects.self"
  
return bArray as list
end uniquifyList

on findDataFrom2DList(anItem, aList as list)
  script spd
    property aList : {}
    
property resList : {}
  end script
  
  
set (aList of spd) to aList
  
set (resList of spd) to {}
  
  
set yCount to 1
  
  
repeat with i in (aList of spd)
    
    
set aResList to (Bplus’s indexesOfItem:anItem inList:i inverting:false) as list
    
    
set tmpList to {}
    
if aResList is not equal to {} then
      repeat with ii in aResList
        set jj to contents of ii
        
set the end of tmpList to {jj, yCount}
      end repeat
      
set (resList of spd) to (resList of spd) & tmpList
    end if
    
    
set yCount to yCount + 1
  end repeat
  
  
return (resList of spd) –return {{x, y}…..} item list (1-based)
end findDataFrom2DList

on retRangeFromPosListVertival(posList as list)
  script rangeSPD
    property posList2 : {}
  end script
  
  
–縦方向へのrange評価に都合がいいようにソート
  
set (posList2 of rangeSPD) to shellSortListAscending(posList, {1, 2}) of me
  
  
–先頭データをピックアップ
  
set firstData to first item of (posList2 of rangeSPD)
  
set (posList2 of rangeSPD) to rest of (posList2 of rangeSPD)
  
  
copy firstData to {curX1, curY1}
  
set tmpRangeStr to aNumToExcelColumn(curX1) of me & (curY1 as string) & ":"
  
  
set tmpRange to {}
  
set hitF to false
  
  
set outList to {}
  
  
repeat with i in (posList2 of rangeSPD)
    copy i to {tmpX, tmpY}
    
    
–log {"{curX1, curY1}", {curX1, curY1}}
    
–log {"{tmpX, tmpY}", {tmpX, tmpY}}


if (curX1 = tmpX) and (curY1 + 1 = tmpY) then
      –Y方向への連続値を拾っている最中
      
if hitF = false then
        –log "case 1a"
        
–log {"hitF", hitF}
        
set hitF to true
      else
        –log "case 1b"
        
–log {"hitF", hitF}
        
–横に連続しているブロックの途中
      end if
    else
      –直前の値と連続していない
      
if hitF = false then
        –log "case 2a"
        
–log {"hitF", hitF}
        
set tmpRangeStr to tmpRangeStr & aNumToExcelColumn(curX1) of me & (curY1 as string)
        
set the end of outList to tmpRangeStr
        
set tmpRangeStr to aNumToExcelColumn(tmpX) of me & (tmpY as string) & ":"
        
set hitF to false
      else
        –log "case 2b"
        
–log {"hitF", hitF}
        
–連続ブロックの末尾を拾った
        
set tmpRangeStr to tmpRangeStr & aNumToExcelColumn(curX1) of me & (curY1 as string)
        
set the end of outList to tmpRangeStr
        
set tmpRangeStr to aNumToExcelColumn(tmpX) of me & (tmpY as string) & ":"
        
set hitF to false
        
–log {"tmpRangeStr", tmpRangeStr}
      end if
    end if
    
    
copy {tmpX, tmpY} to {curX1, curY1}
  end repeat
  
  
–log {tmpRangeStr, hitF}
  
  
if (hitF = true) or (tmpRangeStr is not equal to "") then
    set tmpRangeStr to tmpRangeStr & aNumToExcelColumn(curX1) of me & (curY1 as string)
    
set the end of outList to tmpRangeStr
  end if
  
  
return outList
end retRangeFromPosListVertival

on retRangeFromPosListHorizontal(posList as list)
  script rangeSPD
    property posList2 : {}
  end script
  
  
copy posList to (posList2 of rangeSPD)
  
  
–先頭データをピックアップ
  
set firstData to first item of (posList2 of rangeSPD)
  
set (posList2 of rangeSPD) to rest of (posList2 of rangeSPD)
  
  
copy firstData to {curX1, curY1}
  
set tmpRangeStr to aNumToExcelColumn(curX1) of me & (curY1 as string) & ":"
  
  
set tmpRange to {}
  
set hitF to false
  
  
set outList to {}
  
  
repeat with i in (posList2 of rangeSPD)
    copy i to {tmpX, tmpY}
    
    
–log {"{curX1, curY1}", {curX1, curY1}}
    
–log {"{tmpX, tmpY}", {tmpX, tmpY}}


if (curX1 + 1 = tmpX) and (curY1 = tmpY) then
      –X方向への連続値を拾っている最中
      
if hitF = false then
        –log "case 1a"
        
–log {"hitF", hitF}
        
set hitF to true
      else
        –log "case 1b"
        
–log {"hitF", hitF}
        
–横に連続しているブロックの途中
      end if
    else
      –直前の値と連続していない
      
if hitF = false then
        –log "case 2a"
        
–log {"hitF", hitF}
        
set tmpRangeStr to tmpRangeStr & aNumToExcelColumn(curX1) of me & (curY1 as string)
        
set the end of outList to tmpRangeStr
        
set tmpRangeStr to aNumToExcelColumn(tmpX) of me & (tmpY as string) & ":"
        
set hitF to false
      else
        –log "case 2b"
        
–log {"hitF", hitF}
        
–連続ブロックの末尾を拾った
        
set tmpRangeStr to tmpRangeStr & aNumToExcelColumn(curX1) of me & (curY1 as string)
        
set the end of outList to tmpRangeStr
        
set tmpRangeStr to aNumToExcelColumn(tmpX) of me & (tmpY as string) & ":"
        
set hitF to false
        
–log {"tmpRangeStr", tmpRangeStr}
      end if
    end if
    
    
copy {tmpX, tmpY} to {curX1, curY1}
  end repeat
  
  
–log {tmpRangeStr, hitF}
  
  
if (hitF = true) or (tmpRangeStr is not equal to "") then
    set tmpRangeStr to tmpRangeStr & aNumToExcelColumn(curX1) of me & (curY1 as string)
    
set the end of outList to tmpRangeStr
  end if
  
  
return outList
end retRangeFromPosListHorizontal

–2008/05/01 By Takaaki Naganoya
–10進数数値をExcel 2004/2008的カラム表現にエンコードするサブルーチン を使いまわし
–1〜1351までの間であれば正しいエンコーディング結果を返す
on aNumToExcelColumn(origNum as integer)
  if origNum > 1351 then
    error "エラー:Excel 2004/2008的カラム表現(A1形式)への変換ルーチンにおいて、想定範囲外(1351以上)のパラメータが指定されました"
  end if
  
  
set upperDigitEncTable to {"A", "B", "C", "D", "E", "F", "G", "H", "I", "J", "K", "L", "M", "N", "O", "P", "Q", "R", "S", "T", "U", "V", "W", "X", "Y", "Z", "A"}
  
set lowerDigitEncTable to {"A", "B", "C", "D", "E", "F", "G", "H", "I", "J", "K", "L", "M", "N", "O", "P", "Q", "R", "S", "T", "U", "V", "W", "X", "Y", "Z", "A"}
  
  
set oNum to origNum
  
set nTh to 26
  
set stringLength to 4
  
  
–数字が1桁の場合の対応
  
if origNum < 27 then
    set aRes to (item origNum of upperDigitEncTable) as string
    
return aRes
  end if


if origNum > 702 then
    –3桁になる場合
    
set upupNum to oNum div 676 –整数除算–上の上の桁
    
set oNum to oNum – (upupNum * 676)
    
set upNum to oNum div 26 –整数除算–上の桁
    
set lowNum to oNum mod 26 – 1 –余剰計算–下の桁
    
    
–超つじつま合わせ処理
    
if lowNum = -1 then
      set upNum to upNum – 1
      
set lowNum to 25
    end if
    
    
set upupChar to (item upupNum of upperDigitEncTable) as string
    
set upChar to (item upNum of upperDigitEncTable) as string
    
set lowChar to (item (lowNum + 1) of lowerDigitEncTable) as string
    
set resText to upupChar & upChar & lowChar
    
  else
    –2桁の場合
    
set upNum to oNum div 26 –整数除算–上の桁
    
set lowNum to oNum mod 26 – 1 –余剰計算–下の桁
    
    
–超つじつま合わせ処理
    
if lowNum = -1 then
      set upNum to upNum – 1
      
set lowNum to 25
    end if
    
    
set upChar to (item upNum of upperDigitEncTable) as string
    
set lowChar to (item (lowNum + 1) of lowerDigitEncTable) as string
    
set resText to upChar & lowChar
    
  end if
  
  
return resText
end aNumToExcelColumn

–入れ子のリストを昇順ソート
on shellSortListAscending(a, keyItem)
  return sort2DList(a, keyItem, {true}) of me
end shellSortListAscending

–入れ子のリストを降順ソート
on shellSortListDecending(a, keyItem)
  return sort2DList(a, keyItem, {false}) of me
end shellSortListDecending

–2D Listをソート
on sort2DList(aList as list, sortIndexes as list, sortOrders as list)
  
  
–index値をAS流(アイテムが1はじまり)からCocoa流(アイテムが0はじまり)に変換
  
set newIndex to {}
  
repeat with i in sortIndexes
    set j to contents of i
    
set j to j – 1
    
set the end of newIndex to j
  end repeat
  
  
–Sort TypeのListを作成(あえて外部から指定する内容でもない)
  
set sortTypes to {}
  
repeat (length of sortIndexes) times
    set the end of sortTypes to "compare:"
  end repeat
  
  
–Sort
  
set resList to (current application’s SMSForder’s subarraysIn:(aList) sortedByIndexes:newIndex ascending:sortOrders sortTypes:sortTypes |error|:(missing value)) as list
  
  
return resList
end sort2DList

★Click Here to Open This Script 

Posted in Color GUI | Tagged 10.11savvy 10.12savvy 10.13savvy 10.14savvy NSArray NSBezierPath NSButton NSColor NSImage NSMenu NSMenuItem NSPopUpButton NSRoundedBezelStyle NSScreen NSTextField NSTitledWindowMask NSView NSWindow NSWindowController Numbers | Leave a comment

Pages書類の1ページ目の表の背景色を置換 v4

Posted on 1月 30, 2019 by Takaaki Naganoya

Pagesでオープン中の最前面の書類の1ページ目に存在する表オブジェクト中の背景色を置換するAppleScriptです。

例によって、Pages書類上の表オブジェクトは「配置」を「移動しない」に設定しないとAppleScriptからアクセスできないので、あらかじめ「移動しない」設定にしておく必要があります。

本バージョンでは、データの連続部分をrangeとしてまとめて処理する方法を、1行ずつ横方向に(左→右)スキャンした場合と、1列ずつ(上→下)縦方向にスキャンした場合の2パターンで処理し、より少ないデータ単位(より多くのセルを一括で指定)で処理できる方の方式を採用するようにしました。

このため、処理データによって塗りつぶし動作が変わってきます。横方向のみのスキャンでは大幅に遅くなるタイプのデータ(縦に処理対象セルが並んでいて、横方向にはつながっていない)でも「遅くならない」ことがテーマです。

ほかには、オープンソースの「DBColorNames」を利用して色から色名称を動的に取得したり、ポップアップメニューに表示する色イメージ画像を角丸にしたりしています。

–> dbColNamesKit.framework (To ~/Library/Frameworks)

これ以上の高速化は、「縦横混在のrangeシミュレーション」でも行わないとできないと思いますが、方法についてはいろいろ思いつくので論理的には可能だと思います。ただ、単に塗りつぶしを高速化するためだけに何日も試行錯誤するのはちょっと………なので、このぐらいにしておこうかと。

macOS 10.14上では、「csrutil disable」でSIPをオフにすると、ホームディレクトリ下の~/Library/Frameworksフォルダ内のFrameworkにアクセスでき、本Scriptをそのままスクリプトエディタで実行できました。アプレット形式で書き出して、アプレット内にFrameworkを入れればSIPをオフにしなくても実行できるはずです。Script Debugger/Script Menu上では実行できないというあたりが困りどころです。

AppleScript名:Pages書類の1ページ目の表の背景色を置換 v4.1
— Created 2017-07-15 by Takaaki Naganoya
— Modified 2019-01-29 by Takaaki Naganoya
— 2019 Piyomaru Software
use AppleScript version "2.4"
use scripting additions
use framework "Foundation"
use framework "AppKit"
use framework "dbColNamesKit" –https://github.com/daniel-beard/DBColorNames/
use Bplus : script "BridgePlus" –https://www.macosxautomation.com/applescript/apps/BridgePlus.html

–v1:First Version
–v2:Pick Up target cells by calculate every background color (35% speed up)
–v3:Draw cells by range (x20 speed up)
–v3.1:Bug Fix (retRangeFromPosList)
–v3.1.1:Bug Fix (retRangeFromPosList)
–v4:Two-way Simulation (Horizontal / Vertical scan), Corner-Rounded NSImage, Dynamic Color Naming
–v4.1:Correct Vertical Scan simulation (Sort list for vertical range evaluation, at first)

property NSView : a reference to current application’s NSView
property NSColor : a reference to current application’s NSColor
property NSArray : a reference to current application’s NSArray
property NSMenu : a reference to current application’s NSMenu
property NSImage : a reference to current application’s NSImage
property NSScreen : a reference to current application’s NSScreen
property NSButton : a reference to current application’s NSButton
property NSWindow : a reference to current application’s NSWindow
property NSTextField : a reference to current application’s NSTextField
property NSMenuItem : a reference to current application’s NSMenuItem
property NSBezierPath : a reference to current application’s NSBezierPath
property NSPopUpButton : a reference to current application’s NSPopUpButton
property NSWindowController : a reference to current application’s NSWindowController
property NSTitledWindowMask : a reference to current application’s NSTitledWindowMask
property NSRoundedBezelStyle : a reference to current application’s NSRoundedBezelStyle
property NSFloatingWindowLevel : a reference to current application’s NSFloatingWindowLevel
property NSBackingStoreBuffered : a reference to current application’s NSBackingStoreBuffered
property NSMomentaryLightButton : a reference to current application’s NSMomentaryLightButton

property windisp : true
property wController : missing value
property pop1ind : 1

–初期化
set (my windisp) to true
set (my pop1ind) to 1
load framework

–Pagesの1ページ目にある表の塗り色を取得
tell application "Pages"
  tell front document
    tell table 1
      set c1List to background color of every cell
      
set aProp to properties
      
set xCount to column count of aProp
    end tell
  end tell
end tell

–色データをユニーク化(重複削除)
set bList to uniquifyList(c1List) of me

–Convert 1D List to 2D List
set c3List to (current application’s SMSForder’s subarraysFrom:c1List groupedBy:xCount |error|:(missing value)) as list

–missing value(背景色なし)を除外する
set c2List to (current application’s SMSForder’s arrayByDeletingBlanksIn:(bList)) as list

–Popup Menuで置換色選択
set paramObj to {c2List, 65535, "OK", "Select Target Color", 180} –Timeout = 180 sec, Color val range = 16bit
my performSelectorOnMainThread:"getPopupValues:" withObject:(paramObj) waitUntilDone:true
if pop1ind = false then return –timed out
set fromCol to (contents of item pop1ind of c2List)

–カラーピッカーで置換色選択
set tCol to choose color default color fromCol

set d1 to current date

–実際に表の背景色を置換する
set hitList to findDataFrom2DList(fromCol, c3List) of me –データ上で当該色のセル情報を計算する

–Rangeを横スキャンと縦スキャンの2通りで試算(Two way Simulation)
set rList1 to retRangeFromPosListHorizontal(hitList) of me –横方向へのrange評価
set rList2 to retRangeFromPosListVertival(hitList) of me –縦方向へのrange評価

–Simulationの結果、要素数の少ない方(=処理時間の短い方=高速な方)を採用する
log {"Simulation", (length of rList1), (length of rList2)}
if (length of rList1) < (length of rList2) then
  copy rList1 to rangeList
else
  copy rList2 to rangeList
end if

tell application "Pages"
  activate
  
tell front document
    tell table 1
      repeat with i in rangeList
        set j to contents of i
        
        
ignoring application responses –非同期実行モードで高速実行
          set background color of range j to tCol
        end ignoring
        
      end repeat
    end tell
  end tell
end tell

set d2 to current date
return d2 – d1

–カラーポップアップメニューをウィンドウ表示
on getPopupValues:paramObj
  copy (paramObj as list) to {ap1List, aColMax, aButtonMSG, aSliderValMSG, timeOutSecs}
  
  
set (my windisp) to true
  
  
set aView to NSView’s alloc()’s initWithFrame:(current application’s NSMakeRect(0, 0, 360, 100))
  
  
–Labelをつくる
  
set a1TF to NSTextField’s alloc()’s initWithFrame:(current application’s NSMakeRect(30, 60, 80, 20))
  
a1TF’s setEditable:false
  
a1TF’s setStringValue:"Color:"
  
a1TF’s setDrawsBackground:false
  
a1TF’s setBordered:false
  
  
–Ppopup Buttonをつくる
  
set a1Button to NSPopUpButton’s alloc()’s initWithFrame:(current application’s NSMakeRect(80, 60, 200, 20)) pullsDown:false
  
a1Button’s removeAllItems()
  
  
set a1Menu to NSMenu’s alloc()’s init()
  
set aCDB to current application’s DBColorNames’s alloc()’s init()
  
  
set iCount to 1
  
repeat with i in ap1List
    copy i to {r1, g1, b1}
    
    
set nsCol to makeNSColorFromRGBAval(r1, g1, b1, aColMax, aColMax) of me
    
set anImage to makeRoundedNSImageWithFilledWithColor(64, 64, nsCol, 4) of me
    
    
set aTitle to "#" & (iCount as string) & " " & (aCDB’s nameForColor:nsCol) as string
    
set aMenuItem to (NSMenuItem’s alloc()’s initWithTitle:aTitle action:"actionHandler:" keyEquivalent:"")
    (
aMenuItem’s setImage:anImage)
    (
aMenuItem’s setEnabled:true)
    (
a1Menu’s addItem:aMenuItem)
    
    
set iCount to iCount + 1
  end repeat
  
  
a1Button’s setMenu:a1Menu


–Buttonをつくる
  
set bButton to (NSButton’s alloc()’s initWithFrame:(current application’s NSMakeRect(80, 10, 140, 40)))
  
bButton’s setButtonType:(NSMomentaryLightButton)
  
bButton’s setBezelStyle:(NSRoundedBezelStyle)
  
bButton’s setTitle:aButtonMSG
  
bButton’s setTarget:me
  
bButton’s setAction:("clicked:")
  
bButton’s setKeyEquivalent:(return)
  
  
aView’s addSubview:a1TF
  
  
aView’s addSubview:a1Button
  
aView’s addSubview:bButton
  
aView’s setNeedsDisplay:true
  
  
–NSWindowControllerを作ってみた(いらない?)
  
set aWin to (my makeWinWithView(aView, 300, 100, aSliderValMSG))
  
  
set wController to NSWindowController’s alloc()
  
wController’s initWithWindow:aWin
  
  
wController’s showWindow:me
  
  
set aCount to timeOutSecs * 100
  
  
set hitF to false
  
repeat aCount times
    if (my windisp) = false then
      set hitF to true
      
exit repeat
    end if
    
delay 0.01
    
set aCount to aCount – 1
  end repeat
  
  
my closeWin:aWin
  
  
if hitF = true then
    set s1Val to ((a1Button’s indexOfSelectedItem() as number) + 1)
  else
    set s1Val to false
  end if
  
  
copy s1Val to my pop1ind
  
end getPopupValues:

on clicked:aSender
  set (my windisp) to false
end clicked:

–make Window for Display
on makeWinWithView(aView, aWinWidth as integer, aWinHeight as integer, aTitle as string)
  set aScreen to NSScreen’s mainScreen()
  
set aFrame to {{0, 0}, {aWinWidth, aWinHeight}}
  
  
set aBacking to NSTitledWindowMask
  
  
set aDefer to NSBackingStoreBuffered
  
  
— Window
  
set aWin to NSWindow’s alloc()
  (
aWin’s initWithContentRect:aFrame styleMask:aBacking backing:aDefer defer:false screen:aScreen)
  
  
aWin’s setTitle:aTitle
  
aWin’s setDelegate:me
  
aWin’s setDisplaysWhenScreenProfileChanges:true
  
aWin’s setHasShadow:true
  
aWin’s setIgnoresMouseEvents:false
  
aWin’s setLevel:(NSFloatingWindowLevel)
  
aWin’s setOpaque:false
  
aWin’s setReleasedWhenClosed:true
  
aWin’s |center|()
  
  
aWin’s setContentView:aView
  
  
return aWin
end makeWinWithView

–close win
on closeWin:aWindow
  repeat with n from 10 to 1 by -1
    (aWindow’s setAlphaValue:n / 10)
    
delay 0.02
  end repeat
  
aWindow’s |close|()
end closeWin:

–Popup Action Handler
on actionHandler:sender
  set aTag to tag of sender as integer
  
set aTitle to title of sender as string
end actionHandler:

–aMaxValを最大値とする数値でNSColorを作成して返す
on makeNSColorFromRGBAval(redValue as integer, greenValue as integer, blueValue as integer, alphaValue as integer, aMaxVal as integer)
  set aRedCocoa to (redValue / aMaxVal) as real
  
set aGreenCocoa to (greenValue / aMaxVal) as real
  
set aBlueCocoa to (blueValue / aMaxVal) as real
  
set aAlphaCocoa to (alphaValue / aMaxVal) as real
  
set aColor to NSColor’s colorWithCalibratedRed:aRedCocoa green:aGreenCocoa blue:aBlueCocoa alpha:aAlphaCocoa
  
return aColor
end makeNSColorFromRGBAval

–指定サイズのNSImageを作成し、指定色で塗ってNSImageで返す
on makeNSImageWithFilledWithColor(aWidth as integer, aHeight as integer, fillColor)
  set anImage to NSImage’s alloc()’s initWithSize:(current application’s NSMakeSize(aWidth, aHeight))
  
anImage’s lockFocus()
  
—
  
set theRect to {{x:0, y:0}, {height:aHeight, width:aWidth}}
  
set theNSBezierPath to NSBezierPath’s bezierPath
  
theNSBezierPath’s appendBezierPathWithRect:theRect
  
—
  
fillColor’s |set|() –色設定
  
theNSBezierPath’s fill() –ぬりつぶし
  
—
  
anImage’s unlockFocus()
  
—
  
return anImage
end makeNSImageWithFilledWithColor

–指定サイズのNSImageを作成し、指定色で塗ってNSImageで返す、anRadiusの半径の角丸で
on makeRoundedNSImageWithFilledWithColor(aWidth as integer, aHeight as integer, fillColor, anRadius as real)
  set anImage to NSImage’s alloc()’s initWithSize:(current application’s NSMakeSize(aWidth, aHeight))
  
anImage’s lockFocus()
  
—
  
set theRect to {{x:0, y:0}, {height:aHeight, width:aWidth}}
  
set theNSBezierPath to NSBezierPath’s bezierPathWithRoundedRect:theRect xRadius:anRadius yRadius:anRadius
  
—
  
fillColor’s |set|() –色設定
  
theNSBezierPath’s fill() –ぬりつぶし
  
—
  
anImage’s unlockFocus()
  
  
return anImage
end makeRoundedNSImageWithFilledWithColor

on uniquifyList(aList as list)
  set aArray to NSArray’s arrayWithArray:aList
  
set bArray to aArray’s valueForKeyPath:"@distinctUnionOfObjects.self"
  
return bArray as list
end uniquifyList

on findDataFrom2DList(anItem, aList as list)
  script spd
    property aList : {}
    
property resList : {}
  end script
  
  
set (aList of spd) to aList
  
set (resList of spd) to {}
  
  
set yCount to 1
  
  
repeat with i in (aList of spd)
    
    
set aResList to (Bplus’s indexesOfItem:anItem inList:i inverting:false) as list
    
    
set tmpList to {}
    
if aResList is not equal to {} then
      repeat with ii in aResList
        set jj to contents of ii
        
set the end of tmpList to {jj, yCount}
      end repeat
      
set (resList of spd) to (resList of spd) & tmpList
    end if
    
    
set yCount to yCount + 1
  end repeat
  
  
return (resList of spd) –return {{x, y}…..} item list (1-based)
end findDataFrom2DList

on retRangeFromPosListVertival(posList as list)
  script rangeSPD
    property posList2 : {}
  end script
  
  
–縦方向へのrange評価に都合がいいようにソート
  
set (posList2 of rangeSPD) to shellSortListAscending(posList, {1, 2}) of me
  
  
–先頭データをピックアップ
  
set firstData to first item of (posList2 of rangeSPD)
  
set (posList2 of rangeSPD) to rest of (posList2 of rangeSPD)
  
  
copy firstData to {curX1, curY1}
  
set tmpRangeStr to aNumToExcelColumn(curX1) of me & (curY1 as string) & ":"
  
  
set tmpRange to {}
  
set hitF to false
  
  
set outList to {}
  
  
repeat with i in (posList2 of rangeSPD)
    copy i to {tmpX, tmpY}
    
    
–log {"{curX1, curY1}", {curX1, curY1}}
    
–log {"{tmpX, tmpY}", {tmpX, tmpY}}


if (curX1 = tmpX) and (curY1 + 1 = tmpY) then
      –Y方向への連続値を拾っている最中
      
if hitF = false then
        –log "case 1a"
        
–log {"hitF", hitF}
        
set hitF to true
      else
        –log "case 1b"
        
–log {"hitF", hitF}
        
–横に連続しているブロックの途中
      end if
    else
      –直前の値と連続していない
      
if hitF = false then
        –log "case 2a"
        
–log {"hitF", hitF}
        
set tmpRangeStr to tmpRangeStr & aNumToExcelColumn(curX1) of me & (curY1 as string)
        
set the end of outList to tmpRangeStr
        
set tmpRangeStr to aNumToExcelColumn(tmpX) of me & (tmpY as string) & ":"
        
set hitF to false
      else
        –log "case 2b"
        
–log {"hitF", hitF}
        
–連続ブロックの末尾を拾った
        
set tmpRangeStr to tmpRangeStr & aNumToExcelColumn(curX1) of me & (curY1 as string)
        
set the end of outList to tmpRangeStr
        
set tmpRangeStr to aNumToExcelColumn(tmpX) of me & (tmpY as string) & ":"
        
set hitF to false
        
–log {"tmpRangeStr", tmpRangeStr}
      end if
    end if
    
    
copy {tmpX, tmpY} to {curX1, curY1}
  end repeat
  
  
–log {tmpRangeStr, hitF}
  
  
if (hitF = true) or (tmpRangeStr is not equal to "") then
    set tmpRangeStr to tmpRangeStr & aNumToExcelColumn(curX1) of me & (curY1 as string)
    
set the end of outList to tmpRangeStr
  end if
  
  
return outList
end retRangeFromPosListVertival

on retRangeFromPosListHorizontal(posList as list)
  script rangeSPD
    property posList2 : {}
  end script
  
  
copy posList to (posList2 of rangeSPD)
  
  
–先頭データをピックアップ
  
set firstData to first item of (posList2 of rangeSPD)
  
set (posList2 of rangeSPD) to rest of (posList2 of rangeSPD)
  
  
copy firstData to {curX1, curY1}
  
set tmpRangeStr to aNumToExcelColumn(curX1) of me & (curY1 as string) & ":"
  
  
set tmpRange to {}
  
set hitF to false
  
  
set outList to {}
  
  
repeat with i in (posList2 of rangeSPD)
    copy i to {tmpX, tmpY}
    
    
–log {"{curX1, curY1}", {curX1, curY1}}
    
–log {"{tmpX, tmpY}", {tmpX, tmpY}}


if (curX1 + 1 = tmpX) and (curY1 = tmpY) then
      –X方向への連続値を拾っている最中
      
if hitF = false then
        –log "case 1a"
        
–log {"hitF", hitF}
        
set hitF to true
      else
        –log "case 1b"
        
–log {"hitF", hitF}
        
–横に連続しているブロックの途中
      end if
    else
      –直前の値と連続していない
      
if hitF = false then
        –log "case 2a"
        
–log {"hitF", hitF}
        
set tmpRangeStr to tmpRangeStr & aNumToExcelColumn(curX1) of me & (curY1 as string)
        
set the end of outList to tmpRangeStr
        
set tmpRangeStr to aNumToExcelColumn(tmpX) of me & (tmpY as string) & ":"
        
set hitF to false
      else
        –log "case 2b"
        
–log {"hitF", hitF}
        
–連続ブロックの末尾を拾った
        
set tmpRangeStr to tmpRangeStr & aNumToExcelColumn(curX1) of me & (curY1 as string)
        
set the end of outList to tmpRangeStr
        
set tmpRangeStr to aNumToExcelColumn(tmpX) of me & (tmpY as string) & ":"
        
set hitF to false
        
–log {"tmpRangeStr", tmpRangeStr}
      end if
    end if
    
    
copy {tmpX, tmpY} to {curX1, curY1}
  end repeat
  
  
–log {tmpRangeStr, hitF}
  
  
if (hitF = true) or (tmpRangeStr is not equal to "") then
    set tmpRangeStr to tmpRangeStr & aNumToExcelColumn(curX1) of me & (curY1 as string)
    
set the end of outList to tmpRangeStr
  end if
  
  
return outList
end retRangeFromPosListHorizontal

–2008/05/01 By Takaaki Naganoya
–10進数数値をExcel 2004/2008的カラム表現にエンコードするサブルーチン を使いまわし
–1〜1351までの間であれば正しいエンコーディング結果を返す
on aNumToExcelColumn(origNum as integer)
  if origNum > 1351 then
    error "エラー:Excel 2004/2008的カラム表現(A1形式)への変換ルーチンにおいて、想定範囲外(1351以上)のパラメータが指定されました"
  end if
  
  
set upperDigitEncTable to {"A", "B", "C", "D", "E", "F", "G", "H", "I", "J", "K", "L", "M", "N", "O", "P", "Q", "R", "S", "T", "U", "V", "W", "X", "Y", "Z", "A"}
  
set lowerDigitEncTable to {"A", "B", "C", "D", "E", "F", "G", "H", "I", "J", "K", "L", "M", "N", "O", "P", "Q", "R", "S", "T", "U", "V", "W", "X", "Y", "Z", "A"}
  
  
set oNum to origNum
  
set nTh to 26
  
set stringLength to 4
  
  
–数字が1桁の場合の対応
  
if origNum < 27 then
    set aRes to (item origNum of upperDigitEncTable) as string
    
return aRes
  end if


if origNum > 702 then
    –3桁になる場合
    
set upupNum to oNum div 676 –整数除算–上の上の桁
    
set oNum to oNum – (upupNum * 676)
    
set upNum to oNum div 26 –整数除算–上の桁
    
set lowNum to oNum mod 26 – 1 –余剰計算–下の桁
    
    
–超つじつま合わせ処理
    
if lowNum = -1 then
      set upNum to upNum – 1
      
set lowNum to 25
    end if
    
    
set upupChar to (item upupNum of upperDigitEncTable) as string
    
set upChar to (item upNum of upperDigitEncTable) as string
    
set lowChar to (item (lowNum + 1) of lowerDigitEncTable) as string
    
set resText to upupChar & upChar & lowChar
    
  else
    –2桁の場合
    
set upNum to oNum div 26 –整数除算–上の桁
    
set lowNum to oNum mod 26 – 1 –余剰計算–下の桁
    
    
–超つじつま合わせ処理
    
if lowNum = -1 then
      set upNum to upNum – 1
      
set lowNum to 25
    end if
    
    
set upChar to (item upNum of upperDigitEncTable) as string
    
set lowChar to (item (lowNum + 1) of lowerDigitEncTable) as string
    
set resText to upChar & lowChar
    
  end if
  
  
return resText
end aNumToExcelColumn

–入れ子のリストを昇順ソート
on shellSortListAscending(a, keyItem)
  return sort2DList(a, keyItem, {true}) of me
end shellSortListAscending

–入れ子のリストを降順ソート
on shellSortListDecending(a, keyItem)
  return sort2DList(a, keyItem, {false}) of me
end shellSortListDecending

–2D Listをソート
on sort2DList(aList as list, sortIndexes as list, sortOrders as list)
  
  
–index値をAS流(アイテムが1はじまり)からCocoa流(アイテムが0はじまり)に変換
  
set newIndex to {}
  
repeat with i in sortIndexes
    set j to contents of i
    
set j to j – 1
    
set the end of newIndex to j
  end repeat
  
  
–Sort TypeのListを作成(あえて外部から指定する内容でもない)
  
set sortTypes to {}
  
repeat (length of sortIndexes) times
    set the end of sortTypes to "compare:"
  end repeat
  
  
–Sort
  
set resList to (current application’s SMSForder’s subarraysIn:(aList) sortedByIndexes:newIndex ascending:sortOrders sortTypes:sortTypes |error|:(missing value)) as list
  
  
return resList
end sort2DList

★Click Here to Open This Script 

Posted in Color GUI list | Tagged 10.11savvy 10.12savvy 10.13savvy 10.14savvy NSArray NSBezierPath NSButton NSColor NSImage NSMenu NSMenuItem NSPopUpButton NSScreen NSTextField NSView NSWindow NSWindowController Pages | 2 Comments
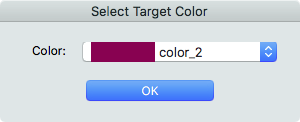
Pages書類の1ページ目の表の背景色を置換 v3.1(約20倍速)

Posted on 1月 29, 2019 by Takaaki Naganoya

Pagesでオープン中の最前面の書類の1ページ目に存在する表オブジェクト中の背景色を置換するAppleScriptの高速化版です。

初版では表中のセルをすべて取得し、すべてのセルについて順次背景色を求め、置換対象色であれば塗り直していました。セル1個ずつ塗っていたので、それなりの時間(テストデータでは20秒)がかかっていました。GUIアプリケーションを操作するために存在しているAppleScriptですが、アプリケーションとの通信はコストが高いので、この通信部分を減らすことが高速化の基本です。

ちなみに、「ignoring application responses」〜「end ignoring」で囲った範囲は非同期実行モードで実行され、2.5倍ぐらい高速になります。AppleScriptでは、GUIアプリケーションに対してコマンドを実行した場合、「コマンド実行」「コマンド処理」「コマンド結果受信」の3ステップを行なっています。非同期実行モードでは「コマンド実行」だけを行うので高速ですが、設定値や状態を知りたいような場合には(結果が返ってこないので)使う意味がありません。本Blogを「ignoring application responses」で検索しても、あまり出てこないはずです。

v2では、高速化のために全セルの背景色を抽出したあとに、2次元配列データ上で当該セルの座標を計算し、塗り替え対象セルのみ処理することで約35%のスピードアップを行いました。GUIアプリケーションにコマンドを送る(そして、処理を待って結果を受信する)よりも配列変数上で検索を行ったほうがはるかに高速です。

本v3では、さらなる高速化のために、2次元配列データ上で当該セルの座標を計算したあと、それらを横方向にスキャンして、点ではなく範囲(range)として評価し、極力複数のセルを連続する範囲(range)としてまとめて、rangeを一括塗りすることで初版から約20倍の高速化を行なったものです。v1やv2ではセルを1つずつ塗りつぶしていましたが、v3からは横方向に複数まとめてぬりつぶします。

実際のPages書類上の表の塗りつぶし領域が、ヘッダーや年表のような横方向に連続した塗りエリアを持つことが多いことに着目して、複数セルを一度に塗りつぶすことで高速化しました(1セル塗るのと複数セルを塗るのとで時間かわらず)。本Scriptでも1マスごとに塗りつぶしが存在するようなハッチング模様の表の塗りつぶし色を変更する場合にはパフォーマンスが最悪の状態に落ち込みますが、v2のレベル以下に落ちることはないでしょう。

この世のどこかには、さらにデータを1D Arrayではなく2D Arrayとして評価して、最大限まとめた面積のrangeとみなすことで本ルーチンの2倍ぐらいの速度で処理できるプログラムも存在しそうですが、人類の叡智のレベルを超えそうなので、自分はこのぐらいの速度が出れば満足です(総当たり的なアプローチで全パターンをシミュレーションして、一番いい結果が出るものを採用というのも考えないではないですが、シミュレーションをていねいに行うと処理時間が余計にかかるので、、、)。

1D Listに入っている座標値をX軸方向に評価して、連続値であればrangeに変換するルーチン「retRangeFromPosList」については、それほど真剣にテストしていないので処理が間違っている可能性もあります。
→ 処理に誤りがあったので修正しました(v3.1)

また、数値からExcelのA1形式のアドレスに変換するために作ってホコリをかぶっていた「aNumToExcelColumn」ルーチンも、一応テストはしてありますが変換できるアドレスの上限値が存在しているため注意が必要です。

AppleScript名:Pages書類の1ページ目の表の背景色を置換 v3.11
— Created 2017-07-15 by Takaaki Naganoya
— Modified 2019-01-29 by Takaaki Naganoya
— 2019 Piyomaru Software
use AppleScript version "2.4"
use scripting additions
use framework "Foundation"
use framework "AppKit"
use Bplus : script "BridgePlus" –https://www.macosxautomation.com/applescript/apps/BridgePlus.html

–v1:First Version
–v2:Pick Up target cells by calculate every background color (35% speed up)
–v3:Draw cells by range (x20 speed up)
–v3.1:Bug Fix (retRangeFromPosList)
–v3.1.1:Bug Fix (retRangeFromPosList)

property NSView : a reference to current application’s NSView
property NSColor : a reference to current application’s NSColor
property NSArray : a reference to current application’s NSArray
property NSMenu : a reference to current application’s NSMenu
property NSImage : a reference to current application’s NSImage
property NSScreen : a reference to current application’s NSScreen
property NSButton : a reference to current application’s NSButton
property NSWindow : a reference to current application’s NSWindow
property NSTextField : a reference to current application’s NSTextField
property NSMenuItem : a reference to current application’s NSMenuItem
property NSBezierPath : a reference to current application’s NSBezierPath
property NSPopUpButton : a reference to current application’s NSPopUpButton
property NSWindowController : a reference to current application’s NSWindowController
property NSTitledWindowMask : a reference to current application’s NSTitledWindowMask
property NSRoundedBezelStyle : a reference to current application’s NSRoundedBezelStyle
property NSNormalWindowLevel : a reference to current application’s NSNormalWindowLevel
property NSBackingStoreBuffered : a reference to current application’s NSBackingStoreBuffered
property NSMomentaryLightButton : a reference to current application’s NSMomentaryLightButton

property windisp : true
property wController : missing value
property pop1ind : 1

–初期化
set (my windisp) to true
set (my pop1ind) to 1
load framework

–Pagesの1ページ目にある表の塗り色を取得
tell application "Pages"
  tell front document
    tell table 1
      set c1List to background color of every cell
      
set aProp to properties
      
set xCount to column count of aProp
    end tell
  end tell
end tell

–色データをユニーク化(重複削除)
set bList to uniquifyList(c1List) of me

–Convert 1D List to 2D List
set c3List to (current application’s SMSForder’s subarraysFrom:c1List groupedBy:xCount |error|:(missing value)) as list

–missing value(背景色なし)を除外する
load framework
set c2List to (current application’s SMSForder’s arrayByDeletingBlanksIn:(bList)) as list

–Popup Menuで置換色選択
set aButtonMSG to "OK"
set aSliderValMSG to "Select Target Color"
set paramObj to {c2List, 65535, aButtonMSG, aSliderValMSG, 20}
my performSelectorOnMainThread:"getPopupValues:" withObject:(paramObj) waitUntilDone:true
set fromCol to (contents of item pop1ind of c2List)

–カラーピッカーで置換色選択
set tCol to choose color default color fromCol

set d1 to current date

–実際に表の背景色を置換する
set hitList to findDataFrom2DList(fromCol, c3List) of me –データ上で当該色のセル情報を計算する

set rangeList to retRangeFromPosList(hitList) of me

tell application "Pages"
  tell front document
    tell table 1
      repeat with i in rangeList
        set j to contents of i
        
        
ignoring application responses –非同期実行モードで高速実行
          set background color of range j to tCol
        end ignoring
      end repeat
    end tell
  end tell
end tell

set d2 to current date
return d2 – d1

–カラーポップアップメニューをウィンドウ表示
on getPopupValues:paramObj
  copy (paramObj as list) to {ap1List, aColMax, aButtonMSG, aSliderValMSG, timeOutSecs}
  
  
set (my windisp) to true
  
  
set aView to NSView’s alloc()’s initWithFrame:(current application’s NSMakeRect(0, 0, 360, 100))
  
  
–Labelをつくる
  
set a1TF to NSTextField’s alloc()’s initWithFrame:(current application’s NSMakeRect(30, 60, 80, 20))
  
a1TF’s setEditable:false
  
a1TF’s setStringValue:"Color:"
  
a1TF’s setDrawsBackground:false
  
a1TF’s setBordered:false
  
  
–Ppopup Buttonをつくる
  
set a1Button to NSPopUpButton’s alloc()’s initWithFrame:(current application’s NSMakeRect(80, 60, 200, 20)) pullsDown:false
  
a1Button’s removeAllItems()
  
  
set a1Menu to NSMenu’s alloc()’s init()
  
  
set iCount to 1
  
repeat with i in ap1List
    copy i to {r1, g1, b1}
    
    
set nsCol to makeNSColorFromRGBAval(r1, g1, b1, aColMax, aColMax) of me
    
set anImage to makeNSImageWithFilledWithColor(64, 64, nsCol) of me
    
    
set aTitle to "color_" & (iCount as string)
    
set aMenuItem to (NSMenuItem’s alloc()’s initWithTitle:aTitle action:"actionHandler:" keyEquivalent:"")
    (
aMenuItem’s setImage:anImage)
    (
aMenuItem’s setEnabled:true)
    (
a1Menu’s addItem:aMenuItem)
    
    
set iCount to iCount + 1
  end repeat
  
  
a1Button’s setMenu:a1Menu


–Buttonをつくる
  
set bButton to (NSButton’s alloc()’s initWithFrame:(current application’s NSMakeRect(80, 10, 140, 40)))
  
bButton’s setButtonType:(NSMomentaryLightButton)
  
bButton’s setBezelStyle:(NSRoundedBezelStyle)
  
bButton’s setTitle:aButtonMSG
  
bButton’s setTarget:me
  
bButton’s setAction:("clicked:")
  
bButton’s setKeyEquivalent:(return)
  
  
aView’s addSubview:a1TF
  
  
aView’s addSubview:a1Button
  
aView’s addSubview:bButton
  
aView’s setNeedsDisplay:true
  
  
–NSWindowControllerを作ってみた(いらない?)
  
set aWin to (my makeWinWithView(aView, 300, 100, aSliderValMSG))
  
  
set wController to NSWindowController’s alloc()
  
wController’s initWithWindow:aWin
  
  
wController’s showWindow:me
  
  
set aCount to timeOutSecs * 100
  
  
set hitF to false
  
repeat aCount times
    if (my windisp) = false then
      set hitF to true
      
exit repeat
    end if
    
delay 0.01
    
set aCount to aCount – 1
  end repeat
  
  
my closeWin:aWin
  
  
if hitF = true then
    set s1Val to ((a1Button’s indexOfSelectedItem() as number) + 1)
  else
    set s1Val to false
  end if
  
  
copy s1Val to my pop1ind
  
end getPopupValues:

on clicked:aSender
  set (my windisp) to false
end clicked:

–make Window for Display
on makeWinWithView(aView, aWinWidth, aWinHeight, aTitle)
  set aScreen to NSScreen’s mainScreen()
  
set aFrame to {{0, 0}, {aWinWidth, aWinHeight}}
  
  
set aBacking to NSTitledWindowMask
  
  
set aDefer to NSBackingStoreBuffered
  
  
— Window
  
set aWin to NSWindow’s alloc()
  (
aWin’s initWithContentRect:aFrame styleMask:aBacking backing:aDefer defer:false screen:aScreen)
  
  
aWin’s setTitle:aTitle
  
aWin’s setDelegate:me
  
aWin’s setDisplaysWhenScreenProfileChanges:true
  
aWin’s setHasShadow:true
  
aWin’s setIgnoresMouseEvents:false
  
aWin’s setLevel:(NSNormalWindowLevel)
  
aWin’s setOpaque:false
  
aWin’s setReleasedWhenClosed:true
  
aWin’s |center|()
  
  
aWin’s setContentView:aView
  
  
return aWin
end makeWinWithView

–close win
on closeWin:aWindow
  repeat with n from 10 to 1 by -1
    (aWindow’s setAlphaValue:n / 10)
    
delay 0.02
  end repeat
  
aWindow’s |close|()
end closeWin:

–Popup Action Handler
on actionHandler:sender
  set aTag to tag of sender as integer
  
set aTitle to title of sender as string
end actionHandler:

–aMaxValを最大値とする数値でNSColorを作成して返す
on makeNSColorFromRGBAval(redValue as integer, greenValue as integer, blueValue as integer, alphaValue as integer, aMaxVal as integer)
  set aRedCocoa to (redValue / aMaxVal) as real
  
set aGreenCocoa to (greenValue / aMaxVal) as real
  
set aBlueCocoa to (blueValue / aMaxVal) as real
  
set aAlphaCocoa to (alphaValue / aMaxVal) as real
  
set aColor to NSColor’s colorWithCalibratedRed:aRedCocoa green:aGreenCocoa blue:aBlueCocoa alpha:aAlphaCocoa
  
return aColor
end makeNSColorFromRGBAval

–指定サイズのNSImageを作成し、指定色で塗ってNSImageで返す
on makeNSImageWithFilledWithColor(aWidth, aHeight, fillColor)
  set anImage to NSImage’s alloc()’s initWithSize:(current application’s NSMakeSize(aWidth, aHeight))
  
anImage’s lockFocus()
  
—
  
set theRect to {{x:0, y:0}, {height:aHeight, width:aWidth}}
  
set theNSBezierPath to NSBezierPath’s bezierPath
  
theNSBezierPath’s appendBezierPathWithRect:theRect
  
—
  
fillColor’s |set|() –色設定
  
theNSBezierPath’s fill() –ぬりつぶし
  
—
  
anImage’s unlockFocus()
  
—
  
return anImage
end makeNSImageWithFilledWithColor

on uniquifyList(aList as list)
  set aArray to NSArray’s arrayWithArray:aList
  
set bArray to aArray’s valueForKeyPath:"@distinctUnionOfObjects.self"
  
return bArray as list
end uniquifyList

on findDataFrom2DList(anItem, aList)
  script spd
    property aList : {}
    
property resList : {}
  end script
  
  
set (aList of spd) to aList
  
set (resList of spd) to {}
  
  
set yCount to 1
  
  
repeat with i in (aList of spd)
    
    
set aResList to (Bplus’s indexesOfItem:anItem inList:i inverting:false) as list
    
    
set tmpList to {}
    
if aResList is not equal to {} then
      repeat with ii in aResList
        set jj to contents of ii
        
set the end of tmpList to {jj, yCount}
      end repeat
      
set (resList of spd) to (resList of spd) & tmpList
    end if
    
    
set yCount to yCount + 1
  end repeat
  
  
return (resList of spd) –return {{x, y}…..} item list (1-based)
end findDataFrom2DList

on retRangeFromPosList(posList as list)
  script rangeSPD
    property posList2 : {}
  end script
  
  
copy posList to (posList2 of rangeSPD)
  
  
–先頭データをピックアップ
  
set firstData to first item of (posList2 of rangeSPD)
  
set (posList2 of rangeSPD) to rest of (posList2 of rangeSPD)
  
  
copy firstData to {curX1, curY1}
  
set tmpRangeStr to aNumToExcelColumn(curX1) of me & (curY1 as string) & ":"
  
  
set tmpRange to {}
  
set hitF to false
  
  
set outList to {}
  
  
repeat with i in (posList2 of rangeSPD)
    copy i to {tmpX, tmpY}
    
    
–log {"{curX1, curY1}", {curX1, curY1}}
    
–log {"{tmpX, tmpY}", {tmpX, tmpY}}


if (curX1 + 1 = tmpX) and (curY1 = tmpY) then
      –X方向への連続値を拾っている最中
      
if hitF = false then
        –log "case 1a"
        
–log {"hitF", hitF}
        
set hitF to true
      else
        –log "case 1b"
        
–log {"hitF", hitF}
        
–横に連続しているブロックの途中
      end if
    else
      –直前の値と連続していない
      
if hitF = false then
        –log "case 2a"
        
–log {"hitF", hitF}
        
set tmpRangeStr to tmpRangeStr & aNumToExcelColumn(curX1) of me & (curY1 as string)
        
set the end of outList to tmpRangeStr
        
set tmpRangeStr to aNumToExcelColumn(tmpX) of me & (tmpY as string) & ":"
        
set hitF to false
      else
        –log "case 2b"
        
–log {"hitF", hitF}
        
–連続ブロックの末尾を拾った
        
set tmpRangeStr to tmpRangeStr & aNumToExcelColumn(curX1) of me & (curY1 as string)
        
set the end of outList to tmpRangeStr
        
set tmpRangeStr to aNumToExcelColumn(tmpX) of me & (tmpY as string) & ":"
        
set hitF to false
        
–log {"tmpRangeStr", tmpRangeStr}
      end if
    end if
    
    
copy {tmpX, tmpY} to {curX1, curY1}
  end repeat
  
  
–log {tmpRangeStr, hitF}
  
  
if (hitF = true) or (tmpRangeStr is not equal to "") then
    set tmpRangeStr to tmpRangeStr & aNumToExcelColumn(curX1) of me & (curY1 as string)
    
set the end of outList to tmpRangeStr
  end if
  
  
return outList
end retRangeFromPosList

–2008/05/01 By Takaaki Naganoya
–10進数数値をExcel 2004/2008的カラム表現にエンコードするサブルーチン を使いまわし
–1〜1351までの間であれば正しいエンコーディング結果を返す
on aNumToExcelColumn(origNum as integer)
  if origNum > 1351 then
    display dialog "エラー:Excel 2004/2008的カラム表現(A1形式)への変換ルーチンにおいて、想定範囲外(1351以上)のパラメータが指定されました" buttons {"OK"} default button 1
    
return ""
  end if
  
  
set upperDigitEncTable to {"A", "B", "C", "D", "E", "F", "G", "H", "I", "J", "K", "L", "M", "N", "O", "P", "Q", "R", "S", "T", "U", "V", "W", "X", "Y", "Z", "A"}
  
set lowerDigitEncTable to {"A", "B", "C", "D", "E", "F", "G", "H", "I", "J", "K", "L", "M", "N", "O", "P", "Q", "R", "S", "T", "U", "V", "W", "X", "Y", "Z", "A"}
  
  
set oNum to origNum
  
set nTh to 26
  
set stringLength to 4
  
  
–数字が1桁の場合の対応
  
if origNum < 27 then
    set aRes to (item origNum of upperDigitEncTable) as string
    
return aRes
  end if


if origNum > 702 then
    –3桁になる場合
    
set upupNum to oNum div 676 –整数除算–上の上の桁
    
set oNum to oNum – (upupNum * 676)
    
set upNum to oNum div 26 –整数除算–上の桁
    
set lowNum to oNum mod 26 – 1 –余剰計算–下の桁
    
    
–超つじつま合わせ処理
    
if lowNum = -1 then
      set upNum to upNum – 1
      
set lowNum to 25
    end if
    
    
set upupChar to (item upupNum of upperDigitEncTable) as string
    
set upChar to (item upNum of upperDigitEncTable) as string
    
set lowChar to (item (lowNum + 1) of lowerDigitEncTable) as string
    
set resText to upupChar & upChar & lowChar
    
  else
    –2桁の場合
    
set upNum to oNum div 26 –整数除算–上の桁
    
set lowNum to oNum mod 26 – 1 –余剰計算–下の桁
    
    
–超つじつま合わせ処理
    
if lowNum = -1 then
      set upNum to upNum – 1
      
set lowNum to 25
    end if
    
    
set upChar to (item upNum of upperDigitEncTable) as string
    
set lowChar to (item (lowNum + 1) of lowerDigitEncTable) as string
    
set resText to upChar & lowChar
    
  end if
  
  
return resText
end aNumToExcelColumn

★Click Here to Open This Script 

Posted in Color GUI list | Tagged 10.11savvy 10.12savvy 10.13savvy 10.14savvy NSArray NSBackingStoreBuffered NSBezierPath NSButton NSColor NSImage NSMenu NSMenuItem NSMomentaryLightButton NSNormalWindowLevel NSPopUpButton NSRoundedBezelStyle NSScreen NSTextField NSTitledWindowMask NSView NSWindow NSWindowController Pages | Leave a comment
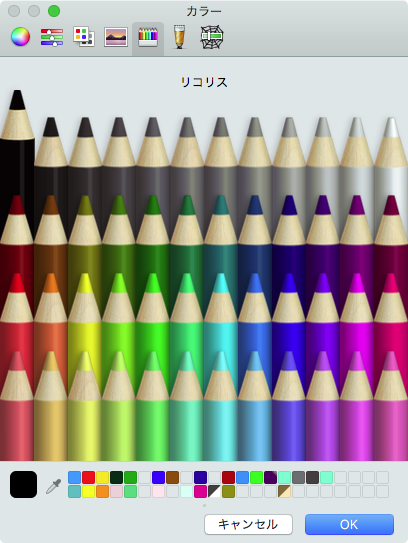
Pages書類の1ページ目の表の背景色を置換

Posted on 1月 28, 2019 by Takaaki Naganoya

Pagesでオープン中の最前面の書類の1ページ目に存在する表オブジェクト中の背景色を置換するAppleScriptです。

Pages書類の「表オブジェクト」にAppleScriptからアクセスするためには、Pages上で表オブジェクトを選択した状態で、

「オブジェクトの配置」を「移動しない」に事前に設定しておく必要があります。

本AppleScriptを実行可能なランタイム環境は、スクリプトエディタ、アプレットの2つです。スクリプトメニューおよびScript Debuggerでは各GUI部品のクリックイベントを拾えないために、実行しても選択などが行えません。

のように、1ページのみのPages書類に表オブジェクトを入れて、「移動しない」設定にしてある状態で本AppleScriptを実行。

表のセル中の色をすべて取得して、ユニーク化してポップアップメニューから「変更元」の色を選択できます。

選択して、「OK」ボタンをクリック。ここで選択した色が置換されます。

選択した色をどの色に変更(置換)するのかを指定します。

黒い色を選択。

ちょっと置換に時間がかかりますが(テストデータ+開発環境で20秒前後)、セルの背景色をします。このあたり、Pagesの表オブジェクト中のセルに対して、background colorでフィルタ参照できればよかったのですが、自分が試した範囲ではフィルタ参照で抽出できませんでした。全セルを取得してループで背景色のチェックと置換を行なっています。

こういう機能が最初からPagesに実装されているわけでもないので、手作業よりははるかに高速なのでしばらく放っておけば終わるのでいいんじゃないでしょうか。

本来であれば、指定色に該当するセルをフィルタ参照で抽出して、ヒットしたセルだけでループして背景色を変更できるとベストですが、実際にフィルタ参照で抽出できるかどうかはアプリケーション側の対応度次第なので、実際にやってみないとわかりません。

AppleScript名:Pages書類の1ページ目の表の背景色を置換
— Created 2017-07-15 by Takaaki Naganoya
— Created 2019-01-28 by Takaaki Naganoya
— 2019 Piyomaru Software
use AppleScript version "2.4"
use scripting additions
use framework "Foundation"
use framework "AppKit"
use Bplus : script "BridgePlus" –https://www.macosxautomation.com/applescript/apps/BridgePlus.html

property NSView : a reference to current application’s NSView
property NSColor : a reference to current application’s NSColor
property NSArray : a reference to current application’s NSArray
property NSMenu : a reference to current application’s NSMenu
property NSImage : a reference to current application’s NSImage
property NSScreen : a reference to current application’s NSScreen
property NSButton : a reference to current application’s NSButton
property NSWindow : a reference to current application’s NSWindow
property NSTextField : a reference to current application’s NSTextField
property NSMenuItem : a reference to current application’s NSMenuItem
property NSBezierPath : a reference to current application’s NSBezierPath
property NSPopUpButton : a reference to current application’s NSPopUpButton
property NSWindowController : a reference to current application’s NSWindowController
property NSTitledWindowMask : a reference to current application’s NSTitledWindowMask
property NSRoundedBezelStyle : a reference to current application’s NSRoundedBezelStyle
property NSNormalWindowLevel : a reference to current application’s NSNormalWindowLevel
property NSBackingStoreBuffered : a reference to current application’s NSBackingStoreBuffered
property NSMomentaryLightButton : a reference to current application’s NSMomentaryLightButton

property windisp : false
property wController : false
property pop1ind : missing value

–Pagesの1ページ目にある表の塗り色を取得
tell application "Pages"
  tell front document
    tell table 1
      set cList to background color of every cell
    end tell
  end tell
end tell

–色データをユニーク化(重複削除)
set bList to uniquifyList(cList) of me

–missing value(背景色なし)を除外する
load framework
set cList to (current application’s SMSForder’s arrayByDeletingBlanksIn:(bList)) as list

–Popup Menuで置換色選択
set aButtonMSG to "OK"
set aSliderValMSG to "Select Target Color"
set paramObj to {cList, 65535, aButtonMSG, aSliderValMSG, 20}
my performSelectorOnMainThread:"getPopupValues:" withObject:(paramObj) waitUntilDone:true

–カラーピッカーで色選択
set fromCol to (contents of item pop1ind of cList)
set tCol to choose color default color fromCol

–実際に表の背景色を置換する
tell application "Pages"
  tell front document
    tell table 1
      set cellList to every cell
      
      
repeat with i in cellList
        set aBG to background color of i
        
        
if aBG = fromCol then
          ignoring application responses
            set background color of i to tCol
          end ignoring
        end if
      end repeat
    end tell
  end tell
end tell

–カラーポップアップメニューをウィンドウ表示
on getPopupValues:paramObj
  copy (paramObj as list) to {ap1List, aColMax, aButtonMSG, aSliderValMSG, timeOutSecs}
  
  
set (my windisp) to true
  
  
set aView to NSView’s alloc()’s initWithFrame:(current application’s NSMakeRect(0, 0, 360, 100))
  
  
–Labelをつくる
  
set a1TF to NSTextField’s alloc()’s initWithFrame:(current application’s NSMakeRect(30, 60, 80, 20))
  
a1TF’s setEditable:false
  
a1TF’s setStringValue:"Color:"
  
a1TF’s setDrawsBackground:false
  
a1TF’s setBordered:false
  
  
–Ppopup Buttonをつくる
  
set a1Button to NSPopUpButton’s alloc()’s initWithFrame:(current application’s NSMakeRect(80, 60, 200, 20)) pullsDown:false
  
a1Button’s removeAllItems()
  
  
set a1Menu to NSMenu’s alloc()’s init()
  
  
set iCount to 0
  
repeat with i in ap1List
    copy i to {r1, g1, b1}
    
    
set nsCol to makeNSColorFromRGBAval(r1, g1, b1, aColMax, aColMax) of me
    
set anImage to makeNSImageWithFilledWithColor(64, 64, nsCol) of me
    
    
set aTitle to "color_" & (iCount as string)
    
set aMenuItem to (NSMenuItem’s alloc()’s initWithTitle:aTitle action:"actionHandler:" keyEquivalent:"")
    (
aMenuItem’s setImage:anImage)
    (
aMenuItem’s setEnabled:true)
    (
a1Menu’s addItem:aMenuItem)
    
    
set iCount to iCount + 1
  end repeat
  
  
a1Button’s setMenu:a1Menu


–Buttonをつくる
  
set bButton to (NSButton’s alloc()’s initWithFrame:(current application’s NSMakeRect(80, 10, 140, 40)))
  
bButton’s setButtonType:(NSMomentaryLightButton)
  
bButton’s setBezelStyle:(NSRoundedBezelStyle)
  
bButton’s setTitle:aButtonMSG
  
bButton’s setTarget:me
  
bButton’s setAction:("clicked:")
  
bButton’s setKeyEquivalent:(return)
  
  
aView’s addSubview:a1TF
  
  
aView’s addSubview:a1Button
  
aView’s addSubview:bButton
  
aView’s setNeedsDisplay:true
  
  
–NSWindowControllerを作ってみた(いらない?)
  
set aWin to (my makeWinWithView(aView, 300, 100, aSliderValMSG))
  
  
set wController to NSWindowController’s alloc()
  
wController’s initWithWindow:aWin
  
  
wController’s showWindow:me
  
  
set aCount to timeOutSecs * 100
  
  
set hitF to false
  
repeat aCount times
    if (my windisp) = false then
      set hitF to true
      
exit repeat
    end if
    
delay 0.01
    
set aCount to aCount – 1
  end repeat
  
  
my closeWin:aWin
  
  
if hitF = true then
    set s1Val to ((a1Button’s indexOfSelectedItem() as number) + 1)
  else
    set s1Val to false
  end if
  
  
copy s1Val to my pop1ind
  
end getPopupValues:

on clicked:aSender
  set (my windisp) to false
end clicked:

–make Window for Display
on makeWinWithView(aView, aWinWidth, aWinHeight, aTitle)
  set aScreen to NSScreen’s mainScreen()
  
set aFrame to {{0, 0}, {aWinWidth, aWinHeight}}
  
  
set aBacking to NSTitledWindowMask
  
  
set aDefer to NSBackingStoreBuffered
  
  
— Window
  
set aWin to NSWindow’s alloc()
  (
aWin’s initWithContentRect:aFrame styleMask:aBacking backing:aDefer defer:false screen:aScreen)
  
  
aWin’s setTitle:aTitle
  
aWin’s setDelegate:me
  
aWin’s setDisplaysWhenScreenProfileChanges:true
  
aWin’s setHasShadow:true
  
aWin’s setIgnoresMouseEvents:false
  
aWin’s setLevel:(NSNormalWindowLevel)
  
aWin’s setOpaque:false
  
aWin’s setReleasedWhenClosed:true
  
aWin’s |center|()
  
  
aWin’s setContentView:aView
  
  
return aWin
end makeWinWithView

–close win
on closeWin:aWindow
  repeat with n from 10 to 1 by -1
    (aWindow’s setAlphaValue:n / 10)
    
delay 0.02
  end repeat
  
aWindow’s |close|()
end closeWin:

–Popup Action Handler
on actionHandler:sender
  set aTag to tag of sender as integer
  
set aTitle to title of sender as string
end actionHandler:

–aMaxValを最大値とする数値でNSColorを作成して返す
on makeNSColorFromRGBAval(redValue as integer, greenValue as integer, blueValue as integer, alphaValue as integer, aMaxVal as integer)
  set aRedCocoa to (redValue / aMaxVal) as real
  
set aGreenCocoa to (greenValue / aMaxVal) as real
  
set aBlueCocoa to (blueValue / aMaxVal) as real
  
set aAlphaCocoa to (alphaValue / aMaxVal) as real
  
set aColor to NSColor’s colorWithCalibratedRed:aRedCocoa green:aGreenCocoa blue:aBlueCocoa alpha:aAlphaCocoa
  
return aColor
end makeNSColorFromRGBAval

–指定サイズのNSImageを作成し、指定色で塗ってNSImageで返す
on makeNSImageWithFilledWithColor(aWidth, aHeight, fillColor)
  set anImage to NSImage’s alloc()’s initWithSize:(current application’s NSMakeSize(aWidth, aHeight))
  
anImage’s lockFocus()
  
—
  
set theRect to {{x:0, y:0}, {height:aHeight, width:aWidth}}
  
set theNSBezierPath to NSBezierPath’s bezierPath
  
theNSBezierPath’s appendBezierPathWithRect:theRect
  
—
  
fillColor’s |set|() –色設定
  
theNSBezierPath’s fill() –ぬりつぶし
  
—
  
anImage’s unlockFocus()
  
—
  
return anImage
end makeNSImageWithFilledWithColor

on uniquifyList(aList as list)
  set aArray to NSArray’s arrayWithArray:aList
  
set bArray to aArray’s valueForKeyPath:"@distinctUnionOfObjects.self"
  
return bArray as list
end uniquifyList

★Click Here to Open This Script 

Posted in Color GUI | Tagged 10.11savvy 10.12savvy 10.13savvy 10.14savvy NSArray NSBackingStoreBuffered NSBezierPath NSButton NSColor NSImage NSMenu NSMenuItem NSMomentaryLightButton NSNormalWindowLevel NSPopUpButton NSRoundedBezelStyle NSScreen NSTextField NSTitledWindowMask NSView NSWindow NSWindowController Pages | 1 Comment
WebView+ボタンを作成 v3.1(URLから読み込み)

Posted on 12月 3, 2018 by Takaaki Naganoya

WkWebViewを動的に生成して、YouTube上の指定ムービーを再生するAppleScriptの改良版です。とくにYouTube限定ではなく、Webコンテンツのブラウズを単体で行うための実験的なScriptです。

# AppleScriptでは、Webブラウザに命令を出せば数行のコマンドで簡単に任意のURLのWebコンテンツを表示させられますが、本ScriptはAppleScriptから他のアプリケーションを介さずに直接Cocoaの機能を呼び出して自前でWebコンテンツを表示させるものです。

NSWindow+NSSplitView+WKWebViewを作成して、Webサーバー上の内容を表示します。v3.0からの改良点は、再生中のWebコンテンツのクリアを明示的に行えるようになったことです。

スクリプトエディタ上で実行し、「OK」ボタンをクリックすると、ウィンドウがクローズし、Webコンテンツの再生も停止します(前バージョンではこれができなかった)。Script MenuおよびScript Debugger上では実行できるもののWebコンテンツ操作はできず、OKボタンも反応しません。

AppleScript Appletとして書き出して実行すると、そのままではインターネットへのアクセスが許可されていないため、表示できません。Info.plistのエントリを書き換える必要があるものと思われます。

再生中のWebコンテンツのクリアについては、US Appleが主催しているCocoa-Dev MLにFritz Andersonが2012年4月11日に投稿した、

On 11 Apr 2012, at 7:51 AM, Koen van der Drift wrote:

> Is there a way to empty or clear a webview when I close the popover,
> so that next time it is opened it doesn't show the previous page? I
> don't want to clear the cache, because when the webview is opened for
> an item that was already selected, it can be loaded from the cache.

What works for me on iOS is having the UIWebView load about:blank. Maybe it works the same in Mac OS.

	— F

が参考になりました。Google検索しても見つからなかったのに、MLの過去ログを漁ってみたら割と簡単に発見。あらかじめMLのログをAppleScriptのロボットでテーマごとに自動フォルダ分けして整理してあったのが効きました。

あとは、実行環境がかなり限定される(Script DebuggerやScript Menuから実行すると、Webコンテンツ操作やボタンのクリックができなくなる)点をなんとかしたいところです。AppleScriptアプレットだとそのまま書き出した状態ではネットワーク接続自体ができない(Info.plist書き換えでなんとか?)とか。

Script Menuからの実行時に無反応になる件をなんとかしたいところです。個人的には、Script Menuが主力実行(ランタイム)環境だと思っているので。

AppleScript名:WebView+ボタンを作成 v3.1(URLから読み込み)
— Created 2018-11-27 by Takaaki Naganoya
— Modified 2018-12-03 by Takaaki Naganoya
— 2018 Piyomaru Software
use AppleScript version "2.5"
use scripting additions
use framework "Foundation"
use framework "AppKit"
use framework "WebKit"

property |NSURL| : a reference to current application’s |NSURL|
property NSString : a reference to current application’s NSString
property NSScreen : a reference to current application’s NSScreen
property NSButton : a reference to current application’s NSButton
property NSWindow : a reference to current application’s NSWindow
property NSSplitView : a reference to current application’s NSSplitView
property NSTextView : a reference to current application’s NSTextView
property NSScrollView : a reference to current application’s NSScrollView
property WKWebView : a reference to current application’s WKWebView
property WKUserScript : a reference to current application’s WKUserScript
property NSURLRequest : a reference to current application’s NSURLRequest
property NSMutableString : a reference to current application’s NSMutableString
property NSWindowController : a reference to current application’s NSWindowController
property NSTitledWindowMask : a reference to current application’s NSTitledWindowMask
property NSRoundedBezelStyle : a reference to current application’s NSRoundedBezelStyle
property NSUTF8StringEncoding : a reference to current application’s NSUTF8StringEncoding
property NSBackingStoreBuffered : a reference to current application’s NSBackingStoreBuffered
property WKUserContentController : a reference to current application’s WKUserContentController
property NSMomentaryLightButton : a reference to current application’s NSMomentaryLightButton
property WKWebViewConfiguration : a reference to current application’s WKWebViewConfiguration
property NSScreenSaverWindowLevel : a reference to current application’s NSScreenSaverWindowLevel
property NSWindowStyleMaskResizable : a reference to current application’s NSWindowStyleMaskResizable
property NSWindowStyleMaskMiniaturizable : a reference to current application’s NSWindowStyleMaskMiniaturizable
property WKUserScriptInjectionTimeAtDocumentEnd : a reference to current application’s WKUserScriptInjectionTimeAtDocumentEnd

property windisp : false
property wController : false

set aWidth to 1100
set aHeight to 700

set aTitle to "WkWebView test2"
set aButtonMSG to "OK"

set aURL to "https://www.youtube.com/embed/GP_tVXTYdmY?autoplay=1&hd=1"

set paramObj to {aWidth, aHeight, aTitle, aURL, aButtonMSG, "600"}
my performSelectorOnMainThread:"dispWebView:" withObject:(paramObj) waitUntilDone:true

on dispWebView:paramObj
  set my windisp to false
  
copy (paramObj as list) to {aWidth, aHeight, aTitle, tmpURL, aButtonMSG, timeOutSecs}
  
  
set (my windisp) to true
  
  
set aWidth to aWidth as integer
  
set aHeight to aHeight as integer
  
set tmpURL to tmpURL as string
  
  
–WebViewをつくる
  
set aConf to WKWebViewConfiguration’s alloc()’s init()
  
  
–指定URLのJavaScriptをFetch
  
set jsSource to my fetchJSSourceString(tmpURL)
  
set userScript to WKUserScript’s alloc()’s initWithSource:jsSource injectionTime:(WKUserScriptInjectionTimeAtDocumentEnd) forMainFrameOnly:true
  
set userContentController to WKUserContentController’s alloc()’s init()
  
userContentController’s addUserScript:(userScript)
  
aConf’s setUserContentController:userContentController
  
  
set aWebView to WKWebView’s alloc()’s initWithFrame:(current application’s NSMakeRect(0, 0, aWidth, aHeight – 100)) configuration:aConf
  
aWebView’s setNavigationDelegate:me
  
aWebView’s setUIDelegate:me
  
aWebView’s setTranslatesAutoresizingMaskIntoConstraints:true
  
  
set bURL to |NSURL|’s URLWithString:tmpURL
  
set aReq to NSURLRequest’s requestWithURL:bURL
  
aWebView’s loadRequest:aReq –Webコンテンツのローディング


–Buttonをつくる
  
set bButton to (NSButton’s alloc()’s initWithFrame:(current application’s NSMakeRect(0, 0, aWidth, 40)))
  
bButton’s setTitle:aButtonMSG
  
bButton’s setTarget:me
  
bButton’s setAction:("clicked:")
  
bButton’s setKeyEquivalent:(return)
  
  
–SplitViewをつくる
  
set aSplitV to NSSplitView’s alloc()’s initWithFrame:(current application’s NSMakeRect(0, 0, aWidth, aHeight))
  
aSplitV’s setVertical:false
  
  
aSplitV’s addSubview:aWebView
  
aSplitV’s addSubview:bButton
  
aSplitV’s setNeedsDisplay:true
  
  
set aWin to makeWinWithView(aSplitV, aWidth, aHeight, aTitle, 1.0)
  
  
–NSWindowControllerを作ってみた
  
set my wController to NSWindowController’s alloc()
  
my (wController’s initWithWindow:aWin)
  
  
my (wController’s showWindow:me)
  
  
set aCount to (timeOutSecs as string as number) * 10 –timeout seconds * 10
  
repeat aCount times
    if (my windisp) = false then
      exit repeat
    end if
    
delay 0.1
  end repeat
  
  
–Stop Web View Action
  
set bURL to |NSURL|’s URLWithString:"about:blank"
  
set bReq to NSURLRequest’s requestWithURL:bURL
  
aWebView’s loadRequest:bReq
  
  
my closeWin:bButton
end dispWebView:

–Button Clicked Event Handler
on clicked:aSender
  set (my windisp) to false
  
my closeWin:aSender
end clicked:

–make Window for Input
on makeWinWithView(aView, aWinWidth, aWinHeight, aTitle, alphaV)
  set aScreen to NSScreen’s mainScreen()
  
set aFrame to {{0, 0}, {aWinWidth, aWinHeight}}
  
set aBacking to NSTitledWindowMask –NSBorderlessWindowMask
  
set aDefer to NSWindowStyleMaskMiniaturizable
  
  
— Window
  
set aWin to NSWindow’s alloc()
  (
aWin’s initWithContentRect:aFrame styleMask:aBacking backing:aDefer defer:false screen:aScreen)
  
  
aWin’s setTitle:aTitle
  
aWin’s setDelegate:me
  
aWin’s setDisplaysWhenScreenProfileChanges:true
  
aWin’s setHasShadow:true
  
aWin’s setIgnoresMouseEvents:false
  
aWin’s setLevel:(NSScreenSaverWindowLevel)
  
aWin’s setOpaque:false
  
aWin’s setAlphaValue:alphaV –append
  
aWin’s setReleasedWhenClosed:true
  
aWin’s |center|()
  
  
— Set Custom View
  
aWin’s setContentView:aView
  
  
return aWin
end makeWinWithView

–close win
on closeWin:aSender
  set tmpWindow to aSender’s |window|()
  
  
repeat with n from 10 to 1 by -1
    (tmpWindow’s setAlphaValue:n / 10)
    
delay 0.02
  end repeat
  
  
my wController’s |close|()
end closeWin:

on viewDidLoad:aNotification
  return true
end viewDidLoad:

on fetchJSSourceString(aURL)
  set jsURL to |NSURL|’s URLWithString:aURL
  
set jsSourceString to NSString’s stringWithContentsOfURL:jsURL encoding:(NSUTF8StringEncoding) |error|:(missing value)
  
return jsSourceString
end fetchJSSourceString

★Click Here to Open This Script 

Posted in URL | Tagged 10.11savvy 10.12savvy 10.13savvy 10.14savvy NSBackingStoreBuffered NSButton NSMomentaryLightButton NSMutableString NSRoundedBezelStyle NSScreen NSSplitView NSString NSTitledWindowMask NSURL NSURLRequest NSUTF8StringEncoding NSWindow NSWindowController WKUserContentController WKUserScript WKUserScriptInjectionTimeAtDocumentEnd WKWebView WKWebViewConfiguration | 1 Comment

WebView+ボタンを作成 v3(URLから読み込み)

Posted on 11月 28, 2018 by Takaaki Naganoya

WkWebViewを動的に生成して、YouTube上の指定ムービーを再生するAppleScriptです。

# AppleScriptでは、Webブラウザに命令を出せば数行のコマンドで簡単に任意のURLのWebコンテンツを表示させられますが、本ScriptはAppleScriptから他のアプリケーションを介さずに直接Cocoaの機能を呼び出して自前でWebコンテンツを表示させるものです

NSWindow+NSSplitView+WKWebViewを作成して、Webサーバー上の内容を表示します。WkWebViewでWebの内容を表示させるのにかなり苦労しましたが、Objective-Cのサンプル数本を比較してテストし実現しました。

WkWebViewでコンテンツを表示するのにこんなに大変だと思いませんでしたが、これができるようになったおかげで、AppleScriptの処理結果のURLを(Webブラウザを利用せずに)プレビューできます。

グラフ描画のプログラムがJavaScript+WebViewで作られているケースが多々あるため、凝ったインタラクティブなグラフの表示を行ったり画像やPDFに出力できるようにもなったわけで、たいへんけっこうなことです。


▲Auto StartでYouTube上のムービーの再生を開始する

まだ解決できていないのは、YouTubeのムービー再生が始まるとウィンドウをクローズしてAppleScriptの実行が終了していても再生中の音声が停止しないあたりでしょうか。メモリ上からWebブラウザのオブジェクトを明示的にパージする方法についてはまだ実装できていません。

あと、Script Debugger上で動かすと、WkWebView上のコンテンツの操作(YouTube映像の再生コントロールとか)ができなくなります。ねんのため。

AppleScript名:WebView+ボタンを作成 v3(URLから読み込み)
— Created 2018-11-27 by Takaaki Naganoya
— 2018 Piyomaru Software
use AppleScript version "2.4"
use scripting additions
use framework "Foundation"
use framework "AppKit"
use framework "WebKit"

property |NSURL| : a reference to current application’s |NSURL|
property NSColor : a reference to current application’s NSColor
property NSString : a reference to current application’s NSString
property NSScreen : a reference to current application’s NSScreen
property NSButton : a reference to current application’s NSButton
property NSWindow : a reference to current application’s NSWindow
property NSSplitView : a reference to current application’s NSSplitView
property NSTextView : a reference to current application’s NSTextView
property NSScrollView : a reference to current application’s NSScrollView
property WKWebView : a reference to current application’s WKWebView
property WKUserScript : a reference to current application’s WKUserScript
property NSURLRequest : a reference to current application’s NSURLRequest
property NSMutableString : a reference to current application’s NSMutableString
property NSWindowController : a reference to current application’s NSWindowController
property NSTitledWindowMask : a reference to current application’s NSTitledWindowMask
property NSRoundedBezelStyle : a reference to current application’s NSRoundedBezelStyle
property NSUTF8StringEncoding : a reference to current application’s NSUTF8StringEncoding
property NSBackingStoreBuffered : a reference to current application’s NSBackingStoreBuffered
property WKUserContentController : a reference to current application’s WKUserContentController
property NSMomentaryLightButton : a reference to current application’s NSMomentaryLightButton
property WKWebViewConfiguration : a reference to current application’s WKWebViewConfiguration
property NSScreenSaverWindowLevel : a reference to current application’s NSScreenSaverWindowLevel
property WKUserScriptInjectionTimeAtDocumentEnd : a reference to current application’s WKUserScriptInjectionTimeAtDocumentEnd

property windisp : false
property wController : false

set aWidth to 1100
set aHeight to 600

set aTitle to "WkWebView test"
set aButtonMSG to "OK"
–set aURL to "https://www.youtube.com/watch?v=GP_tVXTYdmY&autoplay=1&hd=1"
set aURL to "https://www.youtube.com/embed/GP_tVXTYdmY?autoplay=1&hd=1"

set paramObj to {aWidth, aHeight, aTitle, aURL, aButtonMSG, "600"}
my performSelectorOnMainThread:"dispWebView:" withObject:(paramObj) waitUntilDone:true

on dispWebView:paramObj
  set my windisp to false
  
copy (paramObj as list) to {aWidth, aHeight, aTitle, tmpURL, aButtonMSG, timeOutSecs}
  
  
set (my windisp) to true
  
  
set aWidth to aWidth as integer
  
set aHeight to aHeight as integer
  
set tmpURL to tmpURL as string
  
  
–WebViewをつくる
  
set aConf to WKWebViewConfiguration’s alloc()’s init()
  
set jsSource to my fetchJSSourceString(tmpURL)
  
set userScript to WKUserScript’s alloc()’s initWithSource:jsSource injectionTime:(WKUserScriptInjectionTimeAtDocumentEnd) forMainFrameOnly:true
  
set userContentController to WKUserContentController’s alloc()’s init()
  
userContentController’s addUserScript:(userScript)
  
aConf’s setUserContentController:userContentController
  
  
set aWebView to WKWebView’s alloc()’s initWithFrame:(current application’s NSMakeRect(0, 0, aWidth, aHeight – 100)) configuration:aConf –フレームの大きさは根拠レス
  
aWebView’s setNavigationDelegate:me
  
aWebView’s setUIDelegate:me
  
aWebView’s setTranslatesAutoresizingMaskIntoConstraints:true
  
  
set bURL to |NSURL|’s URLWithString:tmpURL
  
set aReq to NSURLRequest’s requestWithURL:bURL
  
aWebView’s loadRequest:aReq


–Buttonをつくる
  
set bButton to (NSButton’s alloc()’s initWithFrame:(current application’s NSMakeRect(0, 0, aWidth, 40)))
  
bButton’s setTitle:aButtonMSG
  
bButton’s setTarget:me
  
bButton’s setAction:("clicked:")
  
bButton’s setKeyEquivalent:(return)
  
  
–SplitViewをつくる
  
set aSplitV to NSSplitView’s alloc()’s initWithFrame:(current application’s NSMakeRect(0, 0, aWidth, aHeight))
  
aSplitV’s setVertical:false
  
  
aSplitV’s addSubview:aWebView
  
aSplitV’s addSubview:bButton
  
aSplitV’s setNeedsDisplay:true
  
  
set aWin to makeWinWithView(aSplitV, aWidth, aHeight, aTitle, 1.0)
  
  
–NSWindowControllerを作ってみた
  
set my wController to NSWindowController’s alloc()
  
my (wController’s initWithWindow:aWin)
  
  
my (wController’s showWindow:me)
  
  
set aCount to (timeOutSecs as string as number) * 10 –timeout seconds * 10
  
repeat aCount times
    if (my windisp) = false then
      exit repeat
    end if
    
delay 0.1
  end repeat
  
  
–Purge Web Objects (not success)
  
set aWebView to ""
  
set userContentController to ""
  
set aConf to ""
  
set userScript to ""
  
set my wController to ""
  
  
my closeWin:bButton
end dispWebView:

–Button Clicked Event Handler
on clicked:aSender
  set (my windisp) to false
  
my closeWin:aSender
end clicked:

–make Window for Input
on makeWinWithView(aView, aWinWidth, aWinHeight, aTitle, alphaV)
  set aScreen to NSScreen’s mainScreen()
  
set aFrame to {{0, 0}, {aWinWidth, aWinHeight}}
  
set aBacking to NSTitledWindowMask –NSBorderlessWindowMask
  
set aDefer to NSBackingStoreBuffered
  
  
— Window
  
set aWin to NSWindow’s alloc()
  (
aWin’s initWithContentRect:aFrame styleMask:aBacking backing:aDefer defer:false screen:aScreen)
  
  
aWin’s setTitle:aTitle
  
aWin’s setDelegate:me
  
aWin’s setDisplaysWhenScreenProfileChanges:true
  
aWin’s setHasShadow:true
  
aWin’s setIgnoresMouseEvents:false
  
aWin’s setLevel:(NSScreenSaverWindowLevel)
  
aWin’s setOpaque:false
  
aWin’s setAlphaValue:alphaV –append
  
aWin’s setReleasedWhenClosed:true
  
aWin’s |center|()
  
  
— Set Custom View
  
aWin’s setContentView:aView
  
  
return aWin
end makeWinWithView

–close win
on closeWin:aSender
  set tmpWindow to aSender’s |window|()
  
  
repeat with n from 10 to 1 by -1
    (tmpWindow’s setAlphaValue:n / 10)
    
delay 0.02
  end repeat
  
  
my wController’s |close|()
end closeWin:

on viewDidLoad:aNotification
  return true
end viewDidLoad:

on fetchJSSourceString(aURL)
  set jsURL to |NSURL|’s URLWithString:aURL
  
set jsSourceString to NSString’s stringWithContentsOfURL:jsURL encoding:(NSUTF8StringEncoding) |error|:(missing value)
  
return jsSourceString
end fetchJSSourceString

★Click Here to Open This Script 

Posted in Internet URL | Tagged 10.12savvy 10.13savvy 10.14savvy NSButton NSMomentaryLightButton NSMutableString NSScreen NSScrollView NSSplitView NSString NSTextView NSURL NSURLRequest NSWindow NSWindowController WKUserContentController WKUserScript WKWebView WKWebViewConfiguration | 1 Comment

QuartzComoserでグラフ表示てすと v6

Posted on 11月 4, 2018 by Takaaki Naganoya

QuartzComposerのグラフに任意のデータを指定してウィンドウ表示するAppleScriptです。

スクリプトバンドル内の「Chart.qtz」を読み出して表示しているため、QuartzComposer入りのスクリプトバンドルを用意しておきましたので、ダウンロードしてお試しください。

–> Download qtc_disp_v6

オリジナルはControl+Command+Rで実行する必要がありましたが、本Scriptではその必要がありません。ちなみに、一般的なQuartzComposerのようにマウスでグリグリ回せるとかいうことはありません。パラメータを反映して静止画として表示されるだけです(Xcode上で作成したAppleScriptのGUIアプリケーションであれば、普通に回せます)。

macOS 10.14上で実行してみたところ、スクリプトエディタではCompositionが表示されませんでしたが、Script Debugger上で実行したかぎりでは実行されました。Framework宣言で足りないものがあるのでしょうか?

備考:QuartzComposerはmacOS 10.15でDeprecated扱いになりました

AppleScript名:QuartzComoserでグラフ表示てすと v6
— Created 2015-11-03 by Takaaki Naganoya
— Modified 2018-11-04 by Takaaki Naganoya
— 2018 Piyomaru Software
use AppleScript version "2.4"
use scripting additions
use framework "Foundation"
use framework "Quartz"
use framework "AppKit"

property NSColor : a reference to current application’s NSColor
property QCView : a reference to current application’s QCView
property NSString : a reference to current application’s NSString
property NSScreen : a reference to current application’s NSScreen
property NSWindow : a reference to current application’s NSWindow
property NSNumber : a reference to current application’s NSNumber
property NSPredicate : a reference to current application’s NSPredicate
property NSDictionary : a reference to current application’s NSDictionary
property NSMutableArray : a reference to current application’s NSMutableArray
property NSWindowController : a reference to current application’s NSWindowController
property NSMutableDictionary : a reference to current application’s NSMutableDictionary
property NSTitledWindowMask : a reference to current application’s NSTitledWindowMask
property NSWindowCloseButton : a reference to current application’s NSWindowCloseButton
property NSNormalWindowLevel : a reference to current application’s NSNormalWindowLevel
property NSBackingStoreBuffered : a reference to current application’s NSBackingStoreBuffered

set chartData to NSMutableArray’s new()
chartData’s addObject:(my recWithLabels:{"label", "value"} andValues:{"練馬区", 3})
chartData’s addObject:(my recWithLabels:{"label", "value"} andValues:{"青梅市", 1})
chartData’s addObject:(my recWithLabels:{"label", "value"} andValues:{"中野区", 2})

my performSelectorOnMainThread:"dispQuartzComposerWindow:" withObject:(chartData) waitUntilDone:true

on dispQuartzComposerWindow:chartData
  –上記データの最大値を求める
  
set aMaxRec to chartData’s filteredArrayUsingPredicate:(NSPredicate’s predicateWithFormat_("SELF.value == %@.@max.value", chartData))
  
set aMax to value of aMaxRec
  
set aMaxVal to (first item of aMax) as integer
  
  
–Scalingの最大値を求める
  
if aMaxVal ≥ 10 then
    set aScaleMax to (10 div aMaxVal)
    
set aScaleMin to aScaleMax div 10
  else
    set aScaleMax to (10 / aMaxVal)
    
set aScaleMin to 1
  end if
  
  
try
    set aPath to path to resource "Chart.qtz"
  on error
    return
  end try
  
  
set qtPath to NSString’s stringWithString:(POSIX path of aPath)
  
  
set aView to QCView’s alloc()’s init()
  
set qtRes to (aView’s loadCompositionFromFile:qtPath)
  
  
aView’s setValue:chartData forInputKey:"Data"
  
aView’s setValue:(NSNumber’s numberWithFloat:(0.5)) forInputKey:"Scale"
  
aView’s setValue:(NSNumber’s numberWithFloat:(0.2)) forInputKey:"Spacing"
  
aView’s setAutostartsRendering:true
  
  
set maXFrameRate to aView’s maxRenderingFrameRate()
  
  (
aView’s setValue:(NSNumber’s numberWithFloat:aScaleMax / 10) forInputKey:"Scale")
  
  
set aWin to (my makeWinWithView(aView, 800, 600, "AppleScript Composition Test"))
  
  
set wController to NSWindowController’s alloc()
  
wController’s initWithWindow:aWin
  
aWin’s makeFirstResponder:aView
  
wController’s showWindow:me
  
  
aWin’s makeKeyAndOrderFront:me
  
  
delay 5
  
  
my closeWin:aWin
  
aView’s stopRendering() –レンダリング停止
  
end dispQuartzComposerWindow:

–make Window for Display
on makeWinWithView(aView, aWinWidth, aWinHeight, aTitle)
  set aScreen to NSScreen’s mainScreen()
  
set aFrame to {{0, 0}, {aWinWidth, aWinHeight}}
  
  
set aBacking to NSTitledWindowMask
  
  
set aDefer to NSBackingStoreBuffered
  
  
— Window
  
set aWin to NSWindow’s alloc()
  (
aWin’s initWithContentRect:aFrame styleMask:aBacking backing:aDefer defer:false screen:aScreen)
  
aWin’s setBackgroundColor:(NSColor’s whiteColor())
  
  
aWin’s setTitle:aTitle
  
aWin’s setDelegate:me
  
aWin’s setDisplaysWhenScreenProfileChanges:true
  
aWin’s setHasShadow:true
  
aWin’s setIgnoresMouseEvents:false
  
aWin’s setLevel:(NSNormalWindowLevel)
  
aWin’s setOpaque:false
  
aWin’s setReleasedWhenClosed:true
  
aWin’s |center|()
  
aWin’s makeKeyAndOrderFront:(me)
  
–aWin’s movableByWindowBackground:true
  
  
— Set Custom View
  
aWin’s setContentView:aView
  
  
–Set Close Button  
  
set closeButton to NSWindow’s standardWindowButton:(NSWindowCloseButton) forStyleMask:(NSTitledWindowMask)
  
  
return aWin
end makeWinWithView

–close win
on closeWin:aWindow
  repeat with n from 10 to 1 by -1
    (aWindow’s setAlphaValue:n / 10)
    
delay 0.01
  end repeat
  
aWindow’s |close|()
end closeWin:

on recWithLabels:theKeys andValues:theValues
  return (NSDictionary’s dictionaryWithObjects:theValues forKeys:theKeys) as record
end recWithLabels:andValues:

★Click Here to Open This Script 

Posted in GUI Image | Tagged 10.11savvy 10.12savvy 10.13savvy 10.14savvy NSColor NSDictionary NSMutableArray NSMutableDictionary NSNumber NSPredicate NSScreen NSString NSWindow NSWindowController QCView | Leave a comment

テキストビュー+ボタンを作成 v2

Posted on 11月 3, 2018 by Takaaki Naganoya

Window+TextView+Buttonを作成してボタンのクリックを受け付けるAppleScriptです。

ちょっとしたログ表示などのために作成したものです。


▲通常(ライト)モード@macOS 10.12.6、ダークモード@10.14.1

オリジナルはスクリプトエディタ上でCommand+Control+Rの「フォアグラウンドで実行」を実行する必要があったのですが、

本バージョンでは強制的にメインスレッド実行を行うことで、この操作は不要になっています。

ただ、ランタイム環境ごとに「ボタンをクリックできない」という現象に遭遇。他のいろいろなランタイムでも試しておく必要を感じます。

ランタイム環境 スクリプトエディタ アプレット スクリプトメニュー osascript Script Debugger
macOS 10.12 OK OK クリックできない クリックできない クリックできない
macOS 10.13 OK OK クリックできない クリックできない クリックできない
macOS 10.14 OK OK クリックできない クリックできない クリックできない

macOS 10.12.6、10.13.6、10.14.1で動作確認してみましたが、傾向は同じです。Script Debugger上でクリックを受け付けないのはかなり問題が、、、、

AppleScript名:テキストビュー+ボタンを作成 v2
— Created 2015-12-11 by Takaaki Naganoya
— 2015 Piyomaru Software
use AppleScript version "2.4"
use scripting additions
use framework "Foundation"
use framework "AppKit"

property NSColor : a reference to current application’s NSColor
property NSScreen : a reference to current application’s NSScreen
property NSButton : a reference to current application’s NSButton
property NSWindow : a reference to current application’s NSWindow
property NSSplitView : a reference to current application’s NSSplitView
property NSTextView : a reference to current application’s NSTextView
property NSScrollView : a reference to current application’s NSScrollView
property NSMutableString : a reference to current application’s NSMutableString
property NSWindowController : a reference to current application’s NSWindowController
property NSTitledWindowMask : a reference to current application’s NSTitledWindowMask
property NSRoundedBezelStyle : a reference to current application’s NSRoundedBezelStyle
property NSNormalWindowLevel : a reference to current application’s NSNormalWindowLevel
property NSBackingStoreBuffered : a reference to current application’s NSBackingStoreBuffered
property NSMomentaryLightButton : a reference to current application’s NSMomentaryLightButton

property windisp : false
property wController : false

set aWidth to 600
set aHeight to 500

set aTitle to "テキストビューのじっけん/TextView Test"
set outText to "ぴよまるソフトウェア / Piyomaru Software "
set aButtonMSG to "OK"

–表示用テキストの作成
set dispStr to NSMutableString’s alloc()’s init()
repeat with i from 1 to 100
  set bStr to (NSMutableString’s stringWithString:(outText & (i as string) & return))
  
set dispStr to (bStr’s stringByAppendingString:dispStr)
end repeat

set paramObj to {aWidth, aHeight, aTitle, dispStr, aButtonMSG, "10"}
my performSelectorOnMainThread:"dispTextView:" withObject:(paramObj) waitUntilDone:true

on dispTextView:paramObj
  set my windisp to false
  
copy paramObj to {aWidth, aHeight, aTitle, dispStr, aButtonMSG, timeOutSecs}
  
  
set aColor to NSColor’s colorWithDeviceRed:0.0 green:0.0 blue:0.0 alpha:0.9
  
set (my windisp) to true
  
  
–Text View+Scroll Viewをつくる
  
set aScroll to NSScrollView’s alloc()’s initWithFrame:(current application’s NSMakeRect(0, 0, aWidth, aHeight))
  
set aView to NSTextView’s alloc()’s initWithFrame:(current application’s NSMakeRect(0, 0, aWidth, aHeight))
  
aView’s setRichText:true
  
aView’s useAllLigatures:true
  
aView’s setTextColor:(NSColor’s cyanColor()) —
  
aView’s setBackgroundColor:aColor
  
aView’s setEditable:false
  
  
aScroll’s setDocumentView:aView
  
aView’s enclosingScrollView()’s setHasVerticalScroller:true


–Buttonをつくる
  
set bButton to (NSButton’s alloc()’s initWithFrame:(current application’s NSMakeRect(0, 0, aWidth, 40)))
  
–bButton’s setButtonType:( NSMomentaryLightButton)
  
–bButton’s setBezelStyle:( NSRoundedBezelStyle)
  
bButton’s setTitle:aButtonMSG
  
bButton’s setTarget:me
  
bButton’s setAction:("clicked:")
  
bButton’s setKeyEquivalent:(return)
  
  
–SplitViewをつくる
  
set aSplitV to NSSplitView’s alloc()’s initWithFrame:(current application’s NSMakeRect(0, 0, aHeight, aWidth))
  
aSplitV’s setVertical:false
  
  
aSplitV’s addSubview:aScroll
  
aSplitV’s addSubview:bButton
  
aSplitV’s setNeedsDisplay:true
  
  
set aWin to makeWinWithView(aSplitV, aWidth, aHeight, aTitle, 0.9)
  
aView’s setString:dispStr
  
  
–NSWindowControllerを作ってみた
  
set my wController to NSWindowController’s alloc()
  
my (wController’s initWithWindow:aWin)
  
  
my (wController’s showWindow:me)
  
  
set aCount to (timeOutSecs as string as number) * 10 –timeout seconds * 10
  
repeat aCount times
    if (my windisp) = false then
      exit repeat
    end if
    
delay 0.1
  end repeat
  
  
my closeWin:bButton
end dispTextView:

–Button Clicked Event Handler
on clicked:aSender
  set (my windisp) to false
  
my closeWin:aSender
end clicked:

–make Window for Input
on makeWinWithView(aView, aWinWidth, aWinHeight, aTitle, alphaV)
  set aScreen to NSScreen’s mainScreen()
  
set aFrame to {{0, 0}, {aWinWidth, aWinHeight}}
  
set aBacking to NSTitledWindowMask –NSBorderlessWindowMask
  
set aDefer to NSBackingStoreBuffered
  
  
— Window
  
set aWin to NSWindow’s alloc()
  (
aWin’s initWithContentRect:aFrame styleMask:aBacking backing:aDefer defer:false screen:aScreen)
  
  
aWin’s setTitle:aTitle
  
aWin’s setDelegate:me
  
aWin’s setDisplaysWhenScreenProfileChanges:true
  
aWin’s setHasShadow:true
  
aWin’s setIgnoresMouseEvents:false
  
aWin’s setLevel:(NSNormalWindowLevel)
  
aWin’s setOpaque:false
  
aWin’s setAlphaValue:alphaV –append
  
aWin’s setReleasedWhenClosed:true
  
aWin’s |center|()
  
  
— Set Custom View
  
aWin’s setContentView:aView
  
  
return aWin
end makeWinWithView

–close win
on closeWin:aSender
  set tmpWindow to aSender’s |window|()
  
  
repeat with n from 10 to 1 by -1
    (tmpWindow’s setAlphaValue:n / 10)
    
delay 0.02
  end repeat
  
  
my wController’s |close|()
end closeWin:

★Click Here to Open This Script 

Posted in GUI | Tagged 10.11savvy 10.12savvy 10.13savvy 10.14savvy NSButton NSColor NSMutableString NSScreen NSScrollView NSSplitView NSTextView NSWindow NSWindowController | 1 Comment

電子書籍(PDF)をオンラインストアで販売中!

Google Search

Popular posts

  • macOS 13, Ventura(継続更新)
  • アラートダイアログ上にWebViewで3Dコンテンツを表示(WebGL+three.js)v3
  • UI Browserがgithub上でソース公開され、オープンソースに
  • macOS 13 TTS Voice環境に変更
  • Xcode 14.2でAppleScript App Templateを復活させる
  • 2022年に書いた価値あるAppleScript
  • ChatGPTで文章のベクトル化(Embedding)
  • 新発売:AppleScriptからSiriを呼び出そう!
  • iWork 12.2がリリースされた
  • 従来と異なるmacOS 13の性格?
  • 新発売:CotEditor Scripting Book with AppleScript
  • macOS 13対応アップデート:AppleScript実践的テクニック集(1)GUI Scripting
  • AS関連データの取り扱いを容易にする(はずの)privateDataTypeLib
  • macOS 13でNSNotFoundバグふたたび
  • macOS 12.5.1、11.6.8でFinderのselectionでスクリーンショット画像をopenできない問題
  • ChatGPTでchatに対する応答文を取得
  • 新発売:iWork Scripting Book with AppleScript
  • Finderの隠し命令openVirtualLocationが発見される
  • macOS 13.1アップデートでスクリプトエディタの挙動がようやくまともに
  • あのコン過去ログビューワー(暫定版)

Tags

10.11savvy (1101) 10.12savvy (1242) 10.13savvy (1390) 10.14savvy (586) 10.15savvy (434) 11.0savvy (277) 12.0savvy (185) 13.0savvy (55) CotEditor (60) Finder (47) iTunes (19) Keynote (98) NSAlert (60) NSArray (51) NSBezierPath (18) NSBitmapImageRep (20) NSBundle (20) NSButton (34) NSColor (51) NSDictionary (27) NSFileManager (23) NSFont (18) NSImage (41) NSJSONSerialization (21) NSMutableArray (62) NSMutableDictionary (21) NSPredicate (36) NSRunningApplication (56) NSScreen (30) NSScrollView (22) NSString (117) NSURL (97) NSURLRequest (23) NSUTF8StringEncoding (30) NSView (33) NSWorkspace (20) Numbers (56) Pages (37) Safari (41) Script Editor (20) WKUserContentController (21) WKUserScript (20) WKUserScriptInjectionTimeAtDocumentEnd (18) WKWebView (23) WKWebViewConfiguration (22)

カテゴリー

  • 2D Bin Packing
  • 3D
  • AirDrop
  • AirPlay
  • Animation
  • AppleScript Application on Xcode
  • beta
  • Bluetooth
  • Books
  • boolean
  • bounds
  • Bug
  • Calendar
  • call by reference
  • Clipboard
  • Code Sign
  • Color
  • Custom Class
  • dialog
  • drive
  • exif
  • file
  • File path
  • filter
  • folder
  • Font
  • Font
  • GAME
  • geolocation
  • GUI
  • GUI Scripting
  • Hex
  • History
  • How To
  • iCloud
  • Icon
  • Image
  • Input Method
  • Internet
  • iOS App
  • JavaScript
  • JSON
  • JXA
  • Keychain
  • Keychain
  • Language
  • Library
  • list
  • Locale
  • Machine Learning
  • Map
  • Markdown
  • Menu
  • Metadata
  • MIDI
  • MIME
  • Natural Language Processing
  • Network
  • news
  • Noification
  • Notarization
  • Number
  • Object control
  • OCR
  • OSA
  • PDF
  • Peripheral
  • PRODUCTS
  • QR Code
  • Raw AppleEvent Code
  • Record
  • rectangle
  • recursive call
  • regexp
  • Release
  • Remote Control
  • Require Control-Command-R to run
  • REST API
  • Review
  • RTF
  • Sandbox
  • Screen Saver
  • Script Libraries
  • sdef
  • search
  • Security
  • selection
  • shell script
  • Shortcuts Workflow
  • Sort
  • Sound
  • Spellchecker
  • Spotlight
  • SVG
  • System
  • Tag
  • Telephony
  • Text
  • Text to Speech
  • timezone
  • Tools
  • Update
  • URL
  • UTI
  • Web Contents Control
  • WiFi
  • XML
  • XML-RPC
  • イベント(Event)
  • 未分類

アーカイブ

  • 2023年9月
  • 2023年8月
  • 2023年7月
  • 2023年6月
  • 2023年5月
  • 2023年4月
  • 2023年3月
  • 2023年2月
  • 2023年1月
  • 2022年12月
  • 2022年11月
  • 2022年10月
  • 2022年9月
  • 2022年8月
  • 2022年7月
  • 2022年6月
  • 2022年5月
  • 2022年4月
  • 2022年3月
  • 2022年2月
  • 2022年1月
  • 2021年12月
  • 2021年11月
  • 2021年10月
  • 2021年9月
  • 2021年8月
  • 2021年7月
  • 2021年6月
  • 2021年5月
  • 2021年4月
  • 2021年3月
  • 2021年2月
  • 2021年1月
  • 2020年12月
  • 2020年11月
  • 2020年10月
  • 2020年9月
  • 2020年8月
  • 2020年7月
  • 2020年6月
  • 2020年5月
  • 2020年4月
  • 2020年3月
  • 2020年2月
  • 2020年1月
  • 2019年12月
  • 2019年11月
  • 2019年10月
  • 2019年9月
  • 2019年8月
  • 2019年7月
  • 2019年6月
  • 2019年5月
  • 2019年4月
  • 2019年3月
  • 2019年2月
  • 2019年1月
  • 2018年12月
  • 2018年11月
  • 2018年10月
  • 2018年9月
  • 2018年8月
  • 2018年7月
  • 2018年6月
  • 2018年5月
  • 2018年4月
  • 2018年3月
  • 2018年2月

https://piyomarusoft.booth.pm/items/301502

メタ情報

  • ログイン
  • 投稿フィード
  • コメントフィード
  • WordPress.org

Forum Posts

  • 人気のトピック
  • 返信がないトピック

メタ情報

  • ログイン
  • 投稿フィード
  • コメントフィード
  • WordPress.org
Proudly powered by WordPress
Theme: Flint by Star Verte LLC