Menu

Skip to content
AppleScriptの穴
  • Home
  • Products
  • Books
  • Docs
  • Events
  • Forum
  • About This Blog
  • License
  • 仕事依頼

AppleScriptの穴

Useful & Practical AppleScript archive. Click '★Click Here to Open This Script' Link to download each AppleScript

タグ: 10.13savvy

QuickTime Playerでオープン中の全ムービーを頭出しして同時再生

Posted on 6月 27, 2019 by Takaaki Naganoya

QuickTime Playerでオープン中のすべてのムービーを頭出し(再生位置を冒頭に移動)して、同時に再生を開始するAppleScriptです。

とくに工夫も何もない、「必要だから作った」というScript。複数の条件で行った操作を画面を録画してならべ、同時に再生を行わせるという用途で使いました。

頭出しとかいうのは、カセットテープ/ビデオテープ時代の名残りの表現ですが、、、、電子データで頭出しというのは、言うんだか言わないんだか、、、

AppleScript名:QuickTime Playerでオープン中の全ムービーを頭出しして同時再生
tell application "QuickTime Player"
  activate
  
set dList to every document
  
  
repeat with i in dList
    tell i
      set current time to 0
    end tell
  end repeat


tell every document to play
  
end tell

★Click Here to Open This Script 

Posted in How To | Tagged 10.12savvy 10.13savvy 10.14savvy QuickTime Player | 2 Comments

Keynote, Pages, Numbersがアップデート

Posted on 6月 26, 2019 by Takaaki Naganoya

macOS 10.13以上で動作するiWorkアプリケーションの最新版がアップデートしました。

Keynote v9.1、Pages v8.1、Numbers v6.1です。

AppleScript用語辞書を書き出して比較してみましたが、用語辞書に変更は一切ありません。

ただし、アプリケーション自体には大幅に機能追加が行われており、ちょっと前までの停滞しまくっていたiWorkアプリケーションとは思えないほどの強化ぶりです。

Photos.app以外でははじめて顔認識の機能が(Apple純正アプリでは)利用され、写真を配置する際に顔認識して配置するとか、ページ間リンクを張るさいにブックマークを挿入(他のアプリケーションで言うところの「アンカー」ですね)したりと、アプリケーションとしてまっとうな機能アップが行われたように感じられました。

Posted in Release | Tagged 10.13savvy 10.14savvy Keynote Numbers Pages | Leave a comment

指定フォルダ以下のWordのファイルをすべてPDFに書き出す

Posted on 6月 22, 2019 by Takaaki Naganoya

指定フォルダ以下のWordファイルをSpotlight機能でリストアップし、かたっぱしからPDF書き出しするAppleScriptです。

Wordの制御以外はありもののルーチンを組み合わせただけなので、とくにたいした手間がかかっているわけではありません。

逆に、Wordでファイルをオープンするという動作が割とたいへんだということがわかりました。Wordの書類によっては変換の必要があるようで、オープン時に形式を聞かれました。Word書類を作成したWordのバージョン次第のようですが、注意したいところです。Script中ではオートで変換してくれるように指定しておいたものの、それほど現場でさまざまな書類を処理したわけではありません。

処理する書類の古さや、作成したWordがどのOS上で作られたかによっては、さらに何かを追加指定する必要があるかもしれません(確認は作成時最新のWord v16.24+macOS 10.12.6にて行いました)。

Spotlightでサーチして、指定フォルダ以下のWord書類をすべてリストアップしたあと、オープンしてPDFに書き出してクローズ、という動作を繰り返します。実にAppleScript「らしい」処理です。

これを、GUI Scripting(メニューやボタンの強制的な操作)だけで行うサンプルもあるようですが、GUI Scriptingは各アプリケーションの持っているAppleScriptのコマンド(AppleScript用語辞書に書かれています)に記載のない命令を「仕方なく」「例外的に」実行するだけのものであって、こういう「命令が最初から用意されているコマンド」を実行させてもメリットが何もありません。

GUI Scriptingを使ったScriptを評して「遅い」とか「確実性がない」と言われることが多いようですが、それはGUI Scriptingを使っているからです。GUI Scriptingを使うと、AppleScript本来の処理速度よりも10〜100倍ぐらい遅くなる(Cocoaの機能を活用している現代のAppleScriptだとそこから50倍ぐらい高速)ものなので、GUI Scriptingが(System Eventsを用いてメニューやボタンのクリックが行われている)多用されているAppleScriptは、本来の性能を活かせない可能性が高い(もっと高速に処理できる余地がある)ことを知っていただきたいところです。

本Scriptはそのような意味をこめて作成・公開したものです。

–> Download WordFileToPDFExporter Run-Only (Applet)

AppleScript名:WordFileToPDFExporter.scptd
— Created 2019-06-20 by Takaaki Naganoya
— 2019 Piyomaru Software
use AppleScript version "2.4"
use scripting additions
use framework "Foundation"
use mdLib : script "Metadata Lib" version "2.0.0" –https://www.macosxautomation.com/applescript/apps/Script_Libs.html#Metadata_Lib

property NSString : a reference to current application’s NSString
property NSFileManager : a reference to current application’s NSFileManager
property NSOrderedSame : a reference to current application’s NSOrderedSame

set basePath to (path to desktop) as string –Target Folder to write PDFs
set origPath to POSIX path of (choose folder with prompt "Select Word File Orig Folder") –(path to documents folder)

–Find Word (.doc & .docx ) files by Spotlight
set resList to mdLib’s searchFolders:{origPath} searchString:("kMDItemContentTypeTree == %@ || kMDItemContentTypeTree == %@") searchArgs:{"org.openxmlformats.wordprocessingml.document", "com.microsoft.word.doc"}

if resList = {} then
  –No Word Files or Spotlight index is broken
  
display dialog "There is no Word File within your folder.." buttons {"OK"} default button 1 with icon 1
  
return
end if

set resNumLen to length of ((length of resList) as string)

–Close Word Documents without saving
closeEveryWordDocs() of me

set sCount to 1 –saving file counter
set erCount to 0

–Loop by Word files
repeat with i in resList
  set j to contents of i
  
set anAlias to (POSIX file j) as alias
  
set dRes to openWordFile(anAlias) of me
  
  
if dRes is not equal to false then
    set numStr to retZeroPaddingText(sCount, resNumLen + 1) of me
    
set newFile to basePath & numStr & "_" & (repFileNameExtension(dRes, ".pdf") of me)
    
saveWordDocAsPDF(newFile) of me
  else
    set erCount to erCount + 1
  end if
  
  
set sCount to sCount + 1 –Increment
end repeat

–Report Finish
if erCount = 0 then
  activate
  
display dialog (sCount as string) & " Word files are converted to PDF.." buttons {"OK"} default button 1 with icon 1
else
  if erCount = 1 then
    set pluralStr to ""
  else
    set pluralStr to "s"
  end if
  
  
activate
  
display dialog (sCount as string) & " Word files are converted to PDF.." & return & "But " & (erCount as string) & "file" & pluralStr & " caused error to open" buttons {"OK"} default button 1 with icon 1
end if

–最前面のWord Documentを指定パスにPDFとして書き出す
on saveWordDocAsPDF(saveHFSpathStr)
  tell application "Microsoft Word"
    save as active document file name saveHFSpathStr file format format PDF
    
close front document saving no
  end tell
end saveWordDocAsPDF

–指定パスのWord書類をオープンする
on openWordFile(aFileAlias)
  tell application "Microsoft Word"
    try
      –このあたり、予想外にいろいろオープン処理を止めるダイアログ表示などがあるようなので試行錯誤が必要
      
open aFileAlias file converter open format auto
      
tell front document
        set dName to name
      end tell
    on error
      return false
    end try
  end tell
  
return dName
end openWordFile

–Word書類をすべてクローズ。未保存のものも破棄してクローズ
on closeEveryWordDocs()
  try
    tell application "Microsoft Word"
      close every document without saving
    end tell
  end try
end closeEveryWordDocs

–ファイル名から拡張子を置換する
on repFileNameExtension(origName, newExt)
  set aName to current application’s NSString’s stringWithString:origName
  
set theExtension to aName’s pathExtension()
  
if (theExtension as string) is not equal to "" then
    set thePathNoExt to aName’s stringByDeletingPathExtension()
    
set newName to (thePathNoExt’s stringByAppendingString:newExt)
  else
    set newName to (aName’s stringByAppendingString:newExt)
  end if
  
  
return newName as string
end repFileNameExtension

–数値にゼロパディングしたテキストを返す
on retZeroPaddingText(aNum, aLen)
  set tText to ("0000000000" & aNum as text)
  
set tCount to length of tText
  
set resText to text (tCount – aLen + 1) thru tCount of tText
  
return resText
end retZeroPaddingText

★Click Here to Open This Script 

Posted in file PDF | Tagged 10.12savvy 10.13savvy 10.14savvy NSFileManager NSOrderedSame NSString Word | Leave a comment

与えられた文字列の1D Listのすべての順列組み合わせパターン文字列を返す v3

Posted on 6月 20, 2019 by Takaaki Naganoya

与えられた1次元配列のデータのすべての順列組み合わせパターンを計算し、そのとおりに配列を並べて連結した文字列を、すべての順列組み合わせパターンについて生成して返す(Permutations)AppleScriptです。

初版ではありもののサブルーチンを組み合わせて、検証を行うには十分なものでした(v2)。ただし、本来その用途に作成したものではないルーチンを寄せ集めて作ったので、組み合わせ数が増えると処理時間がかかりすぎるきらいがありました。

そこで、こうした処理(Permutations)を英語でどう呼ぶのかを調べ、AppleScriptの実装例を調べたら、灯台下暗し。MacScripter.netにありました。

ただし、そのままではいまひとつ使いにくかったので、きちんと組み合わせた文字列を1次元配列で返すように組んでみたところ、オリジナル版よりは処理時間はかかっていますが、初版からくらべると大幅に処理速度とメモリ使用効率が改善されました。

MacScripter.net掲載サンプル処理結果:{{“A”, “T”, “G”, “C”}….}
本Scriptの処理結果:{“ATGC”, “ATCG”…..}

4要素の順列組み合わせ計算:5倍速
5要素の順列組み合わせ計算:10倍速
6要素の順列組み合わせ計算:30倍速
7要素の順列組み合わせ計算:67倍速
8要素の順列組み合わせ計算:(計測不能)

というように、大規模データになればなるほど高速化の度合いが高くなります。AppleScriptにしては大規模データを扱う演算なので、Cocoaの機能を積極的に利用することで高速化を行なっています。

開発機として用いているMacBook Pro 2012 Retina(Core i7 2.6GHz)と、MacBook Pro 13 2017 (Dual Thunderbolt)で処理時間を計測してみたところ、2012のMBPのほうがわずかに高速でした。

AppleScript名:与えられた文字列の1D Listのすべての順列組み合わせパターン文字列を返す v3.scptd
— 2014-10-06 Original By Nigel Garvey@macscripter.net
— 2019-06-19 Modified By Takaaki Naganoya
use AppleScript version "2.4"
use scripting additions
use framework "Foundation"

script spdPerm
  property permutations : missing value
end script

on run
  –Test by MacBook Pro 2012 Retina Core i7 2.6GHz
  
–set theList to {"A", "T", "G", "C", "1"} –0.05 secs (5 digits) 120 items.
  
–set theList to {"A", "T", "G", "C", "1", "2"} –0.21secs (6 digits) 720 items.
  
set theList to {"A", "T", "G", "C", "1", "2", "3"} –1.44 secs (7 digits) 5,040 items.
  
–set theList to {"A", "T", "G", "C", "1", "2", "3", "4"} –11.54 secs (8 digits) 40,320 items.
  
–set theList to {"A", "T", "G", "C", "1", "2", "3", "4", "5"} –107.27 secs (9 digits) 362,880 items.
  
  
set aRes to permute(theList) of me
  
return length of aRes
end run

on permute(theList as list)
  set theArray to current application’s NSMutableArray’s arrayWithArray:theList
  
set (permutations of spdPerm) to current application’s NSMutableArray’s array()
  
prmt(theArray, 0, (count theList) – 1)
  
  
–Return AppleScript string list
  
set aFinishArray to current application’s NSMutableArray’s new()
  
set anEnum to (permutations of spdPerm)’s objectEnumerator()
  
repeat
    set aValue to anEnum’s nextObject()
    
if aValue = missing value then exit repeat
    
set aStr to aValue’s componentsJoinedByString:""
    (
aFinishArray’s addObject:aStr)
  end repeat
  
  
return aFinishArray as list
end permute

on prmt(theArray, theStart as number, theEnd as number)
  if (theStart = theEnd) then
    (permutations of spdPerm)’s addObject:theArray
  else
    repeat with x from theStart to theEnd
      set theCopy to theArray’s mutableCopy()
      
–swap
      
if (x > theStart) then (theCopy’s exchangeObjectAtIndex:theStart withObjectAtIndex:x)
      
prmt(theCopy, theStart + 1, theEnd)
    end repeat
  end if
end prmt

★Click Here to Open This Script 

Posted in list recursive call | Tagged 10.11savvy 10.12savvy 10.13savvy 10.14savvy NSMutableArray | 3 Comments

Keynoteで選択中のスライドだけをデスクトップに画像で書き出す

Posted on 6月 20, 2019 by Takaaki Naganoya

Keynoteでオープン中の最前面の書類で、選択中のスライドだけをデスクトップにPNG画像で書き出すAppleScriptです。Keynote 9.xを必要とします(macOS 10.13以降)。

ちょっとした説明のためにKeynoteの資料の一部だけを画面上でキャプチャして、メールなどに添付して送ることはよくあります(全部送ると量がおおすぎたり、焦点がぼやけたり)。

そこで、複数枚のスライド(ページ)を選択しておくと、それらのみを画像書き出しするAppleScriptを作ってみました。Keynoteにそんな機能はないのですが、「選択中のページ番号」は取れるので、書類全体をPDF書き出ししておいて、書き出したPDFから指定ページを画像として再書き出しを行い、PDFを削除しています。

手品のように見える処理でも、実際に行える機能を組み合わせて地道に作っているだけです。問題は、「手品」が実は地道な調査と機能確認、こまごまとしたライブラリの整備の末に実現されていることが、一般の方にはわかりにくいということでしょうか(いきなり手品を求められて絶句すること多し)。

仕事の合間に作ったので、割と雑な作りです。書き出し画像のファイル名衝突チェックなどは入れていません。

それでも、スクリプトメニューに入れて利用するとなかなか便利です。

AppleScript名:Keynoteで選択中のスライドだけをデスクトップに画像で書き出す.scptd
—
–  Created by: Takaaki Naganoya
–  Created on: 2019/06/20
—
–  Copyright © 2019 Piyomaru Software, All Rights Reserved
—
use AppleScript version "2.7" — 10.13 or later
use framework "Foundation"
use framework "Quartz"
use framework "AppKit"
use scripting additions

set dtPath to (path to desktop) as string

tell application "Keynote"
  set aVer to version
  
  
considering numeric strings
    if aVer < "9.0" then
      display dialog "Too old version for this Script." buttons {"OK"} default button 1 with icon 1
      
return
    end if
  end considering
  
  
tell front document
    set aSel to selection –選択中のスライドオブジェクトへの参照がリストで入る
    
set pList to {}
    
repeat with i in aSel
      set tmpPage to slide number of i
      
set the end of pList to tmpPage
    end repeat
    
  end tell
end tell

–Keynote書類を指定フォルダにPDF書き出し(全ページ書き出し)
set savedPDFPath to exportKeynoteDocToPDF(dtPath) of me
if savedPDFPath = false then return –Error

set aPOSIXpath to POSIX path of savedPDFPath

–書き出したPDFから、部分的にPNG画像に書き出す
repeat with p in pList
  –PDFの指定ページをNSImageとして取り出す
  
set tmpNSImage to getNSImageFromPDFPage(aPOSIXpath, p) of me
  
  
–PDFの書き出しファイル名に子番号にスライド番号をつける
  
set bPath to addStringbeforeExtension(aPOSIXpath, "_" & (p as string)) of me
  
  
–PDF書き出しファイル名に
  
set newPath to repFilePathExtension(bPath, ".png") of me
  
  
–指定のNSImageを指定のパスにPNG形式で保存
  
set sRes to saveNSImageAtPathAsPNG(tmpNSImage, newPath) of me
end repeat

–書き出したPDFを削除
tell application "Finder"
  delete savedPDFPath
end tell

–Keynote書類からPDF書き出し
on exportKeynoteDocToPDF(targFolderPath as string)
  tell application "Keynote"
    set dCount to count every document
    
if dCount = 0 then
      return false
    end if
    
set aPath to file of document 1
  end tell
  
  
set curPath to (current application’s NSString’s stringWithString:(POSIX path of aPath))’s lastPathComponent()’s stringByDeletingPathExtension()’s stringByAppendingString:".pdf"
  
set outPath to (targFolderPath & curPath)
  
  
tell application "Keynote"
    set anOpt to {class:export options, export style:IndividualSlides, all stages:false, skipped slides:true, PDF image quality:Best}
    
export document 1 to file outPath as PDF with properties anOpt
  end tell
  
  
return (outPath as alias)
  
end exportKeynoteDocToPDF

–指定のPDFから、指定のページをNSImageで返す
on getNSImageFromPDFPage(aPOSIX, aPage as number)
  set aURL to (current application’s |NSURL|’s fileURLWithPath:aPOSIX)
  
  
set aPDFdoc to current application’s PDFDocument’s alloc()’s initWithURL:aURL
  
set pCount to aPDFdoc’s pageCount()
  
  
set compFactor to 1.0 –1.0 — 0.0 = max jpeg compression, 1.0 = none
  
  
–Detect Retina Environment
  
set retinaF to current application’s NSScreen’s mainScreen()’s backingScaleFactor()
  
if retinaF = 1.0 then
    set aScale to 2.0 –Non Retina Env
  else
    set aScale to 1.0 –Retina Env
  end if
  
  
set thisPage to (aPDFdoc’s pageAtIndex:(aPage – 1))
  
set anNSImage to (current application’s NSImage’s alloc()’s initWithData:(thisPage’s dataRepresentation()))
  
  
if anNSImage = missing value then error "Error in getting imagerep from PDF"
  
  
return anNSImage
end getNSImageFromPDFPage

–ファイル名の拡張子の直前に子番号的な文字列を入れる
on addStringbeforeExtension(aPath, extraString)
  set pathString to current application’s NSString’s stringWithString:aPath
  
set theExtension to pathString’s pathExtension()
  
set thePathNoExt to pathString’s stringByDeletingPathExtension()
  
set newPath to (thePathNoExt’s stringByAppendingString:extraString)’s stringByAppendingPathExtension:theExtension
  
return newPath as string
end addStringbeforeExtension

–与えられたパスの拡張子を付け替える
on repFilePathExtension(origPath, newExt)
  set aName to current application’s NSString’s stringWithString:origPath
  
set theExtension to aName’s pathExtension()
  
if (theExtension as string) is not equal to "" then
    set thePathNoExt to aName’s stringByDeletingPathExtension()
    
set newName to (thePathNoExt’s stringByAppendingString:newExt)
  else
    set newName to (aName’s stringByAppendingString:newExt)
  end if
  
return newName as string
end repFilePathExtension

–NSImageを指定パスにPNG形式で保存
on saveNSImageAtPathAsPNG(anImage, outPath)
  set imageRep to anImage’s TIFFRepresentation()
  
set aRawimg to current application’s NSBitmapImageRep’s imageRepWithData:imageRep
  
set pathString to current application’s NSString’s stringWithString:outPath
  
set newPath to pathString’s stringByExpandingTildeInPath()
  
set myNewImageData to (aRawimg’s representationUsingType:(current application’s NSPNGFileType) |properties|:(missing value))
  
set aRes to (myNewImageData’s writeToFile:newPath atomically:true) as boolean
  
return aRes –true/false
end saveNSImageAtPathAsPNG

★Click Here to Open This Script 

Posted in file File path Image PDF | Tagged 10.13savvy 10.14savvy Finder Keynote NSBitmapImageRep NSImage NSScreen NSString NSURL PDFDocument | Leave a comment

与えられた1D Listのすべての順列組み合わせパターン文字列を返す

Posted on 6月 18, 2019 by Takaaki Naganoya

与えられた1次元配列のデータのすべての順列組み合わせパターンを計算し、そのとおりに配列を並べて連結した文字列を、すべての順列組み合わせパターンについて生成して返すAppleScriptです。

InDesignやIllustratorなどの書類上に元データをレイアウトした際に、複数のテキストフィールドに分解してレイアウトされていることがあります(見た目重視で)。

その分割されたテキストフィールドを元データと比較する際に、位置情報などをもとに「このあたりが一緒になってそうだ」とあたりをつけるわけですが、左→右、上→下という順序に基づいて配置されているという保証はありません。見た目やインパクト重視で、あえて順番を変えているケースも考えられます。

そこで、並び順について「考えられるかぎりの全ての順列組み合わせでつないでチェック」するという脳筋な(マッチョな)方法を考えてみたりもするわけです。実際、この手の計算にはコンピュータは実に向いている道具なので(やらない方がおかしい?)。

そんな計算を行うために作成したAppleScriptですが、意外や意外、すべての順列組み合わせパターンを計算するルーチンは作ってありませんでした。性格的に、このあたり作ってないと気がすまないと(自分でも)思うものの、これだけ数千本も数万本もAppleScriptを書いておいて、手付かずの処理があったというのは逆に掘り出し物というべきなんでしょう。

そのため、過去に作った一番近いルーチンを流用して、すべての組み合わせパターンを計算し、そのうえで「すべての要素が異なる組み合わせ」だけを抽出しています(すべての組み合わせを計算するのに、「AAAA」とか「AAGG」とかの要素が重複する項目は削除)。

元になっているルーチンは、製品コードなどの複数桁から構成され、それぞれの桁で数値の範囲が異なるという規則性を持つコードを、すべてのパターンについて生成するというものでした。割と、製品カタログ掲載データなどで「ありがち」な仕様です。最新のルーチンでは、各桁についてプロパティ「aRuleList」に、

{下限値, 上限値}

とコードの生成ルールを定義しておいて、そのルールにもとづいてすべてのパターンのコードを展開していました。

出来上がったプログラムにそれほど時間はかけていませんが、それなりの行数に(圧縮記述をせず、見やすく、高度な処理を書けば、行数が増えるのは当然のことなんですけれども)。

  「もう少しシンプルに書けそうなもんだけどー?」

という気持ちでいっぱいですが、まずは機能を実現することが重要です。

→ この処理自体を「Permutations」と呼ぶことを見つけ、MacScripter.netにそのものズバリの処理がずらずらと並んでいるのを見て脱力しました。そうかぁ、再帰で処理するのかぁ。あ、全然高速ですね。ただ、項目数を増やすとやっぱりメモリが足りなくなって、処理がきつくなるのは同様の模様で。

→ 結局、MacScripterに投稿された各種Scriptも、最終的にテキスト要素の1次元配列にデータ変換すると、本ルーチンと同じぐらいの処理時間がかかって驚きです 本ルーチン、そんなに遅くない模様(無駄に長いだけで)

AppleScript名:与えられた文字列の1D Listのすべての順列組み合わせパターン文字列を返す v2
— Created 2019-06-18 by Takaaki Naganoya
— 2019 Piyomaru Software
use AppleScript version "2.4"
use scripting additions
use framework "Foundation"

script spd
  property aList : {}
  
property tmpList : {}
  
property aRuleList : {{1, 4}, {1, 4}, {1, 4}, {1, 4}} –上書きしてしまうので、この通りとはかぎらない
  
property aRuleLen : length of aRuleList
end script

set targList to {"A", "T", "G", "C"}
set aRes to retStrListInAllCombinations(targList) of me
–> {"ATGC", "ATCG", "AGTC", "AGCT", "ACTG", "ACGT", "TAGC", "TACG", "TGAC", "TGCA", "TCAG", "TCGA", "GATC", "GACT", "GTAC", "GTCA", "GCAT", "GCTA", "CATG", "CAGT", "CTAG", "CTGA", "CGAT", "CGTA"}

–与えた文字列リストを、順列組み合わせの全パターンで組み替え直して返す
on retStrListInAllCombinations(targList as list)
  
  
set aRes to retAllPatterns(targList) of me
  
–> {1234, 1243, 1324, 1342, 1423, 1432, 2134, 2143, 2314, 2341, 2413, 2431, 3124, 3142, 3214, 3241, 3412, 3421, 4123, 4132, 4213, 4231, 4312, 4321}
  
  
–順列組み合わせデータをもとに元データをその順番に組み合わせる
  
set (tmpList of spd) to {}
  
repeat with i in aRes
    set jList to characters of (i as string)
    
    
set tmpStr to ""
    
repeat with ii in jList
      set tmpStr to tmpStr & (contents of item (ii as integer) of targList)
    end repeat
    
    
set the end of (tmpList of spd) to tmpStr
  end repeat
  
  
return (tmpList of spd)
end retStrListInAllCombinations

–与えられた要素数のリストをもとに、すべての順列組み合わせパターンを返す
on retAllPatterns(targList)
  –ルールテーブルの初期化
  
set targStrLen to length of targList
  
set (aRuleList of spd) to {}
  
repeat with i from 1 to targStrLen
    set the end of (aRuleList of spd) to {1, targStrLen}
  end repeat
  
set (aRuleLen of spd) to targStrLen –初版ではここを更新していなかったので、データの桁数を増やしても出力結果の桁数が変わらないというバグがあった
  
  
—
  
set (aList of spd) to {} –initilaize
  
set initNum to getMinNum() of me –本ルール下における最小値
  
  
copy initNum to aNum
  
  
repeat
    set aRes to incDigit(aNum, 1) of me
    
    
if aRes = false then
      exit repeat
    end if
    
    
if (chkEachDigitIsNotSameChar(aRes) of me) = true then
      if aRes is not in (aList of spd) then
        set the end of (aList of spd) to aRes
      end if
    end if
    
    
copy aRes to aNum
    
  end repeat
  
  
return (aList of spd)
end retAllPatterns

–与えられたルール下における最小値をルールリストから求める
on getMinNum()
  –桁数が合っているだけのダミー数字を、適切な桁数作成する(例:11111)
  
set tmpNumStr to ""
  
repeat (aRuleLen of spd) times
    set tmpNumStr to tmpNumStr & "1"
  end repeat
  
  
set tmpNum to tmpNumStr as integer
  
  
–ルールから各桁の最小値を取り出して、各桁に設定する
  
repeat with i from 1 to (aRuleLen of spd)
    set aDigNum to item 1 of item i of (aRuleList of spd)
    
set tmpNum to setDigit(tmpNum, i, aDigNum) of me
  end repeat
  
  
return tmpNum
end getMinNum

–繰り上がり処理(再帰呼び出しで使用)
on incDigit(aNum, aDigit)
  set {thisMin, thisMax} to item ((aRuleLen of spd) – aDigit + 1) of (aRuleList of spd)
  
  
set aTarget to getDigit(aNum, aDigit) of me
  
  
if aTarget = thisMax then
    if aDigit = (aRuleLen of spd) then
      –オーバーフロー(桁あふれ)エラーを返す
      
return false
    end if
    
    
set bNum to incDigit(aNum, aDigit + 1) of me
    
    
if bNum = false then return false
    
    
set bNum to setDigit(bNum, aDigit, thisMin) of me
  else
    set aTarget to aTarget + 1
    
set bNum to setDigit(aNum, aDigit, aTarget) of me
  end if
  
  
return bNum
end incDigit

–指定数値のうち指定桁の数字を返す
on getDigit(aNum, aDigit)
  
  
set aStr to aNum as string
  
set aLen to length of aStr
  
if aLen < aDigit then
    return false –エラー
  end if
  
  
set tStr to character (aLen – aDigit + 1) of aStr
  
return tStr as integer
  
end getDigit

–指定数値のうち指定桁の数字を返す
on setDigit(aNum, aDigit, newNum)
  
  
set aStr to aNum as string
  
set aLen to length of aStr
  
if aLen < aDigit then
    return false –エラー
  end if
  
  
set aList to characters of aStr
  
  
set item (aLen – aDigit + 1) of aList to (newNum as string)
  
set aaStr to aList as string
  
  
return aaStr as integer
  
end setDigit

–与えた文字列の各キャラクタがすべて「別のもの」であるかをチェック
on chkEachDigitIsNotSameChar(aStr as string)
  set aLen to length of aStr
  
set aList to characters of aStr
  
  
set bList to {}
  
repeat with i in aList
    set j to contents of i
    
if j is not in bList then
      set the end of bList to j
    else
      return false –Some duplicated character(s) exists
    end if
  end repeat
  
return true –All Characters are different
end chkEachDigitIsNotSameChar

★Click Here to Open This Script 

Posted in list | Tagged 10.11savvy 10.12savvy 10.13savvy 10.14savvy 10.15savvy | 1 Comment

CotEditorで編集中のMarkdown書類をPDFプレビュー

Posted on 6月 15, 2019 by Takaaki Naganoya

CotEditorで編集中のMarkdown書類を、MacDownでPDF書き出しして、Skimでオープンして表示するAppleScriptです。

CotEditorにMarkdownのプレビュー機能がついたらいいと思っている人は多いようですが、MarkdownはMarkdownで、方言は多いし標準がないし、1枚もののMarkdown書類だけ編集できればいいのか、本などのプロジェクト単位で編集とか、目次が作成できないとダメとか、リンクした画像の扱いをどうするのかとか、対応しようとすると「ほぼ別のソフトを作るのと同じ」ぐらい手間がかかりそうです(メンテナー様ご本人談)。

そこで、AppleScript経由で他のソフトを連携させてPDFプレビューさせてみました。これなら、誰にも迷惑をかけずに、今日この時点からすぐにMarkdownのプレビューが行えます(当然、HTML書き出ししてSafariでプレビューするバージョンははるかかなた昔に作ってあります)。

ただし、OS側の機能制限の問題で、CotEditor上のスクリプトメニューから実行はできません(GUI Scriptingの実行が許可されない)。OS側のスクリプトメニューに登録して実行する必要があります。

GUI Scriptingを利用してメニュー操作を行なっているため、システム環境設定で許可しておく必要があります。

本来であれば、PDFの書き出し先フォルダ(この場合は書き出しダイアログで、GUI Scirptingを用いてCommand-Dで指定して一律に場所指定が行えるデスクトップフォルダ)に同名のPDFが存在しないかどうかチェックし、存在すれば削除するといった処理が必要ですが、面倒だったのであらかじめMarkdown書類をUUIDにリネームしておくことで、書き出されたPDFも同じくUUIDのファイル名になるため、論理上はファイル名の衝突を回避できるため、削除処理を省略しています。

AppleScript名:🌏レンダリングしてPDFプレビュー
— Created 2019-06-15 by Takaaki Naganoya
— 2019 Piyomaru Software
use AppleScript version "2.5"
use scripting additions
use framework "Foundation"
use framework "AppKit"

property NSUUID : a reference to current application’s NSUUID
property NSWorkspace : a reference to current application’s NSWorkspace

–オープン中のMarkdown書類を取得する
tell application "CotEditor"
  tell front document
    set cStyle to coloring style
    
if cStyle is not equal to "Markdown" then
      display dialog "編集中のファイルはMarkdown書類ではないようです。" buttons {"OK"} default button 1
      
return
    end if
    
    
set aPath to path
  end tell
end tell

–一時フォルダにMarkdown書類をコピー
set sPath to (path to temporary items)
tell application "Finder"
  set sRes to (duplicate ((POSIX file aPath) as alias) to folder sPath with replacing)
end tell

–コピーしたMarkdown書類をリネーム
set s1Res to sRes as alias
set aUUID to NSUUID’s UUID()’s UUIDString() as text –UUIDを作成する
tell application "Finder"
  set name of s1Res to (aUUID & ".md")
end tell

–Markdown書類をデスクトップにPDF書き出し
set pdfRes to exportFromMacDown(POSIX path of s1Res) of me

–PDF Viewerでオープン
tell application "Skim" –Preview.appでもOK
  activate
  
open pdfRes
end tell

–一時フォルダに書き出したMarkdown書類を削除
tell application "Finder"
  delete s1Res
end tell

–指定のMacDownファイル(alias)をデスクトップ上にPDFで書き出し
on exportFromMacDown(anAlias)
  set s1Text to paragraphs of (do shell script "ls ~/Desktop/*.pdf") –pdf書き出し前のファイル一覧
  
  
tell application "MacDown"
    open {anAlias}
  end tell
  
  
macDownForceSave() of me
  
  
tell application "MacDown"
    close every document without saving
  end tell
  
  
do shell script "sync" –ねんのため
  
  
set s2Text to paragraphs of (do shell script "ls ~/Desktop/*.pdf") –pdf書き出し後のファイル一覧
  
  
set dRes to getDiffBetweenLists(s1Text, s2Text) of me –デスクトップ上のPDFファイル名一覧の差分を取得
  
set d2Res to (addItems of dRes)
  
  
if length of d2Res ≥ 1 then
    return contents of first item of d2Res
  else
    error "Error in exporting PDF to desktop folder…."
  end if
end exportFromMacDown

on getDiffBetweenLists(aArray as list, bArray as list)
  set allSet to current application’s NSMutableSet’s setWithArray:aArray
  
allSet’s addObjectsFromArray:bArray
  
  
–重複する要素のみ抜き出す
  
set duplicateSet to current application’s NSMutableSet’s setWithArray:aArray
  
duplicateSet’s intersectSet:(current application’s NSSet’s setWithArray:bArray)
  
  
–重複部分を削除する
  
allSet’s minusSet:duplicateSet
  
set resArray to (allSet’s allObjects()) as list
  
  
set aSet to current application’s NSMutableSet’s setWithArray:aArray
  
set bSet to current application’s NSMutableSet’s setWithArray:resArray
  
aSet’s intersectSet:bSet –積集合
  
set addRes to aSet’s allObjects() as list
  
  
set cSet to current application’s NSMutableSet’s setWithArray:bArray
  
cSet’s intersectSet:bSet –積集合
  
set minusRes to cSet’s allObjects() as list
  
  
return {addItems:minusRes, minusItems:addRes}
end getDiffBetweenLists

–注意!! ここでGUI Scriptingを使用。バージョンが変わったときにメニュー階層などの変更があったら書き換え
on macDownForceSave()
  activate application "MacDown"
  
tell application "System Events"
    tell process "MacDown"
      — File > Export > PDF
      
click menu item 2 of menu 1 of menu item 14 of menu 1 of menu bar item 3 of menu bar 1
      
      
–Go to Desktop Folder
      
keystroke "d" using {command down}
      
      
–Save Button on Sheet
      
click button 1 of sheet 1 of window 1
    end tell
  end tell
end macDownForceSave

–Bundle IDからアプリケーションのPathを返す
on retAppAbusolutePathFromBundleID(aBundleID)
  set appPath to NSWorkspace’s sharedWorkspace()’s absolutePathForAppBundleWithIdentifier:aBundleID
  
if appPath = missing value then return false
  
return appPath as string
end retAppAbusolutePathFromBundleID

★Click Here to Open This Script 

Posted in file File path GUI Scripting Markdown PDF shell script | Tagged 10.11savvy 10.12savvy 10.13savvy CotEditor Finder MacDown NSUUID NSWorkspace Skim | Leave a comment

Markdown書類をメモ.appに新規エントリで登録する

Posted on 6月 11, 2019 by Takaaki Naganoya

指定のMarkdown書類をメモ.app(Notes.app)に新規エントリとして登録するAppleScriptです。


▲テストに使ったMarkdown書類

Markdown書類をUTF-8のテキストとして読み込み、それをHTMLに変換し、そのままメモ.app(Notes.app)に新規エントリとして登録します。Markdown書類のHTMLへの解釈はオープンソースのMMMarkdownを利用しています。

自分はMarkdownエディタにMacDownを用いているため、使用しているMarkdown書類もMacDownが解釈する、割と自由度の高い(HTMLコードをそのまま書いておいても許容するような)Markdownのコードを与えて処理してみましたが、これらはMMMarkdownでHTML変換する際にスルーされたせいか、装飾がかなり再現されているように感じます。

Markdownタグの互換性はエディタごとに大きく異なるため、確認はお手元のエディタ用のMarkdown書類で行なってください。

–> Download MMMarkdown.framework (To ~/Library/Frameworks/)


▲MMMarkdownを用いてMarkdown書類をHTMLに変換し、メモ.app(Notes.app)に登録した内容。表以外はけっこう反映できている

タイトルやメモ.app(Notes.app)上の登録先などは適宜変更してみてください。

何も考えずに、手元にあったMarkdown書類を処理してみたところ、http://のリンクや、applescript://のリンクなどもそのまま反映。色情報もそのまま反映されているようです。


▲macOS 10.14.5上で、Applet形式で実行。表も反映されている

macOS 10.14上では、①Script Debuggerを用いて実行 ②Frameworkを含めてApplet形式に書き出して実行 ③SIPを解除してスクリプトエディタ上で実行 のどちらか好きなものを選んでください。

Framework入りでAppletに書き出したものをダウンロードできるようにしておきました。macOS 10.14以降ではこちらもお試しください。

2019/6/15 フレームワークのリンク先が間違っていたようで、バイナリを書き出しし直しました。また、macOS 10.14環境で一部Scripterが言っているような「アプリケーション操作の認証を再度求められる」ような現象には遭遇していません。

–> MarkdownToNotes.zip

AppleScript名:Markdown書類をメモ.appに新規エントリで登録する.scptd
— Created 2019-06-11 by Takaaki Naganoya
— 2019 Piyomaru Software
use AppleScript version "2.4"
use scripting additions
use framework "Foundation"
use framework "MMMarkdown" –https://github.com/mdiep/MMMarkdown

property NSUUID : a reference to current application’s NSUUID

–Markdown書類の読み込み
set aFile to choose file of type {"net.daringfireball.markdown"}
tell current application
  set aStr to (read aFile as «class utf8»)
end tell

–Markdown to HTML
set htmlString to current application’s MMMarkdown’s HTMLStringWithMarkdown:aStr |error|:(missing value)

–メモ.app(Notes.app)に新規エントリを作成する
set aUUID to NSUUID’s UUID()’s UUIDString() as text –UUIDを作成する
tell application "Notes"
  make new note at folder "Notes" of account "iCloud" with properties {name:"TEST Notes_" & aUUID, body:(htmlString as string)}
end tell

★Click Here to Open This Script 

Posted in file Markdown | Tagged 10.11savvy 10.12savvy 10.13savvy 10.14savvy Notes | Leave a comment

Keynote書類のテキスト色を置換

Posted on 6月 9, 2019 by Takaaki Naganoya

最前面のKeynote書類の文字色を置換するAppleScriptです。

# 初出時にはmacOS 10.13であったため、スクリプトエディタ上からも野良Framework呼び出しができましたが、macOS 10.14以降ではSIPを解除するかScript Debugger上で実行する必要があります

Keynoteは文字色の置換をする機能が実装されていないので、個別に手で色を変更するか、あるいはスタイルを編集して一括で修正するやり方になります。

そこで、AppleScriptで色置換を行う処理を書いてみました。表の背景色を置換する処理を書いたときの部品を大幅に使いまわしています。

文字色の取得や判定は、テキストアイテムの1文字目の情報で判断しています。途中で色を変更しているような場合にはうまく検出できません(処理スピードを重視したことと、自分の利用方法の範囲ではそういう文字ごとに異なる色を指定するところまではサポートしなくてよいと考えたためです。仕事ならもうちょっと真面目に作り込むかもしれませんが、、、、)。

ポップアップメニュー中の色名の動的な推定に、オープンソースの「DBColorNames」をフレームワーク化した
「dbColNamesKit.framework」を利用しています。

–> dbColNamesKit.framework (To ~/Library/Frameworks)


▲左上の時刻部分の色を置換したい


▲本Scriptを実行した直後。最前面のKeynote書類のすべてのテキストを走査して文字色を取得する


▲取得した文字色リスト。この中から置換対象を選択する。色データから色名を動的に生成し、色IDとともに名称で個別に指定したり識別したりできる


▲変更後の色をカラーピッカーで選択


▲Keynote書類上の文字色を変更してみた

AppleScript名:Keynote書類の現在のテキスト色を置換.scptd
—
–  Created by: Takaaki Naganoya
–  Created on: 2019/06/08
—
–  Copyright © 2019 Piyomaru Software, All Rights Reserved
—
use AppleScript version "2.5" — Yosemite (10.11) or later
use framework "Foundation"
use framework "AppKit"
use framework "dbColNamesKit" –https://github.com/daniel-beard/DBColorNames/
use scripting additions

property NSView : a reference to current application’s NSView
property NSAlert : a reference to current application’s NSAlert
property NSColor : a reference to current application’s NSColor
property NSMenu : a reference to current application’s NSMenu
property NSImage : a reference to current application’s NSImage
property NSIndexSet : a reference to current application’s NSIndexSet
property NSTextField : a reference to current application’s NSTextField
property NSColorWell : a reference to current application’s NSColorWell
property NSMenuItem : a reference to current application’s NSMenuItem
property NSBezierPath : a reference to current application’s NSBezierPath
property NSPopUpButton : a reference to current application’s NSPopUpButton
property NSMutableArray : a reference to current application’s NSMutableArray
property NSRunningApplication : a reference to current application’s NSRunningApplication

property returnCode : 0
property pop1ind : 0

–スライド枚数をカウント
tell application "Keynote"
  tell front document
    set sCount to count every slide
  end tell
end tell

–すべてのテキストアイテム、タイトルから色情報を取得する
set cList to {}
repeat with sNum from 1 to sCount
  set cList to cList & getEveryTextColorOfSlide(sNum) of me
end repeat

–文字色のユニーク化
set dList to makeUniqueListOf(cList) of me

set paramObj to {mainDat:dList, myTitle:"テキスト色置換", mySubTitle:"Keynoteのテキストアイテム、デフォルトアイテム(タイトル)の文字色置換", myColorRangeMax:65535}
my getPopupValues:paramObj

if pop1ind = false then return –timed out
set fromCol to (contents of item pop1ind of dList)

–カラーピッカーで置換色選択
set tCol to choose color default color fromCol

–Keynote書類中のテキストの文字色を置換
repeat with sNum from 1 to sCount
  set cList to cList & repEveryTextColorOfSlide(sNum, fromCol, tCol) of me
end repeat

–カラーポップアップメニューをウィンドウ表示
on getPopupValues:paramObj
  set ap1List to (mainDat of (paramObj as record)) as list
  
set winTitle to (myTitle of (paramObj as record)) as string
  
set subTitle to (mySubTitle of (paramObj as record)) as string
  
set aColMax to (myColorRangeMax of (paramObj as record)) as list
  
  
–Viewをつくる
  
set aView to NSView’s alloc()’s initWithFrame:(current application’s NSMakeRect(0, 0, 360, 80))
  
  
–Labelをつくる
  
set a1TF to NSTextField’s alloc()’s initWithFrame:(current application’s NSMakeRect(0, 40, 80, 20))
  
a1TF’s setEditable:false
  
a1TF’s setStringValue:"From Color:"
  
a1TF’s setDrawsBackground:false
  
a1TF’s setBordered:false
  
  
–Ppopup Buttonをつくる
  
set a1Button to NSPopUpButton’s alloc()’s initWithFrame:(current application’s NSMakeRect(80, 40, 200, 20)) pullsDown:false
  
a1Button’s removeAllItems()
  
  
set a1Menu to NSMenu’s alloc()’s init()
  
set aCDB to current application’s DBColorNames’s alloc()’s init()
  
  
–Popup Menuをつくる
  
set iCount to 1
  
repeat with i in ap1List
    copy i to {r1, g1, b1}
    
    
set nsCol to makeNSColorFromRGBAval(r1, g1, b1, aColMax, aColMax) of me
    
set anImage to makeRoundedNSImageWithFilledWithColor(64, 64, nsCol, 4) of me
    
    
–色名をRGB値から動的に生成(あらかじめdbNamesが持っているカラーパレットの近似色の色名を返す)
    
set aTitle to "#" & (iCount as string) & " " & (aCDB’s nameForColor:nsCol) as string
    
    
–Menu Itemを作成する
    
set aMenuItem to (NSMenuItem’s alloc()’s initWithTitle:aTitle action:"actionHandler:" keyEquivalent:"")
    (
aMenuItem’s setImage:anImage)
    (
aMenuItem’s setEnabled:true)
    (
aMenuItem’s setTarget:me)
    (
a1Menu’s addItem:aMenuItem)
    
    
set iCount to iCount + 1
  end repeat
  
  
–Popup ButtonにPopup Menuを設定する
  
a1Button’s setMenu:a1Menu
  
  
–ViewにPopup Buttonとテキストラベルを入れる
  
aView’s addSubview:a1TF
  
aView’s addSubview:a1Button
  
aView’s setNeedsDisplay:true


— set up alert  
  
set theAlert to NSAlert’s alloc()’s init()
  
tell theAlert
    its setMessageText:winTitle
    
its setInformativeText:subTitle
    
its addButtonWithTitle:"OK"
    
its addButtonWithTitle:"Cancel"
    
its setAccessoryView:aView
  end tell
  
  
— show alert in modal loop
  
NSRunningApplication’s currentApplication()’s activateWithOptions:0
  
my performSelectorOnMainThread:"doModal:" withObject:(theAlert) waitUntilDone:true
  
if (my returnCode as number) = 1001 then error number -128
  
  
set s1Val to ((a1Button’s indexOfSelectedItem() as number) + 1)
  
copy s1Val to my pop1ind
end getPopupValues:

on doModal:aParam
  set (my returnCode) to aParam’s runModal()
end doModal:

–Popup Action Handler
on actionHandler:sender
  set aTag to tag of sender as integer
  
set aTitle to title of sender as string
end actionHandler:

–aMaxValを最大値とする数値でNSColorを作成して返す
on makeNSColorFromRGBAval(redValue as integer, greenValue as integer, blueValue as integer, alphaValue as integer, aMaxVal as integer)
  set aRedCocoa to (redValue / aMaxVal) as real
  
set aGreenCocoa to (greenValue / aMaxVal) as real
  
set aBlueCocoa to (blueValue / aMaxVal) as real
  
set aAlphaCocoa to (alphaValue / aMaxVal) as real
  
set aColor to NSColor’s colorWithCalibratedRed:aRedCocoa green:aGreenCocoa blue:aBlueCocoa alpha:aAlphaCocoa
  
return aColor
end makeNSColorFromRGBAval

–指定サイズのNSImageを作成し、指定色で塗ってNSImageで返す
on makeNSImageWithFilledWithColor(aWidth as integer, aHeight as integer, fillColor)
  set anImage to NSImage’s alloc()’s initWithSize:(current application’s NSMakeSize(aWidth, aHeight))
  
anImage’s lockFocus()
  
—
  
set theRect to {{x:0, y:0}, {height:aHeight, width:aWidth}}
  
set theNSBezierPath to NSBezierPath’s bezierPath
  
theNSBezierPath’s appendBezierPathWithRect:theRect
  
—
  
fillColor’s |set|() –色設定
  
theNSBezierPath’s fill() –ぬりつぶし
  
—
  
anImage’s unlockFocus()
  
—
  
return anImage
end makeNSImageWithFilledWithColor

–指定サイズのNSImageを作成し、指定色で塗ってNSImageで返す、anRadiusの半径の角丸で
on makeRoundedNSImageWithFilledWithColor(aWidth as integer, aHeight as integer, fillColor, anRadius as real)
  set anImage to NSImage’s alloc()’s initWithSize:(current application’s NSMakeSize(aWidth, aHeight))
  
anImage’s lockFocus()
  
—
  
set theRect to {{x:0, y:0}, {height:aHeight, width:aWidth}}
  
set theNSBezierPath to NSBezierPath’s bezierPathWithRoundedRect:theRect xRadius:anRadius yRadius:anRadius
  
—
  
fillColor’s |set|() –色設定
  
theNSBezierPath’s fill() –ぬりつぶし
  
—
  
anImage’s unlockFocus()
  
  
return anImage
end makeRoundedNSImageWithFilledWithColor

–最前面のKeynote書類のすべてのスライドから、テキストアイテムとタイトルアイテムの文字色を取得
on getEveryTextColorOfSlide(sNum)
  set cList to {}
  
  
tell application "Keynote"
    tell front document
      set sMax to count every slide
      
if sMax < sNum then return false
      
      
tell slide sNum
        –すべての文字アイテムの先頭の文字の色情報を取得
        
try
          set tCount to count every text item
          
repeat with i from 1 to tCount
            set s1List to color of character 1 of object text of text item i
            
set the end of cList to s1List
          end repeat
        on error
          –set s1List to {}
        end try
        
        
–タイトルの先頭の文字の色情報を取得
        
try
          set s2List to color of character 1 of object text of default title item
          
set the end of cList to s2List
        on error
          set s2List to {}
        end try
      end tell
      
    end tell
  end tell
  
  
return cList
end getEveryTextColorOfSlide

–最前面のKeynote書類の指定番号のスライドで、テキストアイテムとタイトルアイテムの文字色を置換
on repEveryTextColorOfSlide(sNum, fromCol, toCol)
  tell application "Keynote"
    tell front document
      set sMax to count every slide
      
if sMax < sNum then return false
      
      
tell slide sNum
        –すべての文字アイテムの先頭の文字の色情報を置換
        
try
          set tCount to count every text item
          
repeat with i from 1 to tCount
            set s1List to color of character 1 of object text of text item i
            
if s1List = fromCol then
              ignoring application responses
                set color of every character of object text of text item i to toCol
              end ignoring
            end if
          end repeat
        on error
          —
        end try
        
        
–タイトルの先頭の文字の色情報を置換
        
try
          set s2List to color of character 1 of object text of default title item
          
if s2List = fromCol then
            ignoring application responses
              set color of every character of object text of default title item to toCol
            end ignoring
          end if
        on error
          set s2List to {}
        end try
      end tell
      
    end tell
  end tell
end repEveryTextColorOfSlide

–Listのユニーク化
on makeUniqueListOf(theList)
  set theSet to current application’s NSOrderedSet’s orderedSetWithArray:theList
  
return (theSet’s array()) as list
end makeUniqueListOf

★Click Here to Open This Script 

Posted in Color dialog GUI list | Tagged 10.11savvy 10.12savvy 10.13savvy Keynote NSAlert NSBezierPath NSColor NSColorWell NSImage NSIndexSet NSMenu NSMenuItem NSMutableArray NSPopUpButton NSRunningApplication NSTextField NSView | Leave a comment

Numbersで選択中の表のセルの範囲を背景色で頻度集計

Posted on 6月 6, 2019 by Takaaki Naganoya

Numbersでオープン中の書類の現在のシート上にある表の選択範囲のセルに対して、背景色(Background color)で登場頻度の集計を行って、どの色が何回登場しているかを色プレビューしつつ表示するAppleScriptです。

集計をRGB値で数値的に行うことは容易ですが、結局のところ色なんてRGB値で見せられてもわからず、実際に目で見える色で表示しないと判断できません。そのため、アラートダイアログを作成してその上にColorWellで表示しています。


▲Numbersの表でセルを選択


▲Numbersの表のセルに指定されている背景色の登場頻度で集計し、色プレビューと登場回数を表示(スクリプトエディタ@macOS 10.14.5上の表示、Dark Mode)


▲Numbersの表のセルに指定されている背景色の登場頻度で集計し、色プレビューと登場回数を表示(Script Debugger@macOS 10.14.5上の表示、Dark Mode)

上記サンプル表は本Blog上での説明用のために簡略化した表ですが、実際には数十行の入り組んだNumbersの表を相手にしており、かつ、手作業で色付きセルだけを数えるなんて考えたくもないレベルで頻繁に確認しなくてはならなかったために、本Scriptを作ってみました。

Numbersにかぎらず、iWorkアプリケーション(Keynote、Pages、Numbers)で共通の仕様ですが、背景色を塗らないセルから背景色を取得するとmissing valueが返ります。

本ScriptはScript Menuに入れて実行するとアラートダイアログが最前面に出てこないなど、Script書類(.scpt、.scptd)のままで実行すると問題が発生。Script Menuに入れる場合にはアプレット(.app)書き出しする必要があります。


▲スクリプトメニューにアプレット書き出しした実行ファイルを入れて呼び出し(macOS 10.14.5)。スクリプトメニューは最前面にあるGUIアプリケーションに応じて、それぞれのアプリケーション用のメニューを表示できるようになっている

AppleScript名:選択中の表のセルの範囲を背景色で頻度集計.scptd
—
–  Created by: Takaaki Naganoya
–  Created on: 2019/06/06
—
–  Copyright © 2019 Piyomaru Software, All Rights Reserved
—
use AppleScript version "2.4" — Yosemite (10.10) or later
use framework "Foundation"
use framework "AppKit"
use scripting additions

property NSView : a reference to current application’s NSView
property NSAlert : a reference to current application’s NSAlert
property NSColor : a reference to current application’s NSColor
property NSIndexSet : a reference to current application’s NSIndexSet
property NSTextField : a reference to current application’s NSTextField
property NSColorWell : a reference to current application’s NSColorWell
property NSScrollView : a reference to current application’s NSScrollView
property NSMutableArray : a reference to current application’s NSMutableArray
property NSRunningApplication : a reference to current application’s NSRunningApplication

property theResult : 0
property returnCode : 0
property theDataSource : {}

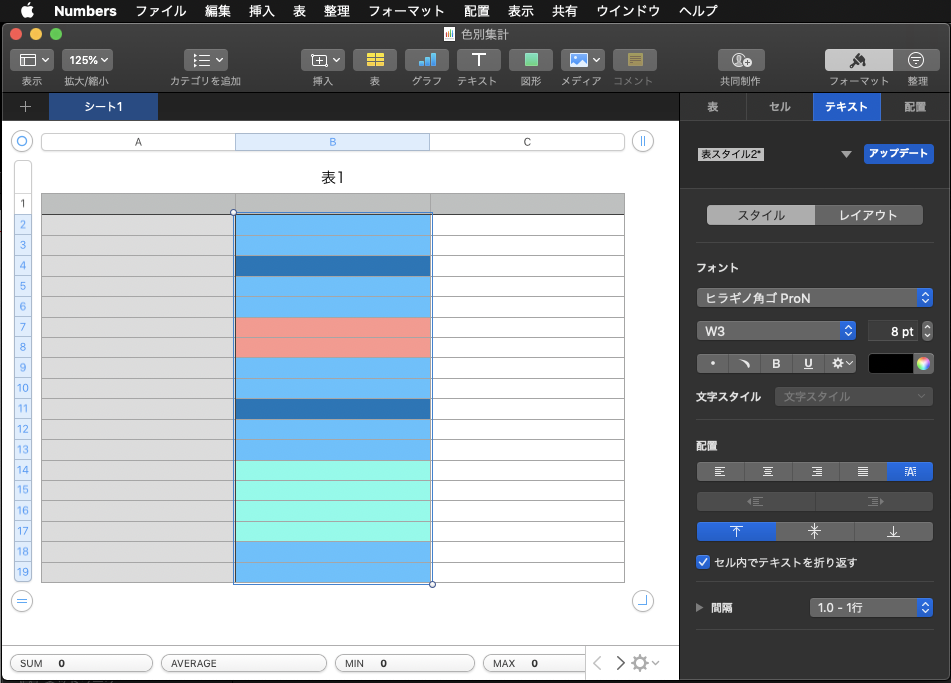
tell application "Numbers"
  tell front document
    tell active sheet
      try
        set theTable to first table whose class of selection range is range
      on error
        return "No Selection" –何も選択されてなかった場合
      end try
      
      
tell theTable
        set bgColList to background color of every cell of selection range
        
–> {{18572, 45937, 65452}, {18572, 45937, 65452}, {3001, 24801, 44056}, {18572, 45937, 65452}, {18572, 45937, 65452}, {64899, 33134, 31509}, {64899, 33134, 31509}, {18572, 45937, 65452}, {18572, 45937, 65452}, {3001, 24801, 44056}, {18572, 45937, 65452}, {18572, 45937, 65452}, {26149, 65534, 58650}, {26149, 65534, 58650}, {26149, 65534, 58650}, {26149, 65534, 58650}, {18572, 45937, 65452}, {18572, 45937, 65452}}
      end tell
    end tell
  end tell
end tell

set bgColList to countItemsByItsAppearance(bgColList) of me
–> {{theName:{65535, 65533, 65534}, numberOfTimes:73}, {theName:{65535, 65535, 21706}, numberOfTimes:73}, {theName:missing value, numberOfTimes:27}}

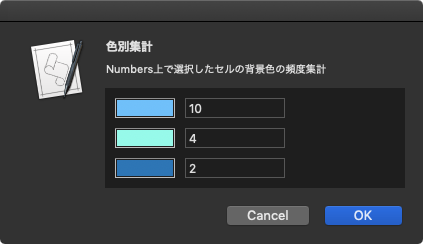
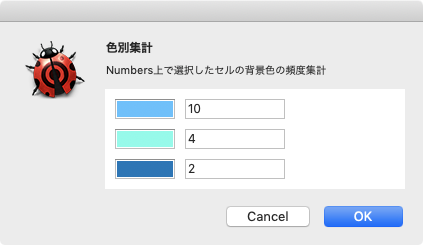
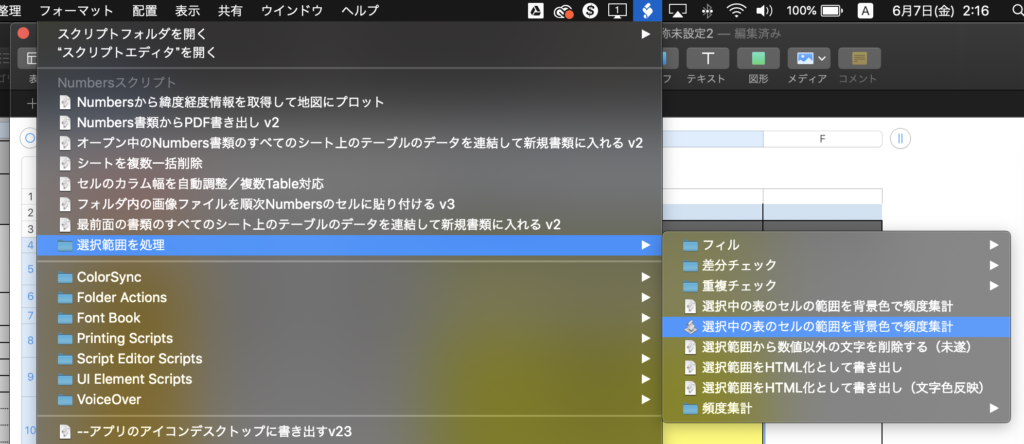
set paramObj to {mainDat:bgColList, myTitle:"色別集計", mySubTitle:"Numbers上で選択したセルの背景色の頻度集計"}
–my browseColors:paramObj–for debug

my performSelectorOnMainThread:"browseColors:" withObject:(paramObj) waitUntilDone:true

on browseColors:paramObj
  set aParamList to (mainDat of (paramObj as record)) as list
  
set winTitle to (myTitle of (paramObj as record)) as string
  
set subTitle to (mySubTitle of (paramObj as record)) as string
  
  
set aLen to length of aParamList
  
  
set aHeight to 100
  
set aWidth to 300
  
  
–NSViewをつくる
  
set aNSV to NSView’s alloc()’s initWithFrame:(current application’s NSMakeRect(0, 0, aWidth, aHeight * 1.5))
  
aNSV’s setNeedsDisplay:true
  
  
— NSScroll Viewをつくる
  
set aScroll to NSScrollView’s alloc()’s initWithFrame:(current application’s NSMakeRect(0, 0, aWidth, aHeight))
  
aScroll’s setDocumentView:aNSV
  
  
aNSV’s enclosingScrollView()’s setHasHorizontalScroller:true
  
aNSV’s enclosingScrollView()’s setHasVerticalScroller:true
  
  
–NSColorWell+ NSTextFieldをつくる
  
set aStep to 1
  
repeat with i in aParamList
    set aColorWell to (NSColorWell’s alloc()’s initWithFrame:(current application’s NSMakeRect(10, ((aLen – aStep + 1) * 30), 60, 20)))
    
    
set myName to (theName of i)
    
set myTimes to (numberOfTimes of i)
    
    
if myName is not equal to missing value then
      copy (myName as list) to {rNum, gNum, bNum}
      
set myTimes to numberOfTimes of i
      
      
set myColor to makeNSColorFromRGBAval(rNum, gNum, bNum, 65535, 65535) of me
      (
aColorWell’s setColor:myColor)
      (
aColorWell’s setBordered:false)
      (
aNSV’s addSubview:aColorWell)
      
      
set aTF to makeNSTextField(80, ((aLen – aStep + 1) * 30), 100, 20, false, myTimes as string, true, true) of me
      (
aNSV’s addSubview:aTF)
      
      
set aStep to aStep + 1
    end if
  end repeat
  
  
–NSScrollViewを強制的にトップにスクロール
  
set aPT to current application’s NSMakePoint(0.0, aHeight)
  
aScroll’s documentView()’s scrollPoint:aPT
  
  
— set up alert  
  
set theAlert to NSAlert’s alloc()’s init()
  
tell theAlert
    its setMessageText:winTitle
    
its setInformativeText:subTitle
    
its addButtonWithTitle:"OK"
    
its addButtonWithTitle:"Cancel"
    
its setAccessoryView:aScroll
  end tell
  
  
— show alert in modal loop
  
NSRunningApplication’s currentApplication()’s activateWithOptions:0
  
my performSelectorOnMainThread:"doModal:" withObject:(theAlert) waitUntilDone:true
  
if (my returnCode as number) = 1001 then error number -128
  
end browseColors:

on doModal:aParam
  set (my returnCode) to aParam’s runModal()
end doModal:

on makeNSColorFromRGBAval(redValue as integer, greenValue as integer, blueValue as integer, alphaValue as integer, aMaxVal as integer)
  set aRedCocoa to (redValue / aMaxVal) as real
  
set aGreenCocoa to (greenValue / aMaxVal) as real
  
set aBlueCocoa to (blueValue / aMaxVal) as real
  
set aAlphaCocoa to (alphaValue / aMaxVal) as real
  
set aColor to NSColor’s colorWithCalibratedRed:aRedCocoa green:aGreenCocoa blue:aBlueCocoa alpha:aAlphaCocoa
  
return aColor
end makeNSColorFromRGBAval

–1D Listを要素別に出現回数で集計
on countItemsByItsAppearance(aList as list)
  set aSet to current application’s NSCountedSet’s alloc()’s initWithArray:aList
  
set bArray to current application’s NSMutableArray’s array()
  
set theEnumerator to aSet’s objectEnumerator()
  
  
repeat
    set aValue to theEnumerator’s nextObject()
    
if aValue is missing value then exit repeat
    
bArray’s addObject:(current application’s NSDictionary’s dictionaryWithObjects:{aValue, (aSet’s countForObject:aValue)} forKeys:{"theName", "numberOfTimes"})
  end repeat
  
  
–出現回数(numberOfTimes)で降順ソート
  
set theDesc to current application’s NSSortDescriptor’s sortDescriptorWithKey:"numberOfTimes" ascending:false
  
bArray’s sortUsingDescriptors:{theDesc}
  
  
return bArray as list
end countItemsByItsAppearance

on makeNSTextField(xPos as integer, yPos as integer, myWidth as integer, myHeight as integer, editableF as boolean, setVal as string, backgroundF as boolean, borderedF as boolean)
  set aNSString to NSTextField’s alloc()’s initWithFrame:(current application’s NSMakeRect(xPos, yPos, myWidth, myHeight))
  
aNSString’s setEditable:(editableF)
  
aNSString’s setStringValue:(setVal)
  
aNSString’s setDrawsBackground:(backgroundF)
  
aNSString’s setBordered:(borderedF)
  
return aNSString
end makeNSTextField

★Click Here to Open This Script 

Posted in Color dialog list Record | Tagged 10.12savvy 10.13savvy 10.14savvy NSAlert NSColor NSColorWell NSCountedSet NSDictionary NSIndexSet NSMutableArray NSRunningApplication NSScrollView NSSortDescriptor NSTextField NSView Numbers | Leave a comment

Finder上で選択中のファイルをDMGに変換して圧縮 v2

Posted on 6月 6, 2019 by Takaaki Naganoya

Finder上で選択中のファイルをあらたに作ったDiskImageに入れてZip圧縮するAppleScriptです。

Script Menuに入れて実行することを前提にして作ってあります。

Google DriveなどのクラウドストレージにAppleScriptアプレットなどの実行ファイルをアップロードすると、バンドルが壊れたり、実行できなくなったりします。

そのため、仕方なくZip圧縮してアップロードしたりするわけですが、どうもZipの中身までGoogle Drive側が内容を展開して確認するらしく、ウィルスと疑われてZip圧縮した実行ファイルをダウンロードできないケースが見られます。

また、.dmgファイルに入れただけでもGoogle Driveが中身をスキャンして実行ファイルに警告を出すとのこと。一般的にはウィルスの拡散を防止する機能として好意的に受け止められるべきものですが、本当にプログラムを受け渡す必要がある場合には、こまった仕様です。

そこで、Diskimageに入れて、本来であればパスワードをつけてZip圧縮したいところですが、取り回しが悪くなるので、パスワードはつけないでアーカイブ化するようにしてみました。


▲Finder上で選択中のファイル(複数可)


▲本Scriptでdmg化してZip圧縮したもの


▲Zipアーカイブを展開してdiskimageファイルをマウントしたところ

本Scriptは、おおよそ自分で組んだ記憶がないのと、プログラムの構造が自分らしくないので、おそらくMacScripter.netあたりで拾ってきたScriptをそのまま使っていたものでしょう。それを一部修正してみました。オリジナルのScriptではFinder上で選択中のフォルダのみ処理するようになっていましたが、実際にはファイルをやりとりしたい(AppleScriptアプレットのケース多し)ので、ファイルをそのままdmg化できるように変更しました(単にフォルダを作成してコピーするだけですが)。

本ScriptはmacOS 10.15Beta1上では、macOS 10.15側にバグがあるため動作しません(POSIX pathへの変換程度でバグを作ってほしくないなー)。

AppleScript名:Finder上で選択中のファイルをDMGに変換して圧縮 v2
—
–  Created by: Takaaki Naganoya
–  Created on: 2019/06/06
—
–  Copyright © 2019 Piyomaru Software, All Rights Reserved
—
use AppleScript version "2.5"
use scripting additions
use framework "Foundation"

property NSUUID : a reference to current application’s NSUUID

property deleteV : true –DMG変換後に対象フォルダを削除しない(trueで削除)
property zipDmg : true –DMG作成後にZip圧縮する(trueで圧縮+DMG削除)

–Finder上の選択項目を取得、選択されていない場合には処理終了
tell application "Finder"
  set selList to selection as alias list
  
if selList = {} or selList = "" or selList = missing value then
    activate
    
display dialog "何も選択されていません。" buttons {"OK"} default button 1 with icon 1
    
return
  end if
end tell

–一時フォルダを作って選択中のアイテムをコピー
set aUUID to NSUUID’s UUID()’s UUIDString() as text

set aTmp to POSIX path of (path to desktop) –macOS 10.15 beta1ではおかしな結果が返ってくる
set tmpDir to aTmp & aUUID
do shell script "mkdir -p " & quoted form of tmpDir

set targFol to (POSIX file tmpDir) as alias

try
  tell application "Finder"
    duplicate selList to folder targFol
  end tell
on error
  display dialog "エラー:ファイルのコピー中にエラーが発生" buttons {"OK"} default button 1 with icon 1
  
return
end try

set aList to {targFol}

tell application "Finder"
  
  
set dmgList to {}
  
  
–選択中のアイテムを順次処理するループ
  
repeat with i in aList
    set the end of dmgList to makeDMGfromFolderAlias(i, "") of me –パスワードは付けない
    
    
–処理後のフォルダを削除する処理
    
if (deleteV as boolean) = true then
      deleteFolderItself(i) of me
    else
      –元フォルダを削除しない場合、元フォルダの名前を変更する
      
tell application "Finder"
        set aName to name of i
      end tell
      
      
set aName to aName & "_origFol"
      
      
tell application "Finder"
        set name of i to aName
      end tell
    end if
  end repeat
  
  
if zipDmg = true then
    repeat with i in dmgList
      set j to contents of i
      
      
set f1Path to quoted form of j –DMGファイルのPOSIX Path
      
set f2Path to quoted form of (j & ".zip") –ZipファイルのPOSIX Path
      
      
–タイムアウト時間は2時間
      
with timeout of 7200 seconds
        do shell script "/usr/bin/zip -r -j " & f2Path & " " & f1Path
        
do shell script "/bin/rm -f " & f1Path
      end timeout
      
    end repeat
  end if
end tell

–指定のフォルダ(alias)をDiskImageに変換する
on makeDMGfromFolderAlias(aaSel, aPassword)
  
  
set aPassword to aPassword as string
  
  
tell application "Finder"
    set fn to name of aaSel
  end tell
  
  
set aDir to (POSIX path of aaSel)
  
set aDir to quoted form of aDir
  
  
set fp2 to do shell script "dirname " & aDir
  
set fp2 to fp2 & "/"
  
  
set outPath to (fp2 & fn & ".dmg")
  
  
if aPassword is not equal to "" then
    –パスワードつきの場合
    
set aCMD to "printf ’" & aPassword & "’ | hdiutil create -encryption -srcfolder " & aDir & " " & (quoted form of outPath)
  else
    –パスワードなしの場合
    
set aCMD to "hdiutil create -srcfolder " & aDir & " " & (quoted form of outPath)
  end if
  
  
set fp3 to do shell script aCMD
  
  
return outPath
  
end makeDMGfromFolderAlias

–指定フォルダ内をすべて削除し、そのフォルダ自体も削除
on deleteFolderItself(aFol)
  set aU to (quoted form of POSIX path of aFol)
  
do shell script "rm -rf " & aU
end deleteFolderItself

★Click Here to Open This Script 

Posted in file list | Tagged 10.12savvy 10.13savvy 10.14savvy Finder NSUUID | Leave a comment

Photoshop CCでファイルをオープン

Posted on 5月 29, 2019 by Takaaki Naganoya

Photoshop CCで画像ファイル/PDFをオープンするAppleScriptです。

作成と動作確認はmacOS 10.14.5+Photoshop CC2019で行っています。一般的な画像ファイルのオープンはこちら。

Adobeのアプリケーションの操作を行っていると、5分に1回ぐらい首をひねる瞬間がやってきますが、疑問に思っても無駄なので、各種操作はサブルーチンに追い出して、直接Adobeアプリケーションの相手をしないほうが精神衛生上よいと思われます(contentsという超重要な予約語がコンフリクトしているのでオブジェクトを取り出してループするときに途方に暮れるとか、アプリケーションによってはオブジェクトの座標情報の順序がおかしいとかいろいろ)。

その中でもとびきりおかしいのが、この、Photoshopでのファイルオープン時のファイルパスの取り扱いです。

結局このおかしな書き方でしかオープンしてくれない(aliasを直接openできない謎仕様)という状況で、ここで疑問が生まれると、ふたたびAdobeのアプリケーションのおかしな仕様をひととおり体験することになるのです。

# 後から気づきましたが、Photoshopのopen命令は返り値がないですね、、、、

AppleScript名:Photoshop CCで画像ファイルをオープンする
set a to choose file

set aPosix to POSIX path of a

tell application id "com.adobe.photoshop"
  open file aPosix
end tell

★Click Here to Open This Script 

PDFのオープンはこちらです。PDFをbounding boxでトリミングしてオープンするのは、Cocoaの機能を利用してもなかなか骨が折れるので、かえってPhotoshopを呼び出してPDF→画像変換を行うほうが簡単なようです。

AppleScript名:Photoshop CCでPDFをオープンする
set aFile to (choose file)
set aPOSIX to POSIX path of aFile

set aPage to 1
set aResol to 300

tell application id "com.adobe.photoshop"
  open file aPOSIX as PDF with options {class:PDF open options, page:aPage, crop page:bounding box, resolution:aResol, mode:RGB}
end tell

★Click Here to Open This Script 

Posted in file Image PDF | Tagged 10.12savvy 10.13savvy 10.14savvy Photoshop | Leave a comment

リストの差分を取得して、登場順序が変わっていても1D List同士の登場要素が同じかをチェック

Posted on 5月 27, 2019 by Takaaki Naganoya

2つの1D List(1次元配列)同士の全要素をチェックし、登場順序に変更があったとしても要素自体に差がないかどうかをチェックするAppleScriptです。

……ソートしてから比較すれば、もっと短くて済むような気もしないでもないですが、もし違った場合には何が足りなくて(minusitems)、何が余計なのか(additems)をレポートしてくれるので実用的だと思います。

AppleScript名:リストの差分を取得して、登場順序が変わっていても1D List同士の登場要素が同じかをチェック
— Created 2019-05-27 by Takaaki Naganoya
— 2019 Piyomaru Software
use AppleScript version "2.4"
use scripting additions
use framework "Foundation"

set aList to {3, 2, 1, 7, 6, 4}
set bList to {1, 2, 3, 4, 6, 7}
set a1Res to checkAllItemsAreSame(aList, bList) of me
–> true (配列要素の登場順序が変わっていても要素はすべて同じ)

set aList to {3, 2, 1, 7, 6}
set bList to {1, 2, 3, 4, 6, 7}
set a2Res to checkAllItemsAreSame(aList, bList) of me
–> addItems:{4}, minusItems:{}}–配列要素に過不足があった

–1D List同士の全要素が(登場順序が変更になっていても)同じかどうかをチェック
on checkAllItemsAreSame(aList, bList)
  set dRes to getDiffBetweenLists(aList, bList) of me
  
set ddRes to (dRes is equal to {addItems:{}, minusItems:{}}) as boolean
  
if ddRes = true then
    return true
  else
    return dRes
  end if
end checkAllItemsAreSame

–1D List同士のdiffを検出
on getDiffBetweenLists(aArray as list, bArray as list)
  set allSet to current application’s NSMutableSet’s setWithArray:aArray
  
allSet’s addObjectsFromArray:bArray
  
  
–重複する要素のみ抜き出す
  
set duplicateSet to current application’s NSMutableSet’s setWithArray:aArray
  
duplicateSet’s intersectSet:(current application’s NSSet’s setWithArray:bArray)
  
  
–重複部分を削除する
  
allSet’s minusSet:duplicateSet
  
set resArray to (allSet’s allObjects()) as list
  
  
set aSet to current application’s NSMutableSet’s setWithArray:aArray
  
set bSet to current application’s NSMutableSet’s setWithArray:resArray
  
aSet’s intersectSet:bSet –積集合
  
set addRes to aSet’s allObjects() as list
  
  
set cSet to current application’s NSMutableSet’s setWithArray:bArray
  
cSet’s intersectSet:bSet –積集合
  
set minusRes to cSet’s allObjects() as list
  
  
return {addItems:minusRes, minusItems:addRes}
end getDiffBetweenLists

★Click Here to Open This Script 

Posted in list Record | Tagged 10.12savvy 10.13savvy 10.14savvy NSMutableSet NSSet | Leave a comment

Photosで選択中の写真をKeynoteの現在の書類の現在のスライド以降に配置 v2

Posted on 5月 27, 2019 by Takaaki Naganoya

Photosで選択中の写真をKeynoteで現在オープン中の書類の現在のスライド(ページ)以降に配置していくAppleScriptの改良版です。

作業の過程をiPhoneで写真撮影。撮影した写真を写真.app(Photos.app)経由でKeynote書類にまとめる作業を行なっていました。作業工程を時間こみで表示できないとわかりにくかったので、Keynoteの各スライドに時刻を入れるようにAppleScriptを書いておきました。

初版では写真.app(Photos)上の選択項目を一切ソートなどしなかったため、exifから取得した撮影日付で昇順ソートしています。


▲写真.app(Photos)上でKeynoteに配置したい写真を選択


▲あらかじめKeynote上でマスタースライド「画像(横長)」上のアイテムを編集しておくといいかも


▲AppleScriptによって写真.app上の写真をKeynote書類上に順次割り付け。タイトル部分にexifに記録されていた撮影時刻が入る


▲実行結果。写真.appから割り付けた写真は撮影日時でソートされている

AppleScript名:Photosで選択中の写真をKeynoteの現在の書類の現在のスライド以降に配置 v2
—
–  Created by: Takaaki Naganoya
–  Created on: 2019/05/26
—
–  Copyright © 2019 Piyomaru Software, All Rights Reserved
—
use AppleScript version "2.4"
use scripting additions
use framework "Foundation"
use framework "AppKit"
use BPlus : script "BridgePlus" –https://www.macosxautomation.com/applescript/apps/BridgePlus.html
use mdLib : script "Metadata Lib" version "2.0.0" –https://www.macosxautomation.com/applescript/apps/Script_Libs.html#Metadata_Lib

property NSUUID : a reference to current application’s NSUUID
property NSString : a reference to current application’s NSString
property SMSForder : a reference to current application’s SMSForder
property NSFileManager : a reference to current application’s NSFileManager

tell application "Keynote"
  if (count every document) = 0 then return
end tell

–Photosで選択中の写真をすべて書き出してalias listを取得する
set aList to exportSelectedPhotoOnPhotos() of me
if aList = {} or aList = false then return

set aLen to length of aList

–書き出した画像の親フォルダを求めておく(あとで削除するため)
tell application "Finder"
  set parentFol to parent of (item 1 of aList)
end tell

–exifから撮影日時を取得して2D List化
set aaList to {}
repeat with i in aList
  set j to contents of i
  
set exifDate to readExifDateTimeOriginal(j) of me
  
set the end of aaList to {j, exifDate, (time string of exifDate)}
end repeat

–撮影日時で昇順ソート
set aaaList to sortList2DAscending(aaList, {2}) of me

tell application "Keynote"
  tell front document
    tell current slide
      set curNum to slide number –現在表示中のスライドの番号(ページ数)を取得する
    end tell
    
    
–Photosから取得した写真のアイテム数でループ
    
repeat with i from 1 to aLen
      copy (item i of aaaList) to {aPhoto, aDateObj, creTime}
      
      
set newSlide to make new slide at slide (curNum + i) with properties {base slide:master slide "画像(横長)"} –This item is localized!! Maybe a "Photo"
      
      
tell newSlide
        set object text of default title item to creTime
        
set file name of image 1 to aPhoto –place an image to image placeholder
      end tell
      
      
–配置画像を削除
      
tell application "Finder"
        delete aPhoto –配置した写真を削除
      end tell
    end repeat
  end tell
end tell

–あとしまつ
tell application "Finder"
  delete parentFol –画像のダウンロードフォルダを削除
end tell

–Photosで選択中のファイルをtmporaryフォルダに書き出してalias listで返す
on exportSelectedPhotoOnPhotos()
  set dtPath to (path to temporary items) as text
  
set aUUID to NSUUID’s UUID()’s UUIDString() as text
  
  
set dirPath to ((POSIX path of dtPath) & aUUID)
  
set fileManager to NSFileManager’s defaultManager()
  
set aRes to (fileManager’s createDirectoryAtPath:dirPath withIntermediateDirectories:true attributes:(missing value) |error|:(reference))
  
set dtPath to dtPath & aUUID
  
  
tell application "Photos"
    set a to selection
    
if a = {} then return {}
    
set aRes to (export a to file dtPath)
  end tell
  
  
tell application "Finder"
    tell folder dtPath
      set fList to (every file) as alias list
    end tell
  end tell
  
  
if fList = {} then return false
  
return fList
end exportSelectedPhotoOnPhotos

–指定JPEG画像のExif情報からDateTimeOriginalを取得してAS dateオブジェクトに変換して返す
on readExifDateTimeOriginal(aTargFileAlias)
  set theMetadata to readMetadataFrom(aTargFileAlias) of me
  
if theMetadata = false then return false
  
  
set keysList to theMetadata’s allKeys()
  
  
if "{Exif}" is not in (keysList as list) then return false
  
  
set exifDate to theMetadata’s valueForKeyPath:"{Exif}.DateTimeOriginal"
  
if exifDate = missing value then return false
  
  
set a to NSString’s stringWithString:exifDate
  
set {aDateStr, aTimeStr} to (a’s componentsSeparatedByString:" ") as list
  
set bDateStr to repChar(aDateStr, ":", "/") of me
  
set fullDate to date (bDateStr & " " & aTimeStr)
  
  
return fullDate
end readExifDateTimeOriginal

–指定のファイルからメタデータを取得する
on readMetadataFrom(imageFile)
  load framework
  
set {theRecord, theError} to SMSForder’s metadataFromImage:imageFile |error|:(reference)
  
if theRecord = missing value then — there was a problem, so extract the error description
    error false
  else
    return theRecord
  end if
end readMetadataFrom

–文字置換
on repChar(origText as string, targChar as string, repChar as string)
  set curDelim to AppleScript’s text item delimiters
  
set AppleScript’s text item delimiters to targChar
  
set tmpList to text items of origText
  
set AppleScript’s text item delimiters to repChar
  
set retText to tmpList as string
  
set AppleScript’s text item delimiters to curDelim
  
return retText
end repChar

–入れ子のリストを昇順ソート
on sortList2DAscending(a, keyItem)
  return sort2DList(a, keyItem, {true}) of me
end sortList2DAscending

–入れ子のリストを降順ソート
on sortList2DDecending(a, keyItem)
  return sort2DList(a, keyItem, {false}) of me
end sortList2DDecending

–2D Listをソート
on sort2DList(aList as list, sortIndexes as list, sortOrders as list)
  load framework
  
  
–index値をAS流(アイテムが1はじまり)からCocoa流(アイテムが0はじまり)に変換
  
set newIndex to {}
  
repeat with i in sortIndexes
    set j to contents of i
    
set j to j – 1
    
set the end of newIndex to j
  end repeat
  
  
set sortTypes to {}
  
repeat (length of sortIndexes) times
    set the end of sortTypes to "compare:"
  end repeat
  
  
set resList to (SMSForder’s subarraysIn:(aList) sortedByIndexes:newIndex ascending:sortOrders sortTypes:sortTypes |error|:(missing value)) as {missing value, list}
  
  
return resList
end sort2DList

★Click Here to Open This Script 

Posted in Calendar exif file Image list | Tagged 10.12savvy 10.13savvy 10.14savvy Finder Keynote NSFileManager NSString NSUUID Photos | Leave a comment

Photosで選択中の写真をKeynoteの現在の書類の現在のスライド以降に配置

Posted on 5月 27, 2019 by Takaaki Naganoya

Photosで選択中の写真をKeynoteで現在オープン中の書類の現在のスライド(ページ)以降に配置していくAppleScriptです。

作業の過程をiPhoneで写真撮影。撮影した写真を写真.app(Photos.app)経由でKeynote書類にまとめる作業を行なっていました。作業工程を時間こみで表示できないとわかりにくかったので、Keynoteの各スライドに時刻を入れるようにAppleScriptを書いておきました(同じ作業が二度あるかは不明ですが、二度目からは明らかに時間の節約。つまり時間の貯金ができることになります)。

写真.app(Photos)上でKeynoteに配置したい写真を選択しておき、本Scriptを実行します。

Keynote書類上に新規スライドを追加し、撮影時刻と写真を配置していきます。

実行直後にPhotosで選択中の写真をファイルに書き出すため、若干待たされます。

# 複数のマシンでiCloudを介して写真を同期した場合に、写真.appのライブラリの写真の並び順は撮影日時どおりにならないようなので、明示的にソートしておく必要があるようです

ちなみに、写真の自作キーボードキットはこの後フットペダルにつなぎなおして、PPSSPP用の足踏みコントローラー化する予定です(「戦場の絆ポータブル」用)。

AppleScript名:Photosで選択中の写真をKeynoteの現在の書類の現在のスライド以降に配置
—
–  Created by: Takaaki Naganoya
–  Created on: 2019/05/26
—
–  Copyright © 2019 Piyomaru Software, All Rights Reserved
—
use AppleScript version "2.4"
use scripting additions
use framework "Foundation"
use framework "AppKit"
use BPlus : script "BridgePlus" –https://www.macosxautomation.com/applescript/apps/BridgePlus.html
use mdLib : script "Metadata Lib" version "2.0.0" –https://www.macosxautomation.com/applescript/apps/Script_Libs.html#Metadata_Lib

property NSUUID : a reference to current application’s NSUUID
property NSString : a reference to current application’s NSString
property NSFileManager : a reference to current application’s NSFileManager

tell application "Keynote"
  if (count every document) = 0 then return
end tell

–Photosで選択中の写真をすべて書き出してalias listを取得する
set aList to exportSelectedPhotoOnPhotos() of me
if aList = {} or aList = false then return

set aLen to length of aList

–書き出した画像の親フォルダを求めておく(あとで削除するため)
tell application "Finder"
  set parentFol to parent of (item 1 of aList)
end tell

tell application "Keynote"
  tell front document
    tell current slide
      set curNum to slide number –現在表示中のスライドの番号(ページ数)を取得する
    end tell
    
    
–Photosから取得した写真のアイテム数でループ
    
repeat with i from 1 to aLen
      set aPhoto to contents of item i of aList
      
set newSlide to make new slide at slide (curNum + i) with properties {base slide:master slide "画像(横長)"} –This item is localized!! Maybe a "Photo"
      
set creTime to getCreationTime(aPhoto) of me
      
tell newSlide
        set object text of default title item to creTime
        
set file name of image 1 to aPhoto –place an image to image placeholder
      end tell
      
      
–配置画像を削除
      
tell application "Finder"
        delete aPhoto –配置した写真を削除
      end tell
    end repeat
  end tell
end tell

–あとしまつ
tell application "Finder"
  delete parentFol –画像のダウンロードフォルダを削除
end tell

–指定のaliasからExif情報の作成日の時刻情報を返す
on getCreationTime(anAlias)
  set exifDate to readExifDateTimeOriginal(anAlias) of me
  
return time string of exifDate
end getCreationTime

–Photosで選択中のファイルをtmporaryフォルダに書き出してalias listで返す
on exportSelectedPhotoOnPhotos()
  set dtPath to (path to temporary items) as text
  
set aUUID to NSUUID’s UUID()’s UUIDString() as text
  
  
set dirPath to ((POSIX path of dtPath) & aUUID)
  
set fileManager to NSFileManager’s defaultManager()
  
set aRes to (fileManager’s createDirectoryAtPath:dirPath withIntermediateDirectories:true attributes:(missing value) |error|:(reference))
  
set dtPath to dtPath & aUUID
  
  
tell application "Photos"
    set a to selection
    
if a = {} then return {}
    
set aRes to (export a to file dtPath)
  end tell
  
  
tell application "Finder"
    tell folder dtPath
      set fList to (every file) as alias list
    end tell
  end tell
  
  
if fList = {} then return false
  
return fList
end exportSelectedPhotoOnPhotos

–指定JPEG画像のExif情報からDateTimeOriginalを取得してAS dateオブジェクトに変換して返す
on readExifDateTimeOriginal(aTargFileAlias)
  set theMetadata to readMetadataFrom(aTargFileAlias) of me
  
if theMetadata = false then return false
  
  
set keysList to theMetadata’s allKeys()
  
  
if "{Exif}" is not in (keysList as list) then return false
  
  
set exifDate to theMetadata’s valueForKeyPath:"{Exif}.DateTimeOriginal"
  
if exifDate = missing value then return false
  
  
set a to NSString’s stringWithString:exifDate
  
set {aDateStr, aTimeStr} to (a’s componentsSeparatedByString:" ") as list
  
set bDateStr to repChar(aDateStr, ":", "/") of me
  
set fullDate to date (bDateStr & " " & aTimeStr)
  
  
return fullDate
end readExifDateTimeOriginal

–指定のファイルからメタデータを取得する
on readMetadataFrom(imageFile)
  load framework
  
set {theRecord, theError} to current application’s SMSForder’s metadataFromImage:imageFile |error|:(reference)
  
if theRecord = missing value then — there was a problem, so extract the error description
    error false
  else
    return theRecord
  end if
end readMetadataFrom

–文字置換
on repChar(origText as string, targChar as string, repChar as string)
  set curDelim to AppleScript’s text item delimiters
  
set AppleScript’s text item delimiters to targChar
  
set tmpList to text items of origText
  
set AppleScript’s text item delimiters to repChar
  
set retText to tmpList as string
  
set AppleScript’s text item delimiters to curDelim
  
return retText
end repChar

★Click Here to Open This Script 

Posted in Calendar exif file Image list | Tagged 10.12savvy 10.13savvy 10.14savvy Finder Keynote NSFileManager NSString NSUUID Photos | 1 Comment

URLにリソースが存在するかチェック v5(NSURLSession)

Posted on 5月 24, 2019 by Takaaki Naganoya

指定URLの存在確認を行うAppleScriptです。

以前はNSURLConnectionを使って確認するものを使っていましたが、NSURLSessionへと移行しようかというところ。

もちろん、shellのcurlコマンドを使えば数行で済んでしまいますが、そこをあえてCocoaの機能を利用して、というよりはちょっと前に書いたREST API呼び出しのサブルーチンが絶好調で動いているので、これをそのまま流用してみました。

ライブラリ化して自分のScriptのバンドル内に入れておくとか、~/Library/Script Librariesフォルダに入れておくとか、そういう使い方になると思います。自分でもわざわざこれだけの機能のために、これだけの量のコードをゼロから書くことは……めったにありません。

AppleScript名:URLにリソースが存在するかチェック(curl版)_v2
set aURL to "http://www.apple.com/jp/"
set aRes to chekURLExistence(aURL) of me

on chekURLExistence(aURL)
  try
    set aRes to do shell script ("/usr/bin/curl -LI " & aURL)
  on error
    return false
  end try
  
return ((aRes contains "HTTP/1.1 200") or (aRes contains "HTTP/2 200")) as boolean
end chekURLExistence

★Click Here to Open This Script 

AppleScript名:URLにリソースが存在するかチェック v5(NSURLSession)
— Created 2019-05-24 by Takaaki Naganoya
— 2019 Piyomaru Software
use AppleScript version "2.4"
use scripting additions
use framework "Foundation"

property |NSURL| : a reference to current application’s |NSURL|
property NSString : a reference to current application’s NSString
property NSURLSession : a reference to current application’s NSURLSession
property NSJSONSerialization : a reference to current application’s NSJSONSerialization
property NSMutableURLRequest : a reference to current application’s NSMutableURLRequest
property NSUTF8StringEncoding : a reference to current application’s NSUTF8StringEncoding
property NSURLSessionConfiguration : a reference to current application’s NSURLSessionConfiguration

property retData : missing value
property retCode : 0
property retHeaders : 0
property drecF : false

set aURL to "http://piyocast.com/as/"
set uRes to chekURLExistence(aURL) of me
–> true

on chekURLExistence(aURL as string)
  set webRes to callRestGETAPIAndParseResults(aURL, 5) of me
  
return ((retCode of webRes) as integer = 200)
end chekURLExistence

— 指定URLにファイル(画像など)が存在するかチェック
–> {存在確認結果(boolean), レスポンスヘッダー(NSDictionary), データ(NSData)}
on callRestGETAPIAndParseResults(reqURLStr as string, timeOutSec as real)
  set (my retData) to false
  
set (my retCode) to 0
  
set (my retHeaders) to {}
  
set (my drecF) to false
  
  
set aURL to |NSURL|’s URLWithString:reqURLStr
  
set aRequest to NSMutableURLRequest’s requestWithURL:aURL
  
aRequest’s setHTTPMethod:"GET"
  
aRequest’s setValue:"gzip" forHTTPHeaderField:"Content-Encoding"
  
aRequest’s setValue:"application/json; charset=UTF-8" forHTTPHeaderField:"Content-Type"
  
  
set aConfig to NSURLSessionConfiguration’s defaultSessionConfiguration()
  
set aSession to NSURLSession’s sessionWithConfiguration:aConfig delegate:(me) delegateQueue:(missing value)
  
set aTask to aSession’s dataTaskWithRequest:aRequest
  
  
set hitF to false
  
aTask’s resume() –Start URL Session
  
  
repeat (1000 * timeOutSec) times
    if (my drecF) = true then
      set hitF to true
      
exit repeat
    end if
    
delay ("0.001" as real)
  end repeat
  
  
if hitF = false then error "REST API Timeout Error"
  
  
return {retData:retData, retCode:retCode, retHeaders:retHeaders}
end callRestGETAPIAndParseResults

on URLSession:tmpSession dataTask:tmpTask didReceiveData:tmpData
  parseSessionResults(tmpSession, tmpTask, tmpData) of me
  
set (my drecF) to true
end URLSession:dataTask:didReceiveData:

–ないとエラーになるので足した。とくに何もしていない
on URLSession:tmpSession dataTask:tmpTask willCacheResponse:cacheRes completionHandler:aHandler
  —
end URLSession:dataTask:willCacheResponse:completionHandler:

on parseSessionResults(aSession, aTask, tmpData)
  set aRes to aTask’s response()
  
set (my retCode) to aRes’s statusCode()
  
set (my retHeaders) to aRes’s allHeaderFields()
  
  
set resStr to NSString’s alloc()’s initWithData:tmpData encoding:(NSUTF8StringEncoding)
  
set jsonString to NSString’s stringWithString:(resStr)
  
  
set jsonData to jsonString’s dataUsingEncoding:(NSUTF8StringEncoding)
  
set aJsonDict to NSJSONSerialization’s JSONObjectWithData:jsonData options:0 |error|:(missing value)
  
  
set (my retData) to aJsonDict as anything
end parseSessionResults

★Click Here to Open This Script 

Posted in Network Record URL | Tagged 10.12savvy 10.13savvy 10.14savvy NSJSONSerialization NSMutableURLRequest NSString NSURL NSURLSession NSURLSessionConfiguration NSUTF8StringEncoding | Leave a comment

ScriptDebuggerでオープン中のScriptをScriptBundleに

Posted on 5月 23, 2019 by Takaaki Naganoya

ScriptDebuggerを使っていて、この作業がひんぱんに発生するのでScriptで自動化しました。

AppleScript書類を編集していて、バンドル内にFrameworkなどを突っ込みたいのにフラットなAppleScript書類(.scpt)だったので、そのままでは突っ込めず、コピペで新規バンドル書類(.scptd)を作成して、同じ名前で保存し直す作業です。

とてもとても標準機能で実装されていそうな内容ですが、子細に調査して存在していなかったので(ASObjC Explorerにはあったような気が)、ささっとAppleScriptで実装してScriptDebuggerのスクリプトメニューに入れて使っています。

ウィンドウの表示座標をきっちりそろえるとか、オリジナルのScriptを新規Scriptの作成後にクローズするとか、作りたくなってウズウズしてくる(自分的な)完成度の低さですが、そこでかっちり作り込むと「仕事中にちょっとだけ作るScript」の域を超えてしまうので、自制した次第です。

「すでに、バンドル形式のScriptが同一フォルダ内に存在する場合には警告を出して処理を中止する」か、あるいは「ファイル名に子番号をつけて重複を回避する」ぐらいの処理は足してもいいような気がします。


▲初期状態。フラットなAppleScript(.scpt)で書かれていたので、バンドル内にいろいろ追加できない状態


▲本Scriptの実行後の状態。ファイル名は拡張子を「.scptd」に変更しただけの状態

AppleScript名:ScriptをScript Bundleに
— Created 2019-05-23 by Takaaki Naganoya
— 2019 Piyomaru Software
use AppleScript version "2.4"
use scripting additions
use framework "Foundation"

tell application "Script Debugger"
  tell front document
    set myType to script type
    
if myType = bundled compiled script then
      display notification "There is no need to convert…."
      
return
    end if
    
    
set mySource to source text
    
set mySpec to file spec
    
    
try
      close with saving
    on error
      display notification "Can not save this Script. So I quited conversion process…."
      
return
    end try
  end tell
end tell

–ファイルパスの拡張子を付け替えてFileに変換
set pathString to current application’s NSString’s stringWithString:(POSIX path of mySpec)
set newPath to ((pathString’s stringByDeletingPathExtension())’s stringByAppendingPathExtension:"scptd") as string
set aFile to POSIX file newPath

–ファイル拡張子を付け替えた新規ファイル名で保存
tell application "Script Debugger"
  set aDoc to make new document with properties {source text:mySource, script type:bundled compiled script}
  
tell aDoc
    set aRes to compile –構文確認(ねんのため)
    
if aRes = false then return
    
    
–compileを通った場合のみファイル保存を行う
    
save in aFile
  end tell
end tell

★Click Here to Open This Script 

Posted in file File path | Tagged 10.12savvy 10.13savvy 10.14savvy ScriptDebugger | 1 Comment

Keynoteで表示中のスライド上の表を2つ、縦方向に連結する

Posted on 5月 21, 2019 by Takaaki Naganoya

Keynoteでオープン中の書類の表示中のスライド(ページ)上にある表を2つ選択して、縦方向に連結するAppleScriptです。

実行頻度から、横連結だけでいいかと思っていたのですが、結局縦連結のScriptも書いておきました。たぶん、こっち(縦連結)は(個人的には)使わないでしょう。

一定の実用性を確保するためには、各表のヘッダー行のラベルを見て、同じラベルのデータを同じ列に入れる必要があることでしょう。本Scriptの実装レベルだと、物理的にただ表をつなげるだけです。

また、ヘッダー部分の処理は一切行っていません。実用性を考えればヘッダー行やヘッダー列を無視して、データ部のみ連結するといった処理が必要になってくると思います。現状の実装では「(作った本人が)わかっているから別にそこまでしなくていい」という程度のお手軽実装です。


▲マージ対象の表


▲現在表示中のスライド(ページ)中に存在している表のタイトルが一覧表示される。座標位置をもとに上→下、左→右とソートした順で表示


▲複数項目を選択する場合にはCommandキーを押しながら選択


▲2つの表を縦方向にマージ(連結)。マージされたほうの表は削除

macOS 10.14.5+Keynote v9.0.2で作成および動作確認を行っています。macOS 10.14上ではBridgePlusを呼び出すためにScript Debugger上で実行するか、アプレット書き出しして実行する必要があります。または、アプレット書き出ししてスクリプトメニューから呼び出してもよいでしょう。

# 個人的には、めんどくさいのでmacOS 10.14環境ではSIP(System Integrity Protection)をオフにして使っています

macOS 10.13.x、macOS 10.12.xでは普通にスクリプトエディタなどから実行可能です。

AppleScript名:Keynoteで表示中のスライド上の表を2つ、縦方向に連結する.scpt
— Created 2019-05-21 by Takaaki Naganoya
— 2019 Piyomaru Software
use AppleScript version "2.4" — Yosemite (10.10) or later
use framework "Foundation"
use scripting additions
use Bplus : script "BridgePlus" –https://www.macosxautomation.com/applescript/apps/BridgePlus.html

tell application "Keynote"
  tell front document
    tell current slide
      set tCount to count every table
      
if tCount < 2 then
        display dialog "There is no tables to merge" buttons {"OK"} default button 1
        
return
      end if
      
      
set tList to every table
      
set tInfoList to {}
      
repeat with i in tList
        set {tPosX, tPosY} to position of i
        
set tName to name of i
        
set the end of tInfoList to {tName, tPosX, tPosY}
      end repeat
    end tell
  end tell
end tell

–表のY座標、X座標で昇順ソート(上→下、左→右の順で並べる)
set sortedList to sort2DList(tInfoList, {3, 2}, {true, true}) of me

–表リストから名前だけ抽出
set tmpTList to retSpecifiedItemFrom2DList({1}, sortedList) of me

–マージ対象のテーブルを名称で選択
set tRes to choose from list tmpTList with title "Vertial Merge Tables" with prompt "Select merge target two table names " & return & "(Sorted Up-> Down, Left->Right)" with multiple selections allowed
if tRes = false then
  display dialog "Canseled" buttons {"OK"} default button 1
  
return
end if

if length of tRes is not equal to 2 then
  display dialog "Select *two* tables" buttons {"OK"} default button 1
  
return
end if

–set mDirection to contents of (choose from list {"Vertival", "Horizontal"} with title "Select Merge Direction" without empty selection allowed)
set mDirection to "Vertival"

set f1Table to contents of item 1 of tRes –Left (Original)
set f2Table to contents of item 2 of tRes –Right (merged)

tell application "Keynote"
  tell front document
    tell current slide
      –マージ先の表のサイズを取得(幅、高さ)
      
tell table f1Table
        set f1Width to column count
        
set f1Height to row count
      end tell
      
      
–マージされるの表のサイズを取得(幅、高さ、データを2D Listで)
      
tell table f2Table
        set f2Width to column count
        
set f2Height to row count
        
set f2DatList to {}
        
repeat with i from 1 to f2Height
          tell row i
            set aRowDat to value of every cell
          end tell
          
set the end of f2DatList to aRowDat
        end repeat
      end tell
      
      
–マージ先の表のサイズを変更して新規追加したセルにデータを埋める
      
tell table f1Table
        set row count to row count + f2Height –表リサイズ
        
        
set rowCount to f1Height + 1
        
repeat with i in f2DatList
          set colCount to 1
          
          
tell row rowCount
            repeat with ii in i
              set jj to contents of ii
              
              
if jj is not equal to missing value then –空白セルを処理スキップ
                tell cell colCount
                  set value to jj
                end tell
              end if
              
              
set colCount to colCount + 1
            end repeat
          end tell
          
          
set rowCount to rowCount + 1
        end repeat
      end tell
      
      
delete table f2Table
    end tell
  end tell
end tell

–2D Listをソート
on sort2DList(aList as list, sortIndexes as list, sortOrders as list)
  load framework
  
–index値をAS流(アイテムが1はじまり)からCocoa流(アイテムが0はじまり)に変換
  
set newIndex to {}
  
repeat with i in sortIndexes
    set j to contents of i
    
set j to j – 1
    
set the end of newIndex to j
  end repeat
  
  
–Sort TypeのListを作成(あえて外部から指定する内容でもない)
  
set sortTypes to {}
  
repeat (length of sortIndexes) times
    set the end of sortTypes to "compare:"
  end repeat
  
  
set resList to (current application’s SMSForder’s subarraysIn:(aList) sortedByIndexes:newIndex ascending:sortOrders sortTypes:sortTypes |error|:(missing value)) as list
  
return resList
end sort2DList

–指定2Dリストから、各要素の指定アイテム目を取り出して(1D Listで)返す
on retSpecifiedItemFrom2DList(aList as list, bList as list)
  set newList to {}
  
repeat with i in aList
    repeat with ii in bList
      set j to contents of ii
      
set a to contents of (item i of j)
      
set the end of newList to a
    end repeat
  end repeat
  
return newList
end retSpecifiedItemFrom2DList

★Click Here to Open This Script 

Posted in list | Tagged 10.12savvy 10.13savvy 10.14savvy Keynote | Leave a comment

Microsoft EdgeのMac版がCanaryチャンネルでプレビュー公開。AS対応

Posted on 5月 21, 2019 by Takaaki Naganoya

Microsoft製のWebブラウザが久しぶりにmacOSに帰ってきました。Microsoft EdgeのMac版がCanaryチャンネルでプレビュー公開されました。Chromiumベースで開発されているというか、まんまChromiumともいえる状態であり、ファーストリリースでありながらAppleScriptのサポート機能が搭載されています。

AppleScript非対応のWebブラウザはダウンロードしても100%ゴミ箱行きになるため、対応しているのはいいことです。ただし、ChromeのScriptingで不満に思っている点は100% Edgeでも再現します。

FileMergeでsdefの差分をチェックしてみたら、差は検出されませんでした。挙動もほぼChromeと同じです。今のところアプリケーション名が「Microsoft Edge Canary」(Bundle ID=com.microsoft.Edge.Canary)であるため、正式リリース時にはこの「Canary」が外れるものと思われます。

AppleScript名:Edge Canaryの情報を取得する
tell application "Microsoft Edge Canary"
  properties
  
–> {bookmarks bar:bookmark folder id 1 of application "Microsoft Edge Canary", frontmost:false, other bookmarks:bookmark folder id 2 of application "Microsoft Edge Canary", class:application, name:"Microsoft Edge Canary", version:"76.0.161.0"}
end tell

★Click Here to Open This Script 

AppleScript名:Edge CanaryにBundle IDでアクセスする
tell application id "com.microsoft.Edge.Canary"
  properties
  
–> {bookmarks bar:bookmark folder id 1 of application "Microsoft Edge Canary", frontmost:false, other bookmarks:bookmark folder id 2 of application "Microsoft Edge Canary", class:application, name:"Microsoft Edge Canary", version:"76.0.161.0"}
end tell

★Click Here to Open This Script 

AppleScript名:Edge Canaryの現在のウィンドウの現在のタブの情報にアクセスする
tell application "Microsoft Edge Canary"
  tell window 1
    tell active tab
      properties
      
–> {URL:"chrome://settings/help", name:"Settings", loading:false, class:tab, id:8}
      
–> {URL:"http://piyocast.com/as/", name:"AppleScriptの穴 – Useful & Practical AppleScript archive. Click ’★Click Here to Open This Script’ Link to download each AppleScript", loading:false, class:tab, id:2}
    end tell
  end tell
end tell

★Click Here to Open This Script 

AppleScript名:Edge Canaryで指定URLをオープンする
tell application "Microsoft Edge Canary"
  make new window
  
tell window 1
    tell tab 1
      set URL to "https://www.apple.com/jp"
    end tell
  end tell
end tell

★Click Here to Open This Script 

AppleScript名:Edge Canaryで指定のローカルのHTMLを表示する
set anAlias to choose file

tell application "Finder"
  set aURL to URL of anAlias
end tell

tell application "Microsoft Edge Canary"
  open location aURL
end tell

★Click Here to Open This Script 

Posted in sdef | Tagged 10.12savvy 10.13savvy 10.14savvy Microsoft Edge | Leave a comment

Keynoteで表示中のスライド上の表を2つ、横方向に連結する

Posted on 5月 21, 2019 by Takaaki Naganoya

Keynoteでオープン中の書類の表示中のスライド(ページ)上にある表を2つ選択して、横方向に連結するAppleScriptです。

Keynoteで資料を作っていて、あまりにこういう処理が多いのでScript化しました。縦方向に連結してもいいのですが(最初は連結方向を選択させかけた)、実際に扱っている表が横長のケースが(個人的に)多いので「横連結だけでいいや」ということに。


▲マージ対象の表


▲現在表示中のスライド(ページ)中に存在している表のタイトルが一覧表示される。座標位置をもとに上→下、左→右とソートした順で表示


▲複数項目を選択する場合にはCommandキーを押しながら選択


▲2つの表を横方向にマージ(連結)。マージされたほうの表は削除

macOS 10.14.5+Keynote v9.0.2で作成および動作確認を行っています。macOS 10.14上ではBridgePlusを呼び出すためにScript Debugger上で実行するか、アプレット書き出しして実行する必要があります。または、アプレット書き出ししてスクリプトメニューから呼び出してもよいでしょう。

# 個人的には、めんどくさいのでmacOS 10.14環境ではSIP(System Integrity Protection)をオフにして使っています

macOS 10.13.x、macOS 10.12.xでは普通にスクリプトエディタなどから実行可能です。

AppleScript名:Keynoteで表示中のスライド上の表を2つ、横方向に連結する.scpt
— Created 2019-05-21 by Takaaki Naganoya
— 2019 Piyomaru Software
use AppleScript version "2.4" — Yosemite (10.10) or later
use framework "Foundation"
use scripting additions
use Bplus : script "BridgePlus" –https://www.macosxautomation.com/applescript/apps/BridgePlus.html

tell application "Keynote"
  tell front document
    tell current slide
      set tCount to count every table
      
if tCount < 2 then
        display dialog "There is no tables to merge" buttons {"OK"} default button 1
        
return
      end if
      
      
set tList to every table
      
set tInfoList to {}
      
repeat with i in tList
        set {tPosX, tPosY} to position of i
        
set tName to name of i
        
set the end of tInfoList to {tName, tPosX, tPosY}
      end repeat
    end tell
  end tell
end tell

–表のY座標、X座標で昇順ソート(上→下、左→右の順で並べる)
set sortedList to sort2DList(tInfoList, {3, 2}, {true, true}) of me

–表リストから名前だけ抽出
set tmpTList to retSpecifiedItemFrom2DList({1}, sortedList) of me

–マージ対象のテーブルを名称で選択
set tRes to choose from list tmpTList with title "Select Merge Tables" with prompt "Select merge target two table names " & return & "(Sorted Up-> Down, Left->Right)" with multiple selections allowed
if length of tRes is not equal to 2 then
  display dialog "Select *two* tables"
  
return
end if

–set mDirection to contents of (choose from list {"Vertival", "Horizontal"} with title "Select Merge Direction" without empty selection allowed)
set mDirection to "Horizontal"

set f1Table to contents of item 1 of tRes –Left (Original)
set f2Table to contents of item 2 of tRes –Right (merged)

tell application "Keynote"
  tell front document
    tell current slide
      –マージ先の表のサイズを取得(幅、高さ)
      
tell table f1Table
        set f1Width to column count
        
set f1Height to row count
      end tell
      
      
–マージされるの表のサイズを取得(幅、高さ、データを2D Listで)
      
tell table f2Table
        set f2Width to column count
        
set f2Height to row count
        
set f2DatList to {}
        
repeat with i from 1 to f2Height
          tell row i
            set aRowDat to value of every cell
          end tell
          
set the end of f2DatList to aRowDat
        end repeat
      end tell
      
      
–マージ先の表のサイズを変更して新規追加したセルにデータを埋める
      
tell table f1Table
        set column count to column count + f2Width –表リサイズ
        
        
set rowCount to 1
        
repeat with i in f2DatList
          set colCount to (f1Width + 1)
          
          
tell row rowCount
            repeat with ii in i
              set jj to contents of ii
              
              
if jj is not equal to missing value then –空白セルを処理スキップ
                tell cell colCount
                  set value to jj
                end tell
              end if
              
              
set colCount to colCount + 1
            end repeat
          end tell
          
          
set rowCount to rowCount + 1
        end repeat
      end tell
      
      
delete table f2Table
    end tell
  end tell
end tell

return f2DatList

–2D Listをソート
on sort2DList(aList as list, sortIndexes as list, sortOrders as list)
  load framework
  
–index値をAS流(アイテムが1はじまり)からCocoa流(アイテムが0はじまり)に変換
  
set newIndex to {}
  
repeat with i in sortIndexes
    set j to contents of i
    
set j to j – 1
    
set the end of newIndex to j
  end repeat
  
  
–Sort TypeのListを作成(あえて外部から指定する内容でもない)
  
set sortTypes to {}
  
repeat (length of sortIndexes) times
    set the end of sortTypes to "compare:"
  end repeat
  
  
set resList to (current application’s SMSForder’s subarraysIn:(aList) sortedByIndexes:newIndex ascending:sortOrders sortTypes:sortTypes |error|:(missing value)) as list
  
return resList
end sort2DList

–指定2Dリストから、各要素の指定アイテム目を取り出して(1D Listで)返す
on retSpecifiedItemFrom2DList(aList as list, bList as list)
  set newList to {}
  
repeat with i in aList
    repeat with ii in bList
      set j to contents of ii
      
set a to contents of (item i of j)
      
set the end of newList to a
    end repeat
  end repeat
  
return newList
end retSpecifiedItemFrom2DList

★Click Here to Open This Script 

Posted in list Sort | Tagged 10.12savvy 10.13savvy 10.14savvy Keynote | Leave a comment

Post navigation

  • Older posts
  • Newer posts

電子書籍(PDF)をオンラインストアで販売中!

Google Search

Popular posts

  • 開発機としてM2 Mac miniが来たのでガチレビュー
  • macOS 15, Sequoia
  • Pages本執筆中に、2つの書類モード切り替えに気がついた
  • Numbersで選択範囲のセルの前後の空白を削除
  • メキシカンハットの描画
  • Pixelmator Pro v3.6.4でAppleScriptからの操作時の挙動に違和感が
  • AppleScriptによる並列処理
  • Safariで「プロファイル」機能を使うとAppleScriptの処理に影響
  • macOS 15でも変化したText to Speech環境
  • AppleScript入門③AppleScriptを使った「自動化」とは?
  • デフォルトインストールされたフォント名を取得するAppleScript
  • 【続報】macOS 15.5で特定ファイル名パターンのfileをaliasにcastすると100%クラッシュするバグ
  • Script Debuggerの開発と販売が2025年に終了
  • macOS 15 リモートApple Eventsにバグ?
  • AppleScript入門① AppleScriptってなんだろう?
  • macOS 14で変更になったOSバージョン取得APIの返り値
  • NSObjectのクラス名を取得 v2.1
  • macOS 15:スクリプトエディタのAppleScript用語辞書を確認できない
  • 有害ではなくなっていたSpaces
  • Xcode上のAppleScriptObjCのプログラムから、Xcodeのログ欄へのメッセージ出力を実行

Tags

10.11savvy (1101) 10.12savvy (1242) 10.13savvy (1391) 10.14savvy (587) 10.15savvy (438) 11.0savvy (283) 12.0savvy (212) 13.0savvy (195) 14.0savvy (148) 15.0savvy (137) CotEditor (66) Finder (51) Keynote (119) NSAlert (61) NSArray (51) NSBitmapImageRep (20) NSBundle (20) NSButton (34) NSColor (53) NSDictionary (28) NSFileManager (23) NSFont (21) NSImage (41) NSJSONSerialization (21) NSMutableArray (63) NSMutableDictionary (22) NSPredicate (36) NSRunningApplication (56) NSScreen (30) NSScrollView (22) NSString (119) NSURL (98) NSURLRequest (23) NSUTF8StringEncoding (30) NSView (33) NSWorkspace (20) Numbers (76) Pages (55) Pixelmator Pro (20) Safari (44) Script Editor (27) WKUserContentController (21) WKUserScript (20) WKWebView (23) WKWebViewConfiguration (22)

カテゴリー

  • 2D Bin Packing
  • 3D
  • AirDrop
  • AirPlay
  • Animation
  • AppleScript Application on Xcode
  • Beginner
  • Benchmark
  • beta
  • Bluetooth
  • Books
  • boolean
  • bounds
  • Bug
  • Calendar
  • call by reference
  • check sum
  • Clipboard
  • Cocoa-AppleScript Applet
  • Code Sign
  • Color
  • Custom Class
  • date
  • dialog
  • diff
  • drive
  • Droplet
  • exif
  • file
  • File path
  • filter
  • folder
  • Font
  • Font
  • GAME
  • geolocation
  • GUI
  • GUI Scripting
  • Hex
  • History
  • How To
  • iCloud
  • Icon
  • Image
  • Input Method
  • Internet
  • iOS App
  • JavaScript
  • JSON
  • JXA
  • Keychain
  • Keychain
  • Language
  • Library
  • list
  • Locale
  • Localize
  • Machine Learning
  • Map
  • Markdown
  • Menu
  • Metadata
  • MIDI
  • MIME
  • Natural Language Processing
  • Network
  • news
  • Noification
  • Notarization
  • Number
  • Object control
  • OCR
  • OSA
  • parallel processing
  • PDF
  • Peripheral
  • process
  • PRODUCTS
  • QR Code
  • Raw AppleEvent Code
  • Record
  • rectangle
  • recursive call
  • regexp
  • Release
  • Remote Control
  • Require Control-Command-R to run
  • REST API
  • Review
  • RTF
  • Sandbox
  • Screen Saver
  • Script Libraries
  • sdef
  • search
  • Security
  • selection
  • shell script
  • Shortcuts Workflow
  • Sort
  • Sound
  • Spellchecker
  • Spotlight
  • SVG
  • System
  • Tag
  • Telephony
  • Text
  • Text to Speech
  • timezone
  • Tools
  • Update
  • URL
  • UTI
  • Web Contents Control
  • WiFi
  • XML
  • XML-RPC
  • イベント(Event)
  • 未分類

アーカイブ

  • 2025年7月
  • 2025年6月
  • 2025年5月
  • 2025年4月
  • 2025年3月
  • 2025年2月
  • 2025年1月
  • 2024年12月
  • 2024年11月
  • 2024年10月
  • 2024年9月
  • 2024年8月
  • 2024年7月
  • 2024年6月
  • 2024年5月
  • 2024年4月
  • 2024年3月
  • 2024年2月
  • 2024年1月
  • 2023年12月
  • 2023年11月
  • 2023年10月
  • 2023年9月
  • 2023年8月
  • 2023年7月
  • 2023年6月
  • 2023年5月
  • 2023年4月
  • 2023年3月
  • 2023年2月
  • 2023年1月
  • 2022年12月
  • 2022年11月
  • 2022年10月
  • 2022年9月
  • 2022年8月
  • 2022年7月
  • 2022年6月
  • 2022年5月
  • 2022年4月
  • 2022年3月
  • 2022年2月
  • 2022年1月
  • 2021年12月
  • 2021年11月
  • 2021年10月
  • 2021年9月
  • 2021年8月
  • 2021年7月
  • 2021年6月
  • 2021年5月
  • 2021年4月
  • 2021年3月
  • 2021年2月
  • 2021年1月
  • 2020年12月
  • 2020年11月
  • 2020年10月
  • 2020年9月
  • 2020年8月
  • 2020年7月
  • 2020年6月
  • 2020年5月
  • 2020年4月
  • 2020年3月
  • 2020年2月
  • 2020年1月
  • 2019年12月
  • 2019年11月
  • 2019年10月
  • 2019年9月
  • 2019年8月
  • 2019年7月
  • 2019年6月
  • 2019年5月
  • 2019年4月
  • 2019年3月
  • 2019年2月
  • 2019年1月
  • 2018年12月
  • 2018年11月
  • 2018年10月
  • 2018年9月
  • 2018年8月
  • 2018年7月
  • 2018年6月
  • 2018年5月
  • 2018年4月
  • 2018年3月
  • 2018年2月

https://piyomarusoft.booth.pm/items/301502

メタ情報

  • ログイン
  • 投稿フィード
  • コメントフィード
  • WordPress.org

Forum Posts

  • 人気のトピック
  • 返信がないトピック

メタ情報

  • ログイン
  • 投稿フィード
  • コメントフィード
  • WordPress.org
Proudly powered by WordPress
Theme: Flint by Star Verte LLC