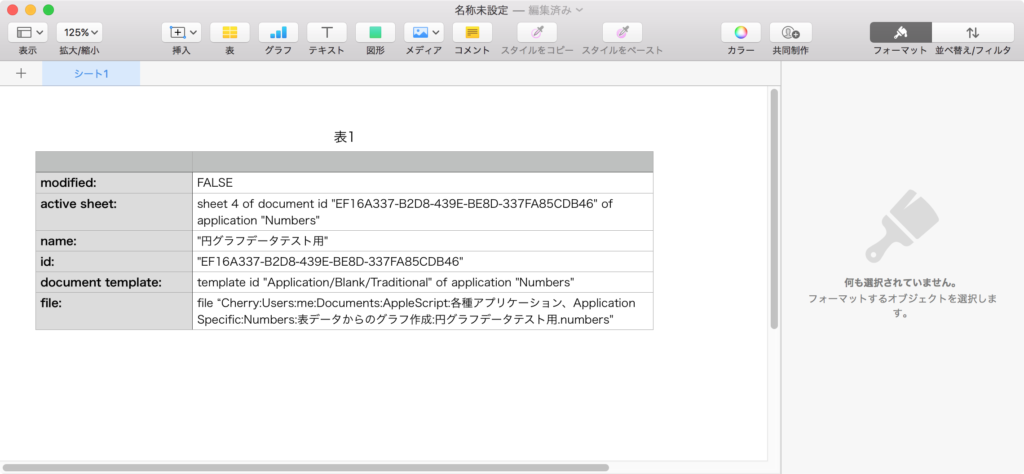
Menu

Skip to content
AppleScriptの穴
  • Home
  • Products
  • Books
  • Docs
  • Events
  • Forum
  • About This Blog
  • License
  • 仕事依頼

AppleScriptの穴

Useful & Practical AppleScript archive. Click '★Click Here to Open This Script' Link to download each AppleScript

Pages書類の1ページ目の表の背景色を置換

Posted on 1月 28, 2019 by Takaaki Naganoya

Pagesでオープン中の最前面の書類の1ページ目に存在する表オブジェクト中の背景色を置換するAppleScriptです。

Pages書類の「表オブジェクト」にAppleScriptからアクセスするためには、Pages上で表オブジェクトを選択した状態で、

「オブジェクトの配置」を「移動しない」に事前に設定しておく必要があります。

本AppleScriptを実行可能なランタイム環境は、スクリプトエディタ、アプレットの2つです。スクリプトメニューおよびScript Debuggerでは各GUI部品のクリックイベントを拾えないために、実行しても選択などが行えません。

のように、1ページのみのPages書類に表オブジェクトを入れて、「移動しない」設定にしてある状態で本AppleScriptを実行。

表のセル中の色をすべて取得して、ユニーク化してポップアップメニューから「変更元」の色を選択できます。

選択して、「OK」ボタンをクリック。ここで選択した色が置換されます。

選択した色をどの色に変更(置換)するのかを指定します。

黒い色を選択。

ちょっと置換に時間がかかりますが(テストデータ+開発環境で20秒前後)、セルの背景色をします。このあたり、Pagesの表オブジェクト中のセルに対して、background colorでフィルタ参照できればよかったのですが、自分が試した範囲ではフィルタ参照で抽出できませんでした。全セルを取得してループで背景色のチェックと置換を行なっています。

こういう機能が最初からPagesに実装されているわけでもないので、手作業よりははるかに高速なのでしばらく放っておけば終わるのでいいんじゃないでしょうか。

本来であれば、指定色に該当するセルをフィルタ参照で抽出して、ヒットしたセルだけでループして背景色を変更できるとベストですが、実際にフィルタ参照で抽出できるかどうかはアプリケーション側の対応度次第なので、実際にやってみないとわかりません。

AppleScript名:Pages書類の1ページ目の表の背景色を置換
— Created 2017-07-15 by Takaaki Naganoya
— Created 2019-01-28 by Takaaki Naganoya
— 2019 Piyomaru Software
use AppleScript version "2.4"
use scripting additions
use framework "Foundation"
use framework "AppKit"
use Bplus : script "BridgePlus" –https://www.macosxautomation.com/applescript/apps/BridgePlus.html

property NSView : a reference to current application’s NSView
property NSColor : a reference to current application’s NSColor
property NSArray : a reference to current application’s NSArray
property NSMenu : a reference to current application’s NSMenu
property NSImage : a reference to current application’s NSImage
property NSScreen : a reference to current application’s NSScreen
property NSButton : a reference to current application’s NSButton
property NSWindow : a reference to current application’s NSWindow
property NSTextField : a reference to current application’s NSTextField
property NSMenuItem : a reference to current application’s NSMenuItem
property NSBezierPath : a reference to current application’s NSBezierPath
property NSPopUpButton : a reference to current application’s NSPopUpButton
property NSWindowController : a reference to current application’s NSWindowController
property NSTitledWindowMask : a reference to current application’s NSTitledWindowMask
property NSRoundedBezelStyle : a reference to current application’s NSRoundedBezelStyle
property NSNormalWindowLevel : a reference to current application’s NSNormalWindowLevel
property NSBackingStoreBuffered : a reference to current application’s NSBackingStoreBuffered
property NSMomentaryLightButton : a reference to current application’s NSMomentaryLightButton

property windisp : false
property wController : false
property pop1ind : missing value

–Pagesの1ページ目にある表の塗り色を取得
tell application "Pages"
  tell front document
    tell table 1
      set cList to background color of every cell
    end tell
  end tell
end tell

–色データをユニーク化(重複削除)
set bList to uniquifyList(cList) of me

–missing value(背景色なし)を除外する
load framework
set cList to (current application’s SMSForder’s arrayByDeletingBlanksIn:(bList)) as list

–Popup Menuで置換色選択
set aButtonMSG to "OK"
set aSliderValMSG to "Select Target Color"
set paramObj to {cList, 65535, aButtonMSG, aSliderValMSG, 20}
my performSelectorOnMainThread:"getPopupValues:" withObject:(paramObj) waitUntilDone:true

–カラーピッカーで色選択
set fromCol to (contents of item pop1ind of cList)
set tCol to choose color default color fromCol

–実際に表の背景色を置換する
tell application "Pages"
  tell front document
    tell table 1
      set cellList to every cell
      
      
repeat with i in cellList
        set aBG to background color of i
        
        
if aBG = fromCol then
          ignoring application responses
            set background color of i to tCol
          end ignoring
        end if
      end repeat
    end tell
  end tell
end tell

–カラーポップアップメニューをウィンドウ表示
on getPopupValues:paramObj
  copy (paramObj as list) to {ap1List, aColMax, aButtonMSG, aSliderValMSG, timeOutSecs}
  
  
set (my windisp) to true
  
  
set aView to NSView’s alloc()’s initWithFrame:(current application’s NSMakeRect(0, 0, 360, 100))
  
  
–Labelをつくる
  
set a1TF to NSTextField’s alloc()’s initWithFrame:(current application’s NSMakeRect(30, 60, 80, 20))
  
a1TF’s setEditable:false
  
a1TF’s setStringValue:"Color:"
  
a1TF’s setDrawsBackground:false
  
a1TF’s setBordered:false
  
  
–Ppopup Buttonをつくる
  
set a1Button to NSPopUpButton’s alloc()’s initWithFrame:(current application’s NSMakeRect(80, 60, 200, 20)) pullsDown:false
  
a1Button’s removeAllItems()
  
  
set a1Menu to NSMenu’s alloc()’s init()
  
  
set iCount to 0
  
repeat with i in ap1List
    copy i to {r1, g1, b1}
    
    
set nsCol to makeNSColorFromRGBAval(r1, g1, b1, aColMax, aColMax) of me
    
set anImage to makeNSImageWithFilledWithColor(64, 64, nsCol) of me
    
    
set aTitle to "color_" & (iCount as string)
    
set aMenuItem to (NSMenuItem’s alloc()’s initWithTitle:aTitle action:"actionHandler:" keyEquivalent:"")
    (
aMenuItem’s setImage:anImage)
    (
aMenuItem’s setEnabled:true)
    (
a1Menu’s addItem:aMenuItem)
    
    
set iCount to iCount + 1
  end repeat
  
  
a1Button’s setMenu:a1Menu


–Buttonをつくる
  
set bButton to (NSButton’s alloc()’s initWithFrame:(current application’s NSMakeRect(80, 10, 140, 40)))
  
bButton’s setButtonType:(NSMomentaryLightButton)
  
bButton’s setBezelStyle:(NSRoundedBezelStyle)
  
bButton’s setTitle:aButtonMSG
  
bButton’s setTarget:me
  
bButton’s setAction:("clicked:")
  
bButton’s setKeyEquivalent:(return)
  
  
aView’s addSubview:a1TF
  
  
aView’s addSubview:a1Button
  
aView’s addSubview:bButton
  
aView’s setNeedsDisplay:true
  
  
–NSWindowControllerを作ってみた(いらない?)
  
set aWin to (my makeWinWithView(aView, 300, 100, aSliderValMSG))
  
  
set wController to NSWindowController’s alloc()
  
wController’s initWithWindow:aWin
  
  
wController’s showWindow:me
  
  
set aCount to timeOutSecs * 100
  
  
set hitF to false
  
repeat aCount times
    if (my windisp) = false then
      set hitF to true
      
exit repeat
    end if
    
delay 0.01
    
set aCount to aCount – 1
  end repeat
  
  
my closeWin:aWin
  
  
if hitF = true then
    set s1Val to ((a1Button’s indexOfSelectedItem() as number) + 1)
  else
    set s1Val to false
  end if
  
  
copy s1Val to my pop1ind
  
end getPopupValues:

on clicked:aSender
  set (my windisp) to false
end clicked:

–make Window for Display
on makeWinWithView(aView, aWinWidth, aWinHeight, aTitle)
  set aScreen to NSScreen’s mainScreen()
  
set aFrame to {{0, 0}, {aWinWidth, aWinHeight}}
  
  
set aBacking to NSTitledWindowMask
  
  
set aDefer to NSBackingStoreBuffered
  
  
— Window
  
set aWin to NSWindow’s alloc()
  (
aWin’s initWithContentRect:aFrame styleMask:aBacking backing:aDefer defer:false screen:aScreen)
  
  
aWin’s setTitle:aTitle
  
aWin’s setDelegate:me
  
aWin’s setDisplaysWhenScreenProfileChanges:true
  
aWin’s setHasShadow:true
  
aWin’s setIgnoresMouseEvents:false
  
aWin’s setLevel:(NSNormalWindowLevel)
  
aWin’s setOpaque:false
  
aWin’s setReleasedWhenClosed:true
  
aWin’s |center|()
  
  
aWin’s setContentView:aView
  
  
return aWin
end makeWinWithView

–close win
on closeWin:aWindow
  repeat with n from 10 to 1 by -1
    (aWindow’s setAlphaValue:n / 10)
    
delay 0.02
  end repeat
  
aWindow’s |close|()
end closeWin:

–Popup Action Handler
on actionHandler:sender
  set aTag to tag of sender as integer
  
set aTitle to title of sender as string
end actionHandler:

–aMaxValを最大値とする数値でNSColorを作成して返す
on makeNSColorFromRGBAval(redValue as integer, greenValue as integer, blueValue as integer, alphaValue as integer, aMaxVal as integer)
  set aRedCocoa to (redValue / aMaxVal) as real
  
set aGreenCocoa to (greenValue / aMaxVal) as real
  
set aBlueCocoa to (blueValue / aMaxVal) as real
  
set aAlphaCocoa to (alphaValue / aMaxVal) as real
  
set aColor to NSColor’s colorWithCalibratedRed:aRedCocoa green:aGreenCocoa blue:aBlueCocoa alpha:aAlphaCocoa
  
return aColor
end makeNSColorFromRGBAval

–指定サイズのNSImageを作成し、指定色で塗ってNSImageで返す
on makeNSImageWithFilledWithColor(aWidth, aHeight, fillColor)
  set anImage to NSImage’s alloc()’s initWithSize:(current application’s NSMakeSize(aWidth, aHeight))
  
anImage’s lockFocus()
  
—
  
set theRect to {{x:0, y:0}, {height:aHeight, width:aWidth}}
  
set theNSBezierPath to NSBezierPath’s bezierPath
  
theNSBezierPath’s appendBezierPathWithRect:theRect
  
—
  
fillColor’s |set|() –色設定
  
theNSBezierPath’s fill() –ぬりつぶし
  
—
  
anImage’s unlockFocus()
  
—
  
return anImage
end makeNSImageWithFilledWithColor

on uniquifyList(aList as list)
  set aArray to NSArray’s arrayWithArray:aList
  
set bArray to aArray’s valueForKeyPath:"@distinctUnionOfObjects.self"
  
return bArray as list
end uniquifyList

★Click Here to Open This Script 

Posted in Color GUI | Tagged 10.11savvy 10.12savvy 10.13savvy 10.14savvy NSArray NSBackingStoreBuffered NSBezierPath NSButton NSColor NSImage NSMenu NSMenuItem NSMomentaryLightButton NSNormalWindowLevel NSPopUpButton NSRoundedBezelStyle NSScreen NSTextField NSTitledWindowMask NSView NSWindow NSWindowController Pages | 1 Comment

スリープおよびスリープ解除Notificationを受信

Posted on 1月 27, 2019 by Takaaki Naganoya

Macがスリープ/スリープから復帰したノーティフィケーションを受信するAppleScriptです。

Cocoaの機能が利用できない時代にスリープ解除を検出するアプリケーション「Okaeri」をAppleScriptで作って動かしていましたが、あれはon idleハンドラで1秒ごとにタイマー割り込みを発生させ、前回割り込み発生時間を記録、前回割り込みと現在時刻の差分を計算し、1ないし数秒以上間隔が空いていたらスリープ解除が発生したとみなして、syslogにスリープ解除が記録されていないかをチェックするようにしていました。

なので、Cocoaの機能呼び出しやNotificationの受信を行えなくても、ある程度は同様の処理が行えるわけですが、使えれば使えたで便利ではあります。

AppleScript名:スリープおよびスリープ解除Notificationを受信.scptd
—
–  Created by: Takaaki Naganoya
–  Created on: 2019/01/25
—
–  Copyright © 2019 Piyomaru Software, All Rights Reserved
—
use AppleScript version "2.4" — Yosemite (10.10) or later
use framework "Foundation"
use framework "AppKit"
use scripting additions

set aCenter to current application’s NSWorkspace’s sharedWorkspace()’s notificationCenter()

aCenter’s addObserver:me selector:"notifSleep:" |name|:"NSWorkspaceWillSleepNotification" object:(missing value)

aCenter’s addObserver:me selector:"notifWaked:" |name|:"NSWorkspaceDidWakeNotification" object:(missing value)

on notifSleep:aNotif
  display notification "System will sleep"
  
say "System will sleep"
end notifSleep:

on notifWaked:aNotif
  display notification "System did wake"
  
say "System did wake"
end notifWaked:

★Click Here to Open This Script 

Posted in Noification System | Tagged 10.11savvy 10.12savvy 10.13savvy 10.14savvy NSWorkspace | 2 Comments

ディスプレイのスリープ/復帰Notificationを受信

Posted on 1月 26, 2019 by Takaaki Naganoya

Macに接続・搭載しているディスプレイのスリープ/スリープ復帰が行われたノーティフィケーションを受信するAppleScriptです。

AppleScript名:ディスプレイがスリープした.scptd
—
–  Created by: Takaaki Naganoya
–  Created on: 2019/01/25
—
–  Copyright © 2019 Piyomaru Software, All Rights Reserved
—
use AppleScript version "2.4" — Yosemite (10.10) or later
use framework "Foundation"
use framework "AppKit"
use scripting additions

set aCenter to current application’s NSWorkspace’s sharedWorkspace()’s notificationCenter()

aCenter’s addObserver:me selector:"notifDispSleeped:" |name|:"NSWorkspaceScreensDidSleepNotification" object:(missing value)

on notifDispSleeped:aNotif
  say "Display sleeped"
end notifDispSleeped:

★Click Here to Open This Script 

AppleScript名:ディスプレイがスリープから復帰した.scptd
—
–  Created by: Takaaki Naganoya
–  Created on: 2019/01/25
—
–  Copyright © 2019 Piyomaru Software, All Rights Reserved
—
use AppleScript version "2.4" — Yosemite (10.10) or later
use framework "Foundation"
use framework "AppKit"
use scripting additions

set aCenter to current application’s NSWorkspace’s sharedWorkspace()’s notificationCenter()

aCenter’s addObserver:me selector:"notifDispWaked:" |name|:"NSWorkspaceScreensDidWakeNotification" object:(missing value)


on notifDispWaked:aNotif
  say "Display waked"
end notifDispWaked:

★Click Here to Open This Script 

Posted in Noification System | Tagged 10.11savvy 10.12savvy 10.13savvy 10.14savvy NSWorkspace | Leave a comment

ボリウムの名称変更Notificationを受信

Posted on 1月 26, 2019 by Takaaki Naganoya

Macに接続・搭載しているドライブのボリウム名変更が行われたノーティフィケーションを受信するAppleScriptです。

ドライブ名を変更してみると、なぜか通知が2回飛んでくるところが謎です。
→ システム再起動後に追試してみましたが、通知が飛んでくるのは1回だけでした。Scriptを複数回実行してしまったのが原因だと思われます。

AppleScript名:ボリウムの名称変更_notification.scptd
—
–  Created by: Takaaki Naganoya
–  Created on: 2019/01/25
—
–  Copyright © 2019 Piyomaru Software, All Rights Reserved
—
use AppleScript version "2.4" — Yosemite (10.10) or later
use framework "Foundation"
use framework "AppKit"
use scripting additions

–ドライブ名の変更時にnotify(なぜか2回通知される?)
set aCenter to current application’s NSWorkspace’s sharedWorkspace()’s notificationCenter()

aCenter’s addObserver:me selector:"driveNameChanged:" |name|:"NSWorkspaceDidRenameVolumeNotification" object:(missing value)

on driveNameChanged:aNotif
  say "Drive name changed"
end driveNameChanged:

★Click Here to Open This Script 

Posted in Noification System | Tagged 10.11savvy 10.12savvy 10.13savvy 10.14savvy NSWorkspace | Leave a comment

Spaces変更Notificationを受信

Posted on 1月 26, 2019 by Takaaki Naganoya

Spacesのスペース変更が行われた(異なるスペースに変更しなくてもOK)ノーティフィケーションを受信するAppleScriptです。

ちなみに、AppleScriptによる処理を行う分にはSpacesは百害あって一利もないので、複数Spaceを登録「しないで」使うことが推奨されます。

AppleScript名:Spaces変更_notification.scptd
—
–  Created by: Takaaki Naganoya
–  Created on: 2019/01/25
—
–  Copyright © 2019 Piyomaru Software, All Rights Reserved
—
use AppleScript version "2.4" — Yosemite (10.10) or later
use framework "Foundation"
use framework "AppKit"
use scripting additions

set aCenter to current application’s NSWorkspace’s sharedWorkspace()’s notificationCenter()

aCenter’s addObserver:me selector:"spacesChanged:" |name|:"NSWorkspaceActiveSpaceDidChangeNotification" object:(missing value)

on spacesChanged:aNotif
  say "Active Spaces changed"
end spacesChanged:

★Click Here to Open This Script 

Posted in Noification System | Tagged 10.11savvy 10.12savvy 10.13savvy 10.14savvy NSWorkspace | 1 Comment

Finder上で選択中の画像のうち、最小のものに合わせて各画像の右上を基準にサイズ統一

Posted on 1月 26, 2019 by Takaaki Naganoya

Finderで選択中の画像のうち、最小のものに合わせて各画像の右上を原点にサイズを統一するAppleScriptです。

Finderで選択中のファイルから画像のみ抽出し、そのうちサイズが最小のものに合わせて他の画像をトリミングし、変更したものをデスクトップフォルダに出力します。

以前に画像の左上を基準に自動トリミングするバージョンのScriptを作成しましたが、あれはメニュー操作の説明用スクリーンショットの大きさを統一するためのもの。右上基準の本バージョンは、Driveのリネームやステータスバーの操作内容を説明するためのスクリーンショットの大きさ統一のために用意したものです。


▲大きさを揃える画像をFinder上で選択


▲処理後の画像。大きさが最小の画像に合わせてそろっている。切り抜き基準は右上

スクリーンショット画像を複数撮った場合に、厳密に同じサイズに固定することは(各種スクリーンショット作成ユーティリティを使わないと)行いづらいところです。

そこで、最小の画像を計算で求めて、それに合わせて自動トリミングするようにしてみました。Cocoaの機能を用いて画像処理しているため、Photoshopは必要ありません。

最小の画像を求めるのに、幅+高さの値でソートして最小のものを求めています(widthとheightによる2 key sortではなく1 Keyで済ませたかったので)。

AppleScript名:Finder上で選択中の画像のうち、最小のものに合わせて各画像の右上を基準にサイズ統一
— Created 2018-01-26 by Takaaki Naganoya
— 2019 Piyomaru Software
use AppleScript version "2.5"
use scripting additions
use framework "Foundation"
use framework "AppKit"
use framework "QuartzCore"

property |NSURL| : a reference to current application’s |NSURL|
property NSUUID : a reference to current application’s NSUUID
property NSArray : a reference to current application’s NSArray
property NSString : a reference to current application’s NSString
property NSImage : a reference to current application’s NSImage
property NSScreen : a reference to current application’s NSScreen
property NSZeroRect : a reference to current application’s NSZeroRect
property NSPredicate : a reference to current application’s NSPredicate
property NSPNGFileType : a reference to current application’s NSPNGFileType
property NSMutableArray : a reference to current application’s NSMutableArray
property NSCompositeCopy : a reference to current application’s NSCompositeCopy
property NSGraphicsContext : a reference to current application’s NSGraphicsContext
property NSBitmapImageRep : a reference to current application’s NSBitmapImageRep
property NSURLTypeIdentifierKey : a reference to current application’s NSURLTypeIdentifierKey
property NSCalibratedRGBColorSpace : a reference to current application’s NSCalibratedRGBColorSpace

tell application "Finder"
  set selList to selection as alias list
end tell

–指定のAlias listのうち画像のみ抽出
set filRes1 to filterAliasListByUTI(selList, "public.image") of me
if filRes1 = {} then
  tell current application
    –Error Message (No Selection)
    
display dialog "Finder上で選択されているファイルはありません。" buttons {"OK"} default button 1 with icon 1 with title "画像リサイズ処理できません"
  end tell
  
return
end if

–各種情報を入れたArrayを作成
set anArray to NSMutableArray’s new()
repeat with i in selList
  set imgPath to (POSIX path of i)
  
  
set aImage to makeNSImageFromFile(i) of me
  
set sizeInfo to |size|() of aImage
  
set sizeInfo to sizeInfo & {aImg:aImage, total:(width of sizeInfo) + (height of sizeInfo), myPath:imgPath}
  (
anArray’s addObject:sizeInfo)
end repeat

–最小のサイズの画像の算出
set aRes to anArray’s valueForKeyPath:("@min.total")
set bRes to first item of (filterRecListByLabel(anArray, "total == " & aRes as string) of me) –最小サイズの画像

–最小サイズ画像のwidthとheight
set minWidth to bRes’s width
set minHeight to bRes’s height

–環境情報の取得
set aPath to POSIX path of (path to desktop)
set retinaF to (NSScreen’s mainScreen()’s backingScaleFactor()) as real
–>  2.0 (Retina) / 1.0 (Non Retina)

set cRes to filterRecListByLabel(anArray, "total != " & aRes as string) of me –最小サイズ以外の画像

repeat with i in cRes
  set j to contents of i
  
set anImage to aImg of j
  
set fRes to myPath of j
  
  
set tmpSize to |size|() of anImage
  
set tmpWidth to (width of tmpSize)
  
set tmpHeight to (height of tmpSize)
  
  
set cropedImage to (my cropNSImageBy:{(tmpWidth – minWidth), 0, minWidth, minHeight} fromImage:anImage)
  
  
–Retina環境対策
  
if retinaF > 1.0 then
    set cropedImage to (my resizedImage:cropedImage toScale:(1.0))
  end if
  
  
–ファイル書き込み
  
set fRes to retUUIDfilePathFromDir(aPath, "png") of me
  
set sRes to saveNSImageAtPathAsPNG(cropedImage, fRes) of me
end repeat

–リストに入れたレコードを、指定の属性ラベルの値で抽出
on filterRecListByLabel(aRecList as list, aPredicate as string)
  –ListからNSArrayへの型変換
  
set aArray to NSArray’s arrayWithArray:aRecList
  
  
–抽出
  
set aPredicate to NSPredicate’s predicateWithFormat:aPredicate
  
set filteredArray to aArray’s filteredArrayUsingPredicate:aPredicate
  
  
–NSArrayからListに型変換して返す
  
set bList to filteredArray as list
  
return bList
end filterRecListByLabel

–Alias listから指定UTIに含まれるものをPOSIX pathのリストで返す
on filterAliasListByUTI(aList, targUTI)
  set newList to {}
  
repeat with i in aList
    set j to POSIX path of i
    
set tmpUTI to my retUTIfromPath(j)
    
set utiRes to my filterUTIList({tmpUTI}, targUTI)
    
if utiRes is not equal to {} then
      set the end of newList to j
    end if
  end repeat
  
return newList
end filterAliasListByUTI

–指定のPOSIX pathのファイルのUTIを求める
on retUTIfromPath(aPOSIXPath)
  set aURL to |NSURL|’s fileURLWithPath:aPOSIXPath
  
set {theResult, theValue} to aURL’s getResourceValue:(reference) forKey:NSURLTypeIdentifierKey |error|:(missing value)
  
  
if theResult = true then
    return theValue as string
  else
    return theResult
  end if
end retUTIfromPath

–UTIリストが指定UTIに含まれているかどうか演算を行う
on filterUTIList(aUTIList, aUTIstr)
  set anArray to NSArray’s arrayWithArray:aUTIList
  
set aPred to NSPredicate’s predicateWithFormat_("SELF UTI-CONFORMS-TO %@", aUTIstr)
  
set bRes to (anArray’s filteredArrayUsingPredicate:aPred) as list
  
return bRes
end filterUTIList

on cropNSImageTo:{x1, y1, x2, y2} fromImage:theImage
  set newWidth to x2 – x1
  
set newHeight to y2 – y1
  
set theSize to (theImage’s |size|()) as record
  
set oldHeight to height of theSize
  
  
— transpose y value for Cocoa coordintates
  
set y1 to oldHeight – newHeight – y1
  
set newRect to {{x:x1, y:y1}, {width:newWidth, height:newHeight}}
  
theImage’s lockFocus()
  
set theRep to NSBitmapImageRep’s alloc()’s initWithFocusedViewRect:newRect
  
theImage’s unlockFocus()
  
  
set outImage to NSImage’s alloc()’s initWithSize:(theRep’s |size|())
  
outImage’s addRepresentation:theRep
  
  
return outImage
end cropNSImageTo:fromImage:

on makeNSImageFromFile(anAlias)
  set imgPath to (POSIX path of anAlias)
  
set aURL to (|NSURL|’s fileURLWithPath:(imgPath))
  
return (NSImage’s alloc()’s initWithContentsOfURL:aURL)
end makeNSImageFromFile

–NSImageを指定の大きさでトリミング
on cropNSImageBy:{x1, y1, newWidth, newHeight} fromImage:theImage
  set theSize to (theImage’s |size|()) as record
  
set oldHeight to height of theSize
  
  
— transpose y value for Cocoa coordintates
  
set y1 to oldHeight – newHeight – y1
  
set newRect to {{x:x1, y:y1}, {width:newWidth, height:newHeight}}
  
theImage’s lockFocus()
  
set theRep to NSBitmapImageRep’s alloc()’s initWithFocusedViewRect:newRect
  
theImage’s unlockFocus()
  
  
set outImage to NSImage’s alloc()’s initWithSize:(theRep’s |size|())
  
outImage’s addRepresentation:theRep
  
  
return outImage
end cropNSImageBy:fromImage:

on retUUIDfilePathFromDir(aPath, aEXT)
  set aUUIDstr to (NSUUID’s UUID()’s UUIDString()) as string
  
set aPath to ((NSString’s stringWithString:aPath)’s stringByAppendingPathComponent:aUUIDstr)’s stringByAppendingPathExtension:aEXT
  
return aPath
end retUUIDfilePathFromDir

–NSImageを指定パスにPNG形式で保存
on saveNSImageAtPathAsPNG(anImage, outPath)
  set imageRep to anImage’s TIFFRepresentation()
  
set aRawimg to NSBitmapImageRep’s imageRepWithData:imageRep
  
set pathString to NSString’s stringWithString:outPath
  
set newPath to pathString’s stringByExpandingTildeInPath()
  
set myNewImageData to (aRawimg’s representationUsingType:(NSPNGFileType) |properties|:(missing value))
  
set aRes to (myNewImageData’s writeToFile:newPath atomically:true) as boolean
  
return aRes –true/false
end saveNSImageAtPathAsPNG

on resizedImage:aSourceImg toScale:imgScale
  if (aSourceImg’s isValid()) as boolean = false then error "Invalid NSImage"
  
  
set aSize to aSourceImg’s |size|()
  
–>  {​​​​​width:32.0, ​​​​​height:32.0​​​}
  
  
set aWidth to (aSize’s width) * imgScale
  
set aHeight to (aSize’s height) * imgScale
  
  
set aRep to NSBitmapImageRep’s alloc()’s initWithBitmapDataPlanes:(missing value) pixelsWide:aWidth pixelsHigh:aHeight bitsPerSample:8 samplesPerPixel:4 hasAlpha:true isPlanar:false colorSpaceName:(NSCalibratedRGBColorSpace) bytesPerRow:0 bitsPerPixel:0
  
  
set newSize to {width:aWidth, height:aHeight}
  
aRep’s setSize:newSize
  
  
NSGraphicsContext’s saveGraphicsState()
  
NSGraphicsContext’s setCurrentContext:(NSGraphicsContext’s graphicsContextWithBitmapImageRep:aRep)
  
  
aSourceImg’s drawInRect:(current application’s NSMakeRect(0, 0, aWidth, aHeight)) fromRect:(NSZeroRect) operation:(NSCompositeCopy) fraction:(1.0)
  
  
NSGraphicsContext’s restoreGraphicsState()
  
  
set newImg to NSImage’s alloc()’s initWithSize:newSize
  
newImg’s addRepresentation:aRep
  
  
return newImg
end resizedImage:toScale:

★Click Here to Open This Script 

Posted in file Image | Tagged 10.11savvy 10.12savvy 10.13savvy NSArray NSBitmapImageRep NSImage NSPredicate NSScreen NSString NSURL NSUUID | Leave a comment

コンピュータのシャットダウン/再起動イベントを受信

Posted on 1月 25, 2019 by Takaaki Naganoya

実行中のMacのシャットダウン/再起動イベントを受信するAppleScrptです。

Classic Mac OS時代のシステム終了項目のような処理をAppleScriptで行いたい場合に、本Scriptのような処理を常駐型アプレット形式で書き出しておいて、起動させたままにしておけば、システム終了/再起動のイベントを受信してハンドラを実行します。

スクリプトエディタ上で実行しても、イベントを受信します、一応、ねんのため。

→ Download this script archive

AppleScript名:シャットダウン_notification.scptd
—
–  Created by: Takaaki Naganoya
–  Created on: 2019/01/25
—
–  Copyright © 2019 Piyomaru Software, All Rights Reserved
—
use AppleScript version "2.4" — Yosemite (10.10) or later
use framework "Foundation"
use framework "AppKit"
use scripting additions

set aCenter to current application’s NSWorkspace’s sharedWorkspace()’s notificationCenter()
aCenter’s addObserver:me selector:"computerWillShutDownNotification:" |name|:"NSWorkspaceWillPowerOffNotification" object:(missing value)

on computerWillShutDownNotification:aNotif
  say "Computer Will shutdown or restart now"
end computerWillShutDownNotification:

★Click Here to Open This Script 

Posted in Noification System | Tagged 10.11savvy 10.12savvy 10.13savvy 10.14savvy NSWorkspace | Leave a comment

Automator Actionを実行

Posted on 1月 24, 2019 by Takaaki Naganoya

指定のAutomator Action(拡張子「.workflow」)を実行するAppleScriptです。

PDFKitをさんざんこづき回しても、指定のPDFに任意のすかし(Watermark)を入れるのが自分にはできなかったので、AutomatorのActionにそういうのが標準装備されているから、それを使えばいいんじゃないかと思い出し、Automator Workflowを直接実行するやりかたを調べて実行してみました。

# これは、Cocoaの機能を呼び出して実行しているものであって、Automatorアプリケーションを呼び出すとか、/usr/bin/automatorを呼び出すやり方などもあります

まだ、パラメータを指定してはいないので、パラメータを指定できるようにするとなおいいと思います。

AppleScript名:Automator Actionを実行.scptd
—
–  Created by: Takaaki Naganoya
–  Created on: 2019/01/22
—
–  Copyright © 2019 Piyomaru Software, All Rights Reserved
—
use AppleScript version "2.5" — El Capitan (10.11) or later
use framework "Foundation"
use framework "Automator"
use scripting additions

property |NSURL| : a reference to current application’s |NSURL|

set aURL to |NSURL|’s fileURLWithPath:(POSIX path of (choose file with prompt "Choose Automator Action" of type {"com.apple.automator-workflow"}))

set aWKres to current application’s AMWorkflow’s runWorkflowAtURL:aURL withInput:(missing value) |error|:(reference)

★Click Here to Open This Script 

Posted in file URL | Tagged 10.11savvy 10.12savvy 10.13savvy 10.14savvy AMWorkflow Automator NSURL | Leave a comment

2D List内で検索してヒットした情報をすべて返す

Posted on 1月 24, 2019 by Takaaki Naganoya

2D List内で項目を検索して、ヒットした項目をすべて{x,y}のアイテム番号リストで返すAppleScriptです。

# 年がら年中、この手のScriptを書き捨てているような気もしますが、、、

Excelのワークシート上の情報をすべて読み取って、2D Listの中をデータ検索するような処理で使うための部品です。

AppleScript名:2D List内で検索してヒットした情報をすべて返す.scptd
—
–  Created by: Takaaki Naganoya
–  Created on: 2019/01/24
—
–  Copyright © 2019 Piyomaru Software, All Rights Reserved
—
use AppleScript version "2.4" — Yosemite (10.10) or later
use framework "Foundation"
use scripting additions
use Bplus : script "BridgePlus" –https://www.macosxautomation.com/applescript/apps/BridgePlus.html

set anItem to "a"
set aList to {{"b", "a", "c", "a"}, {"a", "a", "c", "a"}, {"b", "v", "c", "a"}, {"b", "a", "c", "a"}}
set bRes to findDataFrom2DList(anItem, aList) of me
–> {{2, 1}, {4, 1}, {1, 2}, {2, 2}, {4, 2}, {4, 3}, {2, 4}, {4, 4}}

on findDataFrom2DList(anItem, aList)
  script spd
    property aList : {}
    
property resList : {}
  end script
  
  
set (aList of spd) to aList
  
set (resList of spd) to {}
  
  
set yCount to 1
  
  
repeat with i in (aList of spd)
    
    
set aResList to (Bplus’s indexesOfItem:anItem inList:i inverting:false) as list
    
    
set tmpList to {}
    
if aResList is not equal to {} then
      repeat with ii in aResList
        set jj to contents of ii
        
set the end of tmpList to {jj, yCount}
      end repeat
      
set (resList of spd) to (resList of spd) & tmpList
    end if
    
    
set yCount to yCount + 1
  end repeat
  
  
return (resList of spd) –return {{x, y}…..} item list (1-based)
end findDataFrom2DList

★Click Here to Open This Script 

Posted in list | Tagged 10.11savvy 10.12savvy 10.13savvy 10.14savvy | 1 Comment

オープン中のScriptをすべて書き換える

Posted on 1月 19, 2019 by Takaaki Naganoya

Script Editorでオープン中のAppleScript書類に対してすべて文字置換を行って、変更があれば保存を行うAppleScriptです。

Xcodeで作成するAppleScriptアプリケーションのプロジェクトで、サブScriptをZipアーカイブに入れ、展開しては順次呼び出すようにしていました。

サブスクリプト側とメインのAppleScriptアプリケーション側はUser Defaultsを介してパラメータのやりとりを行っていますが、Bundle IDの大文字/小文字の記述ミスからうまくパラメータの受け渡しが行えませんでした。

そこで、すべてのサブスクリプトを書き換えることにしたのですが、順次オープンして書き換えたのでは、(サブスクリプトの数が多すぎて)手間がかかり書き換えミスの可能性も否定できません。テキストエディタでは、BBEditなどで指定ディレクトリ以下のテキストファイルに対してすべて処理する機能が実装されていますが、Script DebuggerなどAppleScriptの編集プログラムにその機能が実装されているのは見たことがありません。

処理内容も簡単なので、その場で作ってしまいました。

なお、Script EditorをコントロールするAppleScriptは、大事をとってScript Editor以外のプログラム上で実行することが推奨されます。Script DebuggerかmacOS標準搭載のスクリプトメニューです。

Mac OS X 10.4の頃までは、Script Editor上でScript EditorをコントロールするAppleScriptを書いて実行するといろいろ不具合が出ていました。Mac OS X 10.5以降でずいぶん改善された印象があります。

本AppleScriptのような処理内容では、単なる文字置換ではなく、指定の構文要素(文字定数など)に該当するものがあれば置換を行うなど、より高度な処理を行うものに書き換えていくとよいでしょう。さすがに変数名の置換は作って使っていますが、文字定数やコメント内容を対象にするものを用意しておいてもいいように思えます。

AppleScript名:オープン中のScriptをすべて書き換える.scptd
—
–  Created by: Takaaki Naganoya
–  Created on: 2019/01/19
—
–  Copyright © 2019 MyCompanyName, All Rights Reserved
—

use AppleScript version "2.4" — Yosemite (10.10) or later
use framework "Foundation"
use scripting additions

set origStr to "jp.piyomarusoft.samplebundleid"
set toStr to "jp.piyomarusoft.sampleBundleID"

tell application "Script Editor"
  set dList to every document
  
  
repeat with i in dList
    set j to contents of i
    
    
tell j
      
      
set aCon to text of it
      
set bCon to repChar(aCon, origStr, toStr) of me
      
      
considering case
        if aCon is not equal to bCon then
          set text of it to bCon
          
save
        end if
      end considering
      
    end tell
    
  end repeat
end tell

–文字置換ルーチン
on repChar(origText as string, targStr as string, repStr as string)
  set {txdl, AppleScript’s text item delimiters} to {AppleScript’s text item delimiters, targStr}
  
set temp to text items of origText
  
set AppleScript’s text item delimiters to repStr
  
set res to temp as text
  
set AppleScript’s text item delimiters to txdl
  
return res
end repChar

★Click Here to Open This Script 

Posted in Text | Tagged 10.11savvy 10.12savvy 10.13savvy 10.14savvy Script Editor | Leave a comment

セキュリティダイアログに表示するメッセージをローカライズする

Posted on 1月 17, 2019 by Takaaki Naganoya

Xcode上で記述し、他のアプリケーションを操作するAppleScript Cocoaアプリケーションで、セキュリティダイアログに表示する内容(Info.plist内のエントリ)をローカライズする方法について紹介します。

セキュリティダイアログを表示させてユーザーの認証を得る

まず、macOS 10.14, Mojaveではセキュリティ機能が強化され、アプリケーションから他のアプリケーションをAppleEventで操作しようとすると、ユーザーに認証を求めます。この動作は、同一アプリケーションでは初回時のみ行われます。アプリケーションのバージョン・アップ時に再度問い合わされることはありません。

このセキュリティ認証をユーザーに求める動作は、Code Signしてあるアプリケーションであれば初回起動時の初回AppleEvents発行時のみ行われます。最新版のXcode上でアプリケーションを開発する場合にはCode Signできること(=Apple Developper Account年間契約を行っていること)が前提条件となるため、Code Signしない場合については言及しません。

# セキュリティダイアログで「OK」しなかった場合でも、あとからシステム環境設定>セキュリティとプライバシー>プライバシー>オートメーション の項目でチェックを入れれば認証したのと同じことになります。この項目、1年使い続けると項目数がヤバいぐらい増加しそうですが、そのあたりの膨大な数になったときの使い勝手が一切考えられていないバカっぷりが素敵です(項目のしぼりこみぐらいできないとまずい)

そして、ただ漫然とXcode上でAppleScriptアプリケーションのプロジェクトを作成し、AppleScriptアプリケーションを記述しても、実行時にセキュリティダイアログは表示されないという話を昨日書きました。

セキュリティダイアログを表示してユーザーに認証を得るためには、

 (1)Info.plistに「Privacy – AppleEvents Sending Usage Description」(NSAppleEventsUsageDescription)のエントリを作成する必要がある

 (2)AppleScriptアプリケーション内にて、セキュリティダイアログの認証が必要な動作(新規ドキュメントを作成するなど)を、アプリケーション起動中あるいは起動直後のタイミングで行い、セキュリティダイアログでユーザーの認証を得ておく(ことが望ましい)

という状態です。

セキュリティダイアログのメッセージをローカライズする

昨日の段階では、このセキュリティダイアログに表示させる内容がローカライズできないと思っていました。

その後、冗談半分で「Info.plistの内容のローカライズ方法」などと検索エンジンで調べてみたら……さがしてみるもので、すぐに方法が見つかりました。

# 冗談半分で探してみる、というのはけっこう強力なソリューションです

Info.plistの内容のローカライズを行う場合には、InfoPlist.stringsというファイルを作成して、そこに(おなじみの)ローカライズ文字ファイルを、

"key" = "value";

のように記述しておき、InfoPlist.stringsファイルをXcode上でローカライズするのだとか。

Info.plistのエントリのローカライズ

Info.plistに「Privacy – AppleEvents Sending Usage Description」のエントリを作ってある状態から話をすすめます。

このままでは、このエントリのキー名称がよくわからないので、Info.plistをテキスト形式でオープンし直します。

すると、このエントリのキー名称が「NSAppleEventsUsageDescription」だということがわかります。

そこで、Xcodeのプロジェクトに「空のファイル」としてInfoPlist.stringsファイルを追加し、ローカライズします。ここでは、デフォルトで用意されるEnglishのほかにJapaneseを追加しました。

この状態でXcode上でビルド+実行(Command-R)を行うと、

のように、日本語環境にあわせてローカライズしておいたメッセージが表示されることが確認できました。

Posted in AppleScript Application on Xcode | Tagged 10.14savvy | 2 Comments

macOS 10.14で新設されたエラーコード-1743を確認する

Posted on 1月 16, 2019 by Takaaki Naganoya

エラーをプログラムで発生させ、macOS 10.14で新設されたエラーコード-1743のエラーメッセージを確認するAppleScriptです。

Mojaveの「オートメーション」項目未登録アプリケーションがAppleEventを他のアプリケーションに送信した場合に発生するエラー-1743。

2019-01-15 99:99:99.999999+0900 1014test[13673:1813575] *** -[AppDelegate applicationWillFinishLaunching:]: Not authorized to send Apple events to Keynote. (error -1743)

macOS 10.14以降でのみ発生するエラーであり、それ以前のバージョンのmacOSでは発生しません。

以前作った、エラーコード表をプログラムから自動で生成するAppleScriptにこの-1743のエラーを発生させ、そのエラーメッセージ内容を取得してみました。

エラー-1743のエラーメッセージのうち、「current application」の部分には任意のアプリケーション名が入るようです。

AppleScript名:error_generator
—
–  Created by: Takaaki Naganoya
–  Created on: 2019/01/16
—
–  Copyright © 2019 Piyomaru Software, All Rights Reserved
—
use AppleScript version "2.7" — Mojave (10.14) or later
use framework "Foundation"
use scripting additions

set erList to {"-1743"}

set mesList to {}

repeat with i in erList
  set j to contents of i
  
set {aNum, aMes} to errorGenerator(j) of me
  
set the end of mesList to {aNum, aMes}
end repeat

mesList
–> {{-1743, "current applicationにApple Eventsを送信する権限がありません。"}}

on errorGenerator(aNum as number)
  set handlerName to "errorGenerator"
  
try
    error number aNum
  on error errMsg number ErrNbr partial result partialResult from from_ to to_
    return {ErrNbr, errMsg}
  end try
end errorGenerator

★Click Here to Open This Script 

Posted in System | Tagged 10.14savvy | Leave a comment

Xcode 10.1+macOS MojaveでGUIアプリケーションを作成

Posted on 1月 16, 2019 by Takaaki Naganoya

Apple Developper Accountの契約を行い、Xcode上で(他のアプリケーションをコントロールする)AppleScriptアプリケーションを作れるようにしたときに、macOS 10.14+Xcode最新版の10.1だと実際どうなのかをまとめてみました。

Xcode上でこれまでと同様にScriptアプリケーションを記述しただけではダメ

Sandbox対応させると制約事項が増えるため、Sandbox非対応のアプリケーションをビルドしてどこまで行けるかは興味深いところです。

ですが、とりあえず(安全のために)、Code Sign+Sandboxの設定を行ってXcode上でAppleScriptアプリケーションを作成。Keynoteに新規ドキュメントを作成させる程度のお気軽なコードを書き、ビルドして実行。すると、

2019-01-15 99:99:99.999999+0900 1014test[13673:1813575] *** -[AppDelegate applicationWillFinishLaunching:]: Not authorized to send Apple events to Keynote. (error -1743)

などとエラーが出るだけで、AppleScriptからの操作対象アプリケーション(ここではNumbers)は、動かせませんでした。Automationのセキュリティダイアログ自体が表示されない状態です。


▲セキュリティダイアログはこんなやつ

Info.plistにエントリを追加するとSecurityダイアログが表示されるようになる

こういう場合には海外のサイトを調べてみるのが一番手っ取り早いところです。いろいろ調べてみたところ、Info.plistに対して、

Privacy - AppleEvents Sending Usage Description

というエントリを追加する必要があるとのこと。

このInfo.plist上のエントリ、例のMojaveから出るようになったSecurityダイアログにアプリケーション側から出力するカスタムメッセージを定義するエントリのようです。エントリさえ存在すれば、とくに何か気の利いたメッセージを入れる必要はないようです。

英語で書いても、日本語で書いてもそのままダイアログに出力されます。Info.plistの内容自体はローカライズできないので、本エントリの内容は広域に配布するものであれば英語で、特定の日本国内の顧客に向けて納品するものであれば日本語で書けばいいんじゃないでしょうか(一般的なメッセージ同様にローカライズできることが望ましい)。このあたり、ローカライズできないのは仕様的におかしいので、そのうち仕様が変わりそうです、、、、

Securityダイアログを表示させるためには、AppleScriptアプリケーション側から対象のアプリケーションに対して命令を発行する必要があるのですが、これが、activateさせるとかバージョン番号を調べるぐらいのコマンドではそのまま実行されてしまって、セキュリティダイアログは表示されません。

せめて新規ドキュメントを作成(make new document)して破棄(close without saving)するぐらいのことを行わないと、ダメなようです。このあたり、実際に試してみるしかないようです。

■セキュリティダイアログを表示させる程度の意味のない(ウォームアップのための)Scriptサンプル

tell application "Microsoft Excel"
  set aDoc to (make new document)
  
close active workbook without saving
end tell

★Click Here to Open This Script 

tell application "Keynote"
  set aDoc to (make new document)
  
close aDoc without saving
end tell

★Click Here to Open This Script 

tell application "Finder"
  make new Finder window
  
close Finder window 1
end tell

★Click Here to Open This Script 

–Touch Barの有無の検出
on detectTouchBar()
  tell application "System Events"
    set frontApp to first application process whose frontmost is true
    
try
      set touchBar to first UI element of frontApp whose role is "AXFunctionRowTopLevelElement"
    on error errMsg number errNum
      return false
    end try
    
    
set touchBarItems to value of attribute "AXChildren" of touchBar
    
return (touchBarItems is not equal to {})
  end tell
end detectTouchBar

★Click Here to Open This Script 

対象アプリケーションに対してコマンドを実行し、Securityダイアログが表示され、ユーザーによってきちんと認証されれば、tccKitを用いて認証状況を確認して、すべてのアプリケーションの認証完了状態をAppleScriptから知ることができます。

AppleScriptアプリケーションの冒頭(applicationWillFinishLaunchingイベントハンドラなど)でtccKitによって認証状態をチェックし、未認証の状態であれば操作対象のアプリケーションに対して試験的にコマンドを実行するようにすればよいでしょう。

AppleScriptアプリケーションがCode Signされていれば、セキュリティ認証ダイアログでユーザー認証する必要があるのは初回のみです。現在、Xcode上でGUIアプリケーションをビルドするためにはApple Developper Accountが必須となっているため、この点は必然的にクリアされることになります。

なお、この認証フローにおいてアプリケーション自体がSandbox化されている必要はありません(確認ずみ)。

Posted in AppleScript Application on Xcode GUI Security | Tagged 10.14savvy | 2 Comments

ZipZapで指定アーカイブをメモリ上で展開して指定ファイルのみ取り出す

Posted on 1月 11, 2019 by Takaaki Naganoya

オープンソースのZipZapをCocoa Framework化したものを呼び出して、指定のZipアーカイブをメモリ上で展開し、指定ファイルの内容を取り出すAppleScriptです。

–> ZipZap.framework(To ~/Library/Frameworks/)

ZipアーカイブでAppleScriptを固めておいて、XcodeのAppleScriptアプリケーションのプロジェクト中に入れておき、指定ファイルのScriptをZipアーカイブから取り出して実行するときに使っています。

ZipZapはXcode Projectに入れてよし、Cocoa Frameworkに入れて呼び出してよし、と自分にとってたいへんに使い勝手のよい部品であり、重要なパーツになっています。

AppleScript名:ZipZapで指定アーカイブをメモリ上で展開して指定ファイルのみ取り出す
— Created 2019-01-11 by Takaaki Naganoya
— 2019 Piyomaru Software
use AppleScript version "2.4"
use scripting additions
use framework "Foundation"
use framework "ZipZap" –https://github.com/pixelglow/ZipZap
use framework "OSAKit"
use BPlus : script "BridgePlus" –https://www.macosxautomation.com/applescript/apps/BridgePlus.html

property |NSURL| : a reference to current application’s |NSURL|
property ZZArchive : a reference to current application’s ZZArchive
property OSAScript : a reference to current application’s OSAScript

set anArchive to POSIX path of (choose file of type {"public.zip-archive"})
set aRes to extractArchiveAndPickupAFile(anArchive, "", "02_script.scpt") of me

on extractArchiveAndPickupAFile(aPath, aPass, aTargFileName)
  set oldArchive to ZZArchive’s archiveWithURL:(|NSURL|’s fileURLWithPath:aPath) |error|:(missing value)
  
set aList to oldArchive’s entries() as list
  
  set outList to {}
  
  repeat with i in aList
    set encF to i’s encrypted() as boolean
    
set aFileName to (i’s fileName())
    
    if (aFileName as string) = aTargFileName then
      
      set aExt to (aFileName’s pathExtension()) as string
      
set aUTI to my retFileFormatUTI(aExt)
      
set aData to (i’s newDataWithError:(missing value)) –Uncompressed raw data
      
      if aData = missing value then
        set aData to (i’s newDataWithPassword:(aPass) |error|:(missing value))
        
if aData is equal to (missing value) then
          return false
        end if
      end if
      
      if aUTI = "public.plain-text" then
        –Plain Text
        
set aStr to (NSString’s alloc()’s initWithData:aData encoding:(NSUTF8StringEncoding)) as string
        
      else if aUTI = "com.apple.applescript.script" then
        –AppleScript .scpt file
        
set aScript to (OSAScript’s alloc()’s initWithCompiledData:aData |error|:(missing value))
        
set aStr to (aScript’s source()) as string
        
      end if
      
return aStr
      
    end if
  end repeat
  
end extractArchiveAndPickupAFile

on retFileFormatUTI(aExt as string)
  tell script "BridgePlus"
    load framework
    
return (current application’s SMSForder’s UTIForExtension:aExt) as string
  end tell
end retFileFormatUTI

★Click Here to Open This Script 

Posted in file File path OSA Text UTI | Tagged 10.11savvy 10.12savvy 10.13savvy 10.14savvy | Leave a comment

Illustratorで指定のartboardの名称を取得する

Posted on 1月 11, 2019 by Takaaki Naganoya

Adobe Illustratorで指定のartboardの名称を取得するAppleScriptです。

本来であれば、Illustratorのdocument以下のartboardの名称を取得するのであれば、

tell application "Adobe Illustrator"
  set aName to name of artboard 1 of document 1
end tell

★Click Here to Open This Script 

で取得できる「はず」ですが、実際にAdobe Illustratorに対してこれを実行するとエラーになります(Adobe Illustrator CC2018=Adobe Illustrator v22.1にて実行)。

これは、Adobeがいいかげんな実装を行って、出荷前に一切のチェックを行わないためです。100% Adobeのせいです。

ちなみに、このproperty値からnameをIllustratorへのtellブロック外で取得すると、

のようになります。エラーメッセージの文字列としては取得できることがわかります。エラーメッセージのダイアログではAdobe IllustratorのAppleScript用語辞書の予約語を用いて表示が行われていますが、実際にエラーメッセージを(Adobe Illustratorのtellブロック外で)文字列として取得すると、用語辞書が用いられないので生のAppleEventの文字列を相手にすることになります。

というわけで、手段をえらばずにエラーメッセージから名前を取り出してみました。任意のアートボードのプロパティ値を取得してgetArtboardNameFromPropertiesを呼び出すと、アートボード名を抽出します。なお、動作原理の都合上、アートボード名にダブルクォートを含まないようにしてください。

こんなイレギュラーでトリッキーなやり方が必要なのは、Adobeの開発者がバカだからです(本当に)。心の底から軽蔑します(artboardのnameを取得する場合には、部分的にJavaScriptを呼び出して実行してもOK、というかその方法が推奨されます)。

AppleScript名:アートボードの名前を取得する
—
–  Created by: Takaaki Naganoya
–  Created on: 2019/01/11
—
–  Copyright © 2019 Piyomaru Software, All Rights Reserved
—
use AppleScript version "2.4" — Yosemite (10.10) or later
use framework "Foundation"
use scripting additions

tell application "Adobe Illustrator"
  tell document 1
    tell artboard 1
      set aProp to properties
      
set aName to getArtboardNameFromProperties(aProp) of me
    end tell
  end tell
end tell

on getArtboardNameFromProperties(aProp)
  set beginStr to "«class bAl9»:\""
  
  
try
    set aRec to aProp as string
  on error erM
    set offsetA to offset of beginStr in erM
    
set ermB to text (offsetA + (length of beginStr)) thru -1 of erM
    
set offsetB to offset of "\"" in ermB
    
set resB to text 1 thru (offsetB – 1) of ermB
    
return resB
  end try
  
  
error "Illigal Data Format" –Error
end getArtboardNameFromProperties

★Click Here to Open This Script 

Posted in How To Raw AppleEvent Code | Tagged 10.12savvy 10.13savvy Illustrator | 2 Comments

MacJournalで選択中のエントリの文中からdata detectorで日付を取得して作成日付に反映

Posted on 1月 8, 2019 by Takaaki Naganoya

MacJournalで選択中のjournal entryの文中(plain text content)からData Detector(NSDataDetector)で日付を取得し、初出の日付をjournal entryの作成日付に設定するAppleScriptです。

macOSの不具合情報をMacJournalにスクラップして整理していたところ、記事作成日をjournal entryの作成日付に反映させたいと考え、以前に作ってあったScriptを修正し、Data Detectorで日付情報を抽出するようにしてみました。

なお、複数のjournal entryを選択した状態で実行すると、ループですべての選択中のjournal entryを処理します。

macOS標準搭載のScript Menuに入れて使用しています。

AppleScript名:MacJournalで選択中のエントリの文中からdata detectorで日付を取得して作成日付に反映
— Created 2019-01-08 by Takaaki Naganoya
— 2019 Piyomaru Software
use AppleScript version "2.4"
use scripting additions
use framework "Foundation"

property NSString : a reference to current application’s NSString
property NSDataDetector : a reference to current application’s NSDataDetector

tell application "MacJournal"
  set aSel to selected entries
  
  
repeat with i in aSel
    set j to contents of i
    
set aName to name of j
    
set aDate to date of j
    
set aStr to plain text content of j
    
set aDateList to getDatesIn(aStr) of me
    
    
if aStr is not equal to "" and aDateList is not equal to {} then
      set targDate to contents of (first item of aDateList)
      
try
        set date of j to targDate
      end try
    end if
  end repeat
end tell

on getDatesIn(aString)
  set anNSString to NSString’s stringWithString:aString
  
set {theDetector, theError} to NSDataDetector’s dataDetectorWithTypes:(current application’s NSTextCheckingTypeDate) |error|:(reference)
  
set theMatches to theDetector’s matchesInString:anNSString options:0 range:{0, anNSString’s |length|()}
  
set theResults to theMatches’s valueForKey:"date"
  
return theResults as list
end getDatesIn

★Click Here to Open This Script 

Posted in Calendar Text | Tagged 10.11savvy 10.12savvy 10.13savvy 10.14savvy MacJournal NSDataDetector NSString | Leave a comment

Closure?

Posted on 1月 4, 2019 by Takaaki Naganoya

AppleScriptにClosureがない云々という話を見かけることがあります。JavaScript系の人が言っているのをよく見かけます。

ハンドラ内にさらに入れ子状にハンドラを宣言してプライベートなハンドラとして利用するのがclosureである、という説明を見かけました。

そういうものであれば、明確に存在します。Script文で記述するScript Objectです。

ハンドラ内に記述したScript文でScript Objectの宣言を行い、ハンドラ内でプライベートなサブハンドラを列挙することもできますし、外部に記述して論理分割することもできます。

実際に、巨大なScript同士を(何も考えずに)つないで使うような場合に重宝しています。

プライベートなハンドラをハンドラ内に入れ子状に作成したScript(本サンプルScriptのようなもの)については、たしかにinnerFunc1やinnerFunc2はメイン側(一番外側)からは直接呼び出すことはできないので、プライベートな関数のような扱いを行えます。便利かもしれないし、それほどでもない感じもします。

このあたりは個人の「趣味」の世界なので、そういう構造にしたい人はすればいいし、したくない人はしなければよいのではないでしょうか。

AppleScript名:closure1
set a to mainHander("ABC") of me
–> "ABCABC….ABCABC"

on mainHander(aParameter)
  script aClosure
    
    
on innerFunc1(aParameter)
      set a to aParameter & aParameter
      
return a
    end innerFunc1
    
    
on innerFunc2(aParameter)
      set a to aParameter & "…." & aParameter
      
return a
    end innerFunc2
    
  end script
  
  
set a to innerFunc1(aParameter) of aClosure
  
set b to innerFunc2(a) of aClosure
  
return b
end mainHander

★Click Here to Open This Script 

Cocoaの機能を利用するAppleScriptObjCの宣言を行った場合でも、同様にハンドラ内のScript Object内にさらにプライベートハンドラを記述する記法はコンパイル(=構文確認)を通るようです。

AppleScript名:closure2
—
–  Created by: Takaaki Naganoya
–  Created on: 2019/01/04
—
–  Copyright © 2019 Piyomaru Software, All Rights Reserved
—

use AppleScript version "2.4" — Yosemite (10.10) or later
use framework "Foundation"
use scripting additions

set a to mainHander("ABC") of me
–> "ABCABC….ABCABC"

on mainHander(aParameter)
  script aClosure
    
    
on innerFunc1(aParameter)
      set a to aParameter & aParameter
      
return a
    end innerFunc1
    
    
on innerFunc2(aParameter)
      set a to aParameter & "…." & aParameter
      
return a
    end innerFunc2
    
  end script
  
  
set a to innerFunc1(aParameter) of aClosure
  
set b to innerFunc2(a) of aClosure
  
return b
end mainHander

★Click Here to Open This Script 

Posted in How To JavaScript | Tagged 10.11savvy 10.12savvy 10.13savvy 10.14savvy | 1 Comment

指定の1D Listの要素数がaMaxLenに満たない場合には、1D Listの末尾のアイテムでaMaxLenまで埋める

Posted on 1月 3, 2019 by Takaaki Naganoya

指定の1D List(Array)の要素数が指定数に満たない場合には、List末尾のアイテムで指定要素数まで埋めるAppleScriptです。

{"1", "2", "3", "4", "5"}

のようなListがあって、最大数を10と指定してあった場合には、

{"1", "2", "3", "4", "5", "5", "5", "5", "5", "5"}

のように処理します。

AppleScript名:指定の1D Listの要素数がaMaxLenに満たない場合には、1D Listの末尾のアイテムでaMaxLenまで埋める
— Created 2019-01-03 by Takaaki Naganoya
— 2019 Piyomaru Software
use AppleScript version "2.4"
use scripting additions
use framework "Foundation"

set aList to {"11111", "22222", "33333", "44444", "55555"}
set aaList to fillByLastItemToMaxItems(aList, 6) of me
–> {"11111", "22222", "33333", "44444", "55555", "55555"}

–指定の1D Listの要素数がaMaxLenに満たない場合には、1D Listの末尾のアイテムでaMaxLenまで埋める
on fillByLastItemToMaxItems(aList as list, aMaxLen as integer)
  set aLen to length of aList
  
if aLen is not equal to aMaxLen then
    set anItem to contents of last item of aList
    
repeat aMaxLen – aLen times
      set the end of aList to anItem
    end repeat
  end if
  
  
return aList
end fillByLastItemToMaxItems

★Click Here to Open This Script 

Posted in list | Tagged 10.11savvy 10.12savvy 10.13savvy 10.14savvy | Leave a comment

指定の1D Listでゼロが入っていたら末尾のゼロの前の要素で埋める

Posted on 1月 3, 2019 by Takaaki Naganoya

指定の1D List(Array)でゼロが入っていたら、末尾のゼロの前の要素で埋めるAppleScriptです。

{"1", "2", "3", "4", "0", "0"}

のようなリストがあった場合に、

{"1", "2", "3", "4", "4", "4"}

のような処理を行います。

AppleScript名:指定の1D Listでゼロが入っていたら末尾のゼロの前の要素で埋める
— Created 2019-01-03 by Takaaki Naganoya
— 2019 Piyomaru Software
use AppleScript version "2.4"
use scripting additions
use framework "Foundation"

set aList to {"11111", "22222", "33333", "44444", "0", "0"}
set abList to fillByLastItemIfZero(aList)
–> {"11111", "22222", "33333", "44444", "44444", "44444"}

–指定の1D Listでゼロが入っていたらゼロの前の要素で埋める
on fillByLastItemIfZero(aList as list)
  set aLen to length of aList
  
set bList to {}
  
set prevDat to -1
  
  
set aFirst to (contents of first item of aList) as string
  
if aFirst = "0" then error "First Item is 0 in a list"
  
  
repeat with i in aList
    set aTmp to i as string
    
    
if aTmp = "0" then
      copy prevDat to aTmp
    else
      copy aTmp to prevDat
    end if
    
    
set the end of bList to aTmp
  end repeat
  
  
return bList
end fillByLastItemIfZero

★Click Here to Open This Script 

Posted in list | Tagged 10.11savvy 10.12savvy 10.13savvy 10.14savvy | Leave a comment

1D Listのうち指定文字種(複数指定可)で構成される要素のみ抽出 v2

Posted on 1月 1, 2019 by Takaaki Naganoya

1D List(配列)に入れた文字要素を文字種類で該当するものだけ抽出するAppleScriptの改良版です。

プログラムを見ていただくとわかるとおり、

 数字:”9″
 英字:”A”
 半角記号:”$”
 ひらがな:”ひ”
 カタカナ:”カ”
 漢字:”漢”

で文字種類を指定します。

ルーチンは2種類用意しており、

filterByMultipleCharKindStrictly:文字種別を判定して指定文字種のみから構成されるものを抽出(厳密に文字種別を遵守)
filterByMultipleCharKind:文字種別を判定して指定文字種のみから構成されるものを抽出

前者は複数の文字種リストを指定したら、その文字種リストと等しいパターンの文字列だけを抽出します。
後者は複数の文字種リストを指定したら、その文字種のうちどれかだけで構成される文字列だけを抽出します。

 {"Naganoya", "ながのや", "ナガノヤ", "長野谷", "ぴよまるソフトウェア", "ぴよまるSoftware", "Piyomaru12345", "123456789", "ぴよまる1234"} 

  
という文字列を与え、

{"ひ", "カ"}--Hiragana, Katakana

  
という抽出パターンを指定すると、

filterByMultipleCharKindStrictly --> {"ぴよまるソフトウェア"}
filterByMultipleCharKind --> {"ながのや", "ナガノヤ"}

  
のように抽出します。

スピードを考えなければ、機能は実用レベルにあると思われます。

高速化する場合には、

(1)Cocoaの機能を一切使わない(小さいデータを小分けにしてCocoaの機能を呼び出しているので、Cocoaの機能を使って高速化するのに最悪の処理パターンになっている。データ量のわりに時間がかかる。むしろCocoaの機能を使わない方が高速)

(2)Cocoaで一括処理できるように検討する(NSPredicatesで文字種別を同時に指定して抽出するなど)

といったところでしょうか。長い割にはそんなによくないプログラムですね。機能すること以外に取り柄がないというか、、、

AppleScript名:1D Listのうち指定文字種(複数指定可)で構成される要素のみ抽出 v2
—
–  Created by: Takaaki Naganoya
–  Created on: 2019/01/01
—
–  Copyright © 2019 Piyomaru Software, All Rights Reserved
—
use AppleScript version "2.4"
use scripting additions
use framework "Foundation"

property NSArray : a reference to current application’s NSArray
property NSString : a reference to current application’s NSString
property NSScanner : a reference to current application’s NSScanner
property NSNumber : a reference to current application’s NSNumber
property NSDictionary : a reference to current application’s NSDictionary
property NSOrderedSet : a reference to current application’s NSOrderedSet
property NSCountedSet : a reference to current application’s NSCountedSet
property NSCharacterSet : a reference to current application’s NSCharacterSet
property NSMutableArray : a reference to current application’s NSMutableArray
property NSSortDescriptor : a reference to current application’s NSSortDescriptor
property NSNumberFormatter : a reference to current application’s NSNumberFormatter
property NSMutableCharacterSet : a reference to current application’s NSMutableCharacterSet
property NSRegularExpressionSearch : a reference to current application’s NSRegularExpressionSearch
property NSNumberFormatterRoundUp : a reference to current application’s NSNumberFormatterRoundUp
property NSStringTransformFullwidthToHalfwidth : a reference to current application’s NSStringTransformFullwidthToHalfwidth

set aList to {"Naganoya", "ながのや", "ナガノヤ", "長野谷", "ぴよまるソフトウェア", "ぴよまるSoftware", "Piyomaru12345", "123456789", "ぴよまる1234"} –Alphabet, Hiragana, Katakana, Kanji, Hiragana+Katakana, Hiragana + Alphabet, Alphabet + Numeric, Numeric

set aRes to filterByMultipleCharKind(aList, {"A"}) of me –アルファベットで構成される要素のみ抽出
–> {"Naganoya"}

set bRes to filterByMultipleCharKind(aList, {"ひ"}) of me –ひらがなだけで構成される要素のみ抽出
–> {"ながのや"}

set cRes to filterByMultipleCharKind(aList, {"カ"}) of me –カタカナだけで構成される要素のみ抽出
–> {"ナガノヤ"}

set dRes to filterByMultipleCharKind(aList, {"漢"}) of me –漢字だけで構成される要素のみ抽出
–> {"長野谷"}

set eRes1 to filterByMultipleCharKindStrictly(aList, {"ひ", "カ"}) of me –ひらがな+カタカナで構成される要素のみ抽出
–> {"ぴよまるソフトウェア"}

set eRes2 to filterByMultipleCharKind(aList, {"ひ", "カ"}) of me –ひらがな or カタカナ だけで構成される要素のみ抽出
–> {"ながのや", "ナガノヤ"}

set fRes1 to filterByMultipleCharKindStrictly(aList, {"A", "9"}) of me –Alphabet + Numericだけで構成される要素のみ抽出
–> {"Piyomaru12345"}

set fRes2 to filterByMultipleCharKind(aList, {"A", "9"}) of me –Alphabet or Numericだけで構成される要素のみ抽出
–> {"Naganoya", "123456789"}

set gRes1 to filterByMultipleCharKindStrictly(aList, {"ひ", "9"}) of me –Hiragana + Numericだけで構成される要素のみ抽出
–> {"ぴよまる1234"}

–文字種別を判定して指定文字種のみから構成されるものを抽出(厳密に文字種別を遵守)
on filterByMultipleCharKindStrictly(aList as list, targCharKindList as list)
  set dList to {}
  
set paramList to sort1DStringList(targCharKindList, true) of me
  
  
repeat with i in aList
    set j to contents of i
    
set tmpPat to retAtrPatternFromStr(j) of me
    
if tmpPat is equal to paramList then
      set the end of dList to j
    end if
  end repeat
  
  
return dList
end filterByMultipleCharKindStrictly

–文字種別を判定して指定文字種のみから構成されるものを抽出
on filterByMultipleCharKind(aList as list, targCharKindList as list)
  set dList to {}
  
  
repeat with i in aList
    set j to contents of i
    
set tmpPat to retAtrPatternFromStr(j) of me
    
if tmpPat is in targCharKindList then
      set the end of dList to j
    end if
  end repeat
  
  
return dList
end filterByMultipleCharKind

–Objective-Cライクなパラメータ記述
on makeUniqueListOf:theList
  set theSet to NSOrderedSet’s orderedSetWithArray:theList
  
return (theSet’s array()) as list
end makeUniqueListOf:

–Pure AS風のパラメータ記述
on makeUniqueListFrom(theList)
  set aList to my makeUniqueListOf:theList
  
return aList
end makeUniqueListFrom

–1D Listを文字列長でソート v2
on sort1DListByStringLength(aList as list, sortOrder as boolean)
  set aArray to NSArray’s arrayWithArray:aList
  
set desc1 to NSSortDescriptor’s sortDescriptorWithKey:"length" ascending:sortOrder
  
set desc2 to NSSortDescriptor’s sortDescriptorWithKey:"self" ascending:true selector:"localizedCaseInsensitiveCompare:"
  
set bArray to aArray’s sortedArrayUsingDescriptors:{desc1, desc2}
  
return bArray as list of string or string
end sort1DListByStringLength

–1D List(文字)をsort / ascOrderがtrueだと昇順ソート、falseだと降順ソート
on sort1DStringList(theList as list, aBool as boolean)
  set aDdesc to NSSortDescriptor’s sortDescriptorWithKey:"self" ascending:aBool selector:"localizedCaseInsensitiveCompare:"
  
set theArray to NSArray’s arrayWithArray:theList
  
return (theArray’s sortedArrayUsingDescriptors:{aDdesc}) as list
end sort1DStringList

–文字種別の判定
on retAtrPatternFromStr(aText as string)
  set b1List to {"9", "A", "$", "漢", "ひ", "カ"} –数字、アルファベット、記号、全角漢字、全角ひらがな、全角カタカナ
  
  
set outList to {}
  
set cList to characters of (aText)
  
  
repeat with i in cList
    set j to contents of i
    
    
set chk1 to ((my chkNumeric:j) as integer) * 1
    
set chk2 to ((my chkAlphabet:j) as integer) * 2
    
set chk3 to ((my chkSymbol:j) as integer) * 3
    
set chk4 to ((my chkKanji:j) as integer) * 4
    
set chk5 to ((my chkHiragana:j) as integer) * 5
    
set chk6 to ((my chkKatakana:j) as integer) * 6
    
    
set itemVal to (chk1 + chk2 + chk3 + chk4 + chk5 + chk6)
    
    
–if itemVal > 0 then
    
set aVal to (contents of item itemVal of b1List)
    
    
if aVal is not in outList then
      set the end of outList to aVal
    end if
    
–end if
  end repeat
  
  
set out2List to sort1DStringList(outList, true) of me
  
  
return out2List
end retAtrPatternFromStr

–全角→半角変換
on zenToHan(aStr)
  set aString to NSString’s stringWithString:aStr
  
return (aString’s stringByApplyingTransform:(NSStringTransformFullwidthToHalfwidth) |reverse|:false) as string
end zenToHan

–数字か
on chkNumeric:checkString
  set digitCharSet to NSCharacterSet’s characterSetWithCharactersInString:"0123456789"
  
set ret to my chkCompareString:checkString baseString:digitCharSet
  
return ret as boolean
end chkNumeric:

–記号か
on chkSymbol:checkString
  set muCharSet to NSCharacterSet’s alloc()’s init()
  
muCharSet’s addCharactersInString:"$\"!~&=#[]._-+`|{}?%^*/’@-/:;(),"
  
set ret to my chkCompareString:checkString baseString:muCharSet
  
return ret as boolean
end chkSymbol:

–漢字か
on chkKanji:aChar
  return detectCharKind(aChar, "[一-龠]") of me
end chkKanji:

–ひらがなか
on chkHiragana:aChar
  return detectCharKind(aChar, "[ぁ-ん]") of me
end chkHiragana:

–カタカナか
on chkKatakana:aChar
  return detectCharKind(aChar, "[ァ-ヶ]") of me
end chkKatakana:

–半角スペースか
on chkSpace:checkString
  set muCharSet to NSCharacterSet’s alloc()’s init()
  
muCharSet’s addCharactersInString:" " –半角スペース(20h)
  
set ret to my chkCompareString:checkString baseString:muCharSet
  
return ret as boolean
end chkSpace:

— アルファベットか
on chkAlphabet:checkString
  set aStr to NSString’s stringWithString:checkString
  
set allCharSet to NSMutableCharacterSet’s alloc()’s init()
  
allCharSet’s addCharactersInRange:({location:97, |length|:26}) –97 = id of "a"
  
allCharSet’s addCharactersInRange:({location:65, |length|:26}) –65 = id of "A"
  
set aBool to my chkCompareString:aStr baseString:allCharSet
  
return aBool as boolean
end chkAlphabet:

on chkCompareString:checkString baseString:baseString
  set aScanner to NSScanner’s localizedScannerWithString:checkString
  
aScanner’s setCharactersToBeSkipped:(missing value)
  
aScanner’s scanCharactersFromSet:baseString intoString:(missing value)
  
return (aScanner’s isAtEnd()) as boolean
end chkCompareString:baseString:

on detectCharKind(aChar, aPattern)
  set aChar to NSString’s stringWithString:aChar
  
set searchStr to NSString’s stringWithString:aPattern
  
set matchRes to aChar’s rangeOfString:searchStr options:(NSRegularExpressionSearch)
  
if matchRes’s location() = (current application’s NSNotFound) or (matchRes’s location() as number) > 9.99999999E+8 then
    return false
  else
    return true
  end if
end detectCharKind

★Click Here to Open This Script 

Posted in list Text | Tagged 10.11savvy 10.12savvy | Leave a comment

Post navigation

  • Older posts
  • Newer posts

電子書籍(PDF)をオンラインストアで販売中!

Google Search

Popular posts

  • 開発機としてM2 Mac miniが来たのでガチレビュー
  • macOS 15, Sequoia
  • Pages本執筆中に、2つの書類モード切り替えに気がついた
  • Numbersで選択範囲のセルの前後の空白を削除
  • メキシカンハットの描画
  • Pixelmator Pro v3.6.4でAppleScriptからの操作時の挙動に違和感が
  • AppleScriptによる並列処理
  • macOS 15でも変化したText to Speech環境
  • Safariで「プロファイル」機能を使うとAppleScriptの処理に影響
  • デフォルトインストールされたフォント名を取得するAppleScript
  • AppleScript入門③AppleScriptを使った「自動化」とは?
  • 【続報】macOS 15.5で特定ファイル名パターンのfileをaliasにcastすると100%クラッシュするバグ
  • macOS 15 リモートApple Eventsにバグ?
  • Script Debuggerの開発と販売が2025年に終了
  • AppleScript入門① AppleScriptってなんだろう?
  • macOS 14で変更になったOSバージョン取得APIの返り値
  • macOS 15:スクリプトエディタのAppleScript用語辞書を確認できない
  • NSObjectのクラス名を取得 v2.1
  • 有害ではなくなっていたSpaces
  • AVSpeechSynthesizerで読み上げテスト

Tags

10.11savvy (1101) 10.12savvy (1242) 10.13savvy (1391) 10.14savvy (587) 10.15savvy (438) 11.0savvy (283) 12.0savvy (212) 13.0savvy (198) 14.0savvy (151) 15.0savvy (140) CotEditor (66) Finder (51) Keynote (119) NSAlert (61) NSArray (51) NSBitmapImageRep (20) NSBundle (20) NSButton (34) NSColor (53) NSDictionary (28) NSFileManager (23) NSFont (21) NSImage (41) NSJSONSerialization (21) NSMutableArray (63) NSMutableDictionary (22) NSPredicate (36) NSRunningApplication (56) NSScreen (30) NSScrollView (22) NSString (119) NSURL (98) NSURLRequest (23) NSUTF8StringEncoding (30) NSView (33) NSWorkspace (20) Numbers (76) Pages (55) Pixelmator Pro (20) Safari (44) Script Editor (27) WKUserContentController (21) WKUserScript (20) WKWebView (23) WKWebViewConfiguration (22)

カテゴリー

  • 2D Bin Packing
  • 3D
  • AirDrop
  • AirPlay
  • Animation
  • AppleScript Application on Xcode
  • Beginner
  • Benchmark
  • beta
  • Bluetooth
  • Books
  • boolean
  • bounds
  • Bug
  • Calendar
  • call by reference
  • check sum
  • Clipboard
  • Cocoa-AppleScript Applet
  • Code Sign
  • Color
  • Custom Class
  • date
  • dialog
  • diff
  • drive
  • Droplet
  • exif
  • file
  • File path
  • filter
  • folder
  • Font
  • Font
  • GAME
  • geolocation
  • GUI
  • GUI Scripting
  • Hex
  • History
  • How To
  • iCloud
  • Icon
  • Image
  • Input Method
  • Internet
  • iOS App
  • JavaScript
  • JSON
  • JXA
  • Keychain
  • Keychain
  • Language
  • Library
  • list
  • Locale
  • Localize
  • Machine Learning
  • Map
  • Markdown
  • Menu
  • Metadata
  • MIDI
  • MIME
  • Natural Language Processing
  • Network
  • news
  • Noification
  • Notarization
  • Number
  • Object control
  • OCR
  • OSA
  • parallel processing
  • PDF
  • Peripheral
  • process
  • PRODUCTS
  • QR Code
  • Raw AppleEvent Code
  • Record
  • rectangle
  • recursive call
  • regexp
  • Release
  • Remote Control
  • Require Control-Command-R to run
  • REST API
  • Review
  • RTF
  • Sandbox
  • Screen Saver
  • Script Libraries
  • sdef
  • search
  • Security
  • selection
  • shell script
  • Shortcuts Workflow
  • Sort
  • Sound
  • Spellchecker
  • Spotlight
  • SVG
  • System
  • Tag
  • Telephony
  • Text
  • Text to Speech
  • timezone
  • Tools
  • Update
  • URL
  • UTI
  • Web Contents Control
  • WiFi
  • XML
  • XML-RPC
  • イベント(Event)
  • 未分類

アーカイブ

  • 2025年7月
  • 2025年6月
  • 2025年5月
  • 2025年4月
  • 2025年3月
  • 2025年2月
  • 2025年1月
  • 2024年12月
  • 2024年11月
  • 2024年10月
  • 2024年9月
  • 2024年8月
  • 2024年7月
  • 2024年6月
  • 2024年5月
  • 2024年4月
  • 2024年3月
  • 2024年2月
  • 2024年1月
  • 2023年12月
  • 2023年11月
  • 2023年10月
  • 2023年9月
  • 2023年8月
  • 2023年7月
  • 2023年6月
  • 2023年5月
  • 2023年4月
  • 2023年3月
  • 2023年2月
  • 2023年1月
  • 2022年12月
  • 2022年11月
  • 2022年10月
  • 2022年9月
  • 2022年8月
  • 2022年7月
  • 2022年6月
  • 2022年5月
  • 2022年4月
  • 2022年3月
  • 2022年2月
  • 2022年1月
  • 2021年12月
  • 2021年11月
  • 2021年10月
  • 2021年9月
  • 2021年8月
  • 2021年7月
  • 2021年6月
  • 2021年5月
  • 2021年4月
  • 2021年3月
  • 2021年2月
  • 2021年1月
  • 2020年12月
  • 2020年11月
  • 2020年10月
  • 2020年9月
  • 2020年8月
  • 2020年7月
  • 2020年6月
  • 2020年5月
  • 2020年4月
  • 2020年3月
  • 2020年2月
  • 2020年1月
  • 2019年12月
  • 2019年11月
  • 2019年10月
  • 2019年9月
  • 2019年8月
  • 2019年7月
  • 2019年6月
  • 2019年5月
  • 2019年4月
  • 2019年3月
  • 2019年2月
  • 2019年1月
  • 2018年12月
  • 2018年11月
  • 2018年10月
  • 2018年9月
  • 2018年8月
  • 2018年7月
  • 2018年6月
  • 2018年5月
  • 2018年4月
  • 2018年3月
  • 2018年2月

https://piyomarusoft.booth.pm/items/301502

メタ情報

  • ログイン
  • 投稿フィード
  • コメントフィード
  • WordPress.org

Forum Posts

  • 人気のトピック
  • 返信がないトピック

メタ情報

  • ログイン
  • 投稿フィード
  • コメントフィード
  • WordPress.org
Proudly powered by WordPress
Theme: Flint by Star Verte LLC