Menu

Skip to content
AppleScriptの穴
  • Home
  • Products
  • Books
  • Docs
  • Events
  • Forum
  • About This Blog
  • License
  • 仕事依頼

AppleScriptの穴

Useful & Practical AppleScript archive. Click '★Click Here to Open This Script' Link to download each AppleScript

タグ: 10.14savvy

Macの製品名を求める(M1以降対応)v1a

Posted on 7月 29, 2021 by Takaaki Naganoya

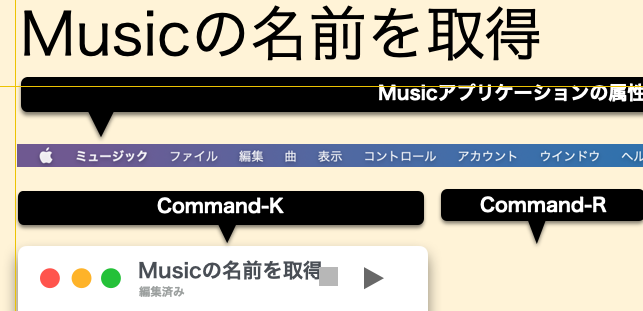
実行中のMacの製品名を求めるAppleScriptです。もともと、AppleScriptで作成して使用しているアイデアプロセッサ「Kamenoko」で行っている処理なのですが、

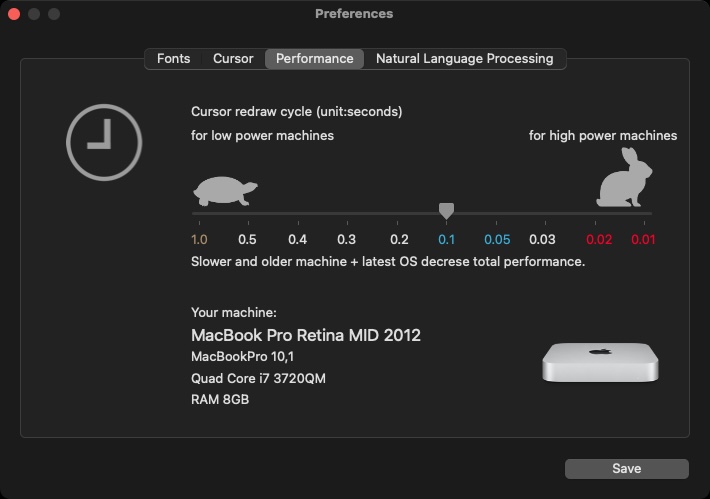
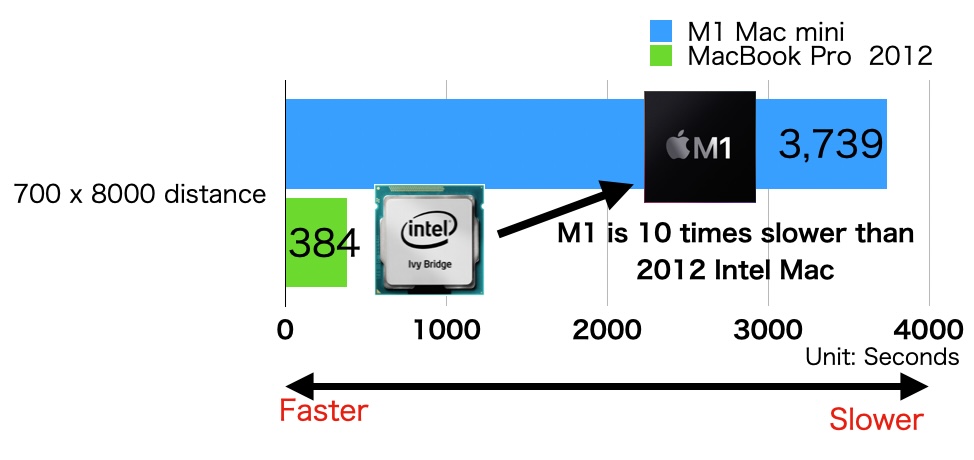
M1上で実行すると、製品名は間違えるわ、仕様は合っていないわで散々でした。あ、マシンのアイコンは取ってきていますね。その他のデータはマシン移行をしたときにそのまま前のマシンのデータが残っていたためでしょう。

調べてみると、M1 Macでは従来どおりの製品名データを持っていないようで、Intel Macでは取得できていた製品の名前をわかりやすく記述するデータがありません。各国語にローカライズされていて便利だったのですが。

そこで、M1 MacかどうかのCPUタイプ検出を行い、そのうえで処理を分けることにしました。動作原理上、購入してセットアップしたてのマシンでこのファイルが存在しているかどうか、検証が必要だと思います。

AppleScript名:Macの製品名を求める(M1以降対応)v1a.scpt
—
–  Created by: Takaaki Naganoya
–  Created on: 2021/07/28
—
–  Copyright © 2021 Piyomaru Software, All Rights Reserved
—
use AppleScript version "2.7" — macOS 10.13 or later
use framework "Foundation"
use scripting additions

set hRes to retModelName() of me
–> "Mac mini (M1, 2020)"–macOS 11.5
–> "Mac mini Intelデュアルコアプロセッサおよび統合型グラフィックス搭載、2014年後期に投入。"–macOS 12beta
–> "15インチMacBook Pro, Retinaディスプレイ, Intel Core i7 (Mid 2012)"–macOS 10.14.6

on retModelName()
  set cRes to CPU type of (system info)
  
  
if cRes begins with "ARM" then
    –Apple Silicon Mac
    
set sText to "defaults read ~/Library/Preferences/com.apple.SystemProfiler.plist" & " ’CPU Names’ | cut -sd ’\"’ -f 4"
    
set hRes to do shell script sText
    
return hRes
  else if cRes begins with "Intel" then
    –Intel Mac
    
set hRes to retModelInfo() of me
    
return hRes
  end if
end retModelName

on retModelInfo()
  tell application "System Events"
    set osVersion to system version of (system info)
  end tell
  
— macOS 10.15.3 –> 15
  
  
considering numeric strings
    if osVersion ≥ "10.15" then
      –macOS 11.0以降
      
set pListPath to "/System/Library/PrivateFrameworks/ServerInformation.framework/" & "Versions/A/Resources/ja.lproj/SIMachineAttributes.plist"
    else if osVersion > "10.14" then
      –macOS 10.14まで
      
set pListPath to "/System/Library/PrivateFrameworks/ServerInformation.framework/" & "Versions/A/Resources/Japanese.lproj/SIMachineAttributes.plist"
    end if
  end considering
  
  
set aRec to retDictFromPlist(pListPath) of me
  
set hwName to (do shell script "sysctl -n hw.model")
  
set aMachineRec to retRecordByLabel(aRec, hwName) of me
  
set aMachineRec2 to first item of aMachineRec
  
return |description| of _LOCALIZABLE_ of aMachineRec2
end retModelInfo

on retDictFromPlist(aPath)
  set thePath to current application’s NSString’s stringWithString:aPath
  
set thePath to thePath’s stringByExpandingTildeInPath()
  
set theDict to current application’s NSDictionary’s dictionaryWithContentsOfFile:thePath
  
return theDict as record
end retDictFromPlist

on retRecordByLabel(aRec as record, aKey as string)
  set aDic to current application’s NSDictionary’s dictionaryWithDictionary:aRec
  
set aVal to aDic’s valueForKey:aKey
  
return aVal as list
end retRecordByLabel

on retRecordByKeyPath(aRec as record, aKey as string)
  set aDic to current application’s NSDictionary’s dictionaryWithDictionary:aRec
  
set aVal to aDic’s valueForKeyPath:aKey
  
return aVal
end retRecordByKeyPath

–1D Listを文字列長でソート v2
on sort1DListByStringLength(aList as list, sortOrder as boolean)
  set aArray to current application’s NSArray’s arrayWithArray:aList
  
set desc1 to current application’s NSSortDescriptor’s sortDescriptorWithKey:"length" ascending:sortOrder
  
set desc2 to current application’s NSSortDescriptor’s sortDescriptorWithKey:"self" ascending:true selector:"localizedCaseInsensitiveCompare:"
  
set bArray to aArray’s sortedArrayUsingDescriptors:{desc1, desc2}
  
return bArray as anything
end sort1DListByStringLength

★Click Here to Open This Script 

Posted in System | Tagged 10.13savvy 10.14savvy 10.15savvy 11.0savvy 12.0savvy | Leave a comment

targetが重複しているFinder Windowをクローズする

Posted on 7月 22, 2021 by Takaaki Naganoya

日常的に生じている不満を解消するための、ちょっとしたかき捨てScript……になるはずだったものです。

Classic Mac OSからMac OS Xへの移行後、Finderの仕様で大きく変わった点が1つあります。「同じフォルダのウィンドウを複数枚オープンできるようになった」点です。

その結果、

といったように、同じフォルダを指し示すウィンドウが何枚もたまる現象が起きています。これは別にバグでも不具合でもありません。仕様です。

この重複Windowを掃除するためのScriptを書いてみました。

AppleScript名:ターゲットが同じWindowを取得(未遂).scpt
tell application "Finder"
  tell window 1
    set aTarg to target
  end tell
  
  
set wList to every window whose target  is equal to aTarg
end tell

★Click Here to Open This Script 

何も考えずに書き始めると、こんな(↑)感じでしょう。ただ、このScriptは動きません。フィルター参照は、たとえばファイル名や拡張子、ファイル種別(kind)あたりには使えるものの、この「target」属性に対しては効きません。

そこで、仕方なくちょっと腰をすえて書いてみました。これ(↓)を動かすと、

のように重複ウィンドウが一掃されます。これでいいはずです。

AppleScript名:targetが重複しているFinder Windowをクローズする.scpt
—
–  Created by: Takaaki Naganoya
–  Created on: 2021/07/22
—
–  Copyright © 2021 Piyomaru Software, All Rights Reserved
—

set clList to {}

tell application "Finder"
  set wList to every window
  
–> {Finder window id 1775 of application "Finder", Finder window id 1612 of application "Finder", Finder window id 1740 of application "Finder", Finder window id 1641 of application "Finder", Finder window id 1630 of application "Finder", Finder window id 1618 of application "Finder", Finder window id 1599 of application "Finder", Finder window id 1592 of application "Finder", Finder window id 1586 of application "Finder", Finder window id 1580 of application "Finder", Finder window id 1575 of application "Finder", Finder window id 1569 of application "Finder", Finder window id 1563 of application "Finder"}
  
  
set tList to (target of every window) as alias list
  
–> {alias "Macintosh HD:Users:me:Public:ドロップボックス:", alias "Macintosh HD:Users:me:Documents:AppleScript 12.0:", alias "Macintosh HD:Users:me:Public:ドロップボックス:", alias "Macintosh HD:Users:me:Public:ドロップボックス:", alias "Macintosh HD:Users:me:Public:ドロップボックス:", alias "Macintosh HD:Users:me:Public:ドロップボックス:", alias "Macintosh HD:Users:me:Public:ドロップボックス:", alias "Macintosh HD:Users:me:Public:ドロップボックス:", alias "Macintosh HD:Users:me:Public:ドロップボックス:", alias "Macintosh HD:Users:me:Public:ドロップボックス:", alias "Macintosh HD:Users:me:Public:ドロップボックス:", alias "Macintosh HD:Users:me:Public:ドロップボックス:", alias "Macintosh HD:Users:me:Public:ドロップボックス:"}
  
  
–ターゲットフォルダをユニーク化
  
set bList to removeDuplicates(tList) of me
  
–> {alias "Macintosh HD:Users:me:Documents:AppleScript 12.0:", alias "Macintosh HD:Users:me:Public:ドロップボックス:"}
  
  
–ユニーク化したターゲットでループ
  
repeat with i in bList
    set j to (contents of i) as alias
    
set firstF to true
    
    
–ウィンドウでループ
    
repeat with ii in wList
      set jj to contents of ii
      
set tmpTarg to (target of jj) as alias
      
      
if tmpTarg is equal to j then
        –最初の1つ目のWindowだけ残す
        
if firstF = true then
          set firstF to false
        else
          –2個目以降のWindowはクローズ対象リストに入れる
          
set the end of clList to jj
        end if
      end if
    end repeat
  end repeat
  
  
–クローズ対象とされるFinder Windowを順次クローズ
  
repeat with i in clList
    set j to contents of i
    
try
      ignoring application responses
        close j
      end ignoring
    end try
  end repeat
end tell

on removeDuplicates(aList)
  set newList to {}
  
repeat with i from 1 to (length of aList)
    set anItem to item 1 of aList
    
set aList to rest of aList
    
if {anItem} is not in aList then set end of newList to anItem
  end repeat
  
return newList
end removeDuplicates

★Click Here to Open This Script 

edama2さんがコメント欄に投稿してくださったプログラムを掲載しておきます。自分が「安全のためにこのぐらいの処理は必要(かも?)」と付けまくった処理を「それ別に実際のところ必要ないんじゃない?」と省略された感じです。

あとは、edama2さんのScriptだと「最前面のWindowのtargetと同じtargetを持つWindowをクローズする」という動作ですが、自分のScriptは「targetが重複しているWindowは1つを残してあとすべてをクローズする」という動作を行うので、厳密にいえば違うものです。

AppleScript名:targetが重複しているFinder Windowをクローズする v2.scpt
–  Created by: edama2
–  Created on: 2021/07/22

tell application "Finder"
  tell front window
    set aTarg to target
  end tell
  
set aList to (every Finder window) as list
  
repeat with num from 2 to count aList
    set anItem to (aList)’s item num
    
if (anItem’s target is aTarg) then close anItem
  end repeat
end tell

★Click Here to Open This Script 

Posted in folder | Tagged 10.14savvy 10.15savvy 11.0savvy 12.0savvy Finder | 1 Comment

macOS 11, AppleScriptをFirestormではなくIcestormで実行か?!

Posted on 6月 22, 2021 by Takaaki Naganoya

M1 Mac miniで各種AppleScript系のベンチマークをとってみたところ、信じられないほど遅く、「どうやらAppleScriptを高性能コア(Firestorm)ではなく高効率・省電力コア(Icestorm)」で実行しているのでは? という疑いを持ちました。

# 本件はmacOS 12で修正されました

10倍遅いというとショッキングな数値に見えますが、問題はこれが「まだマシな方」の結果であり、トータルで77倍遅い処理があったりと、目を疑いたくなるような結果のオンパレードです。

そんな中、アクティビティモニタの「ウィンドウ」>「CPUの履歴」で各CPUコアの履歴とともに種別が表示されることが判明。Icestormには「効率性」、Firestormには「パフォーマンス」とコアごとの種別が表示されます。

冗談抜きで、AppleScriptがIcestormで(効率性コア)実行されているようにしか見えません。

M1 Mac+macOS 11上で各種ベンチマークをとってみたところ、Intel Mac+macOS 10.14よりも大幅にパフォーマンスが低下する例が頻発。NSMutableArrayに21万項目の項目を追加するベンチマーク(5回計測して平均値を計算)を走らせてみたところ、

 MacBook Pro Retina 2012(Intel Core i7 2.6GHz、macOS 10.14.6):8.69秒
 Mac mini M1 2020(M1 3.2GHz、macOS 11.5beta):104.25秒

M1 MacがIntel Mac(しかも2012年のマシン)の77倍も処理時間がかかるという結果が出ています。このため、AppleScriptをFirestormではなくIcestormで動かしているのではないか、と疑っていました。

とくに、M1ではAppleScriptのrandom number(乱数計算)コマンドが極端に遅く、これを使ってテスト用に乱数データを作ると腰が抜けるほど時間がかかります。シーケンシャル値の続く配列を作ってGamePlaykit.frameworkを用いてシャッフルするのがよさそうです。ただ、本当にM1でrandom number計算は遅くなります。

700箇所の位置情報をもとに、日本全国の最寄りの鉄道駅を計算する距離計算を行なったところ、M1 Mac miniでは2012年製のMacBook Pro Retina 2012の10倍処理時間がかかりました。MBPで6分かかるところがM1だと1時間かかりました。

GUIアプリケーションにちょこちょこ命令するだけとかいう、「単なるマクロ言語」としての世界観(小乗AppleScript)で使う分にはよいのですが、アプリケーションに依存せず単体でデータ処理を行なったり、Mac App Storeで販売するGUIアプリケーションまで記述して実行しているわけで、Icestormで実行してほしくはありません。

Intel Macで6分あまりの処理にM1 Macでは60分以上かかっており、2012年のマシンに比べて2021年製の最新鋭のマシンがまさに文字通り「桁違いの遅さ」を見せているのが現状です。

実行中のアクティビティモニタの表示を見ると、高性能コア(Firestorm)への負荷はあまりかかっておらず、逆に高効率コア(Icestorm)への負荷が集中していることが見て取れます。

Intel Mac上で実行中には、4コア8スレッドのIntel Core i7の各コア(4コア)に均等に負荷がかかっていることが見て取れました。

M1 Mac miniの基本性能の高さはグラフィック性能やディスクI/O性能を中心に実証されているため、あくまでOS側の「味付け」の問題が原因と見ています。

AppleScriptが単なる「GUIアプリケーションをちょこっと自動化するだけのお可愛らしいマクロ言語」なのであれば、Icestormで実行するという話も悪くはないでしょう。ただ、Mac App Storeで販売しているGUIアプリケーションから各種データ処理を行うシビアな処理を行う処理系でもあり、やはり2012年のIntelマシンの10倍とか77倍遅いという現状は面白くはありません。

Posted in news | Tagged 10.14savvy 11.0savvy | Leave a comment

M1 Mac miniのベンチマーク 1万要素の1次元配列ソート

Posted on 6月 21, 2021 by Takaaki Naganoya

M1 Mac miniを使ってみて、「なーんかMacBook Pro Retina 2012とかわんねーなー」と感じていましたが、本当にそんな感じでした。

# 後日、詳細に検証したところM1 Mac+macOS 11.xではAppleScriptからのCocoa呼び出しが大幅に遅くなっていることが判明。処理性能重視のメインCPUコアではなく、省エネのサブCPUコアで実行されていることがわかり、これをAppleにレポートしてmacOS 12からはAppleScript+Cocoa呼び出しの処理速度が大幅に改善されました

Webブラウザの動作とかディスクI/Oなど、キビキビ動いて快適なのですが、AppleScriptを書いて動かしてみると……GUIアプリの操作は速い(Mac mini 2014比で2〜3倍速い)のですが、Cocoa Scriptingしていると速くなった感じがしません。

Xcode上でCocoa AppleScriptアプリケーションを書いて動かしてみると、冒頭のような感想になります。

机の上にマシンが5台ぐらい並んでおり、これらすべてでベンチマークを実施。体感速度を裏付ける結果が出ました。

# MacBook Air 2011のベンチマーク計測が抜けていました、、、、

上から3番目のマシンは仲間からの借り物の検証用マシンで、前主力環境のMacBook Pro Retina 2012とは別物で、HDDで動作しているマシンです。macOS 10.15の動作確認用マシンで、MacBook Pro Retina 2012よりも少しCPUが速いマシンでもあります。

なので、MacBook Pro Retina 2012をmacOS 10.15にアップデートすると、ほぼこれと同じ結果になるはずです(もったいなくてアップデートしませんが)。

macOS 10.14から10.15に移行したときに「全体的に速度が遅くなった」との証言をShane Stanleyからももらっています。

全体的な傾向として、「macOS 10.15で大幅な速度低下があり、その低下分をM1 Macのハードウェアとしての速さが穴埋めしている」という印象。macOS 10.15はBeta段階で「こんなのはダメ、使い物にならない」と判断し、パスして10.14を使い続けるという判断を行なっていました。

搭載メモリはM1 Mac miniとMac mini 2014が16GB、MacBook Pro 2012とMacBook Pro Retina 2012が8GBです。

AppleScript名:ASで1D Listをソート(1万件)
use AppleScript version "2.7"
use framework "Foundation"
use scripting additions

script spd
  property aList : {}
  
property aRes : {}
  
property bRes : {}
end script

set (aRes of spd) to {}
set (bRes of spd) to {}

–テスト用データリストの作成(1万アイテム)
set (aList of spd) to {}
repeat with i from 1 to 10000
  set the end of (aList of spd) to (random number from 10000 to 99999)
end repeat

–昇順ソートの時間計測
set a1Dat to current application’s NSDate’s timeIntervalSinceReferenceDate()

set (aRes of spd) to sort1DList_ascOrder_((aList of spd), true)

set b1Dat to current application’s NSDate’s timeIntervalSinceReferenceDate()

set c1Dat to b1Dat – a1Dat

–降順ソートの時間計測
set a2Dat to current application’s NSDate’s timeIntervalSinceReferenceDate()

set (bRes of spd) to sort1DList_ascOrder_((aList of spd), false)

set b2Dat to current application’s NSDate’s timeIntervalSinceReferenceDate()
set c2Dat to b2Dat – a2Dat

return {c1Dat, c2Dat}

–1D Listをsort / ascOrderがtrueだと昇順ソート、falseだと降順ソート
on sort1DList:theList ascOrder:aBool
  set aDdesc to current application’s NSSortDescriptor’s sortDescriptorWithKey:"self" ascending:aBool selector:"compare:"
  
set theArray to current application’s NSArray’s arrayWithArray:theList
  
return (theArray’s sortedArrayUsingDescriptors:{aDdesc}) as list
end sort1DList:ascOrder:

★Click Here to Open This Script 

Posted in Sort | Tagged 10.14savvy 10.15savvy 11.0savvy | Leave a comment

STREAM DECKソフトウェアがv5.0にアップデート

Posted on 6月 9, 2021 by Takaaki Naganoya

STREAM DECK制御ソフトウェアがv5.0にアップデートしました。

プラグインのストアが大幅にアップデートしました。

STREAM DECK本の作成のために行なっていた、画面のキャプチャをやり直す必要が出てきてしまいました(泣)。著作権フリーなBGM集とSFX集をStoreからダウンロードできるようになるなど、製品の性格自体が大きく変わるアップデートだと思います。

Posted in Books | Tagged 10.14savvy 10.15savvy 11.0savvy Stream Deck | Leave a comment

NSDataのdescriptionの形式がmacOS 10.15で変更された

Posted on 5月 20, 2021 by Takaaki Naganoya

文字列データのhexdumpを表示させようとして、予期しない結果が返ってきたので原因を追求してみました。

問題の発生源はNSDataのdescriptionを取得した箇所。

--> "<e38182e3 8184e381 86e38188 e3818a>"--macOS 10.14.6
--> "{length = 15, bytes = 0xe38182e38184e38186e38188e3818a}"--macOS 10.15.7
--> "{length = 15, bytes = 0xe38182e38184e38186e38188e3818a}"--macOS 11.4

macOS 10.15で、この結果を返すさいの記述が変更になったようです。descriptionからhex値を取得するのは、たしかに「裏技」っぽい解決策。

データが長くなると、

{length = 60, bytes = 0xe38182e3 8184e381 86e38188 e3818ae3 ... 81a4e381 a6e381a8 }

のように途中が省略されるので、データを小分けにして処理する必要があります。

AppleScript名:dataのdescription.scptd
—
–  Created by: Takaaki Naganoya
–  Created on: 2021/05/20
—
–  Copyright © 2021 Piyomaru Software, All Rights Reserved
—   
–  Don’t remove this header!!!

use AppleScript version "2.4" — Yosemite (10.10) or later
use framework "Foundation"
use scripting additions

set aStr to current application’s NSString’s stringWithString:"あいうえお"
set aDat to aStr’s dataUsingEncoding:(current application’s NSUTF8StringEncoding)
set bStr to aDat’s |description|() as string
–> "<e38182e3 8184e381 86e38188 e3818a>"–macOS 10.14.6
–> "{length = 15, bytes = 0xe38182e38184e38186e38188e3818a}"–macOS 10.15.7
–> "{length = 15, bytes = 0xe38182e38184e38186e38188e3818a}"–macOS 11.x

★Click Here to Open This Script 

Shane Stanleyからメールで「debugDescriptionだと従来のdescriptionと同じ結果が得られるよ」と教えてもらいました(Thanks Shane!)。

AppleScript名:hexdumpTest.scptd
–By Shane Stanley 2021/05/21
use AppleScript version "2.7"
use framework "Foundation"
use scripting additions

set a to "あいうえおかきくけこさしすせそたちつてと"
set aStr to current application’s NSString’s stringWithString:a
set aDat to aStr’s dataUsingEncoding:(current application’s NSUTF8StringEncoding)
set bStr to aDat’s |debugDescription|() as string
–> <e38182e3 8184e381 86e38188 e3818ae3 818be381 8de3818f e38191e3 8193e381 95e38197 e38199e3 819be381 9de3819f e381a1e3 81a4e381 a6e381a8>

★Click Here to Open This Script 

Posted in Text | Tagged 10.14savvy 10.15savvy 11.0savvy NSData | 1 Comment

Apple Musicが2021年6月から高音質化、空間オーディオ対応

Posted on 5月 18, 2021 by Takaaki Naganoya

サブスクリプション(月額固定費用)サービスのApple Musicの全曲が、「6月からロスレスオーディオのApple Lossless Audio Codec(ALAC)に対応し、一部ではDolby Atmos空間オーディオに対応した楽曲が利用可能になる」とのこと。噂では聞いていましたが、話半分ぐらいで聞いていました。

目下作成中で完成間近の「ミュージック.app Scripting Book With AppleScript」、「書いていないことはない」と自分が胸を張って送り出そうとしている本ですが、当然のようにこの発表に影響を受けます。

こちらで、iTunes Storeで購入した楽曲の詳細情報と、Apple Musicからダウンロードしてきた曲の詳細情報を比較しているのですが……

6/1になったら、再度確認してアップデートする必要がありそうです。この表自体はAppleScriptで、「AppleScriptの実行結果をNumbersの表にまとめる」という処理を行なっているため、作り直してもそれほど作業は発生しないのですが(自動化しておいてよかった!)、まー、反映しておかないとマズイ情報であることに代わりはありません。

Codecが変わるだけだと思われるので、拡張子やらファイル呼称が変わったりすることはなさそうですが、ファイルのサイズが巨大化しそうでそのあたりどーなるのか? 目下、.m4p形式のファイルをローカルにダウンロードできるようになっていますが、そこが変わるのか変わらないのか。

高音質化しても違いがわからない人向けに、従来どおりのCodecでダウンロード/ストリーミングさせるオプションがあるような気もします。6月にMusic.app自体のアップデートもあると見るべきでしょうか。

Posted in news | Tagged 10.14savvy 10.15savvy 11.0savvy iTunes Music | Leave a comment

LAN上のdaapクライアントの共有名をリストアップ v2

Posted on 5月 12, 2021 by Takaaki Naganoya

LAN上のdaap(Music/iTunesライブラリ共有)サービス名を検出するAppleScriptです。

LAN上の他のマシンで動作中のサービス名を収集します。AppleScriptを実行している自機のサービスは除外しています。

他のフォーラムへの無断転載、および転載時にもヘッダー部分を削除することを厳禁します。

AppleScript名:LAN上のdaapクライアントの共有名をリストアップ v2.scptd
—
–  Created by: Takaaki Naganoya
–  Created on: 2021/05/11
—
–  Copyright © 2021 Piyomaru Software, All Rights Reserved
—   http://piyocast.com/as/
—
–  ** You are allowed to use this AppleScript with holding this header comment **
–  ** Don’t re-post this script to other forums without this header comment **
–  ** I’m very angry with removing header comment **

use AppleScript version "2.4"
use scripting additions
use framework "Foundation"
use framework "AppKit"

property foundList : {}
property myHostNames : {}
property services : {}
property comingF : false
property resolveF : false

set mList to findHostsViaBonjour("_daap._tcp", "") of me
–> {"Takaaki Naganoya のライブラリ", "ぴよぴよ ライブラリ"}

on findHostsViaBonjour(aType as string, aDomain as string)
  set my foundList to {}
  
set my comingF to true
  
set my resolveF to false
  
set my myHostNames to (current application’s NSHost’s currentHost()’s names()) as list
  
–> {"MacMini2014.local", "macmini2014.local", "localhost"}
  
  
set aBrowser to current application’s NSNetServiceBrowser’s alloc()’s init()
  
aBrowser’s setDelegate:me
  
aBrowser’s searchForServicesOfType:aType inDomain:aDomain
  
  
repeat 100 times
    if my comingF = false then
      if my foundList is not equal to {} then exit repeat
    end if
    
delay 0.01
  end repeat
  
  
repeat 100 times
    if my resolveF = false then
      if my foundList is not equal to {} then exit repeat
    end if
    
delay 0.01
  end repeat
  
  
aBrowser’s setDelegate:(missing value)
  
return (my foundList)
end findHostsViaBonjour

–searchForServicesOfTypeのdelegate
on netServiceBrowser:aNetServiceBrowser didFindService:aNetService moreComing:aMoreComing
  copy (aMoreComing as boolean) to my comingF
  
set my resolveF to true
  
aNetService’s setDelegate:me
  
set cInfo to aNetService’s resolveWithTimeout:3
end netServiceBrowser:didFindService:moreComing:

–NetService’s resolveWithTimeoutのdelegate
on netServiceDidResolveAddress:aSender
  set cDesc to (aSender’s |name|()) as string
  
set dDesc to (aSender’s |hostName|()) as string
  
aSender’s |stop|() –すげー大事
  
  
set dDesc to repChar(dDesc, ".local.", ".local") of me
  
  
if dDesc is not in (my myHostNames) then
    set the end of (my foundList) to cDesc
  end if
end netServiceDidResolveAddress:

–文字置換
on repChar(origText as string, targChar as string, repChar as string)
  set curDelim to AppleScript’s text item delimiters
  
set AppleScript’s text item delimiters to targChar
  
set tmpList to text items of origText
  
set AppleScript’s text item delimiters to repChar
  
set retText to tmpList as string
  
set AppleScript’s text item delimiters to curDelim
  
return retText
end repChar

★Click Here to Open This Script 

Posted in Network | Tagged 10.14savvy 10.15savvy 11.0savvy NSHost NSNetService NSNetServiceBrowser | Leave a comment

ScriptDebugger v8が正式リリースに

Posted on 5月 8, 2021 by Takaaki Naganoya

Late Night SoftwareからAppleScriptの統合開発環境、ScriptDebugger v8が正式リリースされました。日本語の表示、入力について問題ありません。そして、日本語で問題が出ないということから、同様のCJK(Chinese, Japanese, Korean)言語環境環境でも問題はないことでしょう。

■v8の対応環境

macOS 10.14.6、10.15.7、11.x
Intel Mac/M1 Mac(Apple Silicon Mac)

■v8の新機能

・Apple Silicon(M1 Mac)へのネイティブ対応
・Dark Mode対応

・macOS 11.x対応。Applet書き出し時にCodeSign Localを実行、notarizingを実行
・バージョン管理
・アプリケーション書き出し時の各種設定が「環境設定」ウィンドウに「Building」タブとして新設された

■v8の変更点

・Bundle IDの変更
SD7 Bundle ID: com.latenightsw.ScriptDebugger7
SD8 Bundle ID: com.latenightsw.ScriptDebugger8

・Enhanced Appletのランタイム・プログラム名の変更(要注意)
SD7:FancyDroplet
SD8:FancyDropletFat

ただし、SD8でもmacOS 10.14.x、10.15.x上でアプレット(Enhanced)書き出しを行ったさいには、ランタイム名は「FancyDroplet」になるとのこと。あくまで、macOS 11.x+SD8でアプレット(Enhanced)書き出しを行ったさいに「FancyDropletFat」になる。

・Bundle Script編集時の表示ルートディレクトリ
SD7:/Contents/Resources/
SD8:/Contents/

■v7→v8で変更されていない仕様

・20日の試用期間ののちLiteモードで動作。一部の機能が制限される
・「as anything」は「as any」と解釈される
・AppleScriptのメインスレッド実行機能なし(Script側でメインスレッド実行の記述を追加して対処。ここだけmacOS標準装備のスクリプトエディタの併用が欠かせない)

Posted in news | Tagged 10.14savvy 10.15savvy 11.0savvy Script Debugger | Leave a comment

Keynoteで現在のスライドのタイトルを指定の文字ではじまるテキストアイテムにコピーする

Posted on 5月 3, 2021 by Takaaki Naganoya

Keynoteの最前面の書類の現在表示中のスライド(ページ)のタイトルを、指定の文字ではじまるテキストアイテムにコピーするAppleScriptです。

Music.app本にプログラムリストを2x Retina表示のスクリーンキャプチャで掲載してみたところ、書き出したPDFのファイルサイズが巨大になりすぎたり、後処理で圧縮したら一律に画像が荒くなったりで、画像で掲載することをあきらめてKeynoteのオブジェクトでそれっぽく組み立てて掲載することにしました。

その際に、Keynoteオブジェクトで作ったプログラムリストっぽい何かのタイトル部分を一律にダミー文字を入れておいたので、各ページのタイトルを入れてみることにしました。

AppleScript名:現在のスライドのタイトルを指定の文字ではじまるテキストアイテムにコピーする.scptd
—
–  Created by: Takaaki Naganoya
–  Created on: 2021/05/03
—
–  Copyright © 2021 Piyomaru Software, All Rights Reserved
—

use AppleScript version "2.4" — Yosemite (10.10) or later
use framework "Foundation"
use scripting additions

tell application "Keynote"
  tell front document
    tell current slide
      set tList to every text item whose object text starts with "あああああ" –抽出条件
      
set titleStr to (object text of default title item) as string
      
      
repeat with i in tList
        set j to contents of i
        
set object text of j to titleStr
      end repeat
      
      
(*
      –サイズを自動で調整してみる???
      repeat with i in tList
        set {xPos, yPos} to position of i
        set aHeight to height of i
        set aWidth to width of i
        
        set oList to every shape
        set pList to position of every shape
      end repeat
      *)

    end tell
  end tell
end tell

★Click Here to Open This Script 

Posted in Text | Tagged 10.14savvy 10.15savvy 11.0savvy Keynote | Leave a comment

未知の予約語

Posted on 5月 3, 2021 by Takaaki Naganoya

AppleScript implementors MLの過去ログを漁っていたら、2006年に作られた資料へのリンクを見つけました。

–> AppleScript Terminology and Apple Event Codes

誰が作った資料かはわかりませんが、AppleEventの4文字コードのコンフリクトが起こらないように、AppleEventコードを調べること、すでにこのような予約語があるのでScriptableなアプリケーションで同様に使えということが目的だったようです。

読んでみると、すでに廃止になったAppleScript Studioの予約語はともかくとして、AppleScript Languageレベルの予約語でも、けっこう知らない予約語があります。

一時期騒ぎになった「linked list」とか「vector」といった予約語は記憶に新しいところですが、構文確認をパスする用語の多いこと多いこと。

無意味語として分類すべきなのか悩ましいものがけっこうあって、驚かされます。C StringsとかPascal Stringsといった予約語もそうですが、見たことのないものばかりです。一部、度量衡の予約語が紛れ込んでいますが、それをのぞいてもけっこう知らないものばかりです。

知っていたからといって自慢できるという種類のものでもなさそうですが、先を見越しすぎたものの実現しなかった「RGB16 color」とか「RGB96 color」あたりが黒歴史案件でしょう。「extended real」あたりで桁数の制限の多い数値型を拡張してもらえたらよさそうなんですが……。

AppleScript系で黒歴史的な予約語といえば、CPU Typeの「Intel 80486」でしょうか。つまり、その頃はMotorola系のCPUを使っていたはずの時期ですが、その時期にi80486で動いていたハードウェアの上でClassic MacOSが動き、その上でAppleScriptの処理系が動いていたことを示唆するもの(?)なわけで……Intel CPU上にCLassic MacOSを移植する「Startrek」プロジェクトの残骸だと(勝手に)考えるとなかなか楽しいものがあります。

AppleScript名:未知の予約語.scpt
text flow
text flows

writing code info
writing code infos
color table

color
condensed
RGB color
RGB colors
C string
C strings

reals
data size

type element info

encoded string
encoded strings
constant
constants
PostScript picture
type event info
event
events

extended real
feet
fixed
font
fixed point
fixed rectangle

file specification
file specifications
full
gallons
type class info
event info
suite info
handler
handlers
hyphens
location reference
floating
zoomable
international text
caps lock down

reference form
reference forms

key kind
modifiers

dates

left

long fixed rectangle
long fixed
linked lists

integers

list or record
long point
long rectangle

machines
unsigned integer

machine location
number or date
negate
no
references

off styles
on styles

outline
ounces

plain

language code

type parameter info

prepositions
print length

script code
writing code

Pascal string
Pascal strings
bounding rectangle

class info
quarts

records
subscript

scripts
shadow

small integer
small real
superscript
strikethrough

styled text
type suite info

styled Unicode text
dash style

pixel map record
RGB16 color
RGB96 color

text style info
text style infos

underline
uniform styles
vector
vectors

application dictionary

system dictionary
booleans

★Click Here to Open This Script 

Posted in sdef | Tagged 10.14savvy 10.15savvy 11.0savvy | Leave a comment

Pixelmator Proで指定の画像を複数の3D LUTを用いてカラー調整して画像書き出し

Posted on 5月 2, 2021 by Takaaki Naganoya

Pixelmator Pro v2.0.8で追加された3D LUT(Look Up Table)によるカラー調整機能。これを用いて、複数の3D LUTファイルによるカラー調整を行い、それぞれ3D LUTファイルのファイル名を反映させて書き出すAppleScriptです。

3D LUTファイルは、探してみるとあちこちで配布されており、割とありふれた存在のようです。実際にフリー配布されている3D LUTファイルをダウンロードしてきて、1つのフォルダに入れておき、指定画像に対してカラー調整を行わせてみました。

–> [全てフリー!] シネマティックなルックになる10のLUTsを紹介します!!

フォルダに入っている3D LUTファイルをすべてループで処理するので、3D LUTファイル100個でも1,000個でも処理できますし、ちょっと書き換えれば複数の画像に対してそれぞれすべての3D LUTファイルによる色調整を実行するようにもできます。

AppleScript名:指定の画像を複数の3D LUTでカラー調整して画像書き出し.scpt
—
–  Created by: Takaaki Naganoya
–  Created on: 2020/05/02
—
–  Copyright © 2020 Piyomaru Software, All Rights Reserved
—
use AppleScript version "2.4" — Yosemite (10.10) or later
use framework "Foundation"
use scripting additions

property |NSURL| : a reference to current application’s |NSURL|
property NSArray : a reference to current application’s NSArray
property NSPredicate : a reference to current application’s NSPredicate
property NSURLTypeIdentifierKey : a reference to current application’s NSURLTypeIdentifierKey

–処理対象の画像を選択
set anImage to choose file of type {"public.image"} default location (path to pictures folder) with prompt "Select Proc Image"
set imgParent to getParentPathFromAlias(anImage) of me

–3D LUTファイルを入れてあるフォルダを選択
set lutFolder to choose folder with prompt "Select 3D LUT folder"

–Filter 3D LUT (.cube) files only
tell application "Finder"
  set fList to (every file of folder lutFolder) as alias list
end tell

set lutList to getFilesWithUTI("com.blackmagicdesign.cube", fList) of me

–指定の画像ファイルをオープン
tell application "Pixelmator Pro"
  close every document saving no
  
open anImage
end tell

–Main Loop
repeat with i in lutList
  set aLut to contents of i
  
  
–ファイルパスの加工処理
  
set newImgName to ((current application’s NSString’s stringWithString:(POSIX path of aLut))’s lastPathComponent()’s stringByDeletingPathExtension()’s stringByAppendingString:".jpg") as string
  
set newImgFullPath to (imgParent as string) & "/" & newImgName
  
set newImgFile to POSIX file newImgFullPath
  
  
tell application "Pixelmator Pro"
    activate
    
tell front document
      tell color adjustments of first layer –ここだけ、ネスティングを分割するとエラーになる
        set its custom lut to aLut
      end tell
      
      
export to newImgFullPath as JPEG with properties {compression factor:0.5, bits per channel:8}
      
undo
    end tell
  end tell
end repeat

–後片付け
tell application "Pixelmator Pro"
  tell front document
    close without saving
  end tell
end tell

on getParentPathFromAlias(aliasPath)
  set aPath to POSIX path of aliasPath
  
set pathString to current application’s NSString’s stringWithString:aPath
  
set newPath to pathString’s stringByDeletingLastPathComponent()
  
return newPath
end getParentPathFromAlias

on getFilesWithUTI(acceptUTI, aliasList)
  set aList to {}
  
  
repeat with i in aliasList
    set anAlias to i as alias
    
set aUTI to getUTIfromPath(anAlias) of me
    
if aUTI is not equal to missing value then
      set uRes to filterUTIList({aUTI}, acceptUTI) of me
      
      
if uRes is not equal to {} then
        set the end of aList to contents of i
      end if
    end if
  end repeat
  
  
return aList
end getFilesWithUTI

–AliasからUTIを求める
on getUTIfromPath(anAlias)
  set aPOSIXpath to POSIX path of anAlias
  
set aURL to current application’s |NSURL|’s fileURLWithPath:aPOSIXpath
  
if aURL = missing value then return missing value
  
set aRes to aURL’s resourceValuesForKeys:{current application’s NSURLTypeIdentifierKey} |error|:(missing value)
  
if aRes = missing value then return missing value
  
return (aRes’s NSURLTypeIdentifierKey) as string
end getUTIfromPath

–UTIリストが指定UTIに含まれているかどうか演算を行う
on filterUTIList(aUTIList, aUTIstr)
  set anArray to NSArray’s arrayWithArray:aUTIList
  
set aPred to NSPredicate’s predicateWithFormat_("SELF UTI-CONFORMS-TO %@", aUTIstr)
  
set bRes to (anArray’s filteredArrayUsingPredicate:aPred) as list
  
return bRes
end filterUTIList

★Click Here to Open This Script 

Posted in Color file File path Image | Tagged 10.14savvy 10.15savvy 11.0savvy Pixelmator Pro | Leave a comment

Pixelmator Pro がv2.0.8で3D LUTをサポート

Posted on 5月 2, 2021 by Takaaki Naganoya

Pixelmator Proがv2.0.5からv2.0.8にバージョンアップして、3D LUT(Look Up Table)をサポートしました。

自分は知らなかったのですが、映像や画像の処理時に、色の明度カーブをテーブルで置き換えることで、色の調子を整えたり、「●●っぽい色(光)使い」のデータを他の映像/画像データに統一的に適用させたりと、カラーフィルタ的なものをプログラムではなくデータで表現したもの、と理解しました。カラーコレクション系の技術というか手法で、調べてみるとnVidiaとかAdobeとか、そういう会社が関わってきたようで。

3D LUTのファイル(拡張子「.cube」)のUTIを確認したところ、”com.blackmagicdesign.cube”。ビデオ編集関連のハードウェア/ソフトウェアでさまざまな製品を世に送り出しているBlackMagic Designが仕様の策定を行っているのでしょうか。

この3D LUTをPixelmator Proがサポート。42個のLUTをアプリケーション内で持っているほか、外部の3D LUTファイルを指定することも、Pixelmator書類から3D LUTを生成して書き出すこともできるようです。

AppleScript用語辞書的には、「export as lut」コマンドを新設したことと、「color adjustments」コマンドに「custom lut」を指定するオプションを追加しています。

AppleScript名:現在オープン中の写真に指定のLUTを反映させる.scpt
–Pixelmator Pro用語辞書内に掲載されているサンプルを、読みやすいように書き換えた
set lutFile to choose file with prompt "Choose the LUT you’d like to apply to the layer:" of type {"com.blackmagicdesign.cube"}

tell application "Pixelmator Pro"
  tell front document
    tell color adjustments of first layer –ここだけ、ネスティングを分割するとエラーになる
      set its custom lut to lutFile
    end tell
  end tell
end tell

★Click Here to Open This Script 

Githubを調べてみたら、Objective-Cで書かれた「CocoaLUT」というプロジェクトを見つけました。ずいぶん前から(7年以上前から)存在していたようで、自分は寡聞にしてこれを知りませんでした。ひととおり機能に目を通してみると、3D LUTのファイルを読み込んでNSImageにカラー変更を適用するといった処理が行えるようです。AppleScriptからダイレクトにCocoaLUTを呼び出して色変更できそうです。

一応、Pixelmator Proの「謝辞」を見てみたところ、「CocoaLUT」に関する記載はなかったので、Pixelmator Proでこのプロジェクトの成果物を利用しているといったことはなさそうです。

YouTubeにアップしたムービーをご覧いただければわかるように、Pixelmator Proで3D LUTによる色置換処理を行ってみると、とても高速です。

Posted in Color Image | Tagged 10.14savvy 10.15savvy 11.0savvy Pixelmator Pro | Leave a comment

ボツ・お蔵入りした本

Posted on 5月 1, 2021 by Takaaki Naganoya

これまでに、企画してはボツになったりお蔵入りした本は山のように。ここに挙げた本も、その後再検討して形になったものもあれば、塩漬けコースに入ったままのものもあります。

当初、Cocoa Scripting本はえほんシリーズの1つとして、ものすごく入門的に難易度を下げた本にする計画がありました。実際に設計してみると、内容は薄いわ分量は少ないわ、その割に誰でもわかるような内容ではないわで、なかなか辛いものがありました。

この本はボツになりましたが、のちにCocoa Scripting Courseで図を中心に説明するという、ボツになった元の本のコンセプトが引き継がれています(分量を減らすとろくなことにならないので、必要な量を書くことに)。

Cocoa Scripting本については、文章で説明するバージョンも試作してみたのですが、書いているうちにAppleへの恨みつらみを書きなぐっていたり、読んでみると書いた自分でも眠くなったりで大変でした。

NumbersとPagesを連携させる本です。最終的にはNumbers上の住所録をもとにPagesのレイアウト上にデータを差し込んでPDF書き出しするとか、プリンタで印刷するといったレベルを考えていました。これも、えほんシリーズの1冊として考えていたので、分量を抑えるのが大変でした。分量を抑えることは、とても大変です。

ボイスコマンドで音声認識によってAppleScriptを実行する本です。企画内容は悪くないのですが、どの程度のテーマをこなせると読者が納得するのかが設定しにくいところです。もう少し、どのあたりで初心者が詰まるかを調査できると「思いつき」から「企画」のレベルに昇華できるのではないでしょうか。

これは思いつきレベルの内容ですね。企画を出す場合には、1冊分だけでなくシリーズ構成で数冊分を出すことになりますが、その中の1つです。QuickTime Player 7であれば説明する意義と分量があるのですが、現行のQuickTime Playerだとできることが少なくて、なかなか困ります。この本で予定していた内容はCocoa Scripting Course本のNSImage編あたりで反映されることになるでしょう。

えほんシリーズの一環として企画していた頃のFileMaker Pro本です。画面図を中心に少ないページ数で構成すると、「言及しないこと」が多すぎて不満を抱えてしまうことでしょう。結局、えほんシリーズではなく「徹底解説シリーズ」にチェンジして、必要な内容はひととおり説明する方向に変更しました。また、オリジナルの企画どおり画面図を多用してわかりやすく説明するというコンセプトは維持されることに。

iPhoneからMac上のAppleScriptを操作するEntanglerやEventScriptsの解説本です。企画自体は悪くないと思うのですが、レベル設定がなかなか難しい内容です。付録のスクリプトをただiPhoneから実行できるようにする、というあたりが落としどころだと思いますが、スクリプトも何も知らない人に説明するのは大変ですし、スクリプトを知っている人に説明するといってもなかなかレベル設定が困難です(コピペでしか書けない人から、自分ですべて書ける人まで、Scripterといってもさまざまです)。

えほんシリーズのCotEditor本です。説明すべき内容が多くないので、1冊分の分量が多くありません。基礎だけだと32ページにもならないでしょう。なので、企画としては他のScriptableなエディタもまとめて説明するような本になることでしょう。単に企画を練り回している段階ではあるものの、ちょっといい感じになった気がします。

表紙だけ作ってみてなんとなく満足してしまいましたが、Pixelmator Proの操作がよくわからないので(簡単な編集とかAppleScriptから操作してまとまった画像処理を行わせるための部品としてしか使っていない)、「Photoshopで行う操作がPixelmator Proだとどう操作するか、わかるといいのに」と考え、こんな本を表紙だけ作ってみました。自分としては読んでみたいですね。

Posted in Books PRODUCTS | Tagged 10.14savvy 10.15savvy 11.0savvy | Leave a comment

Keynoteの表の背景色がない箇所を白く塗る

Posted on 4月 29, 2021 by Takaaki Naganoya

Keynoteでオープン中の最前面の書類の現在表示中のスライド(ページ)の上にある表の背景色が塗られていないセルを白く塗るAppleScriptです。

一応、非同期処理モードを使うことでスピードを稼いでいますが、この処理は速くありません。非同期処理モードの宣言部分を外した姿が本当のスピードです。

全部一括で塗るとかRangeを指定して塗るといった処理ができるとスピードを稼げると思いますが、「辻褄合わせ」とか「例外」的な処理なので、(Apple側の対応は)あまり期待できないでしょう。


▲処理前


▲処理後

AppleScript名:Keynoteの表の背景色がない箇所を白く塗る
tell application "Keynote"
  tell front document
    tell current slide
      tell table 1
        set cList to every cell
        
repeat with i in cList
          tell i
            set tmpColor to background color
            
if tmpColor = missing value then
              ignoring application responses
                set background color to {65535, 65535, 65535}
              end ignoring
            end if
          end tell
        end repeat
      end tell
    end tell
  end tell
end tell

★Click Here to Open This Script 

Posted in Color list | Tagged 10.14savvy 10.15savvy 11.0savvy Keynote | Leave a comment

Keynoteで現在表示中のスライド上にあるすべての表のカラム幅を自動調整

Posted on 4月 28, 2021 by Takaaki Naganoya

Keynoteで現在オープン中の書類の表示中のスライド(ページ)に存在する表のカラム幅を自動調整するAppleScriptです。


▲スライド上のカラム幅が不揃いの表を….


▲1列目はそのままの幅で、残りは均等割で調整します

AppleScript名:Keynoteで現在表示中のスライド上にあるすべての表のカラム幅を自動調整
— Created 2017-10-06 by Takaaki Naganoya
— 2017 Piyomaru Software
use AppleScript version "2.4"
use scripting additions
use framework "Foundation"

tell application "Keynote"
  tell front document
    tell current slide
      set tList to every table
      
      
repeat with i in tList
        set j to contents of i
        
prepareCoumnWidthInATable(j) of me
      end repeat
    end tell
  end tell
end tell

on prepareCoumnWidthInATable(aTable)
  tell application "Keynote"
    tell aTable
      set cCount to count every column
      
set cWidth to width of every column
      
set aWidth to width –table width
      
      
set aveWidth to (aWidth – (first item of cWidth)) / (cCount – 1)
      
      
tell columns 2 thru cCount
        set width to aveWidth
      end tell
    end tell
  end tell
end prepareCoumnWidthInATable

★Click Here to Open This Script 

Posted in Number | Tagged 10.14savvy 10.15savvy 11.0savvy Keynote | Leave a comment

PDFにファイルサイズ縮小のQuartzフィルタをかけて出力

Posted on 4月 27, 2021 by Takaaki Naganoya

PDFに対して、Quartzフィルタをかけてファイルサイズを縮小する(はずの)AppleScriptです。

macOS標準搭載のPreview.appやColorSyncユーティリティを使うことで、PDFに対して各種Quartzフィルタを適用して加工できるようになっています。


▲/System/Library/Filtersに入っているQuartzフィルタ

フィルタする対象は「book20_Cocoa Scripting Course #03_v1.0_sampler.pdf」(16.7MB)です。

縮小した結果は22.2MB。オリジナルよりも大きくなってしまいました(実施前から分かっていたので、驚きはありません)。このテストはメインマシンのmacOS 10.14.6環境で実施しましたが、macOS 11.4betaの環境で実行してみたら22.1MB。オリジナルよりも大きくなるという意味では大差ありませんでした。

サンプルはKeynote書類から書き出したPDFで、AppleScriptによりTOCを添付してあるものです。Cocoa Scripting Course #3のリリース後も「もうちょっとPDF小さくなるんでは?」と試しています。Adobe Acrobatで縮小することでかなり小さくできることはわかっているものの、Acrobatとは縁を切りたい気持ちでいっぱいです。

色をいじくるフィルタについては問題なく動作しています。

AppleScript名:PDFにファイルサイズ縮小のQuartzフィルタをかけて出力.scptd
— Created 2014-12-26 by Takaaki Naganoya
— Modified 2021-04-27 by Takaaki Naganoya
— 2021 Piyomaru Software
use AppleScript version "2.4"
use scripting additions
use framework "Foundation"
use framework "Quartz"
use framework "QuartzCore"

property QuartzFilter : a reference to current application’s QuartzFilter
property NSDictionary : a reference to current application’s NSDictionary
property PDFDocument : a reference to current application’s PDFDocument

property |NSURL| : a reference to current application’s |NSURL|

set aHFSPath to (choose file of type {"com.adobe.pdf"} with prompt "フィルタするPDFを指定してください")
set aPOSIX to POSIX path of aHFSPath
set aURL to (|NSURL|’s fileURLWithPath:aPOSIX)

set bHFSPath to (choose file name with prompt "出力先を指定してください")
set bPOSIX to POSIX path of bHFSPath

set origPDFdoc to PDFDocument’s alloc()’s initWithURL:aURL

set aFilterURL to |NSURL|’s fileURLWithPath:"/System/Library/Filters/Reduce File Size.qfilter"
set aQFilter to QuartzFilter’s quartzFilterWithURL:aFilterURL

set aDict to NSDictionary’s dictionaryWithObjects:{aQFilter} forKeys:{"QuartzFilter"}

origPDFdoc’s writeToFile:(bPOSIX) withOptions:(aDict)

★Click Here to Open This Script 

Posted in PDF | Tagged 10.14savvy 10.15savvy 11.0savvy | Leave a comment

Piyo Menu Clicker for Stream Deckβ版を配布開始

Posted on 4月 26, 2021 by Takaaki Naganoya

ファイル名にクリックしたいアプリケーション名+メニュー名を書いておくと、そのメニューをクリックする「Piyo Menu Clicker for Stream Deck」のベータ版の配布を開始しました。

→ 配布ページ(@BOOTH)

β版のため2021/5/31までの試用期限を設けています。

旧称Dynamic Menu Clickerの機能強化版で、クリック先をファイル名から取得。メニュー項目の指定にワイルドカードが使えるなど、トグル式のメニュー項目にも対応しています。

Posted in PRODUCTS | Tagged 10.14savvy 10.15savvy 11.0savvy Streamdeck | Leave a comment

Pagesで最前面の書類中のテキストアイテムと本文テキストで文字サイズが最大のもののテキストを求める

Posted on 4月 12, 2021 by Takaaki Naganoya

Pagesの最前面の書類中のテキストアイテム(ボックス)中のテキストと、本文テキスト(body text)で文字サイズが最大のものを取得するAppleScriptです。Pagesで書いた書類からタイトルらしきものを抽出するために書いたものです。

まず、前提条件を書いておかなければなりません。

一般的なDTPアプリケーション(InDesignとか)やワープロであれば、書式スタイルが「タイトル」のテキストを求めるといった処理になりますが、Pagesにはその機能がありません。正確にいえば、PagesのAppleScript用語辞書にはその機能がありません。そこで、「各文書のタイトルには文章中で最大の文字サイズを設定しておく」というルールを自分に課して、文字サイズが最大のものを取得すればタイトル文字列が取得できるように決めておきました。

テキストアイテム中の最大サイズの文字を抽出し、そのあとで本文テキスト(body text)の最大サイズの文字を抽出、両者の間で最大サイズのものを求めて返します。

目下、実際に本を書き出すのに「指定フォルダ以下のPages、Markdown、Word Document、PDFをすべてPDF化してファイル名順でソートして結合」するAppleScriptを作って利用しているのですが、これにTOCつきPDFを書き出す機能を結合できるといいなーと思って書いています。

Keynote書類からTOCつきPDFを書き出すAppleScriptは実戦レベルのものを作って運用しており、これを用いて電子書籍を作っています(逆をいえば、このAppleScriptの開発に成功したのでバカスカ電子書籍を作れているわけで)。

TOCつきPDFをPagesなどの書類群から書き出せるようになれば、PagesやMarkdownで書いた書籍も自動でTOCつきPDFを生成できるわけで、PagesやMarkdown系の書類で作った書籍も手軽に生成できるようになるはずです。

AppleScript名:pagesTitleLib.scptd
—
–  Created by: Takaaki Naganoya
–  Created on: 2020/06/12
–  Modified on: 2021/04/10
—
–  Copyright © 2020 Piyomaru Software, All Rights Reserved
—

use AppleScript version "2.4" — Yosemite (10.10) or later
use framework "Foundation"
use scripting additions

property NSString : a reference to current application’s NSString
property NSCharacterSet : a reference to current application’s NSCharacterSet
property NSMutableArray : a reference to current application’s NSMutableArray

set aRes to pagesTitleGetter() of me
–> "商標、著作権について"

on pagesTitleGetter()
  set tiList to getLargestTextItem() of me –Text Item
  
set bList to getLargestBodyText() of me –Body Text
  
  
if tiList = {} and bList = {} then return ""
  
if tiList = {} and bList ≠ {} then set allList to bList
  
if tiList ≠ {} and bList = {} then set allList to tiList
  
  
set allList to tiList & bList
  
–> {{10.0, "Macrovector – jp.freepik.com によって作成された business ベクトル"}, {16.0, "商標、著作権について"}}
  
  
set allRes to returnMaxItem(allList, 1, 2) of me
  
set bRes to repChar(allRes, string id 10, "") of me
  
set bRes to repChar(bRes, string id 13, "") of me
  
  
return bRes
end pagesTitleGetter

–2D Listのうち、指定アイテム目の最大値をもとめ、その指定アイテムを返す
on returnMaxItem(aList, seekItemNum, retItemNum)
  script spd
    property aList : {}
  end script
  
  
set (aList of spd) to aList
  
  
set tmpMax to 0
  
set tmpItem to 0
  
set aCount to 1
  
repeat with i in (aList of spd)
    set tmpV to item seekItemNum of i
    
if tmpV > tmpMax then
      copy tmpV to tmpMax
      
set tmpItem to aCount
    end if
    
    
set aCount to aCount + 1
  end repeat
  
return item retItemNum of item tmpItem of (aList of spd)
end returnMaxItem

–Pagesの最大文字サイズのText Item中の最大テキストを返す
on getLargestTextItem()
  set rList to {}
  
  
tell application "Pages"
    if not running then return {}
    
if every document = {} then return {}
    
tell front document
      set tmpList to every text item
      
if length of tmpList = 0 then return –テキストアイテムがない場合には処理終了
      
      
set szList to size of object text of every text item
      
if szList is not equal to {} then
        set aMaxPoint to calcMax(szList) of me –最大の文字サイズを取得
        
        
–文字サイズが最大のテキストアイテムを抽出
        
–set resList to object text of every text item whose size of object text is aMaxPoint
        
set resList to every text item whose size of object text is aMaxPoint
        
        
repeat with ii in resList
          –指定のtet item内の文字のサイズをすべて取得
          
set cList to size of every character of object text of ii
          
          
–文字サイズのうち最大のものを取得
          
set cMax to calcMax(cList) of me
          
          
–最大サイズの文字のみ抽出
          
set cRes to (every character of object text of ii whose size = cMax)
          
set cText to cRes as string
          
          
–取得したテキストの前後の改行などを削除してクリーンアップ
          
set c2Text to cleanUpTextFromHEadAndTail(cText) of me
          
          
set c2Text to repChar(c2Text, string id 10, "") of me
          
set c2Text to repChar(c2Text, string id 13, "") of me
          
          
–何か結果が得られていたら、リストに加える
          
if c2Text is not equal to "" then
            set the end of rList to {cMax, c2Text}
          end if
        end repeat
      end if
    end tell
  end tell
  
  
return rList
  
–> {{10.0, "Macrovector – jp.freepik.com によって作成された business ベクトル"}}
end getLargestTextItem

on getLargestBodyText()
  set esList to {}
  
  
tell application "Pages"
    if not running then return {}
    
if every document = {} then return {}
    
tell front document
      set sCount to count every section
      
repeat with i from 1 to sCount
        tell section sCount
          set sList to size of every character of body text
          
if sList is not equal to {} then
            set cMax to calcMax(sList) of me
            
            
–最大サイズの文字のみ抽出
            
set cRes to (every character of body text of it whose size = cMax)
            
set cText to cRes as string
            
            
–取得したテキストの前後の改行などを削除してクリーンアップ
            
set c2Text to cleanUpTextFromHEadAndTail(cText) of me
            
            
set c2Text to repChar(c2Text, string id 10, "") of me
            
set c2Text to repChar(c2Text, string id 13, "") of me


set tmpList to {cMax, c2Text}
            
            
set the end of esList to tmpList
          end if
        end tell
      end repeat
    end tell
  end tell
  
return esList
end getLargestBodyText

on repChar(origText as string, targStr as string, repStr as string)
  set {txdl, AppleScript’s text item delimiters} to {AppleScript’s text item delimiters, targStr}
  
set temp to text items of origText
  
set AppleScript’s text item delimiters to repStr
  
set res to temp as text
  
set AppleScript’s text item delimiters to txdl
  
return res
end repChar

on calcMax(aList as list)
  set nArray to (NSMutableArray’s arrayWithArray:aList)
  
set maxRes to (nArray’s valueForKeyPath:"@max.self")’s doubleValue()
  
return maxRes
end calcMax

on cleanUpTextFromHEadAndTail(aStr)
  set aString to NSString’s stringWithString:aStr
  
set bStr to (aString’s stringByTrimmingCharactersInSet:(NSCharacterSet’s whitespaceAndNewlineCharacterSet()))
  
return bStr as string
end cleanUpTextFromHEadAndTail

★Click Here to Open This Script 

Posted in list | Tagged 10.14savvy 10.15savvy 11.0savvy Pages | 1 Comment

最前面の書類中のテキストアイテムの文字サイズが最大のものの中に入っている最大のテキストを求める

Posted on 4月 10, 2021 by Takaaki Naganoya

以前に作った、Pagesのページ中のテキストアイテムのうち最大文字サイズのものを抽出するAppleScriptの強化版です。その最大文字サイズの文字を含むテキストアイテムの中から、さらに最大文字サイズのテキストを取り出します。

タイトル部分(と思われるテキストアイテム)から、さらに最大文字サイズのものだけを抽出。

用途は、Blog新アーカイブ本の作成時に書類からタイトルを取り出す処理を行えないか実験してみたものです。このページだけ、この例外のデータだったのですが、あとから考えれば文字サイズの小さなサブタイトル的なものは別のテキストアイテム(ボックス)に分ければよかっただろうかと。

AppleScript名:最前面の書類中のテキストアイテムの文字サイズが最大のものの中に入っている最大のテキストを求める.scptd
—
–  Created by: Takaaki Naganoya
–  Created on: 2020/06/12
–  Modified on: 2021/04/10
—
–  Copyright © 2020 Piyomaru Software, All Rights Reserved
—

use AppleScript version "2.4" — Yosemite (10.10) or later
use framework "Foundation"
use scripting additions

property NSString : a reference to current application’s NSString
property NSCharacterSet : a reference to current application’s NSCharacterSet
property NSMutableArray : a reference to current application’s NSMutableArray

set rList to {}

tell application "Pages"
  tell front document
    set tmpList to every text item
    
if length of tmpList = 0 then return –テキストアイテムがない場合には処理終了
    
    
set szList to size of object text of every text item
    
set aMaxPoint to calcMax(szList) of me –最大の文字サイズを取得
    
    
–文字サイズが最大のテキストアイテムを抽出
    
–set resList to object text of every text item whose size of object text is aMaxPoint
    
set resList to every text item whose size of object text is aMaxPoint
    
    
repeat with ii in resList
      –指定のtet item内の文字のサイズをすべて取得
      
set cList to size of every character of object text of ii
      
      
–文字サイズのうち最大のものを取得
      
set cMax to calcMax(cList) of me
      
      
–最大サイズの文字のみ抽出
      
set cRes to (every character of object text of ii whose size = cMax)
      
set cText to cRes as string
      
      
–取得したテキストの前後の改行などを削除してクリーンアップ
      
set c2Text to cleanUpTextFromHEadAndTail(cText) of me
      
      
–何か結果が得られていたら、リストに加える
      
if c2Text is not equal to "" then
        set the end of rList to c2Text
      end if
    end repeat
  end tell
end tell

return rList
–> {"Shane StanleyのScript Toolの変遷"}

on calcMax(aList as list)
  set nArray to (NSMutableArray’s arrayWithArray:aList)
  
set maxRes to (nArray’s valueForKeyPath:"@max.self")’s doubleValue()
  
return maxRes
end calcMax

on cleanUpTextFromHEadAndTail(aStr)
  set aString to NSString’s stringWithString:aStr
  
set bStr to (aString’s stringByTrimmingCharactersInSet:(NSCharacterSet’s whitespaceAndNewlineCharacterSet()))
  
return bStr as string
end cleanUpTextFromHEadAndTail

★Click Here to Open This Script 

Posted in Text | Tagged 10.14savvy 10.15savvy 11.0savvy Pages | Leave a comment

Post navigation

  • Older posts
  • Newer posts

電子書籍(PDF)をオンラインストアで販売中!

Google Search

Popular posts

  • 開発機としてM2 Mac miniが来たのでガチレビュー
  • macOS 15, Sequoia
  • 指定のWordファイルをPDFに書き出す
  • Pages本執筆中に、2つの書類モード切り替えに気がついた
  • Numbersで選択範囲のセルの前後の空白を削除
  • メキシカンハットの描画
  • Pixelmator Pro v3.6.4でAppleScriptからの操作時の挙動に違和感が
  • AdobeがInDesign v19.4からPOSIX pathを採用
  • AppleScriptによる並列処理
  • Safariで「プロファイル」機能を使うとAppleScriptの処理に影響
  • Cocoa Scripting Course 続刊計画
  • macOS 14.xでScript Menuの実行速度が大幅に下がるバグ
  • AppleScript入門③AppleScriptを使った「自動化」とは?
  • Keynote/Pagesで選択中の表カラムの幅を均等割
  • デフォルトインストールされたフォント名を取得するAppleScript
  • macOS 15 リモートApple Eventsにバグ?
  • Keynote、Pages、Numbers Ver.14.0が登場
  • macOS 15でも変化したText to Speech環境
  • AppleScript入門① AppleScriptってなんだろう?
  • Numbersで最前面の書類のすべてのシート上の表の行数を合計

Tags

10.11savvy (1101) 10.12savvy (1242) 10.13savvy (1391) 10.14savvy (587) 10.15savvy (438) 11.0savvy (283) 12.0savvy (212) 13.0savvy (194) 14.0savvy (147) 15.0savvy (132) CotEditor (66) Finder (51) iTunes (19) Keynote (117) NSAlert (61) NSArray (51) NSBitmapImageRep (20) NSBundle (20) NSButton (34) NSColor (53) NSDictionary (28) NSFileManager (23) NSFont (21) NSImage (41) NSJSONSerialization (21) NSMutableArray (63) NSMutableDictionary (22) NSPredicate (36) NSRunningApplication (56) NSScreen (30) NSScrollView (22) NSString (119) NSURL (98) NSURLRequest (23) NSUTF8StringEncoding (30) NSView (33) NSWorkspace (20) Numbers (76) Pages (55) Safari (44) Script Editor (27) WKUserContentController (21) WKUserScript (20) WKWebView (23) WKWebViewConfiguration (22)

カテゴリー

  • 2D Bin Packing
  • 3D
  • AirDrop
  • AirPlay
  • Animation
  • AppleScript Application on Xcode
  • Beginner
  • Benchmark
  • beta
  • Bluetooth
  • Books
  • boolean
  • bounds
  • Bug
  • Calendar
  • call by reference
  • check sum
  • Clipboard
  • Cocoa-AppleScript Applet
  • Code Sign
  • Color
  • Custom Class
  • date
  • dialog
  • diff
  • drive
  • Droplet
  • exif
  • file
  • File path
  • filter
  • folder
  • Font
  • Font
  • GAME
  • geolocation
  • GUI
  • GUI Scripting
  • Hex
  • History
  • How To
  • iCloud
  • Icon
  • Image
  • Input Method
  • Internet
  • iOS App
  • JavaScript
  • JSON
  • JXA
  • Keychain
  • Keychain
  • Language
  • Library
  • list
  • Locale
  • Localize
  • Machine Learning
  • Map
  • Markdown
  • Menu
  • Metadata
  • MIDI
  • MIME
  • Natural Language Processing
  • Network
  • news
  • Noification
  • Notarization
  • Number
  • Object control
  • OCR
  • OSA
  • parallel processing
  • PDF
  • Peripheral
  • PRODUCTS
  • QR Code
  • Raw AppleEvent Code
  • Record
  • rectangle
  • recursive call
  • regexp
  • Release
  • Remote Control
  • Require Control-Command-R to run
  • REST API
  • Review
  • RTF
  • Sandbox
  • Screen Saver
  • Script Libraries
  • sdef
  • search
  • Security
  • selection
  • shell script
  • Shortcuts Workflow
  • Sort
  • Sound
  • Spellchecker
  • Spotlight
  • SVG
  • System
  • Tag
  • Telephony
  • Text
  • Text to Speech
  • timezone
  • Tools
  • Update
  • URL
  • UTI
  • Web Contents Control
  • WiFi
  • XML
  • XML-RPC
  • イベント(Event)
  • 未分類

アーカイブ

  • 2025年5月
  • 2025年4月
  • 2025年3月
  • 2025年2月
  • 2025年1月
  • 2024年12月
  • 2024年11月
  • 2024年10月
  • 2024年9月
  • 2024年8月
  • 2024年7月
  • 2024年6月
  • 2024年5月
  • 2024年4月
  • 2024年3月
  • 2024年2月
  • 2024年1月
  • 2023年12月
  • 2023年11月
  • 2023年10月
  • 2023年9月
  • 2023年8月
  • 2023年7月
  • 2023年6月
  • 2023年5月
  • 2023年4月
  • 2023年3月
  • 2023年2月
  • 2023年1月
  • 2022年12月
  • 2022年11月
  • 2022年10月
  • 2022年9月
  • 2022年8月
  • 2022年7月
  • 2022年6月
  • 2022年5月
  • 2022年4月
  • 2022年3月
  • 2022年2月
  • 2022年1月
  • 2021年12月
  • 2021年11月
  • 2021年10月
  • 2021年9月
  • 2021年8月
  • 2021年7月
  • 2021年6月
  • 2021年5月
  • 2021年4月
  • 2021年3月
  • 2021年2月
  • 2021年1月
  • 2020年12月
  • 2020年11月
  • 2020年10月
  • 2020年9月
  • 2020年8月
  • 2020年7月
  • 2020年6月
  • 2020年5月
  • 2020年4月
  • 2020年3月
  • 2020年2月
  • 2020年1月
  • 2019年12月
  • 2019年11月
  • 2019年10月
  • 2019年9月
  • 2019年8月
  • 2019年7月
  • 2019年6月
  • 2019年5月
  • 2019年4月
  • 2019年3月
  • 2019年2月
  • 2019年1月
  • 2018年12月
  • 2018年11月
  • 2018年10月
  • 2018年9月
  • 2018年8月
  • 2018年7月
  • 2018年6月
  • 2018年5月
  • 2018年4月
  • 2018年3月
  • 2018年2月

https://piyomarusoft.booth.pm/items/301502

メタ情報

  • ログイン
  • 投稿フィード
  • コメントフィード
  • WordPress.org

Forum Posts

  • 人気のトピック
  • 返信がないトピック

メタ情報

  • ログイン
  • 投稿フィード
  • コメントフィード
  • WordPress.org
Proudly powered by WordPress
Theme: Flint by Star Verte LLC