Menu

Skip to content
AppleScriptの穴
  • Home
  • Products
  • Books
  • Docs
  • Events
  • Forum
  • About This Blog
  • License
  • 仕事依頼

AppleScriptの穴

Useful & Practical AppleScript archive. Click '★Click Here to Open This Script' Link to download each AppleScript

タグ: 10.12savvy

Numbersで選択中の表のセルの範囲を背景色で頻度集計

Posted on 6月 6, 2019 by Takaaki Naganoya

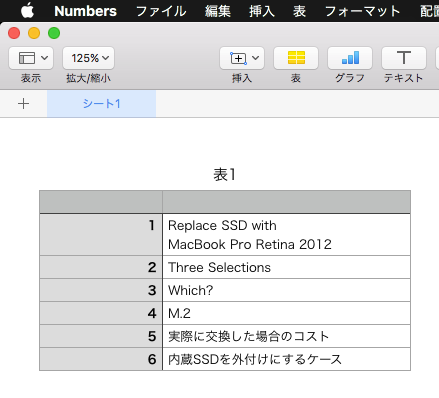
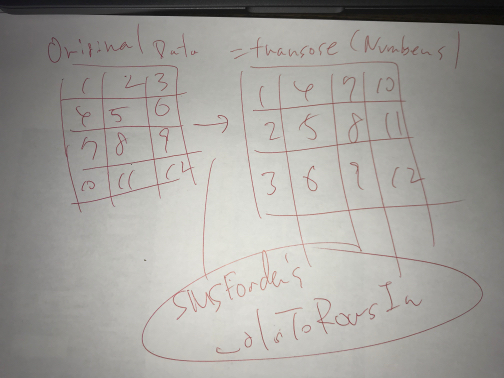
Numbersでオープン中の書類の現在のシート上にある表の選択範囲のセルに対して、背景色(Background color)で登場頻度の集計を行って、どの色が何回登場しているかを色プレビューしつつ表示するAppleScriptです。

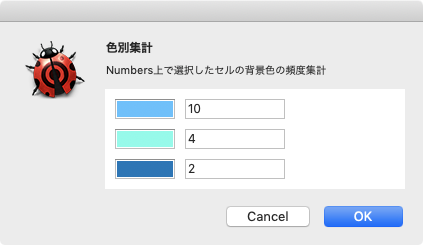
集計をRGB値で数値的に行うことは容易ですが、結局のところ色なんてRGB値で見せられてもわからず、実際に目で見える色で表示しないと判断できません。そのため、アラートダイアログを作成してその上にColorWellで表示しています。
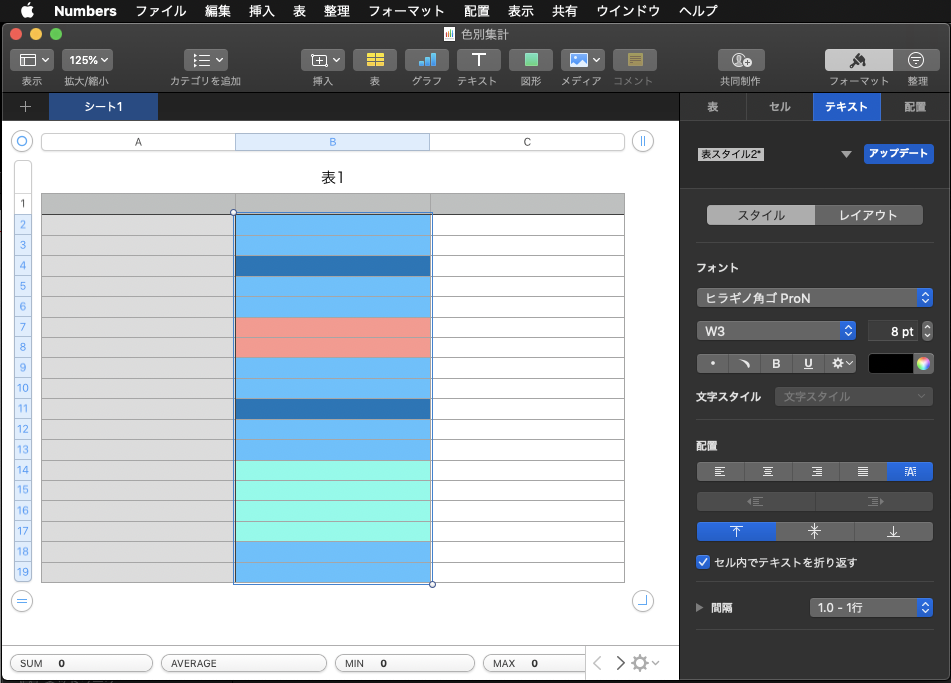
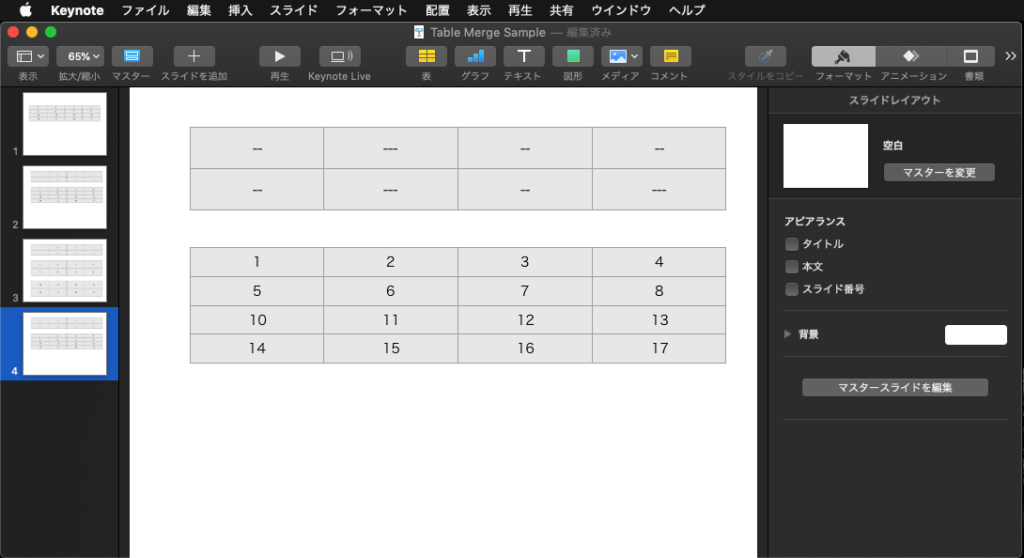
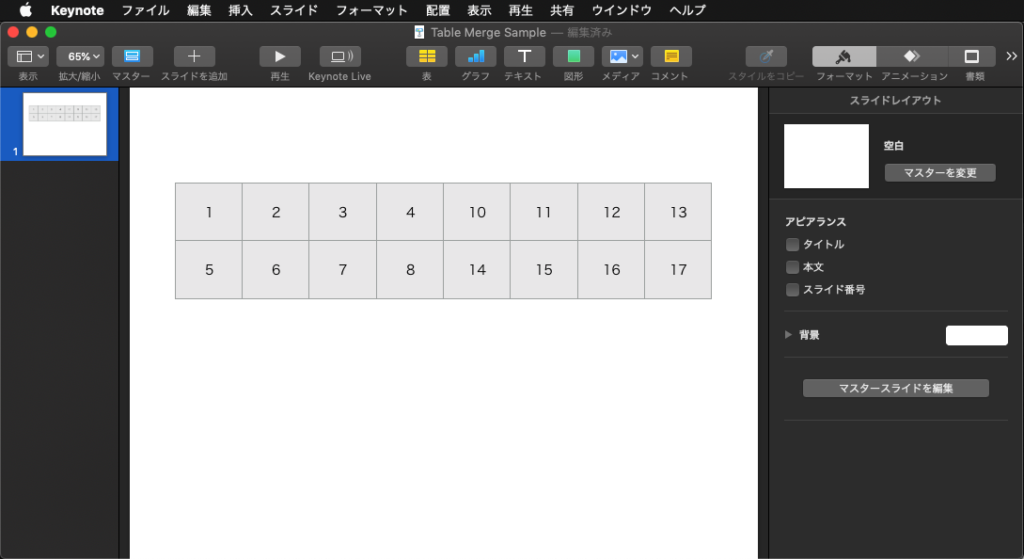
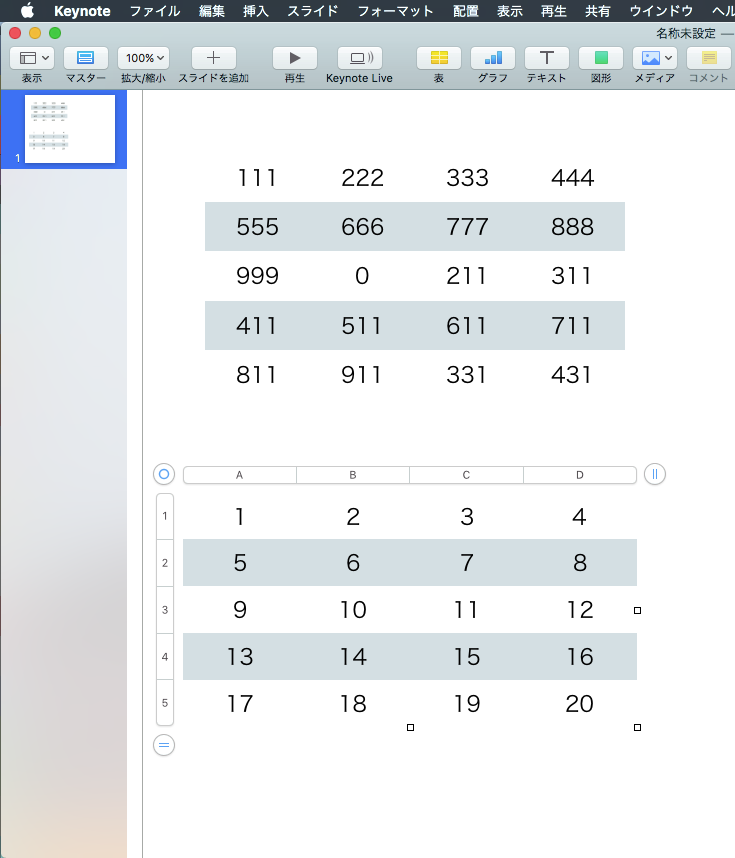

▲Numbersの表でセルを選択


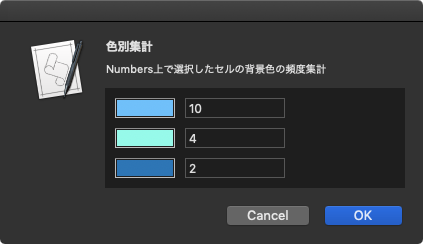
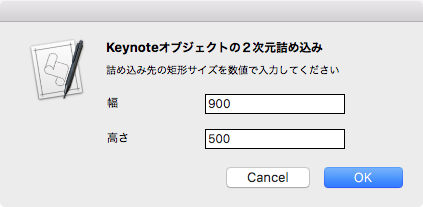
▲Numbersの表のセルに指定されている背景色の登場頻度で集計し、色プレビューと登場回数を表示(スクリプトエディタ@macOS 10.14.5上の表示、Dark Mode)


▲Numbersの表のセルに指定されている背景色の登場頻度で集計し、色プレビューと登場回数を表示(Script Debugger@macOS 10.14.5上の表示、Dark Mode)

上記サンプル表は本Blog上での説明用のために簡略化した表ですが、実際には数十行の入り組んだNumbersの表を相手にしており、かつ、手作業で色付きセルだけを数えるなんて考えたくもないレベルで頻繁に確認しなくてはならなかったために、本Scriptを作ってみました。

Numbersにかぎらず、iWorkアプリケーション(Keynote、Pages、Numbers)で共通の仕様ですが、背景色を塗らないセルから背景色を取得するとmissing valueが返ります。

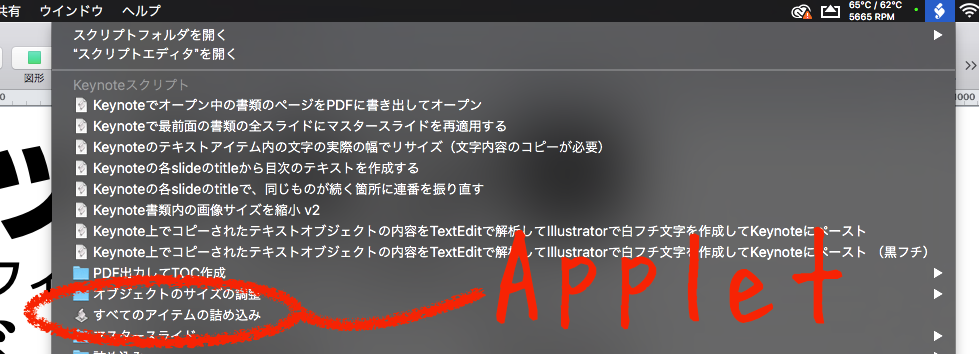
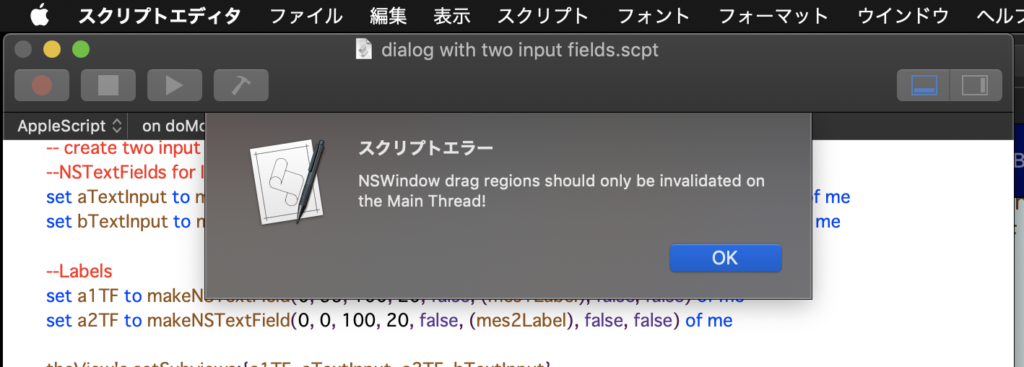
本ScriptはScript Menuに入れて実行するとアラートダイアログが最前面に出てこないなど、Script書類(.scpt、.scptd)のままで実行すると問題が発生。Script Menuに入れる場合にはアプレット(.app)書き出しする必要があります。


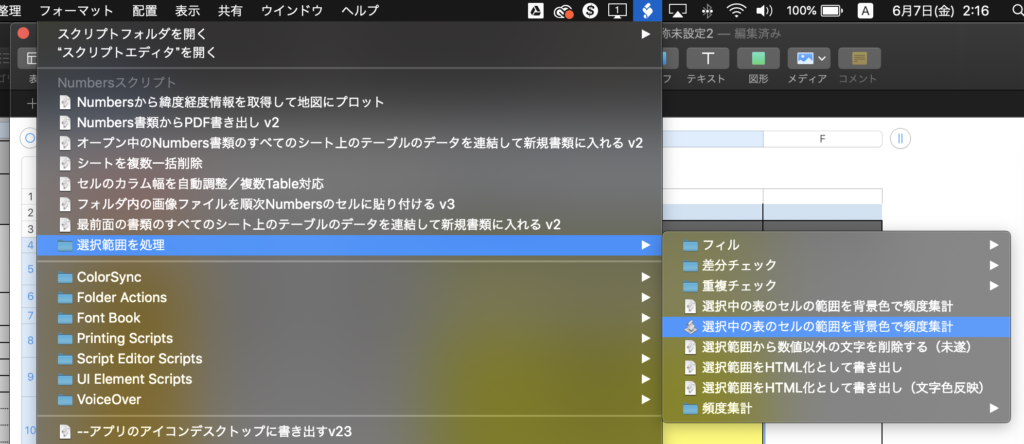
▲スクリプトメニューにアプレット書き出しした実行ファイルを入れて呼び出し(macOS 10.14.5)。スクリプトメニューは最前面にあるGUIアプリケーションに応じて、それぞれのアプリケーション用のメニューを表示できるようになっている

AppleScript名:選択中の表のセルの範囲を背景色で頻度集計.scptd
—
–  Created by: Takaaki Naganoya
–  Created on: 2019/06/06
—
–  Copyright © 2019 Piyomaru Software, All Rights Reserved
—
use AppleScript version "2.4" — Yosemite (10.10) or later
use framework "Foundation"
use framework "AppKit"
use scripting additions

property NSView : a reference to current application’s NSView
property NSAlert : a reference to current application’s NSAlert
property NSColor : a reference to current application’s NSColor
property NSIndexSet : a reference to current application’s NSIndexSet
property NSTextField : a reference to current application’s NSTextField
property NSColorWell : a reference to current application’s NSColorWell
property NSScrollView : a reference to current application’s NSScrollView
property NSMutableArray : a reference to current application’s NSMutableArray
property NSRunningApplication : a reference to current application’s NSRunningApplication

property theResult : 0
property returnCode : 0
property theDataSource : {}

tell application "Numbers"
  tell front document
    tell active sheet
      try
        set theTable to first table whose class of selection range is range
      on error
        return "No Selection" –何も選択されてなかった場合
      end try
      
      
tell theTable
        set bgColList to background color of every cell of selection range
        
–> {{18572, 45937, 65452}, {18572, 45937, 65452}, {3001, 24801, 44056}, {18572, 45937, 65452}, {18572, 45937, 65452}, {64899, 33134, 31509}, {64899, 33134, 31509}, {18572, 45937, 65452}, {18572, 45937, 65452}, {3001, 24801, 44056}, {18572, 45937, 65452}, {18572, 45937, 65452}, {26149, 65534, 58650}, {26149, 65534, 58650}, {26149, 65534, 58650}, {26149, 65534, 58650}, {18572, 45937, 65452}, {18572, 45937, 65452}}
      end tell
    end tell
  end tell
end tell

set bgColList to countItemsByItsAppearance(bgColList) of me
–> {{theName:{65535, 65533, 65534}, numberOfTimes:73}, {theName:{65535, 65535, 21706}, numberOfTimes:73}, {theName:missing value, numberOfTimes:27}}

set paramObj to {mainDat:bgColList, myTitle:"色別集計", mySubTitle:"Numbers上で選択したセルの背景色の頻度集計"}
–my browseColors:paramObj–for debug

my performSelectorOnMainThread:"browseColors:" withObject:(paramObj) waitUntilDone:true

on browseColors:paramObj
  set aParamList to (mainDat of (paramObj as record)) as list
  
set winTitle to (myTitle of (paramObj as record)) as string
  
set subTitle to (mySubTitle of (paramObj as record)) as string
  
  
set aLen to length of aParamList
  
  
set aHeight to 100
  
set aWidth to 300
  
  
–NSViewをつくる
  
set aNSV to NSView’s alloc()’s initWithFrame:(current application’s NSMakeRect(0, 0, aWidth, aHeight * 1.5))
  
aNSV’s setNeedsDisplay:true
  
  
— NSScroll Viewをつくる
  
set aScroll to NSScrollView’s alloc()’s initWithFrame:(current application’s NSMakeRect(0, 0, aWidth, aHeight))
  
aScroll’s setDocumentView:aNSV
  
  
aNSV’s enclosingScrollView()’s setHasHorizontalScroller:true
  
aNSV’s enclosingScrollView()’s setHasVerticalScroller:true
  
  
–NSColorWell+ NSTextFieldをつくる
  
set aStep to 1
  
repeat with i in aParamList
    set aColorWell to (NSColorWell’s alloc()’s initWithFrame:(current application’s NSMakeRect(10, ((aLen – aStep + 1) * 30), 60, 20)))
    
    
set myName to (theName of i)
    
set myTimes to (numberOfTimes of i)
    
    
if myName is not equal to missing value then
      copy (myName as list) to {rNum, gNum, bNum}
      
set myTimes to numberOfTimes of i
      
      
set myColor to makeNSColorFromRGBAval(rNum, gNum, bNum, 65535, 65535) of me
      (
aColorWell’s setColor:myColor)
      (
aColorWell’s setBordered:false)
      (
aNSV’s addSubview:aColorWell)
      
      
set aTF to makeNSTextField(80, ((aLen – aStep + 1) * 30), 100, 20, false, myTimes as string, true, true) of me
      (
aNSV’s addSubview:aTF)
      
      
set aStep to aStep + 1
    end if
  end repeat
  
  
–NSScrollViewを強制的にトップにスクロール
  
set aPT to current application’s NSMakePoint(0.0, aHeight)
  
aScroll’s documentView()’s scrollPoint:aPT
  
  
— set up alert  
  
set theAlert to NSAlert’s alloc()’s init()
  
tell theAlert
    its setMessageText:winTitle
    
its setInformativeText:subTitle
    
its addButtonWithTitle:"OK"
    
its addButtonWithTitle:"Cancel"
    
its setAccessoryView:aScroll
  end tell
  
  
— show alert in modal loop
  
NSRunningApplication’s currentApplication()’s activateWithOptions:0
  
my performSelectorOnMainThread:"doModal:" withObject:(theAlert) waitUntilDone:true
  
if (my returnCode as number) = 1001 then error number -128
  
end browseColors:

on doModal:aParam
  set (my returnCode) to aParam’s runModal()
end doModal:

on makeNSColorFromRGBAval(redValue as integer, greenValue as integer, blueValue as integer, alphaValue as integer, aMaxVal as integer)
  set aRedCocoa to (redValue / aMaxVal) as real
  
set aGreenCocoa to (greenValue / aMaxVal) as real
  
set aBlueCocoa to (blueValue / aMaxVal) as real
  
set aAlphaCocoa to (alphaValue / aMaxVal) as real
  
set aColor to NSColor’s colorWithCalibratedRed:aRedCocoa green:aGreenCocoa blue:aBlueCocoa alpha:aAlphaCocoa
  
return aColor
end makeNSColorFromRGBAval

–1D Listを要素別に出現回数で集計
on countItemsByItsAppearance(aList as list)
  set aSet to current application’s NSCountedSet’s alloc()’s initWithArray:aList
  
set bArray to current application’s NSMutableArray’s array()
  
set theEnumerator to aSet’s objectEnumerator()
  
  
repeat
    set aValue to theEnumerator’s nextObject()
    
if aValue is missing value then exit repeat
    
bArray’s addObject:(current application’s NSDictionary’s dictionaryWithObjects:{aValue, (aSet’s countForObject:aValue)} forKeys:{"theName", "numberOfTimes"})
  end repeat
  
  
–出現回数(numberOfTimes)で降順ソート
  
set theDesc to current application’s NSSortDescriptor’s sortDescriptorWithKey:"numberOfTimes" ascending:false
  
bArray’s sortUsingDescriptors:{theDesc}
  
  
return bArray as list
end countItemsByItsAppearance

on makeNSTextField(xPos as integer, yPos as integer, myWidth as integer, myHeight as integer, editableF as boolean, setVal as string, backgroundF as boolean, borderedF as boolean)
  set aNSString to NSTextField’s alloc()’s initWithFrame:(current application’s NSMakeRect(xPos, yPos, myWidth, myHeight))
  
aNSString’s setEditable:(editableF)
  
aNSString’s setStringValue:(setVal)
  
aNSString’s setDrawsBackground:(backgroundF)
  
aNSString’s setBordered:(borderedF)
  
return aNSString
end makeNSTextField

★Click Here to Open This Script 

Posted in Color dialog list Record | Tagged 10.12savvy 10.13savvy 10.14savvy NSAlert NSColor NSColorWell NSCountedSet NSDictionary NSIndexSet NSMutableArray NSRunningApplication NSScrollView NSSortDescriptor NSTextField NSView Numbers | Leave a comment

Finder上で選択中のファイルをDMGに変換して圧縮 v2

Posted on 6月 6, 2019 by Takaaki Naganoya

Finder上で選択中のファイルをあらたに作ったDiskImageに入れてZip圧縮するAppleScriptです。

Script Menuに入れて実行することを前提にして作ってあります。

Google DriveなどのクラウドストレージにAppleScriptアプレットなどの実行ファイルをアップロードすると、バンドルが壊れたり、実行できなくなったりします。

そのため、仕方なくZip圧縮してアップロードしたりするわけですが、どうもZipの中身までGoogle Drive側が内容を展開して確認するらしく、ウィルスと疑われてZip圧縮した実行ファイルをダウンロードできないケースが見られます。

また、.dmgファイルに入れただけでもGoogle Driveが中身をスキャンして実行ファイルに警告を出すとのこと。一般的にはウィルスの拡散を防止する機能として好意的に受け止められるべきものですが、本当にプログラムを受け渡す必要がある場合には、こまった仕様です。

そこで、Diskimageに入れて、本来であればパスワードをつけてZip圧縮したいところですが、取り回しが悪くなるので、パスワードはつけないでアーカイブ化するようにしてみました。


▲Finder上で選択中のファイル(複数可)


▲本Scriptでdmg化してZip圧縮したもの


▲Zipアーカイブを展開してdiskimageファイルをマウントしたところ

本Scriptは、おおよそ自分で組んだ記憶がないのと、プログラムの構造が自分らしくないので、おそらくMacScripter.netあたりで拾ってきたScriptをそのまま使っていたものでしょう。それを一部修正してみました。オリジナルのScriptではFinder上で選択中のフォルダのみ処理するようになっていましたが、実際にはファイルをやりとりしたい(AppleScriptアプレットのケース多し)ので、ファイルをそのままdmg化できるように変更しました(単にフォルダを作成してコピーするだけですが)。

本ScriptはmacOS 10.15Beta1上では、macOS 10.15側にバグがあるため動作しません(POSIX pathへの変換程度でバグを作ってほしくないなー)。

AppleScript名:Finder上で選択中のファイルをDMGに変換して圧縮 v2
—
–  Created by: Takaaki Naganoya
–  Created on: 2019/06/06
—
–  Copyright © 2019 Piyomaru Software, All Rights Reserved
—
use AppleScript version "2.5"
use scripting additions
use framework "Foundation"

property NSUUID : a reference to current application’s NSUUID

property deleteV : true –DMG変換後に対象フォルダを削除しない(trueで削除)
property zipDmg : true –DMG作成後にZip圧縮する(trueで圧縮+DMG削除)

–Finder上の選択項目を取得、選択されていない場合には処理終了
tell application "Finder"
  set selList to selection as alias list
  
if selList = {} or selList = "" or selList = missing value then
    activate
    
display dialog "何も選択されていません。" buttons {"OK"} default button 1 with icon 1
    
return
  end if
end tell

–一時フォルダを作って選択中のアイテムをコピー
set aUUID to NSUUID’s UUID()’s UUIDString() as text

set aTmp to POSIX path of (path to desktop) –macOS 10.15 beta1ではおかしな結果が返ってくる
set tmpDir to aTmp & aUUID
do shell script "mkdir -p " & quoted form of tmpDir

set targFol to (POSIX file tmpDir) as alias

try
  tell application "Finder"
    duplicate selList to folder targFol
  end tell
on error
  display dialog "エラー:ファイルのコピー中にエラーが発生" buttons {"OK"} default button 1 with icon 1
  
return
end try

set aList to {targFol}

tell application "Finder"
  
  
set dmgList to {}
  
  
–選択中のアイテムを順次処理するループ
  
repeat with i in aList
    set the end of dmgList to makeDMGfromFolderAlias(i, "") of me –パスワードは付けない
    
    
–処理後のフォルダを削除する処理
    
if (deleteV as boolean) = true then
      deleteFolderItself(i) of me
    else
      –元フォルダを削除しない場合、元フォルダの名前を変更する
      
tell application "Finder"
        set aName to name of i
      end tell
      
      
set aName to aName & "_origFol"
      
      
tell application "Finder"
        set name of i to aName
      end tell
    end if
  end repeat
  
  
if zipDmg = true then
    repeat with i in dmgList
      set j to contents of i
      
      
set f1Path to quoted form of j –DMGファイルのPOSIX Path
      
set f2Path to quoted form of (j & ".zip") –ZipファイルのPOSIX Path
      
      
–タイムアウト時間は2時間
      
with timeout of 7200 seconds
        do shell script "/usr/bin/zip -r -j " & f2Path & " " & f1Path
        
do shell script "/bin/rm -f " & f1Path
      end timeout
      
    end repeat
  end if
end tell

–指定のフォルダ(alias)をDiskImageに変換する
on makeDMGfromFolderAlias(aaSel, aPassword)
  
  
set aPassword to aPassword as string
  
  
tell application "Finder"
    set fn to name of aaSel
  end tell
  
  
set aDir to (POSIX path of aaSel)
  
set aDir to quoted form of aDir
  
  
set fp2 to do shell script "dirname " & aDir
  
set fp2 to fp2 & "/"
  
  
set outPath to (fp2 & fn & ".dmg")
  
  
if aPassword is not equal to "" then
    –パスワードつきの場合
    
set aCMD to "printf ’" & aPassword & "’ | hdiutil create -encryption -srcfolder " & aDir & " " & (quoted form of outPath)
  else
    –パスワードなしの場合
    
set aCMD to "hdiutil create -srcfolder " & aDir & " " & (quoted form of outPath)
  end if
  
  
set fp3 to do shell script aCMD
  
  
return outPath
  
end makeDMGfromFolderAlias

–指定フォルダ内をすべて削除し、そのフォルダ自体も削除
on deleteFolderItself(aFol)
  set aU to (quoted form of POSIX path of aFol)
  
do shell script "rm -rf " & aU
end deleteFolderItself

★Click Here to Open This Script 

Posted in file list | Tagged 10.12savvy 10.13savvy 10.14savvy Finder NSUUID | Leave a comment

Photoshop CCでファイルをオープン

Posted on 5月 29, 2019 by Takaaki Naganoya

Photoshop CCで画像ファイル/PDFをオープンするAppleScriptです。

作成と動作確認はmacOS 10.14.5+Photoshop CC2019で行っています。一般的な画像ファイルのオープンはこちら。

Adobeのアプリケーションの操作を行っていると、5分に1回ぐらい首をひねる瞬間がやってきますが、疑問に思っても無駄なので、各種操作はサブルーチンに追い出して、直接Adobeアプリケーションの相手をしないほうが精神衛生上よいと思われます(contentsという超重要な予約語がコンフリクトしているのでオブジェクトを取り出してループするときに途方に暮れるとか、アプリケーションによってはオブジェクトの座標情報の順序がおかしいとかいろいろ)。

その中でもとびきりおかしいのが、この、Photoshopでのファイルオープン時のファイルパスの取り扱いです。

結局このおかしな書き方でしかオープンしてくれない(aliasを直接openできない謎仕様)という状況で、ここで疑問が生まれると、ふたたびAdobeのアプリケーションのおかしな仕様をひととおり体験することになるのです。

# 後から気づきましたが、Photoshopのopen命令は返り値がないですね、、、、

AppleScript名:Photoshop CCで画像ファイルをオープンする
set a to choose file

set aPosix to POSIX path of a

tell application id "com.adobe.photoshop"
  open file aPosix
end tell

★Click Here to Open This Script 

PDFのオープンはこちらです。PDFをbounding boxでトリミングしてオープンするのは、Cocoaの機能を利用してもなかなか骨が折れるので、かえってPhotoshopを呼び出してPDF→画像変換を行うほうが簡単なようです。

AppleScript名:Photoshop CCでPDFをオープンする
set aFile to (choose file)
set aPOSIX to POSIX path of aFile

set aPage to 1
set aResol to 300

tell application id "com.adobe.photoshop"
  open file aPOSIX as PDF with options {class:PDF open options, page:aPage, crop page:bounding box, resolution:aResol, mode:RGB}
end tell

★Click Here to Open This Script 

Posted in file Image PDF | Tagged 10.12savvy 10.13savvy 10.14savvy Photoshop | Leave a comment

リストの差分を取得して、登場順序が変わっていても1D List同士の登場要素が同じかをチェック

Posted on 5月 27, 2019 by Takaaki Naganoya

2つの1D List(1次元配列)同士の全要素をチェックし、登場順序に変更があったとしても要素自体に差がないかどうかをチェックするAppleScriptです。

……ソートしてから比較すれば、もっと短くて済むような気もしないでもないですが、もし違った場合には何が足りなくて(minusitems)、何が余計なのか(additems)をレポートしてくれるので実用的だと思います。

AppleScript名:リストの差分を取得して、登場順序が変わっていても1D List同士の登場要素が同じかをチェック
— Created 2019-05-27 by Takaaki Naganoya
— 2019 Piyomaru Software
use AppleScript version "2.4"
use scripting additions
use framework "Foundation"

set aList to {3, 2, 1, 7, 6, 4}
set bList to {1, 2, 3, 4, 6, 7}
set a1Res to checkAllItemsAreSame(aList, bList) of me
–> true (配列要素の登場順序が変わっていても要素はすべて同じ)

set aList to {3, 2, 1, 7, 6}
set bList to {1, 2, 3, 4, 6, 7}
set a2Res to checkAllItemsAreSame(aList, bList) of me
–> addItems:{4}, minusItems:{}}–配列要素に過不足があった

–1D List同士の全要素が(登場順序が変更になっていても)同じかどうかをチェック
on checkAllItemsAreSame(aList, bList)
  set dRes to getDiffBetweenLists(aList, bList) of me
  
set ddRes to (dRes is equal to {addItems:{}, minusItems:{}}) as boolean
  
if ddRes = true then
    return true
  else
    return dRes
  end if
end checkAllItemsAreSame

–1D List同士のdiffを検出
on getDiffBetweenLists(aArray as list, bArray as list)
  set allSet to current application’s NSMutableSet’s setWithArray:aArray
  
allSet’s addObjectsFromArray:bArray
  
  
–重複する要素のみ抜き出す
  
set duplicateSet to current application’s NSMutableSet’s setWithArray:aArray
  
duplicateSet’s intersectSet:(current application’s NSSet’s setWithArray:bArray)
  
  
–重複部分を削除する
  
allSet’s minusSet:duplicateSet
  
set resArray to (allSet’s allObjects()) as list
  
  
set aSet to current application’s NSMutableSet’s setWithArray:aArray
  
set bSet to current application’s NSMutableSet’s setWithArray:resArray
  
aSet’s intersectSet:bSet –積集合
  
set addRes to aSet’s allObjects() as list
  
  
set cSet to current application’s NSMutableSet’s setWithArray:bArray
  
cSet’s intersectSet:bSet –積集合
  
set minusRes to cSet’s allObjects() as list
  
  
return {addItems:minusRes, minusItems:addRes}
end getDiffBetweenLists

★Click Here to Open This Script 

Posted in list Record | Tagged 10.12savvy 10.13savvy 10.14savvy NSMutableSet NSSet | Leave a comment

Photosで選択中の写真をKeynoteの現在の書類の現在のスライド以降に配置 v2

Posted on 5月 27, 2019 by Takaaki Naganoya

Photosで選択中の写真をKeynoteで現在オープン中の書類の現在のスライド(ページ)以降に配置していくAppleScriptの改良版です。

作業の過程をiPhoneで写真撮影。撮影した写真を写真.app(Photos.app)経由でKeynote書類にまとめる作業を行なっていました。作業工程を時間こみで表示できないとわかりにくかったので、Keynoteの各スライドに時刻を入れるようにAppleScriptを書いておきました。

初版では写真.app(Photos)上の選択項目を一切ソートなどしなかったため、exifから取得した撮影日付で昇順ソートしています。


▲写真.app(Photos)上でKeynoteに配置したい写真を選択


▲あらかじめKeynote上でマスタースライド「画像(横長)」上のアイテムを編集しておくといいかも


▲AppleScriptによって写真.app上の写真をKeynote書類上に順次割り付け。タイトル部分にexifに記録されていた撮影時刻が入る


▲実行結果。写真.appから割り付けた写真は撮影日時でソートされている

AppleScript名:Photosで選択中の写真をKeynoteの現在の書類の現在のスライド以降に配置 v2
—
–  Created by: Takaaki Naganoya
–  Created on: 2019/05/26
—
–  Copyright © 2019 Piyomaru Software, All Rights Reserved
—
use AppleScript version "2.4"
use scripting additions
use framework "Foundation"
use framework "AppKit"
use BPlus : script "BridgePlus" –https://www.macosxautomation.com/applescript/apps/BridgePlus.html
use mdLib : script "Metadata Lib" version "2.0.0" –https://www.macosxautomation.com/applescript/apps/Script_Libs.html#Metadata_Lib

property NSUUID : a reference to current application’s NSUUID
property NSString : a reference to current application’s NSString
property SMSForder : a reference to current application’s SMSForder
property NSFileManager : a reference to current application’s NSFileManager

tell application "Keynote"
  if (count every document) = 0 then return
end tell

–Photosで選択中の写真をすべて書き出してalias listを取得する
set aList to exportSelectedPhotoOnPhotos() of me
if aList = {} or aList = false then return

set aLen to length of aList

–書き出した画像の親フォルダを求めておく(あとで削除するため)
tell application "Finder"
  set parentFol to parent of (item 1 of aList)
end tell

–exifから撮影日時を取得して2D List化
set aaList to {}
repeat with i in aList
  set j to contents of i
  
set exifDate to readExifDateTimeOriginal(j) of me
  
set the end of aaList to {j, exifDate, (time string of exifDate)}
end repeat

–撮影日時で昇順ソート
set aaaList to sortList2DAscending(aaList, {2}) of me

tell application "Keynote"
  tell front document
    tell current slide
      set curNum to slide number –現在表示中のスライドの番号(ページ数)を取得する
    end tell
    
    
–Photosから取得した写真のアイテム数でループ
    
repeat with i from 1 to aLen
      copy (item i of aaaList) to {aPhoto, aDateObj, creTime}
      
      
set newSlide to make new slide at slide (curNum + i) with properties {base slide:master slide "画像(横長)"} –This item is localized!! Maybe a "Photo"
      
      
tell newSlide
        set object text of default title item to creTime
        
set file name of image 1 to aPhoto –place an image to image placeholder
      end tell
      
      
–配置画像を削除
      
tell application "Finder"
        delete aPhoto –配置した写真を削除
      end tell
    end repeat
  end tell
end tell

–あとしまつ
tell application "Finder"
  delete parentFol –画像のダウンロードフォルダを削除
end tell

–Photosで選択中のファイルをtmporaryフォルダに書き出してalias listで返す
on exportSelectedPhotoOnPhotos()
  set dtPath to (path to temporary items) as text
  
set aUUID to NSUUID’s UUID()’s UUIDString() as text
  
  
set dirPath to ((POSIX path of dtPath) & aUUID)
  
set fileManager to NSFileManager’s defaultManager()
  
set aRes to (fileManager’s createDirectoryAtPath:dirPath withIntermediateDirectories:true attributes:(missing value) |error|:(reference))
  
set dtPath to dtPath & aUUID
  
  
tell application "Photos"
    set a to selection
    
if a = {} then return {}
    
set aRes to (export a to file dtPath)
  end tell
  
  
tell application "Finder"
    tell folder dtPath
      set fList to (every file) as alias list
    end tell
  end tell
  
  
if fList = {} then return false
  
return fList
end exportSelectedPhotoOnPhotos

–指定JPEG画像のExif情報からDateTimeOriginalを取得してAS dateオブジェクトに変換して返す
on readExifDateTimeOriginal(aTargFileAlias)
  set theMetadata to readMetadataFrom(aTargFileAlias) of me
  
if theMetadata = false then return false
  
  
set keysList to theMetadata’s allKeys()
  
  
if "{Exif}" is not in (keysList as list) then return false
  
  
set exifDate to theMetadata’s valueForKeyPath:"{Exif}.DateTimeOriginal"
  
if exifDate = missing value then return false
  
  
set a to NSString’s stringWithString:exifDate
  
set {aDateStr, aTimeStr} to (a’s componentsSeparatedByString:" ") as list
  
set bDateStr to repChar(aDateStr, ":", "/") of me
  
set fullDate to date (bDateStr & " " & aTimeStr)
  
  
return fullDate
end readExifDateTimeOriginal

–指定のファイルからメタデータを取得する
on readMetadataFrom(imageFile)
  load framework
  
set {theRecord, theError} to SMSForder’s metadataFromImage:imageFile |error|:(reference)
  
if theRecord = missing value then — there was a problem, so extract the error description
    error false
  else
    return theRecord
  end if
end readMetadataFrom

–文字置換
on repChar(origText as string, targChar as string, repChar as string)
  set curDelim to AppleScript’s text item delimiters
  
set AppleScript’s text item delimiters to targChar
  
set tmpList to text items of origText
  
set AppleScript’s text item delimiters to repChar
  
set retText to tmpList as string
  
set AppleScript’s text item delimiters to curDelim
  
return retText
end repChar

–入れ子のリストを昇順ソート
on sortList2DAscending(a, keyItem)
  return sort2DList(a, keyItem, {true}) of me
end sortList2DAscending

–入れ子のリストを降順ソート
on sortList2DDecending(a, keyItem)
  return sort2DList(a, keyItem, {false}) of me
end sortList2DDecending

–2D Listをソート
on sort2DList(aList as list, sortIndexes as list, sortOrders as list)
  load framework
  
  
–index値をAS流(アイテムが1はじまり)からCocoa流(アイテムが0はじまり)に変換
  
set newIndex to {}
  
repeat with i in sortIndexes
    set j to contents of i
    
set j to j – 1
    
set the end of newIndex to j
  end repeat
  
  
set sortTypes to {}
  
repeat (length of sortIndexes) times
    set the end of sortTypes to "compare:"
  end repeat
  
  
set resList to (SMSForder’s subarraysIn:(aList) sortedByIndexes:newIndex ascending:sortOrders sortTypes:sortTypes |error|:(missing value)) as {missing value, list}
  
  
return resList
end sort2DList

★Click Here to Open This Script 

Posted in Calendar exif file Image list | Tagged 10.12savvy 10.13savvy 10.14savvy Finder Keynote NSFileManager NSString NSUUID Photos | Leave a comment

Photosで選択中の写真をKeynoteの現在の書類の現在のスライド以降に配置

Posted on 5月 27, 2019 by Takaaki Naganoya

Photosで選択中の写真をKeynoteで現在オープン中の書類の現在のスライド(ページ)以降に配置していくAppleScriptです。

作業の過程をiPhoneで写真撮影。撮影した写真を写真.app(Photos.app)経由でKeynote書類にまとめる作業を行なっていました。作業工程を時間こみで表示できないとわかりにくかったので、Keynoteの各スライドに時刻を入れるようにAppleScriptを書いておきました(同じ作業が二度あるかは不明ですが、二度目からは明らかに時間の節約。つまり時間の貯金ができることになります)。

写真.app(Photos)上でKeynoteに配置したい写真を選択しておき、本Scriptを実行します。

Keynote書類上に新規スライドを追加し、撮影時刻と写真を配置していきます。

実行直後にPhotosで選択中の写真をファイルに書き出すため、若干待たされます。

# 複数のマシンでiCloudを介して写真を同期した場合に、写真.appのライブラリの写真の並び順は撮影日時どおりにならないようなので、明示的にソートしておく必要があるようです

ちなみに、写真の自作キーボードキットはこの後フットペダルにつなぎなおして、PPSSPP用の足踏みコントローラー化する予定です(「戦場の絆ポータブル」用)。

AppleScript名:Photosで選択中の写真をKeynoteの現在の書類の現在のスライド以降に配置
—
–  Created by: Takaaki Naganoya
–  Created on: 2019/05/26
—
–  Copyright © 2019 Piyomaru Software, All Rights Reserved
—
use AppleScript version "2.4"
use scripting additions
use framework "Foundation"
use framework "AppKit"
use BPlus : script "BridgePlus" –https://www.macosxautomation.com/applescript/apps/BridgePlus.html
use mdLib : script "Metadata Lib" version "2.0.0" –https://www.macosxautomation.com/applescript/apps/Script_Libs.html#Metadata_Lib

property NSUUID : a reference to current application’s NSUUID
property NSString : a reference to current application’s NSString
property NSFileManager : a reference to current application’s NSFileManager

tell application "Keynote"
  if (count every document) = 0 then return
end tell

–Photosで選択中の写真をすべて書き出してalias listを取得する
set aList to exportSelectedPhotoOnPhotos() of me
if aList = {} or aList = false then return

set aLen to length of aList

–書き出した画像の親フォルダを求めておく(あとで削除するため)
tell application "Finder"
  set parentFol to parent of (item 1 of aList)
end tell

tell application "Keynote"
  tell front document
    tell current slide
      set curNum to slide number –現在表示中のスライドの番号(ページ数)を取得する
    end tell
    
    
–Photosから取得した写真のアイテム数でループ
    
repeat with i from 1 to aLen
      set aPhoto to contents of item i of aList
      
set newSlide to make new slide at slide (curNum + i) with properties {base slide:master slide "画像(横長)"} –This item is localized!! Maybe a "Photo"
      
set creTime to getCreationTime(aPhoto) of me
      
tell newSlide
        set object text of default title item to creTime
        
set file name of image 1 to aPhoto –place an image to image placeholder
      end tell
      
      
–配置画像を削除
      
tell application "Finder"
        delete aPhoto –配置した写真を削除
      end tell
    end repeat
  end tell
end tell

–あとしまつ
tell application "Finder"
  delete parentFol –画像のダウンロードフォルダを削除
end tell

–指定のaliasからExif情報の作成日の時刻情報を返す
on getCreationTime(anAlias)
  set exifDate to readExifDateTimeOriginal(anAlias) of me
  
return time string of exifDate
end getCreationTime

–Photosで選択中のファイルをtmporaryフォルダに書き出してalias listで返す
on exportSelectedPhotoOnPhotos()
  set dtPath to (path to temporary items) as text
  
set aUUID to NSUUID’s UUID()’s UUIDString() as text
  
  
set dirPath to ((POSIX path of dtPath) & aUUID)
  
set fileManager to NSFileManager’s defaultManager()
  
set aRes to (fileManager’s createDirectoryAtPath:dirPath withIntermediateDirectories:true attributes:(missing value) |error|:(reference))
  
set dtPath to dtPath & aUUID
  
  
tell application "Photos"
    set a to selection
    
if a = {} then return {}
    
set aRes to (export a to file dtPath)
  end tell
  
  
tell application "Finder"
    tell folder dtPath
      set fList to (every file) as alias list
    end tell
  end tell
  
  
if fList = {} then return false
  
return fList
end exportSelectedPhotoOnPhotos

–指定JPEG画像のExif情報からDateTimeOriginalを取得してAS dateオブジェクトに変換して返す
on readExifDateTimeOriginal(aTargFileAlias)
  set theMetadata to readMetadataFrom(aTargFileAlias) of me
  
if theMetadata = false then return false
  
  
set keysList to theMetadata’s allKeys()
  
  
if "{Exif}" is not in (keysList as list) then return false
  
  
set exifDate to theMetadata’s valueForKeyPath:"{Exif}.DateTimeOriginal"
  
if exifDate = missing value then return false
  
  
set a to NSString’s stringWithString:exifDate
  
set {aDateStr, aTimeStr} to (a’s componentsSeparatedByString:" ") as list
  
set bDateStr to repChar(aDateStr, ":", "/") of me
  
set fullDate to date (bDateStr & " " & aTimeStr)
  
  
return fullDate
end readExifDateTimeOriginal

–指定のファイルからメタデータを取得する
on readMetadataFrom(imageFile)
  load framework
  
set {theRecord, theError} to current application’s SMSForder’s metadataFromImage:imageFile |error|:(reference)
  
if theRecord = missing value then — there was a problem, so extract the error description
    error false
  else
    return theRecord
  end if
end readMetadataFrom

–文字置換
on repChar(origText as string, targChar as string, repChar as string)
  set curDelim to AppleScript’s text item delimiters
  
set AppleScript’s text item delimiters to targChar
  
set tmpList to text items of origText
  
set AppleScript’s text item delimiters to repChar
  
set retText to tmpList as string
  
set AppleScript’s text item delimiters to curDelim
  
return retText
end repChar

★Click Here to Open This Script 

Posted in Calendar exif file Image list | Tagged 10.12savvy 10.13savvy 10.14savvy Finder Keynote NSFileManager NSString NSUUID Photos | 1 Comment

URLにリソースが存在するかチェック v5(NSURLSession)

Posted on 5月 24, 2019 by Takaaki Naganoya

指定URLの存在確認を行うAppleScriptです。

以前はNSURLConnectionを使って確認するものを使っていましたが、NSURLSessionへと移行しようかというところ。

もちろん、shellのcurlコマンドを使えば数行で済んでしまいますが、そこをあえてCocoaの機能を利用して、というよりはちょっと前に書いたREST API呼び出しのサブルーチンが絶好調で動いているので、これをそのまま流用してみました。

ライブラリ化して自分のScriptのバンドル内に入れておくとか、~/Library/Script Librariesフォルダに入れておくとか、そういう使い方になると思います。自分でもわざわざこれだけの機能のために、これだけの量のコードをゼロから書くことは……めったにありません。

AppleScript名:URLにリソースが存在するかチェック(curl版)_v2
set aURL to "http://www.apple.com/jp/"
set aRes to chekURLExistence(aURL) of me

on chekURLExistence(aURL)
  try
    set aRes to do shell script ("/usr/bin/curl -LI " & aURL)
  on error
    return false
  end try
  
return ((aRes contains "HTTP/1.1 200") or (aRes contains "HTTP/2 200")) as boolean
end chekURLExistence

★Click Here to Open This Script 

AppleScript名:URLにリソースが存在するかチェック v5(NSURLSession)
— Created 2019-05-24 by Takaaki Naganoya
— 2019 Piyomaru Software
use AppleScript version "2.4"
use scripting additions
use framework "Foundation"

property |NSURL| : a reference to current application’s |NSURL|
property NSString : a reference to current application’s NSString
property NSURLSession : a reference to current application’s NSURLSession
property NSJSONSerialization : a reference to current application’s NSJSONSerialization
property NSMutableURLRequest : a reference to current application’s NSMutableURLRequest
property NSUTF8StringEncoding : a reference to current application’s NSUTF8StringEncoding
property NSURLSessionConfiguration : a reference to current application’s NSURLSessionConfiguration

property retData : missing value
property retCode : 0
property retHeaders : 0
property drecF : false

set aURL to "http://piyocast.com/as/"
set uRes to chekURLExistence(aURL) of me
–> true

on chekURLExistence(aURL as string)
  set webRes to callRestGETAPIAndParseResults(aURL, 5) of me
  
return ((retCode of webRes) as integer = 200)
end chekURLExistence

— 指定URLにファイル(画像など)が存在するかチェック
–> {存在確認結果(boolean), レスポンスヘッダー(NSDictionary), データ(NSData)}
on callRestGETAPIAndParseResults(reqURLStr as string, timeOutSec as real)
  set (my retData) to false
  
set (my retCode) to 0
  
set (my retHeaders) to {}
  
set (my drecF) to false
  
  
set aURL to |NSURL|’s URLWithString:reqURLStr
  
set aRequest to NSMutableURLRequest’s requestWithURL:aURL
  
aRequest’s setHTTPMethod:"GET"
  
aRequest’s setValue:"gzip" forHTTPHeaderField:"Content-Encoding"
  
aRequest’s setValue:"application/json; charset=UTF-8" forHTTPHeaderField:"Content-Type"
  
  
set aConfig to NSURLSessionConfiguration’s defaultSessionConfiguration()
  
set aSession to NSURLSession’s sessionWithConfiguration:aConfig delegate:(me) delegateQueue:(missing value)
  
set aTask to aSession’s dataTaskWithRequest:aRequest
  
  
set hitF to false
  
aTask’s resume() –Start URL Session
  
  
repeat (1000 * timeOutSec) times
    if (my drecF) = true then
      set hitF to true
      
exit repeat
    end if
    
delay ("0.001" as real)
  end repeat
  
  
if hitF = false then error "REST API Timeout Error"
  
  
return {retData:retData, retCode:retCode, retHeaders:retHeaders}
end callRestGETAPIAndParseResults

on URLSession:tmpSession dataTask:tmpTask didReceiveData:tmpData
  parseSessionResults(tmpSession, tmpTask, tmpData) of me
  
set (my drecF) to true
end URLSession:dataTask:didReceiveData:

–ないとエラーになるので足した。とくに何もしていない
on URLSession:tmpSession dataTask:tmpTask willCacheResponse:cacheRes completionHandler:aHandler
  —
end URLSession:dataTask:willCacheResponse:completionHandler:

on parseSessionResults(aSession, aTask, tmpData)
  set aRes to aTask’s response()
  
set (my retCode) to aRes’s statusCode()
  
set (my retHeaders) to aRes’s allHeaderFields()
  
  
set resStr to NSString’s alloc()’s initWithData:tmpData encoding:(NSUTF8StringEncoding)
  
set jsonString to NSString’s stringWithString:(resStr)
  
  
set jsonData to jsonString’s dataUsingEncoding:(NSUTF8StringEncoding)
  
set aJsonDict to NSJSONSerialization’s JSONObjectWithData:jsonData options:0 |error|:(missing value)
  
  
set (my retData) to aJsonDict as anything
end parseSessionResults

★Click Here to Open This Script 

Posted in Network Record URL | Tagged 10.12savvy 10.13savvy 10.14savvy NSJSONSerialization NSMutableURLRequest NSString NSURL NSURLSession NSURLSessionConfiguration NSUTF8StringEncoding | Leave a comment

ScriptDebuggerでオープン中のScriptをScriptBundleに

Posted on 5月 23, 2019 by Takaaki Naganoya

ScriptDebuggerを使っていて、この作業がひんぱんに発生するのでScriptで自動化しました。

AppleScript書類を編集していて、バンドル内にFrameworkなどを突っ込みたいのにフラットなAppleScript書類(.scpt)だったので、そのままでは突っ込めず、コピペで新規バンドル書類(.scptd)を作成して、同じ名前で保存し直す作業です。

とてもとても標準機能で実装されていそうな内容ですが、子細に調査して存在していなかったので(ASObjC Explorerにはあったような気が)、ささっとAppleScriptで実装してScriptDebuggerのスクリプトメニューに入れて使っています。

ウィンドウの表示座標をきっちりそろえるとか、オリジナルのScriptを新規Scriptの作成後にクローズするとか、作りたくなってウズウズしてくる(自分的な)完成度の低さですが、そこでかっちり作り込むと「仕事中にちょっとだけ作るScript」の域を超えてしまうので、自制した次第です。

「すでに、バンドル形式のScriptが同一フォルダ内に存在する場合には警告を出して処理を中止する」か、あるいは「ファイル名に子番号をつけて重複を回避する」ぐらいの処理は足してもいいような気がします。


▲初期状態。フラットなAppleScript(.scpt)で書かれていたので、バンドル内にいろいろ追加できない状態


▲本Scriptの実行後の状態。ファイル名は拡張子を「.scptd」に変更しただけの状態

AppleScript名:ScriptをScript Bundleに
— Created 2019-05-23 by Takaaki Naganoya
— 2019 Piyomaru Software
use AppleScript version "2.4"
use scripting additions
use framework "Foundation"

tell application "Script Debugger"
  tell front document
    set myType to script type
    
if myType = bundled compiled script then
      display notification "There is no need to convert…."
      
return
    end if
    
    
set mySource to source text
    
set mySpec to file spec
    
    
try
      close with saving
    on error
      display notification "Can not save this Script. So I quited conversion process…."
      
return
    end try
  end tell
end tell

–ファイルパスの拡張子を付け替えてFileに変換
set pathString to current application’s NSString’s stringWithString:(POSIX path of mySpec)
set newPath to ((pathString’s stringByDeletingPathExtension())’s stringByAppendingPathExtension:"scptd") as string
set aFile to POSIX file newPath

–ファイル拡張子を付け替えた新規ファイル名で保存
tell application "Script Debugger"
  set aDoc to make new document with properties {source text:mySource, script type:bundled compiled script}
  
tell aDoc
    set aRes to compile –構文確認(ねんのため)
    
if aRes = false then return
    
    
–compileを通った場合のみファイル保存を行う
    
save in aFile
  end tell
end tell

★Click Here to Open This Script 

Posted in file File path | Tagged 10.12savvy 10.13savvy 10.14savvy ScriptDebugger | 1 Comment

Keynoteで表示中のスライド上の表を2つ、縦方向に連結する

Posted on 5月 21, 2019 by Takaaki Naganoya

Keynoteでオープン中の書類の表示中のスライド(ページ)上にある表を2つ選択して、縦方向に連結するAppleScriptです。

実行頻度から、横連結だけでいいかと思っていたのですが、結局縦連結のScriptも書いておきました。たぶん、こっち(縦連結)は(個人的には)使わないでしょう。

一定の実用性を確保するためには、各表のヘッダー行のラベルを見て、同じラベルのデータを同じ列に入れる必要があることでしょう。本Scriptの実装レベルだと、物理的にただ表をつなげるだけです。

また、ヘッダー部分の処理は一切行っていません。実用性を考えればヘッダー行やヘッダー列を無視して、データ部のみ連結するといった処理が必要になってくると思います。現状の実装では「(作った本人が)わかっているから別にそこまでしなくていい」という程度のお手軽実装です。


▲マージ対象の表


▲現在表示中のスライド(ページ)中に存在している表のタイトルが一覧表示される。座標位置をもとに上→下、左→右とソートした順で表示


▲複数項目を選択する場合にはCommandキーを押しながら選択


▲2つの表を縦方向にマージ(連結)。マージされたほうの表は削除

macOS 10.14.5+Keynote v9.0.2で作成および動作確認を行っています。macOS 10.14上ではBridgePlusを呼び出すためにScript Debugger上で実行するか、アプレット書き出しして実行する必要があります。または、アプレット書き出ししてスクリプトメニューから呼び出してもよいでしょう。

# 個人的には、めんどくさいのでmacOS 10.14環境ではSIP(System Integrity Protection)をオフにして使っています

macOS 10.13.x、macOS 10.12.xでは普通にスクリプトエディタなどから実行可能です。

AppleScript名:Keynoteで表示中のスライド上の表を2つ、縦方向に連結する.scpt
— Created 2019-05-21 by Takaaki Naganoya
— 2019 Piyomaru Software
use AppleScript version "2.4" — Yosemite (10.10) or later
use framework "Foundation"
use scripting additions
use Bplus : script "BridgePlus" –https://www.macosxautomation.com/applescript/apps/BridgePlus.html

tell application "Keynote"
  tell front document
    tell current slide
      set tCount to count every table
      
if tCount < 2 then
        display dialog "There is no tables to merge" buttons {"OK"} default button 1
        
return
      end if
      
      
set tList to every table
      
set tInfoList to {}
      
repeat with i in tList
        set {tPosX, tPosY} to position of i
        
set tName to name of i
        
set the end of tInfoList to {tName, tPosX, tPosY}
      end repeat
    end tell
  end tell
end tell

–表のY座標、X座標で昇順ソート(上→下、左→右の順で並べる)
set sortedList to sort2DList(tInfoList, {3, 2}, {true, true}) of me

–表リストから名前だけ抽出
set tmpTList to retSpecifiedItemFrom2DList({1}, sortedList) of me

–マージ対象のテーブルを名称で選択
set tRes to choose from list tmpTList with title "Vertial Merge Tables" with prompt "Select merge target two table names " & return & "(Sorted Up-> Down, Left->Right)" with multiple selections allowed
if tRes = false then
  display dialog "Canseled" buttons {"OK"} default button 1
  
return
end if

if length of tRes is not equal to 2 then
  display dialog "Select *two* tables" buttons {"OK"} default button 1
  
return
end if

–set mDirection to contents of (choose from list {"Vertival", "Horizontal"} with title "Select Merge Direction" without empty selection allowed)
set mDirection to "Vertival"

set f1Table to contents of item 1 of tRes –Left (Original)
set f2Table to contents of item 2 of tRes –Right (merged)

tell application "Keynote"
  tell front document
    tell current slide
      –マージ先の表のサイズを取得(幅、高さ)
      
tell table f1Table
        set f1Width to column count
        
set f1Height to row count
      end tell
      
      
–マージされるの表のサイズを取得(幅、高さ、データを2D Listで)
      
tell table f2Table
        set f2Width to column count
        
set f2Height to row count
        
set f2DatList to {}
        
repeat with i from 1 to f2Height
          tell row i
            set aRowDat to value of every cell
          end tell
          
set the end of f2DatList to aRowDat
        end repeat
      end tell
      
      
–マージ先の表のサイズを変更して新規追加したセルにデータを埋める
      
tell table f1Table
        set row count to row count + f2Height –表リサイズ
        
        
set rowCount to f1Height + 1
        
repeat with i in f2DatList
          set colCount to 1
          
          
tell row rowCount
            repeat with ii in i
              set jj to contents of ii
              
              
if jj is not equal to missing value then –空白セルを処理スキップ
                tell cell colCount
                  set value to jj
                end tell
              end if
              
              
set colCount to colCount + 1
            end repeat
          end tell
          
          
set rowCount to rowCount + 1
        end repeat
      end tell
      
      
delete table f2Table
    end tell
  end tell
end tell

–2D Listをソート
on sort2DList(aList as list, sortIndexes as list, sortOrders as list)
  load framework
  
–index値をAS流(アイテムが1はじまり)からCocoa流(アイテムが0はじまり)に変換
  
set newIndex to {}
  
repeat with i in sortIndexes
    set j to contents of i
    
set j to j – 1
    
set the end of newIndex to j
  end repeat
  
  
–Sort TypeのListを作成(あえて外部から指定する内容でもない)
  
set sortTypes to {}
  
repeat (length of sortIndexes) times
    set the end of sortTypes to "compare:"
  end repeat
  
  
set resList to (current application’s SMSForder’s subarraysIn:(aList) sortedByIndexes:newIndex ascending:sortOrders sortTypes:sortTypes |error|:(missing value)) as list
  
return resList
end sort2DList

–指定2Dリストから、各要素の指定アイテム目を取り出して(1D Listで)返す
on retSpecifiedItemFrom2DList(aList as list, bList as list)
  set newList to {}
  
repeat with i in aList
    repeat with ii in bList
      set j to contents of ii
      
set a to contents of (item i of j)
      
set the end of newList to a
    end repeat
  end repeat
  
return newList
end retSpecifiedItemFrom2DList

★Click Here to Open This Script 

Posted in list | Tagged 10.12savvy 10.13savvy 10.14savvy Keynote | Leave a comment

Microsoft EdgeのMac版がCanaryチャンネルでプレビュー公開。AS対応

Posted on 5月 21, 2019 by Takaaki Naganoya

Microsoft製のWebブラウザが久しぶりにmacOSに帰ってきました。Microsoft EdgeのMac版がCanaryチャンネルでプレビュー公開されました。Chromiumベースで開発されているというか、まんまChromiumともいえる状態であり、ファーストリリースでありながらAppleScriptのサポート機能が搭載されています。

AppleScript非対応のWebブラウザはダウンロードしても100%ゴミ箱行きになるため、対応しているのはいいことです。ただし、ChromeのScriptingで不満に思っている点は100% Edgeでも再現します。

FileMergeでsdefの差分をチェックしてみたら、差は検出されませんでした。挙動もほぼChromeと同じです。今のところアプリケーション名が「Microsoft Edge Canary」(Bundle ID=com.microsoft.Edge.Canary)であるため、正式リリース時にはこの「Canary」が外れるものと思われます。

AppleScript名:Edge Canaryの情報を取得する
tell application "Microsoft Edge Canary"
  properties
  
–> {bookmarks bar:bookmark folder id 1 of application "Microsoft Edge Canary", frontmost:false, other bookmarks:bookmark folder id 2 of application "Microsoft Edge Canary", class:application, name:"Microsoft Edge Canary", version:"76.0.161.0"}
end tell

★Click Here to Open This Script 

AppleScript名:Edge CanaryにBundle IDでアクセスする
tell application id "com.microsoft.Edge.Canary"
  properties
  
–> {bookmarks bar:bookmark folder id 1 of application "Microsoft Edge Canary", frontmost:false, other bookmarks:bookmark folder id 2 of application "Microsoft Edge Canary", class:application, name:"Microsoft Edge Canary", version:"76.0.161.0"}
end tell

★Click Here to Open This Script 

AppleScript名:Edge Canaryの現在のウィンドウの現在のタブの情報にアクセスする
tell application "Microsoft Edge Canary"
  tell window 1
    tell active tab
      properties
      
–> {URL:"chrome://settings/help", name:"Settings", loading:false, class:tab, id:8}
      
–> {URL:"http://piyocast.com/as/", name:"AppleScriptの穴 – Useful & Practical AppleScript archive. Click ’★Click Here to Open This Script’ Link to download each AppleScript", loading:false, class:tab, id:2}
    end tell
  end tell
end tell

★Click Here to Open This Script 

AppleScript名:Edge Canaryで指定URLをオープンする
tell application "Microsoft Edge Canary"
  make new window
  
tell window 1
    tell tab 1
      set URL to "https://www.apple.com/jp"
    end tell
  end tell
end tell

★Click Here to Open This Script 

AppleScript名:Edge Canaryで指定のローカルのHTMLを表示する
set anAlias to choose file

tell application "Finder"
  set aURL to URL of anAlias
end tell

tell application "Microsoft Edge Canary"
  open location aURL
end tell

★Click Here to Open This Script 

Posted in sdef | Tagged 10.12savvy 10.13savvy 10.14savvy Microsoft Edge | Leave a comment

Keynoteで表示中のスライド上の表を2つ、横方向に連結する

Posted on 5月 21, 2019 by Takaaki Naganoya

Keynoteでオープン中の書類の表示中のスライド(ページ)上にある表を2つ選択して、横方向に連結するAppleScriptです。

Keynoteで資料を作っていて、あまりにこういう処理が多いのでScript化しました。縦方向に連結してもいいのですが(最初は連結方向を選択させかけた)、実際に扱っている表が横長のケースが(個人的に)多いので「横連結だけでいいや」ということに。


▲マージ対象の表


▲現在表示中のスライド(ページ)中に存在している表のタイトルが一覧表示される。座標位置をもとに上→下、左→右とソートした順で表示


▲複数項目を選択する場合にはCommandキーを押しながら選択


▲2つの表を横方向にマージ(連結)。マージされたほうの表は削除

macOS 10.14.5+Keynote v9.0.2で作成および動作確認を行っています。macOS 10.14上ではBridgePlusを呼び出すためにScript Debugger上で実行するか、アプレット書き出しして実行する必要があります。または、アプレット書き出ししてスクリプトメニューから呼び出してもよいでしょう。

# 個人的には、めんどくさいのでmacOS 10.14環境ではSIP(System Integrity Protection)をオフにして使っています

macOS 10.13.x、macOS 10.12.xでは普通にスクリプトエディタなどから実行可能です。

AppleScript名:Keynoteで表示中のスライド上の表を2つ、横方向に連結する.scpt
— Created 2019-05-21 by Takaaki Naganoya
— 2019 Piyomaru Software
use AppleScript version "2.4" — Yosemite (10.10) or later
use framework "Foundation"
use scripting additions
use Bplus : script "BridgePlus" –https://www.macosxautomation.com/applescript/apps/BridgePlus.html

tell application "Keynote"
  tell front document
    tell current slide
      set tCount to count every table
      
if tCount < 2 then
        display dialog "There is no tables to merge" buttons {"OK"} default button 1
        
return
      end if
      
      
set tList to every table
      
set tInfoList to {}
      
repeat with i in tList
        set {tPosX, tPosY} to position of i
        
set tName to name of i
        
set the end of tInfoList to {tName, tPosX, tPosY}
      end repeat
    end tell
  end tell
end tell

–表のY座標、X座標で昇順ソート(上→下、左→右の順で並べる)
set sortedList to sort2DList(tInfoList, {3, 2}, {true, true}) of me

–表リストから名前だけ抽出
set tmpTList to retSpecifiedItemFrom2DList({1}, sortedList) of me

–マージ対象のテーブルを名称で選択
set tRes to choose from list tmpTList with title "Select Merge Tables" with prompt "Select merge target two table names " & return & "(Sorted Up-> Down, Left->Right)" with multiple selections allowed
if length of tRes is not equal to 2 then
  display dialog "Select *two* tables"
  
return
end if

–set mDirection to contents of (choose from list {"Vertival", "Horizontal"} with title "Select Merge Direction" without empty selection allowed)
set mDirection to "Horizontal"

set f1Table to contents of item 1 of tRes –Left (Original)
set f2Table to contents of item 2 of tRes –Right (merged)

tell application "Keynote"
  tell front document
    tell current slide
      –マージ先の表のサイズを取得(幅、高さ)
      
tell table f1Table
        set f1Width to column count
        
set f1Height to row count
      end tell
      
      
–マージされるの表のサイズを取得(幅、高さ、データを2D Listで)
      
tell table f2Table
        set f2Width to column count
        
set f2Height to row count
        
set f2DatList to {}
        
repeat with i from 1 to f2Height
          tell row i
            set aRowDat to value of every cell
          end tell
          
set the end of f2DatList to aRowDat
        end repeat
      end tell
      
      
–マージ先の表のサイズを変更して新規追加したセルにデータを埋める
      
tell table f1Table
        set column count to column count + f2Width –表リサイズ
        
        
set rowCount to 1
        
repeat with i in f2DatList
          set colCount to (f1Width + 1)
          
          
tell row rowCount
            repeat with ii in i
              set jj to contents of ii
              
              
if jj is not equal to missing value then –空白セルを処理スキップ
                tell cell colCount
                  set value to jj
                end tell
              end if
              
              
set colCount to colCount + 1
            end repeat
          end tell
          
          
set rowCount to rowCount + 1
        end repeat
      end tell
      
      
delete table f2Table
    end tell
  end tell
end tell

return f2DatList

–2D Listをソート
on sort2DList(aList as list, sortIndexes as list, sortOrders as list)
  load framework
  
–index値をAS流(アイテムが1はじまり)からCocoa流(アイテムが0はじまり)に変換
  
set newIndex to {}
  
repeat with i in sortIndexes
    set j to contents of i
    
set j to j – 1
    
set the end of newIndex to j
  end repeat
  
  
–Sort TypeのListを作成(あえて外部から指定する内容でもない)
  
set sortTypes to {}
  
repeat (length of sortIndexes) times
    set the end of sortTypes to "compare:"
  end repeat
  
  
set resList to (current application’s SMSForder’s subarraysIn:(aList) sortedByIndexes:newIndex ascending:sortOrders sortTypes:sortTypes |error|:(missing value)) as list
  
return resList
end sort2DList

–指定2Dリストから、各要素の指定アイテム目を取り出して(1D Listで)返す
on retSpecifiedItemFrom2DList(aList as list, bList as list)
  set newList to {}
  
repeat with i in aList
    repeat with ii in bList
      set j to contents of ii
      
set a to contents of (item i of j)
      
set the end of newList to a
    end repeat
  end repeat
  
return newList
end retSpecifiedItemFrom2DList

★Click Here to Open This Script 

Posted in list Sort | Tagged 10.12savvy 10.13savvy 10.14savvy Keynote | Leave a comment

Keynoteの各slideのtitleから目次のテキストを作成してNumbersの表を作成

Posted on 5月 20, 2019 by Takaaki Naganoya

現在オープン中の最前面のKeynote書類の各スライド(ページ)のタイトルを取得して、Numbersの新規書類上にページとタイトルの一覧表を作成するAppleScriptです。

こういうのが、一番オーソドックスで誰でも「そういうのがあったら楽なのに」と思わせるような用途でしょう。

Keynoteの書類を作成してページ数が増え、タイトル一覧をながめつつ削除したりアップデートしたりする対象を探したいような場合に、このような一覧表を作成させるとわかりやすくて便利です。

本Scriptは本当にありもののルーチンをつなげて最低限の処理を行わせたものですが、さらに手の込んだ処理を行うことも可能です。たとえば、別途Keynote書類をスライド(ページ)ごとに画像書き出ししておいて、Numbersのセル上にプレビュー画像として入れておくとか。あるいは、Keynote書類の各スライドのマスターアイテム名を見て処理を変えるとか。実にいろいろあります。

作成と動作確認はmacOS 10.14.5+Keynote 9.0.2で行っていますが、macOS 10.13/10.12でも動作するはずですしました。

AppleScript名:Keynoteの各slideのtitleから目次のテキストを作成してNumbersの表を作成
—
–  Created by: Takaaki Naganoya
–  Created on: 2019/05/20
—
–  Copyright © 2019 Piyomaru Software, All Rights Reserved

use AppleScript version "2.4" — Yosemite (10.10) or later
use framework "Foundation"
use scripting additions

–Keynoteの各slideのタイトルを取得する
tell application "Keynote"
  tell document 1
    set aList to object text of default title item of every slide
  end tell
end tell

set aLen to (length of aList) + 1 –ヘッダー行の分を+1
set bLen to 2 –data width (columns)

–2D Listを作成する (Page, Title)
set newList to {}
set pCount to 1
repeat with i in aList
  set j to contents of i
  
set the end of newList to {pCount as string, j}
  
set pCount to pCount + 1
end repeat

–Numbersの書類を新規作成して、指定サイズの表を作成する
makeNewNumbersDocumentAndTable(aLen, bLen) of me

–作成した新規書類の表1に2D Listを入れる(ただし、100行分ぐらいを上限とする。それ以上は別途CSVを書き出してオープンさせたほうが圧倒的に高速)I
fillCurrentTable(newList) of me

on fillCurrentTable(aList)
  set aLen to length of aList
  
set aWidth to length of first item of aList
  
  
tell application "Numbers"
    tell front document
      tell active sheet
        tell table 1
          repeat with i from 1 to aLen
            tell row (i + 1)
              set aRowList to contents of item i of aList
              
repeat with ii from 1 to aWidth
                tell cell ii
                  set aTmpData to contents of item ii of aRowList
                  
ignoring application responses
                    set value to aTmpData
                  end ignoring
                end tell
              end repeat
            end tell
          end repeat
        end tell
      end tell
    end tell
  end tell
end fillCurrentTable

on makeNewNumbersDocumentAndTable(aHeight, aWidth)
  tell application "Numbers"
    make new document
    
    
tell front document
      tell active sheet
        delete every table
      end tell
    end tell
    
    
tell front document
      tell active sheet
        set tRes to make new table with properties {row count:aHeight, column count:aWidth}
        
return tRes
      end tell
    end tell
  end tell
end makeNewNumbersDocumentAndTable

★Click Here to Open This Script 

Posted in list | Tagged 10.11savvy 10.12savvy 10.13savvy 10.14savvy Keynote Numbers | Leave a comment

2D Listの行列入れ替え(transpose)

Posted on 5月 16, 2019 by Takaaki Naganoya

2D List(2次元配列)の行列入れ替えを行うAppleScriptです。

本プログラムは前の(2018.1.31に消える前の)Blogに掲載していたものを動作検証を行いつつ再掲載したもので、そもそもはShane StanleyのBridgePlus AppleScript Libraryのドキュメントに掲載されているもの、ほぼそのままです。

BridgePlusの前身であるASObjCExras.frameworkのときにこの機能を見つけて、どうしてこの機能がこの仕様になっているのか、その当時は理解できていませんでした。

2次元配列の回転だけなら、単純にデータを(画像のように)回転させるだけの処理のはずですが(→ 時計まわりに90度回すサンプル)、そういうわけでもない。なんでこんな処理をShaneが書いたのか理解できず、当時は「なーんか使えないメソッドがついてんなー」ぐらいにしか思っていませんでした。

そして、出会ってしまったわけです。この機能がバリバリに必要なデータに。そして、深く理解しました。これはShaneが説明不足すぎです。そして、「致命的に必要な機能」だったので最初からついていたわけです。

ExcelでもNumbersでもGoogle Spreadsheetでも、1レコードといったら行ごとに配置されているのが普通です。プログラマーを10人集めて、2次元配列でそういうデータを表現しろと言われたら、世界中のどこのプログラマーでもだいたい10人とも行ごとにレコードを表現すると思います。

そんな中、1レコード=1行ではなく1レコード=1列とかいうデータがやってきて、途方に暮れたすえにNumbers上で「行と列を転置」機能を利用して縦横の入れ替えを行なって、ハッと気づきました。

 「これや……このためについとったんや」

調べてみたら、ビンゴ! まさに2D Listのtransposeのための機能がBridgePlusの、

SMSForder's colsToRowsIn:① |error|:②

だったわけです。

「プログラミングの身体性」ともいうべきものがあります。実体験をもとにするとデータやオブジェクトをどのように操作すべきなのかを深く理解でき、逆に実体験がともなっていないとまったく理解できないという話であり、これがまさにそれだったのでしょう(AppleScriptってプログラミングの身体性の塊のような気も、、、、一般のプログラマーが仕様だけ読んで組もうとして挫折した話をウンザリするほど聞くもので。実際にアプリケーションを動かしてみないと理解できないことが多すぎです)。

なので、こういう「息を飲むような非常識なデータ」を前に途方に暮れないかぎり、このメソッドの有用性は理解できないと思います(自分がそうだったので)。

AppleScript名:2D Listの行列入れ替え.scptd
—
–  Created by: Takaaki Naganoya
–  Created on: 2019/05/16
—
–  Copyright © 2019 Piyomaru Software, All Rights Reserved
—
use AppleScript version "2.4" — Yosemite (10.10) or later
use framework "Foundation"
use scripting additions
use script "BridgePlus" –https://www.macosxautomation.com/applescript/apps/BridgePlus.html

set aList to {{"r0", "f1", "f2"}, {"r1", "f1r1", "f2r1"}, {"r2", "f1r2", "f2r2"}, {"r3", "f1r3", "f2r3"}}
set bList to transpose2DList(aList) of me
–> {{"r0", "r1", "r2", "r3"}, {"f1", "f1r1", "f1r2", "f1r3"}, {"f2", "f2r1", "f2r2", "f2r3"}}

on transpose2DList(aList as list)
  load framework
  
return (ASify from (current application’s SMSForder’s colsToRowsIn:aList |error|:(missing value)))
end transpose2DList

★Click Here to Open This Script 

Posted in list | Tagged 10.11savvy 10.12savvy 10.13savvy 10.14savvy Excel Numbers | Leave a comment

Keynoteのexport optionsにバグ

Posted on 5月 14, 2019 by Takaaki Naganoya

Keynoteのdocumentをmovieに書き出す(export)際に指定するオプションにバグがあることに気づきました。

AppleScript Users ML上でNigel Garvey氏に検証に付き合っていただきました。同氏にはこの場を借りて感謝の言葉を申し上げる次第です。

確認したのはv8.3および最新のv9.0.2ですが、実際にはv7.1で発生した変更によって起こったものと推測されています。

上記のように、手元のアプリケーションは(ほぼ)すべてのバージョンについてAppleScript用語辞書をHTMLに書き出してあり、diffにより差分チェックを行なっています。赤いタグ(ラベル)がついているのが変更があったバージョンで、この履歴をたどるとv7.0のexport optionsは、

movie format small / medium / large -- format for exported movie.

となっていましたが、Keynote v7.1において、

movie format 360p / 540p / 720p / 1080p / 2160p / native size -- format for exported movie.

と変更されました。実際にこれらのオプションを指定すると、構文確認時にエラーになります。AppleScriptで数値で始まる予約語(例:1080p)や演算記号を含む予約語(例:C++)は使えないので、そもそも言語仕様的に無理なものをsdefに定義しています。Appleの担当者の頭が沸いているとしか思えません。素人以下です。

それぞれ、small / medium / largeというsynonymが定義されているため、{movie format: large}などと入力して構文確認できますが、synonymでしかないため元のキーワードにフォワードされます。結果として、{movie format: 720p} と解釈され、エラーになります。

これは、AppleScriptの処理系の問題ではなくKeynote側の実装が間違っているためです(一切動作確認をしていないんでしょう)。

解決策はとくにありませんが、オリジナルサイズを指定する「native size」オプションだけはエラーにならないため、同オプションを指定するしかないと思います。

AppleScript名:KeynoteからのMovie書き出し
set targetFileHFSPath to (choose file name) as string –かならずファイル拡張子に「.m4v」を指定する必要がある

with timeout of 3600 seconds
  tell application "Keynote"
    export front document to file targetFileHFSPath as QuickTime movie with properties {movie format:native size}
  end tell
end timeout

★Click Here to Open This Script 

Posted in Bug | Tagged 10.11savvy 10.12savvy 10.13savvy 10.14savvy Keynote | 1 Comment

Mail.appで未読メール数を取得する

Posted on 5月 14, 2019 by Takaaki Naganoya

Mail.appで未読メールを取得するAppleScriptです。

まず、「未読メール」とは何かという話があります。未読メールとは、「まだ読んでいないメール」のことです。つまり、すべてのメッセージに未読/既読のフラグが用意されています。

極論すれば、すべてのメッセージの未読/既読状態を調べる必要があるわけですが、さすがにそれだと実用性がいまひとつなので、メールフォルダごとに未読メッセージのカウントが求められるようになっています。

一般的に「未読メール」といった場合、サブフォルダに仕分けしたメールの未読件数ではなく、受信メールボックス(INBOX)に入っている未読メールをカウントすることになることでしょう。

ただし、Mail.appには複数のメールアカウントを登録できるようになっているため、受信メールボックスのうちそれぞれのアカウントに該当するものが別々に返ってくることになります。

Apple純正のアプリケーションの多くはAppleScriptのオブジェクト名までローカライズされている(過剰ローカライズ)ことが多いのですが、Mail.appについては受信ボックス(=受信トレイ)は「INBOX」となっており、その他のボックスについても(ゴミ箱とか)ローカライズされていません。

画面上の表記 AppleScript上で指定する場合の名称
受信 INBOX
VIP —-
フラグ付き —-
下書き Drafts
送信済み Sent Messages
迷惑メール Junk
ゴミ箱 Deleted Messages
アーカイブ Archive
AppleScript名:メールアカウント名の一覧を取得
tell application "Mail"
  set nameList to name of every account
end tell
–> {"iCloud", "maro@XXXXXXXX"}

★Click Here to Open This Script 

AppleScript名:各アカウントのINBOXフォルダの未読メールを取得する
tell application "Mail"
  set tmpCount to unread count of mailbox "INBOX" of every account
end tell
–> {0, 0}–メールアカウントの数だけ配列要素が返ってくる

★Click Here to Open This Script 

AppleScript名:すべてのINBOXの未読メール数を合計して返す
set aCount to countAllUnreadMessages()
–> 0

on countAllUnreadMessages()
  tell application "Mail"
    set aCount to count every account
    
    
set totalUnreadCount to 0
    
repeat with i from 1 to aCount
      set tmpCount to unread count of mailbox "INBOX" of account i
      
set totalUnreadCount to totalUnreadCount + tmpCount
    end repeat
  end tell
  
  
return totalUnreadCount
end countAllUnreadMessages

★Click Here to Open This Script 

Posted in list | Tagged 10.12savvy 10.13savvy 10.14savvy Mail | Leave a comment

矩形座標同士の衝突判定(共通部分の検出) v3b

Posted on 5月 8, 2019 by Takaaki Naganoya

矩形座標(NSRect)同士の衝突判定を行うAppleScriptのmacOS 10.13以降対応改修版です。

macOS 10.13以降への対応を行う際に注意すべきなのは、NSRectやboundsを取得するScriptが異なる結果を返してこないか、確認を行うことです。

set bRect to current application's NSMakeRect(20, 90, 50, 120)
--> {origin:{x:20.0, y:90.0}, |size|:{width:50.0, height:120.0}}
--> {{20.0, 90.0}, {50.0, 120.0}}--10.13, 10.14, 10.15, 11.0

その中でも矩形同士の衝突(重なり)判定はとくに書き換えが必要な箇所です。

実際に、Adobe Illustratorのデータ上で複数製品のデータが並んで掲載されているケースで、製品ごとに別のマスキングレイヤー上に色違いの矩形を配置することで、その矩形エリア内のIllustratorオブジェクトを特定する処理を行ったときに、本ルーチンを使用していたため(macOS 10.13/14対応のために)書き換えが必要になりました。

macOS 10.13/14対応のための、

{{0.0, 0.0}, {0.0, 0.0}}

の部分が一番重要なポイントです。これが、

{{0, 0}, {0, 0}}

だとうまく動作しません。ここ、ちょっとだけハマりました。

2019/05/10 追記
初版では、NSRectがrecordで返ってくるか(macOS 10.10, 10.11, 10.12)、listで返ってくるか(macOS 10.13, 10.14)をOSのバージョンで判定していました。これは実際のところ間違いではないのですが、OSのバグなのか仕様の公式な変更なのか不明なため、たとえばNSNotFoundの定義値が間違っていたバグなどはmacOS 10.13.1で修正されるなど、マイナーバージョンアップで仕様が変わるケースも観測されています。そのため、OSバージョンを見て判定することは将来的に危険であると判断し、データの型を判定する方法に書き換えました(書き捨てレベルのルーチンなので、型判定を行う書き方もよくしています)。

AppleScript名:矩形座標同士の衝突判定(共通部分の検出) v3b
— Created 2017-03-06 by Takaaki Naganoya
— Modified 2019-05-10 by Takaaki Naganoya
— 2019 Piyomaru Software
use AppleScript version "2.4"
use scripting additions
use framework "Foundation"

set a1Rect to {origin:{x:10, y:10}, |size|:{width:100, height:100}}
set b1Rect to {origin:{x:30, y:30}, |size|:{width:100, height:100}}
set a1Res to detectRectanglesCollision(a1Rect, b1Rect) of me
–>  true
–>  true–macOS 10.13, 10.14

set a4Rect to {origin:{x:0, y:20}, |size|:{width:100, height:10}}
set b4Rect to {origin:{x:1000, y:10000}, |size|:{width:50, height:100}}
set a2Res to detectRectanglesCollision(a4Rect, b4Rect) of me
–>  false
–>  false–macOS 10.13, 10.14

set a3Rect to {origin:{x:30, y:30}, |size|:{width:50, height:50}}
set b3Rect to {origin:{x:10, y:10}, |size|:{width:100, height:100}}
set a3Res to detectRectanglesCollision(a3Rect, b3Rect) of me
–> true
–> true–macOS 10.13, 10.14

set a4Rect to {origin:{x:0, y:20}, |size|:{width:100, height:10}}
set b4Rect to {origin:{x:10, y:10}, |size|:{width:50, height:100}}
set a4Res to detectRectanglesCollision(a4Rect, b4Rect) of me
–> true
–> true–macOS 10.13, 10.14

return {a1Res, a2Res, a3Res, a4Res}

–NSRect同士の衝突判定
on detectRectanglesCollision(aRect, bRect)
  set a1Res to (current application’s NSIntersectionRect(aRect, bRect)) as {record, list}
  
set tmpClass to class of a1Res
  
  
if tmpClass = record then
    –macOS 10.10, 10.11, 10.12
    
return not (a1Res = {origin:{x:0.0, y:0.0}, |size|:{width:0.0, height:0.0}})
  else if tmpClass = list then
    –macOS 10.13 or later
    
return not (a1Res = {{0.0, 0.0}, {0.0, 0.0}})
  end if
end detectRectanglesCollision

★Click Here to Open This Script 

Posted in Record | Tagged 10.11savvy 10.12savvy 10.13savvy 10.14savvy NSRect | 1 Comment

Keynoteで選択中の表を取得する

Posted on 5月 3, 2019 by Takaaki Naganoya

最前面に表示しているKeynote書類中の現在表示中のスライド(ページ)上の選択状態にある表オブジェクトへの参照を求めるAppleScriptです。

Keynote v9.0で、これまで実装されていなかった「selection」が実装されたものの、予約語として存在しているだけで機能アップはしていませんでした(Pages v8.0のついでにアップデート?)。

一方で、同様にselectionが実装されてこなかったにもかかわらず、普通に選択中の表オブジェクトへの参照を取得できているNumbersがあります(ちょっとトリッキーな書き方ですけれども)。

では、そのトリッキーな記述でKeynote上の選択状態にある表オブジェクトへの参照が取得できるのか? という疑問を持って実際に試してみたらできました、というのが本Scriptです。Keynote v8.1+macOS 10.12.6、Keynote v9.0.1+macOS 10.13.6、Keynote v9.0.1+macOS 10.14.4の組み合わせで動作確認しています。

実際に、表オブジェクトを選択して本Scriptを実行すると、表オブジェクトへの参照が得られます。

AppleScript名:Keynoteで選択中の表を取得する
tell application "Keynote"
  tell front document
    tell current slide
      try
        set theTable to first table whose class of selection range is range
      on error
        set tCount to count every table
        
if tCount = 0 then
          error "現在のスライド中に選択状態になっている表オブジェクトが存在しません"
        else
          –選択セルがない場合はTable 1を全選択
          
set theTable to table 1
        end if
      end try
      
      
tell theTable
        set aList to value of every cell
        
–> {1.0, 2.0, 3.0, 4.0, 5.0, 6.0, 7.0, 8.0, 9.0, 10.0, 11.0, 12.0, 13.0, 14.0, 15.0, 16.0, 17.0, 18.0, 19.0, 20.0}
      end tell
    end tell
  end tell
end tell

★Click Here to Open This Script 

Posted in How To | Tagged 10.11savvy 10.12savvy 10.13savvy 10.14savvy Keynote | 1 Comment

アラートダイアログ上にTextField x 2を表示 v2

Posted on 5月 2, 2019 by Takaaki Naganoya

アラートダイアログに簡易UIを実装して便利なダイアログ部品を整備する計画の一環として作成した、アラートダイアログにNSTextFieldを2つ+ラベル用のfield2つを作成して、ユーザーからの数値入力を取得するAppleScriptです。

スクリプトエディタ、ScriptDebuggerの両方で実行できますが、Script Menuから実行するとダイアログが最前面に表示されません。Script Menuから実行する場合にはAppleScript書類の状態で呼び出すのではなく、AppleScriptアプレットに書き出して呼び出すのがよいでしょう。

macOS 10.14上では本Scriptの実行は明確にメインスレッド上で行うことを要求されます。Control-Comand-Rで実行してください。

AppleScript名:アラートダイアログ上にTextField x 2を表示 v2
— Created 2019-05-02 by Takaaki Naganoya
— 2019 Piyomaru Software
use AppleScript version "2.5"
use scripting additions
use framework "Foundation"
use framework "AppKit"

property NSView : a reference to current application’s NSView
property NSAlert : a reference to current application’s NSAlert
property NSTextField : a reference to current application’s NSTextField
property NSRunningApplication : a reference to current application’s NSRunningApplication

property theResult : 0
property returnCode : 0

set paramObj to {myMessage:"Keynoteオブジェクトの2次元詰め込み", mySubMessage:"詰め込み先の矩形サイズを数値で入力してください", mes1:"幅", mes1Default:"900", mes2:"高さ", mes2Default:"500"}

set segRes to my simulateAndRetRect:paramObj
–> {a1Res:900, a2Res:500}

on simulateAndRetRect:paramObj
  –Receive Parameters
  
set aMainMes to (myMessage of paramObj) as string –Main Message
  
set aSubMes to (mySubMessage of paramObj) as string –Sub Message
  
set mes1Label to (mes1 of paramObj) as string –Text Input field 1 Label
  
set mes2Label to (mes2 of paramObj) as string –Text Input field 2 Label
  
set aTextInputString to (mes1Default of paramObj) as string –Text Input field 1 Default value
  
set bTextInputString to (mes2Default of paramObj) as string –Text Input field 2 Default value
  
  
— Create a view
  
set theView to NSView’s alloc()’s initWithFrame:(current application’s NSMakeRect(0, 0, 300, 60))
  
  
— create two input field and their labels pairs
  
–NSTextFields for Input
  
set aTextInput to makeNSTextField(100, 35, 140, 20, true, (aTextInputString), true, true) of me
  
set bTextInput to makeNSTextField(100, 0, 140, 20, true, (bTextInputString), true, true) of me
  
  
–Labels
  
set a1TF to makeNSTextField(0, 35, 100, 20, false, (mes1Label), false, false) of me
  
set a2TF to makeNSTextField(0, 0, 100, 20, false, (mes2Label), false, false) of me
  
  
theView’s setSubviews:{a1TF, aTextInput, a2TF, bTextInput}
  
  
— set up alert
  
set theAlert to NSAlert’s alloc()’s init()
  
tell theAlert
    its setMessageText:aMainMes
    
its setInformativeText:aSubMes
    
its addButtonWithTitle:"OK"
    
its addButtonWithTitle:"Cancel"
    
its setAccessoryView:theView
  end tell
  
  
— show alert in modal loop
  
NSRunningApplication’s currentApplication()’s activateWithOptions:0
  
my performSelectorOnMainThread:"doModal:" withObject:(theAlert) waitUntilDone:true
  
if (my returnCode as number) = 1001 then error number -128
  
  
set s1Val to (aTextInput’s integerValue()) as integer
  
set s2Val to (bTextInput’s integerValue()) as integer
  
  
return {a1Res:s1Val, a2Res:s2Val}
end simulateAndRetRect:

on doModal:aParam
  set (my returnCode) to aParam’s runModal()
end doModal:

on makeNSTextField(xPos as integer, yPos as integer, myWidth as integer, myHeight as integer, editableF as boolean, setVal as string, backgroundF as boolean, borderedF as boolean)
  set aNSString to NSTextField’s alloc()’s initWithFrame:(current application’s NSMakeRect(xPos, yPos, myWidth, myHeight))
  
aNSString’s setEditable:(editableF)
  
aNSString’s setStringValue:(setVal)
  
aNSString’s setDrawsBackground:(backgroundF)
  
aNSString’s setBordered:(borderedF)
  
return aNSString
end makeNSTextField

★Click Here to Open This Script 

Posted in GUI Text | Tagged 10.11savvy 10.12savvy 10.13savvy NSAlert NSRunningApplication NSTextField NSView | Leave a comment

GET method REST API v4.3

Posted on 5月 1, 2019 by Takaaki Naganoya

クラウド系のサービスを呼び出すためのAPIとして一般的なREST APIを呼び出すAppleScriptの最新版(のスケルトン)です。

# v4.2からv4.3にバージョンアップしました(2019/05/02)

macOS 10.10でほぼすべてのAppleScriptランタイムでCocoaの機能が利用できるようになったため、Cocoaの機能を利用してクラウド系サービスを呼び出すことを、割と早い時期から調査していました。

「ほぼすべて」と書いているのは、アプリケーション内蔵のScript Menu(iTunesとか)や、Folder Actionなどの独特なランタイム、あるいはMessages(旧称iChat)のメッセージ受信イベントから呼び出されるAppleScriptランタイムなど、それぞれのアプリケーション独自で実装している処理系についてはCocoaの機能が使えるかどうかは保証のかぎりではないからです。

明確に、当初からクラウドと機械学習をAppleScriptから利用するために、苦労してCocoaの機能を追いかけてきたわけです。その途中でいろいろサードパーティのFrameworkを呼び出せたりして、期待よりも大きな成果を手にしている昨今です。OSの内部機能を直接利用できることのメリットは、処理速度や詳細な情報取得など枚挙にいとまがありません(日本語の慣用句表現なので翻訳しにくいかも?)。

話をクラウドにもどしましょう。REST APIを呼び出すには、同期で実行されるNSURLConnectionを使うのが最も簡単で確実でした。

しかし、同APIは非推奨(近い将来に廃止される)という位置付けになったため、その代わりを探す必要に迫られました。すでにNSURLConnectionを用いて記述したREST API呼び出しのScriptが大量に存在していたからです。

代替APIとしてNSURLSessionが提示されましたが、こちらは非同期実行のみで同期実行モードはありません。いろいろ実験してみたものの、数回に1回ぐらい、サーバーからの応答をつかまえ損ねることがあり、処理時間もNSURLConnection版より長くかかります。

このため、「do shell script経由でcurlコマンドを使って回避するか?」といった回避策を検討していたところです。

そんな中、冗談半分でNSURLSessionを利用したバージョンをほんの少し修正してみたところ、いままでの不安定さが嘘のように安定して結果を得られるようになってきました。これはいい兆候です。

ただし、同時に問題点も見つかってきました。macOS標準装備のScript Editor上で実行する分には問題ないのですが、Script Debugger上で実行すると、macOS 10.12/10.13/10.14共通でサーバーからの応答を取得できず、タイムアウトエラーになります。

初回掲載時(v4.2)にはScript Debugger上でデータ受信を検出できないという問題がありました。データの受信用のプロパティがmissing valueでなければデータを受信した、という判定ロジックがうまく動いていない(どういう仕組みかはわからないものの、missing valueと判断され続けた? ラベル値とproperty名でコンフリクト起こしたかも?)現象が見られました。そこで、データの受信プロパティとデータ受信完了検出のプロパティを明確に分けて判定してみたところ、Script DebuggerやmacOS 10.14上でも問題なく動作することを確認しました。

AppleScript名:GET method REST API v4.3
— Created 2019-05-01 by Takaaki Naganoya
— 2019 Piyomaru Software
use AppleScript version "2.5"
use scripting additions
use framework "Foundation"
use framework "AppKit"

property |NSURL| : a reference to current application’s |NSURL|
property NSString : a reference to current application’s NSString
property NSURLSession : a reference to current application’s NSURLSession
property NSJSONSerialization : a reference to current application’s NSJSONSerialization
property NSMutableURLRequest : a reference to current application’s NSMutableURLRequest
property NSUTF8StringEncoding : a reference to current application’s NSUTF8StringEncoding
property NSURLSessionConfiguration : a reference to current application’s NSURLSessionConfiguration

property retData : missing value
property retCode : 0
property retHeaders : 0
property drecF : false

set reqURLStr to "http://jsonplaceholder.typicode.com/posts"
set aRESTres to callRestGETAPIAndParseResults(reqURLStr, 10) of me
–return retData of aRESTres

set aRESTcode to retCode of aRESTres
–return aRESTcode
–> 200

return retHeaders as record
–> {|content-type|:"application/json; charset=utf-8", Pragma:"no-cache", |x-powered-by|:"Express", |set-cookie|:"__cfduid=dd8b4572e0a59951cc7cf7a1120c368541554964103; expires=Fri, 10-Apr-20 06:28:23 GMT; path=/; domain=.typicode.com; HttpOnly", Server:"cloudflare", Via:"1.1 vegur", |content-encoding|:"gzip", Expires:"Wed, 01 May 2019 15:27:42 GMT", |cf-cache-status|:"HIT", |transfer-encoding|:"Identity", |cache-control|:"public, max-age=14400", |date|:"Wed, 01 May 2019 11:27:42 GMT", |access-control-allow-credentials|:"true", Connection:"keep-alive", |cf-ray|:"4d016861ac759413-NRT", Etag:"W/\"6b80-Ybsq/K6GwwqrYkAsFxqDXGC7DoM\"", Vary:"Origin, Accept-Encoding", |x-content-type-options|:"nosniff"}

on callRestGETAPIAndParseResults(reqURLStr as string, timeoutSec as integer)
  set (my retData) to false
  
set (my retCode) to 0
  
set (my retHeaders) to {}
  
set (my drecF) to false
  
  
set aURL to |NSURL|’s URLWithString:reqURLStr
  
set aRequest to NSMutableURLRequest’s requestWithURL:aURL
  
aRequest’s setHTTPMethod:"GET"
  
aRequest’s setValue:"gzip" forHTTPHeaderField:"Content-Encoding"
  
aRequest’s setValue:"application/json; charset=UTF-8" forHTTPHeaderField:"Content-Type"
  
  
set aConfig to NSURLSessionConfiguration’s defaultSessionConfiguration()
  
set aSession to NSURLSession’s sessionWithConfiguration:aConfig delegate:(me) delegateQueue:(missing value)
  
set aTask to aSession’s dataTaskWithRequest:aRequest
  
  
set hitF to false
  
aTask’s resume() –Start URL Session
  
  
repeat (1000 * timeoutSec) times
    if (my drecF) = true then
      set hitF to true
      
exit repeat
    end if
    
delay ("0.001" as real)
  end repeat
  
  
if hitF = false then error "REST API Timeout Error"
  
  
return {retData:retData, retCode:retCode, retHeaders:retHeaders}
end callRestGETAPIAndParseResults

on URLSession:tmpSession dataTask:tmpTask didReceiveData:tmpData
  parseSessionResults(tmpSession, tmpTask, tmpData) of me
  
set (my drecF) to true
end URLSession:dataTask:didReceiveData:

–ないとエラーになるので足した。とくに何もしていない
on URLSession:tmpSession dataTask:tmpTask willCacheResponse:cacheRes completionHandler:aHandler
  —
end URLSession:dataTask:willCacheResponse:completionHandler:

on parseSessionResults(aSession, aTask, tmpData)
  set aRes to aTask’s response()
  
set (my retCode) to aRes’s statusCode()
  
set (my retHeaders) to aRes’s allHeaderFields()
  
  
set resStr to NSString’s alloc()’s initWithData:tmpData encoding:(NSUTF8StringEncoding)
  
set jsonString to NSString’s stringWithString:(resStr)
  
  
set jsonData to jsonString’s dataUsingEncoding:(NSUTF8StringEncoding)
  
set aJsonDict to NSJSONSerialization’s JSONObjectWithData:jsonData options:0 |error|:(missing value)
  
  
set (my retData) to aJsonDict as list of string or string –as anything
end parseSessionResults

★Click Here to Open This Script 

Posted in REST API URL | Tagged 10.11savvy 10.12savvy 10.13savvy 10.14savvy NSJSONSerialization NSMutableURLRequest NSString NSURL NSURLSession NSURLSessionConfiguration | 3 Comments

各種GUI要素なしでSafari上に新規ウィンドウ表示

Posted on 4月 29, 2019 by Takaaki Naganoya

Safari上で操作ボタンなどのGUI要素を表示しないで新規ウィンドウ表示するAppleScriptです。

1つのウィンドウを表示するのはすぐにできましたが、複数表示が大変でした(ーー; 結局、適宜delayコマンドで時間待ちをする必要があったのでした。やれやれー。

現時点で用途はまったく不明なのですが、いつか必要になることもあるでしょう(そういうの多いな!)。「resizable=no」という指定をしているのに、ウィンドウがリサイズできるあたりはご愛嬌。

ちなみに、Safariのdocumentが1つ以上存在することを前提条件としていますが、そこは省略して明示していません(初心者がひっかかりがちな「不明確な前提条件」なのですが本説明をもってかえさせていただきます)。

Twitter上でロシアのMacユーザーが「だれかAppleScriptについて教えてくれー」と言っていたので、「Google翻訳の範囲でなら(込み入った話でなければ)いいぞ」と返信したら、マンツーマンでやりとり。

初のロシア人とのチャットです。

本ScriptのおおもとになったAppleScriptをAlfred.appを使ってキーボードショートカットで呼び出していたそうで、1アクションから1つのサイトをオープンするだけなのが不満で、複数のサイト(URL)をオープンするように変更したかったとのこと。

Google翻訳を使ってコミュニケーションしてみて、いろいろ理解しました。

(1)ロシア人、とっても普通

(2)話した相手がプログラミングわからない人だったので、いろいろ追加で話をされたが、プログラマーが一番嫌がる内容(最初からゴール地点が設定されていない)になってきたので「ここから先は仕事としてならやるが、ギャラなしだったらやらない」と明言して打ち切り

(3)Google翻訳を通じて「ロシア語に翻訳できない表現」がいろいろあって焦る。おそらく、英語ほどには日本語との間の翻訳の用例が多く蓄積されておらず、翻訳できなかったものと想像。一応、日本語→ロシア語に翻訳してから、その文章を再度日本語に再翻訳してチェック。トンでもない表現に翻訳されて驚愕するも、何例か日本語の表現を変えてリトライ

あとから振り返って考えると、「日本語からロシア語に翻訳するより、英語からロシア語に翻訳した方がよかった」、「ダスビダーニャ(До свидания)って挨拶は知っていたのに使えなかったよ、ハラショー」といったところでしょうか。

あとは、固定でプログラム中にURLのデータを入れておかないで、外部ファイル……たとえばNumbers書類上のデータであるとか、DragThingのURLランチャーに登録してある現在選択中のタブからURLを取得してオープンするとかいった処理が考えられると「お、頑張ったね」というレベルでしょうか。

AppleScript名:各種GUI要素なしでSafari上に新規ウィンドウ表示
set aURLstr to "http://piyocast.com/as"

tell application "Safari"
  tell front document
    set jsStr to "open(’" & aURLstr & "’, ’test’,’scrollbars=no,resizable=no,status=no,location=no," & "toolbar=no,menubar=no,width=1024,height=720,left=0,top=0’);"
    
do JavaScript jsStr
  end tell
end tell

★Click Here to Open This Script 

AppleScript名:各種GUI要素なしでSafari上に新規ウィンドウを複数表示
set aURLarray to {"http://piyocast.com/as", "http://www.apple.com", "http://www.microsoft.com"}

repeat with i in aURLarray
  set j to contents of i
  
openNewWindowWithoutGUIElements(j) of me
  
delay 3
end repeat

on openNewWindowWithoutGUIElements(aURLstr)
  set aNum to random number from 1 to 999
  
tell application "Safari"
    tell front document
      set jsStr to ("open(’" & aURLstr & "’, ’test" & aNum as string) & "’,’scrollbars=no,resizable=no,status=no,location=no," & "toolbar=no,menubar=no,width=1024,height=720,left=0,top=0’);"
      
do JavaScript jsStr
    end tell
  end tell
end openNewWindowWithoutGUIElements

★Click Here to Open This Script 

Posted in JavaScript list URL | Tagged 10.11savvy 10.12savvy 10.13savvy 10.14savvy Safari | Leave a comment

Post navigation

  • Older posts
  • Newer posts

電子書籍(PDF)をオンラインストアで販売中!

Google Search

Popular posts

  • 開発機としてM2 Mac miniが来たのでガチレビュー
  • macOS 15, Sequoia
  • Pages本執筆中に、2つの書類モード切り替えに気がついた
  • Numbersで選択範囲のセルの前後の空白を削除
  • メキシカンハットの描画
  • Pixelmator Pro v3.6.4でAppleScriptからの操作時の挙動に違和感が
  • AppleScriptによる並列処理
  • Safariで「プロファイル」機能を使うとAppleScriptの処理に影響
  • macOS 15でも変化したText to Speech環境
  • AppleScript入門③AppleScriptを使った「自動化」とは?
  • デフォルトインストールされたフォント名を取得するAppleScript
  • macOS 15 リモートApple Eventsにバグ?
  • 【続報】macOS 15.5で特定ファイル名パターンのfileをaliasにcastすると100%クラッシュするバグ
  • AppleScript入門① AppleScriptってなんだろう?
  • macOS 14で変更になったOSバージョン取得APIの返り値
  • Script Debuggerの開発と販売が2025年に終了
  • NSObjectのクラス名を取得 v2.1
  • macOS 15:スクリプトエディタのAppleScript用語辞書を確認できない
  • 有害ではなくなっていたSpaces
  • AVSpeechSynthesizerで読み上げテスト

Tags

10.11savvy (1101) 10.12savvy (1242) 10.13savvy (1391) 10.14savvy (587) 10.15savvy (438) 11.0savvy (283) 12.0savvy (212) 13.0savvy (194) 14.0savvy (147) 15.0savvy (135) CotEditor (66) Finder (51) iTunes (19) Keynote (119) NSAlert (61) NSArray (51) NSBitmapImageRep (20) NSBundle (20) NSButton (34) NSColor (53) NSDictionary (28) NSFileManager (23) NSFont (21) NSImage (41) NSJSONSerialization (21) NSMutableArray (63) NSMutableDictionary (22) NSPredicate (36) NSRunningApplication (56) NSScreen (30) NSScrollView (22) NSString (119) NSURL (98) NSURLRequest (23) NSUTF8StringEncoding (30) NSView (33) NSWorkspace (20) Numbers (76) Pages (55) Safari (44) Script Editor (27) WKUserContentController (21) WKUserScript (20) WKWebView (23) WKWebViewConfiguration (22)

カテゴリー

  • 2D Bin Packing
  • 3D
  • AirDrop
  • AirPlay
  • Animation
  • AppleScript Application on Xcode
  • Beginner
  • Benchmark
  • beta
  • Bluetooth
  • Books
  • boolean
  • bounds
  • Bug
  • Calendar
  • call by reference
  • check sum
  • Clipboard
  • Cocoa-AppleScript Applet
  • Code Sign
  • Color
  • Custom Class
  • date
  • dialog
  • diff
  • drive
  • Droplet
  • exif
  • file
  • File path
  • filter
  • folder
  • Font
  • Font
  • GAME
  • geolocation
  • GUI
  • GUI Scripting
  • Hex
  • History
  • How To
  • iCloud
  • Icon
  • Image
  • Input Method
  • Internet
  • iOS App
  • JavaScript
  • JSON
  • JXA
  • Keychain
  • Keychain
  • Language
  • Library
  • list
  • Locale
  • Localize
  • Machine Learning
  • Map
  • Markdown
  • Menu
  • Metadata
  • MIDI
  • MIME
  • Natural Language Processing
  • Network
  • news
  • Noification
  • Notarization
  • Number
  • Object control
  • OCR
  • OSA
  • parallel processing
  • PDF
  • Peripheral
  • process
  • PRODUCTS
  • QR Code
  • Raw AppleEvent Code
  • Record
  • rectangle
  • recursive call
  • regexp
  • Release
  • Remote Control
  • Require Control-Command-R to run
  • REST API
  • Review
  • RTF
  • Sandbox
  • Screen Saver
  • Script Libraries
  • sdef
  • search
  • Security
  • selection
  • shell script
  • Shortcuts Workflow
  • Sort
  • Sound
  • Spellchecker
  • Spotlight
  • SVG
  • System
  • Tag
  • Telephony
  • Text
  • Text to Speech
  • timezone
  • Tools
  • Update
  • URL
  • UTI
  • Web Contents Control
  • WiFi
  • XML
  • XML-RPC
  • イベント(Event)
  • 未分類

アーカイブ

  • 2025年6月
  • 2025年5月
  • 2025年4月
  • 2025年3月
  • 2025年2月
  • 2025年1月
  • 2024年12月
  • 2024年11月
  • 2024年10月
  • 2024年9月
  • 2024年8月
  • 2024年7月
  • 2024年6月
  • 2024年5月
  • 2024年4月
  • 2024年3月
  • 2024年2月
  • 2024年1月
  • 2023年12月
  • 2023年11月
  • 2023年10月
  • 2023年9月
  • 2023年8月
  • 2023年7月
  • 2023年6月
  • 2023年5月
  • 2023年4月
  • 2023年3月
  • 2023年2月
  • 2023年1月
  • 2022年12月
  • 2022年11月
  • 2022年10月
  • 2022年9月
  • 2022年8月
  • 2022年7月
  • 2022年6月
  • 2022年5月
  • 2022年4月
  • 2022年3月
  • 2022年2月
  • 2022年1月
  • 2021年12月
  • 2021年11月
  • 2021年10月
  • 2021年9月
  • 2021年8月
  • 2021年7月
  • 2021年6月
  • 2021年5月
  • 2021年4月
  • 2021年3月
  • 2021年2月
  • 2021年1月
  • 2020年12月
  • 2020年11月
  • 2020年10月
  • 2020年9月
  • 2020年8月
  • 2020年7月
  • 2020年6月
  • 2020年5月
  • 2020年4月
  • 2020年3月
  • 2020年2月
  • 2020年1月
  • 2019年12月
  • 2019年11月
  • 2019年10月
  • 2019年9月
  • 2019年8月
  • 2019年7月
  • 2019年6月
  • 2019年5月
  • 2019年4月
  • 2019年3月
  • 2019年2月
  • 2019年1月
  • 2018年12月
  • 2018年11月
  • 2018年10月
  • 2018年9月
  • 2018年8月
  • 2018年7月
  • 2018年6月
  • 2018年5月
  • 2018年4月
  • 2018年3月
  • 2018年2月

https://piyomarusoft.booth.pm/items/301502

メタ情報

  • ログイン
  • 投稿フィード
  • コメントフィード
  • WordPress.org

Forum Posts

  • 人気のトピック
  • 返信がないトピック

メタ情報

  • ログイン
  • 投稿フィード
  • コメントフィード
  • WordPress.org
Proudly powered by WordPress
Theme: Flint by Star Verte LLC