Menu

Skip to content
AppleScriptの穴
  • Home
  • Products
  • Books
  • Docs
  • Events
  • Forum
  • About This Blog
  • License
  • 仕事依頼

AppleScriptの穴

Useful & Practical AppleScript archive. Click '★Click Here to Open This Script' Link to download each AppleScript

タグ: 10.12savvy

シリアルコードの生成と検証

Posted on 11月 3, 2018 by Takaaki Naganoya

オープンソースのフレームワーク「SerialKeyGenerator」を用いてシリアルコードを生成、検証するAppleScriptです。

シリアルコードについて

シリアルコードは、日本では「レジストコード」「プロダクトコード」などと呼ばれるもので、ソフトウェアの販売時にこのコードを発行し、ソフトウェアのシリアルコード入力ダイアログに入力してもらうことで、完全版として機能させるというものです。

Mac App StoreではApple IDとひもづけることでシリアルコードを使用しないソフトウェア販売とライセンシングを行なっていますが、Mac App Store外で販売する場合にはシリアルコードのことを考える必要が出てきます。

コードの文字数を増やすと、仮にキーボードから入力する場合の難易度が上がってしまいます。適度な長さの文字列になることが望ましいところです。

シリアルコードが仮に流出した場合に備え、どの購入者のコードが流出したかを特定する必要があります。そのため、シリアルコードにはその名のとおり、購入者の番号を含めてあるのが普通です。

SerialKeyGeneratorの使い方について

SerialKeyGeneratorでは、シークレットキーワード、ユーザー番号をもとにシリアルコードが生成されます。日時を考慮してシリアルコードを計算するため、同じシリアルコードを生成させても日時が変われば結果は異なります。

ただ、おおもとのシークレットキーワードが判明してしまうと、第三者がシリアルコードを勝手に発行してソフトウェアの不正使用ができてしまうため、アプリケーション内に格納するシークレットキーワードは文字ダンプされても判明しないようにしておくのが普通です。

–> Download serialKeyGenKit.framework(To ~/Library/Frameworks/)

AppleScript名:SerialKeyGeneratorサンプル1
— Created 2015-10-24 by Takaaki Naganoya
— 2015 Piyomaru Software
use AppleScript version "2.4"
use scripting additions
use framework "Foundation"
use framework "serialKeyGenKit" –https://github.com/danielvy/SerialKeyGenerator

–Generate Serial Code with secret Keyword
set aGen to current application’s SerialKeyGenerator’s alloc()’s initWithSecret:"Piyomaru"
–>  (SerialKeyGenerator) <SerialKeyGenerator: 0x7f8b5b5fa200>

set aList to {}
repeat with i from 1 to 10
  set aRes to (aGen’s generateSerialWithSequence:i |data|:i)
  
set the end of aList to (aRes as text)
end repeat

aList
–>  {​​​​​"1CHH8-BJY89-TR9Z9-AKSTL-70JZF", ​​​​​"4KXCF-LS6P5-7BKYN-CUMPY-NM072", ​​​​​"41GO2-OGZ3T-83YP9-2LS4J-9W3MI", ​​​​​"CA3WV-C7FU7-PSPJ3-LNGT7-N6AJT", ​​​​​"3OG0B-MCFUM-7YKHT-EE533-LNJEJ", ​​​​​"4SKWQ-9G8XE-ZCE6K-APSAL-R0T8S", ​​​​​"CTEZT-H4AQQ-BM15H-FH2DG-P7K7O", ​​​​​"4BZ1X-2OHKF-5FWND-7SZVA-EBR89", ​​​​​"BDKRI-9JU7T-G6N20-YPU9K-6FXQW", ​​​​​"9EWW5-O3FMV-SDEZA-77JZE-OY8FL"​​​}

–Decode Serial with secret Keyword
set rList to {}
set bGen to current application’s SerialKeyGenerator’s alloc()’s initWithSecret:"Piyomaru"
–> (SerialKeyGenerator) <SerialKeyGenerator: 0x7fb6992b8400>

repeat with i in aList
  set bRes to (bGen’s decodeSerial:(contents of i))
  
  
set aDate to bRes’s |date| as date
  
set aSeq to bRes’s sequence as integer
  
set aData to bRes’s |data| as integer
  
  
set the end of rList to {aData, aSeq, aDate}
end repeat
return rList
–> {{1, 1, date "2018年11月3日土曜日 16:44:57"}, {2, 2, date "2018年11月3日土曜日 16:44:57"}, {3, 3, date "2018年11月3日土曜日 16:44:57"}, {4, 4, date "2018年11月3日土曜日 16:44:57"}, {5, 5, date "2018年11月3日土曜日 16:44:57"}, {6, 6, date "2018年11月3日土曜日 16:44:57"}, {7, 7, date "2018年11月3日土曜日 16:44:57"}, {8, 8, date "2018年11月3日土曜日 16:44:57"}, {9, 9, date "2018年11月3日土曜日 16:44:57"}, {10, 10, date "2018年11月3日土曜日 16:44:57"}}

★Click Here to Open This Script 

Posted in How To | Tagged 10.11savvy 10.12savvy 10.13savvy | Leave a comment

Excelデータを組み立てて書き出し(フォント指定、カラー指定)

Posted on 11月 3, 2018 by Takaaki Naganoya

オープンソースのフレームワーク「JXLS」を用いてExcelデータを組み立てるAppleScriptです。

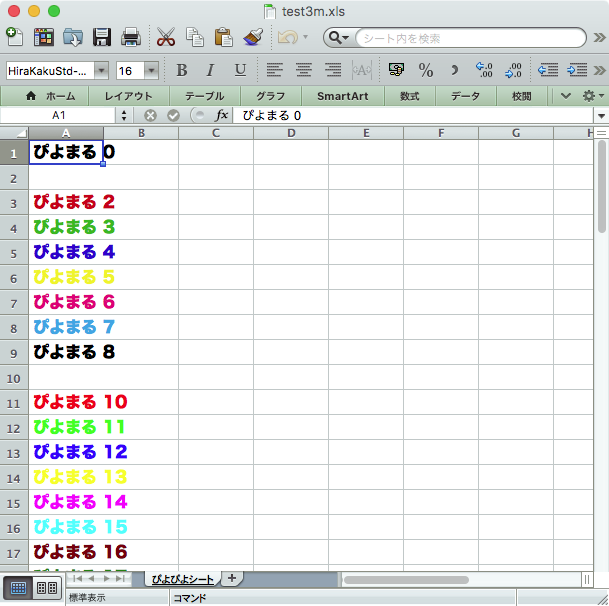
フォント名と色を指定してみました。実際に案件で使用したことがないので、徹底的に活用した………という経験がないので、いまのところ何か風景画像をExcel書類に変換して「実はExcelで作りました」とかフカすぐらいしか用途がなさそうです。

–> Download JXLS(To ~/Library/Frameworks/)

AppleScript名:ASOCでExcelファイル生成テスト v2
— Created 2015-10-08 by Takaaki Naganoya
— 2015 Piyomaru Software
use AppleScript version "2.4"
use scripting additions
use framework "Foundation"
use framework "JXLS" –https://github.com/JanX2/JXLS

set aFile to POSIX path of (choose file name)
set filePath to current application’s NSString’s stringWithString:aFile

set workBook to current application’s JXLSWorkBook’s new()
set workSheet to workBook’s workSheetWithName:"ぴよぴよシート"
workSheet’s setWidth:1000 forColumn:0 defaultFormat:(missing value)

repeat with i from 0 to 64
  set aCell to (workSheet’s setCellAtRow:i column:0 toString:(current application’s NSString’s stringWithString:("ぴよまる " & (i as text))))
  (
aCell’s setFontName:"HiraKakuStd-W8")
  (
aCell’s setFontHeight:320) –this is point * 20
  (
aCell’s setFontColorIndex:i)
  (
aCell’s setForegroundFillColorIndex:13)
end repeat

workBook’s writeToFile:filePath

★Click Here to Open This Script 

Posted in How To | Tagged 10.11savvy 10.12savvy 10.13savvy | Leave a comment

Excelデータを組み立てて書き出し

Posted on 11月 3, 2018 by Takaaki Naganoya

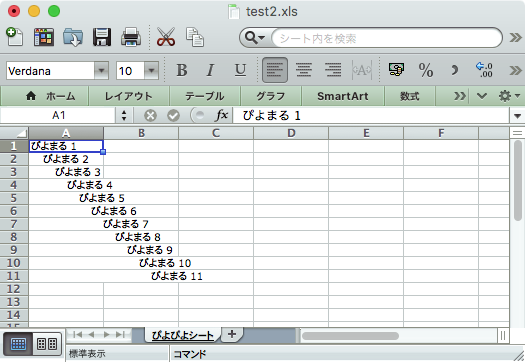
オープンソースの「JXLS.framework」を用いて指定のExcelデータを組み立てて書き出すAppleScriptです。

アプリケーションにメッセージを送ってアプリケーションに仕事をしてもらうのがAppleScriptの流儀ですが、macOS 10.10以降でCocoaの機能が呼べるようになったため、こうしたオープンソースのフレームワークを呼び出して処理できるようになりました。

AppleScriptが自前で行なっていないことには変わらないのですが、Excelデータを(Excelなしで)組み立てられるわけで、出力データとしてExcel書類が求められる用途において、Excelなしで処理が行えます(開発中はExcelでどのように表示されるか確認する必要があるので、開発中は必要です)。

また、本物のExcelをコントロールする方法ではできなかった「並列処理で大量にデータを作成する」という処理も可能になるわけでけっこうなことです(ただ、そういう要求をされたことは皆無なのですが、、、、)。

–> Download JXLS(To ~/Library/Frameworks/)

AppleScript名:ASOCでExcelファイル生成テスト
— Created 2015-10-08 by Takaaki Naganoya
— 2015 Piyomaru Software
use AppleScript version "2.4"
use scripting additions
use framework "Foundation"
use framework "JXLS" –https://github.com/JanX2/JXLS

set aFile to POSIX path of (choose file name)
set filePath to current application’s NSString’s stringWithString:aFile

set workBook to current application’s JXLSWorkBook’s new()

set workSheet to workBook’s workSheetWithName:"ぴよぴよシート"
workSheet’s setWidth:1000 forColumn:0 defaultFormat:(missing value)

repeat with i from 0 to 10
  set aCell to (workSheet’s setCellAtRow:i column:0 toString:(current application’s NSString’s stringWithFormat_("ぴよまる %@", i + 1)))
  (
aCell’s setHorizontalAlignment:1) —-HALIGN_LEFT
  (
aCell’s setIndentation:(0 + i)) —– INDENT_0
end repeat

workBook’s writeToFile:filePath

★Click Here to Open This Script 

Posted in Release | Tagged 10.11savvy 10.12savvy 10.13savvy NSString | Leave a comment

ASOCでXML-RPCのテスト v3

Posted on 11月 3, 2018 by Takaaki Naganoya

オープンソースのXMLRPC.frameworkを用いてXMLRPCを実行するAppleScriptです。

XMLRPCといえば、WordPressか郵便専門ネットかというほど用途が限定されていますが、本Blog(Powered By WordPress)の年初の再構築など、使えないと大変な思いをすることがあるので、定期的に調査しています。

初回掲載時は郵便専門ネットのXMLRPCはバージョン番号を”15.09a”と返してきましたが、再掲載時に実行してみたら”18.10a”を返してきました。

–> Download XMLRPC.framework (To ~/Library/Frameworks/)

AppleScript名:ASOCでXML-RPCのテスト v3
— Created 2015-10-06 by Takaaki Naganoya
— 2015 Piyomaru Software
use AppleScript version "2.4"
use scripting additions
use framework "Foundation"
use framework "AppKit"
use framework "XMLRPC"
–XMLRPC.framework
–https://cocoapods.org/pods/xmlrpc
–Cocoa XML-RPC Framework © 2011 Divisible by Zero
–v2.3.4

set aRes to (callXMLRPC("http://yubin.senmon.net/service/xmlrpc/", "yubin.getMaxFetchCount", missing value)) as integer
–>  100

set bRes to (callXMLRPC("http://yubin.senmon.net/service/xmlrpc/", "yubin.getVersion", missing value)) as text
–> "15.09a"

on callXMLRPC(paramURL, aMethod, aParamList)
  
  
set aURL to current application’s |NSURL|’s URLWithString:paramURL
  
set aReq to current application’s XMLRPCRequest’s alloc()’s initWithURL:aURL
  
aReq’s setMethod:aMethod withParameter:aParamList
  
set aRes to current application’s XMLRPCConnection’s sendSynchronousXMLRPCRequest:aReq |error|:(missing value)
  
  
set errF to (aRes’s isFault()) as boolean
  
  
if errF = true then
    set xmlRPCres to faultCode of aRes
    
–set xmlRPCbody to faultString of aRes
  else
    set xmlRPCres to aRes’s object()
    
–set xmlRPCbody to aRes’s body()
  end if
  
  
return xmlRPCres
  
end callXMLRPC

★Click Here to Open This Script 

Posted in XML-RPC | Tagged 10.11savvy 10.12savvy 10.13savvy | Leave a comment

テキストビュー+ボタンを作成 v2

Posted on 11月 3, 2018 by Takaaki Naganoya

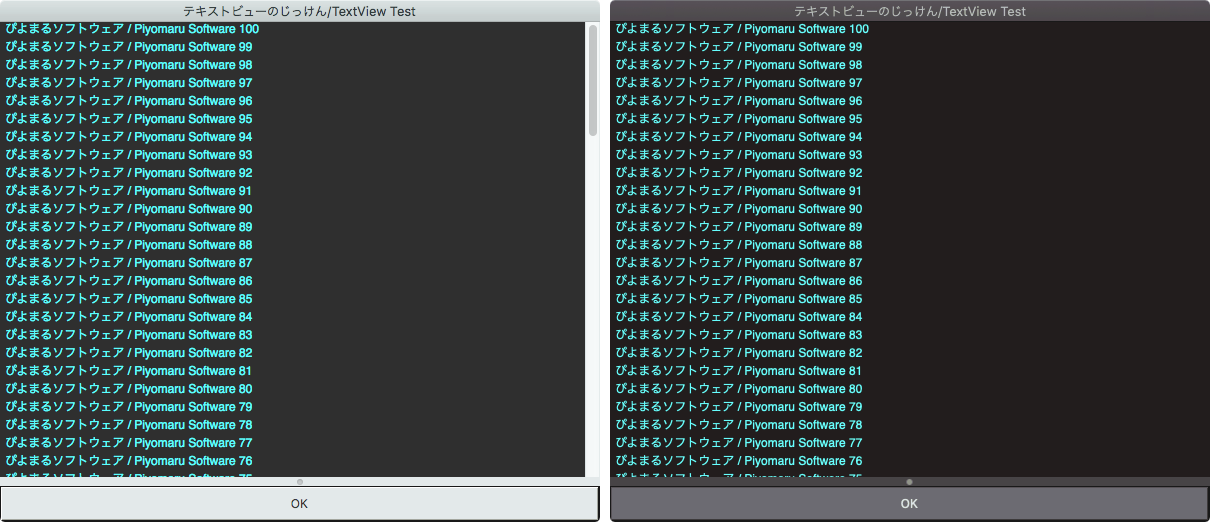
Window+TextView+Buttonを作成してボタンのクリックを受け付けるAppleScriptです。

ちょっとしたログ表示などのために作成したものです。


▲通常(ライト)モード@macOS 10.12.6、ダークモード@10.14.1

オリジナルはスクリプトエディタ上でCommand+Control+Rの「フォアグラウンドで実行」を実行する必要があったのですが、

本バージョンでは強制的にメインスレッド実行を行うことで、この操作は不要になっています。

ただ、ランタイム環境ごとに「ボタンをクリックできない」という現象に遭遇。他のいろいろなランタイムでも試しておく必要を感じます。

ランタイム環境 スクリプトエディタ アプレット スクリプトメニュー osascript Script Debugger
macOS 10.12 OK OK クリックできない クリックできない クリックできない
macOS 10.13 OK OK クリックできない クリックできない クリックできない
macOS 10.14 OK OK クリックできない クリックできない クリックできない

macOS 10.12.6、10.13.6、10.14.1で動作確認してみましたが、傾向は同じです。Script Debugger上でクリックを受け付けないのはかなり問題が、、、、

AppleScript名:テキストビュー+ボタンを作成 v2
— Created 2015-12-11 by Takaaki Naganoya
— 2015 Piyomaru Software
use AppleScript version "2.4"
use scripting additions
use framework "Foundation"
use framework "AppKit"

property NSColor : a reference to current application’s NSColor
property NSScreen : a reference to current application’s NSScreen
property NSButton : a reference to current application’s NSButton
property NSWindow : a reference to current application’s NSWindow
property NSSplitView : a reference to current application’s NSSplitView
property NSTextView : a reference to current application’s NSTextView
property NSScrollView : a reference to current application’s NSScrollView
property NSMutableString : a reference to current application’s NSMutableString
property NSWindowController : a reference to current application’s NSWindowController
property NSTitledWindowMask : a reference to current application’s NSTitledWindowMask
property NSRoundedBezelStyle : a reference to current application’s NSRoundedBezelStyle
property NSNormalWindowLevel : a reference to current application’s NSNormalWindowLevel
property NSBackingStoreBuffered : a reference to current application’s NSBackingStoreBuffered
property NSMomentaryLightButton : a reference to current application’s NSMomentaryLightButton

property windisp : false
property wController : false

set aWidth to 600
set aHeight to 500

set aTitle to "テキストビューのじっけん/TextView Test"
set outText to "ぴよまるソフトウェア / Piyomaru Software "
set aButtonMSG to "OK"

–表示用テキストの作成
set dispStr to NSMutableString’s alloc()’s init()
repeat with i from 1 to 100
  set bStr to (NSMutableString’s stringWithString:(outText & (i as string) & return))
  
set dispStr to (bStr’s stringByAppendingString:dispStr)
end repeat

set paramObj to {aWidth, aHeight, aTitle, dispStr, aButtonMSG, "10"}
my performSelectorOnMainThread:"dispTextView:" withObject:(paramObj) waitUntilDone:true

on dispTextView:paramObj
  set my windisp to false
  
copy paramObj to {aWidth, aHeight, aTitle, dispStr, aButtonMSG, timeOutSecs}
  
  
set aColor to NSColor’s colorWithDeviceRed:0.0 green:0.0 blue:0.0 alpha:0.9
  
set (my windisp) to true
  
  
–Text View+Scroll Viewをつくる
  
set aScroll to NSScrollView’s alloc()’s initWithFrame:(current application’s NSMakeRect(0, 0, aWidth, aHeight))
  
set aView to NSTextView’s alloc()’s initWithFrame:(current application’s NSMakeRect(0, 0, aWidth, aHeight))
  
aView’s setRichText:true
  
aView’s useAllLigatures:true
  
aView’s setTextColor:(NSColor’s cyanColor()) —
  
aView’s setBackgroundColor:aColor
  
aView’s setEditable:false
  
  
aScroll’s setDocumentView:aView
  
aView’s enclosingScrollView()’s setHasVerticalScroller:true


–Buttonをつくる
  
set bButton to (NSButton’s alloc()’s initWithFrame:(current application’s NSMakeRect(0, 0, aWidth, 40)))
  
–bButton’s setButtonType:( NSMomentaryLightButton)
  
–bButton’s setBezelStyle:( NSRoundedBezelStyle)
  
bButton’s setTitle:aButtonMSG
  
bButton’s setTarget:me
  
bButton’s setAction:("clicked:")
  
bButton’s setKeyEquivalent:(return)
  
  
–SplitViewをつくる
  
set aSplitV to NSSplitView’s alloc()’s initWithFrame:(current application’s NSMakeRect(0, 0, aHeight, aWidth))
  
aSplitV’s setVertical:false
  
  
aSplitV’s addSubview:aScroll
  
aSplitV’s addSubview:bButton
  
aSplitV’s setNeedsDisplay:true
  
  
set aWin to makeWinWithView(aSplitV, aWidth, aHeight, aTitle, 0.9)
  
aView’s setString:dispStr
  
  
–NSWindowControllerを作ってみた
  
set my wController to NSWindowController’s alloc()
  
my (wController’s initWithWindow:aWin)
  
  
my (wController’s showWindow:me)
  
  
set aCount to (timeOutSecs as string as number) * 10 –timeout seconds * 10
  
repeat aCount times
    if (my windisp) = false then
      exit repeat
    end if
    
delay 0.1
  end repeat
  
  
my closeWin:bButton
end dispTextView:

–Button Clicked Event Handler
on clicked:aSender
  set (my windisp) to false
  
my closeWin:aSender
end clicked:

–make Window for Input
on makeWinWithView(aView, aWinWidth, aWinHeight, aTitle, alphaV)
  set aScreen to NSScreen’s mainScreen()
  
set aFrame to {{0, 0}, {aWinWidth, aWinHeight}}
  
set aBacking to NSTitledWindowMask –NSBorderlessWindowMask
  
set aDefer to NSBackingStoreBuffered
  
  
— Window
  
set aWin to NSWindow’s alloc()
  (
aWin’s initWithContentRect:aFrame styleMask:aBacking backing:aDefer defer:false screen:aScreen)
  
  
aWin’s setTitle:aTitle
  
aWin’s setDelegate:me
  
aWin’s setDisplaysWhenScreenProfileChanges:true
  
aWin’s setHasShadow:true
  
aWin’s setIgnoresMouseEvents:false
  
aWin’s setLevel:(NSNormalWindowLevel)
  
aWin’s setOpaque:false
  
aWin’s setAlphaValue:alphaV –append
  
aWin’s setReleasedWhenClosed:true
  
aWin’s |center|()
  
  
— Set Custom View
  
aWin’s setContentView:aView
  
  
return aWin
end makeWinWithView

–close win
on closeWin:aSender
  set tmpWindow to aSender’s |window|()
  
  
repeat with n from 10 to 1 by -1
    (tmpWindow’s setAlphaValue:n / 10)
    
delay 0.02
  end repeat
  
  
my wController’s |close|()
end closeWin:

★Click Here to Open This Script 

Posted in GUI | Tagged 10.11savvy 10.12savvy 10.13savvy 10.14savvy NSButton NSColor NSMutableString NSScreen NSScrollView NSSplitView NSTextView NSWindow NSWindowController | 1 Comment

AppleScript系機能の実装がおかしなGoogle Chrome

Posted on 11月 2, 2018 by Takaaki Naganoya

Google Chromeは自動処理の部品に使ってはいけない

Google ChromeをAppleScriptでコントロールすることは、個人的にはほとんどありません。日常的に利用するのは、自動処理への対応機能を持ち信頼できるアプリケーションが中心です。

必要な機能がなかったり、自動処理と相性がよくなかったりするためです。使用中にGoogle App Storeのダイアログなどが表示されることがあるので、自動処理中にやられると処理が止まってしまいます。これは、自動処理の仕組みを組み立てる上で絶対にあってはならない仕様です。
そのため、Google ChromeをAppleScriptで動かす場合は、途中でGoogle Chrome側の都合で勝手に処理が止まっても腹が立たない程度の、あまり重要ではない処理であるとか、とても短くて簡単な基礎的なマクロ処理に限定されます。

1日中タイマーにのっとって定時に指定のWebサイトに、複数のユーザーIDやパスワードで繰り返しログインを行い、指定のメニューに移動してデータをダウンロードするような処理(実際にAppleScript+Safariで動かしています)にGoogle Chromeを使うのは自殺行為です。

比較的短めの、

「写真.appで選択中の写真をOCRで文字認識して『戦場の絆』のリプレイIDを取得し、リプレイムービー検索ページにリプレイIDを突っ込み、YouTube上のリプレイムービーのURLを取得。YouTube上でリプレイを再生する」

といった程度の処理でも、途中でGoogle App Storeのダイアログが表示されたら、処理が途切れてそれっきり。コマンドを1つ実行するたびにGoogle App Storeのダイアログを閉じたり無効化する処理を入れれば不可能ではないかもしれませんが、無人の環境で放置するのは無理です。

かといって、Safariの仕様が自動処理に向いているかと言われれば、そういうわけでもありません。ファイルのダウンロード検出をSafari側で行えないなど、自動処理専用のWebブラウザがあったらいいのに、と思うところです(Folder ActionやFSEventsと組み合わせて、非同期処理でダウンロード検出を行なっています)。ただ、Google Chromeのような致命的な動作を行わない点で選択肢になることでしょう。

Google Chromeには、表示中のページのHTMLソースを取得するという、基本的かつないと困る機能が実装されていないのも困りものです。

Google Chromeは実装がおかしい

Google Chromeは一応JavaScriptを実行するための「execute」コマンドを備えているので、JavaScriptのコマンド経由でWebコンテンツへのアクセスや、フォームへのアクセスはできるようになっています。

ただし、肝心の「指定URLをオープンする」という部分の実装がまともに行われていません。

Google Chromeで指定URLをオープンするAppleScriptでよく見かける記述例は、

tell application "Google Chrome"
  open location "http://piyocast.com/as/"
end tell

★Click Here to Open This Script 

のようなものですが、そもそもこの「open location」はAppleScriptの標準命令であり、Google Chromeが持っているコマンドではありません。open locationは指定URLのURLスキームに対応しているアプリケーションに処理が委ねられます。tellブロックを外すと、OSでデフォルト指定されているアプリケーションで処理されます。Google Chromeへのtellブロック内で実行しているので、Google ChromeにURLが転送されているだけです。

Google Chromeの機能を使って指定URLをオープンしようとすると、

tell application "Google Chrome"
  set newWin to make new window
  
tell newWin
    tell tab 1
      set URL to "http://piyocast.com/as/"
    end tell
  end tell
end tell

★Click Here to Open This Script 

のようになります。

一番ひどいのは、Google Chromeのopen命令。これ、

open v : Open a document.
  open list of file : The file(s) to be opened.

用語辞書のとおりに書いてもエラーになります。

そのため、ローカルのファイルをオープンさせようとしても、openコマンドは使えません。fileを与えてもaliasを与えても、AppleScript用語辞書の記述のとおりにfileのlistを与えてもエラーになります。

結論としては、ローカルのfileをオープンする際には、file pathをURL形式に変換して、そのURLをopen locationでオープンするか、tabのURL属性をfile URLに書き換えて表示させることになります。

set anAlias to choose file

tell application "Finder"
  set aURL to URL of anAlias
end tell

tell application "Google Chrome"
  open location aURL
end tell

★Click Here to Open This Script 

set anAlias to choose file

tell application "Finder"
  set aURL to URL of anAlias
end tell

tell application "Google Chrome"
  tell window 1
    tell active tab
      set URL to aURL
    end tell
  end tell
end tell

★Click Here to Open This Script 

Finder経由で目的のファイルをGoogle Chromeというアプリケーションを利用してオープンする、という記述もできますが、ここでもそのままapplication “Google Chrome”と書くとエラーになり、「path to application “Google Chrome”」という回避的な記述が必要になってしまうのでありました。

–By @fixdot on Twitter
set anAlias to choose file

tell application "Finder"
  open anAlias using (path to application "Google Chrome")
end tell

★Click Here to Open This Script 

ただ、ここで書いているのは「自動処理を行うユーザー環境では」ということであって、Google Chromeは自動処理にさえ使わなければ、それなりによくできたいいソフトウェアだと思います。

ほかにもいろいろ落とし穴が

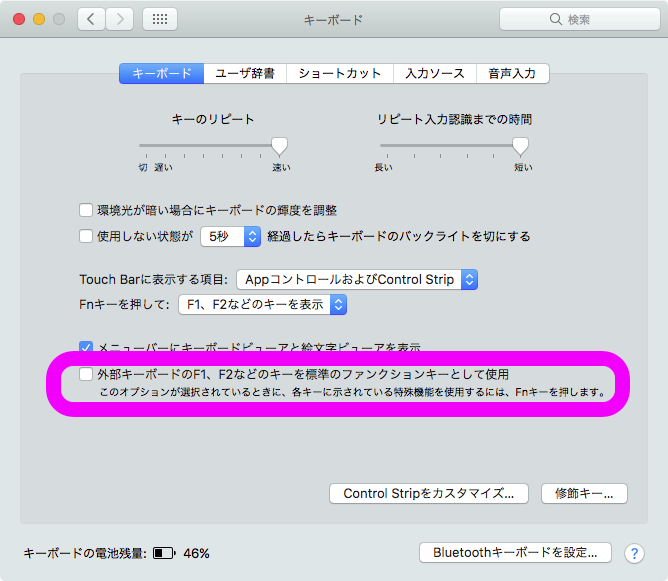
とくに、Google Chromeにかぎらず、macOS内には自動処理の妨げとなる設定項目がいくつか存在しています。デフォルトのまま使うといろいろ問題が出るので、真っ先に設定を変更しています。

Mac miniにBluetooth外付けキーボードを接続した状態で、ファンクションキーをメディアキーに指定して運用していると、iTunesから不定期にダイアログ表示されるため、ファンクションキーはあくまでファンクションキーとして設定しないとダメです(MacBook Proなど本体にキーボードが搭載されているモデルはこのかぎりではありません)。

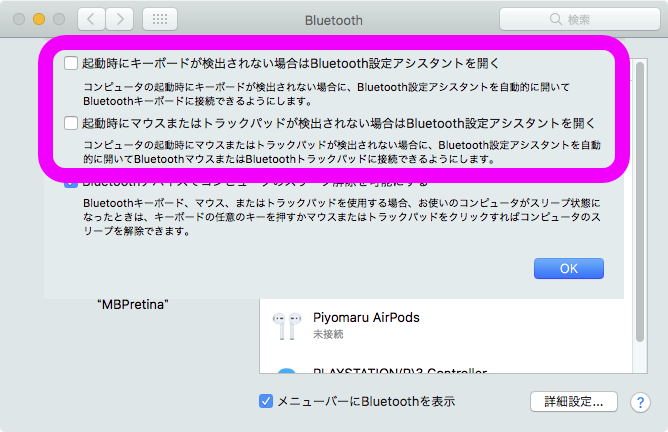
また、同様にMac miniでヘッドレス(画面なし)運用をしている際に、キーボードやマウス/トラックパッドを接続していない状態で警告するように初期設定されていますが、

 「起動時にキーボードが検出されない場合はBluetooth設定アシスタントを開く」
 「起動時にマウスまたはトラックパッドが検出されない場合はBluetooth設定アシスタントを開く」

の2つのチェックボックスをオフにしておく必要があります。

com.google.Chrome

Posted in file URL | Tagged 10.11savvy 10.12savvy 10.13savvy Google Chrome | Leave a comment

Numbersの表の選択範囲をHTML化 v2

Posted on 11月 1, 2018 by Takaaki Naganoya

Numbersの最前面の書類で選択中の表の範囲をHTML化してファイルに書き出すAppleScriptです。

Numbers v5.1+macOS 10.12.6、Numbers v5.2+macOS 10.13.6、Numbers v5.2+macOS 10.14.1で確認しています。

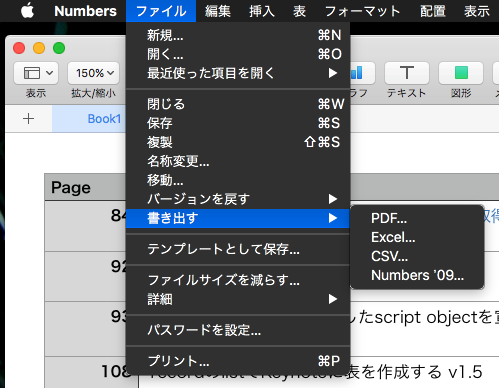
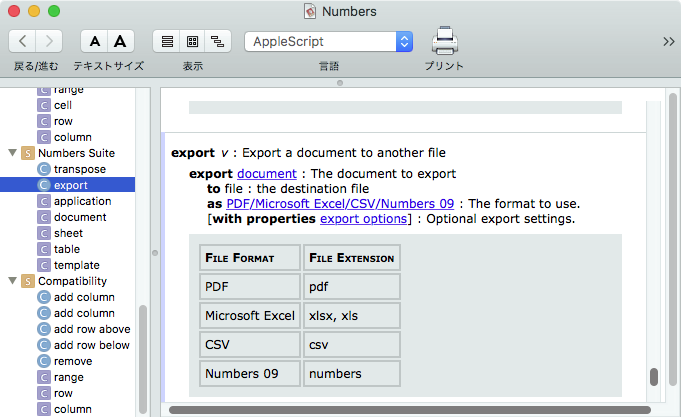
Numbers v5.xでは書類の書き出し(export)形式にPDF、Microsoft Excel、CSV、Numbers 09の4形式を指定できるようになっていますが、HTMLの表(table)に書き出してくれたりはしません。

GUI側(↑)にその機能がありませんし、AppleScript用語辞書(↓)にもそういう機能は見当たりません。

ただ、HTMLの表に書き出すという処理自体はとても初歩的で簡単な内容なので、「なければ作ればいい」ということになるでしょう。

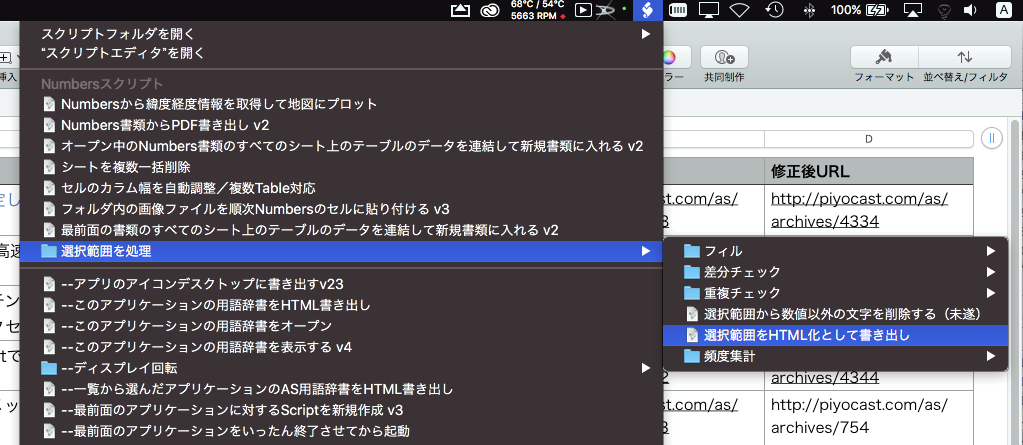
そこで、ありもののルーチンを組み合わせて、選択範囲をHTMLの表(table)として書き出すScriptを書いて、OS標準装備のScript Menuに入れて利用しています。書き出すHTMLの内容は個人の趣味や用途に応じて大きく変わってきますので、そのあたりは自由に書き換えるとよいと思われます。

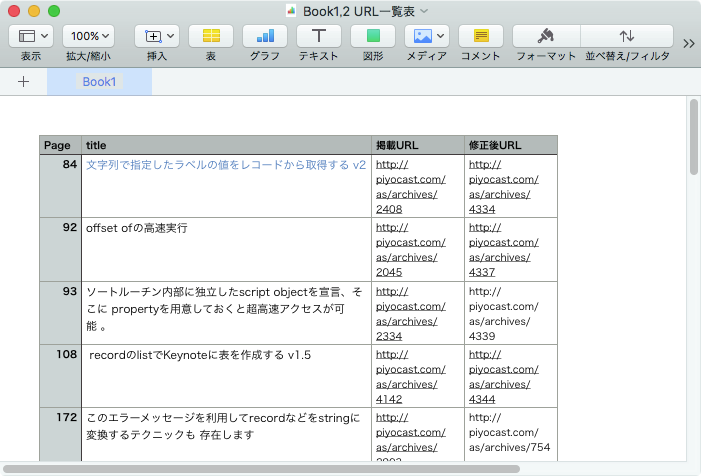
本Scriptは、電子書籍「AppleScript最新リファレンス」の正誤表(2018/1のBlog消失事件の影響で、書籍内で参照していたURLリンクが切れてしまったことへの対処)を作成するために、すでに存在していたものにほんの少しの修正を加えたものです。

データベースやデータからHTMLを作成するという処理は、自分がAppleScriptを覚えようと思ったきっかけでもあり(当時は、FileMaker Pro Server経由でLAN上でデータを共有して処理)、感慨深いものがあります。

AppleScript名:表の選択範囲をHTML化 v2
use AppleScript version "2.5"
use scripting additions
use framework "Foundation"
use bPlus : script "BridgePlus"

script spd
  property uniqList : {}
end script

set (uniqList of spd) to {}

–Numbersからデータを取得する
set aList to get2DListFromNumbersSelection() of me
if aList = false then return

set colCount to (length of first item of first item of aList) + 1

set aHeader to "<!DOCTYPE html><html lang=\"ja\" ><head><meta charset=\"utf-8\"><title>First</title><style>table , td, table , tr, th{border:1px solid #333333;padding:1px;}</style></head><body><table >"
set aTable to "<tr><td>%@</td><td> </td><td>%@</td><td>%@</td><td>%@</td></tr>"
set aFooter to "</table></body></html>"

set aHTMLres to retTableHTML(aList, aHeader, aTable, aFooter) of me

set tFile to choose file name with prompt "Select Output File Name and Folder"
set fRes to writeToFileAsUTF8(aHTMLres, tFile, false) of me

on retTableHTML(aList, aHeaderHTML, aTableHTML, aFooterHTML)
  set allHTML to current application’s NSMutableString’s stringWithString:aHeaderHTML
  
  
set aCounter to 1
  
repeat with i in aList
    set j to contents of i
    
    
set aRowHTML to "<tr>"
    
repeat with ii in j
      set jj to contents of ii
      
if jj = missing value then
        set jj to " "
      else
        try
          set aURL to (current application’s |NSURL|’s URLWithString:jj)
          
if aURL is not equal to missing value then
            set jj to "<a href=\"" & jj & "\">" & jj & "</a>"
          end if
        end try
      end if
      
      
set aTmpHTML to "<td>" & jj & "</td>"
      
set aRowHTML to aRowHTML & aTmpHTML
    end repeat
    
set aRowHTML to aRowHTML & "</tr>"
    
    (
allHTML’s appendString:aRowHTML)
    
set aCounter to aCounter + 1
  end repeat
  
  (
allHTML’s appendString:aFooterHTML)
  
  
return allHTML as list of string or string
end retTableHTML

–テキストを指定デリミタでリスト化
on parseByDelim(aData, aDelim)
  set aText to current application’s NSString’s stringWithString:aData
  
set aList to aText’s componentsSeparatedByString:aDelim
  
return aList as list
end parseByDelim

on get2DListFromNumbersSelection()
  –Numbersで選択範囲を縦に区切ったリストを返す
  
tell application "Numbers"
    tell front document
      tell active sheet
        set theTable to first table whose class of selection range is range
        
        
tell theTable
          try
            set selList to value of every cell of selection range –選択範囲のデータを取得
          on error
            return "" –何も選択されてなかった場合
          end try
          
          
set selName to name of selection range –選択範囲のrange情報を取得
          
set {s1, s2} to parseByDelim(selName, ":") of me
          
          
–始点の情報を取得する
          
set s1Row to (address of row of range s1) as integer
          
set s1Column to (address of column of range s1) as integer
          
          
–終点の情報を取得する
          
set s2Row to (address of row of range s2) as integer
          
set s2Column to (address of column of range s2) as integer
          
          
–選択範囲の情報を取得する
          
set selHeight to s2Row – s1Row + 1 –高さ(Height of selection range)
          
set selWidth to s2Column – s1Column + 1 –幅(Width of selection range)
          
        end tell
      end tell
    end tell
  end tell
  
  
set aLen to length of selList
  
set aaLen to selHeight
  
  
set bList to {}
  
repeat with i from 1 to aaLen
    set aHoriList to {}
    
    
repeat with ii from 1 to selWidth
      set j1 to ii + (i – 1) * selWidth
      
set tmpCon to contents of item j1 of selList
      
      
set aClass to class of tmpCon
      
if aClass = number or aClass = integer or aClass = real then
        set tmpCon to tmpCon as integer
      end if
      
      
set the end of aHoriList to tmpCon
    end repeat
    
    
set the end of bList to aHoriList
  end repeat
  
  
return bList
  
end get2DListFromNumbersSelection

on writeToFileAsUTF8(this_data, target_file, append_data)
  tell current application
    try
      set the target_file to the target_file as text
      
set the open_target_file to open for access file target_file with write permission
      
if append_data is false then set eof of the open_target_file to 0
      
write this_data as «class utf8» to the open_target_file starting at eof
      
close access the open_target_file
      
return true
    on error error_message
      try
        close access file target_file
      end try
      
return error_message
    end try
  end tell
end writeToFileAsUTF8

★Click Here to Open This Script 

Posted in Internet list | Tagged 10.11savvy 10.12savvy 10.13savvy 10.14savvy Numbers | Leave a comment

Photosで選択中の写真が指定場所から50メートル以内の場合には書き出してFineReader OCR Proで処理 v2.1

Posted on 10月 30, 2018 by Takaaki Naganoya

Photos(写真).app上で選択中の写真が、指定場所から50メートル以内の場合にはファイルに書き出して、OCRアプリケーション「FineReader OCR Pro」でOCR処理するAppleScriptです。

–> Demo Movie

アーケードゲーム「戦場の絆」のリプレイムービーは、プレイ後の操作により1日に2プレイ分までYouTubeにアップロードされる仕様になっています。プレイ後、ゲーセンのターミナル上で操作してリプレイムービーにアクセスするためのアクセスコード(リプレイID)が表示されるようになっています。

この、ターミナル上のアクセスコードをiPhoneで写真撮影すると、写真に撮影場所のGPSデータが添付されます。写真.app経由でこのGPSデータを取得し、指定場所(ゲームセンター)から50メートル以内であればターミナルで撮影した写真と判定。

この写真をファイル書き出しして、OCRアプリケーションで認識しやすいようにCocoaの機能を用いて階調反転。一昔前ならPhotoshopで処理していましたが、いまならAppleScriptだけで高速に処理できます。デモムービーは実際の速度なので、その速さを体感していただけると思います。写真.appから選択中の写真を取得して反転するまで一瞬です。

反転した画像をMacのOCRアプリケーション「FineReader OCR Pro」でOCR処理し、YouTubeリプレイ再生用のコードを取得します。

あとは、再生用コードをリプレイムービー検索ページのフォームに入れて、実際のYouTube上のリプレイムービーのURLにアクセス。そのまま再生するなり、ダウンロードして保存しておくことになります。


■©創通・サンライズ

本サンプルでは、AppleScriptからコントロール可能なOCRアプリケーション「FineReader OCR Pro」を用いましたが、日本語の文字列を認識しないのであれば、Web APIのOCRサービス(MicrosoftのCognitive Serviceとか)を用いてみてもよいでしょう。

あとは、全国の「戦場の絆」が導入されているゲームセンターの住所情報および緯度経度情報がストックしてあるので、それらのGPSデータと写真撮影地点とのマッチングを行なってみてもよいかもしれません(700箇所程度なので、たいした演算ではありません)。

AppleScript名:Photosで選択中の写真が指定場所から50メートル以内の場合には書き出してFineReader OCR Proで処理 v2.1
— Created 2015-12-04 by Takaaki Naganoya –v2.1
— getDistanceBetweenTwoPlaces : Created 2015-03-03 by Shane Stanley
— convAsFilteredJPEG : Created 2013-12-29 by badcharan@Twitter
use AppleScript version "2.4"
use scripting additions
use framework "Foundation"
use framework "CoreLocation"
use framework "QuartzCore"

property CIFilter : a reference to current application’s CIFilter
property NSUUID : a reference to current application’s NSUUID
property CIImage : a reference to current application’s CIImage
property NSString : a reference to current application’s NSString
property NSScanner : a reference to current application’s NSScanner
property CLLocation : a reference to current application’s CLLocation
property NSFileManager : a reference to current application’s NSFileManager
property NSCharacterSet : a reference to current application’s NSCharacterSet
property NSJPEGFileType : a reference to current application’s NSJPEGFileType
property NSBitmapImageRep : a reference to current application’s NSBitmapImageRep
property NSMutableCharacterSet : a reference to current application’s NSMutableCharacterSet
property NSRegularExpressionSearch : a reference to current application’s NSRegularExpressionSearch

set targPlace to {35.745769, 139.675565} –Game City Itabashi
set bLoc to getSelectionOnPhotos() of me –Get Location From Photo
set aDist to getDistanceBetweenTwoPlaces(targPlace, bLoc) of me

–指定地点から50メートル以内の距離で撮影された写真であれば、Exportして後続の処理を行う
if aDist is equal to false or aDist > 50 then return false

–選択中の写真のうち最初のものだけExport
set targPhotoAlias to exportSelectedPhotoOnPhotos() of me

–実験に用いた写真はそのままではOCR処理できなかったので、手っ取り早く階調反転を行う
set invertRes to convAsFilteredJPEG(targPhotoAlias, "CIColorInvert") of me
if invertRes = false then
  display dialog "Error in CIImage" with title "Error" buttons {"OK"} default button 1 with icon 2
  
return
end if
set invImage to (POSIX file invertRes) as alias

set outFileName to (NSUUID’s UUID()’s UUIDString() as text) & ".txt"
set outPath to ((path to desktop) as text) & outFileName –sandbox環境ではパスは無視される

tell application id "com.abbyy.FineReaderPro"
  activate
  
  
–Check Ready
  
set getReady to (is finereader controller active)
  
if getReady = false then return
  
  
–set idList to {English} –英語だとスペルチェックされて、"1"と"t"を誤認識するため英語の指定をやめた
  
–Caution: this command is executed asynchronously
  
–Caution: export command was changed in v12.1.4
  
  
set idList to {Basic, Java, Fortran, Cobol, Pascal} –認識ターゲット言語(C++の予約語はあるようだが、指定できないよ!)
  
open invImage — In this version ,we have to open image, at first.
  
export to txt outPath ocr languages enum idList retain layout (as plain text) encoding (utf8)
  
  
–Wait for finish
  
repeat 30 times
    set curStat to (is busy)
    
if curStat = false then exit repeat
    
delay 1
  end repeat
  
  
–sandbox環境(Mac App Store版)の場合にはファイル出力先を別途取得
  
set sandRes to (is sandboxed)
  
if sandRes = true then
    set outDir to (get output dir) as text
    
set outPath to (outDir & outFileName) as text
  end if
  
end tell

–OCR処理した結果のテキストを読み込む
tell current application
  set textRes to read file outPath
end tell

–数字ではじまる行のみを抽出して、リプレイIDを取得
set textList to paragraphs of textRes
set outList to {}
repeat with i in textList
  set j to contents of i
  
  
–1行あたりのテキストが8文字以上か?
  
if length of j > 8 then
    
    
–行頭の文字が数字か?
    
set firstChar to first character of j
    
set nRes to chkNumeric(firstChar) of me
    
if nRes = true then
      set tmp1 to text 2 thru -1 of j –最初の数字を除去
      
      
–数字とアルファベット以外の文字を削除(タブ、スペースなど)
      
set tmp2 to returnNumberAndAlphabetCharsOnly(tmp1) of me
      
if length of tmp2 ≥ 8 then
        set tmp3 to text 1 thru 8 of tmp2
        
–数字とアルファベットの混在の文字列であれば出力する
        
set tmp3Res to chkMixtureOfNumericAndAlphabet(tmp3) of me
        
if tmp3Res = true then
          set the end of outList to tmp3
        end if
      end if
    end if
  end if
end repeat

outList
–> {"4f73vg1v", "v3v32zt3", "yk1z371x", "52yzvn11", "k1ftfvvg"}–Version 1.x (3rd ID is wrong)
–> {"4f73vg1v", "v3v32zt3", "yk1z37tx", "52yzvn11", "k1ftfvvg"}– Version 2.0(Perfect!!!!)
–> {"4f73vg1v", "v3v32zt3", "yk1z37tx", "52yzvn11", "k1ftfvvg"}– Version 2.1(Perfect!!!!)
–> {"51n4gg1f", "2zxt41gg", "57k2txk9", "yy43f3gt", "4f73vg1v"} –Version 2.1(Perfect!!!!)

–Photosで選択中の写真の1枚目(複数時には無視)から緯度、経度情報を取得する
on getSelectionOnPhotos()
  tell application "Photos"
    set aa to selection
    
if aa = {} or aa = missing value then return false
    
set a to first item of aa
    
set aProp to properties of a
    
    
set aLoc to location of aProp
    
return aLoc
  end tell
end getSelectionOnPhotos

–2点間の距離を計算する
on getDistanceBetweenTwoPlaces(aPlaceLoc, bPlaceLoc)
  try
    set {aLat, aLong} to aPlaceLoc
    
set {bLat, bLong} to bPlaceLoc
  on error
    return false
  end try
  
  
set aPlace to CLLocation’s alloc()’s initWithLatitude:aLat longitude:aLong
  
set bPlace to CLLocation’s alloc()’s initWithLatitude:bLat longitude:bLong
  
set distanceInMetres to aPlace’s distanceFromLocation:bPlace
  
return (distanceInMetres as real)
end getDistanceBetweenTwoPlaces

–Photos上で選択中の写真をTemporary Folderに掘ったフォルダに書き出して、そのalias情報を返す
on exportSelectedPhotoOnPhotos()
  set dtPath to (path to temporary items) as text
  
set aUUID to NSUUID’s UUID()’s UUIDString() as text
  
  
set dirPath to ((POSIX path of dtPath) & aUUID)
  
set fileManager to NSFileManager’s defaultManager()
  
set aRes to (fileManager’s createDirectoryAtPath:dirPath withIntermediateDirectories:true attributes:(missing value) |error|:(reference))
  
set dtPath to dtPath & aUUID
  
  
tell application "Photos"
    set a to selection
    
if a = {} then return
    
set aRes to (export a to file dtPath)
  end tell
  
  
tell application "Finder"
    tell folder dtPath
      set fList to (every file) as alias list
    end tell
  end tell
  
  
if fList = {} then return false
  
return first item of fList
end exportSelectedPhotoOnPhotos

–CIFilterをかけたJPEG画像を生成
–参照:http://ashplanning.blogspot.jp/ のうちのどこか
on convAsFilteredJPEG(aPath, aFilterName)
  
  
–aliasをURL(input)とPOSIX path(output) に変換
  
set aURL to (current application’s |NSURL|’s fileURLWithPath:(POSIX path of aPath)) –Input
  
set aPOSIX to (POSIX path of aPath) & "_" & aFilterName & ".jpg" –Output
  
  
–CIImageを生成
  
set aCIImage to CIImage’s alloc()’s initWithContentsOfURL:aURL
  
  
— CIFilter をフィルタの名前で生成
  
set aFilter to CIFilter’s filterWithName:aFilterName
  
aFilter’s setDefaults() –各フィルタのパラメータはデフォルト
  
  
–Filterを実行
  
aFilter’s setValue:aCIImage forKey:"inputImage"
  
set aOutImage to aFilter’s valueForKey:"outputImage"
  
  
— NSBitmapImageRep を CIImage から生成
  
set aRep to NSBitmapImageRep’s alloc()’s initWithCIImage:aOutImage
  
  
— NSBitmapImageRep から JPEG データを取得
  
set jpegData to aRep’s representationUsingType:(NSJPEGFileType) |properties|:(missing value)
  
  
— ファイルに保存
  
set fsRes to jpegData’s writeToFile:aPOSIX atomically:true
  
if (fsRes as boolean) = false then return false –失敗した場合
  
return aPOSIX –成功した場合
  
end convAsFilteredJPEG

–数字とアルファベットの混在状態の時にtrueを返す
on chkMixtureOfNumericAndAlphabet(checkString)
  set a0Res to chkAlphabetAndNumeric(checkString) of me
  
set a1Res to chkNumeric(checkString) of me
  
set a2Res to chkAlphabet(checkString) of me
  
if {a0Res, a1Res, a2Res} = {true, false, false} then
    return true
  else
    return false
  end if
end chkMixtureOfNumericAndAlphabet

–数字のみかを調べて返す
on chkNumeric(checkString)
  set digitCharSet to NSCharacterSet’s characterSetWithCharactersInString:"0123456789"
  
set ret to my chkCompareString:checkString baseString:digitCharSet
  
return ret as boolean
end chkNumeric

— アルファベットのみか調べて返す
on chkAlphabet(checkString)
  set aStr to NSString’s stringWithString:checkString
  
set allCharSet to NSMutableCharacterSet’s alloc()’s init()
  
allCharSet’s addCharactersInRange:(current application’s NSMakeRange(ASCII number of "a", 26))
  
allCharSet’s addCharactersInRange:(current application’s NSMakeRange(ASCII number of "A", 26))
  
set aBool to my chkCompareString:aStr baseString:allCharSet
  
return aBool as boolean
end chkAlphabet

— アルファベットと数字のみか調べて返す
on chkAlphabetAndNumeric(checkString)
  set aStr to NSString’s stringWithString:checkString
  
set allCharSet to NSMutableCharacterSet’s alloc()’s init()
  
allCharSet’s addCharactersInRange:(current application’s NSMakeRange(ASCII number of "0", 10))
  
allCharSet’s addCharactersInRange:(current application’s NSMakeRange(ASCII number of "a", 26))
  
allCharSet’s addCharactersInRange:(current application’s NSMakeRange(ASCII number of "A", 26))
  
set aBool to my chkCompareString:aStr baseString:allCharSet
  
return aBool as boolean
end chkAlphabetAndNumeric

on chkCompareString:checkString baseString:baseString
  set aScanner to NSScanner’s localizedScannerWithString:checkString
  
aScanner’s setCharactersToBeSkipped:(missing value)
  
aScanner’s scanCharactersFromSet:baseString intoString:(missing value)
  
return (aScanner’s isAtEnd()) as boolean
end chkCompareString:baseString:

–文字置換
on repChar(aStr, targStr, repStr)
  set aString to NSString’s stringWithString:aStr
  
set bString to aString’s stringByReplacingOccurrencesOfString:targStr withString:repStr
  
return bString as text
end repChar

–アルファベットと数字以外を削除して返す
on returnNumberAndAlphabetCharsOnly(aStr)
  set anNSString to NSString’s stringWithString:aStr
  
set anNSString to anNSString’s stringByReplacingOccurrencesOfString:"[^0-9A-Za-z]" withString:"" options:(NSRegularExpressionSearch) range:{0, anNSString’s |length|()}
  
return anNSString as text
end returnNumberAndAlphabetCharsOnly

★Click Here to Open This Script 

Posted in file filter geolocation Image list OCR Sandbox | Tagged 10.11savvy 10.12savvy FineReader OCR Pro | Leave a comment

ハッシュ値から、メモリースティックに保存されたReplay Dataのステージ名とプレイ日時を求める v3

Posted on 10月 30, 2018 by Takaaki Naganoya

PSPのゲーム「戦場の絆ポータブル」のセーブデータについているステージ別のプレビュー画像のハッシュ値から対戦ステージと対戦日時を抽出してタブ区切りテキストで出力するAppleScriptです。

保存された対戦データの内容を集計するために作成したものです。

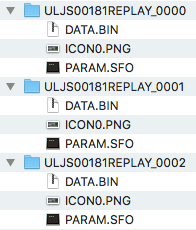
PSPでメモリースティックに保存された対戦データには、すべて同じファイル名(ICON0.PNG)で異なる画像が添付されていました。ファイル名で対戦ステージを判定しようにも同じファイル名なので区別できません。

そこで、Spotlightの機能を用いて各セーブデータの「ICON0.PNG」をピックアップし、画像の内容のハッシュ値(SHA-1)を計算して、対戦ステージ内容を判定しました。

直近の対戦データをメモリースティック経由でMacに読み込み、本Scriptで分析してみたところ、

ジャブロー地上	2017年9月18日月曜日 14:42:48
ジャブロー地上	2017年9月18日月曜日 14:50:02
ジャブロー地上	2017年9月18日月曜日 14:55:22
タクラマカン砂漠	2017年9月18日月曜日 15:02:32
サイド7	2017年9月18日月曜日 15:09:36
ジャブロー地下	2017年9月18日月曜日 15:17:06
ジャブロー地上	2017年9月18日月曜日 15:31:08
サイド7	2017年9月18日月曜日 15:38:28
ジャブロー地上	2017年9月18日月曜日 15:51:52
ジャブロー地上	2018年1月2日火曜日 16:13:30
サイド7	2018年1月2日火曜日 16:23:04
ジャブロー地下	2018年1月2日火曜日 16:57:22

のようになりました。正月と秋分の日に親戚で集まったときに甥っ子と対戦した様子がありありと記録されています。

本Scriptはたまたまゲームのセーブデータの集計を行っていますが、同様の形式のデータを集計したい場合には使えそうです。

–> md5Lib.framework(To ~/Library/Frameworks)

AppleScript名:チェックサム値から、メモリースティックに保存されたReplay Dataのステージ名とプレイ日時を求める v3.1
— Created 2015-04-17 by Takaaki Naganoya
— Modified 2018-10-29 by Takaaki Naganoya
— 2018 Piyomaru Software
use AppleScript version "2.4"
use scripting additions
use framework "Foundation"
use framework "md5Lib" –https://github.com/JoeKun/FileMD5Hash
use bPlus : script "BridgePlus" –https://www.macosxautomation.com/applescript/apps/BridgePlus.html
use mdLib : script "Metadata Lib" version "2.0.0" –https://www.macosxautomation.com/applescript/apps/

property FileHash : a reference to current application’s FileHash
property SMSForder : a reference to current application’s SMSForder
property NSPredicate : a reference to current application’s NSPredicate
property NSFileManager : a reference to current application’s NSFileManager
property NSMutableArray : a reference to current application’s NSMutableArray

–各SAVEDATAフォルダ中の「ICON0.PNG」のSHA-1ハッシュ値とステージ名の対応表
set shaArray to NSMutableArray’s arrayWithArray:{{stageName:"ニューヤーク", sha1:"dbb9e8e26e96dbb4dd3198e55b6cde41aba8e0a8"}, {stageName:"鉱山都市", sha1:"72f35456504b1957ec85fb6a1597ac1a2baa2ee9"}, {stageName:"グレートキャニオン", sha1:"9de93e8b853fe153bc73066fb07481c774499960"}, {stageName:"サイド7", sha1:"be22fa949bfd78b0cd97596929f07ce4ec501d7b"}, {stageName:"タクラマカン砂漠", sha1:"5284dc5f0f7a53ee5677908f66da1e00b80f76b6"}, {stageName:"トリントン・タワー", sha1:"9f080853dac45ecaf1672ff2230f2b9a80a00eb4"}, {stageName:"ジャブロー地下", sha1:"a93550099419f52444cf77366773192d0bf5f848"}, {stageName:"ヒマラヤ", sha1:"877f998d608dd267c380e59a17b2a95a139baef5"}, {stageName:"ジャブロー地上", sha1:"8c4ee44e8f2fbcbf061e6d5ea2b202b08f42c59a"}}

load framework

set apPath1 to choose folder with prompt "リプレイデータが入っているフォルダを選択してください"
set aRes to perform search in folders {apPath1} predicate string "kMDItemFSName == %@" search arguments {"ICON0.PNG"}

set outList to {}
set errorList to {}

repeat with i in aRes
  set j to contents of i
  
set sumRes to (FileHash’s sha1HashOfFileAtPath:(j)) as string
  
  
–チェックサムからステージ名を検索する
  
set aPredStr to "sha1 == ’" & sumRes & "’"
  
set aPredicate to (NSPredicate’s predicateWithFormat:aPredStr)
  
set filteredArray to (shaArray’s filteredArrayUsingPredicate:aPredicate)
  
  
if filteredArray as list = {} then
    set the end of errorList to j
  else
    set tmpStage to (filteredArray’s valueForKey:"stageName") as string
    
    
set fAttrib to (NSFileManager’s defaultManager()’s attributesOfItemAtPath:j |error|:(missing value))
    
set cDat to (fAttrib’s fileCreationDate()) as date
    
    
set tmpList to {tmpStage, cDat}
    
    
if tmpList is not in outList then
      set the end of outList to tmpList
    end if
  end if
end repeat

–2D Listのソート
set sortIndexes to {1} –Key Item id: begin from 0
set sortOrders to {true} –ascending = true
set sortTypes to {"compare:"}
set out2List to (SMSForder’s subarraysIn:(outList) sortedByIndexes:sortIndexes ascending:sortOrders sortTypes:sortTypes |error|:(missing value)) as list

–2D Listをタブ区切りテキストに変換して返す
set aText to retItemDelimedAndParagraphDelimedText(out2List, tab, return) of me

–入れ子のリストを、アイテム間のデリミタとパラグラフ間のデリミタを指定してテキスト化
–というか、入れ子のリストをタブ区切りテキストにするのが目的
on retItemDelimedAndParagraphDelimedText(aList, itemDelim, paragraphDelim)
  set aText to ""
  
  
repeat with i in aList
    set aStr to retDelimedText(i, itemDelim) of me
    
set aText to aText & aStr & paragraphDelim
  end repeat
  
  
return aText
end retItemDelimedAndParagraphDelimedText

on retDelimedText(aList, aDelim)
  set aText to ""
  
set curDelim to AppleScript’s text item delimiters
  
set AppleScript’s text item delimiters to aDelim
  
set aText to aList as text
  
set AppleScript’s text item delimiters to curDelim
  
return aText
end retDelimedText

★Click Here to Open This Script 

Posted in file File path list Record Spotlight | Tagged 10.11savvy 10.12savvy NSFileManager NSMutableArray NSPredicate | Leave a comment

Accessibility Inspectorがv5.0にバージョンアップして使いにくく?

Posted on 10月 30, 2018 by Takaaki Naganoya


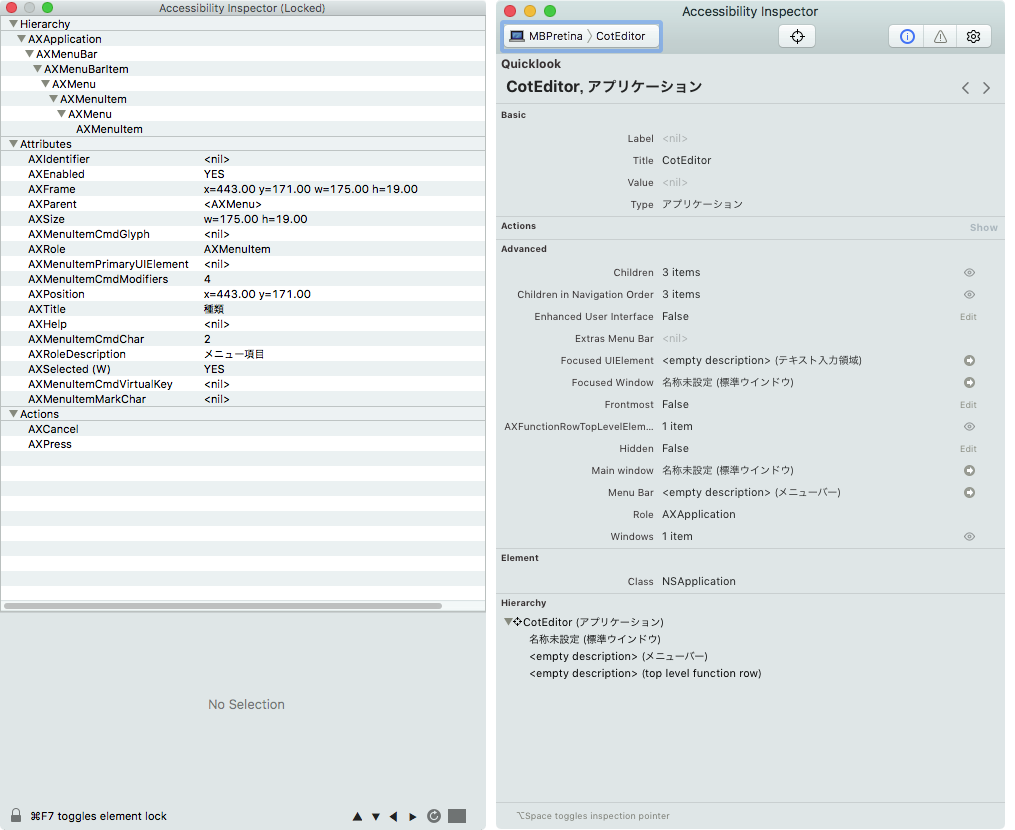
電子ブックからリンクしている情報のBlog側の欠落をチェックしていたら、このAccessibility Inspectorの情報が(Blog上に)抜けていることがわかり、埋めているわけですが………チェックしていたら、バージョンがv4.0からv5.0に上がっていることに気づきました。


▲左側がv4.0、右側がv5.0。v5.0はアプリケーションとして動作し、メニューがある


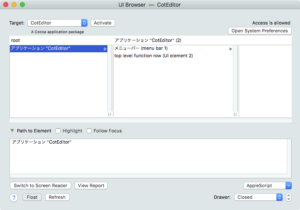
日常的にアプリケーションのGUI部品の情報を収集するのはPFiddlesoftのUI Browserで、使用率は99.9:0.1でUI Browserのほうが圧倒的に多いわけですが、ごくたまにUI Browserでは手が届かないGUI部品があります。


具体的にいえば、フローティングパレットやポップアップメニュー上の凝ったGUI部品で、これらはUI Browserではオブジェクト階層が途中で途切れているものとして表示されるため、オブジェクト階層を追跡できないことがあります。

そんなわけで、ごくたまに(1年間に1回ぐらい?)Accessibility Inspectorのごやっかいになることがあり、v4.0では問題なく使用できていました。

問題は、いつのまにかアップデートされて入っていたAccessibility Inspector v5.0。

これ、Windowの中のGUI部品は追いかけられるんですが、メニュー部品を追いかけられないように見えるのですが………。目の錯覚なのか、使いこなせていないのか現段階では不明です。

それができないと、Accessibility Inspectorの存在意義が、、、、

# メニュー項目はOption+Spaceで選択中のGUI部品への参照をAccessibility Inspector v5.0のメインウィンドウに表示できることを教えてもらいました

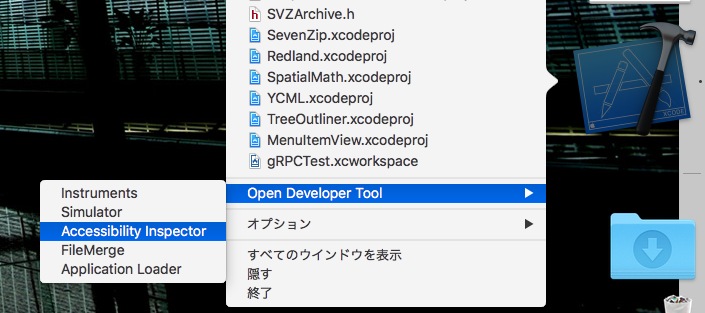
一応、Apple Developper Connectionのアカウントがあれば、Developperサイトにログインして、ダウンロード項目から「Accessibility Tools for Xcode – February 2012」のアーカイブをダウンロードすれば、中にAccessibility Inspector v4.0が入っています。macOS 10.12上にコピーして動かせることを確認しています。

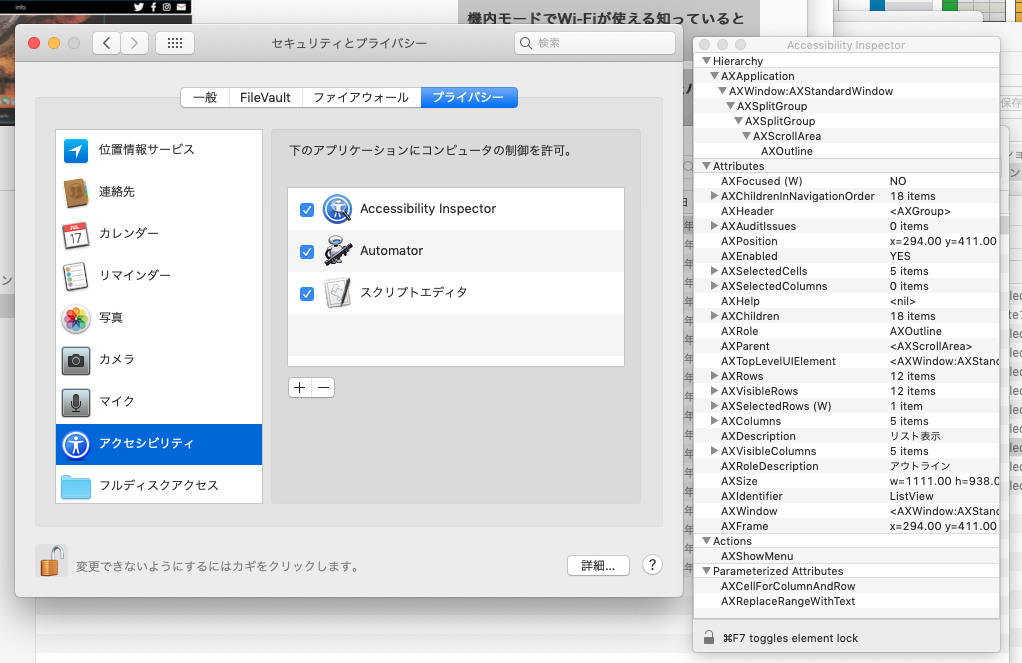
macOS 10.14, MojaveにAccessibility Inspector v4.0をインストールして、期待どおりの動作が行えていることを確認しています。Accessibility Inspector v4.0はCode Signされていないのでシステム環境設定の「セキュリティーとプライバシー」>「アクセシビリティ」でアクセシビリティへのアクセスを許可しておく必要があります。

なお、Accessibility Inspector v4.0はCode Signされていないので、macOS 10.14, Mojave上で起動するといろいろうるさく言われますが、システム環境設定の「セキュリティーとプライバシー」>「一般」からAccessibility Inspector v4.0の起動許可を指示すれば大丈夫です。


▲macOS 10.14, Mojave上でAccessibility Inspector v4.0を起動したところ

Posted in How To Tools | Tagged 10.12savvy 10.13savvy 10.14savvy GUI Scripting | Leave a comment

ファイル作成日、修正日を変更する

Posted on 10月 29, 2018 by Takaaki Naganoya

指定ファイルの作成日、修正日を変更するAppleScriptです。

以前はsetFileコマンド(Xcodeのcommand lineユーティリティーをインストールすると入る)で行うパターンを掲載していたのですが、NSFileManagerの方が楽にできるのと、どの実行環境でも(開発ツールが入っていなくても)実行できていいと思います。

AppleScript名:ファイル作成日、修正日を変更する
— Created 2018-05-30 by Takaaki Naganoya
— 2018 Piyomaru Software
use AppleScript version "2.5"
use scripting additions
use framework "Foundation"
use framework "AppKit"

set aFile to POSIX path of (choose file)
set targDate to current date
changeFileCreationDate(targDate, aFile) of me
changeFileModDate(targDate, aFile) of me

–指定パスのファイルの作成日時を変更する
on changeFileCreationDate(aDate, aFile)
  set aDic to current application’s NSMutableDictionary’s dictionaryWithObject:aDate forKey:(current application’s NSFileCreationDate)
  
set aFM to current application’s NSFileManager’s defaultManager()’s setAttributes:aDic ofItemAtPath:(POSIX path of aFile) |error|:(missing value)
end changeFileCreationDate

–指定パスのファイルの修正日時を変更する
on changeFileModDate(aDate, aFile)
  set aDic to current application’s NSMutableDictionary’s dictionaryWithObject:aDate forKey:(current application’s NSFileModificationDate)
  
set aFM to current application’s NSFileManager’s defaultManager()’s setAttributes:aDic ofItemAtPath:(POSIX path of aFile) |error|:(missing value)
end changeFileModDate

★Click Here to Open This Script 

Posted in Calendar file File path | Tagged 10.11savvy 10.12savvy 10.13savvy 10.14savvy NSFileManager NSMutableDictionary | 1 Comment

光学ドライブのオープン(イジェクト)

Posted on 10月 29, 2018 by Takaaki Naganoya

光学ドライブのオープン(メディアのイジェクト)を行うAppleScriptです。

すっかり、Macのラインナップから光学ドライブ標準搭載モデルがなくなって、外付けの光学ドライブばかりというか、そもそも光学ドライブを持っていないというユーザーが増えてきたので、光学メディアでのデータ配布そのものが無意味になりつつある昨今。

光学ドライブもトレイ式(トレイ開閉が電動)のものがほぼ絶滅状態(Pioneerのみ製造?)。スリムタイプのスロットイン方式か、薄型トレイ(イジェクトしたまま戻らない)方式のみなので、光学メディアのイジェクトについて分かればよいでしょう。

drutilコマンドのほか、macOS 10.13まではDVDプレイヤーがScriptableだったので、DVDプレイヤーに対してejectコマンドを送る方法もありました(10.14でScripting機能が廃止に……アプリケーション自体を作り直したもよう)。


macOS 10.12/13:DVDプレイヤー(32bit) ファイルサイズ:6.4MB バージョン:5.8


macOS 10.14:DVDプレイヤー(64bit) ファイルサイズ:2.1MB バージョン: 6.0
注:macOS 10.14のDVDプレイヤーは/System/Library/CoreServices/Applications/にある。アプリケーションから補助ツールに格下げになった。

これまでDVDプレイヤーが担ってきた用途については、フリーの「Free Mac Media Player」で置き換えるのがよいと思われます。

AppleScript名:光学ドライブのトレイオープン(内蔵ドライブのみ)
do shell script "/usr/bin/drutil eject internal"

★Click Here to Open This Script 

AppleScript名:光学ドライブのトレイオープン(外付けドライブのみ)
do shell script "/usr/bin/drutil eject external"

★Click Here to Open This Script 

Posted in drive System | Tagged 10.11savvy 10.12savvy 10.13savvy 10.14savvy | Leave a comment

スリープ復帰日時を設定する v2

Posted on 10月 29, 2018 by Takaaki Naganoya

指定の日時(年月日時分秒)にスリープ復帰日時を設定するAppleScriptです。

過去に掲載した記事の再掲載分ですが、以前に掲載したリストにバグが見つかったので修正しておきました。サブルーチン内でパラメータの変数と同じ名前の変数に代入してしまい、計算結果がおかしくなるという超恥ずかしいバグでした。

AppleScript名:スリープ復帰日時を設定する v2
use AppleScript version "2.4"
use scripting additions
use framework "Foundation"

set aYear to 2018 –年
set aMonth to 10 –月
set aDate to 30 –日

set aHour to 7 –時
set aMinute to 1 –分
set aSecond to 2 –秒

set myAccount to do shell script "whoami" –他に管理者アカウントを指定することも可。その場合にはmyPasswordには管理者のパスワードを指定
set myPassword to "" –パスワード(カラのままでOK。必要に応じてAS側からダイアログ入力を求める)

set pRes to setAwakeDate(aYear, aMonth, aDate, aHour, aMinute, aSecond, myAccount, myPassword) of me

–スリープからの復帰日時を設定する
on setAwakeDate(aYear, aMonth, aDate, aHour, aMinute, aSecond, myAccount, myPassword)
  if myPassword = "" then
    set myPassword to text returned of (display dialog "パスワードを入力してください" default answer "" with hidden answer)
  end if
  
  
–現在のユーザーに管理権限がない場合にはリターン
  
if getUsersPrivileges(myAccount) of me = false then return false
  
  
–過去の日時を指定していたら設定しない(過去掲載時にここが間違っていたので修正)
  
set tmpDate to getDateInternational(aYear, aMonth, aDate, aHour, aMinute, aSecond, "JST")
  
if ((current date) > tmpDate) then return false
  
  
–数値の整形(日付)
  
set tYear to retZeroPaddingText(aYear, 2) of me
  
set tMonth to retZeroPaddingText(aMonth, 2) of me
  
set tDate to retZeroPaddingText(aDate, 2) of me
  
  
–数値の整形(時刻)
  
set tHour to retZeroPaddingText(aHour, 2) of me
  
set tMinute to retZeroPaddingText(aMinute, 2) of me
  
set tSecond to retZeroPaddingText(aSecond, 2) of me
  
  
set tDateStr to (ASCII character 34) & tMonth & "/" & tDate & "/" & tYear & " " & tHour & ":" & tMinute & ":" & tSecond & (ASCII character 34)
  
  
try
    set sRes to (do shell script "/usr/bin/pmset schedule wake " & tDateStr user name myAccount password myPassword with administrator privileges)
  on error erMes
    return erMes –時間を過去に設定したか、あるいは数値の範囲指定エラー。パスワードの指定ミスの可能性もあり得る
  end try
  
  
return true
  
end setAwakeDate

–指定ユーザーの権限を得る(管理者か、それ以外か) 10.4および10.5以降両用
–管理者だとtrueが、それ以外だとfalseが返る
on getUsersPrivileges(aUser)
  set aVer to system attribute "sys2" –OSメジャーバージョンを取得する(例:Mac OS X 10.6.4→6)
  
  
set current_user to aUser
  
  
if aVer > 4 then
    –Mac OS X 10.5以降の処理
    
set adR to (do shell script "/usr/bin/dsmemberutil checkmembership -U " & current_user & " -G admin users")
    
    
if adR = "user is a member of the group" then
      return true
    else
      return false
    end if
    
  else
    –Mac OS X 10.4までの処理
    
set admin_users to (do shell script "/usr/bin/niutil -readprop . /groups/admin users")
    
tell (a reference to AppleScript’s text item delimiters)
      set {old_atid, contents} to {contents, " "}
      
set {admin_users, contents} to {text items of admin_users, old_atid}
    end tell
    
    
if current_user is in admin_users then
      return true
    else
      return false
    end if
  end if
  
end getUsersPrivileges

–数値にゼロパディングしたテキストを返す
on retZeroPaddingText(aNum, aLen)
  set tText to ("00000000" & aNum as text)
  
set tCount to length of tText
  
set resText to text (tCount – aLen + 1) thru -1 of tText
  
return resText
end retZeroPaddingText

–Make a GMT Date Object with parameters from a given time zone.
on getDateInternational(aYear, aMonth, aDay, anHour, aMinute, aSecond, timeZoneAbbreviation)
  set theNSCalendar to current application’s NSCalendar’s currentCalendar()
  
theNSCalendar’s setTimeZone:(current application’s NSTimeZone’s timeZoneWithAbbreviation:(timeZoneAbbreviation))
  
set theDate to theNSCalendar’s dateWithEra:1 |year|:aYear |month|:aMonth |day|:aDay hour:anHour minute:aMinute |second|:aSecond nanosecond:0
  
return theDate as date
end getDateInternational

★Click Here to Open This Script 

Posted in Calendar System | Tagged 10.11savvy 10.12savvy | Leave a comment

現在地点の緯度経度情報を取得する v2

Posted on 10月 29, 2018 by Takaaki Naganoya

WiFiの情報を元に現在地点の緯度経度情報を取得するAppleScriptです。

実行前にWiFiがオンになっている必要があるので、WiFiの状態を確認して、WiFiがオフだったらオンにする処理が必要になります。

AppleScript名:現在地点の緯度経度情報を取得する v2
— Created 2015-03-04 by Takaaki Naganoya, Shane Stanley
— Modified 2015-12-06 by Takaaki Naganoya
use AppleScript version "2.4"
use scripting additions
use framework "Foundation"
use framework "CoreLocation"

property locationManager : missing value
property curLatitude : 0
property curLongitude : 0

–Get Current Geo Location
set {aLat, aLong} to getCurrentGeoLocation() of me

on getCurrentGeoLocation()
  set locationManager to current application’s CLLocationManager’s alloc()’s init()
  
  
set locE to locationManager’s locationServicesEnabled()
  
if (locE as boolean) = true then
    locationManager’s setDelegate:me
    
locationManager’s setDesiredAccuracy:(current application’s kCLLocationAccuracyNearestTenMeters)
    
locationManager’s setDistanceFilter:500
    
locationManager’s startUpdatingLocation()
  else
    return false –error in init
  end if
  
  
set hitF to false
  
repeat 3000 times
    if {curLatitude, curLongitude} is not equal to {0, 0} then
      set hitF to true
      
exit repeat
    end if
    
delay ("0.0001" as real)
  end repeat
  
  
if hitF = false then return {false, false}
  
return {curLatitude, curLongitude}
end getCurrentGeoLocation

on locationManager:manager didUpdateLocations:locations
  set location to (locations’s lastObject())
  
set eventDate to (location’s timestamp())
  
set howRecent to (eventDate’s timeIntervalSinceNow())
  
set howRecent to howRecent as real
  
set howRecent to absNum(howRecent)
  
  
if howRecent < 15.0 then
    set alt to location’s altitude –>(NSNumber) 46.356517791748
    
set aSpeed to location’s speed –>(NSNumber) -1.0
    
set aCourse to location’s course –North:0, East:90, South:180, West:270
    
–>  (NSNumber) -1.0
    
set theDescription to location’s |description|()
    
–> (NSString) "<+35.xxxxx,+139.xxxxxx> +/- 65.00m (speed -1.00 mps / course -1.00) @ 2015/03/04 8時56分41秒 日本標準時"
    
set anNSScanner to current application’s NSScanner’s scannerWithString:theDescription
    
anNSScanner’s setCharactersToBeSkipped:(current application’s NSCharacterSet’s characterSetWithCharactersInString:"<,")
    
set {theResult, aLat} to anNSScanner’s scanDouble:(reference)
    
set {theResult, aLng} to anNSScanner’s scanDouble:(reference)
    
copy {aLat, aLng} to {my curLatitude, my curLongitude}
  else
    locationManager’s stopUpdatingLocation()
  end if
  
end locationManager:didUpdateLocations:

on locationManager:anCLLocationManager didFailWithError:anNSError
  display dialog (anNSError’s localizedDescription() as text)
end locationManager:didFailWithError:

on absNum(aNum)
  if aNum > 0 then
    return aNum
  else
    return (aNum * -1)
  end if
end absNum

★Click Here to Open This Script 

Posted in geolocation System WiFi | Tagged 10.11savvy 10.12savvy 10.13savvy CLLocationManager NSCharacterSet NSScanner | Leave a comment

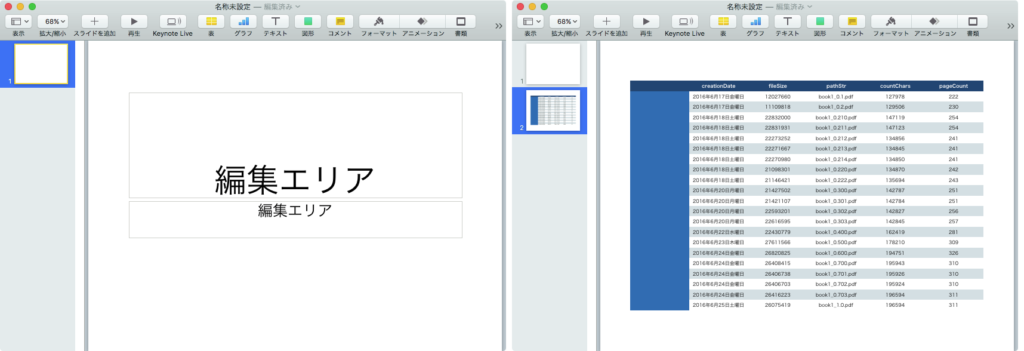
recordのlistでKeynoteに表を作成する v1.5

Posted on 10月 29, 2018 by Takaaki Naganoya

リスト(配列)に入ったレコード(dictionary)のデータをもとに、現在オープン中のKeynoteの書類にスライドを追加し、その上に表を作成するAppleScriptです。

Keynoteで書類をオープンしていない場合には、書類を新規作成します。

表のデータを順次埋めているのは、Keynoteの表作成機能がそのように実装されているからです。普通は、データ内容を指定して表の作成と内容を一気に指定するように実装するのが普通ですが、Keynoteのこの仕様はあまりいただけません。

そのため、各セルを順次データで埋めているわけですが(アプリケーションとの通信頻度が高くなるので本来は避けたい処理)、「ignoring application responses」〜「end ignoring」による非同期実行モードによりデータでセルを埋める箇所のみ倍速実行しています。

「ignoring application responses」を使うと、AppleScriptがアプリケーションに命令を出して、正常に実行されたかどうかの「実行結果」を待たないため、おおよそ2倍の速度で実行できます。ただし、命令が正常に実行できたかどうかを取得できないので、安全性が確認されているようなケースで返り値が不要な場合にのみ利用できます。

macOS 10.14, Mojaveで実行したところ、macOS 10.12, Sierraの倍ぐらいの速度で実行しました。なんだろうこれは(10.12:Keynote v8.1, 10.14:Keynote v8.2)、、、、ハードウェアの構成などはほぼ同じで、まったく同じScriptを実行したのですが、、、、

AppleScript名:recordのlistでKeynoteに表を作成する v1.5
— Created 2016-06-29 by Takaaki Naganoya
— 2016 Piyomaru Software
use AppleScript version "2.4"
use scripting additions
use framework "Foundation"

property aFontSize : 12

–This Date format is localized in Japanese. But this date string works only string. Don’t care about it.
set aList to {{pathStr:"book1_0.1.pdf", creationDate:"2016年6月17日金曜日", pageCount:222, countChars:127978, fileSize:"12027660"}, {pathStr:"book1_0.2.pdf", creationDate:"2016年6月17日金曜日", pageCount:230, countChars:129506, fileSize:"11109818"}, {pathStr:"book1_0.210.pdf", creationDate:"2016年6月18日土曜日", pageCount:254, countChars:147119, fileSize:"22832000"}, {pathStr:"book1_0.211.pdf", creationDate:"2016年6月18日土曜日", pageCount:254, countChars:147123, fileSize:"22831931"}, {pathStr:"book1_0.212.pdf", creationDate:"2016年6月18日土曜日", pageCount:241, countChars:134856, fileSize:"22273252"}, {pathStr:"book1_0.213.pdf", creationDate:"2016年6月18日土曜日", pageCount:241, countChars:134845, fileSize:"22271667"}, {pathStr:"book1_0.214.pdf", creationDate:"2016年6月18日土曜日", pageCount:241, countChars:134850, fileSize:"22270980"}, {pathStr:"book1_0.220.pdf", creationDate:"2016年6月18日土曜日", pageCount:242, countChars:134870, fileSize:"21098301"}, {pathStr:"book1_0.222.pdf", creationDate:"2016年6月18日土曜日", pageCount:243, countChars:135694, fileSize:"21146421"}, {pathStr:"book1_0.300.pdf", creationDate:"2016年6月20日月曜日", pageCount:251, countChars:142787, fileSize:"21427502"}, {pathStr:"book1_0.301.pdf", creationDate:"2016年6月20日月曜日", pageCount:251, countChars:142784, fileSize:"21421107"}, {pathStr:"book1_0.302.pdf", creationDate:"2016年6月20日月曜日", pageCount:256, countChars:142827, fileSize:"22593201"}, {pathStr:"book1_0.303.pdf", creationDate:"2016年6月20日月曜日", pageCount:257, countChars:142845, fileSize:"22616595"}, {pathStr:"book1_0.400.pdf", creationDate:"2016年6月22日水曜日", pageCount:281, countChars:162419, fileSize:"22430779"}, {pathStr:"book1_0.500.pdf", creationDate:"2016年6月23日木曜日", pageCount:309, countChars:178210, fileSize:"27611566"}, {pathStr:"book1_0.600.pdf", creationDate:"2016年6月24日金曜日", pageCount:326, countChars:194751, fileSize:"26820825"}, {pathStr:"book1_0.700.pdf", creationDate:"2016年6月24日金曜日", pageCount:310, countChars:195943, fileSize:"26408415"}, {pathStr:"book1_0.701.pdf", creationDate:"2016年6月24日金曜日", pageCount:310, countChars:195926, fileSize:"26406738"}, {pathStr:"book1_0.702.pdf", creationDate:"2016年6月24日金曜日", pageCount:310, countChars:195924, fileSize:"26406703"}, {pathStr:"book1_0.703.pdf", creationDate:"2016年6月24日金曜日", pageCount:311, countChars:196594, fileSize:"26416223"}, {pathStr:"book1_1.0.pdf", creationDate:"2016年6月25日土曜日", pageCount:311, countChars:196594, fileSize:"26075419"}}

set anItem to contents of first item of aList
set aDict to (current application’s NSMutableArray’s arrayWithObject:anItem)’s firstObject()
set aKeyList to aDict’s allKeys() as list
set aKeyCount to length of aKeyList
set aRowCount to length of aList

tell application "Keynote"
  set dCount to count every document
  
if dCount = 0 then
    set newDoc to make new document with properties {document theme:theme "ホワイト", width:1024, height:768} –This theme name is *localized* by stupid software maker in Cupertino. This means "White" in Japanese
  end if


tell document 1
    set aNewSlide to make new slide
    
set base slide of aNewSlide to master slide "空白" –This theme name is *localized* by stupid software maker in Cupertino. This means "Blank" in Japanese
    
    
tell aNewSlide
      set aTable to make new table with properties {column count:aKeyCount + 1, row count:aRowCount + 1}
      
      
tell aTable
        –ヘッダー行を作成(ラベルで埋める)
        
tell row 1
          repeat with i from 2 to aKeyCount + 1
            set aKey to item (i – 1) of aKeyList
            
            
–非同期実行ここから
            
ignoring application responses
              set value of cell i to aKey
              
set font size to aFontSize
            end ignoring
            
–非同期実行ここまで
            
          end repeat
        end tell
        
        
–各行のデータを埋める
        
repeat with ii from 2 to aRowCount + 1
          set aRecRow to item (ii – 1) of aList
          
tell row ii
            
            
repeat with iii from 2 to (aKeyCount + 1)
              
              
tell cell iii
                set aKey to item (iii – 1) of aKeyList
                
                
–非同期実行ここから
                
ignoring application responses
                  set value to retValueForKey(aRecRow, aKey) of me
                  
set font size to aFontSize
                end ignoring
                
–非同期実行ここまで
                
              end tell
            end repeat
          end tell
        end repeat
        
      end tell
    end tell
    
  end tell
end tell

on retValueForKey(aRec, aLabel)
  set tmpDic to current application’s NSMutableDictionary’s dictionaryWithDictionary:aRec
  
return (tmpDic’s valueForKey:aLabel) as string
end retValueForKey

★Click Here to Open This Script 

Posted in list Record | Tagged 10.11savvy 10.12savvy 10.13savvy 10.14savvy Keynote | Leave a comment

並び順をインデックスリストで指定してソート

Posted on 10月 29, 2018 by Takaaki Naganoya

並び順を定義したリスト(インデックスリスト)にもとづいてソートを行うAppleScriptです。

テストデータにあるように、都道府県別のリストを処理する際に、結果を北から南へと並べたいというニーズを満たすために、その場で作ったものでしかありません。都道府県別なので重複データが存在しないことが前提です。

一応、リストを扱うための高速化処理を行なっているので、速度についてはそれほど困ることはないと思われます。

# 書籍「AppleScript最新リファレンス」からのリンクURLがBlog消失後に修復されていなかったので、再掲載しました。書籍側もリンクURLを修正したものを近日中にアップします

AppleScript名:並び順をインデックスリストで指定してソート
–並び順を指定するインデックスリスト(この順番にソート対象データを並べ替える)
set indexList to {"北海道", "青森県", "岩手県", "秋田県", "宮城県", "山形県", "福島県", "新潟県", "富山県", "石川県", "福井県", "茨城県", "栃木県", "群馬県", "埼玉県", "千葉県", "東京都", "神奈川県", "長野県", "山梨県", "岐阜県", "静岡県", "愛知県", "三重県", "滋賀県", "京都府", "兵庫県", "大阪府", "奈良県", "和歌山県", "島根県", "岡山県", "鳥取県", "広島県", "山口県", "香川県", "徳島県", "愛媛県", "高知県", "福岡県", "大分県", "佐賀県", "長崎県", "宮崎県", "熊本県", "鹿児島県", "沖縄県"}

–ソート対象データ
set aList to {{"東京都", 301}, {"神奈川県", 98}, {"大阪府", 90}, {"千葉県", 60}, {"埼玉県", 55}, {"北海道", 40}, {"愛知県", 40}, {"京都府", 40}, {"兵庫県", 40}, {"福岡県", 30}, {"静岡県", 20}, {"広島県", 20}, {"茨城県", 20}, {"宮城県", 16}, {"長野県", 15}, {"福島県", 12}, {"新潟県", 11}, {"滋賀県", 10}, {"岐阜県", 10}, {"群馬県", 10}, {"石川県", 10}, {"熊本県", 9}, {"岡山県", 9}, {"福井県", 7}, {"青森県", 7}, {"秋田県", 6}, {"愛媛県", 6}, {"和歌山県", 6}, {"奈良県", 5}, {"三重県", 5}, {"沖縄県", 5}, {"岩手県", 5}, {"大分県", 4}, {"鹿児島県", 4}, {"宮崎県", 4}, {"栃木県", 3}, {"香川県", 3}, {"山形県", 3}, {"富山県", 2}, {"山梨県", 2}, {"長崎県", 2}, {"徳島県", 2}, {"島根県", 2}, {"鳥取県", 1}, {"高知県", 1}, {"山口県", 1}}

set bList to sortItemByIndexList(aList, indexList, 1, 2) of me
–> {{"北海道", 40}, {"青森県", 7}, {"岩手県", 5}, {"秋田県", 6}, {"宮城県", 16}, {"山形県", 3}, {"福島県", 12}, {"新潟県", 11}, {"富山県", 2}, {"石川県", 10}, {"福井県", 7}, {"茨城県", 20}, {"栃木県", 3}, {"群馬県", 10}, {"埼玉県", 55}, {"千葉県", 60}, {"東京都", 301}, {"神奈川県", 98}, {"長野県", 15}, {"山梨県", 2}, {"岐阜県", 10}, {"静岡県", 20}, {"愛知県", 40}, {"三重県", 5}, {"滋賀県", 10}, {"京都府", 40}, {"兵庫県", 40}, {"大阪府", 90}, {"奈良県", 5}, {"和歌山県", 6}, {"島根県", 2}, {"岡山県", 9}, {"鳥取県", 1}, {"広島県", 20}, {"山口県", 1}, {"香川県", 3}, {"徳島県", 2}, {"愛媛県", 6}, {"高知県", 1}, {"福岡県", 30}, {"大分県", 4}, {"佐賀県", 0}, {"長崎県", 2}, {"宮崎県", 4}, {"熊本県", 9}, {"鹿児島県", 4}, {"沖縄県", 5}}

–並び順をインデックスリストで指定してソート
–パラメータ: (1) aList=ソート元リスト ({{"name1", number1}, {"name2", number2}……} )、
–      (2) indexList=ソート順指定用インデックスリスト、
–      (3) itemNo=並べ替え対象アイテム番号(ソート元リスト内の各リスト要素内のソートキーになるアイテムの番号)
–      (4) nohitItem=インデックス項目がソート元リストに対してヒットしなかった場合の、件数0を入れるアイテム番号
–エラー:    エラー時にはfalseを返す
on sortItemByIndexList(aList, indexList, itemNo, nohitItem)
  –処理高速化のためにハンドラ内部にScript Objectを宣言してデータアクセス
  
script sortItemByIndexListObj
    property indexListSpd : indexList
    
property aListSpd : aList
  end script
  
  
–パラメータのエラーチェック
  
set tmpItem to contents of first item of aList
  
set tmpLen to length of tmpItem
  
  
–itemNoのエラーチェック
  
if (itemNo < 1) or (itemNo > tmpLen) then return false
  
–nohitItemのエラーチェック
  
if (nohitItem < 1) or (nohitItem > tmpLen) then return false
  
–itemNoとnohitItemが衝突していないかチェック
  
if itemNo = nohitItem then return false


–処理本体
  
set outList to {}
  
repeat with i in indexListSpd of sortItemByIndexListObj
    set j to contents of i
    
    
set hitF to false
    
    
repeat with ii in aListSpd of sortItemByIndexListObj
      set targItem to contents of item itemNo of ii
      
if targItem = j then
        set the end of outList to contents of ii
        
set hitF to true
        
exit repeat
      end if
    end repeat
    
    
–合致するデータがなかった場合の対応
    
if hitF = false then
      set tmpList to {}
      
repeat nohitItem times
        set the end of tmpList to ""
      end repeat
      
set item itemNo of tmpList to j
      
set item nohitItem of tmpList to 0
      
set the end of outList to tmpList
    end if
    
  end repeat
  
  
outList
  
end sortItemByIndexList

★Click Here to Open This Script 

Posted in list Sort | Tagged 10.11savvy 10.12savvy 10.13savvy 10.14savvy | Leave a comment

offset ofの高速実行

Posted on 10月 29, 2018 by Takaaki Naganoya

文字列中の文字/文字列スキャンを行う「offset of」命令を高速化するAppleScriptです。

AppleScript標準装備の「offset of」の処理を横取りして、自前でAppleScriptのコマンドで実行すると2.5倍以上高速になります。発見者に敬意を表して「Jun Araki Method」と呼んでいます。

オリジナルからの改変を行なったポイントは、macOS 10.10以降のAppleScriptObjC(Cocoaの機能を利用するAppleScript)の中に書いたときへの対処として「using terms from scripting additions」句でくくっている点です。Cocoaを使わないOLD Style AppleScriptではこの「using terms from scripting additions」節は必要ありません。

# 書籍「AppleScript最新リファレンス」からのリンクURLがBlog消失後に修復されていなかったので、再掲載しました。書籍側のリンクURLは簡易PDFビューワー「PiyoReader」で変更を吸収できます

AppleScript名:offset ofの高速実行
use AppleScript version "2.4"
use scripting additions
use framework "Foundation"

set aDate to current date
repeat 100000 times
  set aStr to "abcdefghi"
  
using terms from scripting additions
    set aRes to offset of "c" in aStr
  end using terms from
end repeat
set bDate to current date

–結果表示
display dialog (bDate – aDate) as string
–> 通常で5秒、offset ofをフックして自前のサブルーチンで実行すると2秒

–offset命令の実行を横取りする
on offset of searchStr in str
  set aRes to getOffset(str, searchStr) of me
  
return aRes
end offset

on getOffset(str, searchStr)
  set d to divideBy(str, searchStr)
  
if (count d) is less than 2 then return 0
  
return (length of item 1 of d) + 1
end getOffset

on divideBy(str, separator)
  set delSave to AppleScript’s text item delimiters
  
set the AppleScript’s text item delimiters to separator
  
set strItems to every text item of str
  
set the AppleScript’s text item delimiters to delSave
  
return strItems
end divideBy

★Click Here to Open This Script 

Posted in search Text | Tagged 10.11savvy 10.12savvy 10.13savvy 10.14savvy | Leave a comment

文字列で指定したラベルの値をレコードから取得する v2

Posted on 10月 29, 2018 by Takaaki Naganoya

OLD Style AppleScriptで(強引に)レコード中の任意の値を間接指定で取得するAppleScriptです。

裏技を駆使し、エラーメッセージからデータを取り出して動的にScript生成して結果を取得するという、仕様的にはできるわけがないが、実際にできるという処理です。

# 書籍「AppleScript最新リファレンス」からのリンクURLがBlog消失後に修復されていなかったので、再掲載しました。書籍側もリンクURLを修正したものを近日中にアップします

AppleScript名:文字列で指定したラベルの値をレコードから取得する v2
set aRec to {myAge:36, myHight:166, myWeight:70}
set aLabel to "myHight"

set a to getSpecifiedAttrOfRec(aRec, aLabel) of me
–> 166

–与えられたレコードから指定の属性値ラベルの値を取り出して返す
on getSpecifiedAttrOfRec(aRec, aLabel)
  
  
–パラメータのエラーチェック。エラー時にはmissing valueを返す
  
set aClass to class of aRec
  
if aClass is not record then return missing value
  
if aLabel = "" then return missing value
  
if class of aLabel is not string then return missing value
  
  
–レコードを無理矢理stringにcastして、エラーメッセージを取得する
  
try
    set a to aRec as string
  on error aMes
    set a to aMes
  end try
  
  
–エラーメッセージ文字列から、元のレコードの情報を組み立てる
  
set b to trimStrFromTo(a, "{", "}")
  
set b to "{" & b & "}"
  
  
–動的にAppleScriptを生成して、無理矢理レコードから目的の属性値を取り出す
  
set s to "return " & aLabel & " of " & b
  
try
    set recData to run script s
  on error
    return missing value –指定の属性値が存在しなかった場合にはエラー
  end try
  
  
return recData
  
end getSpecifiedAttrOfRec

on trimStrFromTo(aStr, fromStr, toStr)
  –fromStrは前から探す
  
if fromStr is not equal to "" then
    set sPos to (offset of fromStr in aStr) + 1
  else
    set sPos to 1
  end if
  
  
–toStrは後ろから探す
  
if toStr is not equal to "" then
    set b to (reverse of characters of aStr) as string
    
set ePos to (offset of toStr in b)
    
set ePos to ((length of aStr) – ePos)
  else
    set ePos to length of aStr
  end if
  
set aRes to text sPos thru ePos of aStr
  
return aRes
end trimStrFromTo

–文字置換ルーチン
on repChar(origText, targStr, repStr)
  set {txdl, AppleScript’s text item delimiters} to {AppleScript’s text item delimiters, targStr}
  
set temp to text items of origText
  
set AppleScript’s text item delimiters to repStr
  
set res to temp as text
  
set AppleScript’s text item delimiters to txdl
  
return res
end repChar

★Click Here to Open This Script 

Cocoaの機能を利用して(macOS 10.10以降)書くと、こんな感じです。

AppleScript名:レコードからラベルを指定して値を取り出し
use AppleScript version "2.4"
use scripting additions
use framework "Foundation"

set aDict to current application’s NSDictionary’s dictionaryWithDictionary:{abc:"123", bcd:"456"}
set aVal to (aDict’s valueForKey:"abc") as string
–>  "123"

★Click Here to Open This Script 

Posted in Record | Tagged 10.11savvy 10.12savvy 10.13savvy 10.14savvy | Leave a comment

日本語入力のライブ変換のオン、オフ v2

Posted on 10月 28, 2018 by Takaaki Naganoya

日本語入力Input Methodの「ライブ変換」のOn/Offの状態を変更するAppleScriptのmacOS 10.13/10.14対応版です。

大した箇所ではなく、NSDictionaryの作成が通らなかったのできっちり書きました。こういう些細な表記がOSバージョンごとに変わってくるのがCocoa Scriptingの要注意点でしょうか。

AppleScript名:ライブ変換のオン、オフ v2
—
–  Created by: Takaaki Naganoya
–  Created on: 2018/10/28
—
–  Copyright © 2018 Piyomaru Software, All Rights Reserved
—

use AppleScript version "2.4" — Yosemite (10.10) or later
use framework "Foundation"
use scripting additions

makeLiveHenkanEnabled(true) of me –Enable
makeLiveHenkanEnabled(false) of me –Disable

–日本語入力の「ライブ変換」をオン/オフする。Sandbox環境では動作しない
on makeLiveHenkanEnabled(aFlag as boolean)
  set fNumFlag to aFlag as integer
  
  
set aRec to current application’s NSDictionary’s dictionaryWithObjects:{fNumFlag} forKeys:{"JIMPrefLiveConversionKey"}
  
  
current application’s NSDistributedNotificationCenter’s defaultCenter()’s postNotificationName:"com.apple.inputmethod.JIM.PreferencesDidChangeNotification" object:"com.apple.JIMSession" userInfo:aRec options:0
  
  
current application’s NSDistributedNotificationCenter’s defaultCenter()’s postNotificationName:"com.apple.inputmethod.JIM.PreferencesDidChangeNotification" object:"com.apple.JIMPreferences" userInfo:aRec options:0
end makeLiveHenkanEnabled

★Click Here to Open This Script 

Posted in Input Method Record System | Tagged 10.11savvy 10.12savvy 10.13savvy 10.14savvy NSDictionary NSDistributedNotificationCenter | Leave a comment

日本語入力のライブ変換のオン、オフ

Posted on 10月 28, 2018 by Takaaki Naganoya

日本語入力Input Methodの「ライブ変換」のOn/Offの状態を変更するAppleScriptです。

Sandbox環境下では動作しないとのこと。Xcode上で作成したMac App Store向けのGUIアプリケーション環境(Sandbox環境下)だと機能しない可能性が高いとのこと。

テストしてみたところ、macOS 10.13/10.14で動作しなかったため、あとで少々書き換えてみました(v2)。

個人的には、日本語入力のライブ変換は真っ先にオフにする心底いらない機能です。

AppleScript名:ライブ変換のオン、オフ.scptd
—
–  Created by: Takaaki Naganoya
–  Created on: 2018/10/28
—
–  Copyright © 2018 Piyomaru Software, All Rights Reserved
—

use AppleScript version "2.4" — Yosemite (10.10) or later
use framework "Foundation"
use scripting additions

makeLiveHenkanEnabled(true) of me –Enable
makeLiveHenkanEnabled(false) of me –Disable

–日本語入力の「ライブ変換」をオン/オフする。Sandbox環境では動作しない
on makeLiveHenkanEnabled(aFlag as boolean)
  set fNumFlag to aFlag as integer
  
  
set aRec to current application’s NSDictionary’s dictionaryWithObjectsAndKeys_((fNumFlag), "JIMPrefLiveConversionKey")
  
current application’s NSDistributedNotificationCenter’s defaultCenter()’s postNotificationName:"com.apple.inputmethod.JIM.PreferencesDidChangeNotification" object:"com.apple.JIMSession" userInfo:aRec options:0
  
  
set bRec to current application’s NSDictionary’s dictionaryWithObjectsAndKeys_((fNumFlag), "JIMPrefLiveConversionKey")
  
current application’s NSDistributedNotificationCenter’s defaultCenter()’s postNotificationName:"com.apple.inputmethod.JIM.PreferencesDidChangeNotification" object:"com.apple.JIMPreferences" userInfo:bRec options:0
end makeLiveHenkanEnabled

★Click Here to Open This Script 

Posted in Input Method Record System | Tagged 10.11savvy 10.12savvy NSDictionary NSDistributedNotificationCenter | Leave a comment

Post navigation

  • Older posts
  • Newer posts

電子書籍(PDF)をオンラインストアで販売中!

Google Search

Popular posts

  • 開発機としてM2 Mac miniが来たのでガチレビュー
  • macOS 15, Sequoia
  • Pages本執筆中に、2つの書類モード切り替えに気がついた
  • Numbersで選択範囲のセルの前後の空白を削除
  • メキシカンハットの描画
  • Pixelmator Pro v3.6.4でAppleScriptからの操作時の挙動に違和感が
  • AppleScriptによる並列処理
  • Safariで「プロファイル」機能を使うとAppleScriptの処理に影響
  • macOS 15でも変化したText to Speech環境
  • AppleScript入門③AppleScriptを使った「自動化」とは?
  • デフォルトインストールされたフォント名を取得するAppleScript
  • macOS 15 リモートApple Eventsにバグ?
  • 【続報】macOS 15.5で特定ファイル名パターンのfileをaliasにcastすると100%クラッシュするバグ
  • AppleScript入門① AppleScriptってなんだろう?
  • Script Debuggerの開発と販売が2025年に終了
  • macOS 14で変更になったOSバージョン取得APIの返り値
  • NSObjectのクラス名を取得 v2.1
  • 有害ではなくなっていたSpaces
  • macOS 15:スクリプトエディタのAppleScript用語辞書を確認できない
  • Xcode上のAppleScriptObjCのプログラムから、Xcodeのログ欄へのメッセージ出力を実行

Tags

10.11savvy (1101) 10.12savvy (1242) 10.13savvy (1391) 10.14savvy (587) 10.15savvy (438) 11.0savvy (283) 12.0savvy (212) 13.0savvy (194) 14.0savvy (147) 15.0savvy (135) CotEditor (66) Finder (51) iTunes (19) Keynote (119) NSAlert (61) NSArray (51) NSBitmapImageRep (20) NSBundle (20) NSButton (34) NSColor (53) NSDictionary (28) NSFileManager (23) NSFont (21) NSImage (41) NSJSONSerialization (21) NSMutableArray (63) NSMutableDictionary (22) NSPredicate (36) NSRunningApplication (56) NSScreen (30) NSScrollView (22) NSString (119) NSURL (98) NSURLRequest (23) NSUTF8StringEncoding (30) NSView (33) NSWorkspace (20) Numbers (76) Pages (55) Safari (44) Script Editor (27) WKUserContentController (21) WKUserScript (20) WKWebView (23) WKWebViewConfiguration (22)

カテゴリー

  • 2D Bin Packing
  • 3D
  • AirDrop
  • AirPlay
  • Animation
  • AppleScript Application on Xcode
  • Beginner
  • Benchmark
  • beta
  • Bluetooth
  • Books
  • boolean
  • bounds
  • Bug
  • Calendar
  • call by reference
  • check sum
  • Clipboard
  • Cocoa-AppleScript Applet
  • Code Sign
  • Color
  • Custom Class
  • date
  • dialog
  • diff
  • drive
  • Droplet
  • exif
  • file
  • File path
  • filter
  • folder
  • Font
  • Font
  • GAME
  • geolocation
  • GUI
  • GUI Scripting
  • Hex
  • History
  • How To
  • iCloud
  • Icon
  • Image
  • Input Method
  • Internet
  • iOS App
  • JavaScript
  • JSON
  • JXA
  • Keychain
  • Keychain
  • Language
  • Library
  • list
  • Locale
  • Localize
  • Machine Learning
  • Map
  • Markdown
  • Menu
  • Metadata
  • MIDI
  • MIME
  • Natural Language Processing
  • Network
  • news
  • Noification
  • Notarization
  • Number
  • Object control
  • OCR
  • OSA
  • parallel processing
  • PDF
  • Peripheral
  • process
  • PRODUCTS
  • QR Code
  • Raw AppleEvent Code
  • Record
  • rectangle
  • recursive call
  • regexp
  • Release
  • Remote Control
  • Require Control-Command-R to run
  • REST API
  • Review
  • RTF
  • Sandbox
  • Screen Saver
  • Script Libraries
  • sdef
  • search
  • Security
  • selection
  • shell script
  • Shortcuts Workflow
  • Sort
  • Sound
  • Spellchecker
  • Spotlight
  • SVG
  • System
  • Tag
  • Telephony
  • Text
  • Text to Speech
  • timezone
  • Tools
  • Update
  • URL
  • UTI
  • Web Contents Control
  • WiFi
  • XML
  • XML-RPC
  • イベント(Event)
  • 未分類

アーカイブ

  • 2025年6月
  • 2025年5月
  • 2025年4月
  • 2025年3月
  • 2025年2月
  • 2025年1月
  • 2024年12月
  • 2024年11月
  • 2024年10月
  • 2024年9月
  • 2024年8月
  • 2024年7月
  • 2024年6月
  • 2024年5月
  • 2024年4月
  • 2024年3月
  • 2024年2月
  • 2024年1月
  • 2023年12月
  • 2023年11月
  • 2023年10月
  • 2023年9月
  • 2023年8月
  • 2023年7月
  • 2023年6月
  • 2023年5月
  • 2023年4月
  • 2023年3月
  • 2023年2月
  • 2023年1月
  • 2022年12月
  • 2022年11月
  • 2022年10月
  • 2022年9月
  • 2022年8月
  • 2022年7月
  • 2022年6月
  • 2022年5月
  • 2022年4月
  • 2022年3月
  • 2022年2月
  • 2022年1月
  • 2021年12月
  • 2021年11月
  • 2021年10月
  • 2021年9月
  • 2021年8月
  • 2021年7月
  • 2021年6月
  • 2021年5月
  • 2021年4月
  • 2021年3月
  • 2021年2月
  • 2021年1月
  • 2020年12月
  • 2020年11月
  • 2020年10月
  • 2020年9月
  • 2020年8月
  • 2020年7月
  • 2020年6月
  • 2020年5月
  • 2020年4月
  • 2020年3月
  • 2020年2月
  • 2020年1月
  • 2019年12月
  • 2019年11月
  • 2019年10月
  • 2019年9月
  • 2019年8月
  • 2019年7月
  • 2019年6月
  • 2019年5月
  • 2019年4月
  • 2019年3月
  • 2019年2月
  • 2019年1月
  • 2018年12月
  • 2018年11月
  • 2018年10月
  • 2018年9月
  • 2018年8月
  • 2018年7月
  • 2018年6月
  • 2018年5月
  • 2018年4月
  • 2018年3月
  • 2018年2月

https://piyomarusoft.booth.pm/items/301502

メタ情報

  • ログイン
  • 投稿フィード
  • コメントフィード
  • WordPress.org

Forum Posts

  • 人気のトピック
  • 返信がないトピック

メタ情報

  • ログイン
  • 投稿フィード
  • コメントフィード
  • WordPress.org
Proudly powered by WordPress
Theme: Flint by Star Verte LLC