Menu

Skip to content
AppleScriptの穴
  • Home
  • Products
  • Books
  • Docs
  • Events
  • Forum
  • About This Blog
  • License
  • 仕事依頼

AppleScriptの穴

Useful & Practical AppleScript archive. Click '★Click Here to Open This Script' Link to download each AppleScript

タグ: 10.12savvy

Numbersで選択中のデータを2D Listで取得し、ユニーク化

Posted on 12月 3, 2018 by Takaaki Naganoya

Numbersの最前面の書類の選択中のシートの選択中のセルの値を2D List(Array)で取り出して、ユニーク化するAppleScriptです。

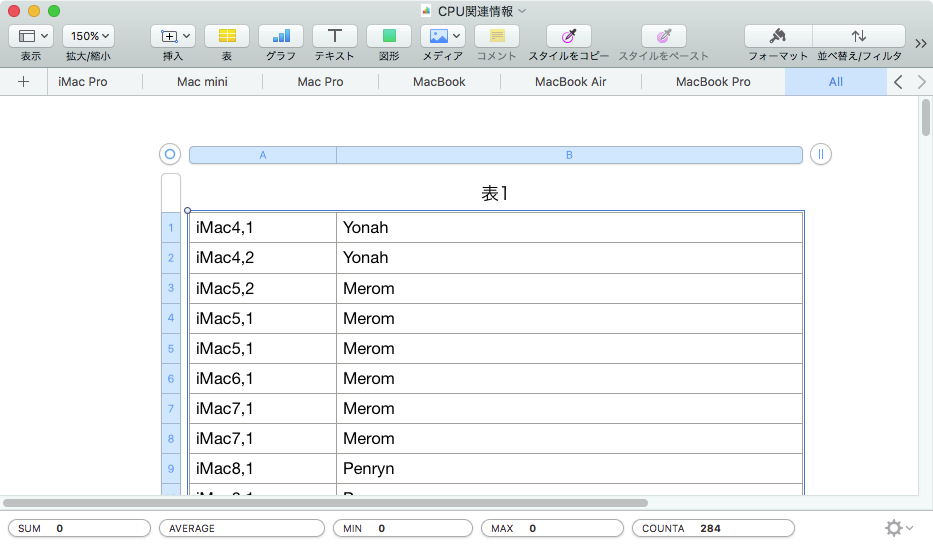
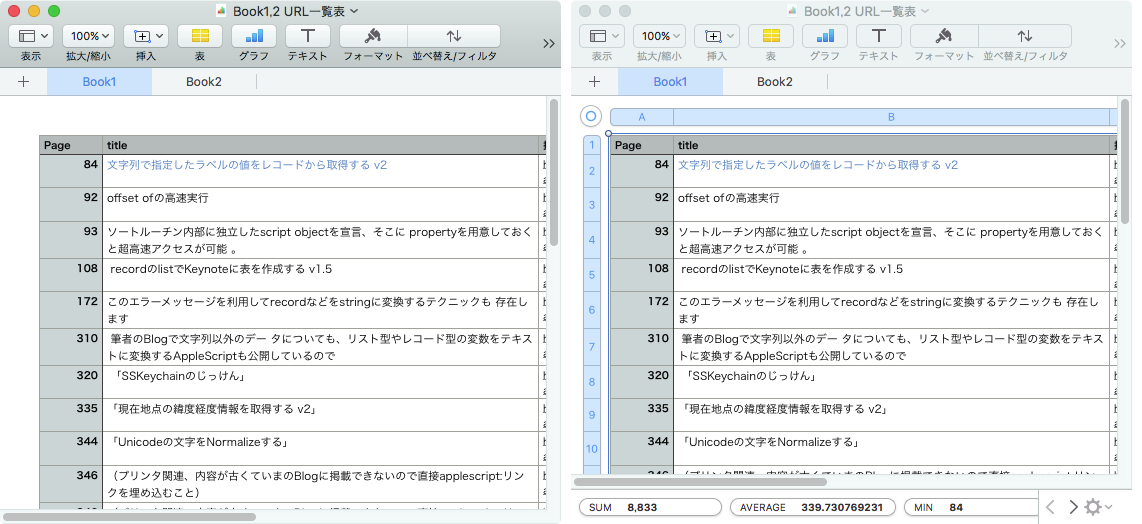
上記のような状態で本AppleScriptを実行すると、

{{"iMac4,1", "Yonah"}, {"iMac4,2", "Yonah"}, {"iMac5,2", "Merom"}, {"iMac5,1", "Merom"}, {"iMac6,1", "Merom"}, {"iMac7,1", "Merom"}, {"iMac8,1", "Penryn"}, {"iMac9,1", "Penryn"}, {"iMac10,1", "Wolfdale"}, {"iMac11,1", "Wolfdale, Lynnfield"}......} 

のような2D Listで結果が得られます。Numbersの選択中のセルからそのまま情報を取得すると1D Listとして結果が返ってきますが、別途selection rangeの情報を取得し、それをもとに2D Listに変換。得られた2D Listに対して重複データの除去をCocoaの機能を用いて行なっています。

特定のフィールド上の選択中のデータを1D Listとして取得し、重複データを検出するようなScriptは日常的に使っていますが、行データをすべて取得して2D Listとして取り出し、重複データ部分を除去するようなものは使っていませんでした。

AppleScript名:Numbersで選択中のデータを2D Listで取得し、ユニーク化
use AppleScript version "2.4"
use scripting additions
use framework "Foundation"

set aList to get2DListFromNumbersSelection() of me
if aList = "" then return "No Selection"

set bList to uniquifyList(aList) of me

on get2DListFromNumbersSelection()
  –Numbersで選択範囲を縦に区切ったリストを返す
  
tell application "Numbers"
    tell front document
      tell active sheet
        try
          set theTable to first table whose class of selection range is range
        on error
          return "" –何も選択されてなかった場合
        end try
        
        
tell theTable
          set selList to value of every cell of selection range –選択範囲のデータを取得
          
          
set selName to name of selection range –選択範囲のrange情報を取得
          
set {s1, s2} to parseByDelim(selName, ":") of me
          
          
–始点の情報を取得する
          
set s1Row to (address of row of range s1) as integer
          
set s1Column to (address of column of range s1) as integer
          
          
–終点の情報を取得する
          
set s2Row to (address of row of range s2) as integer
          
set s2Column to (address of column of range s2) as integer
          
          
–選択範囲の情報を取得する
          
set selHeight to s2Row – s1Row + 1 –高さ(Height of selection range)
          
set selWidth to s2Column – s1Column + 1 –幅(Width of selection range)
          
        end tell
      end tell
    end tell
  end tell
  
  
set aLen to length of selList
  
set aaLen to selHeight
  
  
set bList to {}
  
repeat with i from 1 to aaLen
    set aHoriList to {}
    
    
repeat with ii from 1 to selWidth
      set j1 to ii + (i – 1) * selWidth
      
set tmpCon to contents of item j1 of selList
      
      
set aClass to class of tmpCon
      
if aClass = number or aClass = integer or aClass = real then
        set tmpCon to tmpCon as integer
      end if
      
      
set the end of aHoriList to tmpCon
    end repeat
    
    
set the end of bList to aHoriList
  end repeat
  
  
return bList
end get2DListFromNumbersSelection

–テキストを指定デリミタでリスト化
on parseByDelim(aData, aDelim)
  set aText to current application’s NSString’s stringWithString:aData
  
set aList to aText’s componentsSeparatedByString:aDelim
  
return aList as list
end parseByDelim

–1D/2D Listのユニーク化
on uniquifyList(aList as list)
  set aArray to current application’s NSArray’s arrayWithArray:aList
  
set bArray to aArray’s valueForKeyPath:"@distinctUnionOfObjects.self"
  
return bArray as list
end uniquifyList

★Click Here to Open This Script 

Posted in list | Tagged 10.11savvy 10.12savvy 10.13savvy 10.14savvy NSArray NSString Numbers | Leave a comment

CPU Family Nameを取得する

Posted on 12月 3, 2018 by Takaaki Naganoya

実行中のMacのMachine ID(MacBookPro10,1など)からIntel CPUのFamily Name(Ivy Bridgeなど)を取得するAppleScriptです。

Macの各モデルの搭載CPUについては、MacTrackerを参照しました。

MacTrackerのデータをコピー&ペーストでNumbers上に製品データを作成し(手動)、

ユニーク化(重複データの除去)処理を行なって(ASで処理)、プログラム上に展開しました(手動)。

実用性とか意味については、とくに考えていません。Machine IDとCPU Family Nameのデータについてはplistに記述してプログラム外部に追い出して独自でメンテナンスできるようにしたほうがよいと思われます。

AppleScript名:CPU Family Nameを取得する.scptd
—
–  Created by: Takaaki Naganoya
–  Created on: 2018/12/03
—
–  Copyright © 2018 Piyomaru Software, All Rights Reserved
—
use AppleScript version "2.4" — Yosemite (10.10) or later
use framework "Foundation"
use scripting additions

set macID to do shell script "sysctl -n hw.model" –get machine ID
–set macID to "MacBookPro99,1"–Error case

set myName to getIntelCoreProcessorFamilyName(macID) of me
—> "Ivy Bridge"

on getIntelCoreProcessorFamilyName(macID)
  –Machine ID & CPU Core Model Names (uniquefied)
  
set macList to {{"iMac4,1", "Yonah"}, {"iMac4,2", "Yonah"}, {"iMac5,2", "Merom"}, {"iMac5,1", "Merom"}, {"iMac6,1", "Merom"}, {"iMac7,1", "Merom"}, {"iMac8,1", "Penryn"}, {"iMac9,1", "Penryn"}, {"iMac10,1", "Wolfdale"}, {"iMac11,1", "Wolfdale, Lynnfield"}, {"iMac11,2", "Clarkdale"}, {"iMac11,3", "Clarkdale, Lynnfield"}, {"iMac12,1", "Sandy Bridge"}, {"iMac12,2", "Sandy Bridge"}, {"iMac13,1", "Ivy Bridge"}, {"iMac13,2", "Ivy Bridge"}, {"iMac14,1", "Haswell"}, {"iMac14,3", "Haswell"}, {"iMac14,2", "Haswell"}, {"iMac14,4", "Haswell"}, {"iMac15,1", "Haswell"}, {"iMac16,1", "Broadwell"}, {"iMac16,2", "Broadwell"}, {"iMac17,1", "Skylake"}, {"iMac18,1", "Kaby Lake"}, {"iMac18,2", "Kaby Lake"}, {"iMac18,3", "Kaby Lake"}, {"iMacPro1,1", "Skylake"}, {"Macmini1,1", "Yonah"}, {"Macmini2,1", "Merom"}, {"Macmini3,1", "Penryn"}, {"Macmini4,1", "Penryn"}, {"Macmini5,1", "Sandy Bridge"}, {"Macmini5,2", "Sandy Bridge"}, {"Macmini5,3", "Sandy Bridge"}, {"Macmini6,1", "Ivy Bridge"}, {"Macmini6,2", "Ivy Bridge"}, {"Macmini7,1", "Haswell"}, {"Macmini8,1", "Coffe Lake"}, {"MacPro1,1", "Woodcrest"}, {"MacPro2,1", "Clovertown"}, {"MacPro3,1", "Harpertown"}, {"MacPro4,1", "Bloomfield, Gainestown"}, {"MacPro5,1", "Bloomfield, Gulftown, Westmere"}, {"MacPro5,1", "Bloomfield, Westmere, Gulftown"}, {"MacPro6,1", "Ivy Bridge"}, {"MacBook1,1", "Yonah"}, {"MacBook2,1", "Merom"}, {"MacBook3,1", "Merom"}, {"MacBook4,1", "Penryn"}, {"MacBook5,1", "Penryn"}, {"MacBook5,2", "Penryn"}, {"MacBook6,1", "Penryn"}, {"MacBook7,1", "Penryn"}, {"MacBook8,1", "Broadwell"}, {"MacBook9,1", "Skylake"}, {"MacBook10,1", "Kaby Lake"}, {"MacBookAir1,1", "Merom"}, {"MacBookAir2,1", "Penryn"}, {"MacBookAir3,1", "Penryn"}, {"MacBookAir3,2", "Penryn"}, {"MacBookAir4,1", "Sandy Bridge"}, {"MacBookAir4,2", "Sandy Bridge"}, {"MacBookAir5,1", "Ivy Bridge"}, {"MacBookAir5,2", "Ivy Bridge"}, {"MacBookAir6,1", "Haswell"}, {"MacBookAir6,2", "Haswell"}, {"MacBookAir7,1", "Broadwell"}, {"MacBookAir7,2", "Broadwell"}, {"MacBookAir8,1", "Amber Lake Y"}, {"MacBookPro1,1", "Yonah"}, {"MacBookPro1,2", "Yonah"}, {"MacBookPro2,2", "Merom"}, {"MacBookPro2,1", "Merom"}, {"MacBookPro3,1", "Merom"}, {"MacBookPro4,1", "Penryn"}, {"MacBookPro5,1", "Penryn"}, {"MacBookPro5,2", "Penryn"}, {"MacBookPro5,5", "Penryn"}, {"MacBookPro5,4", "Penryn"}, {"MacBookPro5,3", "Penryn"}, {"MacBookPro7,1", "Penryn"}, {"MacBookPro6,2", "Arrandale"}, {"MacBookPro6,1", "Arrandale"}, {"MacBookPro8,1", "Sandy Bridge"}, {"MacBookPro8,2", "Sandy Bridge"}, {"MacBookPro8,3", "Sandy Bridge"}, {"MacBookPro9,2", "Ivy Bridge"}, {"MacBookPro9,1", "Ivy Bridge"}, {"MacBookPro10,1", "Ivy Bridge"}, {"MacBookPro10,2", "Ivy Bridge"}, {"MacBookPro11,1", "Haswell"}, {"MacBookPro11,2", "Haswell"}, {"MacBookPro11,3", "Haswell"}, {"MacBookPro12,1", "Broadwell"}, {"MacBookPro11,4", "Haswell"}, {"MacBookPro11,5", "Haswell"}, {"MacBookPro13,1", "Skylake"}, {"MacBookPro13,2", "Skylake"}, {"MacBookPro13,3", "Skylake"}, {"MacBookPro14,1", "Kaby Lake"}, {"MacBookPro14,2", "Kaby Lake"}, {"MacBookPro14,3", "Kaby Lake"}, {"MacBookPro15,2", "Coffee Lake"}, {"MacBookPro15,1", "Coffee Lake"}}
  
  
–2D List内の検索
  
set gList to searchInListByIndexItem(macList, 1, macID) of me
  
if gList = missing value or gList = {} then
    error "Error:" & macID & "is newer Machine than I expected in Dec 2018 or Older PowerPC Mac , may be"
  end if
  
  
set g2List to FlattenList(gList) of me –複数の結果が得られた場合に備える
  
return contents of second item of g2List
end getIntelCoreProcessorFamilyName

–2Dリストから、指定インデックスアイテムで、指定データが該当する最初のものを返す
on searchInListByIndexItem(aList as list, itemNum as integer, hitData as string)
  set setKey to current application’s NSMutableSet’s setWithArray:aList
  
  
if itemNum < 1 then return {}
  
set aPredicateStr to ("SELF[" & (itemNum – 1) as string) & "] == ’" & hitData & "’"
  
  
set aPredicate to current application’s NSPredicate’s predicateWithFormat:aPredicateStr
  
set aRes to (setKey’s filteredSetUsingPredicate:aPredicate)
  
set bRes to aRes’s allObjects()
  
  
set cRes to bRes as list of string or string –as anything
  
return cRes
end searchInListByIndexItem

–By Paul Berkowitz
–2009年1月27日 2:24:08:JST
–Re: Flattening Nested Lists
on FlattenList(aList)
  set oldDelims to AppleScript’s text item delimiters
  
set AppleScript’s text item delimiters to {"????"}
  
set aString to aList as text
  
set aList to text items of aString
  
set AppleScript’s text item delimiters to oldDelims
  
return aList
end FlattenList

★Click Here to Open This Script 

Posted in shell script System | Tagged 10.11savvy 10.12savvy 10.13savvy 10.14savvy NSMutableSet NSPredicate | Leave a comment

第8世代Intel Core搭載Mac新モデルでもHaswellと返すsystem info

Posted on 11月 30, 2018 by Takaaki Naganoya

システムまわりの情報を返すAppleScriptの「system info」コマンドが、先日発売された第8世代Intel Coreプロセッサ「Coffe Lake」搭載のMac miniでも「Intel x86-64h Haswell」と返してくることが判明しました。

–> Wikipedia “List of Macintosh models grouped by CPU type”

MacBook Pro Retina 2012だと「CPU type of (system info)」を実行すると、「Intel 80486」と返してきますが、Mac mini 2014だと「Intel x86-64h Haswell」と返します(macOS 10.12.6上で実行)。

先日発売された第8世代Intel Core搭載のMac mini 2018を店頭でさわってみたところ、同機搭載のmacOS 10.14上で、「Intel x86-64h Haswell」と結果を返してきました。


▲PowerBook G4/667(PowerPC G4)@Mac OS X 10.4.11で実行したところ。「PowerPC 7450」と返ってくる

正確なCPU Brand nameを取得するには、こちらの「CPUのBrand Nameとバス速度を表示」AppleScriptを使ってください(CPU Type、Coreの世代を表すコード名ではないのですが、「3720QM」などとBrand Nameを取得できれば、そこから「Ivy Bridge」といった名称テーブルで付け合わせることは十分に可能です)。

CPUアーキテクチャの変わり目の時代に、実行マシンがPowerPC/Intelのどちらかを判定するような用途に使ったこの情報。マシンが想定よりも速すぎる/遅すぎる場合への対策を行うためにこのsystem infoの情報を読んで判定していました。

CPUアーキテクチャが(Intelに)変わってAppleScriptの処理を書き換える必要が出たのは、ファイル処理です。連番ファイルを順次破損チェックして、破損していたら削除して、前の番号のファイルをそのままコピーしてリネームする処理を行なっていたのですが、Intel CPUで実行したら、キャッシュの効きすぎなのか高速なためなのか、破損ファイルが2つ続くとファイルのコピーが間に合わずにエラーになりました。

その際には、処理方式を見直して2パスで(破損画像チェック&削除フェーズ → 欠損画像の補完フェーズ)処理を行うように変更して対処。また、前のファイル番号の画像を単純にコピーするのではなく、空白ブロックを一括で埋める方式に変更して、複数連番画像が欠損しているケースに対応しました。

あとは、データをhexdumpしたときに、byte orderを考慮しつつデータを取り出すような処理を行なったときに、PowerPC/IntelのCPUの違いを検出しました。AppleScript的には、Intel x32とIntel x64の違いについてはほぼ意識する必要はありません。

また、CPUアーキテクチャが変わる可能性があるので、地味にCPUアーキテクチャの確認はおさえておきたいノウハウです。

Posted in System | Tagged 10.12savvy 10.13savvy 10.14savvy | Leave a comment

WebView+ボタンを作成 v3(URLから読み込み)

Posted on 11月 28, 2018 by Takaaki Naganoya

WkWebViewを動的に生成して、YouTube上の指定ムービーを再生するAppleScriptです。

# AppleScriptでは、Webブラウザに命令を出せば数行のコマンドで簡単に任意のURLのWebコンテンツを表示させられますが、本ScriptはAppleScriptから他のアプリケーションを介さずに直接Cocoaの機能を呼び出して自前でWebコンテンツを表示させるものです

NSWindow+NSSplitView+WKWebViewを作成して、Webサーバー上の内容を表示します。WkWebViewでWebの内容を表示させるのにかなり苦労しましたが、Objective-Cのサンプル数本を比較してテストし実現しました。

WkWebViewでコンテンツを表示するのにこんなに大変だと思いませんでしたが、これができるようになったおかげで、AppleScriptの処理結果のURLを(Webブラウザを利用せずに)プレビューできます。

グラフ描画のプログラムがJavaScript+WebViewで作られているケースが多々あるため、凝ったインタラクティブなグラフの表示を行ったり画像やPDFに出力できるようにもなったわけで、たいへんけっこうなことです。


▲Auto StartでYouTube上のムービーの再生を開始する

まだ解決できていないのは、YouTubeのムービー再生が始まるとウィンドウをクローズしてAppleScriptの実行が終了していても再生中の音声が停止しないあたりでしょうか。メモリ上からWebブラウザのオブジェクトを明示的にパージする方法についてはまだ実装できていません。

あと、Script Debugger上で動かすと、WkWebView上のコンテンツの操作(YouTube映像の再生コントロールとか)ができなくなります。ねんのため。

AppleScript名:WebView+ボタンを作成 v3(URLから読み込み)
— Created 2018-11-27 by Takaaki Naganoya
— 2018 Piyomaru Software
use AppleScript version "2.4"
use scripting additions
use framework "Foundation"
use framework "AppKit"
use framework "WebKit"

property |NSURL| : a reference to current application’s |NSURL|
property NSColor : a reference to current application’s NSColor
property NSString : a reference to current application’s NSString
property NSScreen : a reference to current application’s NSScreen
property NSButton : a reference to current application’s NSButton
property NSWindow : a reference to current application’s NSWindow
property NSSplitView : a reference to current application’s NSSplitView
property NSTextView : a reference to current application’s NSTextView
property NSScrollView : a reference to current application’s NSScrollView
property WKWebView : a reference to current application’s WKWebView
property WKUserScript : a reference to current application’s WKUserScript
property NSURLRequest : a reference to current application’s NSURLRequest
property NSMutableString : a reference to current application’s NSMutableString
property NSWindowController : a reference to current application’s NSWindowController
property NSTitledWindowMask : a reference to current application’s NSTitledWindowMask
property NSRoundedBezelStyle : a reference to current application’s NSRoundedBezelStyle
property NSUTF8StringEncoding : a reference to current application’s NSUTF8StringEncoding
property NSBackingStoreBuffered : a reference to current application’s NSBackingStoreBuffered
property WKUserContentController : a reference to current application’s WKUserContentController
property NSMomentaryLightButton : a reference to current application’s NSMomentaryLightButton
property WKWebViewConfiguration : a reference to current application’s WKWebViewConfiguration
property NSScreenSaverWindowLevel : a reference to current application’s NSScreenSaverWindowLevel
property WKUserScriptInjectionTimeAtDocumentEnd : a reference to current application’s WKUserScriptInjectionTimeAtDocumentEnd

property windisp : false
property wController : false

set aWidth to 1100
set aHeight to 600

set aTitle to "WkWebView test"
set aButtonMSG to "OK"
–set aURL to "https://www.youtube.com/watch?v=GP_tVXTYdmY&autoplay=1&hd=1"
set aURL to "https://www.youtube.com/embed/GP_tVXTYdmY?autoplay=1&hd=1"

set paramObj to {aWidth, aHeight, aTitle, aURL, aButtonMSG, "600"}
my performSelectorOnMainThread:"dispWebView:" withObject:(paramObj) waitUntilDone:true

on dispWebView:paramObj
  set my windisp to false
  
copy (paramObj as list) to {aWidth, aHeight, aTitle, tmpURL, aButtonMSG, timeOutSecs}
  
  
set (my windisp) to true
  
  
set aWidth to aWidth as integer
  
set aHeight to aHeight as integer
  
set tmpURL to tmpURL as string
  
  
–WebViewをつくる
  
set aConf to WKWebViewConfiguration’s alloc()’s init()
  
set jsSource to my fetchJSSourceString(tmpURL)
  
set userScript to WKUserScript’s alloc()’s initWithSource:jsSource injectionTime:(WKUserScriptInjectionTimeAtDocumentEnd) forMainFrameOnly:true
  
set userContentController to WKUserContentController’s alloc()’s init()
  
userContentController’s addUserScript:(userScript)
  
aConf’s setUserContentController:userContentController
  
  
set aWebView to WKWebView’s alloc()’s initWithFrame:(current application’s NSMakeRect(0, 0, aWidth, aHeight – 100)) configuration:aConf –フレームの大きさは根拠レス
  
aWebView’s setNavigationDelegate:me
  
aWebView’s setUIDelegate:me
  
aWebView’s setTranslatesAutoresizingMaskIntoConstraints:true
  
  
set bURL to |NSURL|’s URLWithString:tmpURL
  
set aReq to NSURLRequest’s requestWithURL:bURL
  
aWebView’s loadRequest:aReq


–Buttonをつくる
  
set bButton to (NSButton’s alloc()’s initWithFrame:(current application’s NSMakeRect(0, 0, aWidth, 40)))
  
bButton’s setTitle:aButtonMSG
  
bButton’s setTarget:me
  
bButton’s setAction:("clicked:")
  
bButton’s setKeyEquivalent:(return)
  
  
–SplitViewをつくる
  
set aSplitV to NSSplitView’s alloc()’s initWithFrame:(current application’s NSMakeRect(0, 0, aWidth, aHeight))
  
aSplitV’s setVertical:false
  
  
aSplitV’s addSubview:aWebView
  
aSplitV’s addSubview:bButton
  
aSplitV’s setNeedsDisplay:true
  
  
set aWin to makeWinWithView(aSplitV, aWidth, aHeight, aTitle, 1.0)
  
  
–NSWindowControllerを作ってみた
  
set my wController to NSWindowController’s alloc()
  
my (wController’s initWithWindow:aWin)
  
  
my (wController’s showWindow:me)
  
  
set aCount to (timeOutSecs as string as number) * 10 –timeout seconds * 10
  
repeat aCount times
    if (my windisp) = false then
      exit repeat
    end if
    
delay 0.1
  end repeat
  
  
–Purge Web Objects (not success)
  
set aWebView to ""
  
set userContentController to ""
  
set aConf to ""
  
set userScript to ""
  
set my wController to ""
  
  
my closeWin:bButton
end dispWebView:

–Button Clicked Event Handler
on clicked:aSender
  set (my windisp) to false
  
my closeWin:aSender
end clicked:

–make Window for Input
on makeWinWithView(aView, aWinWidth, aWinHeight, aTitle, alphaV)
  set aScreen to NSScreen’s mainScreen()
  
set aFrame to {{0, 0}, {aWinWidth, aWinHeight}}
  
set aBacking to NSTitledWindowMask –NSBorderlessWindowMask
  
set aDefer to NSBackingStoreBuffered
  
  
— Window
  
set aWin to NSWindow’s alloc()
  (
aWin’s initWithContentRect:aFrame styleMask:aBacking backing:aDefer defer:false screen:aScreen)
  
  
aWin’s setTitle:aTitle
  
aWin’s setDelegate:me
  
aWin’s setDisplaysWhenScreenProfileChanges:true
  
aWin’s setHasShadow:true
  
aWin’s setIgnoresMouseEvents:false
  
aWin’s setLevel:(NSScreenSaverWindowLevel)
  
aWin’s setOpaque:false
  
aWin’s setAlphaValue:alphaV –append
  
aWin’s setReleasedWhenClosed:true
  
aWin’s |center|()
  
  
— Set Custom View
  
aWin’s setContentView:aView
  
  
return aWin
end makeWinWithView

–close win
on closeWin:aSender
  set tmpWindow to aSender’s |window|()
  
  
repeat with n from 10 to 1 by -1
    (tmpWindow’s setAlphaValue:n / 10)
    
delay 0.02
  end repeat
  
  
my wController’s |close|()
end closeWin:

on viewDidLoad:aNotification
  return true
end viewDidLoad:

on fetchJSSourceString(aURL)
  set jsURL to |NSURL|’s URLWithString:aURL
  
set jsSourceString to NSString’s stringWithContentsOfURL:jsURL encoding:(NSUTF8StringEncoding) |error|:(missing value)
  
return jsSourceString
end fetchJSSourceString

★Click Here to Open This Script 

Posted in Internet URL | Tagged 10.12savvy 10.13savvy 10.14savvy NSButton NSMomentaryLightButton NSMutableString NSScreen NSScrollView NSSplitView NSString NSTextView NSURL NSURLRequest NSWindow NSWindowController WKUserContentController WKUserScript WKWebView WKWebViewConfiguration | 1 Comment

teratailの指定IDのユーザー情報を取得する_curl

Posted on 11月 27, 2018 by Takaaki Naganoya

プログラミング系質問サイトteratailのREST APIを呼び出して、指定ユーザー名の情報を取得するAppleScriptです。

TeratailのREST APIは、タグ、ユーザー、質問の3ジャンルの情報取得を行えるように整備されており、特定カテゴリ(タグで分類)の新規質問が投稿されたかどうかを定期的に確認するようなAppleScriptを作って運用することもできます(そこまでやっていないですけれども)。

REST API呼び出しにはNSURLConnectionからNSURLSessionに移行していますが、どうもNSURLSessionだと呼び出せない(AppleScriptからの呼び出し処理が完了しない)サービスがあったりするので、結局shellのcurlコマンドを呼び出すのが手短にすむケースが多いようです。

Teratailの場合も、NSURLSessionで呼び出せるAPIもあれば、結果が返ってこないAPIもあり、NSURLConnectionよりも使い勝手がよくないと感じています(個人の感想です)。

このあたり、将来的なmacOSのアップデートでNSURLConnectionが使えなくなる日が来るのかもしれませんが、curlコマンドを使うように集約するべきなのか、NSURLSessionで書き換えるべきなのか悩ましいところです。

AppleScript名:teratailの指定IDのユーザー情報を取得する_curl
— Created 2018-11-26 by Takaaki Naganoya
— 2018 Piyomaru Software
use AppleScript version "2.5"
use scripting additions
use framework "Foundation"

property |NSURL| : a reference to current application’s |NSURL|
property NSString : a reference to current application’s NSString
property NSURLSession : a reference to current application’s NSURLSession
property NSURLQueryItem : a reference to current application’s NSURLQueryItem
property NSJSONSerialization : a reference to current application’s NSJSONSerialization
property NSURLComponents : a reference to current application’s NSURLComponents
property NSMutableDictionary : a reference to current application’s NSMutableDictionary
property NSMutableURLRequest : a reference to current application’s NSMutableURLRequest
property NSUTF8StringEncoding : a reference to current application’s NSUTF8StringEncoding
property NSURLSessionConfiguration : a reference to current application’s NSURLSessionConfiguration

set aUserRes to searchOneUserByDisplayName("Piyomaru") of me
–> {meta:{limit:20, message:"success", hit_num:1, total_page:1, page:1}, users:{{score:43, photo:"https://teratail.storage.googleapis.com/uploads/avatars/u6/66639/MSIS21by_thumbnail.jpg", display_name:"Piyomaru"}}}

on searchOneUserByDisplayName(aName)
  set aRec to {q:aName}
  
set reqURLStr to "https://teratail.com/api/v1/users/search"
  
set bURL to retURLwithParams(reqURLStr, aRec) of me
  
  
set tmpData to (do shell script "curl -X GET \"" & bURL & "\"")
  
set jsonString to NSString’s stringWithString:tmpData
  
set jsonData to jsonString’s dataUsingEncoding:(NSUTF8StringEncoding)
  
set aJsonDict to NSJSONSerialization’s JSONObjectWithData:jsonData options:0 |error|:(missing value)
  
if aJsonDict = missing value then return false
  
return (aJsonDict as record)
end searchOneUserByDisplayName

on retURLwithParams(aBaseURL, aRec)
  set aDic to NSMutableDictionary’s dictionaryWithDictionary:aRec
  
set aKeyList to (aDic’s allKeys()) as list
  
set aValList to (aDic’s allValues()) as list
  
set aLen to length of aKeyList
  
  
set qList to {}
  
repeat with i from 1 to aLen
    set aName to contents of item i of aKeyList
    
set aVal to contents of item i of aValList
    
set the end of qList to (NSURLQueryItem’s queryItemWithName:aName value:aVal)
  end repeat
  
  
set aComp to NSURLComponents’s alloc()’s initWithString:aBaseURL
  
aComp’s setQueryItems:qList
  
set aURL to (aComp’s |URL|()’s absoluteString()) as text
  
  
return aURL
end retURLwithParams

★Click Here to Open This Script 

Posted in Network Record REST API shell script URL | Tagged 10.11savvy 10.12savvy 10.13savvy 10.14savvy NSJSONSerialization NSMutableDictionary NSString NSURL NSURLComponents NSURLQueryItem | 1 Comment

Mail.appで選択中のフォルダ以下に存在する全メールの添付ファイルの拡張子のバリエーションを集計

Posted on 11月 25, 2018 by Takaaki Naganoya

Mail.appで選択中のフォルダ(メールボックス)以下に存在する全メールの添付ファイルの拡張子のバリエーションを集計するAppleScriptです。

階層フォルダで管理しているメールボックス(フォルダ)のうち、選択しているメールフォルダ以下のすべてのメッセージに添付されているファイルの拡張子を取得して結果を表示します。

何のために作ったとかいうことはなくて、ただ単に調査のために作ったものです。処理するメールの数にもよりますが、CPU負荷も大きく、時間もそれなりに(数分ぐらい?)かかります。

AppleScript名:Mail.appで選択中のフォルダ以下に存在する全メールの添付ファイルの拡張子のバリエーションを集計
—
–  Created by: Takaaki Naganoya
–  Created on: 2018/11/25
—
–  Copyright © 2018 Piyomaru Software, All Rights Reserved
—
use AppleScript version "2.4"
use scripting additions
use framework "Foundation"

script spd
  property fullSubPath : {}
  
property tmpMesList : {}
  
property outList : {}
end script

property aFullPath : ""
property tmpFullPath : ""
property extList : {}

–変数の初期化
set tmpFullPath to ""
set aFullPath to ""
set extList to {}
set (fullSubPath of spd) to {}
set (tmpMesList of spd) to {}
set (outList of spd) to {}

–選択中のメールボックス(フォルダ)のフルパスを文字列で取得(dir1/dir2/dir3)
set targMBObj to getSelectedOneMailBox() of me
extraxctTextFullPathOfMBObject(targMBObj) of me

copy aFullPath to targMB

if targMB = "" then
  display notification "Mail.app上で選択中のメールボックス(フォルダ)はありません。" –"No Mail.app folder selection" in Japanese
  
return
end if

–指定メールボックス(フォルダ)以下のすべてのメールボックス(フォルダ)を取得する
tell application "Mail"
  tell mailbox targMB
    set aList to name of every mailbox
  end tell
end tell

–指定フォルダ以下のMailboxをサブフォルダまで再帰ですべて取得する
repeat with i in aList
  set j to contents of i
  
set tmpPath to targMB & "/" & j
  
set the end of (fullSubPath of spd) to tmpPath
  
getEverySubMailbox(tmpPath) of me
end repeat

–全サブフォルダからメールを取得し、添付ファイルの確認を行なって、添付ファイルの拡張子を取得して集計
repeat with i in (fullSubPath of spd)
  set tmpBox to contents of i
  
  
tell application "Mail"
    tell mailbox tmpBox
      set mesList to (every message)
    end tell
    
    
–指定フォルダ中のMailでループ
    
repeat with ii in mesList
      set jj to contents of ii
      
      
try
        set attS to mail attachment of jj
      on error
        set attS to {}
      end try
      
      
if attS is not equal to {} then
        
        
–Mailの添付ファイルの拡張子を集計する
        
try
          repeat with iii in attS
            set jjj to contents of iii
            
set aName to name of jjj
            
            
set aExt to getPathExtension(aName) of me
            
            
if (aExt is not in extList) and (aExt is not equal to "") then
              set the end of extList to aExt
            end if
            
          end repeat
        end try
      end if
    end repeat
  end tell
end repeat

choose from list extList with prompt "選択中のメールフォルダ「" & targMB & "」中のメールに添付されているファイルの種別です" with title "添付ファイルの拡張子一覧"

–指定のメールボックス(フォルダ)以下にあるすべてのサブフォルダを(propertyに)追記して返す
on getEverySubMailbox(aPath)
  tell application "Mail"
    tell mailbox aPath
      set aaList to name of every mailbox
      
if aaList is not equal to {} then
        repeat with i in aaList
          set j to contents of i
          
set tmpFullPath to aPath & "/" & j
          
copy tmpFullPath to newPath
          
set the end of (fullSubPath of spd) to newPath
          
getEverySubMailbox(newPath) of me
        end repeat
      end if
    end tell
  end tell
end getEverySubMailbox

–Message Viewerで現在表示中のメールボックスの情報を1つのみ返す
on getSelectedOneMailBox()
  tell application "Mail"
    tell message viewer 1
      set mbList to selected mailboxes
    end tell
  end tell
  
if length of mbList is equal to 0 then
    return ""
  end if
  
  
set aMailBox to contents of (item 1 of mbList)
  
return aMailBox
end getSelectedOneMailBox

–Mail.appのメールボックスオブジェクトを渡すと、テキストのフルパスに変換
on extraxctTextFullPathOfMBObject(aPath)
  tell application "Mail"
    try
      set parentPath to container of aPath
    on error
      return
    end try
    
    
set meName to name of aPath
    
if aFullPath = "" then –1回目のみスラッシュを入れないで処理
      set aFullPath to meName
    else
      –通常処理はこちら
      
set aFullPath to meName & "/" & aFullPath
    end if
    
    
extraxctTextFullPathOfMBObject(parentPath) of me –再帰呼び出し
  end tell
end extraxctTextFullPathOfMBObject

on getPathExtension(aStr as string)
  set pathString to current application’s NSString’s stringWithString:aStr
  
return (pathString’s pathExtension()) as string
end getPathExtension

★Click Here to Open This Script 

Posted in file list recursive call | Tagged 10.11savvy 10.12savvy Mail | Leave a comment

Mail.appで選択中のフォルダ以下に存在する全メールの指定形式の添付ファイルを指定フォルダにコピー v2

Posted on 11月 25, 2018 by Takaaki Naganoya

Mail.appで選択中のフォルダ(メールボックス)以下に存在する全メールに添付されているファイルのうち、指定形式のファイルのみ指定フォルダに保存するAppleScriptです。

・Mail.appで選択中のフォルダを求め、フォルダの(Mail.app上の)フルパス文字列を再帰処理で取得
・書き出し先フォルダを指定(choose folder)
・指定のMail.app上の選択中のフォルダ以下の全メールフォルダ、およびそれらの中に入っているメールを再帰処理で取得
・取得した全メールをループで調査し、添付ファイルが存在するかチェック
・1メールあたりの添付ファイルはリストで返ってくるので、すべて求めてループで処理
・添付ファイルの拡張子を求め、書き出し許可リスト {“txt”, “gv”, “dot”} に入っていれば、指定フォルダ内に保存


▲書き出したファイル

たまーに、添付ファイルがよく出回っているメーリングリスト(QuartzComposer MLとかGraphViz MLとか)で、メール添付されているファイルを一括で取得するために作成しました。

AppleScript名:Mail.appで選択中のフォルダ以下に存在する全メールの指定形式の添付ファイルを指定フォルダにコピー v2
use AppleScript version "2.4"
use scripting additions
use framework "Foundation"

script spd
  property fullSubPath : {}
  
property tmpMesList : {}
end script

property aFullPath : ""
property tmpFullPath : ""

set targList to {"txt", "gv", "dot"} –書き出し対象拡張子

–変数の初期化
set tmpFullPath to ""
set aFullPath to ""
set (fullSubPath of spd) to {}
set (tmpMesList of spd) to {}

–選択中のメールボックス(フォルダ)のフルパスを文字列で取得(dir1/dir2/dir3)
set targMBObj to getSelectedOneMailBox() of me
extraxctTextFullPathOfMBObject(targMBObj) of me

copy aFullPath to targMB

if targMB = "" then
  display notification "Mail.app上で選択中のメールボックス(フォルダ)はありません。"
  
return
end if

tell current application
  set targFol to choose folder with prompt "添付ファイルの書き出し先フォルダを指定してください"
end tell

–指定メールボックス(フォルダ)以下のすべてのメールボックス(フォルダ)を取得する
tell application "Mail"
  tell mailbox targMB
    set aList to name of every mailbox
  end tell
end tell

–指定フォルダ以下のMailboxをサブフォルダまで再帰ですべて取得する
repeat with i in aList
  set j to contents of i
  
set tmpPath to targMB & "/" & j
  
set the end of (fullSubPath of spd) to tmpPath
  
getEverySubMailbox(tmpPath) of me
end repeat

–全サブフォルダから指定文字列をSubjectに含むものをすべて取得する
repeat with i in (fullSubPath of spd)
  set tmpBox to contents of i
  
  
tell application "Mail"
    tell mailbox tmpBox
      set mesList to (every message)
    end tell
    
    
–指定フォルダ中のMailでループ
    
repeat with ii in mesList
      set jj to contents of ii
      
set attS to mail attachment of jj
      
      
if attS is not equal to {} then
        
        
–Mailの添付ファイルを順次指定フォルダに保存する
        
repeat with iii in attS
          set jjj to contents of iii
          
set aName to name of jjj
          
          
set aExt to getPathExtension(aName) of me
          
if aExt is in targList then
            set savePath to (targFol as string) & aName
            
            
–指定パスに添付ファイルを保存
            
save jjj in file savePath
          end if
        end repeat
        
      end if
    end repeat
  end tell
  
end repeat

–指定のメールボックス(フォルダ)以下にあるすべてのサブフォルダを(propertyに)追記して返す
on getEverySubMailbox(aPath)
  tell application "Mail"
    tell mailbox aPath
      set aaList to name of every mailbox
      
if aaList is not equal to {} then
        repeat with i in aaList
          set j to contents of i
          
set tmpFullPath to aPath & "/" & j
          
copy tmpFullPath to newPath
          
set the end of (fullSubPath of spd) to newPath
          
getEverySubMailbox(newPath) of me
        end repeat
      end if
    end tell
  end tell
end getEverySubMailbox

–Message Viewerで現在表示中のメールボックスの情報を1つのみ返す
on getSelectedOneMailBox()
  tell application "Mail"
    tell message viewer 1
      set mbList to selected mailboxes
    end tell
  end tell
  
if length of mbList is equal to 0 then
    return ""
  end if
  
  
set aMailBox to contents of (item 1 of mbList)
  
return aMailBox
end getSelectedOneMailBox

–Mail.appのメールボックスオブジェクトを渡すと、テキストのフルパスに変換
on extraxctTextFullPathOfMBObject(aPath)
  tell application "Mail"
    try
      set parentPath to container of aPath
    on error
      return
    end try
    
    
set meName to name of aPath
    
if aFullPath = "" then –1回目のみスラッシュを入れないで処理
      set aFullPath to meName
    else
      –通常処理はこちら
      
set aFullPath to meName & "/" & aFullPath
    end if
    
    
extraxctTextFullPathOfMBObject(parentPath) of me –再帰呼び出し
  end tell
end extraxctTextFullPathOfMBObject

–ファイル名から拡張子を取得する
on getPathExtension(aStr as string)
  set pathString to current application’s NSString’s stringWithString:aStr
  
return (pathString’s pathExtension()) as string
end getPathExtension

★Click Here to Open This Script 

Posted in list | Tagged 10.11savvy 10.12savvy Mail NSString | Leave a comment

Mail.appで選択中のメールボックス(フォルダ)のパスを文字列で返す

Posted on 11月 25, 2018 by Takaaki Naganoya

Mail.app上で選択中のメールボックス(フォルダ)のパスをフルパスの文字列で求めるAppleScriptです。

Mail.app上ではメールボックス(フォルダ)を複数階層作成できます。ファイルシステム上のフォルダではないので、ファイル処理でメールのメールボックス(フォルダ)間の移動を行うことはできませんが、パスを指定してmoveコマンドでメールを移動させられます。

Mail.app上のパスは、

level1/level2

のように記述します。

のように選択している場合には、

"ML/Xojo, REALbasic"

と返ってきます。

tell application "Mail"
  tell mailbox "ML/Xojo, REALbasic"
    set aList to every message
  end tell
end tell

★Click Here to Open This Script 

のように指定すれば、指定フォルダ以下のメール(message)が返ってきます(サブフォルダ内のメールは対象外)。ファイルパスと異なり、空白文字が入ってくることに備えてquoted ofでパスをクォート処理しておく必要はありません。

フルパスを求めるのに、再帰処理を行なっています。

AppleScript名:Mail.appで選択中のメールボックス(フォルダ)のパスを文字列で返す
property aFullPath : ""

set aFullPath to ""

–選択中のメールボックス(フォルダ)を取得
set aMB to getSelectedOneMailBox() of me

–メールボックス(フォルダ)のオブジェクトのMail.app上のパスを取得して文字列化する
set pathStr to extraxctTextFullPathOfMBObject(aMB) of me
return aFullPath
–> "ML/Xojo, REALbasic"

–Message Viewerで現在表示中のメールボックスの情報を1つのみ返す
on getSelectedOneMailBox()
  tell application "Mail"
    tell message viewer 1
      set mbList to selected mailboxes
    end tell
  end tell
  
if length of mbList is equal to 0 then
    return ""
  end if
  
  
set aMailBox to contents of (item 1 of mbList)
  
return aMailBox
end getSelectedOneMailBox

–Mail.appのメールボックスオブジェクトを渡すと、テキストのフルパスに変換
on extraxctTextFullPathOfMBObject(aPath)
  tell application "Mail"
    try
      set parentPath to container of aPath
    on error
      return
    end try
    
    
set meName to name of aPath
    
if aFullPath = "" then –1回目のみスラッシュを入れないで処理
      set aFullPath to meName
    else
      –通常処理はこちら
      
set aFullPath to meName & "/" & aFullPath
    end if
    
    
extraxctTextFullPathOfMBObject(parentPath) of me –再帰呼び出し
  end tell
end extraxctTextFullPathOfMBObject

★Click Here to Open This Script 

Posted in list Text | Tagged 10.11savvy 10.12savvy 10.13savvy 10.14savvy Mail | Leave a comment

指定URLをロードしてtitleを取得 v2

Posted on 11月 20, 2018 by Takaaki Naganoya

指定URLのWebページのtitleを取得するAppleScriptです。

この手の処理を記述するには、お手軽にshell scriptでーとか、Cocoaの機能を利用してチクチク記述するとか、SafariにURLをロードしてtitleを読み込むとか、いろいろやり方があって悩むところです。

技術的な難易度が低そう(に見える)やり方を考え、ダウンロード部分はお手軽にcurlコマンドで、取得したHTMLの解析はオープンソースのFramework「HTMLReader」を併用することで高度な処理(URLエンコーディング文字列のデコード)を実現してみました。

–> HTMLReader.framework(To ~/Library/Frameworks/)

AppleScript名:指定URLをロードしてtitleを取得 v2
use AppleScript version "2.4"
use scripting additions
use framework "Foundation"
use framework "AppKit"
use framework "HTMLReader" –https://github.com/nolanw/HTMLReader

property NSString : a reference to current application’s NSString
property HTMLDocument : a reference to current application’s HTMLDocument

set aURL to "http://piyocast.com/as/"
set aTItle to getPageTItleFromURL(aURL) of me
–> "AppleScriptの穴 – Useful & Practical AppleScript archive"

on getPageTItleFromURL(aURL)
  set aRes to (do shell script "curl -s " & aURL)
  
set aData to NSString’s stringWithString:aRes
  
if aData = missing value then return false
  
  
set aHTML to HTMLDocument’s documentWithString:aData
  
  
set aTitleRes to ((aHTML’s nodesMatchingSelector:"title")’s textContent’s firstObject()) as string
  
return aTitleRes
end getPageTItleFromURL

★Click Here to Open This Script 

Posted in Internet Tag Text | Tagged 10.11savvy 10.12savvy 10.13savvy 10.14savvy NSString | Leave a comment

値渡しハンドラと参照渡しハンドラ

Posted on 11月 16, 2018 by Takaaki Naganoya

AppleScriptにおけるハンドラ(メソッド、サブルーチン)呼び出し時の値渡し(call by value)と参照渡し(vall by reference)の記述例です。

一般的なプログラミング言語の世界の「お作法」で、ハンドラ呼び出し時に、値そのものを受けわたす「値渡し」(call by value)と、ポインタを受けわたす「参照渡し」(call by reference)の2つがあります。

AppleScriptでハンドラ呼び出し時に、パラメータを受け渡しするのは値渡しがほとんどです。これは、プログラムにバグを作りにくくするためとサブルーチン(ハンドラ)を明確に区分けするためです。

値渡ししか使っていないといっても、参照渡しができないわけではなく、パラメータとして受け取った変数の内容を変更すると参照渡しになる、という「暗黙の参照渡し」を行える仕様になっています。

ほかには、巨大なデータを値渡しするとメモリー消費がそれだけ大きくなるため、パラメータを参照渡しすることがあります。画像のRaw DataやRTFのデータ内容などがそれに該当します。

本Blog掲載サンプル(1,000本以上)のうち、参照渡しを使っているものは、

・迷路をRTFで作成して脱出経路を赤く着色する v3
・画像+文字作成テスト_v4
・Tag CloudっぽいRTFの作成

ぐらいです。

# Xcode上で記述するAppleScript Applicationでは、ARC環境ではあるものの消費したオブジェクトのメモリが解放されにくいので、割と切実に必要になってくるような

AppleScript名:値渡しハンドラ
set aList to {1, 2, 3}
set aRes to aHandler(aList) of me
–> {3, 2, 1}

aList
–> {1, 2, 3}

on aHandler(bList)
  return reverse of bList
end aHandler

★Click Here to Open This Script 

AppleScript名:参照渡しハンドラ
set aList to {1, 2, 3}
aHandler(aList) of me
aList
–> {1, 2, 3, -1}

on aHandler(aList)
  set the end of aList to -1
end aHandler

★Click Here to Open This Script 

Posted in list | Tagged 10.11savvy 10.12savvy 10.13savvy 10.14savvy | Leave a comment

指定画像の指定座標の色情報をRGBで取得

Posted on 11月 15, 2018 by Takaaki Naganoya

指定画像の指定座標のピクセルの色を8ビットRGB値で返すAppleScriptです。

使用する座標系は左上が{0,0}です。

AppleScript名:指定画像の指定座標の色情報をRGBで取得.scptd
—
–  Created by: Takaaki Naganoya
–  Created on: 2018/11/15
—
–  Copyright © 2018 Piyomaru Software, All Rights Reserved
—
use AppleScript version "2.4" — Yosemite (10.10) or later
use framework "Cocoa" –Foundation + AppKit
use scripting additions

property NSImage : a reference to current application’s NSImage
property NSBitmapImageRep : a reference to current application’s NSBitmapImageRep

set aFile to POSIX path of (choose file of type {"public.image"})
set {xNum, yNum} to {0, 0}

set cRes to getColorRGBNumFromImageByPosition(aFile, xNum, yNum) of me
–> {255, 0, 0}

on getColorRGBNumFromImageByPosition(aFilePath, xPos as integer, yPos as integer)
  set anNSImage to NSImage’s alloc()’s initWithContentsOfFile:aFilePath
  
set aRawimg to NSBitmapImageRep’s imageRepWithData:(anNSImage’s TIFFRepresentation())
  
  
set aColor to (aRawimg’s colorAtX:xPos y:yPos)
  
set aRed to (aColor’s redComponent()) * 255
  
set aGreen to (aColor’s greenComponent()) * 255
  
set aBlue to (aColor’s blueComponent()) * 255
  
  
return {aRed as integer, aGreen as integer, aBlue as integer}
end getColorRGBNumFromImageByPosition

★Click Here to Open This Script 

Posted in Color Image list | Tagged 10.11savvy 10.12savvy 10.13savvy 10.14savvy NSBitmapImageRep NSImage | Leave a comment

MecabCocoaで形態素解析

Posted on 11月 14, 2018 by Takaaki Naganoya

オープンソースのMecabラッパー「MecabCocoa.framework」を呼び出して、日本語の文字列を形態素解析するAppleScriptです。

単語(形態素)に分割する形態素解析については、動作しているものの、

 partOfSpeechType:品詞
 originalForm:原形

といったあたりの、重要な情報がまともに返ってこないので、単語分割やよみがなの機能しか動作していないように見えるのですが、、、、

AppleScript名:MecabCocoaで形態素解析.scptd
—
–  Created by: Takaaki Naganoya
–  Created on: 2018/11/13
—
–  Copyright © 2018 Piyomaru Software, All Rights Reserved
—
use AppleScript version "2.4" — Yosemite (10.10) or later
use framework "Foundation"
use framework "MecabCocoa" –https://github.com/shinjukunian/MecabCocoa
use scripting additions

set aStr to "私の名前は長野谷です。"
set tokenArray to (current application’s MecabTokenizer’s alloc()’s parseToNodeWithString:aStr withDictionary:2)
set tList to (tokenArray’s surface) as list
–> {"私", "の", "名前", "は", "長野", "谷", "です", "。"}

set fList to (tokenArray’s features) as list
–> {{"watakushi"}, missing value, {"namae"}, missing value, {"nagano"}, {"tani"}, missing value, missing value}

set psList to (tokenArray’s partOfSpeechType) as list
–> {100, 100, 100, 100, 100, 100, 100, 100} –おかしい?

★Click Here to Open This Script 

Posted in Natural Language Processing Text | Tagged 10.11savvy 10.12savvy 10.13savvy 10.14savvy | Leave a comment

Bayes推定による文章仕分け(Classifier)

Posted on 11月 12, 2018 by Takaaki Naganoya

ベイズ推定を計算するオープンソースのプログラム「Bayes」をCocoaフレームワーク化した「BayesKit」を呼び出してベイズ推定の計算を行うAppleScriptです。

–> Download BayesKit.framework (To ~/Library/Frameworks)

macOS 10.14以外はスクリプトエディタ/Script Debugger上で実行可能で、10.14のみScript Debugger上での実行を必要とします(この仕様、いい加減かったるいので戻してほしい)。

スパムメール選別用途御用達のベイズ推定の演算を行なってみました。プログラムに添付されていたサンプルは英語の文章を処理するようにできていましたが、予想どおり日本語の文章をそのまま与えると単語切り分けが行えずに計算がうまく行きません。

そこで、掲載サンプルScriptのように単語ごとに手動で半角スペースを入れてみました。

本来であれば、形態素解析辞書を使って単語ごとに切り分け、さらに単語の活用形をどうにかする必要があるはずですが、そこまで神経質にならずに簡易日本語パーサーで単語に分解し、助詞などを削除しデータとして与えることでそこそこの実用性は確保できるのではないかと思われます(これだと固有名詞がバラバラになる可能性は否定できませんが)。

NSLinguisticTagger+macOS 10.14で日本語文章の形態素解析+品詞解析は行えることを期待したいですが、未確認です。ただ、できた場合でも固有名詞への配慮がどの程度あるかは不明です。

AppleScript名:Bayes推定による文章仕分け(Classifier).scptd
—
–  Created by: Takaaki Naganoya
–  Created on: 2018/11/12
—
–  Copyright © 2018 Piyomaru Software, All Rights Reserved
—
use AppleScript version "2.5" — El Capitan(10.11) or later
use framework "Foundation"
use framework "BayesKit" –https://github.com/kevincobain2000/Bayes
use scripting additions

property Bayes : a reference to current application’s Bayes
property FeaturesVector : a reference to current application’s FeaturesVector
property NSMutableArray : a reference to current application’s NSMutableArray

–set positiveStr to "word word good good"
–set negativeStr to "thiss word bad bad"
set positiveStr to "良い 良い 良い 良い 。"
set negativeStr to "悪 悪 悪 悪 悪 。"

set classifierObj to Bayes’s alloc()’s init()
set featuresVec to FeaturesVector’s alloc()’s init()

set featuresArray to NSMutableArray’s arrayWithArray:{"tokens"}

featuresVec’s appendFeatures:positiveStr forFeatures:featuresArray
classifierObj’s train:(featuresVec’s features) forlabel:"positive"

featuresVec’s appendFeatures:negativeStr forFeatures:featuresArray
classifierObj’s train:(featuresVec’s features) forlabel:"negative"

–set toGuess to "word"
set toGuess to "良い 。"

featuresVec’s appendFeatures:toGuess forFeatures:featuresArray
classifierObj’s guessNaiveBayes:(featuresVec’s features)

set vRes to (classifierObj’s probabilities) as record
–> {positive:0.6400000453, negative:0.32000002265}–English Sample Words OK
–> {positive:1.0, negative:0.0}–Japanese Sample Words OK

★Click Here to Open This Script 

Posted in Machine Learning Record Text | Tagged 10.11savvy 10.12savvy 10.13savvy 10.14savvy NSMutableArray | Leave a comment

Table 1の全セルを選択する v3

Posted on 11月 5, 2018 by Takaaki Naganoya

Numbersで選択中のセルがなければ、最前面の書類の選択中のワークシートのうちのTable 1を全選択するAppleScriptです。

選択部分からデータを取得する処理はよく行いますが、プログラム側から選択部分を作成するというのはやっていなかったので、試行錯誤してみました。

AppleScript名:Table 1の全セルを選択する v3.scptd
—
–  Created by: Takaaki Naganoya
–  Created on: 2018/11/05
—
–  Copyright © 2018 Piyomaru Software, All Rights Reserved
—
use AppleScript version "2.4" — Yosemite (10.10) or later
use framework "Foundation"
use scripting additions

tell application "Numbers"
  tell front document
    tell active sheet
      try
        –選択セルがある場合
        
set theTable to first table whose class of selection range is range
      on error
        –選択セルがない場合はTable 1を全選択
        
set tCount to count every table
        
if tCount = 0 then error "There is no table in active sheet"
        
        
tell table 1
          set selection range to cell range
        end tell
        
      end try
    end tell
  end tell
end tell

★Click Here to Open This Script 

Posted in How To | Tagged 10.11savvy 10.12savvy 10.13savvy 10.14savvy Numbers | Leave a comment

MIKMIDIでデバイス一覧を取得 v2

Posted on 11月 4, 2018 by Takaaki Naganoya

オープンソースのフレームワーク「MIKMIDI」を用いてMIDIデバイス情報を取得するAppleScriptです。

Objective-Cのプログラムもいろいろ読んできましたが、その中でもこれは難易度が高く、高尚であるために読んでもさっぱりわかりません。

–> Download MIKMIDI.framework(To ~/Library/Frameworks/)

AppleScript名:MIKMIDIでデバイス一覧を取得 v2
— Created 2015-11-13 by Takaaki Naganoya
— 2015 Piyomaru Software
use AppleScript version "2.4"
use scripting additions
use framework "Foundation"
use framework "MIKMIDI" –https://github.com/mixedinkey-opensource/MIKMIDI

property midiDeviceManager : missing value

set midiDeviceManager to current application’s MIKMIDIDeviceManager’s sharedDeviceManager()’s availableDevices()
set aRes to midiDeviceManager’s mutableCopy()

set endpointsInDevs to current application’s NSMutableSet’s |set|()
repeat with i in (midiDeviceManager as list)
  set aSrcList to (current application’s NSSet’s setWithArray:(i’s entities()’s valueForKeyPath:"sources"))
  
set aDstList to (current application’s NSSet’s setWithArray:(i’s entities()’s valueForKeyPath:"destinations"))
  (
endpointsInDevs’s unionSet:aSrcList)
  (
endpointsInDevs’s unionSet:aDstList)
end repeat

endpointsInDevs’s |description|()
–>  (NSSet) {{(MIKMIDISourceEndpoint) <MIKMIDISourceEndpoint: 0x7f8a61d47950> 新しい外部装置}, {(MIKMIDISourceEndpoint) <MIKMIDISourceEndpoint: 0x7f8a63a65610> IAC Driver GarageBand}, {(MIKMIDIDestinationEndpoint) <MIKMIDIDestinationEndpoint: 0x7f8a61bbc130> IAC Driver GarageBand}, {(MIKMIDIDestinationEndpoint) <MIKMIDIDestinationEndpoint: 0x7f8a5ecadcf0> 新しい外部装置}}

–midiDeviceManager’s virtualSources() –Real MIDI I/Fがつながっていないとエラーになる
–set devicelessSources to current application’s NSMutableSet’s setWithWrray:(midiDeviceManager’s virtualSources())

★Click Here to Open This Script 

Posted in MIDI System | Tagged 10.11savvy 10.12savvy 10.13savvy | Leave a comment

指定URLをロード_WKWebView版 v2

Posted on 11月 4, 2018 by Takaaki Naganoya

指定のURLを読み込んでページのタイトルを取得するAppleScriptです。

オリジナルはControl+Command+Rの操作が必要でしたが、本バージョンでは必要ありません。ただ、Script Debuggerとの相性はよろしくないようで。

AppleScript名:指定URLをロード_WKWebView版 v2
— Created 2015-09-16 by Takaaki Naganoya
— 2015 Piyomaru Software
use AppleScript version "2.4"
use scripting additions
use framework "Foundation"
use framework "WebKit"

property theWebView : missing value

set aURL to "http://www.apple.com/jp/shop/browse/home/specialdeals/mac"

my performSelectorOnMainThread:"getPage:" withObject:(aURL) waitUntilDone:true

set aTitle to (theWebView)’s title()
return aTitle as text
–>  "Mac整備済製品 – Apple(日本)"

–Download the URL page to WkWebView
on getPage:aURL
  set thisURL to current application’s |NSURL|’s URLWithString:aURL
  
set theRequest to current application’s NSURLRequest’s requestWithURL:thisURL
  
  
set aConf to current application’s WKWebViewConfiguration’s alloc()’s init()
  
  
set (my theWebView) to current application’s WKWebView’s alloc()’s initWithFrame:(current application’s NSMakeRect(0, 0, 800, 600)) configuration:aConf –フレームの大きさは根拠レス
  (
my theWebView)’s setNavigationDelegate:me
  (
my theWebView)’s loadRequest:theRequest
  
  
set waitLoop to 100 * 60 –60 seconds
  
  
set hitF to false
  
repeat waitLoop times
    set aLoadF to ((my theWebView)’s estimatedProgress()) as number
    
if aLoadF = 1.0 then
      set hitF to true
      
exit repeat
    end if
    
current application’s NSThread’s sleepForTimeInterval:(0.01)
    
–delay 0.1
  end repeat
  
  
return hitF
end getPage:

★Click Here to Open This Script 

Posted in URL | Tagged 10.11savvy 10.12savvy 10.13savvy NSThread NSURL NSURLRequest WKWebView WKWebViewConfiguration | Leave a comment

QuartzComoserでグラフ表示てすと v6

Posted on 11月 4, 2018 by Takaaki Naganoya

QuartzComposerのグラフに任意のデータを指定してウィンドウ表示するAppleScriptです。

スクリプトバンドル内の「Chart.qtz」を読み出して表示しているため、QuartzComposer入りのスクリプトバンドルを用意しておきましたので、ダウンロードしてお試しください。

–> Download qtc_disp_v6

オリジナルはControl+Command+Rで実行する必要がありましたが、本Scriptではその必要がありません。ちなみに、一般的なQuartzComposerのようにマウスでグリグリ回せるとかいうことはありません。パラメータを反映して静止画として表示されるだけです(Xcode上で作成したAppleScriptのGUIアプリケーションであれば、普通に回せます)。

macOS 10.14上で実行してみたところ、スクリプトエディタではCompositionが表示されませんでしたが、Script Debugger上で実行したかぎりでは実行されました。Framework宣言で足りないものがあるのでしょうか?

備考:QuartzComposerはmacOS 10.15でDeprecated扱いになりました

AppleScript名:QuartzComoserでグラフ表示てすと v6
— Created 2015-11-03 by Takaaki Naganoya
— Modified 2018-11-04 by Takaaki Naganoya
— 2018 Piyomaru Software
use AppleScript version "2.4"
use scripting additions
use framework "Foundation"
use framework "Quartz"
use framework "AppKit"

property NSColor : a reference to current application’s NSColor
property QCView : a reference to current application’s QCView
property NSString : a reference to current application’s NSString
property NSScreen : a reference to current application’s NSScreen
property NSWindow : a reference to current application’s NSWindow
property NSNumber : a reference to current application’s NSNumber
property NSPredicate : a reference to current application’s NSPredicate
property NSDictionary : a reference to current application’s NSDictionary
property NSMutableArray : a reference to current application’s NSMutableArray
property NSWindowController : a reference to current application’s NSWindowController
property NSMutableDictionary : a reference to current application’s NSMutableDictionary
property NSTitledWindowMask : a reference to current application’s NSTitledWindowMask
property NSWindowCloseButton : a reference to current application’s NSWindowCloseButton
property NSNormalWindowLevel : a reference to current application’s NSNormalWindowLevel
property NSBackingStoreBuffered : a reference to current application’s NSBackingStoreBuffered

set chartData to NSMutableArray’s new()
chartData’s addObject:(my recWithLabels:{"label", "value"} andValues:{"練馬区", 3})
chartData’s addObject:(my recWithLabels:{"label", "value"} andValues:{"青梅市", 1})
chartData’s addObject:(my recWithLabels:{"label", "value"} andValues:{"中野区", 2})

my performSelectorOnMainThread:"dispQuartzComposerWindow:" withObject:(chartData) waitUntilDone:true

on dispQuartzComposerWindow:chartData
  –上記データの最大値を求める
  
set aMaxRec to chartData’s filteredArrayUsingPredicate:(NSPredicate’s predicateWithFormat_("SELF.value == %@.@max.value", chartData))
  
set aMax to value of aMaxRec
  
set aMaxVal to (first item of aMax) as integer
  
  
–Scalingの最大値を求める
  
if aMaxVal ≥ 10 then
    set aScaleMax to (10 div aMaxVal)
    
set aScaleMin to aScaleMax div 10
  else
    set aScaleMax to (10 / aMaxVal)
    
set aScaleMin to 1
  end if
  
  
try
    set aPath to path to resource "Chart.qtz"
  on error
    return
  end try
  
  
set qtPath to NSString’s stringWithString:(POSIX path of aPath)
  
  
set aView to QCView’s alloc()’s init()
  
set qtRes to (aView’s loadCompositionFromFile:qtPath)
  
  
aView’s setValue:chartData forInputKey:"Data"
  
aView’s setValue:(NSNumber’s numberWithFloat:(0.5)) forInputKey:"Scale"
  
aView’s setValue:(NSNumber’s numberWithFloat:(0.2)) forInputKey:"Spacing"
  
aView’s setAutostartsRendering:true
  
  
set maXFrameRate to aView’s maxRenderingFrameRate()
  
  (
aView’s setValue:(NSNumber’s numberWithFloat:aScaleMax / 10) forInputKey:"Scale")
  
  
set aWin to (my makeWinWithView(aView, 800, 600, "AppleScript Composition Test"))
  
  
set wController to NSWindowController’s alloc()
  
wController’s initWithWindow:aWin
  
aWin’s makeFirstResponder:aView
  
wController’s showWindow:me
  
  
aWin’s makeKeyAndOrderFront:me
  
  
delay 5
  
  
my closeWin:aWin
  
aView’s stopRendering() –レンダリング停止
  
end dispQuartzComposerWindow:

–make Window for Display
on makeWinWithView(aView, aWinWidth, aWinHeight, aTitle)
  set aScreen to NSScreen’s mainScreen()
  
set aFrame to {{0, 0}, {aWinWidth, aWinHeight}}
  
  
set aBacking to NSTitledWindowMask
  
  
set aDefer to NSBackingStoreBuffered
  
  
— Window
  
set aWin to NSWindow’s alloc()
  (
aWin’s initWithContentRect:aFrame styleMask:aBacking backing:aDefer defer:false screen:aScreen)
  
aWin’s setBackgroundColor:(NSColor’s whiteColor())
  
  
aWin’s setTitle:aTitle
  
aWin’s setDelegate:me
  
aWin’s setDisplaysWhenScreenProfileChanges:true
  
aWin’s setHasShadow:true
  
aWin’s setIgnoresMouseEvents:false
  
aWin’s setLevel:(NSNormalWindowLevel)
  
aWin’s setOpaque:false
  
aWin’s setReleasedWhenClosed:true
  
aWin’s |center|()
  
aWin’s makeKeyAndOrderFront:(me)
  
–aWin’s movableByWindowBackground:true
  
  
— Set Custom View
  
aWin’s setContentView:aView
  
  
–Set Close Button  
  
set closeButton to NSWindow’s standardWindowButton:(NSWindowCloseButton) forStyleMask:(NSTitledWindowMask)
  
  
return aWin
end makeWinWithView

–close win
on closeWin:aWindow
  repeat with n from 10 to 1 by -1
    (aWindow’s setAlphaValue:n / 10)
    
delay 0.01
  end repeat
  
aWindow’s |close|()
end closeWin:

on recWithLabels:theKeys andValues:theValues
  return (NSDictionary’s dictionaryWithObjects:theValues forKeys:theKeys) as record
end recWithLabels:andValues:

★Click Here to Open This Script 

Posted in GUI Image | Tagged 10.11savvy 10.12savvy 10.13savvy 10.14savvy NSColor NSDictionary NSMutableArray NSMutableDictionary NSNumber NSPredicate NSScreen NSString NSWindow NSWindowController QCView | Leave a comment

テキストをMarkdown形式として解釈してHTMLを出力

Posted on 11月 3, 2018 by Takaaki Naganoya

オープンソースのフレームワーク「MMMarkdown」を利用してMarkdownのテキストをHTMLに変換して出力するAppleScriptです。

ただし、解釈できるMarkdownタグは限定的で、表などは解釈できません。

–> Download MMMarkdown.framework (To ~/Library/Frameworks/)

AppleScript名:テキストをMarkdown形式と解釈してHTMLを出力
— Created 2016-05-12 by Takaaki Naganoya
— 2016 Piyomaru Software
use AppleScript version "2.4"
use scripting additions
use framework "Foundation"
use framework "MMMarkdown" –https://github.com/mdiep/MMMarkdown

set markdown to "# Example
What a library!"

set htmlString to (current application’s MMMarkdown’s HTMLStringWithMarkdown:markdown |error|:(missing value)) as string
–>
(*
"<h1>Example</h1>
<p>What a library!</p>
"
*)

★Click Here to Open This Script 

Posted in Markdown Text | Tagged 10.11savvy 10.12savvy 10.13savvy | Leave a comment

ftpKitのじっけん ftpサーバーからファイル一覧を取得

Posted on 11月 3, 2018 by Takaaki Naganoya

オープンソースのFTPManagerをフレームワーク化したftpKitを利用して、指定サーバー上の指定ディレクトリ内のファイル一覧を取得するAppleScriptです。

sftp接続が必要な場合にはTransmitをAppleScriptからコントロールすることになるわけですが、セキュリティ的にあまり問題にならない用途であればFTP経由でファイル転送することもあるでしょう。

AppleScript名:ftpKitでファイル一覧を取得
— Created 2016-03-01by Takaaki Naganoya
— 2016 Piyomaru Software
use AppleScript version "2.4"
use scripting additions
use framework "Foundation"
use framework "ftpKit" –https://github.com/nkreipke/FTPManager

set serverURL to "ftp://www.piyocast.com/xxxxx/public_html/private"
set serverUser to "xxxxx@piyocast.com"
set serverPassword to text returned of (display dialog "Input FTP Password" default answer "" with hidden answer)

set aFtpManager to current application’s FTPManager’s alloc()’s init()
set successF to false

set srv to current application’s FMServer’s serverWithDestination:serverURL username:serverUser |password|:serverPassword
srv’s setPort:21

set aResList to aFtpManager’s contentsOfServer:srv

set fileNameList to {}
set fileCount to aResList’s |count|()

repeat with i from 0 to (fileCount – 1)
  set anItem to (aResList’s objectAtIndex:i)
  
  
set aFileName to (anItem’s valueForKeyPath:"kCFFTPResourceName") as string
  
set the end of fileNameList to aFileName
end repeat

fileNameList
–>  {".", "..", "xls1a.png", "xls3.png"}

★Click Here to Open This Script 

Posted in file Network | Tagged 10.11savvy 10.12savvy 10.13savvy | Leave a comment

度量衡の変換

Posted on 11月 3, 2018 by Takaaki Naganoya

オープンソースの「DDUnitConverter」(By Dave DeLong)を用いて、度量衡(measurement unit)の変換を行うAppleScriptです。AppleScriptから呼び出すために、DDUnitConverterをフレームワーク化した「ddUnitConversionKit」を作成しています。

もともと、AppleScriptには内蔵の度量衡変換機能があり、

AppleScript名:インチからセンチへの変換
set a to 1
set a to a as inches
–> inches 1.0

set b to a as centimeters
–> centimeters 2.54

set c to a as meters
–> meters 0.0254

set d to a as kilometers
–> kilometers 2.54E-5

★Click Here to Open This Script 

とか、

AppleScript名:液体の容積の単位変換
–液体の容積の単位変換
set a to 10 as liters
–> liters 10.0

set b to a as gallons
–> gallons 2.641720372842

set c to a as quarts
–> quarts 10.566881491367

★Click Here to Open This Script 

ぐらいは簡単にできます。AppleScriptがサポートしている度量衡は、長さ、重さ、温度、液体の容積です。

ただ、mmの下のμmとか、オングストロームとか、そういう単位には対応していませんし、重量でいえばKgに対応していてもt(トン)の単位はサポートしていなかったりと、日常的な度量衡の単位の世界でも不十分な感じが否めません(数値の有効桁数が10桁と小さいことも影響?)。

Cocoaの世界で度量衡変換機能について調べてみたところ、km→m→cm→mmといった変換はしてくれるものの、他の単位への変換は行ってくれていなかったりして、標準機能だけではいまひとつな印象です。

AppleScript名:NSLengthFormatterのじっけん
— Created 2015-11-18 by Takaaki Naganoya
— 2015 Piyomaru Software
use AppleScript version "2.4"
use scripting additions
use framework "Foundation"
–http://dev.classmethod.jp/references/ios8-new-formatter/

set aLengthFormatter to current application’s NSLengthFormatter’s alloc()’s init()
set aMeters to 5000
set aRes to (aLengthFormatter’s stringFromMeters:aMeters) as text
–>  "5 km"
set bRes to (aLengthFormatter’s stringFromMeters:500) as text
–>  "500 m"
set cRes to (aLengthFormatter’s stringFromMeters:0.5) as text
–>  "50 cm"
set dRes to (aLengthFormatter’s stringFromMeters:0.005) as text
–>  "5 mm"
set eRes to (aLengthFormatter’s stringFromMeters:("0.000005" as real)) as text
–>  "0.005 mm"

set res2 to aLengthFormatter’s getObjectValue:(missing value) forString:aRes errorDescription:(missing value)
–>  false

set res3 to (aLengthFormatter’s stringFromValue:aMeters unit:(current application’s NSLengthFormatterUnitMillimeter)) as text
–>  "5,000 mm"
set res4 to (aLengthFormatter’s stringFromValue:aMeters unit:(current application’s NSLengthFormatterUnitCentimeter)) as text
–>  "5,000 cm"
set res5 to (aLengthFormatter’s stringFromValue:aMeters unit:(current application’s NSLengthFormatterUnitMeter)) as text
–>  "5,000 m"
set res6 to (aLengthFormatter’s stringFromValue:aMeters unit:(current application’s NSLengthFormatterUnitKilometer)) as text
–>  "5,000 km"
set res7 to (aLengthFormatter’s stringFromValue:aMeters unit:(current application’s NSLengthFormatterUnitInch)) as text
–>  "5,000 in"
set res8 to (aLengthFormatter’s stringFromValue:aMeters unit:(current application’s NSLengthFormatterUnitFoot)) as text
–>  "5,000 ft"
set res9 to (aLengthFormatter’s stringFromValue:aMeters unit:(current application’s NSLengthFormatterUnitYard)) as text
–>  "5,000 yd"
set res10 to (aLengthFormatter’s stringFromValue:aMeters unit:(current application’s NSLengthFormatterUnitMile)) as text
–>  "5,000 mi"

★Click Here to Open This Script 

AppleScript名:NSMassFormatterのじっけん
— Created 2015-11-18 by Takaaki Naganoya
— 2015 Piyomaru Software
use AppleScript version "2.4"
use scripting additions
use framework "Foundation"
–http://dev.classmethod.jp/references/ios8-new-formatter/

set aMasFormatter to current application’s NSMassFormatter’s alloc()’s init()
set aKilloGrams to 60.0
set aRes to (aMasFormatter’s stringFromKilograms:aKilloGrams) as text
–>  "60 kg"
set a2Res to (aMasFormatter’s stringFromKilograms:(0.5)) as text
–>  "500 g"
set a3Res to (aMasFormatter’s stringFromKilograms:(5000000)) as text
–>  "5,000,000 kg"
set a4Res to (aMasFormatter’s stringFromKilograms:("0.0005" as real)) as text
–>  "0.5 g"

set bRes to (aMasFormatter’s stringFromValue:aKilloGrams unit:(current application’s NSMassFormatterUnitGram)) as text
–>  "60 g"
set cRes to (aMasFormatter’s stringFromValue:aKilloGrams unit:(current application’s NSMassFormatterUnitKilogram)) as text
–>  "60 kg"
set dRes to (aMasFormatter’s stringFromValue:aKilloGrams unit:(current application’s NSMassFormatterUnitOunce)) as text
–>  "60 oz"
set eRes to (aMasFormatter’s stringFromValue:aKilloGrams unit:(current application’s NSMassFormatterUnitPound)) as text
–>  "60 lb"
set fRes to (aMasFormatter’s stringFromValue:aKilloGrams unit:(current application’s NSMassFormatterUnitStone)) as text
–>  "60 st"

set gRes to (aMasFormatter’s unitStringFromValue:aKilloGrams unit:(current application’s NSMassFormatterUnitGram)) as text
–>  "g"
set hRes to (aMasFormatter’s unitStringFromValue:aKilloGrams unit:(current application’s NSMassFormatterUnitKilogram)) as text
–>  "kg"
set iRes to (aMasFormatter’s unitStringFromValue:aKilloGrams unit:(current application’s NSMassFormatterUnitOunce)) as text
–>  "oz"
set jRes to (aMasFormatter’s unitStringFromValue:aKilloGrams unit:(current application’s NSMassFormatterUnitPound)) as text
–>  "lb"
set kRes to (aMasFormatter’s unitStringFromValue:aKilloGrams unit:(current application’s NSMassFormatterUnitStone)) as text
–>  "st"

set res01 to aMasFormatter’s getObjectValue:(missing value) forString:fRes errorDescription:(missing value)
–>  false

set res02 to (aMasFormatter’s stringFromKilograms:80) as text
–>  "80 kg"

set res03 to aMasFormatter’s unitStyle()
–>  2 = NSFormattingUnitStyleMedium

★Click Here to Open This Script 

そこで、冒頭に紹介したようにDDUnitConverterを導入してみたわけですが、これはこれで問題がないわけでもありません。本来、通貨同士の変換をサポートしており、通貨レートの更新機能を持っているのですが、実際に呼び出してみると更新されていない雰囲気が濃厚です(呼び出し方を間違っているのか?)。

なので、「通貨レート以外」の度量衡変換にのみ用いるのが安全な使い方なのかもしれない、というところです。

例によって、OS X 10.10以降用にビルドしたバイナリを用意しておきましたので、興味のある方はアーカイブを展開したあとで、~/Library/Frameworksに入れておためしください。

–> Download ddUnitConversionKit.framework(To ~/Library/Frameworks/)

AppleScript名:DDUnitConverterのじっけん1
— Created 2015-11-19 by Takaaki Naganoya
— 2015 Piyomaru Software
use AppleScript version “2.4”
use scripting additions
use framework “Foundation”
use framework “ddUnitConversionKit” –davedelong/DDUnitConverter
–https://github.com/davedelong/DDUnitConverter

–enums in DDVelocityUnitConverter.h
property DDVelocityUnitCentimetersPerHour : 0
property DDVelocityUnitCentimetersPerMinute : 1
property DDVelocityUnitCentimetersPerSecond : 2
property DDVelocityUnitFeetPerHour : 3
property DDVelocityUnitFeetPerMinute : 4
property DDVelocityUnitFeetPerSecond : 5
property DDVelocityUnitInchesPerHour : 6
property DDVelocityUnitInchesPerMinute : 7
property DDVelocityUnitInchesPerSecond : 8
property DDVelocityUnitKilometersPerHour : 9
property DDVelocityUnitKilometersPerMinute : 10
property DDVelocityUnitKilometersPerSecond : 11
property DDVelocityUnitKnots : 12
property DDVelocityUnitLight : 13
property DDVelocityUnitMach : 14
property DDVelocityUnitMetersPerHour : 15
property DDVelocityUnitMetersPerMinute : 16
property DDVelocityUnitMetersPerSecond : 17
property DDVelocityUnitMilesPerHour : 18
property DDVelocityUnitMilesPerMinute : 19
property DDVelocityUnitMilesPerSecond : 20
property DDVelocityUnitFurlongsPerFortnight : 21

–時速100kmを秒速kmに変換
set aVal to ((current application’s DDUnitConverter’s velocityUnitConverter())’s convertNumber:100 fromUnit:(DDVelocityUnitKilometersPerHour) toUnit:(DDVelocityUnitKilometersPerSecond)) as real
–>  0.027777777778

★Click Here to Open This Script 

AppleScript名:DDCurrencyUnitConverterのじっけん
— Created 2015-11-19 by Takaaki Naganoya
— 2015 Piyomaru Software
use AppleScript version “2.4”
use scripting additions
use framework “Foundation”
use framework “ddUnitConversionKit” –davedelong/DDUnitConverter
–https://github.com/davedelong/DDUnitConverter

–enums in DDCurrencyUnitConverter.h
property DDCurrencyUnitEuro : 0
property DDCurrencyUnitJapaneseYen : 1
property DDCurrencyUnitUKPoundSterling : 2
property DDCurrencyUnitUSDollar : 3
property DDCurrencyUnitAlgerianDinar : 4
property DDCurrencyUnitArgentinePeso : 5
property DDCurrencyUnitAustralianDollar : 6
property DDCurrencyUnitBahrainDinar : 7
property DDCurrencyUnitBotswanaPula : 8
property DDCurrencyUnitBrazilianReal : 9
property DDCurrencyUnitBruneiDollar : 10
property DDCurrencyUnitCanadianDollar : 11
property DDCurrencyUnitChileanPeso : 12
property DDCurrencyUnitChineseYuan : 13
property DDCurrencyUnitColombianPeso : 14
property DDCurrencyUnitCzechKoruna : 15
property DDCurrencyUnitDanishKrone : 16
property DDCurrencyUnitHungarianForint : 17
property DDCurrencyUnitIcelandicKrona : 18
property DDCurrencyUnitIndianRupee : 19
property DDCurrencyUnitIndonesianRupiah : 20
property DDCurrencyUnitIranianRial : 21
property DDCurrencyUnitIsraeliNewSheqel : 22
property DDCurrencyUnitKazakhstaniTenge : 23
property DDCurrencyUnitKoreanWon : 24
property DDCurrencyUnitKuwaitiDinar : 25
property DDCurrencyUnitLibyanDinar : 26
property DDCurrencyUnitMalaysianRinggit : 27
property DDCurrencyUnitMauritianRupee : 28
property DDCurrencyUnitMexicanPeso : 29
property DDCurrencyUnitNepaleseRupee : 30
property DDCurrencyUnitNewZealandDollar : 31
property DDCurrencyUnitNorwegianKrone : 32
property DDCurrencyUnitRialOmani : 33
property DDCurrencyUnitPakistaniRupee : 34
property DDCurrencyUnitNuevoSol : 35
property DDCurrencyUnitPhilippinePeso : 36
property DDCurrencyUnitPolishZloty : 37
property DDCurrencyUnitQatarRiyal : 38
property DDCurrencyUnitRussianRuble : 39
property DDCurrencyUnitSaudiArabianRiyal : 40
property DDCurrencyUnitSingaporeDollar : 41
property DDCurrencyUnitSouthAfricanRand : 42
property DDCurrencyUnitSriLankaRupee : 43
property DDCurrencyUnitSwedishKrona : 44
property DDCurrencyUnitSwissFranc : 45
property DDCurrencyUnitThaiBaht : 46
property DDCurrencyUnitTrinidadAndTobagoDollar : 47
property DDCurrencyUnitTunisianDinar : 48
property DDCurrencyUnitUAEDirham : 49
property DDCurrencyUnitPesoUruguayo : 50
property DDCurrencyUnitBolivarFuerte : 51
property DDCurrencyUnitSDR : 52

–最初に通貨レートの更新を行う必要があるが、実行しても変わらないのはなぜ????
set aConv to current application’s DDUnitConverter’s currencyUnitConverter()
aConv’s refreshExchangeRates()
set aVal to (aConv’s convertNumber:100 fromUnit:(DDCurrencyUnitUSDollar) toUnit:(DDCurrencyUnitJapaneseYen))
–>  (NSNumber) 1.006839721743

★Click Here to Open This Script 

Posted in Number | Tagged 10.11savvy 10.12savvy 10.13savvy NSLengthFormatter NSMassFormatter | Leave a comment

Post navigation

  • Older posts
  • Newer posts

電子書籍(PDF)をオンラインストアで販売中!

Google Search

Popular posts

  • 開発機としてM2 Mac miniが来たのでガチレビュー
  • macOS 15, Sequoia
  • Pages本執筆中に、2つの書類モード切り替えに気がついた
  • Numbersで選択範囲のセルの前後の空白を削除
  • メキシカンハットの描画
  • Pixelmator Pro v3.6.4でAppleScriptからの操作時の挙動に違和感が
  • AppleScriptによる並列処理
  • Safariで「プロファイル」機能を使うとAppleScriptの処理に影響
  • macOS 15でも変化したText to Speech環境
  • AppleScript入門③AppleScriptを使った「自動化」とは?
  • デフォルトインストールされたフォント名を取得するAppleScript
  • macOS 15 リモートApple Eventsにバグ?
  • 【続報】macOS 15.5で特定ファイル名パターンのfileをaliasにcastすると100%クラッシュするバグ
  • AppleScript入門① AppleScriptってなんだろう?
  • Script Debuggerの開発と販売が2025年に終了
  • macOS 14で変更になったOSバージョン取得APIの返り値
  • NSObjectのクラス名を取得 v2.1
  • 有害ではなくなっていたSpaces
  • macOS 15:スクリプトエディタのAppleScript用語辞書を確認できない
  • Xcode上のAppleScriptObjCのプログラムから、Xcodeのログ欄へのメッセージ出力を実行

Tags

10.11savvy (1101) 10.12savvy (1242) 10.13savvy (1391) 10.14savvy (587) 10.15savvy (438) 11.0savvy (283) 12.0savvy (212) 13.0savvy (194) 14.0savvy (147) 15.0savvy (135) CotEditor (66) Finder (51) iTunes (19) Keynote (119) NSAlert (61) NSArray (51) NSBitmapImageRep (20) NSBundle (20) NSButton (34) NSColor (53) NSDictionary (28) NSFileManager (23) NSFont (21) NSImage (41) NSJSONSerialization (21) NSMutableArray (63) NSMutableDictionary (22) NSPredicate (36) NSRunningApplication (56) NSScreen (30) NSScrollView (22) NSString (119) NSURL (98) NSURLRequest (23) NSUTF8StringEncoding (30) NSView (33) NSWorkspace (20) Numbers (76) Pages (55) Safari (44) Script Editor (27) WKUserContentController (21) WKUserScript (20) WKWebView (23) WKWebViewConfiguration (22)

カテゴリー

  • 2D Bin Packing
  • 3D
  • AirDrop
  • AirPlay
  • Animation
  • AppleScript Application on Xcode
  • Beginner
  • Benchmark
  • beta
  • Bluetooth
  • Books
  • boolean
  • bounds
  • Bug
  • Calendar
  • call by reference
  • check sum
  • Clipboard
  • Cocoa-AppleScript Applet
  • Code Sign
  • Color
  • Custom Class
  • date
  • dialog
  • diff
  • drive
  • Droplet
  • exif
  • file
  • File path
  • filter
  • folder
  • Font
  • Font
  • GAME
  • geolocation
  • GUI
  • GUI Scripting
  • Hex
  • History
  • How To
  • iCloud
  • Icon
  • Image
  • Input Method
  • Internet
  • iOS App
  • JavaScript
  • JSON
  • JXA
  • Keychain
  • Keychain
  • Language
  • Library
  • list
  • Locale
  • Localize
  • Machine Learning
  • Map
  • Markdown
  • Menu
  • Metadata
  • MIDI
  • MIME
  • Natural Language Processing
  • Network
  • news
  • Noification
  • Notarization
  • Number
  • Object control
  • OCR
  • OSA
  • parallel processing
  • PDF
  • Peripheral
  • process
  • PRODUCTS
  • QR Code
  • Raw AppleEvent Code
  • Record
  • rectangle
  • recursive call
  • regexp
  • Release
  • Remote Control
  • Require Control-Command-R to run
  • REST API
  • Review
  • RTF
  • Sandbox
  • Screen Saver
  • Script Libraries
  • sdef
  • search
  • Security
  • selection
  • shell script
  • Shortcuts Workflow
  • Sort
  • Sound
  • Spellchecker
  • Spotlight
  • SVG
  • System
  • Tag
  • Telephony
  • Text
  • Text to Speech
  • timezone
  • Tools
  • Update
  • URL
  • UTI
  • Web Contents Control
  • WiFi
  • XML
  • XML-RPC
  • イベント(Event)
  • 未分類

アーカイブ

  • 2025年6月
  • 2025年5月
  • 2025年4月
  • 2025年3月
  • 2025年2月
  • 2025年1月
  • 2024年12月
  • 2024年11月
  • 2024年10月
  • 2024年9月
  • 2024年8月
  • 2024年7月
  • 2024年6月
  • 2024年5月
  • 2024年4月
  • 2024年3月
  • 2024年2月
  • 2024年1月
  • 2023年12月
  • 2023年11月
  • 2023年10月
  • 2023年9月
  • 2023年8月
  • 2023年7月
  • 2023年6月
  • 2023年5月
  • 2023年4月
  • 2023年3月
  • 2023年2月
  • 2023年1月
  • 2022年12月
  • 2022年11月
  • 2022年10月
  • 2022年9月
  • 2022年8月
  • 2022年7月
  • 2022年6月
  • 2022年5月
  • 2022年4月
  • 2022年3月
  • 2022年2月
  • 2022年1月
  • 2021年12月
  • 2021年11月
  • 2021年10月
  • 2021年9月
  • 2021年8月
  • 2021年7月
  • 2021年6月
  • 2021年5月
  • 2021年4月
  • 2021年3月
  • 2021年2月
  • 2021年1月
  • 2020年12月
  • 2020年11月
  • 2020年10月
  • 2020年9月
  • 2020年8月
  • 2020年7月
  • 2020年6月
  • 2020年5月
  • 2020年4月
  • 2020年3月
  • 2020年2月
  • 2020年1月
  • 2019年12月
  • 2019年11月
  • 2019年10月
  • 2019年9月
  • 2019年8月
  • 2019年7月
  • 2019年6月
  • 2019年5月
  • 2019年4月
  • 2019年3月
  • 2019年2月
  • 2019年1月
  • 2018年12月
  • 2018年11月
  • 2018年10月
  • 2018年9月
  • 2018年8月
  • 2018年7月
  • 2018年6月
  • 2018年5月
  • 2018年4月
  • 2018年3月
  • 2018年2月

https://piyomarusoft.booth.pm/items/301502

メタ情報

  • ログイン
  • 投稿フィード
  • コメントフィード
  • WordPress.org

Forum Posts

  • 人気のトピック
  • 返信がないトピック

メタ情報

  • ログイン
  • 投稿フィード
  • コメントフィード
  • WordPress.org
Proudly powered by WordPress
Theme: Flint by Star Verte LLC