Menu

Skip to content
AppleScriptの穴
  • Home
  • Products
  • Books
  • Docs
  • Events
  • Forum
  • About This Blog
  • License
  • 仕事依頼

AppleScriptの穴

Useful & Practical AppleScript archive. Click '★Click Here to Open This Script' Link to download each AppleScript

カテゴリー: System

Xcode上で作成したアプリケーション上でDark Mode検出

Posted on 4月 22, 2020 by Takaaki Naganoya

Xcode上で作成したAppleScriptアプリケーションでDark Modeの検出を行いたいときに、NSAppearance’s currentAppearance()で取得したら、正しくModeの検出が行えませんでした。同じコードをスクリプトエディタ/Script Debugger上で動かした場合には正しくModeの判定が行えているのですが。

そこで、System Eventsの機能を用いてMode判定を行うように処理を書き換えたりしてみたのですが、Mac App Storeに出すアプリケーションでこの処理を記述していたら、これを理由にリジェクトされてしまいました。

仕方なく解決策を探してみたところ、macOS 10.13用に書いたshell scriptによる迂回処理を、そのまま他のOSバージョンでも動かせばよいのではないかと気づき、結局そこに落ち着きました。

AppleScript名:Dark Modeの検出(Xcode上でも正しく判定)
—
–  Created by: Takaaki Naganoya
–  Created on: 2020/04/22
—
–  Copyright © 2020 Piyomaru Software, All Rights Reserved
—
use AppleScript version "2.4" — Yosemite (10.10) or later
use framework "Foundation"
use scripting additions

set apRes to retLightOrDark() of me
–> true (Dark), false (Light)

on retLightOrDark()
  try
    set sRes to (do shell script "defaults read -g AppleInterfaceStyle")
    
return (sRes = "Dark") as boolean
  on error
    return false
  end try
end retLightOrDark

★Click Here to Open This Script 

Posted in shell script System | Tagged 10.13savvy 10.14savvy 10.15savvy | Leave a comment

ディスプレイの設定切り替えをAppleScriptでも行えるSwitchResX

Posted on 4月 19, 2020 by Takaaki Naganoya

Cocoaの機能やサードパーティのFrameworkの機能を呼び出して、ディスプレイの回転コントロールを行なったり、解像度の変更を行うなどの制御がAppleScript単体でできるようになってきましたが、ディスプレイの位置関係を定義して変更したいとか凝ったことを言い出すと、さすがにまだまだ市販のツール類を併用したほうが話が早かったりします。

実際に、「システム設定」アプリをGUI Scriptingで強引に操作したり、Objective-Cなどのプログラムを呼び出したとしても、相当に苦労する箇所です。SwitchResXを買って解決できるなら、それで解決すべきだと考えます。最近のシステム設定.appは作りがおかしいので、GUI Scriptingで詳細な設定の変更は行えません。

以前からSwitchResX(16USドル)がAppleScriptからコントロールできることを知っていましたが、どの程度のコントロールが行えるかについては調べたことはありませんでした。どのように使えて、どのようにコントロールできて、どのような点に注意すべきなのかを実際に調べてみました。

SwitchResX v4.9.2を実際にためしてみた

SwitchResXの解像度変更機能自体は水準通りだと思います。この手のツールは割といろいろ存在しており、自分はQuickResを利用しています。どちらのツールも画面のオーバースキャン(実解像度よりも大きな解像度の表示)ができます。画面の回転や色数、画面の相対位置の変更、アプリケーションごとに解像度を変更する機能などが本ツールの特徴でしょう。

画面解像度の変更機能について1つ、QuickResを大幅に上回っているものがありました。HiDPI(Retina解像度)の表示サポートです。非Retina解像度のディスプレイであっても、表示ピクセル数を抑えることでHiDPI表示を可能とするもので、表示すること自体にはあまり意味はありませんが、「HiDPI解像度の画面キャプチャが行える」というメリットがあります(非Retina環境でRetina解像度の画面キャプチャが行えるのは、資料作成時にとても便利)。このあたり、Mac miniでちょっと困らされた点でした。

Mac mini 2014(macOS 10.15.4)+HDMI Display(1980x1080)の組み合わせで、OSが標準で提供しているのは960x540解像度におけるHiDPI表示ですが、SwitchResXは1280x800 / 960x600 / 840x525 / 1280x720 / 800x450 などの解像度におけるHiDPI表示もサポートしています。

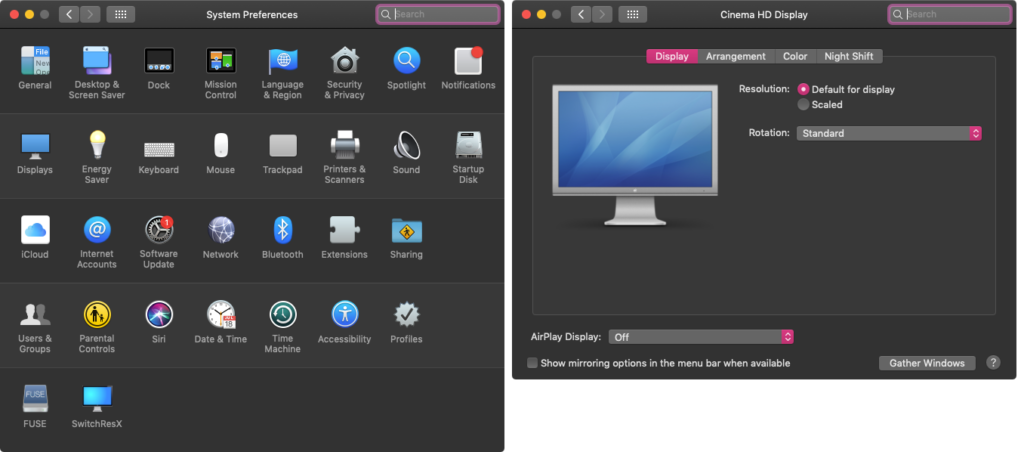
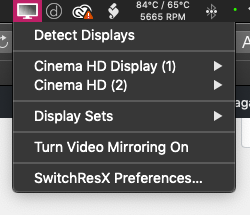
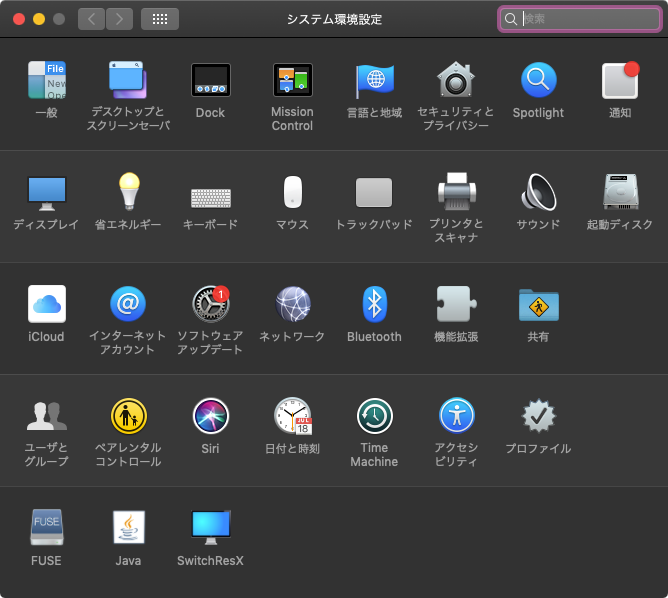
SwitchResXはメニューバーに常駐して、解像度設定の切り替えが行えるようになっています。設定自体はこのメニューバーから「SwitchResX Preferences…」を選択するか、システム環境設定の「SwitchResX」を選択すると起動される「SwitchResX Control」というGUIアプリケーションから行います。
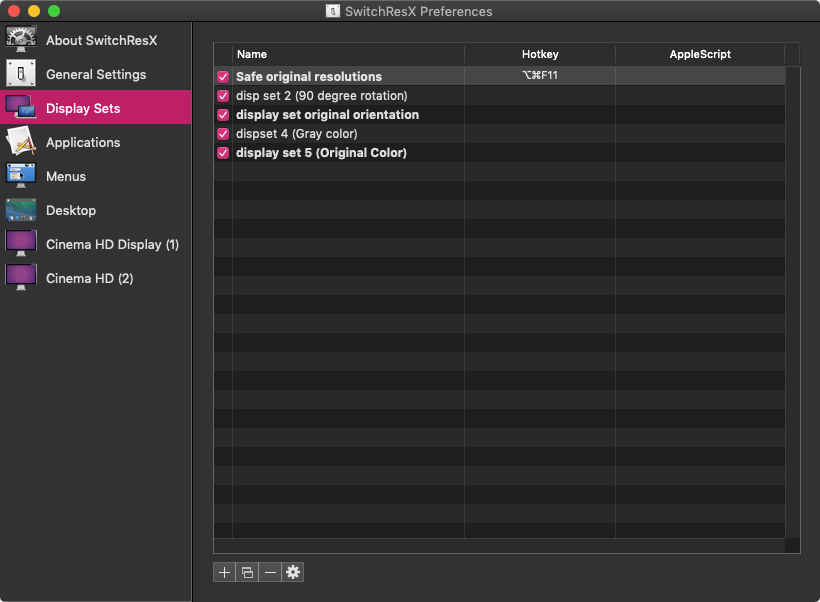
SwitchResXでは、画面解像度、色(カラー、グレイ)、表示ON/OFF、ミラーリング、メインディスプレイ、画面回転、カラープロファイルなどを設定したディスプレイセットを作成し、このディスプレイセットをメニューやキーボードショートカット、コンテクストメニューから切り替えられるようになっており、その一環としてAppleScriptから同様にディスプレイセットの切り替えが行えるようになっています。
AppleScriptからのコントロール

SwitchResXのAppleScript用語辞書は以下のとおりです。
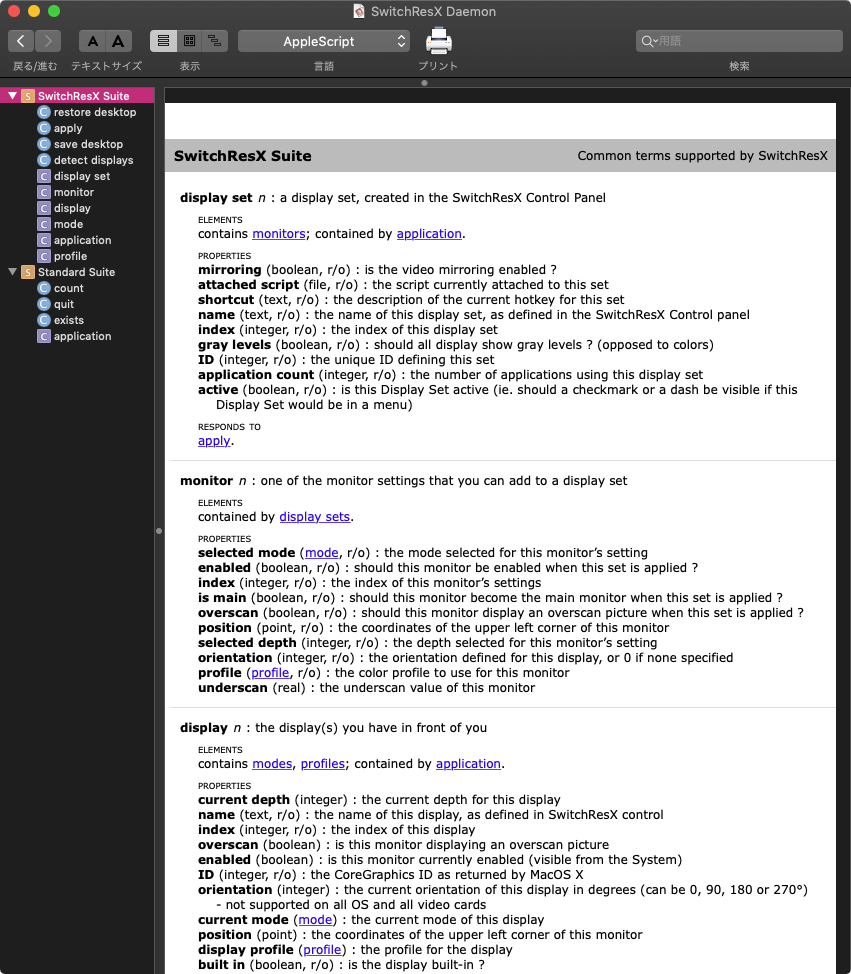
AppleScriptによるコントロールは「SwitchResX Daemon」という不可視アプリケーションプロセスに対して行うようになっており、基本的には各種ディスプレイの状態を取得(Read Only)することと若干の基本的なコマンドの実行と、ユーザーが定義したディスプレイセットの切り替えを行う、という内容です。

AppleScript側からこまかくディスプレイのIDを指定して個別にグレースケール表示を行わせるといったことはできません。逆に、指定したIDのディスプレイの現在の状況(properties)を取得することはできます。そういう感じです。

けっこう多い注意点

ディスプレイセットを新規作成したあとで、GUI側から明示的に保存(Command-S)を実行しないと、追加したディスプレイセットは認識されませんでした。ここは、たいへんに注意が必要です(なかなか気づきませんでした)。

ディスプレイの回転や位置関係の変更など、込み入った設定変更を行ったディスプレイセットを作成した場合には、それらを元に戻したディスプレイセットを作成しておく必要があります。restore desktopコマンドで元の状態に戻してくれるのかと思っていたのですが、そういうものではないようです。

こういうツールを使おうかと考えているユーザーは複数のディスプレイをMacにつないで使っているはずなので、本ツールで一気に切り替えたあと、戻す設定が定義されていないと手作業で元に戻すというScripterにとってはたいへんに屈辱的な作業を強いられることになります。

ディスプレイセットには、すべての設定項目が同居できるというわけではなく、特定の設定項目のみが単独で切り替えられるというものもあるようなので、この点も注意が必要です(注意点ばっかりやな)。

AppleScriptのプログラム中からSwitchResXの機能を呼び出して画面構成の変更を自由に行えるわけですが、個人的には「そこまでやる必要があるのか?」という印象です。あと、AppleScript用語辞書にサンプルScript掲載しとけとか画面キャプチャのグラフィックを入れておかないとわかりにくいので、そのあたり改善の余地ありといったところでしょうか。他人のアプリケーションについては、山のように不満点や改善点が出てくるものです。

あと、SwitchResXを操作するAppleScriptをどこから呼び出すことになるのか、については少し興味があります。macOS標準搭載のスクリプトメニューから呼び出すのが一番「ありそう」な利用パターンですが、それ単体で呼び出すと「隣り合ったSwitchResXのメニューから呼び出すのとほぼ等価な内容をスクリプトメニューに入れたAppleScriptから呼び出す」という間抜けな状態になります。

まとまった自動処理を行うのに必要な画面設定(速度重視のために画面解像度を極端に落とすとか、メニュー操作が想定外の動きを行わないように特定の解像度に明示的に変更するとか)を行い、処理本体を実行したうえで、後処理で画面設定を元に戻しておく、といったところでしょうか。

AppleScript名:ディスプレイを数えて、プロパティを取得
tell application "SwitchResX Daemon"
  set dCount to count every display
  
–> 2
  
  
repeat with i from 1 to dCount
    properties of display i
    
–> {built in:false, position:{0, 0}, name:"Cinema HD Display", class:display, brightness:-1.0, id:69501836, mirroring:{}, enabled:true, overscan:false, index:1, current mode:mode 1 of display 1 of application "SwitchResX Daemon", orientation:0, underscan:1.0, current depth:32, display profile:profile "Cinema HD Display" of application "SwitchResX Daemon"}
    
    
–> {built in:false, position:{-1920, 0}, name:"Cinema HD", class:display, brightness:-1.0, id:69513479, mirroring:{}, enabled:true, overscan:false, index:2, current mode:mode 1 of display 2 of application "SwitchResX Daemon", orientation:0, underscan:1.0, current depth:32, display profile:profile "Cinema HD" of application "SwitchResX Daemon"}
  end repeat
end tell

★Click Here to Open This Script 


▲display set 2だと2行目の「disp set 2 (90 degree rotation)」が指定される

AppleScript名:display set の切り替え
tell application "SwitchResX Daemon"
  set dSet to display set 2
  
apply dSet
end tell

★Click Here to Open This Script 

Posted in System | Tagged 10.14savvy 10.15savvy SwitchResX | Leave a comment

システムフォントの名称を取得

Posted on 4月 13, 2020 by Takaaki Naganoya

システムフォントの名称を取得するAppleScriptです。

GUIベースのアプリケーションを作っているときに、「もう、無難なフォントなんでもいいからとりあえず指定できるものがあれば指定しておこうよ」という局面はあります。ないフォントを指定するとクラッシュすることもあるので、とりあえずコレ指定しておけば大丈夫だから!

という「安全パイ」のフォントとしてSystem Fontを取得&指定したいという時に書いたScriptでもあります。プログラム内容がつまらない割には、切実なニーズを満たすためのものです。

AppleScript名:システムフォントの名称を取得.scptd
—
–  Created by: Takaaki Naganoya
–  Created on: 2020/04/06
—
–  Copyright © 2020 Piyomaru Software, All Rights Reserved
—

use AppleScript version "2.4" — Yosemite (10.10) or later
use framework "Foundation"
use framework "AppKit"
use scripting additions

set aFont to current application’s NSFont’s systemFontOfSize:24.0
set aInfo to aFont’s fontDescriptor()
set aSize to (aInfo’s pointSize()) as real
set aPSName to (aInfo’s postscriptName()) as string
–> ".SFNSDisplay"

set bFont to current application’s NSFont’s boldSystemFontOfSize:24.0
set bInfo to bFont’s fontDescriptor()
set bSize to (bInfo’s pointSize()) as real
set bPSName to (bInfo’s postscriptName()) as string
–> ".SFNSDisplay-Bold"

★Click Here to Open This Script 

Posted in AppleScript Application on Xcode Font | Tagged 10.13savvy 10.14savvy 10.15savvy NSFont | Leave a comment

NSFontPanelでフォントを選択

Posted on 4月 7, 2020 by Takaaki Naganoya

自前でメニューを作ってフォントおよびサイズの選択を行おうとするとめんどくさい(時間がかかるし管理も大変)ので、NSFontPanelを用いてフォントを選択する試作品を作ってみました。

ただし、まだ完全ではなく「1つ前の状態が取得できる」という状態なので、修正が必要です。作成はmacOS 10.14.6+Xcode 11.3.1上で行っています。

–> Download Xcode Project

AppleScript名:AppDelegate.applescript
—
— AppDelegate.applescript
— fontPanel
—
— Created by Takaaki Naganoya on 2020/03/12.
— Copyright © 2020 Takaaki Naganoya. All rights reserved.
—

script AppDelegate
  property parent : class "NSObject"
  
  
— IBOutlets
  
property theWindow : missing value
  
property theField : missing value
  
  
property aFontNameField : missing value
  
property aFontSizeField : missing value
  
  
property aFontManager : missing value
  
  
property font : missing value
  
property aFP : missing value
  
  
on applicationWillFinishLaunching:aNotification
    set aFontManager to current application’s NSFontManager’s sharedFontManager()
    
aFontManager’s setAction:"appSpecificChangeFont:"
    
set aFP to current application’s NSFontPanel’s sharedFontPanel()
    
set aFont to current application’s NSFont’s fontWithName:"Helvetica" |size|:16
    
aFontManager’s setSelectedFont:aFont isMultiple:false
    
    
theField’s setStringValue:"ぴよまるソフトウエア, Piyomaru Software"
  end applicationWillFinishLaunching:
  
  
on applicationShouldTerminate:sender
    — Insert code here to do any housekeeping before your application quits
    
return current application’s NSTerminateNow
  end applicationShouldTerminate:
  
  
on clicked:aSender
    theWindow’s makeFirstResponder:theField
    
aFP’s makeKeyAndOrderFront:me
  end clicked:
  
  
on appSpecificChangeFont:sender
    set aSelFont to sender’s selectedFont()
    
set aDesc to aSelFont’s fontDescriptor()
    
set aPSID to (aDesc’s postscriptName()) as string
    
set aSize to (aDesc’s pointSize()) as real
    
theField’s setFont:aSelFont
    
aFontNameField’s setStringValue:aPSID
    
aFontSizeField’s setStringValue:(aSize as string)
  end appSpecificChangeFont:
end script

★Click Here to Open This Script 

Posted in AppleScript Application on Xcode Font | Tagged 10.13savvy 10.14savvy 10.15savvy NSFont NSFontManager NSFontPanel | 1 Comment

マウスカーソルを変更

Posted on 3月 24, 2020 by Takaaki Naganoya

Xcode上で記述するAppleScriptアプリケーションにおいて、マウスカーソルを変更するAppleScriptです。

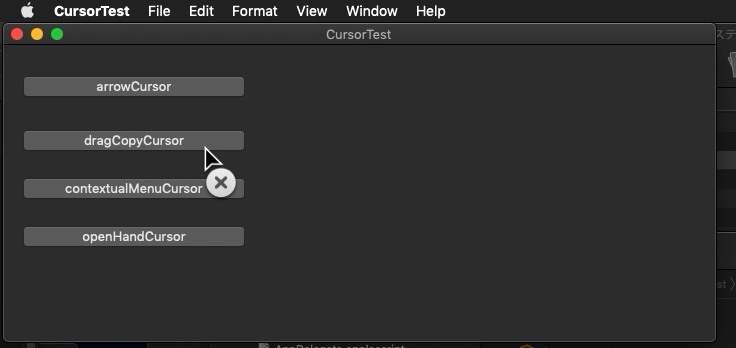
NSCursorにアクセスして、macOS側で用意しているカーソルにマウスカーソルのイメージを変更します。

–> Watch Demo Movie

あらかじめmacOSが用意しているカーソルはいくつかあるわけですが、これで満足するわけがなくて……任意のNSImageをカーソルに指定する方法について調べていたものの、なかなかうまくいかなかったので、このOS側で用意しているカーソルへの切り替えのみまとめておきました。

–> Download Xcode Project

他のアプリケーションに切り替えると通常のカーソルに戻ってしまうので、本プロジェクト側でアプリケーション切り替えのイベントハンドラでカーソルの再変更などを行うべきなのかも。

  set aImage to current application's NSImage's  imageNamed:(current application's NSImageNameComputer)
  set tmpCursor to current application's NSCursor's alloc()'s initWithImage:aImage hotSpot:{0,15}
tmpCursor's |set|()

結局、コンピュータのアイコンをマウスカーソルに指定するというところまでは持って行けた(カーソル画像の差し替えができた)わけなんですが、NSCursorの挙動を評価してみたら、カーソルが標準のものに戻るタイミングがバラバラ(他のディスプレイにカーソルが移動したとき、というわけでもない)で、挙動が謎すぎであります。

その後、対象のビュー(NSViewなど、その派生クラス)にマウスカーソルが入った/出たことを検出するイベントハンドラでマウスカーソルの形状変更を明示的に指定するような実装で落ち着きました(Edama2さんから教えていただきました。ありがとうございます)。

AppleScript名:AppDelegate.applescript
—
— AppDelegate.applescript
— CursorTest
—
— Created by Takaaki Naganoya on 2020/03/24.
— Copyright © 2020 Takaaki Naganoya. All rights reserved.
—

script AppDelegate
  property parent : class "NSObject"
  
  
— IBOutlets
  
property theWindow : missing value
  
  
on applicationWillFinishLaunching:aNotification
    — Insert code here to initialize your application before any files are opened
  end applicationWillFinishLaunching:
  
  
on applicationShouldTerminate:sender
    — Insert code here to do any housekeeping before your application quits
    
return current application’s NSTerminateNoww
  end applicationShouldTerminate:
  
  
on clicked:aSender
    set aTag to (aSender’s tag) as integer
    
if aTag = 100 then
      current application’s NSCursor’s arrowCursor()’s |set|()
    else if aTag = 101 then
      current application’s NSCursor’s disappearingItemCursor()’s |set|()
    else if aTag = 102 then
      current application’s NSCursor’s contextualMenuCursor()’s |set|()
    else if aTag = 103 then
      current application’s NSCursor’s openHandCursor()’s |set|()
    end if
  end clicked:
end script

★Click Here to Open This Script 

Posted in AppleScript Application on Xcode System | Tagged 10.13savvy 10.14savvy 10.15savvy NSCursor NSImage | Leave a comment

mirroringの設定と解除

Posted on 3月 11, 2020 by Takaaki Naganoya

自分はディスプレイのミラーリング機能は日常的にあまり使っていません。実際にやってみたらどうだったのかをまとめてみました。

この手の処理をAppleScriptで書こうとしても、そのための命令が標準で内蔵されていないため、アプローチの方法はかぎられています。

 (1)思いっきりハードウェア寄りのプログラム(Cとかで書いた)を呼び出す
 (2)アクセシビリティ系の機能(GUI Scripting)を使ってシステム環境設定を操作する

の2つです。(2)は、画面上の要素の些細な変更によりプログラムを書き換える必要が出てくるうえに、信頼性が高くないので、あまりやりたくありません。もちろん、画面上の要素を検索しながら処理する方法もあるわけですが、それなりに(画面要素の検索に)時間がかかります。

そうなると、(1)を採用することになります。探すと………すぐにみつかりました。「mirror-displays」というコマンドラインアプリケーションです。ソースコードを読んでみると、CoreGraphics系の各種フレームワークを呼び出している、Objective-Cで書かれた(ほとんどCのコード)プログラムです。

これをスクリプトバンドルの中に入れて呼び出してみました。1回実行するとメインモニタの内容が他のモニタにミラーリングされます。もう1回実行すると、ミラーリングが解除されます。

–> Download mirroring_toggle (Script Bundle with executable command in its bundle)

mirrorコマンドのオプションには、「どのモニタをミラーリングさせるか」といった指定ができるようですが、試していないのでとくに凝った指定も何もしていません。

mirrorコマンドはmacOS 10.14でビルドして10.10以降をターゲットにしてみましたが、そこまで古い環境は手元に残っていないのでテストしていません。また、macOS 10.15のマシンには複数台のモニタをつないでいないので、macOS 10.15上でのテストも行っていません。

AppleScript名:mirroringの設定と解除
—
–  Created by: Takaaki Naganoya
–  Created on: 2020/03/11
—
–  Copyright © 2020 Piyomaru Software, All Rights Reserved
—

–https://github.com/hydra/mirror-displays
–バンドルの中に入れたmirrorコマンドをただ呼んでるだけ
set myPath to POSIX path of (path to me)
set comPath to myPath & "/Contents/Resources/mirror"
do shell script quoted form of comPath

★Click Here to Open This Script 

Posted in shell script System | Tagged 10.13savvy 10.14savvy 10.15savvy | Leave a comment

ServerInformationで製品情報を取得

Posted on 3月 9, 2020 by Takaaki Naganoya

AppleのPrivate Frameworkである「ServerInformation.framework」を呼び出すAppleScriptです。

AppStoreを通じて配布するアプリケーションではPrivate Frameworkの使用は問題になる可能性がありますが、ユーザーの手元で動かしているAppleScriptでPrivate Frameworkを煮ようが焼こうが関係ないと思います。

「ServerInformation.framework」は割と利用価値が高そうなものであります。実際にGithub上で探したサンプルをAppleScriptに翻訳して試してみました。

本サンプルは、/System/Library/PrivateFrameworks/という、ふだんFrameworkを呼び出す先「ではない」ディレクトリに入っているFrameworkを呼び出すサンプルでもあり、NSBundleを通じてFrameworkを呼び出す実例でもあります。

この方法を利用すれば、最新のmacOSで(SIPを解除しないで)そのままでは呼び出せなくなっていたホームディレクトリ下のFrameworkとかアプレット内に同梱したFrameworkをローディングして呼び出すことができそうな雰囲気があります。

AppleScript名:ServerInformationで製品情報を取得.scptd
—
–  Created by: Takaaki Naganoya
–  Created on: 2020/03/09
—
–  Copyright © 2020 Piyomaru Software, All Rights Reserved
—
— https://gist.github.com/erikng/d90d21f502351d64a541600226626a28

use AppleScript version "2.4" — Yosemite (10.10) or later
use framework "Foundation"
use framework "AppKit"
use scripting additions

set ServerInformation to current application’s NSBundle’s bundleWithPath:"/System/Library/PrivateFrameworks/ServerInformation.framework"
set ServerCompatibility to current application’s NSBundle’s bundleWithPath:"/System/Library/PrivateFrameworks/ServerCompatibility.framework"

set ServerInformationComputerModelInfo to ServerInformation’s classNamed:"ServerInformationComputerModelInfo"
set SVCSystemInfo to ServerCompatibility’s classNamed:"SVCSystemInfo"

set myInfo to SVCSystemInfo’s currentSystemInfo()

set exInfo to (ServerInformationComputerModelInfo’s attributesForModelIdentifier:(myInfo’s computerModelIdentifier())) as record

set anArchitecture to exInfo’s architecture
–> "x86_64"

set aMonoImageSel to exInfo’s monochromeSelectedHardwareImage
–> NSImage (Gray)

set aMonoImage to exInfo’s monochromeHardwareImage
–> NSImage (Gray)

set aDesc to exInfo’s |description|
–> "15インチMacBook Pro Retinaディスプレイを装備、デュアルコアIntel Core i7プロセッサ搭載(アルミニウムユニボディ)、2012年の中期に投入。"
–> "Mac mini Intelデュアルコアプロセッサおよび統合型グラフィックス搭載、2014年後期に投入。"
–> "MacBook Air 11インチディスプレイを装備、2011年の中期に投入。"

set aModel to exInfo’s model
–> "MacBook Pro"
–> "Mac mini"
–> "MacBook Air"

set aProcessor to exInfo’s processor
–> "Intel Core i7"
–> "デュアルコアIntel Core i5、デュアルコアIntel Core i7"
–> "Dual-Core Intel Core i5、Intel Core i7"

set aMarketModel to exInfo’s marketingModel
–> "15インチMacBook Pro, Retinaディスプレイ, Intel Core i7 (Mid 2012)"
–> "Mac mini(Late 2014)"
–> "11インチMacBook Air(Mid 2011)"

set aColorImage to exInfo’s hardwareImage
–> NSImage (Color)

★Click Here to Open This Script 

Posted in System | Tagged 10.14savvy 10.15savvy | Leave a comment

使用中のMacの製品呼称を取得する v4

Posted on 3月 8, 2020 by Takaaki Naganoya

使用中のMacの製品呼称を取得するAppleScriptです。

ながらく、この手のルーチンを使い続けてきましたが、macOS 10.15でエラーが出るようになりました。

理由を確認してみたところ、パス名の一部がmacOS 10.15で変更になっていることがわかりました。

目下、Xcode上でアプリケーションを作成すると、ローカライズしたリソースのフォルダについては、「English.lproj」ではなく「en.lproj」と、言語コードが用いられるようになってきました。この、「English」と「en」の変更がOS内部のコンポーネントについても行われた「だけ」というのが理由のようです。

ちなみに、パス名を無意味に途中で切ってつなげているのは、Blog(HTML)やMarkDownのドキュメントに入れたときに、折り返しされずにレンダリング品質を下げる原因になる(行がそこだけ伸びるとか、ページ全体の文字サイズが強制的に小さくなるとか)ためです。

AppleScript名:使用中のMacの製品呼称を取得する v4.scptd
—
–  Created by: Takaaki Naganoya
–  Created on: 2020/03/08
—
–  Copyright © 2020 Piyomaru Software, All Rights Reserved
—
use AppleScript version "2.4" — Yosemite (10.10) or later
use framework "Foundation"
use scripting additions

set myInfo to retModelInfo() of me
–> "Mac mini (Late 2014)"

on retModelInfo()
  set v2 to system attribute "sys2"
  
— macOS 10.15.3 –> 15
  
  
if v2 < 15 then
    –macOS 10.14まで
    
set pListPath to "/System/Library/PrivateFrameworks/ServerInformation.framework/" & "Versions/A/Resources/English.lproj/SIMachineAttributes.plist"
  else
    –macOS 10.15以降
    
set pListPath to "/System/Library/PrivateFrameworks/ServerInformation.framework/" & "Versions/A/Resources/en.lproj/SIMachineAttributes.plist"
  end if
  
  
set aRec to retDictFromPlist(pListPath) of me
  
set hwName to (do shell script "sysctl -n hw.model")
  
–>  "Macmini7,1"
  
  
set aMachineRec to retRecordByLabel(aRec, hwName) of me
  
  
set aMachineRec2 to contents of first item of aMachineRec
  
return (marketingModel of _LOCALIZABLE_ of aMachineRec2)
end retModelInfo

on retDictFromPlist(aPath)
  set thePath to current application’s NSString’s stringWithString:aPath
  
set thePath to thePath’s stringByExpandingTildeInPath()
  
set theDict to current application’s NSDictionary’s dictionaryWithContentsOfFile:thePath
  
return theDict as record
end retDictFromPlist

on retRecordByLabel(aRec as record, aKey as string)
  set aDic to current application’s NSDictionary’s dictionaryWithDictionary:aRec
  
set aVal to aDic’s valueForKey:aKey
  
return aVal as list
end retRecordByLabel

on retRecordByKeyPath(aRec as record, aKey as string)
  set aDic to current application’s NSDictionary’s dictionaryWithDictionary:aRec
  
set aVal to aDic’s valueForKeyPath:aKey
  
return aVal
end retRecordByKeyPath

★Click Here to Open This Script 

Posted in shell script System | Tagged 10.15savvy NSDictionary NSString | Leave a comment

マウス充電用AppleScript

Posted on 3月 6, 2020 by Takaaki Naganoya

本Scriptはいつも書き捨てにするAppleScriptですが、使用頻度はそれなりに高いものです。

AppleのMagic Mouse 2を充電するには、裏返してLightningケーブルを挿す必要があります。

STEP1:コンピュータをスリープさせる
STEP2:マウスを裏返す
STEP3:ケーブルを挿して充電する

という手順になるわけですが、、、マウスを裏返した時点でボタンが押されたりして、充電できないケースが多々あります。

そこで、本Scriptをスクリプトエディタ上で実行して、10秒以内にマウスに充電ケーブルを挿すと、あとからコンピュータがスリープ。問題なくマウスを充電できます。

AppleScript名:マウス充電用Script
delay 10

tell application "System Events" to sleep

★Click Here to Open This Script 

Posted in How To System | Tagged 10.13savvy 10.14savvy 10.15savvy System Events | Leave a comment

Bundle IDで指定したアプリケーションを「隠す」

Posted on 2月 16, 2020 by Takaaki Naganoya

Bundle IDで指定したアプリケーションを隠すAppleScriptです。

アプリケーションの指定

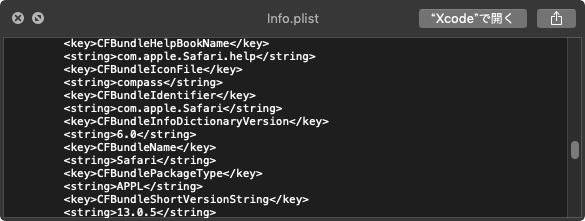
macOS上のアプリケーションは一意に判別できるID「Bundle ID」を持っています。このBundle IDは各アプリケーションのバンドル内のInfo.plistに書かれています。

アプリケーションの名称については、ローカライズ名称を指定できるので、英語環境、フランス語環境、日本語環境で異なるアプリケーション名がFinder上で見えるようにできるので、名称ではなくBundle IDで区別するのが一般的です。

言語環境ごとに名称が変わる代表的なアプリケーションには、「リマインダー」(本当の名称はReminders)、「メモ」(本当の名称はNotes)、「写真」(本当の名称はPhotos)などがあります。

アプリケーションプロセスの隠し方

各アプリケーションのアプリケーションメニューに「隠す」というメニュー項目があり、これを実行することで隠すことができます。AppleScriptからこれに該当する操作は、System Eventsに対して指定のアプリケーションプロセスの可視属性をfalseに設定するというものです。

野蛮かつ強引にメニューを操作するという方法(GUI Scripting)も使えますが、速度や信頼性の面でおすすめしません。

AppleScript名:指定アプリケーションプロセスを隠す(System Events)
—
–  Created by: Takaaki Naganoya
–  Created on: 2020/02/16
—
–  Copyright © 2020 Piyomaru Software, All Rights Reserved
—

set pRes to hideAProcessByBUndleID("com.apple.Safari") of me

–指定プロセスを隠す
on hideAProcessByBUndleID(aBundleID)
  tell application "System Events"
    set targProcList to every process whose bundle identifier is aBundleID
    
if targProcList = {} then return false
    
    
set targProc to first item of targProcList
    
tell targProc
      set visible to false
    end tell
  end tell
  
return true
end hideAProcessByBUndleID

★Click Here to Open This Script 

macOS 10.10以降では通常のAppleScriptでCocoaの機能が使えるようになったため、こうしたOS側の機能を用いてもよいでしょう。


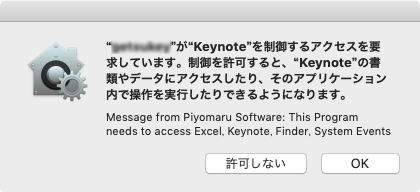
▲セキュリティダイアログの表示例

むしろ、macOS 10.14以降では各種アプリケーションへの初回命令時にはセキュリティ・ダイアログが表示されて止まるため、Cocoaの機能を利用できたほうがメリットが大きいといえるぐらいです。

AppleScript名:指定アプリケーションプロセスを隠す(Cocoa)
—
–  Created by: Takaaki Naganoya
–  Created on: 2020/02/16
—
–  Copyright © 2020 Piyomaru Software, All Rights Reserved
—
use AppleScript version "2.4"
use scripting additions
use framework "Foundation"
use framework "AppKit"

set pRes to hideAProcessByBUndleID("com.apple.Safari") of me

–指定プロセスを隠す
on hideAProcessByBUndleID(aBundleID)
  set appArray to current application’s NSRunningApplication’s runningApplicationsWithBundleIdentifier:aBundleID
  
if appArray’s |count|() > 0 then
    set appItem to appArray’s objectAtIndex:0
    
set aRes to (appItem’s hide()) as boolean
    
return aRes
  else
    return false
  end if
end hideAProcessByBUndleID

★Click Here to Open This Script 

Posted in System | Tagged 10.14savvy 10.15savvy NSArray NSRunningApplication System Events | Leave a comment

ディスプレイの輝度変更

Posted on 1月 5, 2020 by Takaaki Naganoya

ディスプレイの輝度変更を行うAppleScriptです。

AppleScriptにディスプレイの輝度変更を行う機能はないので、GUI Scripting経由で(画面上のGUI部品を野蛮に操作して)変更するか、あるいは「他の方法」を採用することになります。

本Scriptは「他の方法」をとってみたものです。画面の輝度変更については、そのようなニーズがあり、割とまともにOSに機能が実装されていることもあり、IOKitを呼び出して変更している例がいろいろ見つかります(Objective-Cとかで)。そういったものをFramework化してAppleScriptから呼び出すか、あるいはコマンドライン上で動作するプログラムをAppleScript内に入れて呼び出すか、といったところになります。

Github上で探し物をしてみたところ、nriley氏の「brightness」というツールがコマンドライン上から呼び出せるようになっており、AppleScriptのバンドル内に突っ込んで呼び出しやすそうでした。

そこで、実際にAppleScriptバンドル書類中に突っ込んで、いい感じに呼び出せるように最低限の機能を実装してみました。ディスプレイの接続数の確認(getDisplayNumber)、指定ディスプレイの現在の輝度確認(getBrightNess)、そして指定ディスプレイの輝度設定(setBrightNess)です。

–> Download displayBrightness.scptd (Script Bundle with brightness binary in its bundle)

ディスプレイ番号は1から始まるものとして扱っています。輝度は0.0〜1.0(1.0が一番明るい)までの値を指定します。

一応、brightnessユーティリティでは複数のディスプレイが接続された状態を前提に処理しているのですが、どうせ輝度変更ができるのはMacBook ProやiMacなどの内蔵ディスプレイだけです。外部接続したディスプレイの輝度は変更できません。

本Scriptのようなお気楽実装だと問題になってくるのが、

(1)デスクトップマシン(MacPro、Mac miniなど)で外部ディスプレイを接続していない(ヘッドレス運用)の場合への対処
(2)ノート機+iMac/iMac Proで、メインディスプレイを本体内蔵ディスプレイ「以外のもの」に指定している場合への対処
(3)ノート機で、Lid Closed Mode運用している(本体を閉じて外部ディスプレイをつないで使っている)状態への対処

などです。本Scriptはそこまで厳密な対応を行っていません。ただ、実用上はこのぐらいで問題はなさそうだ、という「割り切り」を行って手を抜いています。

各条件でテストを行って「使える」という確証が得られたら、sdef(AppleScript用語辞書)をつけたライブラリにでもするとよさそうです。

また、本Script中に同梱しているbrightnessツールの実行ファイルはNotarizationを通していないため、2020年2月3日を過ぎると10.15.2以降のmacOSで何らかのダイアログが出て実行をキャンセルされる可能性がありますが、正直なところmacOS 10.15.xは「バグが多すぎ」「実用性なし」と判断。macOS 10.15.xは自分としては「パス」するつもりなので、現時点において対処する必要性を感じません(仕事で納品するバイナリについては全力で対処しますが)。

AppleScript名:displayBrightness.scptd
—
–  Created by: Takaaki Naganoya
–  Created on: 2020/01/04
—
–  Copyright © 2020 Piyomaru Software, All Rights Reserved
—
use AppleScript version "2.4" — Yosemite (10.10) or later
use framework "Foundation"
use scripting additions

set dRes to getDisplayNumber() of me
–> 1

set bRes to getBrightNess(1) of me
–> 0.763672

set sRes to setBrightNess(1, 0.7) of me

on getDisplayNumber()
  set myPath to POSIX path of (path to me)
  
set cmdPath to myPath & "Contents/Resources/brightness"
  
set aRes to do shell script quoted form of cmdPath & " -l"
  
set pList to paragraphs of aRes
  
return (length of pList) div 2
end getDisplayNumber

on getBrightNess(displayNumber as integer)
  set dRes to getDisplayNumber() of me
  
if dRes < displayNumber then error "Your parameter is too large (" & "there is " & (dRes as string) & " display only)."
  
  
set targDispNumber to displayNumber – 1
  
set targString to "display " & (targDispNumber as string) & ": brightness "
  
  
set myPath to POSIX path of (path to me)
  
set cmdPath to myPath & "Contents/Resources/brightness"
  
set aRes to do shell script quoted form of cmdPath & " -l"
  
  
repeat with i in (paragraphs of aRes)
    set j to contents of i
    
if j begins with targString then
      set aOffset to offset of targString in j
      
set resStr to text (aOffset + (length of targString)) thru -1 of j
      
return resStr
    end if
  end repeat
  
  
error "Display’s brightness information is not present"
end getBrightNess

on setBrightNess(displayNumber as integer, targBrightnewss as real)
  set dRes to getDisplayNumber() of me
  
if dRes < displayNumber then error "Your parameter is too large (" & "there is " & (dRes as string) & " display only)."
  
  
set targDispNumber to displayNumber – 1
  
set targString to "display " & (targDispNumber as string) & ": brightness "
  
  
set myPath to POSIX path of (path to me)
  
set cmdPath to myPath & "Contents/Resources/brightness"
  
set aRes to do shell script quoted form of cmdPath & " -l"
  
  
set hitF to false
  
repeat with i in (paragraphs of aRes)
    set j to contents of i
    
if j begins with targString then
      set hitF to true
      
exit repeat
    end if
  end repeat
  
  
if hitF = false then error "There is no display (" & (displayNumber as string) & ")"
  
  
set bRes to do shell script quoted form of cmdPath & " " & (targBrightnewss as string)
  
  
set curBright to getBrightNess(displayNumber) of me
  
  
–結果を評価する
  
if (targBrightnewss as real) is not equal to (curBright as real) then
    return false
  else
    return true
  end if
end setBrightNess

★Click Here to Open This Script 

Posted in System | Tagged 10.12savvy 10.13savvy 10.14savvy 10.15savvy | Leave a comment

ダークモードの検出 v4

Posted on 12月 13, 2019 by Takaaki Naganoya

現在のアピアランスがDark ModeかLight Modeかを検出するAppleScriptです。macOS 10.14以降用です。

System Eventsに問い合わせれば簡単に確認できますが、アプレット内/Cocoa Application内でSystem Eventsを呼び出すとセキュリティダイアログが表示されてしまうので、このぐらいで表示されてしまうのは癪なので、Cocoaの機能を利用して検出してみました。

AppleScript名:ダークモードの検出 v4
—
–  Created by: Takaaki Naganoya
–  Created on: 2019/12/13
—
–  Copyright © 2019 Piyomaru Software, All Rights Reserved
—
use AppleScript version "2.7" — Mojave (10.14) or later
use framework "Foundation"
use scripting additions

set apRes to retLightOrDark() of me

on retLightOrDark()
  set curAppearance to ((current application’s NSAppearance)’s currentAppearance()’s |name|()) as string
  
set aDark to (current application’s NSAppearanceNameDarkAqua) as string
  
  
if curAppearance = aDark then
    return true
  else
    return false
  end if
end retLightOrDark

★Click Here to Open This Script 

System Eventsを使うとこんな感じになりますが、、、

AppleScript名:ダークモードの検出 v3
set apRes to retLightOrDark() of me

on retLightOrDark()
  tell application "System Events"
    tell appearance preferences
      return dark mode –returns true in dark mode
    end tell
  end tell
end retLightOrDark

★Click Here to Open This Script 

Posted in System | Tagged 10.14savvy 10.15savvy | 2 Comments

マウスカーソルの現在座標を取得する

Posted on 12月 12, 2019 by Takaaki Naganoya

マウスカーソルの現在座標を取得するAppleScriptです。

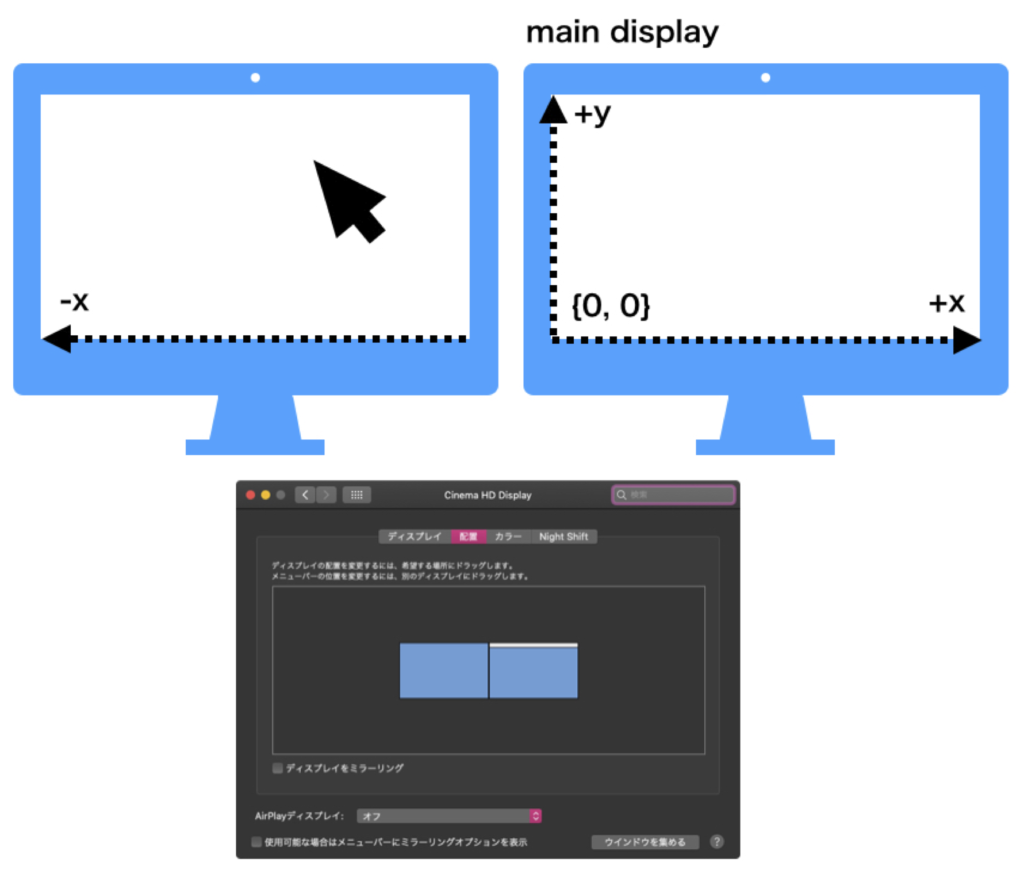
各種アプリケーションで座標系が微妙に(左上が原点だったり、左下が原点だったり)違いますが、Cocoaの座標系は左下が原点です。

# macOS 12からは左上が原点になるのだそうで

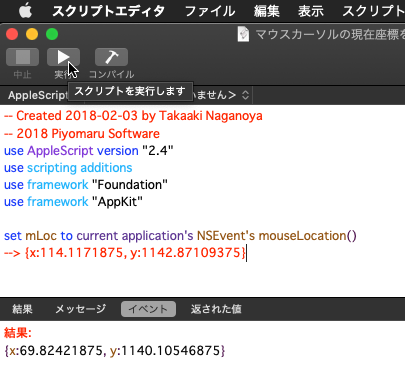
ただ、取得したところで何に使うかというあたりに疑問があります。そんなに使った記憶がありません。スクリプトエディタ上で本Scriptを実行した場合には、実行ボタンを押したときのマウスカーソルの座標が返ってきますし、Script Menuから実行した場合には、実行時のメニュー選択のマウスカーソルの座標が返ってくるだけです。

ちょっとひとひねりして、タイマー割り込みで定期的に取得したところで、何か意味のあるデータが取れるわけでもありません(ジェスチャー検出まで昇華できる気がまったくしない)。

逆に、マウスカーソルの座標の取得でどれだけ「いいこと」があるか教えてほしいもんです。

2021/5/22追記:
ついに、本処理が役立つ用途が見つかりました。「マウスカーソルが存在するディスプレイの内容だけスクリーンキャプチャを撮る」というものです。

ふつう、マルチディスプレイ環境でShift-Command-3のキーボードショートカットによるスクリーンキャプチャ撮影を行うと、それぞれのディスプレイごとに独立した画像ファイルが生成されます。

これが望ましい場合もあれば、そうでない場合もあるので……現在マウスカーソルが存在するディスプレイIDをマウスカーソルの座標値から計算し、マウスカーソルが存在するディスプレイのスクリーンショットのみ撮影するAppleScriptを書いて実行できました。Stream Deckのアクションから呼び出して、ワンボタンで実行できています。

このアクションはなかなか使い勝手がいいですし、本Scriptを書いておかなかったら気楽に実現することはできませんでした。

AppleScript名:マウスカーソルの現在座標を取得する
— Created 2018-02-03 by Takaaki Naganoya
— 2018 Piyomaru Software
use AppleScript version "2.4"
use scripting additions
use framework "Foundation"
use framework "AppKit"

set mLoc to current application’s NSEvent’s mouseLocation()
–> {x:114.1171875, y:1142.87109375}

★Click Here to Open This Script 

Posted in System | Tagged 10.12savvy 10.13savvy 10.14savvy 10.15savvy | Leave a comment

指定のフォントとサイズに該当するテキストを抽出する v3

Posted on 12月 1, 2019 by Takaaki Naganoya

指定のRTFファイルから書式情報を取得し、フォント名とフォントサイズのペアをスタイルを反映させたポップアップメニューで選択。RTFの内容を解析したのち、ダイアログが表示されます(ここの所要時間は読ませるRTFのサイズ次第)。ポップアップメニューで書式を選ぶと、すぐさま抽出した箇所をすべてまとめて表示します。

–> Watch Demo Movie

–> Download Script Bundle with Sample data

ダイアログ表示前に書式ごとの抽出を完了し、個別のTabViewに抽出後の文字データを展開しておくので、ポップアップメニューから選択すると、展開ずみのデータを入れてあるTabViewに表示を切り替えるだけ。切り替え時に計算は行わないため、すぐに抽出ずみの文字データが表示されるという寸法です。

今回は短いサンプルデータを処理してみましたが、サンプル抽出時にあらかじめ範囲指定するなどして、データ処理規模を限定することで処理時間を稼ぐこともできることでしょう。

テキストエディットでオープン中のRTF書類のパスを取得して、それを処理対象にしてもいいでしょう。

ただし、やっつけで作ったのでスクリプトエディタ上でCommand-Control-Rで実行しないと動きません(メインスレッド実行をプログラムで強制しても、途中でクラッシュしてしまいます)。それほど時間もかけずに作ったやっつけプログラムなので、あまり原因追求も行えずそのままです。

AppleScript名:アラートダイアログ+Tab View v3.scptd
—
–  Created by: Takaaki Naganoya
–  Created on: 2019/09/16
—
–  Copyright © 2019 Piyomaru Software, All Rights Reserved
—
use AppleScript version "2.4"
use scripting additions
use framework "Foundation"
use framework "AppKit"
use rtfLib : script "readStyledTextLib"
use parseLib : script "parseAttrLib"

property NSFont : a reference to current application’s NSFont
property NSView : a reference to current application’s NSView
property NSAlert : a reference to current application’s NSAlert
property NSColor : a reference to current application’s NSColor
property NSMenu : a reference to current application’s NSMenu
property NSArray : a reference to current application’s NSArray
property NSTabView : a reference to current application’s NSTabView
property NSPredicate : a reference to current application’s NSPredicate
property NSTextView : a reference to current application’s NSTextView
property NSMenuItem : a reference to current application’s NSMenuItem
property NSTabViewItem : a reference to current application’s NSTabViewItem
property NSPopUpButton : a reference to current application’s NSPopUpButton
property NSMutableDictionary : a reference to current application’s NSMutableDictionary
property NSRunningApplication : a reference to current application’s NSRunningApplication
property NSFontAttributeName : a reference to current application’s NSFontAttributeName
property NSKernAttributeName : a reference to current application’s NSKernAttributeName
property NSLigatureAttributeName : a reference to current application’s NSLigatureAttributeName
property NSMutableAttributedString : a reference to current application’s NSMutableAttributedString
property NSStrokeWidthAttributeName : a reference to current application’s NSStrokeWidthAttributeName
property NSUnderlineStyleAttributeName : a reference to current application’s NSUnderlineStyleAttributeName
property NSForegroundColorAttributeName : a reference to current application’s NSForegroundColorAttributeName

property TabPosition : 4 —0=Top, 1=Left, 2=Bottom, 3=Right, 4=None

property returnCode : 0

property aTabV : missing value
property selectedNum : {}

set aFile to choose file of type {"public.rtf"}

set aStyledStr to readRTFfile(aFile) of rtfLib
set paramObj to {myMessage:"Select Style", mySubMessage:"Select style you want to filter", viewWidth:800, viewHeight:400, myStyledStr:aStyledStr}

my dispTabViewWithAlertdialog:paramObj –for debug
–my performSelectorOnMainThread:"dispTabViewWithAlertdialog:" withObject:paramObj waitUntilDone:true
return selectedNum

on dispTabViewWithAlertdialog:paramObj
  –Receive Parameters
  
set aMainMes to (myMessage of paramObj) as string –Main Message
  
set aSubMes to (mySubMessage of paramObj) as string –Sub Message
  
set aWidth to (viewWidth of paramObj) as integer –TextView width
  
set aHeight to (viewHeight of paramObj) as integer –TextView height
  
set aStyledStr to (myStyledStr of paramObj)
  
  
set attrResTmp to getAttributeRunsFromAttrString(aStyledStr) of parseLib
  
set attrList to attributes of attrResTmp
  
set menuStyle to menuList of attrResTmp
  
  
set selectedNum to {}
  
  
set aView to NSView’s alloc()’s initWithFrame:(current application’s NSMakeRect(0, 0, aWidth, aHeight))
  
  
–Ppopup Buttonをつくる
  
set a1Button to NSPopUpButton’s alloc()’s initWithFrame:(current application’s NSMakeRect(0, aHeight – 20, 400, 20)) pullsDown:false
  
a1Button’s removeAllItems()
  
  
–WYSIWHG popup menuをつくる
  
set a1Menu to NSMenu’s alloc()’s init()
  
repeat with i from 1 to (length of menuStyle)
    set {tmpFont, tmpSize} to contents of item i of menuStyle
    
set aTitle to (tmpFont & " " & tmpSize as string) & " point"
    
set aMenuItem to (NSMenuItem’s alloc()’s initWithTitle:aTitle action:"actionHandler:" keyEquivalent:"")
    
    
set attributedTitle to makeRTFfromParameters(aTitle, tmpFont, tmpSize, NSColor’s blackColor()) of me
    
    (
aMenuItem’s setEnabled:true)
    (
aMenuItem’s setTarget:me)
    (
aMenuItem’s setTag:(i as string))
    (
aMenuItem’s setAttributedTitle:(attributedTitle))
    (
a1Menu’s addItem:aMenuItem)
  end repeat
  
  
–Ppopup Buttonにmenuをつける
  
a1Button’s setMenu:a1Menu
  
  
–Make Tab View
  
set aTabV to NSTabView’s alloc()’s initWithFrame:(current application’s NSMakeRect(0, 0, aWidth, aHeight – 30))
  
aTabV’s setTabViewType:(TabPosition)


–TabViewに中身を入れる
  
repeat with i from 1 to (length of menuStyle)
    set {tmpFont, tmpSize} to contents of item i of menuStyle
    
set tmpKey to (tmpFont as string) & "/" & (tmpSize as string)
    
set tmpArry to filterRecListByLabel1(attrList, "styleKey2 == ’" & tmpKey & "’") of me
    
set tmpStr to (tmpArry’s valueForKeyPath:"stringVal") as list
    
    
set aTVItem to (NSTabViewItem’s alloc()’s initWithIdentifier:(i as string))
    (
aTVItem’s setLabel:(i as string))


set aTextView to (NSTextView’s alloc()’s initWithFrame:(current application’s NSMakeRect(0, 0, aWidth – 10, aHeight – 10)))
    (
aTextView’s setRichText:true)
    
set tmpAttr to makeRTFfromParameters(tmpStr as string, tmpFont, tmpSize, NSColor’s blackColor()) of me
    (
aTextView’s textStorage()’s appendAttributedString:tmpAttr)
    
    (
aTVItem’s setView:aTextView)
    
    (
aTabV’s addTabViewItem:aTVItem)
  end repeat


aView’s setSubviews:{a1Button, aTabV}
  
aView’s setNeedsDisplay:true


— set up alert
  
set theAlert to NSAlert’s alloc()’s init()
  
tell theAlert
    –for Messages
    
its setMessageText:(aMainMes)
    
its setInformativeText:(aSubMes)
    
    
–for Buttons
    
its addButtonWithTitle:"OK"
    
its addButtonWithTitle:"Cancel"
    
    
–Add Accessory View
    
its setAccessoryView:(aView)
    
    
–for Help Button
    
its setShowsHelp:(true)
    
its setDelegate:(me)
  end tell


— show alert in modal loop
  
NSRunningApplication’s currentApplication()’s activateWithOptions:0
  
my performSelectorOnMainThread:"doModal:" withObject:(theAlert) waitUntilDone:true
  
if (my returnCode as number) = 1001 then error number -128
  
  
set selectedNum to contents of item ((a1Button’s indexOfSelectedItem()) + 1) of menuStyle
end dispTabViewWithAlertdialog:

on doModal:aParam
  set (my returnCode) to aParam’s runModal()
end doModal:

on alertShowHelp:aNotification
  display dialog "Help Me!" buttons {"OK"} default button 1 with icon 1
  
return false –trueを返すと親ウィンドウ(アラートダイアログ)がクローズする
end alertShowHelp:

–Popup Action Handler
on actionHandler:sender
  set aTag to tag of sender as integer
  
aTabV’s selectTabViewItemAtIndex:(aTag – 1)
end actionHandler:

–書式つきテキストを組み立てる
on makeRTFfromParameters(aStr as string, aFontName as string, aFontSize as real, aColor)
  –フォント
  
set aVal1 to NSFont’s fontWithName:(aFontName) |size|:aFontSize
  
set aKey1 to (NSFontAttributeName)
  
  
–色
  
set aVal2 to aColor
  
set aKey2 to (NSForegroundColorAttributeName)
  
  
–カーニング
  
set aVal3 to 0.0
  
set akey3 to (NSKernAttributeName)
  
  
–アンダーライン
  
set aVal4 to 0
  
set akey4 to (NSUnderlineStyleAttributeName)
  
  
–リガチャ
  
–set aVal5 to 2 –全てのリガチャを有効にする
  
–set akey5 to ( NSLigatureAttributeName)
  
  
–枠線(アウトライン)
  
–set aVal6 to outlineNum
  
–set akey6 to ( NSStrokeWidthAttributeName)


set keyList to {aKey1, aKey2, akey3, akey4}
  
set valList to {aVal1, aVal2, aVal3, aVal4}
  
set attrsDictionary to NSMutableDictionary’s dictionaryWithObjects:valList forKeys:keyList
  
  
set attrStr to NSMutableAttributedString’s alloc()’s initWithString:aStr attributes:attrsDictionary
  
return attrStr
end makeRTFfromParameters

–リストに入れたレコードを、指定の属性ラベルの値で抽出
on filterRecListByLabel1(aRecList as list, aPredicate as string)
  set aArray to NSArray’s arrayWithArray:aRecList
  
set aPredicate to NSPredicate’s predicateWithFormat:aPredicate
  
set filteredArray to aArray’s filteredArrayUsingPredicate:aPredicate
  
set bList to filteredArray
  
return bList
end filterRecListByLabel1

★Click Here to Open This Script 

Posted in Color dialog Font GUI Require Control-Command-R to run RTF | Tagged 10.14savvy 10.15savvy NSAlert NSArray NSColor NSFont NSFontAttributeName NSForegroundColorAttributeName NSKernAttributeName NSLigatureAttributeName NSMenu NSMenuItem NSMutableAttributedString NSMutableDictionary NSPopUpButton NSPredicate NSRunningApplication NSStrokeWidthAttributeName NSTabView NSTabViewItem NSTextView NSUnderlineStyleAttributeName NSView | 1 Comment

テキストエディットで指定のフォントとサイズに該当するテキストを抽出する

Posted on 11月 22, 2019 by Takaaki Naganoya

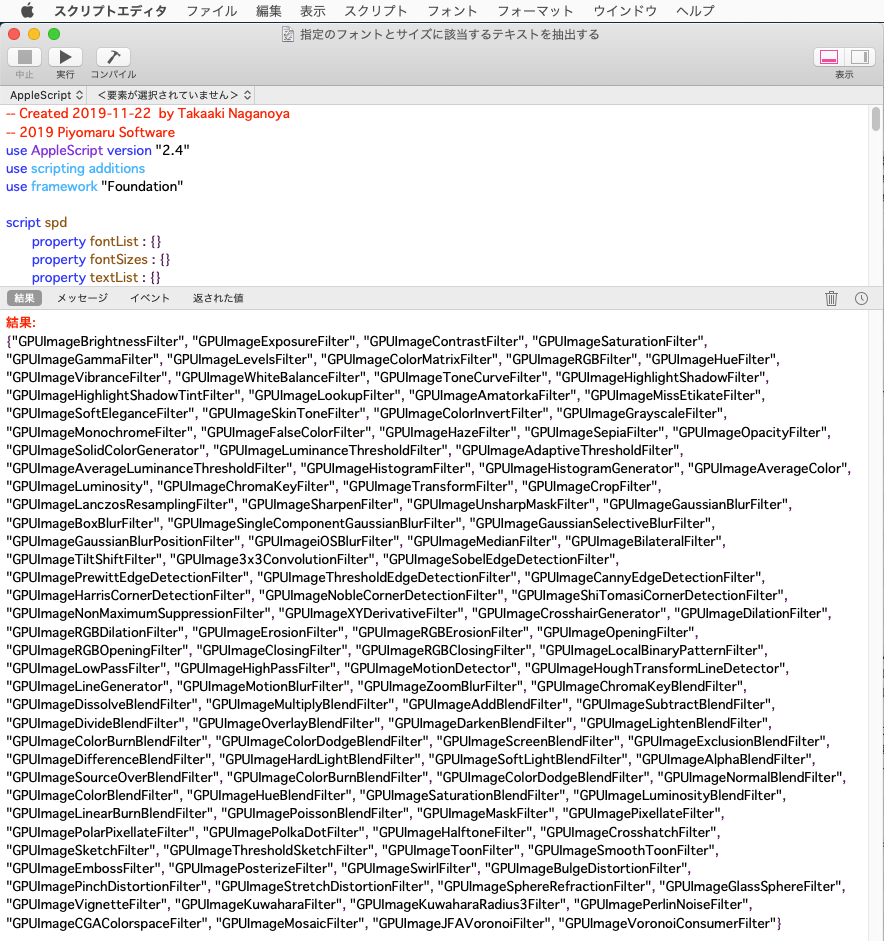
macOS標準搭載のテキストエディタ、「テキストエディット」(TextEdit)をコントロールして、最前面のウィンドウの書類から、指定のフォント名とサイズに該当するテキストを抽出するAppleScriptです。

テキストエディットはApple純正のアプリケーションの割にはAppleScriptサポート機能がよくできていて、選択範囲(selection)を取得できないことをのぞけば、けっこう使えます。

テキストエディットのAppleScript系の機能で最も重要なものは、書類からの書式取得機能(attribute run)です。


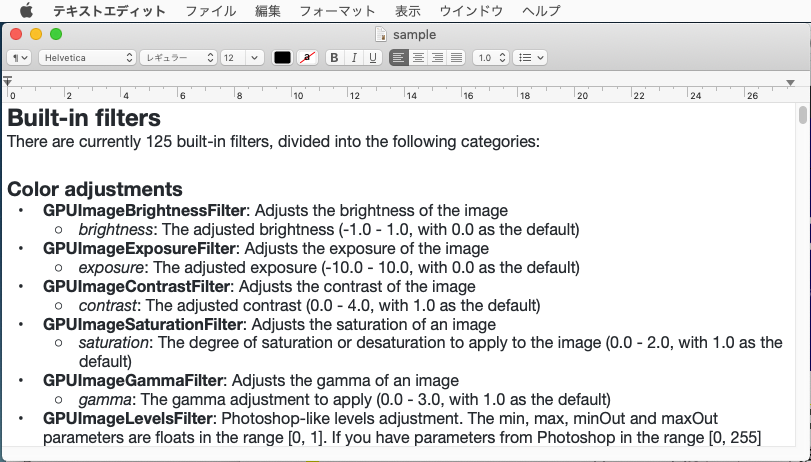
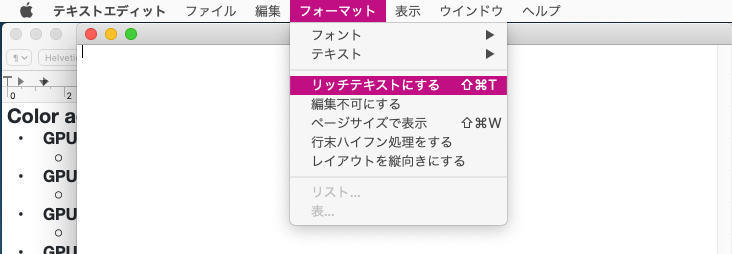
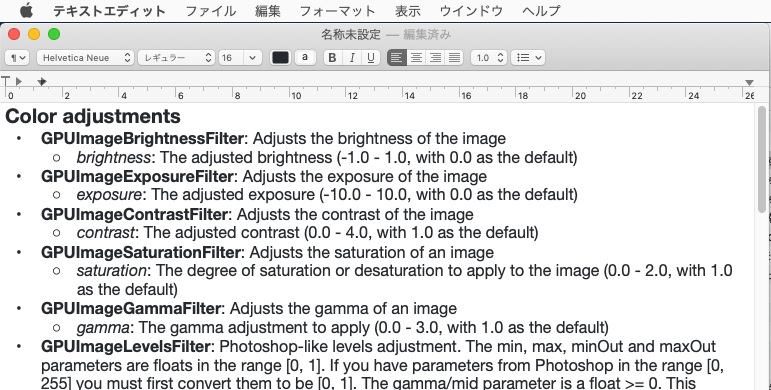
▲最前面の書類がリッチテキストフォーマットになっている必要があります


▲Github上のGPUImageのフィルタ紹介文からコピペしてきた文章


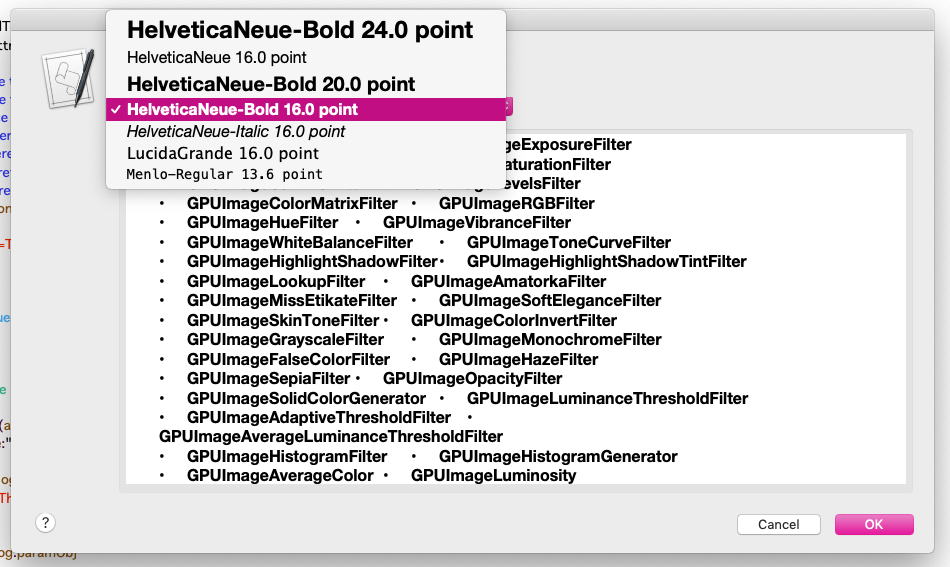
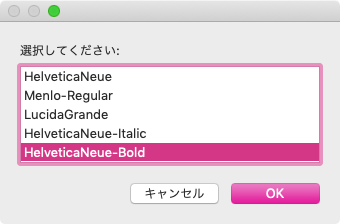
▲この書類のこのレベルの見出しだけを抽出したい場合にはHelvetica Neue Bold 20pointを指定


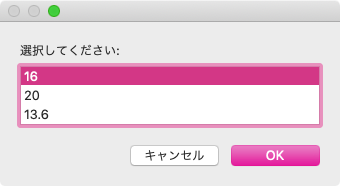
▲この書類のこのレベルの見出しだけを抽出したい場合にはHelvetica Neue Bold 16pointを指定

Webブラウザなどからコピペしてきたスタイル付きテキストから、特定のフォントや文字サイズの箇所を抽出したい場合に使います。

実行すると、リッチテキストで使用されているフォント名とサイズの一覧を生成し、ダイアログでフォント名の選択、

そして、文字サイズの選択を実行。

すると、該当箇所のみ抽出して返します。さらに改行で区切ったテキストに変換するとかいった処理を行なってもよいでしょう。

RTFのファイルを処理するのであれば、テキストエディットを使わなくてもCocoaの機能を用いて同様の処理を行えますが、割と書き捨てレベルの瑣末なScriptなのでテキストエディット経由で書式情報を取得するように組んでみました。

AppleScript名:指定のフォントとサイズに該当するテキストを抽出する
— Created 2019-11-22 by Takaaki Naganoya
— 2019 Piyomaru Software
use AppleScript version "2.4"
use scripting additions
use framework "Foundation"

script spd
  property fontList : {}
  
property fontSizes : {}
  
property textList : {}
  
property outList : {}
end script

set (outList of spd) to {}
set (fontList of spd) to {}
set (fontSizes of spd) to {}
set (textList of spd) to {}

–TextEdit書類から書式情報を根こそぎ取得
tell application "TextEdit"
  tell text of front document
    set (fontList of spd) to font of every attribute run –フォント名
    
set (fontSizes of spd) to size of every attribute run –文字サイズ
    
set (textList of spd) to character of every attribute run –文字
  end tell
end tell

–取得したフォント名一覧から重複部分を除去してどれを対象にするかユーザーに問い合わせ
set fRes to uniquify1DList((fontList of spd), true) of me
set targFont to choose from list fRes
set aFont to contents of first item of targFont

–取得したフォントサイズ一覧から重複部分を除去してどれを対象にするかユーザーに問い合わせ
set sRes to uniquify1DList((fontSizes of spd), true) of me
set targSize to choose from list sRes
set aSize to contents of first item of targSize

–取得した条件にもとづいて、根こそぎ取得した書式と照合を行いつつループ
repeat with i from 1 to length of (fontList of spd)
  set tmpFont to contents of item i of (fontList of spd)
  
set tmpSize to contents of item i of (fontSizes of spd)
  
  
–文字サイズをざっくり判定することで「大、中、小」といったおおまかな切り分けも可能
  
if {tmpFont, tmpSize} = {aFont, aSize} then
    set tmpCon to (contents of item i of (textList of spd)) as string
    
if tmpCon does not contain "•" then –ごみ取り
      set the end of (outList of spd) to tmpCon
    end if
  end if
end repeat

return (outList of spd)

–1D/2D Listをユニーク化
on uniquify1DList(theList as list, aBool as boolean)
  set aArray to current application’s NSArray’s arrayWithArray:theList
  
set bArray to aArray’s valueForKeyPath:"@distinctUnionOfObjects.self"
  
if aBool = true then
    return bArray as list
  else
    return bArray
  end if
end uniquify1DList

★Click Here to Open This Script 

Posted in Font list RTF Text | Tagged 10.13savvy 10.14savvy 10.15savvy NSArray TextEdit | Leave a comment

再帰でKeynote書類上のフォントを置換する(グループ対応)

Posted on 11月 16, 2019 by Takaaki Naganoya

macOS 10.15でバンドルされなくなった「ヒラギノ角ゴProN W3」「ヒラギノ角ゴProN W6」がKeynote書類中に指定されていたら、それぞれ「ヒラギノ角ゴシック W3」「ヒラギノ角ゴシック W6」に置換するAppleScriptです。

現在オープン中の最前面のKeynote書類を走査して、全スライド中のオブジェクトの内容を取得し、text item、shape、table中に指定されているフォントを置換するようになっています。また、group化されたこれらのオブジェクトを再帰で取得するようになっています。

ただし、グラフ(chart)中の文字のフォントについてはAppleScriptからアクセスできないため、フォントの置換は行えません。このあたりでミソがついて、完全自動でヒラギノ角ゴProNを置換できるわけではないので、少々残念(KeynoteのAppleScript用語辞書の仕様の問題)な結果に。

また、別にこれらのフォントを置換しなくても実害はないので、置換しても単に気分の問題だけでしょう。

AppleScript名:再帰でKeynote書類上のフォントを置換する(グループ対応)
— Created 2019-11-14 by Takaaki Naganoya
— 2019 Piyomaru Software
use AppleScript version "2.4"
use scripting additions
use framework "Foundation"

property allText : {}
property allShape : {}
property allTable : {}

set searchFont to {"HiraKakuProN-W6", "HiraKakuProN-W3"}

tell application "Keynote"
  tell front document
    set sCount to count every slide
    
    
repeat with ii from 1 to sCount
      set current slide to slide ii
      
      
tell current slide
        getEveryTextAndShapes() of me
        
        
–Text Item、Shapeのフォント置換ループ
        
set tList to allText & allShape
        
        
repeat with i in tList
          set aClass to class of i
          
–if aClass is not equal to default title item then
          
set aFont to font of object text of i
          
set aText to (object text of i)
          
if aFont is in searchFont and aText is not equal to "" then
            if aFont ends with "-W6" then
              set font of object text of i to "HiraginoSans-W6"
            else if aFont ends with "-W3" then
              set font of object text of i to "HiraginoSans-W3"
            end if
          end if
          
–end if
        end repeat


–Table内の全セルのフォント置換ループ
        
repeat with iii in allTable
          tell iii
            set cList to every cell
            
            
repeat with i in cList –Loop by cells
              set aFont to font name of i
              
set aText to (value of i)
              
              
if aFont is in searchFont then
                if aFont ends with "-W6" then
                  set font name of i to "HiraginoSans-W6"
                else if aFont ends with "-W3" then
                  set font name of i to "HiraginoSans-W3"
                end if
              end if
              
            end repeat
          end tell
        end repeat
        
        
      end tell
    end repeat
  end tell
end tell

on getEveryTextAndShapes()
  set allText to {}
  
set allShape to {}
  
set allTable to {}
  
  
tell application "Keynote"
    tell front document
      tell current slide
        set gList to every group
        
        
set i1List to every text item
        
set i2List to every shape
        
set i3List to every table
        
        
if i1List is not equal to {} then set allText to allText & i1List
        
if i2List is not equal to {} then set allShape to allShape & i2List
        
if i3List is not equal to {} then set allTable to allTable & i3List
        
        
prepareGroup(gList) of me
        
      end tell
    end tell
  end tell
end getEveryTextAndShapes

–Dig into groups by recursive call
on prepareGroup(gList)
  tell application "Keynote"
    tell front document
      tell current slide
        repeat with i in gList
          tell i
            set g2List to every group
            
            
set i1List to every text item
            
set i2List to every shape
            
set i3List to every table
            
            
if i1List is not equal to {} then set allText to allText & i1List
            
if i2List is not equal to {} then set allShape to allShape & i2List
            
if i3List is not equal to {} then set allTable to allTable & i3List
            
            
prepareGroup(g2List) of me
          end tell
        end repeat
      end tell
    end tell
  end tell
end prepareGroup

★Click Here to Open This Script 

Posted in Font recursive call | Tagged 10.15savvy Keynote | Leave a comment

指定アプリケーション内の現在のLocaleの指定stringsファイル内の指定キーの値を取得する

Posted on 11月 16, 2019 by Takaaki Naganoya

Bundle IDで指定したアプリケーションのバンドル中(/Contents/Resources/)の現在のLocalizationに存在する指定のstringsファイル内で、指定キーの値を取得するAppleScriptです。

アプリケーションバンドル内の各ローカライズフォルダの名称は一意に決定されているものでもなく、ある程度の「ゆらぎ」が生じています。

/Contents/Resources/Japanese.lproj/
/Contents/Resources/ja.lproj/

NSLocaleからcurrentLocale()を取得すると、「ja-JP」のような識別子が得られます。これと上記のパターンのフォルダとの付け合わせのためのメソッドがどこかに存在しているはずなのですが、現状では見つけられていません(ないと各アプリケーションが正しくメニュー表示できていないので)。

まだいまひとつ、しっくりきていません。

AppleScript名:指定アプリケーション内の現在のLocaleの指定stringsファイル内の指定キーの値を取得する.scptd
—
–  Created by: Takaaki Naganoya
–  Created on: 2019/11/15
—
–  Copyright © 2019 Piyomaru Software, All Rights Reserved
—
use AppleScript version "2.5"
use scripting additions
use framework "Foundation"
use framework "AppKit"

property |NSURL| : a reference to current application’s |NSURL|
property NSBundle : a reference to current application’s NSBundle
property NSDictionary : a reference to current application’s NSDictionary
property NSWorkspace : a reference to current application’s NSWorkspace
property NSFileManager : a reference to current application’s NSFileManager
property NSLocaleCountryCode : a reference to current application’s NSLocaleCountryCode
property NSLocaleLanguageCode : a reference to current application’s NSLocaleLanguageCode
property NSLocaleCollatorIdentifier : a reference to current application’s NSLocaleCollatorIdentifier

set targID to "com.apple.iWork.Keynote"
set targFile to "Keynote" –"Keynote.strings" file
set targKey to "Arrange"
set vStr to getAValInASpecifiedStringFileOfAllLocaleInABundle(targID, targFile, targKey) of me
–> "配置"

on getAValInASpecifiedStringFileOfAllLocaleInABundle(targID, targFile, targKey)
  set aPath to retPathFromBundleID(targID) of me
  
  
set aURL to (|NSURL|’s fileURLWithPath:aPath)
  
set aBundle to NSBundle’s bundleWithURL:aURL
  
  
set aLocale to (current application’s NSLocale’s preferredLanguages()’s firstObject()) as string
  
  
set curLocale to current application’s NSLocale’s currentLocale()
  
set aDS11 to (curLocale’s objectForKey:(NSLocaleLanguageCode)) as string
  
set aDS12 to (curLocale’s objectForKey:(NSLocaleCountryCode)) as string
  
set aDS5 to (curLocale’s objectForKey:(NSLocaleCollatorIdentifier)) as string
  
–set bID to (current application’s NSBundle’s mainBundle()’s preferredLocalizations()’s firstObject()) as string
  
  
set langIDList to {aDS11, aLocale, aDS12, aDS5} –> {"ja", "ja-JP", "JP", "ja-JP"}
  
  
repeat with i in langIDList
    set j to contents of i
    
set aRes to (aBundle’s pathForResource:targFile ofType:"strings" inDirectory:"" forLocalization:(j))
    
set aDict to (NSDictionary’s alloc()’s initWithContentsOfFile:aRes)
    
if aDict is not equal to missing value then
      set aVal to (aDict’s valueForKeyPath:(targKey))
      
if aVal is not equal to missing value then
        return aVal as string
      end if
    end if
  end repeat
  
  
return false
end getAValInASpecifiedStringFileOfAllLocaleInABundle

on getLocalizationsFromBundleID(aBundleID)
  set aRes to retPathFromBundleID(aBundleID) of me
  
if aRes = false then error "Wrong Bundle ID."
  
return getSpecifiedAppFilesLocalizationListWithDuplication(aRes) of me
end getLocalizationsFromBundleID

–指定アプリケーションファイルの、指定Localeにおけるローカライズ言語リストを求める。重複を許容
on getSpecifiedAppFilesLocalizationListWithDuplication(appPOSIXpath)
  set aURL to (|NSURL|’s fileURLWithPath:appPOSIXpath)
  
set aBundle to NSBundle’s bundleWithURL:aURL
  
set locList to aBundle’s localizations()
  
return locList as list
end getSpecifiedAppFilesLocalizationListWithDuplication

on retPathFromBundleID(aBundleID)
  set aURL to NSWorkspace’s sharedWorkspace()’s URLForApplicationWithBundleIdentifier:aBundleID
  
if aURL = missing value then return false –Error
  
return aURL’s |path|() as string
end retPathFromBundleID

★Click Here to Open This Script 

Posted in list System Text URL | Tagged 10.12savvy 10.13savvy 10.14savvy 10.15savvy NSBundle NSDictionary NSFileManager NSLocaleCollatorIdentifier NSLocaleCountryCode NSLocaleLanguageCode NSURL NSWorkspace | 2 Comments

指定アプリケーション内の全Localeの指定stringsファイル内の指定キーの値を取得する

Posted on 11月 13, 2019 by Takaaki Naganoya

Bundle IDで指定したアプリケーションのバンドル中(/Contents/Resources/)のすべてのLocalizationに存在する指定のstringsファイル内で、指定キーの値を取得するAppleScriptです。

macOSの日本語環境では、Finder上でコピーしたファイルのファイル名の後方に「のコピー」といった文字列が追記されますが、他のLocaleでどのような文字列が使用されているか調査するために作成したものです。

AppleScript名:指定アプリケーション内の全Localeの指定stringsファイル内の指定キーの値を取得する.scptd
—
–  Created by: Takaaki Naganoya
–  Created on: 2019/11/12
—
–  Copyright © 2019 Piyomaru Software, All Rights Reserved
—
use AppleScript version "2.5"
use scripting additions
use framework "Foundation"

property |NSURL| : a reference to current application’s |NSURL|
property NSArray : a reference to current application’s NSArray
property NSBundle : a reference to current application’s NSBundle
property NSPredicate : a reference to current application’s NSPredicate
property NSDictionary : a reference to current application’s NSDictionary
property NSWorkspace : a reference to current application’s NSWorkspace
property NSFileManager : a reference to current application’s NSFileManager
property NSMutableDictionary : a reference to current application’s NSMutableDictionary
property NSURLTypeIdentifierKey : a reference to current application’s NSURLTypeIdentifierKey

set targID to "com.apple.Finder"
set targFile to "Localizable.strings"
set targKey to "N4_V2"
set vList to getAValInASpecifiedStringFileOfAllLocaleInABundle(targID, targFile, targKey) of me
–> {{"he", "עותק של ^=1 ^=0"}, {"en_AU", "^=1 copy ^=0"}, {"ar", "نسخة ^=0 من ^=1"}, {"el", "^=1 αντίγραφο ^=0"}, {"uk", "^=1 копія ^=0"}, {"English", "^=1 copy ^=0"}, {"es_419", "Copia de ^=1 ^=0"}, {"zh_CN", "^=1的副本 ^=0"}, {"Dutch", "^=1 kopie ^=0"}, {"da", "^=1-kopi ^=0"}, {"sk", "^=1 – kópia ^=0"}, {"pt_PT", "^=1 – cópia ^=0"}, {"German", "^=1 Kopie ^=0"}, {"ms", "salinan ^=0 ^=1"}, {"sv", "^=1 (kopia ^=0)"}, {"cs", "^=1 (kopie ^=0)"}, {"ko", "^=1 복사본 ^=0"}, {"no", "^=1-kopi ^=0"}, {"hu", "^=1 másolat ^=0"}, {"zh_HK", "^=1 副本 ^=0"}, {"Spanish", "^=1 copia ^=0"}, {"tr", "^=1 kopyası ^=0"}, {"pl", "^=1-kopia ^=0"}, {"zh_TW", "^=1 拷貝 ^=0"}, {"en_GB", "^=1 copy ^=0"}, {"French", "^=1 copie ^=0"}, {"vi", "Bản sao ^=1 ^=0"}, {"ru", "^=1 — копия ^=0"}, {"fr_CA", "^=1 copie ^=0"}, {"fi", "^=1 kopio ^=0"}, {"id", "Salinan ^=1 ^=0"}, {"th", "^=1 สำเนา ^=0"}, {"pt", "^=1 – cópia ^=0"}, {"ro", "^=1 – copie ^=0"}, {"Japanese", "^=1のコピー^=0"}, {"hr", "^=1 kopija ^=0"}, {"hi", "^=1 कॉपी ^=0"}, {"Italian", "^=1 copia ^=0"}, {"ca", "^=1 còpia ^=0"}}

on getAValInASpecifiedStringFileOfAllLocaleInABundle(targID, targFile, targKey)
  –Get App Path
  
set aPath to retPathFromBundleID(targID) of me
  
  
–Get all Localizations
  
set bRes to getLocalizationsFromBundleID(targID) of me
  
  
set hitList to {}
  
  
–Loop with Localizations in an application bundle
  
repeat with iii in bRes
    set jjj to contents of iii
    
set allPath to aPath & "/Contents/Resources/" & jjj & ".lproj/" & targFile
    
set aDict to (NSDictionary’s alloc()’s initWithContentsOfFile:allPath)
    
if aDict is not equal to missing value then
      set aVal to (aDict’s valueForKeyPath:(targKey))
      
if aVal is not equal to missing value then
        set the end of hitList to {jjj, aVal as string}
      end if
    end if
  end repeat
  
  
return hitList
end getAValInASpecifiedStringFileOfAllLocaleInABundle

on getLocalizationsFromBundleID(aBundleID)
  set aRes to retPathFromBundleID(aBundleID) of me
  
if aRes = false then error "Wrong Bundle ID."
  
return getSpecifiedAppFilesLocalizationListWithDuplication(aRes) of me
end getLocalizationsFromBundleID

–指定アプリケーションファイルの、指定Localeにおけるローカライズ言語リストを求める。重複を許容
on getSpecifiedAppFilesLocalizationListWithDuplication(appPOSIXpath)
  set aURL to (|NSURL|’s fileURLWithPath:appPOSIXpath)
  
set aBundle to NSBundle’s bundleWithURL:aURL
  
set locList to aBundle’s localizations()
  
return locList as list
end getSpecifiedAppFilesLocalizationListWithDuplication

on retPathFromBundleID(aBundleID)
  set aURL to NSWorkspace’s sharedWorkspace()’s URLForApplicationWithBundleIdentifier:aBundleID
  
if aURL = missing value then return false –Error
  
return aURL’s |path|() as string
end retPathFromBundleID

★Click Here to Open This Script 

Posted in System Text | Tagged 10.12savvy 10.13savvy 10.14savvy 10.15savvy Finder NSArray NSBundle NSDictionary NSFileManager NSMutableDictionary NSPredicate NSURL NSURLTypeIdentifierKey NSWorkspace | Leave a comment

CotEditorのScript集、PowerPack & Basic Packをv2.0にアップデート

Posted on 10月 27, 2019 by Takaaki Naganoya

CotEditorの関連ScriptをまとめたScript Pack v2.0の配布を開始しました。無償、無保証、サポートなしで提供しています。CotEditor 3.8+macOS 10.14/10.15にて検証を行っています。

–> Download Page

基礎的なサンプルScriptの「Basic Pack」、強力なユーティリティScriptの「PowerPack」から構成され、今回アップデートしたのはPowerPackです。

PowerPackはCotEditorのScript Folder(~/Library/Application Scripts/com.coteditor.CotEditor)に入れればCotEditorのScript Menuに表示され、実行できるようになります。

Script Menuから実行すると、メニューバーにScript実行中のインジケーターが表示されます。

途中で停止したい場合には、⚙アイコンをクリックして表示されるメニューの×印ボタンをクリックすると、

実行がキャンセルされます。

さらに強化されたツールScript群:PowerPack

CotEditorのスクリプトメニューにインストールして使うためのScript群です。最大のアップデート内容は、メニュー内容の増加で見にくかった箇所を整理した点です。メニューにセパレータを入れて、おおまかな区分けを整理しています。v1.2で新規追加のScriptをわかりやすくしようと試みていましたが、メニュー内容が見にくくなったので廃止しました。


▲バージョンアップしてだんだんメニューが整理されてきました

アップデートしたものをご紹介いたします。

カウントレポート

「👀🔭🧼選択中のテキストの文字の種別ごとの構成比」を追加しました。長い文章の文字種判定を実行すると時間がかかるので、選択範囲のみ判定できるようにしたものです

🍎📜AppleScriptとして解釈


「📜AppleScript書類を読み込み、📄新規書類に展開」バンドル形式ではないAppleScript書類のソースコードを、CotEditorの新規書類に読み込みます
「📜🧼選択範囲をapplescript schemeの🌐URLに💙encodeして📄新規書類に展開」CotEditor上で編集中のAppleScriptの選択範囲をURLエンコードして、CotEditor新規書類に展開します

🧼🧼選択範囲を処理


「1️⃣2️⃣3️⃣行頭に番号を振る」選択中の行の先頭に連番を振ります
「🔄❎すべて❌伏せ字に」選択範囲の文字をすべて伏せ字にします
「🔄❎⚙️🇯🇵簡易日本語形態素解析📚してそれっぽく❌伏せ字に」選択範囲の日本語テキストを簡易形態素解析してそれっぽく伏せ字にします
「🔄❎⚙️🇬🇧英語簡易形態素解析📚してそれっぽく❌伏せ字に」同じく、選択範囲の英語のテキストをパースしてそれっぽく伏せ字にします(前置詞やbe動詞などを残してあとは伏せ字に)。まだ仕上がりがいまひとつです
「🔄✴️行頭にナカグロ(・)を入れる(箇条書き時の整形)」選択範囲の行頭にナカグロ(・)を入れます
「🔄✴️行頭のナカグロ(・)を削除する」行頭のナカグロ文字だけ削除します
「🔜⬇️行単位ソート(A→Z)」選択範囲の行を行単位で昇順ソートします
「🔙⬆️行単位ソート(Z→A)」選択範囲の行を行単位で逆順ソートします
「🔜🔃行単位で逆順に」選択範囲の行を行単位で現在と逆順に入れ替えます
「🔜🏞プロポーショナルフォントで🖥画面表示したピクセル数で行ソート」プロポーショナルフォントをオフスクリーン描画して、描画幅をもとにソートします
「🔄🎉行単位でランダム・シャッフル」行単位でシャッフルします

🈳青空文庫


「🈂️サンプル文章をオープン」同梱のサンプル文章「坊ちゃん」「こころ」「我輩は猫である」のうちのいずれかのテキストをオープンします

📝PDFから情報読み込み


「📝全ページの本文テキストを📗読み込む」指定のPDF本文テキストを新規書類に読み込みます
「📝指定ページの本文テキストを📗読み込む」指定のPDFの指定ページの本文テキストを新規書類に読み込みます
「🧾TOC(Table Of Contents)📗読み込み」指定のPDFのTOCテキストを新規書類に読み込みます
「🔗全ページの🌏URLリンクをまとめて📗新規書類に読み込む(http、https)」指定のPDFのURLリンクのうちプロトコルがhttp、httpsのURLを新規書類に読み込みます
「🔗全ページの🌏URLリンクをまとめて📗新規書類に読み込む(mailto)」指定のPDFのURLリンクのうちプロトコルがmailtoのURLを新規書類に読み込みます
「🔗全ページの🌏URLリンクをデコードして、それぞれ📗📗個別の📗📗新規書類に読み込む(applescript)」指定のPDFのURLリンクのうちプロトコルがapplescriptのURLをデコードして個別の新規書類に読み込みます
「🔗全ページの🌏URLリンクをデコードして、🧼選択語句を含むものをそれぞれ📗📗個別の📗📗新規書類に読み込む(applescript)」指定のPDFのURLリンクのうちプロトコルがapplescriptで、デコード内容にCotEditor上で選択中の語句を含むものを個別の新規書類に読み込みます

🎹iTunesまたはMusic


「🎹🖍現在の音楽トラックに歌詞として書き込む」CotEditorで選択範囲のテキストを、iTunes/Music上で選択中の音楽トラックの歌詞として書き込みます
「🎹👀現在の音楽トラックの歌詞を📗新規書類に読み込む」、iTunes/Music上で選択中の音楽トラックの歌詞をCotEditorの新規書類に読み込みます

🎲QRコード


「🎲💔QRコード画像をdecodeして📗新規書類に読み込み」QRコード画像をデコードして、CotEditorの新規書類に読み込みます
「🎲💙選択範囲をQRコードにencodeして🎆画像出力」CotEditor上で選択中のテキストをQRコードにエンコードしてデスクトップに画像出力します

🌇画像取り込み


「🔌💙base64 encodeして📃新規書類に読み込み」指定画像をbase64エンコードして新規書類に読み込みます
「)🔌💙base64 encodeして🏷img srcタグ🏷つきで📗新規書類に読み込み」指定画像をbase64エンコードして新規書類にimg srcタグつきで新規書類に読み込みます

📄⚙️ファイルの情報読み込み


「📄⚙️指定ファイルの🛍メタデータを📗新規書類に読み込み」指定ファイルのメタデータを新規書類に読み込みます

macOS 10.13上ではインストールできません

macOS 10.13上では配布中のZipファイルの展開時にエラーが出ることを確認していますが、macOS 10.13自体がバグの塊のようなバージョンなので、対処できるのかどうか、、、
–> DiskImageに入れて圧縮してみましたが、macOS 10.13上ではマウントしたDiskImageからのコピー時にエラーが出て(ファイル名をすべて変更しないと)コピー自体ができないようです

Posted in System | Tagged 10.14savvy 10.15savvy CotEditor | 2 Comments

AppleScriptのプログラムの実行を(プログラム的に内部から)止める

Posted on 10月 5, 2019 by Takaaki Naganoya

どこでもプログラムを止める方法についてです。

一般的には、メインのrunハンドラ(記述されていない暗黙のrunハンドラ内)でreturnコマンドを実行すると、実行を終了します。スクリプトエディタ上で実行した場合には、基本的にそういう動作です(「ハンドラの実行後に終了しない」にチェックを入れてアプレット書き出しした「Stay Open Applet」ではアプレットは終了しませんが、実行中の処理自体は止まります)。runハンドラからサブルーチン(ハンドラ)を呼び出している場合には、returnコマンドを実行するとrunハンドラ側に戻ってくるだけです。

# Cocoaの機能を使ってタイマーオブジェクト(NSTimer)を作成して定期的に処理呼び出しするように宣言するとか、ノーティフィケーション宣言してメモリ上にオブジェクトを作ってイベントを受信するとか、そういうScriptを実行した場合にはメモリ上にオブジェクトが常駐しているかぎり実行は止まりません(この場合、スクリプトエディタを終了させるとオブジェクトも消えて動作が完全停止)

以前に、AppleScriptの実行を止めるためにさまざまな方法で、「止めるためのアクション」を検出する方法について紹介したことがあります。

ただ、ユーザーの停止要求を受け付けても、その場ですぐに止められるかどうかは別問題です。止めるためにループで条件を検出(キー入力や特定フォルダ内のファイル/フォルダの存在確認)などを行い、止めるために全力を尽くしていました。

どこでも好きなタイミングで、メインループのような場所でもなく、呼び出されたサブルーチン内などで好きに止めたい、という場合の方法をまとめてみました。

簡単にいえば、エラーを起こして止めることになるわけですが、ダイアログでCancelボタンを押したのと同じ(害のない)エラーコードを指定します。

AppleScript名:abort script
repeat 10 times
  display dialog "TEST" buttons {"OK"} default button 1
  
error number -128
  
–> error "ユーザによってキャンセルされました。" number -128 from «script» to item
end repeat

★Click Here to Open This Script 

AppleScript名:abort script 2
on run
  display dialog "run"
  
sub1() of me
end run

on sub1()
  display dialog "sub1"
  
sub2() of me
end sub1

on sub2()
  display dialog "sub2"
  
error number -128 –ここで止まる
  
–> error "ユーザによってキャンセルされました。" number -128 from «script» to item
end sub2

★Click Here to Open This Script 

Posted in OSA System | Tagged 10.12savvy 10.13savvy 10.14savvy | Leave a comment

Post navigation

  • Older posts
  • Newer posts

電子書籍(PDF)をオンラインストアで販売中!

Google Search

Popular posts

  • 開発機としてM2 Mac miniが来たのでガチレビュー
  • macOS 15, Sequoia
  • Pages本執筆中に、2つの書類モード切り替えに気がついた
  • Numbersで選択範囲のセルの前後の空白を削除
  • メキシカンハットの描画
  • Pixelmator Pro v3.6.4でAppleScriptからの操作時の挙動に違和感が
  • AppleScriptによる並列処理
  • Safariで「プロファイル」機能を使うとAppleScriptの処理に影響
  • macOS 15でも変化したText to Speech環境
  • AppleScript入門③AppleScriptを使った「自動化」とは?
  • デフォルトインストールされたフォント名を取得するAppleScript
  • macOS 15 リモートApple Eventsにバグ?
  • 【続報】macOS 15.5で特定ファイル名パターンのfileをaliasにcastすると100%クラッシュするバグ
  • AppleScript入門① AppleScriptってなんだろう?
  • macOS 14で変更になったOSバージョン取得APIの返り値
  • Script Debuggerの開発と販売が2025年に終了
  • NSObjectのクラス名を取得 v2.1
  • 有害ではなくなっていたSpaces
  • macOS 15:スクリプトエディタのAppleScript用語辞書を確認できない
  • Xcode上のAppleScriptObjCのプログラムから、Xcodeのログ欄へのメッセージ出力を実行

Tags

10.11savvy (1101) 10.12savvy (1242) 10.13savvy (1391) 10.14savvy (587) 10.15savvy (438) 11.0savvy (283) 12.0savvy (212) 13.0savvy (194) 14.0savvy (147) 15.0savvy (135) CotEditor (66) Finder (51) iTunes (19) Keynote (119) NSAlert (61) NSArray (51) NSBitmapImageRep (20) NSBundle (20) NSButton (34) NSColor (53) NSDictionary (28) NSFileManager (23) NSFont (21) NSImage (41) NSJSONSerialization (21) NSMutableArray (63) NSMutableDictionary (22) NSPredicate (36) NSRunningApplication (56) NSScreen (30) NSScrollView (22) NSString (119) NSURL (98) NSURLRequest (23) NSUTF8StringEncoding (30) NSView (33) NSWorkspace (20) Numbers (76) Pages (55) Safari (44) Script Editor (27) WKUserContentController (21) WKUserScript (20) WKWebView (23) WKWebViewConfiguration (22)

カテゴリー

  • 2D Bin Packing
  • 3D
  • AirDrop
  • AirPlay
  • Animation
  • AppleScript Application on Xcode
  • Beginner
  • Benchmark
  • beta
  • Bluetooth
  • Books
  • boolean
  • bounds
  • Bug
  • Calendar
  • call by reference
  • check sum
  • Clipboard
  • Cocoa-AppleScript Applet
  • Code Sign
  • Color
  • Custom Class
  • date
  • dialog
  • diff
  • drive
  • Droplet
  • exif
  • file
  • File path
  • filter
  • folder
  • Font
  • Font
  • GAME
  • geolocation
  • GUI
  • GUI Scripting
  • Hex
  • History
  • How To
  • iCloud
  • Icon
  • Image
  • Input Method
  • Internet
  • iOS App
  • JavaScript
  • JSON
  • JXA
  • Keychain
  • Keychain
  • Language
  • Library
  • list
  • Locale
  • Localize
  • Machine Learning
  • Map
  • Markdown
  • Menu
  • Metadata
  • MIDI
  • MIME
  • Natural Language Processing
  • Network
  • news
  • Noification
  • Notarization
  • Number
  • Object control
  • OCR
  • OSA
  • parallel processing
  • PDF
  • Peripheral
  • process
  • PRODUCTS
  • QR Code
  • Raw AppleEvent Code
  • Record
  • rectangle
  • recursive call
  • regexp
  • Release
  • Remote Control
  • Require Control-Command-R to run
  • REST API
  • Review
  • RTF
  • Sandbox
  • Screen Saver
  • Script Libraries
  • sdef
  • search
  • Security
  • selection
  • shell script
  • Shortcuts Workflow
  • Sort
  • Sound
  • Spellchecker
  • Spotlight
  • SVG
  • System
  • Tag
  • Telephony
  • Text
  • Text to Speech
  • timezone
  • Tools
  • Update
  • URL
  • UTI
  • Web Contents Control
  • WiFi
  • XML
  • XML-RPC
  • イベント(Event)
  • 未分類

アーカイブ

  • 2025年6月
  • 2025年5月
  • 2025年4月
  • 2025年3月
  • 2025年2月
  • 2025年1月
  • 2024年12月
  • 2024年11月
  • 2024年10月
  • 2024年9月
  • 2024年8月
  • 2024年7月
  • 2024年6月
  • 2024年5月
  • 2024年4月
  • 2024年3月
  • 2024年2月
  • 2024年1月
  • 2023年12月
  • 2023年11月
  • 2023年10月
  • 2023年9月
  • 2023年8月
  • 2023年7月
  • 2023年6月
  • 2023年5月
  • 2023年4月
  • 2023年3月
  • 2023年2月
  • 2023年1月
  • 2022年12月
  • 2022年11月
  • 2022年10月
  • 2022年9月
  • 2022年8月
  • 2022年7月
  • 2022年6月
  • 2022年5月
  • 2022年4月
  • 2022年3月
  • 2022年2月
  • 2022年1月
  • 2021年12月
  • 2021年11月
  • 2021年10月
  • 2021年9月
  • 2021年8月
  • 2021年7月
  • 2021年6月
  • 2021年5月
  • 2021年4月
  • 2021年3月
  • 2021年2月
  • 2021年1月
  • 2020年12月
  • 2020年11月
  • 2020年10月
  • 2020年9月
  • 2020年8月
  • 2020年7月
  • 2020年6月
  • 2020年5月
  • 2020年4月
  • 2020年3月
  • 2020年2月
  • 2020年1月
  • 2019年12月
  • 2019年11月
  • 2019年10月
  • 2019年9月
  • 2019年8月
  • 2019年7月
  • 2019年6月
  • 2019年5月
  • 2019年4月
  • 2019年3月
  • 2019年2月
  • 2019年1月
  • 2018年12月
  • 2018年11月
  • 2018年10月
  • 2018年9月
  • 2018年8月
  • 2018年7月
  • 2018年6月
  • 2018年5月
  • 2018年4月
  • 2018年3月
  • 2018年2月

https://piyomarusoft.booth.pm/items/301502

メタ情報

  • ログイン
  • 投稿フィード
  • コメントフィード
  • WordPress.org

Forum Posts

  • 人気のトピック
  • 返信がないトピック

メタ情報

  • ログイン
  • 投稿フィード
  • コメントフィード
  • WordPress.org
Proudly powered by WordPress
Theme: Flint by Star Verte LLC