—
– Created by: Takaaki Naganoya
– Created on: 2018/12/03
—
– Copyright © 2018 Piyomaru Software, All Rights Reserved
—
use AppleScript version "2.4" — Yosemite (10.10) or later
use framework "Foundation"
use scripting additions
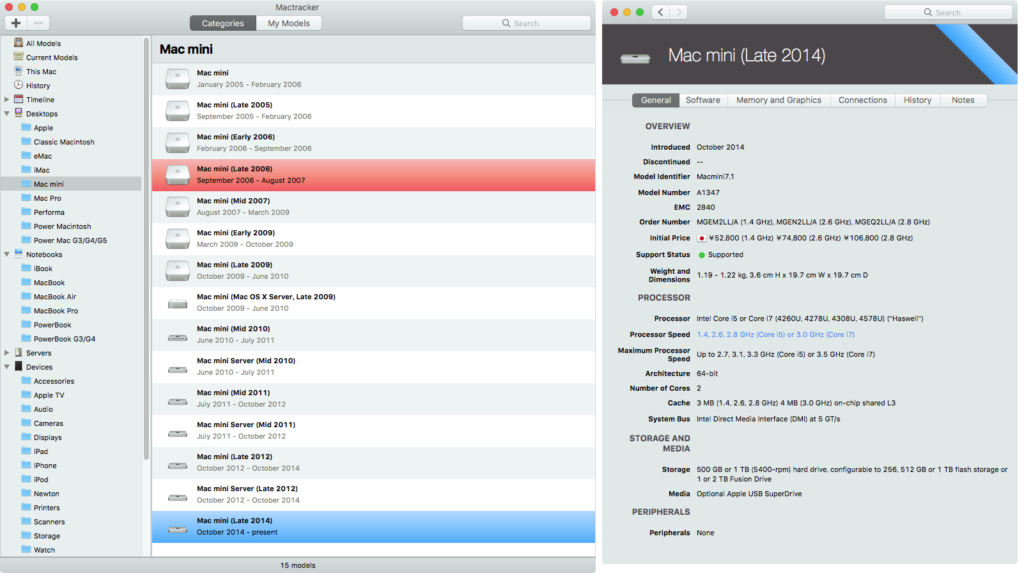
set macID to do shell script "sysctl -n hw.model" –get machine ID
–set macID to "MacBookPro99,1"–Error case
set myName to getIntelCoreProcessorFamilyName(macID) of me
—> "Ivy Bridge"
on getIntelCoreProcessorFamilyName(macID)
–Machine ID & CPU Core Model Names (uniquefied)
set macList to {{"iMac4,1", "Yonah"}, {"iMac4,2", "Yonah"}, {"iMac5,2", "Merom"}, {"iMac5,1", "Merom"}, {"iMac6,1", "Merom"}, {"iMac7,1", "Merom"}, {"iMac8,1", "Penryn"}, {"iMac9,1", "Penryn"}, {"iMac10,1", "Wolfdale"}, {"iMac11,1", "Wolfdale, Lynnfield"}, {"iMac11,2", "Clarkdale"}, {"iMac11,3", "Clarkdale, Lynnfield"}, {"iMac12,1", "Sandy Bridge"}, {"iMac12,2", "Sandy Bridge"}, {"iMac13,1", "Ivy Bridge"}, {"iMac13,2", "Ivy Bridge"}, {"iMac14,1", "Haswell"}, {"iMac14,3", "Haswell"}, {"iMac14,2", "Haswell"}, {"iMac14,4", "Haswell"}, {"iMac15,1", "Haswell"}, {"iMac16,1", "Broadwell"}, {"iMac16,2", "Broadwell"}, {"iMac17,1", "Skylake"}, {"iMac18,1", "Kaby Lake"}, {"iMac18,2", "Kaby Lake"}, {"iMac18,3", "Kaby Lake"}, {"iMacPro1,1", "Skylake"}, {"Macmini1,1", "Yonah"}, {"Macmini2,1", "Merom"}, {"Macmini3,1", "Penryn"}, {"Macmini4,1", "Penryn"}, {"Macmini5,1", "Sandy Bridge"}, {"Macmini5,2", "Sandy Bridge"}, {"Macmini5,3", "Sandy Bridge"}, {"Macmini6,1", "Ivy Bridge"}, {"Macmini6,2", "Ivy Bridge"}, {"Macmini7,1", "Haswell"}, {"Macmini8,1", "Coffe Lake"}, {"MacPro1,1", "Woodcrest"}, {"MacPro2,1", "Clovertown"}, {"MacPro3,1", "Harpertown"}, {"MacPro4,1", "Bloomfield, Gainestown"}, {"MacPro5,1", "Bloomfield, Gulftown, Westmere"}, {"MacPro5,1", "Bloomfield, Westmere, Gulftown"}, {"MacPro6,1", "Ivy Bridge"}, {"MacBook1,1", "Yonah"}, {"MacBook2,1", "Merom"}, {"MacBook3,1", "Merom"}, {"MacBook4,1", "Penryn"}, {"MacBook5,1", "Penryn"}, {"MacBook5,2", "Penryn"}, {"MacBook6,1", "Penryn"}, {"MacBook7,1", "Penryn"}, {"MacBook8,1", "Broadwell"}, {"MacBook9,1", "Skylake"}, {"MacBook10,1", "Kaby Lake"}, {"MacBookAir1,1", "Merom"}, {"MacBookAir2,1", "Penryn"}, {"MacBookAir3,1", "Penryn"}, {"MacBookAir3,2", "Penryn"}, {"MacBookAir4,1", "Sandy Bridge"}, {"MacBookAir4,2", "Sandy Bridge"}, {"MacBookAir5,1", "Ivy Bridge"}, {"MacBookAir5,2", "Ivy Bridge"}, {"MacBookAir6,1", "Haswell"}, {"MacBookAir6,2", "Haswell"}, {"MacBookAir7,1", "Broadwell"}, {"MacBookAir7,2", "Broadwell"}, {"MacBookAir8,1", "Amber Lake Y"}, {"MacBookPro1,1", "Yonah"}, {"MacBookPro1,2", "Yonah"}, {"MacBookPro2,2", "Merom"}, {"MacBookPro2,1", "Merom"}, {"MacBookPro3,1", "Merom"}, {"MacBookPro4,1", "Penryn"}, {"MacBookPro5,1", "Penryn"}, {"MacBookPro5,2", "Penryn"}, {"MacBookPro5,5", "Penryn"}, {"MacBookPro5,4", "Penryn"}, {"MacBookPro5,3", "Penryn"}, {"MacBookPro7,1", "Penryn"}, {"MacBookPro6,2", "Arrandale"}, {"MacBookPro6,1", "Arrandale"}, {"MacBookPro8,1", "Sandy Bridge"}, {"MacBookPro8,2", "Sandy Bridge"}, {"MacBookPro8,3", "Sandy Bridge"}, {"MacBookPro9,2", "Ivy Bridge"}, {"MacBookPro9,1", "Ivy Bridge"}, {"MacBookPro10,1", "Ivy Bridge"}, {"MacBookPro10,2", "Ivy Bridge"}, {"MacBookPro11,1", "Haswell"}, {"MacBookPro11,2", "Haswell"}, {"MacBookPro11,3", "Haswell"}, {"MacBookPro12,1", "Broadwell"}, {"MacBookPro11,4", "Haswell"}, {"MacBookPro11,5", "Haswell"}, {"MacBookPro13,1", "Skylake"}, {"MacBookPro13,2", "Skylake"}, {"MacBookPro13,3", "Skylake"}, {"MacBookPro14,1", "Kaby Lake"}, {"MacBookPro14,2", "Kaby Lake"}, {"MacBookPro14,3", "Kaby Lake"}, {"MacBookPro15,2", "Coffee Lake"}, {"MacBookPro15,1", "Coffee Lake"}}
–2D List内の検索
set gList to searchInListByIndexItem(macList, 1, macID) of me
if gList = missing value or gList = {} then
error "Error:" & macID & "is newer Machine than I expected in Dec 2018 or Older PowerPC Mac , may be"
end if
set g2List to FlattenList(gList) of me –複数の結果が得られた場合に備える
return contents of second item of g2List
end getIntelCoreProcessorFamilyName
–2Dリストから、指定インデックスアイテムで、指定データが該当する最初のものを返す
on searchInListByIndexItem(aList as list, itemNum as integer, hitData as string)
set setKey to current application’s NSMutableSet’s setWithArray:aList
if itemNum < 1 then return {}
set aPredicateStr to ("SELF[" & (itemNum – 1) as string) & "] == ’" & hitData & "’"
set aPredicate to current application’s NSPredicate’s predicateWithFormat:aPredicateStr
set aRes to (setKey’s filteredSetUsingPredicate:aPredicate)
set bRes to aRes’s allObjects()
set cRes to bRes as list of string or string –as anything
return cRes
end searchInListByIndexItem
–By Paul Berkowitz
–2009年1月27日 2:24:08:JST
–Re: Flattening Nested Lists
on FlattenList(aList)
set oldDelims to AppleScript’s text item delimiters
set AppleScript’s text item delimiters to {"????"}
set aString to aList as text
set aList to text items of aString
set AppleScript’s text item delimiters to oldDelims
return aList
end FlattenList
|


