アラートダイアログ上に縦棒グラフを表示するAppleScriptです。
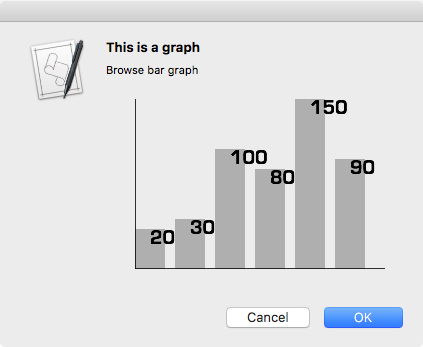
グラフを作成するのであれば、NumbersやKeynoteなどを使ったほうがいいですが、簡単にデータの傾向だけダイアログ上で見せたいような場合のために作成した部品です。
NSImageViewの表示実験がしたかっただけなので、別に他の言語処理系で作成したグラフ画像を読み込んでNSImageに読み込んでからNSIMageViewで表示するぐらいの使い方でもぜんぜんOKでしょう。
WebViewを表示してインタラクティブなグラフ(マウスカーソルに反応してアニメーション表示を行うとか)を表示するといった使い方もよさそうです(アプリケーション化しないとダメかも)。
macOS 10.14上のDark Modeについては、実行環境によって対応度が異なります。
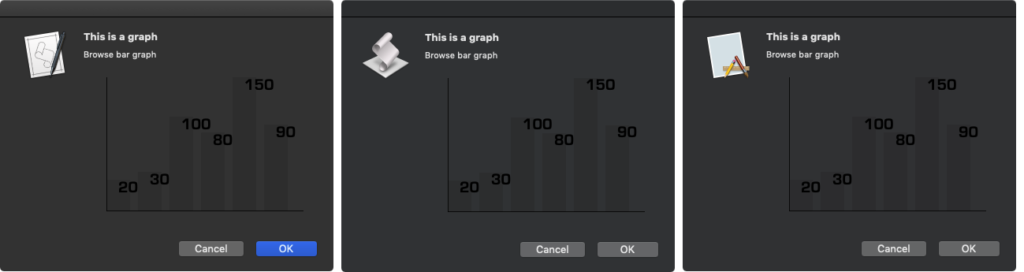
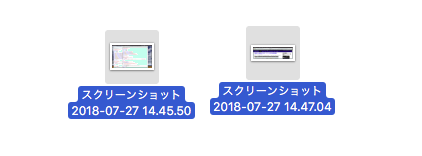
▲macOS 10.14上のDark Modeで実行したところ。左側からスクリプトエディタ、AppleScriptアプレット、スクリプトメニュー
▲macOS 10.14上のDark Modeで実行したところ。左側からScript Debugger、Script DebuggerからSD拡張アプレットで書き出したもの
グラフの描画については、色指定をblackColor()とかgrayColor()などと指定せずに、Dark Mode時に制御されるUI色で指定しておく必要があることでしょう。
| AppleScript名:アラートダイアログ上に縦棒グラフを表示.scptd |
| — – Created by: Takaaki Naganoya – Created on: 2019/03/04 — – Copyright © 2019 Piyomaru Software, All Rights Reserved — use AppleScript version "2.4" — Yosemite (10.10) or later use framework "Foundation" use framework "AppKit" use scripting additions property NSFont : a reference to current application’s NSFont property NSAlert : a reference to current application’s NSAlert property NSColor : a reference to current application’s NSColor property NSArray : a reference to current application’s NSArray property NSString : a reference to current application’s NSString property NSImage : a reference to current application’s NSImage property NSScreen : a reference to current application’s NSScreen property NSDictionary : a reference to current application’s NSDictionary property NSBezierPath : a reference to current application’s NSBezierPath property NSImageView : a reference to current application’s NSImageView property NSMutableArray : a reference to current application’s NSMutableArray property NSBitmapImageRep : a reference to current application’s NSBitmapImageRep property NSRunningApplication : a reference to current application’s NSRunningApplication property NSFontAttributeName : a reference to current application’s NSFontAttributeName property NSAlertSecondButtonReturn : a reference to current application’s NSAlertSecondButtonReturn property NSForegroundColorAttributeName : a reference to current application’s NSForegroundColorAttributeName property NSImageScaleProportionallyUpOrDown : a reference to current application’s NSImageScaleProportionallyUpOrDown property returnCode : 0 set plotData to {20, 30, 100, 80, 150, 90} set paramObj to {myMessage:"This is a graph", mySubMessage:"Browse bar graph", aPlotData:plotData} my performSelectorOnMainThread:"displayBarGraph:" withObject:(paramObj) waitUntilDone:true on displayBarGraph:paramObj set aMainMes to myMessage of paramObj set aSubMes to mySubMessage of paramObj set aTList to (aPlotData of paramObj) as list — make NSIMageView with graph image set anImage to makeGraphImage(aTList, 300, 200) of me set anImageView to NSImageView’s alloc()’s initWithFrame:{origin:{x:0.0, y:0.0}, |size|:{width:300.0, height:200.0}} anImageView’s setImageScaling:(NSImageScaleProportionallyUpOrDown) anImageView’s setEditable:false anImageView’s setImage:anImage anImageView’s display() — set up alert set theAlert to NSAlert’s alloc()’s init() tell theAlert its setMessageText:aMainMes its setInformativeText:aSubMes its addButtonWithTitle:"OK" its addButtonWithTitle:"Cancel" its setAccessoryView:anImageView end tell — show alert in modal loop NSRunningApplication’s currentApplication()’s activateWithOptions:0 my performSelectorOnMainThread:"doModal:" withObject:(theAlert) waitUntilDone:true if (my returnCode as number) = 1001 then error number -128 end displayBarGraph: on doModal:aParam set (my returnCode) to aParam’s runModal() end doModal: on makeGraphImage(plotData, aWidth, aHeight) set innerGapL to 30 set innerGapU to 10 set innerGapR to 20 set innerGapD to 20 set barGap to 10 –パラメータから下地になる画像を作成する set aSize to current application’s NSMakeSize(aWidth, aHeight) set anImage to NSImage’s alloc()’s initWithSize:aSize –各種パラメータの計算 –copy plotArea to {plotWidth, plotHeight} set itemNum to count every item of plotData set barThickness to (aWidth – (itemNum * barGap * 2)) div itemNum –プロットデータの最大値 set anArray to NSArray’s arrayWithArray:plotData set aYmax to (anArray’s valueForKeyPath:"@max.self")’s intValue() set aMaxYVal to aHeight – innerGapU – innerGapD set aYPlotArea to aHeight – innerGapU – innerGapD – 20 set aYUnit to aYPlotArea / aYmax –数値データをもとに描画データを組み立てる set drawList to {} set startX to innerGapL copy startX to origX repeat with i in plotData set the end of drawList to current application’s NSMakeRect(startX, innerGapD, barThickness, innerGapD + (i * aYUnit)) set startX to startX + barThickness + barGap end repeat –グラフ塗りつぶし処理呼び出し set fillColor to (NSColor’s colorWithCalibratedRed:0.1 green:0.1 blue:0.1 alpha:0.3) set resImage to drawImageWithColorFill(anImage, drawList, fillColor) of me –数値データ(文字)をグラフィックに記入 set fillColor2 to NSColor’s blackColor() set resImage to drawImageWithString(resImage, drawList, fillColor2, plotData, "Eurostile Bold", 20.0) of me –補助線を引く set fillColor3 to (NSColor’s colorWithCalibratedRed:0.0 green:0.0 blue:0.0 alpha:0.8) set aVertical to current application’s NSMakeRect(origX, innerGapD, aWidth – innerGapL – innerGapR, 1) set aHorizontal to current application’s NSMakeRect(origX, innerGapD, 1, aHeight – innerGapU – innerGapD) set draw2List to {aVertical, aHorizontal} set resImage to drawImageWithColorFill(resImage, draw2List, fillColor3) of me return resImage end makeGraphImage –NSImageに対して文字を描画する on drawImageWithString(anImage, drawList, fillColor, dataList, aPSFontName, aFontSize) set retinaF to (NSScreen’s mainScreen()’s backingScaleFactor()) as real –> 2.0 (Retina) / 1.0 (Non Retina) set aDict to (NSDictionary’s dictionaryWithObjects:{NSFont’s fontWithName:aPSFontName |size|:aFontSize, fillColor} forKeys:{NSFontAttributeName, NSForegroundColorAttributeName}) anImage’s lockFocus() –描画開始 set aLen to length of drawList repeat with i from 1 to aLen set i1 to contents of item i of drawList set v2 to system attribute "sys2" if v2 ≤ 12 then –To macOS 10.12.x set origX to (x of origin of i1) / retinaF set origY to (y of origin of i1) / retinaF set sizeX to (width of |size| of i1) / retinaF set sizeY to (height of |size| of i1) / retinaF set theRect to {{x:origX, y:origY}, {width:sizeX, height:sizeY}} else –macOS 10.13 or later set origX to (item 1 of item 1 of i1) / retinaF set origY to (item 2 of item 1 of i1) / retinaF set sizeX to (item 1 of item 2 of i1) / retinaF set sizeY to (item 2 of item 2 of i1) / retinaF set theRect to {{origX, origY}, {sizeX, sizeY}} end if set aString to (current application’s NSString’s stringWithString:((contents of item i of dataList) as string)) (aString’s drawAtPoint:(current application’s NSMakePoint(origX + (sizeX / 2), sizeY)) withAttributes:aDict) end repeat anImage’s unlockFocus() –描画ここまで return anImage –returns NSImage end drawImageWithString –NSImageに対して矩形を塗りつぶす on drawImageWithColorFill(anImage, drawList, fillColor) set retinaF to (NSScreen’s mainScreen()’s backingScaleFactor()) as real –> 2.0 (Retina) / 1.0 (Non Retina) anImage’s lockFocus() –描画開始 repeat with i in drawList set v2 to system attribute "sys2" if v2 ≤ 12 then –To macOS 10.12.x set origX to (x of origin of i) / retinaF set origY to (y of origin of i) / retinaF set sizeX to (width of |size| of i) / retinaF set sizeY to (height of |size| of i) / retinaF set theRect to {{x:origX, y:origY}, {width:sizeX, height:sizeY}} else –macOS 10.13 or later set origX to (item 1 of item 1 of i) / retinaF set origY to (item 2 of item 1 of i) / retinaF set sizeX to (item 1 of item 2 of i) / retinaF set sizeY to (item 2 of item 2 of i) / retinaF set theRect to {{origX, origY}, {sizeX, sizeY}} end if set theNSBezierPath to NSBezierPath’s bezierPath (theNSBezierPath’s appendBezierPathWithRect:theRect) fillColor’s |set|() –色設定 theNSBezierPath’s fill() –ぬりつぶし end repeat anImage’s unlockFocus() –描画ここまで return anImage –returns NSImage end drawImageWithColorFill |


