Keynoteがv11.0からv11.0.1にアップデートされました。
AppleScript用語辞書(sdef)の差分をとって確認してみたところ、とくに変更点は見つかりません。
eSeminor: Cocoa Scripting Course Volume #2 NSArray
Cocoa Scripting本「Cocoa Scripting Course #2 NSArray」の販売を開始しました(通称:Cocoa本2)。
ページ数:245ページ(うち、Vol.2独立部分 94ページ 2021/3/30現在)
フォーマット:PDF+Zipアーカイブ(791ファイル)
特別特典:
Script Debuggerの15%割引購入コード入り
購入後3か月まで、本書の内容で理解できない箇所について3か所まで補足説明
理解度確認テストで合格した方に修了証明書を発行
→ Cocoa Scripting Course #2
→ Cocoa Scripting Course #2 (お試し版)
内容:
macOSのAPIであるCocoaをAppleScriptから利用し、macOSの持つ強力な機能をアプリケーションの補助なしに直接呼び出せる「Cocoa Scripting」は、日々の業務やデータ処理に、たいへん強力な武器になります。
この、Cocoa Scriptingについてはとくに日本語の書籍が存在しておらず、これまでは「Xcodeの使い方、GUIの作り方、各メソッドの使い方….」といった、体系がまったく異なるObjective-Cの入門書で断片的に情報を得ることしかできませんでした。
Vol.2では、NSArray/NSMutableArrayを解説。AppleScriptのlist型変数に該当するオブジェクトですが、ソート能力が強力で高速。さまざまな抽出機能を持っているため、いままで巨大な配列を扱うためだけにデータベースを併用していたような機能が、Cocoa Scriptingの導入で他のデータベースの手助けなしに実現できます。基礎的なサンプルから高度な使い方までていねいに解説。実際に巨大な配列をlist型変数とNSArrayで作成して作成時間やメモリ消費サイズなどを計測したうえでグラフ化して比較しています。
また、本書は「AppleScriptの穴」掲載AppleScriptのカテゴリ別アーカイブ集ともなっており、本書にはNSArrayなど配列処理を行うサンプルScriptをはじめ有用なAppleScriptのファイルを大量に添付しています。
続刊予定:
eSeminor: Cocoa Scripting Course Volume #1 NSString (Basic object to know Cocoa API)
eSeminor: Cocoa Scripting Course Volume #2 NSArray(Most valuable API to use Cocoa with AppleScript to sort data)
eSeminor: Cocoa Scripting Course Volume #3 NSDictionary (Key object to access various other APIs)
eSeminor: Cocoa Scripting Course Volume #4 NSURL (Cloud API Scripting)
eSeminor: Cocoa Scripting Course Volume #5 NSImage (image conversion and filtering)
eSeminor: Cocoa Scripting Course Volume #6 PDFKit (PDF Processing)
eSeminor: Cocoa Scripting Course Volume #7 NSAttributedString (Attributed string and HTMLs)
eSeminor: Cocoa Scripting Course Volume #8 NSFileManager (File processing)
eSeminor: Cocoa Scripting Course Volume #9 Webkit (WebView Scripting)
eSeminor: Cocoa Scripting Course Volume #10 System hardware & software Information
入門者向け本はかねてからのPiyomaru Softwareの懸案事項でした。「AppleScriptえほんシリーズ」を出してはいますが、AppleScriptそのものの入門書というのは出していませんでした。
入門書というのは、いざ書いてみると上級者向けの本より難しいと感じます。例え話でたとえても嘘が多く入ってしまいますし、「変数という箱があって….」という説明も、実際に読んでみると「なんのことやらわからない」ことに。
なので、ある操作を行いたいんだけど、どうやったらいいのか分からない…というストーリーを作って、それに基づいてじょじょにレベルアップしていくという流れで説明しています。
ページ数30ページ、価格1,000円。いまなら期間限定で150ページほどの薄いコマンドリファレンスなどの別冊資料集がついてきます。発売です。
大きな数字同士の平均値を求めるAppleScriptです。大きい数字というのは、桁数が(大きい方に)多いものと、小数点以下の桁数が多いものを指しています。
AppleScriptの数値は10桁ぐらいで指数表示になってしまう、一種のウィークポイントですが、数値を文字で保持することでこのように計算できます。
テキストで書いた数値をリストに入れて計算しますが、ヌル要素が入っていると問題になるのであらかじめヌル要素は削除するようにしています。
ちょうど、書籍の原稿で巨大な配列要素を追加するベンチマークを実施したさいに、5回実行してその平均値を求めるために書いたものです。
AppleScript名:大きな数値同士の平均値を求める |
— – Created by: Takaaki Naganoya – Created on: 2021/03/26 — – Copyright © 2021 Piyomaru Software, All Rights Reserved — use AppleScript version "2.4" — Yosemite (10.10) or later use framework "Foundation" use scripting additions set aList to {"", "0.4345240592956544", "0.3104130029678344192", "0.3132869005203247104", "0.2978630065917968384", "0.3173710107803344896"} set c to aveLargeNumber(aList) of me –AppleScriptの範囲外の精度の数値テキストの平均を計算する on aveLargeNumber(aNumList as list) –ヌル要素の削除 set bNumList to listSweep1D(aNumList) of me set aCount to count every item of bNumList set aNumStr to retDelimedText(bNumList, " + ") of me set aCMD to "echo \" scale=10; (" & aNumStr & ") / " & (aCount as string) & " \" | bc" set aRes to do shell script aCMD if aRes begins with "." then set aRes to "0" & aRes return aRes end aveLargeNumber on retDelimedText(aList as list, aDelim) set aText to "" set curDelim to AppleScript’s text item delimiters set AppleScript’s text item delimiters to aDelim set aText to aList as string set AppleScript’s text item delimiters to curDelim return aText end retDelimedText –1Dリスト項目のうち、ヌルの項目はリストから除去する on listSweep1D(aList as list) set bList to {} repeat with i in aList set j to contents of i if j is not equal to "" then set the end of bList to j end if end repeat return bList end listSweep1D |
Pixelmator Proの機能「ML Super Resolution」をAppleScriptから呼び出して、指定フォルダ内の画像をすべて超解像処理を行って、機械学習モデルをもとに解像度2倍化を行った画像を別フォルダに書き出すAppleScriptです。
超解像処理を行う対象は、別に画面のスナップショット画像でなくてもよいのですが、効果がわかりやすい用途です。
Keynoteに画面スナップショット画像を貼り付けていたときに、拡大倍率が上がると解像度が足りずに荒くなってしまいました。Retina環境で画面のスナップショットを取ると、けっこう綺麗に拡大できるのですが、等倍表示しかできない(&画面表示解像度を落とすことで2x Retina解像度で画面キャプチャ可能)環境なので、ちょっと困りました。
▲macOS 11.0、見た目の悪さで使う気が失せるはじめてのmacOS。12.0ではもう少しなんとかしてほしい。とくに、このダイアログ。ダイアログと見分けのつかないウィンドウ。ファイル保存ダイアログとかも
そこで、Pixelmator Proで画像のML Super Resolution機能(超解像機能)を用いてソフトウェアの力で画面スナップショット画像を高解像度化してみました。これが予想を超えていい感じだったので、指定フォルダ以下の画像をすべて処理するようにAppleScriptで処理してみました。
–> Download pixelmatorMLSuperResol(Script Bundle with libraries)
ML Super Resolution処理は自分の使っているIntel Mac(MacBook Pro 10,1)には荷の重い処理でささいな画像でも数秒かかりますが、おそらくApple Silicon搭載Macだと瞬殺でしょう。Core MLの処理が段違いに速いので。
▲オリジナル画像と超解像処理を行なった画像のファイルサイズの違い
本リストは実際にAppleScriptで開発を行う際に記述するコード量そのものを示したものです。本リストには2つのライブラリを利用していますが、ふだんはプログラムリストの再現性(実行できること)を優先して、ライブラリ部分もScript本体に一緒に展開しています。使い回ししている分も同じリストに展開しているので、「たくさん書かないといけない」と思われているようです。
実際には、共通部分はほとんど書いていないので、本処理もこんな(↓)ぐらいの記述量です。リアルな記述量を感じられるような掲載の仕方を考えなくてはいけないのかもしれません。本リストはその試みの第一歩です。
まー、超解像処理を行って72dpiの画面スナップショット画像を144dpiに上げているだけなんで、Retina Display環境で処理すれば不要なんですが、ソフトウェアだけで実現できるのはロマンを感じますし、無駄に2x Retina環境のスクリーンショットを処理して288dpiの高解像度画像に上げてみるとか。
ただ、WWDCのビデオなどを見ていると、画面のスナップショットそのものをベクターグラフィックで取るような仕組みも考えていそうな気配がします。当てずっぽうですが、そういう何かを考えていそうな….
AppleScript名:画面スナップショット超解像バッチ処理 v1 |
— – Created by: Takaaki Naganoya – Created on: 2021/03/25 — – Copyright © 2021 Piyomaru Software, All Rights Reserved — use AppleScript version "2.4" — Yosemite (10.10) or later use framework "Foundation" use scripting additions use cPathLib : script "choosePathLib" use imgPicker : script "imgPickerLib" –掃除 tell application "Pixelmator Pro" to close every document without saving –必要なパス情報をユーザーに問い合わせる set {inFol, outFol} to choose multiple path with titles {"Img Folder", "Output Folder"} set outFolStr to outFol as string –画像フォルダから画像のパス一覧を取得 set f1List to getFilepathListByUTI(POSIX path of inFol, "public.image", "alias") of imgPicker –取得した画像を超解像処理して repeat with i in f1List tell application "Pixelmator Pro" open i tell front document with timeout of 3000 seconds super resolution end timeout end tell end tell –新規保存ファイルパスの作成 set pathStr to POSIX path of i set filenameStr to (current application’s NSString’s stringWithString:(pathStr))’s lastPathComponent() as string set savePath to outFolStr & filenameStr tell application "Pixelmator Pro" save front document in file savePath as PNG tell front document close without saving end tell end tell end repeat |
20周年だそうで。自分がQ&A系SNS「Quora」に投稿した内容を一部書き換えて掲載してみます。自分で書いたものなので、とくに問題はないでしょう。
「Windowsの各バージョンを家に例えると……という話があるが、Mac OS Xではどうか?」 という質問に答えたものです。
新宿・髙島屋で販売されたので「髙島屋記念」品と呼ばれる。Unicode対応で「髙島屋」という文字を入力・表示できるようになった。ヒラギノフォントの美しさに住人が魅了された。ただし、電源コンセント(Appleロゴマーク)が部屋(画面上部)中央にある。実用性を拒否したオールガラス製のモデルハウス。「住めない家」「いつかは新築を」と眺める程度の完成度。DOSを思わせるメンテ用の工具(Terminal.app)が標準装備されてショックを受ける住人多数。
土台と柱しかない。かろうじて美しいガラス窓がついているが、雨風をしのげない。ただし、土台だけは地下3階分あってやたらと豪華。太陽の光を必要としない地下住民(Unix民)にはウケた。
むぎわらの屋根がついた。でも、ドアがついていない。生活に必要なものがそろっていないので、食事したり寝るのに前のあばら屋に帰る必要があった。
はじめて、普通に生活できるようにひととおりの装備が加わった。ただし、家具が入らなかったり居心地が悪かったりしたが、外見はやたらと豪華になった。
はじめて、引越し前のあばら屋(Classic Mac OS)に帰る必要を感じなくなった。ただし、ドアの建てつけが悪かったり、うまく動かない家電製品が散見された。
かなりよくなった。しかし、土台部分で以前からあった不具合がそのままだったので、過渡期感がすごかった。ガス(PowerPC)からオール電化(Intel)に切り替えたので、不具合がありつつも快適さが当社比2.5倍という謎仕様。工具(Xcode)の整備がすすみ、快適さをアップさせるためにはメーカー謹製のオール家電専用工具を使うことが必須となった。
土台の修正が行われた。細かい不具合はあったが、とても快適になった。その一方で、無理のしすぎで、家を建てるのに参加していた棟梁(アビー・テバニアン)が辞めてしまった。また、昔のあばら家から持ってきた家具をそのまま使うことができなくなった。引越し前のあばら家は解約された。
家の完成度が増して、人によっては「過去最高」の完成度。ここから先に進むことを拒む住人が散見された。自動販売機が家の中に設置された最初のバージョン。前バージョンの不具合点の修正に全力で取り組むというCEOの公開土下座が評価された。
電源規格が100Vから200Vに変更され、家具の買い替えが必要になったりした。無料配布されはじめ、土地があれば無料で家を建ててくれるようになった。趣味で仕事をしていた変態CEOが健康問題で一線を退き、その後の内紛が感じられる出来。
微細な変更なので、変更されたことに住人は気づかなかった。部屋の名前や家具の名前が、犬小屋に合わせて変更された。
巨大化した犬小屋に母屋の仕様が変更されはじめた。ただし、時計が狂うというバカみたいな問題点があり、修正できないことに住人が呆れはじめた。
野心的な装備が多数備わった、意欲的な改修である一方、あらたな機能不全も出てきた。
10.10の不具合点の修正を全力で行なった。
セキュリティの強化が行われはじめた。機能が充実した名バージョン。しかし、セキュリティを実現するために階段が使えないなど、実用上問題のある機能がぼちぼち見られはじめた。
完成直前までは高い評価を得ていたが、引き渡し時に廃墟になっていた事故物件。毒の霧が吹き出していて中に住めない家。macOS史上最悪にして最低。なぜこれで眉毛担当者の首が飛ばなかったのかが理解できない。住民からの嫌われようからmacOS「Vista」と呼ばれた。また、家中にひび割れがあり、眉毛出てこいと激怒するもの多数。この毒の沼をパスする住人多数。これをリリースした眉毛担当者とCEOへのヘイトが高まった。
昔ながらの100V電源で動く家電を次のバージョンから家の中に置いておけなくなった。100Vの家電を動かすと警告を受けるようになった。初期はこまごまとした(無視できないレベルの)問題があったが、バージョン末期にはなんとかまとめられた。「偶数バージョンしかインストールしてはいけない。奇数バージョンは廃墟」との見方が強まった。
建築中に廃墟であることがわかった家。200V電源専用になったので、使えない家電は捨てるほかなかった。10.13で住人も慣れたもので「この家には住めない」ことが夏ごろにはわかっていた。使い勝手に目をつぶってセキュリティのために新聞受けをセメントで埋める(PDFViewのリンクに何かを埋め込まれた場合に備えて機能を大幅に制限した)など、やり方が乱暴(説明が一切ない)。リリース前からmacOS「Vista2」「毒の沼2号」と呼ばれていた。翌年にARM移行+11.0構想が発表されなかったら、かなりの住人がメーカーに直接文句を怒鳴り込んでいたことだろう。
このところ強化され続けた犬小屋と一体化されることが発表され、犬用のミニチュア家具が置けるようになるらしい家。犬でも使えるように犬用の取っ手や犬用のドアが新設されている。問題視されるような破滅的な機能が少ない一方で、見た目が犬用なのか人間用なのかはっきりしない。ただし、熱により不毛の荒野となりつつあった土地(Intel)から犬用の涼しい土地(Apple Silicon)に移し替えられることになった。でも油断はできない。最近は引き渡し時に事故を起こすパターンが増えているので、どんな事故が起こるかわからない。
とりあえず、v11.0は「偶数バージョン」(16.0)なので毒の沼になる可能性は低そうだが、v12.0(10.17)が毒の沼化しないことを祈る。
macOS 11.0の評価がとても難しい気がします。AppleScript系については、あまり問題が出ていない雰囲気なんですが、もっと下のレイヤー(ハードウェアに近いレイヤーとか)でいろいろ問題が散見されているので、v11.x台はお試し版みたいなものなんでしょう。
見た目もこなれていなくて、使い勝手が軽視されている印象があります。初期のβはデザイン面での出来がひどくて「見た目で使いたくなくなる初めてのmacOS」だと感じました。リリース版は幾分マシになりましたが、デザイン変更を強引に行いすぎて使い勝手を損ねています。ダイアログとウィンドウの区別がつきにくく、ツールバーアイコンの視認性が低い(iWork Apps)とかいう「これでどーしたいの?」という出来。ユーザーが文句を言いまくって12.0ではもう少しマイルドな仕上がりになってほしいところです。
自分自身はmacOS 10.14.6をメイン環境に据えつつ、10.15.7と11.3betaを並べて使っています。10.14.6もベストというわけではなく、Appleの度重なる改悪によってWebViewの動作がおかしくなっているし(バグレポートしても直せないし直らない)、メモリ管理は10.14.x台はわりとひどくて、アプリケーションで使用済みのメモリが解放されないなど、Kamenokoのアプリケーション開発時にmacOS 10.14特有の問題に悩まされました。
iWork Apps(Keynote、Numbers、Pages)がバージョン11.0にアップデートされました。
3アプリ共通でAppleScriptから書類のパスワード設定確認、パスワード設定の機能が追加されています。
また、Keynote v10.3.5、v10.3.8とmovie書き出し時のCodec指定オプションに「h.264」とAppleScriptの処理系ではエラーになる記号を含む予約語が入っていたのですが、これがv11.0で「h264」と修正されました。
# 記号を含む予約語は禁止されています。「C++」とか(Fine Reader OCR Proに入っていますわー)
実際に動作確認してみないとまともに動くかどうかは不明ですが、用語辞書上では修正されています。報告して半年以内で修正されたので、修正も何もされないよりはマシでしょう。正直なところ、こんな程度の低いバグは事前にチェックして解消してほしいところではあります(Mac App Storeに一般開発者が出したらリジェクトされるレベル?)。
ちょいちょいAppleScriptの瑣末な機能を追加していただけるのはありがたいのですが、ページ内の選択中のオブジェクトへのアクセス(selected itemsとか)を用意してほしいところです。現状ではselectionで取れるのはページ(slide)単位だけです。
また、text itemの縦書き(Vertical)属性にもアクセス(Read/Write)できてほしい気がします。Keynote書類上にWord Cloudを作成するときにScriptから素直にオブジェクト回転ができずに困ります(GUI Scriptingで強引にやってるんですけれども)。
▲Keynote v11:documentに「password protected」属性(Read Only)と、「set password」コマンドが追加
Keynote v11.0上で動作確認ずみ。ただし、いったんパスワードを設定した書類は、GUI側からしかパスワード解除できない点に注意。また、AppleScriptからのKeynote書類オープン時にパスワードを指定してオープンすることもできないので、当該書類のパスワードをKeychainに保存しないと書類オープン時のパスワード入力をパスできない。こちらはちゃんと(h.264と違って)動作確認したらしい。でも、油断はできない。それがAppleクオリティ。
▲Numbers v11:documentに「password protected」属性(Read Only)と、「set password」コマンドが追加
▲Pages v11:documentに「password protected」属性(Read Only)と、「set password」コマンドが追加
▲Pages v11:exportコマンドのexport optionsに「include comments」属性と、「include annotations」属性が追加
電子書籍「Music Control With AppleScript」の企画を再始動させます。
→ 発売しました
iTunesからMusic.appに切り替わり、AppleScriptの解説書を出すならここしかない というタイミングでmacOS 10.15のPDFViewのセキュリティ制限の大幅強化(=できないことが増える)に直面。
気合いを入れてPDF本文中に「applescript://」URLリンクを埋め込んで、ワンクリックで埋め込んだAppleScriptの内容がスクリプトエディタに転送されるよう(本Blogと同じように)準備していたのですが、これが止められてしまいました。URLイベント系はセキュリティホール源としてAppleから目をつけられていた箇所でもあります(Help Bookまわりで一度大穴が開いていたことがあったので)。
URLリンクでAppleScript埋め込みが事実上許可されない(長いURLリンクが途中で切られる)という状況のもと、Appleに文句を送信しつつノーアンサー&ノーリアクションな日々。途中まで書きかけて完全に腐っておりました。
壁に貼ってあった表紙のハードコピーもむなしく、塩漬け状態の日々。そんなMusic.app本もコンセプトをやや変更して再始動。当初はiTunes本のScriptをすべてMusic.appに差し替えただけの内容を予定していましたが、ちょっと変わる感じです。とりあえず、表紙を作り直してみました。また、AppleScriptコマンドリファレンスの最新版を添付しています。いま着手した段階ですでに200ページぐらいですが、最終的には300ページ以上ぐらいいくかもしれません。すでに「えほん」ではありません。
従来の「えほんシリーズ」では「難しく見えそうな資料的コンテンツはつけないようにしよう」「ページ数が増えて紙メディア展開できなくなることは防ごう」というのがコンセプトでした。64ページぐらいの極小ページ数でまとめることと、難易度設定を厳密に管理すること、難しい内容を入れないことに心血を注いでいたわけですが、これらの制限を外して再編集しています。FileMaker Pro Scripting Bookに近い味付け(ひととおり解説)になると思います。
■表 既刊本タイトルとページ数(多い順にソート)
タイトル | ページ数 |
AppleScript最新リファレンス v2.0 | 483.0 |
Blogアーカイブ本Vol.4 | 450.0 |
Blogアーカイブ本Vol.5 | 429.0 |
Blogアーカイブ本Vol.1 | 418.0 |
Blogアーカイブ本Vol.3 | 404.0 |
Blogアーカイブ本Vol.6 | 383.0 |
Blogアーカイブ本Vol.2 | 367.0 |
Music Scripting v3.0(再編集着手直後、作業中) | 261 |
質問サイトで元雑誌編集者が可能なかぎりいろいろ答えてみた | 258.0 |
Cocoa Scripting Course #01_1.1a | 250.0 |
FileMaker Pro Scripting Book_English | 158.0 |
最新事情がわかるAppleScript10大最新技術 v2.0 | 148.0 |
FileMaker Pro Scripting Book v1.2 | 139.0 |
iTunes Control | 48.0 |
Keynote Control 1 | 47.0 |
Keynote Control 2 | 45.0 |
途中、FileMaker Pro本を書いたおりに「URLリンククリックが使えないので、本とは別アーカイブとして提供すればいい」という割り切りを行い、これで「OSの制限がきつくなったけど、機能を損ねずに本+Scriptを提供可能」な状態になっていました。本人がURLリンクにこだわっていただけなんですけれども。
Keynoteの最前面の書類の現在表示中のスライドで選択中のオブジェクトの情報を、テキスト(object text)と幅(width)、高さ(height)から特定するAppleScriptです。
KeynoteのAppleScript用語辞書に「selected item」といった予約語がなく、現在のスライド上の「選択中のオブジェクト」を取得する機能が存在していません。一応、「selection」という予約語はあるのですが、これが有効なのは「選択中のスライド」(複数選択可)なので、本来やりたい「選択中のテキストアイテムからリンク情報を消去」といった処理ができません。
その下調べで作ってみました。
以前、選択中のオブジェクトのテキスト(object text)を取得するScriptを書いたことはあったのですが、それはあくまでテキストを取得するだけで、元のスライド上のオブジェクトのどれが該当するかという処理は行なっていませんでした。
そこで、選択中のオブジェクト(だいたいテキストアイテムが目標)をテキスト(object text)、オブジェクトの幅と高さで比較して特定するようにしてみました。例によってCopy & Pasteで新規書類にペーストして情報を調べるため、GUI Scriptingがオンになっている必要があります。
本Scriptの実行前にKeynote書類上のオブジェクトを選択しておく必要があります。
AppleScript名:選択中のオブジェクトをテキストとサイズを元に特定する.scptd |
— – Created by: Takaaki Naganoya – Created on: 2021/01/27 — – Copyright © 2021 Piyomaru Software, All Rights Reserved — use AppleScript version "2.4" — Yosemite (10.10) or later use framework "Foundation" use scripting additions –選択中のオブジェクト(Text Frameを想定)をコピペで取得する set kList to getEveryTextFromCurrentKeynoteSlide() of me set out2List to {} –取得した情報をもとに元書類からデータを特定する tell application "Keynote" tell front document tell current slide repeat with i in kList copy i to {tmpTitle, tmpW, tmpH} try set bList to (every iWork item whose object text is equal to tmpTitle and width of it is equal to tmpW and height of it is equal to tmpH) set tmpItem to first item of bList set the end of out2List to tmpItem on error log {"Something Wrong with an item", tmpTitle, tmpW, tmpH} end try end repeat end tell end tell end tell return out2List –> {text item 4 of slide 179 of document id "E3EFE83C-A691-4D99-8939-6928892CBED5"} –選択中のオブジェクトをコピーして新規書類にペーストしてオブジェクト情報(テキスト、幅、高さ)を返す on getEveryTextFromCurrentKeynoteSlide() tell application "Keynote" activate set dCount to count every document if dCount = 0 then display notification "There is no Keynote document" return {} end if tell front document set sCount to count every slide end tell if sCount = 0 then display notification "There is no Slide in Keynote document" return {} end if end tell –Copy tell application "System Events" keystroke "c" using {command down} end tell tell application "Keynote" activate set nDoc to make new document tell nDoc set aMaster to master slide "空白" –set aMaster to master slide "Blank" tell current slide set base slide to aMaster end tell end tell end tell –Paste tell application "System Events" keystroke "v" using {command down} end tell delay 0.01 –Important!! set tOut to {} tell application "Keynote" tell front document tell current slide set tList to every iWork item repeat with i in tList set tmpText to (object text of i) as string set tmpHeight to height of i set tmpWidth to width of i set the end of tOut to {tmpText, tmpWidth, tmpHeight} end repeat end tell end tell –Dispose document tell front document close without saving end tell end tell return tOut end getEveryTextFromCurrentKeynoteSlide on retDelimedText(aList, aDelim) set aText to "" set curDelim to AppleScript’s text item delimiters set AppleScript’s text item delimiters to aDelim set aText to aList as text set AppleScript’s text item delimiters to curDelim return aText end retDelimedText |
「Cocoa Scripting Course」シリーズは読者の方からの質問などに従って本文を随時更新していく方式を採用しています。続編で各巻共通部分に変更が加わった場合には既刊分についても共通部分を更新します。
「Cocoa Scripting Course Volume #1 NSString」について、質問により説明不足の箇所が判明したため、追記したり修正したりしています。以下、その修正箇所です。
1章「プログラミングスタイル」>「一部のコマンドで書き換えが必要」「計算の優先順位を示すカッコを修正」を追加。 「添付サンプルScript紹介」>「ディレクトリ構成と概要紹介」を修正。 筆者あとがきの誤字修正。 更新履歴ページを追加。 レイアウトを全体的に修正。 3章「NSString Basic Samples」のヘッダー引用部分の書式変更。 ほか微修正。
昨日販売開始した「Cocoa Scripting Course #1」で同じページが連続している箇所をみつけてしまいました。近日中に修正しますが、これを自動でチェックするAppleScriptを書いておく必要性を感じ、作っておきました。
オープンソースのPDFビューワー「Skim」でオープン中のPDFの全ページのテキストを取得し、取得したあとで連続するページのテキスト同士を比較してチェックしています。
必要に応じて各ページを画像にレンダリングして比較する必要があるかと思っていたのですが、テキストだけでもけっこう検出できているのでこんな感じでしょうか。
このページは、AppleScriptにより実際のファイルを検出して表の内容を自動更新していたのですが、その作業バックアップのためにページそのものを複製して誤操作というか作業のやり直しに備えていたのですが、それを削除し忘れたかっこうです。
AppleScript名:最前面のPDFで連続して同じページが存在するかチェック.scptd |
— – Created by: Takaaki Naganoya – Created on: 2021/03/13 — – Copyright © 2021 Piyomaru Software, All Rights Reserved — use AppleScript version "2.4" — Yosemite (10.10) or later use framework "Foundation" use framework "Quartz" use scripting additions script pdfStore property aList : {} end script set (aList of pdfStore) to {} tell application "Skim" set dCount to count every document if dCount = 0 then return tell front document set myPath to path set pCount to count every page end tell end tell set anNSURL to (current application’s |NSURL|’s fileURLWithPath:myPath) set theDoc to current application’s PDFDocument’s alloc()’s initWithURL:anNSURL repeat with i from 0 to (pCount – 1) set aPage to (theDoc’s pageAtIndex:i) set tmpStr to (aPage’s |string|()) set the end of (aList of pdfStore) to (tmpStr as string) end repeat set resList to {} repeat with i from 1 to (pCount – 1) set aText1 to contents of item i of (aList of pdfStore) set aText2 to contents of item (i + 1) of (aList of pdfStore) if aText1 = aText2 then set the end of resList to {i, i + 1} end if end repeat if resList is equal to {} then display notification "PDFに重複ページは見られませんでした。" else set aText to listToText(resList) of me set the clipboard to aText display dialog "重複ページ:" default answer aText with icon 1 buttons {"OK"} default button 1 end if on listToText(aList) set listText to {"{"} set quotChar to ASCII character 34 set firstFlag to true repeat with i in aList set j to contents of i set aClass to class of i if (aClass = integer) or (aClass = number) or (aClass = real) then set the end of listText to (getFirst(firstFlag) of me & j as text) set firstFlag to false else if (aClass = string) or (aClass = text) or (aClass = Unicode text) then set the end of listText to ((getFirst(firstFlag) of me & quotChar & j as text) & quotChar) set firstFlag to false else if aClass is list then set the end of listText to (getFirst(firstFlag) of me & listToText(j)) –ちょっと再帰処理 set firstFlag to false end if end repeat set the end of listText to "}" set listText to listText as text return listText end listToText on getFirst(aFlag) if aFlag = true then return "" if aFlag = false then return "," end getFirst |
Cocoa Scripting本「Cocoa Scripting Course #1 NSString」の販売を開始しました(通称:Cocoa本)。
ページ数:247ページ
フォーマット:PDF+Zipアーカイブ(715ファイル)
特別特典:
Script Debuggerの15%割引購入コード入り
購入後3か月まで、本書の内容で理解できない箇所について3か所まで補足説明
理解度確認テストで合格した方に修了証明書を発行
→ Cocoa Scripting Course #1 (お試し版)
内容:
macOSのAPIであるCocoaをAppleScriptから利用し、macOSの持つ強力な機能をアプリケーションの補助なしに直接呼び出せる「Cocoa Scripting」は、日々の業務やデータ処理に、たいへん強力な武器になります。
この、Cocoa Scriptingについてはとくに日本語の書籍が存在しておらず、これまでは「Xcodeの使い方、GUIの作り方、各メソッドの使い方….」といった、体系がまったく異なるObjective-Cの入門書で断片的に情報を得ることしかできませんでした。
本書は、Cocoa APIの使い方をAppleScriptに合わせて解説。とくに、Objective-C/Swift入門書にある膨大な「Xcodeの使いこなし」部分は覚える必要はありません。図を中心に説明することで、難解な概念を理解しやすく解説します。
また、本書は「AppleScriptの穴」掲載AppleScriptのカテゴリ別アーカイブ集ともなっており、本書にはNSStringなど文字処理を行うサンプルScriptのファイルを添付しています。
Cocoa Scriptingの日本語による初めての解説本です。文章よりも図などを多めに用いて解説し、添付の大量のScript(715本)を実際に動かして試していただく種類の本です。
eSeminor: Cocoa Scripting Course Volume #1 NSString
eSeminor: Cocoa Scripting Course Volume #2 NSArray
eSeminor: Cocoa Scripting Course Volume #3 NSDictionary
eSeminor: Cocoa Scripting Course Volume #4 NSURL
eSeminor: Cocoa Scripting Course Volume #5 NSImage
eSeminor: Cocoa Scripting Course Volume #6 PDFKit
eSeminor: Cocoa Scripting Course Volume #7 NSAttributedString
eSeminor: Cocoa Scripting Course Volume #8 NSFileManager
eSeminor: Cocoa Scripting Course Volume #9 Webkit
eSeminor: Cocoa Scripting Course Volume #10 System hardware & software Information
▲こちらが構想です。PDFKit本にサードパーティのPDF Framework「PSPDF」に関する言及やサンプルを掲載するという構想もあります。ご意見やご要望は本記事へのコメント欄にお寄せください
Keynoteの表の中に入っている1列目のデータをもとに、指定ルートフォルダ以下のサブフォルダを指定して、その下位フォルダに存在しているAppleScript書類の数をSpotlightでかぞえ、表の2列目に書き戻すAppleScriptです。
新著「Cocoa Scripting Course #1」の付録Scriptについて、各フォルダに入っているScript書類をかぞえて表に入れておく必要がありました。ただ、内容をアップデートするたびに書き換える必要があるので、自動でカウントして表に書き込むScriptを用意しました。
実行にはShane Stanleyの「Metadata Lib」を必要とします。実行にはScript Debuggerも必要です。Keynoteで表の入ったスライドを表示している必要もあります。表の1列目に書かれたサブフォルダ名を指定して、それぞれ含まれている書類数をカウントして表に書き戻します。
▲カウント対象フォルダ。AppleScript書類がフラット形式とバンドル形式の2つが混在して入っている
▲書類数をかぞえるルートフォルダを指定。表の1列目にかかれているフォルダ名と連結して、その下をすべてSpotlightで検索してファイルの存在確認を行う
AppleScript名:表の中に入っている1列目のデータをもとにフォルダ検索して値を返す.scptd |
— – Created by: Takaaki Naganoya – Created on: 2021/03/05 — – Copyright © 2021 Piyomaru Software, All Rights Reserved — use AppleScript version "2.7" — High Sierra (10.13) or later use framework "Foundation" use scripting additions use mdLib : script "Metadata Lib" version "2.0.0" –カウントするAppleScript書類が入っているフォルダのルートフォルダを指定 set origPath to POSIX path of (choose folder with prompt "Select Target folder") tell application "Keynote" tell front document tell current slide –現在のスライド上の表を取得 set tList to every table –表オブジェクトでループ repeat with i in tList –表オブジェクトの情報取得 tell i set colCount to column count set rowCount to row count set headerCount to header row count set footerCount to footer row count –表のセル内データを取得して2D Arrayにまとめる set newList to {} repeat with y from 1 to rowCount tell row y set cList to value of every cell set tmpL to {} repeat with ii in cList set jj to contents of ii if jj = missing value then set jj to "" –空欄はmissing valueが返ってくるのでヌルストリングに差し替え set the end of tmpL to jj end repeat set the end of newList to tmpL end tell end repeat –Keynoteの表データ1列目の情報をもとに、実際のフォルダの中のAppleScript書類を検索してカウントしてlistに記入 set new2List to items (headerCount + 1) thru -1 of newList repeat with ii in new2List copy ii to oneLine set targFolName to first item of oneLine set tmpTarg to origPath & "/" & targFolName & "/" –Spotlight検索でファイルを取得する set aResList to perform search in folders {tmpTarg} predicate string "kMDItemContentType == %@ || kMDItemContentType == %@" search arguments {"com.apple.applescript.script", "com.apple.applescript.script-bundle"} –フラット形式書類とバンドル形式書類を検索 set scrCount to length of aResList –書類数をカウント set last item of ii to scrCount end repeat –Keynoteの表にデータを書き戻す repeat with y from 1 to (length of new2List) tell row (y + 1) set aDat to contents of item y of new2List repeat with x from 1 to length of aDat –非同期実行モード(倍速処理) ignoring application responses tell cell x set its value to contents of (item x of aDat) end tell end ignoring end repeat end tell end repeat end tell end repeat end tell end tell end tell |
現在作成中の「Cocoa Scripting Course #1」のお試し版を掲載いたしました。どういう内容の本かを手にとってご確認いただけます。完成にはもう少しかかりますが、掲載分についてはだいたい確定した内容によるものです。
→ Cocoa Scripting Course #1を販売開始
また、本書は「AppleScriptの穴」掲載AppleScriptのカテゴリ別アーカイブ集ともなっており、Vol.1にはNSStringなど文字処理を行うサンプルScriptのファイルを添付しています(現時点で636本)。内容の重複などもあり、純粋にこの本数すべてが別々のものになっているわけではありませんが、だいたいこのぐらいです。
すべてを網羅したわけではありませんが、地道に基礎的なサンプルを掲載したのが一番大変だったでしょうか。
Keynoteの最前面の書類で、選択したマスタースライドに該当するスライドのタイトルのテキストフレームの高さ(height)を統一するAppleScriptです。
Cocoa Scripting本の監修者のedama2さんからタイトルの大きさが不揃いで見にくいという指摘があり、その対処のために組んでみました(泣)。
AppleScript名:全スライドのデフォルトタイトルアイテムの高さを統一.scpt |
— – Created by: Takaaki Naganoya – Created on: 2021/03/01 — – Copyright © 2021 Piyomaru Software, All Rights Reserved — use AppleScript version "2.5" use scripting additions use framework "Foundation" set targetHeight to 97 –最前面の書類のベーススライド(マスタースライド)名称一覧を取得してユニーク化 tell application "Keynote" set baseNames to (name of base slide of every slide of front document) end tell set aRes to uniquify1DList(baseNames) of me –処理対象のマスタースライドを選択 set tSlide to (choose from list aRes with prompt "処理対象のベーススライド名を選択") as string –最前面の書類の全スライドのうち、指定のマスタースライドを指定してあるもののタイトルの高さを統一 tell application "Keynote" tell front document –全スライドを取得してループ set sList to every slide repeat with i in sList set j to contents of i tell j –スライドのマスタースライド名が指定のものに該当する場合にのみ処理 set bSlide to (name of base slide) as string if bSlide is equal to tSlide then try ignoring application responses set height of default title item to targetHeight end ignoring end try end if end tell end repeat end tell end tell on uniquify1DList(theList as list) set theSet to current application’s NSOrderedSet’s orderedSetWithArray:theList return (theSet’s array()) as list end uniquify1DList |
指定の文字がシフトJISのコードの範囲に存在しているかどうかをチェックするAppleScriptです。
絵文字とか、日本国内で使われていない(CJK統合漢字のうち日本で使われていない)漢字を除外するために作ってみたものです。もともと、半角文字と全角文字の判定を行うためにNSASCIIStringEncodingに変換できるかどうかを調べるサンプルがあったので、「JIS第1/第2水準文字だけ調べるのに同様の処理で済むのでは?」と考えて試してみたものです。
▲実際のプログラムリスト。プログラムリスト下部のURL Linkをクリックすると、文字列が欠落していないすべての内容がスクリプトエディタ上に転送されます
AppleScript名:指定文字のシフトJIS内文字かのチェック.scptd |
— – Created by: Takaaki Naganoya – Created on: 2021/02/28 — – Copyright © 2021 Piyomaru Software, All Rights Reserved — use AppleScript version "2.4" — Yosemite (10.10) or later use framework "Foundation" use scripting additions set a1Res to chkSJISChar("微") of me –> true set a2Res to chkSJISChar("") of me –> false set a3Res to chkSJISChar("熙") of me –> true set a4Res to chkSJISChar("") of me –> false return {a1Res, a2Res, a3Res, a4Res} –> {true, false, true, false} on chkSJISChar(aChar as string) set aStr to current application’s NSString’s stringWithString:aChar set tmpStr1 to (aStr’s canBeConvertedToEncoding:(current application’s NSShiftJISStringEncoding)) return tmpStr1 as boolean end chkSJISChar |
Keynoteで現在オープン中の書類の現在表示中のスライド(ページ)中にあるtext itemのうち、開始文字、終了文字ではさまれているテキストを指定色に塗り替えるAppleScriptです。
用途はご覧の通り、現在作成中のCocoa Scripting本の資料の装飾のためであり、「|」と「|」で囲まれている箇所の色を変えたら見やすいのでは? と、考えて作成・実行したものです。
NSScannerを使えば楽に書けるかも? などと思っておりましたが、検出位置(文字数)を返す機能がないので、位置だけを返してほしいという用途に向いていないもよう。仕方なく、普通にAppleScriptで1文字ごとチェック&開始文字/終了文字のチェックをフラグ管理……という、高級言語らしからぬ泥臭いコードを書く羽目に(でも、こういうの書くケースが多いですよね)。
AppleScript名:指定した文字で囲まれたキーワードの色を置換する |
— – Created by: Takaaki Naganoya – Created on: 2021/02/24 — – Copyright © 2021 Piyomaru Software, All Rights Reserved — use AppleScript version "2.5" use scripting additions use framework "Foundation" set targCol to choose color –塗る文字色を選択 set headPickUpChar to "|" set tailPickUpChar to "|" –処理対象データの取得 tell application "Keynote" –最前面の書類 tell front document –現在表示中のスライド tell current slide –text itemをすべて取得 set tList to every text item if tList = {} then return –何もtext itemが存在しなかったら処理終了 –text itemの中に入っている文字列を取得 set objTList to object text of every text item end tell end tell end tell –出現判定しつつ色を塗る tell application "Keynote" tell front document tell current slide set posList to {} set aCount to 1 –text itemでループ repeat with i in objTList set j to contents of i –ターゲット文字で囲まれている箇所を検出。複数箇所検出対応 set bCon to pickUpPositionPairsFromTo(j, headPickUpChar, tailPickUpChar) of me if bCon is not equal to {} then set aTarg to item aCount of tList –出現位置でループ(複数検出対応) repeat with ii in bCon copy ii to {aStart, anEnd} –高速処理のために非同期実行 ignoring application responses tell aTarg set color of characters aStart thru anEnd of object text to targCol end tell end ignoring end repeat end if set aCount to aCount + 1 end repeat end tell end tell end tell –開始文字と終了文字に囲われた文字列のすべての位置情報を返す on pickUpPositionPairsFromTo(aParamStr, fromStr, toStr) script hsAry property anArray : {} property aList : {} end script set (anArray of hsAry) to {} set (aList of hsAry) to characters of aParamStr set tmpPair to {} set searchMode to 0 — 0:fromStr, 1:toStr set aCount to 1 repeat with i in (aList of hsAry) set j to contents of i if searchMode = 0 then if j = fromStr then set the end of tmpPair to aCount set searchMode to 1 end if else if searchMode = 1 then if j = toStr then set the end of tmpPair to aCount set searchMode to 0 set the end of (anArray of hsAry) to tmpPair set tmpPair to {} end if end if set aCount to aCount + 1 end repeat return (anArray of hsAry) end pickUpPositionPairsFromTo |
旧称「部首で漢字検索」のバージョンアップ版です。部首ではなく構成部品の文字を指定して漢字を検索するAppleScriptです。
便利な道具ではありますが、あくまでも子供の学習用以外の用途にお使いください。
–> Download kanjiSearchFromPartsV3.zip (AppleScript Bundle with library and JSON files in its bundle)
前バージョンでは常用漢字の範囲を超えるデータが出力されるという問題点があったため、常用漢字の一覧データを作成し、これに合致するものだけを出力するようにしました。
常用漢字との照合処理に時間がかかっており、v2ではAppleScriptのネイティブ機能でループして除外チェックを行なっておりました。これをv3ではCocoaの機能を用いて一括で重複部分の抽出を行うことで、v2の半分の時間で完了できることに。v2で0.6秒程度かかっていたものが、v3では0.3秒を下回る時間で処理できるようになりました(MacBook Pro Core i7 2.66GHz)。
そもそも論でいえば、元のJSONデータから常用漢字+人名漢字を超える文字の情報を削除すればいいだけの話なので、JSONデータから常用漢字+人名漢字を超える文字を削除するプログラムを書いて実行するのがよいのでしょう。
AppleScript名:構成要素を指定して漢字検索 v3.scptd |
— – Created by: Takaaki Naganoya – Created on: 2021/02/21 — – Copyright © 2021 Piyomaru Software, All Rights Reserved — use AppleScript version "2.7" use framework "Foundation" use scripting additions use jkLib : script "jyoyoKanjiLib" –常用漢字一覧を返してくるAppleScriptライブラリ script jsonStr property aJsonDict : missing value –JSONから読み取ったNSDictionary property jKanji : missing value –常用漢字データ(NSArray) end script property NSString : a reference to current application’s NSString property NSCountedSet : a reference to current application’s NSCountedSet property NSJSONSerialization : a reference to current application’s NSJSONSerialization property NSUTF8StringEncoding : a reference to current application’s NSUTF8StringEncoding –図形としての構成要素を指定して漢字検索(部首ではない) –set aRes to searchKanjiFromElementJ("木") of me –きへん? のぎへんや他のものも返ってくるよ –> {"椅", "植", "椎", "検", "頼", "漆", "鉢", …} –set bRes to searchKanjiFromElementJ("氵") of me –さんずい –> {"滴", "漁", "漂", "漆", "漏", "演", "漠",…} set dRes to searchKanjiFromElementJ("⻖") of me –>{"堕", "墜", "阪", "防", "阻", "附", "降"…} –検索に使える部首のキー文字の一覧を返す –set qList to listupQueryKeysForKanji() of me –> {"工", "棘", "左", "位", "婁", "攴", …} on searchKanjiFromElementJ(aQueryStr) if (aJsonDict of jsonStr) = missing value then my init() if (jKanji of jsonStr) = missing value then my initJ() set aRes to (aJsonDict of jsonStr)’s valueForKey:aQueryStr if aRes = missing value then return missing value set cArray to aRes’s arrayByAddingObjectsFromArray:(jKanji of jsonStr) set cRes to returnDuplicatesOnly(cArray) of me return cRes end searchKanjiFromElementJ on searchKanjiFromElement(aQueryStr) if (aJsonDict of jsonStr) = missing value then my init() set aRes to (aJsonDict of jsonStr)’s valueForKey:aQueryStr if aRes = missing value then return missing value return aRes as list end searchKanjiFromElement on listupQueryKeysForKanji() if (aJsonDict of jsonStr) = missing value then my init() set aRes to (aJsonDict of jsonStr)’s allKeys() return aRes as list end listupQueryKeysForKanji on initJ() set (jKanji of jsonStr) to current application’s NSArray’s arrayWithArray:(retJyouyouKanji() of jkLib) end initJ on init() –https://github.com/yagays/kanjivg-radical set aPath to (POSIX path of (path to me)) & "Contents/Resources/element2kanji.json" set jsonString to NSString’s alloc()’s initWithContentsOfFile:(aPath) encoding:(NSUTF8StringEncoding) |error|:(missing value) set jsonData to jsonString’s dataUsingEncoding:(NSUTF8StringEncoding) set (aJsonDict of jsonStr) to NSJSONSerialization’s JSONObjectWithData:jsonData options:0 |error|:(missing value) end init on returnDuplicatesOnly(anArray) set aSet to NSCountedSet’s alloc()’s initWithArray:anArray set bList to (aSet’s allObjects()) as list set dupList to {} repeat with i in bList set aRes to (aSet’s countForObject:i) if aRes > 1 then set the end of dupList to (contents of i) end if end repeat return dupList end returnDuplicatesOnly |
漢字の部首を指定して、漢字を検索するAppleScriptです。厳密にいえば「部首」の文字ではなく、それっぽい文字で探せます。用途や利用者を想定できれば(子供が勉強用に使わないのであれば)十分に有用だと思います(理由は後述)。
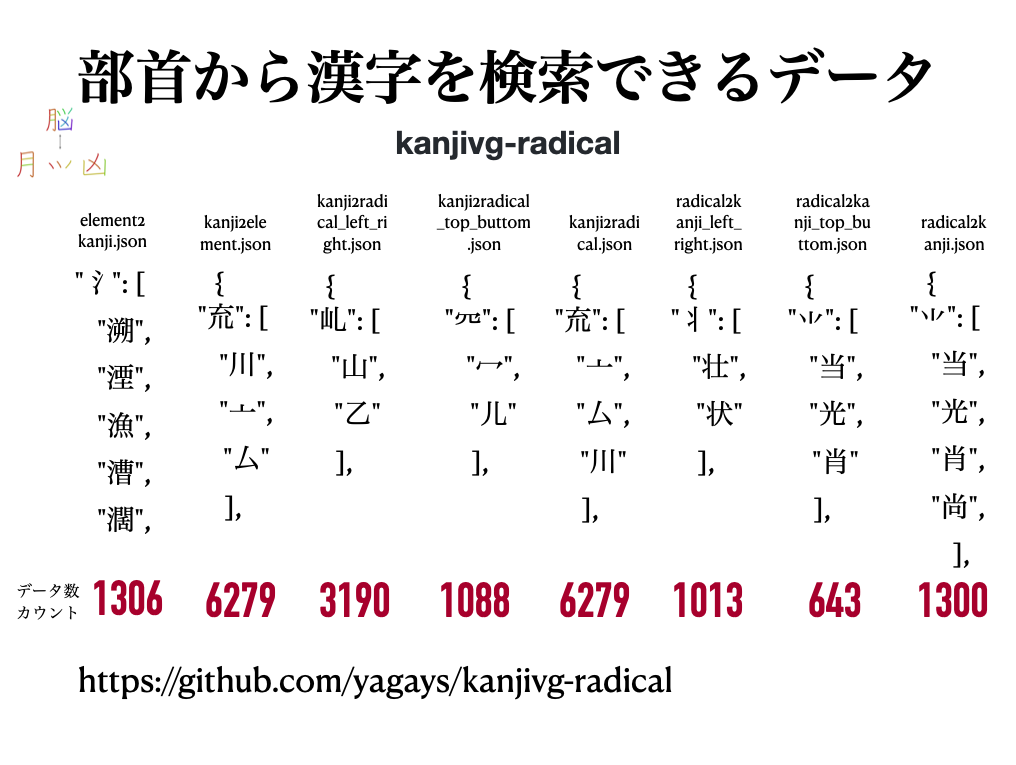
Unicodeのデータから検索できるのではないかと考え、Unicodeの規格を調べていたのですが、漢字のSVGデータから構成文字情報を抽出したとされる「kanjivg-radical」を偶然みつけ、これを利用することで、割と手軽に実現できました。
–> kanjiSearch.zip(Download Script Bundle included JSON in its bundle)
開発環境のMac(Intel Core i7 2.66GHz)で、キャッシュがヒットしていれば(JSONから変換したデータがpropertyに読み込まれていれば)0.02秒程度で検索できています。この手の処理はデータのローディング(読み込み)が命なので、SSD使用必須です。
同データはJSON形式なので、AppleScriptバンドル中にJSONのまま突っ込んで、Cocoaの機能を用いてNSDictionaryに読み込んで検索しています。
ほかにも、Mac OS Xへの移行時に散々紹介されたMac OS Xのビックリドッキリ機能「関連文字に変換」をAppleScriptで実現した「関連文字を検索」も作ってみました。
このあたりをまとめてAppleScriptライブラリにしておけば便利そうですが、まだ使い勝手をテストしている段階です。義務教育で習う漢字の構成要素(へん、つくり etc)の呼び名とkanjivg-radicalで利用できる構成パーツの間に不整合(kanjivg-radicalの方が柔軟)があるので、そのあたりを埋めないと使いにくそう(下手に子供が使うと間違った国語知識を持ってしまう)な危険があるので、そのあたりを補う必要性を感じます。
たとえば、「禾」(のぎへん)を持つ漢字を「木」で検索できてしまうところです。大人は「実用的で使いやすい!」と喜ぶところですが、義務教育課程では両者は厳密に区別されています。自分は使いやすいので喜んで使っていますが、用途によっては使わないほうがよいかもしれません。
へんやつくりを元に検索できるデータとして、同梱の「radical2kanji_left_right.json」や「radical2kanji_top_bottom.json」が存在していることに気づいたので、そちらをAppleScriptのバンドル中に入れて、同様に検索してみました。
ただ、こちらのデータは随分と粗が多く、「⻖」(こざとへん)で自分の名前に使われている「隆」を「radical2kanji_left_right.json」から検索したところヒットしません。
{"阨", "陵", "隈", "険", "陣", "院", "陲", "陦", "陽", "陳", "陬", "隧", "險", "除", "隍", "陜", "陀", "陏", "隗", "階", "障", "隕", "降", "陂", "隴", "隔", "際", "隅", "附", "限", "陸", "陟", "陌", "阮", "阡", "阯", "阻", "阿", "阪", "防"}
国語辞書や文字コード表との照合といいますか、きちんとした検証作業は行われておらず、機械的に処理しただけのデータという印象を受けます。
一方で、「element2kanji.json」を用いて「⻖」(こざとへん)で検索したところ、
{"嶐", "阨", "蔭", "橢", "薩", "隣", "婀", "陵", "隈", "窿", "険", "隠", "陷", "陣", "痾", "院", "陶", "隙", "陲", "陦", "陽", "陪", "陳", "隘", "陥", "陬", "墜", "隧", "陰", "險", "除", "隍", "陜", "陀", "陛", "陏", "隗", "階", "障", "隕", "降", "陂", "隨", "隴", "隔", "随", "際", "隋", "陞", "隰", "墮", "隱", "陝", "隅", "隊", "附", "限", "陋", "陸", "陟", "隲", "陌", "隆", "阮", "阡", "阯", "阻", "阿", "阪", "堕", "防"}
と、結果が返ってきており……どうも複数のJSONデータを用いて、へんやつくりを考慮したJSONデータで検索して、ヒットしなかったら「element2kanji.json」を用いて物量でダメ押しするように設計されているようです。つまり、「radical2kanji_left_right.json」や「radical2kanji_top_bottom.json」が粗いのを複数のデータで補うように使うものである、と。
無限の量とバリエーションを持つデータに対するアプローチとしては間違っていないと思いますが、文字コードという有限のデータに対しての処理としては少し疑問が残る実装です。本当に使い物になるデータにするには、実際に人間の手による検証と校正が必要な内容でしょう。そのことは明記されるべきです。
「element2kanji.json」は現状のままで有用だと思いますが、「radical2kanji_left_right.json」や「radical2kanji_top_bottom.json」については、実際に国語辞典と照合してデータを補わないと実用レベルにはならないと感じました。盲目的に信用しないで、手元で実際に評価・検証することが重要です。
データ自体、CJK(中国語、日本語、韓国語)の統合漢字をサポートする範囲で作成されているようで、日本語で日常的に利用する常用漢字よりも幅広い文字がデータ化されています。常用漢字の範囲内に含まれているかをチェックするデータを併用するのが妥当でしょう。
AppleScript名:部首で漢字検索.scptd |
— – Created by: Takaaki Naganoya – Created on: 2021/02/21 — – Copyright © 2021 Piyomaru Software, All Rights Reserved — use AppleScript version "2.7" use framework "Foundation" use scripting additions script jsonStr property aJsonDict : missing value end script property NSString : a reference to current application’s NSString property NSJSONSerialization : a reference to current application’s NSJSONSerialization property NSUTF8StringEncoding : a reference to current application’s NSUTF8StringEncoding –部首を指定して漢字検索 set aRes to searchKanjiFromElement("木") of me –きへん –> {"稾", "欅", "謀", "酥", "悚", "椁", "検"….} –set bRes to searchKanjiFromElement("氵") of me–さんずい –> {"溯", "湮", "漁", "漕", "濶", "懣", "添", "淨",…..} –set cRes to searchKanjiFromElement("之") of me –> {"芝", "泛", "貶", "乏"} –set dRes to searchKanjiFromElement("⻖") of me –> {"嶐", "阨", "蔭", "橢", "薩", "隣", "婀"…} –検索に使える部首のキー文字の一覧を返す –set qList to listupQueryKeysForKanji() of me –> {"工", "棘", "左", "位", "婁", "攴", "巨", "攵"…} on searchKanjiFromElement(aQueryStr) if (aJsonDict of jsonStr) = missing value then my init() set aRes to (aJsonDict of jsonStr)’s valueForKey:aQueryStr if aRes = missing value then return missing value return aRes as list end searchKanjiFromElement on listupQueryKeysForKanji() if (aJsonDict of jsonStr) = missing value then my init() set aRes to (aJsonDict of jsonStr)’s allKeys() return aRes as list end listupQueryKeysForKanji on init() –https://github.com/yagays/kanjivg-radical set aPath to (POSIX path of (path to me)) & "Contents/Resources/element2kanji.json" set jsonString to NSString’s alloc()’s initWithContentsOfFile:(aPath) encoding:(NSUTF8StringEncoding) |error|:(missing value) set jsonData to jsonString’s dataUsingEncoding:(NSUTF8StringEncoding) set (aJsonDict of jsonStr) to NSJSONSerialization’s JSONObjectWithData:jsonData options:0 |error|:(missing value) end init |
処理対象ページをユーザーに文字入力させた場合に、
X1,X2,X3,Y-Z
のようなフォーマットを解釈して、処理対象ページ番号をすべて展開するAppleScriptです。
もともと16年前に作成したScriptを書き換えたものです。オリジナルもとくに現行環境で問題なく動いているのですが、ソートルーチンを高速なものに差し替えています。ただし、処理データの量がたいして多くないことを前提としているため(数万ページ指定しないとCocoaのソートルーチンを利用するメリットがない)、Cocoaのソートルーチンは使っていません。
AppleScript名:ページ範囲処理 v2 |
— – Created by: Takaaki Naganoya – Created on: 2005/11/04 – Modified on: 2021/02/14 — – Copyright © 2021 Piyomaru Software, All Rights Reserved — use AppleScript version "2.4" — Yosemite (10.10) or later use framework "Foundation" use scripting additions set parsedList to parsePageRangeString("1-10, 35, 37, 39, 100-110") of me –> {1, 2, 3, 4, 5, 6, 7, 8, 9, 10, 35, 37, 39, 100, 101, 102, 103, 104, 105, 106, 107, 108, 109, 110} –ページ範囲指定のテキスト(多分)を展開して実際のページ数の一覧リストに on parsePageRangeString(pageText as string) set curDelim to AppleScript’s text item delimiters set AppleScript’s text item delimiters to ("," as string) set aList to text items of pageText set AppleScript’s text item delimiters to curDelim set eList to {} repeat with i in aList set j to contents of i if ("-" as string) is in j then set eList to eList & parseByHyphen(j) of me else set the end of eList to j as number end if end repeat set eList to removeDuplicates(eList) of me set eList to shellSortAscending(eList) of me return eList end parsePageRangeString –重複部分を削除 on removeDuplicates(aList) set newList to {} repeat with i from 1 to (length of aList) set anItem to item 1 of aList set aList to rest of aList if {anItem} is not in aList then set end of newList to anItem end repeat return newList end removeDuplicates –ハイフンを実際の数値に変換 on parseByHyphen(aText) set aText to aText as string set curDelim to AppleScript’s text item delimiters set AppleScript’s text item delimiters to ("-" as string) set aList to text items of aText set AppleScript’s text item delimiters to curDelim set sList to {} repeat with i from ((item 1 of aList) as number) to ((item 2 of aList) as number) set the end of sList to i end repeat return sList end parseByHyphen –入れ子ではないリストの昇順ソート on shellSortAscending(aSortList) script oBj property list : aSortList end script set len to count oBj’s list’s items set gap to 1 repeat while (gap ≤ len) set gap to ((gap * 3) + 1) end repeat repeat while (gap > 0) set gap to (gap div 3) if (gap < len) then repeat with i from gap to (len – 1) set temp to oBj’s list’s item (i + 1) set j to i repeat while ((j ≥ gap) and (oBj’s list’s item (j – gap + 1) > temp)) set oBj’s list’s item (j + 1) to oBj’s list’s item (j – gap + 1) set j to j – gap end repeat set oBj’s list’s item (j + 1) to temp end repeat end if end repeat return oBj’s list end shellSortAscending |