Menu

Skip to content
AppleScriptの穴
  • Home
  • Products
  • Books
  • Docs
  • Events
  • Forum
  • About This Blog
  • License
  • 仕事依頼

AppleScriptの穴

Useful & Practical AppleScript archive. Click '★Click Here to Open This Script' Link to download each AppleScript

カテゴリー: file

Script Debuggerに必要な機能を追加する

Posted on 2月 8, 2019 by Takaaki Naganoya

毎日仕事で使っているAppleScript統合開発環境(IDE)、Late Night SoftwareのScript Debugger。大変リッチな機能を持っているものの、仕事で使えば使ったで不満が出てくるもので、機能を追加したくなってきました。

Script Debugger自体もScriptableなアプリケーションなので、AppleScriptを記述して機能を追加できます。ScriptからはApple純正のスクリプトエディタとまったく同じことができるわけではありませんが、ある程度まではコントロールが可能です。

Script DebuggerのAppleScript用語辞書はスクリプトの分析機能がスクリプトエディタよりも大幅に高機能であり、比較にもなりません。ただし、スクリプト書類の書式(style runs)を取得できないため、構文色分けを利用した構文要素への分解ができませんでした。変数名のみ置換するとかハンドラ名のリストアップするといった、スクリプトエディタで10年以上前から利用している機能が使えないわけです(このあたりの処理をスクリプトエディタに依存せずに実行できるようになったのは、ほんのつい最近のことです)。マインドマップ上に各ハンドラの呼び出し関係を図示するような処理も10年ぐらい前からやっていますが、それもScript Debugger上では行えませんでした。一長一短です。

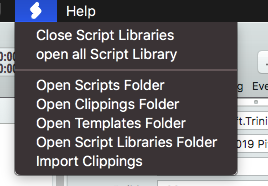
Script Debuggerは独自のScript Menuを持っており、~/Library/Application Support/Script Debugger 7/Scripts/フォルダ内に(Script Debuggerをコントロールする)各種AppleScriptを入れておくとScript Debugger内のScript Menuから呼び出して実行できるようになっています。

ここで紹介するのは「includeしているライブラリをすべてオープンする」Scriptと、「includeしているライブラリのScriptをすべてクローズする」Scriptです。

open all Script Library

スクリプトバンドルのAppleScriptで、バンドル内にAppleScriptライブラリを含んでいる場合に、それらをScript Debuggerでオープンします。機能を細分化して記述している場合に、全Scriptをチェックする必要が生じるとこのようにすべてオープンして確認する必要があります。本来、共通部分をライブラリ化しておく必要があるわけですが、突発的にこういう作業が発生したもので。

Close Script Libraries

「open all Script Library」スクリプトでオープンしたライブラリをクローズするAppleScriptです。Script Debugger上でメインのAppleScriptを選んでおくと、そのScript中でincludeしている(use)AppleScript Librariesをクローズします。

Script Debuggerで一番不満なのは動的に生成したWindowやMenuなどのイベントを拾ってくれないことですが、ほかにも、useコマンドで利用しているAppleScript Librariesでバンドル内に含めていないものをチェックしてバンドル内に入れる機能がないことでしょうか(動作確認して客先に送ったあとで焦ることがたびたび)。そのあたりもぼちぼち、、、、メーカーにリクエストを出して実装を待つよりも、自分でScriptを組んだほうが早いので、、、

AppleScript名:open all Script Library
tell application "Script Debugger"
  tell document 1
    set libList to (used script library files)
    
set aWin to script window of it
    
–> {script window id 13269 of application "Script Debugger"}
  end tell
  
  
set targWin to contents of first item of aWin
  
  
repeat with i in libList
    set j to contents of i
    
set jj to j as alias
    
    
try
      open jj in window targWin
    end try
  end repeat
end tell

★Click Here to Open This Script 

AppleScript名:Close Script Libraries
tell application "Script Debugger"
  tell front document
    set libList to (used script library files)
    
if libList = {} then return –No AppleScript Libraries
  end tell
  
  
set dList to every document
  
repeat with i in dList
    tell i
      set fSpec to file spec
      
if fSpec is in libList then
        ignoring application responses
          close with saving
        end ignoring
      end if
    end tell
  end repeat
end tell

★Click Here to Open This Script 

Posted in file OSA | Tagged 10.11savvy 10.12savvy 10.13savvy Script Debugger | Leave a comment

指定色で塗りつぶし角丸画像を作成

Posted on 2月 5, 2019 by Takaaki Naganoya

指定の矩形に対して、指定色で、指定半径の角丸で、指定ファイルパスに角丸ぬりつぶしPNG画像を作成するAppleScriptです。

色選択のポップアップメニュー中に入れるNSImage作成用に作ったものですが、ねんのために(動作確認のために)ファイル出力させてみました。

AppleScript名:指定色で塗りつぶし角丸画像を作成.scptd
—
–  Created by: Piyomaru Software
–  Created on: 2019/01/29
—
–  Copyright © 2019 Piyomaru Software, All Rights Reserved
—
use AppleScript version "2.4" — Yosemite (10.10) or later
use framework "Foundation"
use scripting additions
use framework "AppKit"

property |NSURL| : a reference to current application’s |NSURL|
property NSColor : a reference to current application’s NSColor
property NSString : a reference to current application’s NSString
property NSImage : a reference to current application’s NSImage
property NSScreen : a reference to current application’s NSScreen
property NSBezierPath : a reference to current application’s NSBezierPath
property NSPNGFileType : a reference to current application’s NSPNGFileType
property NSBitmapImageRep : a reference to current application’s NSBitmapImageRep

set tCol to choose color
copy tCol to {rVal, gVal, bVal}

set aRadius to 12
set aNSColor to makeNSColorFromRGBAval(rVal, gVal, bVal, 65535, 65535) of me
set aNSImage to makeRoundedNSImageWithFilledWithColor(100, 100, aNSColor, aRadius) of me

set aPath to NSString’s stringWithString:(POSIX path of (choose file name))
set bPath to aPath’s stringByAppendingPathExtension:"png"
set aRes to saveNSImageAtPathAsPNG(aNSImage, bPath) of me

–指定サイズのNSImageを作成し、指定色で塗ってNSImageで返す、anRadiusの半径の角丸で
on makeRoundedNSImageWithFilledWithColor(aWidth, aHeight, fillColor, anRadius as real)
  set anImage to NSImage’s alloc()’s initWithSize:(current application’s NSMakeSize(aWidth, aHeight))
  
anImage’s lockFocus()
  
—
  
set theRect to {{x:0, y:0}, {height:aHeight, width:aWidth}}
  
set theNSBezierPath to NSBezierPath’s bezierPathWithRoundedRect:theRect xRadius:anRadius yRadius:anRadius
  
—
  
fillColor’s |set|() –色設定
  
theNSBezierPath’s fill() –ぬりつぶし
  
—
  
anImage’s unlockFocus()
  
  
return anImage
end makeRoundedNSImageWithFilledWithColor

–aMaxValを最大値とする数値でNSColorを作成して返す
on makeNSColorFromRGBAval(redValue as integer, greenValue as integer, blueValue as integer, alphaValue as integer, aMaxVal as integer)
  set aRedCocoa to (redValue / aMaxVal) as real
  
set aGreenCocoa to (greenValue / aMaxVal) as real
  
set aBlueCocoa to (blueValue / aMaxVal) as real
  
set aAlphaCocoa to (alphaValue / aMaxVal) as real
  
set aColor to NSColor’s colorWithCalibratedRed:aRedCocoa green:aGreenCocoa blue:aBlueCocoa alpha:aAlphaCocoa
  
return aColor
end makeNSColorFromRGBAval

–NSImageを指定パスにPNG形式で保存
on saveNSImageAtPathAsPNG(anImage, outPath)
  set imageRep to anImage’s TIFFRepresentation()
  
set aRawimg to NSBitmapImageRep’s imageRepWithData:imageRep
  
  
set pathString to NSString’s stringWithString:outPath
  
set newPath to pathString’s stringByExpandingTildeInPath()
  
  
set myNewImageData to (aRawimg’s representationUsingType:(NSPNGFileType) |properties|:(missing value))
  
set aRes to (myNewImageData’s writeToFile:newPath atomically:true) as boolean
  
  
return aRes –成功ならtrue、失敗ならfalseが返る
end saveNSImageAtPathAsPNG

★Click Here to Open This Script 

Posted in file Image | Tagged 10.11savvy 10.12savvy 10.13savvy 10.14savvy NSBezierPath NSColor NSImage NSScreen NSString NSURL | Leave a comment

Finder上で選択中の画像のうち、最小のものに合わせて各画像の右上を基準にサイズ統一

Posted on 1月 26, 2019 by Takaaki Naganoya

Finderで選択中の画像のうち、最小のものに合わせて各画像の右上を原点にサイズを統一するAppleScriptです。

Finderで選択中のファイルから画像のみ抽出し、そのうちサイズが最小のものに合わせて他の画像をトリミングし、変更したものをデスクトップフォルダに出力します。

以前に画像の左上を基準に自動トリミングするバージョンのScriptを作成しましたが、あれはメニュー操作の説明用スクリーンショットの大きさを統一するためのもの。右上基準の本バージョンは、Driveのリネームやステータスバーの操作内容を説明するためのスクリーンショットの大きさ統一のために用意したものです。


▲大きさを揃える画像をFinder上で選択


▲処理後の画像。大きさが最小の画像に合わせてそろっている。切り抜き基準は右上

スクリーンショット画像を複数撮った場合に、厳密に同じサイズに固定することは(各種スクリーンショット作成ユーティリティを使わないと)行いづらいところです。

そこで、最小の画像を計算で求めて、それに合わせて自動トリミングするようにしてみました。Cocoaの機能を用いて画像処理しているため、Photoshopは必要ありません。

最小の画像を求めるのに、幅+高さの値でソートして最小のものを求めています(widthとheightによる2 key sortではなく1 Keyで済ませたかったので)。

AppleScript名:Finder上で選択中の画像のうち、最小のものに合わせて各画像の右上を基準にサイズ統一
— Created 2018-01-26 by Takaaki Naganoya
— 2019 Piyomaru Software
use AppleScript version "2.5"
use scripting additions
use framework "Foundation"
use framework "AppKit"
use framework "QuartzCore"

property |NSURL| : a reference to current application’s |NSURL|
property NSUUID : a reference to current application’s NSUUID
property NSArray : a reference to current application’s NSArray
property NSString : a reference to current application’s NSString
property NSImage : a reference to current application’s NSImage
property NSScreen : a reference to current application’s NSScreen
property NSZeroRect : a reference to current application’s NSZeroRect
property NSPredicate : a reference to current application’s NSPredicate
property NSPNGFileType : a reference to current application’s NSPNGFileType
property NSMutableArray : a reference to current application’s NSMutableArray
property NSCompositeCopy : a reference to current application’s NSCompositeCopy
property NSGraphicsContext : a reference to current application’s NSGraphicsContext
property NSBitmapImageRep : a reference to current application’s NSBitmapImageRep
property NSURLTypeIdentifierKey : a reference to current application’s NSURLTypeIdentifierKey
property NSCalibratedRGBColorSpace : a reference to current application’s NSCalibratedRGBColorSpace

tell application "Finder"
  set selList to selection as alias list
end tell

–指定のAlias listのうち画像のみ抽出
set filRes1 to filterAliasListByUTI(selList, "public.image") of me
if filRes1 = {} then
  tell current application
    –Error Message (No Selection)
    
display dialog "Finder上で選択されているファイルはありません。" buttons {"OK"} default button 1 with icon 1 with title "画像リサイズ処理できません"
  end tell
  
return
end if

–各種情報を入れたArrayを作成
set anArray to NSMutableArray’s new()
repeat with i in selList
  set imgPath to (POSIX path of i)
  
  
set aImage to makeNSImageFromFile(i) of me
  
set sizeInfo to |size|() of aImage
  
set sizeInfo to sizeInfo & {aImg:aImage, total:(width of sizeInfo) + (height of sizeInfo), myPath:imgPath}
  (
anArray’s addObject:sizeInfo)
end repeat

–最小のサイズの画像の算出
set aRes to anArray’s valueForKeyPath:("@min.total")
set bRes to first item of (filterRecListByLabel(anArray, "total == " & aRes as string) of me) –最小サイズの画像

–最小サイズ画像のwidthとheight
set minWidth to bRes’s width
set minHeight to bRes’s height

–環境情報の取得
set aPath to POSIX path of (path to desktop)
set retinaF to (NSScreen’s mainScreen()’s backingScaleFactor()) as real
–>  2.0 (Retina) / 1.0 (Non Retina)

set cRes to filterRecListByLabel(anArray, "total != " & aRes as string) of me –最小サイズ以外の画像

repeat with i in cRes
  set j to contents of i
  
set anImage to aImg of j
  
set fRes to myPath of j
  
  
set tmpSize to |size|() of anImage
  
set tmpWidth to (width of tmpSize)
  
set tmpHeight to (height of tmpSize)
  
  
set cropedImage to (my cropNSImageBy:{(tmpWidth – minWidth), 0, minWidth, minHeight} fromImage:anImage)
  
  
–Retina環境対策
  
if retinaF > 1.0 then
    set cropedImage to (my resizedImage:cropedImage toScale:(1.0))
  end if
  
  
–ファイル書き込み
  
set fRes to retUUIDfilePathFromDir(aPath, "png") of me
  
set sRes to saveNSImageAtPathAsPNG(cropedImage, fRes) of me
end repeat

–リストに入れたレコードを、指定の属性ラベルの値で抽出
on filterRecListByLabel(aRecList as list, aPredicate as string)
  –ListからNSArrayへの型変換
  
set aArray to NSArray’s arrayWithArray:aRecList
  
  
–抽出
  
set aPredicate to NSPredicate’s predicateWithFormat:aPredicate
  
set filteredArray to aArray’s filteredArrayUsingPredicate:aPredicate
  
  
–NSArrayからListに型変換して返す
  
set bList to filteredArray as list
  
return bList
end filterRecListByLabel

–Alias listから指定UTIに含まれるものをPOSIX pathのリストで返す
on filterAliasListByUTI(aList, targUTI)
  set newList to {}
  
repeat with i in aList
    set j to POSIX path of i
    
set tmpUTI to my retUTIfromPath(j)
    
set utiRes to my filterUTIList({tmpUTI}, targUTI)
    
if utiRes is not equal to {} then
      set the end of newList to j
    end if
  end repeat
  
return newList
end filterAliasListByUTI

–指定のPOSIX pathのファイルのUTIを求める
on retUTIfromPath(aPOSIXPath)
  set aURL to |NSURL|’s fileURLWithPath:aPOSIXPath
  
set {theResult, theValue} to aURL’s getResourceValue:(reference) forKey:NSURLTypeIdentifierKey |error|:(missing value)
  
  
if theResult = true then
    return theValue as string
  else
    return theResult
  end if
end retUTIfromPath

–UTIリストが指定UTIに含まれているかどうか演算を行う
on filterUTIList(aUTIList, aUTIstr)
  set anArray to NSArray’s arrayWithArray:aUTIList
  
set aPred to NSPredicate’s predicateWithFormat_("SELF UTI-CONFORMS-TO %@", aUTIstr)
  
set bRes to (anArray’s filteredArrayUsingPredicate:aPred) as list
  
return bRes
end filterUTIList

on cropNSImageTo:{x1, y1, x2, y2} fromImage:theImage
  set newWidth to x2 – x1
  
set newHeight to y2 – y1
  
set theSize to (theImage’s |size|()) as record
  
set oldHeight to height of theSize
  
  
— transpose y value for Cocoa coordintates
  
set y1 to oldHeight – newHeight – y1
  
set newRect to {{x:x1, y:y1}, {width:newWidth, height:newHeight}}
  
theImage’s lockFocus()
  
set theRep to NSBitmapImageRep’s alloc()’s initWithFocusedViewRect:newRect
  
theImage’s unlockFocus()
  
  
set outImage to NSImage’s alloc()’s initWithSize:(theRep’s |size|())
  
outImage’s addRepresentation:theRep
  
  
return outImage
end cropNSImageTo:fromImage:

on makeNSImageFromFile(anAlias)
  set imgPath to (POSIX path of anAlias)
  
set aURL to (|NSURL|’s fileURLWithPath:(imgPath))
  
return (NSImage’s alloc()’s initWithContentsOfURL:aURL)
end makeNSImageFromFile

–NSImageを指定の大きさでトリミング
on cropNSImageBy:{x1, y1, newWidth, newHeight} fromImage:theImage
  set theSize to (theImage’s |size|()) as record
  
set oldHeight to height of theSize
  
  
— transpose y value for Cocoa coordintates
  
set y1 to oldHeight – newHeight – y1
  
set newRect to {{x:x1, y:y1}, {width:newWidth, height:newHeight}}
  
theImage’s lockFocus()
  
set theRep to NSBitmapImageRep’s alloc()’s initWithFocusedViewRect:newRect
  
theImage’s unlockFocus()
  
  
set outImage to NSImage’s alloc()’s initWithSize:(theRep’s |size|())
  
outImage’s addRepresentation:theRep
  
  
return outImage
end cropNSImageBy:fromImage:

on retUUIDfilePathFromDir(aPath, aEXT)
  set aUUIDstr to (NSUUID’s UUID()’s UUIDString()) as string
  
set aPath to ((NSString’s stringWithString:aPath)’s stringByAppendingPathComponent:aUUIDstr)’s stringByAppendingPathExtension:aEXT
  
return aPath
end retUUIDfilePathFromDir

–NSImageを指定パスにPNG形式で保存
on saveNSImageAtPathAsPNG(anImage, outPath)
  set imageRep to anImage’s TIFFRepresentation()
  
set aRawimg to NSBitmapImageRep’s imageRepWithData:imageRep
  
set pathString to NSString’s stringWithString:outPath
  
set newPath to pathString’s stringByExpandingTildeInPath()
  
set myNewImageData to (aRawimg’s representationUsingType:(NSPNGFileType) |properties|:(missing value))
  
set aRes to (myNewImageData’s writeToFile:newPath atomically:true) as boolean
  
return aRes –true/false
end saveNSImageAtPathAsPNG

on resizedImage:aSourceImg toScale:imgScale
  if (aSourceImg’s isValid()) as boolean = false then error "Invalid NSImage"
  
  
set aSize to aSourceImg’s |size|()
  
–>  {​​​​​width:32.0, ​​​​​height:32.0​​​}
  
  
set aWidth to (aSize’s width) * imgScale
  
set aHeight to (aSize’s height) * imgScale
  
  
set aRep to NSBitmapImageRep’s alloc()’s initWithBitmapDataPlanes:(missing value) pixelsWide:aWidth pixelsHigh:aHeight bitsPerSample:8 samplesPerPixel:4 hasAlpha:true isPlanar:false colorSpaceName:(NSCalibratedRGBColorSpace) bytesPerRow:0 bitsPerPixel:0
  
  
set newSize to {width:aWidth, height:aHeight}
  
aRep’s setSize:newSize
  
  
NSGraphicsContext’s saveGraphicsState()
  
NSGraphicsContext’s setCurrentContext:(NSGraphicsContext’s graphicsContextWithBitmapImageRep:aRep)
  
  
aSourceImg’s drawInRect:(current application’s NSMakeRect(0, 0, aWidth, aHeight)) fromRect:(NSZeroRect) operation:(NSCompositeCopy) fraction:(1.0)
  
  
NSGraphicsContext’s restoreGraphicsState()
  
  
set newImg to NSImage’s alloc()’s initWithSize:newSize
  
newImg’s addRepresentation:aRep
  
  
return newImg
end resizedImage:toScale:

★Click Here to Open This Script 

Posted in file Image | Tagged 10.11savvy 10.12savvy 10.13savvy NSArray NSBitmapImageRep NSImage NSPredicate NSScreen NSString NSURL NSUUID | Leave a comment

Automator Actionを実行

Posted on 1月 24, 2019 by Takaaki Naganoya

指定のAutomator Action(拡張子「.workflow」)を実行するAppleScriptです。

PDFKitをさんざんこづき回しても、指定のPDFに任意のすかし(Watermark)を入れるのが自分にはできなかったので、AutomatorのActionにそういうのが標準装備されているから、それを使えばいいんじゃないかと思い出し、Automator Workflowを直接実行するやりかたを調べて実行してみました。

# これは、Cocoaの機能を呼び出して実行しているものであって、Automatorアプリケーションを呼び出すとか、/usr/bin/automatorを呼び出すやり方などもあります

まだ、パラメータを指定してはいないので、パラメータを指定できるようにするとなおいいと思います。

AppleScript名:Automator Actionを実行.scptd
—
–  Created by: Takaaki Naganoya
–  Created on: 2019/01/22
—
–  Copyright © 2019 Piyomaru Software, All Rights Reserved
—
use AppleScript version "2.5" — El Capitan (10.11) or later
use framework "Foundation"
use framework "Automator"
use scripting additions

property |NSURL| : a reference to current application’s |NSURL|

set aURL to |NSURL|’s fileURLWithPath:(POSIX path of (choose file with prompt "Choose Automator Action" of type {"com.apple.automator-workflow"}))

set aWKres to current application’s AMWorkflow’s runWorkflowAtURL:aURL withInput:(missing value) |error|:(reference)

★Click Here to Open This Script 

Posted in file URL | Tagged 10.11savvy 10.12savvy 10.13savvy 10.14savvy AMWorkflow Automator NSURL | Leave a comment

ZipZapで指定アーカイブをメモリ上で展開して指定ファイルのみ取り出す

Posted on 1月 11, 2019 by Takaaki Naganoya

オープンソースのZipZapをCocoa Framework化したものを呼び出して、指定のZipアーカイブをメモリ上で展開し、指定ファイルの内容を取り出すAppleScriptです。

–> ZipZap.framework(To ~/Library/Frameworks/)

ZipアーカイブでAppleScriptを固めておいて、XcodeのAppleScriptアプリケーションのプロジェクト中に入れておき、指定ファイルのScriptをZipアーカイブから取り出して実行するときに使っています。

ZipZapはXcode Projectに入れてよし、Cocoa Frameworkに入れて呼び出してよし、と自分にとってたいへんに使い勝手のよい部品であり、重要なパーツになっています。

AppleScript名:ZipZapで指定アーカイブをメモリ上で展開して指定ファイルのみ取り出す
— Created 2019-01-11 by Takaaki Naganoya
— 2019 Piyomaru Software
use AppleScript version "2.4"
use scripting additions
use framework "Foundation"
use framework "ZipZap" –https://github.com/pixelglow/ZipZap
use framework "OSAKit"
use BPlus : script "BridgePlus" –https://www.macosxautomation.com/applescript/apps/BridgePlus.html

property |NSURL| : a reference to current application’s |NSURL|
property ZZArchive : a reference to current application’s ZZArchive
property OSAScript : a reference to current application’s OSAScript

set anArchive to POSIX path of (choose file of type {"public.zip-archive"})
set aRes to extractArchiveAndPickupAFile(anArchive, "", "02_script.scpt") of me

on extractArchiveAndPickupAFile(aPath, aPass, aTargFileName)
  set oldArchive to ZZArchive’s archiveWithURL:(|NSURL|’s fileURLWithPath:aPath) |error|:(missing value)
  
set aList to oldArchive’s entries() as list
  
  set outList to {}
  
  repeat with i in aList
    set encF to i’s encrypted() as boolean
    
set aFileName to (i’s fileName())
    
    if (aFileName as string) = aTargFileName then
      
      set aExt to (aFileName’s pathExtension()) as string
      
set aUTI to my retFileFormatUTI(aExt)
      
set aData to (i’s newDataWithError:(missing value)) –Uncompressed raw data
      
      if aData = missing value then
        set aData to (i’s newDataWithPassword:(aPass) |error|:(missing value))
        
if aData is equal to (missing value) then
          return false
        end if
      end if
      
      if aUTI = "public.plain-text" then
        –Plain Text
        
set aStr to (NSString’s alloc()’s initWithData:aData encoding:(NSUTF8StringEncoding)) as string
        
      else if aUTI = "com.apple.applescript.script" then
        –AppleScript .scpt file
        
set aScript to (OSAScript’s alloc()’s initWithCompiledData:aData |error|:(missing value))
        
set aStr to (aScript’s source()) as string
        
      end if
      
return aStr
      
    end if
  end repeat
  
end extractArchiveAndPickupAFile

on retFileFormatUTI(aExt as string)
  tell script "BridgePlus"
    load framework
    
return (current application’s SMSForder’s UTIForExtension:aExt) as string
  end tell
end retFileFormatUTI

★Click Here to Open This Script 

Posted in file File path OSA Text UTI | Tagged 10.11savvy 10.12savvy 10.13savvy 10.14savvy | Leave a comment

Mail.appで選択中のフォルダ以下に存在する全メールの添付ファイルの拡張子のバリエーションを集計

Posted on 11月 25, 2018 by Takaaki Naganoya

Mail.appで選択中のフォルダ(メールボックス)以下に存在する全メールの添付ファイルの拡張子のバリエーションを集計するAppleScriptです。

階層フォルダで管理しているメールボックス(フォルダ)のうち、選択しているメールフォルダ以下のすべてのメッセージに添付されているファイルの拡張子を取得して結果を表示します。

何のために作ったとかいうことはなくて、ただ単に調査のために作ったものです。処理するメールの数にもよりますが、CPU負荷も大きく、時間もそれなりに(数分ぐらい?)かかります。

AppleScript名:Mail.appで選択中のフォルダ以下に存在する全メールの添付ファイルの拡張子のバリエーションを集計
—
–  Created by: Takaaki Naganoya
–  Created on: 2018/11/25
—
–  Copyright © 2018 Piyomaru Software, All Rights Reserved
—
use AppleScript version "2.4"
use scripting additions
use framework "Foundation"

script spd
  property fullSubPath : {}
  
property tmpMesList : {}
  
property outList : {}
end script

property aFullPath : ""
property tmpFullPath : ""
property extList : {}

–変数の初期化
set tmpFullPath to ""
set aFullPath to ""
set extList to {}
set (fullSubPath of spd) to {}
set (tmpMesList of spd) to {}
set (outList of spd) to {}

–選択中のメールボックス(フォルダ)のフルパスを文字列で取得(dir1/dir2/dir3)
set targMBObj to getSelectedOneMailBox() of me
extraxctTextFullPathOfMBObject(targMBObj) of me

copy aFullPath to targMB

if targMB = "" then
  display notification "Mail.app上で選択中のメールボックス(フォルダ)はありません。" –"No Mail.app folder selection" in Japanese
  
return
end if

–指定メールボックス(フォルダ)以下のすべてのメールボックス(フォルダ)を取得する
tell application "Mail"
  tell mailbox targMB
    set aList to name of every mailbox
  end tell
end tell

–指定フォルダ以下のMailboxをサブフォルダまで再帰ですべて取得する
repeat with i in aList
  set j to contents of i
  
set tmpPath to targMB & "/" & j
  
set the end of (fullSubPath of spd) to tmpPath
  
getEverySubMailbox(tmpPath) of me
end repeat

–全サブフォルダからメールを取得し、添付ファイルの確認を行なって、添付ファイルの拡張子を取得して集計
repeat with i in (fullSubPath of spd)
  set tmpBox to contents of i
  
  
tell application "Mail"
    tell mailbox tmpBox
      set mesList to (every message)
    end tell
    
    
–指定フォルダ中のMailでループ
    
repeat with ii in mesList
      set jj to contents of ii
      
      
try
        set attS to mail attachment of jj
      on error
        set attS to {}
      end try
      
      
if attS is not equal to {} then
        
        
–Mailの添付ファイルの拡張子を集計する
        
try
          repeat with iii in attS
            set jjj to contents of iii
            
set aName to name of jjj
            
            
set aExt to getPathExtension(aName) of me
            
            
if (aExt is not in extList) and (aExt is not equal to "") then
              set the end of extList to aExt
            end if
            
          end repeat
        end try
      end if
    end repeat
  end tell
end repeat

choose from list extList with prompt "選択中のメールフォルダ「" & targMB & "」中のメールに添付されているファイルの種別です" with title "添付ファイルの拡張子一覧"

–指定のメールボックス(フォルダ)以下にあるすべてのサブフォルダを(propertyに)追記して返す
on getEverySubMailbox(aPath)
  tell application "Mail"
    tell mailbox aPath
      set aaList to name of every mailbox
      
if aaList is not equal to {} then
        repeat with i in aaList
          set j to contents of i
          
set tmpFullPath to aPath & "/" & j
          
copy tmpFullPath to newPath
          
set the end of (fullSubPath of spd) to newPath
          
getEverySubMailbox(newPath) of me
        end repeat
      end if
    end tell
  end tell
end getEverySubMailbox

–Message Viewerで現在表示中のメールボックスの情報を1つのみ返す
on getSelectedOneMailBox()
  tell application "Mail"
    tell message viewer 1
      set mbList to selected mailboxes
    end tell
  end tell
  
if length of mbList is equal to 0 then
    return ""
  end if
  
  
set aMailBox to contents of (item 1 of mbList)
  
return aMailBox
end getSelectedOneMailBox

–Mail.appのメールボックスオブジェクトを渡すと、テキストのフルパスに変換
on extraxctTextFullPathOfMBObject(aPath)
  tell application "Mail"
    try
      set parentPath to container of aPath
    on error
      return
    end try
    
    
set meName to name of aPath
    
if aFullPath = "" then –1回目のみスラッシュを入れないで処理
      set aFullPath to meName
    else
      –通常処理はこちら
      
set aFullPath to meName & "/" & aFullPath
    end if
    
    
extraxctTextFullPathOfMBObject(parentPath) of me –再帰呼び出し
  end tell
end extraxctTextFullPathOfMBObject

on getPathExtension(aStr as string)
  set pathString to current application’s NSString’s stringWithString:aStr
  
return (pathString’s pathExtension()) as string
end getPathExtension

★Click Here to Open This Script 

Posted in file list recursive call | Tagged 10.11savvy 10.12savvy Mail | Leave a comment

機械学習で学習したMSの画像を連邦・ジオン軍判定してフォルダ分け v2

Posted on 11月 20, 2018 by Takaaki Naganoya

Create MLでガンダムのMS画像(連邦、ジオン区分け)を学習したCore ML Modelをもとに、画像をどちらの軍所属機体かを判定してフォルダ分けするAppleScriptです。

機械学習(深層学習)データをもとに判定を行って対話型処理ではなくバッチ処理的なフローでデータを「なんとなく」推論して区分けを行うサンプルです。非力なIOT機器が機械学習データをもとに推論処理できるぐらいなので、機械学習データを使ってAppleScriptで推論処理できないはずがありません。推論処理時間もさほどかからず、機械学習データを一括処理的なワークフローの中で利用することが可能です。

例によって「戦場の絆」の公式ページから落としてきたMSの画像を連邦軍とジオン軍、および両軍の鹵獲機体の4フォルダに分けてCreate MLで学習させてみました。

実行するとMS画像が入っているフォルダ(各自ご用意ください)と、連邦軍機体(efsf)およびジオン軍機体(zeon)を仕分けるフォルダを聞かれます。あとはプログラム側がなんとなく推論して仕分けを行います。

前回掲載のモデルもそうですが、きちんと学習後にテストデータで評価を行っています。だいたい8割ぐらいのヒット率ではあるものの、特定の画像については間違えることがあらかじめわかっています。

実行にあたっては、macOS 10.14上でCoreML Modelを組み込んだフレームワーク「msDetector.framework」をインストールして、本ScriptをScript Debugger上で動作させてください。

–> Download msDetector.framework (To ~/Library/Frameworks/)

–> Download msDetector (Code Signed executable AppleScript applet with Framework and libraries in its bundle)

Core MLで判定時に詳細なデータを出力させ、その可能性が0.8を上回るものだけを処理するようにしてみました。ただ、全力で間違った判定を行うケースもあるため、単なる「気休め」です。

テストデータでは、連邦軍側が72機体中間違いが9個(正解87.5%)、ジオン軍側が57機体中間違いが3個(正解95%)。鹵獲機体のデータを排除すると、もう少しいい値が出るかもしれません。ただ、学習させたデータとほぼ同じデータ(数が少ない)で再度判定を行っているだけなので、このぐらいの確度が出ないと逆に困ります。

また、確度が高くないものは排除するように処理したので、確度が低い機体の画像バリエーションを増やして学習画像数を足すと正解の確率が上がるのではないか、などと「なんとなく」考えています。

Create MLでは、もっときちんとした表データやタグ付き自然言語テキストデータ(日本語だと形態素への区分けはあらかじめやっておく必要アリ?)の学習が行えるようなので(自然言語テキストの学習例は英語のものしか見かけないけれども)いろいろやっておきたいところです。

今回は「アニメとかゲームに出てくるMSの画像」の判定という、実用性をまったく考えないで行なってみたものですが、自分の身の回りで有用性の高そうな処理といえば……アイコンやプレゼン用資料の作成画像を学習させておおまかなジャンル分けをしておき(メール系のアイコンとか)、未知のアイコン素材をダウンロードしてきたら機械学習データをもとに自動でフォルダ分けするとかでしょうか。

さすがにアイコン画像だとデフォルメされすぎていて、MicrosoftのAzure Computer Vision APIとかでも画像認識してくれなさそうなので。

AppleScript名:機械学習で学習したMSの画像の連邦軍、ジオン軍判定してフォルダ分け v2.scpt
—
–  Created by: Takaaki Naganoya
–  Created on: 2018/11/20
—
–  Copyright © 2018 Piyomaru Software, All Rights Reserved
—
use AppleScript version "2.7" — Mojave (10.14) or later & Script Debugger
use framework "Foundation"
use framework "AppKit"
use framework "msDetector"
use scripting additions

property |NSURL| : a reference to current application’s |NSURL|
property NSArray : a reference to current application’s NSArray
property NSString : a reference to current application’s NSString
property NSPredicate : a reference to current application’s NSPredicate
property NSFileManager : a reference to current application’s NSFileManager
property NSMutableArray : a reference to current application’s NSMutableArray
property NSSortDescriptor : a reference to current application’s NSSortDescriptor
property NSURLTypeIdentifierKey : a reference to current application’s NSURLTypeIdentifierKey

set aFol to POSIX path of (choose folder with prompt "Choose MS Image folder to go!")
set efsfFol to POSIX path of (choose folder with prompt "EFSF folder")
set zeonFol to POSIX path of (choose folder with prompt "Zeon folder")

–指定フォルダ以下のファイルをすべて取得(再帰ですべて取得)
set aSel to retFullpathsWithinAFolderWithRecursive(aFol) of me

–取得したファイルリストを指定UTIでフィルタリング
set filRes2 to filterPOSIXpathListByUTI(aSel, "public.image") of me

–機械学習モデルを用いて区分けを行い、任意の画像の連邦軍(efsf)、ジオン軍(zeon)へのフォルダ分け(コピー)
set msClassifier to current application’s msClassify’s alloc()’s init()

repeat with i in filRes2
  set aFile to contents of i
  
set aImage to (current application’s NSImage’s alloc()’s initWithContentsOfFile:aFile)
  
  
set resDict to (msClassifier’s ImageClassifierWithImageAndRetDict:aImage) –returns NSDictionary
  
  
–Dictinaryのvalueをソートして、最も値の大きいvalueのkeyを求める
  
set sortedArray to (current application’s NSMutableArray’s arrayWithArray:(resDict’s allValues()))
  (
sortedArray’s sortUsingSelector:"compare:")
  
set aRes to (last item of (sortedArray as list)) –末尾のアイテムが一番値の大きい数値
  
set resKey to first item of ((resDict’s allKeysForObject:aRes) as list) –最大値をもとにKeyを求める
  
  
–可能性の高いものだけ処理してみる(自信たっぷりに全力で間違えることもけっこうある)
  
if (aRes as real) > 0.8 then
    if resKey begins with "efsf" then
      –efsf & efsf_stolen
      
set aRes to (my copyFileAt:aFile toFolder:efsfFol)
    else
      –zeon & zeon_stolen
      
set aRes to (my copyFileAt:aFile toFolder:zeonFol)
    end if
  end if
end repeat

–POSIX path listから指定UTIに含まれるものをPOSIX pathのリストで返す
on filterPOSIXpathListByUTI(aList, targUTI)
  set newList to {}
  
repeat with i in aList
    set j to contents of i
    
set tmpUTI to my retUTIfromPath(j)
    
set utiRes to my filterUTIList({tmpUTI}, targUTI)
    
if utiRes is not equal to {} then
      set the end of newList to j
    end if
  end repeat
  
return newList
end filterPOSIXpathListByUTI

–指定のPOSIX pathのファイルのUTIを求める
on retUTIfromPath(aPOSIXPath)
  set aURL to |NSURL|’s fileURLWithPath:aPOSIXPath
  
set {theResult, theValue} to aURL’s getResourceValue:(reference) forKey:NSURLTypeIdentifierKey |error|:(missing value)
  
  
if theResult = true then
    return theValue as string
  else
    return theResult
  end if
end retUTIfromPath

–UTIリストが指定UTIに含まれているかどうか演算を行う
on filterUTIList(aUTIList, aUTIstr)
  set anArray to NSArray’s arrayWithArray:aUTIList
  
set aPred to NSPredicate’s predicateWithFormat_("SELF UTI-CONFORMS-TO %@", aUTIstr)
  
set bRes to (anArray’s filteredArrayUsingPredicate:aPred) as list
  
return bRes
end filterUTIList

–指定フォルダ以下のすべてのファイルを再帰で取得
on retFullpathsWithinAFolderWithRecursive(aFol)
  set anArray to NSMutableArray’s array()
  
set aPath to NSString’s stringWithString:aFol
  
set dirEnum to NSFileManager’s defaultManager()’s enumeratorAtPath:aPath
  
  
repeat
    set aName to (dirEnum’s nextObject())
    
if aName = missing value then exit repeat
    
set aFullPath to aPath’s stringByAppendingPathComponent:aName
    
anArray’s addObject:(aFullPath as string)
  end repeat
  
  
return anArray as list
end retFullpathsWithinAFolderWithRecursive

on copyFileAt:POSIXPath toFolder:folderPath
  set POSIXPath to NSString’s stringWithString:POSIXPath
  
set folderPOSIXPath to NSString’s stringWithString:folderPath
  
set theName to POSIXPath’s lastPathComponent()
  
set newPath to folderPOSIXPath’s stringByAppendingPathComponent:theName
  
set fileManager to NSFileManager’s defaultManager()
  
set theResult to fileManager’s copyItemAtPath:POSIXPath toPath:newPath |error|:(missing value)
  
return (theResult as integer = 1)
end copyFileAt:toFolder:

★Click Here to Open This Script 

Posted in file File path Image list Machine Learning Record | Tagged 10.14savvy NSArray NSFileManager NSMutableArray NSPredicate NSSortDescriptor NSString NSURL NSURLTypeIdentifierKey | 1 Comment

squeezeNetで画像のオブジェクト認識を行い、結果をCSV出力してNumbersでオープン

Posted on 11月 12, 2018 by Takaaki Naganoya

Core MLモデル「squeezeNet.mlmodel」を用いて画像のオブジェクト認識を行い、結果をデスクトップにCSV形式でデータ書き出しを行い、NumbersでオープンするAppleScriptです。

–> Download squeezeNetKit.framework (To ~/Library/Frameworks)

macOS 10.13上ではスクリプトエディタ、Script Debugger上で、macOS 10.14上ではScript Debugger上で動作します(AppleScript Appletでも動作)。

さまざまなCore MLモデルを用いて画像認識を行わせてはみたものの、最もスコアの高いもののラベルだけを返させても、結果がまったく内容にそぐわないケースが多く見られます。


▲機械学習の評価値が1.0に近いものは確度が高く、0.0に近いものは判断に迷った末に消極的に出した値。経験則でいえば、最高スコアの項目が0.7以上のスコアでないといまひとつのようです(0.7以上でもダメな時はダメなわけで、、、)

画像認識については、結果があまりに的外れで「なんじゃこら?」というケースが多いので、確認のためにCSVデータ出力させてNumbers上で確認させてみることにしてみました。そのためにありあわせのサブルーチンを組み合わせて作ったものです。

スコアが高い順に結果を並べて確認してみると、最も高いスコアの値であっても0.0に近い評価値であることがあり、「何も考えずに最高スコアのラベルだけ取ってくるのはものすごく危険」なことがよくわかります。


▲squeezeNet.mlmodelをNetronでビジュアライズしたところ(一部抜粋)

AppleScript名:SqueezeNetでオブジェクト判定して結果をCSV書き出ししてNumbersでオープン.scpt
–  Created by: Takaaki Naganoya
–  Created on: 2018/11/11
–  Copyright © 2018 Piyomaru Software, All Rights Reserved
use AppleScript version "2.7" — High Sierra (10.13) or later
use framework "Foundation"
use framework "AppKit"
use framework "squeezeNetKit"
use scripting additions

property NSUUID : a reference to current application’s NSUUID
property NSArray : a reference to current application’s NSArray
property NSImage : a reference to current application’s NSImage
property NSMutableArray : a reference to current application’s NSMutableArray
property NSSortDescriptor : a reference to current application’s NSSortDescriptor

set aFile to POSIX path of (choose file of type {"public.image"})
set aImage to NSImage’s alloc()’s initWithContentsOfFile:aFile
set resDict to (current application’s imageClassifier’s alloc()’s init()’s ImageClassifierWithImageAndRetDict:aImage)

set kArray to (resDict’s allKeys())
set vArray to (resDict’s allValues())
set aLen to kArray’s |count|()

set anArray to NSMutableArray’s new()

repeat with i from 0 to (aLen – 1)
  set tmpKey to (kArray’s objectAtIndex:i) as string
  
set tmpVal to (vArray’s objectAtIndex:i) as real
  (
anArray’s addObject:{aKey:tmpKey, aVal:tmpVal})
end repeat

–Sort by value
set bList to sortRecListByLabel(anArray, "aVal", false) of me

–record in list –> 2D list
set cList to convRecInListTo2DList(bList) of me

–デスクトップにCSVファイルを書き出してNumbersでオープン
set aPath to (((path to desktop) as string) & (NSUUID’s UUID()’s UUIDString()) as string) & ".csv"
set fRes to saveAsCSV(cList, aPath) of me
tell application "Numbers"
  open (aPath as alias)
end tell

–リストに入れたレコードを、指定の属性ラベルの値でソート
on sortRecListByLabel(aRecList as list, aLabelStr as string, ascendF as boolean)
  set aArray to NSArray’s arrayWithArray:aRecList
  
set sortDesc to NSSortDescriptor’s alloc()’s initWithKey:aLabelStr ascending:ascendF
  
set sortDescArray to NSArray’s arrayWithObjects:sortDesc
  
set sortedArray to aArray’s sortedArrayUsingDescriptors:sortDescArray
  
set bList to (sortedArray) as anything
  
return bList
end sortRecListByLabel

on convRecInListTo2DList(aList)
  set anArray to NSMutableArray’s arrayWithArray:aList
  
set fItem to anArray’s objectAtIndex:0
  
set keyList to fItem’s allKeys() as list
  
set aCount to anArray’s |count|()
  
  
set allArray to NSMutableArray’s new()
  
  
repeat with i from 1 to aCount
    set anItem to (anArray’s objectAtIndex:(i – 1))
    
set tmpItem to {}
    
    
repeat with ii in keyList
      set tmpDat to (anItem’s valueForKeyPath:(contents of ii))
      
if tmpDat is not equal to missing value then
        set the end of tmpItem to tmpDat
      else
        set the end of tmpItem to ""
      end if
    end repeat
    (
allArray’s addObject:tmpItem)
  end repeat
  
  
set allList to allArray as list
  
set the beginning of allList to keyList
  
return allList
end convRecInListTo2DList

–CSV Kit

–2D List to CSV file
on saveAsCSV(aList, aPath)
  –set crlfChar to (ASCII character 13) & (ASCII character 10)
  
set crlfChar to (string id 13) & (string id 10)
  
set LF to (string id 10)
  
set wholeText to ""
  
  
repeat with i in aList
    set newLine to {}
    
    
–Sanitize (Double Quote)
    
repeat with ii in i
      set jj to ii as text
      
set kk to repChar(jj, string id 34, (string id 34) & (string id 34)) of me –Escape Double Quote
      
set the end of newLine to kk
    end repeat
    
    
–Change Delimiter
    
set aLineText to ""
    
set curDelim to AppleScript’s text item delimiters
    
set AppleScript’s text item delimiters to "\",\""
    
set aLineList to newLine as text
    
set AppleScript’s text item delimiters to curDelim
    
    
set aLineText to repChar(aLineList, return, "") of me –delete return
    
set aLineText to repChar(aLineText, LF, "") of me –delete lf
    
    
set wholeText to wholeText & "\"" & aLineText & "\"" & crlfChar –line terminator: CR+LF
  end repeat
  
  
if (aPath as string) does not end with ".csv" then
    set bPath to aPath & ".csv" as Unicode text
  else
    set bPath to aPath as Unicode text
  end if
  
  
write_to_file(wholeText, bPath, false) of me
  
end saveAsCSV

on write_to_file(this_data, target_file, append_data)
  tell current application
    try
      set the target_file to the target_file as text
      
set the open_target_file to open for access file target_file with write permission
      
if append_data is false then set eof of the open_target_file to 0
      
write this_data to the open_target_file starting at eof
      
close access the open_target_file
      
return true
    on error error_message
      try
        close access file target_file
      end try
      
return error_message
    end try
  end tell
end write_to_file

on repChar(origText as text, targChar as text, repChar as text)
  set curDelim to AppleScript’s text item delimiters
  
set AppleScript’s text item delimiters to targChar
  
set tmpList to text items of origText
  
set AppleScript’s text item delimiters to repChar
  
set retText to tmpList as string
  
set AppleScript’s text item delimiters to curDelim
  
return retText
end repChar

★Click Here to Open This Script 

Posted in file Image list Machine Learning Record Sort | Tagged 10.13savvy 10.14savvy NSArray NSImage NSMutableArray NSSortDescriptor NSUUID Numbers | Leave a comment

機械学習モデルをもとに画像のシーン判定

Posted on 11月 6, 2018 by Takaaki Naganoya

Appleが配布しているCoreML Model「Places205-GoogLeNet」を用いて、指定画像のシーン判定を行うAppleScriptです。

Appleが公式に配布している6つのCoreML Modelのうち、「Places205-GoogLeNet」を組み込んだFrameworkを作成して、これをAppleScriptから呼び出しています。

sceneDetection.frameworkをインストールしたうえで、macOS 10.13上ではスクリプトエディタ/Script Debuggerから、macOS 10.14ではScript Debuggerから本Scriptを実行します(AppleScriptアプレットでも動作します)。

「Places205-GoogLeNet」は、

Detects the scene of an image from 205 categories such as an airport terminal, bedroom, forest, coast, and more.

と、画像の内容から、画面やシーン、場所について「だいたいこんなところ」と判定してくれるModelのようです。ただ、日本国内の景色を渡してみると、得られる判定結果にはいまひとつ「ちょっと違う」と感じるものであります。


▲左:crosswalk(横断歩道)実際には自動車販売店と道路(Car shop & road)、右:desert/sand(砂漠、砂)実際にはAirport


▲左:river(川)実際には海、右:bridge(橋) 実際には橋ではありません

–> Download sceneDetection.framework (To ~/Library/Frameworks)


▲GoogLeNetPlaces.mlmodelをNetronでビジュアライズしたところ

AppleScript名:GoogLeNetPlacesでシーン判定.scpt
use AppleScript version "2.7" — High Sierra (10.13) or later
use framework "Foundation"
use framework "AppKit"
use framework "sceneDetection"
use scripting additions

set aFile to POSIX path of (choose file of type {"public.image"})
set aImage to current application’s NSImage’s alloc()’s initWithContentsOfFile:aFile
set msDict to (current application’s sceneDetector’s alloc()’s init()’s GoogLeNetPlacesWithImage:aImage) as string
–> "crosswalk"

★Click Here to Open This Script 

Posted in file Image Machine Learning | Tagged 10.13savvy 10.14savvy NSImage | Leave a comment

CreateMLで機械学習したモデルを利用して、MS画像の連邦、ジオン軍判定

Posted on 11月 6, 2018 by Takaaki Naganoya

「戦場の絆」のホームページからダウンロードしたMSの画像を学習させた機械学習モデルを使用して、指定のMS画像が地球連邦軍(EFSF)かジオン軍(zeon)かを判定するAppleScriptです。


■©創通・サンライズ 学習時に299×299ピクセルに縮小されるので、モノアイとかそういう部分が特徴量として検出されることはないもよう

両軍合わせて180機体ほどの画像を学習させただけなので、正直なところ判定間違いが多いですが、増やしていくとけっこう簡単に判定できそうです(数万ファイルぐらい画像を学習させるともっと明確な傾向が出てくるかも?)。


▲学習させたMS画像データ。efsf、efsf_stole(鹵獲機体)、zeon、zeon_stole(鹵獲機体)に分けてみた。CoreMLで任意のMS画像がこれらのどのグループに所属する可能性が最も高いかをフォルダ名で返してくることになる

macOS 10.14上のスクリプトエディタは野良Frameworkを認識してくれないので、macOS 10.14.x+Script Debugger上で実行する必要があります。あと、AppleScriptアプレットに書き出して実行すると野良Frameworkを認識して実行するので、アプレットに書き出して実行するとScript DebuggerのないmacOS 10.14環境でも動作確認できます。

Xcode上でSwift Playgroundを用いて認識していた時よりも認識精度が下がっているように見えます。結局画像は299×299ピクセルぐらいに縮小されて判定されるので、判定前に画像余白部分をトリミングしておくと認識精度が上がりそうな気もします。

299×299ピクセルに縮小されると、さすがにモノアイが特徴量として認識される可能性も低く、色とかポーズとか構図とかで識別されているのでしょう。


▲作成したmodelをNetronでビジュアライズしたところ

CreateMLで機械学習モデルを作るのがとても簡単であることがわかり、機械学習モデルを呼び出すためのAppleScriptのコードがとてもシンプルなことがわかり、さらに学習モデルを用いた画像分類が短い時間で行えることを確認できました。

現在のところ、1つの機械学習モデル(.mlmodel)を使うためにそのモデルを組み込んだFrameworkを必要としている状態ですが、機械学習モデル自体も外部からパスで指定して柔軟に指定できるようにしたいところです。

これで調子に乗って手書き文字画像データ(Mnist)をCreateMLで機械学習して、手書き文字の画像をスキャナから読み取って手軽に手書き文字認識できるかも?! と、鼻息荒くテストしてみましたが、期待したような精度では判定されないことを思い知らされたのでした。

–> Download msDetector.framework (To ~/Library/Frameworks)

AppleScript名:機械学習で学習したMSの画像の連邦軍、ジオン軍判定.scpt
use AppleScript version "2.7" — Mojave (10.14) or later
use framework "Foundation"
use framework "AppKit"
use framework "msDetector"
use scripting additions

set aFile to POSIX path of (choose file of type {"public.image"})
set aImage to current application’s NSImage’s alloc()’s initWithContentsOfFile:aFile
set msRes to current application’s msClassify’s alloc()’s init()’s ImageClassifierWithImage:aImage
–> "efsf" / "zeon"

★Click Here to Open This Script 

Posted in file Image Machine Learning | Tagged 10.14savvy NSImage | Leave a comment

ftpKitのじっけん ftpサーバーからファイル一覧を取得

Posted on 11月 3, 2018 by Takaaki Naganoya

オープンソースのFTPManagerをフレームワーク化したftpKitを利用して、指定サーバー上の指定ディレクトリ内のファイル一覧を取得するAppleScriptです。

sftp接続が必要な場合にはTransmitをAppleScriptからコントロールすることになるわけですが、セキュリティ的にあまり問題にならない用途であればFTP経由でファイル転送することもあるでしょう。

AppleScript名:ftpKitでファイル一覧を取得
— Created 2016-03-01by Takaaki Naganoya
— 2016 Piyomaru Software
use AppleScript version "2.4"
use scripting additions
use framework "Foundation"
use framework "ftpKit" –https://github.com/nkreipke/FTPManager

set serverURL to "ftp://www.piyocast.com/xxxxx/public_html/private"
set serverUser to "xxxxx@piyocast.com"
set serverPassword to text returned of (display dialog "Input FTP Password" default answer "" with hidden answer)

set aFtpManager to current application’s FTPManager’s alloc()’s init()
set successF to false

set srv to current application’s FMServer’s serverWithDestination:serverURL username:serverUser |password|:serverPassword
srv’s setPort:21

set aResList to aFtpManager’s contentsOfServer:srv

set fileNameList to {}
set fileCount to aResList’s |count|()

repeat with i from 0 to (fileCount – 1)
  set anItem to (aResList’s objectAtIndex:i)
  
  
set aFileName to (anItem’s valueForKeyPath:"kCFFTPResourceName") as string
  
set the end of fileNameList to aFileName
end repeat

fileNameList
–>  {".", "..", "xls1a.png", "xls3.png"}

★Click Here to Open This Script 

Posted in file Network | Tagged 10.11savvy 10.12savvy 10.13savvy | Leave a comment

AppleScript系機能の実装がおかしなGoogle Chrome

Posted on 11月 2, 2018 by Takaaki Naganoya

Google Chromeは自動処理の部品に使ってはいけない

Google ChromeをAppleScriptでコントロールすることは、個人的にはほとんどありません。日常的に利用するのは、自動処理への対応機能を持ち信頼できるアプリケーションが中心です。

必要な機能がなかったり、自動処理と相性がよくなかったりするためです。使用中にGoogle App Storeのダイアログなどが表示されることがあるので、自動処理中にやられると処理が止まってしまいます。これは、自動処理の仕組みを組み立てる上で絶対にあってはならない仕様です。

そのため、Google ChromeをAppleScriptで動かす場合は、途中でGoogle Chrome側の都合で勝手に処理が止まっても腹が立たない程度の、あまり重要ではない処理であるとか、とても短くて簡単な基礎的なマクロ処理に限定されます。

1日中タイマーにのっとって定時に指定のWebサイトに、複数のユーザーIDやパスワードで繰り返しログインを行い、指定のメニューに移動してデータをダウンロードするような処理(実際にAppleScript+Safariで動かしています)にGoogle Chromeを使うのは自殺行為です。

比較的短めの、

「写真.appで選択中の写真をOCRで文字認識して『戦場の絆』のリプレイIDを取得し、リプレイムービー検索ページにリプレイIDを突っ込み、YouTube上のリプレイムービーのURLを取得。YouTube上でリプレイを再生する」

といった程度の処理でも、途中でGoogle App Storeのダイアログが表示されたら、処理が途切れてそれっきり。コマンドを1つ実行するたびにGoogle App Storeのダイアログを閉じたり無効化する処理を入れれば不可能ではないかもしれませんが、無人の環境で放置するのは無理です。

かといって、Safariの仕様が自動処理に向いているかと言われれば、そういうわけでもありません。ファイルのダウンロード検出をSafari側で行えないなど、自動処理専用のWebブラウザがあったらいいのに、と思うところです(Folder ActionやFSEventsと組み合わせて、非同期処理でダウンロード検出を行なっています)。ただ、Google Chromeのような致命的な動作を行わない点で選択肢になることでしょう。

Google Chromeには、表示中のページのHTMLソースを取得するという、基本的かつないと困る機能が実装されていないのも困りものです。

Google Chromeは実装がおかしい

Google Chromeは一応JavaScriptを実行するための「execute」コマンドを備えているので、JavaScriptのコマンド経由でWebコンテンツへのアクセスや、フォームへのアクセスはできるようになっています。

ただし、肝心の「指定URLをオープンする」という部分の実装がまともに行われていません。

Google Chromeで指定URLをオープンするAppleScriptでよく見かける記述例は、

tell application "Google Chrome"
  open location "http://piyocast.com/as/"
end tell

★Click Here to Open This Script 

のようなものですが、そもそもこの「open location」はAppleScriptの標準命令であり、Google Chromeが持っているコマンドではありません。open locationは指定URLのURLスキームに対応しているアプリケーションに処理が委ねられます。tellブロックを外すと、OSでデフォルト指定されているアプリケーションで処理されます。Google Chromeへのtellブロック内で実行しているので、Google ChromeにURLが転送されているだけです。

Google Chromeの機能を使って指定URLをオープンしようとすると、

tell application "Google Chrome"
  set newWin to make new window
  
tell newWin
    tell tab 1
      set URL to "http://piyocast.com/as/"
    end tell
  end tell
end tell

★Click Here to Open This Script 

のようになります。

一番ひどいのは、Google Chromeのopen命令。これ、

open v : Open a document.
  open list of file : The file(s) to be opened.

用語辞書のとおりに書いてもエラーになります。

そのため、ローカルのファイルをオープンさせようとしても、openコマンドは使えません。fileを与えてもaliasを与えても、AppleScript用語辞書の記述のとおりにfileのlistを与えてもエラーになります。

結論としては、ローカルのfileをオープンする際には、file pathをURL形式に変換して、そのURLをopen locationでオープンするか、tabのURL属性をfile URLに書き換えて表示させることになります。

set anAlias to choose file

tell application "Finder"
  set aURL to URL of anAlias
end tell

tell application "Google Chrome"
  open location aURL
end tell

★Click Here to Open This Script 

set anAlias to choose file

tell application "Finder"
  set aURL to URL of anAlias
end tell

tell application "Google Chrome"
  tell window 1
    tell active tab
      set URL to aURL
    end tell
  end tell
end tell

★Click Here to Open This Script 

Finder経由で目的のファイルをGoogle Chromeというアプリケーションを利用してオープンする、という記述もできますが、ここでもそのままapplication “Google Chrome”と書くとエラーになり、「path to application “Google Chrome”」という回避的な記述が必要になってしまうのでありました。

–By @fixdot on Twitter
set anAlias to choose file

tell application "Finder"
  open anAlias using (path to application "Google Chrome")
end tell

★Click Here to Open This Script 

ただ、ここで書いているのは「自動処理を行うユーザー環境では」ということであって、Google Chromeは自動処理にさえ使わなければ、それなりによくできたいいソフトウェアだと思います。

ほかにもいろいろ落とし穴が

とくに、Google Chromeにかぎらず、macOS内には自動処理の妨げとなる設定項目がいくつか存在しています。デフォルトのまま使うといろいろ問題が出るので、真っ先に設定を変更しています。

Mac miniにBluetooth外付けキーボードを接続した状態で、ファンクションキーをメディアキーに指定して運用していると、iTunesから不定期にダイアログ表示されるため、ファンクションキーはあくまでファンクションキーとして設定しないとダメです(MacBook Proなど本体にキーボードが搭載されているモデルはこのかぎりではありません)。

また、同様にMac miniでヘッドレス(画面なし)運用をしている際に、キーボードやマウス/トラックパッドを接続していない状態で警告するように初期設定されていますが、

 「起動時にキーボードが検出されない場合はBluetooth設定アシスタントを開く」
 「起動時にマウスまたはトラックパッドが検出されない場合はBluetooth設定アシスタントを開く」

の2つのチェックボックスをオフにしておく必要があります。

com.google.Chrome

Posted in file URL | Tagged 10.11savvy 10.12savvy 10.13savvy Google Chrome | Leave a comment

Photosで選択中の写真が指定場所から50メートル以内の場合には書き出してFineReader OCR Proで処理 v2.1

Posted on 10月 30, 2018 by Takaaki Naganoya

Photos(写真).app上で選択中の写真が、指定場所から50メートル以内の場合にはファイルに書き出して、OCRアプリケーション「FineReader OCR Pro」でOCR処理するAppleScriptです。

–> Demo Movie

アーケードゲーム「戦場の絆」のリプレイムービーは、プレイ後の操作により1日に2プレイ分までYouTubeにアップロードされる仕様になっています。プレイ後、ゲーセンのターミナル上で操作してリプレイムービーにアクセスするためのアクセスコード(リプレイID)が表示されるようになっています。

この、ターミナル上のアクセスコードをiPhoneで写真撮影すると、写真に撮影場所のGPSデータが添付されます。写真.app経由でこのGPSデータを取得し、指定場所(ゲームセンター)から50メートル以内であればターミナルで撮影した写真と判定。

この写真をファイル書き出しして、OCRアプリケーションで認識しやすいようにCocoaの機能を用いて階調反転。一昔前ならPhotoshopで処理していましたが、いまならAppleScriptだけで高速に処理できます。デモムービーは実際の速度なので、その速さを体感していただけると思います。写真.appから選択中の写真を取得して反転するまで一瞬です。

反転した画像をMacのOCRアプリケーション「FineReader OCR Pro」でOCR処理し、YouTubeリプレイ再生用のコードを取得します。

あとは、再生用コードをリプレイムービー検索ページのフォームに入れて、実際のYouTube上のリプレイムービーのURLにアクセス。そのまま再生するなり、ダウンロードして保存しておくことになります。


■©創通・サンライズ

本サンプルでは、AppleScriptからコントロール可能なOCRアプリケーション「FineReader OCR Pro」を用いましたが、日本語の文字列を認識しないのであれば、Web APIのOCRサービス(MicrosoftのCognitive Serviceとか)を用いてみてもよいでしょう。

あとは、全国の「戦場の絆」が導入されているゲームセンターの住所情報および緯度経度情報がストックしてあるので、それらのGPSデータと写真撮影地点とのマッチングを行なってみてもよいかもしれません(700箇所程度なので、たいした演算ではありません)。

AppleScript名:Photosで選択中の写真が指定場所から50メートル以内の場合には書き出してFineReader OCR Proで処理 v2.1
— Created 2015-12-04 by Takaaki Naganoya –v2.1
— getDistanceBetweenTwoPlaces : Created 2015-03-03 by Shane Stanley
— convAsFilteredJPEG : Created 2013-12-29 by badcharan@Twitter
use AppleScript version "2.4"
use scripting additions
use framework "Foundation"
use framework "CoreLocation"
use framework "QuartzCore"

property CIFilter : a reference to current application’s CIFilter
property NSUUID : a reference to current application’s NSUUID
property CIImage : a reference to current application’s CIImage
property NSString : a reference to current application’s NSString
property NSScanner : a reference to current application’s NSScanner
property CLLocation : a reference to current application’s CLLocation
property NSFileManager : a reference to current application’s NSFileManager
property NSCharacterSet : a reference to current application’s NSCharacterSet
property NSJPEGFileType : a reference to current application’s NSJPEGFileType
property NSBitmapImageRep : a reference to current application’s NSBitmapImageRep
property NSMutableCharacterSet : a reference to current application’s NSMutableCharacterSet
property NSRegularExpressionSearch : a reference to current application’s NSRegularExpressionSearch

set targPlace to {35.745769, 139.675565} –Game City Itabashi
set bLoc to getSelectionOnPhotos() of me –Get Location From Photo
set aDist to getDistanceBetweenTwoPlaces(targPlace, bLoc) of me

–指定地点から50メートル以内の距離で撮影された写真であれば、Exportして後続の処理を行う
if aDist is equal to false or aDist > 50 then return false

–選択中の写真のうち最初のものだけExport
set targPhotoAlias to exportSelectedPhotoOnPhotos() of me

–実験に用いた写真はそのままではOCR処理できなかったので、手っ取り早く階調反転を行う
set invertRes to convAsFilteredJPEG(targPhotoAlias, "CIColorInvert") of me
if invertRes = false then
  display dialog "Error in CIImage" with title "Error" buttons {"OK"} default button 1 with icon 2
  
return
end if
set invImage to (POSIX file invertRes) as alias

set outFileName to (NSUUID’s UUID()’s UUIDString() as text) & ".txt"
set outPath to ((path to desktop) as text) & outFileName –sandbox環境ではパスは無視される

tell application id "com.abbyy.FineReaderPro"
  activate
  
  
–Check Ready
  
set getReady to (is finereader controller active)
  
if getReady = false then return
  
  
–set idList to {English} –英語だとスペルチェックされて、"1"と"t"を誤認識するため英語の指定をやめた
  
–Caution: this command is executed asynchronously
  
–Caution: export command was changed in v12.1.4
  
  
set idList to {Basic, Java, Fortran, Cobol, Pascal} –認識ターゲット言語(C++の予約語はあるようだが、指定できないよ!)
  
open invImage — In this version ,we have to open image, at first.
  
export to txt outPath ocr languages enum idList retain layout (as plain text) encoding (utf8)
  
  
–Wait for finish
  
repeat 30 times
    set curStat to (is busy)
    
if curStat = false then exit repeat
    
delay 1
  end repeat
  
  
–sandbox環境(Mac App Store版)の場合にはファイル出力先を別途取得
  
set sandRes to (is sandboxed)
  
if sandRes = true then
    set outDir to (get output dir) as text
    
set outPath to (outDir & outFileName) as text
  end if
  
end tell

–OCR処理した結果のテキストを読み込む
tell current application
  set textRes to read file outPath
end tell

–数字ではじまる行のみを抽出して、リプレイIDを取得
set textList to paragraphs of textRes
set outList to {}
repeat with i in textList
  set j to contents of i
  
  
–1行あたりのテキストが8文字以上か?
  
if length of j > 8 then
    
    
–行頭の文字が数字か?
    
set firstChar to first character of j
    
set nRes to chkNumeric(firstChar) of me
    
if nRes = true then
      set tmp1 to text 2 thru -1 of j –最初の数字を除去
      
      
–数字とアルファベット以外の文字を削除(タブ、スペースなど)
      
set tmp2 to returnNumberAndAlphabetCharsOnly(tmp1) of me
      
if length of tmp2 ≥ 8 then
        set tmp3 to text 1 thru 8 of tmp2
        
–数字とアルファベットの混在の文字列であれば出力する
        
set tmp3Res to chkMixtureOfNumericAndAlphabet(tmp3) of me
        
if tmp3Res = true then
          set the end of outList to tmp3
        end if
      end if
    end if
  end if
end repeat

outList
–> {"4f73vg1v", "v3v32zt3", "yk1z371x", "52yzvn11", "k1ftfvvg"}–Version 1.x (3rd ID is wrong)
–> {"4f73vg1v", "v3v32zt3", "yk1z37tx", "52yzvn11", "k1ftfvvg"}– Version 2.0(Perfect!!!!)
–> {"4f73vg1v", "v3v32zt3", "yk1z37tx", "52yzvn11", "k1ftfvvg"}– Version 2.1(Perfect!!!!)
–> {"51n4gg1f", "2zxt41gg", "57k2txk9", "yy43f3gt", "4f73vg1v"} –Version 2.1(Perfect!!!!)

–Photosで選択中の写真の1枚目(複数時には無視)から緯度、経度情報を取得する
on getSelectionOnPhotos()
  tell application "Photos"
    set aa to selection
    
if aa = {} or aa = missing value then return false
    
set a to first item of aa
    
set aProp to properties of a
    
    
set aLoc to location of aProp
    
return aLoc
  end tell
end getSelectionOnPhotos

–2点間の距離を計算する
on getDistanceBetweenTwoPlaces(aPlaceLoc, bPlaceLoc)
  try
    set {aLat, aLong} to aPlaceLoc
    
set {bLat, bLong} to bPlaceLoc
  on error
    return false
  end try
  
  
set aPlace to CLLocation’s alloc()’s initWithLatitude:aLat longitude:aLong
  
set bPlace to CLLocation’s alloc()’s initWithLatitude:bLat longitude:bLong
  
set distanceInMetres to aPlace’s distanceFromLocation:bPlace
  
return (distanceInMetres as real)
end getDistanceBetweenTwoPlaces

–Photos上で選択中の写真をTemporary Folderに掘ったフォルダに書き出して、そのalias情報を返す
on exportSelectedPhotoOnPhotos()
  set dtPath to (path to temporary items) as text
  
set aUUID to NSUUID’s UUID()’s UUIDString() as text
  
  
set dirPath to ((POSIX path of dtPath) & aUUID)
  
set fileManager to NSFileManager’s defaultManager()
  
set aRes to (fileManager’s createDirectoryAtPath:dirPath withIntermediateDirectories:true attributes:(missing value) |error|:(reference))
  
set dtPath to dtPath & aUUID
  
  
tell application "Photos"
    set a to selection
    
if a = {} then return
    
set aRes to (export a to file dtPath)
  end tell
  
  
tell application "Finder"
    tell folder dtPath
      set fList to (every file) as alias list
    end tell
  end tell
  
  
if fList = {} then return false
  
return first item of fList
end exportSelectedPhotoOnPhotos

–CIFilterをかけたJPEG画像を生成
–参照:http://ashplanning.blogspot.jp/ のうちのどこか
on convAsFilteredJPEG(aPath, aFilterName)
  
  
–aliasをURL(input)とPOSIX path(output) に変換
  
set aURL to (current application’s |NSURL|’s fileURLWithPath:(POSIX path of aPath)) –Input
  
set aPOSIX to (POSIX path of aPath) & "_" & aFilterName & ".jpg" –Output
  
  
–CIImageを生成
  
set aCIImage to CIImage’s alloc()’s initWithContentsOfURL:aURL
  
  
— CIFilter をフィルタの名前で生成
  
set aFilter to CIFilter’s filterWithName:aFilterName
  
aFilter’s setDefaults() –各フィルタのパラメータはデフォルト
  
  
–Filterを実行
  
aFilter’s setValue:aCIImage forKey:"inputImage"
  
set aOutImage to aFilter’s valueForKey:"outputImage"
  
  
— NSBitmapImageRep を CIImage から生成
  
set aRep to NSBitmapImageRep’s alloc()’s initWithCIImage:aOutImage
  
  
— NSBitmapImageRep から JPEG データを取得
  
set jpegData to aRep’s representationUsingType:(NSJPEGFileType) |properties|:(missing value)
  
  
— ファイルに保存
  
set fsRes to jpegData’s writeToFile:aPOSIX atomically:true
  
if (fsRes as boolean) = false then return false –失敗した場合
  
return aPOSIX –成功した場合
  
end convAsFilteredJPEG

–数字とアルファベットの混在状態の時にtrueを返す
on chkMixtureOfNumericAndAlphabet(checkString)
  set a0Res to chkAlphabetAndNumeric(checkString) of me
  
set a1Res to chkNumeric(checkString) of me
  
set a2Res to chkAlphabet(checkString) of me
  
if {a0Res, a1Res, a2Res} = {true, false, false} then
    return true
  else
    return false
  end if
end chkMixtureOfNumericAndAlphabet

–数字のみかを調べて返す
on chkNumeric(checkString)
  set digitCharSet to NSCharacterSet’s characterSetWithCharactersInString:"0123456789"
  
set ret to my chkCompareString:checkString baseString:digitCharSet
  
return ret as boolean
end chkNumeric

— アルファベットのみか調べて返す
on chkAlphabet(checkString)
  set aStr to NSString’s stringWithString:checkString
  
set allCharSet to NSMutableCharacterSet’s alloc()’s init()
  
allCharSet’s addCharactersInRange:(current application’s NSMakeRange(ASCII number of "a", 26))
  
allCharSet’s addCharactersInRange:(current application’s NSMakeRange(ASCII number of "A", 26))
  
set aBool to my chkCompareString:aStr baseString:allCharSet
  
return aBool as boolean
end chkAlphabet

— アルファベットと数字のみか調べて返す
on chkAlphabetAndNumeric(checkString)
  set aStr to NSString’s stringWithString:checkString
  
set allCharSet to NSMutableCharacterSet’s alloc()’s init()
  
allCharSet’s addCharactersInRange:(current application’s NSMakeRange(ASCII number of "0", 10))
  
allCharSet’s addCharactersInRange:(current application’s NSMakeRange(ASCII number of "a", 26))
  
allCharSet’s addCharactersInRange:(current application’s NSMakeRange(ASCII number of "A", 26))
  
set aBool to my chkCompareString:aStr baseString:allCharSet
  
return aBool as boolean
end chkAlphabetAndNumeric

on chkCompareString:checkString baseString:baseString
  set aScanner to NSScanner’s localizedScannerWithString:checkString
  
aScanner’s setCharactersToBeSkipped:(missing value)
  
aScanner’s scanCharactersFromSet:baseString intoString:(missing value)
  
return (aScanner’s isAtEnd()) as boolean
end chkCompareString:baseString:

–文字置換
on repChar(aStr, targStr, repStr)
  set aString to NSString’s stringWithString:aStr
  
set bString to aString’s stringByReplacingOccurrencesOfString:targStr withString:repStr
  
return bString as text
end repChar

–アルファベットと数字以外を削除して返す
on returnNumberAndAlphabetCharsOnly(aStr)
  set anNSString to NSString’s stringWithString:aStr
  
set anNSString to anNSString’s stringByReplacingOccurrencesOfString:"[^0-9A-Za-z]" withString:"" options:(NSRegularExpressionSearch) range:{0, anNSString’s |length|()}
  
return anNSString as text
end returnNumberAndAlphabetCharsOnly

★Click Here to Open This Script 

Posted in file filter geolocation Image list OCR Sandbox | Tagged 10.11savvy 10.12savvy FineReader OCR Pro | Leave a comment

ハッシュ値から、メモリースティックに保存されたReplay Dataのステージ名とプレイ日時を求める v3

Posted on 10月 30, 2018 by Takaaki Naganoya

PSPのゲーム「戦場の絆ポータブル」のセーブデータについているステージ別のプレビュー画像のハッシュ値から対戦ステージと対戦日時を抽出してタブ区切りテキストで出力するAppleScriptです。

保存された対戦データの内容を集計するために作成したものです。

PSPでメモリースティックに保存された対戦データには、すべて同じファイル名(ICON0.PNG)で異なる画像が添付されていました。ファイル名で対戦ステージを判定しようにも同じファイル名なので区別できません。

そこで、Spotlightの機能を用いて各セーブデータの「ICON0.PNG」をピックアップし、画像の内容のハッシュ値(SHA-1)を計算して、対戦ステージ内容を判定しました。

直近の対戦データをメモリースティック経由でMacに読み込み、本Scriptで分析してみたところ、

ジャブロー地上	2017年9月18日月曜日 14:42:48
ジャブロー地上	2017年9月18日月曜日 14:50:02
ジャブロー地上	2017年9月18日月曜日 14:55:22
タクラマカン砂漠	2017年9月18日月曜日 15:02:32
サイド7	2017年9月18日月曜日 15:09:36
ジャブロー地下	2017年9月18日月曜日 15:17:06
ジャブロー地上	2017年9月18日月曜日 15:31:08
サイド7	2017年9月18日月曜日 15:38:28
ジャブロー地上	2017年9月18日月曜日 15:51:52
ジャブロー地上	2018年1月2日火曜日 16:13:30
サイド7	2018年1月2日火曜日 16:23:04
ジャブロー地下	2018年1月2日火曜日 16:57:22

のようになりました。正月と秋分の日に親戚で集まったときに甥っ子と対戦した様子がありありと記録されています。

本Scriptはたまたまゲームのセーブデータの集計を行っていますが、同様の形式のデータを集計したい場合には使えそうです。

–> md5Lib.framework(To ~/Library/Frameworks)

AppleScript名:チェックサム値から、メモリースティックに保存されたReplay Dataのステージ名とプレイ日時を求める v3.1
— Created 2015-04-17 by Takaaki Naganoya
— Modified 2018-10-29 by Takaaki Naganoya
— 2018 Piyomaru Software
use AppleScript version "2.4"
use scripting additions
use framework "Foundation"
use framework "md5Lib" –https://github.com/JoeKun/FileMD5Hash
use bPlus : script "BridgePlus" –https://www.macosxautomation.com/applescript/apps/BridgePlus.html
use mdLib : script "Metadata Lib" version "2.0.0" –https://www.macosxautomation.com/applescript/apps/

property FileHash : a reference to current application’s FileHash
property SMSForder : a reference to current application’s SMSForder
property NSPredicate : a reference to current application’s NSPredicate
property NSFileManager : a reference to current application’s NSFileManager
property NSMutableArray : a reference to current application’s NSMutableArray

–各SAVEDATAフォルダ中の「ICON0.PNG」のSHA-1ハッシュ値とステージ名の対応表
set shaArray to NSMutableArray’s arrayWithArray:{{stageName:"ニューヤーク", sha1:"dbb9e8e26e96dbb4dd3198e55b6cde41aba8e0a8"}, {stageName:"鉱山都市", sha1:"72f35456504b1957ec85fb6a1597ac1a2baa2ee9"}, {stageName:"グレートキャニオン", sha1:"9de93e8b853fe153bc73066fb07481c774499960"}, {stageName:"サイド7", sha1:"be22fa949bfd78b0cd97596929f07ce4ec501d7b"}, {stageName:"タクラマカン砂漠", sha1:"5284dc5f0f7a53ee5677908f66da1e00b80f76b6"}, {stageName:"トリントン・タワー", sha1:"9f080853dac45ecaf1672ff2230f2b9a80a00eb4"}, {stageName:"ジャブロー地下", sha1:"a93550099419f52444cf77366773192d0bf5f848"}, {stageName:"ヒマラヤ", sha1:"877f998d608dd267c380e59a17b2a95a139baef5"}, {stageName:"ジャブロー地上", sha1:"8c4ee44e8f2fbcbf061e6d5ea2b202b08f42c59a"}}

load framework

set apPath1 to choose folder with prompt "リプレイデータが入っているフォルダを選択してください"
set aRes to perform search in folders {apPath1} predicate string "kMDItemFSName == %@" search arguments {"ICON0.PNG"}

set outList to {}
set errorList to {}

repeat with i in aRes
  set j to contents of i
  
set sumRes to (FileHash’s sha1HashOfFileAtPath:(j)) as string
  
  
–チェックサムからステージ名を検索する
  
set aPredStr to "sha1 == ’" & sumRes & "’"
  
set aPredicate to (NSPredicate’s predicateWithFormat:aPredStr)
  
set filteredArray to (shaArray’s filteredArrayUsingPredicate:aPredicate)
  
  
if filteredArray as list = {} then
    set the end of errorList to j
  else
    set tmpStage to (filteredArray’s valueForKey:"stageName") as string
    
    
set fAttrib to (NSFileManager’s defaultManager()’s attributesOfItemAtPath:j |error|:(missing value))
    
set cDat to (fAttrib’s fileCreationDate()) as date
    
    
set tmpList to {tmpStage, cDat}
    
    
if tmpList is not in outList then
      set the end of outList to tmpList
    end if
  end if
end repeat

–2D Listのソート
set sortIndexes to {1} –Key Item id: begin from 0
set sortOrders to {true} –ascending = true
set sortTypes to {"compare:"}
set out2List to (SMSForder’s subarraysIn:(outList) sortedByIndexes:sortIndexes ascending:sortOrders sortTypes:sortTypes |error|:(missing value)) as list

–2D Listをタブ区切りテキストに変換して返す
set aText to retItemDelimedAndParagraphDelimedText(out2List, tab, return) of me

–入れ子のリストを、アイテム間のデリミタとパラグラフ間のデリミタを指定してテキスト化
–というか、入れ子のリストをタブ区切りテキストにするのが目的
on retItemDelimedAndParagraphDelimedText(aList, itemDelim, paragraphDelim)
  set aText to ""
  
  
repeat with i in aList
    set aStr to retDelimedText(i, itemDelim) of me
    
set aText to aText & aStr & paragraphDelim
  end repeat
  
  
return aText
end retItemDelimedAndParagraphDelimedText

on retDelimedText(aList, aDelim)
  set aText to ""
  
set curDelim to AppleScript’s text item delimiters
  
set AppleScript’s text item delimiters to aDelim
  
set aText to aList as text
  
set AppleScript’s text item delimiters to curDelim
  
return aText
end retDelimedText

★Click Here to Open This Script 

Posted in file File path list Record Spotlight | Tagged 10.11savvy 10.12savvy NSFileManager NSMutableArray NSPredicate | Leave a comment

ファイル作成日、修正日を変更する

Posted on 10月 29, 2018 by Takaaki Naganoya

指定ファイルの作成日、修正日を変更するAppleScriptです。

以前はsetFileコマンド(Xcodeのcommand lineユーティリティーをインストールすると入る)で行うパターンを掲載していたのですが、NSFileManagerの方が楽にできるのと、どの実行環境でも(開発ツールが入っていなくても)実行できていいと思います。

AppleScript名:ファイル作成日、修正日を変更する
— Created 2018-05-30 by Takaaki Naganoya
— 2018 Piyomaru Software
use AppleScript version "2.5"
use scripting additions
use framework "Foundation"
use framework "AppKit"

set aFile to POSIX path of (choose file)
set targDate to current date
changeFileCreationDate(targDate, aFile) of me
changeFileModDate(targDate, aFile) of me

–指定パスのファイルの作成日時を変更する
on changeFileCreationDate(aDate, aFile)
  set aDic to current application’s NSMutableDictionary’s dictionaryWithObject:aDate forKey:(current application’s NSFileCreationDate)
  
set aFM to current application’s NSFileManager’s defaultManager()’s setAttributes:aDic ofItemAtPath:(POSIX path of aFile) |error|:(missing value)
end changeFileCreationDate

–指定パスのファイルの修正日時を変更する
on changeFileModDate(aDate, aFile)
  set aDic to current application’s NSMutableDictionary’s dictionaryWithObject:aDate forKey:(current application’s NSFileModificationDate)
  
set aFM to current application’s NSFileManager’s defaultManager()’s setAttributes:aDic ofItemAtPath:(POSIX path of aFile) |error|:(missing value)
end changeFileModDate

★Click Here to Open This Script 

Posted in Calendar file File path | Tagged 10.11savvy 10.12savvy 10.13savvy 10.14savvy NSFileManager NSMutableDictionary | 1 Comment

アプリケーションの各種記法からBundle IDを求める

Posted on 10月 26, 2018 by Takaaki Naganoya

各種記法で記述したアプリケーション名から、Bundle IDを求めるAppleScriptです。

アプリケーション名(本当の名前)、Bundle ID、アプリケーションのフルパス(POSIX path)の3形式で記述したアプリケーション名から、Bundle IDを求めます。

ただし、Localized Name(Reminders–>「リマインダー」、Notes–>「メモ」)からBundle IDの取得は本Scriptではサポートしていません。

AppleScript名:アプリケーションの各種記法からBundle IDを求める
use AppleScript version "2.5"
use scripting additions
use framework "Foundation"
use framework "AppKit"

set apList to {"Finder", "System Events", "com.apple.Finder", "/Applications/Safari"}
set bIDList to retAppBundleID(apList) of me
–> {"com.apple.finder", "com.apple.systemevents", "com.apple.Finder", "com.apple.Safari"}

–Application name list –> Bundle ID list
on retAppBundleID(appNameList)
  set resList to {}
  
  
repeat with i in appNameList
    set j to contents of i
    
    
if j starts with "/Applications/" then
      –POSIX path
      
if j does not end with ".app" then
        set j to j & ".app"
      end if
      
set aRes to getBundleIDFromPath(j) of me
      
    else if j contains "." then
      –Bundle ID (maybe)
      
copy j to aRes
    else
      –Application Name
      
set aRes to getBundleIDFromAppName(j) of me
    end if
    
    
set the end of resList to aRes
  end repeat
  
  
return resList
end retAppBundleID

–Application path –> Bundle ID
on getBundleIDFromPath(aPOSIXpath)
  set aURL to current application’s |NSURL|’s fileURLWithPath:aPOSIXpath
  
set aWorkspace to current application’s NSWorkspace’s sharedWorkspace()
  
set appURL to aWorkspace’s URLForApplicationToOpenURL:aURL
  
set aBundle to current application’s NSBundle’s bundleWithURL:appURL
  
set anID to aBundle’s bundleIdentifier()
  
return anID as string
end getBundleIDFromPath

–Application Name –> path –> Bundle ID
on getBundleIDFromAppName(appName)
  try
    –Localized Name will require choose application dialog
    
set appPath to POSIX path of (path to application appName)
  on error
    return ""
  end try
  
return getBundleIDFromPath(appPath) of me
end getBundleIDFromAppName

★Click Here to Open This Script 

Posted in file File path System | Tagged 10.11savvy 10.12savvy 10.13savvy 10.14savvy | Leave a comment

NSURLからBookmarkを作成するじっけん

Posted on 10月 3, 2018 by Takaaki Naganoya

NSURLからbookmarkDataを作成、あるいはbookmarkDataからNSURLを復元する実験を行うAppleScriptです。

POSIX pathのファイルパスをplistに保存するような場合に、元のファイルの場所が変わったり名前が変わったりすると、追跡できなくなってしまいます。

 「aliasをpropertyに保存していた時代には、自動で追跡してもらえたんだけどなー」

そのため、plistからPOSIX pathを取り出したあとは逐一「本当にそのパスにファイルが存在するか」をチェックしていたのですが、

 「もっといいものがあるよ」

と教えていただいたのが、このbookmarkDataです。

NSURL(filePathのほう)をbookmarkDataにすると、元のファイルの名前が変わったり場所(パス)が変わったりしても追跡してくれます。ファイルのノード番号をベースに追跡しているのでしょうか。とにかく、追跡してもらえるのはいいことです。

本AppleScriptでは、POSIX pathをNSURLを経由してboookmarkDataに変換し、オリジナルのファイルをリネームして、bookmarkDataからNSURL–> POSIX pathを取得。得られたパスがリネーム後のものと同じかどうかをチェックするものです。

テストを行った範囲では、想定どおりに使えているようです。

AppleScript名:POSIX path–>Bookmark & bookmark –> POSIX path.scptd
—
–  Created by: Takaaki Naganoya
–  Created on: 2018/10/02
—
–  Copyright © 2018 Piyomaru Software, All Rights Reserved
—
use AppleScript version "2.4" — Yosemite (10.10) or later
use framework "Foundation"
use scripting additions

property |NSURL| : a reference to current application’s |NSURL|
property NSString : a reference to current application’s NSString
property NSFileManager : a reference to current application’s NSFileManager
property NSURLBookmarkResolutionWithoutUI : a reference to current application’s NSURLBookmarkResolutionWithoutUI

set aFile to POSIX path of (choose file)
–> "/Users/me/Desktop/9E37BC8B-3920-4844-A6D1-0DCA183D744D.png"

–POSIX path –> URL –> Bookmark
set aURL to |NSURL|’s fileURLWithPath:aFile
set aBookmarkData to aURL’s bookmarkDataWithOptions:0 includingResourceValuesForKeys:(missing value) relativeToURL:(missing value) |error|:(missing value)

–Rename Original File
set fRes to renameFileItem(aFile, "test_test_test") of me
if fRes = false then error "Error: File already exists."

–Bookmark –> URL –> POSIX path
set bURL to |NSURL|’s URLByResolvingBookmarkData:aBookmarkData options:(NSURLBookmarkResolutionWithoutUI) relativeToURL:(missing value) bookmarkDataIsStale:(missing value) |error|:(missing value)
set bPath to (bURL’s |path|()) as string
–> "/Users/me/Desktop/test_test_test.png"

–File Rename Routine
on renameFileItem(aPOSIX, newName)
  set theNSFileManager to NSFileManager’s defaultManager()
  
set POSIXPathNSString to NSString’s stringWithString:(aPOSIX)
  
  
–Make New File Path
  
set anExtension to POSIXPathNSString’s pathExtension()
  
set newPath to (POSIXPathNSString’s stringByDeletingLastPathComponent()’s stringByAppendingPathComponent:newName)’s stringByAppendingPathExtension:anExtension
  
  
–Rename
  
if theNSFileManager’s fileExistsAtPath:newPath then
    return false
  else
    set theResult to theNSFileManager’s moveItemAtPath:POSIXPathNSString toPath:newPath |error|:(missing value)
    
if (theResult as integer = 1) then
      return (newPath as string)
    else
      return false
    end if
  end if
end renameFileItem

★Click Here to Open This Script 

Posted in file URL | Tagged 10.11savvy 10.12savvy 10.13savvy NSFileManager NSString NSURL NSURLBookmarkResolutionWithoutUI | 1 Comment

ZipArchive Frameworkを使ってパスワード付きZipアーカイブを作成

Posted on 9月 30, 2018 by Takaaki Naganoya

オープンソースのSSZipArchiveを呼び出して、パスワード付きZipアーカイブを作成するAppleScriptです。

AppleScriptそのものにZipアーカイブの操作機能はないので、この手の操作は他のプログラムを操作することになります。

–> Download ZipArchive.framework (To ~/Library/Frameworks)

(1)Unix shellのzipコマンド
do shell scriptコマンド経由でUnix shellのzipコマンドを呼び出す方法です。データをファイルで扱っている場合にはよいのですが、そうでない場合には困ります(変数に入れたデータを圧縮したいとか)。以前に、なろう小説APIを呼び出したときに、GZIP.frameworkを用いて変数内のデータをZip展開しましたが、こういう用途には使えません。

(2)アーカイブユーティリティを呼び出す
/System/Library/CoreServices/Applications/Archive Utility.appを呼び出す方法です。Mac OS X 10.5までは「BOMArchiveHelper」という名前でした。その他、AppleScriptに対応しているZipアーカイバがあればそれを使ってみてもよいでしょう。これも、(1)同様にファイル単位で操作するものが普通なので、使える用途と使えない用途があります。

(3)各種Cocoa Frameworkを呼び出す
Objective-CのZipアーカイブ操作プログラムを見つけ、Frameworkになっていなくても、無理やりXcode上でCocoa Frameworkを作成し、必要なファイルをそこに突っ込んでFramework化して使っています。

今回使うのはSSZipArchiveです。

いろいろなZip操作のObjective-Cのプログラムをダウンロードしては分析してみると、各プログラムで作者の好みが色濃く反映されており、どれか1つで済むとは思えない状況です。

また、必要なメソッドの呼び出しにBlocks構文による記述が必要な場合にはAppleScriptから呼べません(さらにそのメソッドを呼び出すためのメソッドをObjective-C上で定義するとか、回避方法はいろいろありそうです)。

結局、いろいろGithub上で探してはビルドして試しています。

AppleScript名:ZipArchive Frameworkを使ってパスワード付きZipアーカイブを作成(ファイル指定).scptd
— Created 2018-09-28 by Takaaki Naganoya
— 2018 Piyomaru Software
use AppleScript version "2.4"
use scripting additions
use framework "Foundation"
use framework "ZipArchive" –https://github.com/ZipArchive/ZipArchive

set aPassWord to "yourpassword"
set targFile to POSIX path of (choose file with prompt "Select a file to Zip")
set archiveTarg to targFile & ".zip"

set zipRes to current application’s SSZipArchive’s createZipFileAtPath:(archiveTarg) withFilesAtPaths:{targFile} withPassword:(aPassWord)
return zipRes as boolean

★Click Here to Open This Script 

Posted in file | Tagged 10.11savvy 10.12savvy 10.13savvy | 7 Comments

ZipZap frameworkを使ってZipアーカイブ内の情報を取得しファイルタイプごとに対応出力

Posted on 9月 29, 2018 by Takaaki Naganoya

オープンソースのZipZap frameworkを用いて、指定Zipアーカイブ内の情報を取得し、ファイルタイプごとに対応した出力を行うAppleScriptです。

–> ZipZap.framework(To ~/Library/Frameworks/)

客観的に動作内容を書くとわかりにくいですが、「目的」を書くと非常にわかりやすい部品です。

「バンドル内にパスワード付きのZipアーカイブ化したAppleScript書類を入れておいて、実行時にアーカイブからAppleScriptのソースを取り出して実行する」

というのが、その用途です。

プレーンテキストと画像を取り出せるような記述になっていますが、それらはあくまでも実験用で、AppleScript書類のソースを取り出すのが本来の目的です。

AppleScriptでGUIアプリケーションを作成したときに、GUIまわりは普通にXcode上で記述して(あるいは、外部エディタ上で記述して)おきますが、外部のアプリケーションをコントロールするコードは、実行専用の.scpt形式でかつ書き込み禁止状態にしてバンドル内に入れておいたりします(SandBox対応のため)。

ただ、さまざまな要求を満たすようにGUIアプリケーション操作用のScriptを呼び出そうとすると、load scriptで読み込んで実行させていたのでは、都合がよくない場合があります(何らかのキーを長押しすると実行を停止できるとか、システム内の別の要素……たとえばCPUの温度が上がりすぎたら停止させるとか)。

load scriptで実行すると、

(1)途中で実行停止しにくい
(2)セキュリティ上の制約がきつい(とくにGUI Scriptingまわり)
(3)スクリプトエディタ上で動かしていた時と挙動が変わる箇所がある(Finder上のselectionを取得していた場合とか)

といった問題がありますが、OSAScriptView上にAppleScriptのソースを展開して実行すると、これらの問題を解決できる一方、ソースが見える形式でアプリケーションバンドル内に入れるのはためらわれます。

その問題を解決するために書いたものです。展開したデータをファイル出力せず、すべて変数上で(オンメモリで)処理できるので都合がいいです。

Mac App Storeで販売するアプリケーションでこの部品を使ったことはありませんが、客先に納品するアプリケーションでは使えるといったところでしょうか。ここまで手の込んだプログラムだとリジェクトできないとは思っています(もっとレベルの低い指摘しか来ないので)。

AppleScript名:ZipZap frameworkを使ってZipアーカイブ内の情報を取得してファイルタイプごとに対応出力 v2
— Created 2018-09-28 by Takaaki Naganoya
— 2018 Piyomaru Software
use AppleScript version "2.5"
use scripting additions
use framework "Foundation"
use framework "OSAKit"
use framework "ZipZap" –https://github.com/pixelglow/zipzap
use bPlus : script "BridgePlus" –https://www.macosxautomation.com/applescript/apps/BridgePlus.html

property |NSURL| : a reference to current application’s |NSURL|
property NSArray : a reference to current application’s NSArray
property NSString : a reference to current application’s NSString
property NSImage : a reference to current application’s NSImage
property ZZArchive : a reference to current application’s ZZArchive
property OSAScript : a reference to current application’s OSAScript
property NSPredicate : a reference to current application’s NSPredicate
property NSUTF8StringEncoding : a reference to current application’s NSUTF8StringEncoding
property NSURLTypeIdentifierKey : a reference to current application’s NSURLTypeIdentifierKey

set aPassword to "piyomarusoftware"
set aPath to POSIX path of (choose file of type {"public.zip-archive"})
set aList to extractArchive(aPath, aPassword) of me

on extractArchive(aPath, aPass)
  set oldArchive to ZZArchive’s archiveWithURL:(|NSURL|’s fileURLWithPath:aPath) |error|:(missing value)
  
set aList to oldArchive’s entries() as list
  
  
set outList to {}
  
  
repeat with i in aList
    set encF to i’s encrypted() as boolean
    
    
set aFileName to i’s fileName()
    
    
if (aFileName as string) does not start with "__MACOSX/" then
      set aExt to (aFileName’s pathExtension()) as string
      
set aUTI to my retFileFormatUTI(aExt)
      
set aData to (i’s newDataWithError:(missing value)) –Uncompressed raw data
      
      
if aData = missing value then
        set aData to (i’s newDataWithPassword:(aPass) |error|:(missing value))
        
if aData is equal to (missing value) then
          error "Internal archive error in extracting"
        end if
      end if
      
      
if aUTI = "public.plain-text" then
        –Plain Text
        
set aStr to (NSString’s alloc()’s initWithData:aData encoding:(NSUTF8StringEncoding)) as string
        
      else if aUTI = "com.apple.applescript.script" then
        –AppleScript .scpt file
        
set aScript to (OSAScript’s alloc()’s initWithCompiledData:aData |error|:(missing value))
        
set aStr to (aScript’s source()) as string
        
      else if (my filterUTIList({aUTI}, "public.image")) is not equal to {} then
        –Various Images
        
set aStr to (NSImage’s alloc()’s initWithData:aData)
        
      end if
      
      
set the end of outList to aStr
    end if
  end repeat
  
  
return outList
end extractArchive

on retFileFormatUTI(aExt as string)
  tell script "BridgePlus"
    load framework
    
return (current application’s SMSForder’s UTIForExtension:aExt) as string
  end tell
end retFileFormatUTI

–UTIリストが指定UTIに含まれているかどうか演算を行う
on filterUTIList(aUTIList, aUTIstr)
  set anArray to NSArray’s arrayWithArray:aUTIList
  
set aPred to NSPredicate’s predicateWithFormat_("SELF UTI-CONFORMS-TO %@", aUTIstr)
  
set bRes to (anArray’s filteredArrayUsingPredicate:aPred) as list
  
return bRes
end filterUTIList

★Click Here to Open This Script 

Posted in file OSA Text URL UTI | Tagged 10.11savvy 10.12savvy 10.13savvy NSArray NSImage NSPredicate NSString NSURL NSURLTypeIdentifierKey NSUTF8StringEncoding OSAScript ZZArchive | Leave a comment

PSPDFkitのじっけん

Posted on 8月 30, 2018 by Takaaki Naganoya

サードパーティの有償Framework「PSPDFkit」をAppleScriptからコントロールする実験のAppleScriptです。

PSPDFkitについては以前から知っていました。サンプルもAppleよりきちんとしているので、いいんじゃないかと思っていました。

PSPDFの重要性を痛感したのは、AppleがmacOS 10.13の開発で大失敗して、α版以下のバグだらけのOSをリリースしたからです。

もはや、「公開デバッグを1年かけて行うので、最新版は使わないでね」という状態です。はい。10.13を積極的に使う意味など何もありません。

とくに、PDFKitまわりは問題だらけで、自分がMac App Storeで売っているソフトウェアも、macOS 10.13では起動してもまともに動きません(Betaで問題なく動くことを確認していたんですがー)。Developper Supportに質問を投げても返事すら来ません(本当)。

そんなわけで、PDF処理でAppleがOS内に作った機能が正しく維持される保証がなく、むしろ悪くなりそうな気配すらある昨今、PSPDFを使うのも悪くないと思えてきました。

問題は、

 ・ライセンス契約の問題 たんに「たまに動かす程度のScript」で使うのに合ったライセンス形態があるのかないのか

といったあたりでしょう。ライセンス価格表が掲載されているわけでもないので、いまひとつ不明です(ありがちー)。

→ PSPDFkitのsalesと話をしてみたら、ユーザー数と用途、OSプラットフォームなどに応じて、年ごとのビルドライセンス+実行ライセンスで契約するようです。ちなみに、試用ライセンスが切れるとスクリプトエディタ上で実行はできてしまうものの、実行直後にスクリプトエディタが終了させられます

何はともあれ、実際にPSPDFkit for macOSの試用版をダウンロードし、試用ライセンスキーを取得して(今度は真剣に)いろいろ試してみました。

ダウンロードしてきた試用版のPSPDFkit.frameworkを~/Library/Frameworksにインストールして、取得したPSPDFkitの試用版ライセンスを「current application’s PSPDFKit’s setLicenseKey:」のパラメータに書き、Control-Command-Rで「最前面で実行」(実際にはメインスレッド実行だが)を行うと動作します。

いろいろ検討してPSPDFkitは使いませんでした。macOS用だとPDFViewに該当する部品が提供されていないため、PDFView自体の代替にならないためです(そこにScripting Bridgeのバグが集中しているので)。

AppleScript名:PSPDFkitのじっけん(Script Editor)
— Created 2018-08-29 by Takaaki Naganoya
— 2018 Piyomaru Software
use AppleScript version "2.4"
use scripting additions
use framework "Foundation"
use framework "PSPDFKit" –https://pspdfkit.com

–This Script have to run in foreground

property PSPDFKit : a reference to current application’s PSPDFKit
property PSPDFDocument : a reference to current application’s PSPDFDocument

current application’s PSPDFKit’s setLicenseKey:"XxXX_XXXXXxXxxXXXXxxXxxxXXXxxXXXXXxXXXxXXXX"

set aPDFfile to POSIX path of (choose file)
set aURL to current application’s |NSURL|’s fileURLWithPath:aPDFfile

set aDoc to current application’s PSPDFDocument’s alloc()’s initWithURL:aURL
set pCount to (aDoc’s pageCount()) as integer
log pCount

set aVf to (aDoc’s isValid()) as boolean
log aVf

set fList to aDoc’s features()

set fName to (aDoc’s fileName()) as string

set f0Name to aDoc’s fileNameForPageAtIndex:10
set f1Name to (aDoc’s title()) as string

★Click Here to Open This Script 

この「最前面で実行」(メインスレッドで実行)する機能がScript Debuggerには存在していないので、一部Scriptを書き換えて、Script Debugger上でも動くようにしてみました。今回はたまたま動きましたが、「スクリプトエディタ上で動作するのにScript Debugger上では動作しない」ことも往々にしてありうるので、ご注意を。

AppleScript名:PSPDFkitのじっけん(Script Debugger)
— Created 2018-08-29 by Takaaki Naganoya
— 2018 Piyomaru Software
use AppleScript version "2.4"
use scripting additions
use framework "Foundation"
use framework "PSPDFKit" –https://pspdfkit.com

–This Script have to run in foreground

property PSPDFKit : a reference to current application’s PSPDFKit
property PSPDFDocument : a reference to current application’s PSPDFDocument

my performSelectorOnMainThread:"setLicence:" withObject:(missing value) waitUntilDone:true

set aPDFfile to POSIX path of (choose file)
set aURL to current application’s |NSURL|’s fileURLWithPath:aPDFfile

set aDoc to current application’s PSPDFDocument’s alloc()’s initWithURL:aURL
set pCount to (aDoc’s pageCount()) as integer
log pCount

set aVf to (aDoc’s isValid()) as boolean
log aVf

set fList to aDoc’s features()

set fName to (aDoc’s fileName()) as string

set f0Name to aDoc’s fileNameForPageAtIndex:10
set f1Name to (aDoc’s title()) as string

on setLicence:(anObj)
  current application’s PSPDFKit’s setLicenseKey:"XxXX_XXXXXxXxxXXXXxxXxxxXXXxxXXXXXxXXXxXXXX"
end setLicence:

★Click Here to Open This Script 

Posted in file PDF | Tagged 10.11savvy 10.12savvy 10.13savvy | Leave a comment

Post navigation

  • Older posts
  • Newer posts

電子書籍(PDF)をオンラインストアで販売中!

Google Search

Popular posts

  • 開発機としてM2 Mac miniが来たのでガチレビュー
  • CotEditorで2つの書類の行単位での差分検出
  • macOS 13.6.5 AS系のバグ、一切直らず
  • macOS 15, Sequoia
  • 初心者がつまづきやすい「log」コマンド
  • 指定のWordファイルをPDFに書き出す
  • Pages本執筆中に、2つの書類モード切り替えに気がついた
  • Adobe AcrobatをAppleScriptから操作してPDF圧縮
  • メキシカンハットの描画
  • 与えられた文字列の1D Listのすべての順列組み合わせパターン文字列を返す v3(ベンチマーク用)
  • 2023年に書いた価値あるAppleScript
  • Pixelmator Pro v3.6.4でAppleScriptからの操作時の挙動に違和感が
  • Numbersで選択範囲のセルの前後の空白を削除
  • AdobeがInDesign v19.4からPOSIX pathを採用
  • Safariで「プロファイル」機能を使うとAppleScriptの処理に影響
  • Cocoa Scripting Course 続刊計画
  • AppleScriptによる並列処理
  • macOS 14.xでScript Menuの実行速度が大幅に下がるバグ
  • NaturalLanguage.frameworkでNLEmbeddingの処理が可能な言語をチェック
  • AppleScript入門③AppleScriptを使った「自動化」とは?

Tags

10.11savvy (1102) 10.12savvy (1243) 10.13savvy (1392) 10.14savvy (587) 10.15savvy (438) 11.0savvy (283) 12.0savvy (212) 13.0savvy (188) 14.0savvy (138) 15.0savvy (116) CotEditor (64) Finder (51) iTunes (19) Keynote (115) NSAlert (61) NSArray (51) NSBitmapImageRep (20) NSBundle (20) NSButton (34) NSColor (53) NSDictionary (28) NSFileManager (23) NSFont (21) NSImage (41) NSJSONSerialization (21) NSMutableArray (63) NSMutableDictionary (22) NSPredicate (36) NSRunningApplication (56) NSScreen (30) NSScrollView (22) NSString (119) NSURL (98) NSURLRequest (23) NSUTF8StringEncoding (30) NSView (33) NSWorkspace (20) Numbers (75) Pages (54) Safari (44) Script Editor (27) WKUserContentController (21) WKUserScript (20) WKWebView (23) WKWebViewConfiguration (22)

カテゴリー

  • 2D Bin Packing
  • 3D
  • AirDrop
  • AirPlay
  • Animation
  • AppleScript Application on Xcode
  • Beginner
  • Benchmark
  • beta
  • Bluetooth
  • Books
  • boolean
  • bounds
  • Bug
  • Calendar
  • call by reference
  • check sum
  • Clipboard
  • Cocoa-AppleScript Applet
  • Code Sign
  • Color
  • Custom Class
  • dialog
  • diff
  • drive
  • Droplet
  • exif
  • file
  • File path
  • filter
  • folder
  • Font
  • Font
  • GAME
  • geolocation
  • GUI
  • GUI Scripting
  • Hex
  • History
  • How To
  • iCloud
  • Icon
  • Image
  • Input Method
  • Internet
  • iOS App
  • JavaScript
  • JSON
  • JXA
  • Keychain
  • Keychain
  • Language
  • Library
  • list
  • Locale
  • Localize
  • Machine Learning
  • Map
  • Markdown
  • Menu
  • Metadata
  • MIDI
  • MIME
  • Natural Language Processing
  • Network
  • news
  • Noification
  • Notarization
  • Number
  • Object control
  • OCR
  • OSA
  • parallel processing
  • PDF
  • Peripheral
  • PRODUCTS
  • QR Code
  • Raw AppleEvent Code
  • Record
  • rectangle
  • recursive call
  • regexp
  • Release
  • Remote Control
  • Require Control-Command-R to run
  • REST API
  • Review
  • RTF
  • Sandbox
  • Screen Saver
  • Script Libraries
  • sdef
  • search
  • Security
  • selection
  • shell script
  • Shortcuts Workflow
  • Sort
  • Sound
  • Spellchecker
  • Spotlight
  • SVG
  • System
  • Tag
  • Telephony
  • Text
  • Text to Speech
  • timezone
  • Tools
  • Update
  • URL
  • UTI
  • Web Contents Control
  • WiFi
  • XML
  • XML-RPC
  • イベント(Event)
  • 未分類

アーカイブ

  • 2025年2月
  • 2025年1月
  • 2024年12月
  • 2024年11月
  • 2024年10月
  • 2024年9月
  • 2024年8月
  • 2024年7月
  • 2024年6月
  • 2024年5月
  • 2024年4月
  • 2024年3月
  • 2024年2月
  • 2024年1月
  • 2023年12月
  • 2023年11月
  • 2023年10月
  • 2023年9月
  • 2023年8月
  • 2023年7月
  • 2023年6月
  • 2023年5月
  • 2023年4月
  • 2023年3月
  • 2023年2月
  • 2023年1月
  • 2022年12月
  • 2022年11月
  • 2022年10月
  • 2022年9月
  • 2022年8月
  • 2022年7月
  • 2022年6月
  • 2022年5月
  • 2022年4月
  • 2022年3月
  • 2022年2月
  • 2022年1月
  • 2021年12月
  • 2021年11月
  • 2021年10月
  • 2021年9月
  • 2021年8月
  • 2021年7月
  • 2021年6月
  • 2021年5月
  • 2021年4月
  • 2021年3月
  • 2021年2月
  • 2021年1月
  • 2020年12月
  • 2020年11月
  • 2020年10月
  • 2020年9月
  • 2020年8月
  • 2020年7月
  • 2020年6月
  • 2020年5月
  • 2020年4月
  • 2020年3月
  • 2020年2月
  • 2020年1月
  • 2019年12月
  • 2019年11月
  • 2019年10月
  • 2019年9月
  • 2019年8月
  • 2019年7月
  • 2019年6月
  • 2019年5月
  • 2019年4月
  • 2019年3月
  • 2019年2月
  • 2019年1月
  • 2018年12月
  • 2018年11月
  • 2018年10月
  • 2018年9月
  • 2018年8月
  • 2018年7月
  • 2018年6月
  • 2018年5月
  • 2018年4月
  • 2018年3月
  • 2018年2月

https://piyomarusoft.booth.pm/items/301502

メタ情報

  • ログイン
  • 投稿フィード
  • コメントフィード
  • WordPress.org

Forum Posts

  • 人気のトピック
  • 返信がないトピック

メタ情報

  • ログイン
  • 投稿フィード
  • コメントフィード
  • WordPress.org
Proudly powered by WordPress
Theme: Flint by Star Verte LLC