Menu

Skip to content
AppleScriptの穴
  • Home
  • Products
  • Books
  • Docs
  • Events
  • Forum
  • About This Blog
  • License
  • 仕事依頼

AppleScriptの穴

Useful & Practical AppleScript archive. Click '★Click Here to Open This Script' Link to download each AppleScript

カテゴリー: file

指定のiOSアプリからジャンル情報を取得

Posted on 6月 20, 2021 by Takaaki Naganoya

M1 Macで、Mac App StoreからインストールしたiOSアプリから、ジャンル情報を取得するAppleScriptです。

iOSアプリケーションでは、Info.plist内にジャンル情報が記載されておらず、バンドル内の別ファイルに記載されています。これを読み取ることで、ジャンル情報を取得できます。

なかなか素敵な機能なのですが、Xcode上のCocoa-AppleScriptアプリケーション内で実行すると、Sandboxの制限によりデータアクセスができません。


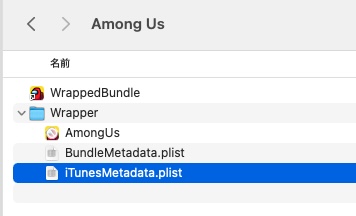
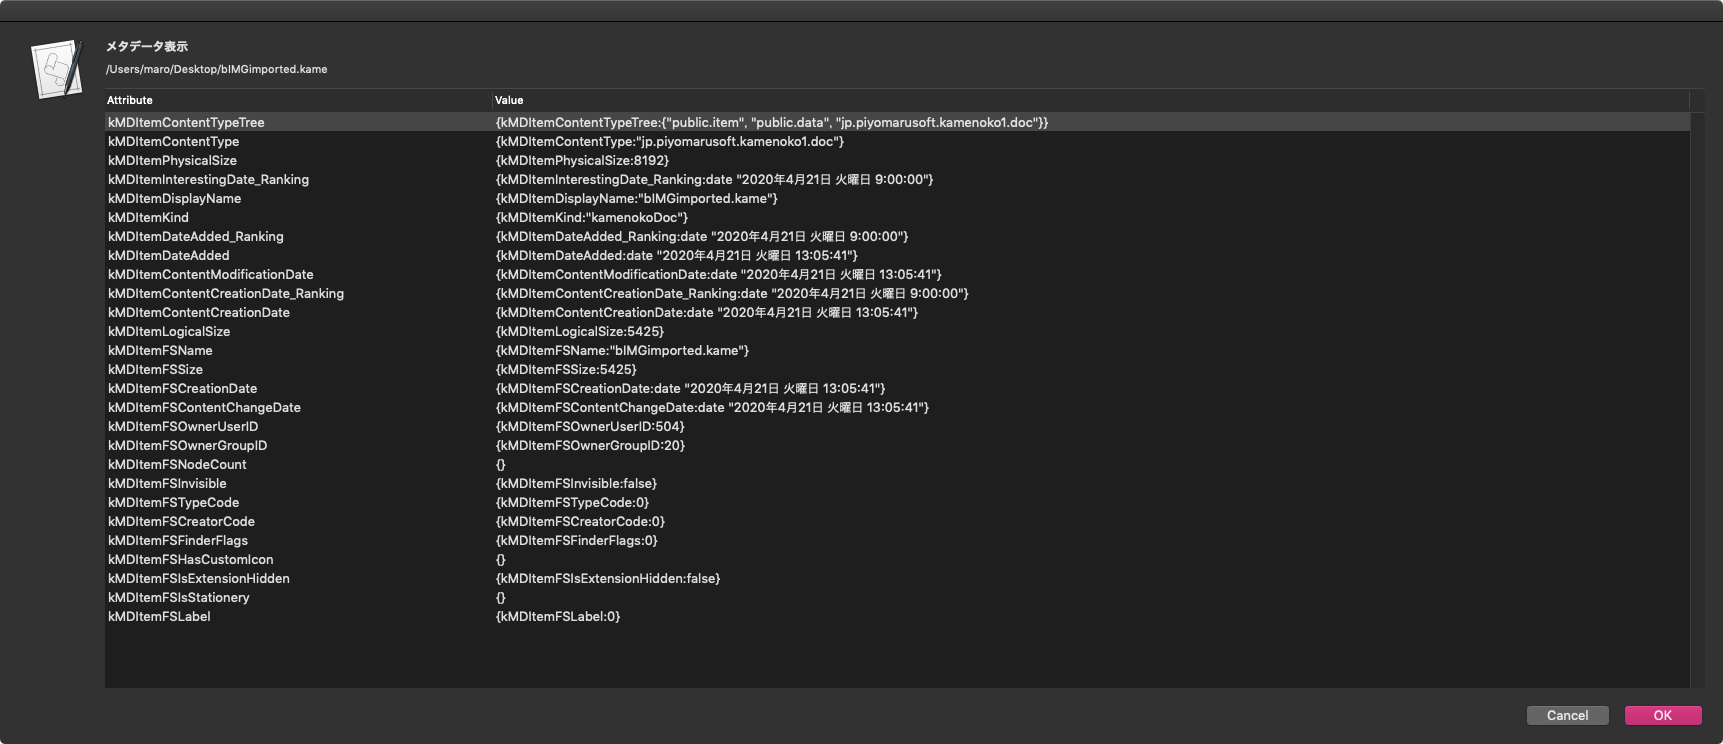
▲macOSのFinder上でiOSアプリのバンドル内部を表示させたところ。メタデータが添付されているのがわかる

ただし、Macのアプリケーションのジャンル情報と項目が異なっていたり、相互に存在しないジャンルなどもあるため、そのままMac上でも同様のジャンルであると判定することは避けたほうがよいでしょう。

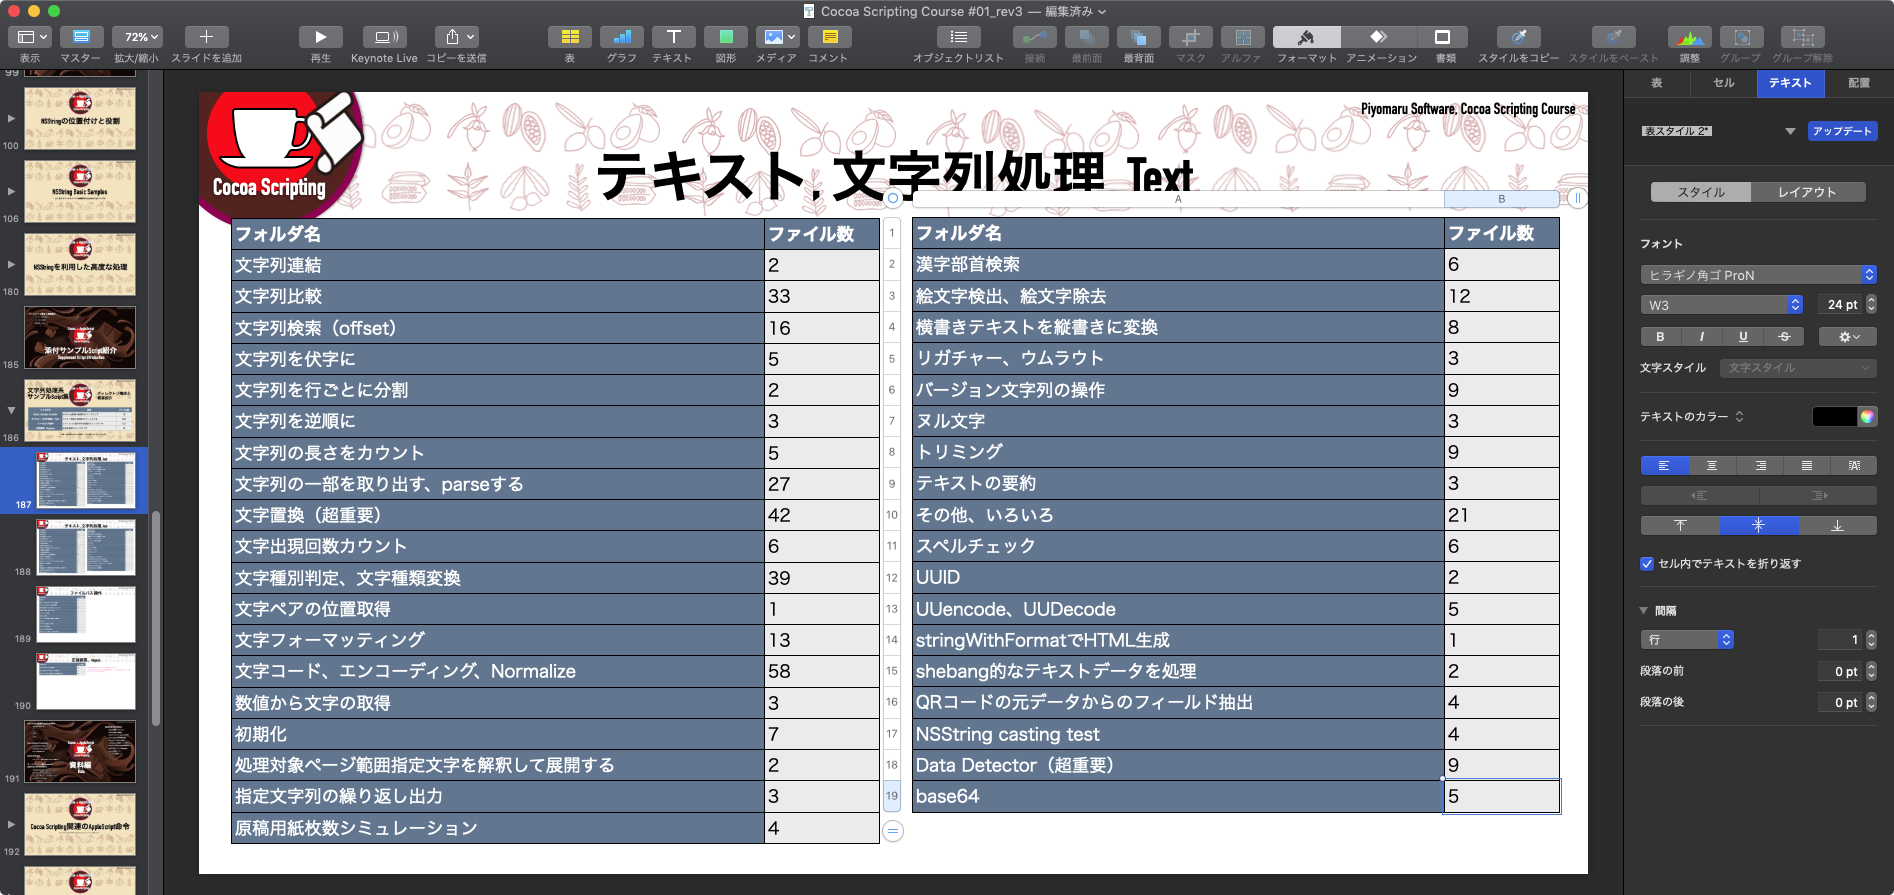
AppleScript名:指定のiOSアプリからジャンル情報を取得.scptd
—
–  Created by: Takaaki Naganoya
–  Created on: 2021/06/20
—
–  Copyright © 2021 Piyomaru Software, All Rights Reserved
—
use AppleScript version "2.7"
use scripting additions
use framework "Foundation"

set aFile to POSIX path of (choose file)
set gID to getGenreNumFromiOSApp(aFile) of me

on getGenreNumFromiOSApp(aPOSIX)
  set metaDataPOSIX to aPOSIX & "Wrapper/iTunesMetadata.plist"
  
set aRec to retDictFromPlist(metaDataPOSIX) of me
  
if aRec = missing value then return missing value
  
set aGenreID to genre of aRec
  
return aGenreID
end getGenreNumFromiOSApp

on retDictFromPlist(aPlistPath)
  set thePath to current application’s NSString’s stringWithString:aPlistPath
  
set thePath to thePath’s stringByExpandingTildeInPath()
  
set theDict to current application’s NSDictionary’s dictionaryWithContentsOfFile:thePath
  
if theDict = missing value then return missing value
  
return theDict as record
end retDictFromPlist

★Click Here to Open This Script 

Posted in file iOS App System | Tagged 10.11savvy | Leave a comment

Pixelmator Proで指定の画像を複数の3D LUTを用いてカラー調整して画像書き出し

Posted on 5月 2, 2021 by Takaaki Naganoya

Pixelmator Pro v2.0.8で追加された3D LUT(Look Up Table)によるカラー調整機能。これを用いて、複数の3D LUTファイルによるカラー調整を行い、それぞれ3D LUTファイルのファイル名を反映させて書き出すAppleScriptです。

3D LUTファイルは、探してみるとあちこちで配布されており、割とありふれた存在のようです。実際にフリー配布されている3D LUTファイルをダウンロードしてきて、1つのフォルダに入れておき、指定画像に対してカラー調整を行わせてみました。

–> [全てフリー!] シネマティックなルックになる10のLUTsを紹介します!!

フォルダに入っている3D LUTファイルをすべてループで処理するので、3D LUTファイル100個でも1,000個でも処理できますし、ちょっと書き換えれば複数の画像に対してそれぞれすべての3D LUTファイルによる色調整を実行するようにもできます。

AppleScript名:指定の画像を複数の3D LUTでカラー調整して画像書き出し.scpt
—
–  Created by: Takaaki Naganoya
–  Created on: 2020/05/02
—
–  Copyright © 2020 Piyomaru Software, All Rights Reserved
—
use AppleScript version "2.4" — Yosemite (10.10) or later
use framework "Foundation"
use scripting additions

property |NSURL| : a reference to current application’s |NSURL|
property NSArray : a reference to current application’s NSArray
property NSPredicate : a reference to current application’s NSPredicate
property NSURLTypeIdentifierKey : a reference to current application’s NSURLTypeIdentifierKey

–処理対象の画像を選択
set anImage to choose file of type {"public.image"} default location (path to pictures folder) with prompt "Select Proc Image"
set imgParent to getParentPathFromAlias(anImage) of me

–3D LUTファイルを入れてあるフォルダを選択
set lutFolder to choose folder with prompt "Select 3D LUT folder"

–Filter 3D LUT (.cube) files only
tell application "Finder"
  set fList to (every file of folder lutFolder) as alias list
end tell

set lutList to getFilesWithUTI("com.blackmagicdesign.cube", fList) of me

–指定の画像ファイルをオープン
tell application "Pixelmator Pro"
  close every document saving no
  
open anImage
end tell

–Main Loop
repeat with i in lutList
  set aLut to contents of i
  
  
–ファイルパスの加工処理
  
set newImgName to ((current application’s NSString’s stringWithString:(POSIX path of aLut))’s lastPathComponent()’s stringByDeletingPathExtension()’s stringByAppendingString:".jpg") as string
  
set newImgFullPath to (imgParent as string) & "/" & newImgName
  
set newImgFile to POSIX file newImgFullPath
  
  
tell application "Pixelmator Pro"
    activate
    
tell front document
      tell color adjustments of first layer –ここだけ、ネスティングを分割するとエラーになる
        set its custom lut to aLut
      end tell
      
      
export to newImgFullPath as JPEG with properties {compression factor:0.5, bits per channel:8}
      
undo
    end tell
  end tell
end repeat

–後片付け
tell application "Pixelmator Pro"
  tell front document
    close without saving
  end tell
end tell

on getParentPathFromAlias(aliasPath)
  set aPath to POSIX path of aliasPath
  
set pathString to current application’s NSString’s stringWithString:aPath
  
set newPath to pathString’s stringByDeletingLastPathComponent()
  
return newPath
end getParentPathFromAlias

on getFilesWithUTI(acceptUTI, aliasList)
  set aList to {}
  
  
repeat with i in aliasList
    set anAlias to i as alias
    
set aUTI to getUTIfromPath(anAlias) of me
    
if aUTI is not equal to missing value then
      set uRes to filterUTIList({aUTI}, acceptUTI) of me
      
      
if uRes is not equal to {} then
        set the end of aList to contents of i
      end if
    end if
  end repeat
  
  
return aList
end getFilesWithUTI

–AliasからUTIを求める
on getUTIfromPath(anAlias)
  set aPOSIXpath to POSIX path of anAlias
  
set aURL to current application’s |NSURL|’s fileURLWithPath:aPOSIXpath
  
if aURL = missing value then return missing value
  
set aRes to aURL’s resourceValuesForKeys:{current application’s NSURLTypeIdentifierKey} |error|:(missing value)
  
if aRes = missing value then return missing value
  
return (aRes’s NSURLTypeIdentifierKey) as string
end getUTIfromPath

–UTIリストが指定UTIに含まれているかどうか演算を行う
on filterUTIList(aUTIList, aUTIstr)
  set anArray to NSArray’s arrayWithArray:aUTIList
  
set aPred to NSPredicate’s predicateWithFormat_("SELF UTI-CONFORMS-TO %@", aUTIstr)
  
set bRes to (anArray’s filteredArrayUsingPredicate:aPred) as list
  
return bRes
end filterUTIList

★Click Here to Open This Script 

Posted in Color file File path Image | Tagged 10.14savvy 10.15savvy 11.0savvy Pixelmator Pro | Leave a comment

画面スナップショット超解像バッチ処理 v1

Posted on 3月 25, 2021 by Takaaki Naganoya

Pixelmator Proの機能「ML Super Resolution」をAppleScriptから呼び出して、指定フォルダ内の画像をすべて超解像処理を行って、機械学習モデルをもとに解像度2倍化を行った画像を別フォルダに書き出すAppleScriptです。

超解像処理を行う対象は、別に画面のスナップショット画像でなくてもよいのですが、効果がわかりやすい用途です。

Keynoteに画面スナップショット画像を貼り付けていたときに、拡大倍率が上がると解像度が足りずに荒くなってしまいました。Retina環境で画面のスナップショットを取ると、けっこう綺麗に拡大できるのですが、等倍表示しかできない(&画面表示解像度を落とすことで2x Retina解像度で画面キャプチャ可能)環境なので、ちょっと困りました。


▲macOS 11.0、見た目の悪さで使う気が失せるはじめてのmacOS。12.0ではもう少しなんとかしてほしい。とくに、このダイアログ。ダイアログと見分けのつかないウィンドウ。ファイル保存ダイアログとかも

そこで、Pixelmator Proで画像のML Super Resolution機能(超解像機能)を用いてソフトウェアの力で画面スナップショット画像を高解像度化してみました。これが予想を超えていい感じだったので、指定フォルダ以下の画像をすべて処理するようにAppleScriptで処理してみました。

–> Download pixelmatorMLSuperResol(Script Bundle with libraries)

ML Super Resolution処理は自分の使っているIntel Mac(MacBook Pro 10,1)には荷の重い処理でささいな画像でも数秒かかりますが、おそらくApple Silicon搭載Macだと瞬殺でしょう。Core MLの処理が段違いに速いので。


▲オリジナル画像(左)、超解像処理を行なった画像(右)


▲オリジナル画像と超解像処理を行なった画像のファイルサイズの違い

本リストは実際にAppleScriptで開発を行う際に記述するコード量そのものを示したものです。本リストには2つのライブラリを利用していますが、ふだんはプログラムリストの再現性(実行できること)を優先して、ライブラリ部分もScript本体に一緒に展開しています。使い回ししている分も同じリストに展開しているので、「たくさん書かないといけない」と思われているようです。

実際には、共通部分はほとんど書いていないので、本処理もこんな(↓)ぐらいの記述量です。リアルな記述量を感じられるような掲載の仕方を考えなくてはいけないのかもしれません。本リストはその試みの第一歩です。

まー、超解像処理を行って72dpiの画面スナップショット画像を144dpiに上げているだけなんで、Retina Display環境で処理すれば不要なんですが、ソフトウェアだけで実現できるのはロマンを感じますし、無駄に2x Retina環境のスクリーンショットを処理して288dpiの高解像度画像に上げてみるとか。

ただ、WWDCのビデオなどを見ていると、画面のスナップショットそのものをベクターグラフィックで取るような仕組みも考えていそうな気配がします。当てずっぽうですが、そういう何かを考えていそうな….

AppleScript名:画面スナップショット超解像バッチ処理 v1
—
–  Created by: Takaaki Naganoya
–  Created on: 2021/03/25
—
–  Copyright © 2021 Piyomaru Software, All Rights Reserved
—

use AppleScript version "2.4" — Yosemite (10.10) or later
use framework "Foundation"
use scripting additions
use cPathLib : script "choosePathLib"
use imgPicker : script "imgPickerLib"

–掃除
tell application "Pixelmator Pro" to close every document without saving

–必要なパス情報をユーザーに問い合わせる
set {inFol, outFol} to choose multiple path with titles {"Img Folder", "Output Folder"}
set outFolStr to outFol as string

–画像フォルダから画像のパス一覧を取得
set f1List to getFilepathListByUTI(POSIX path of inFol, "public.image", "alias") of imgPicker

–取得した画像を超解像処理して
repeat with i in f1List
  tell application "Pixelmator Pro"
    open i
    
tell front document
      with timeout of 3000 seconds
        super resolution
      end timeout
    end tell
  end tell
  
  
–新規保存ファイルパスの作成
  
set pathStr to POSIX path of i
  
set filenameStr to (current application’s NSString’s stringWithString:(pathStr))’s lastPathComponent() as string
  
set savePath to outFolStr & filenameStr
  
  
tell application "Pixelmator Pro"
    save front document in file savePath as PNG
    
    
tell front document
      close without saving
    end tell
  end tell
end repeat

★Click Here to Open This Script 

Posted in file File path Image UTI | Tagged 10.14savvy 10.15savvy 11.0savvy Pixelmator Pro | Leave a comment

Keynoteの表の中に入っている1列目のデータをもとにフォルダ検索して値を返す

Posted on 3月 6, 2021 by Takaaki Naganoya

Keynoteの表の中に入っている1列目のデータをもとに、指定ルートフォルダ以下のサブフォルダを指定して、その下位フォルダに存在しているAppleScript書類の数をSpotlightでかぞえ、表の2列目に書き戻すAppleScriptです。

新著「Cocoa Scripting Course #1」の付録Scriptについて、各フォルダに入っているScript書類をかぞえて表に入れておく必要がありました。ただ、内容をアップデートするたびに書き換える必要があるので、自動でカウントして表に書き込むScriptを用意しました。

実行にはShane Stanleyの「Metadata Lib」を必要とします。実行にはScript Debuggerも必要です。Keynoteで表の入ったスライドを表示している必要もあります。表の1列目に書かれたサブフォルダ名を指定して、それぞれ含まれている書類数をカウントして表に書き戻します。


▲初期状態


▲カウント対象フォルダ。AppleScript書類がフラット形式とバンドル形式の2つが混在して入っている


▲書類数をかぞえるルートフォルダを指定。表の1列目にかかれているフォルダ名と連結して、その下をすべてSpotlightで検索してファイルの存在確認を行う


▲すべてカウントして表に書き戻したところ

AppleScript名:表の中に入っている1列目のデータをもとにフォルダ検索して値を返す.scptd
—
–  Created by: Takaaki Naganoya
–  Created on: 2021/03/05
—
–  Copyright © 2021 Piyomaru Software, All Rights Reserved
—

use AppleScript version "2.7" — High Sierra (10.13) or later
use framework "Foundation"
use scripting additions
use mdLib : script "Metadata Lib" version "2.0.0"

–カウントするAppleScript書類が入っているフォルダのルートフォルダを指定
set origPath to POSIX path of (choose folder with prompt "Select Target folder")

tell application "Keynote"
  tell front document
    tell current slide
      –現在のスライド上の表を取得
      
set tList to every table
      
      
–表オブジェクトでループ
      
repeat with i in tList
        
        
–表オブジェクトの情報取得
        
tell i
          set colCount to column count
          
set rowCount to row count
          
set headerCount to header row count
          
set footerCount to footer row count


–表のセル内データを取得して2D Arrayにまとめる
          
set newList to {}
          
repeat with y from 1 to rowCount
            tell row y
              set cList to value of every cell
              
set tmpL to {}
              
              
repeat with ii in cList
                set jj to contents of ii
                
if jj = missing value then set jj to "" –空欄はmissing valueが返ってくるのでヌルストリングに差し替え
                
set the end of tmpL to jj
              end repeat
              
              
set the end of newList to tmpL
            end tell
          end repeat


–Keynoteの表データ1列目の情報をもとに、実際のフォルダの中のAppleScript書類を検索してカウントしてlistに記入
          
set new2List to items (headerCount + 1) thru -1 of newList
          
repeat with ii in new2List
            copy ii to oneLine
            
set targFolName to first item of oneLine
            
set tmpTarg to origPath & "/" & targFolName & "/"
            
            
–Spotlight検索でファイルを取得する
            
set aResList to perform search in folders {tmpTarg} predicate string "kMDItemContentType == %@ || kMDItemContentType == %@" search arguments {"com.apple.applescript.script", "com.apple.applescript.script-bundle"} –フラット形式書類とバンドル形式書類を検索
            
            
set scrCount to length of aResList –書類数をカウント
            
set last item of ii to scrCount
          end repeat


–Keynoteの表にデータを書き戻す
          
repeat with y from 1 to (length of new2List)
            tell row (y + 1)
              set aDat to contents of item y of new2List
              
repeat with x from 1 to length of aDat
                
                
–非同期実行モード(倍速処理)
                
ignoring application responses
                  tell cell x
                    set its value to contents of (item x of aDat)
                  end tell
                end ignoring
                
              end repeat
            end tell
          end repeat
          
        end tell
      end repeat
    end tell
  end tell
end tell

★Click Here to Open This Script 

Posted in file list Spotlight | Tagged 10.14savvy 10.15savvy 11.0savvy Keynote | 1 Comment

Pixelmator ProのSVG to PNG変換

Posted on 12月 28, 2020 by Takaaki Naganoya

Pixelmator ProでSVGのファイルをPNG形式で書き出すAppleScriptです。

この、ダイアログでファイルを選択して書き出しファイル名を入力させるタイプのAppleScriptをたくさん掲載していますが、もともとAppleScriptの一括処理的なプログラムで、いちいちダイアログを出して1つ1つのファイルを保存させるようなことはやりません。あくまで、サンプルScriptの動作を完結させるための仕様です。

実際には、指定フォルダ以下にあるSVGファイルをSpotlightで抽出して、まとめて書き出し先のフォルダにPNG形式で書き出すといった処理になるでしょう。

SVG方面では1024jpさんのGapplinがあり、こちらもAppleScript対応しており各種操作が行えるようになっているのですが、Sandbox対応度に問題があるためかファイル書き出し操作がAppleScriptから行えていないので、現状では大量のSVG書類の変換にはPhotoshopかPixelmator Proということになりそうです。

SVGを読み込んで他の画像形式に書き出すためのCocoa Frameworkを利用できるとよさそうですが、いまひとつうまく動くものを知りません。


▲SVG対応のアプリケーション。SVGを読めるもの、書けるもの、書き出せるもの、と対応度はさまざま

AppleScript名:PixelmatorのSVG to PNG変換
—
–  Created by: Takaaki Naganoya
–  Created on: 2020/12/01
—
–  Copyright © 2020 Piyomaru Software, All Rights Reserved
—

use AppleScript version "2.7" — Yosemite (10.13) or later
use framework "Foundation"
use scripting additions

set aFile to choose file of type {"public.svg-image"}
set outPath to choose file name with prompt "select output file name"

tell application "Pixelmator Pro"
  open aFile
  
  
tell front document
    export to outPath as PNG
    
close without saving
  end tell
end tell

★Click Here to Open This Script 

AppleScript名:GaplinのSVG to PNG変換
set aFile to choose file of type {"public.svg-image"}
set outPath to choose file name with prompt "select output file name"

tell application "Gapplin"
  open aFile
  
  
tell front document
    export to outPath as PNG with options {class:export options, scale:1.0}
    
close without saving
  end tell
end tell

★Click Here to Open This Script 

Posted in file Image | Tagged 10.13savvy 10.14savvy 10.15savvy 11.0savvy Pixelmator Pro | Leave a comment

アプリケーションが扱えるデータ拡張子を取得

Posted on 10月 28, 2020 by Takaaki Naganoya

指定のアプリケーションが扱えるデータ拡張子を取得するAppleScriptです。

アプリケーションバンドル内のInfo.plistの、CFBundleDocumentTypesエントリの中のCFBundleTypeExtensionsを拾ってリストで返します。用途は、このアプリケーションに表示させるためのものです。

ただ、この標準的といいますか一般的な処理でこのデータを拾ってこれないアプリケーション(凝った処理をしているもよう)がかなりの数存在し、それらについては個別に対応処理を書かないとダメっぽいです。

だいたい、AppleのiWork Appsが全滅。BBEditも独自の記述をしているらしく、Pixelmator Proも少し凝った書き方をしているもよう(Pixelmator Proが「凝っていない」部分なんてないみたいですが)。個別にInfo.plistからエントリをたどって拡張子リストを作るしかなさそうです。

OS内、具体的に言えばNSApplicationとかNSBundleにそういうInfo.plistをあさってこなくても対応ドキュメントデータ型を渡してくれるようなサービスがありそうな気がとてもするのですが、なかなか見つかりそうにありません。

あまりに対応が大変だった場合には、機能を盛り込むことを断念するかもしれません。メタデータから拾ってこれたりすると楽でよいのですが……。


▲結局、できた模様

AppleScript名:アプリケーションが扱えるデータ拡張子を取得.scptd
—
–  Created by: Takaaki Naganoya
–  Created on: 2020/10/28
—
–  Copyright © 2020 Piyomaru Software, All Rights Reserved
—

use AppleScript version "2.4" — Yosemite (10.10) or later
use framework "Foundation"
use scripting additions

set aPath to POSIX path of (choose file of type {"com.apple.application-bundle"})
set aURL to (current application’s |NSURL|’s fileURLWithPath:aPath)
set exResList to getDocumentTypesExtensionsFromPath(aURL) of me

return exResList
–> {".INDD", ".INX", ".IDMS", ".INCD", ".INCX", ".ICML", ".INCA", ".ICMA", ".P65", ".T65", ".PMD", ".PMT", ".QXD", ".QXT", ".INDT", ".INDB", ".INDL", ".INLX", ".FLST", ".PRST", ".PDFS", ".joboptions", ".DCST", ".LNST", ".UDC", ".InDesignPlugin", ".PSET", ".SMRD", ".SMWT", ".IDML", ".IDPP", ".INDK", ".INLK", ".CSF", ".ASE", ".ACB", ".ACBL", ".IDPK", ".INJB", ".INRS", ".INCP", ".INDP", ".ICAP", ".IDAP", ".INMS", ".epub"}

on getDocumentTypesExtensionsFromPath(aURL)
  set aRes to getDocumentTypesFromAppURL(aURL) of me
  
  
set exRes to {}
  
repeat with i in (aRes as list)
    set j to (current application’s NSDictionary’s dictionaryWithDictionary:(contents of i))
    
set tmpExt to (j’s valueForKey:"CFBundleTypeExtensions")
    
    
if tmpExt is not equal to missing value then
      set tmpExt to tmpExt as list
      
repeat with ii in tmpExt
        set jj to "." & (contents of ii)
        
if (jj is not in exRes) and (jj is not equal to ".*") and (jj is not equal to ".???") then
          set the end of exRes to jj
        end if
      end repeat
    end if
  end repeat
  
  
return exRes
end getDocumentTypesExtensionsFromPath

on getDocumentTypesFromAppURL(aURL)
  set aBundle to current application’s NSBundle’s bundleWithURL:aURL
  
if aBundle = missing value then return {}
  
set aInfo to aBundle’s infoDictionary()
  
if aInfo = missing value then return {}
  
set aRes to aInfo’s objectForKey:"CFBundleDocumentTypes" –Document Types
  
if aRes = missing value then return {}
  
return aRes
end getDocumentTypesFromAppURL

★Click Here to Open This Script 

Posted in file File path | Tagged 10.13savvy 10.14savvy 10.15savvy 11.0savvy NSBundle NSDictionary NSURL | Leave a comment

Finderファイルタグの設定、取得、クリア

Posted on 10月 23, 2020 by Takaaki Naganoya

Finderタグの削除(クリア)を行うAppleScriptです。

AppleScript名:Finderファイルタグの設定、取得、クリア
–Created By Shane Stanley
–Modified By Takaaki Naganoya
use AppleScript version "2.4"
use scripting additions
use framework "Foundation"

property |NSURL| : a reference to current application’s |NSURL|
property NSOrderedSet : a reference to current application’s NSOrderedSet
property NSURLTagNamesKey : a reference to current application’s NSURLTagNamesKey

set anAlias to (choose file)
clearTagsForPath(anAlias) of me –delete tags
set aRes to getTagsForPath(anAlias) of me –check

— clear all tags
on clearTagsForPath(anAlias)
  set aURL to |NSURL|’s fileURLWithPath:(POSIX path of anAlias)
  
aURL’s setResourceValue:{} forKey:(NSURLTagNamesKey) |error|:(missing value)
end clearTagsForPath

— get the tags
on getTagsForPath(anAlias)
  set aURL to |NSURL|’s fileURLWithPath:(POSIX path of anAlias)
  
set {theResult, theTags} to aURL’s getResourceValue:(reference) forKey:(NSURLTagNamesKey) |error|:(missing value)
  
if theTags = missing value then return {} — because when there are none, it returns missing value
  
return theTags as list
end getTagsForPath

— set the tags, replacing any existing
on setTagsForPath(tagList, anAlias)
  set aURL to |NSURL|’s fileURLWithPath:(POSIX path of anAlias)
  
aURL’s setResourceValue:tagList forKey:(NSURLTagNamesKey) |error|:(missing value)
end setTagsForPath

— add to existing tags
on addTagsForPath(tagList, anAlias)
  set aURL to |NSURL|’s fileURLWithPath:(POSIX path of anAlias)
  
— get existing tags
  
set {theResult, theTags} to aURL’s getResourceValue:(reference) forKey:(NSURLTagNamesKey) |error|:(missing value)
  
if theTags ≠ missing value then — add new tags
    set tagList to (theTags as list) & tagList
    
set tagList to (NSOrderedSet’s orderedSetWithArray:tagList)’s allObjects() — delete any duplicates
  end if
  
aURL’s setResourceValue:tagList forKey:(NSURLTagNamesKey) |error|:(missing value)
end addTagsForPath

★Click Here to Open This Script 

Posted in file Tag | Tagged 10.13savvy 10.14savvy 10.15savvy 11.0savvy | Leave a comment

Pixelmator Proでアイコン書き出しv2

Posted on 10月 19, 2020 by Takaaki Naganoya

Pixelmator Proで1024×1024 pixelの画像をmacOSのアプリケーションアイコン素材用に各サイズにリサイズして連続書き出しするAppleScriptです。

Pixelmator ProのAppleScriptプログラミングコンテスト優勝賞品Pixelmator Pro。非破壊画像処理を行い、GPUベースの高速な処理を行うPixelmator Proを実務的な画像処理に使うとどんな感じなのか、いろいろ調べていたらアイコン書き出し用の複数同時解像度書き出し機能などはついていなかったので、さくっと作ってみました。

Photoshopを操作して各種解像度書き出しを行うよりも高速に感じます(厳密にベンチマークを計測したわけではないんですけれども)。

AppleScript名:Pixelmator Proでアイコン書き出しv2.scptd
—
–  Created by: Takaaki Naganoya
–  Created on: 2020/10/19
—
–  Copyright © 2020 Piyomaru Software, All Rights Reserved
—

use AppleScript version "2.4" — Yosemite (10.10) or later
use framework "Foundation"
use scripting additions

set resolList to {1024, 512, 256, 128, 64, 32, 16}
set aTargFileBase to (choose file name with prompt "Select Export base name") as string

tell application "Pixelmator Pro"
  if (exists of document 1) = false then
    display dialog "There is no document" buttons {"OK"} default button 1 with icon 1
    
return
  end if
  
  
tell the front document
    set aWidth to width
    
set aHeight to height
    
    
if {aWidth, aHeight} is not equal to {1024.0, 1024.0} then
      display dialog "Wrong Image Size (1024×1024 required)" buttons {"OK"} default button 1 with icon 2 with title "Size Error"
      
return
    end if
    
    
repeat with i in resolList
      resize image width i height i resolution 72 algorithm bilinear
      
export to file (aTargFileBase & "_" & (i as string) & "x" & (i as string) & ".png") as PNG
      
undo
    end repeat
  end tell
end tell

★Click Here to Open This Script 

Posted in file Image | Tagged 10.14savvy 10.15savvy 11.0savvy Pixelmator Pro | 1 Comment

SFPSDWriterのじっけん v2

Posted on 9月 21, 2020 by Takaaki Naganoya

AppleScriptからPhotoshopのデータ(PSD)を出力するテストプログラムです。

AppleScriptにはPhotoshopのデータを書き出す関数や機能はとくに用意されていないため、Photoshopのデータを書くためにはPhotoshopにコマンドを送って実行してもらうのが定番です。

この定番の方法だと、Photoshopが存在しない環境でPhotoshopのデータを作ることができません。この問題を解決するためにはオープンソースで公開されている「Photoshopデータを書くプログラム部品」を呼び出すことになります。

Photoshopデータについては一定の需要があるためか、AdobeがPhotoshopデータ形式の詳細な資料を公開しているためか、Reader(読むプログラム)とWriter(書くプログラム)の2通りのプログラムが存在します。

■PSD Reader/Parser
PSD-Font-Reader
psdparse

■PSD Writer
FMPSD
PSDWriter
SFPSDWriter

ここでは、「SFPSDWriter」内に含まれる「SFPSDWriter」Frameworkを呼び出しています。

–> Download SFPSDWriter.framework(To ~/Library/Frameworks)

実行にあたっては、macOS 10.14以降ではScript Debuggerを用いるか、お使いのMacをSIP解除してScript Editor上で呼び出して実行する必要があります。

ちょっと書き換えるとXcode上でも呼び出せることでしょう。Mac App Storeに出すAppleScript Cocoaアプリケーション(Sandbox対応)内で利用する場合には、ファイル書き込みパスをユーザーに明示的に選択させる必要があるため、choose file nameダイアログでファイル名を入力・選択してもらうようにすべきです(デフォルト指定のファイル名をUUIDで自動生成するとか)。

本AppleScriptはKamenokoから書き出せるデータを増やすべく「Photoshop形式のデータを書けたらどうだろう?」と実験してみた残骸です。結局、PDFで書き出せるしPDFなら拡大縮小しても荒くなったりしないので、PDFのほうがいいという結論に。

Pixelmator Proのデータ形式とかPSD形式で書き出す実験は行っているのですが、処理結果を見るとどちらも「PDF形式のほうがいい」という結論に至っています。


▲ベクターデータではないので、拡大するとアラが見える

AppleScript名:SFPSDWriterのじっけん v2
— Created 2016-03-12 by Takaaki Naganoya
— Modified 2019-02-27 by Takaaki Naganoya
— Modified 2020–09-21 by Takaaki Naganoya
— 2020 Piyomaru Software
use AppleScript version "2.4"
use scripting additions
use framework "Foundation"
use framework "AppKit"
use framework "SFPSDWriter" –https://github.com/shinyfrog/SFPSDWriter

property |NSURL| : a reference to current application’s |NSURL|
property NSString : a reference to current application’s NSString
property NSUUID : a reference to current application’s NSUUID
property NSImage : a reference to current application’s NSImage
property SFPSDWriter : a reference to current application’s SFPSDWriter
property NSWorkspace : a reference to current application’s NSWorkspace

property SFPSDResolutionUnitPPI : 1
property SFPSDResolutionUnitPPC : 2

set anWriter to (SFPSDWriter’s alloc()’s initWithDocumentSize:(current application’s CGSizeMake(1200, 400)) andResolution:72.0 andResolutionUnit:(SFPSDResolutionUnitPPI))

set aCount to 1

repeat with yPos from 0 to 400 by 110
  repeat with xPos from 0 to 1024 by 110
    set aImage to (current application’s NSImage’s alloc()’s initWithSize:{100, 100})
    
set aColor to current application’s NSColor’s redColor()
    
my drawCircleOnNSIMage(aImage, 100, 0, 0, aColor)
    
    (
anWriter’s addLayerWithNSImage:aImage andName:("Layer_" & aCount as string) andOpacity:1.0 andOffset:{x:(xPos as real), y:(yPos as real)})
    
set aCount to aCount + 1
  end repeat
end repeat

set aPSD to anWriter’s createPSDData()

set theName to NSUUID’s UUID()’s UUIDString()
set pathString to NSString’s stringWithString:("~/Desktop/output_" & theName & ".psd")
set newPath to pathString’s stringByExpandingTildeInPath()

aPSD’s writeToFile:newPath atomically:true

#  MARK: Call By Reference
on drawCircleOnNSIMage(aImage, aRadius, aXpos, aYpos, aColor)
  set aBezier to generateCircle(aRadius, aXpos, aYpos) of me
  (
aImage)’s lockFocus()
  
aColor’s |set|()
  
aBezier’s fill() –ぬりつぶし
  (
aImage)’s unlockFocus()
end drawCircleOnNSIMage

#  MARK: circleのBezier曲線を作成して返す
on generateCircle(theRadius, x, y)
  set aRect to current application’s NSMakeRect(x, y, theRadius, theRadius)
  
set aCirCle to current application’s NSBezierPath’s bezierPath()
  
aCirCle’s appendBezierPathWithOvalInRect:aRect
  
return aCirCle
end generateCircle

★Click Here to Open This Script 

Posted in file Image | Tagged 10.13savvy 10.14savvy 10.15savvy 11.0savvy Photoshop | Leave a comment

PDFにパスワードが設定されている場合には、そのパーミッション情報を取得する

Posted on 8月 31, 2020 by Takaaki Naganoya

指定のPDFをチェックし、オープンするのにパスワードが設定されているとか、コピーが禁止されていないかといったパーミッションを調査するAppleScriptです。

API Lebel in this script Desc
(no api) openPermission document allows opening
allowsCopying copyPermission document allows copying of content to the Pasteboard
allowsPrinting printPermission document allows printing
allowsCommenting commentPermission document allows to create or modify document annotations, including form field entries
allowsContentAccessibility contentAccessPermission document allows to extract content from the document
allowsDocumentAssembly assemblyPermission document allows manage a document by inserting, deleting, and rotating pages
allowsDocumentChanges docchangePermission document allows modify the document contents except for document attributes
allowsFormFieldEntry formPermission document allows modify form field entries even if you can’t edit document annotations

PDFのオープン自体にパスワードロックがかかっている状態を検出するAPIがとくになかったので、いろいろ試行錯誤してOpenをロックしてある状態を検出してみました。

検出は、パスワード未指定でUnlockを試みるというもので、実際にパスワードを設定したPDFを相手に試行錯誤して求めてみました。

このUnlock操作に対してfalseが返ってくることでPDFオープンに対してパスワードが設定されているものと判断しています。

AppleScript名:PDFにパスワードが設定されている場合には、そのパーミッション情報を取得する
— Created 2015-11-02 13:48:32 +0900 by Takaaki Naganoya
— 2015 Piyomaru Software
use AppleScript version "2.4"
use scripting additions
use framework "Foundation"
use framework "QuartzCore"

set aPath to (choose file of type {"com.adobe.pdf"} with prompt "Select PDF to check")

set aRes to my retProtectedPDFPermissions(aPath)
–>  missing value (パスワードは設定されていない)

–> {openPermission:false, copyPermission:true, printPermission:true, commentPermission:true, contentAccessPermission:true, assemblyPermission:true, docchangePermission:true, formPermission:true}–オープンするためにはパスワードが必要(openPermission)

–指定のPDFにパスワードが設定されているかどうかをチェック
on retProtectedPDFPermissions(aPath)
  set aURL to current application’s |NSURL|’s fileURLWithPath:(POSIX path of aPath)
  
set aPDFdoc to current application’s PDFDocument’s alloc()’s initWithURL:aURL
  
set anEncF to aPDFdoc’s isEncrypted()
  
if anEncF = false then return missing value
  
  
set passLocked to aPDFdoc’s unlockWithPassword:""
  
  
set cpPerm to aPDFdoc’s allowsCopying() as boolean
  
set prPerm to aPDFdoc’s allowsPrinting() as boolean
  
set cmPerm to aPDFdoc’s allowsCommenting() as boolean
  
set caPerm to aPDFdoc’s allowsContentAccessibility() as boolean
  
set daPerm to aPDFdoc’s allowsDocumentAssembly() as boolean
  
set dcPerm to aPDFdoc’s allowsDocumentChanges() as boolean
  
set ffPerm to aPDFdoc’s allowsFormFieldEntry() as boolean
  
  
return {openPermission:passLocked, copyPermission:cpPerm, printPermission:prPerm, commentPermission:cmPerm, contentAccessPermission:caPerm, assemblyPermission:daPerm, docchangePermission:dcPerm, formPermission:ffPerm}
end retProtectedPDFPermissions

★Click Here to Open This Script 

Posted in file PDF | Tagged 10.13savvy 10.14savvy 10.15savvy 11.0savvy NSURL PDFDocument | Leave a comment

アラートダイアログ上にCollection Viewを表示

Posted on 8月 24, 2020 by Takaaki Naganoya

emada2さんからの投稿です。Collection Viewの利用については、Kamenokoの開発時に導入検討したことがありますが、Objective-CのサンプルコードをAppleScriptに翻訳しきれなくて中途半端に放置していました。

まとまった形でCollection Viewのサンプルコードが出てきたのは、おそらくこれが初めてだと思います。ありがとうございます。

Collection Viewを箱庭ダイアログに乗せることができました。
でも残念なのは、itemPrototypeは10.14でDeprecatedになっているので将来的に長く使えないでしょう
その他のやり方を探してappleのサンプルコードをみたら、swift 3で書かれていているので10.14でビルドできませんでした。
なのでまだまだCollection Viewを使いこなすのは難しそうです😢

–> Download Script Bundle

@property (nullable, strong) NSCollectionViewItem *itemPrototype API_DEPRECATED("Use -registerNib:forItemWithIdentifier: or -registerClass:forItemWithIdentifier: instead.", macos(10.5,10.14));
AppleScript名:アラートダイアログ上にCollection Viewを表示
use AppleScript version "2.4" — Yosemite (10.10) or later
use framework "AppKit"
use framework "AppleScriptObjC"
use framework "CoreFoundation"
use framework "Foundation"
use scripting additions

on run
  my testRun()
end run

on testRun()
  set aMainMes to "アプリケーションの選択"
  
set aSubMes to "適切なものを以下からえらんでください"
  
  
#ダイアログ内のビューサイズを指定
  
set aHeight to 384
  
set aWidth to 512 + 12 –> スクロールバーの分
  
  
#アプリケーションフォルダ内のアプリケーションを取得
  
set aFolder to path to applications folder
  
set aPath to aFolder’s POSIX path
  
set aURL to current application’s NSURL’s fileURLWithPath:aPath
  
  
# 指定フォルダの直下のファイルを取得
  
set filePaths to current application’s NSFileManager’s defaultManager’s ¬
    contentsOfDirectoryAtURL:aURL ¬
      includingPropertiesForKeys:{current application’s NSURLNameKey} ¬
      
options:(current application’s NSDirectoryEnumerationSkipsHiddenFiles) ¬
      
|error|:(missing value)
  
  
set filePaths to filePaths as list
  
set thisFileType to "com.apple.application-bundle"
  
  
set dataSourceList to {}
  
repeat with anItem in filePaths
    
    
set aPath to anItem’s contents’s POSIX path
    
set aURL to (current application’s NSURL’s fileURLWithPath:aPath)
    
    
set {aResult, aUTI, aError} to (aURL’s getResourceValue:(reference) ¬
      forKey:(current application’s NSURLTypeIdentifierKey) ¬
      
|error|:(reference))
    
    
if (aUTI as text) is thisFileType then
      set iconImage to (current application’s NSWorkspace’s sharedWorkspace’s iconForFile:aPath)
      
set dict to {fileURL:aURL, icon:iconImage}
      
set dataSourceList’s end to dict
    end if
  end repeat
  
  
set execButtonTitle to "OK😄"
  
  
set dateObj to my chooseItemByCollectionView:aMainMes subMes:aSubMes myWidth:aWidth myHeight:aHeight myDataSource:dataSourceList okTitle:execButtonTitle
end testRun

on chooseItemByCollectionView:(aMainMes as text) subMes:(aSubMes as text) myWidth:(aWidth as integer) myHeight:(aHeight as integer) myDataSource:(dataSourceList as list) okTitle:(execButtonTitle as text)
  
  
# Script Bundle内のResourcesフォルダを求める
  
set resourcePath to POSIX path of (path to me) & "Contents/Resources/"
  
set theBundle to current application’s NSBundle’s bundleWithPath:resourcePath
  
theBundle’s loadAppleScriptObjectiveCScripts()
  
  
# subClasses.scptを呼び出す
  
set DialogCore to current application’s AppDelegate’s new()
  
set fRes to DialogCore’s chooseItemByCollectionView:aMainMes subMes:aSubMes myWidth:aWidth myHeight:aHeight myDataSource:dataSourceList okTitle:execButtonTitle
  
  
if fRes is missing value then error number -128
  
return fRes as list
end chooseItemByCollectionView:subMes:myWidth:myHeight:myDataSource:okTitle:

★Click Here to Open This Script 

AppleScript名:subClasses
script AppDelegate
  property parent : class "NSObject"
  
  
— IBOutlets
  
property theWindow : missing value
  
  
on applicationShouldTerminate:sender
    return current application’s NSTerminateNow
  end applicationShouldTerminate:
  
  
on applicationShouldTerminateAfterLastWindowClosed:sender
    return true
  end applicationShouldTerminateAfterLastWindowClosed:
  
  
——————
  
  
on applicationWillFinishLaunching:aNotification
    log my testRun()
  end applicationWillFinishLaunching:
  
  
on testRun()
    set aMainMes to "アプリケーションの選択"
    
set aSubMes to "適切なものを以下からえらんでください"
    
    
#ダイアログ内のビューサイズを指定
    
set aHeight to 384
    
set aWidth to 512 + 12 –> スクロールバーの分
    
    
#アプリケーションフォルダ内のアプリケーションを取得
    
set aFolder to path to applications folder
    
set aPath to aFolder’s POSIX path
    
set aURL to current application’s NSURL’s fileURLWithPath:aPath
    
    
# 指定フォルダの直下のファイルを取得
    
set filePaths to current application’s NSFileManager’s defaultManager’s ¬
      contentsOfDirectoryAtURL:aURL ¬
        includingPropertiesForKeys:{current application’s NSURLNameKey} ¬
        
options:(current application’s NSDirectoryEnumerationSkipsHiddenFiles) ¬
        
|error|:(missing value)
    
    
set filePaths to filePaths as list
    
set thisFileType to "com.apple.application-bundle"
    
    
set dataSourceList to {}
    
repeat with anItem in filePaths
      
      
set aPath to anItem’s contents’s POSIX path
      
set aURL to (current application’s NSURL’s fileURLWithPath:aPath)
      
      
set {aResult, aUTI, aError} to (aURL’s getResourceValue:(reference) ¬
        forKey:(current application’s NSURLTypeIdentifierKey) ¬
        
|error|:(reference))
      
      
if (aUTI as text) is thisFileType then
        set iconImage to (current application’s NSWorkspace’s sharedWorkspace’s iconForFile:aPath)
        
set dict to {fileURL:aURL, icon:iconImage}
        
set dataSourceList’s end to dict
      end if
    end repeat
    
    
set execButtonTitle to "OK😄"
    
    
set dateObj to my chooseItemByCollectionView:aMainMes subMes:aSubMes myWidth:aWidth myHeight:aHeight myDataSource:dataSourceList okTitle:execButtonTitle
  end testRun
  
  
# アラートダイアログでCollectionViewを表示
  
property _retrieve_data : missing value
  
on chooseItemByCollectionView:(aMainMes as text) subMes:(aSubMes as text) myWidth:(aWidth as integer) myHeight:(aHeight as integer) myDataSource:(dataSourceList as list) okTitle:(execButtonTitle as text)
    
    
set paramObj to {myMessage:aMainMes}
    
set paramObj to paramObj & {mySubMessage:aSubMes}
    
set paramObj to paramObj & {myDataSource:dataSourceList}
    
set paramObj to paramObj & {myWidth:aWidth}
    
set paramObj to paramObj & {myHeight:aHeight}
    
set paramObj to paramObj & {myOKTitile:execButtonTitle}
    
    
my performSelectorOnMainThread:"raizeAlert:" withObject:paramObj waitUntilDone:true
    
    
if (my _retrieve_data) is missing value then error number -128
    
return (my _retrieve_data)
  end chooseItemByCollectionView:subMes:myWidth:myHeight:myDataSource:okTitle:
  
  
## retrieve date
  
on raizeAlert:paramObj
    
    
set mesText to paramObj’s myMessage as text
    
set infoText to paramObj’s mySubMessage as text
    
set dataSourceList to paramObj’s myDataSource as list
    
set viewWidth to paramObj’s myWidth as integer
    
set viewHeight to paramObj’s myHeight as integer
    
set okButton to paramObj’s myOKTitile as text
    
    
# set up view
    
set {thisView, collectionView} to my makeContentView(dataSourceList, viewWidth, viewHeight)
    
    
### set up alert
    
tell current application’s NSAlert’s new()
      addButtonWithTitle_(okButton)
      
addButtonWithTitle_("Cancel")
      
setAccessoryView_(thisView)
      
–setIcon_(aImage)
      
setInformativeText_(infoText)
      
setMessageText_(mesText)
      
tell |window|()
        setInitialFirstResponder_(thisView)
      end tell
      
#### show alert in modal loop
      
if runModal() is (current application’s NSAlertSecondButtonReturn) then return
    end tell
    
    
### retrieve data
    
set aIndexSet to collectionView’s selectionIndexes()
    
set theArray to current application’s NSArrayController’s alloc()’s initWithContent:(collectionView’s content())
    
set chooseItems to ((theArray)’s arrangedObjects()’s objectsAtIndexes:aIndexSet) as list
    
    
# reset
    
set _retrieve_data to {}
    
    
repeat with anItem in chooseItems
      set (my _retrieve_data)’s end to anItem’s contents
    end repeat
    
    
return my _retrieve_data
  end raizeAlert:
  
  
# set up view
  
on makeContentView(dataSourceList, viewWidth, viewHeight)
    
    
set thisRect to current application’s NSMakeRect(0, 0, viewWidth, viewHeight)
    
    
tell current application’s NSCollectionView’s alloc
      tell initWithFrame_(thisRect)
        setItemPrototype_(current application’s YKZCollectionViewItem’s new())
        
        
setAllowsEmptySelection_(true)
        
setAllowsMultipleSelection_(true)
        
setContent_(dataSourceList)
        
setSelectable_(true)
        
        
set collectionView to it
      end tell
    end tell
    
    
# Viewを作成
    
tell current application’s NSScrollView’s alloc()
      tell initWithFrame_(thisRect)
        setBorderType_(current application’s NSBezelBorder)
        
setDocumentView_(collectionView)
        
setHasHorizontalScroller_(true)
        
setHasVerticalScroller_(true)
        
set baseView to it
      end tell
    end tell
    
    
return {baseView, collectionView}
  end makeContentView
end script

#MARK: –
script YKZView
  property parent : class "NSView"
  
  
property imageView : missing value
  
  
property selected : false
  
property viewItemHeight : 128
  
property viewItemWidth : 128
  
  
on initWithFrame:rect
    
    
set myRect to current application’s NSMakeRect(0, 0, viewItemWidth, viewItemHeight)
    
continue initWithFrame:myRect
    
    
set aHeight to viewItemHeight – 10
    
set aWidth to viewItemWidth – 10
    
set newRect to current application’s NSMakeRect(5, 5, aWidth, aHeight)
    
    
tell current application’s NSImageView’s alloc()
      tell initWithFrame_(newRect)
        setImageScaling_(current application’s NSImageScaleProportionallyUpOrDown)
        
setImageAlignment_(current application’s NSImageAlignCenter)
        
set my imageView to it
      end tell
    end tell
    
    
my addSubview:(my imageView)
    
return me
  end initWithFrame:
  
  
on drawRect:rect
    if my selected then
      current application’s NSColor’s redColor()’s |set|()
    else
      current application’s NSColor’s controlBackgroundColor()’s |set|()
    end if
    
current application’s NSRectFill(rect)
    
continue drawRect:rect
  end drawRect:
end script

#MARK: –
script YKZCollectionViewItem
  property parent : class "NSCollectionViewItem"
  
  
on loadView()
    my setView:(current application’s YKZView’s alloc()’s initWithFrame:(current application’s NSZeroRect))
  end loadView
  
  
on setRepresentedObject:representedObject
    –continue setRepresentedObject:representedObject
    
if representedObject is missing value then return
    (
my view())’s imageView’s setImage:(representedObject’s icon)
  end setRepresentedObject:
  
  
on setSelected:isSelected
    set (my view())’s selected to isSelected
    (
my view())’s setNeedsDisplay:true
    
continue setSelected:isSelected
  end setSelected:
end script

★Click Here to Open This Script 

Posted in dialog file File path | Tagged 10.13savvy 10.14savvy 10.15savvy 11.0savvy NSAlert NSArrayController NSBundle NSCollectionView NSCollectionViewItem NSColor NSFileManager NSImageView NSURL NSWorkspace | Leave a comment

指定アプリケーションのバイナリアーキテクチャ判定 v3

Posted on 8月 18, 2020 by Takaaki Naganoya

指定のアプリケーションファイルが32bitバイナリかどうかを判定するAppleScriptの改訂版です。

本Scriptシリーズは対象のアプリケーションが起動している状態で対象CPUアーキテクチャを判定するものではなく、起動していない状態で判定するものです。

PPC 32 / PPC 64 / Intel 32 / Intel 64 / ARM 64の各アーキテクチャの判定を行います。FAT Binaryの場合には複数のアーキテクチャが返ってきます。


▲本Scriptの応用例

AppleScript名:指定アプリケーションのバイナリアーキテクチャ判定 v3.scptd
—
–  Created by: Takaaki Naganoya
–  Created on: 2020/08/18
—
–  Copyright © 2020 Piyomaru Software, All Rights Reserved
—

use AppleScript version "2.4" — Yosemite (10.10) or later
use framework "Foundation"
use scripting additions

set anApp to choose file of type {"com.apple.application-bundle"} default location (path to applications folder)
–set anApp to choose file default location (path to applications folder)
set app32 to chk32Binary(anApp) of me
–> {"PPC 32", "Intel x32"}

on chk32Binary(anAlias)
  set aPOSIX to POSIX path of anAlias
  
set aURL to current application’s |NSURL|’s fileURLWithPath:(aPOSIX)
  
set aBundle to current application’s NSBundle’s bundleWithURL:aURL
  
  
set F1 to (aBundle = missing value) as boolean
  
if F1 is not equal to false then return calcIllegular(aPOSIX) of me
  
  
set aDict to aBundle’s executableArchitectures()
  
set F2 to (aDict = missing value) as boolean
  
if F2 is equal to true then return calcIllegular(aPOSIX) of me
  
  
set aList to (aDict’s valueForKeyPath:"stringValue") as list
  
  
set arList to {}
  
repeat with i in aList
    set j to contents of i
    
    
if j = "7" then –NSBundleExecutableArchitectureI386
      set the end of arList to "Intel 32"
    else if j = "18" then –NSBundleExecutableArchitecturePPC
      set the end of arList to "PPC 32"
    else if j = "16777223" then –NSBundleExecutableArchitectureX86_64
      set the end of arList to "Intel 64"
    else if j = "16777234" then –NSBundleExecutableArchitecturePPC64
      set the end of arList to "PPC 64"
    else if j = "16777228" then –NSBundleExecutableArchitectureARM64
      set the end of arList to "ARM 64"
    end if
  end repeat
  
  
return arList
end chk32Binary

on calcIllegular(aPOSIX)
  –Old Style Bundle for PPC
  
set sRes to do shell script "file " & quoted form of aPOSIX
  
if sRes contains "Mach-O executable ppc" then return {"PPC 32"} –NSBundleExecutableArchitecturePPC
  
return missing value
end calcIllegular

★Click Here to Open This Script 

Posted in file File path | Tagged 10.13savvy 10.14savvy 10.15savvy 11.0savvy NSBundle NSURL | Leave a comment

指定アプリケーションのバイナリアーキテクチャ判定

Posted on 8月 18, 2020 by Takaaki Naganoya

指定のアプリケーションファイルが32bitバイナリかどうかを判定するAppleScriptです。

実行ファイルのパスを求めて、fileコマンドで情報を取得します。本Scriptでは32bitバイナリであるかどうかの判定のみ行なっていますが、CPUアーキテクチャに着目してPPC/Intel 32/Intel 64/ARMの判定を行えるように作り込めます。

また、アプリケーションでありながらもバンドル形式になっていない実行ファイル(古い時代のファイルだったり、サードパーティの開発環境だったり)も存在しているため、NSBundleを求めたときにmissing valueが返ってくることもあります。

1ファイルだけ処理できてもあまり意味がないので、指定フォルダ以下のすべてのアプリケーションファイルをリストアップして、ループで処理するようなことをやることになるでしょう。

--PPC 32bit
/Applications/okaeri_up/v2.0b/Okaeri.app/Contents/MacOS/Okaeri: Mach-O executable ppc

--PPC/Intel 32bit FAT Binary
/Applications/Adobe Illustrator CS3/Adobe Illustrator.app//Contents/MacOS/Adobe Illustrator: Mach-O universal binary with 2 architectures: [i386:Mach-O executable i386] [ppc]
/Applications/Adobe Illustrator CS3/Adobe Illustrator.app//Contents/MacOS/Adobe Illustrator (for architecture i386):	Mach-O executable i386
/Applications/Adobe Illustrator CS3/Adobe Illustrator.app//Contents/MacOS/Adobe Illustrator (for architecture ppc):	Mach-O executable ppc

--Intel 32
/Applications/Adobe Illustrator CS5/Adobe Illustrator.app//Contents/MacOS/Adobe Illustrator: Mach-O executable i386

--Intel 32/64bit FAT Binary
/Applications/System Preferences.app//Contents/MacOS/System Preferences: Mach-O universal binary with 2 architectures: [x86_64:Mach-O 64-bit executable x86_64] [i386:Mach-O executable i386]
/Applications/System Preferences.app//Contents/MacOS/System Preferences (for architecture x86_64):	Mach-O 64-bit executable x86_64
/Applications/System Preferences.app//Contents/MacOS/System Preferences (for architecture i386):	Mach-O executable i386

--Intel 64
/Applications/Adobe Illustrator 2020/Adobe Illustrator.app//Contents/MacOS/Adobe Illustrator: Mach-O 64-bit executable x86_64

--Intel/PPC 64bit FAT Binary
/Applications/Geekbench 2.1/Geekbench (64-bit).app/Contents/MacOS/Geekbench: Mach-O universal binary with 2 architectures: [x86_64:Mach-O 64-bit executable x86_64] [ppc64]
/Applications/Geekbench 2.1/Geekbench (64-bit).app/Contents/MacOS/Geekbench (for architecture x86_64):	Mach-O 64-bit executable x86_64
/Applications/Geekbench 2.1/Geekbench (64-bit).app/Contents/MacOS/Geekbench (for architecture ppc64):	Mach-O executable ppc64

--Intel 64/ARM 64 FAT Binary
/System/Applications/Utilities/Script Editor.app/Contents/MacOS/Script Editor: Mach-O universal binary with 2 architectures: [x86_64:Mach-O 64-bit executable x86_64] [arm64e:Mach-O 64-bit executable arm64e]
/System/Applications/Utilities/Script Editor.app/Contents/MacOS/Script Editor (for architecture x86_64):	Mach-O 64-bit executable x86_64
/System/Applications/Utilities/Script Editor.app/Contents/MacOS/Script Editor (for architecture arm64e):	Mach-O 64-bit executable arm64e
AppleScript名:指定アプリケーションのバイナリアーキテクチャ判定.scptd
—
–  Created by: Takaaki Naganoya
–  Created on: 2020/08/18
—
–  Copyright © 2020 Piyomaru Software, All Rights Reserved
—

use AppleScript version “2.4” — Yosemite (10.10) or later
use framework “Foundation”
use scripting additions


set anApp to choose file of type {“com.apple.application-bundle”} default location (path to applications folder)


set app32 to chk32Binary(anApp) of me
–> true –32bit
–> false –64bit


on chk32Binary(anApp)
  set aExec to getAppPropertyFromInfoPlist(anApp, “CFBundleExecutable”) of me
set posixPath to (POSIX path of anApp) & “/Contents/MacOS/” & aExec


  set aRes to do shell script “file “ & quoted form of posixPath
log aRes
if aRes contains “Mach-O executable i386” then
    return true –32bit
  else
    return false –64bit
  end if
end chk32Binary


on getAppPropertyFromInfoPlist(anAlias, aKey as string)
  set aURL to current application’s |NSURL|’s fileURLWithPath:(POSIX path of anAlias)
set aBundle to current application’s NSBundle’s bundleWithURL:aURL
set aDict to aBundle’s infoDictionary()
set vRes to (aDict’s valueForKey:aKey) as string
return vRes as string
end getAppPropertyFromInfoPlist


★Click Here to Open This Script 
Posted in file File path | Tagged 10.13savvy 10.14savvy 10.15savvy 11.0savvy NSBundle NSURL | Leave a comment

display selected application’s plist on Finder

Posted on 8月 17, 2020 by Takaaki Naganoya

Finder上で選択中のアプリケーションのplistファイルを探してFinder上で選択表示するAppleScriptです。

AppleScript名:display selected application’s plist on Finder.scpt
—
–  Created by: Takaaki Naganoya
–  Created on: 2020/08/17
—
–  Copyright © 2020 Piyomaru Software, All Rights Reserved
—

use AppleScript version "2.5" –macOS 10.11 or later
use scripting additions
use framework "Foundation"
use framework "AppKit"

property |NSURL| : a reference to current application’s |NSURL|
property NSArray : a reference to current application’s NSArray
property NSPredicate : a reference to current application’s NSPredicate
property NSURLTypeIdentifierKey : a reference to current application’s NSURLTypeIdentifierKey

tell application "Finder"
  set aliasList to selection as alias list
end tell

–Filter selection application bundle only
set aRes to filterAliasListByUTI(aliasList, "com.apple.application-bundle") of me
set aLen to length of aRes
if aLen = 0 then return

–Pick up the first element
set anApp to contents of first item of aRes

set aRes to getBundleIDFromPath(POSIX path of anApp) of me
set pListName to aRes & ".plist"

set prefPath to POSIX path of (path to preferences) & pListName
set aExt to current application’s NSFileManager’s defaultManager()’s fileExistsAtPath:prefPath
if aExt = true then
  revealAFileByFinder(prefPath) of me
end if

on filterAliasListByUTI(aliasList as list, acceptUTI as string)
  set fList to {}
  
repeat with i in aliasList
    set aUTI to getUTIfromPath(i) of me
    
if aUTI is not equal to missing value then
      set uRes to filterUTIList({aUTI}, acceptUTI) of me
      
      
if uRes is not equal to {} then
        set the end of fList to contents of i
      end if
    end if
  end repeat
  
return fList
end filterAliasListByUTI

–Application path –> Bundle ID
on getBundleIDFromPath(aPOSIXpath as string)
  set aURL to current application’s |NSURL|’s fileURLWithPath:aPOSIXpath
  
set aWorkspace to current application’s NSWorkspace’s sharedWorkspace()
  
set appURL to aWorkspace’s URLForApplicationToOpenURL:aURL
  
set aBundle to current application’s NSBundle’s bundleWithURL:appURL
  
set anID to aBundle’s bundleIdentifier()
  
return anID as string
end getBundleIDFromPath

on revealAFileByFinder(aPOSIXpath as string)
  set pathStr to current application’s NSString’s stringWithString:aPOSIXpath
  
set parentPath to pathStr’s stringByDeletingLastPathComponent()
  
set aRes to current application’s NSWorkspace’s sharedWorkspace()’s selectFile:pathStr inFileViewerRootedAtPath:parentPath
end revealAFileByFinder

–Alias –> UTI
on getUTIfromPath(anAlias)
  set aPOSIXpath to POSIX path of anAlias
  
set aURL to current application’s |NSURL|’s fileURLWithPath:aPOSIXpath
  
if aURL = missing value then return missing value
  
set aRes to aURL’s resourceValuesForKeys:{current application’s NSURLTypeIdentifierKey} |error|:(missing value)
  
if aRes = missing value then return missing value
  
return (aRes’s NSURLTypeIdentifierKey) as string
end getUTIfromPath

on filterUTIList(aUTIList, aUTIstr)
  set anArray to NSArray’s arrayWithArray:aUTIList
  
set aPred to NSPredicate’s predicateWithFormat_("SELF UTI-CONFORMS-TO %@", aUTIstr)
  
set bRes to (anArray’s filteredArrayUsingPredicate:aPred) as list
  
return bRes
end filterUTIList

★Click Here to Open This Script 

Posted in file UTI | Tagged 10.13savvy 10.14savvy 10.15savvy 11.0savvy Finder | Leave a comment

指定ファイルのメタデータ表示 v2

Posted on 7月 7, 2020 by Takaaki Naganoya

指定ファイルのメタデータをTable UIで表示するAppleScriptです。

テーブル表示用のライブラリ「display table by list」のアップデート版(v1.3)を利用しています。同ライブラリは特定用途のために間に合わせで作っただけだったので、バグを直して汎用性を高めました(無駄なウィンドウの半透明表示をやめた)。また、アイコン表示用のURL指定を省略したときにエラーになる点を修正しました。

–> Download displayTable.scptd(AppleScript Library)

データのテキスト化ライブラリ「everythingToText」も利用していますが、これソースもオープンにしていてよく使っているのですが、とくに決まったURLから配布というのは行なっていませんね。機能が素朴すぎてライブラリとして配布するのがためらわれるところです。

–> Download displayMetadataByTablev2

というわけで、ライブラリを含んだScript Bundleをダウンロードできるようにしておきました(↑)。

AppleScript名:指定ファイルのメタデータ表示 v2.scptd
—
–  Created by: Takaaki Naganoya
–  Created on: 2020/07/07
—
–  Copyright © 2020 Piyomaru Software, All Rights Reserved
—

use AppleScript version "2.4"
use framework "Foundation"
use scripting additions
use easyTable : script "display table by list"
use eText : script "everythingToTextKit"

property |NSURL| : a reference to current application’s |NSURL|
property NSMetadataItem : a reference to current application’s NSMetadataItem

set aFile to choose file
set aPOSIX to POSIX path of aFile
set aURL to |NSURL|’s fileURLWithPath:(aPOSIX)
set aMetaInfo to NSMetadataItem’s alloc()’s initWithURL:aURL
set attrList to (aMetaInfo’s attributes()) as list

set aList to {}
repeat with i in attrList
  set metaDict to (aMetaInfo’s valuesForAttributes:{i as string}) as record
  
set recStr to convToStr(metaDict) of eText
  
set the end of aList to {i as string, recStr as string}
  
–set the end of aList to (recStr as string)
end repeat

set fLabels to {"Attribute", "Value"}

set aRes to (display table by list aList main message "Metadata" sub message aPOSIX size {1200, 800} labels fLabels)

★Click Here to Open This Script 

Posted in dialog file Metadata | Tagged 10.13savvy 10.14savvy 10.15savvy 11.0savvy NSMetadataItem NSURL | Leave a comment

指定のKeynote書類のタイプを求める

Posted on 7月 5, 2020 by Takaaki Naganoya

指定のKeynote書類がフラット形式かバンドル形式かを取得するAppleScriptです。

UTIを取得してみたら簡単に判定できたので、これでいいでしょう。バンドル形式かどうかを判定するために、ディレクトリ構造を仮定したパスを組み立てて、アクセスしてみることも検討したのですが、UTIを求めるだけですみました。

AppleScript名:指定のKeynote書類のタイプを求める.scpt
—
–  Created by: Takaaki Naganoya
–  Created on: 2020/07/05
—
–  Copyright © 2020 Piyomaru Software, All Rights Reserved
—
use AppleScript version "2.4" — Yosemite (10.10) or later
use framework "Foundation"
use scripting additions

set aFilePath to choose file of type {"com.apple.iwork.keynote.key", "com.apple.iwork.keynote.sffkey"}
set aUTI to getUTIfromPath(aFilePath) of me
–> "com.apple.iwork.keynote.key" (Bundle)
–> "com.apple.iwork.keynote.sffkey" (Flat)

on getUTIfromPath(anAlias)
  set aPOSIXpath to POSIX path of anAlias
  
set aURL to current application’s |NSURL|’s fileURLWithPath:aPOSIXpath
  
if aURL = missing value then return ""
  
set aRes to aURL’s resourceValuesForKeys:{current application’s NSURLTypeIdentifierKey} |error|:(missing value)
  
if aRes = missing value then return ""
  
return (aRes’s NSURLTypeIdentifierKey) as string
end getUTIfromPath

★Click Here to Open This Script 

AppleScript名:指定のKeynote書類のタイプを求める v2.scpt
—
–  Created by: Takaaki Naganoya
–  Created on: 2020/07/05
—
–  Copyright © 2020 Piyomaru Software, All Rights Reserved
—
use AppleScript version "2.4" — Yosemite (10.10) or later
use framework "Foundation"
use scripting additions

set aFilePath to choose file of type {"com.apple.iwork.keynote.key", "com.apple.iwork.keynote.sffkey"}
set aUTI to getUTIfromPath(aFilePath) of me
set aKType to retKeynoteBundleOrNot(aUTI) of me
–> "Flat Keynote"
–> "Bundle Package Keynote"

on retKeynoteBundleOrNot(anUTI)
  if anUTI = "com.apple.iwork.keynote.sffkey" then
    return "Flat Keynote"
  else if anUTI = "com.apple.iwork.keynote.key" then
    return "Bundle Package Keynote"
  else
    return false
  end if
end retKeynoteBundleOrNot

on getUTIfromPath(anAlias)
  set aPOSIXpath to POSIX path of anAlias
  
set aURL to current application’s |NSURL|’s fileURLWithPath:aPOSIXpath
  
if aURL = missing value then return ""
  
set aRes to aURL’s resourceValuesForKeys:{current application’s NSURLTypeIdentifierKey} |error|:(missing value)
  
if aRes = missing value then return ""
  
return (aRes’s NSURLTypeIdentifierKey) as string
end getUTIfromPath

★Click Here to Open This Script 

Posted in file UTI | Tagged 10.13savvy 10.14savvy 10.15savvy 11.0savvy NSURL NSURLTypeIdentifierKey | Leave a comment

Numbers書類からExcel書き出し

Posted on 7月 4, 2020 by Takaaki Naganoya

Numbers書類をExcel形式(.xlsx)で書き出すAppleScriptです。

とりあえず動作確認のために作っただけだったので、動作は最低限のものです。Numbersでオープン中のNumbers書類をExcel形式に書き出します。それだけです。処理対象は1つのシートのみ含んでいる書類に限っています。Numbers書類のオープンや書き出した書類のクローズは別途作成してください。

Numbers書類でシートが複数存在しているものをExcel書類に書き出すと、各シートへのリンクが含まれたインデックスが1枚追加されます。このインデックスは非常に親切でよいのですが、割と邪魔です。あとでScript側から削除することも可能ですが、自分はNumbersから書き出す際に複数シートの書類は書き出さないようにまとめてみました。

もちろん、これはルーチンを整備して実際に使う人の考えによるものなので、別の人はNumbersの複数シートを含む書類をそのままExcel書類に変換されてもいいと考えるかもしれないですし、処理時に複数のシートを個別のNumbers書類に分割するような処理を書いてもいいでしょう。

実際にNumbersを使っていて、あまりExcel書き出しは必要にならなかったので「できる」ことは知っていながらも書かなかった処理ではあります。

AppleScript名:Numbers書類からExcel書き出し
— Created 2017-03-28 by Takaaki Naganoya
— Modified 2020-07-02 by Takaaki Naganoya
— 2020 Piyomaru Software
use AppleScript version "2.4"
use scripting additions
use framework "Foundation"

set tmpPath to (path to desktop) as string
set aRes to exportNumbersDocToExcel(tmpPath) of me

–Numbers書類をExcel書き出し
on exportNumbersDocToExcel(targFolderPath as string)
  tell application "Numbers"
    set dCount to count every document
    
if dCount = 0 then
      return false
    end if
    
    
–複数のシートが存在していると書き出せないことはないが、リンク付きの凝ったExcelシートになる
    
tell front document
      set sCount to count every sheet
      
if sCount = 0 or sCount > 1 then
        return false
      end if
    end tell
    
    
set aPath to file of document 1
  end tell
  
  
set curPath to (current application’s NSString’s stringWithString:(POSIX path of aPath))’s lastPathComponent()’s stringByDeletingPathExtension()’s stringByAppendingString:".xlsx"
  
set outPath to (targFolderPath & curPath)
  
–このあと、安全のために重複パスの回避ルーチンを呼んでおくといいでしょう
  
  
tell application "Numbers"
    set anOpt to {class:export options, image quality:Best}
    
export document 1 to file outPath as Microsoft Excel with properties anOpt
    
return true
  end tell
end exportNumbersDocToExcel

★Click Here to Open This Script 

Posted in file | Tagged 10.13savvy 10.14savvy 10.15savvy 11.0savvy Numbers | Leave a comment

Keynote書類上の画像を実パスを求めてアーカイブ展開してオープン

Posted on 7月 4, 2020 by Takaaki Naganoya

Keynote書類上の指定画像のアーカイブ中のパスを求め、指定画像のファイル名と照合し、当該画像ファイルのみアーカイブ展開してからPreview.appでオープンするAppleScriptです。

Keynote書類には2つの形式(パッケージ形式、フラット形式)があり、現在のデフォルトはフラット形式です。

パッケージ形式についてはFinder上でパッケージバンドルを表示させて、内部データ構造を実際に見られるようになっています。

では、フラット形式はどうかといえば、上記のパッケージ形式データをZip圧縮して拡張子を「.key」に変更したものです。

そのため、拡張子を「.key」から「.zip」に付け替えて、アーカイブ展開すると、実際にパッケージ内部のファイルにアクセスできます。

本Scriptは、フラット形式のKeynote書類に対して動作します。パッケージ形式は想定していません(パッケージ形式は単にファイル構造にアクセスすればよいだけなので)。

画像を貼り付けたスライドを表示した状態で本AppleScriptを実行すると、スライド上に貼り付けた画像をデスクトップフォルダに展開し、Previw.appでオープンします。1回実行するとデスクトップに画像ファイルの名前のフォルダが作られ、その中に画像が展開されています。この状態でScriptを再実行すると、フォルダ名が重複するためエラーになります。再実行したい場合にはデスクトップ上の画像名のフォルダを削除しておいてください。

指定Keynote書類の、指定スライド上にある指定イメージについては、ファイル名がわかるだけでパスやデータを取得できるわけではありません。

そこで、フラット形式のKeynote書類中の画像一覧を取得し、このファイル名と符合するものをピックアップします。ただし、ファイル名が完全一致するわけではなく、オリジナルのファイル名が「someImage.png」だった場合に、「someImage-221.png」といったファイル名が見つかります。

また、見つかるのは実ファイルだけでなくプレビュー用の「someImage-small-221.png」といったものも入っています。このプレビュー用イメージについてはスキップしています。

その後、さまざまな処理を行なってもよいでしょうけれども、とりあえず現状ではPreview.appでファイルをオープンしています。

AppleScript名:Keynote書類上の画像をアーカイブ展開して実パスを求めて展開.scptd
—
–  Created by: Takaaki Naganoya
–  Created on: 2020/07/04
—
–  Copyright © 2020 Piyomaru Software, All Rights Reserved
—

use AppleScript version "2.4" — Yosemite (10.10) or later
use framework "Foundation"
use scripting additions

tell application "Keynote"
  set dCount to count (every document)
  
if dCount = 0 then return
  
  
tell front document
    set myPath to (file of it)
    
if myPath = missing value then return false –Unsaved
    
    
tell current slide
      tell image 1
        set aFile to file name
        
–> "switchControl.png"
      end tell
    end tell
  end tell
end tell

set myPOSIXPath to POSIX path of (myPath as alias)

–Extract document internal image paths by extracting Keynote’s zip archive
set dList to getInternalImagesWithinKeynote(myPath) of me

–Extract file name and ext from image 1 path
set pPath to POSIX path of aFile
set {aName, aExt} to getExtAndFilenameFromPath(pPath) of me

–Filter Keynote internal image list by image 1’s file name and ext
set theArray to current application’s NSArray’s arrayWithArray:dList
set thePred to current application’s NSPredicate’s predicateWithFormat_("self.pathExtension == %@ && self.lastPathComponent beginswith %@ ", aExt, aName)
set bList to (theArray’s filteredArrayUsingPredicate:thePred) as list
–> {"Data/switchControl-226.png", "Data/switchControl-small-227.png"}

–Extrat file
set exF to false

repeat with i in bList
  set outName to getFilenameAndExtFromPath(i) of me
  
  
if outName does not contain "-small-" then –Skip Preview Image
    set outPath to POSIX path of (path to desktop) & outName
    
set bRes to do shell script "unzip -j " & quoted form of myPOSIXPath & " " & quoted form of i & " -d " & " " & outPath
    
    
set extractPath to POSIX path of (path to desktop) & outName & "/" & outName
    
do shell script "open " & quoted form of extractPath –Open for test
    
    
set exF to true
  end if
end repeat

if exF = false then return false

–Keynote書類中の画像ファイル一覧を取得
on getInternalImagesWithinKeynote(myPath)
  set kPath to POSIX path of myPath
  
set aRes to do shell script "unzip -Z1 " & quoted form of kPath & " | grep ^Data/"
  
set aList to paragraphs of aRes
  
return aList
end getInternalImagesWithinKeynote

–ファイルパスからファイル名部分と拡張子を分離
on getExtAndFilenameFromPath(aPOSIXpath)
  set pathString to current application’s NSString’s stringWithString:aPOSIXpath
  
set aStr to pathString’s lastPathComponent()
  
set aExt to (aStr’s pathExtension())
  
set bStr to aStr’s stringByDeletingPathExtension()
  
return {bStr as string, aExt as string}
end getExtAndFilenameFromPath

–ファイルパスからファイル名部分のみ取得
on getFilenameAndExtFromPath(aPOSIXpath)
  set pathString to current application’s NSString’s stringWithString:aPOSIXpath
  
set aStr to pathString’s lastPathComponent()
  
return aStr as string
end getFilenameAndExtFromPath

★Click Here to Open This Script 

Posted in file Image list | Tagged 10.13savvy 10.14savvy 10.15savvy 11.0savvy Keynote | Leave a comment

指定のPDFからTOCを削除する

Posted on 6月 19, 2020 by Takaaki Naganoya

指定のPDFからTOCを削除して別名保存するAppleScriptです。

TOCを削除した新規ファイルは元ファイルと同じ場所に枝番つきで重複回避しつつ作成されます。

33MBで257ページほどあるPDFで、詳細に目次から記事へのリンクを手動で作成し、TOCを手動で作ったところ、Adobe Actobatが、

などというメッセージを出して保存ができなかったので、中途半端に1個だけエントリが残ったTOCを削除するために用意したものです(既存のScriptに機能があったので、削除機能だけ抽出)。

AppleScript名:指定のPDFからTOCを削除する.scptd
—
–  Created by: Takaaki Naganoya
–  Created on: 2018/08/18
—
–  Copyright © 2018 Piyomaru Software, All Rights Reserved
—

use AppleScript version "2.4"
use scripting additions
use framework "Foundation"
use framework "Quartz"

property |NSURL| : a reference to current application’s |NSURL|
property NSString : a reference to current application’s NSString
property PDFDocument : a reference to current application’s PDFDocument
property NSFileManager : a reference to current application’s NSFileManager

–PDFの指定
set aFile to choose file of type {"pdf"} with prompt (progress additional description)
set filePath to aFile’s POSIX path

set fileURL to |NSURL|’s fileURLWithPath:filePath
set aPDFdoc to PDFDocument’s alloc()’s initWithURL:fileURL
set parentOL to aPDFdoc’s outlineRoot()

if parentOL is equal to missing value then
  display dialog "There is no TOC with this PDF"
  
return
end if

set outLineCount to parentOL’s numberOfChildren()
set outLineCount to outLineCount as number

–既存のTOCを削除
repeat with num from (outLineCount – 1) to 0 by -1
  (parentOL’s childAtIndex:num)’s removeFromParent()
end repeat

–保存
set progress description to "PDFを保存"
set progress additional description to "保存先の確認"
tell (NSString’s stringWithString:filePath)
  set parentPath to stringByDeletingLastPathComponent() –>親フォルダ
  
set longFileName to lastPathComponent() –>拡張子ありの名前
end tell
set newFilePath to my pathExists(parentPath, longFileName)

set progress additional description to "書き出し中: " & newFilePath
set newFileURL to |NSURL|’s fileURLWithPath:newFilePath
aPDFdoc’s writeToURL:newFileURL

–名前が重複していないか確認
on pathExists(currentPath as text, fileName as text)
  tell (NSString’s stringWithString:fileName)
    set shortFileName to stringByDeletingPathExtension() as text
    
set aSuffix to pathExtension() as text
  end tell
  
if aSuffix ≠ "" then set aSuffix to "." & aSuffix as text
  
  
set currentPath to NSString’s stringWithString:currentPath
  
set unkonwnPath to (currentPath’s stringByAppendingPathComponent:fileName)
  
  
set aSpace to space
  
set num to 0
  
  
repeat while ((NSFileManager’s defaultManager)’s fileExistsAtPath:unkonwnPath)
    set num to num + 1
    
set tmpName to shortFileName & aSpace & num & aSuffix as text
    
set unkonwnPath to (currentPath’s stringByAppendingPathComponent:tmpName)
  end repeat
  
  
return (unkonwnPath as text)
end pathExists

★Click Here to Open This Script 

Posted in file PDF | Tagged 10.13savvy 10.14savvy 10.15savvy NSFileManager NSString NSURL PDFDocument | Leave a comment

PDFにウォーターマーク画像を重ね合わせる2

Posted on 6月 4, 2020 by Takaaki Naganoya

指定のPDFにウォーターマークのPDFを重ね合わせるAppleScriptです。

これまでにもいろいろ試してきたのですが、不可能ではないものの、再配布が難しかったりアプリケーションに依存していたりで、決定版とはなっていませんでした。

macscripter.netにpeavine氏が投稿したScriptが元になっています。同氏のScriptではcpdfというコマンドラインツールが用いられており、これがなかなかいい感じです。実行時には、cpdfが/usr/local/binに入っている必要があります。Script Bundleの中に入れて呼び出してもよさそうです。

いい感じではあるものの、商用利用は許可されていないとのこと(要、購入)なので、商用利用時にはライセンスを購入すべきでしょう。再配布もできない雰囲気なので、自分のアプリケーション内に入れて呼び出すとかいうのは無理です。

ファイルの複数選択に、自分で作った「choosePathLib」を用いています。NSPathControlにドラッグ&ドロップできるファイル種別を限定できるように作っておけばよかった、と反省しまくりました。

Watermark画像をPDFに重ね合わせる処理については、こういう外部ツールを併用しないでAppleScriptだけで済めばベストですが、、、、


▲オリジナルPDF


▲WatermarkのPDF。背景色に透明を指定している


▲処理対象ファイル選択


▲処理後のPDF。Watermarkが各ページに重ね合わされていることがわかる


▲処理後のPDFにはPDF Creator情報にcpdfのCopyrightが記入される

AppleScript名:PDFにウォーターマーク画像を重ね合わせる2
—
–  Created by: peavine @macscripter.net
–  Created on: 2020/06/04
–  Modified by: Takaaki Naganoya @ Piyomaru Software
–  cpdf
–  https://community.coherentpdf.com

use AppleScript version "2.4" — Yosemite (10.10) or later
use framework "Foundation"
use scripting additions
use pLib : script "choosePathLib" –http://piyocast.com/as/asinyaye

set mesList to {"Logo PDF", "Source PDF"}
set defaultLocList to {"~/Movies", "~/Desktop"}

set cRes to choose multiple path main message "Drag & Drop to set target" sub message "" with titles mesList with default locations defaultLocList dialog width 800

set outFile to POSIX path of (choose file name with prompt "Select Output PDF File name")

copy cRes to {logoFile, sourceFile}

set logoFile to POSIX path of logoFile
set sourceFile to POSIX path of sourceFile

–check file extension = file type
if logoFile does not end with ".pdf" then error "Logo path is not pdf"
if sourceFile does not end with ".pdf" then error "Source file is not pdf"
if outFile does not end with ".pdf" then error "output path is not pdf"

try
  do shell script "/usr/local/bin/cpdf -stamp-on " & quoted form of logoFile & " -center " & quoted form of sourceFile & " -o " & quoted form of outFile
end try

★Click Here to Open This Script 

Posted in dialog file PDF | Tagged 10.13savvy 10.14savvy 10.15savvy | Leave a comment

Post navigation

  • Older posts
  • Newer posts

電子書籍(PDF)をオンラインストアで販売中!

Google Search

Popular posts

  • 開発機としてM2 Mac miniが来たのでガチレビュー
  • CotEditorで2つの書類の行単位での差分検出
  • macOS 13.6.5 AS系のバグ、一切直らず
  • macOS 15, Sequoia
  • 初心者がつまづきやすい「log」コマンド
  • 指定のWordファイルをPDFに書き出す
  • Pages本執筆中に、2つの書類モード切り替えに気がついた
  • Adobe AcrobatをAppleScriptから操作してPDF圧縮
  • メキシカンハットの描画
  • 与えられた文字列の1D Listのすべての順列組み合わせパターン文字列を返す v3(ベンチマーク用)
  • 2023年に書いた価値あるAppleScript
  • Pixelmator Pro v3.6.4でAppleScriptからの操作時の挙動に違和感が
  • Numbersで選択範囲のセルの前後の空白を削除
  • AdobeがInDesign v19.4からPOSIX pathを採用
  • Safariで「プロファイル」機能を使うとAppleScriptの処理に影響
  • Cocoa Scripting Course 続刊計画
  • AppleScriptによる並列処理
  • macOS 14.xでScript Menuの実行速度が大幅に下がるバグ
  • NaturalLanguage.frameworkでNLEmbeddingの処理が可能な言語をチェック
  • AppleScript入門③AppleScriptを使った「自動化」とは?

Tags

10.11savvy (1102) 10.12savvy (1243) 10.13savvy (1392) 10.14savvy (587) 10.15savvy (438) 11.0savvy (283) 12.0savvy (212) 13.0savvy (188) 14.0savvy (138) 15.0savvy (116) CotEditor (64) Finder (51) iTunes (19) Keynote (115) NSAlert (61) NSArray (51) NSBitmapImageRep (20) NSBundle (20) NSButton (34) NSColor (53) NSDictionary (28) NSFileManager (23) NSFont (21) NSImage (41) NSJSONSerialization (21) NSMutableArray (63) NSMutableDictionary (22) NSPredicate (36) NSRunningApplication (56) NSScreen (30) NSScrollView (22) NSString (119) NSURL (98) NSURLRequest (23) NSUTF8StringEncoding (30) NSView (33) NSWorkspace (20) Numbers (75) Pages (54) Safari (44) Script Editor (27) WKUserContentController (21) WKUserScript (20) WKWebView (23) WKWebViewConfiguration (22)

カテゴリー

  • 2D Bin Packing
  • 3D
  • AirDrop
  • AirPlay
  • Animation
  • AppleScript Application on Xcode
  • Beginner
  • Benchmark
  • beta
  • Bluetooth
  • Books
  • boolean
  • bounds
  • Bug
  • Calendar
  • call by reference
  • check sum
  • Clipboard
  • Cocoa-AppleScript Applet
  • Code Sign
  • Color
  • Custom Class
  • dialog
  • diff
  • drive
  • Droplet
  • exif
  • file
  • File path
  • filter
  • folder
  • Font
  • Font
  • GAME
  • geolocation
  • GUI
  • GUI Scripting
  • Hex
  • History
  • How To
  • iCloud
  • Icon
  • Image
  • Input Method
  • Internet
  • iOS App
  • JavaScript
  • JSON
  • JXA
  • Keychain
  • Keychain
  • Language
  • Library
  • list
  • Locale
  • Localize
  • Machine Learning
  • Map
  • Markdown
  • Menu
  • Metadata
  • MIDI
  • MIME
  • Natural Language Processing
  • Network
  • news
  • Noification
  • Notarization
  • Number
  • Object control
  • OCR
  • OSA
  • parallel processing
  • PDF
  • Peripheral
  • PRODUCTS
  • QR Code
  • Raw AppleEvent Code
  • Record
  • rectangle
  • recursive call
  • regexp
  • Release
  • Remote Control
  • Require Control-Command-R to run
  • REST API
  • Review
  • RTF
  • Sandbox
  • Screen Saver
  • Script Libraries
  • sdef
  • search
  • Security
  • selection
  • shell script
  • Shortcuts Workflow
  • Sort
  • Sound
  • Spellchecker
  • Spotlight
  • SVG
  • System
  • Tag
  • Telephony
  • Text
  • Text to Speech
  • timezone
  • Tools
  • Update
  • URL
  • UTI
  • Web Contents Control
  • WiFi
  • XML
  • XML-RPC
  • イベント(Event)
  • 未分類

アーカイブ

  • 2025年2月
  • 2025年1月
  • 2024年12月
  • 2024年11月
  • 2024年10月
  • 2024年9月
  • 2024年8月
  • 2024年7月
  • 2024年6月
  • 2024年5月
  • 2024年4月
  • 2024年3月
  • 2024年2月
  • 2024年1月
  • 2023年12月
  • 2023年11月
  • 2023年10月
  • 2023年9月
  • 2023年8月
  • 2023年7月
  • 2023年6月
  • 2023年5月
  • 2023年4月
  • 2023年3月
  • 2023年2月
  • 2023年1月
  • 2022年12月
  • 2022年11月
  • 2022年10月
  • 2022年9月
  • 2022年8月
  • 2022年7月
  • 2022年6月
  • 2022年5月
  • 2022年4月
  • 2022年3月
  • 2022年2月
  • 2022年1月
  • 2021年12月
  • 2021年11月
  • 2021年10月
  • 2021年9月
  • 2021年8月
  • 2021年7月
  • 2021年6月
  • 2021年5月
  • 2021年4月
  • 2021年3月
  • 2021年2月
  • 2021年1月
  • 2020年12月
  • 2020年11月
  • 2020年10月
  • 2020年9月
  • 2020年8月
  • 2020年7月
  • 2020年6月
  • 2020年5月
  • 2020年4月
  • 2020年3月
  • 2020年2月
  • 2020年1月
  • 2019年12月
  • 2019年11月
  • 2019年10月
  • 2019年9月
  • 2019年8月
  • 2019年7月
  • 2019年6月
  • 2019年5月
  • 2019年4月
  • 2019年3月
  • 2019年2月
  • 2019年1月
  • 2018年12月
  • 2018年11月
  • 2018年10月
  • 2018年9月
  • 2018年8月
  • 2018年7月
  • 2018年6月
  • 2018年5月
  • 2018年4月
  • 2018年3月
  • 2018年2月

https://piyomarusoft.booth.pm/items/301502

メタ情報

  • ログイン
  • 投稿フィード
  • コメントフィード
  • WordPress.org

Forum Posts

  • 人気のトピック
  • 返信がないトピック

メタ情報

  • ログイン
  • 投稿フィード
  • コメントフィード
  • WordPress.org
Proudly powered by WordPress
Theme: Flint by Star Verte LLC