Menu

Skip to content
AppleScriptの穴
  • Home
  • Products
  • Books
  • Docs
  • Events
  • Forum
  • About This Blog
  • License
  • 仕事依頼

AppleScriptの穴

Useful & Practical AppleScript archive. Click '★Click Here to Open This Script' Link to download each AppleScript

タグ: 10.11savvy

Mail.appで選択中のメールボックス(フォルダ)のパスを文字列で返す

Posted on 11月 25, 2018 by Takaaki Naganoya

Mail.app上で選択中のメールボックス(フォルダ)のパスをフルパスの文字列で求めるAppleScriptです。

Mail.app上ではメールボックス(フォルダ)を複数階層作成できます。ファイルシステム上のフォルダではないので、ファイル処理でメールのメールボックス(フォルダ)間の移動を行うことはできませんが、パスを指定してmoveコマンドでメールを移動させられます。

Mail.app上のパスは、

level1/level2

のように記述します。

のように選択している場合には、

"ML/Xojo, REALbasic"

と返ってきます。

tell application "Mail"
  tell mailbox "ML/Xojo, REALbasic"
    set aList to every message
  end tell
end tell

★Click Here to Open This Script 

のように指定すれば、指定フォルダ以下のメール(message)が返ってきます(サブフォルダ内のメールは対象外)。ファイルパスと異なり、空白文字が入ってくることに備えてquoted ofでパスをクォート処理しておく必要はありません。

フルパスを求めるのに、再帰処理を行なっています。

AppleScript名:Mail.appで選択中のメールボックス(フォルダ)のパスを文字列で返す
property aFullPath : ""

set aFullPath to ""

–選択中のメールボックス(フォルダ)を取得
set aMB to getSelectedOneMailBox() of me

–メールボックス(フォルダ)のオブジェクトのMail.app上のパスを取得して文字列化する
set pathStr to extraxctTextFullPathOfMBObject(aMB) of me
return aFullPath
–> "ML/Xojo, REALbasic"

–Message Viewerで現在表示中のメールボックスの情報を1つのみ返す
on getSelectedOneMailBox()
  tell application "Mail"
    tell message viewer 1
      set mbList to selected mailboxes
    end tell
  end tell
  
if length of mbList is equal to 0 then
    return ""
  end if
  
  
set aMailBox to contents of (item 1 of mbList)
  
return aMailBox
end getSelectedOneMailBox

–Mail.appのメールボックスオブジェクトを渡すと、テキストのフルパスに変換
on extraxctTextFullPathOfMBObject(aPath)
  tell application "Mail"
    try
      set parentPath to container of aPath
    on error
      return
    end try
    
    
set meName to name of aPath
    
if aFullPath = "" then –1回目のみスラッシュを入れないで処理
      set aFullPath to meName
    else
      –通常処理はこちら
      
set aFullPath to meName & "/" & aFullPath
    end if
    
    
extraxctTextFullPathOfMBObject(parentPath) of me –再帰呼び出し
  end tell
end extraxctTextFullPathOfMBObject

★Click Here to Open This Script 

Posted in list Text | Tagged 10.11savvy 10.12savvy 10.13savvy 10.14savvy Mail | Leave a comment

指定URLをロードしてtitleを取得 v2

Posted on 11月 20, 2018 by Takaaki Naganoya

指定URLのWebページのtitleを取得するAppleScriptです。

この手の処理を記述するには、お手軽にshell scriptでーとか、Cocoaの機能を利用してチクチク記述するとか、SafariにURLをロードしてtitleを読み込むとか、いろいろやり方があって悩むところです。

技術的な難易度が低そう(に見える)やり方を考え、ダウンロード部分はお手軽にcurlコマンドで、取得したHTMLの解析はオープンソースのFramework「HTMLReader」を併用することで高度な処理(URLエンコーディング文字列のデコード)を実現してみました。

–> HTMLReader.framework(To ~/Library/Frameworks/)

AppleScript名:指定URLをロードしてtitleを取得 v2
use AppleScript version "2.4"
use scripting additions
use framework "Foundation"
use framework "AppKit"
use framework "HTMLReader" –https://github.com/nolanw/HTMLReader

property NSString : a reference to current application’s NSString
property HTMLDocument : a reference to current application’s HTMLDocument

set aURL to "http://piyocast.com/as/"
set aTItle to getPageTItleFromURL(aURL) of me
–> "AppleScriptの穴 – Useful & Practical AppleScript archive"

on getPageTItleFromURL(aURL)
  set aRes to (do shell script "curl -s " & aURL)
  
set aData to NSString’s stringWithString:aRes
  
if aData = missing value then return false
  
  
set aHTML to HTMLDocument’s documentWithString:aData
  
  
set aTitleRes to ((aHTML’s nodesMatchingSelector:"title")’s textContent’s firstObject()) as string
  
return aTitleRes
end getPageTItleFromURL

★Click Here to Open This Script 

Posted in Internet Tag Text | Tagged 10.11savvy 10.12savvy 10.13savvy 10.14savvy NSString | Leave a comment

値渡しハンドラと参照渡しハンドラ

Posted on 11月 16, 2018 by Takaaki Naganoya

AppleScriptにおけるハンドラ(メソッド、サブルーチン)呼び出し時の値渡し(call by value)と参照渡し(vall by reference)の記述例です。

一般的なプログラミング言語の世界の「お作法」で、ハンドラ呼び出し時に、値そのものを受けわたす「値渡し」(call by value)と、ポインタを受けわたす「参照渡し」(call by reference)の2つがあります。

AppleScriptでハンドラ呼び出し時に、パラメータを受け渡しするのは値渡しがほとんどです。これは、プログラムにバグを作りにくくするためとサブルーチン(ハンドラ)を明確に区分けするためです。

値渡ししか使っていないといっても、参照渡しができないわけではなく、パラメータとして受け取った変数の内容を変更すると参照渡しになる、という「暗黙の参照渡し」を行える仕様になっています。

ほかには、巨大なデータを値渡しするとメモリー消費がそれだけ大きくなるため、パラメータを参照渡しすることがあります。画像のRaw DataやRTFのデータ内容などがそれに該当します。

本Blog掲載サンプル(1,000本以上)のうち、参照渡しを使っているものは、

・迷路をRTFで作成して脱出経路を赤く着色する v3
・画像+文字作成テスト_v4
・Tag CloudっぽいRTFの作成

ぐらいです。

# Xcode上で記述するAppleScript Applicationでは、ARC環境ではあるものの消費したオブジェクトのメモリが解放されにくいので、割と切実に必要になってくるような

AppleScript名:値渡しハンドラ
set aList to {1, 2, 3}
set aRes to aHandler(aList) of me
–> {3, 2, 1}

aList
–> {1, 2, 3}

on aHandler(bList)
  return reverse of bList
end aHandler

★Click Here to Open This Script 

AppleScript名:参照渡しハンドラ
set aList to {1, 2, 3}
aHandler(aList) of me
aList
–> {1, 2, 3, -1}

on aHandler(aList)
  set the end of aList to -1
end aHandler

★Click Here to Open This Script 

Posted in list | Tagged 10.11savvy 10.12savvy 10.13savvy 10.14savvy | Leave a comment

指定画像の指定座標の色情報をRGBで取得

Posted on 11月 15, 2018 by Takaaki Naganoya

指定画像の指定座標のピクセルの色を8ビットRGB値で返すAppleScriptです。

使用する座標系は左上が{0,0}です。

AppleScript名:指定画像の指定座標の色情報をRGBで取得.scptd
—
–  Created by: Takaaki Naganoya
–  Created on: 2018/11/15
—
–  Copyright © 2018 Piyomaru Software, All Rights Reserved
—
use AppleScript version "2.4" — Yosemite (10.10) or later
use framework "Cocoa" –Foundation + AppKit
use scripting additions

property NSImage : a reference to current application’s NSImage
property NSBitmapImageRep : a reference to current application’s NSBitmapImageRep

set aFile to POSIX path of (choose file of type {"public.image"})
set {xNum, yNum} to {0, 0}

set cRes to getColorRGBNumFromImageByPosition(aFile, xNum, yNum) of me
–> {255, 0, 0}

on getColorRGBNumFromImageByPosition(aFilePath, xPos as integer, yPos as integer)
  set anNSImage to NSImage’s alloc()’s initWithContentsOfFile:aFilePath
  
set aRawimg to NSBitmapImageRep’s imageRepWithData:(anNSImage’s TIFFRepresentation())
  
  
set aColor to (aRawimg’s colorAtX:xPos y:yPos)
  
set aRed to (aColor’s redComponent()) * 255
  
set aGreen to (aColor’s greenComponent()) * 255
  
set aBlue to (aColor’s blueComponent()) * 255
  
  
return {aRed as integer, aGreen as integer, aBlue as integer}
end getColorRGBNumFromImageByPosition

★Click Here to Open This Script 

Posted in Color Image list | Tagged 10.11savvy 10.12savvy 10.13savvy 10.14savvy NSBitmapImageRep NSImage | Leave a comment

MecabCocoaで形態素解析

Posted on 11月 14, 2018 by Takaaki Naganoya

オープンソースのMecabラッパー「MecabCocoa.framework」を呼び出して、日本語の文字列を形態素解析するAppleScriptです。

単語(形態素)に分割する形態素解析については、動作しているものの、

 partOfSpeechType:品詞
 originalForm:原形

といったあたりの、重要な情報がまともに返ってこないので、単語分割やよみがなの機能しか動作していないように見えるのですが、、、、

AppleScript名:MecabCocoaで形態素解析.scptd
—
–  Created by: Takaaki Naganoya
–  Created on: 2018/11/13
—
–  Copyright © 2018 Piyomaru Software, All Rights Reserved
—
use AppleScript version "2.4" — Yosemite (10.10) or later
use framework "Foundation"
use framework "MecabCocoa" –https://github.com/shinjukunian/MecabCocoa
use scripting additions

set aStr to "私の名前は長野谷です。"
set tokenArray to (current application’s MecabTokenizer’s alloc()’s parseToNodeWithString:aStr withDictionary:2)
set tList to (tokenArray’s surface) as list
–> {"私", "の", "名前", "は", "長野", "谷", "です", "。"}

set fList to (tokenArray’s features) as list
–> {{"watakushi"}, missing value, {"namae"}, missing value, {"nagano"}, {"tani"}, missing value, missing value}

set psList to (tokenArray’s partOfSpeechType) as list
–> {100, 100, 100, 100, 100, 100, 100, 100} –おかしい?

★Click Here to Open This Script 

Posted in Natural Language Processing Text | Tagged 10.11savvy 10.12savvy 10.13savvy 10.14savvy | Leave a comment

Bayes推定による文章仕分け(Classifier)

Posted on 11月 12, 2018 by Takaaki Naganoya

ベイズ推定を計算するオープンソースのプログラム「Bayes」をCocoaフレームワーク化した「BayesKit」を呼び出してベイズ推定の計算を行うAppleScriptです。

–> Download BayesKit.framework (To ~/Library/Frameworks)

macOS 10.14以外はスクリプトエディタ/Script Debugger上で実行可能で、10.14のみScript Debugger上での実行を必要とします(この仕様、いい加減かったるいので戻してほしい)。

スパムメール選別用途御用達のベイズ推定の演算を行なってみました。プログラムに添付されていたサンプルは英語の文章を処理するようにできていましたが、予想どおり日本語の文章をそのまま与えると単語切り分けが行えずに計算がうまく行きません。

そこで、掲載サンプルScriptのように単語ごとに手動で半角スペースを入れてみました。

本来であれば、形態素解析辞書を使って単語ごとに切り分け、さらに単語の活用形をどうにかする必要があるはずですが、そこまで神経質にならずに簡易日本語パーサーで単語に分解し、助詞などを削除しデータとして与えることでそこそこの実用性は確保できるのではないかと思われます(これだと固有名詞がバラバラになる可能性は否定できませんが)。

NSLinguisticTagger+macOS 10.14で日本語文章の形態素解析+品詞解析は行えることを期待したいですが、未確認です。ただ、できた場合でも固有名詞への配慮がどの程度あるかは不明です。

AppleScript名:Bayes推定による文章仕分け(Classifier).scptd
—
–  Created by: Takaaki Naganoya
–  Created on: 2018/11/12
—
–  Copyright © 2018 Piyomaru Software, All Rights Reserved
—
use AppleScript version "2.5" — El Capitan(10.11) or later
use framework "Foundation"
use framework "BayesKit" –https://github.com/kevincobain2000/Bayes
use scripting additions

property Bayes : a reference to current application’s Bayes
property FeaturesVector : a reference to current application’s FeaturesVector
property NSMutableArray : a reference to current application’s NSMutableArray

–set positiveStr to "word word good good"
–set negativeStr to "thiss word bad bad"
set positiveStr to "良い 良い 良い 良い 。"
set negativeStr to "悪 悪 悪 悪 悪 。"

set classifierObj to Bayes’s alloc()’s init()
set featuresVec to FeaturesVector’s alloc()’s init()

set featuresArray to NSMutableArray’s arrayWithArray:{"tokens"}

featuresVec’s appendFeatures:positiveStr forFeatures:featuresArray
classifierObj’s train:(featuresVec’s features) forlabel:"positive"

featuresVec’s appendFeatures:negativeStr forFeatures:featuresArray
classifierObj’s train:(featuresVec’s features) forlabel:"negative"

–set toGuess to "word"
set toGuess to "良い 。"

featuresVec’s appendFeatures:toGuess forFeatures:featuresArray
classifierObj’s guessNaiveBayes:(featuresVec’s features)

set vRes to (classifierObj’s probabilities) as record
–> {positive:0.6400000453, negative:0.32000002265}–English Sample Words OK
–> {positive:1.0, negative:0.0}–Japanese Sample Words OK

★Click Here to Open This Script 

Posted in Machine Learning Record Text | Tagged 10.11savvy 10.12savvy 10.13savvy 10.14savvy NSMutableArray | Leave a comment

Table 1の全セルを選択する v3

Posted on 11月 5, 2018 by Takaaki Naganoya

Numbersで選択中のセルがなければ、最前面の書類の選択中のワークシートのうちのTable 1を全選択するAppleScriptです。

選択部分からデータを取得する処理はよく行いますが、プログラム側から選択部分を作成するというのはやっていなかったので、試行錯誤してみました。

AppleScript名:Table 1の全セルを選択する v3.scptd
—
–  Created by: Takaaki Naganoya
–  Created on: 2018/11/05
—
–  Copyright © 2018 Piyomaru Software, All Rights Reserved
—
use AppleScript version "2.4" — Yosemite (10.10) or later
use framework "Foundation"
use scripting additions

tell application "Numbers"
  tell front document
    tell active sheet
      try
        –選択セルがある場合
        
set theTable to first table whose class of selection range is range
      on error
        –選択セルがない場合はTable 1を全選択
        
set tCount to count every table
        
if tCount = 0 then error "There is no table in active sheet"
        
        
tell table 1
          set selection range to cell range
        end tell
        
      end try
    end tell
  end tell
end tell

★Click Here to Open This Script 

Posted in How To | Tagged 10.11savvy 10.12savvy 10.13savvy 10.14savvy Numbers | Leave a comment

MIKMIDIでデバイス一覧を取得 v2

Posted on 11月 4, 2018 by Takaaki Naganoya

オープンソースのフレームワーク「MIKMIDI」を用いてMIDIデバイス情報を取得するAppleScriptです。

Objective-Cのプログラムもいろいろ読んできましたが、その中でもこれは難易度が高く、高尚であるために読んでもさっぱりわかりません。

–> Download MIKMIDI.framework(To ~/Library/Frameworks/)

AppleScript名:MIKMIDIでデバイス一覧を取得 v2
— Created 2015-11-13 by Takaaki Naganoya
— 2015 Piyomaru Software
use AppleScript version "2.4"
use scripting additions
use framework "Foundation"
use framework "MIKMIDI" –https://github.com/mixedinkey-opensource/MIKMIDI

property midiDeviceManager : missing value

set midiDeviceManager to current application’s MIKMIDIDeviceManager’s sharedDeviceManager()’s availableDevices()
set aRes to midiDeviceManager’s mutableCopy()

set endpointsInDevs to current application’s NSMutableSet’s |set|()
repeat with i in (midiDeviceManager as list)
  set aSrcList to (current application’s NSSet’s setWithArray:(i’s entities()’s valueForKeyPath:"sources"))
  
set aDstList to (current application’s NSSet’s setWithArray:(i’s entities()’s valueForKeyPath:"destinations"))
  (
endpointsInDevs’s unionSet:aSrcList)
  (
endpointsInDevs’s unionSet:aDstList)
end repeat

endpointsInDevs’s |description|()
–>  (NSSet) {{(MIKMIDISourceEndpoint) <MIKMIDISourceEndpoint: 0x7f8a61d47950> 新しい外部装置}, {(MIKMIDISourceEndpoint) <MIKMIDISourceEndpoint: 0x7f8a63a65610> IAC Driver GarageBand}, {(MIKMIDIDestinationEndpoint) <MIKMIDIDestinationEndpoint: 0x7f8a61bbc130> IAC Driver GarageBand}, {(MIKMIDIDestinationEndpoint) <MIKMIDIDestinationEndpoint: 0x7f8a5ecadcf0> 新しい外部装置}}

–midiDeviceManager’s virtualSources() –Real MIDI I/Fがつながっていないとエラーになる
–set devicelessSources to current application’s NSMutableSet’s setWithWrray:(midiDeviceManager’s virtualSources())

★Click Here to Open This Script 

Posted in MIDI System | Tagged 10.11savvy 10.12savvy 10.13savvy | Leave a comment

指定URLをロード_WKWebView版 v2

Posted on 11月 4, 2018 by Takaaki Naganoya

指定のURLを読み込んでページのタイトルを取得するAppleScriptです。

オリジナルはControl+Command+Rの操作が必要でしたが、本バージョンでは必要ありません。ただ、Script Debuggerとの相性はよろしくないようで。

AppleScript名:指定URLをロード_WKWebView版 v2
— Created 2015-09-16 by Takaaki Naganoya
— 2015 Piyomaru Software
use AppleScript version "2.4"
use scripting additions
use framework "Foundation"
use framework "WebKit"

property theWebView : missing value

set aURL to "http://www.apple.com/jp/shop/browse/home/specialdeals/mac"

my performSelectorOnMainThread:"getPage:" withObject:(aURL) waitUntilDone:true

set aTitle to (theWebView)’s title()
return aTitle as text
–>  "Mac整備済製品 – Apple(日本)"

–Download the URL page to WkWebView
on getPage:aURL
  set thisURL to current application’s |NSURL|’s URLWithString:aURL
  
set theRequest to current application’s NSURLRequest’s requestWithURL:thisURL
  
  
set aConf to current application’s WKWebViewConfiguration’s alloc()’s init()
  
  
set (my theWebView) to current application’s WKWebView’s alloc()’s initWithFrame:(current application’s NSMakeRect(0, 0, 800, 600)) configuration:aConf –フレームの大きさは根拠レス
  (
my theWebView)’s setNavigationDelegate:me
  (
my theWebView)’s loadRequest:theRequest
  
  
set waitLoop to 100 * 60 –60 seconds
  
  
set hitF to false
  
repeat waitLoop times
    set aLoadF to ((my theWebView)’s estimatedProgress()) as number
    
if aLoadF = 1.0 then
      set hitF to true
      
exit repeat
    end if
    
current application’s NSThread’s sleepForTimeInterval:(0.01)
    
–delay 0.1
  end repeat
  
  
return hitF
end getPage:

★Click Here to Open This Script 

Posted in URL | Tagged 10.11savvy 10.12savvy 10.13savvy NSThread NSURL NSURLRequest WKWebView WKWebViewConfiguration | Leave a comment

QuartzComoserでグラフ表示てすと v6

Posted on 11月 4, 2018 by Takaaki Naganoya

QuartzComposerのグラフに任意のデータを指定してウィンドウ表示するAppleScriptです。

スクリプトバンドル内の「Chart.qtz」を読み出して表示しているため、QuartzComposer入りのスクリプトバンドルを用意しておきましたので、ダウンロードしてお試しください。

–> Download qtc_disp_v6

オリジナルはControl+Command+Rで実行する必要がありましたが、本Scriptではその必要がありません。ちなみに、一般的なQuartzComposerのようにマウスでグリグリ回せるとかいうことはありません。パラメータを反映して静止画として表示されるだけです(Xcode上で作成したAppleScriptのGUIアプリケーションであれば、普通に回せます)。

macOS 10.14上で実行してみたところ、スクリプトエディタではCompositionが表示されませんでしたが、Script Debugger上で実行したかぎりでは実行されました。Framework宣言で足りないものがあるのでしょうか?

備考:QuartzComposerはmacOS 10.15でDeprecated扱いになりました

AppleScript名:QuartzComoserでグラフ表示てすと v6
— Created 2015-11-03 by Takaaki Naganoya
— Modified 2018-11-04 by Takaaki Naganoya
— 2018 Piyomaru Software
use AppleScript version "2.4"
use scripting additions
use framework "Foundation"
use framework "Quartz"
use framework "AppKit"

property NSColor : a reference to current application’s NSColor
property QCView : a reference to current application’s QCView
property NSString : a reference to current application’s NSString
property NSScreen : a reference to current application’s NSScreen
property NSWindow : a reference to current application’s NSWindow
property NSNumber : a reference to current application’s NSNumber
property NSPredicate : a reference to current application’s NSPredicate
property NSDictionary : a reference to current application’s NSDictionary
property NSMutableArray : a reference to current application’s NSMutableArray
property NSWindowController : a reference to current application’s NSWindowController
property NSMutableDictionary : a reference to current application’s NSMutableDictionary
property NSTitledWindowMask : a reference to current application’s NSTitledWindowMask
property NSWindowCloseButton : a reference to current application’s NSWindowCloseButton
property NSNormalWindowLevel : a reference to current application’s NSNormalWindowLevel
property NSBackingStoreBuffered : a reference to current application’s NSBackingStoreBuffered

set chartData to NSMutableArray’s new()
chartData’s addObject:(my recWithLabels:{"label", "value"} andValues:{"練馬区", 3})
chartData’s addObject:(my recWithLabels:{"label", "value"} andValues:{"青梅市", 1})
chartData’s addObject:(my recWithLabels:{"label", "value"} andValues:{"中野区", 2})

my performSelectorOnMainThread:"dispQuartzComposerWindow:" withObject:(chartData) waitUntilDone:true

on dispQuartzComposerWindow:chartData
  –上記データの最大値を求める
  
set aMaxRec to chartData’s filteredArrayUsingPredicate:(NSPredicate’s predicateWithFormat_("SELF.value == %@.@max.value", chartData))
  
set aMax to value of aMaxRec
  
set aMaxVal to (first item of aMax) as integer
  
  
–Scalingの最大値を求める
  
if aMaxVal ≥ 10 then
    set aScaleMax to (10 div aMaxVal)
    
set aScaleMin to aScaleMax div 10
  else
    set aScaleMax to (10 / aMaxVal)
    
set aScaleMin to 1
  end if
  
  
try
    set aPath to path to resource "Chart.qtz"
  on error
    return
  end try
  
  
set qtPath to NSString’s stringWithString:(POSIX path of aPath)
  
  
set aView to QCView’s alloc()’s init()
  
set qtRes to (aView’s loadCompositionFromFile:qtPath)
  
  
aView’s setValue:chartData forInputKey:"Data"
  
aView’s setValue:(NSNumber’s numberWithFloat:(0.5)) forInputKey:"Scale"
  
aView’s setValue:(NSNumber’s numberWithFloat:(0.2)) forInputKey:"Spacing"
  
aView’s setAutostartsRendering:true
  
  
set maXFrameRate to aView’s maxRenderingFrameRate()
  
  (
aView’s setValue:(NSNumber’s numberWithFloat:aScaleMax / 10) forInputKey:"Scale")
  
  
set aWin to (my makeWinWithView(aView, 800, 600, "AppleScript Composition Test"))
  
  
set wController to NSWindowController’s alloc()
  
wController’s initWithWindow:aWin
  
aWin’s makeFirstResponder:aView
  
wController’s showWindow:me
  
  
aWin’s makeKeyAndOrderFront:me
  
  
delay 5
  
  
my closeWin:aWin
  
aView’s stopRendering() –レンダリング停止
  
end dispQuartzComposerWindow:

–make Window for Display
on makeWinWithView(aView, aWinWidth, aWinHeight, aTitle)
  set aScreen to NSScreen’s mainScreen()
  
set aFrame to {{0, 0}, {aWinWidth, aWinHeight}}
  
  
set aBacking to NSTitledWindowMask
  
  
set aDefer to NSBackingStoreBuffered
  
  
— Window
  
set aWin to NSWindow’s alloc()
  (
aWin’s initWithContentRect:aFrame styleMask:aBacking backing:aDefer defer:false screen:aScreen)
  
aWin’s setBackgroundColor:(NSColor’s whiteColor())
  
  
aWin’s setTitle:aTitle
  
aWin’s setDelegate:me
  
aWin’s setDisplaysWhenScreenProfileChanges:true
  
aWin’s setHasShadow:true
  
aWin’s setIgnoresMouseEvents:false
  
aWin’s setLevel:(NSNormalWindowLevel)
  
aWin’s setOpaque:false
  
aWin’s setReleasedWhenClosed:true
  
aWin’s |center|()
  
aWin’s makeKeyAndOrderFront:(me)
  
–aWin’s movableByWindowBackground:true
  
  
— Set Custom View
  
aWin’s setContentView:aView
  
  
–Set Close Button  
  
set closeButton to NSWindow’s standardWindowButton:(NSWindowCloseButton) forStyleMask:(NSTitledWindowMask)
  
  
return aWin
end makeWinWithView

–close win
on closeWin:aWindow
  repeat with n from 10 to 1 by -1
    (aWindow’s setAlphaValue:n / 10)
    
delay 0.01
  end repeat
  
aWindow’s |close|()
end closeWin:

on recWithLabels:theKeys andValues:theValues
  return (NSDictionary’s dictionaryWithObjects:theValues forKeys:theKeys) as record
end recWithLabels:andValues:

★Click Here to Open This Script 

Posted in GUI Image | Tagged 10.11savvy 10.12savvy 10.13savvy 10.14savvy NSColor NSDictionary NSMutableArray NSMutableDictionary NSNumber NSPredicate NSScreen NSString NSWindow NSWindowController QCView | Leave a comment

テキストをMarkdown形式として解釈してHTMLを出力

Posted on 11月 3, 2018 by Takaaki Naganoya

オープンソースのフレームワーク「MMMarkdown」を利用してMarkdownのテキストをHTMLに変換して出力するAppleScriptです。

ただし、解釈できるMarkdownタグは限定的で、表などは解釈できません。

–> Download MMMarkdown.framework (To ~/Library/Frameworks/)

AppleScript名:テキストをMarkdown形式と解釈してHTMLを出力
— Created 2016-05-12 by Takaaki Naganoya
— 2016 Piyomaru Software
use AppleScript version "2.4"
use scripting additions
use framework "Foundation"
use framework "MMMarkdown" –https://github.com/mdiep/MMMarkdown

set markdown to "# Example
What a library!"

set htmlString to (current application’s MMMarkdown’s HTMLStringWithMarkdown:markdown |error|:(missing value)) as string
–>
(*
"<h1>Example</h1>
<p>What a library!</p>
"
*)

★Click Here to Open This Script 

Posted in Markdown Text | Tagged 10.11savvy 10.12savvy 10.13savvy | Leave a comment

ftpKitのじっけん ftpサーバーからファイル一覧を取得

Posted on 11月 3, 2018 by Takaaki Naganoya

オープンソースのFTPManagerをフレームワーク化したftpKitを利用して、指定サーバー上の指定ディレクトリ内のファイル一覧を取得するAppleScriptです。

sftp接続が必要な場合にはTransmitをAppleScriptからコントロールすることになるわけですが、セキュリティ的にあまり問題にならない用途であればFTP経由でファイル転送することもあるでしょう。

AppleScript名:ftpKitでファイル一覧を取得
— Created 2016-03-01by Takaaki Naganoya
— 2016 Piyomaru Software
use AppleScript version "2.4"
use scripting additions
use framework "Foundation"
use framework "ftpKit" –https://github.com/nkreipke/FTPManager

set serverURL to "ftp://www.piyocast.com/xxxxx/public_html/private"
set serverUser to "xxxxx@piyocast.com"
set serverPassword to text returned of (display dialog "Input FTP Password" default answer "" with hidden answer)

set aFtpManager to current application’s FTPManager’s alloc()’s init()
set successF to false

set srv to current application’s FMServer’s serverWithDestination:serverURL username:serverUser |password|:serverPassword
srv’s setPort:21

set aResList to aFtpManager’s contentsOfServer:srv

set fileNameList to {}
set fileCount to aResList’s |count|()

repeat with i from 0 to (fileCount – 1)
  set anItem to (aResList’s objectAtIndex:i)
  
  
set aFileName to (anItem’s valueForKeyPath:"kCFFTPResourceName") as string
  
set the end of fileNameList to aFileName
end repeat

fileNameList
–>  {".", "..", "xls1a.png", "xls3.png"}

★Click Here to Open This Script 

Posted in file Network | Tagged 10.11savvy 10.12savvy 10.13savvy | Leave a comment

度量衡の変換

Posted on 11月 3, 2018 by Takaaki Naganoya

オープンソースの「DDUnitConverter」(By Dave DeLong)を用いて、度量衡(measurement unit)の変換を行うAppleScriptです。AppleScriptから呼び出すために、DDUnitConverterをフレームワーク化した「ddUnitConversionKit」を作成しています。

もともと、AppleScriptには内蔵の度量衡変換機能があり、

AppleScript名:インチからセンチへの変換
set a to 1
set a to a as inches
–> inches 1.0

set b to a as centimeters
–> centimeters 2.54

set c to a as meters
–> meters 0.0254

set d to a as kilometers
–> kilometers 2.54E-5

★Click Here to Open This Script 

とか、

AppleScript名:液体の容積の単位変換
–液体の容積の単位変換
set a to 10 as liters
–> liters 10.0

set b to a as gallons
–> gallons 2.641720372842

set c to a as quarts
–> quarts 10.566881491367

★Click Here to Open This Script 

ぐらいは簡単にできます。AppleScriptがサポートしている度量衡は、長さ、重さ、温度、液体の容積です。

ただ、mmの下のμmとか、オングストロームとか、そういう単位には対応していませんし、重量でいえばKgに対応していてもt(トン)の単位はサポートしていなかったりと、日常的な度量衡の単位の世界でも不十分な感じが否めません(数値の有効桁数が10桁と小さいことも影響?)。

Cocoaの世界で度量衡変換機能について調べてみたところ、km→m→cm→mmといった変換はしてくれるものの、他の単位への変換は行ってくれていなかったりして、標準機能だけではいまひとつな印象です。

AppleScript名:NSLengthFormatterのじっけん
— Created 2015-11-18 by Takaaki Naganoya
— 2015 Piyomaru Software
use AppleScript version "2.4"
use scripting additions
use framework "Foundation"
–http://dev.classmethod.jp/references/ios8-new-formatter/

set aLengthFormatter to current application’s NSLengthFormatter’s alloc()’s init()
set aMeters to 5000
set aRes to (aLengthFormatter’s stringFromMeters:aMeters) as text
–>  "5 km"
set bRes to (aLengthFormatter’s stringFromMeters:500) as text
–>  "500 m"
set cRes to (aLengthFormatter’s stringFromMeters:0.5) as text
–>  "50 cm"
set dRes to (aLengthFormatter’s stringFromMeters:0.005) as text
–>  "5 mm"
set eRes to (aLengthFormatter’s stringFromMeters:("0.000005" as real)) as text
–>  "0.005 mm"

set res2 to aLengthFormatter’s getObjectValue:(missing value) forString:aRes errorDescription:(missing value)
–>  false

set res3 to (aLengthFormatter’s stringFromValue:aMeters unit:(current application’s NSLengthFormatterUnitMillimeter)) as text
–>  "5,000 mm"
set res4 to (aLengthFormatter’s stringFromValue:aMeters unit:(current application’s NSLengthFormatterUnitCentimeter)) as text
–>  "5,000 cm"
set res5 to (aLengthFormatter’s stringFromValue:aMeters unit:(current application’s NSLengthFormatterUnitMeter)) as text
–>  "5,000 m"
set res6 to (aLengthFormatter’s stringFromValue:aMeters unit:(current application’s NSLengthFormatterUnitKilometer)) as text
–>  "5,000 km"
set res7 to (aLengthFormatter’s stringFromValue:aMeters unit:(current application’s NSLengthFormatterUnitInch)) as text
–>  "5,000 in"
set res8 to (aLengthFormatter’s stringFromValue:aMeters unit:(current application’s NSLengthFormatterUnitFoot)) as text
–>  "5,000 ft"
set res9 to (aLengthFormatter’s stringFromValue:aMeters unit:(current application’s NSLengthFormatterUnitYard)) as text
–>  "5,000 yd"
set res10 to (aLengthFormatter’s stringFromValue:aMeters unit:(current application’s NSLengthFormatterUnitMile)) as text
–>  "5,000 mi"

★Click Here to Open This Script 

AppleScript名:NSMassFormatterのじっけん
— Created 2015-11-18 by Takaaki Naganoya
— 2015 Piyomaru Software
use AppleScript version "2.4"
use scripting additions
use framework "Foundation"
–http://dev.classmethod.jp/references/ios8-new-formatter/

set aMasFormatter to current application’s NSMassFormatter’s alloc()’s init()
set aKilloGrams to 60.0
set aRes to (aMasFormatter’s stringFromKilograms:aKilloGrams) as text
–>  "60 kg"
set a2Res to (aMasFormatter’s stringFromKilograms:(0.5)) as text
–>  "500 g"
set a3Res to (aMasFormatter’s stringFromKilograms:(5000000)) as text
–>  "5,000,000 kg"
set a4Res to (aMasFormatter’s stringFromKilograms:("0.0005" as real)) as text
–>  "0.5 g"

set bRes to (aMasFormatter’s stringFromValue:aKilloGrams unit:(current application’s NSMassFormatterUnitGram)) as text
–>  "60 g"
set cRes to (aMasFormatter’s stringFromValue:aKilloGrams unit:(current application’s NSMassFormatterUnitKilogram)) as text
–>  "60 kg"
set dRes to (aMasFormatter’s stringFromValue:aKilloGrams unit:(current application’s NSMassFormatterUnitOunce)) as text
–>  "60 oz"
set eRes to (aMasFormatter’s stringFromValue:aKilloGrams unit:(current application’s NSMassFormatterUnitPound)) as text
–>  "60 lb"
set fRes to (aMasFormatter’s stringFromValue:aKilloGrams unit:(current application’s NSMassFormatterUnitStone)) as text
–>  "60 st"

set gRes to (aMasFormatter’s unitStringFromValue:aKilloGrams unit:(current application’s NSMassFormatterUnitGram)) as text
–>  "g"
set hRes to (aMasFormatter’s unitStringFromValue:aKilloGrams unit:(current application’s NSMassFormatterUnitKilogram)) as text
–>  "kg"
set iRes to (aMasFormatter’s unitStringFromValue:aKilloGrams unit:(current application’s NSMassFormatterUnitOunce)) as text
–>  "oz"
set jRes to (aMasFormatter’s unitStringFromValue:aKilloGrams unit:(current application’s NSMassFormatterUnitPound)) as text
–>  "lb"
set kRes to (aMasFormatter’s unitStringFromValue:aKilloGrams unit:(current application’s NSMassFormatterUnitStone)) as text
–>  "st"

set res01 to aMasFormatter’s getObjectValue:(missing value) forString:fRes errorDescription:(missing value)
–>  false

set res02 to (aMasFormatter’s stringFromKilograms:80) as text
–>  "80 kg"

set res03 to aMasFormatter’s unitStyle()
–>  2 = NSFormattingUnitStyleMedium

★Click Here to Open This Script 

そこで、冒頭に紹介したようにDDUnitConverterを導入してみたわけですが、これはこれで問題がないわけでもありません。本来、通貨同士の変換をサポートしており、通貨レートの更新機能を持っているのですが、実際に呼び出してみると更新されていない雰囲気が濃厚です(呼び出し方を間違っているのか?)。

なので、「通貨レート以外」の度量衡変換にのみ用いるのが安全な使い方なのかもしれない、というところです。

例によって、OS X 10.10以降用にビルドしたバイナリを用意しておきましたので、興味のある方はアーカイブを展開したあとで、~/Library/Frameworksに入れておためしください。

–> Download ddUnitConversionKit.framework(To ~/Library/Frameworks/)

AppleScript名:DDUnitConverterのじっけん1
— Created 2015-11-19 by Takaaki Naganoya
— 2015 Piyomaru Software
use AppleScript version “2.4”
use scripting additions
use framework “Foundation”
use framework “ddUnitConversionKit” –davedelong/DDUnitConverter
–https://github.com/davedelong/DDUnitConverter

–enums in DDVelocityUnitConverter.h
property DDVelocityUnitCentimetersPerHour : 0
property DDVelocityUnitCentimetersPerMinute : 1
property DDVelocityUnitCentimetersPerSecond : 2
property DDVelocityUnitFeetPerHour : 3
property DDVelocityUnitFeetPerMinute : 4
property DDVelocityUnitFeetPerSecond : 5
property DDVelocityUnitInchesPerHour : 6
property DDVelocityUnitInchesPerMinute : 7
property DDVelocityUnitInchesPerSecond : 8
property DDVelocityUnitKilometersPerHour : 9
property DDVelocityUnitKilometersPerMinute : 10
property DDVelocityUnitKilometersPerSecond : 11
property DDVelocityUnitKnots : 12
property DDVelocityUnitLight : 13
property DDVelocityUnitMach : 14
property DDVelocityUnitMetersPerHour : 15
property DDVelocityUnitMetersPerMinute : 16
property DDVelocityUnitMetersPerSecond : 17
property DDVelocityUnitMilesPerHour : 18
property DDVelocityUnitMilesPerMinute : 19
property DDVelocityUnitMilesPerSecond : 20
property DDVelocityUnitFurlongsPerFortnight : 21

–時速100kmを秒速kmに変換
set aVal to ((current application’s DDUnitConverter’s velocityUnitConverter())’s convertNumber:100 fromUnit:(DDVelocityUnitKilometersPerHour) toUnit:(DDVelocityUnitKilometersPerSecond)) as real
–>  0.027777777778

★Click Here to Open This Script 

AppleScript名:DDCurrencyUnitConverterのじっけん
— Created 2015-11-19 by Takaaki Naganoya
— 2015 Piyomaru Software
use AppleScript version “2.4”
use scripting additions
use framework “Foundation”
use framework “ddUnitConversionKit” –davedelong/DDUnitConverter
–https://github.com/davedelong/DDUnitConverter

–enums in DDCurrencyUnitConverter.h
property DDCurrencyUnitEuro : 0
property DDCurrencyUnitJapaneseYen : 1
property DDCurrencyUnitUKPoundSterling : 2
property DDCurrencyUnitUSDollar : 3
property DDCurrencyUnitAlgerianDinar : 4
property DDCurrencyUnitArgentinePeso : 5
property DDCurrencyUnitAustralianDollar : 6
property DDCurrencyUnitBahrainDinar : 7
property DDCurrencyUnitBotswanaPula : 8
property DDCurrencyUnitBrazilianReal : 9
property DDCurrencyUnitBruneiDollar : 10
property DDCurrencyUnitCanadianDollar : 11
property DDCurrencyUnitChileanPeso : 12
property DDCurrencyUnitChineseYuan : 13
property DDCurrencyUnitColombianPeso : 14
property DDCurrencyUnitCzechKoruna : 15
property DDCurrencyUnitDanishKrone : 16
property DDCurrencyUnitHungarianForint : 17
property DDCurrencyUnitIcelandicKrona : 18
property DDCurrencyUnitIndianRupee : 19
property DDCurrencyUnitIndonesianRupiah : 20
property DDCurrencyUnitIranianRial : 21
property DDCurrencyUnitIsraeliNewSheqel : 22
property DDCurrencyUnitKazakhstaniTenge : 23
property DDCurrencyUnitKoreanWon : 24
property DDCurrencyUnitKuwaitiDinar : 25
property DDCurrencyUnitLibyanDinar : 26
property DDCurrencyUnitMalaysianRinggit : 27
property DDCurrencyUnitMauritianRupee : 28
property DDCurrencyUnitMexicanPeso : 29
property DDCurrencyUnitNepaleseRupee : 30
property DDCurrencyUnitNewZealandDollar : 31
property DDCurrencyUnitNorwegianKrone : 32
property DDCurrencyUnitRialOmani : 33
property DDCurrencyUnitPakistaniRupee : 34
property DDCurrencyUnitNuevoSol : 35
property DDCurrencyUnitPhilippinePeso : 36
property DDCurrencyUnitPolishZloty : 37
property DDCurrencyUnitQatarRiyal : 38
property DDCurrencyUnitRussianRuble : 39
property DDCurrencyUnitSaudiArabianRiyal : 40
property DDCurrencyUnitSingaporeDollar : 41
property DDCurrencyUnitSouthAfricanRand : 42
property DDCurrencyUnitSriLankaRupee : 43
property DDCurrencyUnitSwedishKrona : 44
property DDCurrencyUnitSwissFranc : 45
property DDCurrencyUnitThaiBaht : 46
property DDCurrencyUnitTrinidadAndTobagoDollar : 47
property DDCurrencyUnitTunisianDinar : 48
property DDCurrencyUnitUAEDirham : 49
property DDCurrencyUnitPesoUruguayo : 50
property DDCurrencyUnitBolivarFuerte : 51
property DDCurrencyUnitSDR : 52

–最初に通貨レートの更新を行う必要があるが、実行しても変わらないのはなぜ????
set aConv to current application’s DDUnitConverter’s currencyUnitConverter()
aConv’s refreshExchangeRates()
set aVal to (aConv’s convertNumber:100 fromUnit:(DDCurrencyUnitUSDollar) toUnit:(DDCurrencyUnitJapaneseYen))
–>  (NSNumber) 1.006839721743

★Click Here to Open This Script 

Posted in Number | Tagged 10.11savvy 10.12savvy 10.13savvy NSLengthFormatter NSMassFormatter | Leave a comment

シリアルコードの生成と検証

Posted on 11月 3, 2018 by Takaaki Naganoya

オープンソースのフレームワーク「SerialKeyGenerator」を用いてシリアルコードを生成、検証するAppleScriptです。

シリアルコードについて

シリアルコードは、日本では「レジストコード」「プロダクトコード」などと呼ばれるもので、ソフトウェアの販売時にこのコードを発行し、ソフトウェアのシリアルコード入力ダイアログに入力してもらうことで、完全版として機能させるというものです。

Mac App StoreではApple IDとひもづけることでシリアルコードを使用しないソフトウェア販売とライセンシングを行なっていますが、Mac App Store外で販売する場合にはシリアルコードのことを考える必要が出てきます。

コードの文字数を増やすと、仮にキーボードから入力する場合の難易度が上がってしまいます。適度な長さの文字列になることが望ましいところです。

シリアルコードが仮に流出した場合に備え、どの購入者のコードが流出したかを特定する必要があります。そのため、シリアルコードにはその名のとおり、購入者の番号を含めてあるのが普通です。

SerialKeyGeneratorの使い方について

SerialKeyGeneratorでは、シークレットキーワード、ユーザー番号をもとにシリアルコードが生成されます。日時を考慮してシリアルコードを計算するため、同じシリアルコードを生成させても日時が変われば結果は異なります。

ただ、おおもとのシークレットキーワードが判明してしまうと、第三者がシリアルコードを勝手に発行してソフトウェアの不正使用ができてしまうため、アプリケーション内に格納するシークレットキーワードは文字ダンプされても判明しないようにしておくのが普通です。

–> Download serialKeyGenKit.framework(To ~/Library/Frameworks/)

AppleScript名:SerialKeyGeneratorサンプル1
— Created 2015-10-24 by Takaaki Naganoya
— 2015 Piyomaru Software
use AppleScript version "2.4"
use scripting additions
use framework "Foundation"
use framework "serialKeyGenKit" –https://github.com/danielvy/SerialKeyGenerator

–Generate Serial Code with secret Keyword
set aGen to current application’s SerialKeyGenerator’s alloc()’s initWithSecret:"Piyomaru"
–>  (SerialKeyGenerator) <SerialKeyGenerator: 0x7f8b5b5fa200>

set aList to {}
repeat with i from 1 to 10
  set aRes to (aGen’s generateSerialWithSequence:i |data|:i)
  
set the end of aList to (aRes as text)
end repeat

aList
–>  {​​​​​"1CHH8-BJY89-TR9Z9-AKSTL-70JZF", ​​​​​"4KXCF-LS6P5-7BKYN-CUMPY-NM072", ​​​​​"41GO2-OGZ3T-83YP9-2LS4J-9W3MI", ​​​​​"CA3WV-C7FU7-PSPJ3-LNGT7-N6AJT", ​​​​​"3OG0B-MCFUM-7YKHT-EE533-LNJEJ", ​​​​​"4SKWQ-9G8XE-ZCE6K-APSAL-R0T8S", ​​​​​"CTEZT-H4AQQ-BM15H-FH2DG-P7K7O", ​​​​​"4BZ1X-2OHKF-5FWND-7SZVA-EBR89", ​​​​​"BDKRI-9JU7T-G6N20-YPU9K-6FXQW", ​​​​​"9EWW5-O3FMV-SDEZA-77JZE-OY8FL"​​​}

–Decode Serial with secret Keyword
set rList to {}
set bGen to current application’s SerialKeyGenerator’s alloc()’s initWithSecret:"Piyomaru"
–> (SerialKeyGenerator) <SerialKeyGenerator: 0x7fb6992b8400>

repeat with i in aList
  set bRes to (bGen’s decodeSerial:(contents of i))
  
  
set aDate to bRes’s |date| as date
  
set aSeq to bRes’s sequence as integer
  
set aData to bRes’s |data| as integer
  
  
set the end of rList to {aData, aSeq, aDate}
end repeat
return rList
–> {{1, 1, date "2018年11月3日土曜日 16:44:57"}, {2, 2, date "2018年11月3日土曜日 16:44:57"}, {3, 3, date "2018年11月3日土曜日 16:44:57"}, {4, 4, date "2018年11月3日土曜日 16:44:57"}, {5, 5, date "2018年11月3日土曜日 16:44:57"}, {6, 6, date "2018年11月3日土曜日 16:44:57"}, {7, 7, date "2018年11月3日土曜日 16:44:57"}, {8, 8, date "2018年11月3日土曜日 16:44:57"}, {9, 9, date "2018年11月3日土曜日 16:44:57"}, {10, 10, date "2018年11月3日土曜日 16:44:57"}}

★Click Here to Open This Script 

Posted in How To | Tagged 10.11savvy 10.12savvy 10.13savvy | Leave a comment

Excelデータを組み立てて書き出し(フォント指定、カラー指定)

Posted on 11月 3, 2018 by Takaaki Naganoya

オープンソースのフレームワーク「JXLS」を用いてExcelデータを組み立てるAppleScriptです。

フォント名と色を指定してみました。実際に案件で使用したことがないので、徹底的に活用した………という経験がないので、いまのところ何か風景画像をExcel書類に変換して「実はExcelで作りました」とかフカすぐらいしか用途がなさそうです。

–> Download JXLS(To ~/Library/Frameworks/)

AppleScript名:ASOCでExcelファイル生成テスト v2
— Created 2015-10-08 by Takaaki Naganoya
— 2015 Piyomaru Software
use AppleScript version "2.4"
use scripting additions
use framework "Foundation"
use framework "JXLS" –https://github.com/JanX2/JXLS

set aFile to POSIX path of (choose file name)
set filePath to current application’s NSString’s stringWithString:aFile

set workBook to current application’s JXLSWorkBook’s new()
set workSheet to workBook’s workSheetWithName:"ぴよぴよシート"
workSheet’s setWidth:1000 forColumn:0 defaultFormat:(missing value)

repeat with i from 0 to 64
  set aCell to (workSheet’s setCellAtRow:i column:0 toString:(current application’s NSString’s stringWithString:("ぴよまる " & (i as text))))
  (
aCell’s setFontName:"HiraKakuStd-W8")
  (
aCell’s setFontHeight:320) –this is point * 20
  (
aCell’s setFontColorIndex:i)
  (
aCell’s setForegroundFillColorIndex:13)
end repeat

workBook’s writeToFile:filePath

★Click Here to Open This Script 

Posted in How To | Tagged 10.11savvy 10.12savvy 10.13savvy | Leave a comment

Excelデータを組み立てて書き出し

Posted on 11月 3, 2018 by Takaaki Naganoya

オープンソースの「JXLS.framework」を用いて指定のExcelデータを組み立てて書き出すAppleScriptです。

アプリケーションにメッセージを送ってアプリケーションに仕事をしてもらうのがAppleScriptの流儀ですが、macOS 10.10以降でCocoaの機能が呼べるようになったため、こうしたオープンソースのフレームワークを呼び出して処理できるようになりました。

AppleScriptが自前で行なっていないことには変わらないのですが、Excelデータを(Excelなしで)組み立てられるわけで、出力データとしてExcel書類が求められる用途において、Excelなしで処理が行えます(開発中はExcelでどのように表示されるか確認する必要があるので、開発中は必要です)。

また、本物のExcelをコントロールする方法ではできなかった「並列処理で大量にデータを作成する」という処理も可能になるわけでけっこうなことです(ただ、そういう要求をされたことは皆無なのですが、、、、)。

–> Download JXLS(To ~/Library/Frameworks/)

AppleScript名:ASOCでExcelファイル生成テスト
— Created 2015-10-08 by Takaaki Naganoya
— 2015 Piyomaru Software
use AppleScript version "2.4"
use scripting additions
use framework "Foundation"
use framework "JXLS" –https://github.com/JanX2/JXLS

set aFile to POSIX path of (choose file name)
set filePath to current application’s NSString’s stringWithString:aFile

set workBook to current application’s JXLSWorkBook’s new()

set workSheet to workBook’s workSheetWithName:"ぴよぴよシート"
workSheet’s setWidth:1000 forColumn:0 defaultFormat:(missing value)

repeat with i from 0 to 10
  set aCell to (workSheet’s setCellAtRow:i column:0 toString:(current application’s NSString’s stringWithFormat_("ぴよまる %@", i + 1)))
  (
aCell’s setHorizontalAlignment:1) —-HALIGN_LEFT
  (
aCell’s setIndentation:(0 + i)) —– INDENT_0
end repeat

workBook’s writeToFile:filePath

★Click Here to Open This Script 

Posted in Release | Tagged 10.11savvy 10.12savvy 10.13savvy NSString | Leave a comment

ASOCでXML-RPCのテスト v3

Posted on 11月 3, 2018 by Takaaki Naganoya

オープンソースのXMLRPC.frameworkを用いてXMLRPCを実行するAppleScriptです。

XMLRPCといえば、WordPressか郵便専門ネットかというほど用途が限定されていますが、本Blog(Powered By WordPress)の年初の再構築など、使えないと大変な思いをすることがあるので、定期的に調査しています。

初回掲載時は郵便専門ネットのXMLRPCはバージョン番号を”15.09a”と返してきましたが、再掲載時に実行してみたら”18.10a”を返してきました。

–> Download XMLRPC.framework (To ~/Library/Frameworks/)

AppleScript名:ASOCでXML-RPCのテスト v3
— Created 2015-10-06 by Takaaki Naganoya
— 2015 Piyomaru Software
use AppleScript version "2.4"
use scripting additions
use framework "Foundation"
use framework "AppKit"
use framework "XMLRPC"
–XMLRPC.framework
–https://cocoapods.org/pods/xmlrpc
–Cocoa XML-RPC Framework © 2011 Divisible by Zero
–v2.3.4

set aRes to (callXMLRPC("http://yubin.senmon.net/service/xmlrpc/", "yubin.getMaxFetchCount", missing value)) as integer
–>  100

set bRes to (callXMLRPC("http://yubin.senmon.net/service/xmlrpc/", "yubin.getVersion", missing value)) as text
–> "15.09a"

on callXMLRPC(paramURL, aMethod, aParamList)
  
  
set aURL to current application’s |NSURL|’s URLWithString:paramURL
  
set aReq to current application’s XMLRPCRequest’s alloc()’s initWithURL:aURL
  
aReq’s setMethod:aMethod withParameter:aParamList
  
set aRes to current application’s XMLRPCConnection’s sendSynchronousXMLRPCRequest:aReq |error|:(missing value)
  
  
set errF to (aRes’s isFault()) as boolean
  
  
if errF = true then
    set xmlRPCres to faultCode of aRes
    
–set xmlRPCbody to faultString of aRes
  else
    set xmlRPCres to aRes’s object()
    
–set xmlRPCbody to aRes’s body()
  end if
  
  
return xmlRPCres
  
end callXMLRPC

★Click Here to Open This Script 

Posted in XML-RPC | Tagged 10.11savvy 10.12savvy 10.13savvy | Leave a comment

テキストビュー+ボタンを作成 v2

Posted on 11月 3, 2018 by Takaaki Naganoya

Window+TextView+Buttonを作成してボタンのクリックを受け付けるAppleScriptです。

ちょっとしたログ表示などのために作成したものです。


▲通常(ライト)モード@macOS 10.12.6、ダークモード@10.14.1

オリジナルはスクリプトエディタ上でCommand+Control+Rの「フォアグラウンドで実行」を実行する必要があったのですが、

本バージョンでは強制的にメインスレッド実行を行うことで、この操作は不要になっています。

ただ、ランタイム環境ごとに「ボタンをクリックできない」という現象に遭遇。他のいろいろなランタイムでも試しておく必要を感じます。

ランタイム環境 スクリプトエディタ アプレット スクリプトメニュー osascript Script Debugger
macOS 10.12 OK OK クリックできない クリックできない クリックできない
macOS 10.13 OK OK クリックできない クリックできない クリックできない
macOS 10.14 OK OK クリックできない クリックできない クリックできない

macOS 10.12.6、10.13.6、10.14.1で動作確認してみましたが、傾向は同じです。Script Debugger上でクリックを受け付けないのはかなり問題が、、、、

AppleScript名:テキストビュー+ボタンを作成 v2
— Created 2015-12-11 by Takaaki Naganoya
— 2015 Piyomaru Software
use AppleScript version "2.4"
use scripting additions
use framework "Foundation"
use framework "AppKit"

property NSColor : a reference to current application’s NSColor
property NSScreen : a reference to current application’s NSScreen
property NSButton : a reference to current application’s NSButton
property NSWindow : a reference to current application’s NSWindow
property NSSplitView : a reference to current application’s NSSplitView
property NSTextView : a reference to current application’s NSTextView
property NSScrollView : a reference to current application’s NSScrollView
property NSMutableString : a reference to current application’s NSMutableString
property NSWindowController : a reference to current application’s NSWindowController
property NSTitledWindowMask : a reference to current application’s NSTitledWindowMask
property NSRoundedBezelStyle : a reference to current application’s NSRoundedBezelStyle
property NSNormalWindowLevel : a reference to current application’s NSNormalWindowLevel
property NSBackingStoreBuffered : a reference to current application’s NSBackingStoreBuffered
property NSMomentaryLightButton : a reference to current application’s NSMomentaryLightButton

property windisp : false
property wController : false

set aWidth to 600
set aHeight to 500

set aTitle to "テキストビューのじっけん/TextView Test"
set outText to "ぴよまるソフトウェア / Piyomaru Software "
set aButtonMSG to "OK"

–表示用テキストの作成
set dispStr to NSMutableString’s alloc()’s init()
repeat with i from 1 to 100
  set bStr to (NSMutableString’s stringWithString:(outText & (i as string) & return))
  
set dispStr to (bStr’s stringByAppendingString:dispStr)
end repeat

set paramObj to {aWidth, aHeight, aTitle, dispStr, aButtonMSG, "10"}
my performSelectorOnMainThread:"dispTextView:" withObject:(paramObj) waitUntilDone:true

on dispTextView:paramObj
  set my windisp to false
  
copy paramObj to {aWidth, aHeight, aTitle, dispStr, aButtonMSG, timeOutSecs}
  
  
set aColor to NSColor’s colorWithDeviceRed:0.0 green:0.0 blue:0.0 alpha:0.9
  
set (my windisp) to true
  
  
–Text View+Scroll Viewをつくる
  
set aScroll to NSScrollView’s alloc()’s initWithFrame:(current application’s NSMakeRect(0, 0, aWidth, aHeight))
  
set aView to NSTextView’s alloc()’s initWithFrame:(current application’s NSMakeRect(0, 0, aWidth, aHeight))
  
aView’s setRichText:true
  
aView’s useAllLigatures:true
  
aView’s setTextColor:(NSColor’s cyanColor()) —
  
aView’s setBackgroundColor:aColor
  
aView’s setEditable:false
  
  
aScroll’s setDocumentView:aView
  
aView’s enclosingScrollView()’s setHasVerticalScroller:true


–Buttonをつくる
  
set bButton to (NSButton’s alloc()’s initWithFrame:(current application’s NSMakeRect(0, 0, aWidth, 40)))
  
–bButton’s setButtonType:( NSMomentaryLightButton)
  
–bButton’s setBezelStyle:( NSRoundedBezelStyle)
  
bButton’s setTitle:aButtonMSG
  
bButton’s setTarget:me
  
bButton’s setAction:("clicked:")
  
bButton’s setKeyEquivalent:(return)
  
  
–SplitViewをつくる
  
set aSplitV to NSSplitView’s alloc()’s initWithFrame:(current application’s NSMakeRect(0, 0, aHeight, aWidth))
  
aSplitV’s setVertical:false
  
  
aSplitV’s addSubview:aScroll
  
aSplitV’s addSubview:bButton
  
aSplitV’s setNeedsDisplay:true
  
  
set aWin to makeWinWithView(aSplitV, aWidth, aHeight, aTitle, 0.9)
  
aView’s setString:dispStr
  
  
–NSWindowControllerを作ってみた
  
set my wController to NSWindowController’s alloc()
  
my (wController’s initWithWindow:aWin)
  
  
my (wController’s showWindow:me)
  
  
set aCount to (timeOutSecs as string as number) * 10 –timeout seconds * 10
  
repeat aCount times
    if (my windisp) = false then
      exit repeat
    end if
    
delay 0.1
  end repeat
  
  
my closeWin:bButton
end dispTextView:

–Button Clicked Event Handler
on clicked:aSender
  set (my windisp) to false
  
my closeWin:aSender
end clicked:

–make Window for Input
on makeWinWithView(aView, aWinWidth, aWinHeight, aTitle, alphaV)
  set aScreen to NSScreen’s mainScreen()
  
set aFrame to {{0, 0}, {aWinWidth, aWinHeight}}
  
set aBacking to NSTitledWindowMask –NSBorderlessWindowMask
  
set aDefer to NSBackingStoreBuffered
  
  
— Window
  
set aWin to NSWindow’s alloc()
  (
aWin’s initWithContentRect:aFrame styleMask:aBacking backing:aDefer defer:false screen:aScreen)
  
  
aWin’s setTitle:aTitle
  
aWin’s setDelegate:me
  
aWin’s setDisplaysWhenScreenProfileChanges:true
  
aWin’s setHasShadow:true
  
aWin’s setIgnoresMouseEvents:false
  
aWin’s setLevel:(NSNormalWindowLevel)
  
aWin’s setOpaque:false
  
aWin’s setAlphaValue:alphaV –append
  
aWin’s setReleasedWhenClosed:true
  
aWin’s |center|()
  
  
— Set Custom View
  
aWin’s setContentView:aView
  
  
return aWin
end makeWinWithView

–close win
on closeWin:aSender
  set tmpWindow to aSender’s |window|()
  
  
repeat with n from 10 to 1 by -1
    (tmpWindow’s setAlphaValue:n / 10)
    
delay 0.02
  end repeat
  
  
my wController’s |close|()
end closeWin:

★Click Here to Open This Script 

Posted in GUI | Tagged 10.11savvy 10.12savvy 10.13savvy 10.14savvy NSButton NSColor NSMutableString NSScreen NSScrollView NSSplitView NSTextView NSWindow NSWindowController | 1 Comment

AppleScript系機能の実装がおかしなGoogle Chrome

Posted on 11月 2, 2018 by Takaaki Naganoya

Google Chromeは自動処理の部品に使ってはいけない

Google ChromeをAppleScriptでコントロールすることは、個人的にはほとんどありません。日常的に利用するのは、自動処理への対応機能を持ち信頼できるアプリケーションが中心です。

必要な機能がなかったり、自動処理と相性がよくなかったりするためです。使用中にGoogle App Storeのダイアログなどが表示されることがあるので、自動処理中にやられると処理が止まってしまいます。これは、自動処理の仕組みを組み立てる上で絶対にあってはならない仕様です。

そのため、Google ChromeをAppleScriptで動かす場合は、途中でGoogle Chrome側の都合で勝手に処理が止まっても腹が立たない程度の、あまり重要ではない処理であるとか、とても短くて簡単な基礎的なマクロ処理に限定されます。

1日中タイマーにのっとって定時に指定のWebサイトに、複数のユーザーIDやパスワードで繰り返しログインを行い、指定のメニューに移動してデータをダウンロードするような処理(実際にAppleScript+Safariで動かしています)にGoogle Chromeを使うのは自殺行為です。

比較的短めの、

「写真.appで選択中の写真をOCRで文字認識して『戦場の絆』のリプレイIDを取得し、リプレイムービー検索ページにリプレイIDを突っ込み、YouTube上のリプレイムービーのURLを取得。YouTube上でリプレイを再生する」

といった程度の処理でも、途中でGoogle App Storeのダイアログが表示されたら、処理が途切れてそれっきり。コマンドを1つ実行するたびにGoogle App Storeのダイアログを閉じたり無効化する処理を入れれば不可能ではないかもしれませんが、無人の環境で放置するのは無理です。

かといって、Safariの仕様が自動処理に向いているかと言われれば、そういうわけでもありません。ファイルのダウンロード検出をSafari側で行えないなど、自動処理専用のWebブラウザがあったらいいのに、と思うところです(Folder ActionやFSEventsと組み合わせて、非同期処理でダウンロード検出を行なっています)。ただ、Google Chromeのような致命的な動作を行わない点で選択肢になることでしょう。

Google Chromeには、表示中のページのHTMLソースを取得するという、基本的かつないと困る機能が実装されていないのも困りものです。

Google Chromeは実装がおかしい

Google Chromeは一応JavaScriptを実行するための「execute」コマンドを備えているので、JavaScriptのコマンド経由でWebコンテンツへのアクセスや、フォームへのアクセスはできるようになっています。

ただし、肝心の「指定URLをオープンする」という部分の実装がまともに行われていません。

Google Chromeで指定URLをオープンするAppleScriptでよく見かける記述例は、

tell application "Google Chrome"
  open location "http://piyocast.com/as/"
end tell

★Click Here to Open This Script 

のようなものですが、そもそもこの「open location」はAppleScriptの標準命令であり、Google Chromeが持っているコマンドではありません。open locationは指定URLのURLスキームに対応しているアプリケーションに処理が委ねられます。tellブロックを外すと、OSでデフォルト指定されているアプリケーションで処理されます。Google Chromeへのtellブロック内で実行しているので、Google ChromeにURLが転送されているだけです。

Google Chromeの機能を使って指定URLをオープンしようとすると、

tell application "Google Chrome"
  set newWin to make new window
  
tell newWin
    tell tab 1
      set URL to "http://piyocast.com/as/"
    end tell
  end tell
end tell

★Click Here to Open This Script 

のようになります。

一番ひどいのは、Google Chromeのopen命令。これ、

open v : Open a document.
  open list of file : The file(s) to be opened.

用語辞書のとおりに書いてもエラーになります。

そのため、ローカルのファイルをオープンさせようとしても、openコマンドは使えません。fileを与えてもaliasを与えても、AppleScript用語辞書の記述のとおりにfileのlistを与えてもエラーになります。

結論としては、ローカルのfileをオープンする際には、file pathをURL形式に変換して、そのURLをopen locationでオープンするか、tabのURL属性をfile URLに書き換えて表示させることになります。

set anAlias to choose file

tell application "Finder"
  set aURL to URL of anAlias
end tell

tell application "Google Chrome"
  open location aURL
end tell

★Click Here to Open This Script 

set anAlias to choose file

tell application "Finder"
  set aURL to URL of anAlias
end tell

tell application "Google Chrome"
  tell window 1
    tell active tab
      set URL to aURL
    end tell
  end tell
end tell

★Click Here to Open This Script 

Finder経由で目的のファイルをGoogle Chromeというアプリケーションを利用してオープンする、という記述もできますが、ここでもそのままapplication “Google Chrome”と書くとエラーになり、「path to application “Google Chrome”」という回避的な記述が必要になってしまうのでありました。

–By @fixdot on Twitter
set anAlias to choose file

tell application "Finder"
  open anAlias using (path to application "Google Chrome")
end tell

★Click Here to Open This Script 

ただ、ここで書いているのは「自動処理を行うユーザー環境では」ということであって、Google Chromeは自動処理にさえ使わなければ、それなりによくできたいいソフトウェアだと思います。

ほかにもいろいろ落とし穴が

とくに、Google Chromeにかぎらず、macOS内には自動処理の妨げとなる設定項目がいくつか存在しています。デフォルトのまま使うといろいろ問題が出るので、真っ先に設定を変更しています。

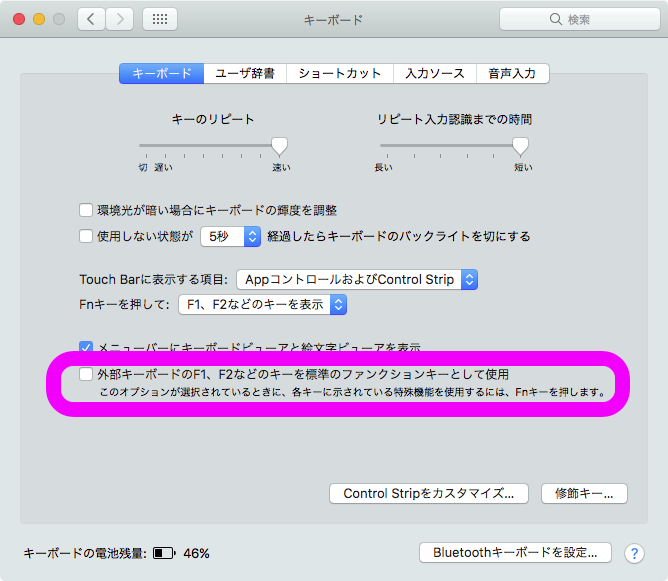
Mac miniにBluetooth外付けキーボードを接続した状態で、ファンクションキーをメディアキーに指定して運用していると、iTunesから不定期にダイアログ表示されるため、ファンクションキーはあくまでファンクションキーとして設定しないとダメです(MacBook Proなど本体にキーボードが搭載されているモデルはこのかぎりではありません)。

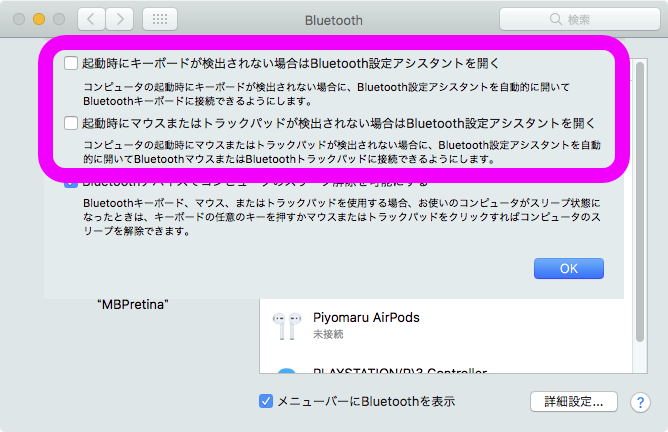
また、同様にMac miniでヘッドレス(画面なし)運用をしている際に、キーボードやマウス/トラックパッドを接続していない状態で警告するように初期設定されていますが、

 「起動時にキーボードが検出されない場合はBluetooth設定アシスタントを開く」
 「起動時にマウスまたはトラックパッドが検出されない場合はBluetooth設定アシスタントを開く」

の2つのチェックボックスをオフにしておく必要があります。

com.google.Chrome

Posted in file URL | Tagged 10.11savvy 10.12savvy 10.13savvy Google Chrome | Leave a comment

Numbersの表の選択範囲をHTML化 v2

Posted on 11月 1, 2018 by Takaaki Naganoya

Numbersの最前面の書類で選択中の表の範囲をHTML化してファイルに書き出すAppleScriptです。

Numbers v5.1+macOS 10.12.6、Numbers v5.2+macOS 10.13.6、Numbers v5.2+macOS 10.14.1で確認しています。

Numbers v5.xでは書類の書き出し(export)形式にPDF、Microsoft Excel、CSV、Numbers 09の4形式を指定できるようになっていますが、HTMLの表(table)に書き出してくれたりはしません。

GUI側(↑)にその機能がありませんし、AppleScript用語辞書(↓)にもそういう機能は見当たりません。

ただ、HTMLの表に書き出すという処理自体はとても初歩的で簡単な内容なので、「なければ作ればいい」ということになるでしょう。

そこで、ありもののルーチンを組み合わせて、選択範囲をHTMLの表(table)として書き出すScriptを書いて、OS標準装備のScript Menuに入れて利用しています。書き出すHTMLの内容は個人の趣味や用途に応じて大きく変わってきますので、そのあたりは自由に書き換えるとよいと思われます。

本Scriptは、電子書籍「AppleScript最新リファレンス」の正誤表(2018/1のBlog消失事件の影響で、書籍内で参照していたURLリンクが切れてしまったことへの対処)を作成するために、すでに存在していたものにほんの少しの修正を加えたものです。

データベースやデータからHTMLを作成するという処理は、自分がAppleScriptを覚えようと思ったきっかけでもあり(当時は、FileMaker Pro Server経由でLAN上でデータを共有して処理)、感慨深いものがあります。

AppleScript名:表の選択範囲をHTML化 v2
use AppleScript version "2.5"
use scripting additions
use framework "Foundation"
use bPlus : script "BridgePlus"

script spd
  property uniqList : {}
end script

set (uniqList of spd) to {}

–Numbersからデータを取得する
set aList to get2DListFromNumbersSelection() of me
if aList = false then return

set colCount to (length of first item of first item of aList) + 1

set aHeader to "<!DOCTYPE html><html lang=\"ja\" ><head><meta charset=\"utf-8\"><title>First</title><style>table , td, table , tr, th{border:1px solid #333333;padding:1px;}</style></head><body><table >"
set aTable to "<tr><td>%@</td><td> </td><td>%@</td><td>%@</td><td>%@</td></tr>"
set aFooter to "</table></body></html>"

set aHTMLres to retTableHTML(aList, aHeader, aTable, aFooter) of me

set tFile to choose file name with prompt "Select Output File Name and Folder"
set fRes to writeToFileAsUTF8(aHTMLres, tFile, false) of me

on retTableHTML(aList, aHeaderHTML, aTableHTML, aFooterHTML)
  set allHTML to current application’s NSMutableString’s stringWithString:aHeaderHTML
  
  
set aCounter to 1
  
repeat with i in aList
    set j to contents of i
    
    
set aRowHTML to "<tr>"
    
repeat with ii in j
      set jj to contents of ii
      
if jj = missing value then
        set jj to " "
      else
        try
          set aURL to (current application’s |NSURL|’s URLWithString:jj)
          
if aURL is not equal to missing value then
            set jj to "<a href=\"" & jj & "\">" & jj & "</a>"
          end if
        end try
      end if
      
      
set aTmpHTML to "<td>" & jj & "</td>"
      
set aRowHTML to aRowHTML & aTmpHTML
    end repeat
    
set aRowHTML to aRowHTML & "</tr>"
    
    (
allHTML’s appendString:aRowHTML)
    
set aCounter to aCounter + 1
  end repeat
  
  (
allHTML’s appendString:aFooterHTML)
  
  
return allHTML as list of string or string
end retTableHTML

–テキストを指定デリミタでリスト化
on parseByDelim(aData, aDelim)
  set aText to current application’s NSString’s stringWithString:aData
  
set aList to aText’s componentsSeparatedByString:aDelim
  
return aList as list
end parseByDelim

on get2DListFromNumbersSelection()
  –Numbersで選択範囲を縦に区切ったリストを返す
  
tell application "Numbers"
    tell front document
      tell active sheet
        set theTable to first table whose class of selection range is range
        
        
tell theTable
          try
            set selList to value of every cell of selection range –選択範囲のデータを取得
          on error
            return "" –何も選択されてなかった場合
          end try
          
          
set selName to name of selection range –選択範囲のrange情報を取得
          
set {s1, s2} to parseByDelim(selName, ":") of me
          
          
–始点の情報を取得する
          
set s1Row to (address of row of range s1) as integer
          
set s1Column to (address of column of range s1) as integer
          
          
–終点の情報を取得する
          
set s2Row to (address of row of range s2) as integer
          
set s2Column to (address of column of range s2) as integer
          
          
–選択範囲の情報を取得する
          
set selHeight to s2Row – s1Row + 1 –高さ(Height of selection range)
          
set selWidth to s2Column – s1Column + 1 –幅(Width of selection range)
          
        end tell
      end tell
    end tell
  end tell
  
  
set aLen to length of selList
  
set aaLen to selHeight
  
  
set bList to {}
  
repeat with i from 1 to aaLen
    set aHoriList to {}
    
    
repeat with ii from 1 to selWidth
      set j1 to ii + (i – 1) * selWidth
      
set tmpCon to contents of item j1 of selList
      
      
set aClass to class of tmpCon
      
if aClass = number or aClass = integer or aClass = real then
        set tmpCon to tmpCon as integer
      end if
      
      
set the end of aHoriList to tmpCon
    end repeat
    
    
set the end of bList to aHoriList
  end repeat
  
  
return bList
  
end get2DListFromNumbersSelection

on writeToFileAsUTF8(this_data, target_file, append_data)
  tell current application
    try
      set the target_file to the target_file as text
      
set the open_target_file to open for access file target_file with write permission
      
if append_data is false then set eof of the open_target_file to 0
      
write this_data as «class utf8» to the open_target_file starting at eof
      
close access the open_target_file
      
return true
    on error error_message
      try
        close access file target_file
      end try
      
return error_message
    end try
  end tell
end writeToFileAsUTF8

★Click Here to Open This Script 

Posted in Internet list | Tagged 10.11savvy 10.12savvy 10.13savvy 10.14savvy Numbers | Leave a comment

Post navigation

  • Older posts
  • Newer posts

電子書籍(PDF)をオンラインストアで販売中!

Google Search

Popular posts

  • 開発機としてM2 Mac miniが来たのでガチレビュー
  • macOS 15, Sequoia
  • 指定のWordファイルをPDFに書き出す
  • Pages本執筆中に、2つの書類モード切り替えに気がついた
  • Numbersで選択範囲のセルの前後の空白を削除
  • メキシカンハットの描画
  • Pixelmator Pro v3.6.4でAppleScriptからの操作時の挙動に違和感が
  • AdobeがInDesign v19.4からPOSIX pathを採用
  • Safariで「プロファイル」機能を使うとAppleScriptの処理に影響
  • AppleScriptによる並列処理
  • Cocoa Scripting Course 続刊計画
  • macOS 14.xでScript Menuの実行速度が大幅に下がるバグ
  • AppleScript入門③AppleScriptを使った「自動化」とは?
  • Keynote/Pagesで選択中の表カラムの幅を均等割
  • Keynote、Pages、Numbers Ver.14.0が登場
  • デフォルトインストールされたフォント名を取得するAppleScript
  • macOS 15 リモートApple Eventsにバグ?
  • AppleScript入門① AppleScriptってなんだろう?
  • Numbersで最前面の書類のすべてのシート上の表の行数を合計
  • macOS 14で変更になったOSバージョン取得APIの返り値

Tags

10.11savvy (1101) 10.12savvy (1242) 10.13savvy (1391) 10.14savvy (587) 10.15savvy (438) 11.0savvy (283) 12.0savvy (212) 13.0savvy (194) 14.0savvy (147) 15.0savvy (129) CotEditor (66) Finder (51) iTunes (19) Keynote (116) NSAlert (61) NSArray (51) NSBitmapImageRep (20) NSBundle (20) NSButton (34) NSColor (53) NSDictionary (28) NSFileManager (23) NSFont (21) NSImage (41) NSJSONSerialization (21) NSMutableArray (63) NSMutableDictionary (22) NSPredicate (36) NSRunningApplication (56) NSScreen (30) NSScrollView (22) NSString (119) NSURL (98) NSURLRequest (23) NSUTF8StringEncoding (30) NSView (33) NSWorkspace (20) Numbers (76) Pages (55) Safari (44) Script Editor (27) WKUserContentController (21) WKUserScript (20) WKWebView (23) WKWebViewConfiguration (22)

カテゴリー

  • 2D Bin Packing
  • 3D
  • AirDrop
  • AirPlay
  • Animation
  • AppleScript Application on Xcode
  • Beginner
  • Benchmark
  • beta
  • Bluetooth
  • Books
  • boolean
  • bounds
  • Bug
  • Calendar
  • call by reference
  • check sum
  • Clipboard
  • Cocoa-AppleScript Applet
  • Code Sign
  • Color
  • Custom Class
  • date
  • dialog
  • diff
  • drive
  • Droplet
  • exif
  • file
  • File path
  • filter
  • folder
  • Font
  • Font
  • GAME
  • geolocation
  • GUI
  • GUI Scripting
  • Hex
  • History
  • How To
  • iCloud
  • Icon
  • Image
  • Input Method
  • Internet
  • iOS App
  • JavaScript
  • JSON
  • JXA
  • Keychain
  • Keychain
  • Language
  • Library
  • list
  • Locale
  • Localize
  • Machine Learning
  • Map
  • Markdown
  • Menu
  • Metadata
  • MIDI
  • MIME
  • Natural Language Processing
  • Network
  • news
  • Noification
  • Notarization
  • Number
  • Object control
  • OCR
  • OSA
  • parallel processing
  • PDF
  • Peripheral
  • PRODUCTS
  • QR Code
  • Raw AppleEvent Code
  • Record
  • rectangle
  • recursive call
  • regexp
  • Release
  • Remote Control
  • Require Control-Command-R to run
  • REST API
  • Review
  • RTF
  • Sandbox
  • Screen Saver
  • Script Libraries
  • sdef
  • search
  • Security
  • selection
  • shell script
  • Shortcuts Workflow
  • Sort
  • Sound
  • Spellchecker
  • Spotlight
  • SVG
  • System
  • Tag
  • Telephony
  • Text
  • Text to Speech
  • timezone
  • Tools
  • Update
  • URL
  • UTI
  • Web Contents Control
  • WiFi
  • XML
  • XML-RPC
  • イベント(Event)
  • 未分類

アーカイブ

  • 2025年4月
  • 2025年3月
  • 2025年2月
  • 2025年1月
  • 2024年12月
  • 2024年11月
  • 2024年10月
  • 2024年9月
  • 2024年8月
  • 2024年7月
  • 2024年6月
  • 2024年5月
  • 2024年4月
  • 2024年3月
  • 2024年2月
  • 2024年1月
  • 2023年12月
  • 2023年11月
  • 2023年10月
  • 2023年9月
  • 2023年8月
  • 2023年7月
  • 2023年6月
  • 2023年5月
  • 2023年4月
  • 2023年3月
  • 2023年2月
  • 2023年1月
  • 2022年12月
  • 2022年11月
  • 2022年10月
  • 2022年9月
  • 2022年8月
  • 2022年7月
  • 2022年6月
  • 2022年5月
  • 2022年4月
  • 2022年3月
  • 2022年2月
  • 2022年1月
  • 2021年12月
  • 2021年11月
  • 2021年10月
  • 2021年9月
  • 2021年8月
  • 2021年7月
  • 2021年6月
  • 2021年5月
  • 2021年4月
  • 2021年3月
  • 2021年2月
  • 2021年1月
  • 2020年12月
  • 2020年11月
  • 2020年10月
  • 2020年9月
  • 2020年8月
  • 2020年7月
  • 2020年6月
  • 2020年5月
  • 2020年4月
  • 2020年3月
  • 2020年2月
  • 2020年1月
  • 2019年12月
  • 2019年11月
  • 2019年10月
  • 2019年9月
  • 2019年8月
  • 2019年7月
  • 2019年6月
  • 2019年5月
  • 2019年4月
  • 2019年3月
  • 2019年2月
  • 2019年1月
  • 2018年12月
  • 2018年11月
  • 2018年10月
  • 2018年9月
  • 2018年8月
  • 2018年7月
  • 2018年6月
  • 2018年5月
  • 2018年4月
  • 2018年3月
  • 2018年2月

https://piyomarusoft.booth.pm/items/301502

メタ情報

  • ログイン
  • 投稿フィード
  • コメントフィード
  • WordPress.org

Forum Posts

  • 人気のトピック
  • 返信がないトピック

メタ情報

  • ログイン
  • 投稿フィード
  • コメントフィード
  • WordPress.org
Proudly powered by WordPress
Theme: Flint by Star Verte LLC