Menu

Skip to content
AppleScriptの穴
  • Home
  • Products
  • Books
  • Docs
  • Events
  • Forum
  • About This Blog
  • License
  • 仕事依頼

AppleScriptの穴

Useful & Practical AppleScript archive. Click '★Click Here to Open This Script' Link to download each AppleScript

カテゴリー: Image

画像の指定エリアを塗りつぶしで縦棒グラフを作成 v3

Posted on 4月 5, 2018 by Takaaki Naganoya

指定データをもとに縦棒グラフの画像をデスクトップフォルダ上に作成するAppleScriptです。

グラフの画像を作ろうとしたら、Keynote上で作成して画像書き出しするとかExcel上でグラフを作成して画像書き出しすることを考えますが、アプリケーションを利用しないでグラフ画像を作ってみました。

一応、Github上で探し回ってみるとObjective-Cで書かれたグラフ描画プログラムはいくつかあって、Xcode上のGUIアプリケーションであれば使えたりするものの、スクリプトエディタ上で実行するAppleScriptでは描画できていませんでした。

  「このぐらいだったら、自分で描けばいいんじゃね?」

と、ありもののサブルーチンを組み合わせてみたら、割とさっくりできました。実行すると0.02秒ぐらいでグラフ画像を作成します(HDD環境だともう少し時間がかかるかも)。

自前グラフ作成Scriptといえば、Adobe Illustratorのグラフ機能で作成したグラフをグループ解除しまくって自動装飾するものを昔に作った覚えがあります。

AppleScript名:画像の指定エリアを塗りつぶしで縦棒グラフを作成 v3
— Created 2017-11-19 by Takaaki Naganoya
— Modified 2018-04-01 by Takaaki Naganoya
use AppleScript version "2.5"
use scripting additions
use framework "Foundation"
use framework "AppKit"

property NSUUID : a reference to current application’s NSUUID
property NSColor : a reference to current application’s NSColor
property NSString : a reference to current application’s NSString
property NSImage : a reference to current application’s NSImage
property NSScreen : a reference to current application’s NSScreen
property NSBezierPath : a reference to current application’s NSBezierPath
property NSPNGFileType : a reference to current application’s NSPNGFileType
property NSBitmapImageRep : a reference to current application’s NSBitmapImageRep

set plotData to {20, 30, 100, 80, 150, 90}
set plotArea to {300, 200}

set innerGapL to 30
set innerGapU to 10
set innerGapR to 20
set innerGapD to 20
set barGap to 10

–パラメータから下地になる画像を作成する
set aSize to current application’s NSMakeSize(first item of plotArea, second item of plotArea)
set anImage to NSImage’s alloc()’s initWithSize:aSize

–各種パラメータの計算
copy plotArea to {plotWidth, plotHeight}
set itemNum to count every item of plotData
set barThickness to (plotWidth – (itemNum * barGap * 2)) div itemNum

–プロットデータの最大値
set anArray to current application’s NSArray’s arrayWithArray:plotData
set aYmax to (anArray’s valueForKeyPath:"@max.self")’s intValue()
set aMaxYVal to plotHeight – innerGapU – innerGapD
set aYPlotArea to plotHeight – innerGapU – innerGapD – 20
set aYUnit to aYPlotArea / aYmax

–数値データをもとに描画データを組み立てる
set drawList to {}

set startX to innerGapL
copy startX to origX

repeat with i in plotData
  set the end of drawList to current application’s NSMakeRect(startX, innerGapD, barThickness, innerGapD + (i * aYUnit))
  
set startX to startX + barThickness + barGap
end repeat

–グラフ塗りつぶし処理呼び出し
set fillColor to (NSColor’s colorWithCalibratedRed:0.1 green:0.1 blue:0.1 alpha:0.3)
set resImage to drawImageWithColorFill(anImage, drawList, fillColor) of me

–数値データ(文字)をグラフィックに記入
set fillColor2 to NSColor’s blackColor()
set resImage to drawImageWithString(resImage, drawList, fillColor2, plotData, "HiraginoSans-W1", 16.0) of me

–補助線を引く
set fillColor3 to (NSColor’s colorWithCalibratedRed:0.0 green:0.0 blue:0.0 alpha:0.8)
set aVertical to current application’s NSMakeRect(origX, innerGapD, plotWidth – innerGapL – innerGapR, 1)
set aHorizontal to current application’s NSMakeRect(origX, innerGapD, 1, plotHeight – innerGapU – innerGapD)
set draw2List to {aVertical, aHorizontal}
set resImage to drawImageWithColorFill(resImage, draw2List, fillColor3) of me

–画像のファイル出力
set imgPath to POSIX path of (path to desktop folder)
set aUUIDstr to (NSUUID’s UUID()’s UUIDString()) as string
set aPath to ((NSString’s stringWithString:imgPath)’s stringByAppendingPathComponent:aUUIDstr)’s stringByAppendingPathExtension:"png"
set fRes to saveImageRepAtPathAsPNG(resImage, aPath) of me

–NSImageに対して文字を描画する
on drawImageWithString(anImage, drawList, fillColor, dataList, aPSFontName, aFontSize)
  set retinaF to (NSScreen’s mainScreen()’s backingScaleFactor()) as real
  
–>  2.0 (Retina) / 1.0 (Non Retina)
  
  
set aDict to (current application’s NSDictionary’s dictionaryWithObjects:{current application’s NSFont’s fontWithName:aPSFontName |size|:aFontSize, fillColor} forKeys:{current application’s NSFontAttributeName, current application’s NSForegroundColorAttributeName})
  
  
anImage’s lockFocus() –描画開始
  
  
set aLen to length of drawList
  
repeat with i from 1 to aLen
    set i1 to contents of item i of drawList
    
set origX to (x of origin of i1) / retinaF
    
set origY to (y of origin of i1) / retinaF
    
set sizeX to (width of |size| of i1) / retinaF
    
set sizeY to (height of |size| of i1) / retinaF
    
    
set aString to (current application’s NSString’s stringWithString:((contents of item i of dataList) as string))
    (
aString’s drawAtPoint:(current application’s NSMakePoint(origX + (sizeX / 2), sizeY)) withAttributes:aDict)
  end repeat
  
  
anImage’s unlockFocus() –描画ここまで
  
  
return anImage –returns NSImage
end drawImageWithString

–NSImageに対して矩形を塗りつぶす
on drawImageWithColorFill(anImage, drawList, fillColor)
  set retinaF to (NSScreen’s mainScreen()’s backingScaleFactor()) as real
  
–>  2.0 (Retina) / 1.0 (Non Retina)
  
  
anImage’s lockFocus() –描画開始
  
  
repeat with i in drawList
    set origX to (x of origin of i) / retinaF
    
set origY to (y of origin of i) / retinaF
    
set sizeX to (width of |size| of i) / retinaF
    
set sizeY to (height of |size| of i) / retinaF
    
    
set theRect to {{x:origX, y:origY}, {width:sizeX, height:sizeY}}
    
    
set theNSBezierPath to NSBezierPath’s bezierPath
    (
theNSBezierPath’s appendBezierPathWithRect:theRect)
    
    
fillColor’s |set|() –色設定
    
theNSBezierPath’s fill() –ぬりつぶし
    
  end repeat
  
  
anImage’s unlockFocus() –描画ここまで
  
  
return anImage –returns NSImage
end drawImageWithColorFill

–画像を指定パスにPNG形式で保存
on saveImageRepAtPathAsPNG(anImage, outPath)
  set imageRep to anImage’s TIFFRepresentation()
  
set aRawimg to NSBitmapImageRep’s imageRepWithData:imageRep
  
  
–パスのチルダ展開処理
  
set pathString to NSString’s stringWithString:outPath
  
set newPath to pathString’s stringByExpandingTildeInPath()
  
  
set myNewImageData to (aRawimg’s representationUsingType:(NSPNGFileType) |properties|:(missing value))
  
return (myNewImageData’s writeToFile:newPath atomically:true) as boolean
end saveImageRepAtPathAsPNG

★Click Here to Open This Script 

Posted in Image | Tagged 10.11savvy 10.12savvy | Leave a comment

Finder上で選択中の画像を横方向に連結 v2

Posted on 4月 5, 2018 by Takaaki Naganoya

Finder上で選択中の画像ファイルを横方向に連結して結果をデスクトップ上に出力するAppleScriptです。

以前掲載したバージョンでは、2枚以上の画像を横に連結しない(座標値の加算ミスを行なって2枚目の座標に上書き)という問題点が見つかったので、修正しておいたものです。

画像2枚でしか試験していなかったので問題自体が見つかっていませんでした。

–> MagicKit.framework (To ~/Library/Frameworks/)

AppleScript名:Finder上で選択中の画像を横方向に連結
— Created 2017-11-21 by Takaaki Naganoya
— 2017 Piyomaru Software
use AppleScript version "2.4"
use scripting additions
use framework "Foundation"
use framework "QuartzCore"
use framework "AppKit"
use framework "MagicKit" –https://github.com/aidansteele/magickit

property |NSURL| : a reference to current application’s |NSURL|
property NSUUID : a reference to current application’s NSUUID
property NSArray : a reference to current application’s NSArray
property NSString : a reference to current application’s NSString
property NSImage : a reference to current application’s NSImage
property GEMagicKit : a reference to current application’s GEMagicKit
property NSPNGFileType : a reference to current application’s NSPNGFileType
property NSMutableArray : a reference to current application’s NSMutableArray
property NSBitmapImageRep : a reference to current application’s NSBitmapImageRep

property xGap : 10 –連結時の画像間のアキ(横方向)

tell application "Finder"
  set aSel to selection as alias list
  
if aSel = {} or aSel = "" then return
end tell

–選択した画像をArrayに入れる
set imgList to NSMutableArray’s new()
repeat with i in aSel
  set aPath to POSIX path of i
  
  
–指定ファイルのUTIを取得して、画像(public.image)があれば処理を行う
  
set aRes to (GEMagicKit’s magicForFileAtPath:aPath)
  
set utiList to (aRes’s uniformTypeHierarchy()) as list
  
if "public.image" is in utiList then
    set aNSImage to (NSImage’s alloc()’s initWithContentsOfFile:aPath)
    (
imgList’s addObject:aNSImage)
  end if
end repeat

–KVCで画像の各種情報をまとめて取得
set sizeList to (imgList’s valueForKeyPath:"size") as list –NSSize to list of record conversion
set maxHeight to ((NSArray’s arrayWithArray:sizeList)’s valueForKeyPath:"@max.height") as real
set totalWidth to ((NSArray’s arrayWithArray:sizeList)’s valueForKeyPath:"@sum.width") as real
set totalCount to ((NSArray’s arrayWithArray:sizeList)’s valueForKeyPath:"@count") as integer

–出力画像作成
set tSize to current application’s NSMakeSize((totalWidth + (xGap * totalCount)), maxHeight)
set newImage to NSImage’s alloc()’s initWithSize:tSize

–順次画像を新規画像に上書き
set xOrig to 0
repeat with i in (imgList as list)
  set j to contents of i
  
set curSize to j’s |size|()
  
set aRect to {xOrig, (maxHeight – (curSize’s height())), (curSize’s width()), (curSize’s height())}
  
set newImage to composeImage(newImage, j, aRect) of me
  
set xOrig to xOrig + (curSize’s width()) + xGap
end repeat

–デスクトップにPNG形式でNSImageをファイル保存
set aDesktopPath to current application’s NSHomeDirectory()’s stringByAppendingString:"/Desktop/"
set savePath to aDesktopPath’s stringByAppendingString:((NSUUID’s UUID()’s UUIDString())’s stringByAppendingString:".png")
set fRes to saveNSImageAtPathAsPNG(newImage, savePath) of me

–2つのNSImageを重ね合わせ合成してNSImageで返す
on composeImage(backImage, composeImage, aTargerRect)
  set newImage to NSImage’s alloc()’s initWithSize:(backImage’s |size|())
  
  
copy aTargerRect to {x1, y1, x2, y2}
  
set bRect to current application’s NSMakeRect(x1, y1, x2, y2)
  
  
newImage’s lockFocus()
  
  
set newImageRect to current application’s CGRectZero
  
set newImageRect’s |size| to (newImage’s |size|)
  
  
backImage’s drawInRect:newImageRect
  
composeImage’s drawInRect:bRect
  
  
newImage’s unlockFocus()
  
return newImage
end composeImage

–NSImageを指定パスにPNG形式で保存
on saveNSImageAtPathAsPNG(anImage, outPath)
  set imageRep to anImage’s TIFFRepresentation()
  
set aRawimg to NSBitmapImageRep’s imageRepWithData:imageRep
  
set pathString to NSString’s stringWithString:outPath
  
set newPath to pathString’s stringByExpandingTildeInPath()
  
set myNewImageData to (aRawimg’s representationUsingType:(NSPNGFileType) |properties|:(missing value))
  
set aRes to (myNewImageData’s writeToFile:newPath atomically:true) as boolean
  
return aRes –成功ならtrue、失敗ならfalseが返る
end saveNSImageAtPathAsPNG

★Click Here to Open This Script 

Posted in file Image | Tagged 10.11savvy 10.12savvy Finder | Leave a comment

アニメーションGIFをフレームごとに画像に分解する

Posted on 4月 5, 2018 by Takaaki Naganoya
AppleScript名:アニメーションGIFをフレームごとにTIFF画像に分解する
— Created 2016-11-29 by Takaaki Naganoya
— 2016 Piyomaru Software
use AppleScript version "2.4"
use scripting additions
use framework "Foundation"
use framework "AppKit"

set gifFile to POSIX path of (choose file of type "com.compuserve.gif" with prompt "Select Animation-GIF file")
set destFol to POSIX path of (choose folder with prompt "Select the folder to save gif’s frames")

set anImage to current application’s NSImage’s alloc()’s initWithContentsOfFile:gifFile
if anImage is equal to missing value then error "Illegal GIF Image"

set anImgRep to anImage’s representations()’s firstObject()
set framesNum to (anImgRep’s valueForProperty:"NSImageFrameCount") as integer

repeat with i from 0 to (framesNum – 1)
  (anImgRep’s setProperty:"NSImageCurrentFrame" withValue:i)
  
set aRep to (anImgRep’s representationUsingType:(current application’s NSTIFFFileType) |properties|:(missing value))
  (
aRep’s writeToFile:(destFol & (i as string) & ".tif") atomically:true)
end repeat

★Click Here to Open This Script 

AppleScript名:アニメーションGIFをフレームごとにPNG画像に分解する
— Created 2016-11-29 by Takaaki Naganoya
— 2016 Piyomaru Software
use AppleScript version "2.4"
use scripting additions
use framework "Foundation"
use framework "AppKit"

set gifFile to POSIX path of (choose file of type "com.compuserve.gif" with prompt "Select Animation-GIF file")
set destFol to POSIX path of (choose folder with prompt "Select the folder to save gif’s frames")

set anImage to current application’s NSImage’s alloc()’s initWithContentsOfFile:gifFile
if anImage is equal to missing value then error "Illegal GIF Image"

set anImgRep to anImage’s representations()’s firstObject()
set framesNum to (anImgRep’s valueForProperty:"NSImageFrameCount") as integer

repeat with i from 0 to (framesNum – 1)
  (anImgRep’s setProperty:"NSImageCurrentFrame" withValue:i)
  
set aRep to (anImgRep’s representationUsingType:(current application’s NSPNGFileType) |properties|:(missing value))
  (
aRep’s writeToFile:(destFol & (i as string) & ".png") atomically:true)
end repeat

★Click Here to Open This Script 

AppleScript名:アニメーションGIFをフレームごとにJPG画像に分解する
— Created 2016-11-29 by Takaaki Naganoya
— 2016 Piyomaru Software
use AppleScript version "2.4"
use scripting additions
use framework "Foundation"
use framework "AppKit"

set gifFile to POSIX path of (choose file of type "com.compuserve.gif" with prompt "Select Animation-GIF file")
set destFol to POSIX path of (choose folder with prompt "Select the folder to save gif’s frames")

set anImage to current application’s NSImage’s alloc()’s initWithContentsOfFile:gifFile
if anImage is equal to missing value then error "Illegal GIF Image"

set anImgRep to anImage’s representations()’s firstObject()
set framesNum to (anImgRep’s valueForProperty:"NSImageFrameCount") as integer

repeat with i from 0 to (framesNum – 1)
  (anImgRep’s setProperty:"NSImageCurrentFrame" withValue:i)
  
set aRep to (anImgRep’s representationUsingType:(current application’s NSJPEGFileType) |properties|:(missing value))
  (
aRep’s writeToFile:(destFol & (i as string) & ".jpg") atomically:true)
end repeat

★Click Here to Open This Script 

AppleScript名:アニメーションGIFをフレームごとにGIFF画像に分解する
— Created 2016-11-29 by Takaaki Naganoya
— 2016 Piyomaru Software
use AppleScript version "2.4"
use scripting additions
use framework "Foundation"
use framework "AppKit"

set gifFile to POSIX path of (choose file of type "com.compuserve.gif" with prompt "Select Animation-GIF file")
set destFol to POSIX path of (choose folder with prompt "Select the folder to save gif’s frames")

set anImage to current application’s NSImage’s alloc()’s initWithContentsOfFile:gifFile
if anImage is equal to missing value then error "Illegal GIF Image"

set anImgRep to anImage’s representations()’s firstObject()
set framesNum to (anImgRep’s valueForProperty:"NSImageFrameCount") as integer

repeat with i from 0 to (framesNum – 1)
  (anImgRep’s setProperty:"NSImageCurrentFrame" withValue:i)
  
set aRep to (anImgRep’s representationUsingType:(current application’s NSGIFFileType) |properties|:(missing value))
  (
aRep’s writeToFile:(destFol & (i as string) & ".gif") atomically:true)
end repeat

★Click Here to Open This Script 

Posted in file Image | Tagged 10.11savvy 10.12savvy 10.13savvy | 1 Comment

MediaInfoKitでQuickTimeムービーから詳細な情報を取得する

Posted on 4月 4, 2018 by Takaaki Naganoya

MediaInfoKit.frameworkを呼び出して、QuickTimeムービーから詳細な情報を取得するAppleScriptです。

MediaInfoKit.framework(To ~/Library/Frameworks/)

AppleScript名:MediaInfoKitでQuickTimeムービーから詳細な情報を取得する
— Created 2017-01-24 by Takaaki Naganoya
— 2017 Piyomaru Software
use AppleScript version "2.4"
use scripting additions
use framework "Foundation"
use framework "MediaInfoKit" –https://github.com/jeremyvizzini/MediaInfoKit

set aMovie to POSIX path of (choose file) –(choose file of type {"com.apple.quicktime-movie"})
set aURL to current application’s |NSURL|’s fileURLWithPath:aMovie
set aInfo to current application’s MIKMediaInfo’s alloc()’s initWithFileURL:aURL
set a1info to aInfo’s valuesOfStream:"General"

–Get Each Information
set a2info to aInfo’s valueForKey:"Complete name" ofStream:"General"
–>  (NSString) "/Users/me/Desktop/IMG_0217.MOV"

set a4Info to aInfo’s jsonText() –json形式で取得
–set a5Info to aInfo’s plistText()–plist形式で取得
–set a6Info to aInfo’s csvText()–csv形式で取得
–set a3Info to aInfo’s attributedText()–スタイルつきテキストで取得

—JSON to NSDictionary to record
set jsonData to a4Info’s dataUsingEncoding:(current application’s NSUTF8StringEncoding)
set aJsonDict to current application’s NSJSONSerialization’s JSONObjectWithData:jsonData options:0 |error|:(missing value)
set aRec to aJsonDict as record
–Movie file
–>  {​​​​​General:{​​​​​​​Encoded date:"UTC 2017-01-24 04:03:48", ​​​​​​​Format profile:"QuickTime", ​​​​​​​Overall bit rate mode:"Variable", ​​​​​​​Tagged date:"UTC 2017-01-24 04:04:40", ​​​​​​​Codec ID:"qt 0000.00 (qt )", ​​​​​​​com.apple.quicktime.software:"10.2", ​​​​​​​Format:"MPEG-4", ​​​​​​​Complete name:"/Users/me/Desktop/IMG_0219.MOV", ​​​​​​​Duration:"52 s 53 ms", ​​​​​​​File size:"50.8 MiB", ​​​​​​​Writing library:"Apple QuickTime", ​​​​​​​Overall bit rate:"8 191 kb/s", ​​​​​​​com.apple.quicktime.make:"Apple", ​​​​​​​com.apple.quicktime.model:"iPhone 7", ​​​​​​​com.apple.quicktime.creationdate:"2017-01-24T13:03:47+0900", ​​​​​​​com.apple.quicktime.location.ISO6709:"+35.xxxx+139.xxxx+043.xxx/"​​​​​}, ​​​​​Video:{​​​​​​​Minimum frame rate:"28.571 FPS", ​​​​​​​Display aspect ratio:"16:9", ​​​​​​​Bit depth:"8 bits", ​​​​​​​Scan type:"Progressive", ​​​​​​​Title:"Core Media Video", ​​​​​​​Chroma subsampling:"4:2:0", ​​​​​​​Color range:"Limited", ​​​​​​​Format/Info:"Advanced Video Codec", ​​​​​​​Frame rate:"29.970 (29970/1000) FPS", ​​​​​​​Bits/(Pixel*Frame):"0.292", ​​​​​​​Frame rate mode:"Variable", ​​​​​​​Format:"AVC", ​​​​​​​Matrix coefficients:"BT.709", ​​​​​​​Encoded date:"UTC 2017-01-24 04:03:48", ​​​​​​​Rotation:"90°", ​​​​​​​Height:"720 pixels", ​​​​​​​Color space:"YUV", ​​​​​​​Transfer characteristics:"BT.709", ​​​​​​​Duration:"52 s 53 ms", ​​​​​​​Bit rate:"8 079 kb/s", ​​​​​​​Codec ID:"avc1", ​​​​​​​ID:"1", ​​​​​​​Width:"1 280 pixels", ​​​​​​​Tagged date:"UTC 2017-01-24 04:04:40", ​​​​​​​Format profile:"High@L3.1", ​​​​​​​Color primaries:"BT.709", ​​​​​​​Maximum frame rate:"30.000 FPS", ​​​​​​​Stream size:"50.1 MiB (99%)", ​​​​​​​Codec ID/Info:"Advanced Video Coding", ​​​​​​​Format settings:"CABAC,Yes"​​​​​}, ​​​​​Audio:{​​​​​​​Other:"1", ​​​​​​​Title:"Core Media Audio", ​​​​​​​Channel(s):"1 channel", ​​​​​​​Format/Info:"Advanced Audio Codec", ​​​​​​​Frame rate:"43.066 FPS (1024 spf)", ​​​​​​​Sampling rate:"44.1 kHz", ​​​​​​​Source duration:"52 s 106 ms", ​​​​​​​Format:"AAC", ​​​​​​​Compression mode:"Lossy", ​​​​​​​Encoded date:"UTC 2017-01-24 04:03:48", ​​​​​​​Channel positions:"Front: C", ​​​​​​​Type:"meta", ​​​​​​​Duration:"52 s 53 ms", ​​​​​​​Bit rate mode:"Variable", ​​​​​​​Source stream size:"568 KiB (1%)", ​​​​​​​Bit rate:"89.3 kb/s", ​​​​​​​Codec ID:"40", ​​​​​​​ID:"2", ​​​​​​​Tagged date:"UTC 2017-01-24 04:04:40", ​​​​​​​Format profile:"LC", ​​​​​​​Stream size:"568 KiB (1%)"​​​​​}​​​}

–Image file
–>  {​​​​​General:{​​​​​​​Format/Info:"Portable Network Graphic", ​​​​​​​Complete name:"/Users/me/Desktop/スクリーンショット 2.png", ​​​​​​​File size:"33.3 KiB", ​​​​​​​Format:"PNG"​​​​​}, ​​​​​Image:{​​​​​​​Height:"319 pixels", ​​​​​​​Format:"PNG", ​​​​​​​Bit depth:"32 bits", ​​​​​​​Format/Info:"Portable Network Graphic", ​​​​​​​Width:"352 pixels", ​​​​​​​Compression mode:"Lossless", ​​​​​​​Stream size:"33.3 KiB (100%)"​​​​​}​​​}

★Click Here to Open This Script 

Posted in Image | Tagged 10.11savvy 10.12savvy 10.13savvy | Leave a comment

ffmpegでムービーの静止画書き出し

Posted on 4月 4, 2018 by Takaaki Naganoya

QuickTimeムービーから指定ポイント(先頭からの再生秒)のフレームを静止画(PNG)に書き出すAppleScriptです。

ffmpegをバンドル内に格納して、それを呼び出すようにしています。ffmpegでフレーム抽出処理を行うと、QuickTime Playerに比べて処理時間がかかるようです。

ffmpegLib

AppleScript名:ffmpegでムービーの静止画書き出し
— Created 2017-03-13 by Takaaki Naganoya
— 2017 Piyomaru Software
use AppleScript version "2.4"
use scripting additions
use framework "Foundation"
use framework "AVFoundation"

–Caution: Don’t run on ASObjc Explorer 4
property NSUUID : a reference to current application’s NSUUID
property AVAsset : a reference to current application’s AVAsset
property AVAssetImageGenerator : a reference to current application’s AVAssetImageGenerator
property |NSURL| : a reference to current application’s |NSURL|

set targTime to 320 –target duration (seconds)

set inPath to choose file of type {"public.mpeg-4", "public.movie"}
set outPathPosix to getImageFromMovie(inPath, targTime) of me

on getImageFromMovie(inPath, outTime)
  –https://yuichon.com/2016/02/ffmpeg-install/
  
–https://www.npmjs.com/package/ffmpeg-static
  
set ffmpegPath to POSIX path of (path to me) & "Contents/Resources/ffmpeg" –ffmpeg-static
  
  
–Adjust the pickup frame duration of the target
  
set aDuration to getMovieDurationInSeconds(inPath) of me
  
if outTime > aDuration then
    set outTime to aDuration
  end if
  
  
–Generate Out File Path
  
set outPath to POSIX path of (path to desktop)
  
set aUUID to NSUUID’s UUID()’s UUIDString() as string
  
set outFullPath to (outPath & aUUID & ".png")
  
set sText to ffmpegPath & space & "-i" & space & (quoted form of POSIX path of inPath) & space & "-ss " & (outTime as string) & space & "-vframes 1" & space & quoted form of outFullPath
  
  
do shell script sText
  
  
return outFullPath
end getImageFromMovie

–指定ムービーの再生時間を秒で取得する
on getMovieDurationInSeconds(aMoviePathAlias)
  set aPOSIX to POSIX path of aMoviePathAlias
  
set aURL to |NSURL|’s fileURLWithPath:aPOSIX
  
set anAsset to AVAsset’s assetWithURL:aURL
  
set imageGenerator to AVAssetImageGenerator’s alloc()’s initWithAsset:anAsset
  
set durTimes to current application’s CMTimeGetSeconds(anAsset’s duration())
  
return durTimes
end getMovieDurationInSeconds

★Click Here to Open This Script 

Posted in Image | Tagged 10.11savvy 10.12savvy 10.13savvy | Leave a comment

実行中のコンピュータのアイコン画像を取得してデスクトップにPNG形式で保存

Posted on 4月 4, 2018 by Takaaki Naganoya
AppleScript名:実行中のコンピュータのアイコン画像を取得してデスクトップにPNG形式で保存
— Created 2016-02-09 by Takaaki Naganoya
— 2016 Piyomaru Software
use AppleScript version "2.4"
use scripting additions
use framework "Foundation"
use framework "AppKit"

–Get Computer Icon
set anImage to current application’s NSImage’s imageNamed:(current application’s NSImageNameComputer)

set aDesktopPath to (current application’s NSProcessInfo’s processInfo()’s environment()’s objectForKey:("HOME"))’s stringByAppendingString:"/Desktop/"
set savePath to aDesktopPath’s stringByAppendingString:((current application’s NSUUID’s UUID()’s UUIDString())’s stringByAppendingString:".png")

set fRes to saveNSImageAtPathAsPNG(anImage, savePath) of me

–NSImageを指定パスにPNG形式で保存
on saveNSImageAtPathAsPNG(anImage, outPath)
  set imageRep to anImage’s TIFFRepresentation()
  
set aRawimg to current application’s NSBitmapImageRep’s imageRepWithData:imageRep
  
set pathString to current application’s NSString’s stringWithString:outPath
  
set newPath to pathString’s stringByExpandingTildeInPath()
  
set myNewImageData to (aRawimg’s representationUsingType:(current application’s NSPNGFileType) |properties|:(missing value))
  
set aRes to (myNewImageData’s writeToFile:newPath atomically:true) as boolean
  
return aRes –成功ならtrue、失敗ならfalseが返る
end saveNSImageAtPathAsPNG

★Click Here to Open This Script 

Posted in Image System | Tagged 10.11savvy 10.12savvy 10.13savvy | Leave a comment

選択中のEvernoteのNoteに添付されているattachmentのファイルをデスクトップに書き出す

Posted on 4月 1, 2018 by Takaaki Naganoya

Evernoteの選択中のNoteに添付されているattachmentファイル(おそらく画像)をデスクトップに書き出すAppleScriptです。

# Evernoteはバージョン10でAppleScriptサポートが削除されてしまったので、本Scriptはバージョン10以降のEvernoteでは動作しません

書き出す添付ファイルのファイル名はAppleScript経由でオリジナルのものを求めていますが、オリジナルのファイル名に「missing value」を返してくるものもあるので、その場合にはUUIDを割り振っています。

また、MIME TYPEを調査しててきとーに割り振っていますが、すべてのパターンに対処するものではありません。

正直なところ、Evernoteはあまりできのよくないアプリケーションです。同様の機能を提供するアプリケーションやサービスに、もっと出来のいいものがたくさんあります。調子に乗ってAppleScriptから大量のNoteを自動作成すると、デバイス間のデータのシンクロが大量に発生してデータ転送量が増え、利用料金が増えていきます。

# 自分は、MacJournalやmacOS標準装備のメモ(Notes.app)をよく使っています

AppleScript対応機能も動くんだか動かないんだかよくわからないものが多く、挙げ句の果てには間違った命令を実行するとアプリケーションまるごとクラッシュしたりします。

AppleScriptからEvernoteをコントロールしようとすると、

(1)AppleScript用語辞書の範囲内で操作
(2)GUI Scirptingを用いてGUI操作
(3)REST API経由で操作

の3つの方法があるでしょう。Evernoteの(1)の出来がよくないので、(3)について少々調べておくぐらいでしょうか。ただ、調査に無限に時間がかかりそうなので、結局(2)に落ち着きそうな、、、、

AppleScript名:選択中のNoteに添付されているattachmentのファイルをデスクトップに書き出す
set dtPath to (path to desktop folder) as string

tell application "Evernote"
  set aSel to selection
  
if aSel = {} then return
  
  
set aaSel to first item of aSel
  
  
tell aaSel
    set aList to every attachment
    
repeat with i in aList
      set aFN to (filename of i)
      
      
if aFN = missing value then
        –ファイル名が添付画像ファイルについていなかった場合の対策
        
set aFN to (do shell script "uuidgen") & retExtFromEvernoteMIME(mime of i) of me
      end if
      
      
set tmpPath to dtPath & aFN
      
      
try
        write i to file tmpPath
      on error erM
        log erM
      end try
    end repeat
  end tell
  
end tell

–EvernoteのNoteに添付した画像のMIME TYPEから拡張子を判定する(とりあえず版)
on retExtFromEvernoteMIME(aMime)
  if aMime = "image/jpeg" then
    return ".jpg"
  else if aMime = "image/png" then
    return ".png"
  else if aMime = "application/pdf" then
    return ".pdf"
  else
    return ".dat"
  end if
end retExtFromEvernoteMIME

★Click Here to Open This Script 

Posted in file Image | Tagged 10.11savvy 10.12savvy 10.13savvy Evernote | Leave a comment

Microsoft Azure Computer Vision API Version 1.0で画像認識(analyze) v2

Posted on 3月 27, 2018 by Takaaki Naganoya

Microsoft AzureのComputer Vision API Version 1.0(analyze)を呼び出して、画像認識するAppleScriptです。

Microsoft Azureで無料アカウントを取得して「Computer Vision API」を使用する設定にするとAPI Keyが開示されるので、Keyを本Script末尾のハンドラにコピー&ペーストで記入してください。

再掲載時に動作確認してみたら、REST APIのEndpointのURLがMicrosoft Projext OxfordからMicrosoft Azureのものに変更になっていたので、書き換えました。そのぐらいです。

あいかわらず、惚れ惚れするぐらい見事に画像認識してくれて驚かされます。これでWebサイトがわかりやすかったら最高なのに、、、、(ーー;; 

ちなみに、水着の女性の認識率がぶっちぎりで高く、その一方で子供の認識率が低いという趣味に走りまくった特徴があります。学習モデルの偏りがすごくて好感が持てます。顔認識、人物認識はWASP向けに最適化されていて、黄色人種などの有色人種の認識でえっらく苦労していますね。コンピュータには影の部分なので黒いのか、それとも髪が黒くてその部分が黒いのかはわかりません。とくに、われわれ「平たい顔」族の顔認識と、肌が黒い方々の顔認識が大変なようです。物量で乗り切るか、写真撮影の方法に一手間加えるしかありません。


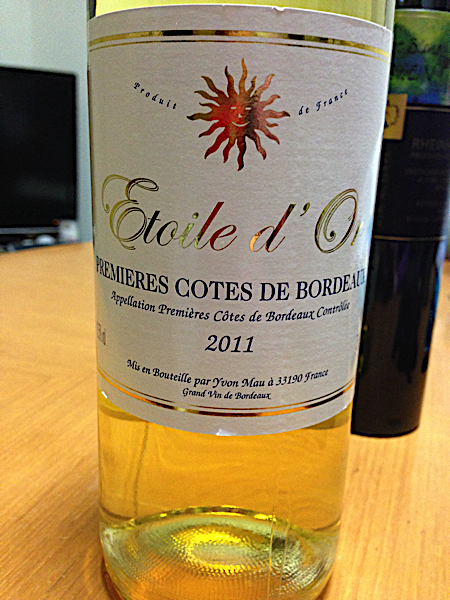
–> {{metadata:{width:450, |format|:”Png”, height:600}, categories:{{|name|:”drink_”, score:0.6875}}, |description|:{tags:{“bottle”, “table”, “indoor”, “wine”, “sitting”, “food”, “glass”, “cup”, “beer”, “top”, “banana”, “wooden”, “computer”, “sandwich”, “counter”, “phone”, “desk”, “refrigerator”, “laying”, “pizza”, “kitchen”, “plate”, “white”}, captions:{{|text|:”a bottle of wine and a glass of beer on a table”, confidence:0.669977619305}}}, requestId:”fa209b50-f693-428b-9502-bb04ae18a612″}}


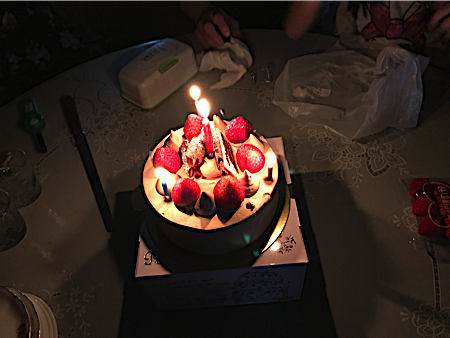
–> {{metadata:{width:450, |format|:”Png”, height:338}, categories:{{|name|:”others_”, score:0.00390625}, {|name|:”people_”, score:0.40625}}, |description|:{tags:{“cake”, “table”, “indoor”, “thing”, “birthday”, “object”, “food”, “sitting”, “lit”, “chocolate”, “plate”, “decorated”, “top”, “woman”, “covered”, “bowl”, “man”, “holding”, “people”, “standing”}, captions:{{|text|:”a person sitting at a table with a birthday cake with lit candles”, confidence:0.767489416177}}}, requestId:”f8a27ffe-7a0c-44ef-b4d3-403b539f7202″}}


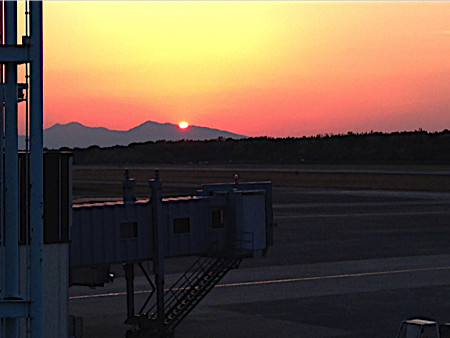
–> {{metadata:{width:450, |format|:”Png”, height:338}, categories:{{|name|:”outdoor_”, score:0.0078125, detail:{landmarks:{}}}, {|name|:”outdoor_waterside”, score:0.2890625, detail:{landmarks:{}}}}, |description|:{tags:{“outdoor”, “sunset”, “building”, “plane”, “airplane”, “runway”, “sitting”, “large”, “track”, “front”, “sun”, “orange”, “cloudy”, “top”, “road”, “train”, “light”, “standing”, “city”, “riding”, “jet”, “red”, “bridge”, “tower”, “man”, “water”, “flying”, “white”, “night”, “parked”, “tarmac”, “blue”, “traffic”, “air”}, captions:{{|text|:”a sunset over a city”, confidence:0.920834312504}}}, requestId:”dce04975-c95a-4d70-9f9d-661ffda12de8″}}


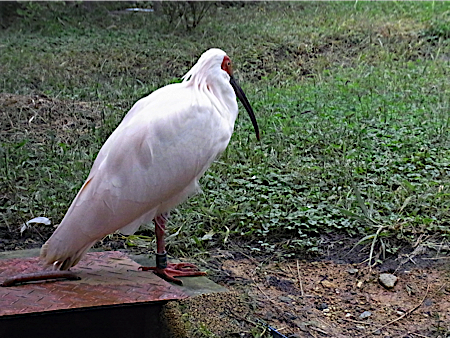
–> {{metadata:{width:450, |format|:”Png”, height:338}, categories:{{|name|:”animal_horse”, score:0.984375}}, |description|:{tags:{“grass”, “outdoor”, “animal”, “bird”, “standing”, “field”, “water”, “white”, “walking”, “small”, “food”, “brown”, “sitting”, “large”, “green”, “grassy”, “parrot”, “river”}, captions:{{|text|:”a bird that is standing in the grass”, confidence:0.958508972922}}}, requestId:”4372eca0-ce0a-484a-ada9-4c49e5490f00″}}


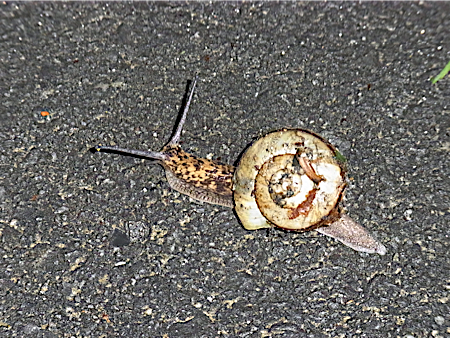
–> {{metadata:{width:450, |format|:”Png”, height:338}, categories:{{|name|:”abstract_net”, score:0.18359375}, {|name|:”abstract_texture”, score:0.53515625}, {|name|:”others_”, score:0.00390625}}, |description|:{tags:{“animal”, “outdoor”, “shellfish”, “snail”, “food”, “bird”, “piece”, “sitting”, “street”, “laying”, “top”, “beach”, “fruit”, “standing”, “slug”, “plate”, “board”, “white”}, captions:{{|text|:”a snail on the ground”, confidence:0.889422773135}}}, requestId:”7edb1788-2887-45d9-bb48-68f78f72ee2c”}}


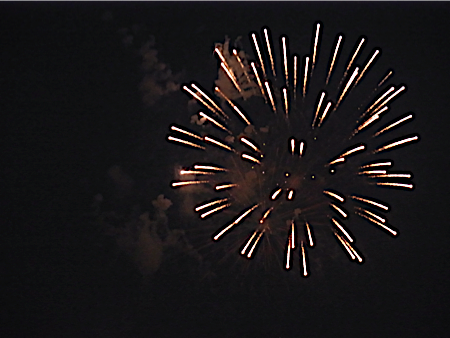
–> {{metadata:{width:450, |format|:”Png”, height:338}, categories:{{|name|:”dark_fireworks”, score:0.99609375}}, |description|:{tags:{“object”, “fireworks”}, captions:{{|text|:”fireworks in the sky”, confidence:0.542768984765}}}, requestId:”0a2d5b92-27ff-4ac4-a431-14ca2f0454c3″}}


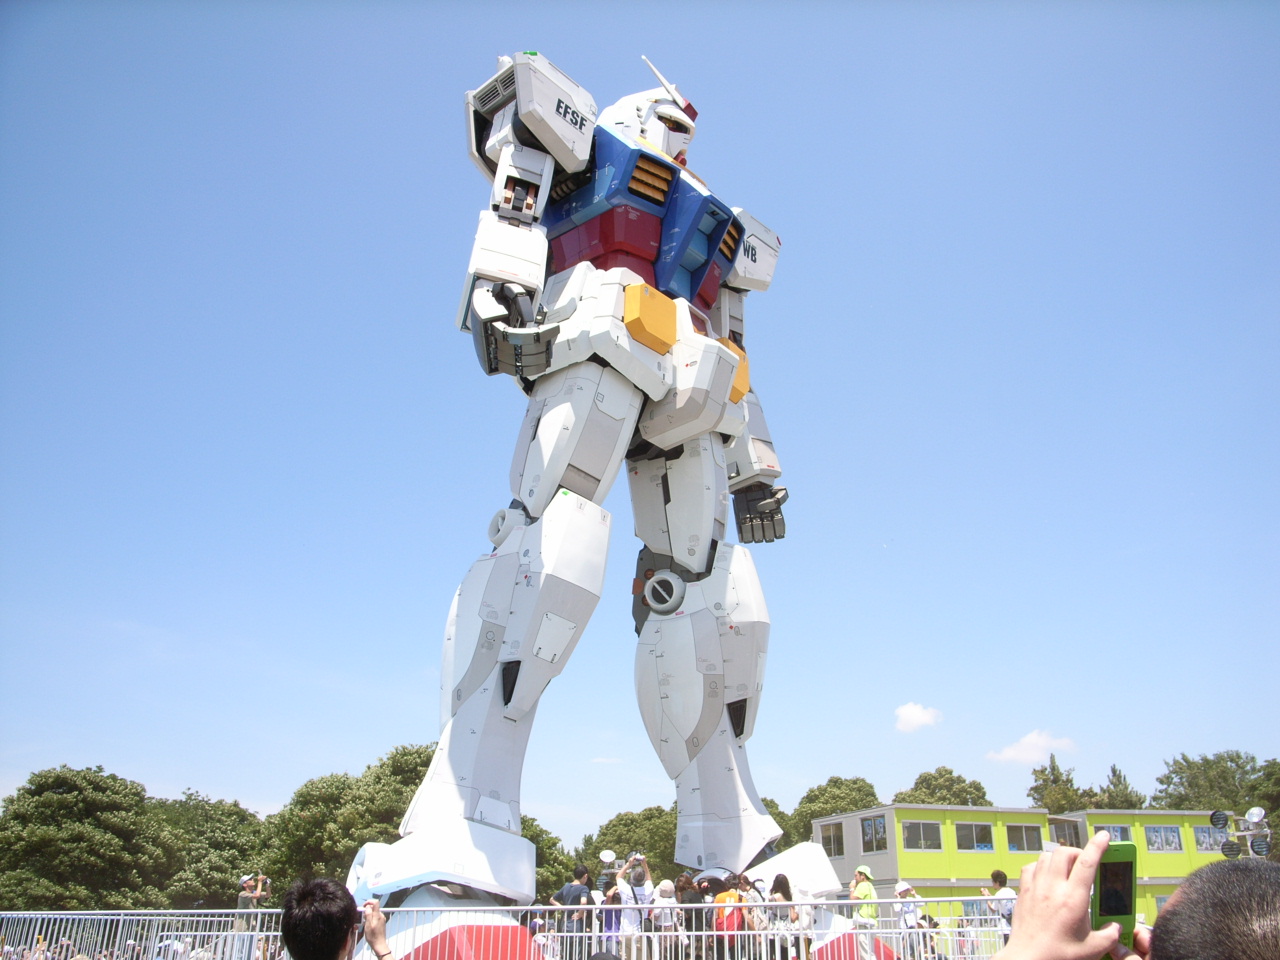
–> {{metadata:{width:1280, |format|:”Jpeg”, height:960}, categories:{{|name|:”others_”, score:0.00390625}, {|name|:”outdoor_”, score:0.01171875, detail:{landmarks:{}}}}, |description|:{tags:{“outdoor”, “person”, “toy”, “thing”, “man”, “white”, “grass”, “standing”, “people”, “field”, “riding”, “jumping”, “doing”, “air”, “holding”, “group”, “trick”, “board”, “statue”, “dog”, “player”, “ramp”}, captions:{{|text|:”a statue of a man”, confidence:0.666301928732}}}, requestId:”45a3a778-c4d5-4b9e-9a0f-480345197fc6″}}

AppleScript名:Microsoft Asure Analyze Image APIで画像認識(analyze) v2
— Created 2017-05-03 by Takaaki Naganoya
— 2017 Piyomaru Software
use AppleScript version "2.4"
use scripting additions
use framework "Foundation"

property |NSURL| : a reference to current application’s |NSURL|
property NSData : a reference to current application’s NSData
property NSString : a reference to current application’s NSString
property NSMutableData : a reference to current application’s NSMutableData
property NSURLQueryItem : a reference to current application’s NSURLQueryItem
property NSURLConnection : a reference to current application’s NSURLConnection
property NSJSONSerialization : a reference to current application’s NSJSONSerialization
property NSURLComponents : a reference to current application’s NSURLComponents
property NSMutableDictionary : a reference to current application’s NSMutableDictionary
property NSMutableURLRequest : a reference to current application’s NSMutableURLRequest
property NSUTF8StringEncoding : a reference to current application’s NSUTF8StringEncoding
property NSURLRequestReloadIgnoringLocalCacheData : a reference to current application’s NSURLRequestReloadIgnoringLocalCacheData

set imgFilePath to POSIX path of (choose file of type {"public.image"} with prompt "Select an Image to Analyze")
set aRes to recogImage(imgFilePath) of me
–>  {{metadata:{width:3264, |format|:"Jpeg", height:2448}, categories:{{|name|:"abstract_", score:0.01171875}, {|name|:"abstract_shape", score:0.4609375}, {|name|:"others_", score:0.0078125}, {|name|:"outdoor_", score:0.046875, detail:{landmarks:{{|name|:"Tokyo Skytree", confidence:0.999957323074}}}}}, |description|:{tags:{"outdoor", "building", "bridge", "large", "water", "top", "tower", "blue", "tall", "riding", "city", "standing", "snow", "train", "man", "clock", "air", "sign", "white", "skiing", "street", "boat", "flying", "group", "people"}, captions:{{|text|:"a close up of Tokyo Skytree", confidence:0.90930354838}}}, requestId:"72909fd5-c0be-47dd-81ce-d626873fcbfe"}}

on recogImage(imgFilePath)
  set reqURLStr to "https://westcentralus.api.cognitive.microsoft.com/vision/v1.0/analyze" –Microsoft Azure (New)
  
–set reqURLStr to "https://api.projectoxford.ai/vision/v1.0/analyze" –Microsoft Project Oxford (OLD)
  
set myAPIkey to retAPIkey() of me –API Key 1
  
  
set aRec to {visualFeatures:"Description", details:"Celebrities", |language|:"en"} –age, gender, headPose, smile, facialHair, glasses
  
set bURL to retURLwithParams(reqURLStr, aRec) of me
  
  
set aRes to callRestPOSTAPIAndParseResultsWithImage(bURL, imgFilePath, myAPIkey) of me
  
set aRESTres to json of aRes
  
set aRESCode to responseCode of aRes
  
set aRESHeader to responseHeader of aRes
  
  
return (aRESTres as list)
end recogImage

–POST methodのREST APIを画像をアップロードしつつ呼ぶ
on callRestPOSTAPIAndParseResultsWithImage(aURL, imgFilePath, anAPIkey)
  –Get Image Contents from file
  
set imgPathStr to NSString’s stringWithString:imgFilePath
  
set imgData to NSData’s dataWithContentsOfFile:imgPathStr
  
set postBody to NSMutableData’s |data|()
  
postBody’s appendData:imgData
  
  
–Request
  
set aRequest to NSMutableURLRequest’s requestWithURL:(|NSURL|’s URLWithString:aURL)
  
aRequest’s setHTTPMethod:"POST"
  
aRequest’s setCachePolicy:(NSURLRequestReloadIgnoringLocalCacheData)
  
aRequest’s setHTTPShouldHandleCookies:false
  
aRequest’s setTimeoutInterval:60
  
aRequest’s setHTTPBody:postBody
  
aRequest’s setValue:"application/octet-stream" forHTTPHeaderField:"Content-Type"
  
aRequest’s setValue:anAPIkey forHTTPHeaderField:"Ocp-Apim-Subscription-Key"
  
  
–CALL REST API
  
set aRes to NSURLConnection’s sendSynchronousRequest:aRequest returningResponse:(reference) |error|:(missing value)
  
  
–Parse Results
  
set resList to aRes as list
  
  
set bRes to contents of (first item of resList)
  
set resStr to NSString’s alloc()’s initWithData:bRes encoding:(NSUTF8StringEncoding)
  
  
set jsonString to NSString’s stringWithString:resStr
  
set jsonData to jsonString’s dataUsingEncoding:(NSUTF8StringEncoding)
  
set aJsonDict to NSJSONSerialization’s JSONObjectWithData:jsonData options:0 |error|:(missing value)
  
  
–Get Response Code
  
set dRes to contents of second item of resList
  
if dRes = missing value then
    set resCode to -1
    
set resHeaders to {}
  else
    set resCode to (dRes’s statusCode()) as integer
    
–Get Response Header
    
set resHeaders to (dRes’s allHeaderFields()) as record
  end if
  
  
return {json:aJsonDict, responseCode:resCode, responseHeader:resHeaders}
  
end callRestPOSTAPIAndParseResultsWithImage

on retURLwithParams(aBaseURL, aRec)
  set aDic to NSMutableDictionary’s dictionaryWithDictionary:aRec
  
  
set aKeyList to (aDic’s allKeys()) as list
  
set aValList to (aDic’s allValues()) as list
  
set aLen to length of aKeyList
  
  
set qList to {}
  
repeat with i from 1 to aLen
    set aName to contents of item i of aKeyList
    
set aVal to contents of item i of aValList
    
set the end of qList to (NSURLQueryItem’s queryItemWithName:aName value:aVal)
  end repeat
  
  
set aComp to NSURLComponents’s alloc()’s initWithString:aBaseURL
  
aComp’s setQueryItems:qList
  
set aURL to (aComp’s |URL|()’s absoluteString()) –as text
  
  
return aURL
end retURLwithParams

on retAPIkey()
  return "xxXXXxXXxxXxXXXXxXXxXxXXXXxXxxXX" –API Primary Key
end retAPIkey

★Click Here to Open This Script 

Posted in Image JSON Network REST API | Tagged 10.11savvy 10.12savvy 10.13savvy | 1 Comment

画面キャプチャから指定アプリケーションの表示エリアを切り抜いてファイル書き出し v2

Posted on 3月 2, 2018 by Takaaki Naganoya

指定アプリケーションのメインウィンドウのサイズとポジションを取得し、画面キャプチャから該当エリアを切り抜いてPNG画像に書き出すAppleScriptです。

Mac Blue-ray Playerの再生中のポジションを取得しようとして、AppleScript用語辞書の中身を確認したところ、そのような属性値は存在していません。

そこで、GUI Scripting経由でウィンドウ上のUser Interfaceを確認してみたところ、

といったように、現在の再生ポジションを取得できるような部品にアクセスすることはできませんでした。

ここまで試してダメということは、さすがにAppleScriptでも画面上からまっとうな方法で文字情報を拾うことはできません。

そこで試してみたのがコレです。GUI Scripting経由でメインウィンドウの大きさと位置は取得できます。画面のスクリーンキャプチャから当該エリアのみ切り抜くことも可能です。

そして、現在再生位置を示す文字情報(おそらく画像としてレンダリングして表示)のエリアはウィンドウ位置とサイズから計算で求められます。

これらの文字を、たとえばMicrosoftのCognitive APIなどを呼び出してOCR処理を行うか、あるいは画素数がきわめて少ない情報であるためAppleScript単独で画像解析して0〜9の数字との類似度を計算して擬似的に文字認識を行うといったことは可能でしょう。

いまひとつ、そうした試行錯誤を行う時間がないため、「とりあえず」の場所で止めておきますが、、、、できそうといえばできそうな感じが、、、するようなしないような。

AppleScript名:画面キャプチャから指定アプリケーションの表示エリアを切り抜いてファイル書き出し v2
— Created 2015-12-22 by Takaaki Naganoya
— Modified 2018-03-02 by Takaaki Naganoya
— 2018 Piyomaru Software
use AppleScript version "2.4"
use scripting additions
use framework "Foundation"
use framework "Quartz"
use framework "AppKit"
use framework "ApplicationServices"

property |NSURL| : a reference to current application’s |NSURL|
property NSUUID : a reference to current application’s NSUUID
property NSString : a reference to current application’s NSString
property NSImage : a reference to current application’s NSImage
property NSPNGFileType : a reference to current application’s NSPNGFileType
property NSBitmapImageRep : a reference to current application’s NSBitmapImageRep

tell application "Blu-ray Player" to activate
tell application "System Events"
  tell application process "Mac Blu-ray Player"
    tell window 1
      set {xSize, ySize} to size
      
set {xPos, yPos} to position
    end tell
  end tell
end tell

do shell script "/usr/sbin/screencapture -c -x"
set aImage to current application’s NSImage’s alloc()’s initWithPasteboard:(current application’s NSPasteboard’s generalPasteboard())

set cropedImage to my cropNSImageBy:{xPos, yPos, xSize, ySize} fromImage:aImage

set aPath to POSIX path of (path to desktop)
set fRes to retUUIDfilePathFromDir(aPath, "png") of me
set sRes to saveNSImageAtPathAsPNG(cropedImage, fRes) of me

on cropNSImageTo:{x1, y1, x2, y2} fromImage:theImage
  set newWidth to x2 – x1
  
set newHeight to y2 – y1
  
set theSize to (theImage’s |size|()) as record
  
set oldHeight to height of theSize
  
  — transpose y value for Cocoa coordintates
  
set y1 to oldHeight – newHeight – y1
  
set newRect to {{x:x1, y:y1}, {width:newWidth, height:newHeight}}
  
theImage’s lockFocus()
  
set theRep to NSBitmapImageRep’s alloc()’s initWithFocusedViewRect:newRect
  
theImage’s unlockFocus()
  
  set outImage to NSImage’s alloc()’s initWithSize:(theRep’s |size|())
  
outImage’s addRepresentation:theRep
  
  return outImage
end cropNSImageTo:fromImage:

–NSImageを指定の大きさでトリミング
on cropNSImageBy:{x1, y1, newWidth, newHeight} fromImage:theImage
  set theSize to (theImage’s |size|()) as record
  
set oldHeight to height of theSize
  
  — transpose y value for Cocoa coordintates
  
set y1 to oldHeight – newHeight – y1
  
set newRect to {{x:x1, y:y1}, {width:newWidth, height:newHeight}}
  
theImage’s lockFocus()
  
set theRep to NSBitmapImageRep’s alloc()’s initWithFocusedViewRect:newRect
  
theImage’s unlockFocus()
  
  set outImage to NSImage’s alloc()’s initWithSize:(theRep’s |size|())
  
outImage’s addRepresentation:theRep
  
  return outImage
end cropNSImageBy:fromImage:

on retUUIDfilePathFromDir(aPath, aEXT)
  set aUUIDstr to (NSUUID’s UUID()’s UUIDString()) as string
  
set aPath to ((NSString’s stringWithString:aPath)’s stringByAppendingPathComponent:aUUIDstr)’s stringByAppendingPathExtension:aEXT
  
return aPath
end retUUIDfilePathFromDir

–NSImageを指定パスにPNG形式で保存
on saveNSImageAtPathAsPNG(anImage, outPath)
  set imageRep to anImage’s TIFFRepresentation()
  
set aRawimg to NSBitmapImageRep’s imageRepWithData:imageRep
  
set pathString to NSString’s stringWithString:outPath
  
set newPath to pathString’s stringByExpandingTildeInPath()
  
set myNewImageData to (aRawimg’s representationUsingType:(NSPNGFileType) |properties|:(missing value))
  
set aRes to (myNewImageData’s writeToFile:newPath atomically:true) as boolean
  
return aRes –true/false
end saveNSImageAtPathAsPNG

★Click Here to Open This Script 

Posted in file Image | Tagged 10.11savvy 10.12savvy 10.13savvy Mac Blu-ray Player | Leave a comment

連番JPEGファイルを読み込んで連結したPDFを作成(新規作成)

Posted on 2月 24, 2018 by Takaaki Naganoya
AppleScript名:連番JPEGファイルを読み込んで連結したPDFを作成(新規作成)
— Created 2016-09-20 by Takaaki Naganoya
— 2016 Piyomaru Software
use AppleScript version "2.4"
use scripting additions
use framework "Foundation"
use framework "QuartzCore"
use framework "Quartz"
use framework "AppKit"

set aExt to ".jpg"
set aFol to choose folder
set fList to getFilePathList(aFol, aExt) of me
set f2List to my sort1DList:fList ascOrder:true –sort by ascending

set newFile to POSIX path of (choose file name with prompt "新規PDFファイルの名称を選択")
set newFilePath to current application’s NSString’s stringWithString:newFile

–Make Blank PDF
set aPDFdoc to current application’s PDFDocument’s alloc()’s init()

set pageNum to 0

repeat with i in f2List
  set j to contents of i
  
set aURL to (current application’s |NSURL|’s fileURLWithPath:j)
  
set bImg to (current application’s NSImage’s alloc()’s initWithContentsOfURL:aURL)
  (
aPDFdoc’s insertPage:(current application’s PDFPage’s alloc()’s initWithImage:bImg) atIndex:pageNum)
  
set pageNum to pageNum + 1
end repeat

aPDFdoc’s writeToFile:newFilePath

–ASOCで指定フォルダのファイルパス一覧取得(拡張子指定つき)
on getFilePathList(aFol, aExt)
  set aPath to current application’s NSString’s stringWithString:(POSIX path of aFol)
  
set aFM to current application’s NSFileManager’s defaultManager()
  
set nameList to (aFM’s contentsOfDirectoryAtPath:aPath |error|:(missing value)) as list
  
set anArray to current application’s NSMutableArray’s alloc()’s init()
  
  
repeat with i in nameList
    set j to i as text
    
if (j ends with aExt) and (j does not start with ".") then –exclude invisible files
      set newPath to (aPath’s stringByAppendingString:j)
      (
anArray’s addObject:newPath)
    end if
  end repeat
  
  
return anArray as list
end getFilePathList

–1D List(文字)をsort / ascOrderがtrueだと昇順ソート、falseだと降順ソート
on sort1DList:theList ascOrder:aBool
  set aDdesc to current application’s NSSortDescriptor’s sortDescriptorWithKey:"self" ascending:aBool selector:"localizedCaseInsensitiveCompare:"
  
set theArray to current application’s NSArray’s arrayWithArray:theList
  
return (theArray’s sortedArrayUsingDescriptors:{aDdesc}) as list
end sort1DList:ascOrder:

★Click Here to Open This Script 

Posted in Image PDF | Tagged 10.11savvy 10.12savvy 10.13savvy | Leave a comment

連番JPEGファイルを読み込んで連結したPDFを作成(既存のPDFに追加)

Posted on 2月 24, 2018 by Takaaki Naganoya
AppleScript名:連番JPEGファイルを読み込んで連結したPDFを作成(既存のPDFに追加)
— Created 2016-09-20 by Takaaki Naganoya
— 2016 Piyomaru Software
use AppleScript version "2.4"
use scripting additions
use framework "Foundation"
use framework "QuartzCore"
use framework "Quartz"
use framework "AppKit"

set aExt to ".jpg"

set targAlias to retFrontFinderWindowsTargetIfExits(path to desktop) of me
set aFol to choose folder with prompt "追記するJPEG画像ファイルが入っているフォルダを選択" default location targAlias

set fList to getFilePathList(aFol, aExt) of me
set f2List to my sort1DList:fList ascOrder:true –sort by ascending

set newFile to POSIX path of (choose file of type {"com.adobe.pdf"} with prompt "既存のPDFファイルを選択(このPDF末尾に画像を追加)")
set newFilePath to current application’s NSString’s stringWithString:newFile
set newFileURL to current application’s |NSURL|’s fileURLWithPath:newFile

–Get Exsisting PDF’s URL and Use it
set aPDFdoc to current application’s PDFDocument’s alloc()’s initWithURL:newFileURL
set pageNum to ((aPDFdoc’s pageCount()) as integer)

repeat with i in f2List
  set j to contents of i
  
set aURL to (current application’s |NSURL|’s fileURLWithPath:j)
  
set bImg to (current application’s NSImage’s alloc()’s initWithContentsOfURL:aURL)
  (
aPDFdoc’s insertPage:(current application’s PDFPage’s alloc()’s initWithImage:bImg) atIndex:pageNum)
  
set pageNum to pageNum + 1
end repeat

aPDFdoc’s writeToFile:newFilePath

–ASOCで指定フォルダのファイルパス一覧取得(拡張子指定つき)
on getFilePathList(aFol, aExt)
  set aPath to current application’s NSString’s stringWithString:(POSIX path of aFol)
  
set aFM to current application’s NSFileManager’s defaultManager()
  
set nameList to (aFM’s contentsOfDirectoryAtPath:aPath |error|:(missing value)) as list
  
set anArray to current application’s NSMutableArray’s alloc()’s init()
  
  
repeat with i in nameList
    set j to i as text
    
if (j ends with aExt) and (j does not start with ".") then –exclude invisible files
      set newPath to (aPath’s stringByAppendingString:j)
      (
anArray’s addObject:newPath)
    end if
  end repeat
  
  
return anArray as list
end getFilePathList

–1D List(文字)をsort / ascOrderがtrueだと昇順ソート、falseだと降順ソート
on sort1DList:theList ascOrder:aBool
  set aDdesc to current application’s NSSortDescriptor’s sortDescriptorWithKey:"self" ascending:aBool selector:"localizedCaseInsensitiveCompare:"
  
set theArray to current application’s NSArray’s arrayWithArray:theList
  
return (theArray’s sortedArrayUsingDescriptors:{aDdesc}) as list
end sort1DList:ascOrder:

on retFrontFinderWindowsTargetIfExits(aDefaultLocation)
  tell application "Finder"
    set wCount to count every window
    
if wCount ≥ 1 then
      tell front window
        set aTarg to target as alias
      end tell
      
return aTarg
    else
      return aDefaultLocation
    end if
  end tell
end retFrontFinderWindowsTargetIfExits

★Click Here to Open This Script 

Posted in Image PDF | Tagged 10.11savvy 10.12savvy 10.13savvy | Leave a comment

PDFをページごとに分解してJPEGで保存する v3

Posted on 2月 15, 2018 by Takaaki Naganoya
AppleScript名:PDFをページごとに分解してJPEGで保存する v3
— Created 2014-12-26 by Takaaki Naganoya
— Modified 2015-09-26 by Takaaki Naganoya
— Modified 2015-10-01 by Takaaki Naganoya
— Modified 2016-07-27 by Takaaki Naganoya–Save each PDF page as jpeg
— Modified 2016-07-27 by Takaaki Naganoya–Zero padding function, Consider Retina Env
— 2016 Piyomaru Software

use AppleScript version "2.4"
use scripting additions
use framework "Foundation"
use framework "Quartz"
use framework "AppKit"

set aHFSPath to (choose file of type {"com.adobe.pdf"} with prompt "ページごとに分解するPDFを指定してください")
set aPOSIX to POSIX path of aHFSPath
set aURL to (current application’s |NSURL|’s fileURLWithPath:aPOSIX)

set aPOSIXpath to POSIX path of aHFSPath —書き出し先パスをPOSIX pathで用意しておく(あとで加工)

set aPDFdoc to current application’s PDFDocument’s alloc()’s initWithURL:aURL
set pCount to aPDFdoc’s pageCount()

set compFactor to 1.0 –1.0 — 0.0 = max jpeg compression, 1.0 = none

–Detect Retina Environment
set retinaF to current application’s NSScreen’s mainScreen()’s backingScaleFactor()
if retinaF = 1.0 then
  set aScale to 2.0 –Non Retina Env
else
  set aScale to 1.0 –Retina Env
end if

–PDFをページごとに分割してJPEGでファイル書き出し
repeat with i from 0 to (pCount – 1)
  –Pick Up a PDF page as an image
  
set thisPage to (aPDFdoc’s pageAtIndex:(i))
  
set thisDoc to (current application’s NSImage’s alloc()’s initWithData:(thisPage’s dataRepresentation()))
  
if thisDoc = missing value then error "Error in getting imagerep from PDF in page:" & (i as string)
  
  
–Resize Image
  
set pointSize to thisDoc’s |size|()
  
set newSize to current application’s NSMakeSize((pointSize’s width) * aScale, (pointSize’s height) * aScale)
  
set newImage to (current application’s NSImage’s alloc()’s initWithSize:newSize)
  
  
newImage’s lockFocus()
  (
thisDoc’s setSize:newSize)
  (
current application’s NSGraphicsContext’s currentContext()’s setImageInterpolation:(current application’s NSImageInterpolationHigh))
  (
thisDoc’s drawAtPoint:(current application’s NSZeroPoint) fromRect:(current application’s CGRectMake(0, 0, newSize’s width, newSize’s height)) operation:(current application’s NSCompositeCopy) fraction:1.0)
  
newImage’s unlockFocus()
  
  
–Save Image as JPEG
  
set theData to newImage’s TIFFRepresentation()
  
set newRep to (current application’s NSBitmapImageRep’s imageRepWithData:theData)
  
set targData to (newRep’s representationUsingType:(current application’s NSJPEGFileType) |properties|:{NSImageCompressionFactor:compFactor, NSImageProgressive:false})
  
set zText to retZeroPaddingText((i + 1), 4) of me
  
set outPath to addString_beforeExtensionIn_addingExtension_("_" & zText, aPOSIXpath, "jpg")
  
  (
targData’s writeToFile:outPath atomically:true) –書き出し
end repeat

–ファイルパス(POSIX path)に対して、文字列(枝番)を追加。任意の拡張子を追加
on addString:extraString beforeExtensionIn:aPath addingExtension:aExt
  set pathString to current application’s NSString’s stringWithString:aPath
  
set theExtension to pathString’s pathExtension()
  
set thePathNoExt to pathString’s stringByDeletingPathExtension()
  
  
set newPath to (thePathNoExt’s stringByAppendingString:extraString)’s stringByAppendingPathExtension:aExt
  
return newPath as string
end addString:beforeExtensionIn:addingExtension:

on retZeroPaddingText(aNum as integer, aDigitNum as integer)
  if aNum > (((10 ^ aDigitNum) as integer) – 1) then return "" –Range Check
  
set aFormatter to current application’s NSNumberFormatter’s alloc()’s init()
  
aFormatter’s setUsesGroupingSeparator:false
  
aFormatter’s setAllowsFloats:false
  
aFormatter’s setMaximumIntegerDigits:aDigitNum
  
aFormatter’s setMinimumIntegerDigits:aDigitNum
  
aFormatter’s setPaddingCharacter:"0"
  
set aStr to aFormatter’s stringFromNumber:(current application’s NSNumber’s numberWithFloat:aNum)
  
return aStr as string
end retZeroPaddingText

★Click Here to Open This Script 

Posted in file Image PDF | Tagged 10.11savvy 10.12savvy 10.13savvy | Leave a comment

画像の指定エリアを塗りつぶし

Posted on 2月 14, 2018 by Takaaki Naganoya


▲Before


▲After

AppleScript名:画像の指定エリアを塗りつぶし
— Created 2017-11-19 by Takaaki Naganoya
— Modified 2018-02-14 by Takaaki Naganoya
use AppleScript version "2.5"
use scripting additions
use framework "Foundation"
use framework "AppKit"

property NSUUID : a reference to current application’s NSUUID
property NSColor : a reference to current application’s NSColor
property NSString : a reference to current application’s NSString
property NSImage : a reference to current application’s NSImage
property NSScreen : a reference to current application’s NSScreen
property NSBezierPath : a reference to current application’s NSBezierPath
property NSPNGFileType : a reference to current application’s NSPNGFileType
property NSBitmapImageRep : a reference to current application’s NSBitmapImageRep

–塗りつぶしエリア(複数)
set drawList to {{origin:{x:0, y:0}, |size|:{width:200, height:100}}, {origin:{x:300, y:100}, |size|:{width:50, height:50}}}

set imgPath to POSIX path of (choose file of type {"public.image"})
set anImage to NSImage’s alloc()’s initWithContentsOfFile:imgPath

set fillColor to (NSColor’s colorWithCalibratedRed:1.0 green:0.0 blue:0.0 alpha:0.9)

–塗りつぶし処理呼び出し
set resImage to drawImageWithColorFill(anImage, drawList, fillColor) of me

set aUUIDstr to (NSUUID’s UUID()’s UUIDString()) as string
set aPath to ((NSString’s stringWithString:imgPath)’s stringByDeletingLastPathComponent()’s stringByAppendingPathComponent:aUUIDstr)’s stringByAppendingPathExtension:"png"

set fRes to saveImageRepAtPathAsPNG(resImage, aPath) of me

on drawImageWithColorFill(anImage, drawList, fillColor)
  set retinaF to (NSScreen’s mainScreen()’s backingScaleFactor()) as real
  
–>  2.0 (Retina) / 1.0 (Non Retina)
  
  
anImage’s lockFocus() –描画開始
  
  
repeat with i in drawList
    set origX to (x of origin of i) / retinaF
    
set origY to (y of origin of i) / retinaF
    
set sizeX to (width of |size| of i) / retinaF
    
set sizeY to (height of |size| of i) / retinaF
    
    
set theRect to {{x:origX, y:origY}, {width:sizeX, height:sizeY}}
    
    
set theNSBezierPath to NSBezierPath’s bezierPath
    (
theNSBezierPath’s appendBezierPathWithRect:theRect)
    
    
fillColor’s |set|() –色設定
    
theNSBezierPath’s fill() –ぬりつぶし
  end repeat
  
  
anImage’s unlockFocus() –描画ここまで
  
  
return anImage –returns NSImage
end drawImageWithColorFill

–画像を指定パスにPNG形式で保存
on saveImageRepAtPathAsPNG(anImage, outPath)
  set imageRep to anImage’s TIFFRepresentation()
  
set aRawimg to NSBitmapImageRep’s imageRepWithData:imageRep
  
  
–パスのチルダ展開処理
  
set pathString to NSString’s stringWithString:outPath
  
set newPath to pathString’s stringByExpandingTildeInPath()
  
  
set myNewImageData to (aRawimg’s representationUsingType:(NSPNGFileType) |properties|:(missing value))
  
return (myNewImageData’s writeToFile:newPath atomically:true) as boolean
end saveImageRepAtPathAsPNG

★Click Here to Open This Script 

Posted in file Image | Tagged 10.11savvy 10.12savvy 10.13savvy | 1 Comment

画像を文字認識して文字エリアを塗りつぶし v3

Posted on 2月 11, 2018 by Takaaki Naganoya


▲Original Image


▲Filtered Image(CIColorMonochrome)


▲Filtered Image(CIColorPosterize)


▲Result Image

AppleScript名:画像を文字認識して文字エリアを塗りつぶし v3
— Created 2017-11-19 by Takaaki Naganoya
— Modified 2018-02-11 by Takaaki Naganoya
–v3:画像の前処理を付加
use AppleScript version "2.5"
use scripting additions
use framework "Foundation"
use framework "AppKit"
use framework "QuartzCore"
use framework "AppKit"

set retinaF to (current application’s NSScreen’s mainScreen()’s backingScaleFactor()) as real
–>  2.0 (Retina) / 1.0 (Non Retina)

set imgPath to POSIX path of (choose file of type {"public.image"})
set anImage to current application’s NSImage’s alloc()’s initWithContentsOfFile:imgPath
set aCIImage to convNSImageToCIimage(anImage)

–モノクロ化フィルタ
set bCIImage to monochromefilterACGImage(aCIImage) of me

–2階調ポスタライズフィルタ
set cCIImage to posterizefilterACGImage(bCIImage) of me

–文字領域認識
set detectList to textDetect(cCIImage) of me

–描画開始
anImage’s lockFocus()

repeat with i in detectList
  set origX to (x of origin of i) / retinaF
  
set origY to (y of origin of i) / retinaF
  
set sizeX to (width of |size| of i) / retinaF
  
set sizeY to (height of |size| of i) / retinaF
  
  
set theRect to {{x:origX, y:origY}, {width:sizeX, height:sizeY}}
  
  
set theNSBezierPath to current application’s NSBezierPath’s bezierPath
  (
theNSBezierPath’s appendBezierPathWithRect:theRect)
  
  
set rRnd to (random number from 1 to 10) / 10
  
set gRnd to (random number from 1 to 10) / 10
  
set bRnd to (random number from 1 to 10) / 10
  
set fillColor to (current application’s NSColor’s colorWithCalibratedRed:rRnd green:gRnd blue:bRnd alpha:0.6)
  
  
fillColor’s |set|() –色設定
  
theNSBezierPath’s fill() –ぬりつぶし
end repeat

anImage’s unlockFocus()
–描画ここまで

set aUUIDstr to (current application’s NSUUID’s UUID()’s UUIDString()) as string
set aPath to ((current application’s NSString’s stringWithString:imgPath)’s stringByDeletingLastPathComponent()’s stringByAppendingPathComponent:aUUIDstr)’s stringByAppendingPathExtension:"png"

set fRes to saveImageRepAtPathAsPNG(anImage, aPath) of me

on openImageFile(imageFile) — imageFile: POSIX path 形式のファイルパス
  set fileURL to current application’s |NSURL|’s fileURLWithPath:imageFile
  
return current application’s CIImage’s alloc()’s initWithContentsOfURL:fileURL
end openImageFile

–画像を指定パスにPNG形式で保存
on saveImageRepAtPathAsPNG(anImage, outPath)
  set imageRep to anImage’s TIFFRepresentation()
  
set aRawimg to current application’s NSBitmapImageRep’s imageRepWithData:imageRep
  
  
–書き出しファイルパス情報を作成
  
set pathString to current application’s NSString’s stringWithString:outPath
  
set newPath to pathString’s stringByExpandingTildeInPath()
  
  
–書き出し
  
set myNewImageData to (aRawimg’s representationUsingType:(current application’s NSPNGFileType) |properties|:(missing value))
  
return (myNewImageData’s writeToFile:newPath atomically:true) as boolean
end saveImageRepAtPathAsPNG

on textDetect(imageRef)
  — 検出器のオプションを NSDictonary で作成
  
set optDic1 to current application’s NSDictionary’s dictionaryWithObject:(current application’s CIDetectorAccuracyHigh) forKey:(current application’s CIDetectorAccuracy)
  
set textDetector to current application’s CIDetector’s detectorOfType:(current application’s CIDetectorTypeText) context:(missing value) options:optDic1
  
  
— 文字エリア検出を実行
  
set optDic2 to current application’s NSDictionary’s dictionaryWithObject:true forKey:(current application’s CIDetectorReturnSubFeatures)
  
set textArray to textDetector’s featuresInImage:imageRef options:optDic2
  
  
set fList to {}
  
  
— 検出されたテキストの位置とサイズをログに出力
  
repeat with i from 1 to (count of textArray)
    set typeFace to item i of textArray
    
set bList to (typeFace’s subFeatures())
    
    
repeat with ii in bList
      set aBounds to ii’s |bounds|()
      
set aType to ii’s type()
      
set the end of fList to aBounds
    end repeat
    
  end repeat
  
  
return fList
  
end textDetect

on convCIimageToNSImage(aCIImage)
  set aRep to current application’s NSBitmapImageRep’s alloc()’s initWithCIImage:aCIImage
  
set tmpSize to aRep’s |size|()
  
set newImg to current application’s NSImage’s alloc()’s initWithSize:tmpSize
  
newImg’s addRepresentation:aRep
  
return newImg
end convCIimageToNSImage

on convNSImageToCIimage(aNSImage)
  set tiffDat to aNSImage’s TIFFRepresentation()
  
set aRep to current application’s NSBitmapImageRep’s imageRepWithData:tiffDat
  
set newImg to current application’s CIImage’s alloc()’s initWithBitmapImageRep:aRep
  
return newImg
end convNSImageToCIimage

–Posterizeフィルタ
on posterizefilterACGImage(aCIImage)
  set aFilter to current application’s CIFilter’s filterWithName:"CIColorPosterize"
  
aFilter’s setDefaults()
  
  
aFilter’s setValue:aCIImage forKey:"inputImage"
  
aFilter’s setValue:2 forKey:"inputLevels"
  
  
set aOutImage to aFilter’s valueForKey:"outputImage"
  
return aOutImage
end posterizefilterACGImage

–Monochromeフィルタ
on monochromefilterACGImage(aCIImage)
  set aFilter to current application’s CIFilter’s filterWithName:"CIColorMonochrome"
  
aFilter’s setDefaults()
  
  
aFilter’s setValue:aCIImage forKey:"inputImage"
  
aFilter’s setValue:1.0 forKey:"inputIntensity"
  
  
set aOutImage to aFilter’s valueForKey:"outputImage"
  
return aOutImage
end monochromefilterACGImage

★Click Here to Open This Script 

Posted in file Image Text | Tagged 10.11savvy 10.12savvy 10.13savvy | Leave a comment

JPEG画像の破損チェック

Posted on 2月 11, 2018 by Takaaki Naganoya

かつて、破損JPEG画像はアプリケーションのクラッシュを引き起こすケースもあり、Mac OS Xでもなかなか細心の注意をはらって事前のチェックを行なっていました(Mac OS X 10.4のころ)。

AppleScriptによるバッチ処理では、大量のデータを相手にします。そのため、途中でエラーを発生させるようなイレギュラーなデータにはエラートラップを仕掛けてあらかじめ対処しておきますが、クラッシュを引き起こすような破損データについては事前に手の施しようがありません。

# 破損画像によるクラッシュが発生して処理が停止するトラブルに直面したときには、入稿データの添付画像の破損チェックを自動で行うようにして対処しました。そもそも破損していては話にならないので

この破損画像が引き起こすクラッシュは(iOSの方で)クラッカーからの格好の標的にされたため(初期の「脱獄」の手口がこの破損画像にともなうクラッシュ→実行権限乗っ取りでした)、対策がすすみ、iOSと共通基盤を持っているMac OS Xでも同様の対策が行われたためか、Mac OS X→OS X→macOSと呼称が変わるにつれて徐々にクラッシュしないように強化されてきた機能でもあります。

今日、破損画像にそれほど神経質にならなくても済むようになっていますが、古いOSを使い続けている環境がないわけではありません。そうした環境においては、画像処理前の破損画像のチェックは重要な処理であり続けることでしょう。

また、巨大な画像データを遅い回線/サーバー経由でダウンロードして処理する場合には、「念のため」チェックを行なっておくべきかもしれません。

本ScriptのようにJPEGマーカーの有無をチェックするのは、破損画像検出の手口としては入門レベルであり、画像処理を行うプログラムで実際に読み込み+表示+書き出しを行わせるぐらいの処理をしておく必要があります(読み込めて表示できても、書き出しができない破損画像にも遭遇しました)。

実際にさまざまな現場で集めた「破損画像」は、大切に自分の手元に集めてあります。

AppleScript名:JPEG画像の破損チェック
— Created 2006-10-17 by Somebody
— Modified 2015-10-06 by Takaaki Naganoya

set aFile to choose file of type {"public.jpeg"}
set dRes to VerifyCompleteJPEG(aFile) of me

— to verify whether a JPEG is a111 full or partial (e.g. partially downloaded) JPEG
— last two JPEG file bytes must be (ASCII character 255) & (ASCII character 217)
on VerifyCompleteJPEG(f)
  try
    set s to read f from -2 for 2
  on error
    return false –error "JPEG image is too short or currupted"
  end try
  
  
if s = (ASCII character 255) & (ASCII character 217) then
    return true
  else
    return false
  end if
end VerifyCompleteJPEG

★Click Here to Open This Script 

Posted in file Image | Tagged 10.11savvy 10.12savvy 10.13savvy | Leave a comment

画像の破損チェック v2

Posted on 2月 11, 2018 by Takaaki Naganoya
AppleScript名:画像の破損チェック v2
set theFile to choose file
set aRes to breakImageCheck(theFile) of me
–> true / false

–破損画像チェック
–(通常時:true、破損時:false が返ってくる)
–対象形式:PICT/Photoshop/BMP/QuickTime Image/GIF/JPEG/MacPaint/JPEG2/SGI/PSD/TGA/Text/PDF/PNG/TIFF
on breakImageCheck(theFile)
  try
    tell application "Image Events"
      set {theWidth, theHeight} to dimensions of image theFile
    end tell
    
return true –normal image
  on error
    return false –broken image
  end try
end breakImageCheck

★Click Here to Open This Script 

macOS 10.14、10.15向けに修正。ただし、macOS 10.15ではデフォルト設定のままだとImage Eventsがユーザーディレクトリ以下のファイルにアクセスできない状態で出荷されているため、システム環境設定の「セキュリティとプライバシー」>「セキュリティ」>「フルディスクアクセス」に登録しておく必要があります。

AppleScript名:画像の破損チェック v2b.scpt
set theFile to (choose file of type {"public.image"}) as «class furl»
set aRes to breakImageCheck(theFile) of me
–> true / false

–破損画像チェック
–(通常時:true、破損時:false が返ってくる)
–対象形式:PICT/Photoshop/BMP/QuickTime Image/GIF/JPEG/MacPaint/JPEG2/SGI/PSD/TGA/Text/PDF/PNG/TIFF
on breakImageCheck(theFile)
  try
    tell application "Image Events"
      set tmpImage to open theFile
      
set aProp to properties of tmpImage
      
close tmpImage
    end tell
    
return true –normal image
  on error
    return false –broken image
  end try
end breakImageCheck

★Click Here to Open This Script 

Posted in file Image | Tagged 10.11savvy 10.12savvy 10.13savvy 10.14savvy 10.15savvy Image Events | Leave a comment

画像の破損チェック

Posted on 2月 11, 2018 by Takaaki Naganoya

画像の破損チェックを行うAppleScriptです。

昔、Mac OS X 10.3や10.4の時代には、破損画像をオープンするとアプリケーションごとクラッシュすることがありました。そのため、アプリケーションのクラッシュを伴うような「破損画像」のチェックを行うことには意味がありました。

その後、Mac OS XからOS Xへと名称が変更になったあたりで、共通の基盤を持っているiOSのクラッシュ対策がフィードバックされたためか、こうした破損画像に対する耐性が高まりました(OS X 10.7ぐらい?)。

画像の破損は、①オープン時にワーニングメッセージが出るレベル、②画像として読み込んでムービー書き出し時に問題の出るレベル、③そもそも全破損していてオープンすらできないレベル、に個人的に区分けしており、本ルーチンでは③に対してエラーを出しつつも、①と②についてはOSの進歩とともに問題になりにくくなっている(エラー検出できない)状態です。

AppleScriptの穴Blogアーカイブ本Vol.5において、「EPSファイルの破損チェック(高速版)」を収録しています。

AppleScript名:画像の破損チェック
— Created 2016-08-24 by Takaaki Naganoya
— 2016 Piyomaru Software
use AppleScript version "2.4"
use scripting additions
use framework "Foundation"
use framework "AppKit"

set aPath to (choose file of type {"public.image"})
set aRes to confirmImage(aPath) of me

–画像の破損チェック(can not open画像はチェックOK) 破損時にはfalseを返す
on confirmImage(aPath)
  set aType to type identifier of (info for aPath)
  
set aPOSIX to POSIX path of aPath
  
  
set aImage to current application’s NSImage’s alloc()’s initWithContentsOfFile:aPOSIX
  
if aImage = missing value then return {false, aType, 1}
  
  
set aRes to aImage’s isValid()
  
return {aRes, aType, 2}
end confirmImage

★Click Here to Open This Script 

Posted in file Image | Tagged 10.11savvy 10.12savvy 10.13savvy | Leave a comment

与えられた画像ファイルがNSImageでハンドリング可能かを取得 v2

Posted on 2月 11, 2018 by Takaaki Naganoya
AppleScript名:与えられた画像ファイルがNSImageでハンドリング可能かを取得 v2
— Created 2015-08-18 by Shane Stanley
— Modified 2018-02-10 by Takaaki Naganoya
use AppleScript version "2.4"
use scripting additions
use framework "Foundation"

set oldPath to POSIX path of (choose file)
set aRes to chkHandlingByNSImage(oldPath, "JPEG")
–> {nsImageAcceptable:true, requireConvert:true}

on chkHandlingByNSImage(aPath, targetFormatExt)
  set aRes to chkNSImageAcceptableFormat(aPath, targetFormatExt)
  
set bRes to chkIsThereNeedToConvert(aPath, targetFormatExt)
  
return {nsImageAcceptable:aRes, requireConvert:bRes}
end chkHandlingByNSImage

–与えられた画像ファイルがNSImageでハンドリング可能かを取得
on chkNSImageAcceptableFormat(aPath as text, targetFormatExt as text)
  
  
— check if UTI of file is one NSImage can read
  
set theWorkspace to current application’s NSWorkspace’s sharedWorkspace()
  
set theType to theWorkspace’s typeOfFile:aPath |error|:(missing value) — returns UTI of file
  
–>  (NSString) "public.jpeg"
  
  
set supportedTypes to current application’s NSImage’s imageTypes() — returns supported UTIs
  
–>  (NSArray) {​​​​​"com.adobe.pdf", ​​​​​"com.apple.pict", ​​​​​"com.adobe.encapsulated-postscript", ​​​​​"public.jpeg", ​​​​​"public.png", ​​​​​"com.compuserve.gif", ​​​​​"public.jpeg-2000", ​​​​​"com.canon.tif-raw-image", ​​​​​"com.adobe.raw-image", ​​​​​"com.dxo.raw-image", ​​​​​"com.canon.cr2-raw-image", ​​​​​"com.leafamerica.raw-image", ​​​​​"com.hasselblad.fff-raw-image", ​​​​​"com.hasselblad.3fr-raw-image", ​​​​​"com.nikon.raw-image", ​​​​​"com.nikon.nrw-raw-image", ​​​​​"com.pentax.raw-image", ​​​​​"com.samsung.raw-image", ​​​​​"com.sony.raw-image", ​​​​​"com.sony.sr2-raw-image", ​​​​​"com.sony.arw-raw-image", ​​​​​"com.epson.raw-image", ​​​​​"com.kodak.raw-image", ​​​​​"public.tiff", ​​​​​"com.apple.icns", ​​​​​"com.canon.crw-raw-image", ​​​​​"com.fuji.raw-image", ​​​​​"com.panasonic.raw-image", ​​​​​"com.panasonic.rw2-raw-image", ​​​​​"com.leica.raw-image", ​​​​​"com.leica.rwl-raw-image", ​​​​​"com.konicaminolta.raw-image", ​​​​​"com.olympus.sr-raw-image", ​​​​​"com.olympus.or-raw-image", ​​​​​"com.olympus.raw-image", ​​​​​"com.adobe.photoshop-image", ​​​​​"com.microsoft.ico", ​​​​​"com.microsoft.bmp", ​​​​​"com.microsoft.cur", ​​​​​"com.truevision.tga-image", ​​​​​"com.sgi.sgi-image", ​​​​​"com.apple.macpaint-image", ​​​​​"com.ilm.openexr-image", ​​​​​"public.radiance", ​​​​​"public.mpo-image", ​​​​​"public.pbm", ​​​​​"public.pvr", ​​​​​"com.apple.rjpeg", ​​​​​"com.apple.quicktime-image", ​​​​​"com.kodak.flashpix-image"​​​}
  
  
if (supportedTypes’s containsObject:theType) as boolean is false then
    return "File format is unsupported"
    
— check required type doesn’t already match
  else
    return true
  end if
  
end chkNSImageAcceptableFormat

–変換元の画像パスと変換対象の拡張子を与え、変換不要(同一ファイル"JPG"–> "JPEG"など)かをチェックする
on chkIsThereNeedToConvert(aPath as text, targetFormatExt as text)
  set theWorkspace to current application’s NSWorkspace’s sharedWorkspace()
  
set theType to theWorkspace’s typeOfFile:aPath |error|:(missing value) — returns UTI of file
  
if (theWorkspace’s filenameExtension:targetFormatExt isValidForType:theType) as boolean then
    return false –"No conversion needed"
  else
    return true
  end if
end chkIsThereNeedToConvert

★Click Here to Open This Script 

Posted in file Image | Tagged 10.11savvy 10.12savvy 10.13savvy | Leave a comment

ColorCubeによる頻出色の抽出

Posted on 2月 9, 2018 by Takaaki Naganoya

ColorCube.frameworkを呼び出して、指定画像の頻出色を抽出するAppleScriptです。

抽出した色数をダイアログ表示したあとに、抽出した色をchoose colorダイアログで抽出色分だけプレビューします。JPEG画像からの色抽出はうまくできましたが、透過色つきのPNG画像の演算結果は納得行かないものがありました。JPEG推奨です。

ColorCubeには除外色の指定を明示的に(flagsではなく)指定できるはずですが、NSColor’s whiteColor()などで指定してもエラーになったので、flagsによる制御を推奨します。

–> ColorCube.framework

AppleScript名:ColorCubeによる頻出色の抽出
— Created 2018-02-05 by Takaaki Naganoya
— 2018 Piyomaru Software
use AppleScript version "2.4"
use scripting additions
use framework "Foundation"
use framework "AppKit"
use framework "ColorCube" –https://github.com/pixelogik/ColorCube

property CCOnlyBrightColors : 1
property CCOnlyDarkColors : 2
property CCOnlyDistinctColors : 4
property CCOrderByBrightness : 8
property CCOrderByDarkness : 16
property CCAvoidWhite : 32
property CCAvoidBlack : 64

–List up frequent colors from image
set aFile to POSIX path of (choose file of type {"public.image"})
set targImage to current application’s NSImage’s alloc()’s initWithContentsOfFile:aFile
set colorCube to current application’s CCColorCube’s alloc()’s init()

–set imgColors to (colorCube’s extractColorsFromImage:targImage flags:(CCOnlyDistinctColors + CCAvoidWhite)) as list
set imgColors to (colorCube’s extractColorsFromImage:targImage flags:(CCAvoidWhite) |count|:4) as list

display dialog (length of imgColors) as string

repeat with i in imgColors
  set r2Val to i’s redComponent()
  
set g2Val to i’s greenComponent()
  
set b2Val to i’s blueComponent()
  
set a2Val to i’s alphaComponent()
  
  
set r2Val to r2Val * 65535
  
set g2Val to g2Val * 65535
  
set b2Val to b2Val * 65535
  
  
choose color default color {r2Val, g2Val, b2Val}
end repeat

★Click Here to Open This Script 

Posted in Color file Image | Tagged 10.11savvy 10.12savvy 10.13savvy | Leave a comment

色付き単色画像を作成する

Posted on 2月 9, 2018 by Takaaki Naganoya


▲Original


▲Filtered Image

–> GPUImage.framework (To ~/Library/Frameworks/)

AppleScript名:色付き単色画像を作成する
— Created 2017-02-11 by Takaaki Naganoya
— 2017 Piyomaru Software
use AppleScript version "2.4"
use scripting additions
use framework "Foundation"
use framework "AppKit"
use framework "GPUImage" –https://github.com/BradLarson/GPUImage

set aFile to POSIX path of (choose file of type {"public.image"} with prompt "Select image 1")
set fillColorR to current application’s NSColor’s redColor()
set imgRes to makeMonoColoredImage(aFile, fillColorR) of me
set fRes to retUUIDfilePath(aFile, "png") of me
set bRes to saveNSImageAtPathAsPNG(imgRes, fRes) of me

on retUUIDfilePath(aPath, aEXT)
  set aUUIDstr to (current application’s NSUUID’s UUID()’s UUIDString()) as string
  
set aPath to ((current application’s NSString’s stringWithString:aPath)’s stringByDeletingLastPathComponent()’s stringByAppendingPathComponent:aUUIDstr)’s stringByAppendingPathExtension:aEXT
  
return aPath
end retUUIDfilePath

on makeMonoColoredImage(aFile, NScolorObj)
  set aImage to current application’s NSImage’s alloc()’s initWithContentsOfFile:aFile
  
return makeColoredNSImageWithColor(aImage, NScolorObj) of me –色付き単色画像を作成する
end makeMonoColoredImage

on makeColoredNSImageWithColor(aImage, fillColor)
  set aSize to aImage’s |size|()
  
set aWidth to width of aSize
  
set aHeight to height of aSize
  
set newNSImage to makeNSImageWithFilledWithColor(aWidth, aHeight, fillColor)
  
set grayImage to filterWithNSImage(aImage, "GPUImageGrayscaleFilter") of me
  
set compImage to composeImageWithBlendFilter(grayImage, newNSImage, "GPUImageScreenBlendFilter") of me
  
return compImage
end makeColoredNSImageWithColor

on filterWithNSImage(aNSImage, filterName as string)
  set aClass to current application’s NSClassFromString(filterName)
  
set aImageFilter to aClass’s alloc()’s init()
  
set aProcImg to (aImageFilter’s imageByFilteringImage:aNSImage)
  
return aProcImg
end filterWithNSImage

on composeImageWithBlendFilter(aImage, bImage, filterName)
  set aClass to current application’s NSClassFromString(filterName)
  
set blendFilter to aClass’s alloc()’s init()
  
set pictureA to current application’s GPUImagePicture’s alloc()’s initWithImage:aImage
  
pictureA’s addTarget:blendFilter
  
pictureA’s processImage()
  
set imgRes to blendFilter’s imageByFilteringImage:bImage
  
return imgRes
end composeImageWithBlendFilter

–指定サイズの画像を作成し、指定色で塗ってNSImageで返す
on makeNSImageWithFilledWithColor(aWidth, aHeight, fillColor)
  –Imageの作成  
  
set curSize to current application’s NSMakeSize(aWidth, aHeight)
  
set anImage to current application’s NSImage’s alloc()’s initWithSize:curSize
  
  
anImage’s lockFocus() –描画開始
  
  
set theRect to {{x:0, y:0}, {height:aHeight, width:aWidth}}
  
set theNSBezierPath to current application’s NSBezierPath’s bezierPath
  
theNSBezierPath’s appendBezierPathWithRect:theRect
  
  
fillColor’s |set|() –色設定
  
theNSBezierPath’s fill() –ぬりつぶし
  
  
anImage’s unlockFocus() –描画ここまで
  
  
–生成した画像のRaw画像を作成
  
set imageRep to anImage’s TIFFRepresentation()
  
set aRawimg to current application’s NSBitmapImageRep’s imageRepWithData:imageRep
  
  
set newImg to current application’s NSImage’s alloc()’s initWithSize:curSize
  
newImg’s addRepresentation:aRawimg
  
return newImg
end makeNSImageWithFilledWithColor

–NSImageを指定パスにPNG形式で保存
on saveNSImageAtPathAsPNG(anImage, outPath)
  set imageRep to anImage’s TIFFRepresentation()
  
set aRawimg to current application’s NSBitmapImageRep’s imageRepWithData:imageRep
  
set pathString to current application’s NSString’s stringWithString:outPath
  
set newPath to pathString’s stringByExpandingTildeInPath()
  
set myNewImageData to (aRawimg’s representationUsingType:(current application’s NSPNGFileType) |properties|:(missing value))
  
set aRes to (myNewImageData’s writeToFile:newPath atomically:true) as boolean
  
return aRes –true/false
end saveNSImageAtPathAsPNG

★Click Here to Open This Script 

Posted in file filter Image | Tagged 10.11savvy 10.12savvy 10.13savvy | Leave a comment

Post navigation

  • Older posts
  • Newer posts

電子書籍(PDF)をオンラインストアで販売中!

Google Search

Popular posts

  • 開発機としてM2 Mac miniが来たのでガチレビュー
  • CotEditorで2つの書類の行単位での差分検出
  • macOS 13.6.5 AS系のバグ、一切直らず
  • macOS 15, Sequoia
  • 初心者がつまづきやすい「log」コマンド
  • 指定のWordファイルをPDFに書き出す
  • Pages本執筆中に、2つの書類モード切り替えに気がついた
  • Adobe AcrobatをAppleScriptから操作してPDF圧縮
  • メキシカンハットの描画
  • 与えられた文字列の1D Listのすべての順列組み合わせパターン文字列を返す v3(ベンチマーク用)
  • 2023年に書いた価値あるAppleScript
  • Pixelmator Pro v3.6.4でAppleScriptからの操作時の挙動に違和感が
  • Numbersで選択範囲のセルの前後の空白を削除
  • AdobeがInDesign v19.4からPOSIX pathを採用
  • Safariで「プロファイル」機能を使うとAppleScriptの処理に影響
  • Cocoa Scripting Course 続刊計画
  • AppleScriptによる並列処理
  • macOS 14.xでScript Menuの実行速度が大幅に下がるバグ
  • NaturalLanguage.frameworkでNLEmbeddingの処理が可能な言語をチェック
  • AppleScript入門③AppleScriptを使った「自動化」とは?

Tags

10.11savvy (1102) 10.12savvy (1243) 10.13savvy (1392) 10.14savvy (587) 10.15savvy (438) 11.0savvy (283) 12.0savvy (212) 13.0savvy (188) 14.0savvy (138) 15.0savvy (116) CotEditor (64) Finder (51) iTunes (19) Keynote (115) NSAlert (61) NSArray (51) NSBitmapImageRep (20) NSBundle (20) NSButton (34) NSColor (53) NSDictionary (28) NSFileManager (23) NSFont (21) NSImage (41) NSJSONSerialization (21) NSMutableArray (63) NSMutableDictionary (22) NSPredicate (36) NSRunningApplication (56) NSScreen (30) NSScrollView (22) NSString (119) NSURL (98) NSURLRequest (23) NSUTF8StringEncoding (30) NSView (33) NSWorkspace (20) Numbers (75) Pages (54) Safari (44) Script Editor (27) WKUserContentController (21) WKUserScript (20) WKWebView (23) WKWebViewConfiguration (22)

カテゴリー

  • 2D Bin Packing
  • 3D
  • AirDrop
  • AirPlay
  • Animation
  • AppleScript Application on Xcode
  • Beginner
  • Benchmark
  • beta
  • Bluetooth
  • Books
  • boolean
  • bounds
  • Bug
  • Calendar
  • call by reference
  • check sum
  • Clipboard
  • Cocoa-AppleScript Applet
  • Code Sign
  • Color
  • Custom Class
  • dialog
  • diff
  • drive
  • Droplet
  • exif
  • file
  • File path
  • filter
  • folder
  • Font
  • Font
  • GAME
  • geolocation
  • GUI
  • GUI Scripting
  • Hex
  • History
  • How To
  • iCloud
  • Icon
  • Image
  • Input Method
  • Internet
  • iOS App
  • JavaScript
  • JSON
  • JXA
  • Keychain
  • Keychain
  • Language
  • Library
  • list
  • Locale
  • Localize
  • Machine Learning
  • Map
  • Markdown
  • Menu
  • Metadata
  • MIDI
  • MIME
  • Natural Language Processing
  • Network
  • news
  • Noification
  • Notarization
  • Number
  • Object control
  • OCR
  • OSA
  • parallel processing
  • PDF
  • Peripheral
  • PRODUCTS
  • QR Code
  • Raw AppleEvent Code
  • Record
  • rectangle
  • recursive call
  • regexp
  • Release
  • Remote Control
  • Require Control-Command-R to run
  • REST API
  • Review
  • RTF
  • Sandbox
  • Screen Saver
  • Script Libraries
  • sdef
  • search
  • Security
  • selection
  • shell script
  • Shortcuts Workflow
  • Sort
  • Sound
  • Spellchecker
  • Spotlight
  • SVG
  • System
  • Tag
  • Telephony
  • Text
  • Text to Speech
  • timezone
  • Tools
  • Update
  • URL
  • UTI
  • Web Contents Control
  • WiFi
  • XML
  • XML-RPC
  • イベント(Event)
  • 未分類

アーカイブ

  • 2025年2月
  • 2025年1月
  • 2024年12月
  • 2024年11月
  • 2024年10月
  • 2024年9月
  • 2024年8月
  • 2024年7月
  • 2024年6月
  • 2024年5月
  • 2024年4月
  • 2024年3月
  • 2024年2月
  • 2024年1月
  • 2023年12月
  • 2023年11月
  • 2023年10月
  • 2023年9月
  • 2023年8月
  • 2023年7月
  • 2023年6月
  • 2023年5月
  • 2023年4月
  • 2023年3月
  • 2023年2月
  • 2023年1月
  • 2022年12月
  • 2022年11月
  • 2022年10月
  • 2022年9月
  • 2022年8月
  • 2022年7月
  • 2022年6月
  • 2022年5月
  • 2022年4月
  • 2022年3月
  • 2022年2月
  • 2022年1月
  • 2021年12月
  • 2021年11月
  • 2021年10月
  • 2021年9月
  • 2021年8月
  • 2021年7月
  • 2021年6月
  • 2021年5月
  • 2021年4月
  • 2021年3月
  • 2021年2月
  • 2021年1月
  • 2020年12月
  • 2020年11月
  • 2020年10月
  • 2020年9月
  • 2020年8月
  • 2020年7月
  • 2020年6月
  • 2020年5月
  • 2020年4月
  • 2020年3月
  • 2020年2月
  • 2020年1月
  • 2019年12月
  • 2019年11月
  • 2019年10月
  • 2019年9月
  • 2019年8月
  • 2019年7月
  • 2019年6月
  • 2019年5月
  • 2019年4月
  • 2019年3月
  • 2019年2月
  • 2019年1月
  • 2018年12月
  • 2018年11月
  • 2018年10月
  • 2018年9月
  • 2018年8月
  • 2018年7月
  • 2018年6月
  • 2018年5月
  • 2018年4月
  • 2018年3月
  • 2018年2月

https://piyomarusoft.booth.pm/items/301502

メタ情報

  • ログイン
  • 投稿フィード
  • コメントフィード
  • WordPress.org

Forum Posts

  • 人気のトピック
  • 返信がないトピック

メタ情報

  • ログイン
  • 投稿フィード
  • コメントフィード
  • WordPress.org
Proudly powered by WordPress
Theme: Flint by Star Verte LLC