| AppleScript名:与えられた画像ファイルがNSImageでハンドリング可能かを取得 v2 |
| — Created 2015-08-18 by Shane Stanley — Modified 2018-02-10 by Takaaki Naganoya use AppleScript version "2.4" use scripting additions use framework "Foundation" set oldPath to POSIX path of (choose file) set aRes to chkHandlingByNSImage(oldPath, "JPEG") –> {nsImageAcceptable:true, requireConvert:true} on chkHandlingByNSImage(aPath, targetFormatExt) set aRes to chkNSImageAcceptableFormat(aPath, targetFormatExt) set bRes to chkIsThereNeedToConvert(aPath, targetFormatExt) return {nsImageAcceptable:aRes, requireConvert:bRes} end chkHandlingByNSImage –与えられた画像ファイルがNSImageでハンドリング可能かを取得 on chkNSImageAcceptableFormat(aPath as text, targetFormatExt as text) — check if UTI of file is one NSImage can read set theWorkspace to current application’s NSWorkspace’s sharedWorkspace() set theType to theWorkspace’s typeOfFile:aPath |error|:(missing value) — returns UTI of file –> (NSString) "public.jpeg" set supportedTypes to current application’s NSImage’s imageTypes() — returns supported UTIs –> (NSArray) {"com.adobe.pdf", "com.apple.pict", "com.adobe.encapsulated-postscript", "public.jpeg", "public.png", "com.compuserve.gif", "public.jpeg-2000", "com.canon.tif-raw-image", "com.adobe.raw-image", "com.dxo.raw-image", "com.canon.cr2-raw-image", "com.leafamerica.raw-image", "com.hasselblad.fff-raw-image", "com.hasselblad.3fr-raw-image", "com.nikon.raw-image", "com.nikon.nrw-raw-image", "com.pentax.raw-image", "com.samsung.raw-image", "com.sony.raw-image", "com.sony.sr2-raw-image", "com.sony.arw-raw-image", "com.epson.raw-image", "com.kodak.raw-image", "public.tiff", "com.apple.icns", "com.canon.crw-raw-image", "com.fuji.raw-image", "com.panasonic.raw-image", "com.panasonic.rw2-raw-image", "com.leica.raw-image", "com.leica.rwl-raw-image", "com.konicaminolta.raw-image", "com.olympus.sr-raw-image", "com.olympus.or-raw-image", "com.olympus.raw-image", "com.adobe.photoshop-image", "com.microsoft.ico", "com.microsoft.bmp", "com.microsoft.cur", "com.truevision.tga-image", "com.sgi.sgi-image", "com.apple.macpaint-image", "com.ilm.openexr-image", "public.radiance", "public.mpo-image", "public.pbm", "public.pvr", "com.apple.rjpeg", "com.apple.quicktime-image", "com.kodak.flashpix-image"} if (supportedTypes’s containsObject:theType) as boolean is false then return "File format is unsupported" — check required type doesn’t already match else return true end if end chkNSImageAcceptableFormat –変換元の画像パスと変換対象の拡張子を与え、変換不要(同一ファイル"JPG"–> "JPEG"など)かをチェックする on chkIsThereNeedToConvert(aPath as text, targetFormatExt as text) set theWorkspace to current application’s NSWorkspace’s sharedWorkspace() set theType to theWorkspace’s typeOfFile:aPath |error|:(missing value) — returns UTI of file if (theWorkspace’s filenameExtension:targetFormatExt isValidForType:theType) as boolean then return false –"No conversion needed" else return true end if end chkIsThereNeedToConvert |
カテゴリー: Image
ColorCubeによる頻出色の抽出
ColorCube.frameworkを呼び出して、指定画像の頻出色を抽出するAppleScriptです。
抽出した色数をダイアログ表示したあとに、抽出した色をchoose colorダイアログで抽出色分だけプレビューします。JPEG画像からの色抽出はうまくできましたが、透過色つきのPNG画像の演算結果は納得行かないものがありました。JPEG推奨です。
ColorCubeには除外色の指定を明示的に(flagsではなく)指定できるはずですが、NSColor’s whiteColor()などで指定してもエラーになったので、flagsによる制御を推奨します。
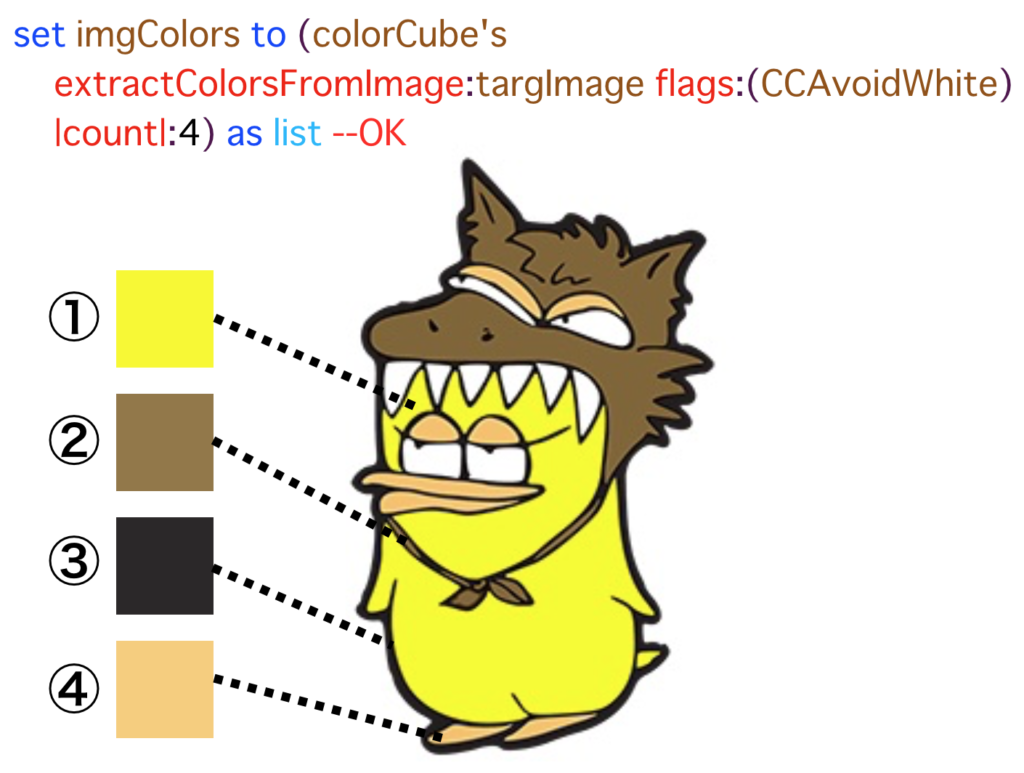
| AppleScript名:ColorCubeによる頻出色の抽出 |
| — Created 2018-02-05 by Takaaki Naganoya — 2018 Piyomaru Software use AppleScript version "2.4" use scripting additions use framework "Foundation" use framework "AppKit" use framework "ColorCube" –https://github.com/pixelogik/ColorCube property CCOnlyBrightColors : 1 property CCOnlyDarkColors : 2 property CCOnlyDistinctColors : 4 property CCOrderByBrightness : 8 property CCOrderByDarkness : 16 property CCAvoidWhite : 32 property CCAvoidBlack : 64 –List up frequent colors from image set aFile to POSIX path of (choose file of type {"public.image"}) set targImage to current application’s NSImage’s alloc()’s initWithContentsOfFile:aFile set colorCube to current application’s CCColorCube’s alloc()’s init() –set imgColors to (colorCube’s extractColorsFromImage:targImage flags:(CCOnlyDistinctColors + CCAvoidWhite)) as list set imgColors to (colorCube’s extractColorsFromImage:targImage flags:(CCAvoidWhite) |count|:4) as list display dialog (length of imgColors) as string repeat with i in imgColors set r2Val to i’s redComponent() set g2Val to i’s greenComponent() set b2Val to i’s blueComponent() set a2Val to i’s alphaComponent() set r2Val to r2Val * 65535 set g2Val to g2Val * 65535 set b2Val to b2Val * 65535 choose color default color {r2Val, g2Val, b2Val} end repeat |
色付き単色画像を作成する

▲Original

▲Filtered Image
–> GPUImage.framework (To ~/Library/Frameworks/)
| AppleScript名:色付き単色画像を作成する |
| — Created 2017-02-11 by Takaaki Naganoya — 2017 Piyomaru Software use AppleScript version "2.4" use scripting additions use framework "Foundation" use framework "AppKit" use framework "GPUImage" –https://github.com/BradLarson/GPUImage set aFile to POSIX path of (choose file of type {"public.image"} with prompt "Select image 1") set fillColorR to current application’s NSColor’s redColor() set imgRes to makeMonoColoredImage(aFile, fillColorR) of me set fRes to retUUIDfilePath(aFile, "png") of me set bRes to saveNSImageAtPathAsPNG(imgRes, fRes) of me on retUUIDfilePath(aPath, aEXT) set aUUIDstr to (current application’s NSUUID’s UUID()’s UUIDString()) as string set aPath to ((current application’s NSString’s stringWithString:aPath)’s stringByDeletingLastPathComponent()’s stringByAppendingPathComponent:aUUIDstr)’s stringByAppendingPathExtension:aEXT return aPath end retUUIDfilePath on makeMonoColoredImage(aFile, NScolorObj) set aImage to current application’s NSImage’s alloc()’s initWithContentsOfFile:aFile return makeColoredNSImageWithColor(aImage, NScolorObj) of me –色付き単色画像を作成する end makeMonoColoredImage on makeColoredNSImageWithColor(aImage, fillColor) set aSize to aImage’s |size|() set aWidth to width of aSize set aHeight to height of aSize set newNSImage to makeNSImageWithFilledWithColor(aWidth, aHeight, fillColor) set grayImage to filterWithNSImage(aImage, "GPUImageGrayscaleFilter") of me set compImage to composeImageWithBlendFilter(grayImage, newNSImage, "GPUImageScreenBlendFilter") of me return compImage end makeColoredNSImageWithColor on filterWithNSImage(aNSImage, filterName as string) set aClass to current application’s NSClassFromString(filterName) set aImageFilter to aClass’s alloc()’s init() set aProcImg to (aImageFilter’s imageByFilteringImage:aNSImage) return aProcImg end filterWithNSImage on composeImageWithBlendFilter(aImage, bImage, filterName) set aClass to current application’s NSClassFromString(filterName) set blendFilter to aClass’s alloc()’s init() set pictureA to current application’s GPUImagePicture’s alloc()’s initWithImage:aImage pictureA’s addTarget:blendFilter pictureA’s processImage() set imgRes to blendFilter’s imageByFilteringImage:bImage return imgRes end composeImageWithBlendFilter –指定サイズの画像を作成し、指定色で塗ってNSImageで返す on makeNSImageWithFilledWithColor(aWidth, aHeight, fillColor) –Imageの作成 set curSize to current application’s NSMakeSize(aWidth, aHeight) set anImage to current application’s NSImage’s alloc()’s initWithSize:curSize anImage’s lockFocus() –描画開始 set theRect to {{x:0, y:0}, {height:aHeight, width:aWidth}} set theNSBezierPath to current application’s NSBezierPath’s bezierPath theNSBezierPath’s appendBezierPathWithRect:theRect fillColor’s |set|() –色設定 theNSBezierPath’s fill() –ぬりつぶし anImage’s unlockFocus() –描画ここまで –生成した画像のRaw画像を作成 set imageRep to anImage’s TIFFRepresentation() set aRawimg to current application’s NSBitmapImageRep’s imageRepWithData:imageRep set newImg to current application’s NSImage’s alloc()’s initWithSize:curSize newImg’s addRepresentation:aRawimg return newImg end makeNSImageWithFilledWithColor –NSImageを指定パスにPNG形式で保存 on saveNSImageAtPathAsPNG(anImage, outPath) set imageRep to anImage’s TIFFRepresentation() set aRawimg to current application’s NSBitmapImageRep’s imageRepWithData:imageRep set pathString to current application’s NSString’s stringWithString:outPath set newPath to pathString’s stringByExpandingTildeInPath() set myNewImageData to (aRawimg’s representationUsingType:(current application’s NSPNGFileType) |properties|:(missing value)) set aRes to (myNewImageData’s writeToFile:newPath atomically:true) as boolean return aRes –true/false end saveNSImageAtPathAsPNG |
CoreImageでフィルタしまくり
フィルタ名称をテキストで与えて動的に画像のフィルタ処理を変更させるAppleScriptです。
ただし、各CIFilterのパラメータまでは指定していないため、パラメータ値はデフォルトのままです。別途、パラメータ値を与えるようにすると有用性が増すことでしょう。
多数のCIFilterの名称をリスト(配列)で間接指定して、順次フィルター処理を行なってファイル出力する、というのが本プログラムの実験内容です。

▲Original

▲Filtered Image
| AppleScript名:CoreImageでフィルタしまくり |
| — Created 2014-12-09 by Takaaki Naganoya — 2014 Piyomaru Software use AppleScript version "2.4" use scripting additions use framework "Foundation" use framework "QuartzCore" property CIFilter : a reference to current application’s CIFilter property |NSURL| : a reference to current application’s |NSURL| property CIImage : a reference to current application’s CIImage property NSJPEGFileType : a reference to current application’s NSJPEGFileType property NSBitmapImageRep : a reference to current application’s NSBitmapImageRep –CIFilters (Not everything!!) From Apple’s Core Image Filter Reference set ciList to {"CIColorPosterize"} –{"CIColorInvert", "CIBoxBlur", "CIDiscBlur", "CIGaussianBlur", "CIMedianFilter", "CIMotionBlur", "CINoiseReduction", "CIZoomBlur", "CIColorMonochrome", "CIColorPosterize", "CIPhotoEffectChrome", "CISepiaTone", "CISharpenLuminance", "CIUnsharpMask", "CIKaleidoscope"} –画像を選択 set aPath to POSIX path of (choose file of type {"public.image"}) –すべてのフィルタを実行 repeat with i in ciList set j to contents of i set aRes to convAsFilteredJPEG(aPath, j) of me end repeat –CIFilterをかけたJPEG画像を生成 –参照:http://ashplanning.blogspot.jp/ のうちのどこか on convAsFilteredJPEG(aPath, aFilterName) set aURL to (|NSURL|’s fileURLWithPath:aPath) –Input set aPOSIX to (POSIX path of aPath) & "_" & aFilterName & ".jpg" –Output –CIImageを生成 set aCIImage to CIImage’s alloc()’s initWithContentsOfURL:aURL — CIFilter をフィルタの名前で生成 set aFilter to CIFilter’s filterWithName:aFilterName aFilter’s setDefaults() –各フィルタのパラメータはデフォルト(そこが問題) –Filterを実行 aFilter’s setValue:aCIImage forKey:"inputImage" set aOutImage to aFilter’s valueForKey:"outputImage" — NSBitmapImageRep を CIImage から生成 set aRep to NSBitmapImageRep’s alloc()’s initWithCIImage:aOutImage — NSBitmapImageRep から JPEG データを取得 set jpegData to aRep’s representationUsingType:(NSJPEGFileType) |properties|:(missing value) — ファイルに保存 return (jpegData’s writeToFile:aPOSIX atomically:true) as boolean end convAsFilteredJPEG |
CoreImageで指定画像をCIGaussianBlur
▲Original
▲Filtered Image
| AppleScript名:CoreImageで指定画像をCIGaussianBlur |
| — Created 2017-03-21 by Takaaki Naganoya — 2017 Piyomaru Software use AppleScript version "2.4" use scripting additions use framework "Foundation" use framework "QuartzCore" –画像を選択 set aPath to POSIX path of (choose file of type {"public.image"}) set aNSImage to current application’s NSImage’s alloc()’s initWithContentsOfFile:aPath set paramRec to {inputRadius:10.0} set imgRes to execCIFilterWithNSImageAndParams(aNSImage, "CIGaussianBlur", paramRec) of me set aDesktopPath to (current application’s NSProcessInfo’s processInfo()’s environment()’s objectForKey:("HOME"))’s stringByAppendingString:"/Desktop/" set savePath to aDesktopPath’s stringByAppendingString:((current application’s NSUUID’s UUID()’s UUIDString())’s stringByAppendingString:".png") set fRes to saveNSImageAtPathAsPNG(imgRes, savePath) of me –NSImageをCIImageに変換してCIfilterを実行 on execCIFilterWithNSImageAndParams(aNSImage, aFilterName as string, paramRec as record) set aDict to current application’s NSDictionary’s dictionaryWithDictionary:paramRec set aCIImage to convNSImageToCIimage(aNSImage) of me set aFilter to current application’s CIFilter’s filterWithName:aFilterName aFilter’s setDefaults() aFilter’s setValue:aCIImage forKey:"inputImage" set aOutImage to aFilter’s valueForKey:"outputImage" set keyList to aDict’s allKeys() as list repeat with i in keyList set aVal to (aDict’s valueForKey:i) as list of string or string –as anything (aFilter’s setValue:aVal forKey:(i as string)) end repeat set newNSImage to convCIimageToNSImage(aOutImage) of me return newNSImage end execCIFilterWithNSImageAndParams on convCIimageToNSImage(aCIImage) set aRep to current application’s NSBitmapImageRep’s alloc()’s initWithCIImage:aCIImage set tmpSize to aRep’s |size|() set newImg to current application’s NSImage’s alloc()’s initWithSize:tmpSize newImg’s addRepresentation:aRep return newImg end convCIimageToNSImage on convNSImageToCIimage(aNSImage) set tiffDat to aNSImage’s TIFFRepresentation() set aRep to current application’s NSBitmapImageRep’s imageRepWithData:tiffDat set newImg to current application’s CIImage’s alloc()’s initWithBitmapImageRep:aRep return newImg end convNSImageToCIimage –NSImageを指定パスにPNG形式で保存 on saveNSImageAtPathAsPNG(anImage, outPath) set imageRep to anImage’s TIFFRepresentation() set aRawimg to current application’s NSBitmapImageRep’s imageRepWithData:imageRep set pathString to current application’s NSString’s stringWithString:outPath set newPath to pathString’s stringByExpandingTildeInPath() set myNewImageData to (aRawimg’s representationUsingType:(current application’s NSPNGFileType) |properties|:(missing value)) set aRes to (myNewImageData’s writeToFile:newPath atomically:true) as boolean return aRes –成功ならtrue、失敗ならfalseが返る end saveNSImageAtPathAsPNG |
CoreImageで指定画像をCIDiscBlur
▲Original

▲Filtered Image
| AppleScript名:CoreImageで指定画像をCIDiscBlur |
| — Created 2017-03-21 by Takaaki Naganoya — 2017 Piyomaru Software use AppleScript version "2.4" use scripting additions use framework "Foundation" use framework "QuartzCore" –画像を選択 set aPath to POSIX path of (choose file of type {"public.image"}) set aNSImage to current application’s NSImage’s alloc()’s initWithContentsOfFile:aPath set paramRec to {inputRadius:10.0} set imgRes to execCIFilterWithNSImageAndParams(aNSImage, "CIDiscBlur", paramRec) of me set aDesktopPath to (current application’s NSProcessInfo’s processInfo()’s environment()’s objectForKey:("HOME"))’s stringByAppendingString:"/Desktop/" set savePath to aDesktopPath’s stringByAppendingString:((current application’s NSUUID’s UUID()’s UUIDString())’s stringByAppendingString:".png") set fRes to saveNSImageAtPathAsPNG(imgRes, savePath) of me –NSImageをCIImageに変換してCIfilterを実行 on execCIFilterWithNSImageAndParams(aNSImage, aFilterName as string, paramRec as record) set aDict to current application’s NSDictionary’s dictionaryWithDictionary:paramRec set aCIImage to convNSImageToCIimage(aNSImage) of me set aFilter to current application’s CIFilter’s filterWithName:aFilterName aFilter’s setDefaults() aFilter’s setValue:aCIImage forKey:"inputImage" set aOutImage to aFilter’s valueForKey:"outputImage" set keyList to aDict’s allKeys() as list repeat with i in keyList set aVal to (aDict’s valueForKey:i) as list of string or string –as anything (aFilter’s setValue:aVal forKey:(i as string)) end repeat set newNSImage to convCIimageToNSImage(aOutImage) of me return newNSImage end execCIFilterWithNSImageAndParams on convCIimageToNSImage(aCIImage) set aRep to current application’s NSBitmapImageRep’s alloc()’s initWithCIImage:aCIImage set tmpSize to aRep’s |size|() set newImg to current application’s NSImage’s alloc()’s initWithSize:tmpSize newImg’s addRepresentation:aRep return newImg end convCIimageToNSImage on convNSImageToCIimage(aNSImage) set tiffDat to aNSImage’s TIFFRepresentation() set aRep to current application’s NSBitmapImageRep’s imageRepWithData:tiffDat set newImg to current application’s CIImage’s alloc()’s initWithBitmapImageRep:aRep return newImg end convNSImageToCIimage –NSImageを指定パスにPNG形式で保存 on saveNSImageAtPathAsPNG(anImage, outPath) set imageRep to anImage’s TIFFRepresentation() set aRawimg to current application’s NSBitmapImageRep’s imageRepWithData:imageRep set pathString to current application’s NSString’s stringWithString:outPath set newPath to pathString’s stringByExpandingTildeInPath() set myNewImageData to (aRawimg’s representationUsingType:(current application’s NSPNGFileType) |properties|:(missing value)) set aRes to (myNewImageData’s writeToFile:newPath atomically:true) as boolean return aRes –成功ならtrue、失敗ならfalseが返る end saveNSImageAtPathAsPNG |
CoreImageで指定画像をCIColorMonochrome
▲Original

▲Filtered Image
| AppleScript名:CoreImageで指定画像をCIColorMonochrome |
| — Created 2017-03-21 by Takaaki Naganoya — 2017 Piyomaru Software use AppleScript version "2.4" use scripting additions use framework "Foundation" use framework "QuartzCore" use framework "AppKit" property CIFilter : a reference to current application’s CIFilter property CIColor : a reference to current application’s CIColor property NSUUID : a reference to current application’s NSUUID property CIImage : a reference to current application’s CIImage property NSColor : a reference to current application’s NSColor property NSString : a reference to current application’s NSString property NSImage : a reference to current application’s NSImage property NSDictionary : a reference to current application’s NSDictionary property NSProcessInfo : a reference to current application’s NSProcessInfo property NSPNGFileType : a reference to current application’s NSPNGFileType property NSBitmapImageRep : a reference to current application’s NSBitmapImageRep –画像を選択 set aPath to POSIX path of (choose file of type {"public.image"}) set aNSImage to NSImage’s alloc()’s initWithContentsOfFile:aPath set aCIColor to makeCIColorFromParams(0.0, 1.0, 0.0, 1.0) of me set paramRec to {inputColor:aCIColor, inputIntensity:1.0} set imgRes to execCIFilterWithNSImageAndParams(aNSImage, "CIColorMonochrome", paramRec) of me set aDesktopPath to (NSProcessInfo’s processInfo()’s environment()’s objectForKey:("HOME"))’s stringByAppendingString:"/Desktop/" set savePath to aDesktopPath’s stringByAppendingString:((NSUUID’s UUID()’s UUIDString())’s stringByAppendingString:".png") set fRes to saveNSImageAtPathAsPNG(imgRes, savePath) of me –NSImageをCIImageに変換してCIfilterを実行 on execCIFilterWithNSImageAndParams(aNSImage, aFilterName as string, paramRec as record) set aDict to NSDictionary’s dictionaryWithDictionary:paramRec set aCIImage to convNSImageToCIimage(aNSImage) of me set aFilter to CIFilter’s filterWithName:aFilterName aFilter’s setDefaults() aFilter’s setValue:aCIImage forKey:"inputImage" set aOutImage to aFilter’s valueForKey:"outputImage" set keyList to aDict’s allKeys() as list repeat with i in keyList set aVal to (aDict’s valueForKey:i) as list of string or string –as anything (aFilter’s setValue:aVal forKey:(i as string)) end repeat set newNSImage to convCIimageToNSImage(aOutImage) of me return newNSImage end execCIFilterWithNSImageAndParams on makeCIColorFromParams(redValue, greenValue, blueValue, alphaValue) set aNSColor to NSColor’s colorWithCalibratedRed:redValue green:greenValue blue:blueValue alpha:alphaValue set aCIColor to CIColor’s alloc()’s initWithColor:aNSColor return aCIColor end makeCIColorFromParams on convCIimageToNSImage(aCIImage) set aRep to NSBitmapImageRep’s alloc()’s initWithCIImage:aCIImage set tmpSize to aRep’s |size|() set newImg to NSImage’s alloc()’s initWithSize:tmpSize newImg’s addRepresentation:aRep return newImg end convCIimageToNSImage on convNSImageToCIimage(aNSImage) set tiffDat to aNSImage’s TIFFRepresentation() set aRep to NSBitmapImageRep’s imageRepWithData:tiffDat set newImg to CIImage’s alloc()’s initWithBitmapImageRep:aRep return newImg end convNSImageToCIimage –NSImageを指定パスにPNG形式で保存 on saveNSImageAtPathAsPNG(anImage, outPath) set imageRep to anImage’s TIFFRepresentation() set aRawimg to NSBitmapImageRep’s imageRepWithData:imageRep set pathString to NSString’s stringWithString:outPath set newPath to pathString’s stringByExpandingTildeInPath() set myNewImageData to (aRawimg’s representationUsingType:(NSPNGFileType) |properties|:(missing value)) set aRes to (myNewImageData’s writeToFile:newPath atomically:true) as boolean return aRes –成功ならtrue、失敗ならfalseが返る end saveNSImageAtPathAsPNG |
CoreImageで指定画像をBoxBlur v2
▲Original

▲Filtered Image
| AppleScript名:CoreImageで指定画像をBoxBlur v2 |
| — Created 2017-03-21 by Takaaki Naganoya — 2017 Piyomaru Software use AppleScript version "2.4" use scripting additions use framework "Foundation" use framework "QuartzCore" property CIFilter : a reference to current application’s CIFilter property |NSURL| : a reference to current application’s |NSURL| property NSUUID : a reference to current application’s NSUUID property CIImage : a reference to current application’s CIImage property NSString : a reference to current application’s NSString property NSImage : a reference to current application’s NSImage property NSProcessInfo : a reference to current application’s NSProcessInfo property NSPNGFileType : a reference to current application’s NSPNGFileType property NSBitmapImageRep : a reference to current application’s NSBitmapImageRep –画像を選択 set aPath to POSIX path of (choose file of type {"public.image"}) set aNSImage to NSImage’s alloc()’s initWithContentsOfFile:aPath set paramRec to {inputRadius:10} –5から10 set imgRes to execCIFilterWithNSImageAndParams(aNSImage, "CIBoxBlur", paramRec) of me set savePath to retUUIDfilePath(aPath, "png") of me set fRes to saveNSImageAtPathAsPNG(imgRes, savePath) of me –NSImageをCIImageに変換してCIfilterを実行 on execCIFilterWithNSImageAndParams(aNSImage, aFilterName as string, paramRec as record) set aDict to current application’s NSDictionary’s dictionaryWithDictionary:paramRec set aCIImage to convNSImageToCIimage(aNSImage) of me set aFilter to current application’s CIFilter’s filterWithName:aFilterName aFilter’s setDefaults() aFilter’s setValue:aCIImage forKey:"inputImage" set aOutImage to aFilter’s valueForKey:"outputImage" set keyList to aDict’s allKeys() as list repeat with i in keyList set aVal to (aDict’s valueForKey:i) as list of string or string –as anything (aFilter’s setValue:aVal forKey:(i as string)) end repeat set newNSImage to convCIimageToNSImage(aOutImage) of me return newNSImage end execCIFilterWithNSImageAndParams on convCIimageToNSImage(aCIImage) set aRep to NSBitmapImageRep’s alloc()’s initWithCIImage:aCIImage set tmpSize to aRep’s |size|() set newImg to NSImage’s alloc()’s initWithSize:tmpSize newImg’s addRepresentation:aRep return newImg end convCIimageToNSImage on convNSImageToCIimage(aNSImage) set tiffDat to aNSImage’s TIFFRepresentation() set aRep to NSBitmapImageRep’s imageRepWithData:tiffDat set newImg to CIImage’s alloc()’s initWithBitmapImageRep:aRep return newImg end convNSImageToCIimage on retUUIDfilePath(aPath, aEXT) set aUUIDstr to (NSUUID’s UUID()’s UUIDString()) as string set aPath to ((NSString’s stringWithString:aPath)’s stringByDeletingLastPathComponent()’s stringByAppendingPathComponent:aUUIDstr)’s stringByAppendingPathExtension:aEXT return aPath end retUUIDfilePath –NSImageを指定パスにPNG形式で保存 on saveNSImageAtPathAsPNG(anImage, outPath) set imageRep to anImage’s TIFFRepresentation() set aRawimg to NSBitmapImageRep’s imageRepWithData:imageRep set pathString to NSString’s stringWithString:outPath set newPath to pathString’s stringByExpandingTildeInPath() set myNewImageData to (aRawimg’s representationUsingType:(NSPNGFileType) |properties|:(missing value)) set aRes to (myNewImageData’s writeToFile:newPath atomically:true) as boolean return aRes –true/false end saveNSImageAtPathAsPNG |
CoreImageで指定画像を2階調ポスタライズ v2

▲Original

▲2-level postalized image
| AppleScript名:CoreImageで指定画像を2階調ポスタライズ v2 |
| — Created 2014-12-09 by Takaaki Naganoya — 2014 Piyomaru Software use AppleScript version "2.4" use scripting additions use framework "Foundation" use framework "QuartzCore" property |NSURL| : a reference to current application’s |NSURL| property NSUUID : a reference to current application’s NSUUID property NSString : a reference to current application’s NSString property NSImage : a reference to current application’s NSImage property NSPNGFileType : a reference to current application’s NSPNGFileType property NSBitmapImageRep : a reference to current application’s NSBitmapImageRep –CIFilters (Not everything!!) From Apple’s Core Image Filter Reference set cifilterName to "CIColorPosterize" –画像を選択 set aPath to POSIX path of (choose file of type {"public.image"}) –指定フィルタ名でフィルタしたNSImageを取得 set nsimageRes to filterAnImageFile(aPath, cifilterName) of me –Save as PNG set fRes to retUUIDfilePath(aPath, "png") of me set sRes to saveNSImageAtPathAsPNG(nsimageRes, fRes) of me –CIFilterをかけたJPEG画像を生成 –参照:http://ashplanning.blogspot.jp/ のうちのどこか on filterAnImageFile(aPath, aFilterName) –CIImageを生成 set aURL to current application’s |NSURL|’s fileURLWithPath:aPath –Input set aCIImage to current application’s CIImage’s alloc()’s initWithContentsOfURL:aURL — CIFilter をフィルタの名前で生成 set aFilter to current application’s CIFilter’s filterWithName:aFilterName aFilter’s setDefaults() –各フィルタのパラメータはデフォルト –Filterを実行 aFilter’s setValue:aCIImage forKey:"inputImage" aFilter’s setValue:2 forKey:"inputLevels" set aOutImage to aFilter’s valueForKey:"outputImage" set outNSImage to convCIimageToNSImage(aOutImage) of me return outNSImage end filterAnImageFile on convCIimageToNSImage(aCIImage) set aRep to current application’s NSBitmapImageRep’s alloc()’s initWithCIImage:aCIImage set tmpSize to aRep’s |size|() set newImg to current application’s NSImage’s alloc()’s initWithSize:tmpSize newImg’s addRepresentation:aRep return newImg end convCIimageToNSImage on convNSImageToCIimage(aNSImage) set tiffDat to aNSImage’s TIFFRepresentation() set aRep to current application’s NSBitmapImageRep’s imageRepWithData:tiffDat set newImg to current application’s CIImage’s alloc()’s initWithBitmapImageRep:aRep return newImg end convNSImageToCIimage on retUUIDfilePath(aPath, aEXT) set aUUIDstr to (NSUUID’s UUID()’s UUIDString()) as string set aPath to ((NSString’s stringWithString:aPath)’s stringByDeletingLastPathComponent()’s stringByAppendingPathComponent:aUUIDstr)’s stringByAppendingPathExtension:aEXT return aPath end retUUIDfilePath –NSImageを指定パスにPNG形式で保存 on saveNSImageAtPathAsPNG(anImage, outPath) set imageRep to anImage’s TIFFRepresentation() set aRawimg to NSBitmapImageRep’s imageRepWithData:imageRep set pathString to NSString’s stringWithString:outPath set newPath to pathString’s stringByExpandingTildeInPath() set myNewImageData to (aRawimg’s representationUsingType:(NSPNGFileType) |properties|:(missing value)) set aRes to (myNewImageData’s writeToFile:newPath atomically:true) as boolean return aRes –true/false end saveNSImageAtPathAsPNG |
指定画像をBMP形式で保存
| AppleScript名:指定画像をBMP形式で保存 |
| — Created 2017-02-05 by Takaaki Naganoya — 2017 Piyomaru Software use AppleScript version "2.4" use scripting additions use framework "Foundation" use framework "AppKit" set aFile to POSIX path of (choose file of type {"public.image"} with prompt "Select Image A") set aImage to current application’s NSImage’s alloc()’s initWithContentsOfFile:aFile set fRes to retUUIDfilePath(aFile, "bmp") of me set sRes to saveNSImageAtPathAsBMP(imgRes, fRes) of me on retUUIDfilePath(aPath, aEXT) set aUUIDstr to (current application’s NSUUID’s UUID()’s UUIDString()) as string set aPath to ((current application’s NSString’s stringWithString:aPath)’s stringByDeletingLastPathComponent()’s stringByAppendingPathComponent:aUUIDstr)’s stringByAppendingPathExtension:aEXT return aPath end retUUIDfilePath –NSImageを指定パスにBMP形式で保存 on saveNSImageAtPathAsBMP(anImage, outPath) set imageRep to anImage’s TIFFRepresentation() set aRawimg to current application’s NSBitmapImageRep’s imageRepWithData:imageRep set pathString to current application’s NSString’s stringWithString:outPath set newPath to pathString’s stringByExpandingTildeInPath() set myNewImageData to (aRawimg’s representationUsingType:(current application’s NSBMPFileType) |properties|:(missing value)) set aRes to (myNewImageData’s writeToFile:newPath atomically:true) as boolean return aRes –true/false end saveNSImageAtPathAsBMP |
指定画像をPNG形式で保存
| AppleScript名:指定画像をPNG形式で保存 |
| — Created 2017-02-05 by Takaaki Naganoya — 2017 Piyomaru Software use AppleScript version "2.4" use scripting additions use framework "Foundation" use framework "AppKit" set aFile to POSIX path of (choose file of type {"public.image"} with prompt "Select Image A") set aImage to current application’s NSImage’s alloc()’s initWithContentsOfFile:aFile set fRes to retUUIDfilePath(aFile, "png") of me set sRes to saveNSImageAtPathAsPNG(imgRes, fRes) of me on retUUIDfilePath(aPath, aEXT) set aUUIDstr to (current application’s NSUUID’s UUID()’s UUIDString()) as string set aPath to ((current application’s NSString’s stringWithString:aPath)’s stringByDeletingLastPathComponent()’s stringByAppendingPathComponent:aUUIDstr)’s stringByAppendingPathExtension:aEXT return aPath end retUUIDfilePath –NSImageを指定パスにPNG形式で保存 on saveNSImageAtPathAsPNG(anImage, outPath) set imageRep to anImage’s TIFFRepresentation() set aRawimg to current application’s NSBitmapImageRep’s imageRepWithData:imageRep set pathString to current application’s NSString’s stringWithString:outPath set newPath to pathString’s stringByExpandingTildeInPath() set myNewImageData to (aRawimg’s representationUsingType:(current application’s NSPNGFileType) |properties|:(missing value)) set aRes to (myNewImageData’s writeToFile:newPath atomically:true) as boolean return aRes –true/false end saveNSImageAtPathAsPNG |
指定画像をJPG形式で保存
指定の画像をJPEG形式+指定圧縮率で保存するAppleScriptです。
現在は、これをさらに発展させて指定ファイルサイズになるまで圧縮率を順次変更して動的に圧縮率を変更して保存する、という処理に発展し、これは日常的に(SNSなどでアップロード可能なファイルサイズに制限があるサイトに画像掲載を行うさいに)利用しています。
| AppleScript名:指定画像をJPG形式で保存 |
| — Created 2017-02-05 by Takaaki Naganoya — 2017 Piyomaru Software use AppleScript version "2.4" use scripting additions use framework "Foundation" use framework "AppKit" set aFile to POSIX path of (choose file of type {"public.image"} with prompt "Select Image A") set aImage to current application’s NSImage’s alloc()’s initWithContentsOfFile:aFile set fRes to retUUIDfilePath(aFile, "jpg") of me set sRes to saveNSImageAtPathAsJPG(aImage, fRes, 1.0) of me on retUUIDfilePath(aPath, aEXT) set aUUIDstr to (current application’s NSUUID’s UUID()’s UUIDString()) as string set aPath to ((current application’s NSString’s stringWithString:aPath)’s stringByDeletingLastPathComponent()’s stringByAppendingPathComponent:aUUIDstr)’s stringByAppendingPathExtension:aEXT return aPath end retUUIDfilePath –NSImageを指定パスにJPEG形式で保存、qulityNumは0.0〜1.0。1.0は無圧縮 on saveNSImageAtPathAsJPG(anImage, outPath, qulityNum as real) set imageRep to anImage’s TIFFRepresentation() set aRawimg to current application’s NSBitmapImageRep’s imageRepWithData:imageRep set pathString to current application’s NSString’s stringWithString:outPath set newPath to pathString’s stringByExpandingTildeInPath() set myNewImageData to (aRawimg’s representationUsingType:(current application’s NSJPEGFileType) |properties|:{NSImageCompressionFactor:qulityNum}) set aRes to (myNewImageData’s writeToFile:newPath atomically:true) as boolean return aRes –true/false end saveNSImageAtPathAsJPG |
指定画像をTIFF形式で保存
| AppleScript名:指定画像をTIFF形式で保存 |
| — Created 2017-02-05 by Takaaki Naganoya — 2017 Piyomaru Software use AppleScript version "2.4" use scripting additions use framework "Foundation" use framework "AppKit" set aFile to POSIX path of (choose file of type {"public.image"} with prompt "Select Image A") set aImage to current application’s NSImage’s alloc()’s initWithContentsOfFile:aFile set fRes to retUUIDfilePath(aFile, "tif") of me set sRes to saveNSImageAtPathAsTIFF(imgRes, fRes) of me on retUUIDfilePath(aPath, aEXT) set aUUIDstr to (current application’s NSUUID’s UUID()’s UUIDString()) as string set aPath to ((current application’s NSString’s stringWithString:aPath)’s stringByDeletingLastPathComponent()’s stringByAppendingPathComponent:aUUIDstr)’s stringByAppendingPathExtension:aEXT return aPath end retUUIDfilePath –NSImageを指定パスにTIFF形式で保存 on saveNSImageAtPathAsTIFF(anImage, outPath) set imageRep to anImage’s TIFFRepresentation() set aRawimg to current application’s NSBitmapImageRep’s imageRepWithData:imageRep set pathString to current application’s NSString’s stringWithString:outPath set newPath to pathString’s stringByExpandingTildeInPath() set myNewImageData to (aRawimg’s representationUsingType:(current application’s NSTIFFFileType) |properties|:(missing value)) set aRes to (myNewImageData’s writeToFile:newPath atomically:true) as boolean return aRes –true/false end saveNSImageAtPathAsTIFF |
画像にステガノグラフィーで埋め込まれた文字列を取り出す
オープンソースのステガノグラフィーのプログラム「ISStego」(By Isaac Stevao Sena氏)を用いて、JPEG画像に埋め込んだ文字情報を取り出すAppleScriptです。
ISStegoは普通にObjective-Cで書かれたGUIベースのアプリケーションだったので、そのままではAppleScriptから呼び出せませんでした。
そこで、中身をそのままそっくり移し替えた新規フレームワーク「stegLib.framework」をでっちあげてビルドし、AppleScriptから呼び出してみました。
JPEG画像にUTF-8の文字情報(日本語文字列)を埋め込んで別のPNG画像に書き出し、書き出した画像からUTF-8の文字情報を取り出す実験を行ってみました。エンコードもデコードもうまく行っているようなので、うまく処理できていると思います。
ステガノグラフィーについて初めて聞いたのは20年ぐらい前のことと記憶していますが、こんなに手軽に使えるようになっていたとは驚きです。

▲Original Image

▲Information Embedded Image
| AppleScript名:画像にステガノグラフィーで埋め込まれた文字列を取り出す |
| — Created 2015-10-21 by Takaaki Naganoya — 2015 Piyomaru Software use AppleScript version "2.4" use scripting additions use framework "Foundation" use framework "AppKit" use framework "stegLib" –https://github.com/isena/ISStego set aFile to POSIX path of (choose file of type {"public.png"}) set aFilePath to current application’s NSString’s stringWithString:aFile set aURL to current application’s |NSURL|’s fileURLWithPath:aFilePath set aImage to current application’s NSImage’s alloc()’s initWithContentsOfURL:aURL set aDecodedData to current application’s ISStegoDecoder’s alloc()’s init()’s decodeStegoImage:aImage |error|:(missing value) set resStr to (current application’s NSString’s alloc()’s initWithData:aDecodedData encoding:(current application’s NSUTF8StringEncoding)) as string –> "長野谷隆昌/ぴよまるソフトウェア/Piyomaru Software" |
画像にステガノグラフィーで情報を埋め込む
オープンソースのステガノグラフィー(steganography)のプログラム「ISStego」(By Isaac Stevao Sena氏)を用いて、JPEG画像に文字情報を埋め込むAppleScriptです。
ISStegoは普通にObjective-Cで書かれたGUIベースのアプリケーションだったので、そのままではAppleScriptから呼び出せませんでした。
そこで、中身をそのままそっくり移し替えた新規フレームワーク「stegLib.framework」をでっちあげてビルドし、AppleScriptから呼び出してみました。
JPEG画像にUTF-8の文字情報(日本語文字列)を埋め込んで別のPNG画像に書き出し、書き出した画像からUTF-8の文字情報を取り出す実験を行ってみました。エンコードもデコードもうまく行っているようなので、うまく処理できていると思います。
ステガノグラフィー(steganography)について初めて聞いたのは20年ぐらい前のことと記憶していますが、こんなに手軽に使えるようになっていたとは驚きです。
Twitterにプログラムを投稿するのに、(140文字制限を回避するため)文字を画像化して投稿しているのを見て、「そこまでやるなら、画像にプログラムの文字データを埋め込めばいいのに」と思い、「ステガノグラフィーで埋め込めばいいんじゃないか?」ということで、埋め込めるようになったのですが、肝心のTwitterクライアントから画像をダウンロードする手段がなかったのがダメダメでした(Webブラウザ経由ならOKです)。
▲Original Image
▲Information Embedded Image
| AppleScript名:画像にステガノグラフィーで情報を埋め込む |
| — Created 2015-10-21 by Takaaki Naganoya — 2015 Piyomaru Software use AppleScript version "2.4" use scripting additions use framework "Foundation" use framework "AppKit" use framework "stegLib" –https://github.com/isena/ISStego set aFile to POSIX path of (choose file of type {"public.jpeg"}) set encString to "長野谷隆昌/ぴよまるソフトウェア/Piyomaru Software" set aFilePath to current application’s NSString’s stringWithString:aFile set aExt to "png" set newPath to aFilePath’s stringByDeletingPathExtension() set newPath2 to newPath’s stringByAppendingString:"_stego" set newPath3 to newPath2’s stringByAppendingPathExtension:aExt set aURL to current application’s |NSURL|’s fileURLWithPath:aFilePath set aImage to current application’s NSImage’s alloc()’s initWithContentsOfURL:aURL set strData to current application’s NSString’s stringWithString:encString set aEncimage to current application’s ISStegoEncoder’s alloc()’s init()’s stegoImageForImage:aImage |data|:strData |error|:(missing value) my saveImageRepAtPathAsPNG(aEncimage, newPath3) –画像を指定パスにPNG形式で保存 on saveImageRepAtPathAsPNG(anImage, outPath) set imageRep to anImage’s TIFFRepresentation() set aRawimg to current application’s NSBitmapImageRep’s imageRepWithData:imageRep set pathString to current application’s NSString’s stringWithString:outPath set newPath to pathString’s stringByExpandingTildeInPath() set myNewImageData to (aRawimg’s representationUsingType:(current application’s NSPNGFileType) |properties|:(missing value)) return (myNewImageData’s writeToFile:newPath atomically:true) as boolean end saveImageRepAtPathAsPNG |
指定写真をQRコード認識してエンコードされたデータをデコード

–> {“MEMORY:(メモ文字列)
NAME1:(姓名)
NAME2:(姓名読み)
TEL1:(電話番号1)
MAIL1:(メールアドレス1)
TEL2:(電話番号2)
MAIL2:(メールアドレス2)
MECARD:N:(姓),(名);SOUND:(姓読み),(名読み);TEL:(電話番号1);TEL:(電話番号2);EMAIL:(メールアドレス1);EMAIL:(メールアドレス2);NOTE:(メモ文字列) ;;”}
| AppleScript名:指定写真をQRコード認識してエンコードされたデータをデコード |
| use AppleScript version "2.4" use framework "Foundation" use framework "QuartzCore" use scripting additions –画像選択 set inputFile to choose file of type {"public.image"} –QRコード検出 set recogRes to qrcodeDetect(inputFile) of me –> (* {"http://www.su-gomori.com \nMEBKM:TITLE:スゴモリ;URL:http¥://www.su-gomori.com;;"} *) on qrcodeDetect(inputFile) –画像オープン set imageRef to openImageFile(inputFile) — 検出器のオプションを NSDictonary で作成 set optDic1 to current application’s NSDictionary’s dictionaryWithObject:(current application’s CIDetectorAccuracyHigh) forKey:(current application’s CIDetectorAccuracy) set faceDetector to current application’s CIDetector’s detectorOfType:(current application’s CIDetectorTypeQRCode) context:(missing value) options:optDic1 — QRコードの検出を行う際のオプションを NSDictonary で作成 set optDic2 to current application’s NSDictionary’s dictionaryWithObject:(current application’s CIDetectorImageOrientation) forKey:"Orientation" — QRコード検出を実行 set faceArray to faceDetector’s featuresInImage:imageRef options:optDic2 set fList to {} — 検出されたQRコードの位置とサイズをログに出力 repeat with i from 1 to (count of faceArray) set face to item i of faceArray set bRec to (face’s messageString()) as string –set cRec to retURLdecodedStrings(bRec) of me –URLエンコード対策 set the end of fList to bRec end repeat return fList end qrcodeDetect on openImageFile(imageFile) — imageFile: POSIX path 形式のファイルパス — aliasをURLに変換 set fileURL to current application’s |NSURL|’s fileURLWithPath:(POSIX path of imageFile) — CIImage を生成 return current application’s CIImage’s alloc()’s initWithContentsOfURL:fileURL end openImageFile on retURLencodedStrings(aText) set aStr to current application’s NSString’s stringWithString:aText set encodedStr to aStr’s stringByAddingPercentEncodingWithAllowedCharacters:(current application’s NSCharacterSet’s alphanumericCharacterSet()) return encodedStr as text end retURLencodedStrings on retURLdecodedStrings(aURLencodedStr) set aStr to current application’s NSString’s stringWithString:aURLencodedStr set aDecoded to aStr’s stringByRemovingPercentEncoding() return aDecoded as text end retURLdecodedStrings |
指定文字列からQRコード画像(PNG)をデスクトップに作成する(日本語を含むデータ)v2_画像拡大倍率指定
| AppleScript名:指定文字列からQRコード画像(PNG)をデスクトップに作成する(日本語を含むデータ)v2_画像拡大倍率指定 |
| — Created 2016-03-16 by Takaaki Naganoya — Modified 2017-01-15 by Takaaki Naganoya — 2016 Piyomaru Software use AppleScript version "2.4" use scripting additions use framework "Foundation" use framework "AppKit" use framework "QuartzCore" –QRCodeを作成 set a to "MEMORY:(メモ文字列) NAME1:(姓名) NAME2:(姓名読み) TEL1:(電話番号1) MAIL1:(メールアドレス1) TEL2:(電話番号2) MAIL2:(メールアドレス2) MECARD:N:(姓),(名);SOUND:(姓読み),(名読み);TEL:(電話番号1);TEL:(電話番号2);EMAIL:(メールアドレス1);EMAIL:(メールアドレス2);NOTE:(メモ文字列) ;;" set aStr to current application’s NSString’s stringWithString:a set strData to aStr’s dataUsingEncoding:(current application’s NSShiftJISStringEncoding) –シフトJISにエンコード set qrFilter to current application’s CIFilter’s filterWithName:"CIQRCodeGenerator" qrFilter’s setValue:strData forKey:"inputMessage" qrFilter’s setValue:"H" forKey:"inputCorrectionLevel" set anImage to qrFilter’s outputImage() set convImg to convCIimageToNSImage(anImage) of me –NSImageを拡大(アンチエイリアス解除で) set resizedImg to my resizeNSImageWithoutAntlialias:convImg toScale:16.0 –デスクトップに保存 set aDesktopPath to (current application’s NSProcessInfo’s processInfo()’s environment()’s objectForKey:("HOME"))’s stringByAppendingString:"/Desktop/" set savePath to aDesktopPath’s stringByAppendingString:((current application’s NSUUID’s UUID()’s UUIDString())’s stringByAppendingString:".png") saveNSImageAtPathAsPNG(resizedImg, savePath) of me on convCIimageToNSImage(aCIImage) set aRep to current application’s NSBitmapImageRep’s alloc()’s initWithCIImage:aCIImage set tmpSize to aRep’s |size|() set newImg to current application’s NSImage’s alloc()’s initWithSize:tmpSize newImg’s addRepresentation:aRep return newImg end convCIimageToNSImage on convNSImageToCIimage(aNSImage) set tiffDat to aNSImage’s TIFFRepresentation() set aRep to current application’s NSBitmapImageRep’s imageRepWithData:tiffDat set newImg to current application’s CIImage’s alloc()’s initWithBitmapImageRep:aRep return newImg end convNSImageToCIimage –NSImageを指定パスにPNG形式で保存 on saveNSImageAtPathAsPNG(anImage, outPath) set imageRep to anImage’s TIFFRepresentation() set aRawimg to current application’s NSBitmapImageRep’s imageRepWithData:imageRep set pathString to current application’s NSString’s stringWithString:outPath set newPath to pathString’s stringByExpandingTildeInPath() set myNewImageData to (aRawimg’s representationUsingType:(current application’s NSPNGFileType) |properties|:(missing value)) set aRes to (myNewImageData’s writeToFile:newPath atomically:true) as boolean return aRes –成功ならtrue、失敗ならfalseが返る end saveNSImageAtPathAsPNG –NSImageを指定倍率で拡大(アンチエイリアス解除状態で)–By Shane Stanley on resizeNSImageWithoutAntlialias:aSourceImg toScale:imgScale set aSize to aSourceImg’s |size|() set aWidth to (aSize’s width) * imgScale set aHeight to (aSize’s height) * imgScale set aRep to current application’s NSBitmapImageRep’s alloc()’s initWithBitmapDataPlanes:(missing value) pixelsWide:aWidth pixelsHigh:aHeight bitsPerSample:8 samplesPerPixel:4 hasAlpha:true isPlanar:false colorSpaceName:(current application’s NSCalibratedRGBColorSpace) bytesPerRow:0 bitsPerPixel:0 set newSize to {width:aWidth, height:aHeight} aRep’s setSize:newSize current application’s NSGraphicsContext’s saveGraphicsState() set theContext to current application’s NSGraphicsContext’s graphicsContextWithBitmapImageRep:aRep current application’s NSGraphicsContext’s setCurrentContext:theContext theContext’s setShouldAntialias:false theContext’s setImageInterpolation:(current application’s NSImageInterpolationNone) aSourceImg’s drawInRect:(current application’s NSMakeRect(0, 0, aWidth, aHeight)) fromRect:(current application’s NSZeroRect) operation:(current application’s NSCompositeCopy) fraction:(1.0) current application’s NSGraphicsContext’s restoreGraphicsState() set newImg to current application’s NSImage’s alloc()’s initWithSize:newSize newImg’s addRepresentation:aRep return newImg end resizeNSImageWithoutAntlialias:toScale: |
Finder上で選択中の画像を横方向に連結
| AppleScript名:Finder上で選択中の画像を横方向に連結 |
| — Created 2017-11-21 by Takaaki Naganoya — 2017 Piyomaru Software use AppleScript version "2.4" use scripting additions use framework "Foundation" use framework "QuartzCore" use framework "AppKit" use framework "MagicKit" –https://github.com/aidansteele/magickit property |NSURL| : a reference to current application’s |NSURL| property NSUUID : a reference to current application’s NSUUID property NSArray : a reference to current application’s NSArray property NSString : a reference to current application’s NSString property NSImage : a reference to current application’s NSImage property GEMagicKit : a reference to current application’s GEMagicKit property NSPNGFileType : a reference to current application’s NSPNGFileType property NSMutableArray : a reference to current application’s NSMutableArray property NSBitmapImageRep : a reference to current application’s NSBitmapImageRep property xGap : 10 –連結時の画像間のアキ(横方向) tell application "Finder" set aSel to selection as alias list if aSel = {} or aSel = "" then return end tell –選択した画像をArrayに入れる set imgList to NSMutableArray’s new() repeat with i in aSel set aPath to POSIX path of i –指定ファイルのUTIを取得して、画像(public.image)があれば処理を行う set aRes to (GEMagicKit’s magicForFileAtPath:aPath) set utiList to (aRes’s uniformTypeHierarchy()) as list if "public.image" is in utiList then set aNSImage to (NSImage’s alloc()’s initWithContentsOfFile:aPath) (imgList’s addObject:aNSImage) end if end repeat –KVCで画像の各種情報をまとめて取得 set sizeList to (imgList’s valueForKeyPath:"size") as list –NSSize to list of record conversion set maxHeight to ((NSArray’s arrayWithArray:sizeList)’s valueForKeyPath:"@max.height") as real set totalWidth to ((NSArray’s arrayWithArray:sizeList)’s valueForKeyPath:"@sum.width") as real set totalCount to ((NSArray’s arrayWithArray:sizeList)’s valueForKeyPath:"@count") as integer –出力画像作成 set tSize to current application’s NSMakeSize((totalWidth + (xGap * totalCount)), maxHeight) set newImage to NSImage’s alloc()’s initWithSize:tSize –順次画像を新規画像に上書き set xOrig to 0 repeat with i in (imgList as list) set j to contents of i set curSize to j’s |size|() set aRect to {xOrig, (maxHeight – (curSize’s height())), (curSize’s width()), (curSize’s height())} set newImage to composeImage(newImage, j, aRect) of me set xOrig to (curSize’s width()) + xGap end repeat –デスクトップにPNG形式でNSImageをファイル保存 set aDesktopPath to current application’s NSHomeDirectory()’s stringByAppendingString:"/Desktop/" set savePath to aDesktopPath’s stringByAppendingString:((NSUUID’s UUID()’s UUIDString())’s stringByAppendingString:".png") set fRes to saveNSImageAtPathAsPNG(newImage, savePath) of me –2つのNSImageを重ね合わせ合成してNSImageで返す on composeImage(backImage, composeImage, aTargerRect) set newImage to NSImage’s alloc()’s initWithSize:(backImage’s |size|()) copy aTargerRect to {x1, y1, x2, y2} set bRect to current application’s NSMakeRect(x1, y1, x2, y2) newImage’s lockFocus() set newImageRect to current application’s CGRectZero set newImageRect’s |size| to (newImage’s |size|) backImage’s drawInRect:newImageRect composeImage’s drawInRect:bRect newImage’s unlockFocus() return newImage end composeImage –NSImageを指定パスにPNG形式で保存 on saveNSImageAtPathAsPNG(anImage, outPath) set imageRep to anImage’s TIFFRepresentation() set aRawimg to NSBitmapImageRep’s imageRepWithData:imageRep set pathString to NSString’s stringWithString:outPath set newPath to pathString’s stringByExpandingTildeInPath() set myNewImageData to (aRawimg’s representationUsingType:(NSPNGFileType) |properties|:(missing value)) set aRes to (myNewImageData’s writeToFile:newPath atomically:true) as boolean return aRes –成功ならtrue、失敗ならfalseが返る end saveNSImageAtPathAsPNG |
Dockアイコンにプログレスバーを追加
Dockアイコンにプレグレスバーを描画するAppleScriptです。
書き方のクセがあからさまに違うこの内容は、Edama2さんからいただいたものですね、コレ。
| AppleScript名:Dockアイコンにプログレスバーを追加 |
| use AppleScript use framework "Foundation" use scripting additions on run set max to 100 repeat with num from 1 to max my progDockTile(max, num) delay 0.1 end repeat #アイコンを元に戻す current application’s NSApp’s setApplicationIconImage:(current application’s NSImage’s imageNamed:"NSApplicationIcon") end run #Dockアイコンにプログレスバーを追加 on progDockTile(max, current) set appIcon to current application’s NSImage’s imageNamed:"NSApplicationIcon" set iconSize to appIcon’s |size|() tell (current application’s NSImage’s alloc()’s initWithSize:iconSize) lockFocus() appIcon’s dissolveToPoint:(current application’s NSZeroPoint) fraction:1.0 set n to (iconSize’s width) / 16 #プログレスバーの長方形 set myRect to current application’s NSMakeRect(n / 2, n, n * 15, n * 1.6) –>{origin:{x:4.0, y:8.0}, |size|:{width:120.0, height:12.800000190735}} tell (current application’s NSBezierPath’s ¬ bezierPathWithRoundedRect:myRect ¬ xRadius:(myRect’s |size|’s height) / 2 ¬ yRadius:(myRect’s |size|’s height) / 2) current application’s (NSColor’s colorWithWhite:1.0 alpha:0.4)’s |set|() –>背景色 fill() current application’s NSColor’s whiteColor()’s |set|() –>枠色 stroke() end tell if current is greater than 0 then if current is greater than max then set current to max set myRect’s |size|’s width to (myRect’s |size|’s width) / max * current tell (current application’s NSBezierPath’s ¬ bezierPathWithRoundedRect:myRect ¬ xRadius:(myRect’s |size|’s height) / 2 ¬ yRadius:(myRect’s |size|’s height) / 2) set strartColor to current application’s NSColor’s colorWithRed:0.15 green:0.55 blue:1 alpha:0.8 set endColor to strartColor’s shadowWithLevel:0.7 set grad to current application’s NSGradient’s alloc()’s initWithStartingColor:strartColor endingColor:endColor grad’s drawInBezierPath:it angle:270.0 end tell end if unlockFocus() current application’s NSApp’s setApplicationIconImage:it end tell return (current + 1) end progDockTile |
アプリケーションのDockアイコンに文字列をバッジ表示(5文字まで)

| AppleScript名:アプリケーションのDockアイコンに文字列をバッジ表示(5文字まで) |
| use AppleScript version "2.4" use scripting additions use framework "Foundation" use framework "AppKit" –初版では入っておらず、環境によってはクラッシュした。後から追記 showDockBadge_("") delay 1 showDockBadge_("77777") –Max 5 文字 delay 5 showDockBadge_("") –Dockのアプリケーションアイコンに指定文字をバッジ表示 on showDockBadge:theText set theDockTile to current application’s NSApp’s dockTile() theDockTile’s setBadgeLabel:theText theDockTile’s display() end showDockBadge: |