Menu

Skip to content
AppleScriptの穴
  • Home
  • Products
  • Books
  • Docs
  • Events
  • Forum
  • About This Blog
  • License
  • 仕事依頼

AppleScriptの穴

Useful & Practical AppleScript archive. Click '★Click Here to Open This Script' Link to download each AppleScript

タグ: NSScreen

Pages書類の1ページ目の表の背景色を置換 v3.1(約20倍速)

Posted on 1月 29, 2019 by Takaaki Naganoya

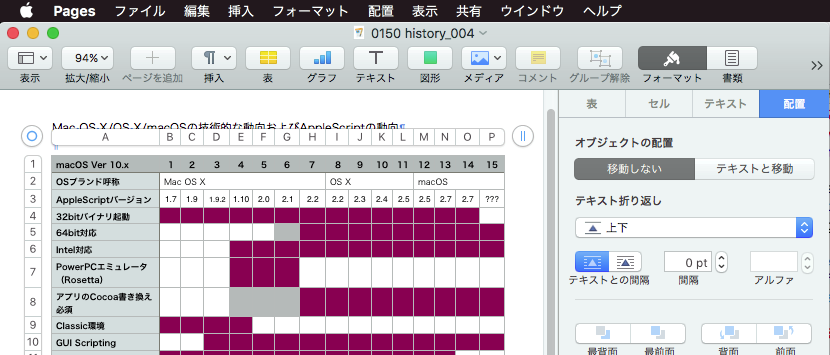
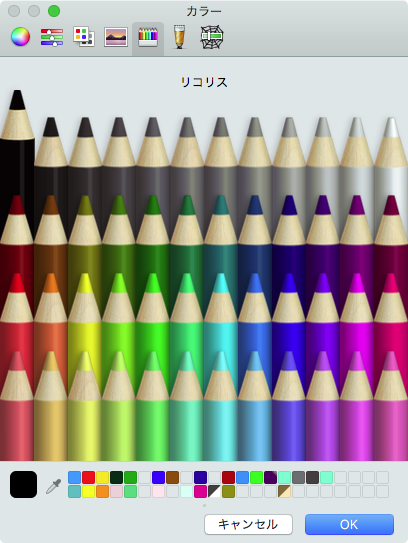
Pagesでオープン中の最前面の書類の1ページ目に存在する表オブジェクト中の背景色を置換するAppleScriptの高速化版です。

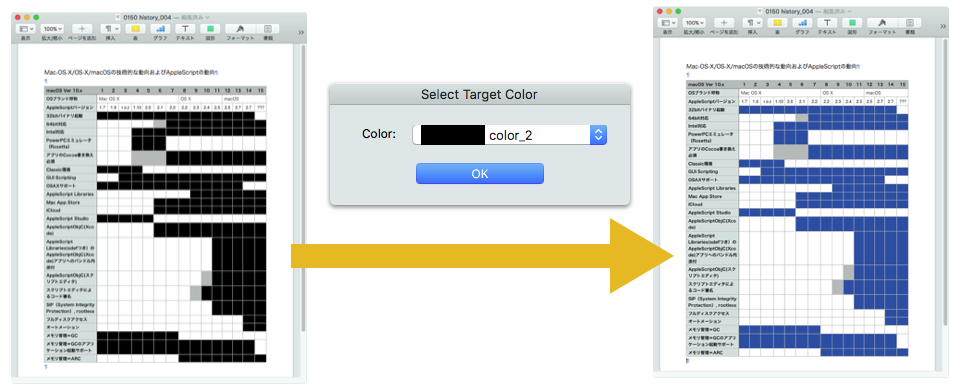
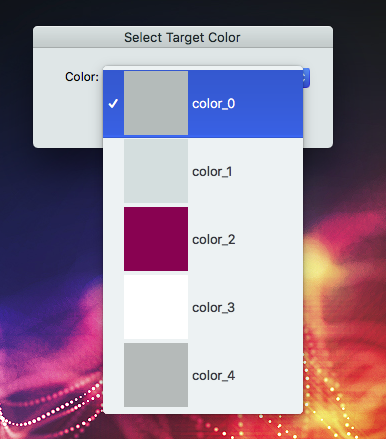
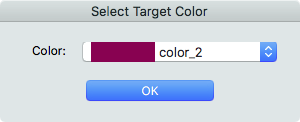
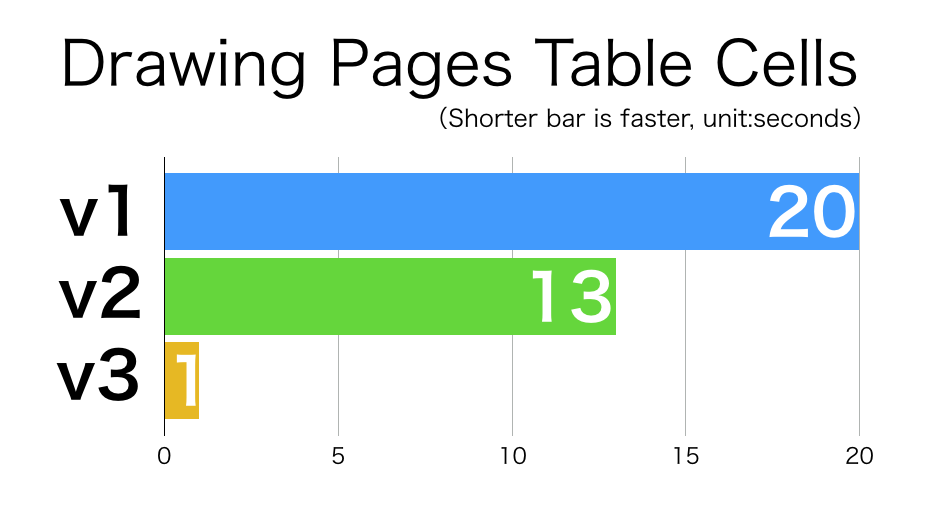
初版では表中のセルをすべて取得し、すべてのセルについて順次背景色を求め、置換対象色であれば塗り直していました。セル1個ずつ塗っていたので、それなりの時間(テストデータでは20秒)がかかっていました。GUIアプリケーションを操作するために存在しているAppleScriptですが、アプリケーションとの通信はコストが高いので、この通信部分を減らすことが高速化の基本です。

ちなみに、「ignoring application responses」〜「end ignoring」で囲った範囲は非同期実行モードで実行され、2.5倍ぐらい高速になります。AppleScriptでは、GUIアプリケーションに対してコマンドを実行した場合、「コマンド実行」「コマンド処理」「コマンド結果受信」の3ステップを行なっています。非同期実行モードでは「コマンド実行」だけを行うので高速ですが、設定値や状態を知りたいような場合には(結果が返ってこないので)使う意味がありません。本Blogを「ignoring application responses」で検索しても、あまり出てこないはずです。

v2では、高速化のために全セルの背景色を抽出したあとに、2次元配列データ上で当該セルの座標を計算し、塗り替え対象セルのみ処理することで約35%のスピードアップを行いました。GUIアプリケーションにコマンドを送る(そして、処理を待って結果を受信する)よりも配列変数上で検索を行ったほうがはるかに高速です。

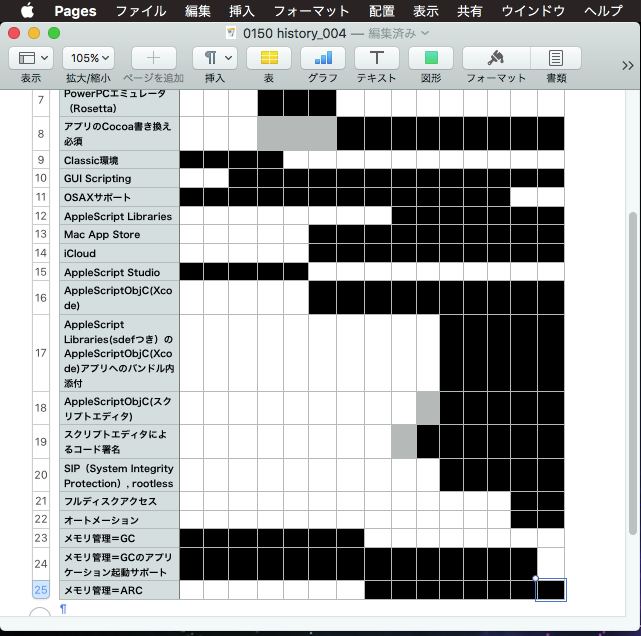
本v3では、さらなる高速化のために、2次元配列データ上で当該セルの座標を計算したあと、それらを横方向にスキャンして、点ではなく範囲(range)として評価し、極力複数のセルを連続する範囲(range)としてまとめて、rangeを一括塗りすることで初版から約20倍の高速化を行なったものです。v1やv2ではセルを1つずつ塗りつぶしていましたが、v3からは横方向に複数まとめてぬりつぶします。

実際のPages書類上の表の塗りつぶし領域が、ヘッダーや年表のような横方向に連続した塗りエリアを持つことが多いことに着目して、複数セルを一度に塗りつぶすことで高速化しました(1セル塗るのと複数セルを塗るのとで時間かわらず)。本Scriptでも1マスごとに塗りつぶしが存在するようなハッチング模様の表の塗りつぶし色を変更する場合にはパフォーマンスが最悪の状態に落ち込みますが、v2のレベル以下に落ちることはないでしょう。

この世のどこかには、さらにデータを1D Arrayではなく2D Arrayとして評価して、最大限まとめた面積のrangeとみなすことで本ルーチンの2倍ぐらいの速度で処理できるプログラムも存在しそうですが、人類の叡智のレベルを超えそうなので、自分はこのぐらいの速度が出れば満足です(総当たり的なアプローチで全パターンをシミュレーションして、一番いい結果が出るものを採用というのも考えないではないですが、シミュレーションをていねいに行うと処理時間が余計にかかるので、、、)。

1D Listに入っている座標値をX軸方向に評価して、連続値であればrangeに変換するルーチン「retRangeFromPosList」については、それほど真剣にテストしていないので処理が間違っている可能性もあります。
→ 処理に誤りがあったので修正しました(v3.1)

また、数値からExcelのA1形式のアドレスに変換するために作ってホコリをかぶっていた「aNumToExcelColumn」ルーチンも、一応テストはしてありますが変換できるアドレスの上限値が存在しているため注意が必要です。

AppleScript名:Pages書類の1ページ目の表の背景色を置換 v3.11
— Created 2017-07-15 by Takaaki Naganoya
— Modified 2019-01-29 by Takaaki Naganoya
— 2019 Piyomaru Software
use AppleScript version "2.4"
use scripting additions
use framework "Foundation"
use framework "AppKit"
use Bplus : script "BridgePlus" –https://www.macosxautomation.com/applescript/apps/BridgePlus.html

–v1:First Version
–v2:Pick Up target cells by calculate every background color (35% speed up)
–v3:Draw cells by range (x20 speed up)
–v3.1:Bug Fix (retRangeFromPosList)
–v3.1.1:Bug Fix (retRangeFromPosList)

property NSView : a reference to current application’s NSView
property NSColor : a reference to current application’s NSColor
property NSArray : a reference to current application’s NSArray
property NSMenu : a reference to current application’s NSMenu
property NSImage : a reference to current application’s NSImage
property NSScreen : a reference to current application’s NSScreen
property NSButton : a reference to current application’s NSButton
property NSWindow : a reference to current application’s NSWindow
property NSTextField : a reference to current application’s NSTextField
property NSMenuItem : a reference to current application’s NSMenuItem
property NSBezierPath : a reference to current application’s NSBezierPath
property NSPopUpButton : a reference to current application’s NSPopUpButton
property NSWindowController : a reference to current application’s NSWindowController
property NSTitledWindowMask : a reference to current application’s NSTitledWindowMask
property NSRoundedBezelStyle : a reference to current application’s NSRoundedBezelStyle
property NSNormalWindowLevel : a reference to current application’s NSNormalWindowLevel
property NSBackingStoreBuffered : a reference to current application’s NSBackingStoreBuffered
property NSMomentaryLightButton : a reference to current application’s NSMomentaryLightButton

property windisp : true
property wController : missing value
property pop1ind : 1

–初期化
set (my windisp) to true
set (my pop1ind) to 1
load framework

–Pagesの1ページ目にある表の塗り色を取得
tell application "Pages"
  tell front document
    tell table 1
      set c1List to background color of every cell
      
set aProp to properties
      
set xCount to column count of aProp
    end tell
  end tell
end tell

–色データをユニーク化(重複削除)
set bList to uniquifyList(c1List) of me

–Convert 1D List to 2D List
set c3List to (current application’s SMSForder’s subarraysFrom:c1List groupedBy:xCount |error|:(missing value)) as list

–missing value(背景色なし)を除外する
load framework
set c2List to (current application’s SMSForder’s arrayByDeletingBlanksIn:(bList)) as list

–Popup Menuで置換色選択
set aButtonMSG to "OK"
set aSliderValMSG to "Select Target Color"
set paramObj to {c2List, 65535, aButtonMSG, aSliderValMSG, 20}
my performSelectorOnMainThread:"getPopupValues:" withObject:(paramObj) waitUntilDone:true
set fromCol to (contents of item pop1ind of c2List)

–カラーピッカーで置換色選択
set tCol to choose color default color fromCol

set d1 to current date

–実際に表の背景色を置換する
set hitList to findDataFrom2DList(fromCol, c3List) of me –データ上で当該色のセル情報を計算する

set rangeList to retRangeFromPosList(hitList) of me

tell application "Pages"
  tell front document
    tell table 1
      repeat with i in rangeList
        set j to contents of i
        
        
ignoring application responses –非同期実行モードで高速実行
          set background color of range j to tCol
        end ignoring
      end repeat
    end tell
  end tell
end tell

set d2 to current date
return d2 – d1

–カラーポップアップメニューをウィンドウ表示
on getPopupValues:paramObj
  copy (paramObj as list) to {ap1List, aColMax, aButtonMSG, aSliderValMSG, timeOutSecs}
  
  
set (my windisp) to true
  
  
set aView to NSView’s alloc()’s initWithFrame:(current application’s NSMakeRect(0, 0, 360, 100))
  
  
–Labelをつくる
  
set a1TF to NSTextField’s alloc()’s initWithFrame:(current application’s NSMakeRect(30, 60, 80, 20))
  
a1TF’s setEditable:false
  
a1TF’s setStringValue:"Color:"
  
a1TF’s setDrawsBackground:false
  
a1TF’s setBordered:false
  
  
–Ppopup Buttonをつくる
  
set a1Button to NSPopUpButton’s alloc()’s initWithFrame:(current application’s NSMakeRect(80, 60, 200, 20)) pullsDown:false
  
a1Button’s removeAllItems()
  
  
set a1Menu to NSMenu’s alloc()’s init()
  
  
set iCount to 1
  
repeat with i in ap1List
    copy i to {r1, g1, b1}
    
    
set nsCol to makeNSColorFromRGBAval(r1, g1, b1, aColMax, aColMax) of me
    
set anImage to makeNSImageWithFilledWithColor(64, 64, nsCol) of me
    
    
set aTitle to "color_" & (iCount as string)
    
set aMenuItem to (NSMenuItem’s alloc()’s initWithTitle:aTitle action:"actionHandler:" keyEquivalent:"")
    (
aMenuItem’s setImage:anImage)
    (
aMenuItem’s setEnabled:true)
    (
a1Menu’s addItem:aMenuItem)
    
    
set iCount to iCount + 1
  end repeat
  
  
a1Button’s setMenu:a1Menu


–Buttonをつくる
  
set bButton to (NSButton’s alloc()’s initWithFrame:(current application’s NSMakeRect(80, 10, 140, 40)))
  
bButton’s setButtonType:(NSMomentaryLightButton)
  
bButton’s setBezelStyle:(NSRoundedBezelStyle)
  
bButton’s setTitle:aButtonMSG
  
bButton’s setTarget:me
  
bButton’s setAction:("clicked:")
  
bButton’s setKeyEquivalent:(return)
  
  
aView’s addSubview:a1TF
  
  
aView’s addSubview:a1Button
  
aView’s addSubview:bButton
  
aView’s setNeedsDisplay:true
  
  
–NSWindowControllerを作ってみた(いらない?)
  
set aWin to (my makeWinWithView(aView, 300, 100, aSliderValMSG))
  
  
set wController to NSWindowController’s alloc()
  
wController’s initWithWindow:aWin
  
  
wController’s showWindow:me
  
  
set aCount to timeOutSecs * 100
  
  
set hitF to false
  
repeat aCount times
    if (my windisp) = false then
      set hitF to true
      
exit repeat
    end if
    
delay 0.01
    
set aCount to aCount – 1
  end repeat
  
  
my closeWin:aWin
  
  
if hitF = true then
    set s1Val to ((a1Button’s indexOfSelectedItem() as number) + 1)
  else
    set s1Val to false
  end if
  
  
copy s1Val to my pop1ind
  
end getPopupValues:

on clicked:aSender
  set (my windisp) to false
end clicked:

–make Window for Display
on makeWinWithView(aView, aWinWidth, aWinHeight, aTitle)
  set aScreen to NSScreen’s mainScreen()
  
set aFrame to {{0, 0}, {aWinWidth, aWinHeight}}
  
  
set aBacking to NSTitledWindowMask
  
  
set aDefer to NSBackingStoreBuffered
  
  
— Window
  
set aWin to NSWindow’s alloc()
  (
aWin’s initWithContentRect:aFrame styleMask:aBacking backing:aDefer defer:false screen:aScreen)
  
  
aWin’s setTitle:aTitle
  
aWin’s setDelegate:me
  
aWin’s setDisplaysWhenScreenProfileChanges:true
  
aWin’s setHasShadow:true
  
aWin’s setIgnoresMouseEvents:false
  
aWin’s setLevel:(NSNormalWindowLevel)
  
aWin’s setOpaque:false
  
aWin’s setReleasedWhenClosed:true
  
aWin’s |center|()
  
  
aWin’s setContentView:aView
  
  
return aWin
end makeWinWithView

–close win
on closeWin:aWindow
  repeat with n from 10 to 1 by -1
    (aWindow’s setAlphaValue:n / 10)
    
delay 0.02
  end repeat
  
aWindow’s |close|()
end closeWin:

–Popup Action Handler
on actionHandler:sender
  set aTag to tag of sender as integer
  
set aTitle to title of sender as string
end actionHandler:

–aMaxValを最大値とする数値でNSColorを作成して返す
on makeNSColorFromRGBAval(redValue as integer, greenValue as integer, blueValue as integer, alphaValue as integer, aMaxVal as integer)
  set aRedCocoa to (redValue / aMaxVal) as real
  
set aGreenCocoa to (greenValue / aMaxVal) as real
  
set aBlueCocoa to (blueValue / aMaxVal) as real
  
set aAlphaCocoa to (alphaValue / aMaxVal) as real
  
set aColor to NSColor’s colorWithCalibratedRed:aRedCocoa green:aGreenCocoa blue:aBlueCocoa alpha:aAlphaCocoa
  
return aColor
end makeNSColorFromRGBAval

–指定サイズのNSImageを作成し、指定色で塗ってNSImageで返す
on makeNSImageWithFilledWithColor(aWidth, aHeight, fillColor)
  set anImage to NSImage’s alloc()’s initWithSize:(current application’s NSMakeSize(aWidth, aHeight))
  
anImage’s lockFocus()
  
—
  
set theRect to {{x:0, y:0}, {height:aHeight, width:aWidth}}
  
set theNSBezierPath to NSBezierPath’s bezierPath
  
theNSBezierPath’s appendBezierPathWithRect:theRect
  
—
  
fillColor’s |set|() –色設定
  
theNSBezierPath’s fill() –ぬりつぶし
  
—
  
anImage’s unlockFocus()
  
—
  
return anImage
end makeNSImageWithFilledWithColor

on uniquifyList(aList as list)
  set aArray to NSArray’s arrayWithArray:aList
  
set bArray to aArray’s valueForKeyPath:"@distinctUnionOfObjects.self"
  
return bArray as list
end uniquifyList

on findDataFrom2DList(anItem, aList)
  script spd
    property aList : {}
    
property resList : {}
  end script
  
  
set (aList of spd) to aList
  
set (resList of spd) to {}
  
  
set yCount to 1
  
  
repeat with i in (aList of spd)
    
    
set aResList to (Bplus’s indexesOfItem:anItem inList:i inverting:false) as list
    
    
set tmpList to {}
    
if aResList is not equal to {} then
      repeat with ii in aResList
        set jj to contents of ii
        
set the end of tmpList to {jj, yCount}
      end repeat
      
set (resList of spd) to (resList of spd) & tmpList
    end if
    
    
set yCount to yCount + 1
  end repeat
  
  
return (resList of spd) –return {{x, y}…..} item list (1-based)
end findDataFrom2DList

on retRangeFromPosList(posList as list)
  script rangeSPD
    property posList2 : {}
  end script
  
  
copy posList to (posList2 of rangeSPD)
  
  
–先頭データをピックアップ
  
set firstData to first item of (posList2 of rangeSPD)
  
set (posList2 of rangeSPD) to rest of (posList2 of rangeSPD)
  
  
copy firstData to {curX1, curY1}
  
set tmpRangeStr to aNumToExcelColumn(curX1) of me & (curY1 as string) & ":"
  
  
set tmpRange to {}
  
set hitF to false
  
  
set outList to {}
  
  
repeat with i in (posList2 of rangeSPD)
    copy i to {tmpX, tmpY}
    
    
–log {"{curX1, curY1}", {curX1, curY1}}
    
–log {"{tmpX, tmpY}", {tmpX, tmpY}}


if (curX1 + 1 = tmpX) and (curY1 = tmpY) then
      –X方向への連続値を拾っている最中
      
if hitF = false then
        –log "case 1a"
        
–log {"hitF", hitF}
        
set hitF to true
      else
        –log "case 1b"
        
–log {"hitF", hitF}
        
–横に連続しているブロックの途中
      end if
    else
      –直前の値と連続していない
      
if hitF = false then
        –log "case 2a"
        
–log {"hitF", hitF}
        
set tmpRangeStr to tmpRangeStr & aNumToExcelColumn(curX1) of me & (curY1 as string)
        
set the end of outList to tmpRangeStr
        
set tmpRangeStr to aNumToExcelColumn(tmpX) of me & (tmpY as string) & ":"
        
set hitF to false
      else
        –log "case 2b"
        
–log {"hitF", hitF}
        
–連続ブロックの末尾を拾った
        
set tmpRangeStr to tmpRangeStr & aNumToExcelColumn(curX1) of me & (curY1 as string)
        
set the end of outList to tmpRangeStr
        
set tmpRangeStr to aNumToExcelColumn(tmpX) of me & (tmpY as string) & ":"
        
set hitF to false
        
–log {"tmpRangeStr", tmpRangeStr}
      end if
    end if
    
    
copy {tmpX, tmpY} to {curX1, curY1}
  end repeat
  
  
–log {tmpRangeStr, hitF}
  
  
if (hitF = true) or (tmpRangeStr is not equal to "") then
    set tmpRangeStr to tmpRangeStr & aNumToExcelColumn(curX1) of me & (curY1 as string)
    
set the end of outList to tmpRangeStr
  end if
  
  
return outList
end retRangeFromPosList

–2008/05/01 By Takaaki Naganoya
–10進数数値をExcel 2004/2008的カラム表現にエンコードするサブルーチン を使いまわし
–1〜1351までの間であれば正しいエンコーディング結果を返す
on aNumToExcelColumn(origNum as integer)
  if origNum > 1351 then
    display dialog "エラー:Excel 2004/2008的カラム表現(A1形式)への変換ルーチンにおいて、想定範囲外(1351以上)のパラメータが指定されました" buttons {"OK"} default button 1
    
return ""
  end if
  
  
set upperDigitEncTable to {"A", "B", "C", "D", "E", "F", "G", "H", "I", "J", "K", "L", "M", "N", "O", "P", "Q", "R", "S", "T", "U", "V", "W", "X", "Y", "Z", "A"}
  
set lowerDigitEncTable to {"A", "B", "C", "D", "E", "F", "G", "H", "I", "J", "K", "L", "M", "N", "O", "P", "Q", "R", "S", "T", "U", "V", "W", "X", "Y", "Z", "A"}
  
  
set oNum to origNum
  
set nTh to 26
  
set stringLength to 4
  
  
–数字が1桁の場合の対応
  
if origNum < 27 then
    set aRes to (item origNum of upperDigitEncTable) as string
    
return aRes
  end if


if origNum > 702 then
    –3桁になる場合
    
set upupNum to oNum div 676 –整数除算–上の上の桁
    
set oNum to oNum – (upupNum * 676)
    
set upNum to oNum div 26 –整数除算–上の桁
    
set lowNum to oNum mod 26 – 1 –余剰計算–下の桁
    
    
–超つじつま合わせ処理
    
if lowNum = -1 then
      set upNum to upNum – 1
      
set lowNum to 25
    end if
    
    
set upupChar to (item upupNum of upperDigitEncTable) as string
    
set upChar to (item upNum of upperDigitEncTable) as string
    
set lowChar to (item (lowNum + 1) of lowerDigitEncTable) as string
    
set resText to upupChar & upChar & lowChar
    
  else
    –2桁の場合
    
set upNum to oNum div 26 –整数除算–上の桁
    
set lowNum to oNum mod 26 – 1 –余剰計算–下の桁
    
    
–超つじつま合わせ処理
    
if lowNum = -1 then
      set upNum to upNum – 1
      
set lowNum to 25
    end if
    
    
set upChar to (item upNum of upperDigitEncTable) as string
    
set lowChar to (item (lowNum + 1) of lowerDigitEncTable) as string
    
set resText to upChar & lowChar
    
  end if
  
  
return resText
end aNumToExcelColumn

★Click Here to Open This Script 

Posted in Color GUI list | Tagged 10.11savvy 10.12savvy 10.13savvy 10.14savvy NSArray NSBackingStoreBuffered NSBezierPath NSButton NSColor NSImage NSMenu NSMenuItem NSMomentaryLightButton NSNormalWindowLevel NSPopUpButton NSRoundedBezelStyle NSScreen NSTextField NSTitledWindowMask NSView NSWindow NSWindowController Pages | Leave a comment

Pages書類の1ページ目の表の背景色を置換

Posted on 1月 28, 2019 by Takaaki Naganoya

Pagesでオープン中の最前面の書類の1ページ目に存在する表オブジェクト中の背景色を置換するAppleScriptです。

Pages書類の「表オブジェクト」にAppleScriptからアクセスするためには、Pages上で表オブジェクトを選択した状態で、

「オブジェクトの配置」を「移動しない」に事前に設定しておく必要があります。

本AppleScriptを実行可能なランタイム環境は、スクリプトエディタ、アプレットの2つです。スクリプトメニューおよびScript Debuggerでは各GUI部品のクリックイベントを拾えないために、実行しても選択などが行えません。

のように、1ページのみのPages書類に表オブジェクトを入れて、「移動しない」設定にしてある状態で本AppleScriptを実行。

表のセル中の色をすべて取得して、ユニーク化してポップアップメニューから「変更元」の色を選択できます。

選択して、「OK」ボタンをクリック。ここで選択した色が置換されます。

選択した色をどの色に変更(置換)するのかを指定します。

黒い色を選択。

ちょっと置換に時間がかかりますが(テストデータ+開発環境で20秒前後)、セルの背景色をします。このあたり、Pagesの表オブジェクト中のセルに対して、background colorでフィルタ参照できればよかったのですが、自分が試した範囲ではフィルタ参照で抽出できませんでした。全セルを取得してループで背景色のチェックと置換を行なっています。

こういう機能が最初からPagesに実装されているわけでもないので、手作業よりははるかに高速なのでしばらく放っておけば終わるのでいいんじゃないでしょうか。

本来であれば、指定色に該当するセルをフィルタ参照で抽出して、ヒットしたセルだけでループして背景色を変更できるとベストですが、実際にフィルタ参照で抽出できるかどうかはアプリケーション側の対応度次第なので、実際にやってみないとわかりません。

AppleScript名:Pages書類の1ページ目の表の背景色を置換
— Created 2017-07-15 by Takaaki Naganoya
— Created 2019-01-28 by Takaaki Naganoya
— 2019 Piyomaru Software
use AppleScript version "2.4"
use scripting additions
use framework "Foundation"
use framework "AppKit"
use Bplus : script "BridgePlus" –https://www.macosxautomation.com/applescript/apps/BridgePlus.html

property NSView : a reference to current application’s NSView
property NSColor : a reference to current application’s NSColor
property NSArray : a reference to current application’s NSArray
property NSMenu : a reference to current application’s NSMenu
property NSImage : a reference to current application’s NSImage
property NSScreen : a reference to current application’s NSScreen
property NSButton : a reference to current application’s NSButton
property NSWindow : a reference to current application’s NSWindow
property NSTextField : a reference to current application’s NSTextField
property NSMenuItem : a reference to current application’s NSMenuItem
property NSBezierPath : a reference to current application’s NSBezierPath
property NSPopUpButton : a reference to current application’s NSPopUpButton
property NSWindowController : a reference to current application’s NSWindowController
property NSTitledWindowMask : a reference to current application’s NSTitledWindowMask
property NSRoundedBezelStyle : a reference to current application’s NSRoundedBezelStyle
property NSNormalWindowLevel : a reference to current application’s NSNormalWindowLevel
property NSBackingStoreBuffered : a reference to current application’s NSBackingStoreBuffered
property NSMomentaryLightButton : a reference to current application’s NSMomentaryLightButton

property windisp : false
property wController : false
property pop1ind : missing value

–Pagesの1ページ目にある表の塗り色を取得
tell application "Pages"
  tell front document
    tell table 1
      set cList to background color of every cell
    end tell
  end tell
end tell

–色データをユニーク化(重複削除)
set bList to uniquifyList(cList) of me

–missing value(背景色なし)を除外する
load framework
set cList to (current application’s SMSForder’s arrayByDeletingBlanksIn:(bList)) as list

–Popup Menuで置換色選択
set aButtonMSG to "OK"
set aSliderValMSG to "Select Target Color"
set paramObj to {cList, 65535, aButtonMSG, aSliderValMSG, 20}
my performSelectorOnMainThread:"getPopupValues:" withObject:(paramObj) waitUntilDone:true

–カラーピッカーで色選択
set fromCol to (contents of item pop1ind of cList)
set tCol to choose color default color fromCol

–実際に表の背景色を置換する
tell application "Pages"
  tell front document
    tell table 1
      set cellList to every cell
      
      
repeat with i in cellList
        set aBG to background color of i
        
        
if aBG = fromCol then
          ignoring application responses
            set background color of i to tCol
          end ignoring
        end if
      end repeat
    end tell
  end tell
end tell

–カラーポップアップメニューをウィンドウ表示
on getPopupValues:paramObj
  copy (paramObj as list) to {ap1List, aColMax, aButtonMSG, aSliderValMSG, timeOutSecs}
  
  
set (my windisp) to true
  
  
set aView to NSView’s alloc()’s initWithFrame:(current application’s NSMakeRect(0, 0, 360, 100))
  
  
–Labelをつくる
  
set a1TF to NSTextField’s alloc()’s initWithFrame:(current application’s NSMakeRect(30, 60, 80, 20))
  
a1TF’s setEditable:false
  
a1TF’s setStringValue:"Color:"
  
a1TF’s setDrawsBackground:false
  
a1TF’s setBordered:false
  
  
–Ppopup Buttonをつくる
  
set a1Button to NSPopUpButton’s alloc()’s initWithFrame:(current application’s NSMakeRect(80, 60, 200, 20)) pullsDown:false
  
a1Button’s removeAllItems()
  
  
set a1Menu to NSMenu’s alloc()’s init()
  
  
set iCount to 0
  
repeat with i in ap1List
    copy i to {r1, g1, b1}
    
    
set nsCol to makeNSColorFromRGBAval(r1, g1, b1, aColMax, aColMax) of me
    
set anImage to makeNSImageWithFilledWithColor(64, 64, nsCol) of me
    
    
set aTitle to "color_" & (iCount as string)
    
set aMenuItem to (NSMenuItem’s alloc()’s initWithTitle:aTitle action:"actionHandler:" keyEquivalent:"")
    (
aMenuItem’s setImage:anImage)
    (
aMenuItem’s setEnabled:true)
    (
a1Menu’s addItem:aMenuItem)
    
    
set iCount to iCount + 1
  end repeat
  
  
a1Button’s setMenu:a1Menu


–Buttonをつくる
  
set bButton to (NSButton’s alloc()’s initWithFrame:(current application’s NSMakeRect(80, 10, 140, 40)))
  
bButton’s setButtonType:(NSMomentaryLightButton)
  
bButton’s setBezelStyle:(NSRoundedBezelStyle)
  
bButton’s setTitle:aButtonMSG
  
bButton’s setTarget:me
  
bButton’s setAction:("clicked:")
  
bButton’s setKeyEquivalent:(return)
  
  
aView’s addSubview:a1TF
  
  
aView’s addSubview:a1Button
  
aView’s addSubview:bButton
  
aView’s setNeedsDisplay:true
  
  
–NSWindowControllerを作ってみた(いらない?)
  
set aWin to (my makeWinWithView(aView, 300, 100, aSliderValMSG))
  
  
set wController to NSWindowController’s alloc()
  
wController’s initWithWindow:aWin
  
  
wController’s showWindow:me
  
  
set aCount to timeOutSecs * 100
  
  
set hitF to false
  
repeat aCount times
    if (my windisp) = false then
      set hitF to true
      
exit repeat
    end if
    
delay 0.01
    
set aCount to aCount – 1
  end repeat
  
  
my closeWin:aWin
  
  
if hitF = true then
    set s1Val to ((a1Button’s indexOfSelectedItem() as number) + 1)
  else
    set s1Val to false
  end if
  
  
copy s1Val to my pop1ind
  
end getPopupValues:

on clicked:aSender
  set (my windisp) to false
end clicked:

–make Window for Display
on makeWinWithView(aView, aWinWidth, aWinHeight, aTitle)
  set aScreen to NSScreen’s mainScreen()
  
set aFrame to {{0, 0}, {aWinWidth, aWinHeight}}
  
  
set aBacking to NSTitledWindowMask
  
  
set aDefer to NSBackingStoreBuffered
  
  
— Window
  
set aWin to NSWindow’s alloc()
  (
aWin’s initWithContentRect:aFrame styleMask:aBacking backing:aDefer defer:false screen:aScreen)
  
  
aWin’s setTitle:aTitle
  
aWin’s setDelegate:me
  
aWin’s setDisplaysWhenScreenProfileChanges:true
  
aWin’s setHasShadow:true
  
aWin’s setIgnoresMouseEvents:false
  
aWin’s setLevel:(NSNormalWindowLevel)
  
aWin’s setOpaque:false
  
aWin’s setReleasedWhenClosed:true
  
aWin’s |center|()
  
  
aWin’s setContentView:aView
  
  
return aWin
end makeWinWithView

–close win
on closeWin:aWindow
  repeat with n from 10 to 1 by -1
    (aWindow’s setAlphaValue:n / 10)
    
delay 0.02
  end repeat
  
aWindow’s |close|()
end closeWin:

–Popup Action Handler
on actionHandler:sender
  set aTag to tag of sender as integer
  
set aTitle to title of sender as string
end actionHandler:

–aMaxValを最大値とする数値でNSColorを作成して返す
on makeNSColorFromRGBAval(redValue as integer, greenValue as integer, blueValue as integer, alphaValue as integer, aMaxVal as integer)
  set aRedCocoa to (redValue / aMaxVal) as real
  
set aGreenCocoa to (greenValue / aMaxVal) as real
  
set aBlueCocoa to (blueValue / aMaxVal) as real
  
set aAlphaCocoa to (alphaValue / aMaxVal) as real
  
set aColor to NSColor’s colorWithCalibratedRed:aRedCocoa green:aGreenCocoa blue:aBlueCocoa alpha:aAlphaCocoa
  
return aColor
end makeNSColorFromRGBAval

–指定サイズのNSImageを作成し、指定色で塗ってNSImageで返す
on makeNSImageWithFilledWithColor(aWidth, aHeight, fillColor)
  set anImage to NSImage’s alloc()’s initWithSize:(current application’s NSMakeSize(aWidth, aHeight))
  
anImage’s lockFocus()
  
—
  
set theRect to {{x:0, y:0}, {height:aHeight, width:aWidth}}
  
set theNSBezierPath to NSBezierPath’s bezierPath
  
theNSBezierPath’s appendBezierPathWithRect:theRect
  
—
  
fillColor’s |set|() –色設定
  
theNSBezierPath’s fill() –ぬりつぶし
  
—
  
anImage’s unlockFocus()
  
—
  
return anImage
end makeNSImageWithFilledWithColor

on uniquifyList(aList as list)
  set aArray to NSArray’s arrayWithArray:aList
  
set bArray to aArray’s valueForKeyPath:"@distinctUnionOfObjects.self"
  
return bArray as list
end uniquifyList

★Click Here to Open This Script 

Posted in Color GUI | Tagged 10.11savvy 10.12savvy 10.13savvy 10.14savvy NSArray NSBackingStoreBuffered NSBezierPath NSButton NSColor NSImage NSMenu NSMenuItem NSMomentaryLightButton NSNormalWindowLevel NSPopUpButton NSRoundedBezelStyle NSScreen NSTextField NSTitledWindowMask NSView NSWindow NSWindowController Pages | 1 Comment

Finder上で選択中の画像のうち、最小のものに合わせて各画像の右上を基準にサイズ統一

Posted on 1月 26, 2019 by Takaaki Naganoya

Finderで選択中の画像のうち、最小のものに合わせて各画像の右上を原点にサイズを統一するAppleScriptです。

Finderで選択中のファイルから画像のみ抽出し、そのうちサイズが最小のものに合わせて他の画像をトリミングし、変更したものをデスクトップフォルダに出力します。

以前に画像の左上を基準に自動トリミングするバージョンのScriptを作成しましたが、あれはメニュー操作の説明用スクリーンショットの大きさを統一するためのもの。右上基準の本バージョンは、Driveのリネームやステータスバーの操作内容を説明するためのスクリーンショットの大きさ統一のために用意したものです。


▲大きさを揃える画像をFinder上で選択


▲処理後の画像。大きさが最小の画像に合わせてそろっている。切り抜き基準は右上

スクリーンショット画像を複数撮った場合に、厳密に同じサイズに固定することは(各種スクリーンショット作成ユーティリティを使わないと)行いづらいところです。

そこで、最小の画像を計算で求めて、それに合わせて自動トリミングするようにしてみました。Cocoaの機能を用いて画像処理しているため、Photoshopは必要ありません。

最小の画像を求めるのに、幅+高さの値でソートして最小のものを求めています(widthとheightによる2 key sortではなく1 Keyで済ませたかったので)。

AppleScript名:Finder上で選択中の画像のうち、最小のものに合わせて各画像の右上を基準にサイズ統一
— Created 2018-01-26 by Takaaki Naganoya
— 2019 Piyomaru Software
use AppleScript version "2.5"
use scripting additions
use framework "Foundation"
use framework "AppKit"
use framework "QuartzCore"

property |NSURL| : a reference to current application’s |NSURL|
property NSUUID : a reference to current application’s NSUUID
property NSArray : a reference to current application’s NSArray
property NSString : a reference to current application’s NSString
property NSImage : a reference to current application’s NSImage
property NSScreen : a reference to current application’s NSScreen
property NSZeroRect : a reference to current application’s NSZeroRect
property NSPredicate : a reference to current application’s NSPredicate
property NSPNGFileType : a reference to current application’s NSPNGFileType
property NSMutableArray : a reference to current application’s NSMutableArray
property NSCompositeCopy : a reference to current application’s NSCompositeCopy
property NSGraphicsContext : a reference to current application’s NSGraphicsContext
property NSBitmapImageRep : a reference to current application’s NSBitmapImageRep
property NSURLTypeIdentifierKey : a reference to current application’s NSURLTypeIdentifierKey
property NSCalibratedRGBColorSpace : a reference to current application’s NSCalibratedRGBColorSpace

tell application "Finder"
  set selList to selection as alias list
end tell

–指定のAlias listのうち画像のみ抽出
set filRes1 to filterAliasListByUTI(selList, "public.image") of me
if filRes1 = {} then
  tell current application
    –Error Message (No Selection)
    
display dialog "Finder上で選択されているファイルはありません。" buttons {"OK"} default button 1 with icon 1 with title "画像リサイズ処理できません"
  end tell
  
return
end if

–各種情報を入れたArrayを作成
set anArray to NSMutableArray’s new()
repeat with i in selList
  set imgPath to (POSIX path of i)
  
  
set aImage to makeNSImageFromFile(i) of me
  
set sizeInfo to |size|() of aImage
  
set sizeInfo to sizeInfo & {aImg:aImage, total:(width of sizeInfo) + (height of sizeInfo), myPath:imgPath}
  (
anArray’s addObject:sizeInfo)
end repeat

–最小のサイズの画像の算出
set aRes to anArray’s valueForKeyPath:("@min.total")
set bRes to first item of (filterRecListByLabel(anArray, "total == " & aRes as string) of me) –最小サイズの画像

–最小サイズ画像のwidthとheight
set minWidth to bRes’s width
set minHeight to bRes’s height

–環境情報の取得
set aPath to POSIX path of (path to desktop)
set retinaF to (NSScreen’s mainScreen()’s backingScaleFactor()) as real
–>  2.0 (Retina) / 1.0 (Non Retina)

set cRes to filterRecListByLabel(anArray, "total != " & aRes as string) of me –最小サイズ以外の画像

repeat with i in cRes
  set j to contents of i
  
set anImage to aImg of j
  
set fRes to myPath of j
  
  
set tmpSize to |size|() of anImage
  
set tmpWidth to (width of tmpSize)
  
set tmpHeight to (height of tmpSize)
  
  
set cropedImage to (my cropNSImageBy:{(tmpWidth – minWidth), 0, minWidth, minHeight} fromImage:anImage)
  
  
–Retina環境対策
  
if retinaF > 1.0 then
    set cropedImage to (my resizedImage:cropedImage toScale:(1.0))
  end if
  
  
–ファイル書き込み
  
set fRes to retUUIDfilePathFromDir(aPath, "png") of me
  
set sRes to saveNSImageAtPathAsPNG(cropedImage, fRes) of me
end repeat

–リストに入れたレコードを、指定の属性ラベルの値で抽出
on filterRecListByLabel(aRecList as list, aPredicate as string)
  –ListからNSArrayへの型変換
  
set aArray to NSArray’s arrayWithArray:aRecList
  
  
–抽出
  
set aPredicate to NSPredicate’s predicateWithFormat:aPredicate
  
set filteredArray to aArray’s filteredArrayUsingPredicate:aPredicate
  
  
–NSArrayからListに型変換して返す
  
set bList to filteredArray as list
  
return bList
end filterRecListByLabel

–Alias listから指定UTIに含まれるものをPOSIX pathのリストで返す
on filterAliasListByUTI(aList, targUTI)
  set newList to {}
  
repeat with i in aList
    set j to POSIX path of i
    
set tmpUTI to my retUTIfromPath(j)
    
set utiRes to my filterUTIList({tmpUTI}, targUTI)
    
if utiRes is not equal to {} then
      set the end of newList to j
    end if
  end repeat
  
return newList
end filterAliasListByUTI

–指定のPOSIX pathのファイルのUTIを求める
on retUTIfromPath(aPOSIXPath)
  set aURL to |NSURL|’s fileURLWithPath:aPOSIXPath
  
set {theResult, theValue} to aURL’s getResourceValue:(reference) forKey:NSURLTypeIdentifierKey |error|:(missing value)
  
  
if theResult = true then
    return theValue as string
  else
    return theResult
  end if
end retUTIfromPath

–UTIリストが指定UTIに含まれているかどうか演算を行う
on filterUTIList(aUTIList, aUTIstr)
  set anArray to NSArray’s arrayWithArray:aUTIList
  
set aPred to NSPredicate’s predicateWithFormat_("SELF UTI-CONFORMS-TO %@", aUTIstr)
  
set bRes to (anArray’s filteredArrayUsingPredicate:aPred) as list
  
return bRes
end filterUTIList

on cropNSImageTo:{x1, y1, x2, y2} fromImage:theImage
  set newWidth to x2 – x1
  
set newHeight to y2 – y1
  
set theSize to (theImage’s |size|()) as record
  
set oldHeight to height of theSize
  
  
— transpose y value for Cocoa coordintates
  
set y1 to oldHeight – newHeight – y1
  
set newRect to {{x:x1, y:y1}, {width:newWidth, height:newHeight}}
  
theImage’s lockFocus()
  
set theRep to NSBitmapImageRep’s alloc()’s initWithFocusedViewRect:newRect
  
theImage’s unlockFocus()
  
  
set outImage to NSImage’s alloc()’s initWithSize:(theRep’s |size|())
  
outImage’s addRepresentation:theRep
  
  
return outImage
end cropNSImageTo:fromImage:

on makeNSImageFromFile(anAlias)
  set imgPath to (POSIX path of anAlias)
  
set aURL to (|NSURL|’s fileURLWithPath:(imgPath))
  
return (NSImage’s alloc()’s initWithContentsOfURL:aURL)
end makeNSImageFromFile

–NSImageを指定の大きさでトリミング
on cropNSImageBy:{x1, y1, newWidth, newHeight} fromImage:theImage
  set theSize to (theImage’s |size|()) as record
  
set oldHeight to height of theSize
  
  
— transpose y value for Cocoa coordintates
  
set y1 to oldHeight – newHeight – y1
  
set newRect to {{x:x1, y:y1}, {width:newWidth, height:newHeight}}
  
theImage’s lockFocus()
  
set theRep to NSBitmapImageRep’s alloc()’s initWithFocusedViewRect:newRect
  
theImage’s unlockFocus()
  
  
set outImage to NSImage’s alloc()’s initWithSize:(theRep’s |size|())
  
outImage’s addRepresentation:theRep
  
  
return outImage
end cropNSImageBy:fromImage:

on retUUIDfilePathFromDir(aPath, aEXT)
  set aUUIDstr to (NSUUID’s UUID()’s UUIDString()) as string
  
set aPath to ((NSString’s stringWithString:aPath)’s stringByAppendingPathComponent:aUUIDstr)’s stringByAppendingPathExtension:aEXT
  
return aPath
end retUUIDfilePathFromDir

–NSImageを指定パスにPNG形式で保存
on saveNSImageAtPathAsPNG(anImage, outPath)
  set imageRep to anImage’s TIFFRepresentation()
  
set aRawimg to NSBitmapImageRep’s imageRepWithData:imageRep
  
set pathString to NSString’s stringWithString:outPath
  
set newPath to pathString’s stringByExpandingTildeInPath()
  
set myNewImageData to (aRawimg’s representationUsingType:(NSPNGFileType) |properties|:(missing value))
  
set aRes to (myNewImageData’s writeToFile:newPath atomically:true) as boolean
  
return aRes –true/false
end saveNSImageAtPathAsPNG

on resizedImage:aSourceImg toScale:imgScale
  if (aSourceImg’s isValid()) as boolean = false then error "Invalid NSImage"
  
  
set aSize to aSourceImg’s |size|()
  
–>  {​​​​​width:32.0, ​​​​​height:32.0​​​}
  
  
set aWidth to (aSize’s width) * imgScale
  
set aHeight to (aSize’s height) * imgScale
  
  
set aRep to NSBitmapImageRep’s alloc()’s initWithBitmapDataPlanes:(missing value) pixelsWide:aWidth pixelsHigh:aHeight bitsPerSample:8 samplesPerPixel:4 hasAlpha:true isPlanar:false colorSpaceName:(NSCalibratedRGBColorSpace) bytesPerRow:0 bitsPerPixel:0
  
  
set newSize to {width:aWidth, height:aHeight}
  
aRep’s setSize:newSize
  
  
NSGraphicsContext’s saveGraphicsState()
  
NSGraphicsContext’s setCurrentContext:(NSGraphicsContext’s graphicsContextWithBitmapImageRep:aRep)
  
  
aSourceImg’s drawInRect:(current application’s NSMakeRect(0, 0, aWidth, aHeight)) fromRect:(NSZeroRect) operation:(NSCompositeCopy) fraction:(1.0)
  
  
NSGraphicsContext’s restoreGraphicsState()
  
  
set newImg to NSImage’s alloc()’s initWithSize:newSize
  
newImg’s addRepresentation:aRep
  
  
return newImg
end resizedImage:toScale:

★Click Here to Open This Script 

Posted in file Image | Tagged 10.11savvy 10.12savvy 10.13savvy NSArray NSBitmapImageRep NSImage NSPredicate NSScreen NSString NSURL NSUUID | Leave a comment

WebView+ボタンを作成 v3.1(URLから読み込み)

Posted on 12月 3, 2018 by Takaaki Naganoya

WkWebViewを動的に生成して、YouTube上の指定ムービーを再生するAppleScriptの改良版です。とくにYouTube限定ではなく、Webコンテンツのブラウズを単体で行うための実験的なScriptです。

# AppleScriptでは、Webブラウザに命令を出せば数行のコマンドで簡単に任意のURLのWebコンテンツを表示させられますが、本ScriptはAppleScriptから他のアプリケーションを介さずに直接Cocoaの機能を呼び出して自前でWebコンテンツを表示させるものです。

NSWindow+NSSplitView+WKWebViewを作成して、Webサーバー上の内容を表示します。v3.0からの改良点は、再生中のWebコンテンツのクリアを明示的に行えるようになったことです。

スクリプトエディタ上で実行し、「OK」ボタンをクリックすると、ウィンドウがクローズし、Webコンテンツの再生も停止します(前バージョンではこれができなかった)。Script MenuおよびScript Debugger上では実行できるもののWebコンテンツ操作はできず、OKボタンも反応しません。

AppleScript Appletとして書き出して実行すると、そのままではインターネットへのアクセスが許可されていないため、表示できません。Info.plistのエントリを書き換える必要があるものと思われます。

再生中のWebコンテンツのクリアについては、US Appleが主催しているCocoa-Dev MLにFritz Andersonが2012年4月11日に投稿した、

On 11 Apr 2012, at 7:51 AM, Koen van der Drift wrote:

> Is there a way to empty or clear a webview when I close the popover,
> so that next time it is opened it doesn't show the previous page? I
> don't want to clear the cache, because when the webview is opened for
> an item that was already selected, it can be loaded from the cache.

What works for me on iOS is having the UIWebView load about:blank. Maybe it works the same in Mac OS.

	— F

が参考になりました。Google検索しても見つからなかったのに、MLの過去ログを漁ってみたら割と簡単に発見。あらかじめMLのログをAppleScriptのロボットでテーマごとに自動フォルダ分けして整理してあったのが効きました。

あとは、実行環境がかなり限定される(Script DebuggerやScript Menuから実行すると、Webコンテンツ操作やボタンのクリックができなくなる)点をなんとかしたいところです。AppleScriptアプレットだとそのまま書き出した状態ではネットワーク接続自体ができない(Info.plist書き換えでなんとか?)とか。

Script Menuからの実行時に無反応になる件をなんとかしたいところです。個人的には、Script Menuが主力実行(ランタイム)環境だと思っているので。

AppleScript名:WebView+ボタンを作成 v3.1(URLから読み込み)
— Created 2018-11-27 by Takaaki Naganoya
— Modified 2018-12-03 by Takaaki Naganoya
— 2018 Piyomaru Software
use AppleScript version "2.5"
use scripting additions
use framework "Foundation"
use framework "AppKit"
use framework "WebKit"

property |NSURL| : a reference to current application’s |NSURL|
property NSString : a reference to current application’s NSString
property NSScreen : a reference to current application’s NSScreen
property NSButton : a reference to current application’s NSButton
property NSWindow : a reference to current application’s NSWindow
property NSSplitView : a reference to current application’s NSSplitView
property NSTextView : a reference to current application’s NSTextView
property NSScrollView : a reference to current application’s NSScrollView
property WKWebView : a reference to current application’s WKWebView
property WKUserScript : a reference to current application’s WKUserScript
property NSURLRequest : a reference to current application’s NSURLRequest
property NSMutableString : a reference to current application’s NSMutableString
property NSWindowController : a reference to current application’s NSWindowController
property NSTitledWindowMask : a reference to current application’s NSTitledWindowMask
property NSRoundedBezelStyle : a reference to current application’s NSRoundedBezelStyle
property NSUTF8StringEncoding : a reference to current application’s NSUTF8StringEncoding
property NSBackingStoreBuffered : a reference to current application’s NSBackingStoreBuffered
property WKUserContentController : a reference to current application’s WKUserContentController
property NSMomentaryLightButton : a reference to current application’s NSMomentaryLightButton
property WKWebViewConfiguration : a reference to current application’s WKWebViewConfiguration
property NSScreenSaverWindowLevel : a reference to current application’s NSScreenSaverWindowLevel
property NSWindowStyleMaskResizable : a reference to current application’s NSWindowStyleMaskResizable
property NSWindowStyleMaskMiniaturizable : a reference to current application’s NSWindowStyleMaskMiniaturizable
property WKUserScriptInjectionTimeAtDocumentEnd : a reference to current application’s WKUserScriptInjectionTimeAtDocumentEnd

property windisp : false
property wController : false

set aWidth to 1100
set aHeight to 700

set aTitle to "WkWebView test2"
set aButtonMSG to "OK"

set aURL to "https://www.youtube.com/embed/GP_tVXTYdmY?autoplay=1&hd=1"

set paramObj to {aWidth, aHeight, aTitle, aURL, aButtonMSG, "600"}
my performSelectorOnMainThread:"dispWebView:" withObject:(paramObj) waitUntilDone:true

on dispWebView:paramObj
  set my windisp to false
  
copy (paramObj as list) to {aWidth, aHeight, aTitle, tmpURL, aButtonMSG, timeOutSecs}
  
  
set (my windisp) to true
  
  
set aWidth to aWidth as integer
  
set aHeight to aHeight as integer
  
set tmpURL to tmpURL as string
  
  
–WebViewをつくる
  
set aConf to WKWebViewConfiguration’s alloc()’s init()
  
  
–指定URLのJavaScriptをFetch
  
set jsSource to my fetchJSSourceString(tmpURL)
  
set userScript to WKUserScript’s alloc()’s initWithSource:jsSource injectionTime:(WKUserScriptInjectionTimeAtDocumentEnd) forMainFrameOnly:true
  
set userContentController to WKUserContentController’s alloc()’s init()
  
userContentController’s addUserScript:(userScript)
  
aConf’s setUserContentController:userContentController
  
  
set aWebView to WKWebView’s alloc()’s initWithFrame:(current application’s NSMakeRect(0, 0, aWidth, aHeight – 100)) configuration:aConf
  
aWebView’s setNavigationDelegate:me
  
aWebView’s setUIDelegate:me
  
aWebView’s setTranslatesAutoresizingMaskIntoConstraints:true
  
  
set bURL to |NSURL|’s URLWithString:tmpURL
  
set aReq to NSURLRequest’s requestWithURL:bURL
  
aWebView’s loadRequest:aReq –Webコンテンツのローディング


–Buttonをつくる
  
set bButton to (NSButton’s alloc()’s initWithFrame:(current application’s NSMakeRect(0, 0, aWidth, 40)))
  
bButton’s setTitle:aButtonMSG
  
bButton’s setTarget:me
  
bButton’s setAction:("clicked:")
  
bButton’s setKeyEquivalent:(return)
  
  
–SplitViewをつくる
  
set aSplitV to NSSplitView’s alloc()’s initWithFrame:(current application’s NSMakeRect(0, 0, aWidth, aHeight))
  
aSplitV’s setVertical:false
  
  
aSplitV’s addSubview:aWebView
  
aSplitV’s addSubview:bButton
  
aSplitV’s setNeedsDisplay:true
  
  
set aWin to makeWinWithView(aSplitV, aWidth, aHeight, aTitle, 1.0)
  
  
–NSWindowControllerを作ってみた
  
set my wController to NSWindowController’s alloc()
  
my (wController’s initWithWindow:aWin)
  
  
my (wController’s showWindow:me)
  
  
set aCount to (timeOutSecs as string as number) * 10 –timeout seconds * 10
  
repeat aCount times
    if (my windisp) = false then
      exit repeat
    end if
    
delay 0.1
  end repeat
  
  
–Stop Web View Action
  
set bURL to |NSURL|’s URLWithString:"about:blank"
  
set bReq to NSURLRequest’s requestWithURL:bURL
  
aWebView’s loadRequest:bReq
  
  
my closeWin:bButton
end dispWebView:

–Button Clicked Event Handler
on clicked:aSender
  set (my windisp) to false
  
my closeWin:aSender
end clicked:

–make Window for Input
on makeWinWithView(aView, aWinWidth, aWinHeight, aTitle, alphaV)
  set aScreen to NSScreen’s mainScreen()
  
set aFrame to {{0, 0}, {aWinWidth, aWinHeight}}
  
set aBacking to NSTitledWindowMask –NSBorderlessWindowMask
  
set aDefer to NSWindowStyleMaskMiniaturizable
  
  
— Window
  
set aWin to NSWindow’s alloc()
  (
aWin’s initWithContentRect:aFrame styleMask:aBacking backing:aDefer defer:false screen:aScreen)
  
  
aWin’s setTitle:aTitle
  
aWin’s setDelegate:me
  
aWin’s setDisplaysWhenScreenProfileChanges:true
  
aWin’s setHasShadow:true
  
aWin’s setIgnoresMouseEvents:false
  
aWin’s setLevel:(NSScreenSaverWindowLevel)
  
aWin’s setOpaque:false
  
aWin’s setAlphaValue:alphaV –append
  
aWin’s setReleasedWhenClosed:true
  
aWin’s |center|()
  
  
— Set Custom View
  
aWin’s setContentView:aView
  
  
return aWin
end makeWinWithView

–close win
on closeWin:aSender
  set tmpWindow to aSender’s |window|()
  
  
repeat with n from 10 to 1 by -1
    (tmpWindow’s setAlphaValue:n / 10)
    
delay 0.02
  end repeat
  
  
my wController’s |close|()
end closeWin:

on viewDidLoad:aNotification
  return true
end viewDidLoad:

on fetchJSSourceString(aURL)
  set jsURL to |NSURL|’s URLWithString:aURL
  
set jsSourceString to NSString’s stringWithContentsOfURL:jsURL encoding:(NSUTF8StringEncoding) |error|:(missing value)
  
return jsSourceString
end fetchJSSourceString

★Click Here to Open This Script 

Posted in URL | Tagged 10.11savvy 10.12savvy 10.13savvy 10.14savvy NSBackingStoreBuffered NSButton NSMomentaryLightButton NSMutableString NSRoundedBezelStyle NSScreen NSSplitView NSString NSTitledWindowMask NSURL NSURLRequest NSUTF8StringEncoding NSWindow NSWindowController WKUserContentController WKUserScript WKUserScriptInjectionTimeAtDocumentEnd WKWebView WKWebViewConfiguration | 1 Comment

WebView+ボタンを作成 v3(URLから読み込み)

Posted on 11月 28, 2018 by Takaaki Naganoya

WkWebViewを動的に生成して、YouTube上の指定ムービーを再生するAppleScriptです。

# AppleScriptでは、Webブラウザに命令を出せば数行のコマンドで簡単に任意のURLのWebコンテンツを表示させられますが、本ScriptはAppleScriptから他のアプリケーションを介さずに直接Cocoaの機能を呼び出して自前でWebコンテンツを表示させるものです

NSWindow+NSSplitView+WKWebViewを作成して、Webサーバー上の内容を表示します。WkWebViewでWebの内容を表示させるのにかなり苦労しましたが、Objective-Cのサンプル数本を比較してテストし実現しました。

WkWebViewでコンテンツを表示するのにこんなに大変だと思いませんでしたが、これができるようになったおかげで、AppleScriptの処理結果のURLを(Webブラウザを利用せずに)プレビューできます。

グラフ描画のプログラムがJavaScript+WebViewで作られているケースが多々あるため、凝ったインタラクティブなグラフの表示を行ったり画像やPDFに出力できるようにもなったわけで、たいへんけっこうなことです。


▲Auto StartでYouTube上のムービーの再生を開始する

まだ解決できていないのは、YouTubeのムービー再生が始まるとウィンドウをクローズしてAppleScriptの実行が終了していても再生中の音声が停止しないあたりでしょうか。メモリ上からWebブラウザのオブジェクトを明示的にパージする方法についてはまだ実装できていません。

あと、Script Debugger上で動かすと、WkWebView上のコンテンツの操作(YouTube映像の再生コントロールとか)ができなくなります。ねんのため。

AppleScript名:WebView+ボタンを作成 v3(URLから読み込み)
— Created 2018-11-27 by Takaaki Naganoya
— 2018 Piyomaru Software
use AppleScript version "2.4"
use scripting additions
use framework "Foundation"
use framework "AppKit"
use framework "WebKit"

property |NSURL| : a reference to current application’s |NSURL|
property NSColor : a reference to current application’s NSColor
property NSString : a reference to current application’s NSString
property NSScreen : a reference to current application’s NSScreen
property NSButton : a reference to current application’s NSButton
property NSWindow : a reference to current application’s NSWindow
property NSSplitView : a reference to current application’s NSSplitView
property NSTextView : a reference to current application’s NSTextView
property NSScrollView : a reference to current application’s NSScrollView
property WKWebView : a reference to current application’s WKWebView
property WKUserScript : a reference to current application’s WKUserScript
property NSURLRequest : a reference to current application’s NSURLRequest
property NSMutableString : a reference to current application’s NSMutableString
property NSWindowController : a reference to current application’s NSWindowController
property NSTitledWindowMask : a reference to current application’s NSTitledWindowMask
property NSRoundedBezelStyle : a reference to current application’s NSRoundedBezelStyle
property NSUTF8StringEncoding : a reference to current application’s NSUTF8StringEncoding
property NSBackingStoreBuffered : a reference to current application’s NSBackingStoreBuffered
property WKUserContentController : a reference to current application’s WKUserContentController
property NSMomentaryLightButton : a reference to current application’s NSMomentaryLightButton
property WKWebViewConfiguration : a reference to current application’s WKWebViewConfiguration
property NSScreenSaverWindowLevel : a reference to current application’s NSScreenSaverWindowLevel
property WKUserScriptInjectionTimeAtDocumentEnd : a reference to current application’s WKUserScriptInjectionTimeAtDocumentEnd

property windisp : false
property wController : false

set aWidth to 1100
set aHeight to 600

set aTitle to "WkWebView test"
set aButtonMSG to "OK"
–set aURL to "https://www.youtube.com/watch?v=GP_tVXTYdmY&autoplay=1&hd=1"
set aURL to "https://www.youtube.com/embed/GP_tVXTYdmY?autoplay=1&hd=1"

set paramObj to {aWidth, aHeight, aTitle, aURL, aButtonMSG, "600"}
my performSelectorOnMainThread:"dispWebView:" withObject:(paramObj) waitUntilDone:true

on dispWebView:paramObj
  set my windisp to false
  
copy (paramObj as list) to {aWidth, aHeight, aTitle, tmpURL, aButtonMSG, timeOutSecs}
  
  
set (my windisp) to true
  
  
set aWidth to aWidth as integer
  
set aHeight to aHeight as integer
  
set tmpURL to tmpURL as string
  
  
–WebViewをつくる
  
set aConf to WKWebViewConfiguration’s alloc()’s init()
  
set jsSource to my fetchJSSourceString(tmpURL)
  
set userScript to WKUserScript’s alloc()’s initWithSource:jsSource injectionTime:(WKUserScriptInjectionTimeAtDocumentEnd) forMainFrameOnly:true
  
set userContentController to WKUserContentController’s alloc()’s init()
  
userContentController’s addUserScript:(userScript)
  
aConf’s setUserContentController:userContentController
  
  
set aWebView to WKWebView’s alloc()’s initWithFrame:(current application’s NSMakeRect(0, 0, aWidth, aHeight – 100)) configuration:aConf –フレームの大きさは根拠レス
  
aWebView’s setNavigationDelegate:me
  
aWebView’s setUIDelegate:me
  
aWebView’s setTranslatesAutoresizingMaskIntoConstraints:true
  
  
set bURL to |NSURL|’s URLWithString:tmpURL
  
set aReq to NSURLRequest’s requestWithURL:bURL
  
aWebView’s loadRequest:aReq


–Buttonをつくる
  
set bButton to (NSButton’s alloc()’s initWithFrame:(current application’s NSMakeRect(0, 0, aWidth, 40)))
  
bButton’s setTitle:aButtonMSG
  
bButton’s setTarget:me
  
bButton’s setAction:("clicked:")
  
bButton’s setKeyEquivalent:(return)
  
  
–SplitViewをつくる
  
set aSplitV to NSSplitView’s alloc()’s initWithFrame:(current application’s NSMakeRect(0, 0, aWidth, aHeight))
  
aSplitV’s setVertical:false
  
  
aSplitV’s addSubview:aWebView
  
aSplitV’s addSubview:bButton
  
aSplitV’s setNeedsDisplay:true
  
  
set aWin to makeWinWithView(aSplitV, aWidth, aHeight, aTitle, 1.0)
  
  
–NSWindowControllerを作ってみた
  
set my wController to NSWindowController’s alloc()
  
my (wController’s initWithWindow:aWin)
  
  
my (wController’s showWindow:me)
  
  
set aCount to (timeOutSecs as string as number) * 10 –timeout seconds * 10
  
repeat aCount times
    if (my windisp) = false then
      exit repeat
    end if
    
delay 0.1
  end repeat
  
  
–Purge Web Objects (not success)
  
set aWebView to ""
  
set userContentController to ""
  
set aConf to ""
  
set userScript to ""
  
set my wController to ""
  
  
my closeWin:bButton
end dispWebView:

–Button Clicked Event Handler
on clicked:aSender
  set (my windisp) to false
  
my closeWin:aSender
end clicked:

–make Window for Input
on makeWinWithView(aView, aWinWidth, aWinHeight, aTitle, alphaV)
  set aScreen to NSScreen’s mainScreen()
  
set aFrame to {{0, 0}, {aWinWidth, aWinHeight}}
  
set aBacking to NSTitledWindowMask –NSBorderlessWindowMask
  
set aDefer to NSBackingStoreBuffered
  
  
— Window
  
set aWin to NSWindow’s alloc()
  (
aWin’s initWithContentRect:aFrame styleMask:aBacking backing:aDefer defer:false screen:aScreen)
  
  
aWin’s setTitle:aTitle
  
aWin’s setDelegate:me
  
aWin’s setDisplaysWhenScreenProfileChanges:true
  
aWin’s setHasShadow:true
  
aWin’s setIgnoresMouseEvents:false
  
aWin’s setLevel:(NSScreenSaverWindowLevel)
  
aWin’s setOpaque:false
  
aWin’s setAlphaValue:alphaV –append
  
aWin’s setReleasedWhenClosed:true
  
aWin’s |center|()
  
  
— Set Custom View
  
aWin’s setContentView:aView
  
  
return aWin
end makeWinWithView

–close win
on closeWin:aSender
  set tmpWindow to aSender’s |window|()
  
  
repeat with n from 10 to 1 by -1
    (tmpWindow’s setAlphaValue:n / 10)
    
delay 0.02
  end repeat
  
  
my wController’s |close|()
end closeWin:

on viewDidLoad:aNotification
  return true
end viewDidLoad:

on fetchJSSourceString(aURL)
  set jsURL to |NSURL|’s URLWithString:aURL
  
set jsSourceString to NSString’s stringWithContentsOfURL:jsURL encoding:(NSUTF8StringEncoding) |error|:(missing value)
  
return jsSourceString
end fetchJSSourceString

★Click Here to Open This Script 

Posted in Internet URL | Tagged 10.12savvy 10.13savvy 10.14savvy NSButton NSMomentaryLightButton NSMutableString NSScreen NSScrollView NSSplitView NSString NSTextView NSURL NSURLRequest NSWindow NSWindowController WKUserContentController WKUserScript WKWebView WKWebViewConfiguration | 1 Comment

QuartzComoserでグラフ表示てすと v6

Posted on 11月 4, 2018 by Takaaki Naganoya

QuartzComposerのグラフに任意のデータを指定してウィンドウ表示するAppleScriptです。

スクリプトバンドル内の「Chart.qtz」を読み出して表示しているため、QuartzComposer入りのスクリプトバンドルを用意しておきましたので、ダウンロードしてお試しください。

–> Download qtc_disp_v6

オリジナルはControl+Command+Rで実行する必要がありましたが、本Scriptではその必要がありません。ちなみに、一般的なQuartzComposerのようにマウスでグリグリ回せるとかいうことはありません。パラメータを反映して静止画として表示されるだけです(Xcode上で作成したAppleScriptのGUIアプリケーションであれば、普通に回せます)。

macOS 10.14上で実行してみたところ、スクリプトエディタではCompositionが表示されませんでしたが、Script Debugger上で実行したかぎりでは実行されました。Framework宣言で足りないものがあるのでしょうか?

備考:QuartzComposerはmacOS 10.15でDeprecated扱いになりました

AppleScript名:QuartzComoserでグラフ表示てすと v6
— Created 2015-11-03 by Takaaki Naganoya
— Modified 2018-11-04 by Takaaki Naganoya
— 2018 Piyomaru Software
use AppleScript version "2.4"
use scripting additions
use framework "Foundation"
use framework "Quartz"
use framework "AppKit"

property NSColor : a reference to current application’s NSColor
property QCView : a reference to current application’s QCView
property NSString : a reference to current application’s NSString
property NSScreen : a reference to current application’s NSScreen
property NSWindow : a reference to current application’s NSWindow
property NSNumber : a reference to current application’s NSNumber
property NSPredicate : a reference to current application’s NSPredicate
property NSDictionary : a reference to current application’s NSDictionary
property NSMutableArray : a reference to current application’s NSMutableArray
property NSWindowController : a reference to current application’s NSWindowController
property NSMutableDictionary : a reference to current application’s NSMutableDictionary
property NSTitledWindowMask : a reference to current application’s NSTitledWindowMask
property NSWindowCloseButton : a reference to current application’s NSWindowCloseButton
property NSNormalWindowLevel : a reference to current application’s NSNormalWindowLevel
property NSBackingStoreBuffered : a reference to current application’s NSBackingStoreBuffered

set chartData to NSMutableArray’s new()
chartData’s addObject:(my recWithLabels:{"label", "value"} andValues:{"練馬区", 3})
chartData’s addObject:(my recWithLabels:{"label", "value"} andValues:{"青梅市", 1})
chartData’s addObject:(my recWithLabels:{"label", "value"} andValues:{"中野区", 2})

my performSelectorOnMainThread:"dispQuartzComposerWindow:" withObject:(chartData) waitUntilDone:true

on dispQuartzComposerWindow:chartData
  –上記データの最大値を求める
  
set aMaxRec to chartData’s filteredArrayUsingPredicate:(NSPredicate’s predicateWithFormat_("SELF.value == %@.@max.value", chartData))
  
set aMax to value of aMaxRec
  
set aMaxVal to (first item of aMax) as integer
  
  
–Scalingの最大値を求める
  
if aMaxVal ≥ 10 then
    set aScaleMax to (10 div aMaxVal)
    
set aScaleMin to aScaleMax div 10
  else
    set aScaleMax to (10 / aMaxVal)
    
set aScaleMin to 1
  end if
  
  
try
    set aPath to path to resource "Chart.qtz"
  on error
    return
  end try
  
  
set qtPath to NSString’s stringWithString:(POSIX path of aPath)
  
  
set aView to QCView’s alloc()’s init()
  
set qtRes to (aView’s loadCompositionFromFile:qtPath)
  
  
aView’s setValue:chartData forInputKey:"Data"
  
aView’s setValue:(NSNumber’s numberWithFloat:(0.5)) forInputKey:"Scale"
  
aView’s setValue:(NSNumber’s numberWithFloat:(0.2)) forInputKey:"Spacing"
  
aView’s setAutostartsRendering:true
  
  
set maXFrameRate to aView’s maxRenderingFrameRate()
  
  (
aView’s setValue:(NSNumber’s numberWithFloat:aScaleMax / 10) forInputKey:"Scale")
  
  
set aWin to (my makeWinWithView(aView, 800, 600, "AppleScript Composition Test"))
  
  
set wController to NSWindowController’s alloc()
  
wController’s initWithWindow:aWin
  
aWin’s makeFirstResponder:aView
  
wController’s showWindow:me
  
  
aWin’s makeKeyAndOrderFront:me
  
  
delay 5
  
  
my closeWin:aWin
  
aView’s stopRendering() –レンダリング停止
  
end dispQuartzComposerWindow:

–make Window for Display
on makeWinWithView(aView, aWinWidth, aWinHeight, aTitle)
  set aScreen to NSScreen’s mainScreen()
  
set aFrame to {{0, 0}, {aWinWidth, aWinHeight}}
  
  
set aBacking to NSTitledWindowMask
  
  
set aDefer to NSBackingStoreBuffered
  
  
— Window
  
set aWin to NSWindow’s alloc()
  (
aWin’s initWithContentRect:aFrame styleMask:aBacking backing:aDefer defer:false screen:aScreen)
  
aWin’s setBackgroundColor:(NSColor’s whiteColor())
  
  
aWin’s setTitle:aTitle
  
aWin’s setDelegate:me
  
aWin’s setDisplaysWhenScreenProfileChanges:true
  
aWin’s setHasShadow:true
  
aWin’s setIgnoresMouseEvents:false
  
aWin’s setLevel:(NSNormalWindowLevel)
  
aWin’s setOpaque:false
  
aWin’s setReleasedWhenClosed:true
  
aWin’s |center|()
  
aWin’s makeKeyAndOrderFront:(me)
  
–aWin’s movableByWindowBackground:true
  
  
— Set Custom View
  
aWin’s setContentView:aView
  
  
–Set Close Button  
  
set closeButton to NSWindow’s standardWindowButton:(NSWindowCloseButton) forStyleMask:(NSTitledWindowMask)
  
  
return aWin
end makeWinWithView

–close win
on closeWin:aWindow
  repeat with n from 10 to 1 by -1
    (aWindow’s setAlphaValue:n / 10)
    
delay 0.01
  end repeat
  
aWindow’s |close|()
end closeWin:

on recWithLabels:theKeys andValues:theValues
  return (NSDictionary’s dictionaryWithObjects:theValues forKeys:theKeys) as record
end recWithLabels:andValues:

★Click Here to Open This Script 

Posted in GUI Image | Tagged 10.11savvy 10.12savvy 10.13savvy 10.14savvy NSColor NSDictionary NSMutableArray NSMutableDictionary NSNumber NSPredicate NSScreen NSString NSWindow NSWindowController QCView | Leave a comment

テキストビュー+ボタンを作成 v2

Posted on 11月 3, 2018 by Takaaki Naganoya

Window+TextView+Buttonを作成してボタンのクリックを受け付けるAppleScriptです。

ちょっとしたログ表示などのために作成したものです。


▲通常(ライト)モード@macOS 10.12.6、ダークモード@10.14.1

オリジナルはスクリプトエディタ上でCommand+Control+Rの「フォアグラウンドで実行」を実行する必要があったのですが、

本バージョンでは強制的にメインスレッド実行を行うことで、この操作は不要になっています。

ただ、ランタイム環境ごとに「ボタンをクリックできない」という現象に遭遇。他のいろいろなランタイムでも試しておく必要を感じます。

ランタイム環境 スクリプトエディタ アプレット スクリプトメニュー osascript Script Debugger
macOS 10.12 OK OK クリックできない クリックできない クリックできない
macOS 10.13 OK OK クリックできない クリックできない クリックできない
macOS 10.14 OK OK クリックできない クリックできない クリックできない

macOS 10.12.6、10.13.6、10.14.1で動作確認してみましたが、傾向は同じです。Script Debugger上でクリックを受け付けないのはかなり問題が、、、、

AppleScript名:テキストビュー+ボタンを作成 v2
— Created 2015-12-11 by Takaaki Naganoya
— 2015 Piyomaru Software
use AppleScript version "2.4"
use scripting additions
use framework "Foundation"
use framework "AppKit"

property NSColor : a reference to current application’s NSColor
property NSScreen : a reference to current application’s NSScreen
property NSButton : a reference to current application’s NSButton
property NSWindow : a reference to current application’s NSWindow
property NSSplitView : a reference to current application’s NSSplitView
property NSTextView : a reference to current application’s NSTextView
property NSScrollView : a reference to current application’s NSScrollView
property NSMutableString : a reference to current application’s NSMutableString
property NSWindowController : a reference to current application’s NSWindowController
property NSTitledWindowMask : a reference to current application’s NSTitledWindowMask
property NSRoundedBezelStyle : a reference to current application’s NSRoundedBezelStyle
property NSNormalWindowLevel : a reference to current application’s NSNormalWindowLevel
property NSBackingStoreBuffered : a reference to current application’s NSBackingStoreBuffered
property NSMomentaryLightButton : a reference to current application’s NSMomentaryLightButton

property windisp : false
property wController : false

set aWidth to 600
set aHeight to 500

set aTitle to "テキストビューのじっけん/TextView Test"
set outText to "ぴよまるソフトウェア / Piyomaru Software "
set aButtonMSG to "OK"

–表示用テキストの作成
set dispStr to NSMutableString’s alloc()’s init()
repeat with i from 1 to 100
  set bStr to (NSMutableString’s stringWithString:(outText & (i as string) & return))
  
set dispStr to (bStr’s stringByAppendingString:dispStr)
end repeat

set paramObj to {aWidth, aHeight, aTitle, dispStr, aButtonMSG, "10"}
my performSelectorOnMainThread:"dispTextView:" withObject:(paramObj) waitUntilDone:true

on dispTextView:paramObj
  set my windisp to false
  
copy paramObj to {aWidth, aHeight, aTitle, dispStr, aButtonMSG, timeOutSecs}
  
  
set aColor to NSColor’s colorWithDeviceRed:0.0 green:0.0 blue:0.0 alpha:0.9
  
set (my windisp) to true
  
  
–Text View+Scroll Viewをつくる
  
set aScroll to NSScrollView’s alloc()’s initWithFrame:(current application’s NSMakeRect(0, 0, aWidth, aHeight))
  
set aView to NSTextView’s alloc()’s initWithFrame:(current application’s NSMakeRect(0, 0, aWidth, aHeight))
  
aView’s setRichText:true
  
aView’s useAllLigatures:true
  
aView’s setTextColor:(NSColor’s cyanColor()) —
  
aView’s setBackgroundColor:aColor
  
aView’s setEditable:false
  
  
aScroll’s setDocumentView:aView
  
aView’s enclosingScrollView()’s setHasVerticalScroller:true


–Buttonをつくる
  
set bButton to (NSButton’s alloc()’s initWithFrame:(current application’s NSMakeRect(0, 0, aWidth, 40)))
  
–bButton’s setButtonType:( NSMomentaryLightButton)
  
–bButton’s setBezelStyle:( NSRoundedBezelStyle)
  
bButton’s setTitle:aButtonMSG
  
bButton’s setTarget:me
  
bButton’s setAction:("clicked:")
  
bButton’s setKeyEquivalent:(return)
  
  
–SplitViewをつくる
  
set aSplitV to NSSplitView’s alloc()’s initWithFrame:(current application’s NSMakeRect(0, 0, aHeight, aWidth))
  
aSplitV’s setVertical:false
  
  
aSplitV’s addSubview:aScroll
  
aSplitV’s addSubview:bButton
  
aSplitV’s setNeedsDisplay:true
  
  
set aWin to makeWinWithView(aSplitV, aWidth, aHeight, aTitle, 0.9)
  
aView’s setString:dispStr
  
  
–NSWindowControllerを作ってみた
  
set my wController to NSWindowController’s alloc()
  
my (wController’s initWithWindow:aWin)
  
  
my (wController’s showWindow:me)
  
  
set aCount to (timeOutSecs as string as number) * 10 –timeout seconds * 10
  
repeat aCount times
    if (my windisp) = false then
      exit repeat
    end if
    
delay 0.1
  end repeat
  
  
my closeWin:bButton
end dispTextView:

–Button Clicked Event Handler
on clicked:aSender
  set (my windisp) to false
  
my closeWin:aSender
end clicked:

–make Window for Input
on makeWinWithView(aView, aWinWidth, aWinHeight, aTitle, alphaV)
  set aScreen to NSScreen’s mainScreen()
  
set aFrame to {{0, 0}, {aWinWidth, aWinHeight}}
  
set aBacking to NSTitledWindowMask –NSBorderlessWindowMask
  
set aDefer to NSBackingStoreBuffered
  
  
— Window
  
set aWin to NSWindow’s alloc()
  (
aWin’s initWithContentRect:aFrame styleMask:aBacking backing:aDefer defer:false screen:aScreen)
  
  
aWin’s setTitle:aTitle
  
aWin’s setDelegate:me
  
aWin’s setDisplaysWhenScreenProfileChanges:true
  
aWin’s setHasShadow:true
  
aWin’s setIgnoresMouseEvents:false
  
aWin’s setLevel:(NSNormalWindowLevel)
  
aWin’s setOpaque:false
  
aWin’s setAlphaValue:alphaV –append
  
aWin’s setReleasedWhenClosed:true
  
aWin’s |center|()
  
  
— Set Custom View
  
aWin’s setContentView:aView
  
  
return aWin
end makeWinWithView

–close win
on closeWin:aSender
  set tmpWindow to aSender’s |window|()
  
  
repeat with n from 10 to 1 by -1
    (tmpWindow’s setAlphaValue:n / 10)
    
delay 0.02
  end repeat
  
  
my wController’s |close|()
end closeWin:

★Click Here to Open This Script 

Posted in GUI | Tagged 10.11savvy 10.12savvy 10.13savvy 10.14savvy NSButton NSColor NSMutableString NSScreen NSScrollView NSSplitView NSTextView NSWindow NSWindowController | 1 Comment

CSVデータを読み込んで表インタフェースで表示確認 v2

Posted on 8月 14, 2018 by Takaaki Naganoya

指定のCSVファイルを読み込んで、表インタフェースで表示確認するAppleScriptです。

Numbers.appから文字コードにUTF-8を指定して書き出したCSVファイルを想定しています。CSVデータのparseにはBridgePlusを、表UIの表示にはMyriad Tables Libを利用しています。

ほぼ、テンプレートともいえるような定型処理ですが、巨大なAppleScriptに入れたときにはusing terms from句がないとアプレットとして動作中にクラッシュが発生する可能性があります。

CSVデータの処理はありふれたありきたりの内容で、本来は処理内容にはほとんど関係ない表示・確認を行わせるとユーザーの反応がいいようです。

あとは、CSVデータ中にカラムヘッダーが存在するかどうかをCSVデータからでは検出できないことが問題です。せめて、メタデータ中にでもカラムヘッダーの有無を(Export時に)書いておいてくれるとよいのですが。あとは、CSV1行目のデータと他の行との文字コードの分布状況を比較して統計処理すると、相関性を数値化してヘッダーかどうかを計算できそうですが、、、そこまでやるのは「やりすぎ」でしょう。

ユーザーにヘッダーの有無を確認するとか、そのぐらい?

_kMDItemOwnerUserID            = 504
kMDItemAlternateNames          = (
    "2010_index.csv"
)
kMDItemContentCreationDate     = 2018-08-14 00:51:24 +0000
kMDItemContentModificationDate = 2018-08-14 00:51:24 +0000
kMDItemContentType             = "public.comma-separated-values-text"
kMDItemContentTypeTree         = (
    "public.comma-separated-values-text",
    "public.data",
    "public.delimited-values-text",
    "public.plain-text",
    "public.item",
    "public.content",
    "public.text"
)
kMDItemDateAdded               = 2018-08-14 00:51:24 +0000
kMDItemDisplayName             = "2010_index"
kMDItemFSContentChangeDate     = 2018-08-14 00:51:24 +0000
kMDItemFSCreationDate          = 2018-08-14 00:51:24 +0000
kMDItemFSCreatorCode           = ""
kMDItemFSFinderFlags           = 16
kMDItemFSHasCustomIcon         = (null)
kMDItemFSInvisible             = 0
kMDItemFSIsExtensionHidden     = 1
kMDItemFSIsStationery          = (null)
kMDItemFSLabel                 = 0
kMDItemFSName                  = "2010_index.csv"
kMDItemFSNodeCount             = (null)
kMDItemFSOwnerGroupID          = 80
kMDItemFSOwnerUserID           = 504
kMDItemFSSize                  = 7746
kMDItemFSTypeCode              = ""
kMDItemKind                    = "Comma Separated Spreadsheet (.csv)"
kMDItemLogicalSize             = 7746
kMDItemPhysicalSize            = 8192
kMDItemUserCreatedDate         = (
    "2018-08-14 00:51:24 +0000"
)
kMDItemUserCreatedUserHandle   = (
    504
)

▲ここ(メタデータ)にCSVのヘッダーの有無の情報が入っているといいのに、、、、にしても、メタデータに大昔のResource Forkよろしくいろんなデータが突っ込まれるようになってきました


▲CSVファイルの選択


▲CSVファイル内容の表示


▲CSV内のカラム数が合っていた場合の動作


▲CSV内のカラム数が合っていない場合の動作(データ確認表示)


▲CSV内のカラム数が合っていない場合の動作(ダイアログ表示)

AppleScript名:CSVデータを読み込んで表インタフェースで表示確認 v2.scptd
—
–  Created by: Takaaki Naganoya
–  Created on: 2018/08/10
—
–  Copyright © 2018 Piyomaru Software, All Rights Reserved
—

use AppleScript version "2.4"
use scripting additions
use framework "Foundation"
use framework "AppKit"
use Bplus : script "BridgePlus" –https://www.macosxautomation.com/applescript/apps/BridgePlus.html
use tableLib : script "Myriad Tables Lib" –https://www.macosxautomation.com/applescript/apps/Script_Libs.html#MyriadTablesLib

–Numbersから書き出したUTF-8のCSVを読み取る
set someString to read (choose file of type {"public.comma-separated-values-text"}) as «class utf8»

–読み込んだテキストをParseして、ヘッダーとデータ本体に分離
set {theHeader, origList} to readCSVAndParse(someString) of me

–Table UIを表示して内容を確認
set colMax to 3 –あらかじめ期待しているカラム数
set {dRes, tRes} to dispTableUI(theHeader, origList, colMax) of me
if dRes = false then
  display dialog "データ不全のため処理を終了します" with title "CSVデータエラー"
  
return
else
  display dialog "CSVデータの処理を続行します" with title "CSVデータOK"
end if

on readCSVAndParse(someString)
  load framework
  
using terms from script "BridgePlus"
    set theData to current application’s SMSForder’s arrayFromCSV:someString commaIs:","
    
set origList to (current application’s SMSForder’s subarraysIn:theData paddedWith:"" |error|:(missing value)) as list
  end using terms from
  
  
set theHeader to contents of first item of origList –Header Row
  
set origList to rest of origList –Data
  
return {theHeader, origList}
end readCSVAndParse

on dispTableUI(theHeader, origList, colMax)
  set {curDispW, curDispH} to (current application’s NSScreen’s mainScreen()’s frame()’s |size|()) as list
  
  
set curLen to length of first item of origList
  
set dRes to (curLen = colMax) as boolean
  
if dRes = true then
    set aMessage to "問題がなければ「OK」をクリックして実行してください" –Normal message
    
set aTitle to "CSVファイルの内容確認"
  else
    set aMessage to "CSVファイルのカラム数が期待どおりではありません。「Cancel」をクリックして実行を停止してください" –Error Message
    
set aTitle to "CSVファイルに異常あり"
  end if
  
  
using terms from script "Myriad Tables Lib"
    tell script "Myriad Tables Lib"
      set aDispBounds to my makeInitialBounds:(curDispW – 100) withHeight:(curDispH – 100)
      
set theTable to make new table with data origList column headings theHeader with title aTitle with prompt aMessage with row numbering, empty selection allowed and multiple lines allowed
      
      
modify table theTable initial position aDispBounds
      
      
–表を表示
      
set tRes to (display table theTable)
      
return {dRes, tRes}
    end tell
  end using terms from
end dispTableUI

on makeInitialBounds:(aTWidth as integer) withHeight:(aTHeight as integer)
  set aDispBounds to current application’s NSScreen’s mainScreen()’s frame()
  
set aWidth to (width of |size| of aDispBounds)
  
set aHeight to (height of |size| of aDispBounds)
  
  
set xPos to (aWidth div 2) – (aTWidth div 2)
  
set yPos to (aHeight div 2) – (aTHeight div 2)
  
  
return {xPos, yPos, aTWidth, aTHeight}
end makeInitialBounds:withHeight:

★Click Here to Open This Script 

Posted in file GUI Text | Tagged 10.11savvy 10.12savvy 10.13savvy NSScreen | Leave a comment

Finder上で選択中の画像のうち、最小のものに合わせて各画像の左上を原点にサイズ統一

Posted on 7月 27, 2018 by Takaaki Naganoya

Finderで選択中の画像のうち、最小のものに合わせて各画像の左上を原点にサイズを統一するAppleScriptです。

Finderで選択中のファイルから画像のみ抽出し、そのうちサイズが最小のものに合わせて他の画像をトリミングし、変更したものをデスクトップフォルダに出力します。


▲大きさを揃える画像をFinder上で選択


▲処理前の画像。大きさがまちまち


▲処理後の画像。大きさが最小の画像に合わせてそろっている

スクリーンショット画像を複数撮った場合に、厳密に同じサイズに固定することは(各種スクリーンショット作成ユーティリティを使わないと)行いづらいところです。

そこで、最小の画像を計算で求めて、それに合わせて自動トリミングするようにしてみました。Cocoaの機能を用いて画像処理しているため、Photoshopは必要ありません。

最小の画像を求めるのに、幅+高さの値でソートして最小のものを求めています(widthとheightによる2 key sortではなく1 Keyで済ませたかったので)。

Blogや書籍用の掲載画面図の作成用、といったところでしょうか。Retina画面で撮ったスクリーンショットと非Retina画面のスクリーンショットが混在するとうまく動きません(スクリーンショット画像からはRetina環境で撮った画像であるかどうかを取得できません)。

スクリーンショットの画像からRetina/非Retina環境で撮ったかを判定するのは、(Retina対応機であるかをMachine IDから取得したあとで)Syslogにアクセスしてスクリーンが接続されたか、取り外されたかといった状態を追っていくしかないのかも。

本ScriptをmacOS 10.13.6上で動作確認して驚いたのですが、いままでRecordが返ってくるべき箇所でlistが返ってくる盛大なバグが直って、本ScriptがmacOS 10.13用に書き換えずに動きました(動かないことを確認しようとして動いたので驚いた)。

AppleScript名:Finder上で選択中の画像のうち、最小のものに合わせて各画像の左上を原点にサイズ統一 v2
— Created 2018-07-23 by Takaaki Naganoya
— 2018 Piyomaru Software
use AppleScript version "2.5"
use scripting additions
use framework "Foundation"
use framework "AppKit"
use framework "QuartzCore"

property |NSURL| : a reference to current application’s |NSURL|
property NSUUID : a reference to current application’s NSUUID
property NSArray : a reference to current application’s NSArray
property NSString : a reference to current application’s NSString
property NSImage : a reference to current application’s NSImage
property NSScreen : a reference to current application’s NSScreen
property NSZeroRect : a reference to current application’s NSZeroRect
property NSPredicate : a reference to current application’s NSPredicate
property NSPNGFileType : a reference to current application’s NSPNGFileType
property NSMutableArray : a reference to current application’s NSMutableArray
property NSCompositeCopy : a reference to current application’s NSCompositeCopy
property NSGraphicsContext : a reference to current application’s NSGraphicsContext
property NSBitmapImageRep : a reference to current application’s NSBitmapImageRep
property NSURLTypeIdentifierKey : a reference to current application’s NSURLTypeIdentifierKey
property NSCalibratedRGBColorSpace : a reference to current application’s NSCalibratedRGBColorSpace

tell application "Finder"
  set selList to selection as alias list
end tell

–指定のAlias listのうち画像のみ抽出
set filRes1 to filterAliasListByUTI(selList, "public.image") of me
if filRes1 = {} then
  tell current application
    –Error Message (No Selection)
    
display dialog "Finder上で選択されているファイルはありません。" buttons {"OK"} default button 1 with icon 1 with title "画像リサイズ処理できません"
  end tell
  
return
end if

–各種情報を入れたArrayを作成
set anArray to NSMutableArray’s new()
repeat with i in selList
  set imgPath to (POSIX path of i)
  
  
set aImage to makeNSImageFromFile(i) of me
  
set sizeInfo to |size|() of aImage
  
set sizeInfo to sizeInfo & {aImg:aImage, total:(width of sizeInfo) + (height of sizeInfo), myPath:imgPath}
  (
anArray’s addObject:sizeInfo)
end repeat

–最小のサイズの画像の算出
set aRes to anArray’s valueForKeyPath:("@min.total")
set bRes to first item of (filterRecListByLabel(anArray, "total == " & aRes as string) of me) –最小サイズの画像

–最小サイズ画像のwidthとheight
set minWidth to bRes’s width
set minHeight to bRes’s height

–環境情報の取得
set aPath to POSIX path of (path to desktop)
set retinaF to (NSScreen’s mainScreen()’s backingScaleFactor()) as real
–>  2.0 (Retina) / 1.0 (Non Retina)

set cRes to filterRecListByLabel(anArray, "total != " & aRes as string) of me –最小サイズ以外の画像

repeat with i in cRes
  set j to contents of i
  
set anImage to aImg of j
  
set fRes to myPath of j
  
  
set cropedImage to (my cropNSImageBy:{0, 0, minWidth, minHeight} fromImage:anImage) –v1で間違っていた
  
  
–Retina環境対策
  
if retinaF > 1.0 then
    set cropedImage to (my resizedImage:cropedImage toScale:(1.0))
  end if
  
  
–ファイル書き込み
  
set fRes to retUUIDfilePathFromDir(aPath, "png") of me
  
set sRes to saveNSImageAtPathAsPNG(cropedImage, fRes) of me
end repeat

–リストに入れたレコードを、指定の属性ラベルの値で抽出
on filterRecListByLabel(aRecList as list, aPredicate as string)
  –ListからNSArrayへの型変換
  
set aArray to NSArray’s arrayWithArray:aRecList
  
  
–抽出
  
set aPredicate to NSPredicate’s predicateWithFormat:aPredicate
  
set filteredArray to aArray’s filteredArrayUsingPredicate:aPredicate
  
  
–NSArrayからListに型変換して返す
  
set bList to filteredArray as list
  
return bList
end filterRecListByLabel

–Alias listから指定UTIに含まれるものをPOSIX pathのリストで返す
on filterAliasListByUTI(aList, targUTI)
  set newList to {}
  
repeat with i in aList
    set j to POSIX path of i
    
set tmpUTI to my retUTIfromPath(j)
    
set utiRes to my filterUTIList({tmpUTI}, targUTI)
    
if utiRes is not equal to {} then
      set the end of newList to j
    end if
  end repeat
  
return newList
end filterAliasListByUTI

–指定のPOSIX pathのファイルのUTIを求める
on retUTIfromPath(aPOSIXPath)
  set aURL to |NSURL|’s fileURLWithPath:aPOSIXPath
  
set {theResult, theValue} to aURL’s getResourceValue:(reference) forKey:NSURLTypeIdentifierKey |error|:(missing value)
  
  
if theResult = true then
    return theValue as string
  else
    return theResult
  end if
end retUTIfromPath

–UTIリストが指定UTIに含まれているかどうか演算を行う
on filterUTIList(aUTIList, aUTIstr)
  set anArray to NSArray’s arrayWithArray:aUTIList
  
set aPred to NSPredicate’s predicateWithFormat_("SELF UTI-CONFORMS-TO %@", aUTIstr)
  
set bRes to (anArray’s filteredArrayUsingPredicate:aPred) as list
  
return bRes
end filterUTIList

on cropNSImageTo:{x1, y1, x2, y2} fromImage:theImage
  set newWidth to x2 – x1
  
set newHeight to y2 – y1
  
set theSize to (theImage’s |size|()) as record
  
set oldHeight to height of theSize
  
  
— transpose y value for Cocoa coordintates
  
set y1 to oldHeight – newHeight – y1
  
set newRect to {{x:x1, y:y1}, {width:newWidth, height:newHeight}}
  
theImage’s lockFocus()
  
set theRep to NSBitmapImageRep’s alloc()’s initWithFocusedViewRect:newRect
  
theImage’s unlockFocus()
  
  
set outImage to NSImage’s alloc()’s initWithSize:(theRep’s |size|())
  
outImage’s addRepresentation:theRep
  
  
return outImage
end cropNSImageTo:fromImage:

on makeNSImageFromFile(anAlias)
  set imgPath to (POSIX path of anAlias)
  
set aURL to (|NSURL|’s fileURLWithPath:(imgPath))
  
return (NSImage’s alloc()’s initWithContentsOfURL:aURL)
end makeNSImageFromFile

–NSImageを指定の大きさでトリミング
on cropNSImageBy:{x1, y1, newWidth, newHeight} fromImage:theImage
  set theSize to (theImage’s |size|()) as record
  
set oldHeight to height of theSize
  
  
— transpose y value for Cocoa coordintates
  
set y1 to oldHeight – newHeight – y1
  
set newRect to {{x:x1, y:y1}, {width:newWidth, height:newHeight}}
  
theImage’s lockFocus()
  
set theRep to NSBitmapImageRep’s alloc()’s initWithFocusedViewRect:newRect
  
theImage’s unlockFocus()
  
  
set outImage to NSImage’s alloc()’s initWithSize:(theRep’s |size|())
  
outImage’s addRepresentation:theRep
  
  
return outImage
end cropNSImageBy:fromImage:

on retUUIDfilePathFromDir(aPath, aEXT)
  set aUUIDstr to (NSUUID’s UUID()’s UUIDString()) as string
  
set aPath to ((NSString’s stringWithString:aPath)’s stringByAppendingPathComponent:aUUIDstr)’s stringByAppendingPathExtension:aEXT
  
return aPath
end retUUIDfilePathFromDir

–NSImageを指定パスにPNG形式で保存
on saveNSImageAtPathAsPNG(anImage, outPath)
  set imageRep to anImage’s TIFFRepresentation()
  
set aRawimg to NSBitmapImageRep’s imageRepWithData:imageRep
  
set pathString to NSString’s stringWithString:outPath
  
set newPath to pathString’s stringByExpandingTildeInPath()
  
set myNewImageData to (aRawimg’s representationUsingType:(NSPNGFileType) |properties|:(missing value))
  
set aRes to (myNewImageData’s writeToFile:newPath atomically:true) as boolean
  
return aRes –true/false
end saveNSImageAtPathAsPNG

on resizedImage:aSourceImg toScale:imgScale
  if (aSourceImg’s isValid()) as boolean = false then error "Invalid NSImage"
  
  
set aSize to aSourceImg’s |size|()
  
–>  {​​​​​width:32.0, ​​​​​height:32.0​​​}
  
  
set aWidth to (aSize’s width) * imgScale
  
set aHeight to (aSize’s height) * imgScale
  
  
set aRep to NSBitmapImageRep’s alloc()’s initWithBitmapDataPlanes:(missing value) pixelsWide:aWidth pixelsHigh:aHeight bitsPerSample:8 samplesPerPixel:4 hasAlpha:true isPlanar:false colorSpaceName:(NSCalibratedRGBColorSpace) bytesPerRow:0 bitsPerPixel:0
  
  
set newSize to {width:aWidth, height:aHeight}
  
aRep’s setSize:newSize
  
  
NSGraphicsContext’s saveGraphicsState()
  
NSGraphicsContext’s setCurrentContext:(NSGraphicsContext’s graphicsContextWithBitmapImageRep:aRep)
  
  
aSourceImg’s drawInRect:(current application’s NSMakeRect(0, 0, aWidth, aHeight)) fromRect:(NSZeroRect) operation:(NSCompositeCopy) fraction:(1.0)
  
  
NSGraphicsContext’s restoreGraphicsState()
  
  
set newImg to NSImage’s alloc()’s initWithSize:newSize
  
newImg’s addRepresentation:aRep
  
  
return newImg
end resizedImage:toScale:

★Click Here to Open This Script 

Posted in file Image | Tagged 10.11savvy 10.12savvy 10.13savvy Finder NSArray NSBitmapImageRep NSImage NSMutableArray NSPredicate NSScreen NSString NSURL NSUUID | 1 Comment

Skimで現在表示中のPDFのページをJPEG画像で書き出す

Posted on 6月 30, 2018 by Takaaki Naganoya

オープンソースのPDFビューワー「Skim」で現在表示中のPDFの現在表示中のページをJPEG画像で書き出すAppleScriptです。

macOS標準装備のPreview.appはつい最近AppleScriptからの制御が公式に行えるようになった程度で、対応度も最低限です。Skimであれば、こうした「現在オープン中のPDFの表示中のページ」の番号を取得することもできます。

macOS標準装備のScript Menuから呼び出して利用することを前提に作成してあります。

Skimでオープン中の最前面のPDFと同じフォルダに、元ファイル名に対してページの数値をゼロパディングして追加したものをJPEG画像のファイル名に指定しています。ファイル名の重複回避などは行っていません。

ただし、Skimで表示モードが「単一」(1ページ分のみビューワーに表示)以外になっていると、カレントページ(現在表示中のページ)が画面上とアプリケーション側で管理しているものがズレることがあるので、表示モードを「単一」に切り替えてから「このページでよいか?」といった確認をユーザーに対して行うとよいかもしれません。

AppleScript名:Skimで現在表示中のPDFのページをJPEG画像で書き出す
— Created 2018-06-30 by Takaaki Naganoya
— 2018 Piyomaru Software
use AppleScript version "2.4"
use scripting additions
use framework "Foundation"
use framework "Quartz"
use framework "AppKit"

property |NSURL| : a reference to current application’s |NSURL|
property NSString : a reference to current application’s NSString
property NSImage : a reference to current application’s NSImage
property NSScreen : a reference to current application’s NSScreen
property NSNumber : a reference to current application’s NSNumber
property NSZeroPoint : a reference to current application’s NSZeroPoint
property PDFDocument : a reference to current application’s PDFDocument
property NSJPEGFileType : a reference to current application’s NSJPEGFileType
property NSCompositeCopy : a reference to current application’s NSCompositeCopy
property NSGraphicsContext : a reference to current application’s NSGraphicsContext
property NSBitmapImageRep : a reference to current application’s NSBitmapImageRep
property NSNumberFormatter : a reference to current application’s NSNumberFormatter
property NSImageInterpolationHigh : a reference to current application’s NSImageInterpolationHigh

tell application "Skim"
  set docCount to count every document
  
if docCount = 0 then return
  
  
tell front document
    set curInd to index of current page
    
set docFile to file of it
  end tell
end tell

set aPOSIX to POSIX path of docFile
set aURL to (|NSURL|’s fileURLWithPath:aPOSIX)

set aPDFdoc to PDFDocument’s alloc()’s initWithURL:aURL
set pCount to aPDFdoc’s pageCount()

set compFactor to 1.0 –1.0 — 0.0 = max jpeg compression, 1.0 = none

–Detect Retina Environment
set retinaF to NSScreen’s mainScreen()’s backingScaleFactor()
if retinaF = 1.0 then
  set aScale to 2.0 –Non Retina Env
else
  set aScale to 1.0 –Retina Env
end if

–PDFをページごとに分割してJPEGでファイル書き出し
set i to (curInd – 1) –AppleScript index (1 based) to Cocoa index (0 based) conversion

–Pick Up a PDF page as an image
set thisPage to (aPDFdoc’s pageAtIndex:(i))
set thisDoc to (NSImage’s alloc()’s initWithData:(thisPage’s dataRepresentation()))
if thisDoc = missing value then error "Error in getting imagerep from PDF in page:" & (i as string)

–Resize Image
set pointSize to thisDoc’s |size|()
set newSize to current application’s NSMakeSize((pointSize’s width) * aScale, (pointSize’s height) * aScale)
set newImage to (NSImage’s alloc()’s initWithSize:newSize)

newImage’s lockFocus()
(
thisDoc’s setSize:newSize)
(
NSGraphicsContext’s currentContext()’s setImageInterpolation:(NSImageInterpolationHigh))
(
thisDoc’s drawAtPoint:(NSZeroPoint) fromRect:(current application’s CGRectMake(0, 0, newSize’s width, newSize’s height)) operation:(NSCompositeCopy) fraction:2.0)
newImage’s unlockFocus()

–Save Image as JPEG
set theData to newImage’s TIFFRepresentation()
set newRep to (NSBitmapImageRep’s imageRepWithData:theData)
set targData to (newRep’s representationUsingType:(NSJPEGFileType) |properties|:{NSImageCompressionFactor:compFactor, NSImageProgressive:false})
set zText to retZeroPaddingText((i + 1), 4) of me
set outPath to addString_beforeExtensionIn_addingExtension_("_" & zText, aPOSIX, "jpg")

(targData’s writeToFile:outPath atomically:true) –書き出し

–ファイルパス(POSIX path)に対して、文字列(枝番)を追加。任意の拡張子を追加
on addString:extraString beforeExtensionIn:aPath addingExtension:aExt
  set pathString to NSString’s stringWithString:aPath
  
set theExtension to pathString’s pathExtension()
  
set thePathNoExt to pathString’s stringByDeletingPathExtension()
  
  
set newPath to (thePathNoExt’s stringByAppendingString:extraString)’s stringByAppendingPathExtension:aExt
  
return newPath as string
end addString:beforeExtensionIn:addingExtension:

on retZeroPaddingText(aNum as integer, aDigitNum as integer)
  if aNum > (((10 ^ aDigitNum) as integer) – 1) then return "" –Range Check
  
set aFormatter to NSNumberFormatter’s alloc()’s init()
  
aFormatter’s setUsesGroupingSeparator:false
  
aFormatter’s setAllowsFloats:false
  
aFormatter’s setMaximumIntegerDigits:aDigitNum
  
aFormatter’s setMinimumIntegerDigits:aDigitNum
  
aFormatter’s setPaddingCharacter:"0"
  
set aStr to aFormatter’s stringFromNumber:(NSNumber’s numberWithFloat:aNum)
  
return aStr as string
end retZeroPaddingText

★Click Here to Open This Script 

Posted in Image PDF | Tagged 10.11savvy 10.12savvy 10.13savvy NSBitmapImageRep NSImage NSNumber NSNumberFormatter NSScreen NSString NSURL PDFDocument Skim | Leave a comment

Post navigation

  • Newer posts

電子書籍(PDF)をオンラインストアで販売中!

Google Search

Popular posts

  • macOS 13, Ventura(継続更新)
  • アラートダイアログ上にWebViewで3Dコンテンツを表示(WebGL+three.js)v3
  • UI Browserがgithub上でソース公開され、オープンソースに
  • macOS 13 TTS Voice環境に変更
  • Xcode 14.2でAppleScript App Templateを復活させる
  • 2022年に書いた価値あるAppleScript
  • ChatGPTで文章のベクトル化(Embedding)
  • 新発売:AppleScriptからSiriを呼び出そう!
  • iWork 12.2がリリースされた
  • 従来と異なるmacOS 13の性格?
  • 新発売:CotEditor Scripting Book with AppleScript
  • macOS 13対応アップデート:AppleScript実践的テクニック集(1)GUI Scripting
  • AS関連データの取り扱いを容易にする(はずの)privateDataTypeLib
  • macOS 13でNSNotFoundバグふたたび
  • macOS 12.5.1、11.6.8でFinderのselectionでスクリーンショット画像をopenできない問題
  • ChatGPTでchatに対する応答文を取得
  • 新発売:iWork Scripting Book with AppleScript
  • Finderの隠し命令openVirtualLocationが発見される
  • macOS 13.1アップデートでスクリプトエディタの挙動がようやくまともに
  • あのコン過去ログビューワー(暫定版)

Tags

10.11savvy (1101) 10.12savvy (1242) 10.13savvy (1390) 10.14savvy (586) 10.15savvy (434) 11.0savvy (277) 12.0savvy (185) 13.0savvy (55) CotEditor (60) Finder (47) iTunes (19) Keynote (98) NSAlert (60) NSArray (51) NSBezierPath (18) NSBitmapImageRep (20) NSBundle (20) NSButton (34) NSColor (51) NSDictionary (27) NSFileManager (23) NSFont (18) NSImage (41) NSJSONSerialization (21) NSMutableArray (62) NSMutableDictionary (21) NSPredicate (36) NSRunningApplication (56) NSScreen (30) NSScrollView (22) NSString (117) NSURL (97) NSURLRequest (23) NSUTF8StringEncoding (30) NSView (33) NSWorkspace (20) Numbers (56) Pages (37) Safari (41) Script Editor (20) WKUserContentController (21) WKUserScript (20) WKUserScriptInjectionTimeAtDocumentEnd (18) WKWebView (23) WKWebViewConfiguration (22)

カテゴリー

  • 2D Bin Packing
  • 3D
  • AirDrop
  • AirPlay
  • Animation
  • AppleScript Application on Xcode
  • beta
  • Bluetooth
  • Books
  • boolean
  • bounds
  • Bug
  • Calendar
  • call by reference
  • Clipboard
  • Code Sign
  • Color
  • Custom Class
  • dialog
  • drive
  • exif
  • file
  • File path
  • filter
  • folder
  • Font
  • Font
  • GAME
  • geolocation
  • GUI
  • GUI Scripting
  • Hex
  • History
  • How To
  • iCloud
  • Icon
  • Image
  • Input Method
  • Internet
  • iOS App
  • JavaScript
  • JSON
  • JXA
  • Keychain
  • Keychain
  • Language
  • Library
  • list
  • Locale
  • Machine Learning
  • Map
  • Markdown
  • Menu
  • Metadata
  • MIDI
  • MIME
  • Natural Language Processing
  • Network
  • news
  • Noification
  • Notarization
  • Number
  • Object control
  • OCR
  • OSA
  • PDF
  • Peripheral
  • PRODUCTS
  • QR Code
  • Raw AppleEvent Code
  • Record
  • rectangle
  • recursive call
  • regexp
  • Release
  • Remote Control
  • Require Control-Command-R to run
  • REST API
  • Review
  • RTF
  • Sandbox
  • Screen Saver
  • Script Libraries
  • sdef
  • search
  • Security
  • selection
  • shell script
  • Shortcuts Workflow
  • Sort
  • Sound
  • Spellchecker
  • Spotlight
  • SVG
  • System
  • Tag
  • Telephony
  • Text
  • Text to Speech
  • timezone
  • Tools
  • Update
  • URL
  • UTI
  • Web Contents Control
  • WiFi
  • XML
  • XML-RPC
  • イベント(Event)
  • 未分類

アーカイブ

  • 2023年9月
  • 2023年8月
  • 2023年7月
  • 2023年6月
  • 2023年5月
  • 2023年4月
  • 2023年3月
  • 2023年2月
  • 2023年1月
  • 2022年12月
  • 2022年11月
  • 2022年10月
  • 2022年9月
  • 2022年8月
  • 2022年7月
  • 2022年6月
  • 2022年5月
  • 2022年4月
  • 2022年3月
  • 2022年2月
  • 2022年1月
  • 2021年12月
  • 2021年11月
  • 2021年10月
  • 2021年9月
  • 2021年8月
  • 2021年7月
  • 2021年6月
  • 2021年5月
  • 2021年4月
  • 2021年3月
  • 2021年2月
  • 2021年1月
  • 2020年12月
  • 2020年11月
  • 2020年10月
  • 2020年9月
  • 2020年8月
  • 2020年7月
  • 2020年6月
  • 2020年5月
  • 2020年4月
  • 2020年3月
  • 2020年2月
  • 2020年1月
  • 2019年12月
  • 2019年11月
  • 2019年10月
  • 2019年9月
  • 2019年8月
  • 2019年7月
  • 2019年6月
  • 2019年5月
  • 2019年4月
  • 2019年3月
  • 2019年2月
  • 2019年1月
  • 2018年12月
  • 2018年11月
  • 2018年10月
  • 2018年9月
  • 2018年8月
  • 2018年7月
  • 2018年6月
  • 2018年5月
  • 2018年4月
  • 2018年3月
  • 2018年2月

https://piyomarusoft.booth.pm/items/301502

メタ情報

  • ログイン
  • 投稿フィード
  • コメントフィード
  • WordPress.org

Forum Posts

  • 人気のトピック
  • 返信がないトピック

メタ情報

  • ログイン
  • 投稿フィード
  • コメントフィード
  • WordPress.org
Proudly powered by WordPress
Theme: Flint by Star Verte LLC