| AppleScript名:与えられた画像ファイルがNSImageでハンドリング可能かを取得 v2 |
| — Created 2015-08-18 by Shane Stanley — Modified 2018-02-10 by Takaaki Naganoya use AppleScript version "2.4" use scripting additions use framework "Foundation" set oldPath to POSIX path of (choose file) set aRes to chkHandlingByNSImage(oldPath, "JPEG") –> {nsImageAcceptable:true, requireConvert:true} on chkHandlingByNSImage(aPath, targetFormatExt) set aRes to chkNSImageAcceptableFormat(aPath, targetFormatExt) set bRes to chkIsThereNeedToConvert(aPath, targetFormatExt) return {nsImageAcceptable:aRes, requireConvert:bRes} end chkHandlingByNSImage –与えられた画像ファイルがNSImageでハンドリング可能かを取得 on chkNSImageAcceptableFormat(aPath as text, targetFormatExt as text) — check if UTI of file is one NSImage can read set theWorkspace to current application’s NSWorkspace’s sharedWorkspace() set theType to theWorkspace’s typeOfFile:aPath |error|:(missing value) — returns UTI of file –> (NSString) "public.jpeg" set supportedTypes to current application’s NSImage’s imageTypes() — returns supported UTIs –> (NSArray) {"com.adobe.pdf", "com.apple.pict", "com.adobe.encapsulated-postscript", "public.jpeg", "public.png", "com.compuserve.gif", "public.jpeg-2000", "com.canon.tif-raw-image", "com.adobe.raw-image", "com.dxo.raw-image", "com.canon.cr2-raw-image", "com.leafamerica.raw-image", "com.hasselblad.fff-raw-image", "com.hasselblad.3fr-raw-image", "com.nikon.raw-image", "com.nikon.nrw-raw-image", "com.pentax.raw-image", "com.samsung.raw-image", "com.sony.raw-image", "com.sony.sr2-raw-image", "com.sony.arw-raw-image", "com.epson.raw-image", "com.kodak.raw-image", "public.tiff", "com.apple.icns", "com.canon.crw-raw-image", "com.fuji.raw-image", "com.panasonic.raw-image", "com.panasonic.rw2-raw-image", "com.leica.raw-image", "com.leica.rwl-raw-image", "com.konicaminolta.raw-image", "com.olympus.sr-raw-image", "com.olympus.or-raw-image", "com.olympus.raw-image", "com.adobe.photoshop-image", "com.microsoft.ico", "com.microsoft.bmp", "com.microsoft.cur", "com.truevision.tga-image", "com.sgi.sgi-image", "com.apple.macpaint-image", "com.ilm.openexr-image", "public.radiance", "public.mpo-image", "public.pbm", "public.pvr", "com.apple.rjpeg", "com.apple.quicktime-image", "com.kodak.flashpix-image"} if (supportedTypes’s containsObject:theType) as boolean is false then return "File format is unsupported" — check required type doesn’t already match else return true end if end chkNSImageAcceptableFormat –変換元の画像パスと変換対象の拡張子を与え、変換不要(同一ファイル"JPG"–> "JPEG"など)かをチェックする on chkIsThereNeedToConvert(aPath as text, targetFormatExt as text) set theWorkspace to current application’s NSWorkspace’s sharedWorkspace() set theType to theWorkspace’s typeOfFile:aPath |error|:(missing value) — returns UTI of file if (theWorkspace’s filenameExtension:targetFormatExt isValidForType:theType) as boolean then return false –"No conversion needed" else return true end if end chkIsThereNeedToConvert |
カテゴリー: file
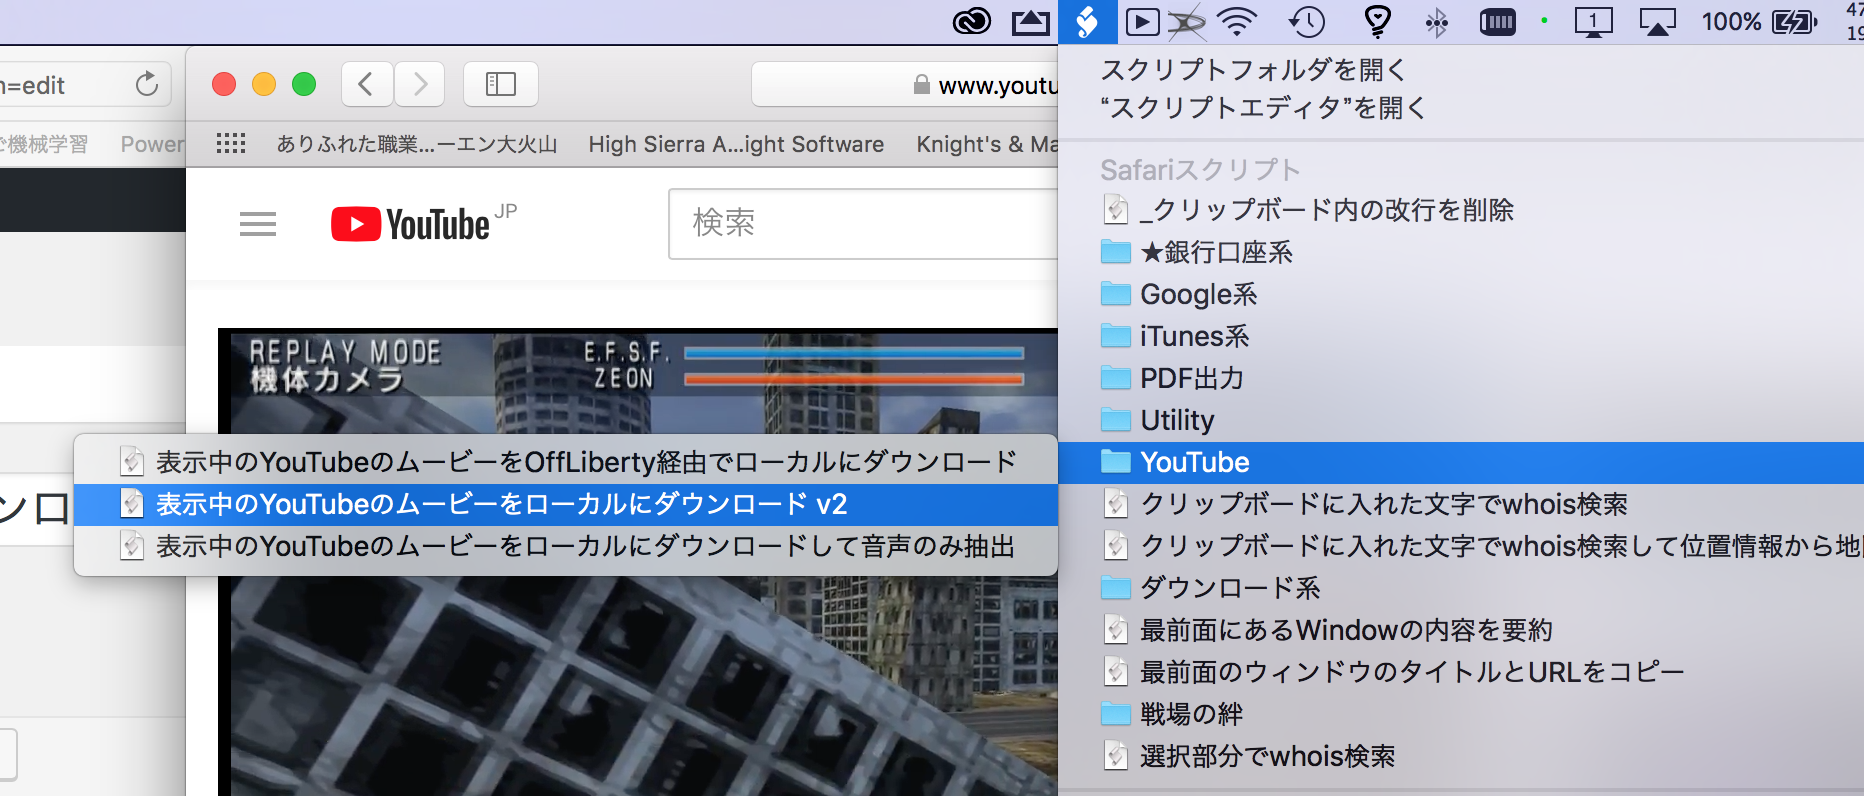
表示中のYouTubeのムービーをローカルにダウンロードして音声のみ抽出
Safariで表示中のYouTubeのムービーをローカルのMoviesフォルダにダウンロードして音声部分のみ抽出するAppleScriptです。
YouTubeからのダウンロードを行う「YouTubeDLLib」およびShane StanleyのAppleScript Libraries「BridgePlus」を~/Libraries/AppleScript Librariesフォルダに、XAttribute.frameworkを~/Libraries/Frameworksフォルダにインストールして実行してください。
YouTubeDLLib内部には「youtube-dl」を含んでおり、これ単体でアップデートが必要な場合もあります。急に動かなくなったような場合には、新バージョンが出ていないかチェックしてみてください。
Script Menuから実行することを前提としています。
| AppleScript名:表示中のYouTubeのムービーをローカルにダウンロードして音声のみ抽出 |
| use AppleScript version "2.4" use scripting additions use framework "Foundation" use framework "AVFoundation" use framework "XAttribute" –https://github.com/rylio/OTMXAttribute use BridgePlus : script "BridgePlus" –https://www.macosxautomation.com/applescript/apps/BridgePlus.html use youtubeLib : script "YouTubeDLLib" set dlFolder to POSIX path of (path to movies folder) –ダウンロード先のフォルダ set aURL to getPageURLOfFrontmostWindow() of me set aList to aURL load framework –指定URLのYouTubeのムービーをダウンロードする set aRes to downLoadMovieToFile(aURL, dlFolder) of youtubeLib –オーディオ部分のみ抽出 set dlFullPath to dlFolder & aRes –ダウンロードしたMovieからXattrを削除する set xRes to removeXAttrFromFile(dlFullPath, "com.apple.quarantine") my convertMovieAt:dlFullPath ToType:"AVAssetExportPresetAppleM4A" withExtension:"m4a" deleteOriginal:true on getPageURLOfFrontmostWindow() tell application "Safari" if (count every window) = 0 then return false tell window 1 set aProp to properties end tell set aDoc to document of aProp set aText to URL of aDoc end tell return aText end getPageURLOfFrontmostWindow on getPageTitleOfFrontmostWindow() tell application "Safari" if (count every window) = 0 then return false tell window 1 set aProp to properties end tell set aDoc to document of aProp set aText to name of aDoc end tell return aText end getPageTitleOfFrontmostWindow –指定のムービーを、指定の書き出しプリセットで、指定のファイル形式で、オリジナルファイルを削除するかどうか指定しつつ書き出し on convertMovieAt:(posixPath as string) ToType:(assetTypeStr as string) withExtension:(aExt as string) deleteOriginal:(deleteFlag as boolean) set theURL to current application’s |NSURL|’s fileURLWithPath:posixPath set aPreset to current application’s NSString’s stringWithString:assetTypeStr — set destination to use same path, different extension set destURL to theURL’s URLByDeletingPathExtension()’s URLByAppendingPathExtension:aExt set theAsset to current application’s AVAsset’s assetWithURL:theURL — check asset can be converted set allowedPresets to current application’s AVAssetExportSession’s exportPresetsCompatibleWithAsset:theAsset if (allowedPresets’s containsObject:aPreset) as boolean is false then error "Can’t export this file as an ." & aExt & " file." end if — set up export session set fileTypeUTIstr to retFileFormatUTI(aExt) of me –ファイル拡張子からFile Type UTIを求める set theSession to current application’s AVAssetExportSession’s exportSessionWithAsset:theAsset presetName:aPreset theSession’s setOutputFileType:fileTypeUTIstr theSession’s setOutputURL:destURL — begin export and poll for completion theSession’s exportAsynchronouslyWithCompletionHandler:(missing value) repeat set theStatus to theSession’s status() as integer if theStatus < 3 then delay 0.2 else exit repeat end if end repeat — throw error if it failed if theStatus = (current application’s AVAssetExportSessionStatusFailed) as integer then error (theSession’s |error|()’s localizedDescription() as text) end if — delete original if required if deleteFlag then current application’s NSFileManager’s defaultManager()’s removeItemAtURL:theURL |error|:(missing value) end if end convertMovieAt:ToType:withExtension:deleteOriginal: on retFileFormatUTI(aExt as string) return (current application’s SMSForder’s UTIForExtension:aExt) end retFileFormatUTI on removeXAttrFromFile(aFile, anXattr) –Get Xattr String set anAttribute to (current application’s OTMXAttribute’s stringAttributeAtPath:aFile |name|:anXattr |error|:(missing value)) if anAttribute = missing value then return true –There is no use to remove xattr –Remove Xattr set xRes to (current application’s OTMXAttribute’s removeAttributeAtPath:aFile |name|:anXattr |error|:(missing value)) if xRes = missing value then return false return (xRes as boolean) end removeXAttrFromFile |
表示中のYouTubeのムービーをローカルにダウンロード v2
Safariで表示中のYouTubeのムービーをローカルのMoviesフォルダにダウンロードするAppleScriptです。
YouTubeからのダウンロードを行う「YouTubeDLLib」を~/Library/Script Librariesフォルダ(初期状態では存在しないので、ない場合には手動で作成)にインストールして実行してください。
–> Download YouTubeDLLib (To ~/Library/Script Libraries)
YouTubeDLLib内部には「youtube-dl」を含んでおり、これ単体でアップデートが必要な場合もあります(半年に1回ぐらいアップデートしています)。
Script Menuから実行することを前提としています。
| AppleScript名:表示中のYouTubeのムービーをローカルにダウンロード v2 |
| use AppleScript version "2.4" use scripting additions use framework "Foundation" use youtubeLib : script "YouTubeDLLib" set dlFolder to POSIX path of (path to movies folder) –ダウンロード先のフォルダ set aURL to getPageURLOfFrontmostWindow() of me set aList to {aURL} set erList to {} –set aList to paragraphs of a repeat with i in aList set j to contents of i –指定URLのYouTubeのムービーをダウンロードする dlMovieSub(aURL, dlFolder) of youtubeLib end repeat return erList –ダウンロード結果 on getPageURLOfFrontmostWindow() tell application "Safari" if (count every window) = 0 then return false tell window 1 set aProp to properties end tell set aDoc to document of aProp set aText to URL of aDoc end tell return aText end getPageURLOfFrontmostWindow |
rtf_rtfdからテキスト抽出
RTFないしRTFD(添付ファイルつきRTF)からテキストを抽出するAppleScriptです。
| AppleScript名:rtf_rtfdからテキスト抽出 |
| — Created 2018-02-10 by Takaaki Naganoya — 2018 Piyomaru Software use AppleScript version "2.4" use scripting additions use framework "Foundation" set aFile to choose file of type {"com.apple.rtfd", "public.rtf"} set aRes to retTextFromRTF(aFile) of me on retTextFromRTF(aFile) set aFilePath to current application’s NSString’s stringWithString:(POSIX path of aFile) set anExt to (aFilePath’s pathExtension()) as string if anExt = "rtfd" then set aFilePath to aFilePath’s stringByAppendingString:"TXT.rtf" end if set aData to current application’s NSData’s dataWithContentsOfFile:aFilePath options:0 |error|:(missing value) set theStyledText to current application’s NSMutableAttributedString’s alloc()’s initWithData:aData options:(missing value) documentAttributes:(missing value) |error|:(missing value) if theStyledText is not equal to missing value then return (theStyledText’s |string|()) as string else return false –Not RTF file end if end retTextFromRTF |
Read Safari Bookmark v2
Safariのブックマーク内容からURLとページタイトルを取得してテキスト書き出しするAppleScriptです。
一番のみどころは、Predicate文でURLStringがnilでなければ、という記述を行っている箇所です。AppleScriptのデータに変換するとnilはmissing valueになるので、ここでmissing valueを指定したくなるところですが、nilを指定しました。
実行のためには、AppleScriptの実行プログラム(スクリプトエディタとかScript Debugger)を「システム環境設定」の「セキュリティとプライバシー」>「プライバシー」>「フルディスクアクセス」に登録しておく必要があります。AppleScriptアプレットから実行する場合には、そのAppleScriptアプレットそのものを「フルディスクアクセス」に登録する必要があります。
| AppleScript名:Read Safari Bookmark v2 |
| — Created 2016-02-27 by Takaaki Naganoya — Piyomaru Software 2016 use AppleScript version "2.4" use scripting additions use framework "Foundation" script spdBk property outList : {} end script set (outList of spdBk) to {} set libPath to (POSIX path of (path to library folder from user domain)) & "Safari/Bookmarks.plist" set aRec to retDictFromPlist(libPath) of me set aList to aRec’s Children set aPredicate to current application’s NSPredicate’s predicateWithFormat:"URLString != nil" set filteredArray to (aList’s filteredArrayUsingPredicate:aPredicate) as list repeat with i in filteredArray set the end of (outList of spdBk) to "■" & (Title of URIDictionary of i) & return & (URLString of i) end repeat set aRes to listToStringUsingTextItemDelimiter(contents of (outList of spdBk), return & return) of me –Read plist as record on retDictFromPlist(aPath as text) set thePath to current application’s NSString’s stringWithString:aPath set thePath to thePath’s stringByExpandingTildeInPath() set theDict to current application’s NSDictionary’s dictionaryWithContentsOfFile:thePath return theDict end retDictFromPlist on listToStringUsingTextItemDelimiter(sourceList, textItemDelimiter) set anArray to current application’s NSArray’s arrayWithArray:sourceList set aString to anArray’s componentsJoinedByString:textItemDelimiter return (aString as string) end listToStringUsingTextItemDelimiter |
Safariで表示中のURLをwebarchive保存
Safariで表示中の最前面のウィンドウのURLの内容をデスクトップ上にWebarchive書類として保存するAppleScriptです。
webArchiveはDeprecatedになったので、macOS 10.14あたりまでのOSで使うならOK。今後については何か別の機能が実装されるのかどうか。macOS 10.15で別の何かが紹介されるのでしょうか。
| AppleScript名:Safariで表示中のURLをwebarchive保存 |
| — Created 2014-11-13 Shane Stanley — Modified 2018-02-11 Takaaki Naganoya use AppleScript version "2.4" use scripting additions use framework "Foundation" use framework "WebKit" property theSender : missing value property thePath : missing value property loadDone : false –original was "webFrame" property aWebView : missing value tell application "Safari" if (count every document) = 0 then return tell front document set aURL to URL end tell end tell set aPath to (POSIX path of (path to desktop)) & ((current application’s NSUUID’s UUID()’s UUIDString()) as string) & ".webarchive" set archRes to archivePageToPathWithoutSearching(aURL, aPath, me, 10) of me on archivePageToPathWithoutSearching(thePageURL, aPath, sender, timeoutSec) –Check If this script runs in foreground if not (current application’s NSThread’s isMainThread()) as boolean then display alert "This script must be run from the main thread (Command-Control-R in Script Editor)." buttons {"Cancel"} as critical error number -128 end if set my theSender to sender — store main script so we can call back set my thePath to aPath — store path for use later set my aWebView to missing value set my loadDone to false — make a WebView set theView to current application’s WebView’s alloc()’s initWithFrame:{origin:{x:0, y:0}, |size|:{width:100, height:100}} — tell it call delegate methods on me theView’s setFrameLoadDelegate:me — load the page theView’s setMainFrameURL:thePageURL –wait for download & saving repeat timeoutSec * 10 times if my loadDone is not equal to false then exit repeat end if delay 0.1 end repeat if my loadDone = false then return "timed out" — the main frame is our interest if (my loadDone) = aWebView’s mainFrame() then — get the data and write it to file set theArchiveData to (my loadDone)’s dataSource()’s webArchive()’s |data|() theArchiveData’s writeToFile:thePath atomically:true — tell our script it’s all done return "The webarchive was saved" end if end archivePageToPathWithoutSearching — called when our WebView loads a frame on WebView:curWebView didFinishLoadForFrame:webFrame set my loadDone to webFrame set my aWebView to curWebView end WebView:didFinishLoadForFrame: — called when there’s a problem on WebView:WebView didFailLoadWithError:theError forFrame:webFrame — got an error, bail WebView’s stopLoading:me set my loadDone to false error "The webarchive was not saved" end WebView:didFailLoadWithError:forFrame: |
指定URLのページをwebarchive保存 v2
指定のURLの内容をデスクトップ上にwebarchive書類として保存するAppleScriptです。
SafariがAppleScript側にwebarchive保存機能を提供していないので、
(1)GUI Scriptingで無理やりメニューを操作してwebarchive保存
(2)AppleScriptでCocoaの機能を呼び出してwebarchive保存
(3)コマンドラインツールを呼び出してwebarchive保存
といった代替策をとる必要があります。本Scriptは(2)を行なったものです。
オリジナルのAppleScriptはShane StanleyがCocoa Scripting普及初期に書いたもので、非同期で処理しておりそのままではAppleScriptのワークフローに組み込むには難がありました(処理結果が正しく実行できたかなど、結果を確実に確認できたほうがよいので)。
そこで、他のワークフローに組み込みやすいように構造を変えてみました。ただ、内部でdelegateによる通知処理を利用しているのでフォアグラウンドでの実行が必須となります(Command-Control-R)。
| AppleScript名:指定URLのページをwebarchive保存 v2 |
| — Created 2014-11-13 Shane Stanley — Modified 2018-02-11 Takaaki Naganoya use AppleScript version "2.4" use scripting additions use framework "Foundation" use framework "WebKit" property theSender : missing value property thePath : missing value property theSearchString : missing value property loadDone : false –original was "webFrame" property aWebView : missing value set aPath to (POSIX path of (path to desktop)) & ((current application’s NSUUID’s UUID()’s UUIDString()) as string) & ".webarchive" set archRes to archivePageToPath("https://www.apple.com/jp/shop/browse/home/specialdeals/mac", aPath, "Mac mini", me, 10) of me on archivePageToPath(thePageURL, aPath, searchString, sender, timeoutSec) –Check If this script runs in foreground if not (current application’s NSThread’s isMainThread()) as boolean then display alert "This script must be run from the main thread (Command-Control-R in Script Editor)." buttons {"Cancel"} as critical error number -128 end if set my theSender to sender — store main script so we can call back set my thePath to aPath — store path for use later set my theSearchString to searchString — store for use later set my aWebView to missing value set my loadDone to false — make a WebView set theView to current application’s WebView’s alloc()’s initWithFrame:{origin:{x:0, y:0}, |size|:{width:100, height:100}} — tell it call delegate methods on me theView’s setFrameLoadDelegate:me — load the page theView’s setMainFrameURL:thePageURL –wait for download & saving repeat timeoutSec * 10 times if my loadDone is not equal to false then exit repeat end if delay 0.1 end repeat if my loadDone = false then return "timed out" — the main frame is our interest if (my loadDone) = aWebView’s mainFrame() then — get the text of the page set theText to ((my loadDone)’s DOMDocument()’s documentElement()’s outerText()) — search it if (theText’s rangeOfString:theSearchString)’s |length|() > 0 then — get the data and write it to file set theArchiveData to (my loadDone)’s dataSource()’s webArchive()’s |data|() theArchiveData’s writeToFile:thePath atomically:true — tell our script it’s all done return "The webarchive was saved" else return "Seach string not found" end if end if end archivePageToPath — called when our WebView loads a frame on WebView:curWebView didFinishLoadForFrame:webFrame set my loadDone to webFrame set my aWebView to curWebView end WebView:didFinishLoadForFrame: — called when there’s a problem on WebView:WebView didFailLoadWithError:theError forFrame:webFrame — got an error, bail WebView’s stopLoading:me set my loadDone to false error "The webarchive was not saved" end WebView:didFailLoadWithError:forFrame: |
指定URLをロードしてページ中の画像を取得 v2
| AppleScript名:指定URLをロードしてページ中の画像を取得 v2 |
| — Created 2015-09-07 by Takaaki Naganoya — 2015 Piyomaru Software use AppleScript version "2.4" use scripting additions use framework "Foundation" use framework "WebKit" property loadDone : false property theWebView : missing value set aURL to "http://piyocast.com/as/archives/1176" set aRes to getPage(aURL) set aList to getPageImages() of me set theWebView to missing value –Purge aList –theWebViewにロードしておいたページから画像情報を取得 on getPageImages() set aList to {} set imgNum to ((my theWebView)’s stringByEvaluatingJavaScriptFromString:"document.images.length") as integer repeat with i from 0 to (imgNum – 1) set jsT to "document.images[" & (i as string) & "].height" set aHeight to ((my theWebView)’s stringByEvaluatingJavaScriptFromString:jsT) as integer set jsT to "document.images[" & (i as string) & "].width" set aWidth to ((my theWebView)’s stringByEvaluatingJavaScriptFromString:jsT) as integer set jsT to "document.images[" & (i as string) & "].src" set aSRC to ((my theWebView)’s stringByEvaluatingJavaScriptFromString:jsT) as text set the end of aList to {aHeight, aWidth, aSRC} end repeat return aList end getPageImages –theWebViewにロードしておいたページからタイトルを取得 on getPageTitle() set x to ((my theWebView)’s stringByEvaluatingJavaScriptFromString:"document.title") as text return x end getPageTitle –指定のURLの内容をtheWebViewに取得 on getPage(aURL) –Check If this script runs in foreground if not (current application’s NSThread’s isMainThread()) as boolean then display alert "This script must be run from the main thread (Command-Control-R in Script Editor)." buttons {"Cancel"} as critical error number -128 end if set my loadDone to false set my theWebView to missing value openURL(aURL) set waitLoop to 1000 * 60 –60 seconds set hitF to false repeat waitLoop times if my loadDone = true then set hitF to true exit repeat end if current application’s NSThread’s sleepForTimeInterval:("0.001" as real) –delay 0.001 end repeat if hitF = false then return return true end getPage –WebViewにURLを読み込む on openURL(aURL) set noter1 to current application’s NSNotificationCenter’s defaultCenter() set my theWebView to current application’s WebView’s alloc()’s init() noter1’s addObserver:me selector:"webLoaded:" |name|:(current application’s WebViewProgressFinishedNotification) object:(my theWebView) my (theWebView’s setMainFrameURL:aURL) end openURL –Web Viewのローディング完了時に実行 on webLoaded:aNotification set my loadDone to true end webLoaded: |
web上の画像をローカルにダウンロードして保存
| AppleScript名:web上の画像をローカルにダウンロードして保存 |
| — Created 2013-12-27 Shane Stanley use AppleScript version "2.4" use scripting additions use framework "Foundation" set thePicURL to "http://www.macosxautomation.com/applescript/apps/gfx/EverydayCover300.jpg" set thePath to POSIX path of ((path to desktop as text) & "Test.jpg") set aRes to saveImageURLToPath(thePicURL, thePath) on saveImageURLToPath(thePicURL, thePath) set theNSURL to current application’s |NSURL|’s URLWithString:thePicURL set picData to current application’s NSData’s dataWithContentsOfURL:theNSURL picData’s writeToFile:thePath atomically:true end saveImageURLToPath |
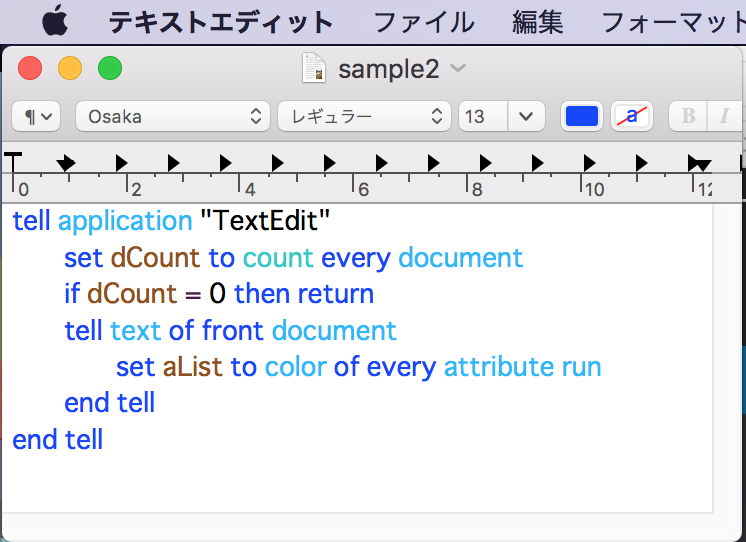
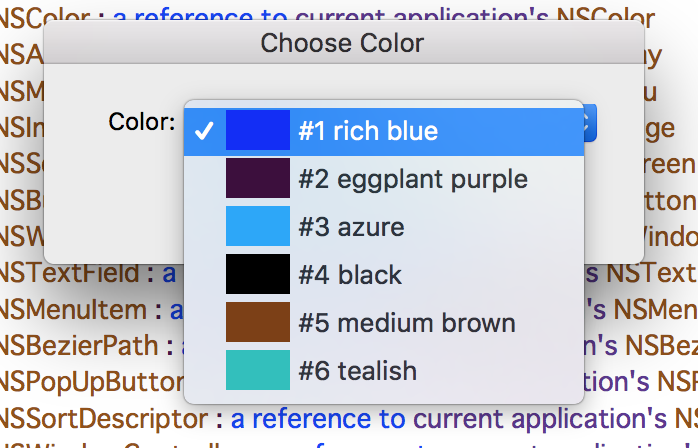
TextEditで最前面のドキュメント内で使用されている色情報を抽出して処理対象色を選択(色名の計算機能つき)v3
TextEditの最前面の書類本文の色情報を抽出し、ダイアログ上に色選択ポップアップを作成して処理対象色をえらび、該当する色の文字を抽出するAppleScriptです。
DBColorNames.frameworkを用いて、900色程度の色見本から近似の色名称を計算しています。
| AppleScript名:TextEditで最前面のドキュメント内で使用されている色情報を抽出して処理対象色を選択(色名の計算機能つき)v3 |
| — Created 2017-12-26 by Takaaki Naganoya — 2017 Piyomaru Software use AppleScript version "2.5" use scripting additions use framework "Foundation" use framework "AppKit" use framework "Carbon" — AEInteractWithUser() is in Carbon use framework "dbColNamesKit" –https://github.com/daniel-beard/DBColorNames/ property NSView : a reference to current application’s NSView property NSColor : a reference to current application’s NSColor property NSArray : a reference to current application’s NSArray property NSMenu : a reference to current application’s NSMenu property NSImage : a reference to current application’s NSImage property NSScreen : a reference to current application’s NSScreen property NSButton : a reference to current application’s NSButton property NSWindow : a reference to current application’s NSWindow property NSTextField : a reference to current application’s NSTextField property NSMenuItem : a reference to current application’s NSMenuItem property NSBezierPath : a reference to current application’s NSBezierPath property NSPopUpButton : a reference to current application’s NSPopUpButton property NSSortDescriptor : a reference to current application’s NSSortDescriptor property NSWindowController : a reference to current application’s NSWindowController property NSTitledWindowMask : a reference to current application’s NSTitledWindowMask property NSRoundedBezelStyle : a reference to current application’s NSRoundedBezelStyle property NSNormalWindowLevel : a reference to current application’s NSNormalWindowLevel property NSBackingStoreBuffered : a reference to current application’s NSBackingStoreBuffered property NSMomentaryLightButton : a reference to current application’s NSMomentaryLightButton property windisp : false if current application’s AEInteractWithUser(-1, missing value, missing value) is not equal to 0 then return tell application "TextEdit" set dCount to count every document if dCount = 0 then return tell text of front document set aList to color of every attribute run end tell end tell –1D/2D Listのユニーク化 set ap1List to uniquify1DList(aList, true) of me –色選択ダイアログを表示してポップアップメニューから色選択 set aButtonMSG to "OK" set aWindowTitle to "Choose Color" set aVal to getPopupValues(ap1List, 65535, aButtonMSG, aWindowTitle, 180) of me if (aVal = false) or (aVal = missing value) then display dialog "No Selection" buttons {"OK"} default button 1 with icon 2 return end if set targColor to item aVal of ap1List set aRes to pickupColoredText(targColor) of me set the clipboard to aRes –抽出結果をクリップボードへ return aRes on getPopupValues(ap1List, aColMax, aButtonMSG, aWindowMSG, timeOutSecs) set (my windisp) to true set aView to NSView’s alloc()’s initWithFrame:(current application’s NSMakeRect(0, 0, 360, 100)) –Labelをつくる set a1TF to NSTextField’s alloc()’s initWithFrame:(current application’s NSMakeRect(30, 60, 80, 20)) a1TF’s setEditable:false a1TF’s setStringValue:"Color:" a1TF’s setDrawsBackground:false a1TF’s setBordered:false –Ppopup Buttonをつくる set a1Button to NSPopUpButton’s alloc()’s initWithFrame:(current application’s NSMakeRect(80, 60, 200, 20)) pullsDown:false a1Button’s removeAllItems() set a1Menu to NSMenu’s alloc()’s init() set iCount to 1 repeat with i in ap1List copy i to {rCol, gCol, bCol} set j to contents of i set aCocoaList to retCocoaColorList(j, aColMax) of me set nsCol to (NSColor’s colorFromRGBAArray:aCocoaList) set anImage to makeNSImageWithFilledWithColor(32, 20, nsCol) of me set aColName to retColorDetailName(rCol, gCol, bCol, 65535) of me set aTitle to "#" & (iCount as string) & " " & aColName set aMenuItem to (NSMenuItem’s alloc()’s initWithTitle:aTitle action:"actionHandler:" keyEquivalent:"") (aMenuItem’s setImage:anImage) (aMenuItem’s setEnabled:true) (a1Menu’s addItem:aMenuItem) set iCount to iCount + 1 end repeat a1Button’s setMenu:a1Menu –Buttonをつくる set bButton to (NSButton’s alloc()’s initWithFrame:(current application’s NSMakeRect(80, 10, 140, 40))) bButton’s setButtonType:(current application’s NSMomentaryLightButton) bButton’s setBezelStyle:(current application’s NSRoundedBezelStyle) bButton’s setTitle:aButtonMSG bButton’s setTarget:me bButton’s setAction:("clicked:") bButton’s setKeyEquivalent:(return) aView’s addSubview:a1TF aView’s addSubview:a1Button aView’s addSubview:bButton aView’s setNeedsDisplay:true –NSWindowControllerを作ってみた set aWin to (my makeWinWithView(aView, 300, 100, aWindowMSG)) set wController to NSWindowController’s alloc() wController’s initWithWindow:aWin wController’s showWindow:me set aCount to timeOutSecs * 100 set hitF to false repeat aCount times if (my windisp) = false then set hitF to true exit repeat end if delay 0.01 set aCount to aCount – 1 end repeat my closeWin:aWin if hitF = true then set s1Val to (a1Button’s indexOfSelectedItem() as integer) + 1 else set s1Val to false end if return s1Val end getPopupValues on clicked:aSender set (my windisp) to false end clicked: –make Window for Display on makeWinWithView(aView, aWinWidth, aWinHeight, aTitle) set aScreen to NSScreen’s mainScreen() set aFrame to {{0, 0}, {aWinWidth, aWinHeight}} set aBacking to current application’s NSTitledWindowMask set aDefer to current application’s NSBackingStoreBuffered — Window set aWin to NSWindow’s alloc() (aWin’s initWithContentRect:aFrame styleMask:aBacking backing:aDefer defer:false screen:aScreen) –aWin’s setBackgroundColor:(current application’s NSColor’s whiteColor()) aWin’s setTitle:aTitle aWin’s setDelegate:me aWin’s setDisplaysWhenScreenProfileChanges:true aWin’s setHasShadow:true aWin’s setIgnoresMouseEvents:false aWin’s setLevel:(current application’s NSNormalWindowLevel) aWin’s setOpaque:false aWin’s setReleasedWhenClosed:true aWin’s |center|() –aWin’s makeKeyAndOrderFront:(me) aWin’s setContentView:aView return aWin end makeWinWithView –close win on closeWin:aWindow repeat with n from 10 to 1 by -1 (aWindow’s setAlphaValue:n / 10) delay 0.02 end repeat aWindow’s |close|() end closeWin: –Popup Action Handler on actionHandler:sender set aTag to tag of sender as integer set aTitle to title of sender as string end actionHandler: on makeNSColorFromRGBAval(redValue as integer, greenValue as integer, blueValue as integer, alphaValue as integer, aMaxVal as integer) set aRedCocoa to (redValue / aMaxVal) as real set aGreenCocoa to (greenValue / aMaxVal) as real set aBlueCocoa to (blueValue / aMaxVal) as real set aAlphaCocoa to (alphaValue / aMaxVal) as real set aColor to NSColor’s colorWithCalibratedRed:aRedCocoa green:aGreenCocoa blue:aBlueCocoa alpha:aAlphaCocoa return aColor end makeNSColorFromRGBAval –1D Listをユニーク化 on uniquify1DList(theList as list, aBool as boolean) set aArray to NSArray’s arrayWithArray:theList set bArray to aArray’s valueForKeyPath:"@distinctUnionOfObjects.self" set bList to bArray as list return bList end uniquify1DList –指定サイズのNSImageを作成し、指定色で塗って返す on makeNSImageWithFilledWithColor(aWidth, aHeight, fillColor) set anImage to NSImage’s alloc()’s initWithSize:(current application’s NSMakeSize(aWidth, aHeight)) anImage’s lockFocus() — set theRect to {{x:0, y:0}, {height:aHeight, width:aWidth}} set theNSBezierPath to NSBezierPath’s bezierPath theNSBezierPath’s appendBezierPathWithRect:theRect — fillColor’s |set|() –色設定 theNSBezierPath’s fill() –ぬりつぶし — anImage’s unlockFocus() — return anImage end makeNSImageWithFilledWithColor on pickupColoredText(aColList) set outStrList to "" tell application "TextEdit" tell text of front document set colorList to color of every attribute run set textList to characters of every attribute run set aCount to length of colorList repeat with i from 1 to aCount set aColCon to item i of colorList if aColCon is equal to aColList then –指定色の箇所 set outStrList to outStrList & ((contents of item i of textList) as string) & return end if end repeat end tell end tell return outStrList end pickupColoredText on retColorDetailName(rCol as integer, gCol as integer, bCol as integer, aColorMax) set aColor to makeNSColorFromRGBAval(rCol, gCol, bCol, aColorMax, aColorMax) of me set aCDB to current application’s DBColorNames’s alloc()’s init() set aColorStr to (aCDB’s nameForColor:aColor) as string return aColorStr end retColorDetailName on retCocoaColorList(aColorList as list, aMax as integer) set tmpList to {} repeat with i in aColorList set j to (contents of i) if j = 0 then set the end of tmpList to 0 else set the end of tmpList to (j / aMax) as real end if end repeat set the end of tmpList to 1.0 return tmpList end retCocoaColorList –数値の1D List with Recordをソート on sort1DRecList(aList as list, aKey as string, ascendingF as boolean) set aArray to NSArray’s arrayWithArray:aList set desc1 to NSSortDescriptor’s sortDescriptorWithKey:aKey ascending:ascendingF selector:"compare:" set bList to (aArray’s sortedArrayUsingDescriptors:{desc1}) as list return bList end sort1DRecList |
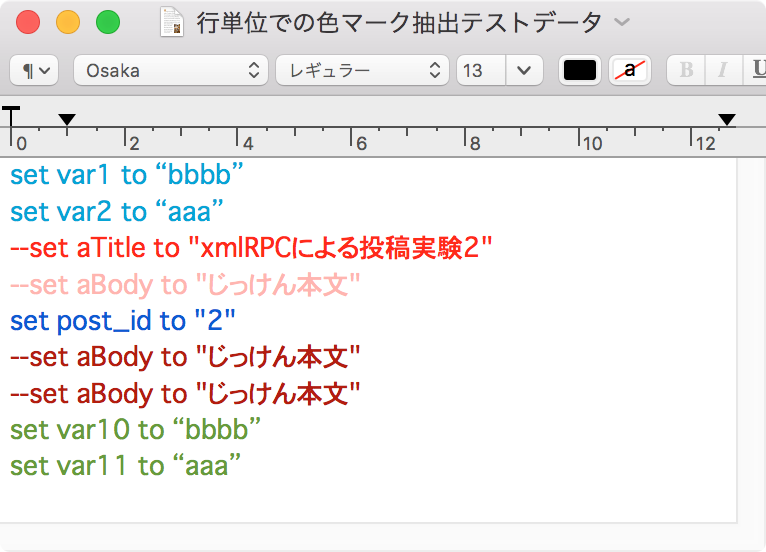
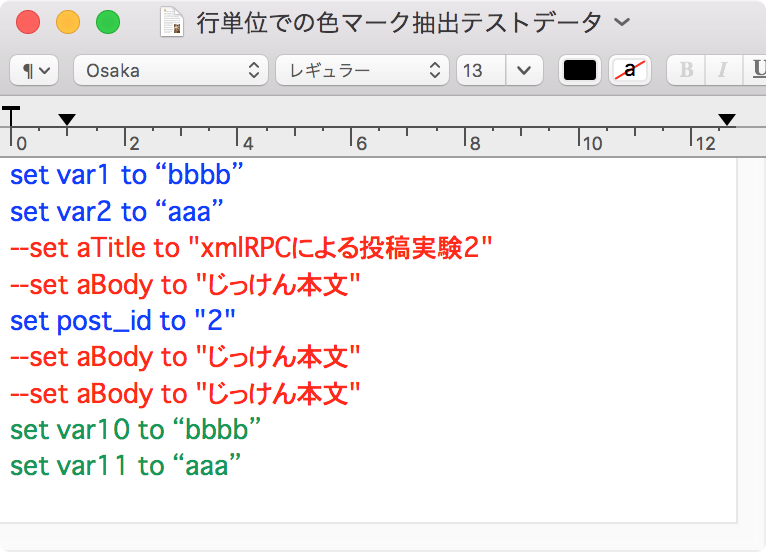
TextEditの文章のうち赤っぽい色でマークされた箇所をピックアップする v2
TextEditの最前面の書類本文のうち、指定の色名称の色(red)に分類できる文字を出力するAppleScriptです。
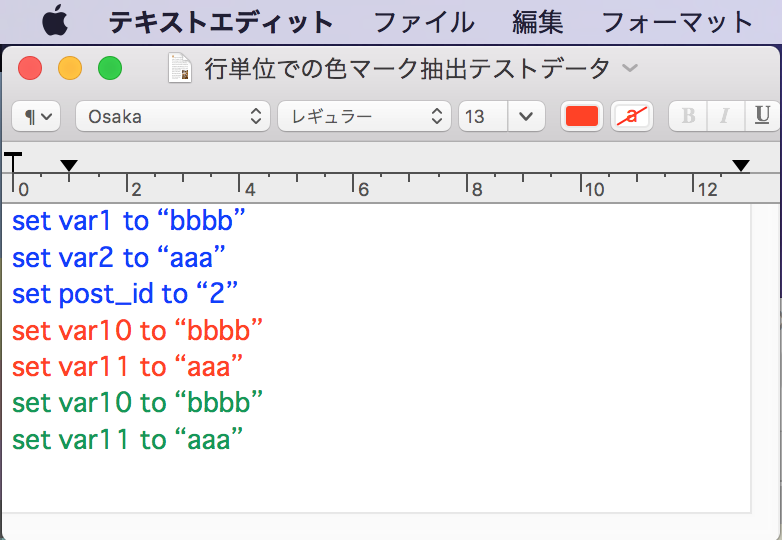
| AppleScript名:TextEditの文章のうち赤っぽい色でマークされた行をカウントする v2 |
| — Created 2018-01-08 by Takaaki Naganoya — 2018 Piyomaru Software use AppleScript version "2.4" use scripting additions use framework "Foundation" use framework "AppKit" property NSColor : a reference to current application’s NSColor set rNum to 0 set colMax to 65535 tell application "TextEdit" tell text of document 1 set pCount to (count paragraphs) repeat with i from 1 to pCount set {rCol, gCol, bCol} to color of paragraph i set cName to retColorDomainName(rCol, gCol, bCol, colMax) of me if cName = "red" then –{r, g, b} set rNum to rNum + 1 end if end repeat end tell end tell return {pCount, rNum} on retColorDomainName(rCol as integer, gCol as integer, bCol as integer, aColorMax) set aCol to makeNSColorFromRGBAval(rCol, gCol, bCol, aColorMax, aColorMax) of me set hueVal to aCol’s hueComponent() set satVal to aCol’s saturationComponent() set brightVal to aCol’s brightnessComponent() if satVal ≤ 0.01 then set satVal to 0.0 set colName to "" if satVal = 0.0 then if brightVal ≤ 0.2 then set colName to "black" else if (brightVal > 0.95) then set colName to "white" else set colName to "gray" end if else if hueVal ≤ (15.0 / 360) or hueVal ≥ (330 / 360) then set colName to "red" else if hueVal ≤ (45.0 / 360) then set colName to "orange" else if hueVal < (70.0 / 360) then set colName to "yellow" else if hueVal < (150.0 / 360) then set colName to "green" else if hueVal < (190.0 / 360) then set colName to "cyan" else if (hueVal < 250.0 / 360.0) then set colName to "blue" else if (hueVal < 290.0 / 360.0) then set colName to "purple" else set colName to "magenta" end if end if return colName end retColorDomainName on makeNSColorFromRGBAval(redValue as integer, greenValue as integer, blueValue as integer, alphaValue as integer, aMaxVal as integer) set aRedCocoa to (redValue / aMaxVal) as real set aGreenCocoa to (greenValue / aMaxVal) as real set aBlueCocoa to (blueValue / aMaxVal) as real set aAlphaCocoa to (alphaValue / aMaxVal) as real set aColor to NSColor’s colorWithCalibratedRed:aRedCocoa green:aGreenCocoa blue:aBlueCocoa alpha:aAlphaCocoa return aColor end makeNSColorFromRGBAval |
TextEditで本文中の使用色をリストアップ(色判定つき)v3
TextEditの最前面のドキュメントの本文色を取得して名称に変換して返すAppleScriptです。
本文中で「だいたいこの系統の色」が使われているかをリストアップします。
–> {“blue”, “red”, “green”}
ただし、いろいろ編集していると改行文字の箇所に意図しない色がついていることがあり、見た目だけではわからない色が検出されるケースもあります。そのような場合には、TextEditの文章のうち赤っぽい色でマークされた箇所をピックアップする v2を使って指定色に該当する箇所の文字データを抽出して確認してください(ペアで使うことを前提に書いたので)。
| AppleScript名:TextEditで本文中の使用色をリストアップ(色判定つき)v3 |
| — Created 2018-02-06 by Takaaki Naganoya — 2018 Piyomaru Software use AppleScript version "2.5" use scripting additions use framework "Foundation" use framework "AppKit" property NSColor : a reference to current application’s NSColor property NSArray : a reference to current application’s NSArray property NSSortDescriptor : a reference to current application’s NSSortDescriptor set colMax to 65535 tell application "TextEdit" set dCount to count every document if dCount = 0 then return tell text of front document set aList to color of every attribute run end tell end tell set ap1List to uniquify1DList(aList, true) of me set cList to {} repeat with i in ap1List copy i to {rCol, gCol, bCol} set cName to retColorDomainName(rCol, gCol, bCol, colMax) of me if cName is not in cList then set the end of cList to cName end if end repeat return cList –> {"blue", "red", "green"} –1D Listをユニーク化 on uniquify1DList(theList as list, aBool as boolean) set aArray to NSArray’s arrayWithArray:theList set bArray to aArray’s valueForKeyPath:"@distinctUnionOfObjects.self" set bList to bArray as list return bList end uniquify1DList on retColorDomainName(rCol as integer, gCol as integer, bCol as integer, aColorMax) set aCol to makeNSColorFromRGBAval(rCol, gCol, bCol, aColorMax, aColorMax) of me set hueVal to aCol’s hueComponent() set satVal to aCol’s saturationComponent() set brightVal to aCol’s brightnessComponent() if satVal ≤ 0.01 then set satVal to 0.0 set colName to "" if satVal = 0.0 then if brightVal ≤ 0.2 then set colName to "black" else if (brightVal > 0.95) then set colName to "white" else set colName to "gray" end if else if hueVal ≤ (15.0 / 360) or hueVal ≥ (330 / 360) then set colName to "red" else if hueVal ≤ (45.0 / 360) then set colName to "orange" else if hueVal < (70.0 / 360) then set colName to "yellow" else if hueVal < (150.0 / 360) then set colName to "green" else if hueVal < (190.0 / 360) then set colName to "cyan" else if (hueVal < 250.0 / 360.0) then set colName to "blue" else if (hueVal < 290.0 / 360.0) then set colName to "purple" else set colName to "magenta" end if end if return colName end retColorDomainName on makeNSColorFromRGBAval(redValue as integer, greenValue as integer, blueValue as integer, alphaValue as integer, aMaxVal as integer) set aRedCocoa to (redValue / aMaxVal) as real set aGreenCocoa to (greenValue / aMaxVal) as real set aBlueCocoa to (blueValue / aMaxVal) as real set aAlphaCocoa to (alphaValue / aMaxVal) as real set aColor to NSColor’s colorWithCalibratedRed:aRedCocoa green:aGreenCocoa blue:aBlueCocoa alpha:aAlphaCocoa return aColor end makeNSColorFromRGBAval –数値の1D List with Recordをソート on sort1DRecList(aList as list, aKey as string, ascendingF as boolean) set aArray to NSArray’s arrayWithArray:aList set desc1 to NSSortDescriptor’s sortDescriptorWithKey:aKey ascending:ascendingF selector:"compare:" set bList to (aArray’s sortedArrayUsingDescriptors:{desc1}) as list return bList end sort1DRecList |
TextEditで本文色をポスタライズ v2
▲Before
▲After
| AppleScript名:TextEditで本文色をポスタライズ v2 |
| — Created 2018-01-08 by Takaaki Naganoya — 2018 Piyomaru Software use AppleScript version "2.4" use scripting additions use framework "Foundation" use framework "AppKit" use bPlus : script "BridgePlus" –https://www.macosxautomation.com/applescript/apps/BridgePlus.html property NSColor : a reference to current application’s NSColor property NSArray : a reference to current application’s NSArray property NSSortDescriptor : a reference to current application’s NSSortDescriptor script spd property colList : {} property attList : {} end script load framework set cList to retTextEditColors() of me set dList to {} repeat with i in cList copy i to {rVal, gVal, bVal} set newColList to posterizeColor(rVal, gVal, bVal, 65535) of me repTextEditColor(i, newColList) of me end repeat on repTextEditColor(targColor, newColor) set hitIndex to {} tell application "TextEdit" tell text of front document set colList to color of every attribute run end tell end tell set hitIndex to (current application’s SMSForder’s indexesOfItem:targColor inArray:(colList) inverting:false) as list tell application "TextEdit" tell text of front document repeat with i in hitIndex ignoring application responses set color of attribute run (i + 1) to newColor –0 based index to 1 based index conversion end ignoring end repeat end tell end tell end repTextEditColor on posterizeColor(rCol as integer, gCol as integer, bCol as integer, aColorMax) set aCol to makeNSColorFromRGBAval(rCol, gCol, bCol, aColorMax, aColorMax) of me set hueVal to aCol’s hueComponent() set satVal to aCol’s saturationComponent() set brightVal to aCol’s brightnessComponent() if satVal ≤ 0.01 then set satVal to 0.0 if satVal = 0.0 then if brightVal ≤ 0.2 then set colVal to {0, 0, 0} –Black else if (brightVal > 0.95) then set colVal to {65535, 65535, 65535} –White else set colVal to {32768, 32768, 32768} –Gray end if else if hueVal ≤ (15.0 / 360) or hueVal ≥ (330 / 360) then set colVal to {65535, 0, 0} –red else if hueVal ≤ (45.0 / 360) then set colVal to {65535, 32768, 0} –orange else if hueVal < (70.0 / 360) then set colVal to {65533, 63639, 2654} –yellow else if hueVal < (150.0 / 360) then set colVal to {4626, 35488, 17789} –green else if hueVal < (190.0 / 360) then set colVal to {0, 60802, 65535} –cyan, light blue else if (hueVal < 250.0 / 360.0) then set colVal to {0, 0, 65535} –blue else if (hueVal < 290.0 / 360.0) then set colVal to {32768, 0, 32768} –purple else set colVal to {65535, 0, 65535} –magenta, pink end if end if return colVal end posterizeColor on makeNSColorFromRGBAval(redValue as integer, greenValue as integer, blueValue as integer, alphaValue as integer, aMaxVal as integer) set aRedCocoa to (redValue / aMaxVal) as real set aGreenCocoa to (greenValue / aMaxVal) as real set aBlueCocoa to (blueValue / aMaxVal) as real set aAlphaCocoa to (alphaValue / aMaxVal) as real set aColor to NSColor’s colorWithCalibratedRed:aRedCocoa green:aGreenCocoa blue:aBlueCocoa alpha:aAlphaCocoa return aColor end makeNSColorFromRGBAval on retTextEditColors() tell application "TextEdit" set dCount to count every document if dCount = 0 then return tell text of front document set aList to color of every character end tell end tell set ap1List to uniquify1DList(aList, true) of me set cList to {} repeat with i in ap1List set the end of cList to contents of i end repeat return cList end retTextEditColors –1D Listをユニーク化 on uniquify1DList(theList as list, aBool as boolean) set aArray to NSArray’s arrayWithArray:theList set bArray to aArray’s valueForKeyPath:"@distinctUnionOfObjects.self" set bList to bArray as list return bList end uniquify1DList |
TextEditの文章のうち赤っぽい色でマークされた行をカウントする v2
TextEditでオープン中の最前面のドキュメント本文の色情報にアクセスして、「赤っぽい色」でマークされた行をカウントするAppleScriptです。

RGB色からHSB色に変換して、おおよその色の名前を計算することで、「赤っぽい色でマークされた行」を抽出してカウントできるようにしてみました。
テストのためにTextEditで処理してみましたが、PagesでもKeynoteでも、InDesignでもIllustratorでも同様のアプローチで色を数値から「だいたいの色」に抽象化することで、高度な判定処理を行うことが可能になります。
| AppleScript名:TextEditの文章のうち赤っぽい色でマークされた行をカウントする v2 |
| — Created 2018-01-08 by Takaaki Naganoya — 2018 Piyomaru Software use AppleScript version "2.4" use scripting additions use framework "Foundation" use framework "AppKit" property NSColor : a reference to current application’s NSColor set rNum to 0 set colMax to 65535 tell application "TextEdit" tell text of document 1 set pCount to (count paragraphs) repeat with i from 1 to pCount set {rCol, gCol, bCol} to color of paragraph i set cName to retColorDomainName(rCol, gCol, bCol, colMax) of me if cName = "red" then –{r, g, b} set rNum to rNum + 1 end if end repeat end tell end tell return {pCount, rNum} on retColorDomainName(rCol as integer, gCol as integer, bCol as integer, aColorMax) set aCol to makeNSColorFromRGBAval(rCol, gCol, bCol, aColorMax, aColorMax) of me set hueVal to aCol’s hueComponent() set satVal to aCol’s saturationComponent() set brightVal to aCol’s brightnessComponent() if satVal ≤ 0.01 then set satVal to 0.0 set colName to "" if satVal = 0.0 then if brightVal ≤ 0.2 then set colName to "black" else if (brightVal > 0.95) then set colName to "white" else set colName to "gray" end if else if hueVal ≤ (15.0 / 360) or hueVal ≥ (330 / 360) then set colName to "red" else if hueVal ≤ (45.0 / 360) then set colName to "orange" else if hueVal < (70.0 / 360) then set colName to "yellow" else if hueVal < (150.0 / 360) then set colName to "green" else if hueVal < (190.0 / 360) then set colName to "cyan" else if (hueVal < 250.0 / 360.0) then set colName to "blue" else if (hueVal < 290.0 / 360.0) then set colName to "purple" else set colName to "magenta" end if end if return colName end retColorDomainName on makeNSColorFromRGBAval(redValue as integer, greenValue as integer, blueValue as integer, alphaValue as integer, aMaxVal as integer) set aRedCocoa to (redValue / aMaxVal) as real set aGreenCocoa to (greenValue / aMaxVal) as real set aBlueCocoa to (blueValue / aMaxVal) as real set aAlphaCocoa to (alphaValue / aMaxVal) as real set aColor to NSColor’s colorWithCalibratedRed:aRedCocoa green:aGreenCocoa blue:aBlueCocoa alpha:aAlphaCocoa return aColor end makeNSColorFromRGBAval |
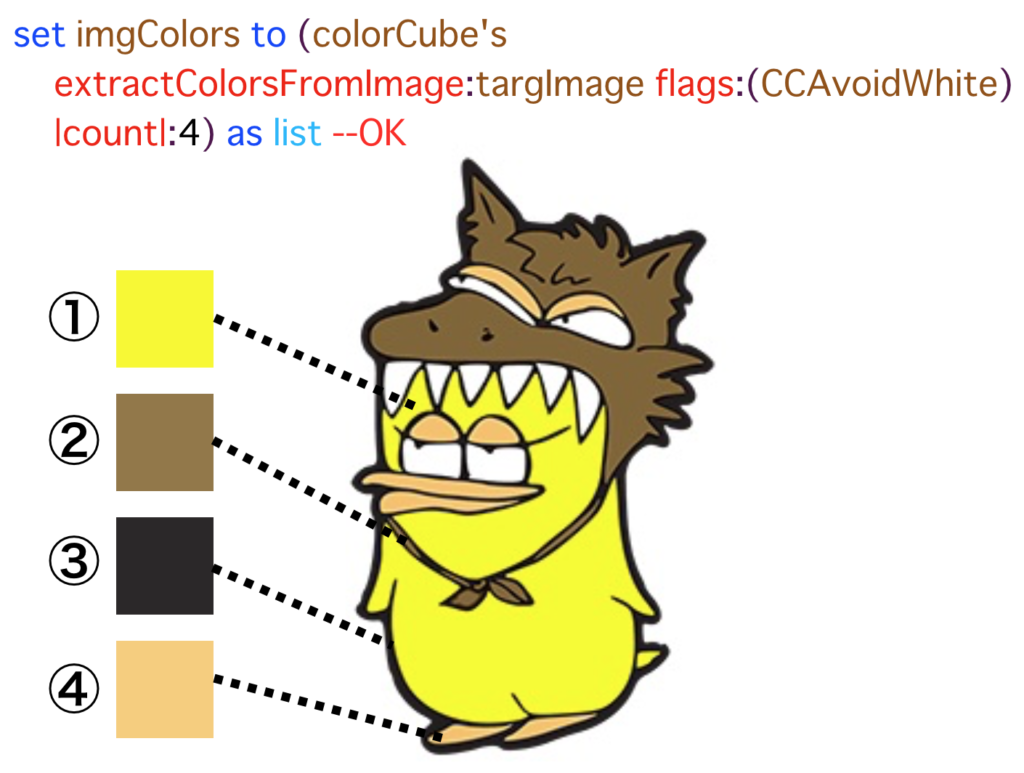
ColorCubeによる頻出色の抽出
ColorCube.frameworkを呼び出して、指定画像の頻出色を抽出するAppleScriptです。
抽出した色数をダイアログ表示したあとに、抽出した色をchoose colorダイアログで抽出色分だけプレビューします。JPEG画像からの色抽出はうまくできましたが、透過色つきのPNG画像の演算結果は納得行かないものがありました。JPEG推奨です。
ColorCubeには除外色の指定を明示的に(flagsではなく)指定できるはずですが、NSColor’s whiteColor()などで指定してもエラーになったので、flagsによる制御を推奨します。
| AppleScript名:ColorCubeによる頻出色の抽出 |
| — Created 2018-02-05 by Takaaki Naganoya — 2018 Piyomaru Software use AppleScript version "2.4" use scripting additions use framework "Foundation" use framework "AppKit" use framework "ColorCube" –https://github.com/pixelogik/ColorCube property CCOnlyBrightColors : 1 property CCOnlyDarkColors : 2 property CCOnlyDistinctColors : 4 property CCOrderByBrightness : 8 property CCOrderByDarkness : 16 property CCAvoidWhite : 32 property CCAvoidBlack : 64 –List up frequent colors from image set aFile to POSIX path of (choose file of type {"public.image"}) set targImage to current application’s NSImage’s alloc()’s initWithContentsOfFile:aFile set colorCube to current application’s CCColorCube’s alloc()’s init() –set imgColors to (colorCube’s extractColorsFromImage:targImage flags:(CCOnlyDistinctColors + CCAvoidWhite)) as list set imgColors to (colorCube’s extractColorsFromImage:targImage flags:(CCAvoidWhite) |count|:4) as list display dialog (length of imgColors) as string repeat with i in imgColors set r2Val to i’s redComponent() set g2Val to i’s greenComponent() set b2Val to i’s blueComponent() set a2Val to i’s alphaComponent() set r2Val to r2Val * 65535 set g2Val to g2Val * 65535 set b2Val to b2Val * 65535 choose color default color {r2Val, g2Val, b2Val} end repeat |
色付き単色画像を作成する

▲Original

▲Filtered Image
–> GPUImage.framework (To ~/Library/Frameworks/)
| AppleScript名:色付き単色画像を作成する |
| — Created 2017-02-11 by Takaaki Naganoya — 2017 Piyomaru Software use AppleScript version "2.4" use scripting additions use framework "Foundation" use framework "AppKit" use framework "GPUImage" –https://github.com/BradLarson/GPUImage set aFile to POSIX path of (choose file of type {"public.image"} with prompt "Select image 1") set fillColorR to current application’s NSColor’s redColor() set imgRes to makeMonoColoredImage(aFile, fillColorR) of me set fRes to retUUIDfilePath(aFile, "png") of me set bRes to saveNSImageAtPathAsPNG(imgRes, fRes) of me on retUUIDfilePath(aPath, aEXT) set aUUIDstr to (current application’s NSUUID’s UUID()’s UUIDString()) as string set aPath to ((current application’s NSString’s stringWithString:aPath)’s stringByDeletingLastPathComponent()’s stringByAppendingPathComponent:aUUIDstr)’s stringByAppendingPathExtension:aEXT return aPath end retUUIDfilePath on makeMonoColoredImage(aFile, NScolorObj) set aImage to current application’s NSImage’s alloc()’s initWithContentsOfFile:aFile return makeColoredNSImageWithColor(aImage, NScolorObj) of me –色付き単色画像を作成する end makeMonoColoredImage on makeColoredNSImageWithColor(aImage, fillColor) set aSize to aImage’s |size|() set aWidth to width of aSize set aHeight to height of aSize set newNSImage to makeNSImageWithFilledWithColor(aWidth, aHeight, fillColor) set grayImage to filterWithNSImage(aImage, "GPUImageGrayscaleFilter") of me set compImage to composeImageWithBlendFilter(grayImage, newNSImage, "GPUImageScreenBlendFilter") of me return compImage end makeColoredNSImageWithColor on filterWithNSImage(aNSImage, filterName as string) set aClass to current application’s NSClassFromString(filterName) set aImageFilter to aClass’s alloc()’s init() set aProcImg to (aImageFilter’s imageByFilteringImage:aNSImage) return aProcImg end filterWithNSImage on composeImageWithBlendFilter(aImage, bImage, filterName) set aClass to current application’s NSClassFromString(filterName) set blendFilter to aClass’s alloc()’s init() set pictureA to current application’s GPUImagePicture’s alloc()’s initWithImage:aImage pictureA’s addTarget:blendFilter pictureA’s processImage() set imgRes to blendFilter’s imageByFilteringImage:bImage return imgRes end composeImageWithBlendFilter –指定サイズの画像を作成し、指定色で塗ってNSImageで返す on makeNSImageWithFilledWithColor(aWidth, aHeight, fillColor) –Imageの作成 set curSize to current application’s NSMakeSize(aWidth, aHeight) set anImage to current application’s NSImage’s alloc()’s initWithSize:curSize anImage’s lockFocus() –描画開始 set theRect to {{x:0, y:0}, {height:aHeight, width:aWidth}} set theNSBezierPath to current application’s NSBezierPath’s bezierPath theNSBezierPath’s appendBezierPathWithRect:theRect fillColor’s |set|() –色設定 theNSBezierPath’s fill() –ぬりつぶし anImage’s unlockFocus() –描画ここまで –生成した画像のRaw画像を作成 set imageRep to anImage’s TIFFRepresentation() set aRawimg to current application’s NSBitmapImageRep’s imageRepWithData:imageRep set newImg to current application’s NSImage’s alloc()’s initWithSize:curSize newImg’s addRepresentation:aRawimg return newImg end makeNSImageWithFilledWithColor –NSImageを指定パスにPNG形式で保存 on saveNSImageAtPathAsPNG(anImage, outPath) set imageRep to anImage’s TIFFRepresentation() set aRawimg to current application’s NSBitmapImageRep’s imageRepWithData:imageRep set pathString to current application’s NSString’s stringWithString:outPath set newPath to pathString’s stringByExpandingTildeInPath() set myNewImageData to (aRawimg’s representationUsingType:(current application’s NSPNGFileType) |properties|:(missing value)) set aRes to (myNewImageData’s writeToFile:newPath atomically:true) as boolean return aRes –true/false end saveNSImageAtPathAsPNG |
CoreImageでフィルタしまくり
フィルタ名称をテキストで与えて動的に画像のフィルタ処理を変更させるAppleScriptです。
ただし、各CIFilterのパラメータまでは指定していないため、パラメータ値はデフォルトのままです。別途、パラメータ値を与えるようにすると有用性が増すことでしょう。
多数のCIFilterの名称をリスト(配列)で間接指定して、順次フィルター処理を行なってファイル出力する、というのが本プログラムの実験内容です。

▲Original

▲Filtered Image
| AppleScript名:CoreImageでフィルタしまくり |
| — Created 2014-12-09 by Takaaki Naganoya — 2014 Piyomaru Software use AppleScript version "2.4" use scripting additions use framework "Foundation" use framework "QuartzCore" property CIFilter : a reference to current application’s CIFilter property |NSURL| : a reference to current application’s |NSURL| property CIImage : a reference to current application’s CIImage property NSJPEGFileType : a reference to current application’s NSJPEGFileType property NSBitmapImageRep : a reference to current application’s NSBitmapImageRep –CIFilters (Not everything!!) From Apple’s Core Image Filter Reference set ciList to {"CIColorPosterize"} –{"CIColorInvert", "CIBoxBlur", "CIDiscBlur", "CIGaussianBlur", "CIMedianFilter", "CIMotionBlur", "CINoiseReduction", "CIZoomBlur", "CIColorMonochrome", "CIColorPosterize", "CIPhotoEffectChrome", "CISepiaTone", "CISharpenLuminance", "CIUnsharpMask", "CIKaleidoscope"} –画像を選択 set aPath to POSIX path of (choose file of type {"public.image"}) –すべてのフィルタを実行 repeat with i in ciList set j to contents of i set aRes to convAsFilteredJPEG(aPath, j) of me end repeat –CIFilterをかけたJPEG画像を生成 –参照:http://ashplanning.blogspot.jp/ のうちのどこか on convAsFilteredJPEG(aPath, aFilterName) set aURL to (|NSURL|’s fileURLWithPath:aPath) –Input set aPOSIX to (POSIX path of aPath) & "_" & aFilterName & ".jpg" –Output –CIImageを生成 set aCIImage to CIImage’s alloc()’s initWithContentsOfURL:aURL — CIFilter をフィルタの名前で生成 set aFilter to CIFilter’s filterWithName:aFilterName aFilter’s setDefaults() –各フィルタのパラメータはデフォルト(そこが問題) –Filterを実行 aFilter’s setValue:aCIImage forKey:"inputImage" set aOutImage to aFilter’s valueForKey:"outputImage" — NSBitmapImageRep を CIImage から生成 set aRep to NSBitmapImageRep’s alloc()’s initWithCIImage:aOutImage — NSBitmapImageRep から JPEG データを取得 set jpegData to aRep’s representationUsingType:(NSJPEGFileType) |properties|:(missing value) — ファイルに保存 return (jpegData’s writeToFile:aPOSIX atomically:true) as boolean end convAsFilteredJPEG |
CoreImageで指定画像をCIGaussianBlur
▲Original

▲Filtered Image
| AppleScript名:CoreImageで指定画像をCIGaussianBlur |
| — Created 2017-03-21 by Takaaki Naganoya — 2017 Piyomaru Software use AppleScript version "2.4" use scripting additions use framework "Foundation" use framework "QuartzCore" –画像を選択 set aPath to POSIX path of (choose file of type {"public.image"}) set aNSImage to current application’s NSImage’s alloc()’s initWithContentsOfFile:aPath set paramRec to {inputRadius:10.0} set imgRes to execCIFilterWithNSImageAndParams(aNSImage, "CIGaussianBlur", paramRec) of me set aDesktopPath to (current application’s NSProcessInfo’s processInfo()’s environment()’s objectForKey:("HOME"))’s stringByAppendingString:"/Desktop/" set savePath to aDesktopPath’s stringByAppendingString:((current application’s NSUUID’s UUID()’s UUIDString())’s stringByAppendingString:".png") set fRes to saveNSImageAtPathAsPNG(imgRes, savePath) of me –NSImageをCIImageに変換してCIfilterを実行 on execCIFilterWithNSImageAndParams(aNSImage, aFilterName as string, paramRec as record) set aDict to current application’s NSDictionary’s dictionaryWithDictionary:paramRec set aCIImage to convNSImageToCIimage(aNSImage) of me set aFilter to current application’s CIFilter’s filterWithName:aFilterName aFilter’s setDefaults() aFilter’s setValue:aCIImage forKey:"inputImage" set aOutImage to aFilter’s valueForKey:"outputImage" set keyList to aDict’s allKeys() as list repeat with i in keyList set aVal to (aDict’s valueForKey:i) as list of string or string –as anything (aFilter’s setValue:aVal forKey:(i as string)) end repeat set newNSImage to convCIimageToNSImage(aOutImage) of me return newNSImage end execCIFilterWithNSImageAndParams on convCIimageToNSImage(aCIImage) set aRep to current application’s NSBitmapImageRep’s alloc()’s initWithCIImage:aCIImage set tmpSize to aRep’s |size|() set newImg to current application’s NSImage’s alloc()’s initWithSize:tmpSize newImg’s addRepresentation:aRep return newImg end convCIimageToNSImage on convNSImageToCIimage(aNSImage) set tiffDat to aNSImage’s TIFFRepresentation() set aRep to current application’s NSBitmapImageRep’s imageRepWithData:tiffDat set newImg to current application’s CIImage’s alloc()’s initWithBitmapImageRep:aRep return newImg end convNSImageToCIimage –NSImageを指定パスにPNG形式で保存 on saveNSImageAtPathAsPNG(anImage, outPath) set imageRep to anImage’s TIFFRepresentation() set aRawimg to current application’s NSBitmapImageRep’s imageRepWithData:imageRep set pathString to current application’s NSString’s stringWithString:outPath set newPath to pathString’s stringByExpandingTildeInPath() set myNewImageData to (aRawimg’s representationUsingType:(current application’s NSPNGFileType) |properties|:(missing value)) set aRes to (myNewImageData’s writeToFile:newPath atomically:true) as boolean return aRes –成功ならtrue、失敗ならfalseが返る end saveNSImageAtPathAsPNG |
CoreImageで指定画像をCIDiscBlur
▲Original

▲Filtered Image
| AppleScript名:CoreImageで指定画像をCIDiscBlur |
| — Created 2017-03-21 by Takaaki Naganoya — 2017 Piyomaru Software use AppleScript version "2.4" use scripting additions use framework "Foundation" use framework "QuartzCore" –画像を選択 set aPath to POSIX path of (choose file of type {"public.image"}) set aNSImage to current application’s NSImage’s alloc()’s initWithContentsOfFile:aPath set paramRec to {inputRadius:10.0} set imgRes to execCIFilterWithNSImageAndParams(aNSImage, "CIDiscBlur", paramRec) of me set aDesktopPath to (current application’s NSProcessInfo’s processInfo()’s environment()’s objectForKey:("HOME"))’s stringByAppendingString:"/Desktop/" set savePath to aDesktopPath’s stringByAppendingString:((current application’s NSUUID’s UUID()’s UUIDString())’s stringByAppendingString:".png") set fRes to saveNSImageAtPathAsPNG(imgRes, savePath) of me –NSImageをCIImageに変換してCIfilterを実行 on execCIFilterWithNSImageAndParams(aNSImage, aFilterName as string, paramRec as record) set aDict to current application’s NSDictionary’s dictionaryWithDictionary:paramRec set aCIImage to convNSImageToCIimage(aNSImage) of me set aFilter to current application’s CIFilter’s filterWithName:aFilterName aFilter’s setDefaults() aFilter’s setValue:aCIImage forKey:"inputImage" set aOutImage to aFilter’s valueForKey:"outputImage" set keyList to aDict’s allKeys() as list repeat with i in keyList set aVal to (aDict’s valueForKey:i) as list of string or string –as anything (aFilter’s setValue:aVal forKey:(i as string)) end repeat set newNSImage to convCIimageToNSImage(aOutImage) of me return newNSImage end execCIFilterWithNSImageAndParams on convCIimageToNSImage(aCIImage) set aRep to current application’s NSBitmapImageRep’s alloc()’s initWithCIImage:aCIImage set tmpSize to aRep’s |size|() set newImg to current application’s NSImage’s alloc()’s initWithSize:tmpSize newImg’s addRepresentation:aRep return newImg end convCIimageToNSImage on convNSImageToCIimage(aNSImage) set tiffDat to aNSImage’s TIFFRepresentation() set aRep to current application’s NSBitmapImageRep’s imageRepWithData:tiffDat set newImg to current application’s CIImage’s alloc()’s initWithBitmapImageRep:aRep return newImg end convNSImageToCIimage –NSImageを指定パスにPNG形式で保存 on saveNSImageAtPathAsPNG(anImage, outPath) set imageRep to anImage’s TIFFRepresentation() set aRawimg to current application’s NSBitmapImageRep’s imageRepWithData:imageRep set pathString to current application’s NSString’s stringWithString:outPath set newPath to pathString’s stringByExpandingTildeInPath() set myNewImageData to (aRawimg’s representationUsingType:(current application’s NSPNGFileType) |properties|:(missing value)) set aRes to (myNewImageData’s writeToFile:newPath atomically:true) as boolean return aRes –成功ならtrue、失敗ならfalseが返る end saveNSImageAtPathAsPNG |
CoreImageで指定画像をCIColorMonochrome
▲Original

▲Filtered Image
| AppleScript名:CoreImageで指定画像をCIColorMonochrome |
| — Created 2017-03-21 by Takaaki Naganoya — 2017 Piyomaru Software use AppleScript version "2.4" use scripting additions use framework "Foundation" use framework "QuartzCore" use framework "AppKit" property CIFilter : a reference to current application’s CIFilter property CIColor : a reference to current application’s CIColor property NSUUID : a reference to current application’s NSUUID property CIImage : a reference to current application’s CIImage property NSColor : a reference to current application’s NSColor property NSString : a reference to current application’s NSString property NSImage : a reference to current application’s NSImage property NSDictionary : a reference to current application’s NSDictionary property NSProcessInfo : a reference to current application’s NSProcessInfo property NSPNGFileType : a reference to current application’s NSPNGFileType property NSBitmapImageRep : a reference to current application’s NSBitmapImageRep –画像を選択 set aPath to POSIX path of (choose file of type {"public.image"}) set aNSImage to NSImage’s alloc()’s initWithContentsOfFile:aPath set aCIColor to makeCIColorFromParams(0.0, 1.0, 0.0, 1.0) of me set paramRec to {inputColor:aCIColor, inputIntensity:1.0} set imgRes to execCIFilterWithNSImageAndParams(aNSImage, "CIColorMonochrome", paramRec) of me set aDesktopPath to (NSProcessInfo’s processInfo()’s environment()’s objectForKey:("HOME"))’s stringByAppendingString:"/Desktop/" set savePath to aDesktopPath’s stringByAppendingString:((NSUUID’s UUID()’s UUIDString())’s stringByAppendingString:".png") set fRes to saveNSImageAtPathAsPNG(imgRes, savePath) of me –NSImageをCIImageに変換してCIfilterを実行 on execCIFilterWithNSImageAndParams(aNSImage, aFilterName as string, paramRec as record) set aDict to NSDictionary’s dictionaryWithDictionary:paramRec set aCIImage to convNSImageToCIimage(aNSImage) of me set aFilter to CIFilter’s filterWithName:aFilterName aFilter’s setDefaults() aFilter’s setValue:aCIImage forKey:"inputImage" set aOutImage to aFilter’s valueForKey:"outputImage" set keyList to aDict’s allKeys() as list repeat with i in keyList set aVal to (aDict’s valueForKey:i) as list of string or string –as anything (aFilter’s setValue:aVal forKey:(i as string)) end repeat set newNSImage to convCIimageToNSImage(aOutImage) of me return newNSImage end execCIFilterWithNSImageAndParams on makeCIColorFromParams(redValue, greenValue, blueValue, alphaValue) set aNSColor to NSColor’s colorWithCalibratedRed:redValue green:greenValue blue:blueValue alpha:alphaValue set aCIColor to CIColor’s alloc()’s initWithColor:aNSColor return aCIColor end makeCIColorFromParams on convCIimageToNSImage(aCIImage) set aRep to NSBitmapImageRep’s alloc()’s initWithCIImage:aCIImage set tmpSize to aRep’s |size|() set newImg to NSImage’s alloc()’s initWithSize:tmpSize newImg’s addRepresentation:aRep return newImg end convCIimageToNSImage on convNSImageToCIimage(aNSImage) set tiffDat to aNSImage’s TIFFRepresentation() set aRep to NSBitmapImageRep’s imageRepWithData:tiffDat set newImg to CIImage’s alloc()’s initWithBitmapImageRep:aRep return newImg end convNSImageToCIimage –NSImageを指定パスにPNG形式で保存 on saveNSImageAtPathAsPNG(anImage, outPath) set imageRep to anImage’s TIFFRepresentation() set aRawimg to NSBitmapImageRep’s imageRepWithData:imageRep set pathString to NSString’s stringWithString:outPath set newPath to pathString’s stringByExpandingTildeInPath() set myNewImageData to (aRawimg’s representationUsingType:(NSPNGFileType) |properties|:(missing value)) set aRes to (myNewImageData’s writeToFile:newPath atomically:true) as boolean return aRes –成功ならtrue、失敗ならfalseが返る end saveNSImageAtPathAsPNG |