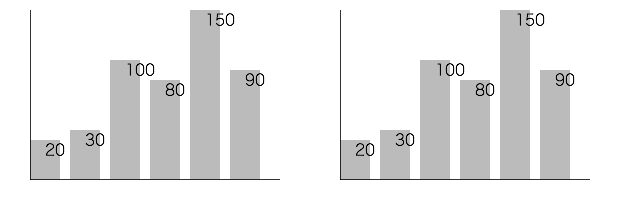
Finder上で選択中の画像ファイルを横方向に連結して結果をデスクトップ上に出力するAppleScriptです。
Shane Stanleyから「macOS 10.13で動かないよ」とツッコミが入ってmacOS 10.13に対応するよう書き換えたものです。


| AppleScript名:Finder上で選択中の画像を横方向に連結 v4 |
| — Created 2017-11-21 by Takaaki Naganoya — Modified 2018-04-06 by Takaaki Naganoya — 2018 Piyomaru Software use AppleScript version "2.5" — El Capitan (10.11) or later use framework "Foundation" use framework "QuartzCore" use framework "AppKit" use scripting additions property |NSURL| : a reference to current application’s |NSURL| property NSUUID : a reference to current application’s NSUUID property NSArray : a reference to current application’s NSArray property NSString : a reference to current application’s NSString property NSImage : a reference to current application’s NSImage property NSWorkspace : a reference to current application’s NSWorkspace property NSPNGFileType : a reference to current application’s NSPNGFileType property NSMutableArray : a reference to current application’s NSMutableArray property NSBitmapImageRep : a reference to current application’s NSBitmapImageRep property NSURLTypeIdentifierKey : a reference to current application’s NSURLTypeIdentifierKey property xGap : 10 –連結時の画像間のアキ(横方向) tell application "Finder" set aSel to selection as alias list if aSel = {} or aSel = "" then return end tell –選択した画像をArrayに入れる set imgList to NSMutableArray’s new() repeat with i in aSel set aPath to POSIX path of i set imgRes to (my isImageAtPath:aPath) if imgRes as boolean = true then set aNSImage to (NSImage’s alloc()’s initWithContentsOfFile:aPath) (imgList’s addObject:aNSImage) end if end repeat –KVCで画像の各種情報をまとめて取得 set sizeList to (imgList’s valueForKeyPath:"size") as list –NSSize to list of record conversion set maxHeight to ((NSArray’s arrayWithArray:sizeList)’s valueForKeyPath:"@max.height") as real set totalWidth to ((NSArray’s arrayWithArray:sizeList)’s valueForKeyPath:"@sum.width") as real set totalCount to ((NSArray’s arrayWithArray:sizeList)’s valueForKeyPath:"@count") as integer –出力画像作成 set tSize to current application’s NSMakeSize((totalWidth + (xGap * totalCount)), maxHeight) set newImage to NSImage’s alloc()’s initWithSize:tSize –順次画像を新規画像に上書き set xOrig to 0 repeat with i in (imgList as list) set j to contents of i set curSize to j’s |size|() set aRect to {xOrig, (maxHeight – (curSize’s height())), (curSize’s width()), (curSize’s height())} set newImage to composeImage(newImage, j, aRect) of me set xOrig to xOrig + (curSize’s width()) + xGap end repeat –デスクトップにPNG形式でNSImageをファイル保存 set aDesktopPath to current application’s NSHomeDirectory()’s stringByAppendingString:"/Desktop/" set savePath to aDesktopPath’s stringByAppendingString:((NSUUID’s UUID()’s UUIDString())’s stringByAppendingString:".png") set fRes to saveNSImageAtPathAsPNG(newImage, savePath) of me –2つのNSImageを重ね合わせ合成してNSImageで返す on composeImage(backImage, composeImage, aTargerRect) set newImage to NSImage’s alloc()’s initWithSize:(backImage’s |size|()) copy aTargerRect to {x1, y1, x2, y2} newImage’s lockFocus() set v2 to system attribute "sys2" if v2 ≤ 12 then –To macOS 10.12.x set bRect to current application’s NSMakeRect(x1, y1, x2, y2) set newImageRect to current application’s CGRectZero set newImageRect’s |size| to (newImage’s |size|) else –macOS 10.13 or later set bRect to {{x1, y1}, {x2, y2}} set newImageRect to {{0, 0}, (newImage’s |size|)} end if backImage’s drawInRect:newImageRect composeImage’s drawInRect:bRect newImage’s unlockFocus() return newImage end composeImage –NSImageを指定パスにPNG形式で保存 on saveNSImageAtPathAsPNG(anImage, outPath) set imageRep to anImage’s TIFFRepresentation() set aRawimg to NSBitmapImageRep’s imageRepWithData:imageRep set pathString to NSString’s stringWithString:outPath set newPath to pathString’s stringByExpandingTildeInPath() set myNewImageData to (aRawimg’s representationUsingType:(NSPNGFileType) |properties|:(missing value)) set aRes to (myNewImageData’s writeToFile:newPath atomically:true) as boolean return aRes –成功ならtrue、失敗ならfalseが返る end saveNSImageAtPathAsPNG –指定のパスのファイルが画像かどうかをチェック on isImageAtPath:aPath set aURL to |NSURL|’s fileURLWithPath:aPath set {theResult, theValue} to aURL’s getResourceValue:(reference) forKey:NSURLTypeIdentifierKey |error|:(missing value) return (NSImage’s imageTypes()’s containsObject:theValue) as boolean end isImageAtPath: |