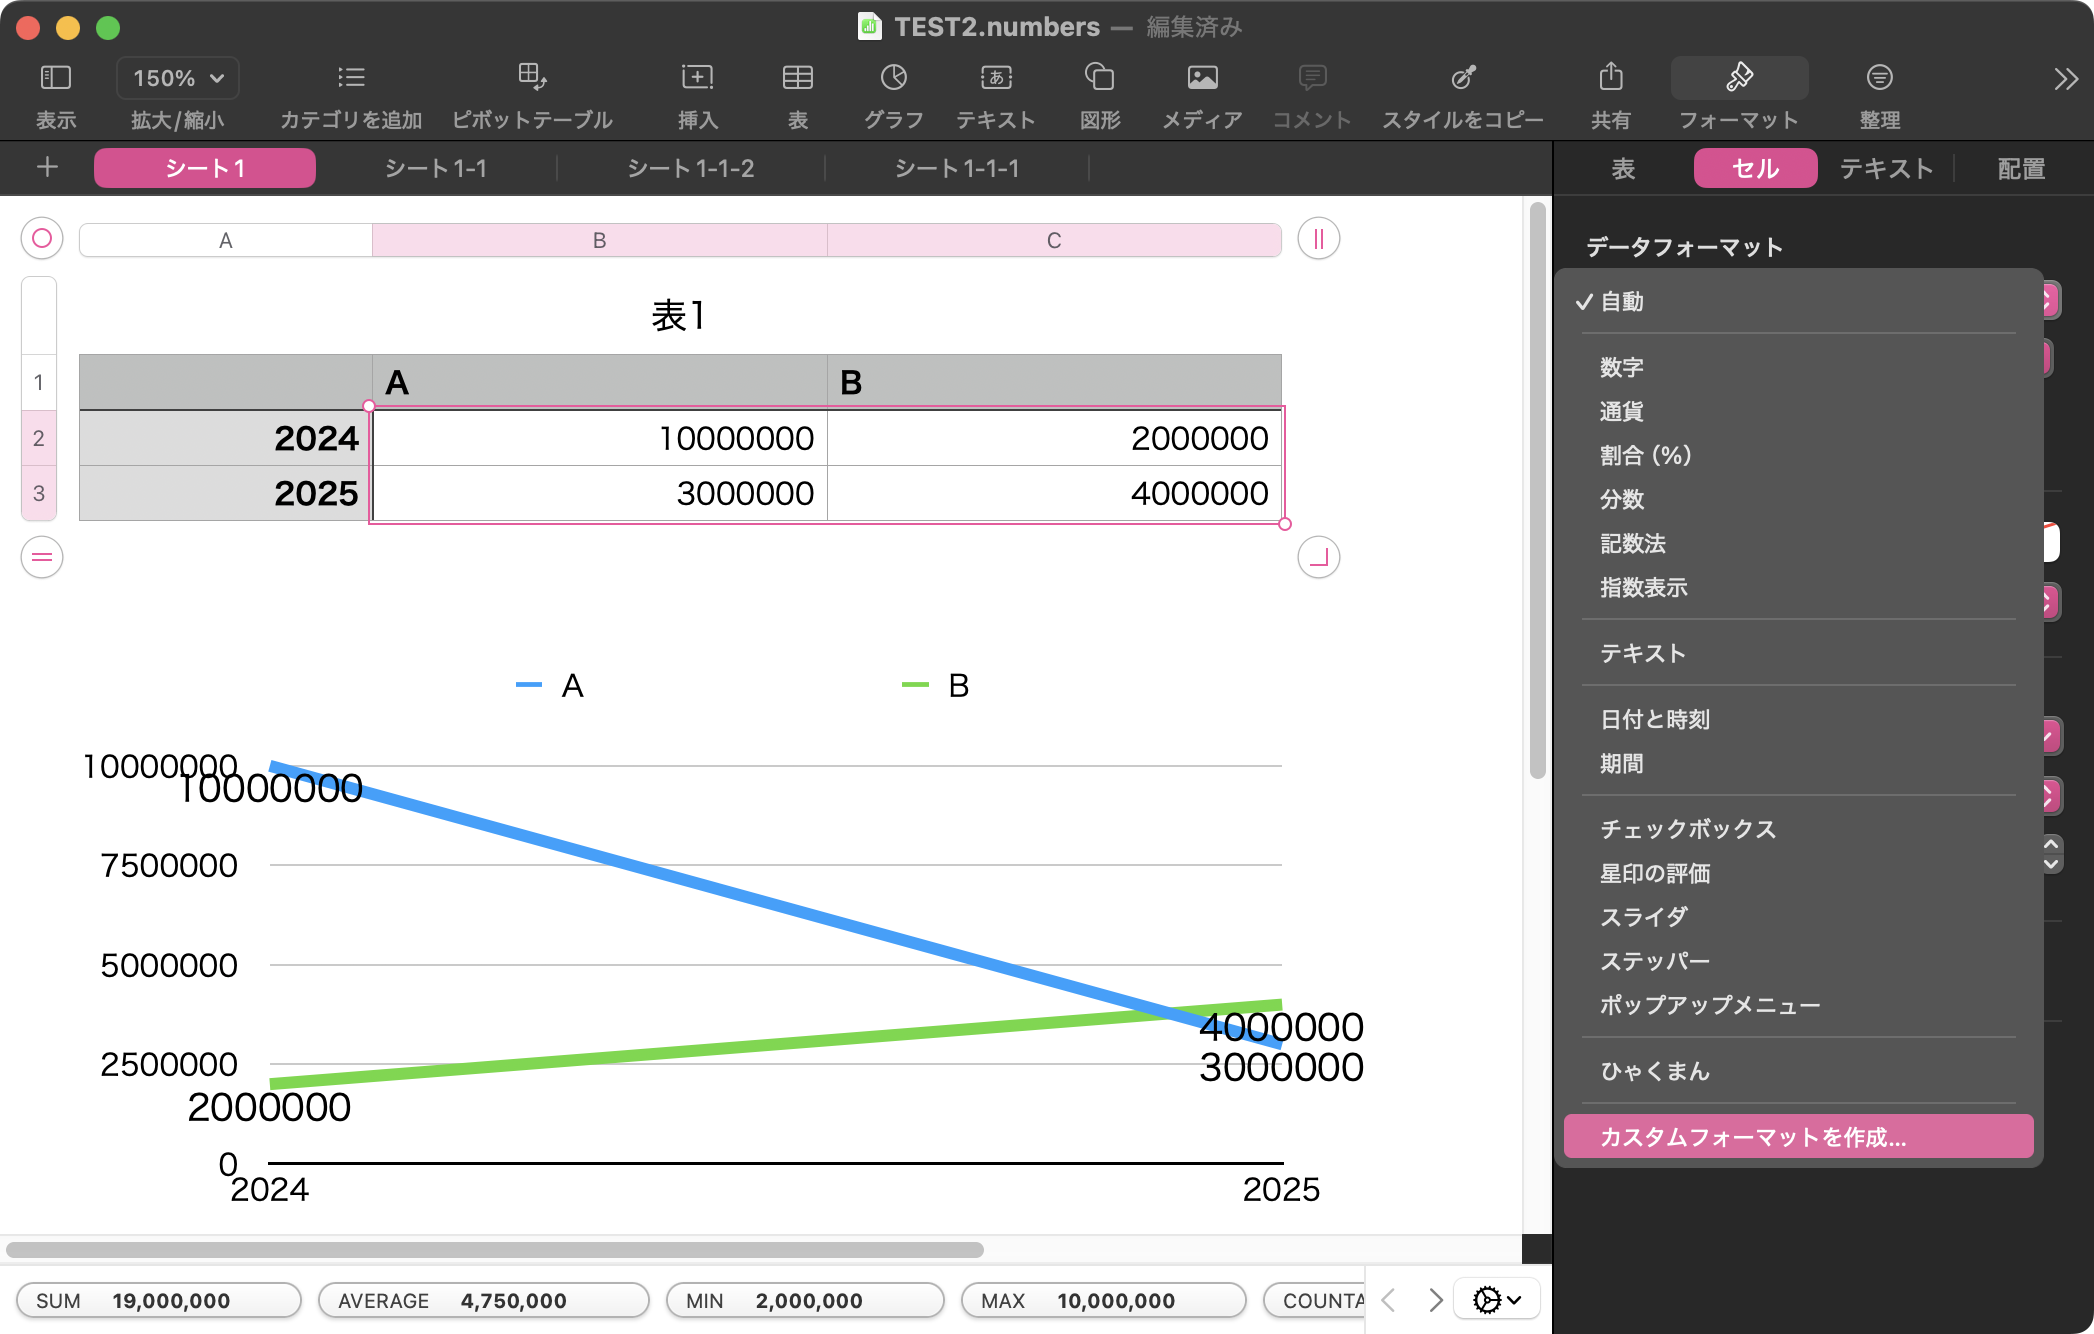
Menu

Skip to content
AppleScriptの穴
  • Home
  • Products
  • Books
  • Docs
  • Events
  • Forum
  • About This Blog
  • License
  • 仕事依頼

AppleScriptの穴

Useful & Practical AppleScript archive. Click '★Click Here to Open This Script' Link to download each AppleScript

タグ: 15.0savvy

Numbersで選択中の表を書籍掲載用にセル内容の整理(重複セルをまとめる)v2

Posted on 12月 3, 2024 by Takaaki Naganoya

Numbersの表を、書籍掲載用に体裁をととのえるAppleScriptのアップデート版です。書籍掲載時には、同じ値が横方向に連続している箇所は1つにまとめたいところなので、その作業を自動で行います。

新型のNumbers/Excelセルアドレス変換ルーチンを実際に使用してみました。モジュールを入れ替えただけです。


▲対象の表のいずれかのセルを選択してAppleScriptを実行


▲処理後の表

AppleScript名:Numbersで選択中の表を書籍掲載用にセル内容の整理(重複セルをまとめる)v2.scpt
—
–  Created by: Takaaki Naganoya
–  Created on: 2024/12/03
—
–  Copyright © 2024 Piyomaru Software, All Rights Reserved
—

use AppleScript version "2.4"
use scripting additions
use framework "Foundation"

tell application "Numbers"
  tell front document
    tell active sheet
      try
        set theTable to first table whose class of selection range is range
      on error
        return "" –何も選択されてなかった場合
      end try


–セルを選択中の表を処理する
      
tell theTable
        set headR to header row count
        
set headC to header column count
        
set rowC to count every row
        
set colC to count every column
        
        
repeat with y from (headR + 1) to (rowC)
          –1行分(ヘッダーカラムをのぞく)のデータを1D Listで取得
          
set tmpRangeStr to numberToCell(headC + 1) of AddressEncoder & (y as string) & ":" & numberToCell(colC) of AddressEncoder & (y as string)
          
set tValList to value of cells of range tmpRangeStr
          
          
–1D Listから値が連続している区間を求める
          
set sameBlock to detectSameValueRepeatationBlockIn1DArray(tValList) of detectRepeatation
          
          
–連続区間でループ
          
repeat with i in sameBlock
            copy i to {startX, endX} –データ内の項目Indexであることに留意
            
            
–重複値のセルをクリアする(初出セルの値は残す)
            
repeat with ii from (startX + 1) to endX
              set value of cell (ii + headC) of row y to ""
            end repeat
            
            
–重複していたセルをマージする
            
set mRangeStr to numberToCell(headC + startX) of AddressEncoder & (y as string) & ":" & numberToCell(headC + endX) of AddressEncoder & (y as string)
            
set mRange to range mRangeStr
            
merge mRange
          end repeat
        end repeat
      end tell
    end tell
  end tell
end tell

script detectRepeatation
  property parent : AppleScript
  
use scripting additions
  
use framework "Foundation"
  
  
–巨大なデータの処理に向いていないかも?
  
on detectSameValueRepeatationBlockIn1DArray(aList)
    set dList to returnDuplicatesOnly(aList) of me
    
–>  {​​​​​"年間仕様", ​​​​​"YP仕様", ​​​​​"月間仕様"​​​}
    
    
set anArray to current application’s NSMutableArray’s arrayWithArray:aList
    
anArray’s addObject:""
    
    
set resList to {}
    
repeat with i in dList
      set j to contents of i
      
set anIndex to (anArray’s indexOfObject:j)
      
repeat with ii from (anIndex + 1) to ((length of aList))
        set jj to (anArray’s objectAtIndex:ii) as string
        
if jj is not equal to j then
          set the end of resList to {anIndex + 1, ii}
          
exit repeat
        end if
      end repeat
    end repeat
    
    
resList
    
–>  {​​​​​{​​​​​​​4, ​​​​​​​6​​​​​}, ​​​​​{​​​​​​​7, ​​​​​​​9​​​​​}, ​​​​​{​​​​​​​10, ​​​​​​​17​​​​​}​​​}
  end detectSameValueRepeatationBlockIn1DArray
  
  
on returnDuplicatesOnly(aList)
    set countedSet to current application’s NSCountedSet’s alloc()’s initWithArray:aList
    
set simpleSet to current application’s NSSet’s setWithArray:aList
    
countedSet’s minusSet:simpleSet
    
return countedSet’s allObjects() as list
  end returnDuplicatesOnly
end script

script AddressEncoder
  property parent : AppleScript
  
use scripting additions
  
  
— 数値からセルアドレス(A1形式)への変換
  
on numberToCell(columnNumber)
    set columnAddress to ""
    
set tempNumber to columnNumber
    
    
— 列番号をA-Z形式に変換
    
repeat while tempNumber > 0
      set remainder to (tempNumber – 1) mod 26
      
set columnAddress to (character (remainder + 1) of "ABCDEFGHIJKLMNOPQRSTUVWXYZ") & columnAddress
      
set tempNumber to (tempNumber – 1) div 26
    end repeat
    
    
— A1形式のアドレスを返す
    
return columnAddress
  end numberToCell


— セルアドレス(A1形式)から数値への変換
  
on cellToNumber(cellAddress)
    set columnPart to ""
    
set rowPart to ""
    
    
— 列部分と行部分を分離
    
repeat with char in cellAddress
      if char is in "0123456789" then
        set rowPart to rowPart & char
      else
        set columnPart to columnPart & char
      end if
    end repeat
    
    
— 列部分を数値に変換
    
set columnNumber to 0
    
repeat with i from 1 to length of columnPart
      set char to character i of columnPart
      
using terms from scripting additions
        set columnNumber to columnNumber * 26 + (offset of char in "ABCDEFGHIJKLMNOPQRSTUVWXYZ")
      end using terms from
    end repeat
    
    
— 数値を返す
    
return {columnNumber, (rowPart as integer)}
  end cellToNumber
  
end script

★Click Here to Open This Script 

Posted in list Object control | Tagged 13.0savvy 14.0savvy 15.0savvy Numbers | Leave a comment

Excel__Numbersセルアドレスの相互変換

Posted on 12月 3, 2024 by Takaaki Naganoya

ExcelやNumbersで使われているセルのアドレス表記方法「A1形式」と数値の相互変換を行うAppleScriptです。

一応、自分でも昔に書いたルーチンを使い回していますが、26進数と10進数との間の変換で桁が増えたときの処理に難があって、上限値を設けてその間であれば変換できる、という感じになっていました。

もともと、このルーチンはExcel 2008でVBAの処理系を搭載しないことになったのを好機ととらえ、AppleScriptをエンコードしてExcelの隠しワークシート上に格納しておいて外部から実行する「ExcelAS」プロジェクトのために作成したものです。

実際に調布のMicrosoftでデモを行なって、US Microsoftに掛け合ってもらったものの、次バージョンでVBAの処理系を復活させることになって、(Visual BASIC互換の)「REALbasic」のエンジンを書いていたエンジニアをMSがヘッドハント。常識的に考えればVBAの廃止自体がおかしな決定だったので、その隙を狙えるかも? と企画して作ったものの、残念な結果になってしまいました。ただ、現在に至るもMac上のVBAの処理系、とくにエディタは作りが残念(Retina解像度に合ってないとか、日本語入力できないとか、フォームが使えないとか)なので、もうちょっとなんとかならないものかと思ってしまいます。

話をアドレス変換ルーチンに戻しましょう。実際に、そんなに大きな値の相互変換はしていないので問題視していませんでしたが、変換ルーチンに上限値のしばりがあるのはうっとおしいとは思っていました。ただ、ExcelASプロジェクトの頓挫により、アドレス変換処理を書き換えるほどのインセンティブがなかったので、ながらく放置状態に。

そこで、定期的に行なっているChatGPTによるAppleScript記述実用性チェックの「お題」としてこのセルアドレスの相互変換を行わせてみました。

ちゃんと動いているように見えます。こういうデータ変換系のプログラムは、割とChatGPTで書かせるのは「アリ」だと思います。本ルーチンの注意点は、Excelアドレス(カラム名指定)はアルファベット大文字で記述する必要があるということです。小文字のアルファベットで記述すると本バージョンではエラーになります。

ただ、アプリケーションの詳細なコントロールを行わせると、首をひねってしまうような書き方を返してきます。

AppleScript名:Excel__Numbersセルアドレスの相互変換.scpt
— 数値 → A1形式
set result1 to numberToCell(2024, 5) — "BYV5"
display dialog "Number to Cell: " & result1

— A1形式 → 数値
set result2 to cellToNumber("BYV5") — {2024, 5}
display dialog "Cell to Number: Column: " & item 1 of result2 & ", Row: " & item 2 of result2

— 数値からセルアドレス(A1形式)への変換
on numberToCell(columnNumber, rowNumber)
  set columnAddress to ""
  
set tempNumber to columnNumber
  
  
— 列番号をA-Z形式に変換
  
repeat while tempNumber > 0
    set remainder to (tempNumber – 1) mod 26
    
set columnAddress to (character (remainder + 1) of "ABCDEFGHIJKLMNOPQRSTUVWXYZ") & columnAddress
    
set tempNumber to (tempNumber – 1) div 26
  end repeat
  
  
— A1形式のアドレスを返す
  
return columnAddress & rowNumber
end numberToCell

— セルアドレス(A1形式)から数値への変換
on cellToNumber(cellAddress)
  set columnPart to ""
  
set rowPart to ""
  
  
— 列部分と行部分を分離
  
repeat with char in cellAddress
    if char is in "0123456789" then
      set rowPart to rowPart & char
    else
      set columnPart to columnPart & char
    end if
  end repeat
  
  
— 列部分を数値に変換
  
set columnNumber to 0
  
repeat with i from 1 to length of columnPart
    set char to character i of columnPart
    
set columnNumber to columnNumber * 26 + (offset of char in "ABCDEFGHIJKLMNOPQRSTUVWXYZ")
  end repeat
  
  
— 数値を返す
  
return {columnNumber, (rowPart as integer)}
end cellToNumber

★Click Here to Open This Script 

Posted in Number Text | Tagged 10.10savvy 10.11savvy 10.12savvy 10.13savvy 10.14savvy 10.15savvy 11.0savvy 12.0savvy 13.0savvy 14.0savvy 15.0savvy Excel Numbers | Leave a comment

Pagesで選択中の表を書籍掲載用にセル内容の整理(重複セルをまとめる)

Posted on 12月 2, 2024 by Takaaki Naganoya

Pages書類上の表を、書籍掲載用に体裁をととのえるAppleScriptです。書籍掲載時には、同じ値が横方向に連続している箇所は1つにまとめたいところなので、その作業を自動で行います。


▲Pages書類上の表のいずれかのセルを選択しておいて、本Scriptを実行します


▲実行後

AppleScript名:Pagesで選択中の表を書籍掲載用にセル内容の整理(重複セルをまとめる).scpt
—
–  Created by: Takaaki Naganoya
–  Created on: 2024/12/02
—
–  Copyright © 2024 Piyomaru Software, All Rights Reserved
—

use AppleScript version "2.4"
use scripting additions
use framework "Foundation"

tell application "Pages"
  tell front document
    try
      set theTable to first table whose class of selection range is range
    on error
      return "" –何も選択されてなかった場合
    end try
    
    
–セルを選択中の表を処理する
    
tell theTable
      set headR to header row count
      
set headC to header column count
      
set rowC to count every row
      
set colC to count every column
      
      
repeat with y from (headR + 1) to (rowC)
        –1行分(ヘッダーカラムをのぞく)のデータを1D Listで取得
        
set tmpRangeStr to numAdrToColumnEncode(headC + 1) of AddressEncoder & (y as string) & ":" & numAdrToColumnEncode(colC) of AddressEncoder & (y as string)
        
set tValList to value of cells of range tmpRangeStr
        
        
–1D Listから値が連続している区間を求める
        
set sameBlock to detectSameValueRepeatationBlockIn1DArray(tValList) of detectRepeatation
        
        
–連続区間でループ
        
repeat with i in sameBlock
          copy i to {startX, endX} –データ内の項目Indexであることに留意
          
          
–重複値のセルをクリアする(初出セルの値は残す)
          
repeat with ii from (startX + 1) to endX
            set value of cell (ii + headC) of row y to ""
          end repeat
          
          
–重複していたセルをマージする
          
set mRangeStr to numAdrToColumnEncode(headC + startX) of AddressEncoder & (y as string) & ":" & numAdrToColumnEncode(headC + endX) of AddressEncoder & (y as string)
          
set mRange to range mRangeStr
          
merge mRange
        end repeat
      end repeat
    end tell
  end tell
end tell

script detectRepeatation
  property parent : AppleScript
  
use scripting additions
  
use framework "Foundation"
  
  
–巨大なデータの処理に向いていないかも?
  
on detectSameValueRepeatationBlockIn1DArray(aList)
    set dList to returnDuplicatesOnly(aList) of me
    
–>  {​​​​​"年間仕様", ​​​​​"YP仕様", ​​​​​"月間仕様"​​​}
    
    
set anArray to current application’s NSMutableArray’s arrayWithArray:aList
    
anArray’s addObject:""
    
    
set resList to {}
    
repeat with i in dList
      set j to contents of i
      
set anIndex to (anArray’s indexOfObject:j)
      
repeat with ii from (anIndex + 1) to ((length of aList))
        set jj to (anArray’s objectAtIndex:ii) as string
        
if jj is not equal to j then
          set the end of resList to {anIndex + 1, ii}
          
exit repeat
        end if
      end repeat
    end repeat
    
    
resList
    
–>  {​​​​​{​​​​​​​4, ​​​​​​​6​​​​​}, ​​​​​{​​​​​​​7, ​​​​​​​9​​​​​}, ​​​​​{​​​​​​​10, ​​​​​​​17​​​​​}​​​}
  end detectSameValueRepeatationBlockIn1DArray
  
  
on returnDuplicatesOnly(aList)
    set countedSet to current application’s NSCountedSet’s alloc()’s initWithArray:aList
    
set simpleSet to current application’s NSSet’s setWithArray:aList
    
countedSet’s minusSet:simpleSet
    
return countedSet’s allObjects() as list
  end returnDuplicatesOnly
end script

script AddressEncoder
  property parent : AppleScript
  
  
–10進数数値をExcel 2004/2008的カラム表現にエンコードするサブルーチン(エンコード範囲:1~1351)
  
on numAdrToColumnEncode(origNum)
    if origNum > 1351 then
      error "エラー:Numbersのカラム表現(A1形式)への変換ルーチンにおいて、想定範囲外(1351以上)のパラメータが指定されました"
    end if
    
    
set upperDigitEncTable to {"A", "B", "C", "D", "E", "F", "G", "H", "I", "J", "K", "L", "M", "N", "O", "P", "Q", "R", "S", "T", "U", "V", "W", "X", "Y", "Z", "A"}
    
set lowerDigitEncTable to {"A", "B", "C", "D", "E", "F", "G", "H", "I", "J", "K", "L", "M", "N", "O", "P", "Q", "R", "S", "T", "U", "V", "W", "X", "Y", "Z", "A"}
    
    
set oNum to origNum
    
set nTh to 26
    
set stringLength to 4
    
    
–数字が1桁の場合の対応
    
if origNum < 27 then
      set aRes to (item origNum of upperDigitEncTable) as string
      
return aRes
    end if
    
    
if origNum > 702 then
      –3桁になる場合
      
set upupNum to oNum div 676 –整数除算–上の上の桁
      
set oNum to oNum – (upupNum * 676)
      
set upNum to oNum div 26 –整数除算–上の桁
      
set lowNum to oNum mod 26 – 1 –余剰計算–下の桁
      
      
–つじつま合わせ処理 【強引】
      
if lowNum = -1 then
        set upNum to upNum – 1
        
set lowNum to 25
      end if
      
      
set upupChar to (item upupNum of upperDigitEncTable) as string
      
set upChar to (item upNum of upperDigitEncTable) as string
      
set lowChar to (item (lowNum + 1) of lowerDigitEncTable) as string
      
set resText to upupChar & upChar & lowChar
      
    else
      –2桁の場合
      
set upNum to oNum div 26 –整数除算–上の桁
      
set lowNum to oNum mod 26 – 1 –余剰計算–下の桁
      
      
–つじつま合わせ処理 【強引】
      
if lowNum = -1 then
        set upNum to upNum – 1
        
set lowNum to 25
      end if
      
      
set upChar to (item upNum of upperDigitEncTable) as string
      
set lowChar to (item (lowNum + 1) of lowerDigitEncTable) as string
      
set resText to upChar & lowChar
      
    end if
    
    
return resText
  end numAdrToColumnEncode
  
  
–Numbersの横方向アドレス(A~Zの26進数)文字列を10進数に変換
  
on colAddrToNumDecode(origStr)
    return aNthToDecimal(origStr, {"A", "B", "C", "D", "E", "F", "G", "H", "I", "J", "K", "L", "M", "N", "O", "P", "Q", "R", "S", "T", "U", "V", "W", "X", "Y", "Z"}) of me
  end colAddrToNumDecode


–n進数文字列を10進数に変換する
  
on aNthToDecimal(origStr, nTh)
    set resNumber to 0
    
    
set sList to reverse of (characters of origStr)
    
set aLen to length of nTh
    
set digitCount to 0
    
    
repeat with i in sList
      set j to contents of i
      
set aRes to offsetInList(j, nTh) of me
      
      
set resNumber to resNumber + (aLen ^ digitCount) * aRes
      
      
set digitCount to digitCount + 1
    end repeat
    
    
return resNumber as integer
  end aNthToDecimal


on offsetInList(aChar, aList)
    set anArray to NSArray’s arrayWithArray:aList
    
set aInd to (anArray’s indexOfObject:aChar)
    
if aInd = current application’s NSNotFound or (aInd as number) > 9.99999999E+8 then
      error "Invalid Character Error"
    else
      return (aInd as integer) + 1 –0 to 1 based index conversion
    end if
  end offsetInList
  
end script

★Click Here to Open This Script 

Posted in list Object control | Tagged 13.0savvy 14.0savvy 15.0savvy Pages | Leave a comment

Numbersで選択中の表を書籍掲載用にセル内容の整理(重複セルをまとめる)

Posted on 12月 2, 2024 by Takaaki Naganoya

Numbersの表を、書籍掲載用に体裁をととのえるAppleScriptです。書籍掲載時には、同じ値が横方向に連続している箇所は1つにまとめたいところなので、その作業を自動で行います。


▲こんな感じに掲載している表を作るためのScript

いずれかのセルを選択した表に対して処理を行います。表の各行のデータを取得し、データ連続区間を検出。連続区間の2つ目以降のセルの内容を消去したうえで、当該区間のセルをまとめます。

そんなに大きな表を処理するようにはできていません。色をつけるところまで自動化しようかとも考えたのですが、色についてはケースバイケースだろうと考え、そこまでは処理していません。


▲対象の表のいずれかのセルを選択してAppleScriptを実行


▲処理後の表

AppleScript名:Numbersで選択中の表を書籍掲載用にセル内容の整理(重複セルをまとめる).scpt
—
–  Created by: Takaaki Naganoya
–  Created on: 2024/12/02
—
–  Copyright © 2024 Piyomaru Software, All Rights Reserved
—

use AppleScript version "2.4"
use scripting additions
use framework "Foundation"

tell application "Numbers"
  tell front document
    tell active sheet
      try
        set theTable to first table whose class of selection range is range
      on error
        return "" –何も選択されてなかった場合
      end try


–セルを選択中の表を処理する
      
tell theTable
        set headR to header row count
        
set headC to header column count
        
set rowC to count every row
        
set colC to count every column
        
        
repeat with y from (headR + 1) to (rowC)
          –1行分(ヘッダーカラムをのぞく)のデータを1D Listで取得
          
set tmpRangeStr to numAdrToColumnEncode(headC + 1) of AddressEncoder & (y as string) & ":" & numAdrToColumnEncode(colC) of AddressEncoder & (y as string)
          
set tValList to value of cells of range tmpRangeStr
          
          
–1D Listから値が連続している区間を求める
          
set sameBlock to detectSameValueRepeatationBlockIn1DArray(tValList) of detectRepeatation
          
          
–連続区間でループ
          
repeat with i in sameBlock
            copy i to {startX, endX} –データ内の項目Indexであることに留意
            
            
–重複値のセルをクリアする(初出セルの値は残す)
            
repeat with ii from (startX + 1) to endX
              set value of cell (ii + headC) of row y to ""
            end repeat
            
            
–重複していたセルをマージする
            
set mRangeStr to numAdrToColumnEncode(headC + startX) of AddressEncoder & (y as string) & ":" & numAdrToColumnEncode(headC + endX) of AddressEncoder & (y as string)
            
set mRange to range mRangeStr
            
merge mRange
          end repeat
        end repeat
      end tell
    end tell
  end tell
end tell

script detectRepeatation
  property parent : AppleScript
  
use scripting additions
  
use framework "Foundation"
  
  
–巨大なデータの処理に向いていないかも?
  
on detectSameValueRepeatationBlockIn1DArray(aList)
    set dList to returnDuplicatesOnly(aList) of me
    
–>  {​​​​​"年間仕様", ​​​​​"YP仕様", ​​​​​"月間仕様"​​​}
    
    
set anArray to current application’s NSMutableArray’s arrayWithArray:aList
    
anArray’s addObject:""
    
    
set resList to {}
    
repeat with i in dList
      set j to contents of i
      
set anIndex to (anArray’s indexOfObject:j)
      
repeat with ii from (anIndex + 1) to ((length of aList))
        set jj to (anArray’s objectAtIndex:ii) as string
        
if jj is not equal to j then
          set the end of resList to {anIndex + 1, ii}
          
exit repeat
        end if
      end repeat
    end repeat
    
    
resList
    
–>  {​​​​​{​​​​​​​4, ​​​​​​​6​​​​​}, ​​​​​{​​​​​​​7, ​​​​​​​9​​​​​}, ​​​​​{​​​​​​​10, ​​​​​​​17​​​​​}​​​}
  end detectSameValueRepeatationBlockIn1DArray
  
  
on returnDuplicatesOnly(aList)
    set countedSet to current application’s NSCountedSet’s alloc()’s initWithArray:aList
    
set simpleSet to current application’s NSSet’s setWithArray:aList
    
countedSet’s minusSet:simpleSet
    
return countedSet’s allObjects() as list
  end returnDuplicatesOnly
end script

script AddressEncoder
  property parent : AppleScript
  
  
–10進数数値をExcel 2004/2008的カラム表現にエンコードするサブルーチン(エンコード範囲:1~1351)
  
on numAdrToColumnEncode(origNum)
    if origNum > 1351 then
      error "エラー:Numbersのカラム表現(A1形式)への変換ルーチンにおいて、想定範囲外(1351以上)のパラメータが指定されました"
    end if
    
    
set upperDigitEncTable to {"A", "B", "C", "D", "E", "F", "G", "H", "I", "J", "K", "L", "M", "N", "O", "P", "Q", "R", "S", "T", "U", "V", "W", "X", "Y", "Z", "A"}
    
set lowerDigitEncTable to {"A", "B", "C", "D", "E", "F", "G", "H", "I", "J", "K", "L", "M", "N", "O", "P", "Q", "R", "S", "T", "U", "V", "W", "X", "Y", "Z", "A"}
    
    
set oNum to origNum
    
set nTh to 26
    
set stringLength to 4
    
    
–数字が1桁の場合の対応
    
if origNum < 27 then
      set aRes to (item origNum of upperDigitEncTable) as string
      
return aRes
    end if
    
    
if origNum > 702 then
      –3桁になる場合
      
set upupNum to oNum div 676 –整数除算–上の上の桁
      
set oNum to oNum – (upupNum * 676)
      
set upNum to oNum div 26 –整数除算–上の桁
      
set lowNum to oNum mod 26 – 1 –余剰計算–下の桁
      
      
–つじつま合わせ処理 【強引】
      
if lowNum = -1 then
        set upNum to upNum – 1
        
set lowNum to 25
      end if
      
      
set upupChar to (item upupNum of upperDigitEncTable) as string
      
set upChar to (item upNum of upperDigitEncTable) as string
      
set lowChar to (item (lowNum + 1) of lowerDigitEncTable) as string
      
set resText to upupChar & upChar & lowChar
      
    else
      –2桁の場合
      
set upNum to oNum div 26 –整数除算–上の桁
      
set lowNum to oNum mod 26 – 1 –余剰計算–下の桁
      
      
–つじつま合わせ処理 【強引】
      
if lowNum = -1 then
        set upNum to upNum – 1
        
set lowNum to 25
      end if
      
      
set upChar to (item upNum of upperDigitEncTable) as string
      
set lowChar to (item (lowNum + 1) of lowerDigitEncTable) as string
      
set resText to upChar & lowChar
      
    end if
    
    
return resText
  end numAdrToColumnEncode
  
  
–Numbersの横方向アドレス(A~Zの26進数)文字列を10進数に変換
  
on colAddrToNumDecode(origStr)
    return aNthToDecimal(origStr, {"A", "B", "C", "D", "E", "F", "G", "H", "I", "J", "K", "L", "M", "N", "O", "P", "Q", "R", "S", "T", "U", "V", "W", "X", "Y", "Z"}) of me
  end colAddrToNumDecode


–n進数文字列を10進数に変換する
  
on aNthToDecimal(origStr, nTh)
    set resNumber to 0
    
    
set sList to reverse of (characters of origStr)
    
set aLen to length of nTh
    
set digitCount to 0
    
    
repeat with i in sList
      set j to contents of i
      
set aRes to offsetInList(j, nTh) of me
      
      
set resNumber to resNumber + (aLen ^ digitCount) * aRes
      
      
set digitCount to digitCount + 1
    end repeat
    
    
return resNumber as integer
  end aNthToDecimal


on offsetInList(aChar, aList)
    set anArray to NSArray’s arrayWithArray:aList
    
set aInd to (anArray’s indexOfObject:aChar)
    
if aInd = current application’s NSNotFound or (aInd as number) > 9.99999999E+8 then
      error "Invalid Character Error"
    else
      return (aInd as integer) + 1 –0 to 1 based index conversion
    end if
  end offsetInList
  
end script

★Click Here to Open This Script 

Posted in list Object control | Tagged 13.0savvy 14.0savvy 15.0savvy Numbers | Leave a comment

macOS 15: Pasteboardにimageを設定したときの挙動が変わった?

Posted on 12月 1, 2024 by Takaaki Naganoya

これまで利用してきたAppleScriptの挙動が変わってしまい、面食らっています。SF Symbolsの内容(文字)をコピーして呼び出すと、いい感じに画像にレンダリングしてクリップボードに設定するというScriptです。

SF Symbolsは、Appleがアイコンなどの素材として用意した「フォント」であり、アプリ間の基礎的なアイコンを共通化して、文字が読めなくてもなんとなくアプリを操作できるようにしようという、現代において最も新しい象形文字ともいえます。

SF Symbolsをブラウズするアプリ「SF Symbols」(現行バージョン6.0)が配布されており、画像レンダリング機能もついているのですが、アプリの画面上のアイコンをねらって作られている機能であるため、いまひとつレンダリングサイズが小さいという不満があります。

かくして、クリップボードに入れたSF Symbolsの文字を指定色で透明画像の上にレンダリングしてクリップボードに入れるというAppleScriptは継続して使用しています。

ただ、ここに来て問題が発生しました。指定した色と、実際に画面上で表示される色が異なるという問題です。

macOS 13とmacOS 15の上で比較を行い、同一プログラムでもあきらかに処理結果が違います。

Script Debuggerを用いて、処理のステップごとに値を返すようにして(Script Debuggerだと、NSImageやらを直接画面上でブラウズ可能)確認してみたのですが、どのステップでも期待どおりの結果になっています。

結局残されたのは、Cocoaの機能を用いて記述されたペーストボード(クリップボード)にNSImageを設定する処理。ペーストボードにNSImageを設定したときに色が変わります。

そして、内容をKeynote上にペーストするとその現象の一端が見えてきます。

Keynoteの書類上にmacOS 13上で処理した画像とmacOS 15上で処理した画像を並べて、それぞれを選択してみると……画面右端の画像プレビューエリア上では色がまったく同じです。書類上では違う色に見えるのに、プレビューでは一緒。

これは、間違ったカラープロファイルが適用されてしまっているか、あるいは明示的に何かのカラープロファイルを付加したNSImageをペーストボードに設定する必要があるか、のどちらかでしょう。

–クリップボードに内容を設定する(復帰用)
on restoreClipboard:theArray
— get pasteboard
set thePasteboard to current application’s NSPasteboard’s generalPasteboard()

— clear it, then write new contents
thePasteboard’s clearContents()
thePasteboard’s writeObjects:theArray
end restoreClipboard:


▲クリップボードに設定する直前のNSImageをPNGに変換してファイルに書き出したもの。この時点でも色が変わっていないので、クリップボード設定部分が問題という見立てをした次第


▲Script実行直後の状態。Finder上でクリップボードの内容を表示させたところ。色は変わっていないようだが……

Posted in Clipboard | Tagged 15.0savvy NSPasteboard | Leave a comment

Cocoa-AppleScript AppletがRosettaオンで動いた!

Posted on 11月 29, 2024 by Takaaki Naganoya

macOS 13.6以降、スクリプトエディタに備わっているテンプレート「Cocoa-AppleScript Applet」から作成したアプレットが動作しなくなっていました。macOS 15.2Betaでもこの状況は変わりません。


▲スクリプトエディタ>ファイル>テンプレートから新規作成>Cocoa-AppleScript Applet.app を選択


▲Cocoa-AppleScript Appletのテンプレートで新規作成したところ


▲Cocoa-AppleScript Appletを作成して実行すると、このような警告ダイアログが表示される

通常のアプレットやScript Debuggerで作成したEnhanced Appletなどもあるため、致命傷ではないのですが……Scripter側でCocoaの利用経験がたまってきたために、「アプリケーション」という実行環境のさまざまなイベントを利用したいという声が出てきて、ようやくCocoa-AppleScript Appletが再評価されつつあった矢先の出来事でした。

# Cocoa-AppleScript Appletを使っているScripterなんて、edama2氏しか知りません

Appleにもバグレポートしているのですが、一向に直りません。そんな中、MacScripter.netにてred_menace氏が報告したところによると、「Rosettaをオンにして動かすと、動く」とのこと。なんの冗談だろうと疑いながら……

ためしに、Cocoa-AppleScript AppletをRosettaをオンにしてx64コードで動かすと、本当に動きました。これは驚きです。

ARM64Eバイナリが存在していないのかチェックしてみたら、

me@m1mini ~ % file /Users/me/Desktop/名称未設定Cocoa-AppleScript\ Applet.app/Contents/MacOS/CocoaApplet
/Users/me/Desktop/名称未設定Cocoa-AppleScript Applet.app/Contents/MacOS/CocoaApplet: Mach-O universal binary with 2 architectures: [x86_64:Mach-O 64-bit executable x86_64] [arm64e:Mach-O 64-bit executable arm64e]
/Users/me/Desktop/名称未設定Cocoa-AppleScript Applet.app/Contents/MacOS/CocoaApplet (for architecture x86_64): Mach-O 64-bit executable x86_64
/Users/me/Desktop/名称未設定Cocoa-AppleScript Applet.app/Contents/MacOS/CocoaApplet (for architecture arm64e): Mach-O 64-bit executable arm64e

そういうわけではないようです。このことから、Appleの現場ではApple Siliconで動作チェックを行なっていないか、チェック自体を行なっていないか、文字が読めないようです。

Posted in Bug Cocoa-AppleScript Applet | Tagged 13.0savvy 14.0savvy 15.0savvy | Leave a comment

各Framework内のbridgesupportファイル情報の収集

Posted on 11月 29, 2024 by Takaaki Naganoya

macOS内の標準装備のFrameworkの情報を収集するAppleScriptです。AppleScriptからmacOS内のFrameworkを呼ぶには、Framework内にbridgesupportファイルが存在している必要があります。

これまで、さまざまな資料を作成するさいに、Frameworkの有無だけをまとめてきましたが……結局のところ、bridgesupportファイルの有無を調査しないと意味がないのでは? ということで書いてみたものです。

結果は、Framework名、x86版の有無、ARM64E版の有無がCSVファイルで出力されます。

AppleScript名:各Framework内のbridgesupportファイル情報の収集_v2.scptd
—
–  Created by: Takaaki Naganoya
–  Created on: 2024/11/29
—
–  Copyright © 2024 Piyomaru Software, All Rights Reserved
—

use AppleScript
use framework "Foundation"
use scripting additions

script spd
  property a1Res : {}
  
property a2Res : {}
  
property a3Res : {}
  
property allList : {}
  
property fNames : {}
end script

set outPath to POSIX path of (choose file name with prompt "Input file name (with \".csv\")")

–Frameworkフォルダ1から取得
set frPath to "/System/Library/Frameworks/"
set s1Text to "find " & frPath & " -name *.framework"
set (a1Res of spd) to paragraphs of (do shell script s1Text)

set osV to my numToHex((system attribute "sysv"), 4)

if osV ≥ "1200" then
  –Frameworkフォルダ2から取得
  
set frPath to "/System/DriverKit/System/Library/Frameworks"
  
set s1Text to "find " & frPath & " -name *.framework"
  
set (a2Res of spd) to paragraphs of (do shell script s1Text)
  
  
–合成
  
set (a3Res of spd) to (a1Res of spd) & (a2Res of spd)
else
  copy (a1Res of spd) to (a3Res of spd)
end if

–合成して重複を除去
set aRes to uniquify1DList((a3Res of spd)) of me

–フレームワークでループして、bridgesupportファイルをx64とApple Silicon版を検索
set (fNames of spd) to {}
repeat with i in aRes
  set t1Path to (current application’s NSString’s stringWithString:(i))
  
set t2Path to t1Path’s stringByResolvingSymlinksInPath() –リンクを解消
  
set tName to t2Path’s lastPathComponent()’s stringByDeletingPathExtension() as string
  
  
–Find x64 bridgesupport
  
set s1Text to "find " & t2Path & " -name " & tName & ".bridgesupport"
  
try
    set a1Res to do shell script s1Text
  on error
    set a1Res to ""
  end try
  
  
–Find Apple Silicon (ARM64E) bridgesupport
  
set s2Text to "find " & t2Path & " -name " & tName & ".arm64e.bridgesupport"
  
try
    set a2Res to do shell script s2Text
  on error
    set a2Res to ""
  end try
  
  
–Check result of x64 bridgesupport  
  
set ttList to {tName}
  
if a1Res is not equal to "" then
    set the end of ttList to "●"
  else
    set the end of ttList to ""
  end if
  
  
–Check result of Apple Silicon (ARM64E) bridgesupport   
  
if a2Res is not equal to "" then
    set the end of ttList to "●"
  else
    set the end of ttList to ""
  end if
  
  
–Store Results
  
if tName is not in (fNames of spd) then –重複出力を防ぐ
    set the end of (allList of spd) to ttList
    
set the end of (fNames of spd) to tName
  end if
end repeat

–結果のCSV書き出し
set sRes to saveAsCSV((allList of spd), outPath) of me

on numToHex(theNumber, stringLength)
  set hexString to {}
  
repeat with i from stringLength to 1 by -1
    set hexString to ((theNumber mod 16) as string) & hexString
    
set theNumber to theNumber div 16
  end repeat
  
return (hexString as string)
end numToHex

on getFileSizeFromPath(aPath)
  set aaPath to current application’s NSString’s stringWithString:(aPath)
  
set aaaPath to aaPath’s stringByResolvingSymlinksInPath() –リンクを解消
  
set aFM to current application’s NSFileManager’s defaultManager()
  
set anAttr to aFM’s attributesOfItemAtPath:(aaaPath) |error|:(missing value)
  
set sRes to anAttr’s fileSize()
  
return sRes as string
end getFileSizeFromPath

–文字置換
on repChar(origText as string, targChar as string, repChar as string)
  set curDelim to AppleScript’s text item delimiters
  
set AppleScript’s text item delimiters to targChar
  
set tmpList to text items of origText
  
set AppleScript’s text item delimiters to repChar
  
set retText to tmpList as string
  
set AppleScript’s text item delimiters to curDelim
  
return retText
end repChar

–2D List to CSV file
on saveAsCSV(aList, aPath)
  –set crlfChar to (ASCII character 13) & (ASCII character 10)
  
set crlfChar to (string id 13) & (string id 10)
  
set LF to (string id 10)
  
set wholeText to ""
  
  
repeat with i in aList
    set newLine to {}
    
    
–Sanitize (Double Quote)
    
repeat with ii in i
      set jj to ii as text
      
set kk to repChar(jj, string id 34, (string id 34) & (string id 34)) of me –Escape Double Quote
      
set the end of newLine to kk
    end repeat
    
    
–Change Delimiter
    
set aLineText to ""
    
set curDelim to AppleScript’s text item delimiters
    
set AppleScript’s text item delimiters to "\",\""
    
set aLineList to newLine as text
    
set AppleScript’s text item delimiters to curDelim
    
    
set aLineText to repChar(aLineList, return, "") of me –delete return
    
set aLineText to repChar(aLineText, LF, "") of me –delete lf
    
    
set wholeText to wholeText & "\"" & aLineText & "\"" & crlfChar –line terminator: CR+LF
  end repeat
  
  
if (aPath as string) does not end with ".csv" then
    set bPath to aPath & ".csv" as Unicode text
  else
    set bPath to aPath as Unicode text
  end if
  
  
return writeToFileAsUTF8(wholeText, bPath) of me
end saveAsCSV

on writeToFileAsUTF8(aStr, aPath)
  set cStr to current application’s NSString’s stringWithString:aStr
  
set thePath to POSIX path of aPath
  
set aRes to cStr’s writeToFile:thePath atomically:false encoding:(current application’s NSUTF8StringEncoding) |error|:(missing value)
  
return aRes as boolean
end writeToFileAsUTF8

on uniquify1DList(theList as list)
  set theSet to current application’s NSOrderedSet’s orderedSetWithArray:theList
  
return (theSet’s array()) as list
end uniquify1DList

★Click Here to Open This Script 

Posted in System | Tagged 12.0savvy 13.0savvy 14.0savvy 15.0savvy | Leave a comment

書式つきテキストを組み立てて、画像を追加し、RTFDとして保存 v2

Posted on 11月 25, 2024 by Takaaki Naganoya

書式つきテキスト(NSAttributedString)にコンピュータのアイコン画像を添付し、RTFDとしてファイル保存するAppleScriptです。

RTFDはRTFに対して画像などの要素を追加したApple独自の拡張仕様です。書式つきテキストはRTFとしてファイルに書き込んだり、逆にRTFから読み込んで書式つきテキスト化することも可能ですが、画像を添付したらRTFDとして保存する必要があります。

AppleScript名:書式つきテキストを組み立てて、画像を追加し、RTFDとして保存 v2
— Created 2017-09-25 by Takaaki Naganoya
— Modified 2017-09-27 by Shane Stanley
— Modified 2024-11-25 by Takaaki Naganoya
— 2017-2024 Piyomaru Software
use AppleScript
use scripting additions
use framework "Foundation"
use framework "AppKit"

property NSFont : a reference to current application’s NSFont
property |NSURL| : a reference to current application’s |NSURL|
property NSColor : a reference to current application’s NSColor
property NSString : a reference to current application’s NSString
property NSImage : a reference to current application’s NSImage
property NSDictionary : a reference to current application’s NSDictionary
property NSTextAttachment : a reference to current application’s NSTextAttachment
property NSAttributedString : a reference to current application’s NSAttributedString
property NSMutableDictionary : a reference to current application’s NSMutableDictionary
property NSFontAttributeName : a reference to current application’s NSFontAttributeName
property NSKernAttributeName : a reference to current application’s NSKernAttributeName
property NSImageNameComputer : a reference to current application’s NSImageNameComputer
property NSMutableParagraphStyle : a reference to current application’s NSMutableParagraphStyle
property NSLigatureAttributeName : a reference to current application’s NSLigatureAttributeName
property NSMutableAttributedString : a reference to current application’s NSMutableAttributedString
property NSRTFDTextDocumentType : a reference to current application’s NSRTFDTextDocumentType
property NSUnderlineStyleAttributeName : a reference to current application’s NSUnderlineStyleAttributeName
property NSDocumentTypeDocumentAttribute : a reference to current application’s NSDocumentTypeDocumentAttribute
property NSParagraphStyleAttributeName : a reference to current application’s NSParagraphStyleAttributeName
property NSForegroundColorAttributeName : a reference to current application’s NSForegroundColorAttributeName

set aFile to POSIX path of (choose file name with prompt "保存するファイル名を入力(拡張子.rtfdつきで)")
set aURL to |NSURL|’s fileURLWithPath:aFile

–Attributed Stringを作成
set aFontSize to 48
set aString to "My Mac"
set anAssrStr to makeRTFfromParameters(aString, "HelveticaNeue-Light", aFontSize, -2, (aFontSize * 1.5)) of me

–添付画像を作成
set anAttach to NSTextAttachment’s alloc()’s init()
set anImage to NSImage’s imageNamed:(NSImageNameComputer)
set bImage to my resizeNSImage:anImage toSize:64
anAttach’s setImage:bImage

–添付画像をAttributed Stringに添付
set iconString to NSAttributedString’s attributedStringWithAttachment:anAttach
anAssrStr’s insertAttributedString:iconString atIndex:0 –冒頭に添付

–添付画像つきAttributed StringをRTFDとしてファイル保存
set aStrRange to current application’s NSMakeRange(0, anAssrStr’s |length|())
set attrDict1 to NSDictionary’s dictionaryWithObject:NSRTFDTextDocumentType forKey:NSDocumentTypeDocumentAttribute
set {aFileWrapper, anError} to anAssrStr’s fileWrapperFromRange:aStrRange documentAttributes:(attrDict1) |error|:(reference)
if anError is not equal to missing value then error

set {fRes, fError} to aFileWrapper’s writeToURL:aURL options:(current application’s NSFileWrapperWritingAtomic) originalContentsURL:(missing value) |error|:(reference)

–書式つきテキストを組み立てる
on makeRTFfromParameters(aStr as string, fontName as string, aFontSize as real, aKerning as real, aLineSpacing as real)
  –Font
  
set aVal1 to NSFont’s fontWithName:fontName |size|:aFontSize
  
set aKey1 to (NSFontAttributeName)
  
  
–Color
  
set aVal2 to NSColor’s blackColor()
  
set aKey2 to (NSForegroundColorAttributeName)
  
  
–Kerning
  
set aVal3 to aKerning
  
set akey3 to (NSKernAttributeName)
  
  
–Underline
  
set aVal4 to 0
  
set akey4 to (NSUnderlineStyleAttributeName)
  
  
–Ligature
  
set aVal5 to 2 –all ligature ON
  
set akey5 to (NSLigatureAttributeName)
  
  
–縦書き指定–Japanese tategaki setting (Up to down, right to left direction drawing)
  
set aVal6 to false
  
set aKey6 to (current application’s NSVerticalGlyphFormAttributeName)
  
  
–Paragraph space
  
set aParagraphStyle to NSMutableParagraphStyle’s alloc()’s init()
  
aParagraphStyle’s setMinimumLineHeight:(aLineSpacing)
  
aParagraphStyle’s setMaximumLineHeight:(aLineSpacing)
  
set akey7 to (NSParagraphStyleAttributeName)
  
  
set keyList to {aKey1, aKey2, akey3, akey4, akey5, aKey6, akey7}
  
set valList to {aVal1, aVal2, aVal3, aVal4, aVal5, aVal6, aParagraphStyle}
  
set attrsDictionary to NSMutableDictionary’s dictionaryWithObjects:valList forKeys:keyList
  
  
set attrStr to NSMutableAttributedString’s alloc()’s initWithString:aStr attributes:attrsDictionary
  
return attrStr
end makeRTFfromParameters

on resizeNSImage:aImg toSize:aSize
  if (aImg’s isValid()) as boolean = false then error "Invalid NSImage"
  
  
set tmpView to current application’s NSImageView’s alloc()’s initWithFrame:(current application’s NSMakeRect(0, 0, aSize, aSize))
  
tmpView’s setImageScaling:(current application’s NSImageScaleProportionallyUpOrDown)
  
tmpView’s setImage:aImg
  
  
set newRect to tmpView’s frame()
  
set newRep to tmpView’s bitmapImageRepForCachingDisplayInRect:newRect
  
  
tmpView’s cacheDisplayInRect:newRect toBitmapImageRep:newRep
  
set newData to newRep’s TIFFRepresentation() –representationUsingType:(current application’s NSPNGFileType) |properties|:(missing value)
  
  
return current application’s NSImage’s alloc()’s initWithData:newData
end resizeNSImage:toSize:

★Click Here to Open This Script 

Posted in Image RTF | Tagged 13.0savvy 14.0savvy 15.0savvy NSAttributedString NSFileWrapper NSTextAttachment | Leave a comment

書式つきテキストを組み立てて、画像を追加

Posted on 11月 25, 2024 by Takaaki Naganoya

書式つきテキスト(NSAttributedString)を作成し、その先頭にコンピュータアイコン画像を追加してダイアログ表示するAppleScriptです。

–> Download Script Archive with Libraries

AppleScript名:書式つきテキストを組み立てて、画像を追加
— Created 2017-09-25 by Takaaki Naganoya
— Modified 2017-09-27 by Shane Stanley
— Modified 2024-11-25 by Takaaki Naganoya
— 2017-2024 Piyomaru Software
use AppleScript
use scripting additions
use framework "Foundation"
use framework "AppKit"
use tv : script "tvLib"
use hwName : script "hardwareNameLib"

property NSFont : a reference to current application’s NSFont
property NSColor : a reference to current application’s NSColor
property NSString : a reference to current application’s NSString
property NSImage : a reference to current application’s NSImage
property NSTextAttachment : a reference to current application’s NSTextAttachment
property NSAttributedString : a reference to current application’s NSAttributedString
property NSMutableDictionary : a reference to current application’s NSMutableDictionary
property NSFontAttributeName : a reference to current application’s NSFontAttributeName
property NSKernAttributeName : a reference to current application’s NSKernAttributeName
property NSImageNameComputer : a reference to current application’s NSImageNameComputer
property NSMutableParagraphStyle : a reference to current application’s NSMutableParagraphStyle
property NSLigatureAttributeName : a reference to current application’s NSLigatureAttributeName
property NSMutableAttributedString : a reference to current application’s NSMutableAttributedString
property NSUnderlineStyleAttributeName : a reference to current application’s NSUnderlineStyleAttributeName
property NSParagraphStyleAttributeName : a reference to current application’s NSParagraphStyleAttributeName
property NSForegroundColorAttributeName : a reference to current application’s NSForegroundColorAttributeName

–Attributed Stringを作成
set aFontSize to 48
set aString to getSystemProfileInAGenre("SPHardwareDataType", "machine_name") of hwName
set anAssrStr to makeRTFfromParameters(aString, "HelveticaNeue-Light", aFontSize, -2, (aFontSize * 1.5)) of me

–添付画像を作成
set anAttach to NSTextAttachment’s alloc()’s init()
set anImage to NSImage’s imageNamed:(NSImageNameComputer)
anAttach’s setImage:anImage

–添付画像をAttributed Stringに添付
set iconString to NSAttributedString’s attributedStringWithAttachment:anAttach
anAssrStr’s insertAttributedString:iconString atIndex:0 –冒頭に添付

–ライブラリを用いてダイアログ表示
dispAttrStr(aString, "Computer Icon", anAssrStr, 600, 200) of tv

–書式つきテキストを組み立てる
on makeRTFfromParameters(aStr as string, fontName as string, aFontSize as real, aKerning as real, aLineSpacing as real)
  –Font
  
set aVal1 to NSFont’s fontWithName:fontName |size|:aFontSize
  
set aKey1 to (NSFontAttributeName)
  
  
–Color
  
set aVal2 to NSColor’s blackColor()
  
set aKey2 to (NSForegroundColorAttributeName)
  
  
–Kerning
  
set aVal3 to aKerning
  
set akey3 to (NSKernAttributeName)
  
  
–Underline
  
set aVal4 to 0
  
set akey4 to (NSUnderlineStyleAttributeName)
  
  
–Ligature
  
set aVal5 to 2 –all ligature ON
  
set akey5 to (NSLigatureAttributeName)
  
  
–縦書き指定–Japanese tategaki setting (Up to down, right to left direction drawing)
  
set aVal6 to false
  
set aKey6 to (current application’s NSVerticalGlyphFormAttributeName)
  
  
–Paragraph space
  
set aParagraphStyle to NSMutableParagraphStyle’s alloc()’s init()
  
aParagraphStyle’s setMinimumLineHeight:(aLineSpacing)
  
aParagraphStyle’s setMaximumLineHeight:(aLineSpacing)
  
set akey7 to (NSParagraphStyleAttributeName)
  
  
set keyList to {aKey1, aKey2, akey3, akey4, akey5, aKey6, akey7}
  
set valList to {aVal1, aVal2, aVal3, aVal4, aVal5, aVal6, aParagraphStyle}
  
set attrsDictionary to NSMutableDictionary’s dictionaryWithObjects:valList forKeys:keyList
  
  
set attrStr to NSMutableAttributedString’s alloc()’s initWithString:aStr attributes:attrsDictionary
  
return attrStr
end makeRTFfromParameters

★Click Here to Open This Script 

Posted in dialog RTF | Tagged 13.0savvy 14.0savvy 15.0savvy NSAttributedString NSTextAttachment | Leave a comment

KagiのWebブラウザ、Orion

Posted on 11月 23, 2024 by Takaaki Naganoya

たまにMac用のWebブラウザが新登場しているのですが、ほとんどがGoogle Chromiumの互換といいますか、Chromiumのぱちも……といいますか、ほぼそのまま利用して作られていたりして、そのおかげで割としっかりとAppleScript対応機能が実装されたまま多数のWebブラウザがリリースされるというメリットがありました。

そんな中、たまたま見つけた「Orion」。Kagiが作ったWebブラウザとのことです。

AppleScriptから見ると、見たこともないような挙動をするWebブラウザです。

用語辞書の傾向はChrome系というよりも、Safariからとんがったコマンドを削除したようなたたずまい。

そして、必要な機能がついていなくて、割と「何これ?」と首をひねってしまうような出来です。

SafariもGoogle Chromeも、現在のタブを指し示すactive tabとかcurrent tabといった予約語でアクセスできるのですが、それができません。一応、Windowのプロパティとしてcurrent tabがあるのですが、このtabからIDとかIndexが取得できません。

do JavaScriptコマンドがあるので、ちょっとOrion固有の制限が加わりつつもJavaScriptコマンドを実行してWebのソースコードやテキストを取得できたりはしつつ、Webブラウザ上で選択中の要素を取得できなかったりします。

そして、肝心のdo JavaScriptコマンドでtabを指定する必要があるものの、current tabが何であるかを特定できず……仕方ないので、tabから取得できるURLをもとにどのtabがcurrent tabであるかを探し回ってなんとか。

windowの新規作成は、documentを作成することで行うことに。

人間らしく、というレベルはクリアできていないような気がします。久しぶりに、挙動がここまで不完全というか不自然なWebブラウザを見かけました。

AppleScript名:Orionのアプリのプロパティを取得.scpt
tell application "Orion"
  properties
  
–> {frontmost:false, class:application, name:"Orion", version:"0.99"}
end tell

★Click Here to Open This Script 

AppleScript名:OrionでWindowのtitleを取得.scpt
–同じURLを持つTabが複数あった場合には処理が破綻する
tell application "Orion"
  tell window 1
    set aURL to URL of current tab
    
set tList to URL of every tab
    
set tInd to retIndexNumInArray(tList, aURL) of me
    
if tInd = 0 then return
    
    
tell tab tInd –current tabのindexを求める方法がないのに、current tabを指定できないし、具体的にtab idを指定しないといけない
      set aRes to do JavaScript "document.querySelector(’title’).textContent;"
    end tell
  end tell
end tell

–1Dimensionリスト中のシーケンシャルサーチ
on retIndexNumInArray(aList, aTarget)
  set aCount to 1
  
set hitF to false
  
  
repeat with i in aList
    set j to contents of i
    
if aTarget = j then return aCount
    
    
set aCount to aCount + 1
  end repeat
  
  
if hitF = false then return 0
end retIndexNumInArray

★Click Here to Open This Script 

AppleScript名:Orionで新規URLをオープン(新規Tab).scpt
tell application "Orion"
  open location "https://www.apple.com/jp" –新規Tabでオープン
end tell

★Click Here to Open This Script 

AppleScript名:Orionの最前面のWindowのcurrent tabで新規URLをオープン.scpt
tell application "Orion"
  set URL of current tab of window 1 to "https://www.apple.com/jp"
end tell

★Click Here to Open This Script 

AppleScript名:Orionでcurrent tabに対してJavaScript実行してソースを取得.scpt
–同じURLを持つTabが複数あった場合には処理が破綻する
tell application "Orion"
  tell window 1
    set aURL to URL of current tab
    
set tList to URL of every tab
    
set tInd to retIndexNumInArray(tList, aURL) of me
    
if tInd = 0 then return
    
    
tell tab tInd –current tabのindexを求める方法がないのに、current tabを指定できないし、具体的にtab idを指定しないといけない
      set aRes to do JavaScript "document.getElementsByTagName(’html’)[0].innerHTML"
    end tell
  end tell
end tell

–1Dimensionリスト中のシーケンシャルサーチ
on retIndexNumInArray(aList, aTarget)
  set aCount to 1
  
set hitF to false
  
  
repeat with i in aList
    set j to contents of i
    
if aTarget = j then return aCount
    
    
set aCount to aCount + 1
  end repeat
  
  
if hitF = false then return 0
end retIndexNumInArray

★Click Here to Open This Script 

AppleScript名:Orion、WindowのCloseができるが、makeできない.scpt
tell application "Orion"
  close every window
end tell

★Click Here to Open This Script 

AppleScript名:Orionで新規document作成.scpt
tell application "Orion"
  make new document
end tell

★Click Here to Open This Script 

AppleScript名:新規tabの作成.scpt
tell application "Orion"
  tell window 1
    make new tab with properties {URL:"http://www.apple.com/jp"}
  end tell
end tell

★Click Here to Open This Script 

Posted in Object control | Tagged 13.0savvy 14.0savvy 15.0savvy Orion | Leave a comment

余白トリミング実験 v3

Posted on 11月 23, 2024 by Takaaki Naganoya

背景が透過しているPNG画像で、余計な余白部分を自動でトリミングするAppleScriptの試作品です。実際に画像のトリミングを行います。1024×1024ぐらいまでの大きさのPNG画像が想定しているターゲットで、4Kとか8Kぐらいの画像は想定していません。

既存のCやObjective-Cなどの言語で書かれたトリミングのプログラムは、1ドットずつスキャンしていく方式だったので、そのままの処理をインタプリタ方式のAppleScriptで行うと、遅くて話になりません。

そこで、ブロックごとに分割して、ブロック単位で描画部分がないか(同サイズの透明イメージと比較して同じかどうか)チェックするという方式を採用しました。これは、画像がすべて空白かどうかをチェックする処理の原理を応用したものです。


▲テストに利用したPNG画像(196 × 309 ピクセル)

前バージョン(v2)を実際の用途に利用してみたら、トンでもなく使い物にならなかったので、プログラムのおかしなところを見直して、2段階で処理を行うことでさらに精度を上げてみたのが、このv3です。

画像全体を16×16のブロックに分割して、個別に透明なエリアか描画されているエリアかを判定します(パス1)。

そのままだと処理がラフすぎるので、外周部のブロックをさらに16分割し、外周部だけ透明ブロックかどうかの判定を行います(パス2)。

このテスト画像に対しては、それなりの結果が出ています。前バージョンと比べると大幅に性能向上してます。実戦投入してみるとまた別の感想が出てくるかもしれませんが……。


▲実戦投入。SF Symbolsをコピーした内容を指定色で画像化してクリップボードに入れるAppleScriptで使用してみたら、けっこういい感じに切り抜いてくれました

プログラムもまだ試作品段階なので、無駄な処理が多そうです。パス1とパス2で共通部分が多いので、見直すとメイン部分の長さが半分ぐらいになりそうですが、試作品段階なのであんまり短くしすぎると内容を理解しにくくなりそうで。

AppleScript名:余白トリミング実験 v3.scptd
—
–  Created by: Takaaki Naganoya
–  Created on: 2024/11/21
—
–  Copyright © 2024 Piyomaru Software, All Rights Reserved
—

use AppleScript
use framework "Foundation"
use framework "AppKit"
use scripting additions

property NSData : a reference to current application’s NSData
property |NSURL| : a reference to current application’s |NSURL|
property NSColor : a reference to current application’s NSColor
property NSString : a reference to current application’s NSString
property NSImage : a reference to current application’s NSImage
property NSScreen : a reference to current application’s NSScreen
property NSBezierPath : a reference to current application’s NSBezierPath
property NSPNGFileType : a reference to current application’s NSPNGFileType
property NSMutableArray : a reference to current application’s NSMutableArray
property NSBitmapImageRep : a reference to current application’s NSBitmapImageRep

–画像分割ブロックサイズ
property imgDivXStep : 16
property imgDivYStep : 16

set aPOSIXpath to POSIX path of (choose file with prompt "PNG画像を選択")

–時間計測用
set a1Dat to current application’s NSDate’s timeIntervalSinceReferenceDate()

–画像自動切り抜き
set cImage to autoTrimImageFromPath(aPOSIXpath) of me

–時間計測用
set b1Dat to current application’s NSDate’s timeIntervalSinceReferenceDate()
set c1Dat to b1Dat – a1Dat
log c1Dat

–ファイル保存
set outPath to POSIX path of (choose file name with prompt "PNG画像の保存ファイル名を指定してください(拡張子入力必須)")
set sRes to saveImageRepAtPathAsPNG(cImage, outPath) of me

–POSIX pathで示したPNG画像(多分)の外周部の余白を自動トリミング
on autoTrimImageFromPath(aPOSIXpath)
  set aURL to |NSURL|’s fileURLWithPath:aPOSIXpath
  
set aImage to NSImage’s alloc()’s initWithContentsOfURL:aURL
  
return autoTrimImage(aImage) of me –return NSImage
end autoTrimImageFromPath

–NSImageの外周部の余白を自動トリミング
on autoTrimImage(aImage)
  script spd
    property outList : {} –Pass 1用
    
property pass2Res : {} –Pass 2用
  end script
  
  
–PASS 1 16 x 16 Whole Area Scan
  
  
set sRes to aImage’s |size|()
  
–> example: {width:196.0, height:309.0}
  
  
set aHeight to height of sRes
  
set aWidth to width of sRes
  
  
set xBlockSize to (aWidth div imgDivXStep)
  
set yBlockSize to (aHeight div imgDivYStep)


–transparent block sample for PASS 1
  
set blankImg1 to makeNSImageWithFilledWithColor(xBlockSize, yBlockSize, current application’s NSColor’s clearColor()) of me
  
set blankBit1 to blankImg1’s TIFFRepresentation()


set (outList of spd) to {}
  
  
repeat with yy from 0 to (aHeight – yBlockSize) by yBlockSize
    set oneLine to ""
    
    
repeat with xx from 0 to (aWidth – xBlockSize) by xBlockSize
      –crop a part of image and check transparent
      
set tmpImg to (my cropNSImageBy:{xx, yy, xBlockSize, yBlockSize} fromImage:aImage)
      
set tmpBit to tmpImg’s TIFFRepresentation()
      
set chkTrans to (blankBit1’s isEqualToData:tmpBit) as boolean


if chkTrans = false then –Not transparent block
        set the end of (outList of spd) to {xPos:xx, yPos:yy}
      end if
      
    end repeat
  end repeat


–最大値、最小値を取得
  
set nArray to (NSMutableArray’s arrayWithArray:(outList of spd))
  
  
set xMin to calcMin("xPos", nArray) of me
  
set xMax to calcMax("xPos", nArray) of me
  
  
set yMin to calcMin("yPos", nArray) of me
  
set yMax to calcMax("yPos", nArray) of me


–PASS 2: Edge Blocks 64 x 64 scan Most Edge blocks only
  
  
–transparent block sample for PASS 2 (1/4 size)
  
set blankImg2 to makeNSImageWithFilledWithColor(xBlockSize div 4, yBlockSize div 4, current application’s NSColor’s clearColor()) of me
  
set blankBit2 to blankImg2’s TIFFRepresentation()


set aArray to current application’s NSArray’s arrayWithArray:(outList of spd)
  
  
set westList to filterRecListByLabel1(aArray, "xPos == %@", xMin) of me as list
  
set eastList to filterRecListByLabel1(aArray, "xPos == %@", xMax) of me as list
  
set northLIst to filterRecListByLabel1(aArray, "yPos == %@", yMax) of me as list
  
set southLIst to filterRecListByLabel1(aArray, "yPos == %@", yMin) of me as list
  
  
set pass2List to westList & eastList & northLIst & southLIst
  
  
set (pass2Res of spd) to {}
  
  
repeat with i in pass2List
    set origPX to xPos of i
    
set origPY to yPos of i
    
    
repeat with y from 0 to 3
      repeat with x from 0 to 3
        
        
set tmpPX to origPX + (xBlockSize div 4) * x
        
set tmpPY to origPY + (yBlockSize div 4) * y
        
        
set tmpImg to (my cropNSImageBy:{tmpPX, tmpPY, xBlockSize div 4, yBlockSize div 4} fromImage:aImage)
        
set tmpBit2 to tmpImg’s TIFFRepresentation()
        
set chkTrans to (blankBit2’s isEqualToData:tmpBit2) as boolean
        
        
if chkTrans = false then –Not transparent block
          set the end of (pass2Res of spd) to {xPos:tmpPX, yPos:tmpPY}
        end if
      end repeat
    end repeat
  end repeat


set bArray to current application’s NSArray’s arrayWithArray:(pass2Res of spd)
  
  
set x2Min to calcMin("xPos", bArray) of me
  
set x2Max to calcMax("xPos", bArray) of me
  
  
set y2Min to calcMin("yPos", bArray) of me
  
set y2Max to calcMax("yPos", bArray) of me
  
  
–オリジナル画像を切り抜きして返す(NSImage)
  
return my cropNSImageTo:{x2Min, y2Min, x2Max + (xBlockSize div 4), y2Max + (yBlockSize div 4)} fromImage:aImage
end autoTrimImage

on calcMin(aLabel as string, nArray)
  set aStr to "@min." & aLabel
  
set aRes to nArray’s valueForKeyPath:aStr
  
return aRes as anything
end calcMin

on calcMax(aLabel as string, nArray)
  set aStr to "@max." & aLabel
  
set aRes to nArray’s valueForKeyPath:aStr
  
return aRes as anything
end calcMax

–指定サイズの画像を作成し、指定色で塗って返す
on makeNSImageWithFilledWithColor(aWidth, aHeight, fillColor)
  set retinaF to 1.0 —(NSScreen’s mainScreen()’s backingScaleFactor()) as real
  
–>  2.0 (Retina) / 1.0 (Non Retina)
  
  
set anImage to current application’s NSImage’s alloc()’s initWithSize:(current application’s NSMakeSize(aWidth, aHeight))
  
anImage’s lockFocus()
  
—
  
set theRect to {{x:0, y:0}, {height:aHeight / retinaF, width:aWidth / retinaF}}
  
set theNSBezierPath to current application’s NSBezierPath’s bezierPath
  
theNSBezierPath’s appendBezierPathWithRect:theRect
  
—
  
fillColor’s |set|() –色設定
  
theNSBezierPath’s fill() –ぬりつぶし
  
—
  
anImage’s unlockFocus()
  
—
  
return anImage
end makeNSImageWithFilledWithColor

on cropNSImageTo:{x1, y1, x2, y2} fromImage:theImage
  set newWidth to x2 – x1
  
set newHeight to y2 – y1
  
  
set newRect to {{x:x1, y:y1}, {width:newWidth, height:newHeight}}
  
  
theImage’s lockFocus()
  
set theRep to NSBitmapImageRep’s alloc()’s initWithFocusedViewRect:newRect
  
theImage’s unlockFocus()
  
  
set outImage to NSImage’s alloc()’s initWithSize:(theRep’s |size|())
  
outImage’s addRepresentation:theRep
  
  
return outImage
end cropNSImageTo:fromImage:

–NSImageを指定の大きさでトリミング
on cropNSImageBy:{x1, y1, newWidth, newHeight} fromImage:theImage
  set theSize to (theImage’s |size|()) as record
  
set oldHeight to height of theSize
  
  
set newRect to {{x:x1, y:y1}, {width:newWidth, height:newHeight}}
  
  
theImage’s lockFocus()
  
set theRep to NSBitmapImageRep’s alloc()’s initWithFocusedViewRect:newRect
  
theImage’s unlockFocus()
  
  
set outImage to NSImage’s alloc()’s initWithSize:(theRep’s |size|())
  
outImage’s addRepresentation:theRep
  
  
return outImage
end cropNSImageBy:fromImage:

–画像を指定パスにPNG形式で保存
on saveImageRepAtPathAsPNG(anImage, outPath)
  set imageRep to anImage’s TIFFRepresentation()
  
set aRawimg to NSBitmapImageRep’s imageRepWithData:imageRep
  
  
–パスのチルダ展開処理
  
set pathString to NSString’s stringWithString:outPath
  
set newPath to pathString’s stringByExpandingTildeInPath()
  
  
set myNewImageData to (aRawimg’s representationUsingType:(NSPNGFileType) |properties|:(missing value))
  
return (myNewImageData’s writeToFile:newPath atomically:true) as boolean
end saveImageRepAtPathAsPNG

–リストに入れたレコードを、指定の属性ラベルの値で抽出
on filterRecListByLabel1(aArray, aPredicate as string, aVal)
  set aPredicate to current application’s NSPredicate’s predicateWithFormat_(aPredicate, aVal)
  
set filteredArray to aArray’s filteredArrayUsingPredicate:aPredicate
  
return filteredArray
end filterRecListByLabel1

★Click Here to Open This Script 

Posted in Image | Tagged 13.0savvy 14.0savvy 15.0savvy | 1 Comment

余白トリミング実験 v2

Posted on 11月 21, 2024 by Takaaki Naganoya

背景が透過しているPNG画像で、余計な余白部分を自動でトリミングするAppleScriptの試作品です。実際に画像のトリミングを行います。1024×1024ぐらいまでの大きさのPNG画像が想定しているターゲットで、4Kとか8Kぐらいの画像は想定していません。

この、背景透過画像の余計な余白を自動トリミングする、という部品は割と(個人的に)重要なのでいろいろ試してみたものです。


▲テストに利用したPNG画像(196 × 309 ピクセル)


▲オリジナル画像をPreview.appで表示させたところ。背景の余白がある


▲本Scriptで自動トリミングを行ったところ

いろいろチューニングしてみましたが、画像の空白エリアの検出は、「元画像の分割数」に応じていろいろ切り抜きすぎたり、余白が多すぎたりとかなり変動が生じました。

32×32分割だと処理速度的に0.4秒@M2なので、16×16前後が向いている感じでした。20×20ぐらいでも試していますが、結局、切り抜きすぎるのは避けたいところです。

AppleScript名:余白トリミング実験 v2.scptd
—
–  Created by: Takaaki Naganoya
–  Created on: 2024/11/21
—
–  Copyright © 2024 Piyomaru Software, All Rights Reserved
—

use AppleScript version "2.8" — macOS 12 or later
use framework "Foundation"
use framework "AppKit"
use scripting additions

property NSData : a reference to current application’s NSData
property |NSURL| : a reference to current application’s |NSURL|
property NSColor : a reference to current application’s NSColor
property NSString : a reference to current application’s NSString
property NSImage : a reference to current application’s NSImage
property NSScreen : a reference to current application’s NSScreen
property NSBezierPath : a reference to current application’s NSBezierPath
property NSPNGFileType : a reference to current application’s NSPNGFileType
property NSMutableArray : a reference to current application’s NSMutableArray
property NSBitmapImageRep : a reference to current application’s NSBitmapImageRep

–画像分割ブロックサイズ
property imgDivXStep : 16
property imgDivYStep : 16

script spd
  property outList : {}
end script

set aFile to POSIX path of (choose file with prompt "PNG画像を選択")

–時間計測用
set a1Dat to current application’s NSDate’s timeIntervalSinceReferenceDate()

set aURL to |NSURL|’s fileURLWithPath:aFile
set aImage to NSImage’s alloc()’s initWithContentsOfURL:aURL

set sRes to aImage’s |size|()
–> example: {width:196.0, height:309.0}

set aHeight to height of sRes
set aWidth to width of sRes

set xBlockSize to (aWidth div imgDivXStep)
set yBlockSize to (aHeight div imgDivYStep)

–transparent block sample
set blankImg to makeNSImageWithFilledWithColor(xBlockSize, yBlockSize, current application’s NSColor’s clearColor()) of me
set blankBit to blankImg’s TIFFRepresentation()

set (outList of spd) to {}

repeat with y from 0 to (aHeight – yBlockSize) by yBlockSize
  set oneLine to ""
  
  
repeat with x from 0 to (aWidth – xBlockSize) by xBlockSize
    –crop a part of image and check transparent
    
set tmpImg to (my cropNSImageBy:{x, y, xBlockSize, yBlockSize} fromImage:aImage)
    
set tmpBit to tmpImg’s TIFFRepresentation()
    
set chkTrans to (blankBit’s isEqualToData:tmpBit) as boolean
    
    
if chkTrans = false then –Not transparent block
      set the end of (outList of spd) to {xPos:x, yPos:y}
    end if
  end repeat
  
end repeat

–時間計測用
set b1Dat to current application’s NSDate’s timeIntervalSinceReferenceDate()
set c1Dat to b1Dat – a1Dat
log c1Dat

–最大値、最小値を取得
set nArray to (NSMutableArray’s arrayWithArray:(outList of spd))

set xMin to calcMin("xPos", nArray) of me
set xMax to calcMax("xPos", nArray) of me

set yMin to calcMin("yPos", nArray) of me
set yMax to calcMax("yPos", nArray) of me

–オリジナル画像を切り抜き
set cImage to my cropNSImageTo:{xMin + (xBlockSize / 2), yMin + (yBlockSize / 2), xMax + (xBlockSize / 2), yMax + (yBlockSize / 2)} fromImage:aImage

–ファイル保存
set outPath to POSIX path of (choose file name with prompt "PNG画像の保存ファイル名を指定してください(拡張子入力必須)")
saveImageRepAtPathAsPNG(cImage, outPath) of me

on calcMin(aLabel as string, nArray)
  set aStr to "@min." & aLabel
  
set aRes to nArray’s valueForKeyPath:aStr
  
return aRes as anything
end calcMin

on calcMax(aLabel as string, nArray)
  set aStr to "@max." & aLabel
  
set aRes to nArray’s valueForKeyPath:aStr
  
return aRes as anything
end calcMax

–指定サイズの画像を作成し、指定色で塗ってファイル書き出し
on makeNSImageWithFilledWithColor(aWidth, aHeight, fillColor)
  set retinaF to (NSScreen’s mainScreen()’s backingScaleFactor()) as real
  
–>  2.0 (Retina) / 1.0 (Non Retina)
  
  
set anImage to current application’s NSImage’s alloc()’s initWithSize:(current application’s NSMakeSize(aWidth, aHeight))
  
anImage’s lockFocus()
  
—
  
set theRect to {{x:0, y:0}, {height:aHeight / retinaF, width:aWidth / retinaF}}
  
set theNSBezierPath to current application’s NSBezierPath’s bezierPath
  
theNSBezierPath’s appendBezierPathWithRect:theRect
  
—
  
fillColor’s |set|() –色設定
  
theNSBezierPath’s fill() –ぬりつぶし
  
—
  
anImage’s unlockFocus()
  
—
  
return anImage
end makeNSImageWithFilledWithColor

on cropNSImageTo:{x1, y1, x2, y2} fromImage:theImage
  set newWidth to x2 – x1
  
set newHeight to y2 – y1
  
set theSize to (theImage’s |size|()) as record
  
set oldHeight to height of theSize
  
  
— transpose y value for Cocoa coordintates
  
set y1 to oldHeight – newHeight – y1
  
set newRect to {{x:x1, y:y1}, {width:newWidth, height:newHeight}}
  
  
theImage’s lockFocus()
  
set theRep to NSBitmapImageRep’s alloc()’s initWithFocusedViewRect:newRect
  
theImage’s unlockFocus()
  
  
set outImage to NSImage’s alloc()’s initWithSize:(theRep’s |size|())
  
outImage’s addRepresentation:theRep
  
  
return outImage
end cropNSImageTo:fromImage:

–NSImageを指定の大きさでトリミング
on cropNSImageBy:{x1, y1, newWidth, newHeight} fromImage:theImage
  set theSize to (theImage’s |size|()) as record
  
set oldHeight to height of theSize
  
  
— transpose y value for Cocoa coordintates
  
set y1 to oldHeight – newHeight – y1
  
set newRect to {{x:x1, y:y1}, {width:newWidth, height:newHeight}}
  
  
theImage’s lockFocus()
  
set theRep to NSBitmapImageRep’s alloc()’s initWithFocusedViewRect:newRect
  
theImage’s unlockFocus()
  
  
set outImage to NSImage’s alloc()’s initWithSize:(theRep’s |size|())
  
outImage’s addRepresentation:theRep
  
  
return outImage
end cropNSImageBy:fromImage:

–画像を指定パスにPNG形式で保存
on saveImageRepAtPathAsPNG(anImage, outPath)
  set imageRep to anImage’s TIFFRepresentation()
  
set aRawimg to NSBitmapImageRep’s imageRepWithData:imageRep
  
  
–パスのチルダ展開処理
  
set pathString to NSString’s stringWithString:outPath
  
set newPath to pathString’s stringByExpandingTildeInPath()
  
  
set myNewImageData to (aRawimg’s representationUsingType:(NSPNGFileType) |properties|:(missing value))
  
return (myNewImageData’s writeToFile:newPath atomically:true) as boolean
end saveImageRepAtPathAsPNG

★Click Here to Open This Script 

Posted in Image | Tagged 13.0savvy 14.0savvy 15.0savvy | Leave a comment

新刊電子書籍「AppleScript基礎テクニック(33)選択中のオブジェクト取得」を刊行

Posted on 11月 21, 2024 by Takaaki Naganoya

新刊電子書籍「AppleScript基礎テクニック(33)複数のアプリをコントロール」を刊行しました。全74ページ、サンプルAppleScriptアーカイブつき。
→ 販売ページ

macOS上のGUIアプリの書類やウィンドウ中で選択中のオブジェクトを取得し、その情報をもとにAppleScriptで処理を行なって、もとの選択オブジェクトに反映させるといった処理を、日常的に行っています。

このような書き方ができると、まるでAppleScriptによってGUIアプリの機能を拡張しているようにも見えます。実際には外部で処理を行なっていたとしても、使い勝手としては拡張しているように振る舞えます。

ある意味、AppleScriptの備える最強の機能といってもよいでしょう。本書で、この強力なselection機能について、その概要から実例、注意点にいたるまで幅広くご紹介いたします。

PDF 74ページ、Zipアーカイブ添付

目次

■最初に:macOS 13以降では最初にステージマネージャを必ずオフにしてください

macOS 13.x
macOS 14.x
macOS 15.x
その他、オフにすることが望ましい機能

■アプリ上の選択中のオブジェクトにアクセスする予約語「selection」

GUIアプリ上の選択中のオブジェクトを知る
選択中のオブジェクトは、1つだけじゃない
選択中のオブジェクトを加工することも
選択中のオブジェクトの情報分析

■選択中のオブジェクトの情報をもとに他のアプリで処理

selection系の機能をサポートしているアプリ一覧
selectを含む予約語を持つアプリと予約語①
selectを含む予約語を持つアプリと予約語②
selectを含む予約語を持つアプリと予約語③

■selectionの主な実例

selectionの取得方法①(Finder)
selectionの取得方法②(Finder)
selectionの書き換え①(Finder)
selectionの書き換え②(Finder)
selectionの取得方法③(Finder)

selectionの取得方法(住所録)
selectionの書き換え(住所録)
selectionの書き換え(住所録)

selectionの取得方法①(Keynote)
selectionの取得方法②(Keynote)
selectionの書き換え(Keynote)

selectionの取得方法①(ミュージック)
selectionの取得方法②(ミュージック)
selectionの書き換え(ミュージック)

selectionの取得方法①(CotEditor)
selectionの取得方法②(CotEditor)
selectionの書き換え(CotEditor)

selectionの取得方法①(Numbers)
selectionの取得方法②(Numbers)
active sheetの取得方法(Numbers)
selection rangeの取得方法①(Numbers)
selection rangeの取得方法②(Numbers)
selection rangeのセル内容書き換え①(Numbers)
selection rangeのセル内容書き換え②(Numbers)
selection rangeのセル内容書き換え③(Numbers)

selectionの取得方法①(Excel)
selectionの取得方法②(Excel)
選択中のワークシートの取得方法(Excel)
selectionの書き換え(Excel)

selectionの取得方法(Pixelmator Pro)
select-を含む予約語解説①(Pixelmator Pro)
select-を含む予約語解説②(Pixelmator Pro)
select-を含むコマンド実例①(Pixelmator Pro)
select-を含むコマンド実例②(Pixelmator Pro)
select-を含むコマンド実例③(Pixelmator Pro)
select-を含むコマンド実例④(Pixelmator Pro)
select-を含むコマンド実例⑤(Pixelmator Pro)
select-を含むコマンド実例⑥(Pixelmator Pro)
select-を含むコマンド実例⑦(Pixelmator Pro)
select-を含むコマンド実例⑧(Pixelmator Pro)
select-を含むコマンド実例⑨(Pixelmator Pro)
select-を含むコマンド実例⑩(Pixelmator Pro)
select-を含むコマンド実例⑪(Pixelmator Pro)

■selectionを使用うえで注意すべき点

注意点1:大量のオブジェクトの受け渡しに要注意
注意点2:情報の書き戻し時には時間がかかる例も
注意点3:選択オブジェクトの種別判定を①
注意点3:選択オブジェクトの種別判定を②

Posted in Books news | Tagged 13.0savvy 14.0savvy 15.0savvy Contacts CotEditor Excel Finder Keynote Music Numbers Pixelmator Pro | Leave a comment

新刊電子書籍「AppleScript基礎テクニック(32)複数のアプリをコントロール」を刊行

Posted on 11月 21, 2024 by Takaaki Naganoya

電子書籍新刊「AppleScript基礎テクニック(32)複数のアプリをコントロール」を刊行しました。全370ページ、サンプルAppleScriptアーカイブつき。
→ 販売ページ

1つのAppleScriptで複数のアプリを操作して処理するのは「常識」ですが、複数のアプリをAppleScriptで操作して処理を行うスタイルは割と独特なものだと指摘されました。

複数アプリの操作はとくに特殊な話ではありませんし、それほど難しい話でもありません。日常的にやっていることなので、その原理がわかれば柔軟で多用途なScriptを書いて「業務を積極的に楽にする」手助けとなることでしょう。

PDF 39ページ、Zipアーカイブ添付

目次

最初に:macOS 13以降では最初にステージマネージャを必ずオフにしてください
macOS 13.x
macOS 14.x
macOS 15.x
その他、オフにすることが望ましい機能

■複数アプリのコントロール3つのパターン

複数アプリのコントロール
自動処理フローから見た各アプリの役割
複数アプリ操作パターン①コマンド呼び出し
複数アプリ操作パターン②ファイル入出力
複数アプリ操作パターン③選択箇所を処理

■複数アプリのコントロール処理の具体例

各アプリは他のアプリのオブジェクトを理解できない
他のアプリのオブジェクトを理解するには
オブジェクトの属性値をよく見てみよう①
オブジェクトの属性値をよく見てみよう②
Keynote上のテキストをPages上に再現①
Keynote上のテキストをPages上に再現②
Keynote上のテキストをPages上に再現③
Keynote上のテキストをPages上に再現④

■GUI Scriptingによるコピペではほとんどの処理を実現できません

GUI Scriptingでコピー&ペースト動作?
異なるアプリ間のオブジェクトのテキスト色の反映

■複数アプリのコントロールその具体例

アプリAのデータをもとにアプリBの機能を利用
複数アプリ、機能の操作例①
複数アプリ、機能の操作例②
複数アプリ、機能の操作例②(参考資料)
複数アプリ、機能の操作例③

Posted in Books news | Tagged 13.0savvy 14.0savvy 15.0savvy | Leave a comment

余白トリミング実験 v1

Posted on 11月 21, 2024 by Takaaki Naganoya

背景が透過しているPNG画像で、余計な余白部分を自動でトリミングするAppleScriptの試作品です。


▲テストに利用したPNG画像(196 × 309 ピクセル)

いまのところ、画像を細かく分割して、透明な画像かどうかをブロックごとにチェックするだけです。

画像が真っ白かどうか、透明かどうかといったチェックは、すでに高速処理できるノウハウがあったので、ただそれを応用したものです。

実際にAppleScriptだけで記述して、そこそこの速度が出ています。画像の分割ブロック数が8×8だといまひとつで、16×16でもイマイチ。32 x 32分割ブロックぐらいで「そんなもんだろ」という印象。


▲8×8分割ブロック(0.04秒ぐらい @MacBook Air M2)


▲16×16分割ブロック(0.1秒ぐらい @MacBook Air M2)


▲32×32分割ブロック(0.5秒ぐらい @MacBook Air M2)

当初は可変サイズ分割を考えていましたが、そこまで難しい処理をしなくても良さそうな雰囲気。

何らかの画像処理を行った結果で透明部分が余計に存在するエリアを削除しておくぐらいなので、そんなにシビアにチューニングしなくてもよさそうな気がします。そんなに巨大な画像を処理しなければいいんじゃないでしょうか。

もしも、巨大な画像を処理する場合には、サムネイル画像を作成して、その画像に対してこのような処理を行えばいいんじゃないでしょうか。

このScriptは、背景が透過していることを前提に組んでありますが、画像の4隅から色をピックアップして、多数決で透過なのか白なのかを決定してもいいかもしれません。「余白がかならず存在する」画像であれば、このやり方でいいかも?

AppleScript名:余白トリミング実験 v1.scptd
—
–  Created by: Takaaki Naganoya
–  Created on: 2024/11/21
—
–  Copyright © 2024 Piyomaru Software, All Rights Reserved
—

use AppleScript version "2.8" — macOS 12 or later
use framework "Foundation"
use framework "AppKit"
use scripting additions

property NSData : a reference to current application’s NSData
property |NSURL| : a reference to current application’s |NSURL|
property NSColor : a reference to current application’s NSColor
property NSString : a reference to current application’s NSString
property NSImage : a reference to current application’s NSImage
property NSBezierPath : a reference to current application’s NSBezierPath
property NSPNGFileType : a reference to current application’s NSPNGFileType
property NSBitmapImageRep : a reference to current application’s NSBitmapImageRep

property imgDivXStep : 8
property imgDivYStep : 8

set aFile to POSIX path of (choose file)

set a1Dat to current application’s NSDate’s timeIntervalSinceReferenceDate()

set aURL to |NSURL|’s fileURLWithPath:aFile
set aImage to NSImage’s alloc()’s initWithContentsOfURL:aURL

set sRes to aImage’s |size|()
–> example: {width:196.0, height:309.0}

set aHeight to height of sRes
set aWidth to width of sRes

set xBlockSize to (aWidth div imgDivXStep)
set yBlockSize to (aHeight div imgDivYStep)

–transparent block sample
set blankImg to makeNSImageWithFilledWithColor(xBlockSize, yBlockSize, current application’s NSColor’s clearColor()) of me
set blankBit to blankImg’s TIFFRepresentation()

set outList to ""

repeat with y from 0 to (aHeight – yBlockSize) by yBlockSize
  set oneLine to ""
  
  
repeat with x from 0 to (aWidth – xBlockSize) by xBlockSize
    –crop a part of image and check transparent
    
set tmpImg to (my cropNSImageBy:{x, y, xBlockSize, yBlockSize} fromImage:aImage)
    
set tmpBit to tmpImg’s TIFFRepresentation()
    
set chkTrans to (blankBit’s isEqualToData:tmpBit) as boolean
    
    
if chkTrans = true then
      set oneLine to oneLine & "□" –Transparent Block
    else
      set oneLine to oneLine & "■" –Not transparent Block
    end if
  end repeat
  
  
set outList to outList & oneLine & return
end repeat

set b1Dat to current application’s NSDate’s timeIntervalSinceReferenceDate()
set c1Dat to b1Dat – a1Dat
log c1Dat

return outList

–指定サイズの画像を作成し、指定色で塗ってファイル書き出し
on makeNSImageWithFilledWithColor(aWidth, aHeight, fillColor)
  set anImage to current application’s NSImage’s alloc()’s initWithSize:(current application’s NSMakeSize(aWidth, aHeight))
  
anImage’s lockFocus()
  
—
  
set theRect to {{x:0, y:0}, {height:aHeight, width:aWidth}}
  
set theNSBezierPath to current application’s NSBezierPath’s bezierPath
  
theNSBezierPath’s appendBezierPathWithRect:theRect
  
—
  
fillColor’s |set|() –色設定
  
theNSBezierPath’s fill() –ぬりつぶし
  
—
  
anImage’s unlockFocus()
  
—
  
return anImage
end makeNSImageWithFilledWithColor

on cropNSImageTo:{x1, y1, x2, y2} fromImage:theImage
  set newWidth to x2 – x1
  
set newHeight to y2 – y1
  
set theSize to (theImage’s |size|()) as record
  
set oldHeight to height of theSize
  
  
— transpose y value for Cocoa coordintates
  
set y1 to oldHeight – newHeight – y1
  
set newRect to {{x:x1, y:y1}, {width:newWidth, height:newHeight}}
  
  
theImage’s lockFocus()
  
set theRep to NSBitmapImageRep’s alloc()’s initWithFocusedViewRect:newRect
  
theImage’s unlockFocus()
  
  
set outImage to NSImage’s alloc()’s initWithSize:(theRep’s |size|())
  
outImage’s addRepresentation:theRep
  
  
return outImage
end cropNSImageTo:fromImage:

–NSImageを指定の大きさでトリミング
on cropNSImageBy:{x1, y1, newWidth, newHeight} fromImage:theImage
  set theSize to (theImage’s |size|()) as record
  
set oldHeight to height of theSize
  
  
— transpose y value for Cocoa coordintates
  
set y1 to oldHeight – newHeight – y1
  
set newRect to {{x:x1, y:y1}, {width:newWidth, height:newHeight}}
  
  
theImage’s lockFocus()
  
set theRep to NSBitmapImageRep’s alloc()’s initWithFocusedViewRect:newRect
  
theImage’s unlockFocus()
  
  
set outImage to NSImage’s alloc()’s initWithSize:(theRep’s |size|())
  
outImage’s addRepresentation:theRep
  
  
return outImage
end cropNSImageBy:fromImage:

★Click Here to Open This Script 

Posted in Image | Tagged 13.0savvy 14.0savvy 15.0savvy | Leave a comment

写真.appのバージョン番号、修正される

Posted on 11月 21, 2024 by Takaaki Naganoya

macOS 15.2betaにおいて「写真.app」のバージョン番号が「10.0」ではなく「1.0」になっていた件、本日配信されたmacOS 15.2beta(24C5089c)において「10.0」に修正されていました。


▲修正前


▲修正後

Posted in Bug | Tagged 15.0savvy Photos | Leave a comment

アプリのキーワード登録をチェック

Posted on 11月 21, 2024 by Takaaki Naganoya

アプリケーションフォルダ以下にあるアプリをすべてリストアップして、各アプリに「キーワード」が登録されているかをチェックするAppleScriptです。「キーワード」が設定されているものをPOSIX pathの一覧で返します。

「キーワード」というのは、Finder上で「情報を見る」コマンドで表示させたウィンドウで、「詳細情報」の下に表示される「キーワード」です。

最近、これを登録してあるアプリが出始めてきたので、全体でどの程度の数になっているのか調査すべく、書いてみました。実行には「Metadata Lib」AppleScriptライブラリを必要とします。実行環境はScript Debuggerである必要はありません。普通にスクリプトエディタで大丈夫です。

App Store申請時に記述する検索用キーワードとは異なるようです。他のアプリを検索したときにヒットすることを目的に、「iPhoto」「Aperture」などと指定してあるところが戦略的です。たしかに、Spotlightで「Aperture」をキーワードに検索するとPixelmator Proが出てきます。

AppleScript名:指定フォルダ以下のアプリケーションを取得して、アプリのキーワード登録をチェック.scptd
—
–  Created by: Takaaki Naganoya
–  Created on: 2024/11/21
—
–  Copyright © 2024 Piyomaru Software, All Rights Reserved
—

use AppleScript
use scripting additions
use framework "Foundation"
use framework "AppKit"
use mdLib : script "Metadata Lib" version "2.0.0" –https://macosxautomation.com/applescript/apps/Script_Libs.html

set origPath to {(POSIX path of (path to applications folder))}

set aResList to mdLib’s searchFolders:(origPath) searchString:("kMDItemContentType == %@") searchArgs:{"com.apple.application-bundle"}

set sList to {}

repeat with i in aResList
  set j to contents of i
  
set sRes to retAppKeywordsFromBundleIPath(j) of me
  
if sRes ≠ "" then
    set the end of sList to j
  end if
end repeat

return sList
–> {"/Applications/Pixelmator Pro.app", "/Applications/Dropzone 4.app", "/Applications/Spotify.app", "/Applications/MarsEdit.localized/MarsEdit.app", "/Applications/Keka.app", "/Applications/MindNode.app", "/Applications/NeoFinder.app", "/Applications/Linearity Curve.app", "/Applications/Amazon Kindle.app", "/Applications/PrimeVideo.app"}

–指定パスからアプリケーションの「キーワード」メタデータを取得する
on retAppKeywordsFromBundleIPath(appPath as string)
  set theRecord to mdLib’s fetchMetadataFor:appPath
  
return kMDItemKeywords of theRecord
end retAppKeywordsFromBundleIPath

★Click Here to Open This Script 

Posted in Metadata | Tagged 13.0savvy 14.0savvy 15.0savvy | Leave a comment

KGPixelBoundsClipがmacOS 15で動作しない?

Posted on 11月 19, 2024 by Takaaki Naganoya

画像から透過部分を周囲から切り抜く、KGPixelBoundsClipをCooca Framework化して利用していますが、macOS 15上でこれが動作しないことを確認しました。

このFrameworkをAppleScriptから呼び出せることで、Adobe PhotoshopなどのGUIアプリの併用が必要ないため、応用範囲がものすごく広くなりました。

→ 指定画像の余白の自動トリミング

一般向けに公開していない個人用ツールで、本フレームワークを利用しまくっていました。

しかし、macOS 15+MacBook Air M2(Retina Display)の環境では以前のように動作しません(Universal Binaryビルドずみ)。

本プログラムの動作原理はおそろしく簡単です。

周囲から1ピクセルずつ色を拾って、透明色が続く矩形エリアを検出します。CとかObjective-Cだとパフォーマンスを確保しやすい処理内容ですが(脳筋プログラミング)、インタプリタ型のAppleScriptだとこういう脳筋な処理内容だと著しく不利になります。

目下、

(1)かわりの部品をオープンソースのプロジェクトからみつくろう
(2)その後、OS内で類似の機能が追加されていないか調査する
(3)もう、あとくされないようにAppleScriptで書き換える

といった対処を検討中です。

(1)については、Image+Trim.swiftといったSwiftで書かれたプログラムが見つかっています。AppleScriptから呼び出すためには、Bridging Headerを書く必要があるので、ひたすらダルいです。

(2)については、たぶん実装されていないんでないかと(未調査)

(3)については、1ピクセルずつチェックするのでなければ作れそうです。画像の外周部を画像のサイズから計算して細分化したブロックに分割、このブロックごとに透明かどうかをチェックし、ある程度まとめて処理することで速度を稼げそうな気がします。

あとは、最初にサムネイル画像を作ってしまって、その小さくした画像で外周部から色をピックアップしていくという手段もあります。いくつかの方法を試してどれが一番速いかを調べておく必要がありそうです。

Posted in Image | Tagged 15.0savvy KGPixelBoundsClip | Leave a comment

(確認中)AppleScript Dropletのバグっぽい動作が解消?

Posted on 11月 18, 2024 by Takaaki Naganoya

macOS 10.12で導入されたセキュリティ系の機能によって、AppleScriptドロップレットの動作が妨げられる現象が確認されてきました。

ドロップしたファイルが数回に分かれてon openハンドラに渡されたり、ドラッグ&ドロップしたファイルすべてがドロップレット側に認識されなかったりするという動作です。

これは、Gatekeeperの動作とquarantine機能(もたらされたファイルが安全かどうか確認されるまでプログラム側に引き渡されない仕組み)の相互作用によるもの、という話になっていますが……認証のためのインタフェースが用意されておらず、ユーザー側から見れば「説明もなしに動かなくなった」という状態でした。

macOS 10.12、10.13、10.14、10.15、11、12、13、14とずーーっとそのままです。レポートしても修正されず、Scripter側でも対策コードを共有するほかなく、この素朴な機能は問題を抱えたままになっていました。

一応、Shane Stanleyによる対策コードによってドロップレットが運用できていたのと、display drop dialogなどの他のドラッグ&ドロップのためのインタフェースを用意できていたのと、もともと個人的にはドロップレットが性に合わなかった(Finder上の選択中のファイルを取得したほうが事故が起こらなくて簡単)ため、対策はできていました。

ただ、初心者にこの状態をどう説明するの? Apple側で説明する気は一切ありません。完全にバグであり、不具合としかユーザーには映りません。

macOS 15betaでも問題が解決されていなかったので、この問題は放置状態のまま解決されないものとばかり思っていました。

それが、macOS 15.2betaか15.1あたりで解消されたようで(バグが出ても直してもレポートを出さないのがApple風味)、確認してみると13.7.2でもドロップしたファイルを見失うといった動作をしなくなった……ような気がします。

macOS 13/14/15と現行のmacOSに対しては同様のアップデートが行われたのではないでしょうか。

まだ確認が不十分だと感じるのと、どうせmacOSのマイナーアップデートでまた使えなくなったりするんだろうというところです。

一方で、Cocoa AppleScript AppletについてはmacOS 12.6以降ずっと動作しない状況が続いています。こちらもレポートしても一切の反応がない状態です。直す気があるのであればいいのですが、その気がないのならスクリプトエディタのテンプレートから削除するといった処置が必要(試してみて動かないというのが最悪)でしょう。

Posted in Droplet | Tagged 13.0savvy 14.0savvy 15.0savvy | 1 Comment

最前面のKeynote書類で選択中のshapeを一番上のガイドオブジェクトの幅をもとに、残りを等分割

Posted on 11月 15, 2024 by Takaaki Naganoya

Keynote書類上で複数Shapeないしtext itemが選択された状態で、一番上にあるitemの幅に、下にあるitemを等分割+位置合わせを行うAppleScriptです。

言葉で言い表すと難しいのですが、画面キャプチャで表現すると一目瞭然です。


▲処理前、4つのshapeオブジェクトを選択状態に


▲処理後、上側のshapeの幅で下のshapeを等分割+ギャップ指定

電子書籍作成時によく行う作業をワンアクションで行えるようにしてみました。

2D ListのソートはVanilla AppleScriptで書かれたものを使っていますが、これはソートする対象のデータが極小なのと、本ScriptをmacOS標準搭載のScript Menuから呼び出すために作ったためです。

2D Listのソートを行うためだけに、BridgePlusを使用=Script DebuggerでEnhanced Appletに書き出す必要があるというのは面倒なので。

AppleScript名:最前面のKeynote書類で選択中のshapeを一番上のガイドオブジェクトの幅をもとに、残りを等分割
—
–  Created by: Takaaki Naganoya
–  Created on: 2024/11/15
—
–  Copyright © 2024 Piyomaru Software, All Rights Reserved
—

use AppleScript version "2.4" — Yosemite (10.10) or later
use framework "Foundation"
use scripting additions

property xGap : 8 –X軸方向のオブジェクトの隙間座標値

tell application "Keynote"
  tell front document
    set aSel to selection
    
if aSel = {} then return
    
set fClass to class of first item of aSel
    
if fClass = slide then return –スライド上のオブジェクトではなく、スライドが選択されていた場合には処理しない
    
    
set objList to {}
    
set posList to {}
    
set aCount to 1
    
    
repeat with i in aSel
      set j to contents of i
      
set tmpClass to class of j
      
      
–条件に合うオブジェクトのみ処理対象に
      
if tmpClass is in {text item, shape} then
        set the end of objList to j
        
set the end of posList to ((position of j) & (width of j) & aCount)
        
        
set aCount to aCount + 1
      end if
    end repeat


set newPosList to shellSortListAscending(posList, 2) of sortLib –Y軸値をもとにソート
    
set guideObj to first item of newPosList –Y軸座標が一番少ない(上)のものをガイドオブジェクトとしてみなす
    
    
set newPosList to shellSortListAscending(rest of newPosList, 1) of sortLib –ガイドオブジェクト以外のオブジェクト座標値をX軸値でソート
    
set guideWidth to contents of item 3 of guideObj
    
    
set xStartPos to item 1 of item 1 of newPosList
    
set yPos to item 2 of item 1 of newPosList
    
set itemsCount to length of newPosList
    
    
set itemWidth to (guideWidth – (xGap * (itemsCount – 1))) / itemsCount
    
    
–下側オブジェクトの位置と幅修正処理
    
copy xStartPos to x
    
repeat with i from 1 to itemsCount
      
      
set y to item 2 of (item i of newPosList)
      
      
set targObj to item (item 4 of (item i of newPosList)) of objList
      
      
tell targObj
        set position of it to {x, y}
        
set width of it to itemWidth
      end tell
      
      
set x to x + itemWidth + (xGap)
      
    end repeat
  end tell
end tell

–Vanilla AppleScriptで書いた2D ListのSorting Lib
script sortLib
  –シェルソートで入れ子のリストを昇順ソート
  
on shellSortListAscending(aSortList, aKeyItem)
    script oBj
      property list : aSortList
    end script
    
set len to count oBj’s list’s items
    
set gap to 1
    
repeat while (gap ≤ len)
      set gap to ((gap * 3) + 1)
    end repeat
    
repeat while (gap > 0)
      set gap to (gap div 3)
      
if (gap < len) then
        repeat with i from gap to (len – 1)
          set temp to oBj’s list’s item (i + 1)
          
set j to i
          
repeat while ((j ≥ gap) and (contents of item aKeyItem of (oBj’s list’s item (j – gap + 1)) > item aKeyItem of temp))
            set oBj’s list’s item (j + 1) to oBj’s list’s item (j – gap + 1)
            
set j to j – gap
          end repeat
          
set oBj’s list’s item (j + 1) to temp
        end repeat
      end if
    end repeat
    
return oBj’s list
  end shellSortListAscending


–シェルソートで入れ子のリストを降順ソート
  
on shellSortListDescending(aSortList, aKeyItem)
    script oBj
      property list : aSortList
    end script
    
set len to count oBj’s list’s items
    
set gap to 1
    
repeat while (gap ≤ len)
      set gap to ((gap * 3) + 1)
    end repeat
    
repeat while (gap > 0)
      set gap to (gap div 3)
      
if (gap < len) then
        repeat with i from gap to (len – 1)
          set temp to oBj’s list’s item (i + 1)
          
set j to i
          
repeat while ((j ≥ gap) and (contents of item aKeyItem of (oBj’s list’s item (j – gap + 1)) < item aKeyItem of temp))
            set oBj’s list’s item (j + 1) to oBj’s list’s item (j – gap + 1)
            
set j to j – gap
          end repeat
          
set oBj’s list’s item (j + 1) to temp
        end repeat
      end if
    end repeat
    
return oBj’s list
  end shellSortListDescending
end script

★Click Here to Open This Script 

Posted in Object control | Tagged 13.0savvy 14.0savvy 15.0savvy Keynote | Leave a comment

Post navigation

  • Older posts
  • Newer posts

電子書籍(PDF)をオンラインストアで販売中!

Google Search

Popular posts

  • 開発機としてM2 Mac miniが来たのでガチレビュー
  • macOS 15, Sequoia
  • 指定のWordファイルをPDFに書き出す
  • Pages本執筆中に、2つの書類モード切り替えに気がついた
  • Numbersで選択範囲のセルの前後の空白を削除
  • メキシカンハットの描画
  • Pixelmator Pro v3.6.4でAppleScriptからの操作時の挙動に違和感が
  • AdobeがInDesign v19.4からPOSIX pathを採用
  • AppleScriptによる並列処理
  • Safariで「プロファイル」機能を使うとAppleScriptの処理に影響
  • Cocoa Scripting Course 続刊計画
  • macOS 14.xでScript Menuの実行速度が大幅に下がるバグ
  • AppleScript入門③AppleScriptを使った「自動化」とは?
  • Keynote/Pagesで選択中の表カラムの幅を均等割
  • デフォルトインストールされたフォント名を取得するAppleScript
  • macOS 15 リモートApple Eventsにバグ?
  • Keynote、Pages、Numbers Ver.14.0が登場
  • macOS 15でも変化したText to Speech環境
  • AppleScript入門① AppleScriptってなんだろう?
  • Numbersで最前面の書類のすべてのシート上の表の行数を合計

Tags

10.11savvy (1101) 10.12savvy (1242) 10.13savvy (1391) 10.14savvy (587) 10.15savvy (438) 11.0savvy (283) 12.0savvy (212) 13.0savvy (194) 14.0savvy (147) 15.0savvy (132) CotEditor (66) Finder (51) iTunes (19) Keynote (117) NSAlert (61) NSArray (51) NSBitmapImageRep (20) NSBundle (20) NSButton (34) NSColor (53) NSDictionary (28) NSFileManager (23) NSFont (21) NSImage (41) NSJSONSerialization (21) NSMutableArray (63) NSMutableDictionary (22) NSPredicate (36) NSRunningApplication (56) NSScreen (30) NSScrollView (22) NSString (119) NSURL (98) NSURLRequest (23) NSUTF8StringEncoding (30) NSView (33) NSWorkspace (20) Numbers (76) Pages (55) Safari (44) Script Editor (27) WKUserContentController (21) WKUserScript (20) WKWebView (23) WKWebViewConfiguration (22)

カテゴリー

  • 2D Bin Packing
  • 3D
  • AirDrop
  • AirPlay
  • Animation
  • AppleScript Application on Xcode
  • Beginner
  • Benchmark
  • beta
  • Bluetooth
  • Books
  • boolean
  • bounds
  • Bug
  • Calendar
  • call by reference
  • check sum
  • Clipboard
  • Cocoa-AppleScript Applet
  • Code Sign
  • Color
  • Custom Class
  • date
  • dialog
  • diff
  • drive
  • Droplet
  • exif
  • file
  • File path
  • filter
  • folder
  • Font
  • Font
  • GAME
  • geolocation
  • GUI
  • GUI Scripting
  • Hex
  • History
  • How To
  • iCloud
  • Icon
  • Image
  • Input Method
  • Internet
  • iOS App
  • JavaScript
  • JSON
  • JXA
  • Keychain
  • Keychain
  • Language
  • Library
  • list
  • Locale
  • Localize
  • Machine Learning
  • Map
  • Markdown
  • Menu
  • Metadata
  • MIDI
  • MIME
  • Natural Language Processing
  • Network
  • news
  • Noification
  • Notarization
  • Number
  • Object control
  • OCR
  • OSA
  • parallel processing
  • PDF
  • Peripheral
  • PRODUCTS
  • QR Code
  • Raw AppleEvent Code
  • Record
  • rectangle
  • recursive call
  • regexp
  • Release
  • Remote Control
  • Require Control-Command-R to run
  • REST API
  • Review
  • RTF
  • Sandbox
  • Screen Saver
  • Script Libraries
  • sdef
  • search
  • Security
  • selection
  • shell script
  • Shortcuts Workflow
  • Sort
  • Sound
  • Spellchecker
  • Spotlight
  • SVG
  • System
  • Tag
  • Telephony
  • Text
  • Text to Speech
  • timezone
  • Tools
  • Update
  • URL
  • UTI
  • Web Contents Control
  • WiFi
  • XML
  • XML-RPC
  • イベント(Event)
  • 未分類

アーカイブ

  • 2025年5月
  • 2025年4月
  • 2025年3月
  • 2025年2月
  • 2025年1月
  • 2024年12月
  • 2024年11月
  • 2024年10月
  • 2024年9月
  • 2024年8月
  • 2024年7月
  • 2024年6月
  • 2024年5月
  • 2024年4月
  • 2024年3月
  • 2024年2月
  • 2024年1月
  • 2023年12月
  • 2023年11月
  • 2023年10月
  • 2023年9月
  • 2023年8月
  • 2023年7月
  • 2023年6月
  • 2023年5月
  • 2023年4月
  • 2023年3月
  • 2023年2月
  • 2023年1月
  • 2022年12月
  • 2022年11月
  • 2022年10月
  • 2022年9月
  • 2022年8月
  • 2022年7月
  • 2022年6月
  • 2022年5月
  • 2022年4月
  • 2022年3月
  • 2022年2月
  • 2022年1月
  • 2021年12月
  • 2021年11月
  • 2021年10月
  • 2021年9月
  • 2021年8月
  • 2021年7月
  • 2021年6月
  • 2021年5月
  • 2021年4月
  • 2021年3月
  • 2021年2月
  • 2021年1月
  • 2020年12月
  • 2020年11月
  • 2020年10月
  • 2020年9月
  • 2020年8月
  • 2020年7月
  • 2020年6月
  • 2020年5月
  • 2020年4月
  • 2020年3月
  • 2020年2月
  • 2020年1月
  • 2019年12月
  • 2019年11月
  • 2019年10月
  • 2019年9月
  • 2019年8月
  • 2019年7月
  • 2019年6月
  • 2019年5月
  • 2019年4月
  • 2019年3月
  • 2019年2月
  • 2019年1月
  • 2018年12月
  • 2018年11月
  • 2018年10月
  • 2018年9月
  • 2018年8月
  • 2018年7月
  • 2018年6月
  • 2018年5月
  • 2018年4月
  • 2018年3月
  • 2018年2月

https://piyomarusoft.booth.pm/items/301502

メタ情報

  • ログイン
  • 投稿フィード
  • コメントフィード
  • WordPress.org

Forum Posts

  • 人気のトピック
  • 返信がないトピック

メタ情報

  • ログイン
  • 投稿フィード
  • コメントフィード
  • WordPress.org
Proudly powered by WordPress
Theme: Flint by Star Verte LLC