| AppleScript名:AVCapture Deviceの情報を取得する |
| — Created 2017-10-24 by Takaaki Naganoya — 2017 Piyomaru Software use AppleScript version "2.4" use scripting additions use framework "Foundation" use framework "AVFoundation" –https://github.com/pombredanne/osx_headers/blob/master/Frameworks/AVFoundation/AVCaptureHALDevice.h set inputDevs to current application’s AVCaptureDevice’s devices() set a1Res to (inputDevs’s valueForKeyPath:"manufacturer") as list –> {"ma++ ingalls for Cycling ’74", "Shape Services", "Apple Inc.", "Shape Services", "ma++ ingalls for Cycling ’74", "Allocinit.com", "Allocinit.com", "Apple Inc."} set a2Res to (inputDevs’s valueForKeyPath:"localizedName") as list –> {"Soundflower (64ch)", "Mobiola Headphone", "内蔵マイク", "Mobiola Microphone", "Soundflower (2ch)", "CamTwist", "CamTwist (2VUY)", "FaceTime HDカメラ(内蔵)"} set a3Res to (inputDevs’s valueForKeyPath:"isConnected") as list –> {1, 1, 1, 1, 1, 1, 1, 1} set a4Res to (inputDevs’s valueForKeyPath:"activeFormat") as list –> {(AVCaptureDeviceFormat) <AVCaptureDeviceFormat: 0x610000605a30> ’soun’/’lpcm’ SR=44100,FF=30,BPP=256,FPP=1,BPF=256,CH=64,BPC=32, (AVCaptureDeviceFormat) <AVCaptureDeviceFormat: 0x618000407a90> ’soun’/’lpcm’ SR=48000,FF=30,BPP=4,FPP=1,BPF=4,CH=1,BPC=32, (AVCaptureDeviceFormat) <AVCaptureDeviceFormat: 0x608000c171f0> ’soun’/’lpcm’ SR=44100,FF=4,BPP=8,FPP=1,BPF=8,CH=2,BPC=24, (AVCaptureDeviceFormat) <AVCaptureDeviceFormat: 0x600000c0ba40> ’soun’/’lpcm’ SR=48000,FF=30,BPP=4,FPP=1,BPF=4,CH=1,BPC=32, (AVCaptureDeviceFormat) <AVCaptureDeviceFormat: 0x610000606310> ’soun’/’lpcm’ SR=44100,FF=30,BPP=8,FPP=1,BPF=8,CH=2,BPC=32, (AVCaptureDeviceFormat) <AVCaptureDeviceFormat: 0x618000a07010> ’vide’/’BGRA’ enc dims = 720×480, pres dims = 720×480 { 30.00 fps }, (AVCaptureDeviceFormat) <AVCaptureDeviceFormat: 0x608000a15070> ’vide’/’2vuy’ enc dims = 720×480, pres dims = 720×480 { 30.00 fps }, (AVCaptureDeviceFormat) <AVCaptureDeviceFormat: 0x610000605bb0> ’vide’/’2vuy’ enc dims = 160×120, pres dims = 160×120 { 29.97 25.00 24.00 15.00 fps }} set a5Res to (inputDevs’s valueForKeyPath:"transportType") as list –> {0, 0, 1.651274862E+9, 0, 0, 1.651274862E+9, 1.651274862E+9, 1.651274862E+9} set a6Res to (inputDevs’s valueForKeyPath:"modelID") as list –> {"com_cycling74_driver_SoundflowerDevice:Soundflower", "com_ShapeServices_driver_HSAudioDevice:Headset Audio Device", "AppleHDA:40", "com_ShapeServices_driver_HSAudioDevice:Headset Audio Device", "com_cycling74_driver_SoundflowerDevice:Soundflower", "Stiltskin", "Stiltskin", "UVC Camera VendorID_1452 ProductID_34064"} set a7Res to (inputDevs’s valueForKeyPath:"formats") as list –> {{(AVCaptureDeviceFormat) <AVCaptureDeviceFormat: 0x610000606240> ’soun’/’lpcm’ SR=192000,FF=30,BPP=256,FPP=1,BPF=256,CH=64,BPC=32, (AVCaptureDeviceFormat) <AVCaptureDeviceFormat: 0x610000605d30> ’soun’/’lpcm’ SR=176400,FF=30,BPP=256,FPP=1,BPF=256,CH=64,BPC=32, (AVCaptureDeviceFormat) <AVCaptureDeviceFormat: 0x610000605020> ’soun’/’lpcm’ SR=96000,FF=30,BPP=256,FPP=1,BPF=256,CH=64,BPC=32, (AVCaptureDeviceFormat) <AVCaptureDeviceFormat: 0x610000605a90> ’soun’/’lpcm’ SR=88200,FF=30,BPP=256,FPP=1,BPF=256,CH=64,BPC=32, (AVCaptureDeviceFormat) <AVCaptureDeviceFormat: 0x610000601b70> ’soun’/’lpcm’ SR=48000,FF=30,BPP=256,FPP=1,BPF=256,CH=64,BPC=32, (AVCaptureDeviceFormat) <AVCaptureDeviceFormat: 0x610000605a30> ’soun’/’lpcm’ SR=44100,FF=30,BPP=256,FPP=1,BPF=256,CH=64,BPC=32}, set a8Res to (inputDevs’s valueForKeyPath:"connectionID") as list –> {65, 40, 200, 47, 54, 33, 36, 39} set a9Res to (inputDevs’s valueForKeyPath:"connectionUnitComponentSubType") –> (NSArray) {1751215136, 1751215136, 1751215136, 1751215136, 1751215136, 1684106272, 1684106272, 1684106272} set a10Res to (inputDevs’s valueForKeyPath:"deviceID") as list –> {65, 40, 200, 47, 54, 33, 36, 39} set a11Res to (inputDevs’s valueForKeyPath:"deviceSystem") as list –> {2, 2, 2, 2, 2, 1, 1, 1} set a12Res to (inputDevs’s valueForKeyPath:"isInUseByAnotherApplication") as list –> {0, 0, 0, 0, 0, 0, 0, 0} set a13Res to (inputDevs’s valueForKeyPath:"activeInputSource") as list –> {missing value, missing value, (AVCaptureDeviceInputSource) <AVCaptureDeviceInputSource: 0x610000606290 ’imic’ "内蔵マイク">, missing value, missing value, missing value, missing value, missing value} set a14Res to (inputDevs’s valueForKeyPath:"uniqueID") as list –> {"SoundflowerEngine:1", "HSAudioPipeEngine:0", "AppleHDAEngineInput:1B,0,1,0:1", "HSAudioPipeEngine:1", "SoundflowerEngine:0", "CDC85FD0-E73A-4FC2-B3A8-EA237D6990E0", "CDC85FD0-E73A-4FC2-B3A8-EA237D6990E1", "0x1a11000005ac8510"} set a15Res to (inputDevs’s valueForKeyPath:"inputSources") as list –> {{}, {}, {(AVCaptureDeviceInputSource) <AVCaptureDeviceInputSource: 0x610000606290 ’imic’ "内蔵マイク">}, {}, {}, {}, {}, {}} set a16Res to (inputDevs’s valueForKeyPath:"description") as list –> {"<AVCaptureHALDevice: 0x6180002f6d80 [Soundflower (64ch)][SoundflowerEngine:1]>", "<AVCaptureHALDevice: 0x6000002fba00 [Mobiola Headphone][HSAudioPipeEngine:0]>", "<AVCaptureHALDevice: 0x6180002fbe80 [内蔵マイク][AppleHDAEngineInput:1B,0,1,0:1]>", "<AVCaptureHALDevice: 0x6180002e8900 [Mobiola Microphone][HSAudioPipeEngine:1]>", "<AVCaptureHALDevice: 0x6100004f2c00 [Soundflower (2ch)][SoundflowerEngine:0]>", "<AVCaptureDALDevice: 0x7f804e6bae00 [CamTwist][CDC85FD0-E73A-4FC2-B3A8-EA237D6990E0]>", "<AVCaptureDALDevice: 0x7f804e5a3fa0 [CamTwist (2VUY)][CDC85FD0-E73A-4FC2-B3A8-EA237D6990E1]>", "<AVCaptureDALDevice: 0x7f804e5a24c0 [FaceTime HDカメラ(内蔵)][0x1a11000005ac8510]>"} |
月: 2018年4月
画像+文字作成テスト_v4
指定サイズの画像に対して指定の文字を描画して指定ファイル名のPNG画像を書き出すAppleScriptです。

| AppleScript名:画像+文字作成テスト_v4 |
| — Created 2015-07-31 by Takaaki Naganoya — Modified 2015-08-01 by Shane Stanley — Modified 2017-11-19 by Takaaki Naganoya / macOS 10.13のバグに対応 use AppleScript version "2.4" use scripting additions use framework "Foundation" use framework "AppKit" set aWidth to 400.0 –幅 set aHeight to 200.0 –高さ set outPath to "~/Desktop/test.png" –書き出し先のファイルパス set fillColor to current application’s NSColor’s blackColor –塗り色 set drawColor to current application’s NSColor’s whiteColor –文字色 set aText to "ぴよまるソフトウェア" set {xPos, yPos} to {1, 5} –新規画像を作成して背景を塗る set anImage to makeImageWithFilledColor(aWidth, aHeight, outPath, fillColor) of me –画像に文字を塗る(参照渡し(call by reference)で、結果はaImage1に入る) drawStringsOnImage(anImage, aText, "HiraKakuStd-W8", 36.0, drawColor, xPos, yPos) of me –ファイル保存 set aRes to saveImageRepAtPathAsPNG(anImage, outPath) of me –画像のうえに指定の文字を描画して画像を返す on drawStringsOnImage(anImage, aText, aFontName, aPoint, drawColor) set retinaF to (current application’s NSScreen’s mainScreen()’s backingScaleFactor()) as real –> 2.0 (Retina) / 1.0 (Non Retina) set aString to current application’s NSString’s stringWithString:aText set aDict to current application’s NSDictionary’s dictionaryWithObjects:{current application’s NSFont’s fontWithName:aFontName |size|:aPoint, drawColor} forKeys:{current application’s NSFontAttributeName, current application’s NSForegroundColorAttributeName} set imageSize to anImage’s |size|() set textSize to aString’s sizeWithAttributes:aDict set xPos to ((width of imageSize) – (width of textSize)) / 2 / retinaF set yPos to ((height of imageSize) – (height of textSize)) / 2 / retinaF –文字描画開始 anImage’s lockFocus() aString’s drawAtPoint:(current application’s NSMakePoint(xPos, yPos)) withAttributes:aDict anImage’s unlockFocus() end drawStringsOnImage –指定サイズの画像を作成し、背景を指定色で塗る on makeImageWithFilledColor(aWidth, aHeight, outPath, fillColor) set anImage to current application’s NSImage’s alloc()’s initWithSize:(current application’s NSMakeSize(aWidth, aHeight)) –描画開始 anImage’s lockFocus() set theRect to {{x:0, y:0}, {width:aWidth, height:aHeight}} set theNSBezierPath to current application’s NSBezierPath’s bezierPath theNSBezierPath’s appendBezierPathWithRect:theRect fillColor’s |set|() –色設定 theNSBezierPath’s fill() –ぬりつぶし anImage’s unlockFocus() –描画ここまで return anImage –画像を返す end makeImageWithFilledColor –画像を指定パスにPNG形式で保存 on saveImageRepAtPathAsPNG(anImage, outPath) set imageRep to anImage’s TIFFRepresentation() set aRawimg to current application’s NSBitmapImageRep’s imageRepWithData:imageRep –書き出しファイルパス情報を作成 set pathString to current application’s NSString’s stringWithString:outPath set newPath to pathString’s stringByExpandingTildeInPath() –書き出し set myNewImageData to (aRawimg’s representationUsingType:(current application’s NSPNGFileType) |properties|:(missing value)) set aRes to (myNewImageData’s writeToFile:newPath atomically:true) as boolean return aRes –成功ならtrue、失敗ならfalseが返る end saveImageRepAtPathAsPNG |
DSCaptureで画面キャプチャ
shellのscreencaptureコマンドを使わずにフレームワーク経由で画面キャプチャを行うAppleScriptです。
オープンソースのDSCaptureを利用しており、キャプチャ内容をファイルではなくNSImageに格納できる(メモリ上に、ファイルI/Oを経由せずに取得できる)ので、割と使い手があります。とくに、ファイルI/Oに対してはセキュリティ機能による制約が多いために、メモリ上で処理できることのメリットははかりしれません。
本サンプルScriptでは、動作確認のためにキャプチャ内容をファイルに保存していますが、本来このFrameworkの性格からいえばファイル保存するのは「特徴」を台無しにしています。キャプチャしたイメージ(NSImage)をメモリ上で加工するのに向いています。
–> Download DSCapture.framework (To ~/Library/Frameworks/)
| AppleScript名:DSCaptureで画面キャプチャ |
| — Created 2017-01-16 by Takaaki Naganoya — 2017 Piyomaru Software use AppleScript version "2.4" use scripting additions use framework "Foundation" use framework "DSCapture" –https://github.com/kiding/DSCapture.framework use framework "AppKit" –Full Screen (Every Display) set aCapt to current application’s DSCapture’s sharedCapture()’s |full|()’s captureWithTarget:me selector:"displayCaptureData:" useCG:false –Selected Area (Selected Area Only by user operation) –set bCapt to current application’s DSCapture’s sharedCapture()’s |selection|()’s captureWithTarget:me selector:"displayCaptureData:" useCG:false –Delegate Handler on displayCaptureData:aSender set aCount to aSender’s |count|() repeat with i from 0 to (aCount – 1) set anImage to (aSender’s imageAtIndex:i) –Make Save Image Path set aDesktopPath to ((current application’s NSProcessInfo’s processInfo()’s environment()’s objectForKey:("HOME"))’s stringByAppendingString:"/Desktop/") set savePath to (aDesktopPath’s stringByAppendingString:((current application’s NSUUID’s UUID()’s UUIDString())’s stringByAppendingString:".png")) saveNSImageAtPathAsPNG(anImage, savePath) of me end repeat end displayCaptureData: –NSImageを指定パスにPNG形式で保存 on saveNSImageAtPathAsPNG(anImage, outPath) set imageRep to anImage’s TIFFRepresentation() set aRawimg to current application’s NSBitmapImageRep’s imageRepWithData:imageRep set pathString to current application’s NSString’s stringWithString:outPath set newPath to pathString’s stringByExpandingTildeInPath() set myNewImageData to (aRawimg’s representationUsingType:(current application’s NSPNGFileType) |properties|:(missing value)) set aRes to (myNewImageData’s writeToFile:newPath atomically:true) as boolean return aRes –成功ならtrue、失敗ならfalseが返る end saveNSImageAtPathAsPNG |
Finder上で選択中の画像を横方向に連結 v4
Finder上で選択中の画像ファイルを横方向に連結して結果をデスクトップ上に出力するAppleScriptです。
Shane Stanleyから「macOS 10.13で動かないよ」とツッコミが入ってmacOS 10.13に対応するよう書き換えたものです。


| AppleScript名:Finder上で選択中の画像を横方向に連結 v4 |
| — Created 2017-11-21 by Takaaki Naganoya — Modified 2018-04-06 by Takaaki Naganoya — 2018 Piyomaru Software use AppleScript version "2.5" — El Capitan (10.11) or later use framework "Foundation" use framework "QuartzCore" use framework "AppKit" use scripting additions property |NSURL| : a reference to current application’s |NSURL| property NSUUID : a reference to current application’s NSUUID property NSArray : a reference to current application’s NSArray property NSString : a reference to current application’s NSString property NSImage : a reference to current application’s NSImage property NSWorkspace : a reference to current application’s NSWorkspace property NSPNGFileType : a reference to current application’s NSPNGFileType property NSMutableArray : a reference to current application’s NSMutableArray property NSBitmapImageRep : a reference to current application’s NSBitmapImageRep property NSURLTypeIdentifierKey : a reference to current application’s NSURLTypeIdentifierKey property xGap : 10 –連結時の画像間のアキ(横方向) tell application "Finder" set aSel to selection as alias list if aSel = {} or aSel = "" then return end tell –選択した画像をArrayに入れる set imgList to NSMutableArray’s new() repeat with i in aSel set aPath to POSIX path of i set imgRes to (my isImageAtPath:aPath) if imgRes as boolean = true then set aNSImage to (NSImage’s alloc()’s initWithContentsOfFile:aPath) (imgList’s addObject:aNSImage) end if end repeat –KVCで画像の各種情報をまとめて取得 set sizeList to (imgList’s valueForKeyPath:"size") as list –NSSize to list of record conversion set maxHeight to ((NSArray’s arrayWithArray:sizeList)’s valueForKeyPath:"@max.height") as real set totalWidth to ((NSArray’s arrayWithArray:sizeList)’s valueForKeyPath:"@sum.width") as real set totalCount to ((NSArray’s arrayWithArray:sizeList)’s valueForKeyPath:"@count") as integer –出力画像作成 set tSize to current application’s NSMakeSize((totalWidth + (xGap * totalCount)), maxHeight) set newImage to NSImage’s alloc()’s initWithSize:tSize –順次画像を新規画像に上書き set xOrig to 0 repeat with i in (imgList as list) set j to contents of i set curSize to j’s |size|() set aRect to {xOrig, (maxHeight – (curSize’s height())), (curSize’s width()), (curSize’s height())} set newImage to composeImage(newImage, j, aRect) of me set xOrig to xOrig + (curSize’s width()) + xGap end repeat –デスクトップにPNG形式でNSImageをファイル保存 set aDesktopPath to current application’s NSHomeDirectory()’s stringByAppendingString:"/Desktop/" set savePath to aDesktopPath’s stringByAppendingString:((NSUUID’s UUID()’s UUIDString())’s stringByAppendingString:".png") set fRes to saveNSImageAtPathAsPNG(newImage, savePath) of me –2つのNSImageを重ね合わせ合成してNSImageで返す on composeImage(backImage, composeImage, aTargerRect) set newImage to NSImage’s alloc()’s initWithSize:(backImage’s |size|()) copy aTargerRect to {x1, y1, x2, y2} newImage’s lockFocus() set v2 to system attribute "sys2" if v2 ≤ 12 then –To macOS 10.12.x set bRect to current application’s NSMakeRect(x1, y1, x2, y2) set newImageRect to current application’s CGRectZero set newImageRect’s |size| to (newImage’s |size|) else –macOS 10.13 or later set bRect to {{x1, y1}, {x2, y2}} set newImageRect to {{0, 0}, (newImage’s |size|)} end if backImage’s drawInRect:newImageRect composeImage’s drawInRect:bRect newImage’s unlockFocus() return newImage end composeImage –NSImageを指定パスにPNG形式で保存 on saveNSImageAtPathAsPNG(anImage, outPath) set imageRep to anImage’s TIFFRepresentation() set aRawimg to NSBitmapImageRep’s imageRepWithData:imageRep set pathString to NSString’s stringWithString:outPath set newPath to pathString’s stringByExpandingTildeInPath() set myNewImageData to (aRawimg’s representationUsingType:(NSPNGFileType) |properties|:(missing value)) set aRes to (myNewImageData’s writeToFile:newPath atomically:true) as boolean return aRes –成功ならtrue、失敗ならfalseが返る end saveNSImageAtPathAsPNG –指定のパスのファイルが画像かどうかをチェック on isImageAtPath:aPath set aURL to |NSURL|’s fileURLWithPath:aPath set {theResult, theValue} to aURL’s getResourceValue:(reference) forKey:NSURLTypeIdentifierKey |error|:(missing value) return (NSImage’s imageTypes()’s containsObject:theValue) as boolean end isImageAtPath: |
画像の指定エリアを塗りつぶしで縦棒グラフを作成 v4
指定データをもとに縦棒グラフの画像をデスクトップフォルダ上に作成するAppleScriptです。
グラフの画像を作ろうとしたら、Keynote上で作成して画像書き出しするとかExcel上でグラフを作成して画像書き出しすることを考えますが、アプリケーションを利用しないでグラフ画像を作ってみました。
前バージョンがmacOS 10.13上で動作しなかったので、対処してみました。
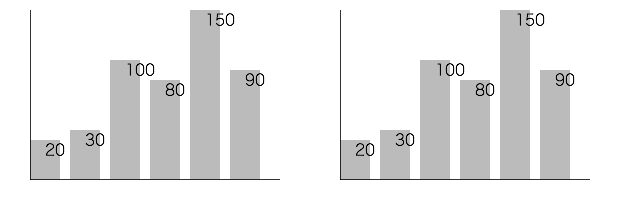
▲macOS 10.13.5beta & macOS 10.12.6 (same result)
| AppleScript名:画像の指定エリアを塗りつぶしで縦棒グラフを作成 v4 |
| — Created 2017-11-19 by Takaaki Naganoya — Modified 2018-04-01 by Takaaki Naganoya use AppleScript version "2.5" use scripting additions use framework "Foundation" use framework "AppKit" property NSUUID : a reference to current application’s NSUUID property NSColor : a reference to current application’s NSColor property NSString : a reference to current application’s NSString property NSImage : a reference to current application’s NSImage property NSScreen : a reference to current application’s NSScreen property NSBezierPath : a reference to current application’s NSBezierPath property NSPNGFileType : a reference to current application’s NSPNGFileType property NSBitmapImageRep : a reference to current application’s NSBitmapImageRep set plotData to {20, 30, 100, 80, 150, 90} set plotArea to {300, 200} set innerGapL to 30 set innerGapU to 10 set innerGapR to 20 set innerGapD to 20 set barGap to 10 –パラメータから下地になる画像を作成する set aSize to current application’s NSMakeSize(first item of plotArea, second item of plotArea) set anImage to NSImage’s alloc()’s initWithSize:aSize –各種パラメータの計算 copy plotArea to {plotWidth, plotHeight} set itemNum to count every item of plotData set barThickness to (plotWidth – (itemNum * barGap * 2)) div itemNum –プロットデータの最大値 set anArray to current application’s NSArray’s arrayWithArray:plotData set aYmax to (anArray’s valueForKeyPath:"@max.self")’s intValue() set aMaxYVal to plotHeight – innerGapU – innerGapD set aYPlotArea to plotHeight – innerGapU – innerGapD – 20 set aYUnit to aYPlotArea / aYmax –数値データをもとに描画データを組み立てる set drawList to {} set startX to innerGapL copy startX to origX repeat with i in plotData set the end of drawList to current application’s NSMakeRect(startX, innerGapD, barThickness, innerGapD + (i * aYUnit)) set startX to startX + barThickness + barGap end repeat –グラフ塗りつぶし処理呼び出し set fillColor to (NSColor’s colorWithCalibratedRed:0.1 green:0.1 blue:0.1 alpha:0.3) set resImage to drawImageWithColorFill(anImage, drawList, fillColor) of me –数値データ(文字)をグラフィックに記入 set fillColor2 to NSColor’s blackColor() set resImage to drawImageWithString(resImage, drawList, fillColor2, plotData, "HiraginoSans-W1", 16.0) of me –補助線を引く set fillColor3 to (NSColor’s colorWithCalibratedRed:0.0 green:0.0 blue:0.0 alpha:0.8) set aVertical to current application’s NSMakeRect(origX, innerGapD, plotWidth – innerGapL – innerGapR, 1) set aHorizontal to current application’s NSMakeRect(origX, innerGapD, 1, plotHeight – innerGapU – innerGapD) set draw2List to {aVertical, aHorizontal} set resImage to drawImageWithColorFill(resImage, draw2List, fillColor3) of me –画像のファイル出力 set imgPath to POSIX path of (path to desktop folder) set aUUIDstr to (NSUUID’s UUID()’s UUIDString()) as string set aPath to ((NSString’s stringWithString:imgPath)’s stringByAppendingPathComponent:aUUIDstr)’s stringByAppendingPathExtension:"png" set fRes to saveImageRepAtPathAsPNG(resImage, aPath) of me –NSImageに対して文字を描画する on drawImageWithString(anImage, drawList, fillColor, dataList, aPSFontName, aFontSize) set retinaF to (NSScreen’s mainScreen()’s backingScaleFactor()) as real –> 2.0 (Retina) / 1.0 (Non Retina) set aDict to (current application’s NSDictionary’s dictionaryWithObjects:{current application’s NSFont’s fontWithName:aPSFontName |size|:aFontSize, fillColor} forKeys:{current application’s NSFontAttributeName, current application’s NSForegroundColorAttributeName}) anImage’s lockFocus() –描画開始 set aLen to length of drawList repeat with i from 1 to aLen set i1 to contents of item i of drawList set v2 to system attribute "sys2" if v2 ≤ 12 then –To macOS 10.12.x set origX to (x of origin of i1) / retinaF set origY to (y of origin of i1) / retinaF set sizeX to (width of |size| of i1) / retinaF set sizeY to (height of |size| of i1) / retinaF set theRect to {{x:origX, y:origY}, {width:sizeX, height:sizeY}} else –macOS 10.13 or later set origX to (item 1 of item 1 of i1) / retinaF set origY to (item 2 of item 1 of i1) / retinaF set sizeX to (item 1 of item 2 of i1) / retinaF set sizeY to (item 2 of item 2 of i1) / retinaF set theRect to {{origX, origY}, {sizeX, sizeY}} end if set aString to (current application’s NSString’s stringWithString:((contents of item i of dataList) as string)) (aString’s drawAtPoint:(current application’s NSMakePoint(origX + (sizeX / 2), sizeY)) withAttributes:aDict) end repeat anImage’s unlockFocus() –描画ここまで return anImage –returns NSImage end drawImageWithString –NSImageに対して矩形を塗りつぶす on drawImageWithColorFill(anImage, drawList, fillColor) set retinaF to (NSScreen’s mainScreen()’s backingScaleFactor()) as real –> 2.0 (Retina) / 1.0 (Non Retina) anImage’s lockFocus() –描画開始 repeat with i in drawList set v2 to system attribute "sys2" if v2 ≤ 12 then –To macOS 10.12.x set origX to (x of origin of i) / retinaF set origY to (y of origin of i) / retinaF set sizeX to (width of |size| of i) / retinaF set sizeY to (height of |size| of i) / retinaF set theRect to {{x:origX, y:origY}, {width:sizeX, height:sizeY}} else –macOS 10.13 or later set origX to (item 1 of item 1 of i) / retinaF set origY to (item 2 of item 1 of i) / retinaF set sizeX to (item 1 of item 2 of i) / retinaF set sizeY to (item 2 of item 2 of i) / retinaF set theRect to {{origX, origY}, {sizeX, sizeY}} end if set theNSBezierPath to NSBezierPath’s bezierPath (theNSBezierPath’s appendBezierPathWithRect:theRect) fillColor’s |set|() –色設定 theNSBezierPath’s fill() –ぬりつぶし end repeat anImage’s unlockFocus() –描画ここまで return anImage –returns NSImage end drawImageWithColorFill –画像を指定パスにPNG形式で保存 on saveImageRepAtPathAsPNG(anImage, outPath) set imageRep to anImage’s TIFFRepresentation() set aRawimg to NSBitmapImageRep’s imageRepWithData:imageRep –パスのチルダ展開処理 set pathString to NSString’s stringWithString:outPath set newPath to pathString’s stringByExpandingTildeInPath() set myNewImageData to (aRawimg’s representationUsingType:(NSPNGFileType) |properties|:(missing value)) return (myNewImageData’s writeToFile:newPath atomically:true) as boolean end saveImageRepAtPathAsPNG |
Finder上で選択中の画像を横方向に連結 v3
Finder上で選択中の画像ファイルを横方向に連結して結果をデスクトップ上に出力するAppleScriptです。
指定ファイルからUTIを取得するのに外部フレームワークを使っていたのを、Shane Stanleyから「標準機能でできるよ」とツッコミが入って書き換えたものです。
| AppleScript名:Finder上で選択中の画像を横方向に連結 v3.scptd |
| — Created 2017-11-21 by Takaaki Naganoya — Modified 2018-04-06 by Takaaki Naganoya — 2018 Piyomaru Software use AppleScript version "2.5" — El Capitan (10.11) or later use framework "Foundation" use framework "QuartzCore" use framework "AppKit" use scripting additions property |NSURL| : a reference to current application’s |NSURL| property NSUUID : a reference to current application’s NSUUID property NSArray : a reference to current application’s NSArray property NSString : a reference to current application’s NSString property NSImage : a reference to current application’s NSImage property NSWorkspace : a reference to current application’s NSWorkspace property NSPNGFileType : a reference to current application’s NSPNGFileType property NSMutableArray : a reference to current application’s NSMutableArray property NSBitmapImageRep : a reference to current application’s NSBitmapImageRep property NSURLTypeIdentifierKey : a reference to current application’s NSURLTypeIdentifierKey property xGap : 10 –連結時の画像間のアキ(横方向) tell application "Finder" set aSel to selection as alias list if aSel = {} or aSel = "" then return end tell –選択した画像をArrayに入れる set imgList to NSMutableArray’s new() repeat with i in aSel set aPath to POSIX path of i set imgRes to (my isImageAtPath:aPath) if imgRes as boolean = true then set aNSImage to (NSImage’s alloc()’s initWithContentsOfFile:aPath) (imgList’s addObject:aNSImage) end if end repeat –KVCで画像の各種情報をまとめて取得 set sizeList to (imgList’s valueForKeyPath:"size") as list –NSSize to list of record conversion set maxHeight to ((NSArray’s arrayWithArray:sizeList)’s valueForKeyPath:"@max.height") as real set totalWidth to ((NSArray’s arrayWithArray:sizeList)’s valueForKeyPath:"@sum.width") as real set totalCount to ((NSArray’s arrayWithArray:sizeList)’s valueForKeyPath:"@count") as integer –出力画像作成 set tSize to current application’s NSMakeSize((totalWidth + (xGap * totalCount)), maxHeight) set newImage to NSImage’s alloc()’s initWithSize:tSize –順次画像を新規画像に上書き set xOrig to 0 repeat with i in (imgList as list) set j to contents of i set curSize to j’s |size|() set aRect to {xOrig, (maxHeight – (curSize’s height())), (curSize’s width()), (curSize’s height())} set newImage to composeImage(newImage, j, aRect) of me set xOrig to xOrig + (curSize’s width()) + xGap end repeat –デスクトップにPNG形式でNSImageをファイル保存 set aDesktopPath to current application’s NSHomeDirectory()’s stringByAppendingString:"/Desktop/" set savePath to aDesktopPath’s stringByAppendingString:((NSUUID’s UUID()’s UUIDString())’s stringByAppendingString:".png") set fRes to saveNSImageAtPathAsPNG(newImage, savePath) of me –2つのNSImageを重ね合わせ合成してNSImageで返す on composeImage(backImage, composeImage, aTargerRect) set newImage to NSImage’s alloc()’s initWithSize:(backImage’s |size|()) copy aTargerRect to {x1, y1, x2, y2} set bRect to current application’s NSMakeRect(x1, y1, x2, y2) newImage’s lockFocus() set newImageRect to current application’s CGRectZero set newImageRect’s |size| to (newImage’s |size|) backImage’s drawInRect:newImageRect composeImage’s drawInRect:bRect newImage’s unlockFocus() return newImage end composeImage –NSImageを指定パスにPNG形式で保存 on saveNSImageAtPathAsPNG(anImage, outPath) set imageRep to anImage’s TIFFRepresentation() set aRawimg to NSBitmapImageRep’s imageRepWithData:imageRep set pathString to NSString’s stringWithString:outPath set newPath to pathString’s stringByExpandingTildeInPath() set myNewImageData to (aRawimg’s representationUsingType:(NSPNGFileType) |properties|:(missing value)) set aRes to (myNewImageData’s writeToFile:newPath atomically:true) as boolean return aRes –成功ならtrue、失敗ならfalseが返る end saveNSImageAtPathAsPNG –指定のパスのファイルが画像かどうかをチェック on isImageAtPath:aPath set aURL to |NSURL|’s fileURLWithPath:aPath set {theResult, theValue} to aURL’s getResourceValue:(reference) forKey:NSURLTypeIdentifierKey |error|:(missing value) return (NSImage’s imageTypes()’s containsObject:theValue) as boolean end isImageAtPath: |
画像の指定エリアを塗りつぶしで縦棒グラフを作成 v3
指定データをもとに縦棒グラフの画像をデスクトップフォルダ上に作成するAppleScriptです。
グラフの画像を作ろうとしたら、Keynote上で作成して画像書き出しするとかExcel上でグラフを作成して画像書き出しすることを考えますが、アプリケーションを利用しないでグラフ画像を作ってみました。
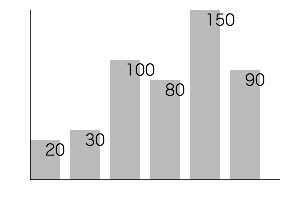
一応、Github上で探し回ってみるとObjective-Cで書かれたグラフ描画プログラムはいくつかあって、Xcode上のGUIアプリケーションであれば使えたりするものの、スクリプトエディタ上で実行するAppleScriptでは描画できていませんでした。
「このぐらいだったら、自分で描けばいいんじゃね?」
と、ありもののサブルーチンを組み合わせてみたら、割とさっくりできました。実行すると0.02秒ぐらいでグラフ画像を作成します(HDD環境だともう少し時間がかかるかも)。
自前グラフ作成Scriptといえば、Adobe Illustratorのグラフ機能で作成したグラフをグループ解除しまくって自動装飾するものを昔に作った覚えがあります。
| AppleScript名:画像の指定エリアを塗りつぶしで縦棒グラフを作成 v3 |
| — Created 2017-11-19 by Takaaki Naganoya — Modified 2018-04-01 by Takaaki Naganoya use AppleScript version "2.5" use scripting additions use framework "Foundation" use framework "AppKit" property NSUUID : a reference to current application’s NSUUID property NSColor : a reference to current application’s NSColor property NSString : a reference to current application’s NSString property NSImage : a reference to current application’s NSImage property NSScreen : a reference to current application’s NSScreen property NSBezierPath : a reference to current application’s NSBezierPath property NSPNGFileType : a reference to current application’s NSPNGFileType property NSBitmapImageRep : a reference to current application’s NSBitmapImageRep set plotData to {20, 30, 100, 80, 150, 90} set plotArea to {300, 200} set innerGapL to 30 set innerGapU to 10 set innerGapR to 20 set innerGapD to 20 set barGap to 10 –パラメータから下地になる画像を作成する set aSize to current application’s NSMakeSize(first item of plotArea, second item of plotArea) set anImage to NSImage’s alloc()’s initWithSize:aSize –各種パラメータの計算 copy plotArea to {plotWidth, plotHeight} set itemNum to count every item of plotData set barThickness to (plotWidth – (itemNum * barGap * 2)) div itemNum –プロットデータの最大値 set anArray to current application’s NSArray’s arrayWithArray:plotData set aYmax to (anArray’s valueForKeyPath:"@max.self")’s intValue() set aMaxYVal to plotHeight – innerGapU – innerGapD set aYPlotArea to plotHeight – innerGapU – innerGapD – 20 set aYUnit to aYPlotArea / aYmax –数値データをもとに描画データを組み立てる set drawList to {} set startX to innerGapL copy startX to origX repeat with i in plotData set the end of drawList to current application’s NSMakeRect(startX, innerGapD, barThickness, innerGapD + (i * aYUnit)) set startX to startX + barThickness + barGap end repeat –グラフ塗りつぶし処理呼び出し set fillColor to (NSColor’s colorWithCalibratedRed:0.1 green:0.1 blue:0.1 alpha:0.3) set resImage to drawImageWithColorFill(anImage, drawList, fillColor) of me –数値データ(文字)をグラフィックに記入 set fillColor2 to NSColor’s blackColor() set resImage to drawImageWithString(resImage, drawList, fillColor2, plotData, "HiraginoSans-W1", 16.0) of me –補助線を引く set fillColor3 to (NSColor’s colorWithCalibratedRed:0.0 green:0.0 blue:0.0 alpha:0.8) set aVertical to current application’s NSMakeRect(origX, innerGapD, plotWidth – innerGapL – innerGapR, 1) set aHorizontal to current application’s NSMakeRect(origX, innerGapD, 1, plotHeight – innerGapU – innerGapD) set draw2List to {aVertical, aHorizontal} set resImage to drawImageWithColorFill(resImage, draw2List, fillColor3) of me –画像のファイル出力 set imgPath to POSIX path of (path to desktop folder) set aUUIDstr to (NSUUID’s UUID()’s UUIDString()) as string set aPath to ((NSString’s stringWithString:imgPath)’s stringByAppendingPathComponent:aUUIDstr)’s stringByAppendingPathExtension:"png" set fRes to saveImageRepAtPathAsPNG(resImage, aPath) of me –NSImageに対して文字を描画する on drawImageWithString(anImage, drawList, fillColor, dataList, aPSFontName, aFontSize) set retinaF to (NSScreen’s mainScreen()’s backingScaleFactor()) as real –> 2.0 (Retina) / 1.0 (Non Retina) set aDict to (current application’s NSDictionary’s dictionaryWithObjects:{current application’s NSFont’s fontWithName:aPSFontName |size|:aFontSize, fillColor} forKeys:{current application’s NSFontAttributeName, current application’s NSForegroundColorAttributeName}) anImage’s lockFocus() –描画開始 set aLen to length of drawList repeat with i from 1 to aLen set i1 to contents of item i of drawList set origX to (x of origin of i1) / retinaF set origY to (y of origin of i1) / retinaF set sizeX to (width of |size| of i1) / retinaF set sizeY to (height of |size| of i1) / retinaF set aString to (current application’s NSString’s stringWithString:((contents of item i of dataList) as string)) (aString’s drawAtPoint:(current application’s NSMakePoint(origX + (sizeX / 2), sizeY)) withAttributes:aDict) end repeat anImage’s unlockFocus() –描画ここまで return anImage –returns NSImage end drawImageWithString –NSImageに対して矩形を塗りつぶす on drawImageWithColorFill(anImage, drawList, fillColor) set retinaF to (NSScreen’s mainScreen()’s backingScaleFactor()) as real –> 2.0 (Retina) / 1.0 (Non Retina) anImage’s lockFocus() –描画開始 repeat with i in drawList set origX to (x of origin of i) / retinaF set origY to (y of origin of i) / retinaF set sizeX to (width of |size| of i) / retinaF set sizeY to (height of |size| of i) / retinaF set theRect to {{x:origX, y:origY}, {width:sizeX, height:sizeY}} set theNSBezierPath to NSBezierPath’s bezierPath (theNSBezierPath’s appendBezierPathWithRect:theRect) fillColor’s |set|() –色設定 theNSBezierPath’s fill() –ぬりつぶし end repeat anImage’s unlockFocus() –描画ここまで return anImage –returns NSImage end drawImageWithColorFill –画像を指定パスにPNG形式で保存 on saveImageRepAtPathAsPNG(anImage, outPath) set imageRep to anImage’s TIFFRepresentation() set aRawimg to NSBitmapImageRep’s imageRepWithData:imageRep –パスのチルダ展開処理 set pathString to NSString’s stringWithString:outPath set newPath to pathString’s stringByExpandingTildeInPath() set myNewImageData to (aRawimg’s representationUsingType:(NSPNGFileType) |properties|:(missing value)) return (myNewImageData’s writeToFile:newPath atomically:true) as boolean end saveImageRepAtPathAsPNG |
Finder上で選択中の画像を横方向に連結 v2
Finder上で選択中の画像ファイルを横方向に連結して結果をデスクトップ上に出力するAppleScriptです。
以前掲載したバージョンでは、2枚以上の画像を横に連結しない(座標値の加算ミスを行なって2枚目の座標に上書き)という問題点が見つかったので、修正しておいたものです。
画像2枚でしか試験していなかったので問題自体が見つかっていませんでした。
–> MagicKit.framework (To ~/Library/Frameworks/)
| AppleScript名:Finder上で選択中の画像を横方向に連結 |
| — Created 2017-11-21 by Takaaki Naganoya — 2017 Piyomaru Software use AppleScript version "2.4" use scripting additions use framework "Foundation" use framework "QuartzCore" use framework "AppKit" use framework "MagicKit" –https://github.com/aidansteele/magickit property |NSURL| : a reference to current application’s |NSURL| property NSUUID : a reference to current application’s NSUUID property NSArray : a reference to current application’s NSArray property NSString : a reference to current application’s NSString property NSImage : a reference to current application’s NSImage property GEMagicKit : a reference to current application’s GEMagicKit property NSPNGFileType : a reference to current application’s NSPNGFileType property NSMutableArray : a reference to current application’s NSMutableArray property NSBitmapImageRep : a reference to current application’s NSBitmapImageRep property xGap : 10 –連結時の画像間のアキ(横方向) tell application "Finder" set aSel to selection as alias list if aSel = {} or aSel = "" then return end tell –選択した画像をArrayに入れる set imgList to NSMutableArray’s new() repeat with i in aSel set aPath to POSIX path of i –指定ファイルのUTIを取得して、画像(public.image)があれば処理を行う set aRes to (GEMagicKit’s magicForFileAtPath:aPath) set utiList to (aRes’s uniformTypeHierarchy()) as list if "public.image" is in utiList then set aNSImage to (NSImage’s alloc()’s initWithContentsOfFile:aPath) (imgList’s addObject:aNSImage) end if end repeat –KVCで画像の各種情報をまとめて取得 set sizeList to (imgList’s valueForKeyPath:"size") as list –NSSize to list of record conversion set maxHeight to ((NSArray’s arrayWithArray:sizeList)’s valueForKeyPath:"@max.height") as real set totalWidth to ((NSArray’s arrayWithArray:sizeList)’s valueForKeyPath:"@sum.width") as real set totalCount to ((NSArray’s arrayWithArray:sizeList)’s valueForKeyPath:"@count") as integer –出力画像作成 set tSize to current application’s NSMakeSize((totalWidth + (xGap * totalCount)), maxHeight) set newImage to NSImage’s alloc()’s initWithSize:tSize –順次画像を新規画像に上書き set xOrig to 0 repeat with i in (imgList as list) set j to contents of i set curSize to j’s |size|() set aRect to {xOrig, (maxHeight – (curSize’s height())), (curSize’s width()), (curSize’s height())} set newImage to composeImage(newImage, j, aRect) of me set xOrig to xOrig + (curSize’s width()) + xGap end repeat –デスクトップにPNG形式でNSImageをファイル保存 set aDesktopPath to current application’s NSHomeDirectory()’s stringByAppendingString:"/Desktop/" set savePath to aDesktopPath’s stringByAppendingString:((NSUUID’s UUID()’s UUIDString())’s stringByAppendingString:".png") set fRes to saveNSImageAtPathAsPNG(newImage, savePath) of me –2つのNSImageを重ね合わせ合成してNSImageで返す on composeImage(backImage, composeImage, aTargerRect) set newImage to NSImage’s alloc()’s initWithSize:(backImage’s |size|()) copy aTargerRect to {x1, y1, x2, y2} set bRect to current application’s NSMakeRect(x1, y1, x2, y2) newImage’s lockFocus() set newImageRect to current application’s CGRectZero set newImageRect’s |size| to (newImage’s |size|) backImage’s drawInRect:newImageRect composeImage’s drawInRect:bRect newImage’s unlockFocus() return newImage end composeImage –NSImageを指定パスにPNG形式で保存 on saveNSImageAtPathAsPNG(anImage, outPath) set imageRep to anImage’s TIFFRepresentation() set aRawimg to NSBitmapImageRep’s imageRepWithData:imageRep set pathString to NSString’s stringWithString:outPath set newPath to pathString’s stringByExpandingTildeInPath() set myNewImageData to (aRawimg’s representationUsingType:(NSPNGFileType) |properties|:(missing value)) set aRes to (myNewImageData’s writeToFile:newPath atomically:true) as boolean return aRes –成功ならtrue、失敗ならfalseが返る end saveNSImageAtPathAsPNG |
指定のムービーファイルのエクスポート可能な形式一覧を取得する
| AppleScript名:指定のムービーファイルのエクスポート可能な形式一覧を取得する |
| — Created 2016-10-24 by Shane Stanley use AppleScript version "2.4" use scripting additions use framework "Foundation" use framework "AVFoundation" set posixPath to POSIX path of (choose file with prompt "Choose an Movie file:") set theURL to current application’s |NSURL|’s fileURLWithPath:posixPath set theAsset to current application’s AVAsset’s assetWithURL:theURL set allowedPresets to (current application’s AVAssetExportSession’s exportPresetsCompatibleWithAsset:theAsset) as list –> {"AVAssetExportPreset1920x1080", "AVAssetExportPresetLowQuality", "AVAssetExportPresetAppleM4V720pHD", "AVAssetExportPresetAppleM4VAppleTV", "AVAssetExportPresetAppleM4A", "AVAssetExportPreset640x480", "AVAssetExportPresetAppleProRes422LPCM", "AVAssetExportPreset3840x2160", "AVAssetExportPresetAppleM4VWiFi", "AVAssetExportPresetHighestQuality", "AVAssetExportPresetAppleM4VCellular", "AVAssetExportPreset1280x720", "AVAssetExportPresetMediumQuality", "AVAssetExportPresetAppleM4V1080pHD", "AVAssetExportPresetAppleM4V480pSD", "AVAssetExportPreset960x540", "AVAssetExportPresetAppleM4ViPod"} |
アニメーションGIFをフレームごとに画像に分解する
| AppleScript名:アニメーションGIFをフレームごとにTIFF画像に分解する |
| — Created 2016-11-29 by Takaaki Naganoya — 2016 Piyomaru Software use AppleScript version "2.4" use scripting additions use framework "Foundation" use framework "AppKit" set gifFile to POSIX path of (choose file of type "com.compuserve.gif" with prompt "Select Animation-GIF file") set destFol to POSIX path of (choose folder with prompt "Select the folder to save gif’s frames") set anImage to current application’s NSImage’s alloc()’s initWithContentsOfFile:gifFile if anImage is equal to missing value then error "Illegal GIF Image" set anImgRep to anImage’s representations()’s firstObject() set framesNum to (anImgRep’s valueForProperty:"NSImageFrameCount") as integer repeat with i from 0 to (framesNum – 1) (anImgRep’s setProperty:"NSImageCurrentFrame" withValue:i) set aRep to (anImgRep’s representationUsingType:(current application’s NSTIFFFileType) |properties|:(missing value)) (aRep’s writeToFile:(destFol & (i as string) & ".tif") atomically:true) end repeat |
| AppleScript名:アニメーションGIFをフレームごとにPNG画像に分解する |
| — Created 2016-11-29 by Takaaki Naganoya — 2016 Piyomaru Software use AppleScript version "2.4" use scripting additions use framework "Foundation" use framework "AppKit" set gifFile to POSIX path of (choose file of type "com.compuserve.gif" with prompt "Select Animation-GIF file") set destFol to POSIX path of (choose folder with prompt "Select the folder to save gif’s frames") set anImage to current application’s NSImage’s alloc()’s initWithContentsOfFile:gifFile if anImage is equal to missing value then error "Illegal GIF Image" set anImgRep to anImage’s representations()’s firstObject() set framesNum to (anImgRep’s valueForProperty:"NSImageFrameCount") as integer repeat with i from 0 to (framesNum – 1) (anImgRep’s setProperty:"NSImageCurrentFrame" withValue:i) set aRep to (anImgRep’s representationUsingType:(current application’s NSPNGFileType) |properties|:(missing value)) (aRep’s writeToFile:(destFol & (i as string) & ".png") atomically:true) end repeat |
| AppleScript名:アニメーションGIFをフレームごとにJPG画像に分解する |
| — Created 2016-11-29 by Takaaki Naganoya — 2016 Piyomaru Software use AppleScript version "2.4" use scripting additions use framework "Foundation" use framework "AppKit" set gifFile to POSIX path of (choose file of type "com.compuserve.gif" with prompt "Select Animation-GIF file") set destFol to POSIX path of (choose folder with prompt "Select the folder to save gif’s frames") set anImage to current application’s NSImage’s alloc()’s initWithContentsOfFile:gifFile if anImage is equal to missing value then error "Illegal GIF Image" set anImgRep to anImage’s representations()’s firstObject() set framesNum to (anImgRep’s valueForProperty:"NSImageFrameCount") as integer repeat with i from 0 to (framesNum – 1) (anImgRep’s setProperty:"NSImageCurrentFrame" withValue:i) set aRep to (anImgRep’s representationUsingType:(current application’s NSJPEGFileType) |properties|:(missing value)) (aRep’s writeToFile:(destFol & (i as string) & ".jpg") atomically:true) end repeat |
| AppleScript名:アニメーションGIFをフレームごとにGIFF画像に分解する |
| — Created 2016-11-29 by Takaaki Naganoya — 2016 Piyomaru Software use AppleScript version "2.4" use scripting additions use framework "Foundation" use framework "AppKit" set gifFile to POSIX path of (choose file of type "com.compuserve.gif" with prompt "Select Animation-GIF file") set destFol to POSIX path of (choose folder with prompt "Select the folder to save gif’s frames") set anImage to current application’s NSImage’s alloc()’s initWithContentsOfFile:gifFile if anImage is equal to missing value then error "Illegal GIF Image" set anImgRep to anImage’s representations()’s firstObject() set framesNum to (anImgRep’s valueForProperty:"NSImageFrameCount") as integer repeat with i from 0 to (framesNum – 1) (anImgRep’s setProperty:"NSImageCurrentFrame" withValue:i) set aRep to (anImgRep’s representationUsingType:(current application’s NSGIFFileType) |properties|:(missing value)) (aRep’s writeToFile:(destFol & (i as string) & ".gif") atomically:true) end repeat |
MediaInfoKitでQuickTimeムービーから詳細な情報を取得する
MediaInfoKit.frameworkを呼び出して、QuickTimeムービーから詳細な情報を取得するAppleScriptです。
MediaInfoKit.framework(To ~/Library/Frameworks/)
| AppleScript名:MediaInfoKitでQuickTimeムービーから詳細な情報を取得する |
| — Created 2017-01-24 by Takaaki Naganoya — 2017 Piyomaru Software use AppleScript version "2.4" use scripting additions use framework "Foundation" use framework "MediaInfoKit" –https://github.com/jeremyvizzini/MediaInfoKit set aMovie to POSIX path of (choose file) –(choose file of type {"com.apple.quicktime-movie"}) set aURL to current application’s |NSURL|’s fileURLWithPath:aMovie set aInfo to current application’s MIKMediaInfo’s alloc()’s initWithFileURL:aURL set a1info to aInfo’s valuesOfStream:"General" –Get Each Information set a2info to aInfo’s valueForKey:"Complete name" ofStream:"General" –> (NSString) "/Users/me/Desktop/IMG_0217.MOV" set a4Info to aInfo’s jsonText() –json形式で取得 –set a5Info to aInfo’s plistText()–plist形式で取得 –set a6Info to aInfo’s csvText()–csv形式で取得 –set a3Info to aInfo’s attributedText()–スタイルつきテキストで取得 —JSON to NSDictionary to record set jsonData to a4Info’s dataUsingEncoding:(current application’s NSUTF8StringEncoding) set aJsonDict to current application’s NSJSONSerialization’s JSONObjectWithData:jsonData options:0 |error|:(missing value) set aRec to aJsonDict as record –Movie file –> {General:{Encoded date:"UTC 2017-01-24 04:03:48", Format profile:"QuickTime", Overall bit rate mode:"Variable", Tagged date:"UTC 2017-01-24 04:04:40", Codec ID:"qt 0000.00 (qt )", com.apple.quicktime.software:"10.2", Format:"MPEG-4", Complete name:"/Users/me/Desktop/IMG_0219.MOV", Duration:"52 s 53 ms", File size:"50.8 MiB", Writing library:"Apple QuickTime", Overall bit rate:"8 191 kb/s", com.apple.quicktime.make:"Apple", com.apple.quicktime.model:"iPhone 7", com.apple.quicktime.creationdate:"2017-01-24T13:03:47+0900", com.apple.quicktime.location.ISO6709:"+35.xxxx+139.xxxx+043.xxx/"}, Video:{Minimum frame rate:"28.571 FPS", Display aspect ratio:"16:9", Bit depth:"8 bits", Scan type:"Progressive", Title:"Core Media Video", Chroma subsampling:"4:2:0", Color range:"Limited", Format/Info:"Advanced Video Codec", Frame rate:"29.970 (29970/1000) FPS", Bits/(Pixel*Frame):"0.292", Frame rate mode:"Variable", Format:"AVC", Matrix coefficients:"BT.709", Encoded date:"UTC 2017-01-24 04:03:48", Rotation:"90°", Height:"720 pixels", Color space:"YUV", Transfer characteristics:"BT.709", Duration:"52 s 53 ms", Bit rate:"8 079 kb/s", Codec ID:"avc1", ID:"1", Width:"1 280 pixels", Tagged date:"UTC 2017-01-24 04:04:40", Format profile:"High@L3.1", Color primaries:"BT.709", Maximum frame rate:"30.000 FPS", Stream size:"50.1 MiB (99%)", Codec ID/Info:"Advanced Video Coding", Format settings:"CABAC,Yes"}, Audio:{Other:"1", Title:"Core Media Audio", Channel(s):"1 channel", Format/Info:"Advanced Audio Codec", Frame rate:"43.066 FPS (1024 spf)", Sampling rate:"44.1 kHz", Source duration:"52 s 106 ms", Format:"AAC", Compression mode:"Lossy", Encoded date:"UTC 2017-01-24 04:03:48", Channel positions:"Front: C", Type:"meta", Duration:"52 s 53 ms", Bit rate mode:"Variable", Source stream size:"568 KiB (1%)", Bit rate:"89.3 kb/s", Codec ID:"40", ID:"2", Tagged date:"UTC 2017-01-24 04:04:40", Format profile:"LC", Stream size:"568 KiB (1%)"}} –Image file –> {General:{Format/Info:"Portable Network Graphic", Complete name:"/Users/me/Desktop/スクリーンショット 2.png", File size:"33.3 KiB", Format:"PNG"}, Image:{Height:"319 pixels", Format:"PNG", Bit depth:"32 bits", Format/Info:"Portable Network Graphic", Width:"352 pixels", Compression mode:"Lossless", Stream size:"33.3 KiB (100%)"}} |
ffmpegでムービーの静止画書き出し
QuickTimeムービーから指定ポイント(先頭からの再生秒)のフレームを静止画(PNG)に書き出すAppleScriptです。
ffmpegをバンドル内に格納して、それを呼び出すようにしています。ffmpegでフレーム抽出処理を行うと、QuickTime Playerに比べて処理時間がかかるようです。
| AppleScript名:ffmpegでムービーの静止画書き出し |
| — Created 2017-03-13 by Takaaki Naganoya — 2017 Piyomaru Software use AppleScript version "2.4" use scripting additions use framework "Foundation" use framework "AVFoundation" –Caution: Don’t run on ASObjc Explorer 4 property NSUUID : a reference to current application’s NSUUID property AVAsset : a reference to current application’s AVAsset property AVAssetImageGenerator : a reference to current application’s AVAssetImageGenerator property |NSURL| : a reference to current application’s |NSURL| set targTime to 320 –target duration (seconds) set inPath to choose file of type {"public.mpeg-4", "public.movie"} set outPathPosix to getImageFromMovie(inPath, targTime) of me on getImageFromMovie(inPath, outTime) –https://yuichon.com/2016/02/ffmpeg-install/ –https://www.npmjs.com/package/ffmpeg-static set ffmpegPath to POSIX path of (path to me) & "Contents/Resources/ffmpeg" –ffmpeg-static –Adjust the pickup frame duration of the target set aDuration to getMovieDurationInSeconds(inPath) of me if outTime > aDuration then set outTime to aDuration end if –Generate Out File Path set outPath to POSIX path of (path to desktop) set aUUID to NSUUID’s UUID()’s UUIDString() as string set outFullPath to (outPath & aUUID & ".png") set sText to ffmpegPath & space & "-i" & space & (quoted form of POSIX path of inPath) & space & "-ss " & (outTime as string) & space & "-vframes 1" & space & quoted form of outFullPath do shell script sText return outFullPath end getImageFromMovie –指定ムービーの再生時間を秒で取得する on getMovieDurationInSeconds(aMoviePathAlias) set aPOSIX to POSIX path of aMoviePathAlias set aURL to |NSURL|’s fileURLWithPath:aPOSIX set anAsset to AVAsset’s assetWithURL:aURL set imageGenerator to AVAssetImageGenerator’s alloc()’s initWithAsset:anAsset set durTimes to current application’s CMTimeGetSeconds(anAsset’s duration()) return durTimes end getMovieDurationInSeconds |
実行中のコンピュータのアイコン画像を取得してデスクトップにPNG形式で保存
| AppleScript名:実行中のコンピュータのアイコン画像を取得してデスクトップにPNG形式で保存 |
| — Created 2016-02-09 by Takaaki Naganoya — 2016 Piyomaru Software use AppleScript version "2.4" use scripting additions use framework "Foundation" use framework "AppKit" –Get Computer Icon set anImage to current application’s NSImage’s imageNamed:(current application’s NSImageNameComputer) set aDesktopPath to (current application’s NSProcessInfo’s processInfo()’s environment()’s objectForKey:("HOME"))’s stringByAppendingString:"/Desktop/" set savePath to aDesktopPath’s stringByAppendingString:((current application’s NSUUID’s UUID()’s UUIDString())’s stringByAppendingString:".png") set fRes to saveNSImageAtPathAsPNG(anImage, savePath) of me –NSImageを指定パスにPNG形式で保存 on saveNSImageAtPathAsPNG(anImage, outPath) set imageRep to anImage’s TIFFRepresentation() set aRawimg to current application’s NSBitmapImageRep’s imageRepWithData:imageRep set pathString to current application’s NSString’s stringWithString:outPath set newPath to pathString’s stringByExpandingTildeInPath() set myNewImageData to (aRawimg’s representationUsingType:(current application’s NSPNGFileType) |properties|:(missing value)) set aRes to (myNewImageData’s writeToFile:newPath atomically:true) as boolean return aRes –成功ならtrue、失敗ならfalseが返る end saveNSImageAtPathAsPNG |
TwitterへのTweet文字数チェック
Twitterへの投稿可能な文字数のチェックを行うAppleScriptです。
Twitterへの投稿可能な文字数の計算は、なかなか頭の痛い処理です。つい先日廃止されたMac版のクライアントアプリケーションはついに最後まで正しい文字数をカウントできていませんでした(本来の仕様よりも少ない文字数しか投稿できなかった)。
# macOS 10.15以降向けにCatalystアプリケーションとしてMac用クライアントが再公開されました。が……
Twitter, IncがGithubで公開しているフレームワーク「twitter-text」を使えば、Tweet文字数カウントシミュレーションを行えるようだったので、フレームワークをXcodeでビルドして試してみました。
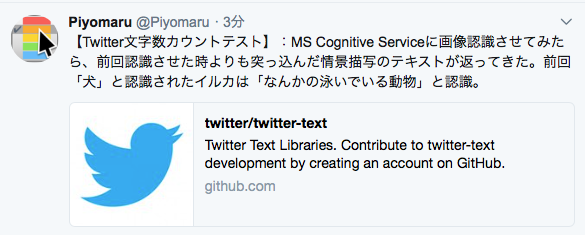
この(↑)テスト文字列は、普通にlengthで文字数をカウントすると155文字ですが、Twitterの文字カウントロジックを用いると139文字。実際にTwitterのWebサイト上から投稿してみると、なるほどたしかにエラーになりません(じゃあなんでMac版のTwitterクライアントにこの機能が乗ってなかったんだろう。とっても不思議)。
TwitterText.framework (To ~/Library/Frameworks/)
| AppleScript名:TwitterへのTweet文字数チェック |
| — Created 2018-04-03 by Takaaki Naganoya — 2018 Piyomaru Software use AppleScript version "2.4" use scripting additions use framework "Foundation" use framework "TwitterText" –https://github.com/twitter/twitter-text set aText to "【Twitter文字数カウントテスト】:MS Cognitive Serviceに画像認識させてみたら、前回認識させた時よりも突っ込んだ情景描写のテキストが返ってきた。前回「犬」と認識されたイルカは「なんかの泳いでいる動物」と認識。https://github.com/twitter/twitter-text" set aParser to current application’s TwitterTextParser’s defaultParser()’s parseTweet:aText set aLen to aParser’s weightedLength() –> 139 set aPerm to aParser’s permillage() –Twitter文字数Fullで1,000 –> 992 set aValid to aParser’s isValid() as boolean –> true set aRange to aParser’s displayTextRange() –> {location:0, length:155} set aVDTRange to aParser’s validDisplayTextRange() –> {location:0, length:155} |
Evernoteで選択中のnoteを指定のNotebookにコピー
Evernoteで選択中のnoteをいったん書き出して、指定のNotebookにインポートするAppleScriptです。
# Evernoteはバージョン10でAppleScriptサポートが削除されてしまったので、本Scriptはバージョン10以降のEvernoteでは動作しません
選択中のnoteを指定のNotebookにコピーします(添付画像なども含めてすべて)。元の選択中のnoteを削除すれば、「移動」したのと同じことになります。
EvernoteのAppleScript用語辞書には、importコマンドの説明に、
Import notes from an xml file.
とあります。このXML fileというのがENEXファイルだというのがこのimportコマンドの説明に書かれていないので、
「ENEXファイルで書き出して、ENEXファイルで読み込む」
という操作ができることが読み解けません。辞書の説明の書き方がよくない、としかいいようがありません。
| AppleScript名:Evernoteで選択中のnoteをいったん書き出して、書き出したファイルで新規noteを作成する |
| — Created 2018-04-03 by Takaaki Naganoya — 2018 Piyomaru Software set exPath to ((path to desktop folder) as string) & (do shell script "uuidgen") & ".ENEX" tell application "Evernote" set aSel to selection if aSel = {} then return –デスクトップに選択中のノートを書き出す export aSel to file exPath format ENEX –指定のノートブックに書き出したノートをインポートする set aNote to (import file exPath to notebook "hiyoko") end tell do shell script "rm -f " & quoted form of POSIX path of exPath |
Safariで検索を実行
Safariで指定の検索エンジンで検索を実行するAppleScriptです。
URL欄にキーワードを入れて検索を行うと、文字入力の途中で待たされることがあるため、別途ダイアログで入力して検索できたほうが便利です。
Script Menuに入れて呼び出して使っています。
| AppleScript名:Safariで検索を実行 |
| tell application "Safari" set aText to text returned of (display dialog "検索キーワードを入力" default answer "") set dCount to count every document if dCount > 0 then search the web in front document for aText else search the web for aText end if end tell |
SafariとiTunesがアップデート
macOS 10.13.4 Releaseに合わせて、macOS 10.12向けにもSafari v11.1とiTunes v12.7.4のアップデートがリリースされました。
大幅な整理と謎の見直しが行われたSafari v11.1
Safari v11.1では過去に例を見ないほどの用語辞書の変更が行われました。ただし、ほとんどが「整理」「清書」に類するものであり、機能的に変更があったということではありません。
これまで、Safariの用語辞書には「Text Suites」という「意味のない予約語」が記載されていました。
これがv11.1では削除されました。削除されても、もともと意味がなかったので問題はありません。
saveコマンドで指定するパスオブジェクトがaliasからfileに変更されていますが、これはもともとfileで指定するものなので、「用語辞書の間違いを直した」といえます。実体が存在しない(保存する前なので)パスのaliasは作れません。
ほかには、AppleScript用語内の細かい表記が修正されています。もともと、macOS 10.5でText, String, Unicode textは統一されているので、あえて用語辞書にUnicode Textと書いておく必要はなかったわけで、それがTextに書き換えられていたりします(説明文が変わっただけで動作に変更はありません)。
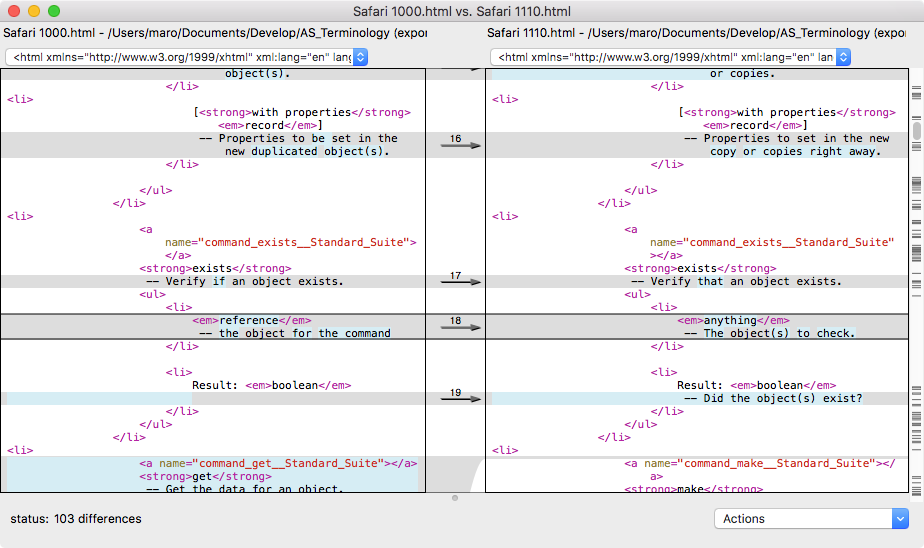
あと気になるのは「anything」の表記があることです。あまり多用されてこなかったこの予約語、AppleScriptObjC環境でも「list of string or string」などという表記にならないことを期待したいところです(ScriptDebuggerではこれが「any」などという単語に解釈されてしまうし)。
iTunesには変更なし
iTunes v12.7.4には変更がありません。
選択中のEvernoteのNoteに添付されているattachmentのファイルをデスクトップに書き出す
Evernoteの選択中のNoteに添付されているattachmentファイル(おそらく画像)をデスクトップに書き出すAppleScriptです。
# Evernoteはバージョン10でAppleScriptサポートが削除されてしまったので、本Scriptはバージョン10以降のEvernoteでは動作しません
書き出す添付ファイルのファイル名はAppleScript経由でオリジナルのものを求めていますが、オリジナルのファイル名に「missing value」を返してくるものもあるので、その場合にはUUIDを割り振っています。
また、MIME TYPEを調査しててきとーに割り振っていますが、すべてのパターンに対処するものではありません。
正直なところ、Evernoteはあまりできのよくないアプリケーションです。同様の機能を提供するアプリケーションやサービスに、もっと出来のいいものがたくさんあります。調子に乗ってAppleScriptから大量のNoteを自動作成すると、デバイス間のデータのシンクロが大量に発生してデータ転送量が増え、利用料金が増えていきます。
# 自分は、MacJournalやmacOS標準装備のメモ(Notes.app)をよく使っています
AppleScript対応機能も動くんだか動かないんだかよくわからないものが多く、挙げ句の果てには間違った命令を実行するとアプリケーションまるごとクラッシュしたりします。
AppleScriptからEvernoteをコントロールしようとすると、
(1)AppleScript用語辞書の範囲内で操作
(2)GUI Scirptingを用いてGUI操作
(3)REST API経由で操作
の3つの方法があるでしょう。Evernoteの(1)の出来がよくないので、(3)について少々調べておくぐらいでしょうか。ただ、調査に無限に時間がかかりそうなので、結局(2)に落ち着きそうな、、、、
| AppleScript名:選択中のNoteに添付されているattachmentのファイルをデスクトップに書き出す |
| set dtPath to (path to desktop folder) as string
tell application "Evernote" set aSel to selection if aSel = {} then return set aaSel to first item of aSel tell aaSel set aList to every attachment repeat with i in aList set aFN to (filename of i) if aFN = missing value then –ファイル名が添付画像ファイルについていなかった場合の対策 set aFN to (do shell script "uuidgen") & retExtFromEvernoteMIME(mime of i) of me end if set tmpPath to dtPath & aFN try write i to file tmpPath on error erM log erM end try end repeat end tell end tell –EvernoteのNoteに添付した画像のMIME TYPEから拡張子を判定する(とりあえず版) on retExtFromEvernoteMIME(aMime) if aMime = "image/jpeg" then return ".jpg" else if aMime = "image/png" then return ".png" else if aMime = "application/pdf" then return ".pdf" else return ".dat" end if end retExtFromEvernoteMIME |