| AppleScript名:指定URLをロードしてtitleを取得 |
| — Created 2015-09-07 by Takaaki Naganoya — 2015 Piyomaru Software use AppleScript version "2.4" use scripting additions use framework "Foundation" use framework "WebKit" property loadDone : false property theWebView : missing value set aURL to "https://www.youtube.com/watch?v=WuziqYptTyE" set aTitle to getPageTitle(aURL) –> "戦場の絆ポータブル【HD】鉱山都市 オンライン対戦 2015.09.04 – YouTube" on getPageTitle(aURL) –Check If this script runs in foreground if not (current application’s NSThread’s isMainThread()) as boolean then display alert "This script must be run from the main thread (Command-Control-R in Script Editor)." buttons {"Cancel"} as critical error number -128 end if set my loadDone to false set my theWebView to missing value openURL(aURL) set waitLoop to 1000 * 60 –60 seconds set hitF to false repeat waitLoop times if my loadDone = true then set hitF to true exit repeat end if current application’s NSThread’s sleepForTimeInterval:("0.001" as real) –delay 0.001 end repeat if hitF = false then return set jsText to "document.title" set x to ((my theWebView)’s stringByEvaluatingJavaScriptFromString:jsText) as text set my theWebView to missing value return x end getPageTitle –WebViewにURLを読み込む on openURL(aURL) set noter1 to current application’s NSNotificationCenter’s defaultCenter() set my theWebView to current application’s WebView’s alloc()’s init() noter1’s addObserver:me selector:"webLoaded:" |name|:(current application’s WebViewProgressFinishedNotification) object:(my theWebView) my (theWebView’s setMainFrameURL:aURL) end openURL –Web Viewのローディング完了時に実行 on webLoaded:aNotification set my loadDone to true end webLoaded: |
月: 2018年2月
web上の画像をローカルにダウンロードして保存
| AppleScript名:web上の画像をローカルにダウンロードして保存 |
| — Created 2013-12-27 Shane Stanley use AppleScript version "2.4" use scripting additions use framework "Foundation" set thePicURL to "http://www.macosxautomation.com/applescript/apps/gfx/EverydayCover300.jpg" set thePath to POSIX path of ((path to desktop as text) & "Test.jpg") set aRes to saveImageURLToPath(thePicURL, thePath) on saveImageURLToPath(thePicURL, thePath) set theNSURL to current application’s |NSURL|’s URLWithString:thePicURL set picData to current application’s NSData’s dataWithContentsOfURL:theNSURL picData’s writeToFile:thePath atomically:true end saveImageURLToPath |
URLの妥当性チェック
| AppleScript名:URLの妥当性チェック |
| — Created 2015-09-06 by Takaaki Naganoya — 2015 Piyomaru Software use AppleScript version "2.4" use scripting additions use framework "Foundation" –http://stackoverflow.com/questions/1471201/how-to-validate-an-url-on-the-iphone set aRes1 to validateURL("http://www.apple.com/jp") –> true set aRes2 to validateURL("http.s://www.gmail.com") –> false set aRes3 to validateURL("https:.//gmailcom") –> false set aRes4 to validateURL("https://gmail.me.") –> false set aRes5 to validateURL("https://www.gmail.me.com.com.com.com") –> true set aRes6 to validateURL("http:/./ww-w.wowone.com") –> false set aRes7 to validateURL("http://.www.wowone") –> false set aRes8 to validateURL("http://www.wow-one.com") –> true set aRes9 to validateURL("http://www.wow_one.com") –> true set aRes10 to validateURL("http://.") –> false set aRes11 to validateURL("http://") –> false set aRes12 to validateURL("http://k") –> false return {aRes2, aRes3, aRes4, aRes5, aRes6, aRes7, aRes8, aRes9, aRes10, aRes11, aRes12} –> {false, false, false, true, false, false, true, true, false, false, false} –URLの妥当性チェック on validateURL(anURL as text) –set regEx1 to current application’s NSString’s stringWithString:"(http|https)://((\\w)*|([0-9]*)|([-|_])*)+([\\.|/]((\\w)*|([0-9]*)|([-|_])*))+" set regEx1 to current application’s NSString’s stringWithString:"((https|http)://)((\\w|-)+)(([.]|[/])((\\w|-)+))+" set predicate1 to current application’s NSPredicate’s predicateWithFormat_("SELF MATCHES %@", regEx1) set aPredRes1 to (predicate1’s evaluateWithObject:anURL) as boolean return aPredRes1 end validateURL |
VPN経由のネットワーク接続を切断する
| AppleScript名:VPN経由のネットワーク接続を切断する |
| — Created 2017-09-30 by Takaaki Naganoya — 2017 Piyomaru Software tell application "System Events" tell current location of network preferences set sList to every service whose kind is 13 and active is true –種別がVPNのNetwork Serviceで状態がactive(接続中)のものを取得 if sList = {} then return false if length of sList is not equal to 1 then –複数VPNが存在している場合にはユーザー選択 set ssRes to choose from list sList if ssRes = false then return false set sRes to first item of ssRes else set sRes to first item of sList end if disconnect sRes end tell end tell |
VPN経由でネットワーク接続
VPN経由でネットワーク接続を行うAppleScriptです。
システム環境設定の「ネットワーク」で「VPN」を追加、定義し、正常にVPN接続できていることを確認してください。本AppleScriptはあらかじめ定義してあるVPN接続先への自動接続を行うものです。
複数のVPN接続を定義してある場合にはユーザーに選択を求めます。
VPN接続関連のAppleScriptの機能に、勝手に新規接続先を定義してVPN接続できるようなものはありません。あくまで、すでにユーザーが定義したVPN接続先に対して接続/切断を行うだけの機能です。
| AppleScript名:VPN経由でネットワーク接続 |
| — Created 2017-09-30 by Takaaki Naganoya — 2017 Piyomaru Software tell application "System Events" tell current location of network preferences set sList to every service whose kind is 13 –種別がVPNのNetwork Service if sList = {} then return false if length of sList is not equal to 1 then –複数VPNが存在している場合にはユーザー選択 set ssRes to choose from list sList if ssRes = false then return false set sRes to first item of ssRes else set sRes to first item of sList end if connect sRes end tell end tell |
(GET)Wikipedia APIでキーワード検索を行う
| AppleScript名:(GET)Wikipedia APIでキーワード検索を行う |
| — Created 2016-11-04 by Takaaki Naganoya — 2016 Piyomaru Software use AppleScript version "2.5" use scripting additions use framework "Foundation" –https://www.mediawiki.org/wiki/API:Main_page/ja set reqURLStr to "https://jp.wikipedia.org/w/api.php" –Japanese Version set aRec to {action:"query", titles:"アップル (企業)", |prop|:"revisions", rvprop:"content", |format|:"json"} set aURL to retURLwithParams(reqURLStr, aRec) of me set aRes to callRestGETAPIAndParseResults(aURL) of me set aRESTres to (query of json of aRes) return aRESTres as list of string or string –as anything –GET methodのREST APIを呼ぶ on callRestGETAPIAndParseResults(aURL) set aRequest to current application’s NSMutableURLRequest’s requestWithURL:(current application’s |NSURL|’s URLWithString:aURL) aRequest’s setHTTPMethod:"GET" aRequest’s setCachePolicy:(current application’s NSURLRequestReloadIgnoringLocalCacheData) aRequest’s setHTTPShouldHandleCookies:false aRequest’s setTimeoutInterval:60 aRequest’s setValue:"application/json" forHTTPHeaderField:"Accept" set aRes to current application’s NSURLConnection’s sendSynchronousRequest:aRequest returningResponse:(reference) |error|:(missing value) set resList to aRes as list set bRes to contents of (first item of resList) set resStr to current application’s NSString’s alloc()’s initWithData:bRes encoding:(current application’s NSUTF8StringEncoding) set jsonString to current application’s NSString’s stringWithString:resStr set jsonData to jsonString’s dataUsingEncoding:(current application’s NSUTF8StringEncoding) set aJsonDict to current application’s NSJSONSerialization’s JSONObjectWithData:jsonData options:0 |error|:(missing value) –Get Response Code & Header set dRes to contents of second item of resList if dRes is not equal to missing value then set resCode to (dRes’s statusCode()) as number set resHeaders to (dRes’s allHeaderFields()) as record else set resCode to 0 set resHeaders to {} end if return {json:aJsonDict, responseCode:resCode, responseHeader:resHeaders} end callRestGETAPIAndParseResults on retURLwithParams(aBaseURL, aRec) set aDic to current application’s NSMutableDictionary’s dictionaryWithDictionary:aRec set aKeyList to (aDic’s allKeys()) as list set aValList to (aDic’s allValues()) as list set aLen to length of aKeyList set qList to {} repeat with i from 1 to aLen set aName to contents of item i of aKeyList set aVal to contents of item i of aValList set the end of qList to (current application’s NSURLQueryItem’s queryItemWithName:aName value:aVal) end repeat set aComp to current application’s NSURLComponents’s alloc()’s initWithString:aBaseURL aComp’s setQueryItems:qList set aURL to (aComp’s |URL|()’s absoluteString()) as text return aURL end retURLwithParams on urlencodeStr(aStr) set aString to current application’s NSString’s stringWithString:aStr set aString to (aString’s stringByAddingPercentEncodingWithAllowedCharacters:(current application’s NSCharacterSet’s URLQueryAllowedCharacterSet())) as text return aString end urlencodeStr |
connpassイベントサーチAPIで検索を行うv2
| AppleScript名:connpassイベントサーチAPIで検索を行うv2 |
| — Created 2016-10-29 by Takaaki Naganoya — 2016 Piyomaru Software use AppleScript version "2.5" use scripting additions use framework "Foundation" –http://connpass.com/about/api/ –http://piyocast.com/as/archives/4300 set reqURLStr to "https://connpass.com/api/v1/event/" set aRec to {keyword:"AppleScript", ym:"201611"} –サーチクエリーと対象月 set aURL to retURLwithParams(reqURLStr, aRec) of me set aRes to callRestGETAPIAndParseResults(aURL) of me set aRESTres to (json of aRes) as record return aRESTres –> (* {results_available:1, results_start:1, |events|:{{place:"マイ・スペース MS&BB 池袋西武横店 1号室", event_url:"http://ashole.connpass.com/event/44103/", accepted:2, title:"AppleScript本フィードバック会", limit:7, event_type:"participation", owner_id:64136, ended_at:"2016-11-26T20:30:00+09:00", updated_at:"2016-11-01T09:22:15+09:00", lon:"139.711383200000", waiting:0, event_id:44103, hash_tag:"AppleScript,Mac,macOS,Mac OS X", owner_nickname:"Piyomaru", lat:"35.726486900000", started_at:"2016-11-26T18:30:00+09:00", owner_display_name:"Piyomaru", catch:"「AppleScript最新リファレンス」「AppleScript最新10大技術」についての解説", series:{|url|:"http://ashole.connpass.com/", |id|:3041, title:"AppleScriptの穴"}, address:"〒171-0022 東京都豊島区南池袋1-16-20(ぬかりやビル2階)", |description|:"<p>macOS標準装備で、GUIアプリケーションを操作できるマクロ言語「AppleScript」、その20年以上の歴史をまとめ、最新情報を盛り込んだ電子書籍「AppleScript最新リファレンス」「AppleScript 最新10大技術」を発行いたしました。</p>\n<p>・電子書籍オンライン販売URL\n<a href=\"https://piyomarusoft.booth.pm\" rel=\"nofollow\">https://piyomarusoft.booth.pm</a></p>\n<p>これらの本について、分からない点やもっと知りたい点について、筆者本人と直接お話できる場を設けました。</p>\n<p>参加資格は、AppleScriptを実際に使っている方、興味を持っている方で、筆者の書籍を実際に購入した、あるいは購入しようと考えている方です。事前に内容を読んであることが望ましいです。</p>\n<p>筆者Blog「AppleScriptの穴」\n<a href=\"http://piyocast.com/as/\" rel=\"nofollow\">http://piyocast.com/as/</a></p>"}}, results_returned:1} *) –GET methodのREST APIを呼ぶ on callRestGETAPIAndParseResults(aURL) set aRequest to current application’s NSMutableURLRequest’s requestWithURL:(current application’s |NSURL|’s URLWithString:aURL) aRequest’s setHTTPMethod:"GET" aRequest’s setCachePolicy:(current application’s NSURLRequestReloadIgnoringLocalCacheData) aRequest’s setHTTPShouldHandleCookies:false aRequest’s setTimeoutInterval:60 aRequest’s setValue:"application/json" forHTTPHeaderField:"Accept" set aRes to current application’s NSURLConnection’s sendSynchronousRequest:aRequest returningResponse:(reference) |error|:(missing value) set resList to aRes as list set bRes to contents of (first item of resList) set resStr to current application’s NSString’s alloc()’s initWithData:bRes encoding:(current application’s NSUTF8StringEncoding) set jsonString to current application’s NSString’s stringWithString:resStr set jsonData to jsonString’s dataUsingEncoding:(current application’s NSUTF8StringEncoding) set aJsonDict to current application’s NSJSONSerialization’s JSONObjectWithData:jsonData options:0 |error|:(missing value) –Get Response Code & Header set dRes to contents of second item of resList if dRes is not equal to missing value then set resCode to (dRes’s statusCode()) as number set resHeaders to (dRes’s allHeaderFields()) as record else set resCode to 0 set resHeaders to {} end if return {json:aJsonDict, responseCode:resCode, responseHeader:resHeaders} end callRestGETAPIAndParseResults on retURLwithParams(aBaseURL, aRec) set aDic to current application’s NSMutableDictionary’s dictionaryWithDictionary:aRec set aKeyList to (aDic’s allKeys()) as list set aValList to (aDic’s allValues()) as list set aLen to length of aKeyList set qList to {} repeat with i from 1 to aLen set aName to contents of item i of aKeyList set aVal to contents of item i of aValList set the end of qList to (current application’s NSURLQueryItem’s queryItemWithName:aName value:aVal) end repeat set aComp to current application’s NSURLComponents’s alloc()’s initWithString:aBaseURL aComp’s setQueryItems:qList set aURL to (aComp’s |URL|()’s absoluteString()) as text return aURL end retURLwithParams on urlencodeStr(aStr) set aString to current application’s NSString’s stringWithString:aStr set aString to (aString’s stringByAddingPercentEncodingWithAllowedCharacters:(current application’s NSCharacterSet’s URLQueryAllowedCharacterSet())) as text return aString end urlencodeStr |
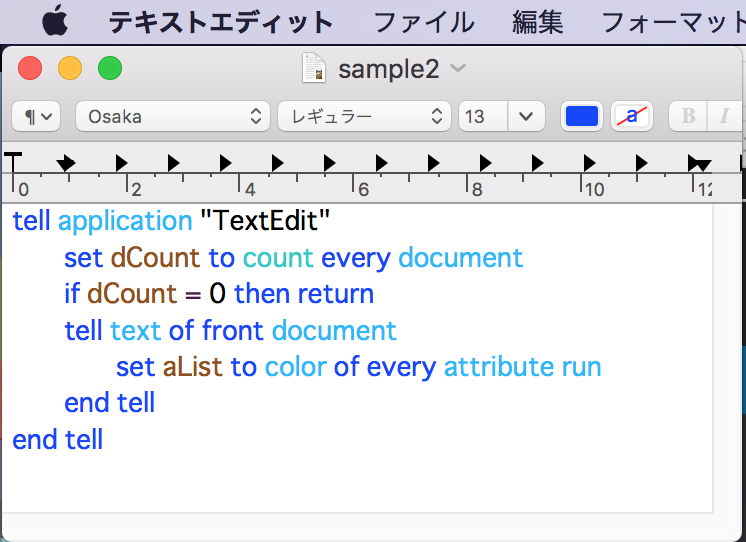
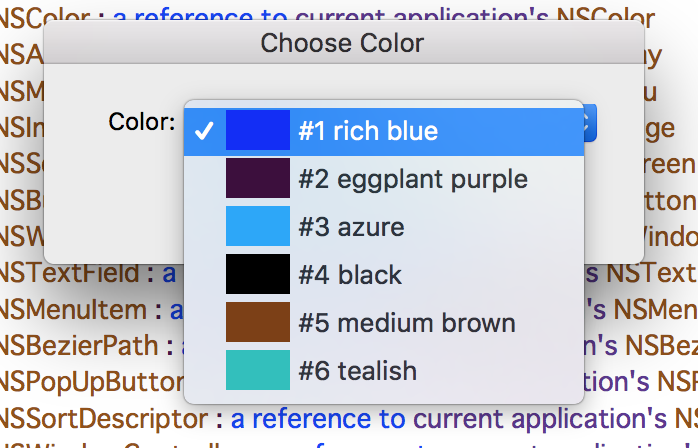
TextEditで最前面のドキュメント内で使用されている色情報を抽出して処理対象色を選択(色名の計算機能つき)v3
TextEditの最前面の書類本文の色情報を抽出し、ダイアログ上に色選択ポップアップを作成して処理対象色をえらび、該当する色の文字を抽出するAppleScriptです。
DBColorNames.frameworkを用いて、900色程度の色見本から近似の色名称を計算しています。
| AppleScript名:TextEditで最前面のドキュメント内で使用されている色情報を抽出して処理対象色を選択(色名の計算機能つき)v3 |
| — Created 2017-12-26 by Takaaki Naganoya — 2017 Piyomaru Software use AppleScript version "2.5" use scripting additions use framework "Foundation" use framework "AppKit" use framework "Carbon" — AEInteractWithUser() is in Carbon use framework "dbColNamesKit" –https://github.com/daniel-beard/DBColorNames/ property NSView : a reference to current application’s NSView property NSColor : a reference to current application’s NSColor property NSArray : a reference to current application’s NSArray property NSMenu : a reference to current application’s NSMenu property NSImage : a reference to current application’s NSImage property NSScreen : a reference to current application’s NSScreen property NSButton : a reference to current application’s NSButton property NSWindow : a reference to current application’s NSWindow property NSTextField : a reference to current application’s NSTextField property NSMenuItem : a reference to current application’s NSMenuItem property NSBezierPath : a reference to current application’s NSBezierPath property NSPopUpButton : a reference to current application’s NSPopUpButton property NSSortDescriptor : a reference to current application’s NSSortDescriptor property NSWindowController : a reference to current application’s NSWindowController property NSTitledWindowMask : a reference to current application’s NSTitledWindowMask property NSRoundedBezelStyle : a reference to current application’s NSRoundedBezelStyle property NSNormalWindowLevel : a reference to current application’s NSNormalWindowLevel property NSBackingStoreBuffered : a reference to current application’s NSBackingStoreBuffered property NSMomentaryLightButton : a reference to current application’s NSMomentaryLightButton property windisp : false if current application’s AEInteractWithUser(-1, missing value, missing value) is not equal to 0 then return tell application "TextEdit" set dCount to count every document if dCount = 0 then return tell text of front document set aList to color of every attribute run end tell end tell –1D/2D Listのユニーク化 set ap1List to uniquify1DList(aList, true) of me –色選択ダイアログを表示してポップアップメニューから色選択 set aButtonMSG to "OK" set aWindowTitle to "Choose Color" set aVal to getPopupValues(ap1List, 65535, aButtonMSG, aWindowTitle, 180) of me if (aVal = false) or (aVal = missing value) then display dialog "No Selection" buttons {"OK"} default button 1 with icon 2 return end if set targColor to item aVal of ap1List set aRes to pickupColoredText(targColor) of me set the clipboard to aRes –抽出結果をクリップボードへ return aRes on getPopupValues(ap1List, aColMax, aButtonMSG, aWindowMSG, timeOutSecs) set (my windisp) to true set aView to NSView’s alloc()’s initWithFrame:(current application’s NSMakeRect(0, 0, 360, 100)) –Labelをつくる set a1TF to NSTextField’s alloc()’s initWithFrame:(current application’s NSMakeRect(30, 60, 80, 20)) a1TF’s setEditable:false a1TF’s setStringValue:"Color:" a1TF’s setDrawsBackground:false a1TF’s setBordered:false –Ppopup Buttonをつくる set a1Button to NSPopUpButton’s alloc()’s initWithFrame:(current application’s NSMakeRect(80, 60, 200, 20)) pullsDown:false a1Button’s removeAllItems() set a1Menu to NSMenu’s alloc()’s init() set iCount to 1 repeat with i in ap1List copy i to {rCol, gCol, bCol} set j to contents of i set aCocoaList to retCocoaColorList(j, aColMax) of me set nsCol to (NSColor’s colorFromRGBAArray:aCocoaList) set anImage to makeNSImageWithFilledWithColor(32, 20, nsCol) of me set aColName to retColorDetailName(rCol, gCol, bCol, 65535) of me set aTitle to "#" & (iCount as string) & " " & aColName set aMenuItem to (NSMenuItem’s alloc()’s initWithTitle:aTitle action:"actionHandler:" keyEquivalent:"") (aMenuItem’s setImage:anImage) (aMenuItem’s setEnabled:true) (a1Menu’s addItem:aMenuItem) set iCount to iCount + 1 end repeat a1Button’s setMenu:a1Menu –Buttonをつくる set bButton to (NSButton’s alloc()’s initWithFrame:(current application’s NSMakeRect(80, 10, 140, 40))) bButton’s setButtonType:(current application’s NSMomentaryLightButton) bButton’s setBezelStyle:(current application’s NSRoundedBezelStyle) bButton’s setTitle:aButtonMSG bButton’s setTarget:me bButton’s setAction:("clicked:") bButton’s setKeyEquivalent:(return) aView’s addSubview:a1TF aView’s addSubview:a1Button aView’s addSubview:bButton aView’s setNeedsDisplay:true –NSWindowControllerを作ってみた set aWin to (my makeWinWithView(aView, 300, 100, aWindowMSG)) set wController to NSWindowController’s alloc() wController’s initWithWindow:aWin wController’s showWindow:me set aCount to timeOutSecs * 100 set hitF to false repeat aCount times if (my windisp) = false then set hitF to true exit repeat end if delay 0.01 set aCount to aCount – 1 end repeat my closeWin:aWin if hitF = true then set s1Val to (a1Button’s indexOfSelectedItem() as integer) + 1 else set s1Val to false end if return s1Val end getPopupValues on clicked:aSender set (my windisp) to false end clicked: –make Window for Display on makeWinWithView(aView, aWinWidth, aWinHeight, aTitle) set aScreen to NSScreen’s mainScreen() set aFrame to {{0, 0}, {aWinWidth, aWinHeight}} set aBacking to current application’s NSTitledWindowMask set aDefer to current application’s NSBackingStoreBuffered — Window set aWin to NSWindow’s alloc() (aWin’s initWithContentRect:aFrame styleMask:aBacking backing:aDefer defer:false screen:aScreen) –aWin’s setBackgroundColor:(current application’s NSColor’s whiteColor()) aWin’s setTitle:aTitle aWin’s setDelegate:me aWin’s setDisplaysWhenScreenProfileChanges:true aWin’s setHasShadow:true aWin’s setIgnoresMouseEvents:false aWin’s setLevel:(current application’s NSNormalWindowLevel) aWin’s setOpaque:false aWin’s setReleasedWhenClosed:true aWin’s |center|() –aWin’s makeKeyAndOrderFront:(me) aWin’s setContentView:aView return aWin end makeWinWithView –close win on closeWin:aWindow repeat with n from 10 to 1 by -1 (aWindow’s setAlphaValue:n / 10) delay 0.02 end repeat aWindow’s |close|() end closeWin: –Popup Action Handler on actionHandler:sender set aTag to tag of sender as integer set aTitle to title of sender as string end actionHandler: on makeNSColorFromRGBAval(redValue as integer, greenValue as integer, blueValue as integer, alphaValue as integer, aMaxVal as integer) set aRedCocoa to (redValue / aMaxVal) as real set aGreenCocoa to (greenValue / aMaxVal) as real set aBlueCocoa to (blueValue / aMaxVal) as real set aAlphaCocoa to (alphaValue / aMaxVal) as real set aColor to NSColor’s colorWithCalibratedRed:aRedCocoa green:aGreenCocoa blue:aBlueCocoa alpha:aAlphaCocoa return aColor end makeNSColorFromRGBAval –1D Listをユニーク化 on uniquify1DList(theList as list, aBool as boolean) set aArray to NSArray’s arrayWithArray:theList set bArray to aArray’s valueForKeyPath:"@distinctUnionOfObjects.self" set bList to bArray as list return bList end uniquify1DList –指定サイズのNSImageを作成し、指定色で塗って返す on makeNSImageWithFilledWithColor(aWidth, aHeight, fillColor) set anImage to NSImage’s alloc()’s initWithSize:(current application’s NSMakeSize(aWidth, aHeight)) anImage’s lockFocus() — set theRect to {{x:0, y:0}, {height:aHeight, width:aWidth}} set theNSBezierPath to NSBezierPath’s bezierPath theNSBezierPath’s appendBezierPathWithRect:theRect — fillColor’s |set|() –色設定 theNSBezierPath’s fill() –ぬりつぶし — anImage’s unlockFocus() — return anImage end makeNSImageWithFilledWithColor on pickupColoredText(aColList) set outStrList to "" tell application "TextEdit" tell text of front document set colorList to color of every attribute run set textList to characters of every attribute run set aCount to length of colorList repeat with i from 1 to aCount set aColCon to item i of colorList if aColCon is equal to aColList then –指定色の箇所 set outStrList to outStrList & ((contents of item i of textList) as string) & return end if end repeat end tell end tell return outStrList end pickupColoredText on retColorDetailName(rCol as integer, gCol as integer, bCol as integer, aColorMax) set aColor to makeNSColorFromRGBAval(rCol, gCol, bCol, aColorMax, aColorMax) of me set aCDB to current application’s DBColorNames’s alloc()’s init() set aColorStr to (aCDB’s nameForColor:aColor) as string return aColorStr end retColorDetailName on retCocoaColorList(aColorList as list, aMax as integer) set tmpList to {} repeat with i in aColorList set j to (contents of i) if j = 0 then set the end of tmpList to 0 else set the end of tmpList to (j / aMax) as real end if end repeat set the end of tmpList to 1.0 return tmpList end retCocoaColorList –数値の1D List with Recordをソート on sort1DRecList(aList as list, aKey as string, ascendingF as boolean) set aArray to NSArray’s arrayWithArray:aList set desc1 to NSSortDescriptor’s sortDescriptorWithKey:aKey ascending:ascendingF selector:"compare:" set bList to (aArray’s sortedArrayUsingDescriptors:{desc1}) as list return bList end sort1DRecList |
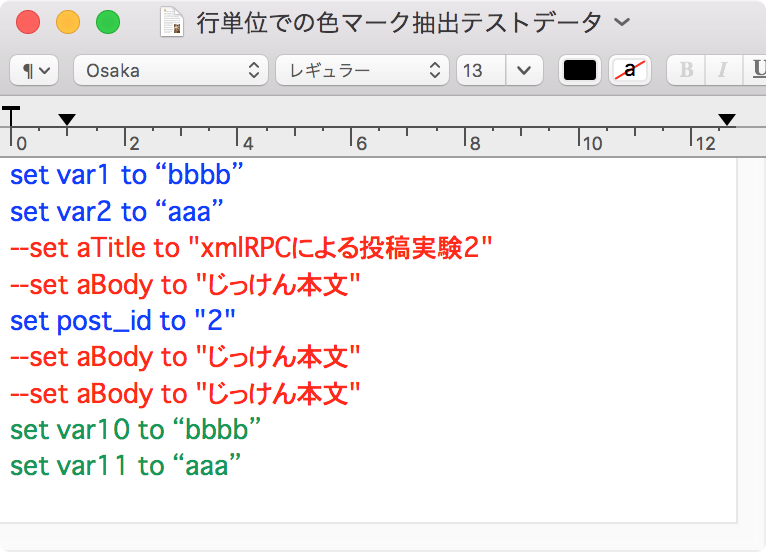
TextEditの文章のうち赤っぽい色でマークされた箇所をピックアップする v2
TextEditの最前面の書類本文のうち、指定の色名称の色(red)に分類できる文字を出力するAppleScriptです。
| AppleScript名:TextEditの文章のうち赤っぽい色でマークされた行をカウントする v2 |
| — Created 2018-01-08 by Takaaki Naganoya — 2018 Piyomaru Software use AppleScript version "2.4" use scripting additions use framework "Foundation" use framework "AppKit" property NSColor : a reference to current application’s NSColor set rNum to 0 set colMax to 65535 tell application "TextEdit" tell text of document 1 set pCount to (count paragraphs) repeat with i from 1 to pCount set {rCol, gCol, bCol} to color of paragraph i set cName to retColorDomainName(rCol, gCol, bCol, colMax) of me if cName = "red" then –{r, g, b} set rNum to rNum + 1 end if end repeat end tell end tell return {pCount, rNum} on retColorDomainName(rCol as integer, gCol as integer, bCol as integer, aColorMax) set aCol to makeNSColorFromRGBAval(rCol, gCol, bCol, aColorMax, aColorMax) of me set hueVal to aCol’s hueComponent() set satVal to aCol’s saturationComponent() set brightVal to aCol’s brightnessComponent() if satVal ≤ 0.01 then set satVal to 0.0 set colName to "" if satVal = 0.0 then if brightVal ≤ 0.2 then set colName to "black" else if (brightVal > 0.95) then set colName to "white" else set colName to "gray" end if else if hueVal ≤ (15.0 / 360) or hueVal ≥ (330 / 360) then set colName to "red" else if hueVal ≤ (45.0 / 360) then set colName to "orange" else if hueVal < (70.0 / 360) then set colName to "yellow" else if hueVal < (150.0 / 360) then set colName to "green" else if hueVal < (190.0 / 360) then set colName to "cyan" else if (hueVal < 250.0 / 360.0) then set colName to "blue" else if (hueVal < 290.0 / 360.0) then set colName to "purple" else set colName to "magenta" end if end if return colName end retColorDomainName on makeNSColorFromRGBAval(redValue as integer, greenValue as integer, blueValue as integer, alphaValue as integer, aMaxVal as integer) set aRedCocoa to (redValue / aMaxVal) as real set aGreenCocoa to (greenValue / aMaxVal) as real set aBlueCocoa to (blueValue / aMaxVal) as real set aAlphaCocoa to (alphaValue / aMaxVal) as real set aColor to NSColor’s colorWithCalibratedRed:aRedCocoa green:aGreenCocoa blue:aBlueCocoa alpha:aAlphaCocoa return aColor end makeNSColorFromRGBAval |
TextEditで本文中の使用色をリストアップ(色判定つき)v3
TextEditの最前面のドキュメントの本文色を取得して名称に変換して返すAppleScriptです。
本文中で「だいたいこの系統の色」が使われているかをリストアップします。
–> {“blue”, “red”, “green”}
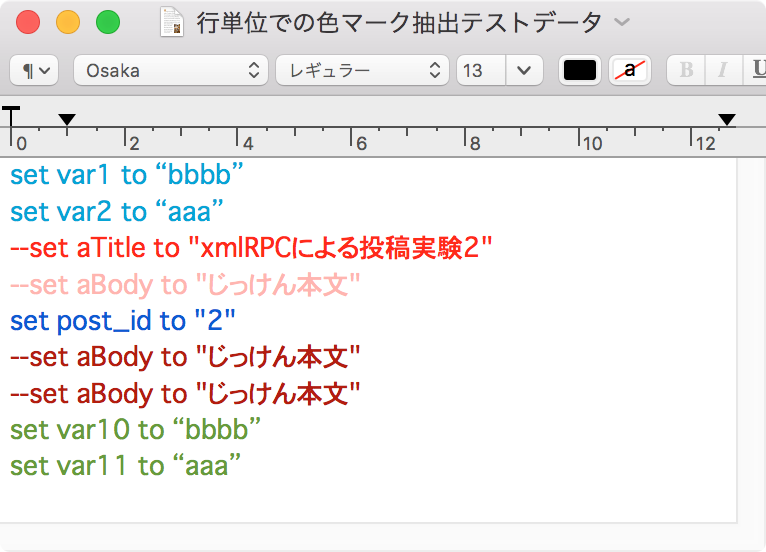
ただし、いろいろ編集していると改行文字の箇所に意図しない色がついていることがあり、見た目だけではわからない色が検出されるケースもあります。そのような場合には、TextEditの文章のうち赤っぽい色でマークされた箇所をピックアップする v2を使って指定色に該当する箇所の文字データを抽出して確認してください(ペアで使うことを前提に書いたので)。
| AppleScript名:TextEditで本文中の使用色をリストアップ(色判定つき)v3 |
| — Created 2018-02-06 by Takaaki Naganoya — 2018 Piyomaru Software use AppleScript version "2.5" use scripting additions use framework "Foundation" use framework "AppKit" property NSColor : a reference to current application’s NSColor property NSArray : a reference to current application’s NSArray property NSSortDescriptor : a reference to current application’s NSSortDescriptor set colMax to 65535 tell application "TextEdit" set dCount to count every document if dCount = 0 then return tell text of front document set aList to color of every attribute run end tell end tell set ap1List to uniquify1DList(aList, true) of me set cList to {} repeat with i in ap1List copy i to {rCol, gCol, bCol} set cName to retColorDomainName(rCol, gCol, bCol, colMax) of me if cName is not in cList then set the end of cList to cName end if end repeat return cList –> {"blue", "red", "green"} –1D Listをユニーク化 on uniquify1DList(theList as list, aBool as boolean) set aArray to NSArray’s arrayWithArray:theList set bArray to aArray’s valueForKeyPath:"@distinctUnionOfObjects.self" set bList to bArray as list return bList end uniquify1DList on retColorDomainName(rCol as integer, gCol as integer, bCol as integer, aColorMax) set aCol to makeNSColorFromRGBAval(rCol, gCol, bCol, aColorMax, aColorMax) of me set hueVal to aCol’s hueComponent() set satVal to aCol’s saturationComponent() set brightVal to aCol’s brightnessComponent() if satVal ≤ 0.01 then set satVal to 0.0 set colName to "" if satVal = 0.0 then if brightVal ≤ 0.2 then set colName to "black" else if (brightVal > 0.95) then set colName to "white" else set colName to "gray" end if else if hueVal ≤ (15.0 / 360) or hueVal ≥ (330 / 360) then set colName to "red" else if hueVal ≤ (45.0 / 360) then set colName to "orange" else if hueVal < (70.0 / 360) then set colName to "yellow" else if hueVal < (150.0 / 360) then set colName to "green" else if hueVal < (190.0 / 360) then set colName to "cyan" else if (hueVal < 250.0 / 360.0) then set colName to "blue" else if (hueVal < 290.0 / 360.0) then set colName to "purple" else set colName to "magenta" end if end if return colName end retColorDomainName on makeNSColorFromRGBAval(redValue as integer, greenValue as integer, blueValue as integer, alphaValue as integer, aMaxVal as integer) set aRedCocoa to (redValue / aMaxVal) as real set aGreenCocoa to (greenValue / aMaxVal) as real set aBlueCocoa to (blueValue / aMaxVal) as real set aAlphaCocoa to (alphaValue / aMaxVal) as real set aColor to NSColor’s colorWithCalibratedRed:aRedCocoa green:aGreenCocoa blue:aBlueCocoa alpha:aAlphaCocoa return aColor end makeNSColorFromRGBAval –数値の1D List with Recordをソート on sort1DRecList(aList as list, aKey as string, ascendingF as boolean) set aArray to NSArray’s arrayWithArray:aList set desc1 to NSSortDescriptor’s sortDescriptorWithKey:aKey ascending:ascendingF selector:"compare:" set bList to (aArray’s sortedArrayUsingDescriptors:{desc1}) as list return bList end sort1DRecList |
TextEditで本文色をポスタライズ v2
▲Before
▲After
| AppleScript名:TextEditで本文色をポスタライズ v2 |
| — Created 2018-01-08 by Takaaki Naganoya — 2018 Piyomaru Software use AppleScript version "2.4" use scripting additions use framework "Foundation" use framework "AppKit" use bPlus : script "BridgePlus" –https://www.macosxautomation.com/applescript/apps/BridgePlus.html property NSColor : a reference to current application’s NSColor property NSArray : a reference to current application’s NSArray property NSSortDescriptor : a reference to current application’s NSSortDescriptor script spd property colList : {} property attList : {} end script load framework set cList to retTextEditColors() of me set dList to {} repeat with i in cList copy i to {rVal, gVal, bVal} set newColList to posterizeColor(rVal, gVal, bVal, 65535) of me repTextEditColor(i, newColList) of me end repeat on repTextEditColor(targColor, newColor) set hitIndex to {} tell application "TextEdit" tell text of front document set colList to color of every attribute run end tell end tell set hitIndex to (current application’s SMSForder’s indexesOfItem:targColor inArray:(colList) inverting:false) as list tell application "TextEdit" tell text of front document repeat with i in hitIndex ignoring application responses set color of attribute run (i + 1) to newColor –0 based index to 1 based index conversion end ignoring end repeat end tell end tell end repTextEditColor on posterizeColor(rCol as integer, gCol as integer, bCol as integer, aColorMax) set aCol to makeNSColorFromRGBAval(rCol, gCol, bCol, aColorMax, aColorMax) of me set hueVal to aCol’s hueComponent() set satVal to aCol’s saturationComponent() set brightVal to aCol’s brightnessComponent() if satVal ≤ 0.01 then set satVal to 0.0 if satVal = 0.0 then if brightVal ≤ 0.2 then set colVal to {0, 0, 0} –Black else if (brightVal > 0.95) then set colVal to {65535, 65535, 65535} –White else set colVal to {32768, 32768, 32768} –Gray end if else if hueVal ≤ (15.0 / 360) or hueVal ≥ (330 / 360) then set colVal to {65535, 0, 0} –red else if hueVal ≤ (45.0 / 360) then set colVal to {65535, 32768, 0} –orange else if hueVal < (70.0 / 360) then set colVal to {65533, 63639, 2654} –yellow else if hueVal < (150.0 / 360) then set colVal to {4626, 35488, 17789} –green else if hueVal < (190.0 / 360) then set colVal to {0, 60802, 65535} –cyan, light blue else if (hueVal < 250.0 / 360.0) then set colVal to {0, 0, 65535} –blue else if (hueVal < 290.0 / 360.0) then set colVal to {32768, 0, 32768} –purple else set colVal to {65535, 0, 65535} –magenta, pink end if end if return colVal end posterizeColor on makeNSColorFromRGBAval(redValue as integer, greenValue as integer, blueValue as integer, alphaValue as integer, aMaxVal as integer) set aRedCocoa to (redValue / aMaxVal) as real set aGreenCocoa to (greenValue / aMaxVal) as real set aBlueCocoa to (blueValue / aMaxVal) as real set aAlphaCocoa to (alphaValue / aMaxVal) as real set aColor to NSColor’s colorWithCalibratedRed:aRedCocoa green:aGreenCocoa blue:aBlueCocoa alpha:aAlphaCocoa return aColor end makeNSColorFromRGBAval on retTextEditColors() tell application "TextEdit" set dCount to count every document if dCount = 0 then return tell text of front document set aList to color of every character end tell end tell set ap1List to uniquify1DList(aList, true) of me set cList to {} repeat with i in ap1List set the end of cList to contents of i end repeat return cList end retTextEditColors –1D Listをユニーク化 on uniquify1DList(theList as list, aBool as boolean) set aArray to NSArray’s arrayWithArray:theList set bArray to aArray’s valueForKeyPath:"@distinctUnionOfObjects.self" set bList to bArray as list return bList end uniquify1DList |
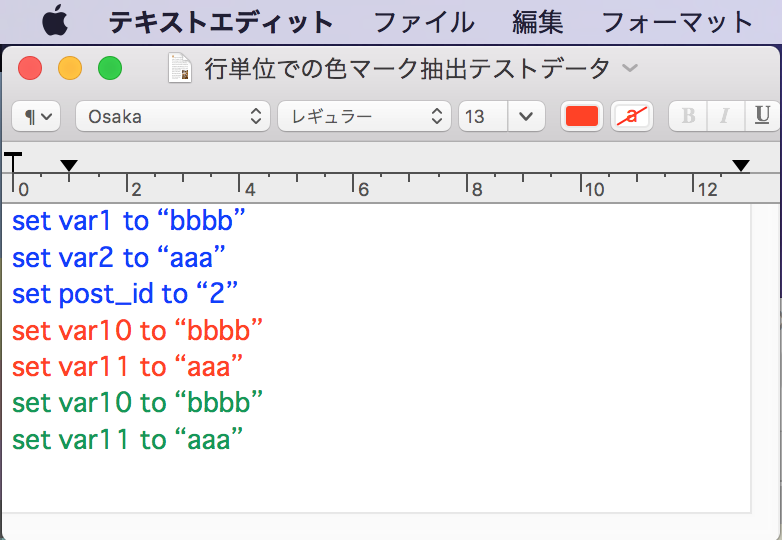
TextEditの文章のうち赤っぽい色でマークされた行をカウントする v2
TextEditでオープン中の最前面のドキュメント本文の色情報にアクセスして、「赤っぽい色」でマークされた行をカウントするAppleScriptです。

RGB色からHSB色に変換して、おおよその色の名前を計算することで、「赤っぽい色でマークされた行」を抽出してカウントできるようにしてみました。
テストのためにTextEditで処理してみましたが、PagesでもKeynoteでも、InDesignでもIllustratorでも同様のアプローチで色を数値から「だいたいの色」に抽象化することで、高度な判定処理を行うことが可能になります。
| AppleScript名:TextEditの文章のうち赤っぽい色でマークされた行をカウントする v2 |
| — Created 2018-01-08 by Takaaki Naganoya — 2018 Piyomaru Software use AppleScript version "2.4" use scripting additions use framework "Foundation" use framework "AppKit" property NSColor : a reference to current application’s NSColor set rNum to 0 set colMax to 65535 tell application "TextEdit" tell text of document 1 set pCount to (count paragraphs) repeat with i from 1 to pCount set {rCol, gCol, bCol} to color of paragraph i set cName to retColorDomainName(rCol, gCol, bCol, colMax) of me if cName = "red" then –{r, g, b} set rNum to rNum + 1 end if end repeat end tell end tell return {pCount, rNum} on retColorDomainName(rCol as integer, gCol as integer, bCol as integer, aColorMax) set aCol to makeNSColorFromRGBAval(rCol, gCol, bCol, aColorMax, aColorMax) of me set hueVal to aCol’s hueComponent() set satVal to aCol’s saturationComponent() set brightVal to aCol’s brightnessComponent() if satVal ≤ 0.01 then set satVal to 0.0 set colName to "" if satVal = 0.0 then if brightVal ≤ 0.2 then set colName to "black" else if (brightVal > 0.95) then set colName to "white" else set colName to "gray" end if else if hueVal ≤ (15.0 / 360) or hueVal ≥ (330 / 360) then set colName to "red" else if hueVal ≤ (45.0 / 360) then set colName to "orange" else if hueVal < (70.0 / 360) then set colName to "yellow" else if hueVal < (150.0 / 360) then set colName to "green" else if hueVal < (190.0 / 360) then set colName to "cyan" else if (hueVal < 250.0 / 360.0) then set colName to "blue" else if (hueVal < 290.0 / 360.0) then set colName to "purple" else set colName to "magenta" end if end if return colName end retColorDomainName on makeNSColorFromRGBAval(redValue as integer, greenValue as integer, blueValue as integer, alphaValue as integer, aMaxVal as integer) set aRedCocoa to (redValue / aMaxVal) as real set aGreenCocoa to (greenValue / aMaxVal) as real set aBlueCocoa to (blueValue / aMaxVal) as real set aAlphaCocoa to (alphaValue / aMaxVal) as real set aColor to NSColor’s colorWithCalibratedRed:aRedCocoa green:aGreenCocoa blue:aBlueCocoa alpha:aAlphaCocoa return aColor end makeNSColorFromRGBAval |
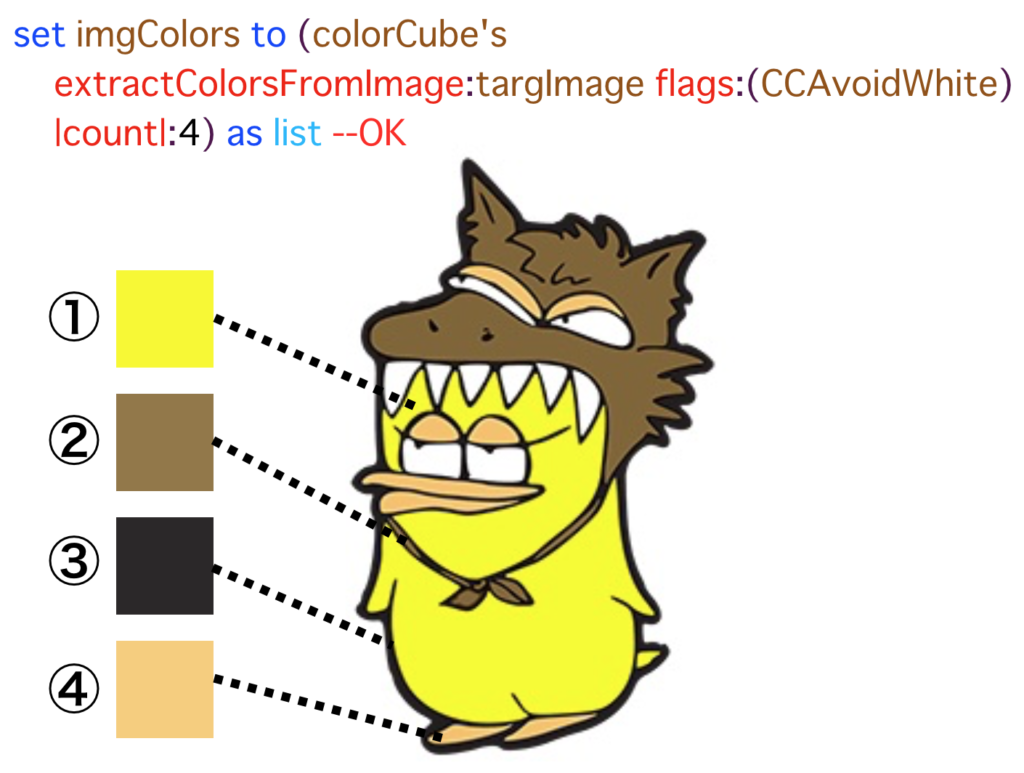
ColorCubeによる頻出色の抽出
ColorCube.frameworkを呼び出して、指定画像の頻出色を抽出するAppleScriptです。
抽出した色数をダイアログ表示したあとに、抽出した色をchoose colorダイアログで抽出色分だけプレビューします。JPEG画像からの色抽出はうまくできましたが、透過色つきのPNG画像の演算結果は納得行かないものがありました。JPEG推奨です。
ColorCubeには除外色の指定を明示的に(flagsではなく)指定できるはずですが、NSColor’s whiteColor()などで指定してもエラーになったので、flagsによる制御を推奨します。
| AppleScript名:ColorCubeによる頻出色の抽出 |
| — Created 2018-02-05 by Takaaki Naganoya — 2018 Piyomaru Software use AppleScript version "2.4" use scripting additions use framework "Foundation" use framework "AppKit" use framework "ColorCube" –https://github.com/pixelogik/ColorCube property CCOnlyBrightColors : 1 property CCOnlyDarkColors : 2 property CCOnlyDistinctColors : 4 property CCOrderByBrightness : 8 property CCOrderByDarkness : 16 property CCAvoidWhite : 32 property CCAvoidBlack : 64 –List up frequent colors from image set aFile to POSIX path of (choose file of type {"public.image"}) set targImage to current application’s NSImage’s alloc()’s initWithContentsOfFile:aFile set colorCube to current application’s CCColorCube’s alloc()’s init() –set imgColors to (colorCube’s extractColorsFromImage:targImage flags:(CCOnlyDistinctColors + CCAvoidWhite)) as list set imgColors to (colorCube’s extractColorsFromImage:targImage flags:(CCAvoidWhite) |count|:4) as list display dialog (length of imgColors) as string repeat with i in imgColors set r2Val to i’s redComponent() set g2Val to i’s greenComponent() set b2Val to i’s blueComponent() set a2Val to i’s alphaComponent() set r2Val to r2Val * 65535 set g2Val to g2Val * 65535 set b2Val to b2Val * 65535 choose color default color {r2Val, g2Val, b2Val} end repeat |
色付き単色画像を作成する

▲Original

▲Filtered Image
–> GPUImage.framework (To ~/Library/Frameworks/)
| AppleScript名:色付き単色画像を作成する |
| — Created 2017-02-11 by Takaaki Naganoya — 2017 Piyomaru Software use AppleScript version "2.4" use scripting additions use framework "Foundation" use framework "AppKit" use framework "GPUImage" –https://github.com/BradLarson/GPUImage set aFile to POSIX path of (choose file of type {"public.image"} with prompt "Select image 1") set fillColorR to current application’s NSColor’s redColor() set imgRes to makeMonoColoredImage(aFile, fillColorR) of me set fRes to retUUIDfilePath(aFile, "png") of me set bRes to saveNSImageAtPathAsPNG(imgRes, fRes) of me on retUUIDfilePath(aPath, aEXT) set aUUIDstr to (current application’s NSUUID’s UUID()’s UUIDString()) as string set aPath to ((current application’s NSString’s stringWithString:aPath)’s stringByDeletingLastPathComponent()’s stringByAppendingPathComponent:aUUIDstr)’s stringByAppendingPathExtension:aEXT return aPath end retUUIDfilePath on makeMonoColoredImage(aFile, NScolorObj) set aImage to current application’s NSImage’s alloc()’s initWithContentsOfFile:aFile return makeColoredNSImageWithColor(aImage, NScolorObj) of me –色付き単色画像を作成する end makeMonoColoredImage on makeColoredNSImageWithColor(aImage, fillColor) set aSize to aImage’s |size|() set aWidth to width of aSize set aHeight to height of aSize set newNSImage to makeNSImageWithFilledWithColor(aWidth, aHeight, fillColor) set grayImage to filterWithNSImage(aImage, "GPUImageGrayscaleFilter") of me set compImage to composeImageWithBlendFilter(grayImage, newNSImage, "GPUImageScreenBlendFilter") of me return compImage end makeColoredNSImageWithColor on filterWithNSImage(aNSImage, filterName as string) set aClass to current application’s NSClassFromString(filterName) set aImageFilter to aClass’s alloc()’s init() set aProcImg to (aImageFilter’s imageByFilteringImage:aNSImage) return aProcImg end filterWithNSImage on composeImageWithBlendFilter(aImage, bImage, filterName) set aClass to current application’s NSClassFromString(filterName) set blendFilter to aClass’s alloc()’s init() set pictureA to current application’s GPUImagePicture’s alloc()’s initWithImage:aImage pictureA’s addTarget:blendFilter pictureA’s processImage() set imgRes to blendFilter’s imageByFilteringImage:bImage return imgRes end composeImageWithBlendFilter –指定サイズの画像を作成し、指定色で塗ってNSImageで返す on makeNSImageWithFilledWithColor(aWidth, aHeight, fillColor) –Imageの作成 set curSize to current application’s NSMakeSize(aWidth, aHeight) set anImage to current application’s NSImage’s alloc()’s initWithSize:curSize anImage’s lockFocus() –描画開始 set theRect to {{x:0, y:0}, {height:aHeight, width:aWidth}} set theNSBezierPath to current application’s NSBezierPath’s bezierPath theNSBezierPath’s appendBezierPathWithRect:theRect fillColor’s |set|() –色設定 theNSBezierPath’s fill() –ぬりつぶし anImage’s unlockFocus() –描画ここまで –生成した画像のRaw画像を作成 set imageRep to anImage’s TIFFRepresentation() set aRawimg to current application’s NSBitmapImageRep’s imageRepWithData:imageRep set newImg to current application’s NSImage’s alloc()’s initWithSize:curSize newImg’s addRepresentation:aRawimg return newImg end makeNSImageWithFilledWithColor –NSImageを指定パスにPNG形式で保存 on saveNSImageAtPathAsPNG(anImage, outPath) set imageRep to anImage’s TIFFRepresentation() set aRawimg to current application’s NSBitmapImageRep’s imageRepWithData:imageRep set pathString to current application’s NSString’s stringWithString:outPath set newPath to pathString’s stringByExpandingTildeInPath() set myNewImageData to (aRawimg’s representationUsingType:(current application’s NSPNGFileType) |properties|:(missing value)) set aRes to (myNewImageData’s writeToFile:newPath atomically:true) as boolean return aRes –true/false end saveNSImageAtPathAsPNG |
CoreImageでフィルタしまくり
フィルタ名称をテキストで与えて動的に画像のフィルタ処理を変更させるAppleScriptです。
ただし、各CIFilterのパラメータまでは指定していないため、パラメータ値はデフォルトのままです。別途、パラメータ値を与えるようにすると有用性が増すことでしょう。
多数のCIFilterの名称をリスト(配列)で間接指定して、順次フィルター処理を行なってファイル出力する、というのが本プログラムの実験内容です。

▲Original

▲Filtered Image
| AppleScript名:CoreImageでフィルタしまくり |
| — Created 2014-12-09 by Takaaki Naganoya — 2014 Piyomaru Software use AppleScript version "2.4" use scripting additions use framework "Foundation" use framework "QuartzCore" property CIFilter : a reference to current application’s CIFilter property |NSURL| : a reference to current application’s |NSURL| property CIImage : a reference to current application’s CIImage property NSJPEGFileType : a reference to current application’s NSJPEGFileType property NSBitmapImageRep : a reference to current application’s NSBitmapImageRep –CIFilters (Not everything!!) From Apple’s Core Image Filter Reference set ciList to {"CIColorPosterize"} –{"CIColorInvert", "CIBoxBlur", "CIDiscBlur", "CIGaussianBlur", "CIMedianFilter", "CIMotionBlur", "CINoiseReduction", "CIZoomBlur", "CIColorMonochrome", "CIColorPosterize", "CIPhotoEffectChrome", "CISepiaTone", "CISharpenLuminance", "CIUnsharpMask", "CIKaleidoscope"} –画像を選択 set aPath to POSIX path of (choose file of type {"public.image"}) –すべてのフィルタを実行 repeat with i in ciList set j to contents of i set aRes to convAsFilteredJPEG(aPath, j) of me end repeat –CIFilterをかけたJPEG画像を生成 –参照:http://ashplanning.blogspot.jp/ のうちのどこか on convAsFilteredJPEG(aPath, aFilterName) set aURL to (|NSURL|’s fileURLWithPath:aPath) –Input set aPOSIX to (POSIX path of aPath) & "_" & aFilterName & ".jpg" –Output –CIImageを生成 set aCIImage to CIImage’s alloc()’s initWithContentsOfURL:aURL — CIFilter をフィルタの名前で生成 set aFilter to CIFilter’s filterWithName:aFilterName aFilter’s setDefaults() –各フィルタのパラメータはデフォルト(そこが問題) –Filterを実行 aFilter’s setValue:aCIImage forKey:"inputImage" set aOutImage to aFilter’s valueForKey:"outputImage" — NSBitmapImageRep を CIImage から生成 set aRep to NSBitmapImageRep’s alloc()’s initWithCIImage:aOutImage — NSBitmapImageRep から JPEG データを取得 set jpegData to aRep’s representationUsingType:(NSJPEGFileType) |properties|:(missing value) — ファイルに保存 return (jpegData’s writeToFile:aPOSIX atomically:true) as boolean end convAsFilteredJPEG |
CoreImageで指定画像をCIGaussianBlur
▲Original

▲Filtered Image
| AppleScript名:CoreImageで指定画像をCIGaussianBlur |
| — Created 2017-03-21 by Takaaki Naganoya — 2017 Piyomaru Software use AppleScript version "2.4" use scripting additions use framework "Foundation" use framework "QuartzCore" –画像を選択 set aPath to POSIX path of (choose file of type {"public.image"}) set aNSImage to current application’s NSImage’s alloc()’s initWithContentsOfFile:aPath set paramRec to {inputRadius:10.0} set imgRes to execCIFilterWithNSImageAndParams(aNSImage, "CIGaussianBlur", paramRec) of me set aDesktopPath to (current application’s NSProcessInfo’s processInfo()’s environment()’s objectForKey:("HOME"))’s stringByAppendingString:"/Desktop/" set savePath to aDesktopPath’s stringByAppendingString:((current application’s NSUUID’s UUID()’s UUIDString())’s stringByAppendingString:".png") set fRes to saveNSImageAtPathAsPNG(imgRes, savePath) of me –NSImageをCIImageに変換してCIfilterを実行 on execCIFilterWithNSImageAndParams(aNSImage, aFilterName as string, paramRec as record) set aDict to current application’s NSDictionary’s dictionaryWithDictionary:paramRec set aCIImage to convNSImageToCIimage(aNSImage) of me set aFilter to current application’s CIFilter’s filterWithName:aFilterName aFilter’s setDefaults() aFilter’s setValue:aCIImage forKey:"inputImage" set aOutImage to aFilter’s valueForKey:"outputImage" set keyList to aDict’s allKeys() as list repeat with i in keyList set aVal to (aDict’s valueForKey:i) as list of string or string –as anything (aFilter’s setValue:aVal forKey:(i as string)) end repeat set newNSImage to convCIimageToNSImage(aOutImage) of me return newNSImage end execCIFilterWithNSImageAndParams on convCIimageToNSImage(aCIImage) set aRep to current application’s NSBitmapImageRep’s alloc()’s initWithCIImage:aCIImage set tmpSize to aRep’s |size|() set newImg to current application’s NSImage’s alloc()’s initWithSize:tmpSize newImg’s addRepresentation:aRep return newImg end convCIimageToNSImage on convNSImageToCIimage(aNSImage) set tiffDat to aNSImage’s TIFFRepresentation() set aRep to current application’s NSBitmapImageRep’s imageRepWithData:tiffDat set newImg to current application’s CIImage’s alloc()’s initWithBitmapImageRep:aRep return newImg end convNSImageToCIimage –NSImageを指定パスにPNG形式で保存 on saveNSImageAtPathAsPNG(anImage, outPath) set imageRep to anImage’s TIFFRepresentation() set aRawimg to current application’s NSBitmapImageRep’s imageRepWithData:imageRep set pathString to current application’s NSString’s stringWithString:outPath set newPath to pathString’s stringByExpandingTildeInPath() set myNewImageData to (aRawimg’s representationUsingType:(current application’s NSPNGFileType) |properties|:(missing value)) set aRes to (myNewImageData’s writeToFile:newPath atomically:true) as boolean return aRes –成功ならtrue、失敗ならfalseが返る end saveNSImageAtPathAsPNG |
CoreImageで指定画像をCIDiscBlur
▲Original

▲Filtered Image
| AppleScript名:CoreImageで指定画像をCIDiscBlur |
| — Created 2017-03-21 by Takaaki Naganoya — 2017 Piyomaru Software use AppleScript version "2.4" use scripting additions use framework "Foundation" use framework "QuartzCore" –画像を選択 set aPath to POSIX path of (choose file of type {"public.image"}) set aNSImage to current application’s NSImage’s alloc()’s initWithContentsOfFile:aPath set paramRec to {inputRadius:10.0} set imgRes to execCIFilterWithNSImageAndParams(aNSImage, "CIDiscBlur", paramRec) of me set aDesktopPath to (current application’s NSProcessInfo’s processInfo()’s environment()’s objectForKey:("HOME"))’s stringByAppendingString:"/Desktop/" set savePath to aDesktopPath’s stringByAppendingString:((current application’s NSUUID’s UUID()’s UUIDString())’s stringByAppendingString:".png") set fRes to saveNSImageAtPathAsPNG(imgRes, savePath) of me –NSImageをCIImageに変換してCIfilterを実行 on execCIFilterWithNSImageAndParams(aNSImage, aFilterName as string, paramRec as record) set aDict to current application’s NSDictionary’s dictionaryWithDictionary:paramRec set aCIImage to convNSImageToCIimage(aNSImage) of me set aFilter to current application’s CIFilter’s filterWithName:aFilterName aFilter’s setDefaults() aFilter’s setValue:aCIImage forKey:"inputImage" set aOutImage to aFilter’s valueForKey:"outputImage" set keyList to aDict’s allKeys() as list repeat with i in keyList set aVal to (aDict’s valueForKey:i) as list of string or string –as anything (aFilter’s setValue:aVal forKey:(i as string)) end repeat set newNSImage to convCIimageToNSImage(aOutImage) of me return newNSImage end execCIFilterWithNSImageAndParams on convCIimageToNSImage(aCIImage) set aRep to current application’s NSBitmapImageRep’s alloc()’s initWithCIImage:aCIImage set tmpSize to aRep’s |size|() set newImg to current application’s NSImage’s alloc()’s initWithSize:tmpSize newImg’s addRepresentation:aRep return newImg end convCIimageToNSImage on convNSImageToCIimage(aNSImage) set tiffDat to aNSImage’s TIFFRepresentation() set aRep to current application’s NSBitmapImageRep’s imageRepWithData:tiffDat set newImg to current application’s CIImage’s alloc()’s initWithBitmapImageRep:aRep return newImg end convNSImageToCIimage –NSImageを指定パスにPNG形式で保存 on saveNSImageAtPathAsPNG(anImage, outPath) set imageRep to anImage’s TIFFRepresentation() set aRawimg to current application’s NSBitmapImageRep’s imageRepWithData:imageRep set pathString to current application’s NSString’s stringWithString:outPath set newPath to pathString’s stringByExpandingTildeInPath() set myNewImageData to (aRawimg’s representationUsingType:(current application’s NSPNGFileType) |properties|:(missing value)) set aRes to (myNewImageData’s writeToFile:newPath atomically:true) as boolean return aRes –成功ならtrue、失敗ならfalseが返る end saveNSImageAtPathAsPNG |
CoreImageで指定画像をCIColorMonochrome
▲Original

▲Filtered Image
| AppleScript名:CoreImageで指定画像をCIColorMonochrome |
| — Created 2017-03-21 by Takaaki Naganoya — 2017 Piyomaru Software use AppleScript version "2.4" use scripting additions use framework "Foundation" use framework "QuartzCore" use framework "AppKit" property CIFilter : a reference to current application’s CIFilter property CIColor : a reference to current application’s CIColor property NSUUID : a reference to current application’s NSUUID property CIImage : a reference to current application’s CIImage property NSColor : a reference to current application’s NSColor property NSString : a reference to current application’s NSString property NSImage : a reference to current application’s NSImage property NSDictionary : a reference to current application’s NSDictionary property NSProcessInfo : a reference to current application’s NSProcessInfo property NSPNGFileType : a reference to current application’s NSPNGFileType property NSBitmapImageRep : a reference to current application’s NSBitmapImageRep –画像を選択 set aPath to POSIX path of (choose file of type {"public.image"}) set aNSImage to NSImage’s alloc()’s initWithContentsOfFile:aPath set aCIColor to makeCIColorFromParams(0.0, 1.0, 0.0, 1.0) of me set paramRec to {inputColor:aCIColor, inputIntensity:1.0} set imgRes to execCIFilterWithNSImageAndParams(aNSImage, "CIColorMonochrome", paramRec) of me set aDesktopPath to (NSProcessInfo’s processInfo()’s environment()’s objectForKey:("HOME"))’s stringByAppendingString:"/Desktop/" set savePath to aDesktopPath’s stringByAppendingString:((NSUUID’s UUID()’s UUIDString())’s stringByAppendingString:".png") set fRes to saveNSImageAtPathAsPNG(imgRes, savePath) of me –NSImageをCIImageに変換してCIfilterを実行 on execCIFilterWithNSImageAndParams(aNSImage, aFilterName as string, paramRec as record) set aDict to NSDictionary’s dictionaryWithDictionary:paramRec set aCIImage to convNSImageToCIimage(aNSImage) of me set aFilter to CIFilter’s filterWithName:aFilterName aFilter’s setDefaults() aFilter’s setValue:aCIImage forKey:"inputImage" set aOutImage to aFilter’s valueForKey:"outputImage" set keyList to aDict’s allKeys() as list repeat with i in keyList set aVal to (aDict’s valueForKey:i) as list of string or string –as anything (aFilter’s setValue:aVal forKey:(i as string)) end repeat set newNSImage to convCIimageToNSImage(aOutImage) of me return newNSImage end execCIFilterWithNSImageAndParams on makeCIColorFromParams(redValue, greenValue, blueValue, alphaValue) set aNSColor to NSColor’s colorWithCalibratedRed:redValue green:greenValue blue:blueValue alpha:alphaValue set aCIColor to CIColor’s alloc()’s initWithColor:aNSColor return aCIColor end makeCIColorFromParams on convCIimageToNSImage(aCIImage) set aRep to NSBitmapImageRep’s alloc()’s initWithCIImage:aCIImage set tmpSize to aRep’s |size|() set newImg to NSImage’s alloc()’s initWithSize:tmpSize newImg’s addRepresentation:aRep return newImg end convCIimageToNSImage on convNSImageToCIimage(aNSImage) set tiffDat to aNSImage’s TIFFRepresentation() set aRep to NSBitmapImageRep’s imageRepWithData:tiffDat set newImg to CIImage’s alloc()’s initWithBitmapImageRep:aRep return newImg end convNSImageToCIimage –NSImageを指定パスにPNG形式で保存 on saveNSImageAtPathAsPNG(anImage, outPath) set imageRep to anImage’s TIFFRepresentation() set aRawimg to NSBitmapImageRep’s imageRepWithData:imageRep set pathString to NSString’s stringWithString:outPath set newPath to pathString’s stringByExpandingTildeInPath() set myNewImageData to (aRawimg’s representationUsingType:(NSPNGFileType) |properties|:(missing value)) set aRes to (myNewImageData’s writeToFile:newPath atomically:true) as boolean return aRes –成功ならtrue、失敗ならfalseが返る end saveNSImageAtPathAsPNG |
CoreImageで指定画像をBoxBlur v2
▲Original

▲Filtered Image
| AppleScript名:CoreImageで指定画像をBoxBlur v2 |
| — Created 2017-03-21 by Takaaki Naganoya — 2017 Piyomaru Software use AppleScript version "2.4" use scripting additions use framework "Foundation" use framework "QuartzCore" property CIFilter : a reference to current application’s CIFilter property |NSURL| : a reference to current application’s |NSURL| property NSUUID : a reference to current application’s NSUUID property CIImage : a reference to current application’s CIImage property NSString : a reference to current application’s NSString property NSImage : a reference to current application’s NSImage property NSProcessInfo : a reference to current application’s NSProcessInfo property NSPNGFileType : a reference to current application’s NSPNGFileType property NSBitmapImageRep : a reference to current application’s NSBitmapImageRep –画像を選択 set aPath to POSIX path of (choose file of type {"public.image"}) set aNSImage to NSImage’s alloc()’s initWithContentsOfFile:aPath set paramRec to {inputRadius:10} –5から10 set imgRes to execCIFilterWithNSImageAndParams(aNSImage, "CIBoxBlur", paramRec) of me set savePath to retUUIDfilePath(aPath, "png") of me set fRes to saveNSImageAtPathAsPNG(imgRes, savePath) of me –NSImageをCIImageに変換してCIfilterを実行 on execCIFilterWithNSImageAndParams(aNSImage, aFilterName as string, paramRec as record) set aDict to current application’s NSDictionary’s dictionaryWithDictionary:paramRec set aCIImage to convNSImageToCIimage(aNSImage) of me set aFilter to current application’s CIFilter’s filterWithName:aFilterName aFilter’s setDefaults() aFilter’s setValue:aCIImage forKey:"inputImage" set aOutImage to aFilter’s valueForKey:"outputImage" set keyList to aDict’s allKeys() as list repeat with i in keyList set aVal to (aDict’s valueForKey:i) as list of string or string –as anything (aFilter’s setValue:aVal forKey:(i as string)) end repeat set newNSImage to convCIimageToNSImage(aOutImage) of me return newNSImage end execCIFilterWithNSImageAndParams on convCIimageToNSImage(aCIImage) set aRep to NSBitmapImageRep’s alloc()’s initWithCIImage:aCIImage set tmpSize to aRep’s |size|() set newImg to NSImage’s alloc()’s initWithSize:tmpSize newImg’s addRepresentation:aRep return newImg end convCIimageToNSImage on convNSImageToCIimage(aNSImage) set tiffDat to aNSImage’s TIFFRepresentation() set aRep to NSBitmapImageRep’s imageRepWithData:tiffDat set newImg to CIImage’s alloc()’s initWithBitmapImageRep:aRep return newImg end convNSImageToCIimage on retUUIDfilePath(aPath, aEXT) set aUUIDstr to (NSUUID’s UUID()’s UUIDString()) as string set aPath to ((NSString’s stringWithString:aPath)’s stringByDeletingLastPathComponent()’s stringByAppendingPathComponent:aUUIDstr)’s stringByAppendingPathExtension:aEXT return aPath end retUUIDfilePath –NSImageを指定パスにPNG形式で保存 on saveNSImageAtPathAsPNG(anImage, outPath) set imageRep to anImage’s TIFFRepresentation() set aRawimg to NSBitmapImageRep’s imageRepWithData:imageRep set pathString to NSString’s stringWithString:outPath set newPath to pathString’s stringByExpandingTildeInPath() set myNewImageData to (aRawimg’s representationUsingType:(NSPNGFileType) |properties|:(missing value)) set aRes to (myNewImageData’s writeToFile:newPath atomically:true) as boolean return aRes –true/false end saveNSImageAtPathAsPNG |
CoreImageで指定画像を2階調ポスタライズ v2

▲Original

▲2-level postalized image
| AppleScript名:CoreImageで指定画像を2階調ポスタライズ v2 |
| — Created 2014-12-09 by Takaaki Naganoya — 2014 Piyomaru Software use AppleScript version "2.4" use scripting additions use framework "Foundation" use framework "QuartzCore" property |NSURL| : a reference to current application’s |NSURL| property NSUUID : a reference to current application’s NSUUID property NSString : a reference to current application’s NSString property NSImage : a reference to current application’s NSImage property NSPNGFileType : a reference to current application’s NSPNGFileType property NSBitmapImageRep : a reference to current application’s NSBitmapImageRep –CIFilters (Not everything!!) From Apple’s Core Image Filter Reference set cifilterName to "CIColorPosterize" –画像を選択 set aPath to POSIX path of (choose file of type {"public.image"}) –指定フィルタ名でフィルタしたNSImageを取得 set nsimageRes to filterAnImageFile(aPath, cifilterName) of me –Save as PNG set fRes to retUUIDfilePath(aPath, "png") of me set sRes to saveNSImageAtPathAsPNG(nsimageRes, fRes) of me –CIFilterをかけたJPEG画像を生成 –参照:http://ashplanning.blogspot.jp/ のうちのどこか on filterAnImageFile(aPath, aFilterName) –CIImageを生成 set aURL to current application’s |NSURL|’s fileURLWithPath:aPath –Input set aCIImage to current application’s CIImage’s alloc()’s initWithContentsOfURL:aURL — CIFilter をフィルタの名前で生成 set aFilter to current application’s CIFilter’s filterWithName:aFilterName aFilter’s setDefaults() –各フィルタのパラメータはデフォルト –Filterを実行 aFilter’s setValue:aCIImage forKey:"inputImage" aFilter’s setValue:2 forKey:"inputLevels" set aOutImage to aFilter’s valueForKey:"outputImage" set outNSImage to convCIimageToNSImage(aOutImage) of me return outNSImage end filterAnImageFile on convCIimageToNSImage(aCIImage) set aRep to current application’s NSBitmapImageRep’s alloc()’s initWithCIImage:aCIImage set tmpSize to aRep’s |size|() set newImg to current application’s NSImage’s alloc()’s initWithSize:tmpSize newImg’s addRepresentation:aRep return newImg end convCIimageToNSImage on convNSImageToCIimage(aNSImage) set tiffDat to aNSImage’s TIFFRepresentation() set aRep to current application’s NSBitmapImageRep’s imageRepWithData:tiffDat set newImg to current application’s CIImage’s alloc()’s initWithBitmapImageRep:aRep return newImg end convNSImageToCIimage on retUUIDfilePath(aPath, aEXT) set aUUIDstr to (NSUUID’s UUID()’s UUIDString()) as string set aPath to ((NSString’s stringWithString:aPath)’s stringByDeletingLastPathComponent()’s stringByAppendingPathComponent:aUUIDstr)’s stringByAppendingPathExtension:aEXT return aPath end retUUIDfilePath –NSImageを指定パスにPNG形式で保存 on saveNSImageAtPathAsPNG(anImage, outPath) set imageRep to anImage’s TIFFRepresentation() set aRawimg to NSBitmapImageRep’s imageRepWithData:imageRep set pathString to NSString’s stringWithString:outPath set newPath to pathString’s stringByExpandingTildeInPath() set myNewImageData to (aRawimg’s representationUsingType:(NSPNGFileType) |properties|:(missing value)) set aRes to (myNewImageData’s writeToFile:newPath atomically:true) as boolean return aRes –true/false end saveNSImageAtPathAsPNG |